People often wonder how to make a staircase so that it is both of high quality and inexpensive? In most cases, they resort to the services of private specialists who are ready to make almost any wooden staircase.
But there is another option that is not the easiest - to do it on your own. And the main thing here is not to doubt your abilities and read our article.

The main elements of the stairs
To begin with, we will analyze the structure of a wooden staircase, we will study all the parts of which it consists:
- Carrying beam - can be in the form of a stringer or bowstring... They differ greatly from each other, if the kosour is cut under the steps, taking into account the depth and height of the platforms, then only grooves are made in the bowstring. Accordingly, the fastening of the steps occurs in one case vertically to the beam, and in the other horizontally, through the beam.

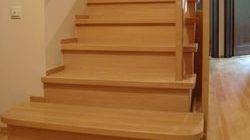
- Steps - usually made up of treads and risers... If the tread is the horizontal part on which our leg rests during movement, then the riser is installed vertically. It plays the role of limiting the step, while it is necessary to increase the strength of the structure.
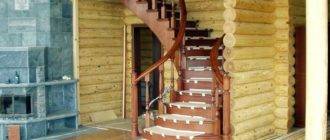
- Railings - these include handrails and vertical posts, balusters, which are a fence on stairs... The main load falls on the support posts located at the beginning and end of the flight of stairs.

Note! Balusters are necessary to protect structures from injuries that children can get, and also play the role of a decorative element in the stairs.
Drafting a project
You can contact a specialized organization, where your desires will be taken into account by a professional designer, but, let's say, the price of this issue is too expensive for many consumers.
Therefore, it is better to use the information below and do everything yourself:
- The first step is to calculate the number of steps and the distance between them, that is, the riser. To do this, you need to determine the height of the stairs, the distance from the floor of the first floor to the floor of the second floor.
Important! Dimensions should be taken taking into account the floor covering so that the last step does not happen much higher or lower than the floor.
- When you have the total height in your hands, you can calculate the number of steps. The average size of the riser (the distance from the top of one step to the bottom of the other) ranges from 15 to 20 cm, depending on whether there are small children in the house. Do not forget to take into account the thickness of the steps themselves.
For your information! If the height is too high or, conversely, too low, it will knock down the step, which will make it difficult not only to climb, but also to descend the stairs.
- As for the depth - tread, it should be about 20-35 cm, it all depends on the planned angle of inclination. After all, the wider the tread, the smaller the angle relative to the floor.
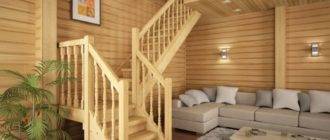
- It is up to you to decide whether to add another march - a support platform, but if you want to save space, then you should make the stairs U-shaped.
After you have a project ready in your hands, you need to calculate the amount of building materials that will be spent on the construction of the structure. Only after that you can proceed with the installation.

Preparatory stage
Before starting the construction of wooden stairs with your own hands, you should prepare tools for work:
- Jigsaw.
- Drill.
- Screwdriver.
- Hacksaw for wood.
- Roulette.
- Building level.
- Chisel.
- Hammer.
- Building corner.
And, of course, you will need a brush or roller to finish the finished staircase.
Construction stage
- The first step is to cut the wooden planks purchased for the stringer (bowstring) to size. It is better to use a jigsaw, but if there is no power tool, then you will have to work with a hacksaw.

- In the case of a stringer, all the notches under the steps are made with the same tool as when sawing, and for a bowstring it is better to use a hammer and a chisel.
- After the supporting beams are ready, you can start sawing the boards for the steps.
Note! Boards for the above-described elements should have a minimum thickness of 40 mm and a width of at least 20 cm. Steps that are too thin, which will bend under each step, are not allowed, even if a riser is installed.
Manufacturing of handrails and stringers
- Handrails can be made of wooden bars, but to make the handrails attractive and pleasant to the touch, it is better to purchase them ready-made. The same applies to balusters, which can be of various shapes.
- After all the elements are prepared, you can start marking up:
- Initially, the structural beam is trimmed to fit on the first floor and touch the second floor at the specified location.
- After, the level of the steps is noted, taking into account the thickness of the products themselves.
- The tool makes cuts or grooves in the beams.
For your information! The technology of the device of wooden stairs allows the use of one kosour, which is located in the center of the structure - optimal for those cases when the width of the steps is not more than 60 cm.
- After marking, all elements of the ladder should be carefully sanded so that they do not have burrs.
- Now, using a drill, you need to fix the supporting beams to the floor and ceiling so that they do not wobble. Fasteners should not have play, for such moments it is better to use anchor bolts.

- The next step is to install the steps on self-tapping screws. If you do not want the fasteners to be visible, then you can use dowels, for this you need to make shallow holes of a suitable diameter. Fill them with glue and drive a dowel into them, then do the same in the surface of the step.
- When the steps are fixed, you should secure the risers, if you have them planned.

- Now you need to fix the support pillars at the very beginning and at the end of the staircase. Since they bear the main load, at least anchor bolts should act as a fastening element.
- Balusters are installed in compliance with certain rules, for example, the distance between the posts should not exceed 15 cm. The supports are adjusted in accordance with the level of each step.
- The railing can be mounted on self-tapping screws if platforms are provided on the balusters, although you can drive them into an angle with a self-tapping screw through the rack. But you can also fix it on glue, for this, grooves are made in the handrails for balusters, after which the guide is pushed onto the racks, smeared with glue.

- Now it remains to wait until the glue mixture is completely set and the ladder is ready.
- The last step is the decorative finishing of the structure.
You can cover the tree with anything you want, but there are products that you just need to use. These include an antiseptic that increases the tree's resistance to various insects and fungal organisms.
Features of the workflow
The above instructions allow you to independently solve the problems with the construction of the stairs, and in this section you will get acquainted with some important points:
- Use only stainless steel fasteners, otherwise, rust will damage not only the hardware, but also the wood.
- The combination of hidden fasteners and self-tapping screws allows you to increase the strength at the joints, but, of course, also increases the time that will be spent on the construction of the staircase.
- It is not uncommon for people to ask the question - how to eliminate the creak of a wooden staircase? Sometimes even new ladders will hold together from the loads - it's not as scary as it seems at first glance. First, you need to determine the source of the nasty sound, then study the occurrence of a squeak. If this is due to friction between two surfaces, then they just need to be pulled together well. If it is a step that creaks after being stepped on (sags), then a vertical support should be installed.
- The wood can dry out over time, which leads to weakening at the joints, so do not forget to tighten the screws.

What happens device stairs in a private house
In the video presented in this article, you will find additional information on this topic.