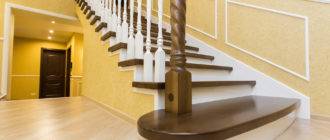
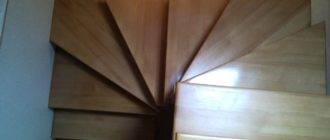
The single-flight staircase to the second floor is one of the least complex structures. That is why experts advise one-marching option to those who have not previously encountered such work.
In the article, we will describe the key features of this type of stairs, as well as analyze the main points of the technology of their independent production.

Calculated part
Ladder requirements
Before starting work, it is necessary to calculate the main parameters of our future design.
These include:
- The height of the floor we are going to climb.
- The dimensions of the steps (width and height).
- Tilt angle.
It is worth noting that all three parameters are closely related, and therefore, when one of them is changed, the rest are automatically changed. So, with a decrease in the angle of inclination of the lifting part, it is necessary to increase the width of the steps, and make them lower. Conversely, for a steep staircase, it will be advisable to install sufficiently high and narrow steps.

The main difficulty in the design of single-flight staircase structures is that, while observing a comfortable ratio of the slope and parameters of the steps, we get a rather long span. If we take into account that both at the entrance and at the exit from the stairs it is necessary to equip platforms, then the total length of the structure will be from 4.5 to 7-8 meters.
Note!
According to the requirements of regulatory documents, entry and exit platforms must be at least 0.8 m in length.
The optimal width of the landing is equal to the width of the staircase itself.
The optimal parameters that one-flight stairs must correspond to are given in the table:
|
Tilt angle, lifting part, degrees |
Slope indicator |
Height of one step, cm |
Minimum width of one step, cm |
|
32 |
1,6 |
17 |
28 |
|
33,5 |
1,5 |
18 |
27 |
|
36,5 |
1,3 |
19 |
25 |
|
41 |
1,15 |
20 |
23 |
|
45 |
1 |
21 |
20,5 |
Naturally, the flatter the structure is, the more area it will occupy. Of course, under the stairs you can make a pantry, and even a small room - but still, you will not be able to fully use this space.
Calculations
Since the overall dimensions of the structure are largely determined by the size of the room in which it will be installed, the calculation of a single-flight staircase primarily involves determining the number of steps:
- Determine the length of the staircase and the total height difference between the marks on the plan.
- We fix the level of rise taking into account the floor slabs, since they can have a significant thickness.
- We calculate the angle at which the stairs will be located, and determine the corresponding slope coefficient.
- Depending on the slope, we determine the optimal step height.
- Dividing the lifting height by the height of one step, we get the number of steps needed for comfortable movement (round up to an integer value).

In conclusion, we will need to determine the width of each step. To do this, the length of the march laid down in the project is divided by the number of individual elements. If the figure is not less than in the table, then everything is in order.
Calculation example
To make it clearer, here are the calculations that can be used to design a staircase in a small house:
- Lifting height - 2.85 m, span length - 3.7 m.
- The angle of inclination of the stairs will be about 37.50and the slope factor is approximately 1.2.
- There is no exact value in the table, therefore we stop at the average version of the step with a height of 19 cm.
- We calculate the number of steps as follows: 2.85: 0.19 = 15 pieces. I didn't even have to round off!
- We divide the length of the march by the number of steps: 3.7: 15 = 0.247 m.
The resulting step width of 25 cm fits almost perfectly into the requirements of our table. Therefore, we have designed the structure correctly, and we can get to work.
Building stairs
Main elements

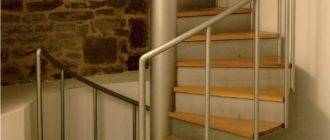
Today, one-march wooden stairs are mounted according to different schemes, but the most reliable is the construction on the so-called stringers. Of course, compared to attaching steps to the walls or installing them on straight bowstrings, this technique is more complicated, but the reliability of the stairs increases many times over.
Note!
In addition to the complexity of the construction, the disadvantages include the high price, which is due to the high consumption of building material.
However, if you do not use wood of extremely expensive species, the rise in price is acceptable.
What are the features of this design:
- The basis of the span is made up of inclined beams - stringers.
- The lower part of the beams rests on the floor of the first floor, and the upper part is flush with the floor covering of the second.
- For most structures, it is optimal to use three supporting elements: two stringers are located on the sides, and one in the center of the steps.
- The steps themselves are attached horizontally to the cutouts on the support beam. The vertical parts are covered with special strips - the so-called risers.
Note!
In some cases, risers are not used.
This design turns out to be somewhat less reliable, but at the same time, it is “lighter” from a visual point of view.
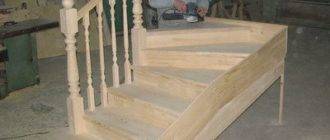
We make blanks
So, when we have all the sizes on hand, and we roughly imagine what the final result will look like, we start working. (see also Attic stairs)
First of all, we need to cut the blanks:
- As a rule, the instruction recommends making all the elements from the same wood species.... An exception is made only for treads (horizontal parts of a step) and railings, which are often cut from more expensive material.

- For kosour we take three beams with dimensions of at least 50x300 mm... Naturally, it is preferable to use a solid board, but since it is very difficult to find one without knots and cracks, the use of glued structures is allowed.
- On the blanks of the stringers, cut to size, we mark the protrusions for the installation of steps.
- At the markings, we first go through the wood with a circular saw, and then finally finish the cuts with a hacksaw. This cutting technique almost completely eliminates the risk of damage to the supporting beam at the place where the step is installed.

- Depending on the width of the tread, it can be either solid or composite... They are made from edged boards.
- Tread blanks are cut to size, after which they are leveled and polished... The outer edge of the tread can be rounded.
- Risers are cut from a flat edged board without cutting corners... It is very important that the riser is sized to cover the free space between the two steps.
All workpieces must be thoroughly dried. Complex treatment with fire retardants and antiseptics will also not be superfluous.
Assembling the stairs
With carpentry skills, a straight wooden staircase can be assembled rather quickly.
Below are some guidelines to help you master this technology:
- First, we install the stringers in the span, attaching them to the structural elements of the floor of the first and second floors. Fastening is carried out "in a gash": either a recess is made in the beam or in the stringer, which ensures a reliable installation.

- An option for fixing is to attach the lower base directly to the concrete floor. In this case, a large diameter anchor bolt is used.
- We fix the extreme bearing beams to the wall and side supports of the stairs, and mount the central one between them.
Note!
It is very important that all the cutouts in the stringers are in the same plane.
You can control this using a level.
- We lay the steps on the cutouts and fix them with self-tapping screws. To improve the appearance, you can first drill the secret nests with a larger drill, install self-tapping screws and hide their caps with wooden decorative overlays.

- It is also allowed to install treads on wooden filly or steel supports.
After installing and leveling the treads, we proceed to the installation of the risers.
There are several technologies for fixing these parts:
- Secret connection with self-tapping screws (as in the case of tread fastening).
- Glue joint in the groove.
- Concealed installation from the inside using steel brackets or wooden corners.

All risers are mounted from top to bottom. During installation, it is imperative to ensure that there are no gaps between the parts, since in the future these gaps will only increase.
The final stage is the installation of balusters and the installation of handrails. To do this, at the beginning and end of the march, we fix the support pillars, between which we lay the railing.
Balusters, providing support for the railing, can be mounted either on each step or through one.
The assembled ladder is cleaned of dust and sawdust. Then it can be sanded again "clean", varnished or painted. (see also Two-flight staircase)

Output
If there is suitable wood, a one-flight staircase with your own hands can be erected in just a couple of days. The most laborious is the process of cutting out blanks, and the assembly itself does not present any problems for a more or less skillful craftsman. So if you were not mistaken at the stage of calculations, then you will soon be able to climb to the second floor with comfort! In the video presented in this article, you will find additional information on this topic.