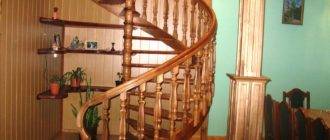
To ensure the most comfortable movement around the house, many make homemade stairs to the second floor. Today, you can find more than a dozen designs of such stairs, and therefore, if necessary, there should be no problems with information.
The easiest to manufacture options include metal and wooden single-span stairs. Our article is devoted to the technology of their manufacture.

Calculations before work
Any construction work should start with a detailed plan. We will not deviate from this rule either: we will decide what basic parameters our staircase should have.
What do experts recommend to us?
For the most comfortable movement (and we will need to walk the steps every day, because the second floor is not an attic or an attic), it is worth observing the following dimensions:
- The optimal slope of the stairs is 1: 2 or 1: 2.5. This ratio of length and height should correspond to an angle of rise from 30 to 400.
- In one flight of stairs it is worth doing no more 18 steps... If you have high ceilings in your house, then it is advisable to equip a small area between two separate marches.
Advice! It is most convenient to navigate the stairs with an odd number of steps in the march. This design makes it possible to start and end a step with the same foot.
- The step height must be within 150 - 210 mm.
- The optimal step width is about 300 mm... The more gently we climb, the wider the treads (horizontal parts of the steps) can be.

As for the bearing characteristics, they are as follows:
- The load on the ladder itself is at least 200 kg.
- The load on the handrail or guardrail is 120-150 kg.
Based on these parameters, we make a sketch of the staircase structure and select the appropriate materials for its manufacture.
Metal structures
What do we need?
The first option that we will describe is a homemade metal ladder. To make it, we need the following:

- Channel 16 (height 160 mm, flange width 64 mm) - two beams, the length of which corresponds to the length of the march.
- Thick-walled profile pipe 40x40 mm - depending on the number of steps. To make a small staircase, we need about 20 running meters.
With the toolkit, everything is somewhat more complicated. To work with metal, we will need:
- Saw for metal (pendulum, and preferably more powerful).
- Drilling machine.
- Welding machine.
- Drill for mounting wooden treads.
Since most of the structural elements have a very impressive mass, the participation of an assistant will definitely not be superfluous.
Work technology
If you have the skills to work with welding, installing the ladder with your own hands is not particularly difficult and can be completed in two to three days.
The instruction assumes the following sequence of operations:

- We cut the channels to the required size so that after installation they rest on the floor with the flat part of the cut.
- For more reliable installation on the first and second floors, we lay metal beams to the concrete base under the floor (you can use a 220 mm channel), the length of which should be slightly more than the width of the staircase.
- We weld the supporting channels to the embedded beams.
- From a profile pipe we make blanks for steps in the form of rectangles.
- We install the blanks on the guides and weld them to them. For maximum strength, the structure can be reinforced with vertical support parts from the same pipe.

Advice! To facilitate the structure, it is worth purchasing a thick-walled steel profile or corner instead of a pipe.
- We clean the frame and paint it to protect it from corrosion.
- We lay wooden treads on metal bases and fasten them with self-tapping screws through pre-drilled holes.
- On the sides of the guide channels, we weld support pillars on which we lay the railing.
- We install vertical balusters on the stairs. Instead of balusters, you can use horizontal rods or sheet material - plexiglass, plastic, veneered plywood, triplex, etc.

The resulting structure is characterized by high mechanical strength, but it weighs a lot. It can be mounted only when the bearing capacity of the building itself allows it. In addition, the high price of rolled metal can make such a ladder "unaffordable" for our budget.
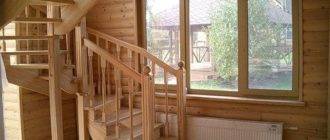
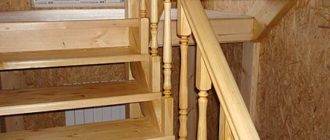
Making a wooden staircase
Material and workpieces
To save effort and money, you can make a wooden structure. With the right choice of material, its mechanical characteristics will not be inferior to the properties of a metal ladder. But working with a tree is much easier.
We need the following details:
- Two or three beams with a section of 50 x 200 mm and a length of at least 4 meters - for the formation of load-bearing elements.
- Edged board from which we will cut treads and risers. The workpieces should be cut in accordance with the width of the staircase. The outer edges of the treads can be chamfered.

- A set of blanks for handrails - handrails, support pedestals and balusters.

The work will be carried out using the simplest woodworking tools - a saw, a hammer, a screwdriver, chisels, etc. For fastening, it is better to use glue for wood products and self-tapping screws.
Assembly
We begin to assemble the structure by installing the supporting beams - kosour:
- We cut the bars to the size of our future stairs. To install the steps on the stringers, we make rectangular cuts or choose the grooves in the side surfaces.

- We install the stringers in the span between the floors and fix them on the lower and upper support beams.
Advice! In order for all the steps to be perfectly even, you need to very carefully set the stringers along the plane using a level.

- We lay treads on the fixed kosour and fix them with glue or self-tapping screws. When using screws, it is worth drilling out the pot with a larger diameter drill, and the resulting hole should be closed with a cork made of the same wood as the step itself.
- We fix the installed risers on the lower side of the stairs. To increase the strength of the connection, you need to use metal corners, which are attached to the parts to be connected "from the inside out".

- On the upper and lower platforms, we mount the support pedestals for the railings. Pull the cord between the pedestals at a height of 900 - 1200 mm.
- Having fastened the balusters on the steps by gluing the spikes into the grooves, we cut the upper parts along the cord.
- We lay the handrail and attach it to the balusters and support pedestals.
Next, we need to carry out finishing. We carefully putty all the cracks and irregularities, after which we carry out the final grinding of the stairs. We clean the sanded surfaces from dust and shavings, prime them and open them with varnish or paint.

In the video presented in this article, you will find additional information on this topic (read also about the benefits of folding attic stairs).
my task was to put the stairs not exactly on the second floor, but on the second tier in the room. those. staircase and double bed as one single structure. a room with a ceiling larger than 4m. for reliability, I considered the option from the profile, but I thought that even if the three of us climbed into this attic, the structure would not bend, I had to make it out of pine