When deciding to tackle a roof repair, the first thing you need to think about is a roof ladder. Moreover, it is not at all necessary to buy this item. After all, the ladder for the roof - self-constructed, can easily be made by any home craftsman.
Our article will tell you how to do this.

Roof ladder classification
These products can be divided into several types:
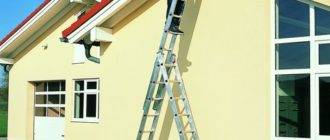
- Roofing - are the most common type. They are attached directly to the roof slope. With their help, comfortable and safe movement on the roof is carried out. Such a ladder can be used for roof repairs, maintenance of chimneys and installation of antennas;

- Attic stairs - they lead from the attic to the roof hatch, from which access to the roof is carried out;
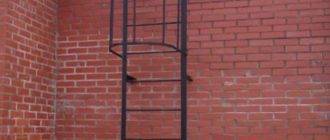
- Wall-mounted - allow you to climb to the roof directly from the ground. Thanks to this, they are also used as fire escapes to the roof.

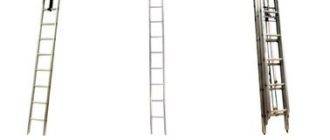
The materials used for their manufacture are wood, aluminum or steel. But there are also combined options.
Each of these types has its own design features. For example, wall ladders are fixed to the wall with brackets. In this case, the distance from them to the wall should be at least 20 cm.
Roof ladder manufacturing

In the process of roof repair, both wooden and aluminum roof ladders can be used. Below we will look at how to create the first ones at home.
Materials (edit)
Let's start by preparing the necessary materials.
These include the following:
- bars measuring 5 * 5 cm;
- nails 100 mm long - self-tapping screws can be used instead;
- trimming bars and boards.
Advice!
If corrugated material is laid on the roof, then the distance between the sidewalls of the stairs should be a multiple of the interval between the waves.
For example, if from wave to wave 10 cm, then the gap between the sidewalls can be 50-60 cm. The inconsistency of this distance can lead to damage to the coating.

Manufacturing process
Having measured and cut out two guides of the required length, we proceed to the preparation of steps. It is not worth making them thin, because it will be uncomfortable for the legs, and they will quickly get tired. It is also not necessary to fasten the steps close to each other, as this will complicate the movement process. The optimal distance will be 40-50 cm.

To connect the elements, nails with a length of 100 mm are usually used. They are hammered to the end, and then the protruding end is sunk into the wood. It is not recommended to use self-tapping fastening in this case, since a ladder with a ridge for the roof will turn out to be less durable. (see also the article Wooden ladders: do-it-yourself production)
Next, we move on to creating a "hook" - that part of the product that allows us to attach our structure to the ridge. We collect it from thick boards, which we fasten with nails 150-200 mm. the size of such a counterweight should be 30 centimeters or more.
We draw your attention to the fact that this part must be very durable and reliable. Indeed, in many respects, the safety of the person on the roof depends on it.

Advice!
Avoid nailing various tool hooks onto the ladder.
Indeed, in the process of working on them, you can catch on, lose your balance and fall off the roof.
Therefore, it is better to use a construction belt for placing tools.
To move such a ladder along the roof, you will need an assistant.He will have to be on the skate, while you will lift this product from below and move it in the right direction.
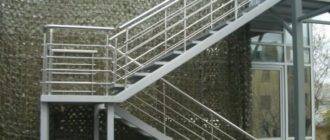
Installation of a wall ladder

The fire escape to the roof is also called wall-mounted.
The process of its self-assembly is simple:
- it starts on the ground - the first thing we do is fix the ridge brackets. Then, at the locations of the crossbars, we mount the roof supports. Their step will be 2 meters;
- after that, you need to accurately measure the required length of the ladder - if you get a surplus, you will have to saw it off. Further, we lift the assembled ladder up the roof and attach it to the upper board, which is part of the sheathing.
Next, we proceed to the assembly of the wall part of the structure.
We do this, as in the first case, on the ground:
- we connect the handrail and wall supports - we make their step equal to two meters. In addition, we fasten the brackets for the cornices to the upper wall supports. Then we lift the ladder with our own hands and attach it to the structure that we previously installed on the roof;
- the connection is made using two brackets. We fasten the fasteners for the cornices to the wall supports. In the course of work, we make sure that the lower step of the product is at a level not lower than 1 meter above ground level, and the upper one is at a height of 10 centimeters from the cornice;
- then we fix the pre-assembled brackets to the upper and lower edges of the sheathing - at the same time, we must put a sealant between the roofing sheet and the mount. Then, using the bracket, we attach the transition bridge.
Output

In total, there are three types of these products - roofing, attic and wall stairs. The first type is the most common. It is usually made of wood. The manufacturing process of such a structure is simple and accessible to any home craftsman.
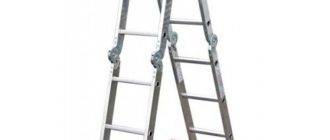
Do-it-yourself wall ladder to the roof is mounted in a slightly different way. It consists of 2 main parts, one of which is on the roof, and the other is attached to the wall. They collect it in two stages, each of which begins with installation work on the ground. (see also the article Folding ladder - we save useful space)
We advise you to watch the video in this article, it will help you to clearly see the simplicity of performing the work specified above.