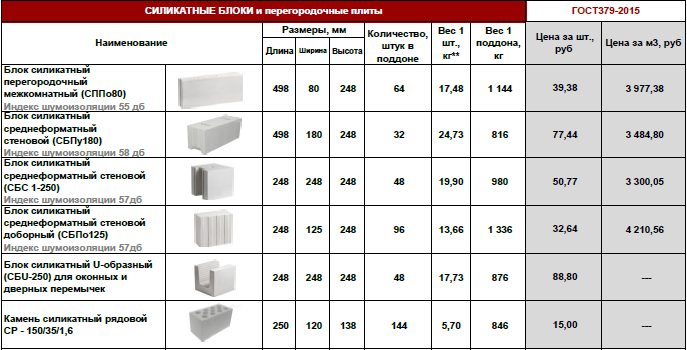
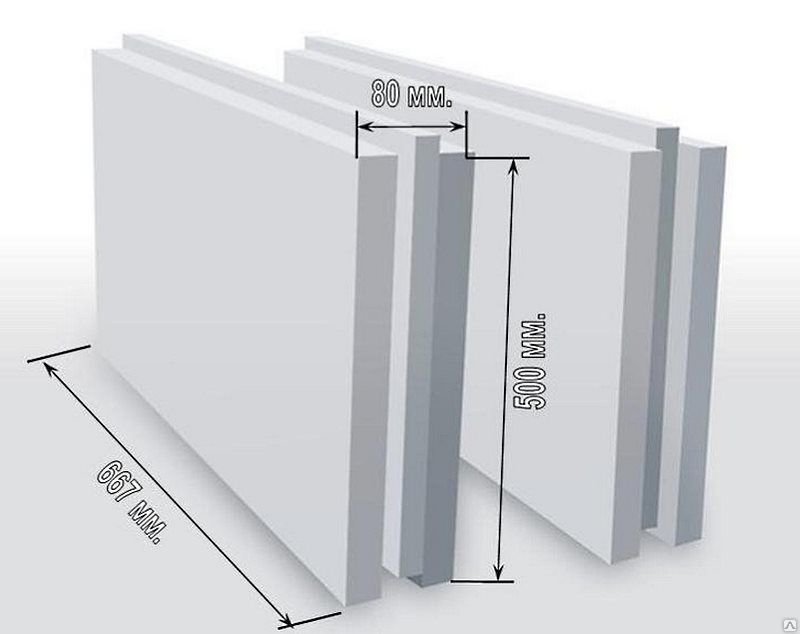
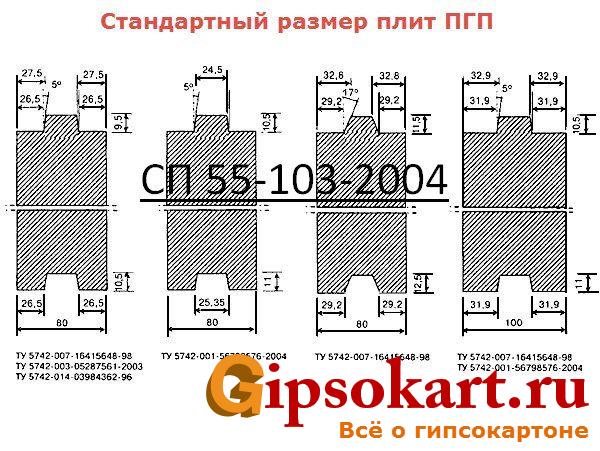
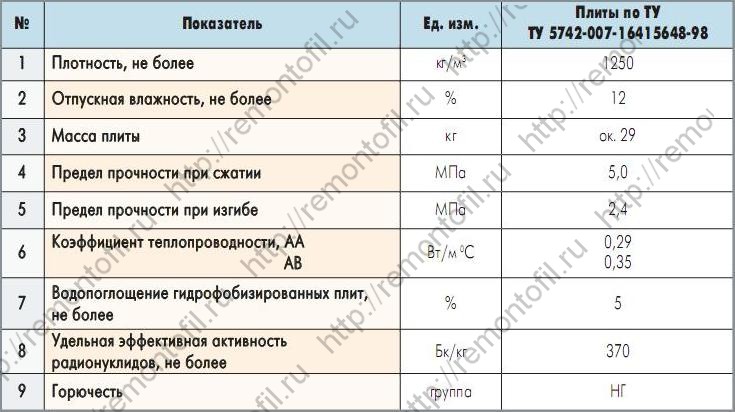
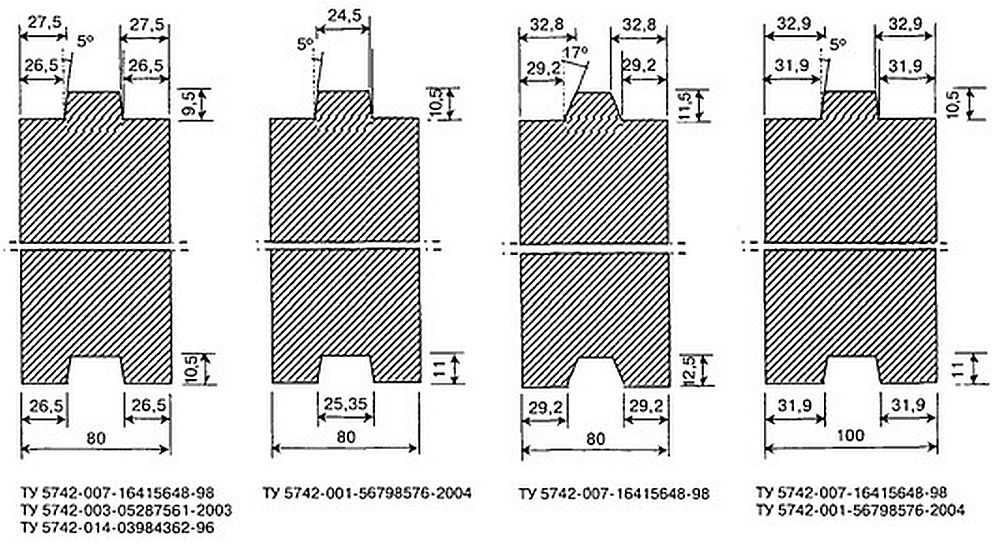
Standard parameters
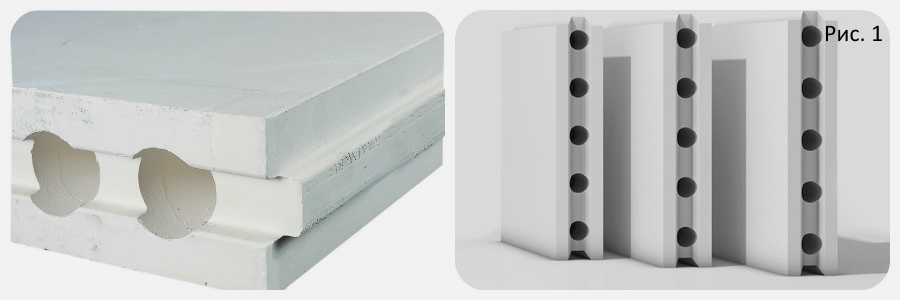
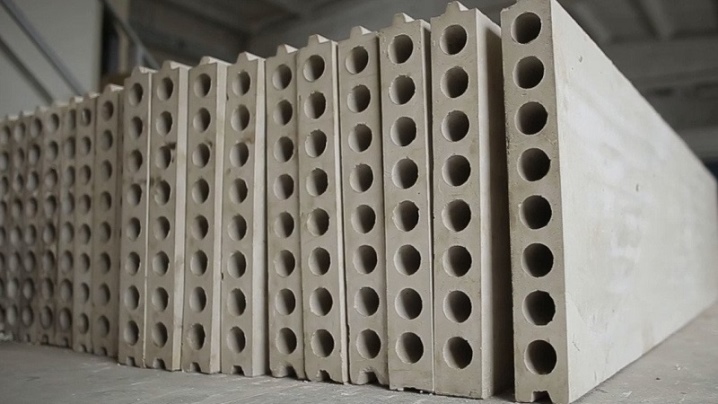
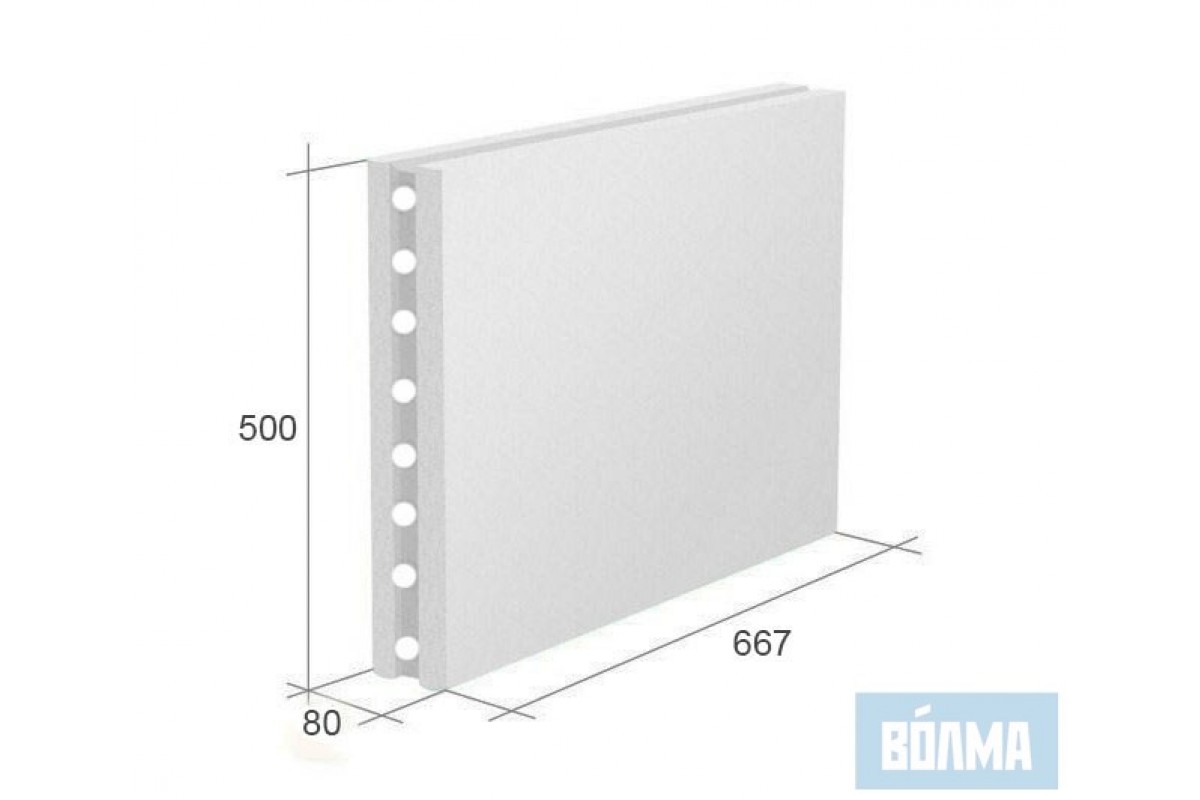
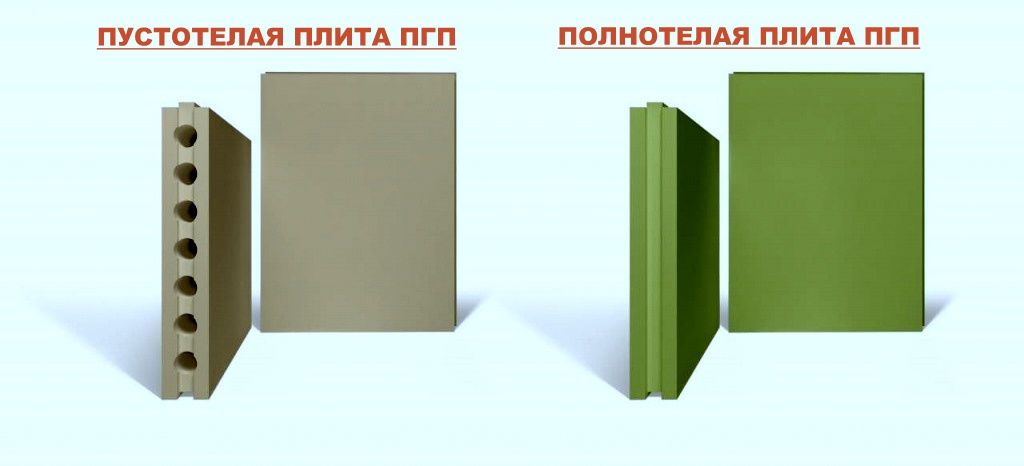
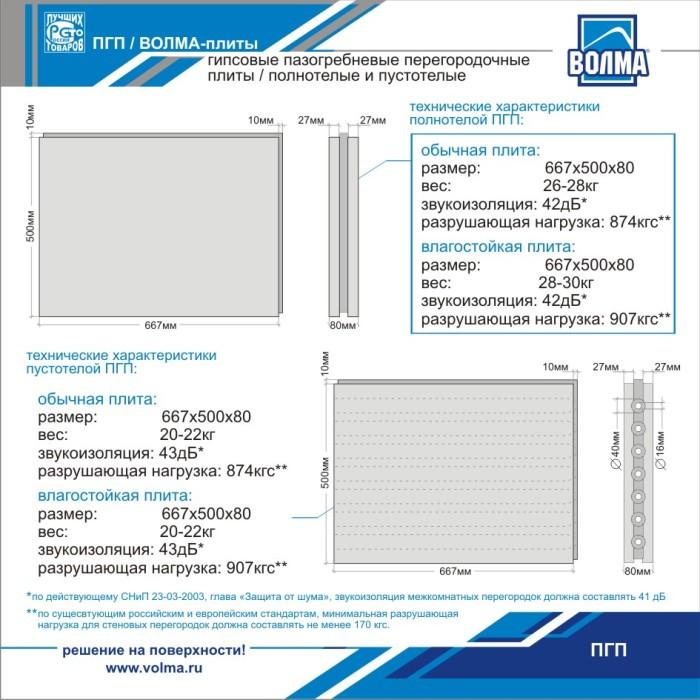
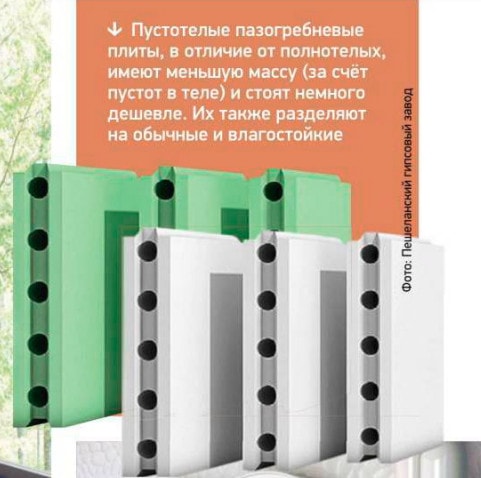
Before evaluating the mass of slabs in which there is a tongue-and-groove, it is necessary to take into account other significant points. The most important of these is the significant difference between hollow and full-bodied GWPs. Strictly speaking, in technical and engineering terms, they are approximately the same, and the difference manifests itself precisely in the mass of the finished product. The option with cavities inside is considered more stable and more suitable for concealed installation of utilities.
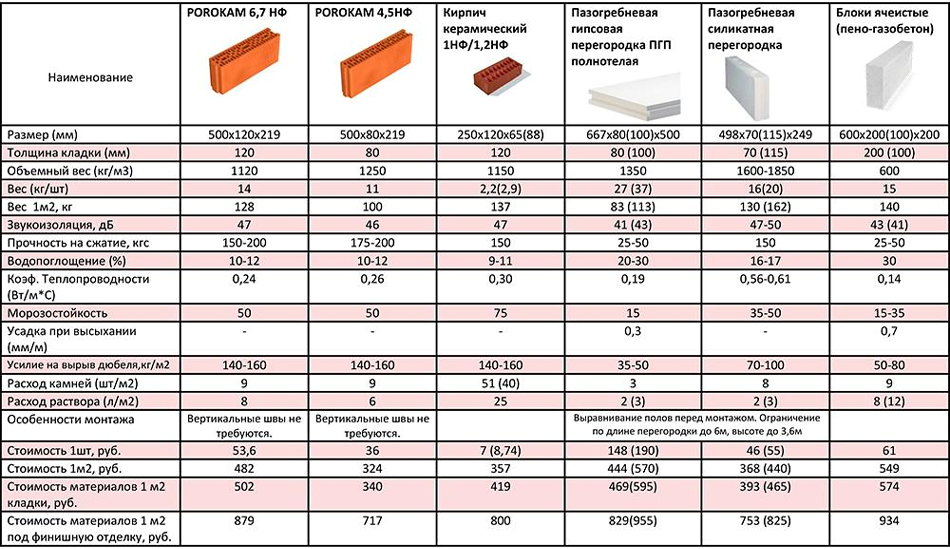
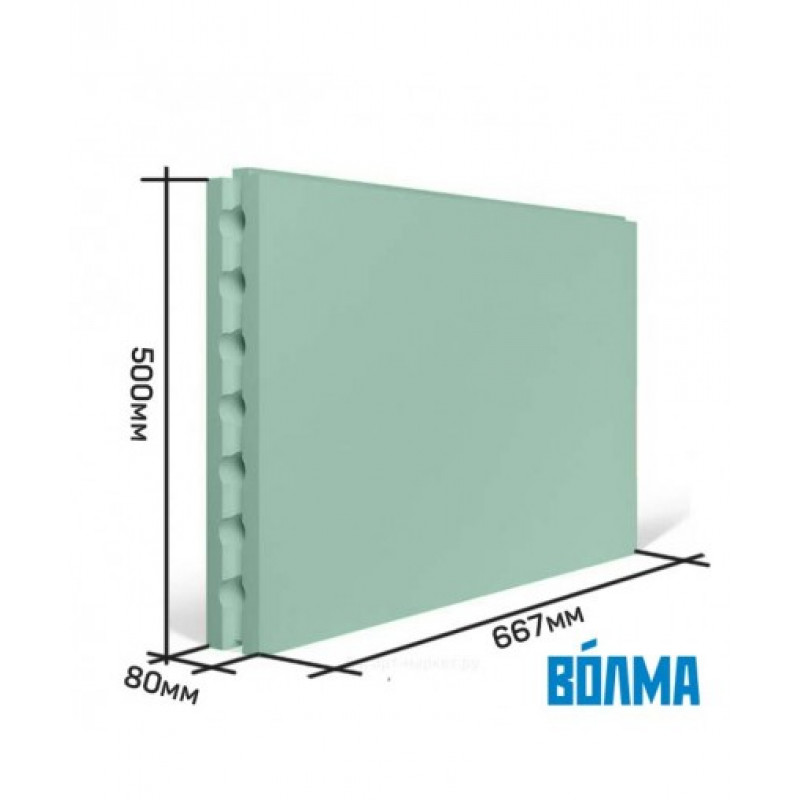
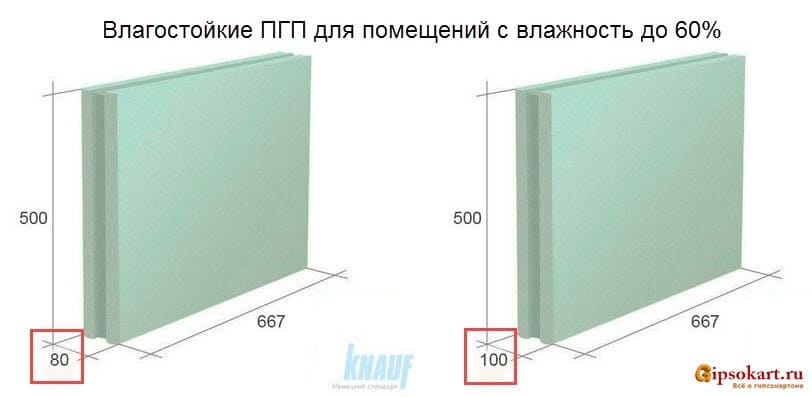
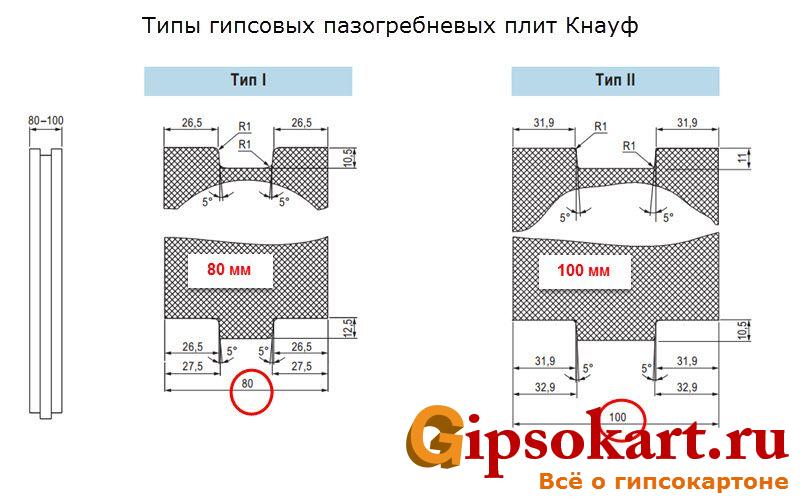
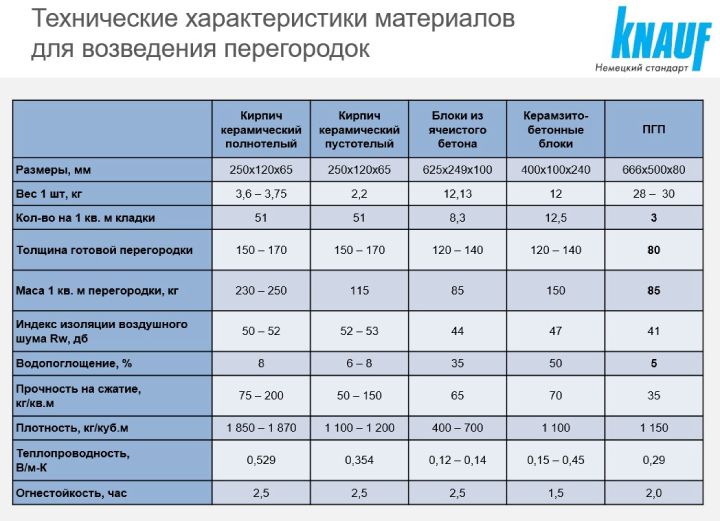
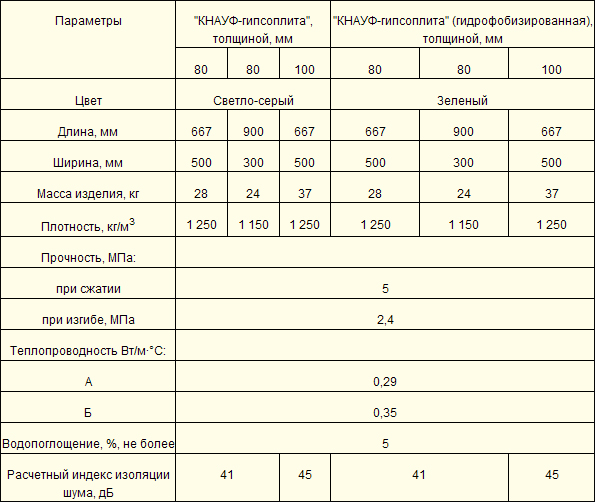
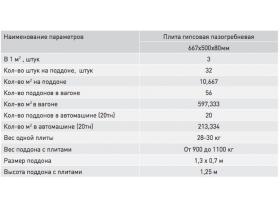
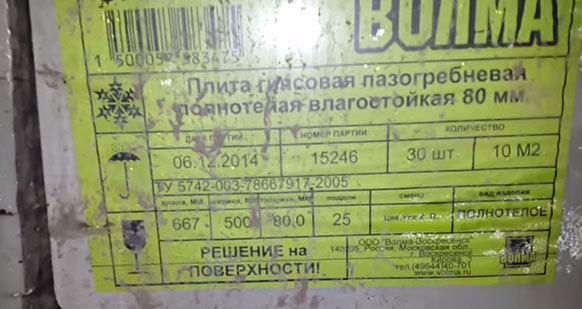
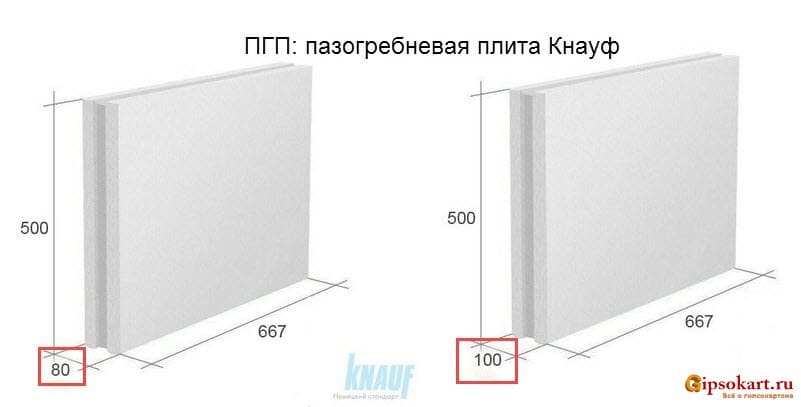
Knauf supplies excellent 100 mm gypsum blocks - more precisely, their total size is 667x500x100 mm. There are 24 pieces of such plates per 1 pallet of transport layout. The main applications are floors, walls and partitions, including in bathrooms. The gross weight of such products reaches 41 kg. The moisture-resistant type of 80 mm blocks is also widely used - more precisely, again, 667x500x80 mm.
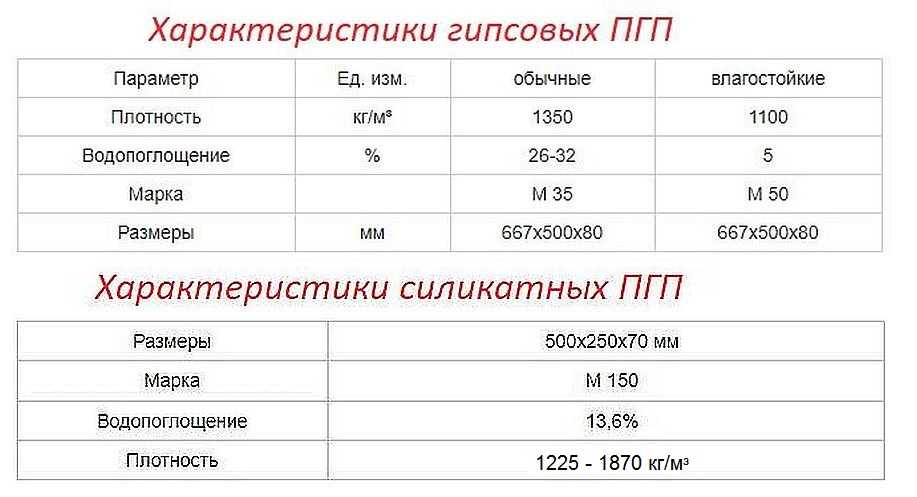
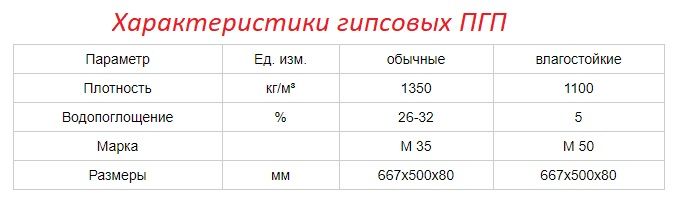
This moisture-resistant parallelepiped can be used even in rooms with a stable air humidity of 60-70%. The density reaches 1250 kg per 1 m3, and the total value is 0.33 m2. For your information: in some cases, other technical conditions apply, prescribing to limit the density to 1100 kg per 1 m3. Standardized full-size slabs will weigh 24 kilograms, and after hydrophobic treatment, the mass grows on average to 29 kilograms.
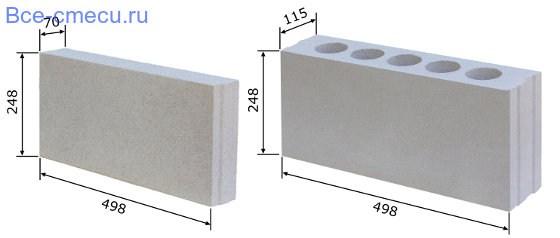
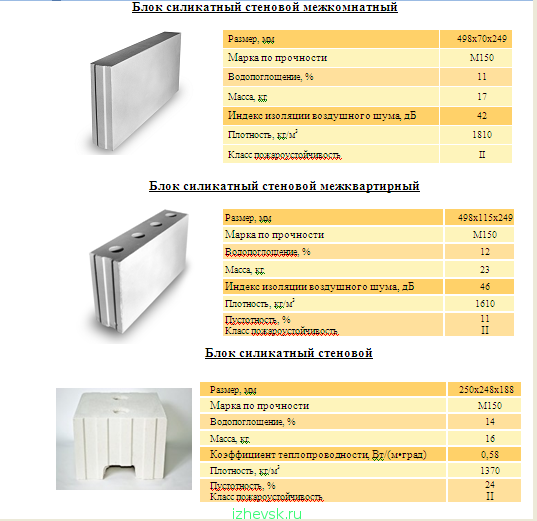
But we must not forget about the existence of silicate tongue-and-groove plates. Here are their main weight and size parameters (weight in kilograms):
- YAZSK 0.498x0.248x0.07 m - 15.3;
- YAZSK 0.498x0.248x0.07 m with cavities - 14.5;
- YAZSK 0.498x0.248x0.115 m - 19.5;
- YAZSK 0.498x0.248x0.115 m with cavities - 18.2;
- KZSM 0.5x0.25x0.088 m - 20.
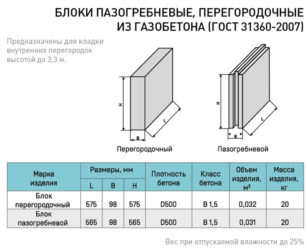
Moreover, all of the listed modifications of silicate blocks have an interesting property - there are exactly 8 pieces per 1 m2. The largest structures (0.115 m thick) are advised to be used as dividing walls. The density of silicate GWP reaches 1870 kg per 1 m3. Standard silicate-based tongue-and-groove plates are formed from M150 strength grade material. In terms of 1 pallet, exactly ½ centner of glue is consumed, which must also be taken into account when calculating the mass of finished buildings. One way or another, tongue-and-groove products weigh very little compared to other solutions. Therefore, they are widely used even alone.
Application
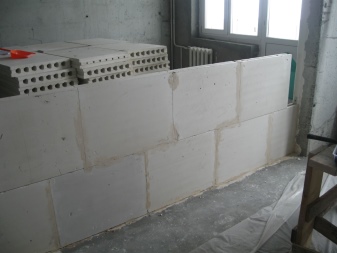
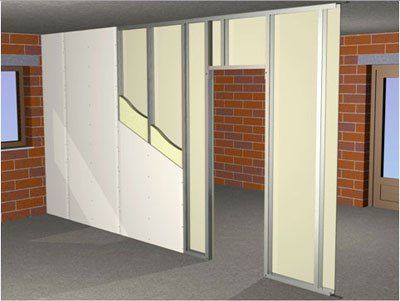
The main area in which tongue-and-groove slabs are used is the erection of lintels, partitions in construction. Self-supporting walls are erected from blocks 100 mm thick, separating the bathroom or creating an additional division of space in the bathroom. They are also used for partitions for technical purposes in offices, in production, in the decoration of wall structures. Installation is carried out on a concrete floor screed or other even and solid foundation.
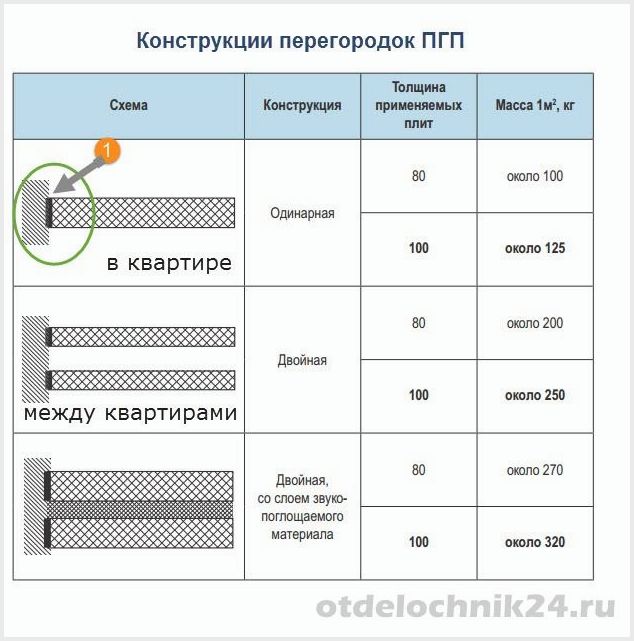
For the construction of a wall partition with improved insulating characteristics, a parallel installation of 2 vertical structures with an air layer of 40-50 mm between them is used. The main installation technology implies the presence of already erected load-bearing elements. Installation of partitions is carried out before the start of finishing work.
Partition installation instructions
The process of installing walls can be seen on the example of using gypsum blocks. This material is one of the most demanded in any renovation and is perfect for the construction of interior partitions. Installation should be carried out after finishing work on leveling the floor surface. It is best to use materials from well-known manufacturers. For example, Knauf firms. This will avoid unpleasant surprises and problems.
To install interior partitions made of tongue-and-groove plates, you need to purchase a number of accessories and the necessary tools:
- gypsum boards;
- assembly glue;
- putty for gaskets;
- gaskets (suitable from processed felt or cork);
- drill;
- mixer;
- hacksaw;
- level;
- rule;
- rubber hammer;
- roulette;
- marker or pencil;
- tape or twine;
- putty knife;
- wedges.
 Masonry of interior partitions
After the purchase of materials has been resolved, you can proceed to the main points of the installation. The installation diagram will look like this:
- markup;
- cleansing all surfaces adjacent to the future partition from dirt;
- gluing the gasket to the installation sites of the plates (using Fügenfüller putty);
- installation of the first row of tongue-and-groove plates;
- laying the second row;
- installation of the last row (the edge of the slabs must be beveled);
- sealing of seams;
- finishing finish.
At first glance, everything is simple: partition from tongue-and-groove plates is assembled as a constructor, and there are no problems. But there are some nuances that need to be taken into account.
First, at least a day before installation, it is necessary to bring the blocks into the room. This is necessary in order for the material to “get used”, that is, to accept the required humidity and temperature. Secondly, the installation is done with the groove up. The grooves are subsequently filled with putty.
 Laying of interior partitions in the room
Before laying the second row, you need to saw the first slab in two. This is necessary to arrange vertical joints in a checkerboard pattern and to give mechanical strength to the structure.
Important: the width of the seams must be equal horizontally and vertically!
After the installation of the partition is completed, the surface of the tongue-and-groove plates must be primed. This will ensure the adhesion of the decorative layer and avoid surface defects. Any type of wallpaper and coloring is suitable for decoration. The main thing is to choose the ornament or shade you like and carefully apply it to the partition.
Peculiarities
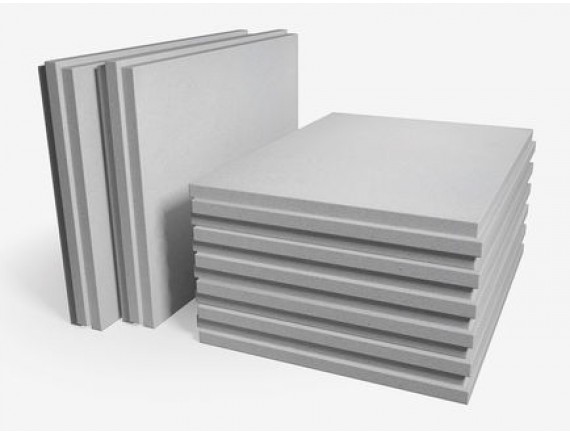
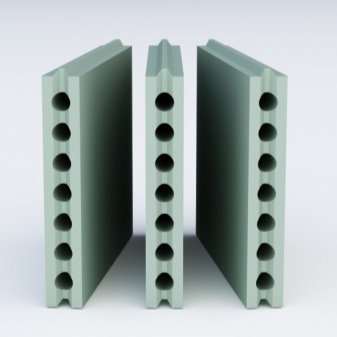
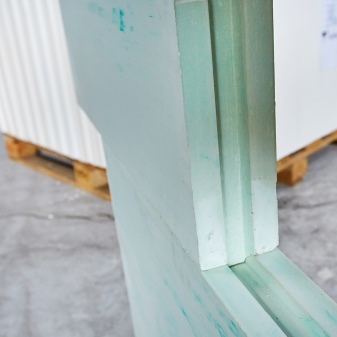
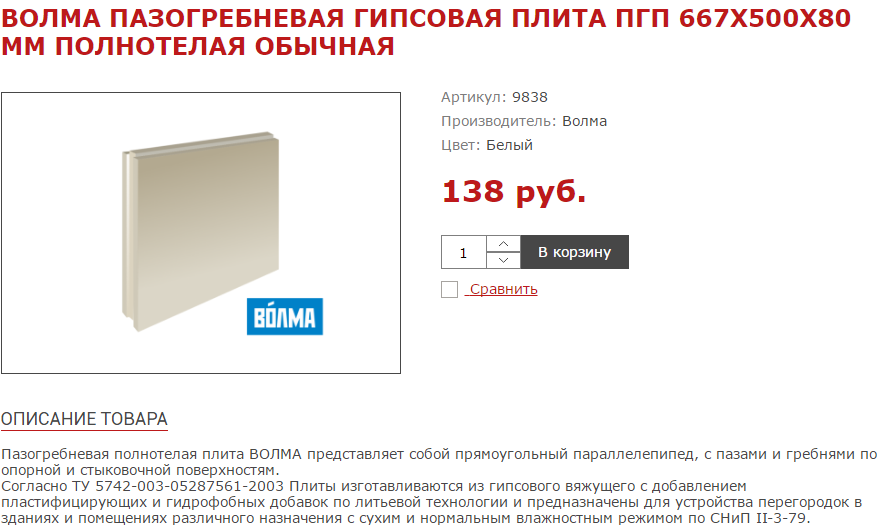
The tongue-and-groove plate is a rectangular block-parallelepiped with ridges and grooves at the joining edges. This is one of the modern building materials that is in great demand today. It belongs to monolithic products.
For the manufacture of such plates, gypsum is used, in which there are no toxic components and substances. Production takes place in accordance with building regulations such as TU 5742-003-78667917-2005.
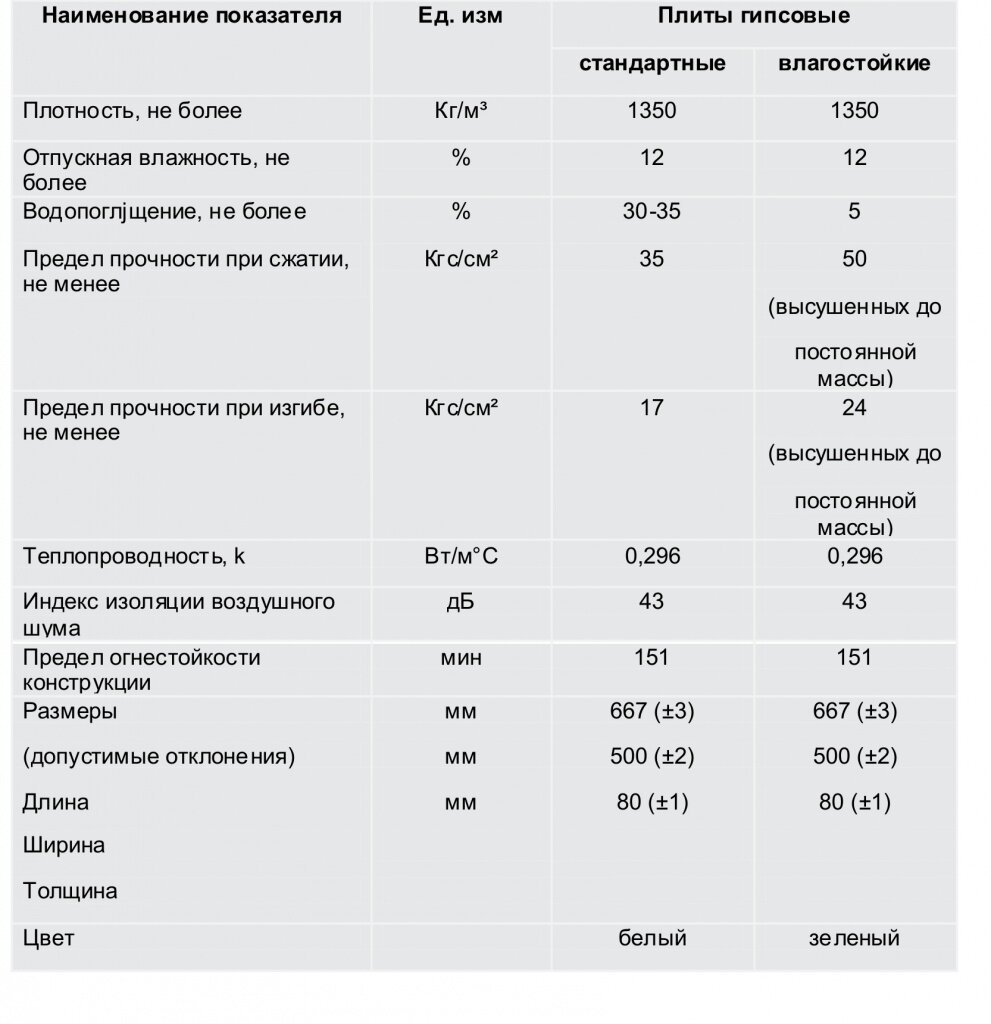

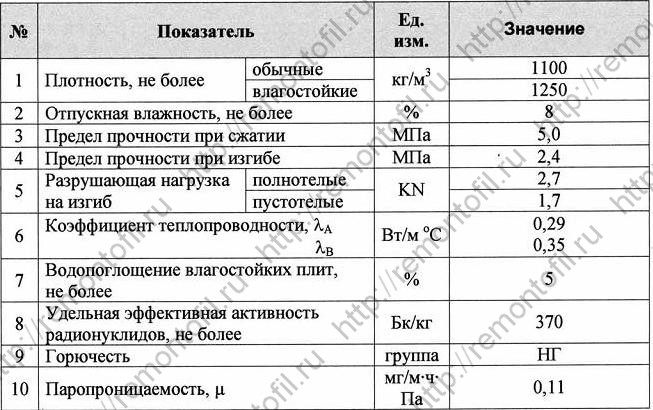
GWP has the following technical characteristics:
- noise isolation coefficient - 35-41 dB;
- density - 1350 kg / m³;
- water absorption coefficient - from 5% to 32%;
- resistance coefficient - 0.025.
The stove has a number of advantages, among which it is worth noting:
- high level of vapor barrier and gas permeability;
- ease of installation;
- environmental friendliness - this building material, which is used as partitions in the room, is considered the most harmless and safe;
- fire resistance;
- long service life;
- light weight;
- resistance to corrosion and decay processes;
- excellent strength characteristics.
The most important qualities are also a wide range of applications and the fact that the product does not need to be plastered after installation - just apply a layer of finishing.
As for the shortcomings, there is only one - high cost.
The technology of erecting a partition from GWP
Before installation, the GWP must be brought into the room and left there for some time.
Preparatory stage
We perform the following manipulations:
- We remove dust and dirt from the base base, walls and ceiling.
- In the presence of large irregularities on the base, we equip a leveling screed made of sand-cement mortar (grade not lower than M50).
- After the leveling layer has dried and gained the necessary strength, we mark the location of the partition on the floor.
Important! It is necessary to mark the location of the doorway on the floor.
- We prepare assembly glue for gypsum products: pour dry gypsum mixture into a container with cold, clean water; wait 2 ÷ 3 minutes and mix with a spatula until smooth, creamy consistency.
- Along the entire perimeter of the partition (that is, the floor, walls and ceiling), we glue an elastic gasket using assembly glue.
On a note! The prepared mortar mixture of the adhesive putty must be worked out within 30 minutes from the moment the dry mixture is poured into the water.
Main works
The order of work is as follows:
Only after complete hardening of assembly adhesive (under the gasket), we begin to apply the adhesive to the gasket and install the products of the 1st row: we install the GWP on the large edge with the groove up or down.
Advice! We recommend installing the products with the groove up: then the adhesive solution will be evenly distributed in the groove cavity. To do this, remove the combs from all plates of the 1st row with a hacksaw. Then we process the surfaces with a roughing plane.
- We plant the GWP with a rubber mallet.
- When joining the blocks, we apply the glue into the groove located in the vertical end plane of the slab.
- We also glue the boards in contact with the wall.
- Using the level, we constantly check the correctness of the installation of the GWP vertically and horizontally.
Important! The presence of vertical through joints is unacceptable
- At the joints of the slabs and where the partitions intersect with each other, we make a transverse groove at one of the slabs using a hacksaw and a trowel (so that the installation of the upper rows of slabs is carried out with overlapping joints of the lower rows).
- Apply glue to the groove of the bottom plate and install the top plate so that the joint of the bottom row overlaps.
Important! We must install the GWP with a breakdown of the end joints.
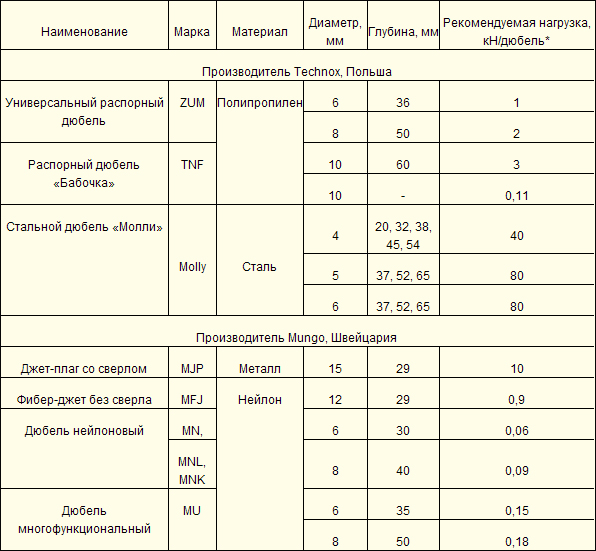
- We fasten the slabs to the walls using certain brackets. We install the bracket in the groove of the already mounted plate and fix it with self-tapping screws to the plate and anchors to the wall. Then we install the gypsum board on top of the glue.
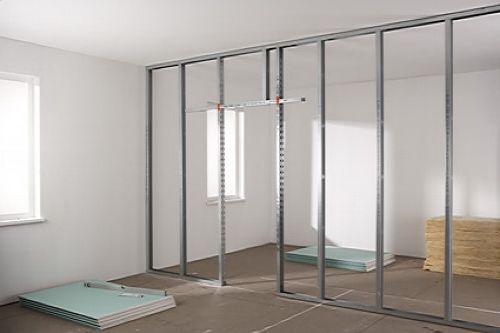
- When arranging openings for doors and windows, we install a wooden structure that supports the plates in a fixed position until the adhesive solution hardens.
On a note! After the glue has dried, remove the jumper.
We leave a gap (about 2 cm) between the ceiling and the last row of slabs.
Advice! In order to reduce waste, the products of the last row can be laid on a smaller edge (vertical).
The final stage
- After the assembly glue has hardened, we process the surface of the outer corner with a roughing plane.
- Apply a putty to the corner surface, into which we press a galvanized metal profile to protect the corner.
- Fill the gap between the erected wall and the ceiling with glue or polyurethane foam.
- We putty the joints between the blocks.
- After hardening of the mounting glue that holds the corner profile, we level the corner surfaces with putty.
- We close up the inner corners between the wall and the partition, between the partition and the ceiling: first we apply the mortar mixture on the surfaces of the sides of the corner, then level it (with a spatula for internal corners), lay the reinforcing tape and sink it into the mortar mixture (with a spatula).
- We re-putty the outer corner surfaces with the protective corner.
- After the mortar mixture has dried, we clean and polish the surface of the partition.
- The entire surface of the partition is primed and painted.
Guided by this description of the work, it will not be difficult to build a partition with your own hands.
Gypsum GWP
Products are manufactured in accordance with environmental safety requirements. The basic raw materials of the blocks are cement and gypsum powder, grades G-4, G-5. They are classified as environmentally friendly building materials. During manufacturing, additives are introduced that improve the quality of the manufactured products. The strength and moisture resistance of the plates increases.

 Gypsum
When installing the GWP, ensure that the slabs are uniform. Slab structures take up significantly less space. Additional reinforcement of the doorway, up to 0.9 m wide, is not required. The erection of the partition is greatly simplified.
Physical and technical parameters of gypsum products
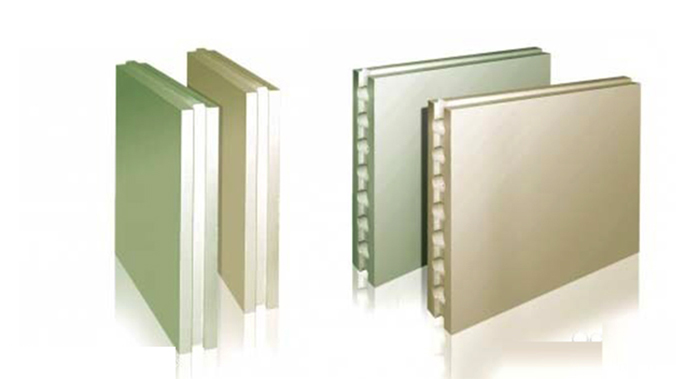
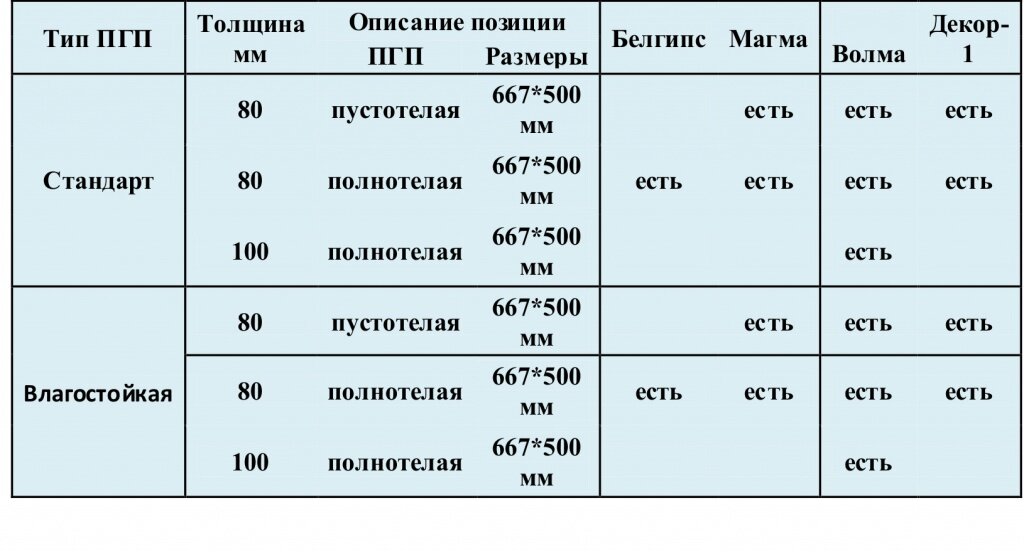
Technical and operational parameters of gypsum building materials depend on raw materials, block structure. It can be hollow and full-bodied.
Full-bodied products are very durable. The hollow analogue is lighter in weight, easier during the installation of the partition. There is a simultaneous improvement in the sound insulation of the room. GWP is fixed by standard gluing, which ensures speed and ease of work with the material. There is no formation of construction waste. Plates are installed in two layers to increase the strength of the structure. No surface plastering required.
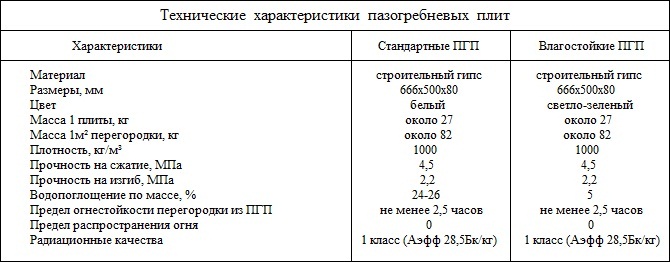
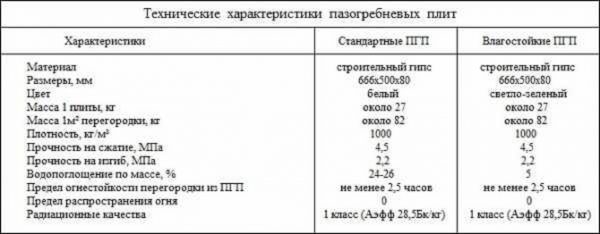 Technical specifications
Moisture resistant gypsum
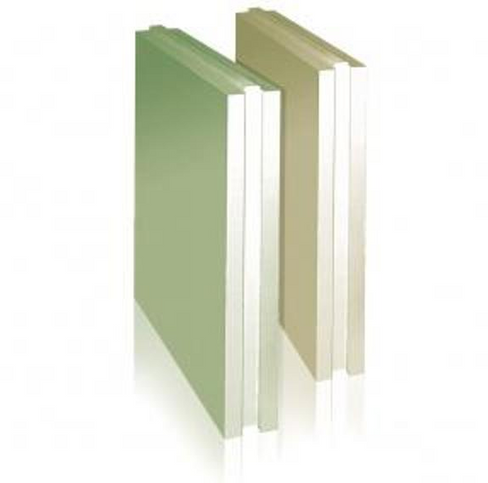
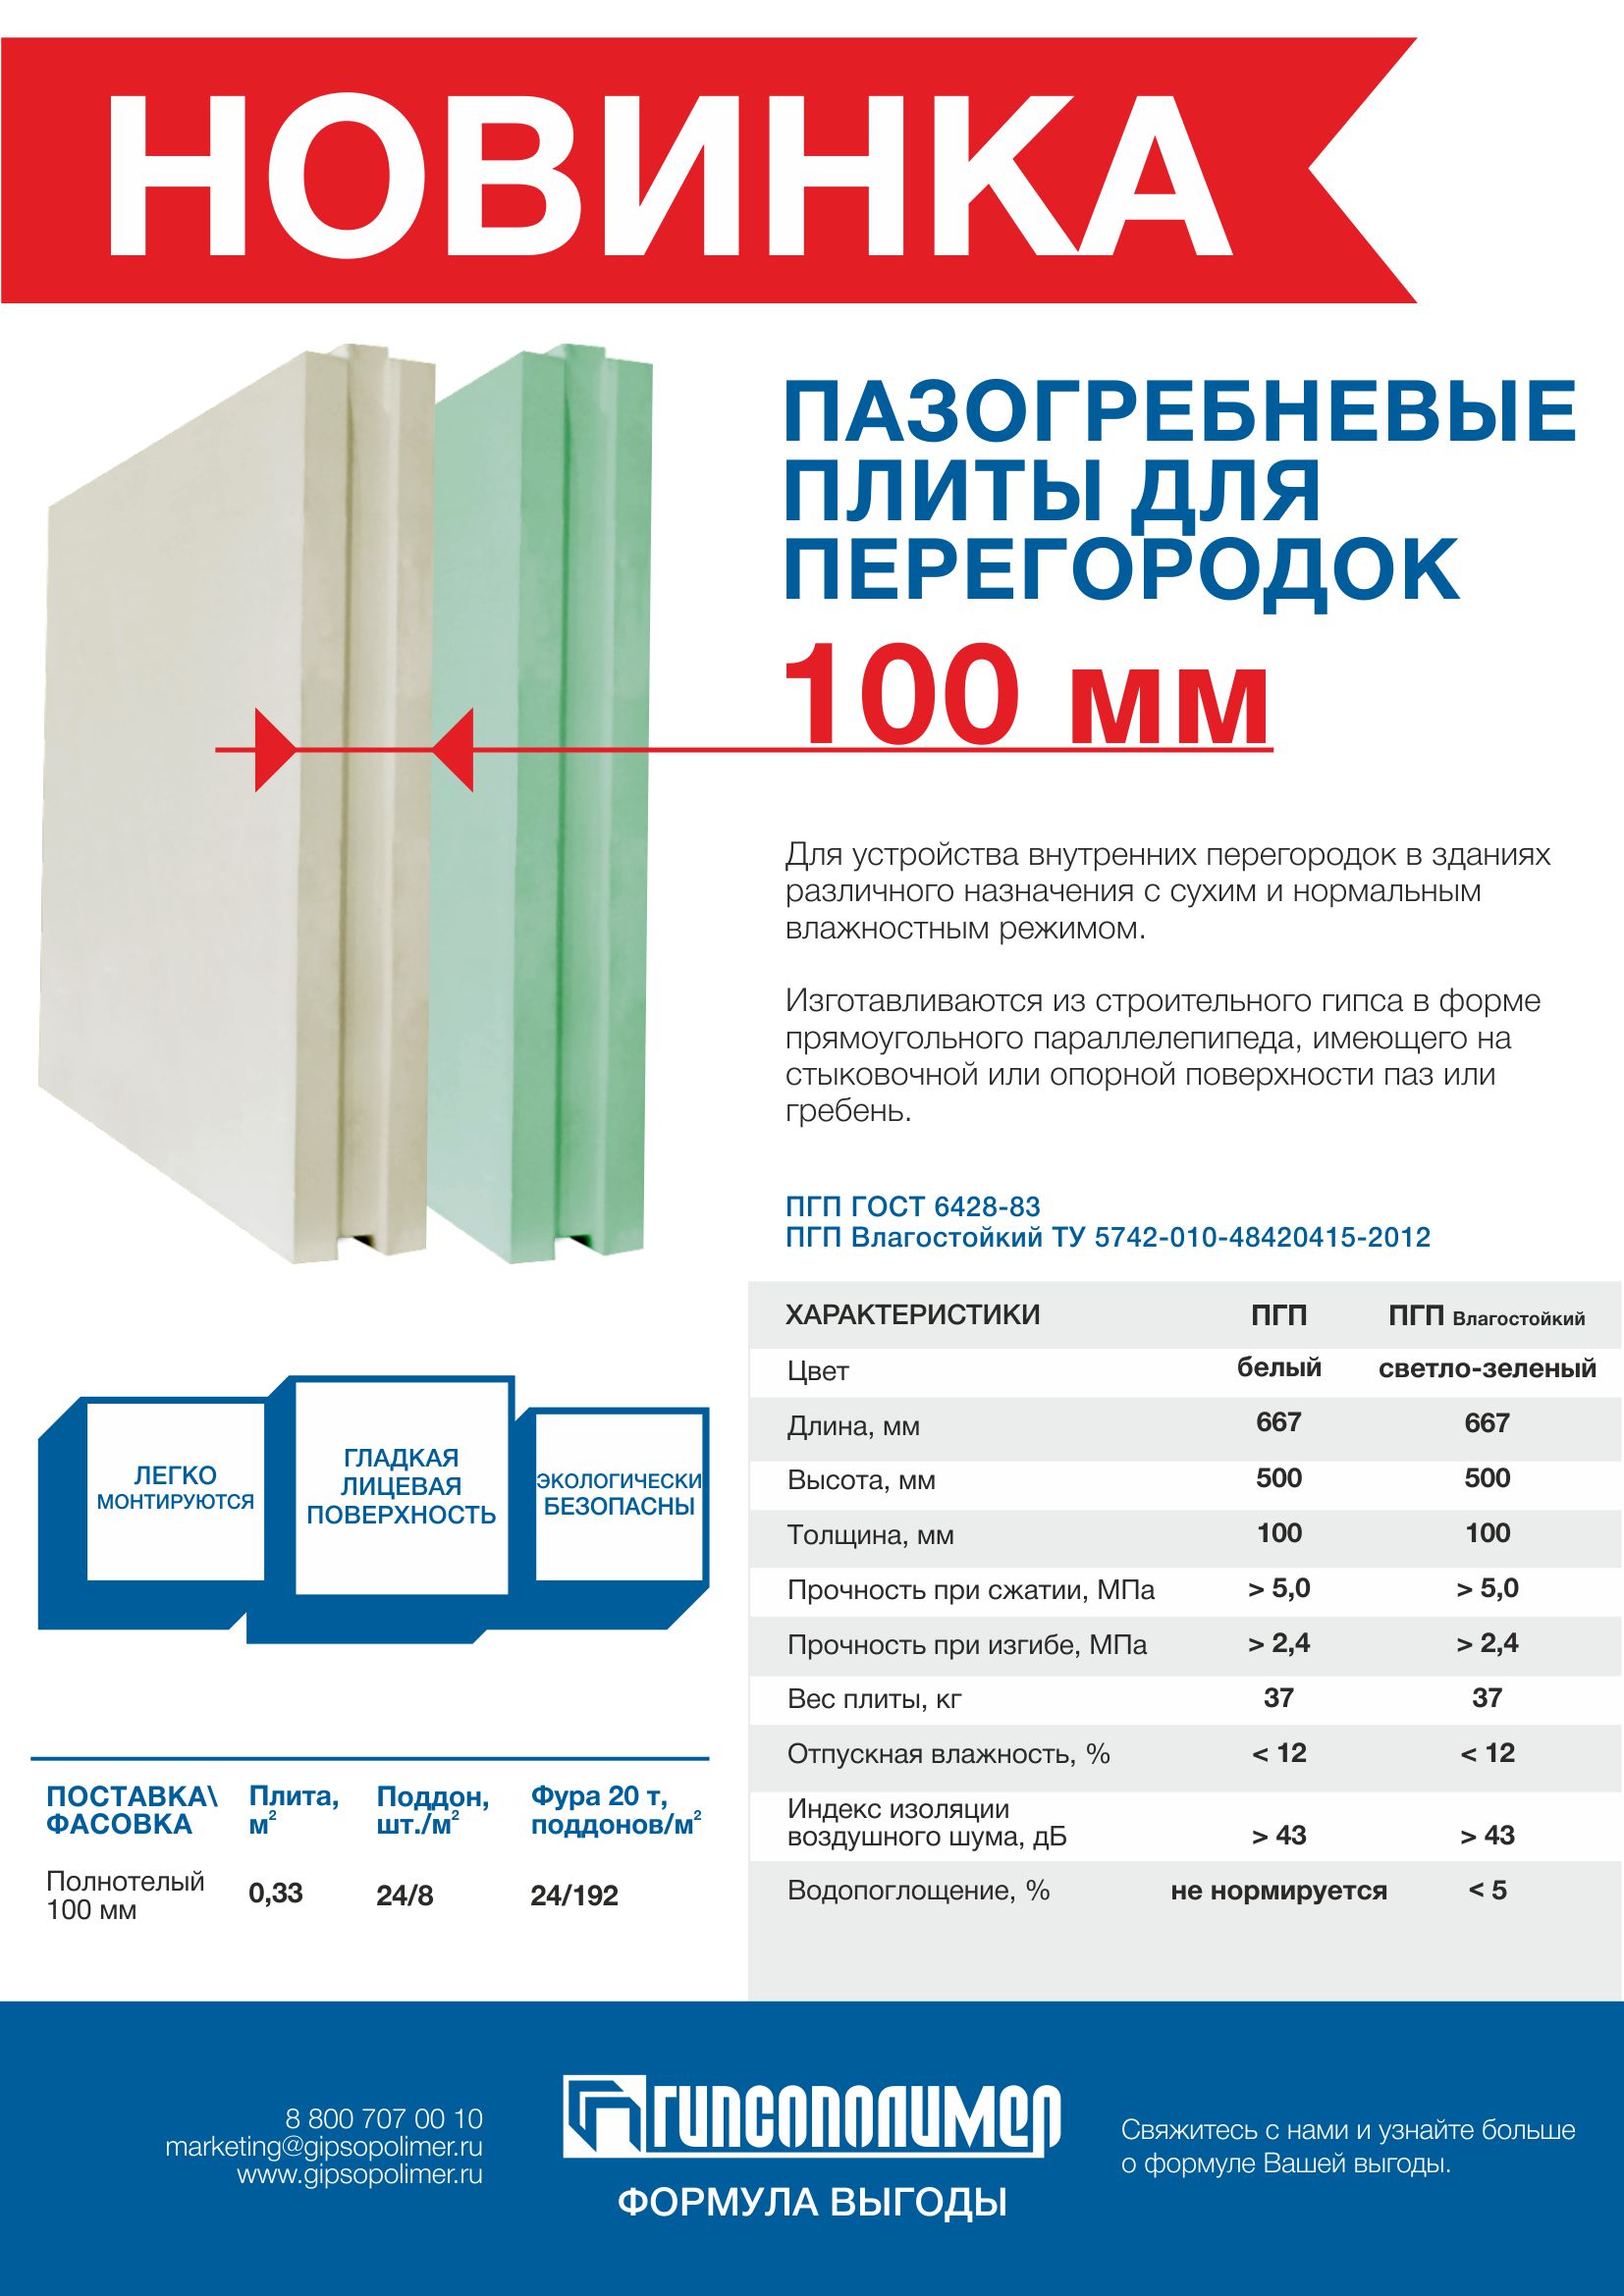
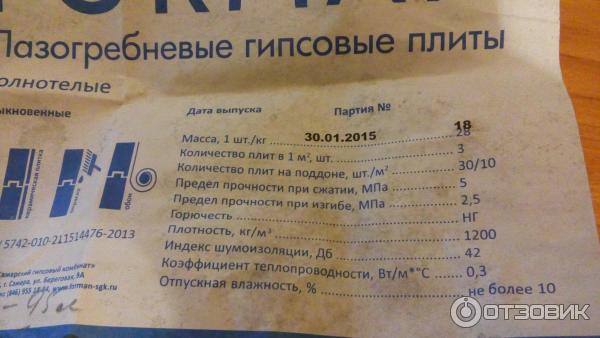
Standard tongue and groove products are used for the construction of partitions and wall cladding inside buildings with a dry, normal microclimate. For rooms with a high degree of humidity, moisture resistant boards are recommended. They can be recognized by their characteristic greenish color.
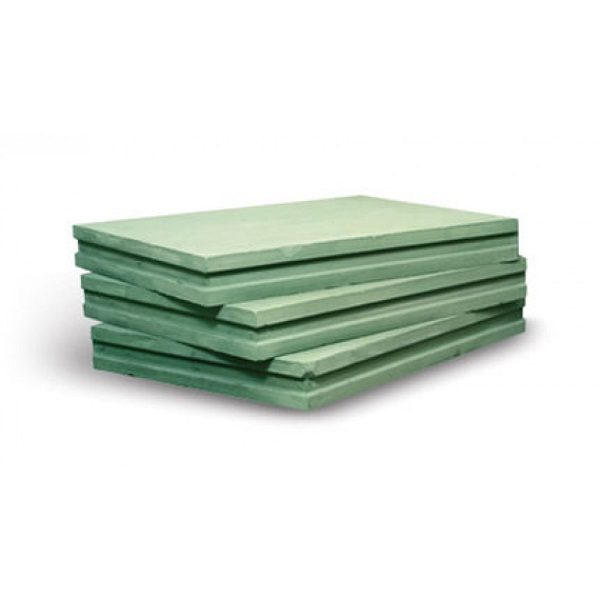 Moisture resistant
When choosing a material, you need to take into account the conditions for installing the plates. Check the quality certificates of construction materials in order not to fall for a fake. Better to do this in a store. If you install conventional GWPs in a humid environment, they will “creep” after a while.
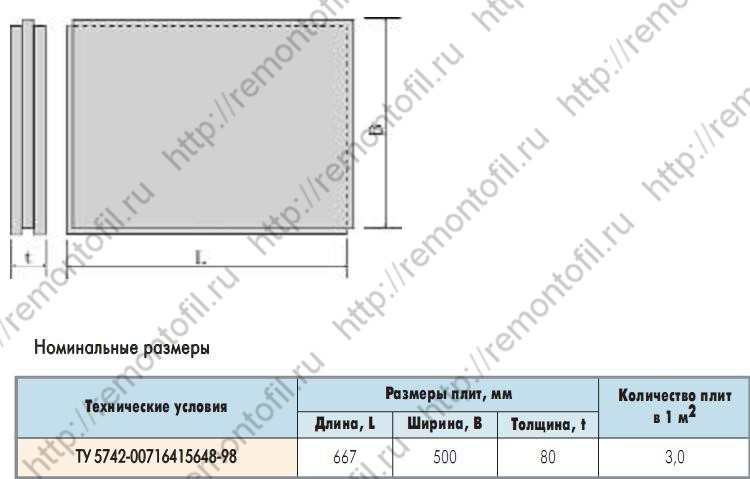
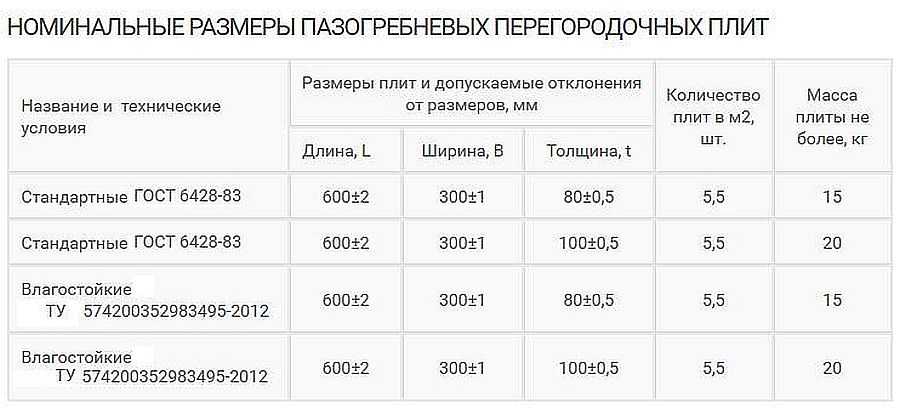
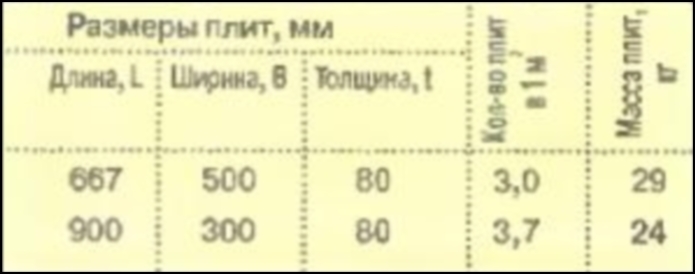
Dimensions of GWP
When choosing products for construction purposes, a preliminary calculation is required. Otherwise, even the available material is impractical to use. It is easy to calculate the building material, you need to familiarize yourself with the dimensions of one unit and calculate their number by the area of the partition or wall for cladding.
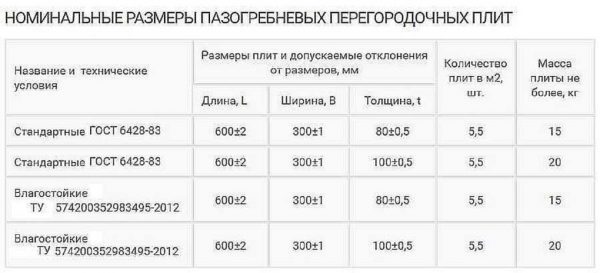 Dimensional range of moisture resistant plates
Weight of gypsum products
The standard typical product size allows you to bring the mass of products to a single value. Weight of one plate:
- standard - 24 kg;
- moisture resistant - 29 kg;
- hollow (lightweight) - 22 kg.
The small mass of one unit of building material allows for the construction of the forces of one person. No outside help required.