Laying plywood on a wooden floor: basic rules
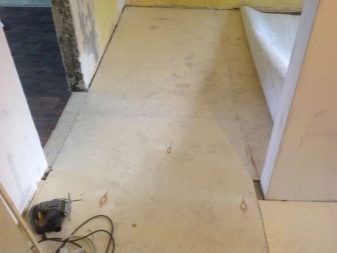
Laying plywood on a wooden floor becomes especially important when the plank floors are dry, loosened and become unusable. Plywood will allow you to make repairs in the most optimal way - quickly, inexpensively and reliably.
First of all, you should check whether the wooden floors do not bend along the logs (of course, if they are). If they bend, then you will have to completely disassemble the flooring and repair the base of the wooden floor. If it's not about logs, then the best way out is to lay plywood on a wooden floor.
Remember that plywood is not recommended to be used where there are too large changes in temperature and high humidity. Plywood is not suitable for bathrooms and unheated rooms. To check if your floor has high humidity, place a 1x1 meter sheet of polyethylene tightly on it and leave it for three days. If condensation does not appear on the inside of the polyethylene, the floor is suitable for further use.
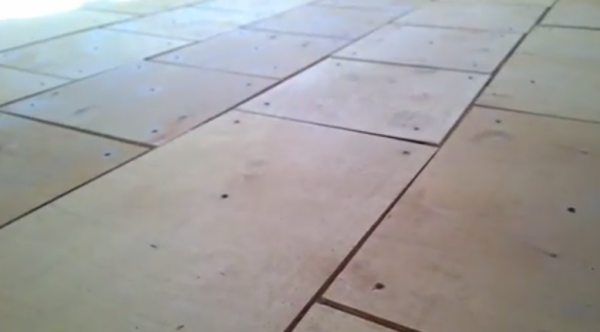
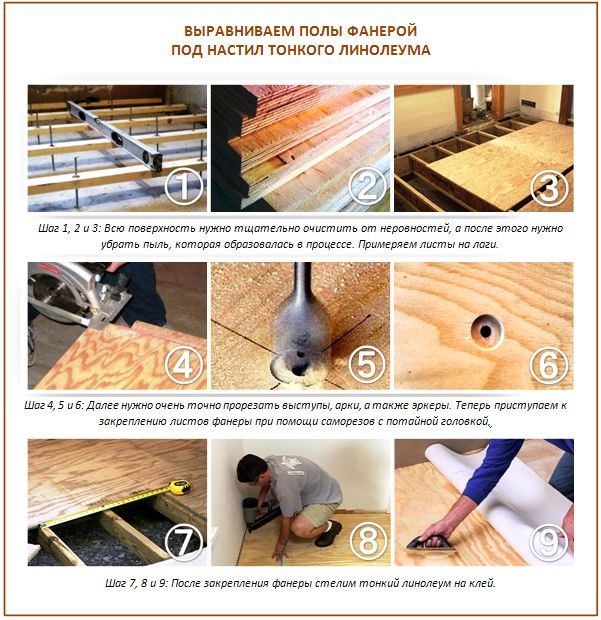
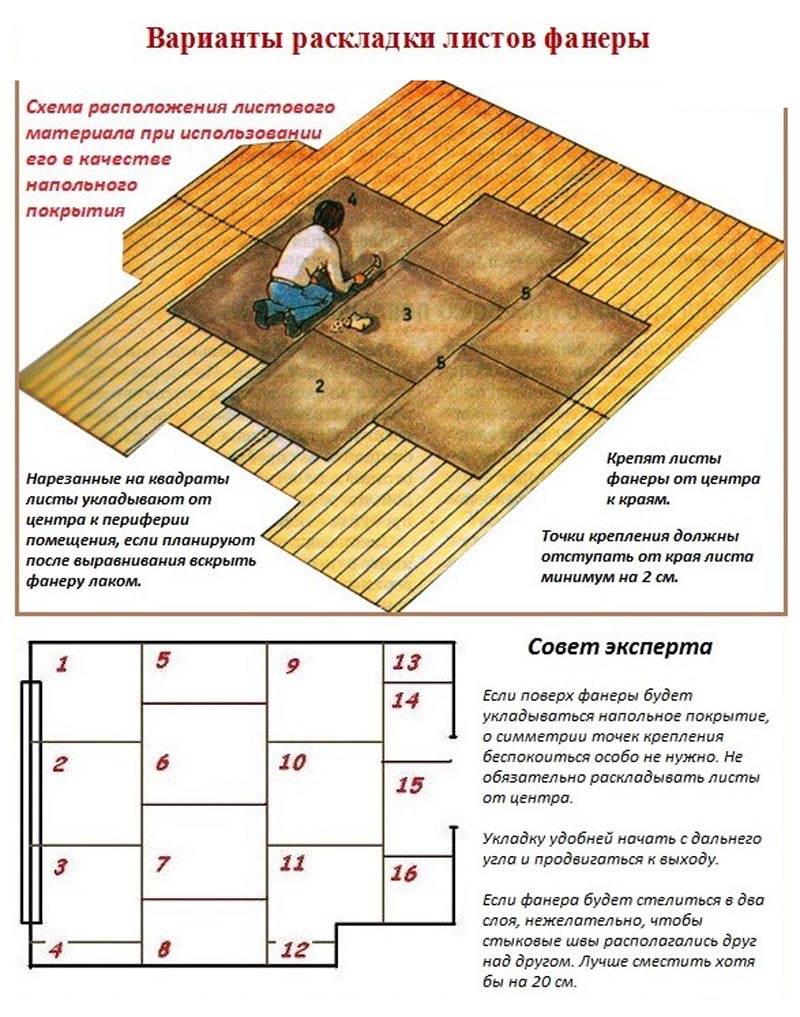
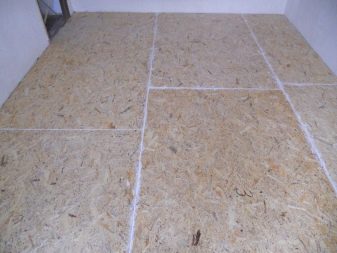
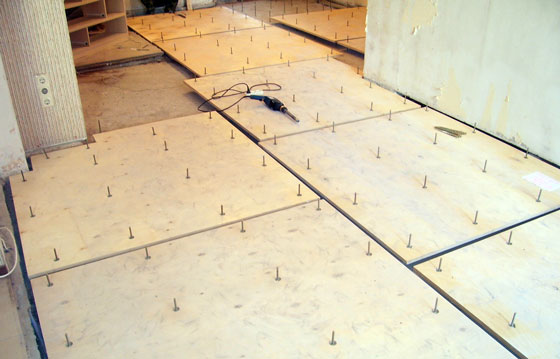
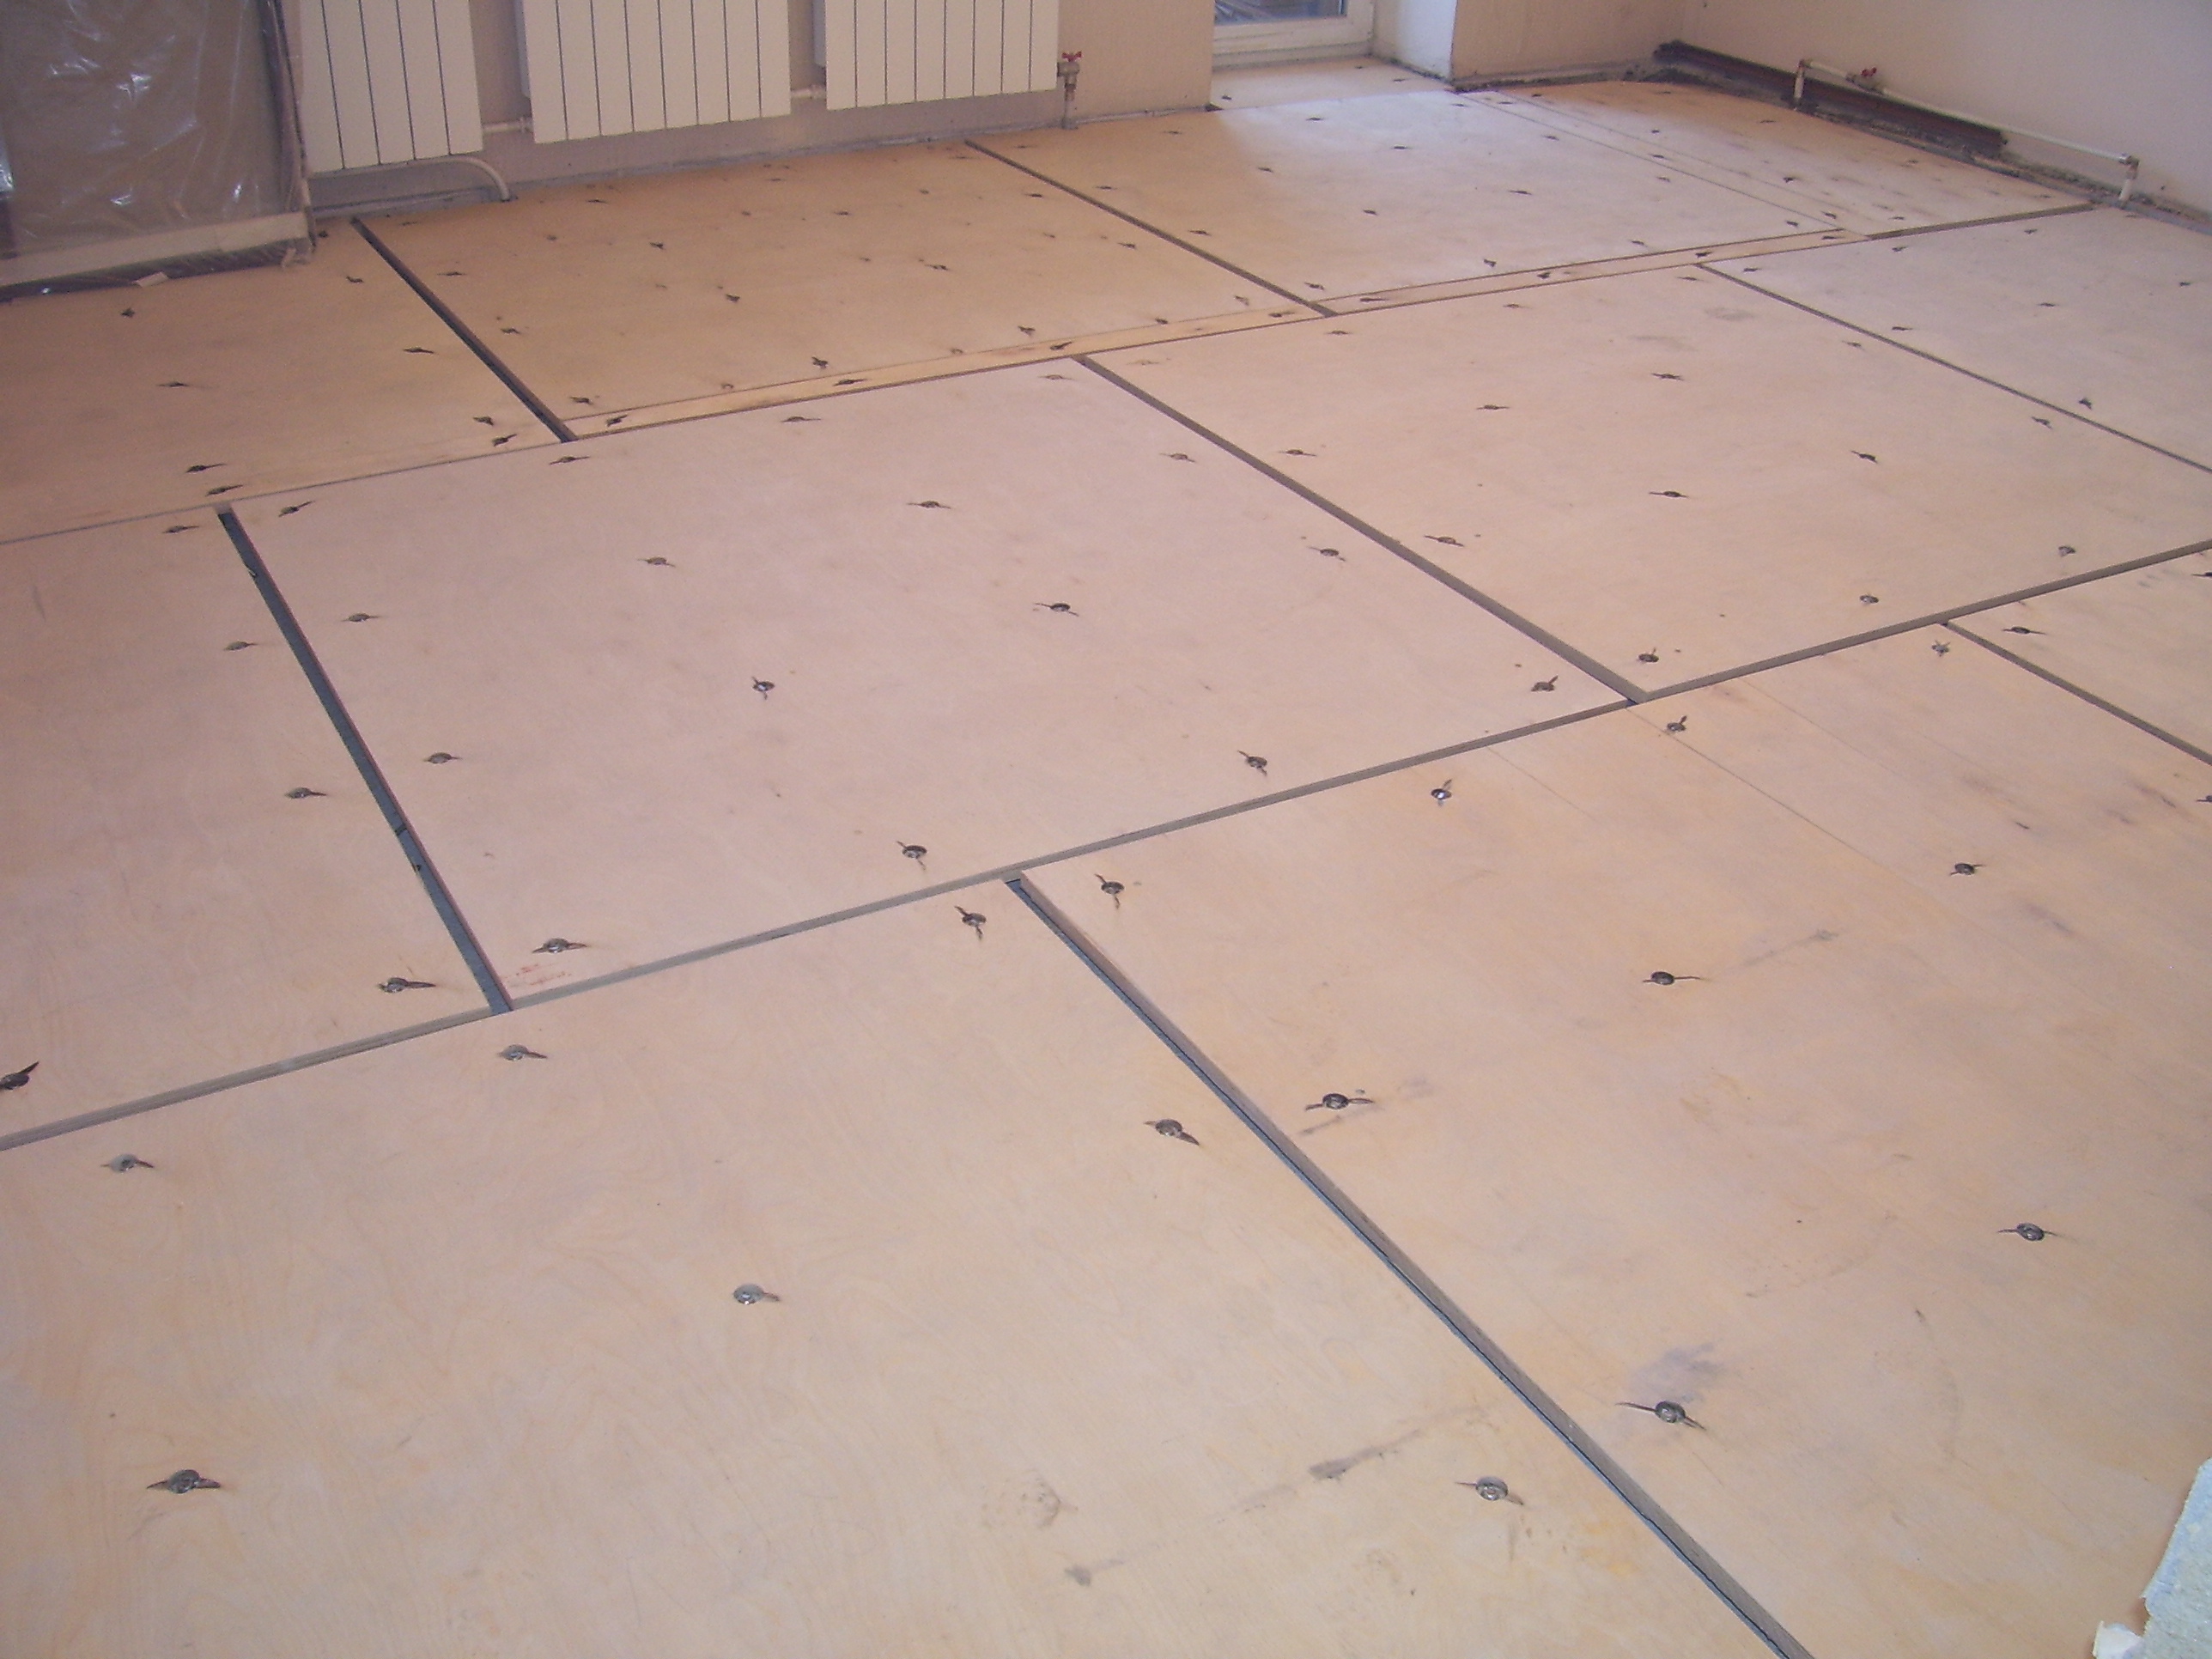
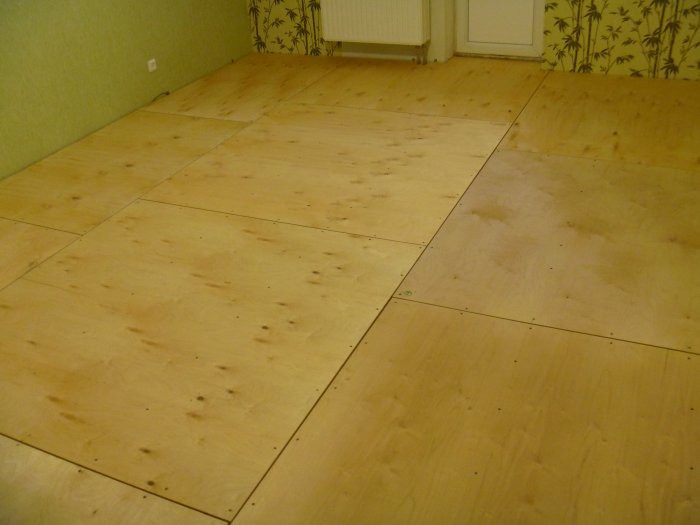
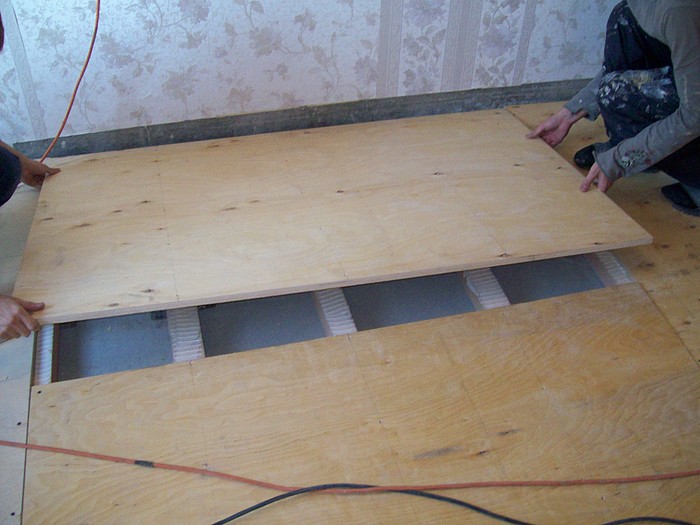
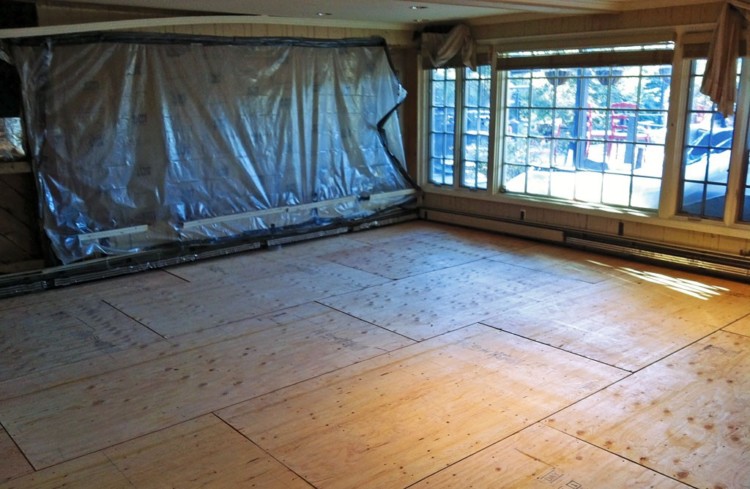
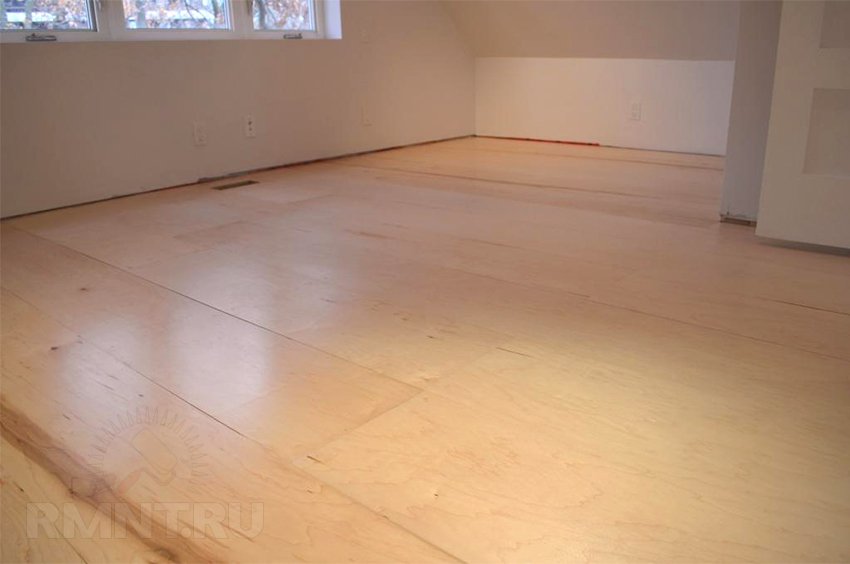
Plywood sheets are laid "dry" with an offset so that a maximum of three seams converge at one point. So individual sheets are adjusted to the size of the room, bypassing the protrusions and filling the niches. When carrying out this procedure, remember that a space of about 8-10 mm wide should be left between the scattered sheets - these are the so-called damper seams
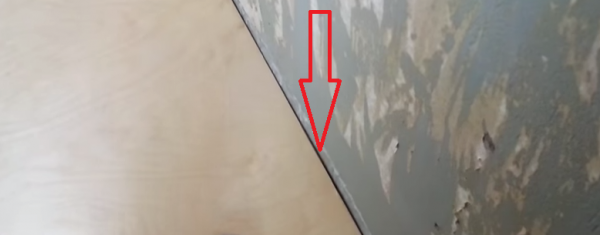
It is important to know: there must be a gap of 15-20 mm between the extreme squares of the plywood and the walls. Do not worry that this will spoil the overall look, because later these indents will be covered with baseboards.
In order not to confuse the fitted sheets during the final assembly, it is worthwhile to number them and, focusing on the numbers, draw up a small plan diagram of their location.
When choosing plywood, keep in mind that the thickness of the plywood sheet should be at least 12 mm, and even better - 15 mm
On perfectly flat surfaces, sheets with a thickness of 8-10 mm are allowed. If you are planning to floor a solid board, then plywood less than 15 mm thick will not work for you.
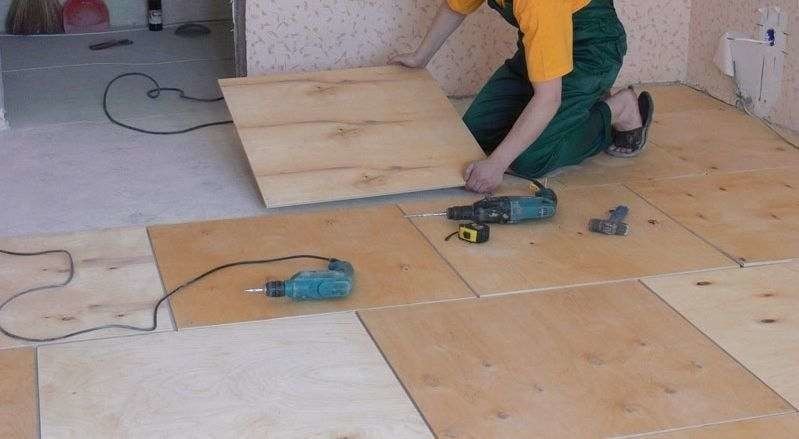
It is recommended to cut the plywood sheets into squares with a side of 60 cm. This will give you the optimal number of damper joints. In addition, it is easier to detect delamination that is not visible in whole sheets.
Before finally laying the plywood, you should very carefully clean the base from dust and debris. In addition, it is recommended to carry out priming - this is the treatment of the floor with a special primer.
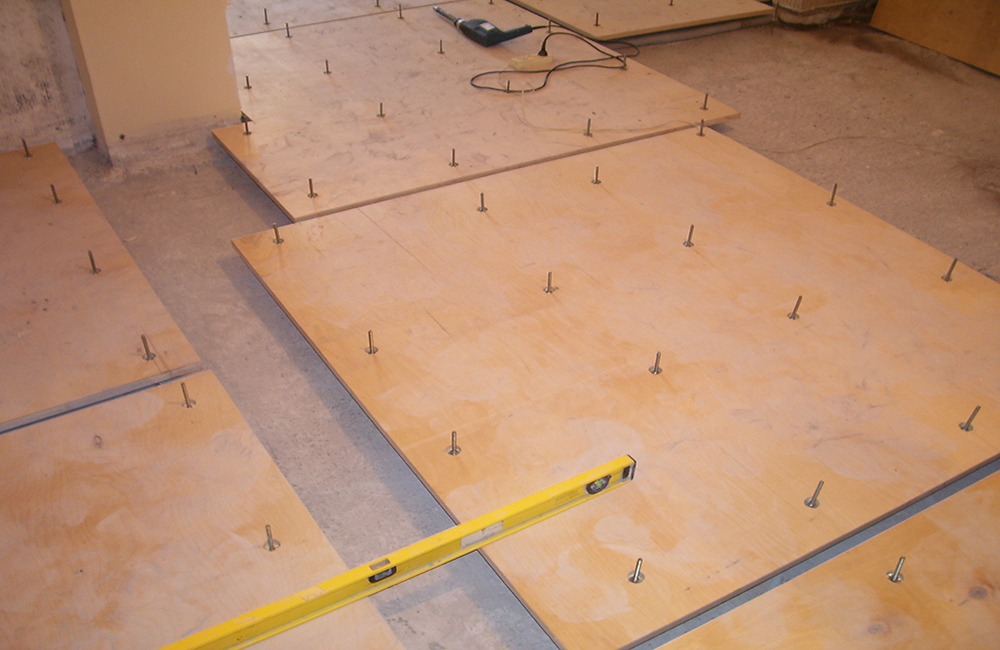
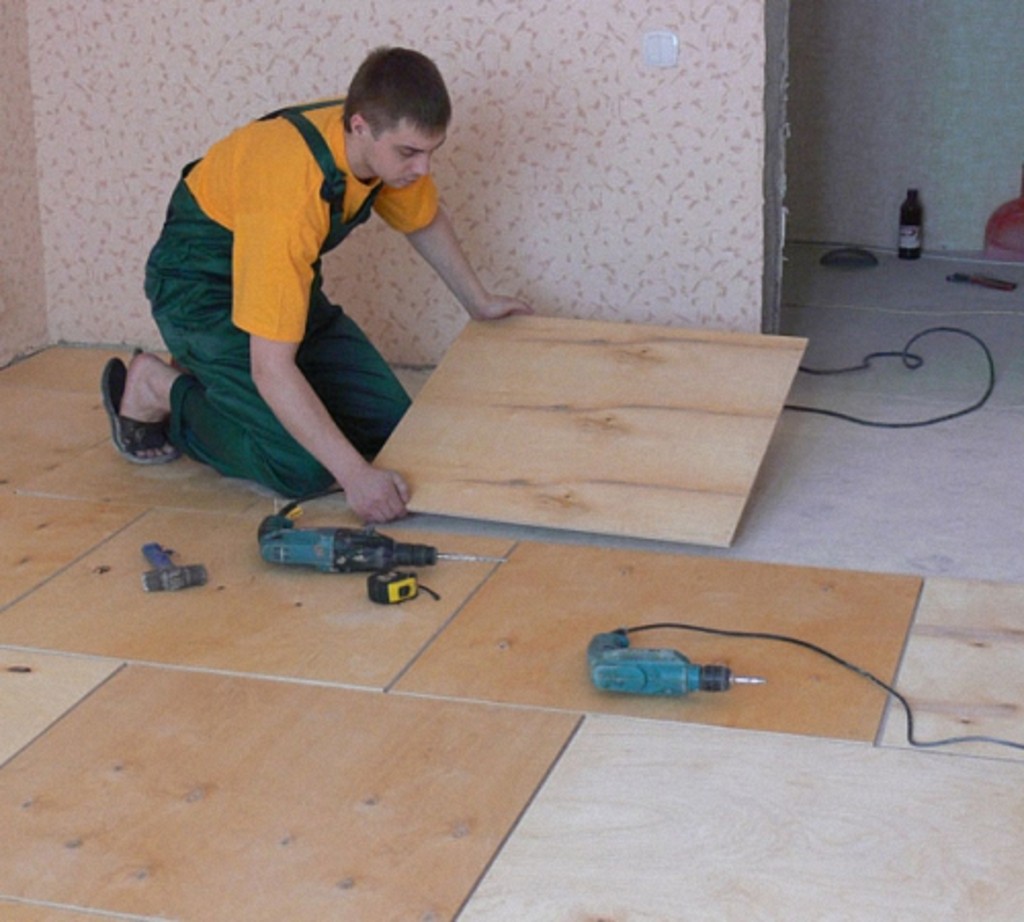
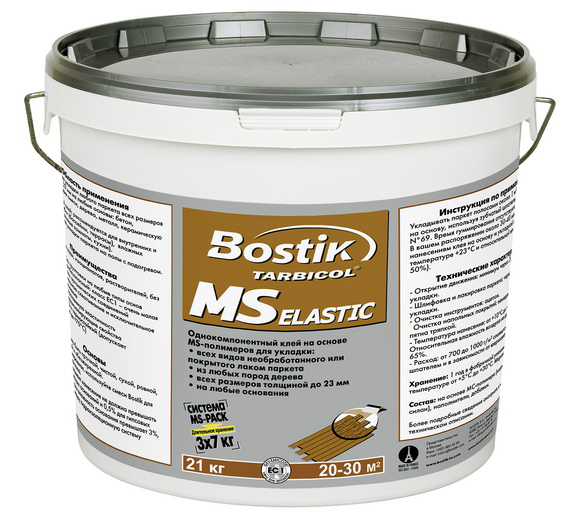
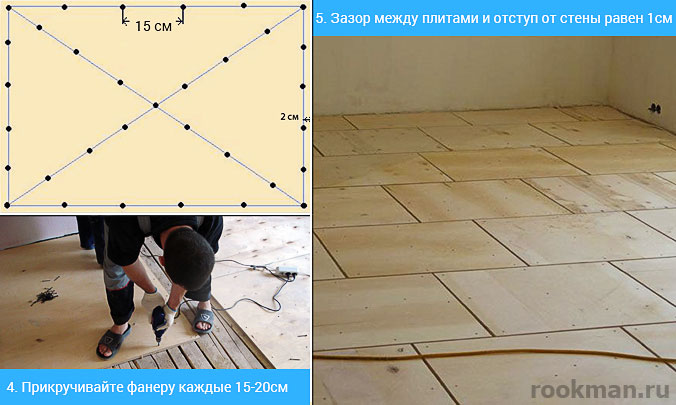
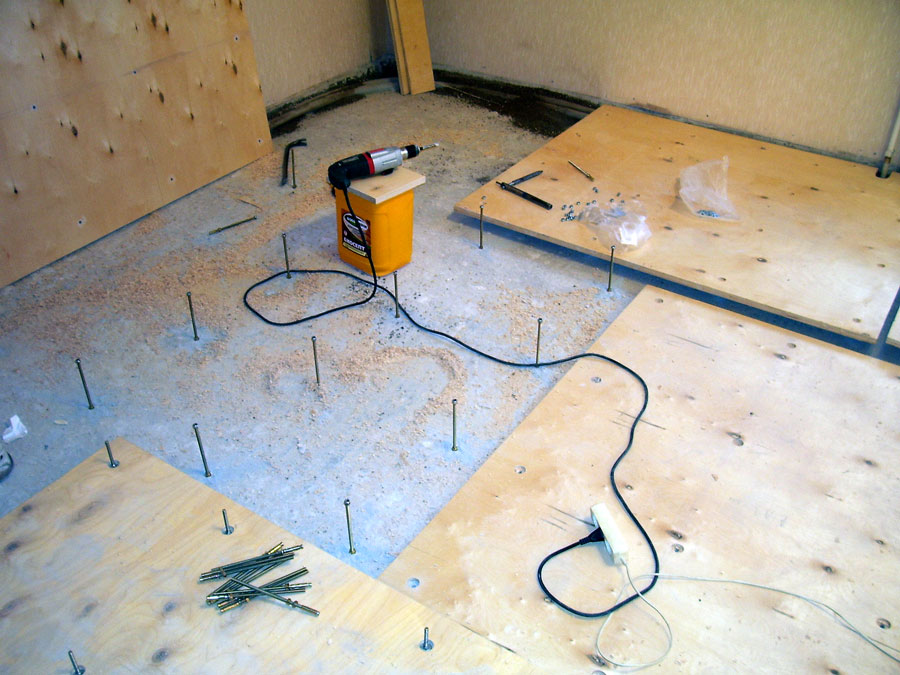
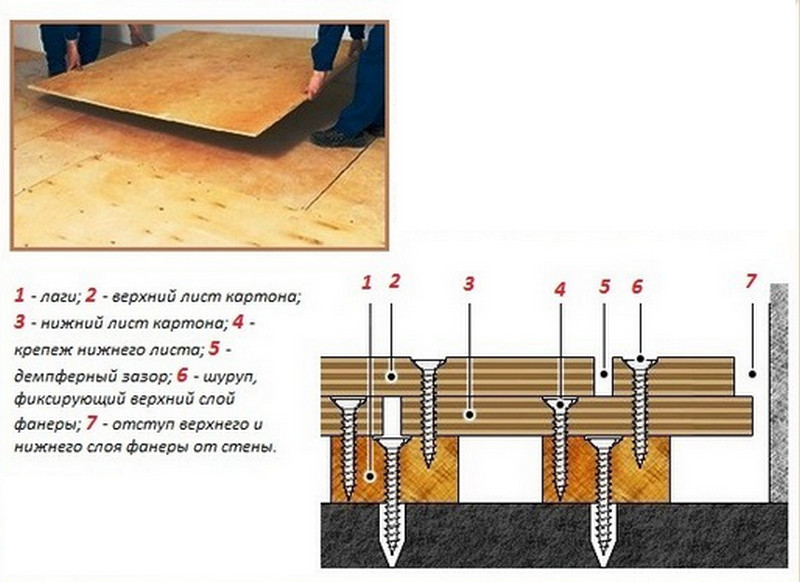
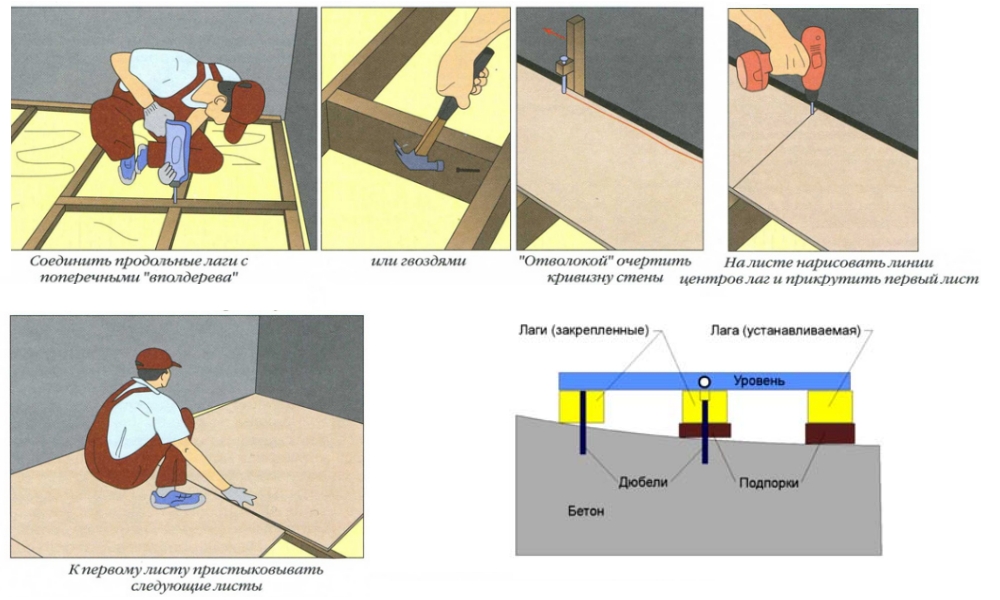
Better to put plywood on glue, but you can do without it. According to numerology, each sheet fits into its place and is fastened with self-tapping screws along the edges and diagonals with a step of 15-20 cm. Make an indent from the edges - 2 cm. It is imperative to sink the caps of the screws, countersinking the holes for fasteners.
It is important to know that the fasteners must be at least 3 times the length of the sheet thickness. For example, 40 mm self-tapping screws are suitable for a 12 mm sheet.
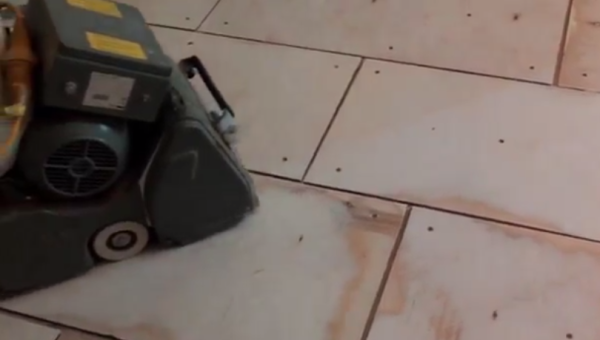
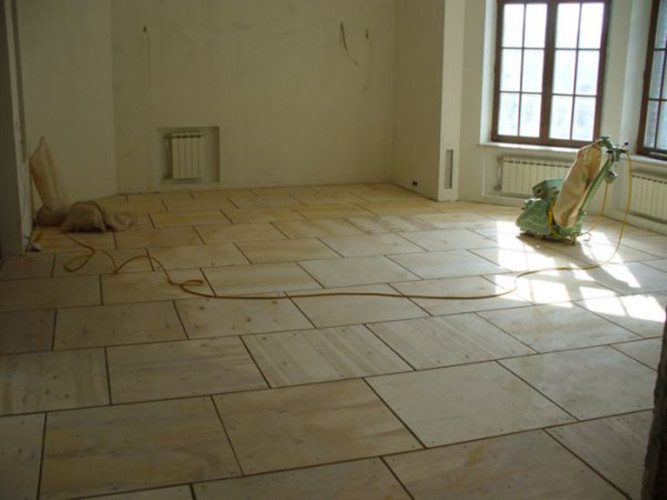
After installation, the surface must be carefully sanded. This can be done with a parquet sander and coarse sandpaper.
So, you have learned how to lay plywood on a wooden floor. Remember that a well-laid floor covering will delight all household members for many years!
Material calculation
To correctly determine the quantity of products, you must follow the step-by-step instructions:
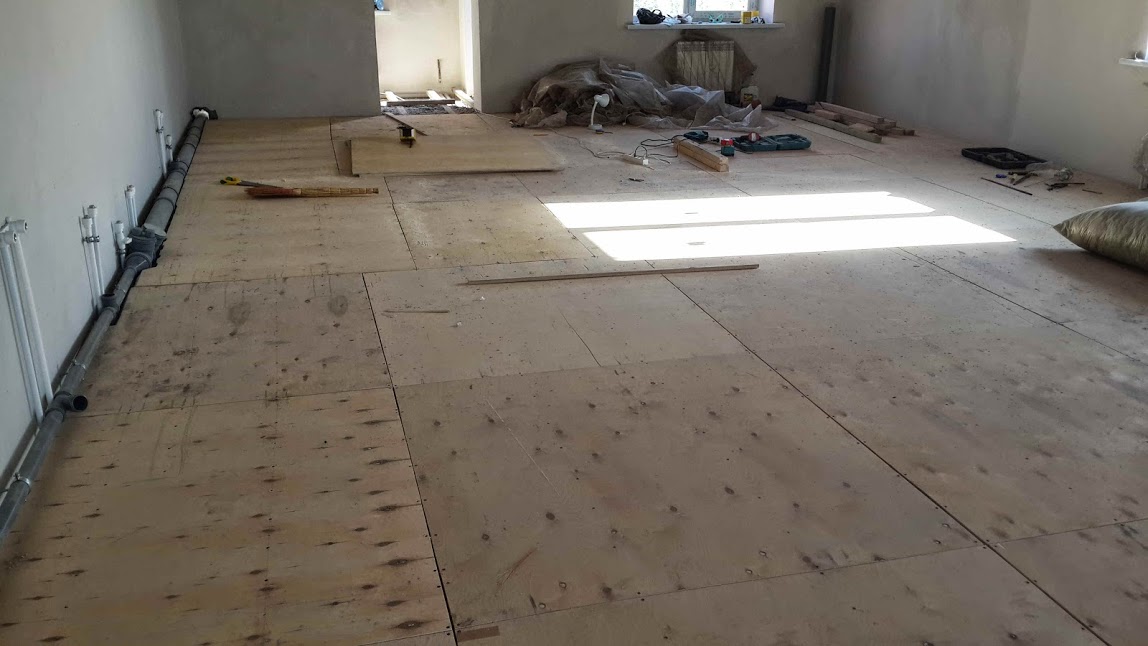
- The floor surface is measured, all data is transferred to paper. You should get a detailed diagram of the base with a lag laying system.This allows you to immediately calculate the order of placement and fitting of all parts, which is especially important in rooms with protrusions and niches.
- A suitable sheet size is determined, a layout plan is drawn up.
- According to the data obtained, the required number of plates is calculated.
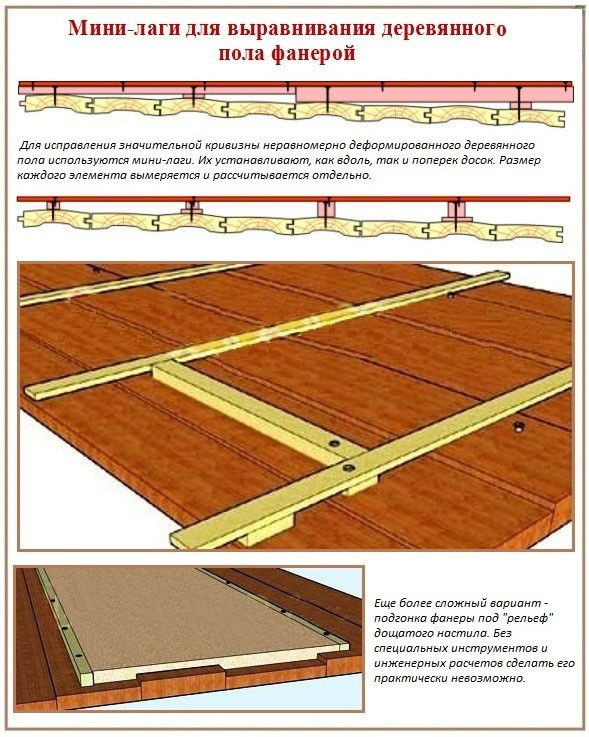
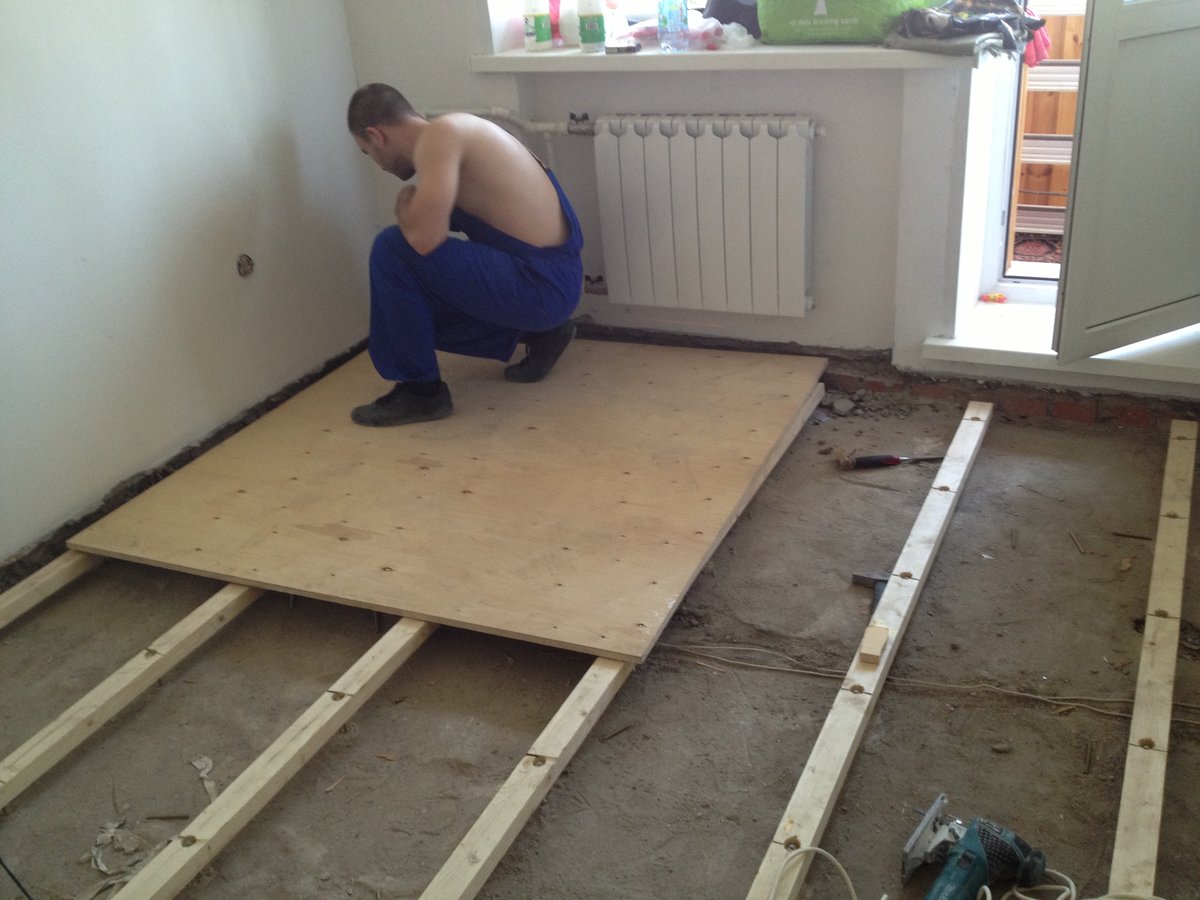
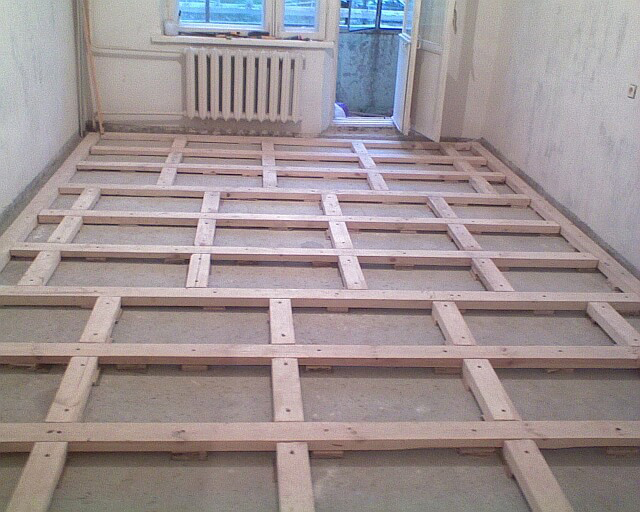
 When installing the floor on the logs, first of all, it is necessary to draw up a scheme for installing the logs, after which it is necessary to plan the laying of plywood using it
If the room has the correct shape, it will be easier to calculate the consumption: for this, the size of the object and the dimensions of the sheet are converted into an area, the data in square meters is divided.
3 Installation of plywood on a plank base - quick operation with a minimum of hassle
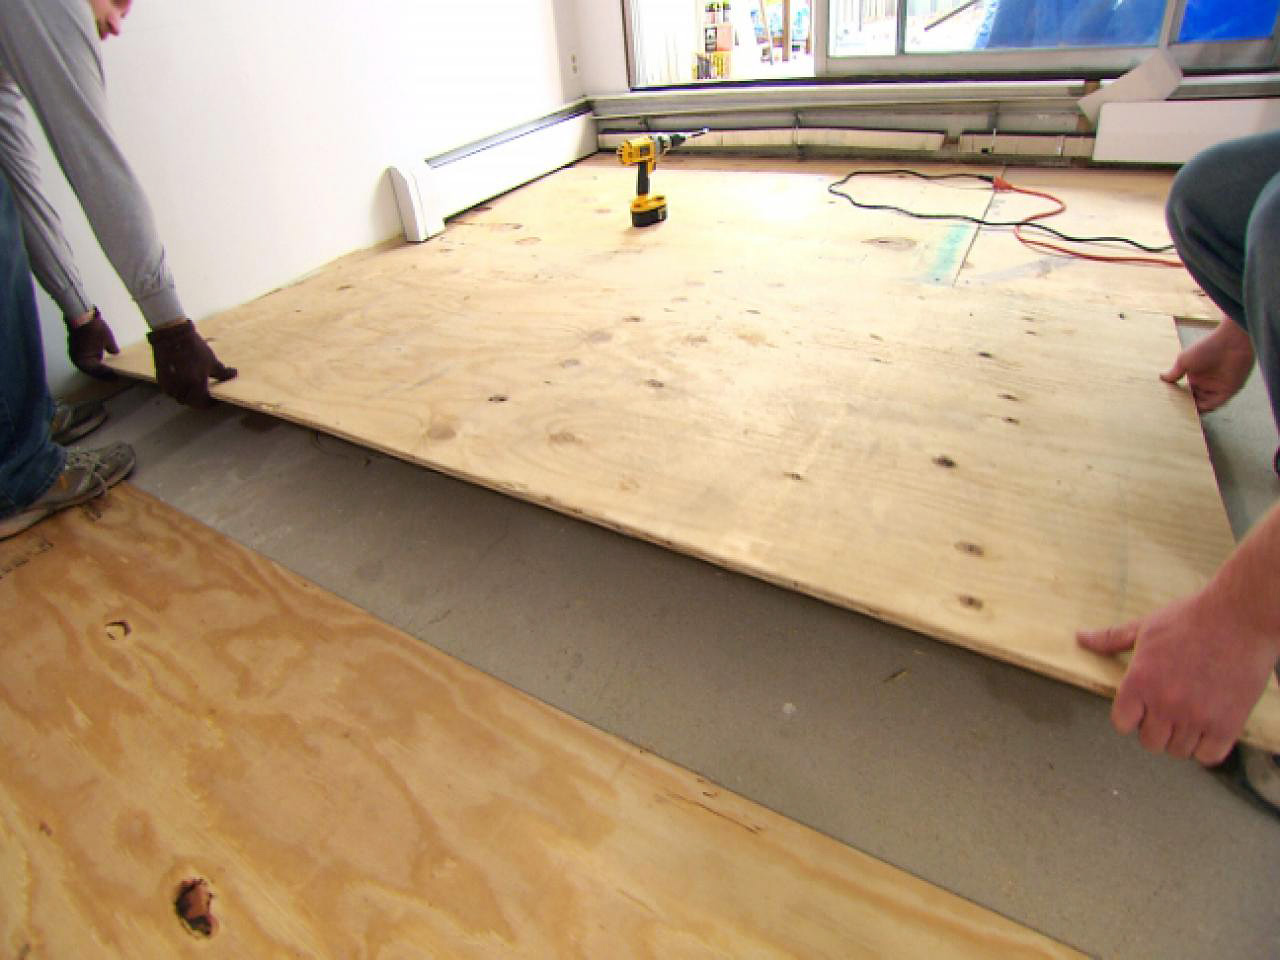
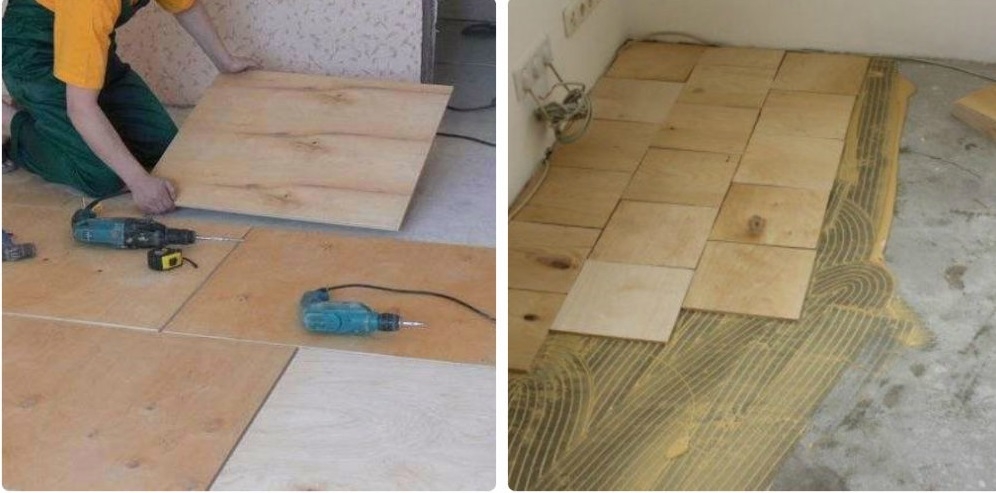
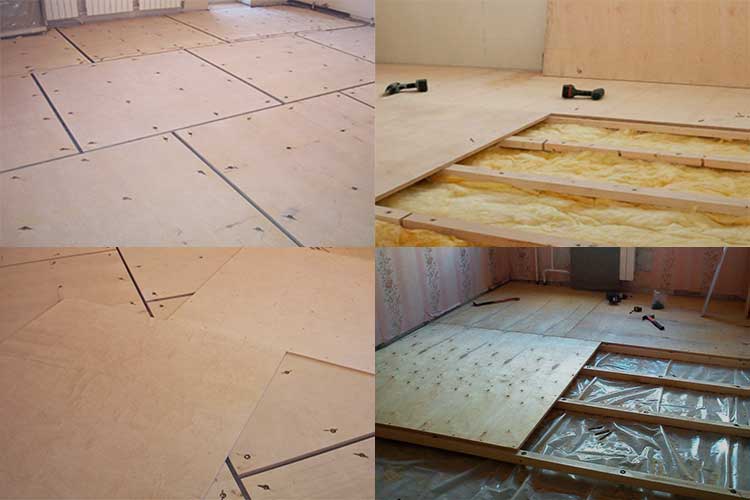
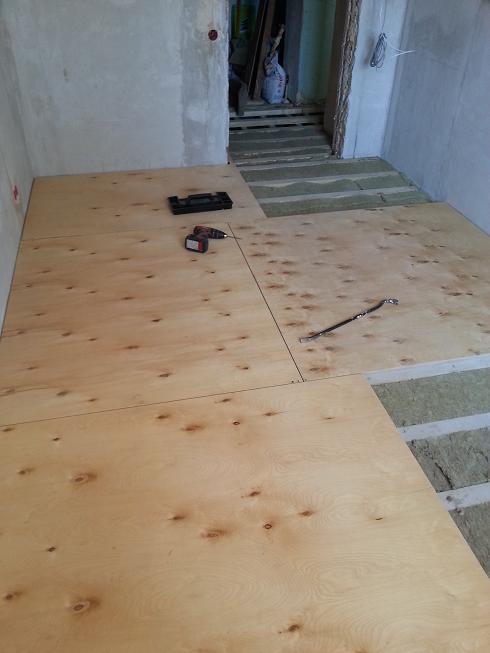
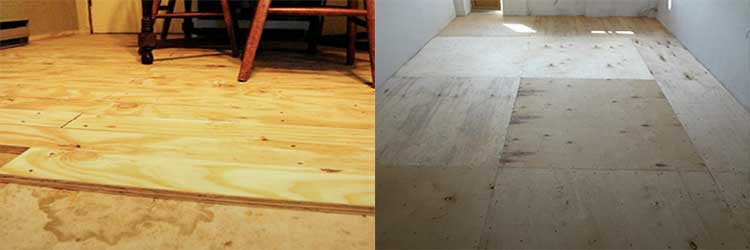
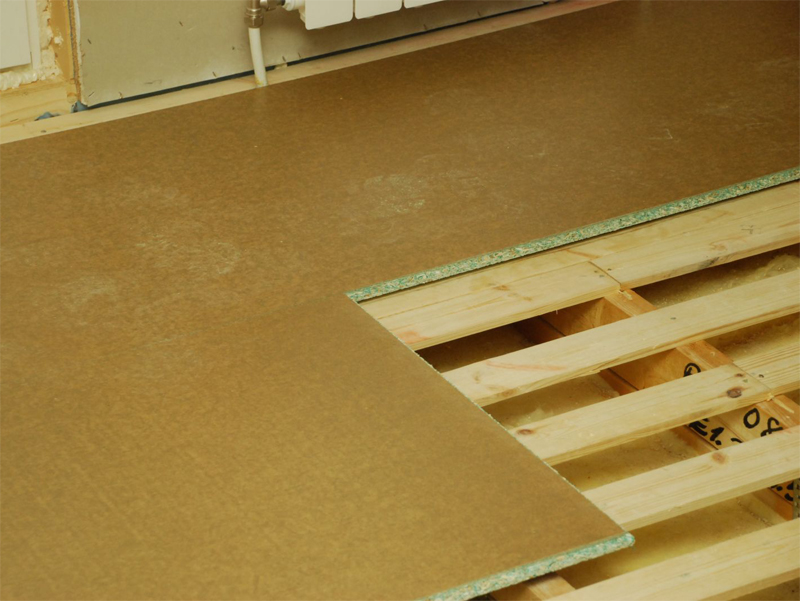
If there are no large height differences on the floors, the leveling sheets are laid directly on the boards. Plywood is sawn into blanks. Their number is taken so that after laying the material, the number of joints is minimal. When drawing up the cutting plan, the required damping clearances should be taken into account. Between the walls of the room and the plywood sheets, their size is 9–10 mm, between the individual blanks - 3–4 mm. These gaps are mandatory. They prevent plywood flooring from swelling due to fluctuations in temperature and humidity in the home.
The leveling material is cut with an electric jigsaw. If, after cutting, there are delaminations at the ends of the blanks, they must be well sanded. Experts advise cutting plywood into 60x60 or 50x50 cm squares.
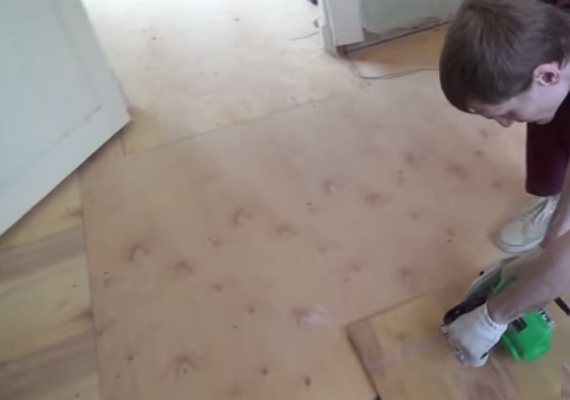
The cut blanks are numbered. The wooden flooring is lined with squares. Each of them is assigned its own number. After that, it will not be difficult to properly lay the plywood with your own hands. The work is carried out according to the following scheme.
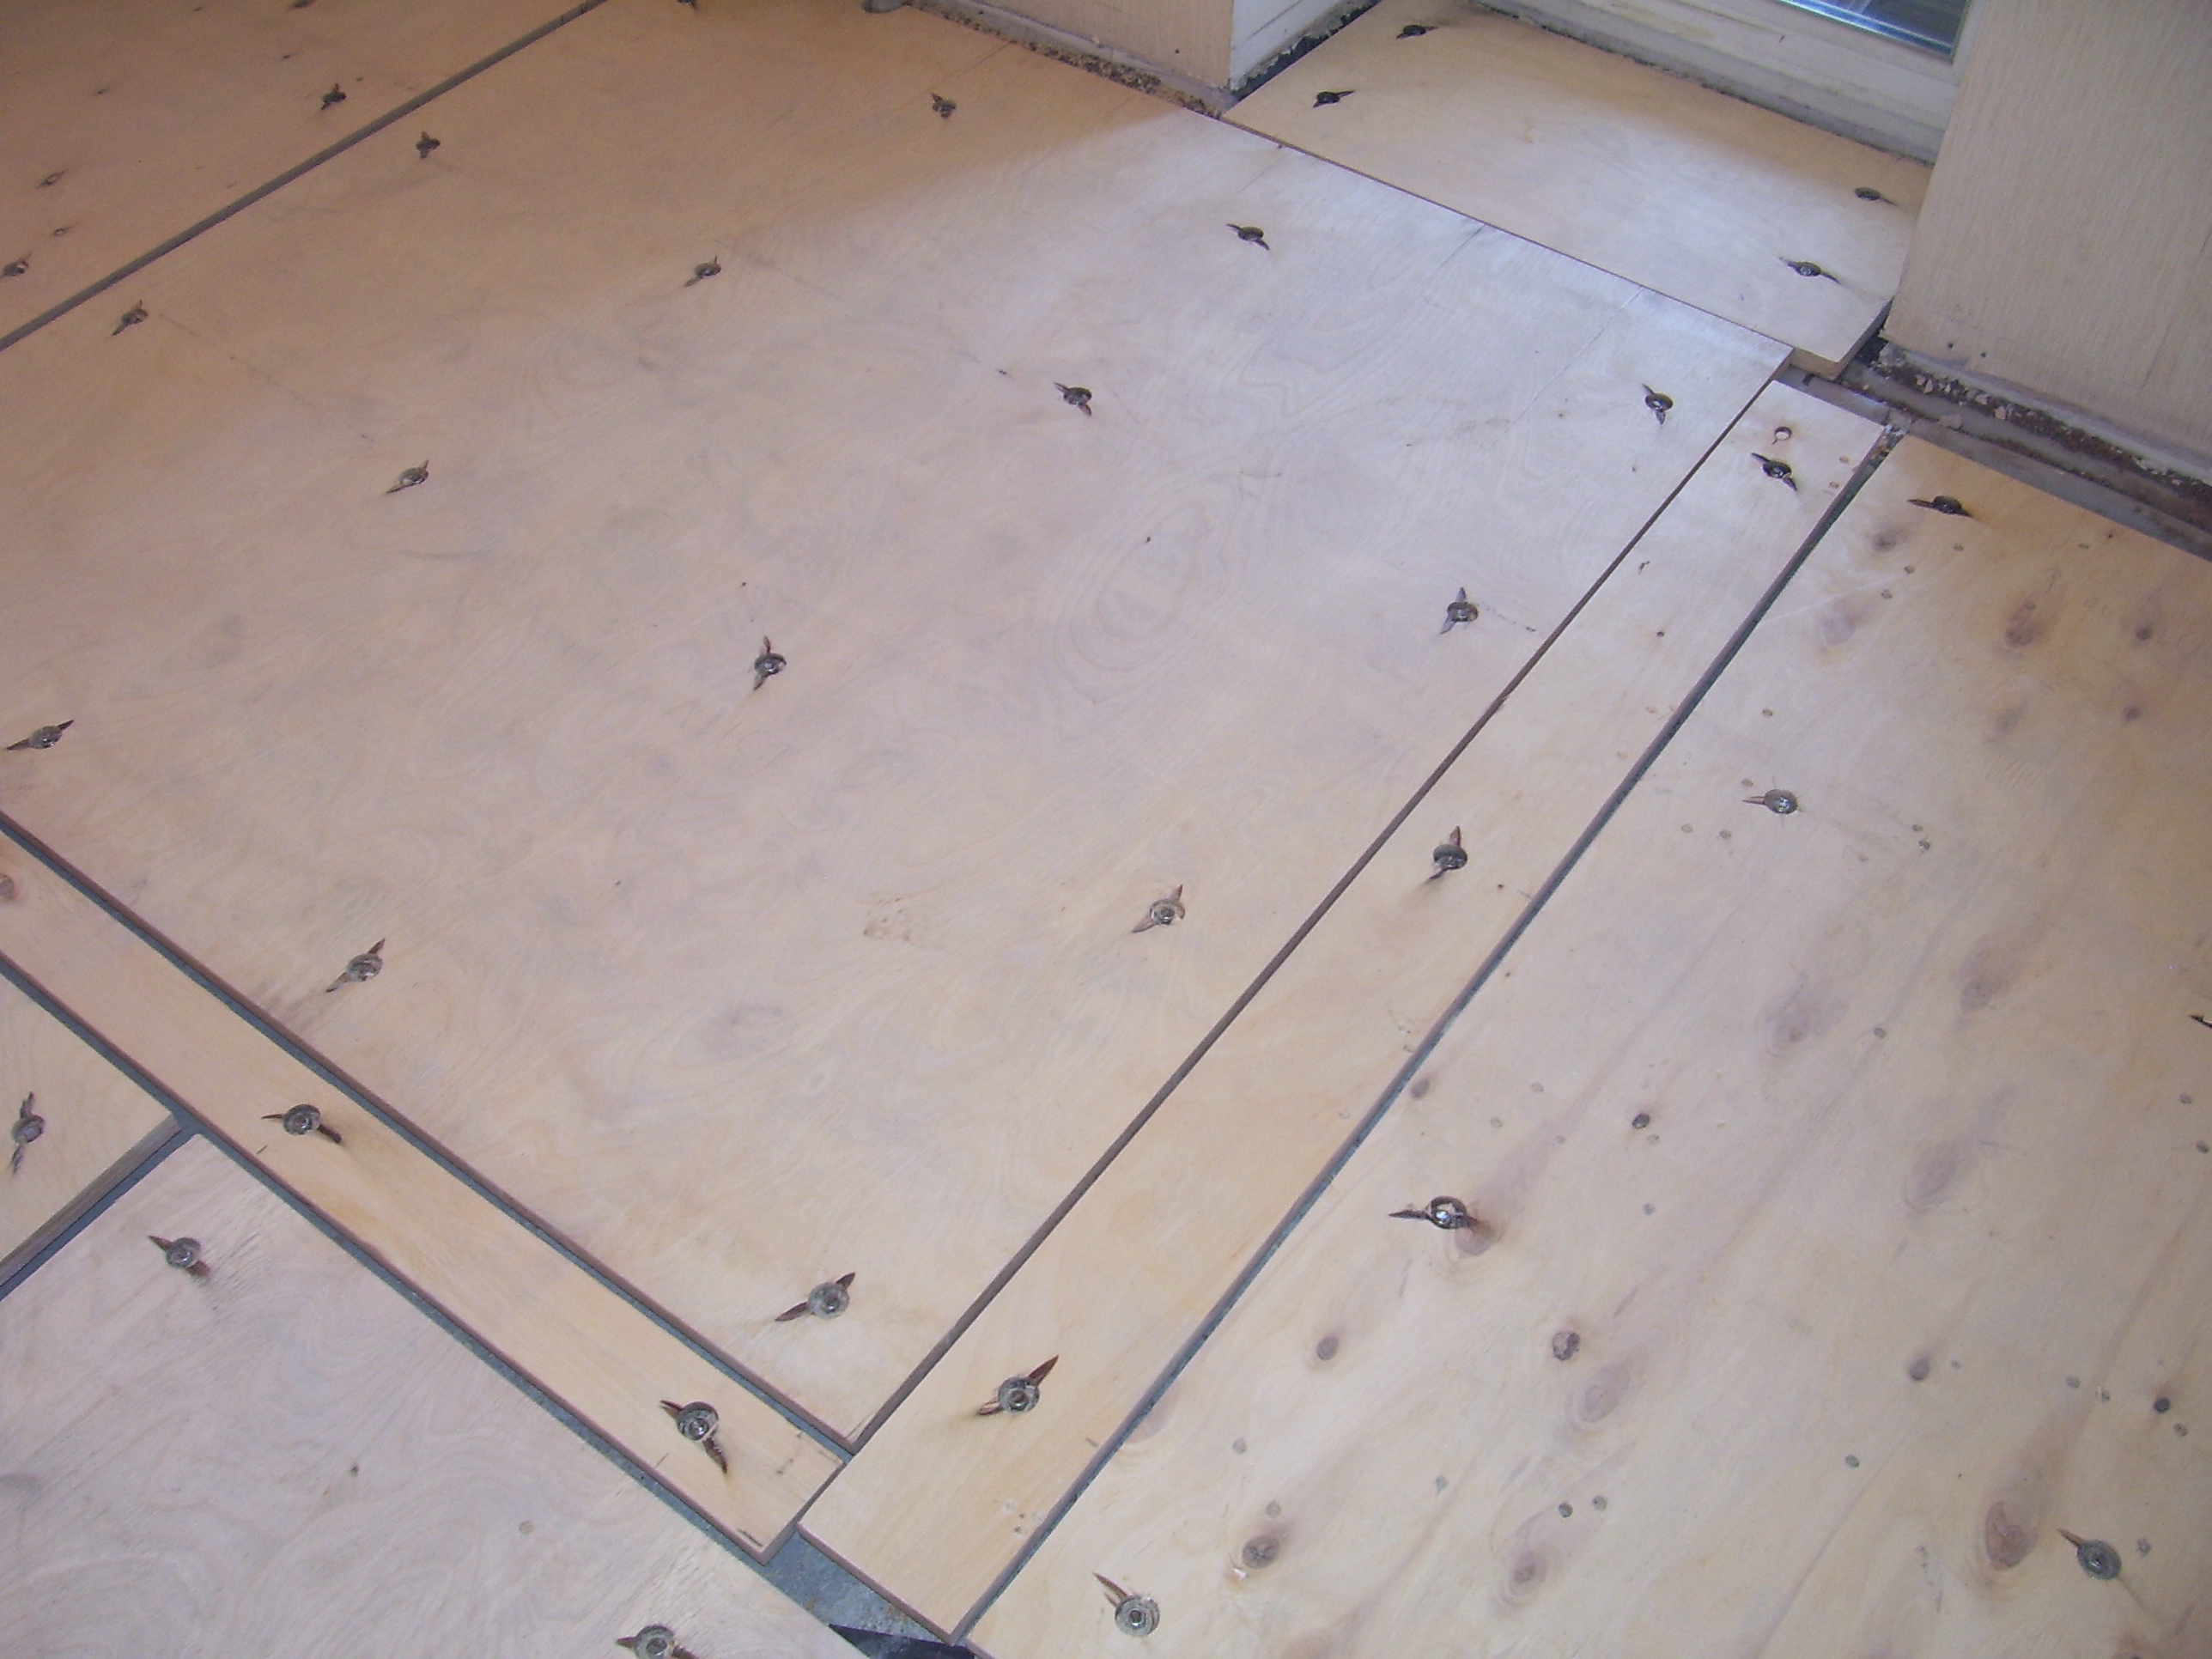
The substrate is laid on the flooring in strips. The joints between its individual parts are fixed with tape. Holes for self-tapping screws are drilled in plywood blanks. Sheets are mounted on the floor. Laying begins with ledges, catwalks, niches. Then the squares for alignment are set from the middle of the room to its edges with a shift of the workpieces relative to each other.
Sheets are fastened with self-tapping screws. The latter's hats are recessed. The finished plywood structure is cycled (if necessary). The floor is ready for the installation of the final floor covering (not only linoleum, but also laminate or parquet boards).
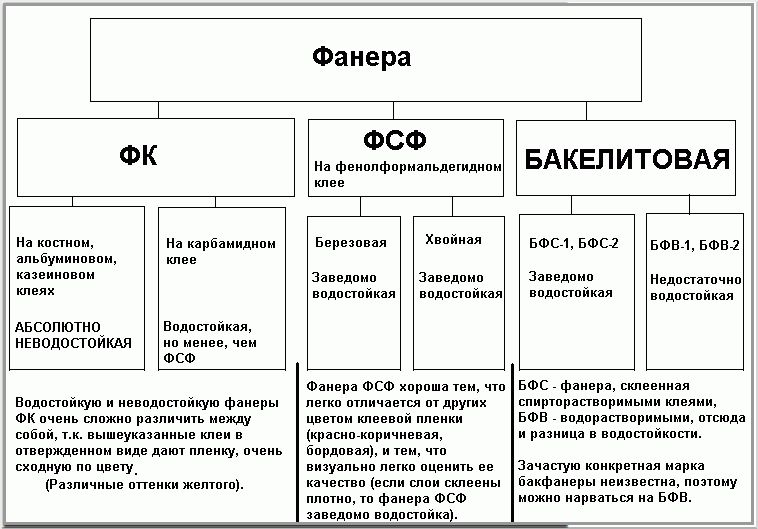
Plywood grades for moisture resistance and impregnation
-
FSF brand. Has the highest moisture resistance, can be in direct contact with water for a long time. But for housing construction it is rarely used due to unsatisfactory environmental performance. The reason is that the manufacturing process involves the use of very toxic formaldehyde-based adhesives. Such plywood is often used for reusable formwork during the manufacture of cast concrete structures, including foundations. It is often used during the construction of roofs, wall cladding of garages, outbuildings and other non-residential premises.
-
FBA brand. For universal purposes, sanitary state organizations do not put forward any restrictions on the use. It is used as a base for many types of floor coverings. In terms of moisture resistance, it occupies an average position. Albuminocasein glue was used to glue the veneer.
-
BS brand. A high-quality product takes first place in all physical indicators. Impregnated with bakelite glue. It has ultra-high strength indicators, flexible and elastic, does not bend, does not get wet, does not change its dimensions. Unfortunately, too high a cost does not allow the use of such plywood for construction purposes, it is used only in the ship and aircraft industries.
-
FC brand. The most natural product, but moisture resistance indicators limit the scope of use. It is used mainly in the furniture industry, in construction for the construction of various structures that exclude prolonged contact with water.Another area of use is the design of various architectural structures in rooms with very high safety requirements. During the manufacture, urea glue was used.
FK plywood can also be used under the floors in bedrooms and children's rooms, in all other rooms it is recommended to make a base for a laminate of FBA plywood. It is strictly forbidden to use BV plywood under the base of the laminate floor. For gluing, it is impregnated with water-soluble bakelite glue. If its strength indicators do not differ from the above-described brands, then it is not water resistant. At high humidity values, bakelite glue loses its bonding capabilities, the plywood sheet creeps into separate veneers.

Bakelite plywood
As for the quality and grade, there are no restrictions on these parameters, you can buy the cheapest materials. If there are minor chips at the edges, and there are knots on the veneer, including rotten ones, this does not mean at all that the base will not withstand the load on the laminate floor. Physical indicators of strength due to such flaws decrease slightly.

Plywood grade
Consider two options for laying plywood under a laminate: on a concrete screed and a rough floor or logs.
moisture resistant plywood
Step-by-step guide to stacking sheets
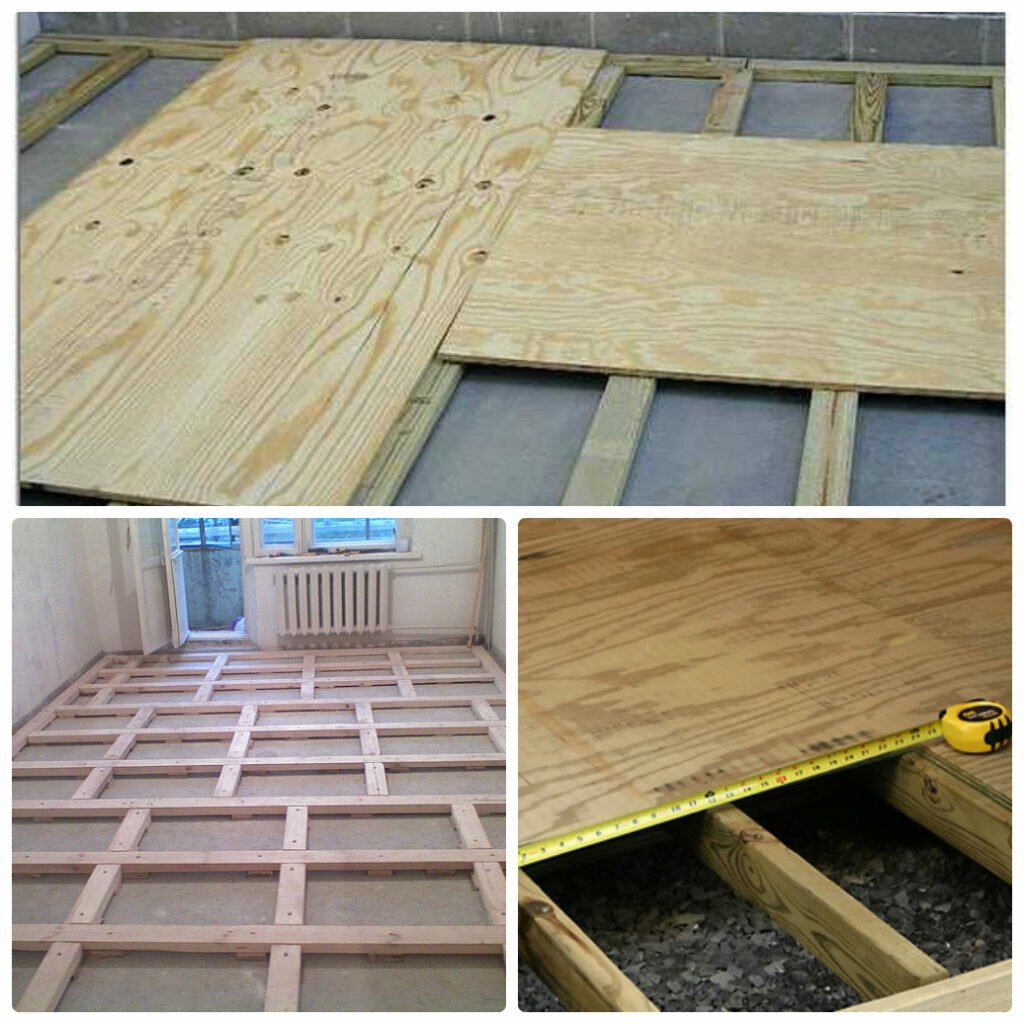
It is quite possible to lay plywood under concrete on your own. The work involves several main stages, each of which affects the final quality of the coating.
What nuances you need to remember before you start laying plywood on concrete:
- The wood should be allowed to rest in the room for a couple of days before starting work. The humidity level in the room should not be higher than 18%, if higher, the sheets are simply deformed and become unusable.
- When the wood is already matured, it is treated with special impregnations that increase fire resistance, protect against insects, microorganisms, etc. It is not worth neglecting this stage, since the service life of the flooring depends on it.
- If plywood is laid in 2 layers, then the second must be placed with an offset relative to the first.
- In the case of fixing sheets to logs, choose black self-tapping screws for wood, the length of which should correspond to the thickness of the sheet (but not less than 35 millimeters). Nails are not used, as such fasteners loosen over time, making the floor squeak disgustingly.
- It is imperative to remember about the gap between the plywood sheets and the wall, since wood can change size over time under the influence of the microclimate.
- If you plan to lay parquet, laminate, linoleum on top of plywood, then the use of a substrate is mandatory.

Checking the moisture content of the concrete base
It is impossible to lay plywood on a damp floor, as it will quickly deform and become unusable. It is better to check with special devices, but if they are not there, plastic wrap and a few weights are enough.
How to check the moisture content of the floor with your own hands:
- Spread plastic wrap on the floor.
- Press down the edges of the film with a load, leaving the center free. Leave for a few days, but a week is better.
- After the specified time, check the condition of the film - if there is condensed moisture under it, it is better to stay away from the plywood flooring and first lay the waterproofing or wait for the screed to completely dry, changes in the humidity in the room.
Cleaning the base
All irregularities must be sanded with a grinder with a suitable attachment or with a special machine. Then the remnants of the old mixtures are removed, all the grooves are closed (if any). Cracks and other similar defects are removed using a cement-sand mortar or special mixtures.
The surface must be thoroughly cleaned of dust, for which an industrial vacuum cleaner is used. If it is not there, an ordinary broom will do, but you need to clean it carefully and meticulously. It is forbidden to wet the broom with water, as this will moisten the screed and worsen the quality of the plywood layer.
Base primer
In this case, the masters are advised to choose primers as primers. They are applied with a paint roller, the substance demonstrates better properties in comparison with an ordinary primer - such as a high ability to dedust the surface, optimal penetration depth and increase the strength of the floor, the ability to enhance the adhesion of materials.
Laying plywood
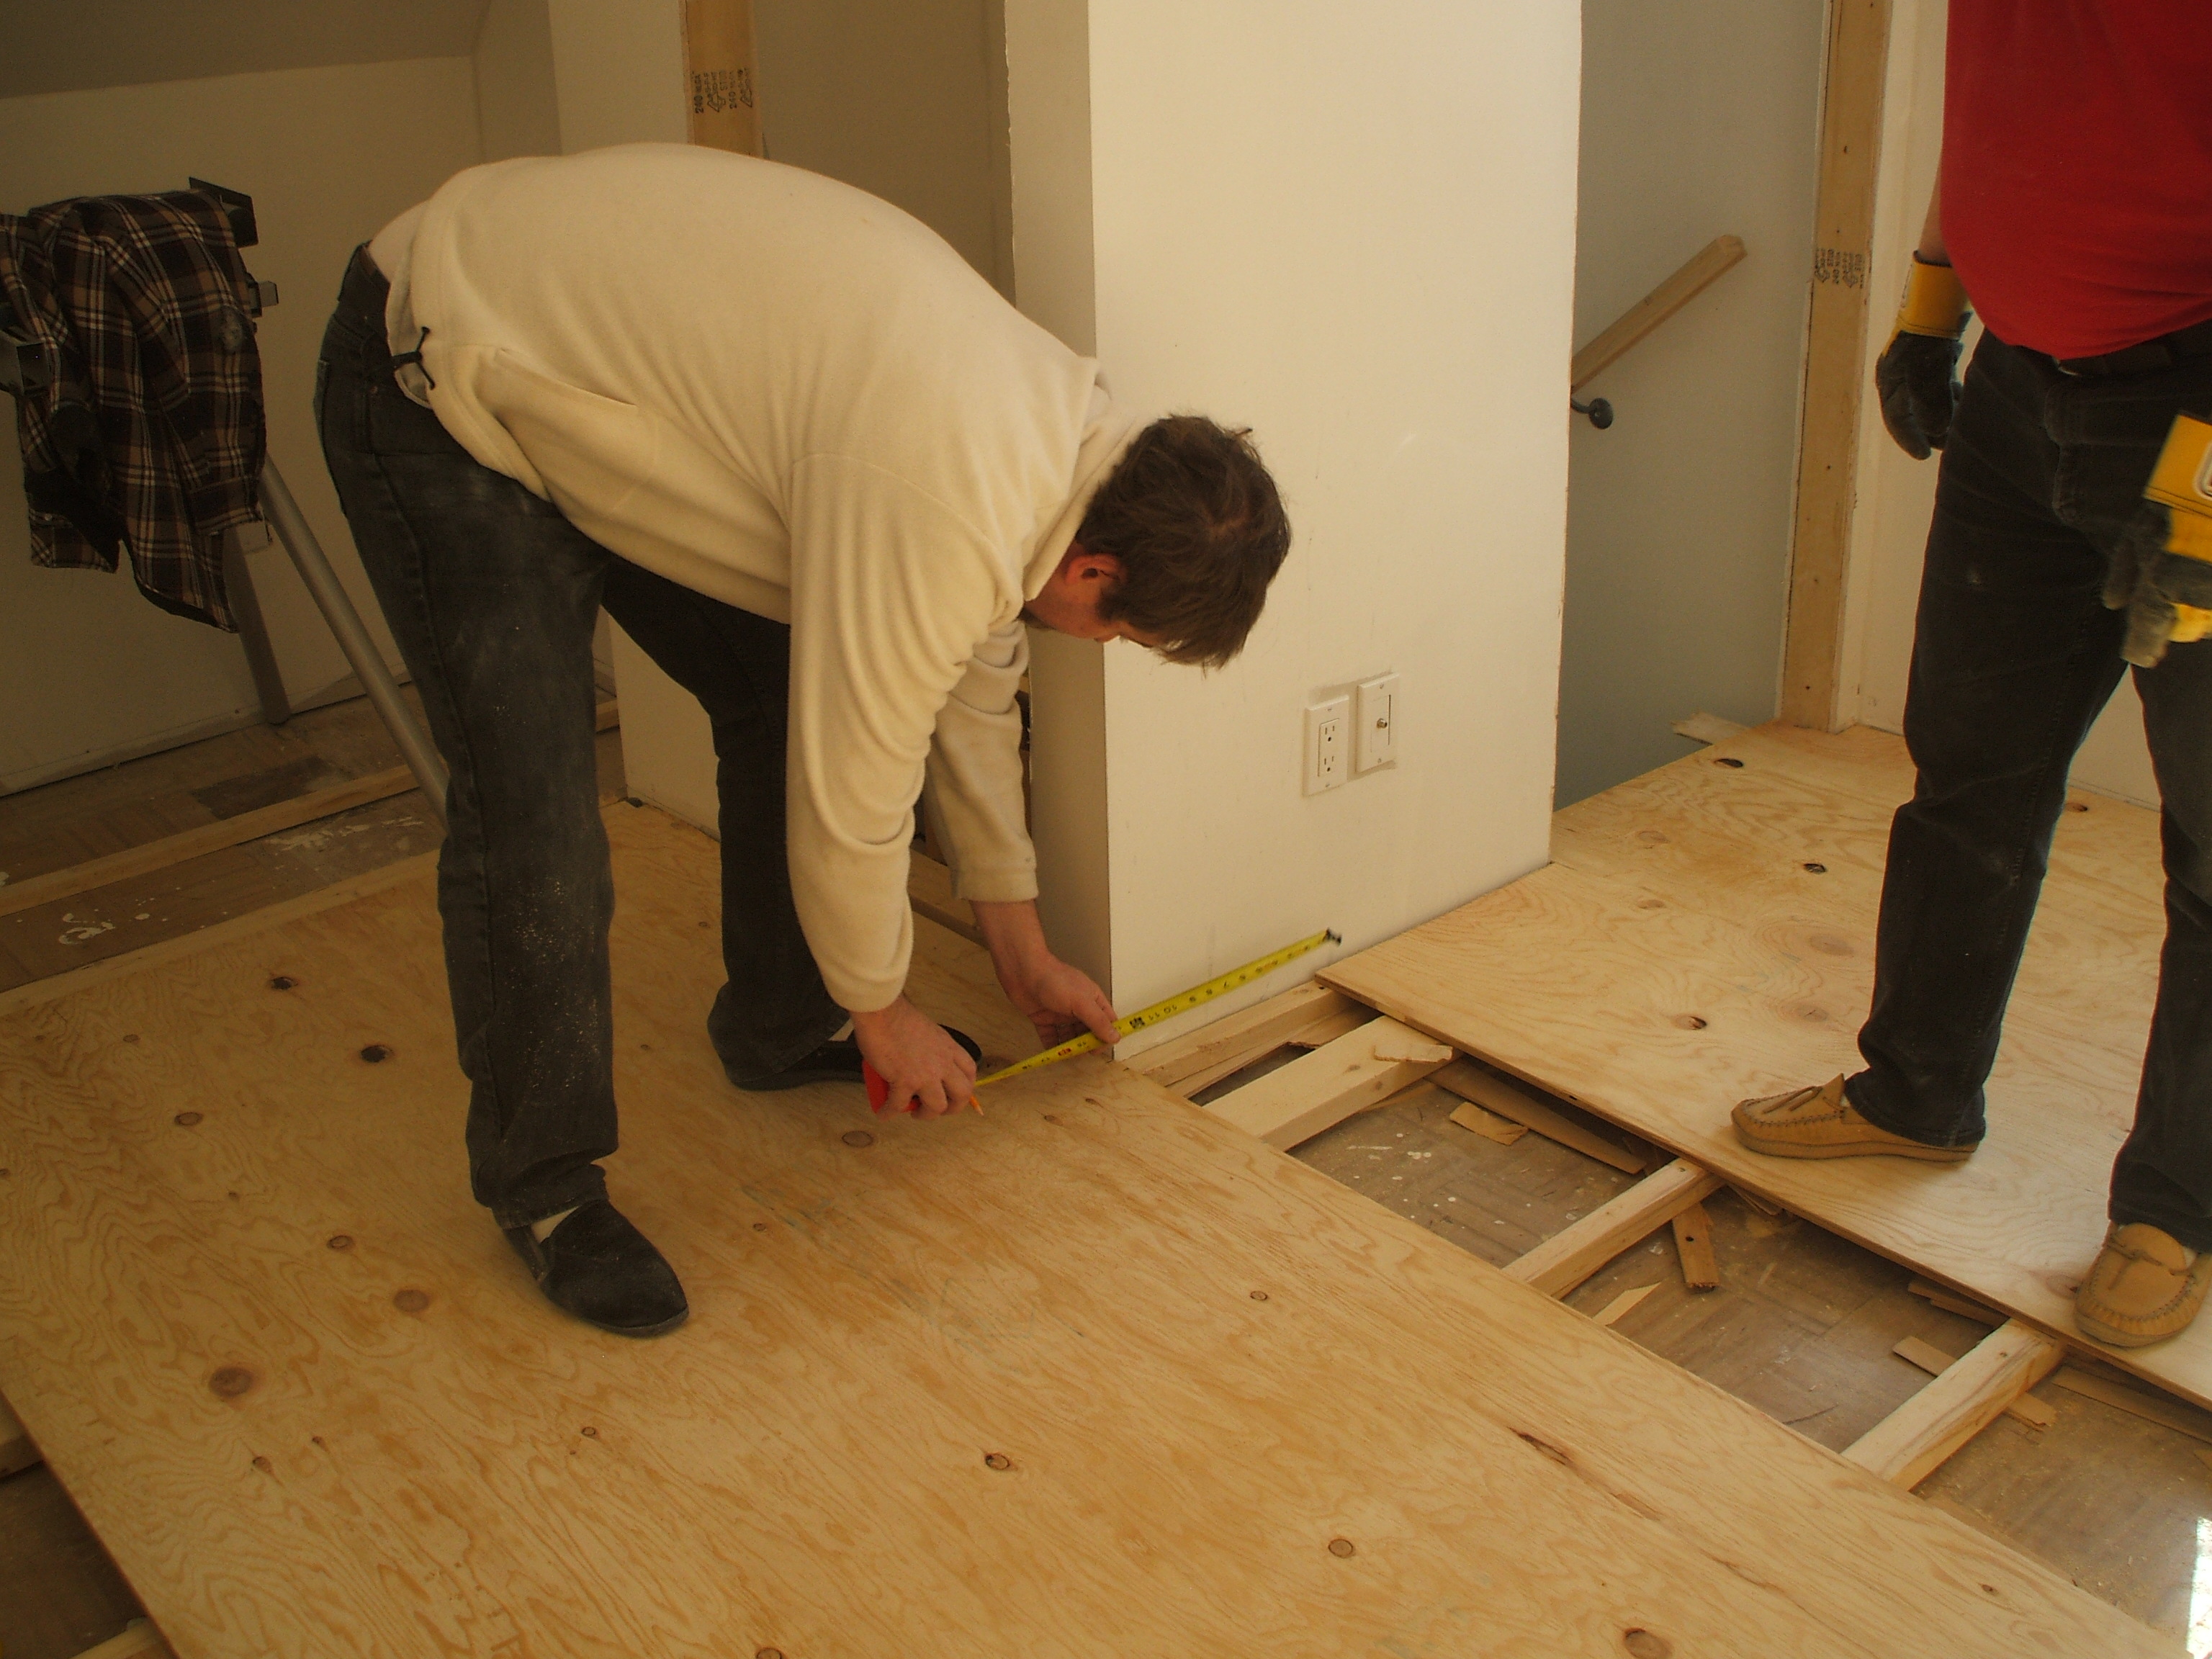
The sheets have been cut, the floor has been finished and ready for laying the plywood layer. It is also worthwhile to find a diagram with numbered sheets and lay it out on it.
Sequence of plywood laying works:
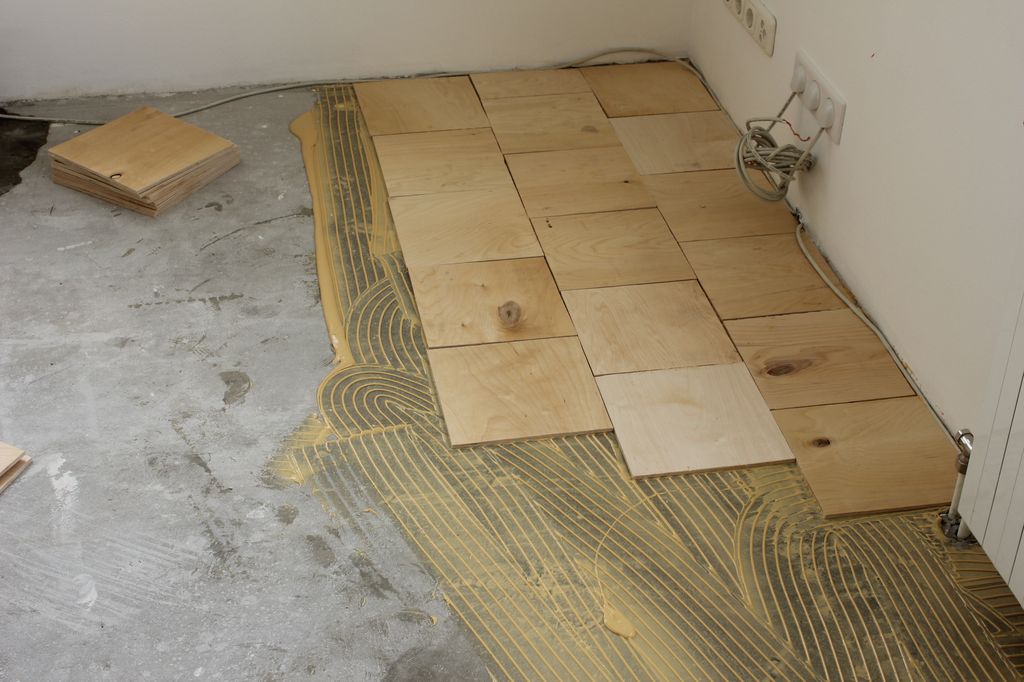
- The concrete floor is covered with a 2 mm layer of adhesive. It is advisable to apply consistently to not too large areas so that the glue does not have time to dry before laying out the layers.
- Plywood is placed on the base according to the scheme.
- All sheets are additionally fixed with self-tapping screws along the diagonal and perimeter. It is advisable to screw the fasteners in 15-20 centimeters increments, retreating from the edge no more than 2 centimeters. The fasteners should be 3 times the thickness of the plywood sheets in length (40 mm self-tapping screws are suitable for 12 mm plywood).
- The laid plywood is processed using a sander with an attachment or ordinary sandpaper. During grinding, it is possible to remove the discrepancies in the height of sheets in the neighborhood and burrs, other small defects.
Checking work
After the entire surface is covered with plywood sheets, you need to visually inspect the layer
It is important to make sure that the sheets are not in contact with the walls, there are gaps between the individual squares. There should be no obvious differences in height on the surface - a maximum of 2 millimeters, no more
Then they gently knock on the surface with a wooden block and when an inhomogeneous thud appears, it is advisable to redo the work, since it indicates the separation of plywood from the concrete floor.


Laying plywood on a concrete floor is a relatively simple and feasible task, which you can do with your own hands without any special knowledge, tools, or devices. The main thing is to choose the right material from the beginning and follow the technology exactly.
Successful examples and options
In this case, the flooring was made on the old wooden floor in compliance with the horizontal position, the sections of the threaded rod, covered with PVC corrugated tube, were used.
The floor is laid with plywood evenly, the seams between the sheets are treated with sealant and putty.
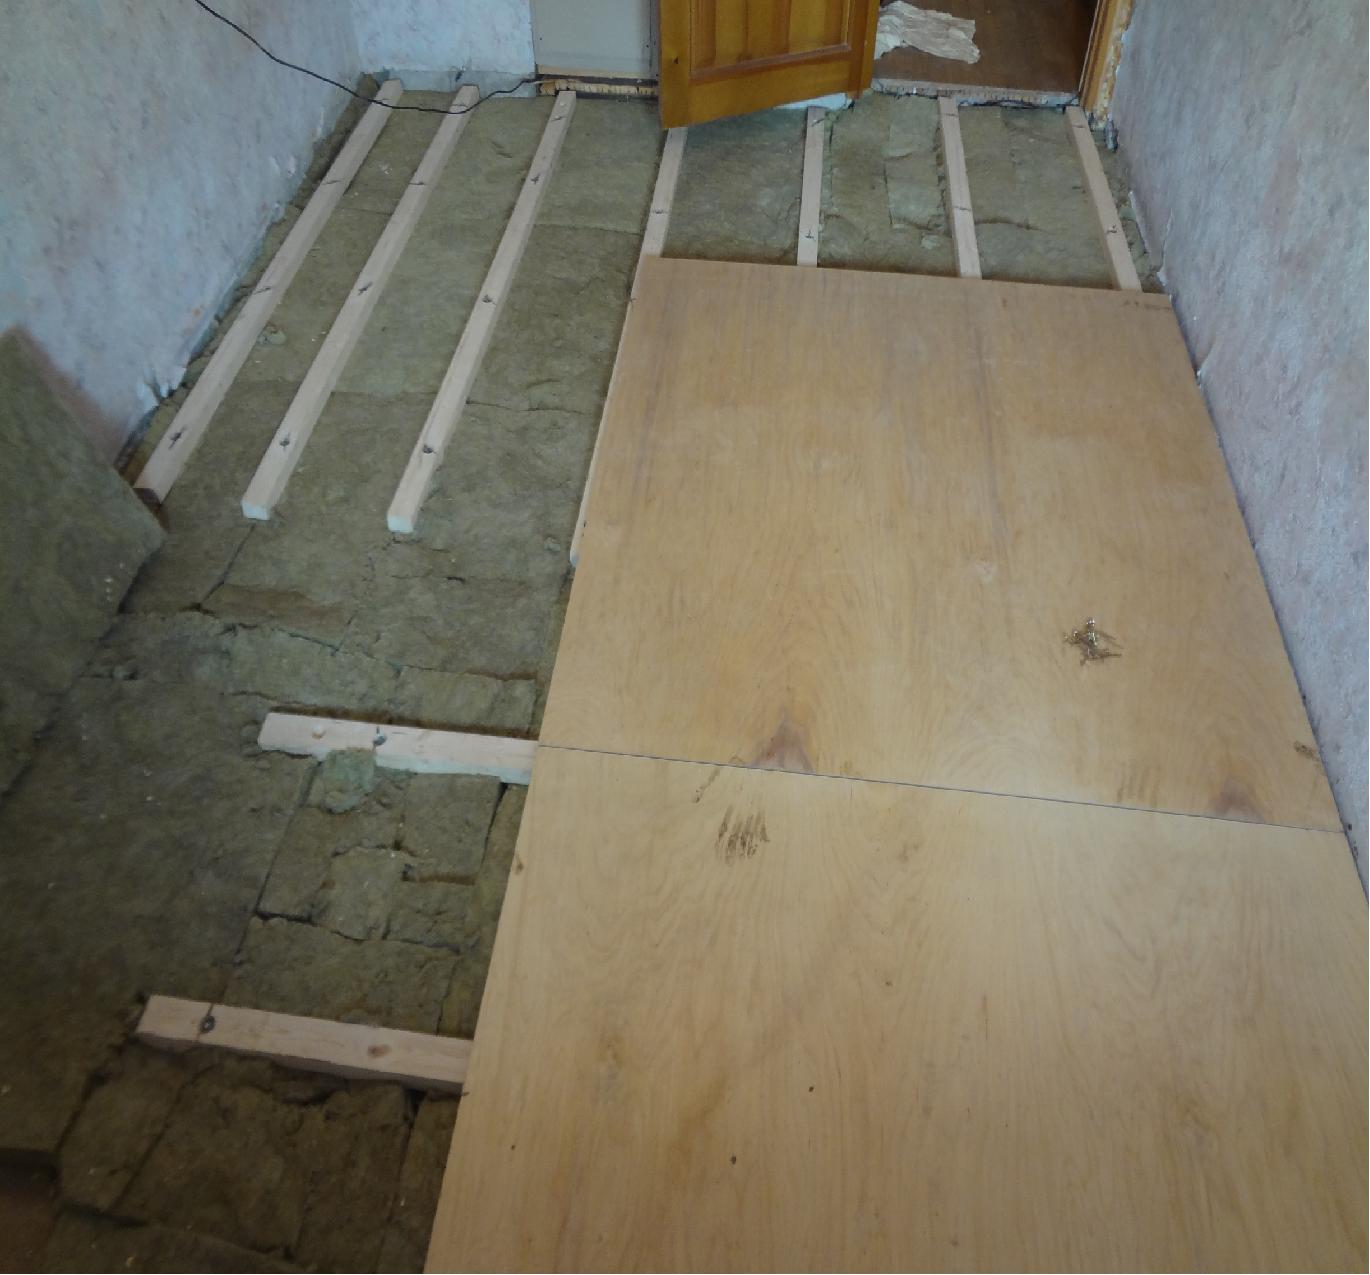
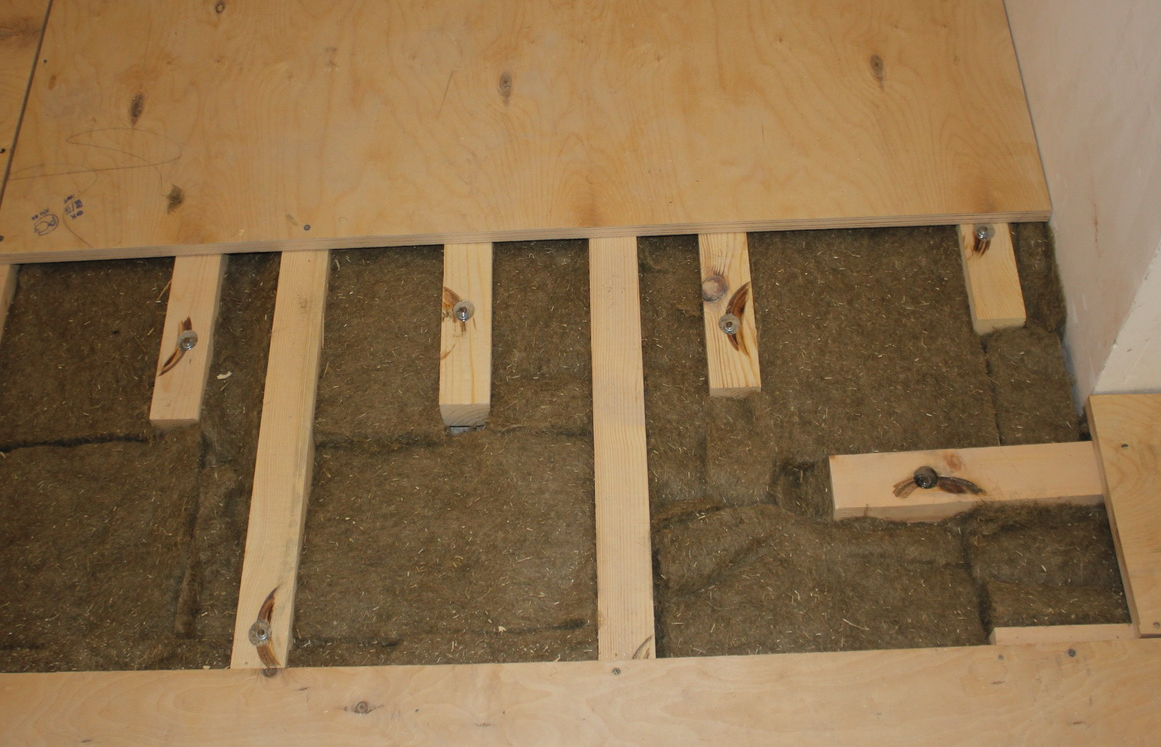
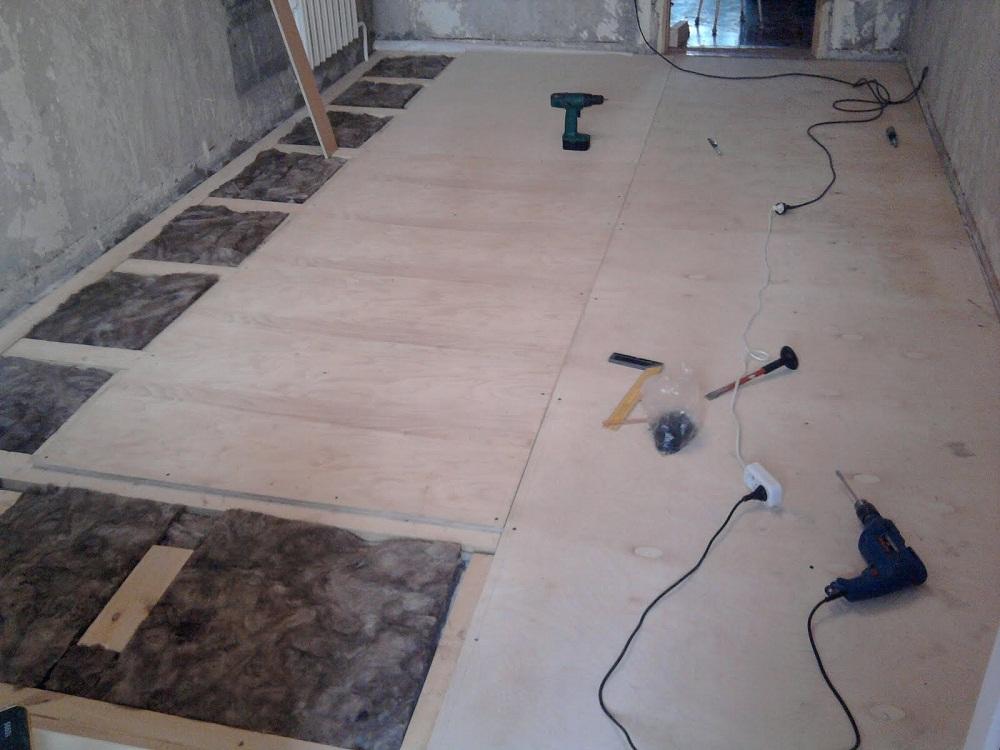
Installation on logs is made in solid sheets with a minimum of cuts, compensation gaps between the sheets are taken into account. Mineral wool is laid between the logs as insulation and sound insulator.
Preparations are being made for the flooring along the logs, the concrete floor is leveled, and a polyethylene film is laid for waterproofing.
The case when the recommended clearance from the wall is allowed to be neglected - a narrow section of the floor covered with logs. For metal elements protruding along the edges, cuts are made with a minimum loss of bearing capacity. Fastening with self-tapping screws. Mineral wool in the space between the lags.
For information on how you can level the floor with plywood, see the next video.
Plywood innovations
Plywood flooring - the construction machinery industry seems far from over. In the age of composites and nanotechnology, good old plywood does not recede and finds new applications.
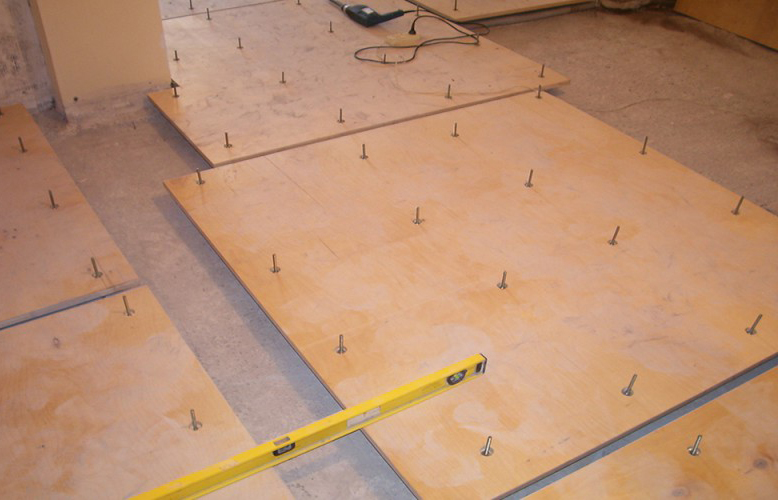
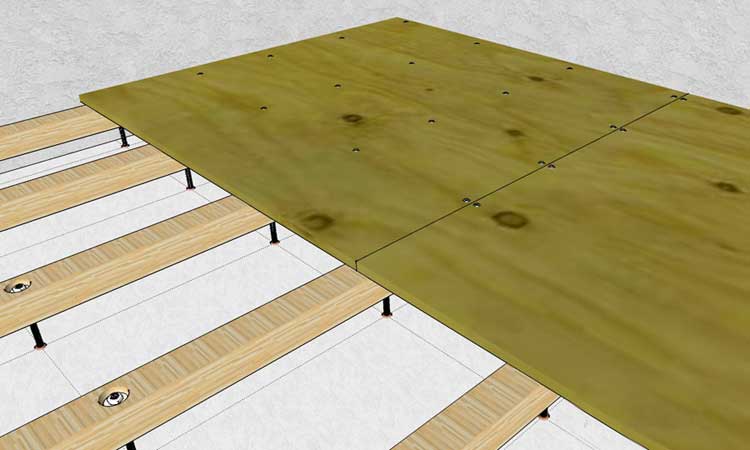
Adjustable floors
These floors are used as a base for wood inlays and other fine and exclusive work. Plywood flooring - double, made of high quality plywood. In the sheets of the lower layer there are threaded sockets for bolts. The bolts are shaped: above the thread there is a flat broadening in the form of a press washer, and above it there is a neck 3/4 of the thickness of the sheet for a hexagon or with a cross recess.
Plywood-based adjustable floors
The top sheet with holes for the necks of the bolts is laid on the bolts screwed into the bottom sheet, and adjusted with an open-end wrench or a screwdriver.When using bakelized plywood, the accuracy of the overall surface is quite mechanical.
Plywood parquet
But plywood flooring is an invention of craftsmen. The forgotten skill of artistic cutting out of plywood was revived at a new level in it. Plywood parquet technology is simple and accessible to anyone:
-
- The required amount of FC or improved plywood, preferably birch, but pine will also go, paint with stains in the right tones.
- The pattern is pre-modeled on a computer, then an application is made in full size or on a scale from cardboard using a printout and checked for the coherence of the details.
- With a manual circular saw or jigsaw with "clean cut" saws, the sheets are cut into the desired shapes; in the simplest case - squares, rectangles, stripes.
plywood parquet
- Lay out the pattern on the rough plywood floor on liquid nails with gluing the joints. The protruding drips are immediately removed with a cloth slightly moistened with solvent.
- The laid pattern is covered with acrylic varnish in two or three layers, each subsequent after the previous one has completely dried.
- What is the result of simple geometric shapes can be seen in the figure. Some aces of plywood craftsmanship, having rummaged through old books on art sawing, create compositions that cannot be seen in the mansions of oligarchs. For example - a portrait of his wife in the bedroom. In the living room - a bouquet of chrysanthemums, and in the nursery - Cheburashka, conducting the Pokemon Orchestra. By the way, the Japanese call Cheburashka a Russian Pokemon and consider it the progenitor of their own.
Outcome
Plywood is suitable for use in suitable premises - warm and dry. But there, with skillful hands, you can work wonders from it: plywood is suitable not only for rough floors or wall cladding, but also as a material for decorative interior compositions.
Plywood base
Leveling the floor with plywood is a widespread construction technique. It is used both for laying new floors and for express repairs of existing ones. Different plywood installation techniques are used for different combinations of base floors and decorative topcoats.
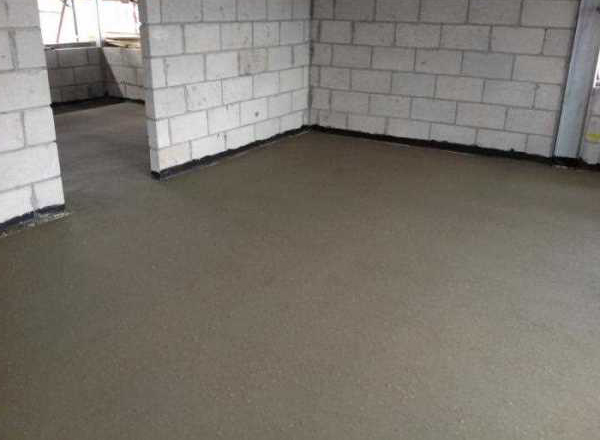
On concrete
Laying plywood on a concrete floor is possible either directly along the screed or on the joists. The first method is used if the base floor is sufficiently even, and the topcoat is somewhat plastic; for example - under the linoleum or cork floor. Marmoleum can be installed directly on the screed without a subfloor.
On a flat dry screed
The room is thoroughly swept and vacuumed. The floor is treated with bituminous varnish or parquet mastic, diluted five times with solvent or kerosene (priming). When working, they open the windows wide open, work in a petal respirator, and in the apartment completely, after unscrewing the plugs or turning off the machine on the floor panel, they remove the power supply: there is no need to explain what a spark is in air saturated with organic solvent vapors.
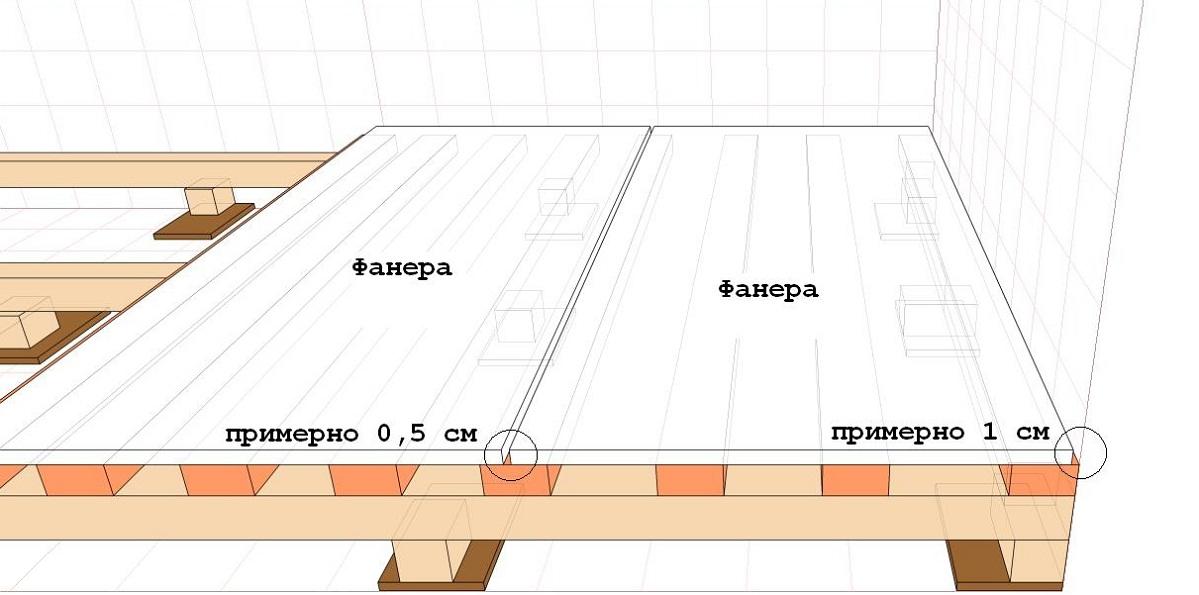
Plywood 8-18 mm is pre-cut into squares into a quarter of a standard sheet (1250x1250 mm) or strips. They are laid apart, i.e. with a shift: there should not be four seams converging at one point. The sheets are cut with a jigsaw or a hand-held circular electric saw - this can be done in the next room an hour after priming. When cutting, it must be borne in mind that a gap of 20-30 mm should remain around the perimeter of the room.
Then the plywood sheets are laid out on the floor, "on dry", adjusted and numbered without fastening. How can plywood be attached to the base floor in this case? For linoleum or cork, you can simply use glue such as bustilate or parquet mastic, without mounting slots - you get a floating subfloor. In this case, the ends of the sheets also need to be glued.
Under ordinary oak or parquet flooring similar to it in properties, plywood, along with gluing, is fixed with self-tapping screws 4-5x60 mm in dowels. In this case, sheets / strips must be laid out with mounting slots of 2-3 mm; for this it is convenient to use halves of toothpicks:
- Drill holes in 3/4 of the diameter of the self-tapping screw through the plywood sheet. Drill with an "envelope": in the corners, in the middle of the sides and in the center. The row of center holes of the strip are drilled with an offset of half a step along the long side, i.e. 1/4 of the bandwidth. Drill with a solid carbide drill - the usual one will quickly become dull, "striking" on the concrete.
- The sheet / strip is removed, blind holes are drilled in the concrete for the dowels according to the marks from the previous drill and the dowels are driven into them.
- Glue is applied to the underside of a sheet / strip of plywood with a glue spatula, the plywood is placed in place, and the screws are driven with a screwdriver or drill with an insert for a cross slot until the head is recessed into the plywood.
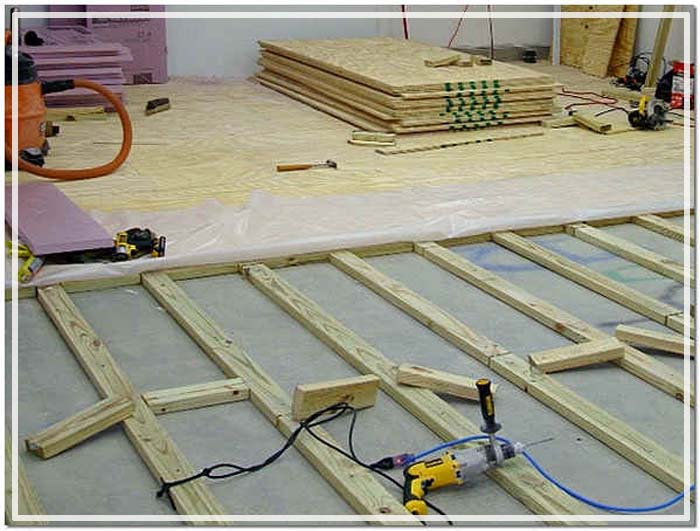
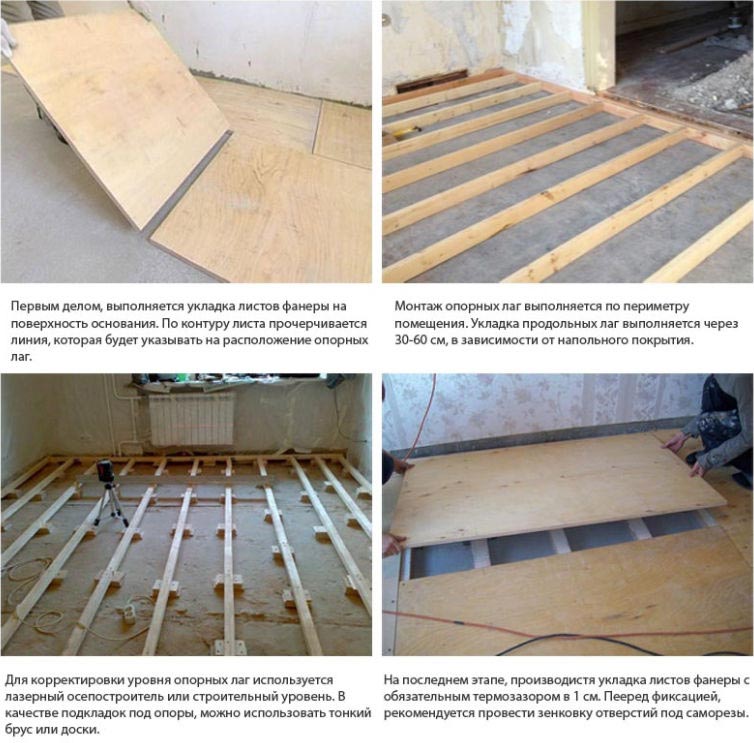
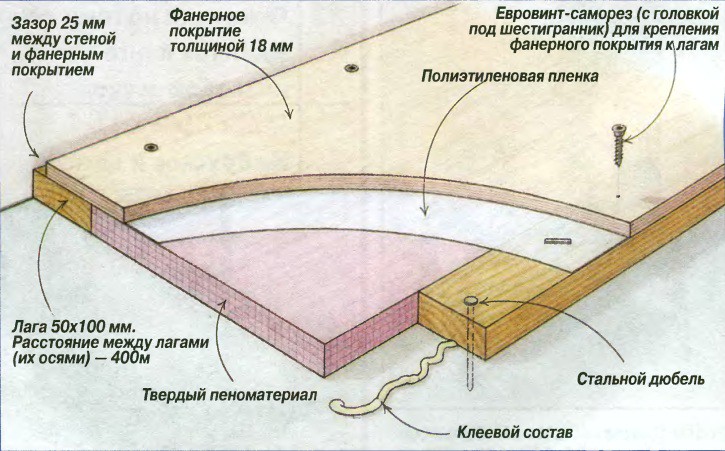
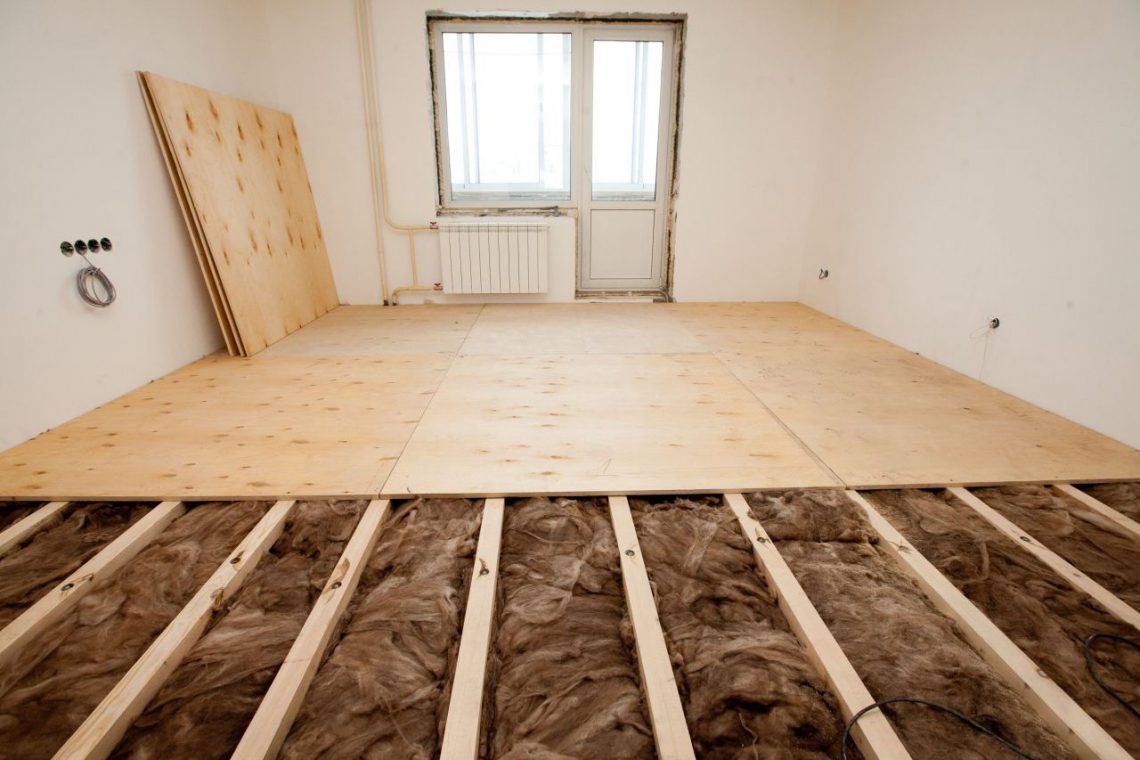
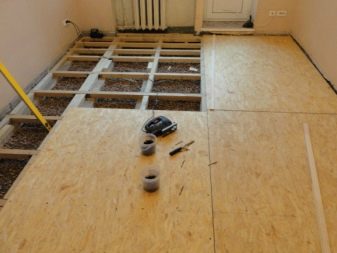
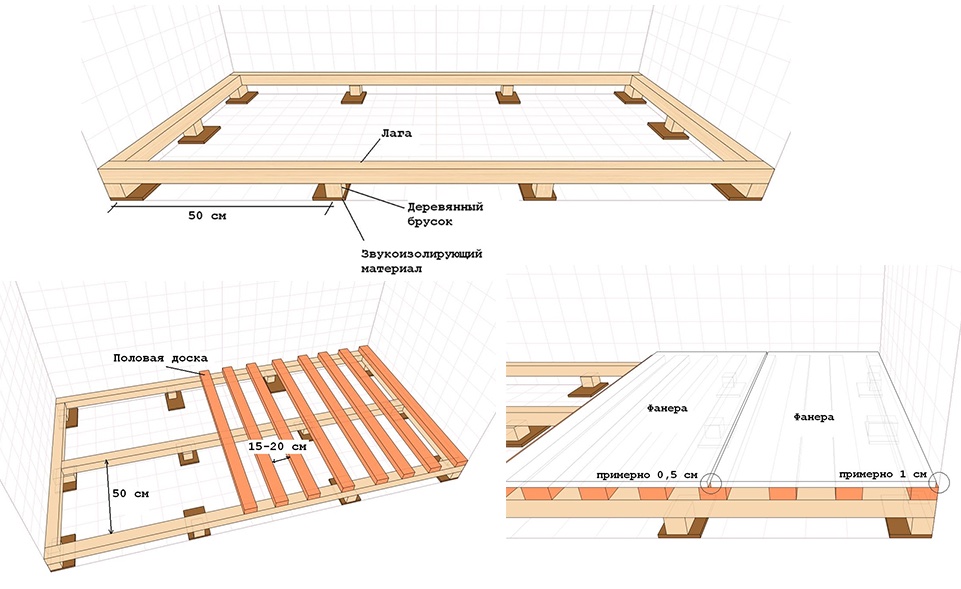
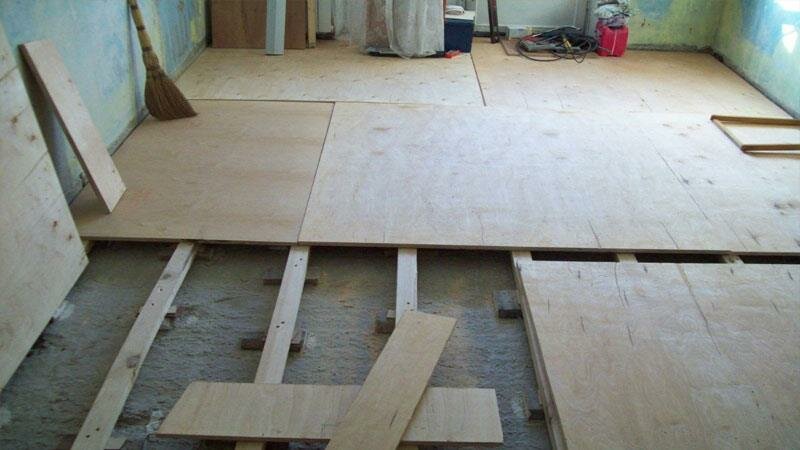
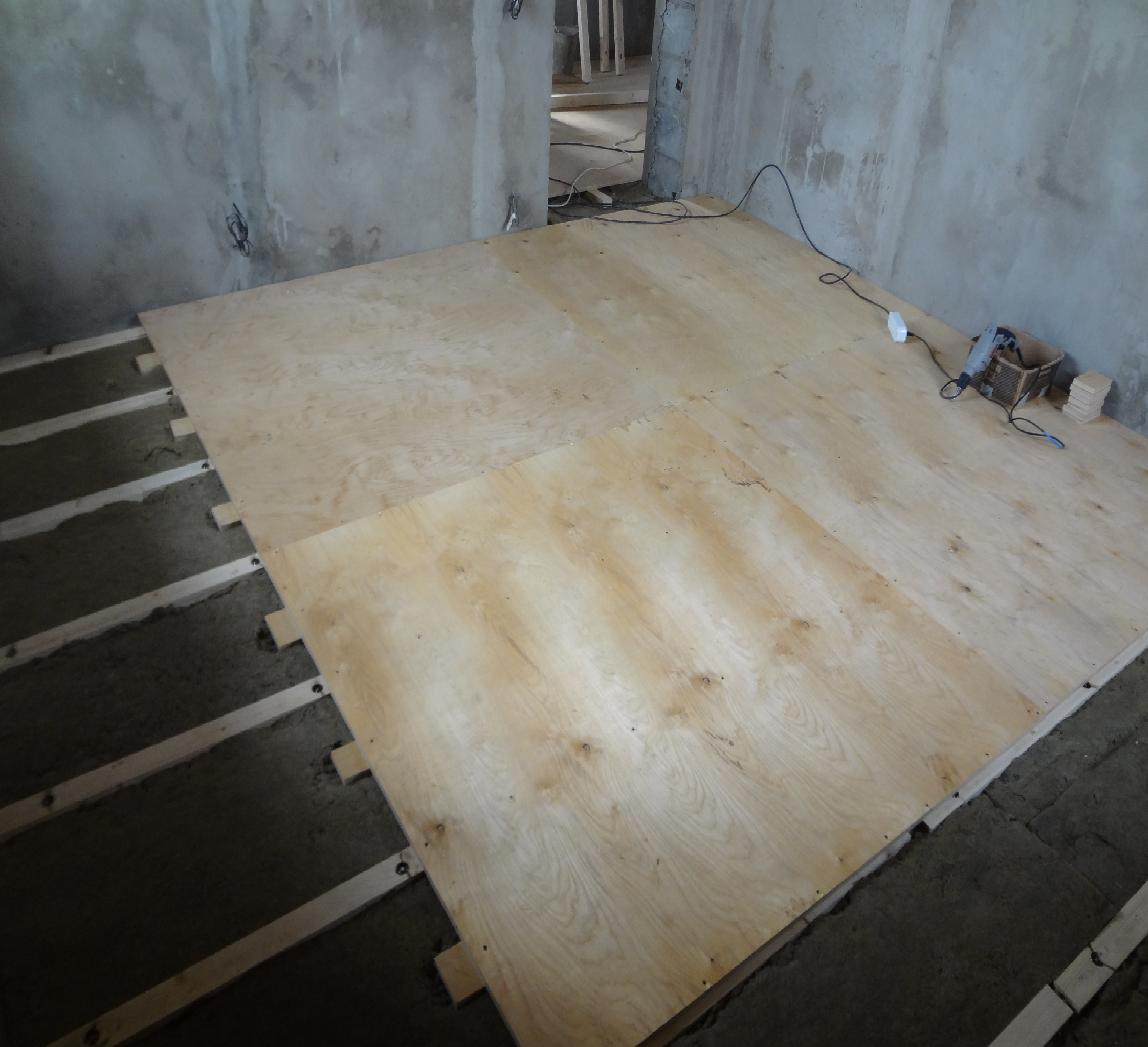
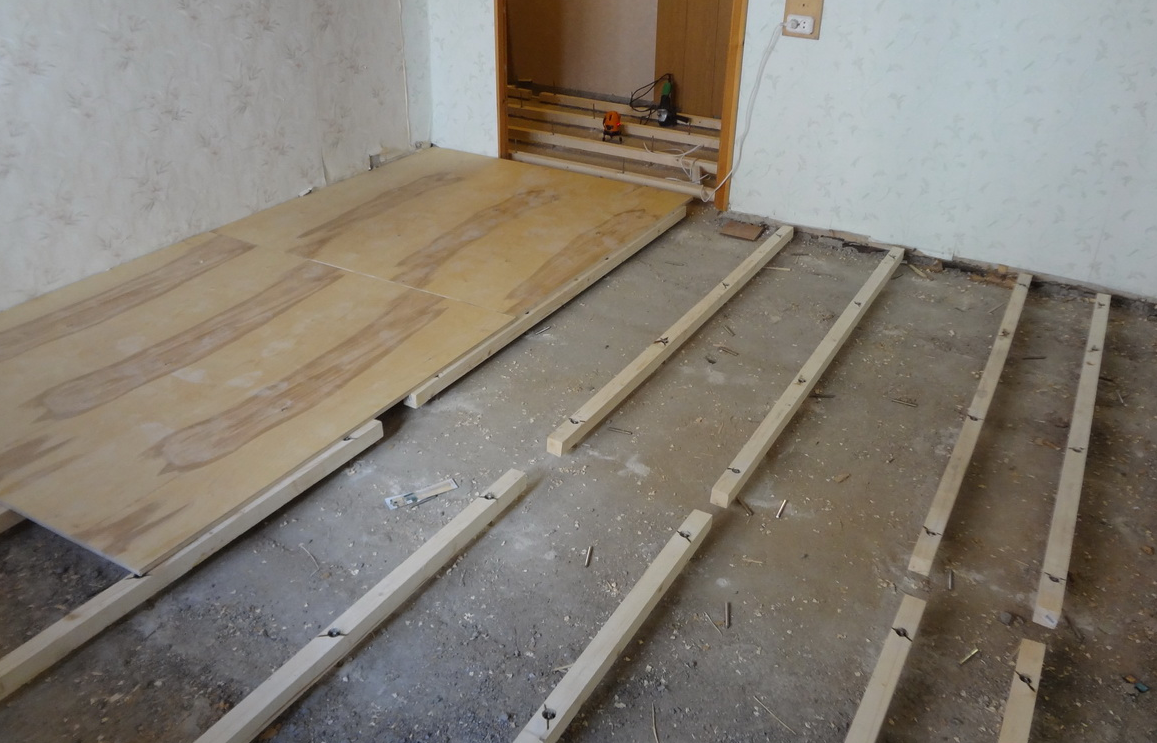
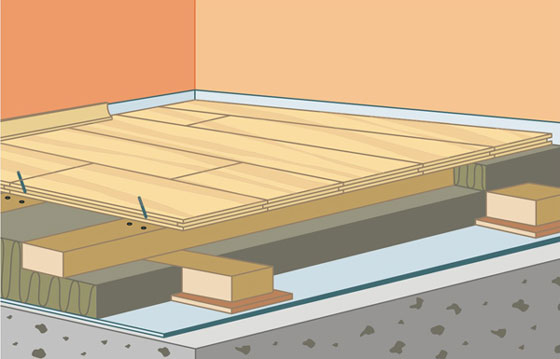
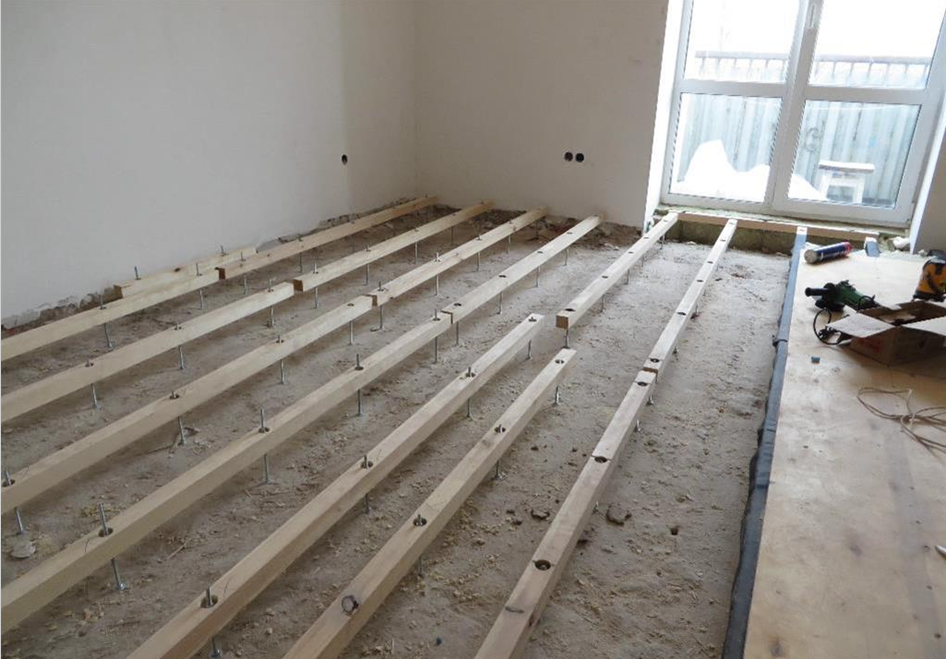
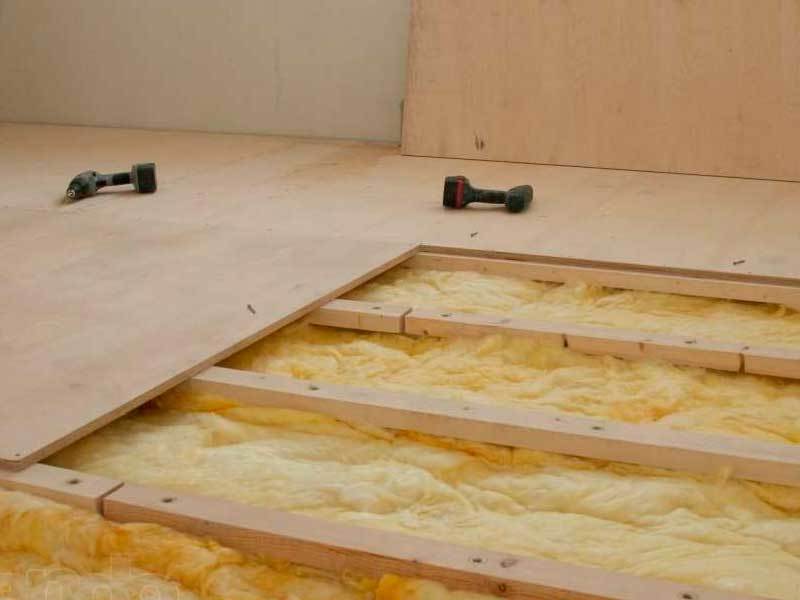
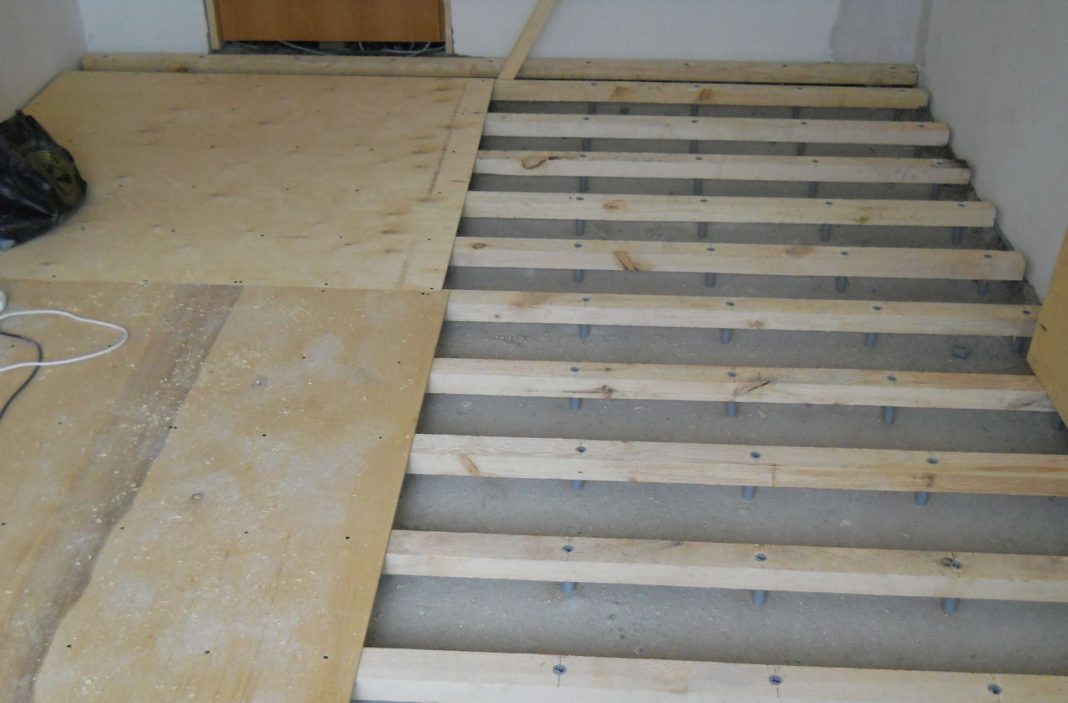
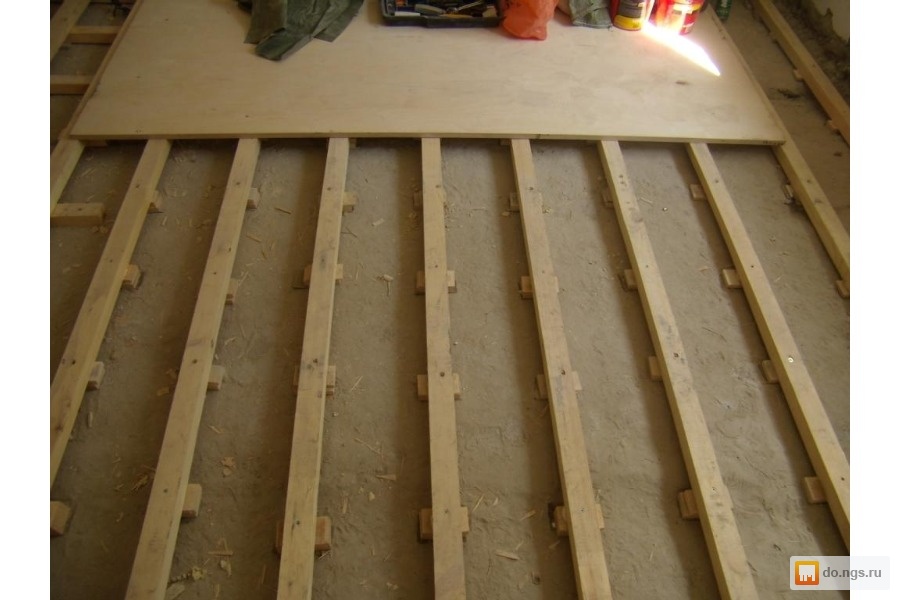
On concrete on logs
Under the laminate, inlaid parquet or parquet made of fine wood, plywood is laid on a concrete base on a crate made of wooden logs. The same is done if the stability of the temperature and humidity conditions in the room is in doubt. The device of the rough plywood floor on the logs is clear from the figure, we will give only the necessary explanations:
- Boards for logs take non-planed 100 mm ("weaving").
- Lag boards are kept for at least a week in the room where they will be used, after which they are rejected: those that have warped in an arc are allowed to go to the bosses, and those that have driven the screw are completely discarded.
- Plywood is taken from FC or improved on its own, with a thickness of at least 12 mm; better - 18-20.
- The preparation of the base floor is done in the same way as in the previous case.
- The lathing of the logs is made with a step of 300-600 mm so that all the edges of the plywood sheets fall on the logs.
- The sections of the lathing are filled with polyurethane foam or other hydro- and heat-insulating material, but not with mineral wool - from it microscopic needles will inevitably appear in the air, irritating the respiratory system.
- Plywood sheets are laid with a mounting gap of 2-3 mm and a gap around the perimeter of the room of 20-30 mm.
- Fasten plywood to the logs with liquid nails glue and fix it with nails; fastening with self-tapping screws in this case does not noticeably improve the quality of the subfloor, but it is more expensive.
Laying plywood on logs
What kind of plywood is used for log flooring?
Multi-layer veneer panels include many variations, allowing you to choose the optimal solution for a specific situation.
View
Sheets are divided according to the type of glue used, which is responsible for the acquisition of certain properties by the material:
- FBA. Based on albumin-casein composition. This option refers to environmentally friendly, suitable for children's rooms and bedrooms. The slabs are characterized by low resistance to high humidity, therefore, careful waterproofing of the floors is necessary, which is especially important for the first floor of an apartment building.
- FC. For gluing such panels, urea solutions are used. The material has average moisture resistance, which allows plywood to be laid on logs in the living room, bedroom and hallway.
- FSF. It is made on the basis of phenol-formaldehyde resins. High parameters of resistance to humidity make the material an ideal solution for bathrooms, kitchens, attic rooms and closed loggias.
- FOB. Laminated coated FSF boards are suitable for all types of premises.
The rest of the varieties are special, they are expensive and are used only in special cases.
Variety
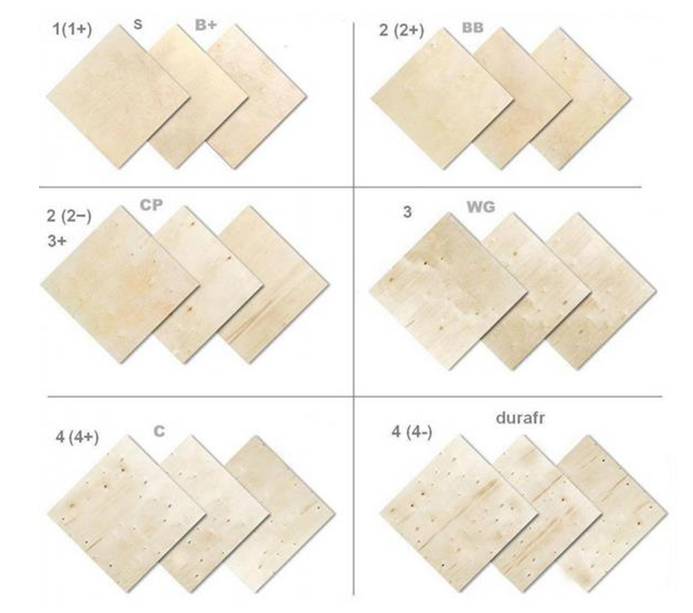
There are 5 categories of plywood quality. Elite is not used when installing flooring, so one of the following options is selected for work:
- I grade. Has minimal damage and defects that do not affect the appearance of the coating. Suitable for installation on logs and forming a finishing surface in all areas of the house.
- II grade. The boards can be used to create a decorative finish that needs additional processing. For this, the existing cracks are sealed with a special putty or sawdust with PVA glue.
- III and IV grades. Lower quality sheets are preferred for subfloors.It is recommended to lay the products exclusively on the lathing, since the broach with self-tapping screws ensures the leveling of possible distortions of the multi-layer panels.
It is taken into account that the material of the 4th quality group should be chosen especially carefully: some manufacturers produce products suitable only for creating disposable containers for transportation.
 It makes sense to use plywood of the first grade only when arranging the finishing layer of floors; for a rough base, grade 2, 3 or 4 is suitable, while the latter is undesirable to mount on highly loaded structures
Thickness
To determine the optimal value, it is required to take into account the peculiarities of work and the distance between the lags:
If it is necessary to put a beam with a pitch of 35–40 cm, then the thickness of the plywood should be at least 9 mm. The lathing with 50 cm intervals between segments is covered with 10 mm thick slabs
It is important that the material has high strength. If the distance between the lags is 60 cm, then the sheet thickness should be at least 12 mm.
table
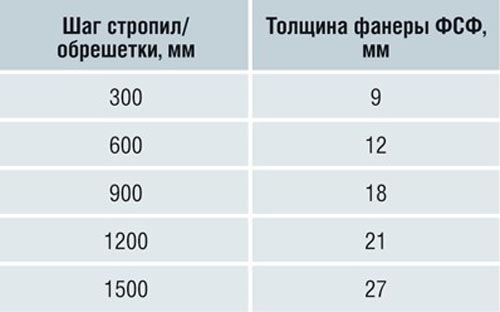
Dependence of the plywood thickness on the rafter pitch
Table. Dependence of the plywood thickness on the rafter pitch
The expected impact on the surface is also taken into account. When placing massive furniture and equipment in a room, the optimal thickness is 18 mm. To distribute the load and save, instead of one layer, two are allowed.


The size
It is recommended to lay plywood in small pieces, optimal dimensions are 1525 x 1525 mm. Products 1210 x 2440 mm are also popular. These dimensions are specific to different types of material, including laminated products, which are most often subjected to minimal cutting.
When choosing the best option, you need to estimate the total cost and the effort expended. When cutting large-format products, there will be cuts, especially when working in small rooms.
 When purchasing material, you should not chase large-format sheets, since during installation in any case they will have to be cut, besides, such plywood is difficult to transport
Finishing floor
There is controversy over whether plywood can be used for fine flooring. Many people say that such floors look unpresentable, but there are good examples of a clean plywood coating.
For decoration, use square or rectangular panels. If you plan to lay out some special pattern, then first make a sketch. The most common layout is staggered or herringbone. This is very similar to wood flooring.
The base on which the plywood slabs will be laid must be perfectly flat, regardless of whether it is a concrete screed or wood material. The surface is primed to ensure good adhesion. Next, markings are made on plywood sheets and plates of the required size are cut out. Each slab is numbered, as in a sketch or diagram, so that you know exactly where to lay it
This is especially important for a complex pattern, but if all the slabs are of the same size and shape, then there is no need for numbering.
> First, the slabs are laid out on the floor, then finally glued. To give the shade, the plywood is treated with wood stain and opened with several layers of matte varnish. You can use an opaque paint to hide bumps and blemishes if they have formed after the stain has been applied. One of the design options is to seal the joints with putty, paint with enamel paint, which will protect against moisture and hide flaws.
The main advantages of a plywood sub-floor
A sub-floor made of plywood by price category suits most consumers. This coating will last for more than a dozen years, retaining its performance for a long time. Plywood is a durable and environmentally friendly material, easy to saw. When working with it, no special expensive construction tools are required - the entire installation of the floor can be carried out using an ordinary screwdriver.

Sometimes plywood is used as a topcoat
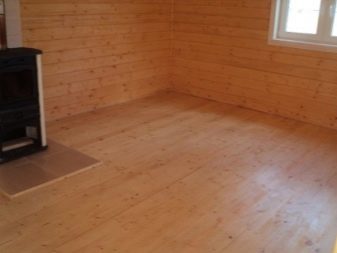
If necessary, plywood can be used as a topcoat. When installing it, one must not forget that it is imperative to leave gaps between the plywood sheets, and this will slightly spoil the overall appearance of the coating. Some specialists who have experience in installing a floor made of this material can lay the plywood floor so well - sand, tint, varnish, that the plywood flooring will look perfect. How to lay plywood on a wooden floor is described in detail below.
Most often, plywood is used for laying the subfloor, followed by the installation of the topcoat (laminate, parquet, etc.). Previously, chipboard was usually used for the subfloor, a rather loose and hygroscopic surface. Unlike waterproof plywood, when in contact with water, chipboard got wet and lost its strength and appearance, while it is not particularly scary for plywood to get slightly wet.

Especially talented craftsmen can decorate even walls with plywood so that the design of the room will look very original.
Plywood is most suitable for floors with a thickness of 12 to 15 mm. With a flat floor surface, which is very rare, you can use thinner plywood 8-10 mm. If you plan to install thick floorboards on it, the thickness of the plywood on the floor should be more than 15 mm in order to support the weight of the floor and not bend. For convenience, when installing a floor made of plywood sheets, it is cut into even squares with a side of 60 cm.With such a cutting, it is easier to detect material delamination, and the optimal number of damping seams will be obtained, but this is not necessary.

It is not recommended to install a subfloor made of plywood in rooms with high humidity and variable temperatures - in bathrooms, on unheated terraces, on balconies.
To determine if a plywood floor can be made indoors, you need to assess the humidity in it. For this, a piece of plastic wrap (1x1 meter) is used, which is tightly placed directly on the floor. After three days, drops of condensation form on the polyethylene at high humidity, and if the film remains dry, it means that work with plywood panels can be carried out in the room.