Do-it-yourself plywood leveling of the wooden floor
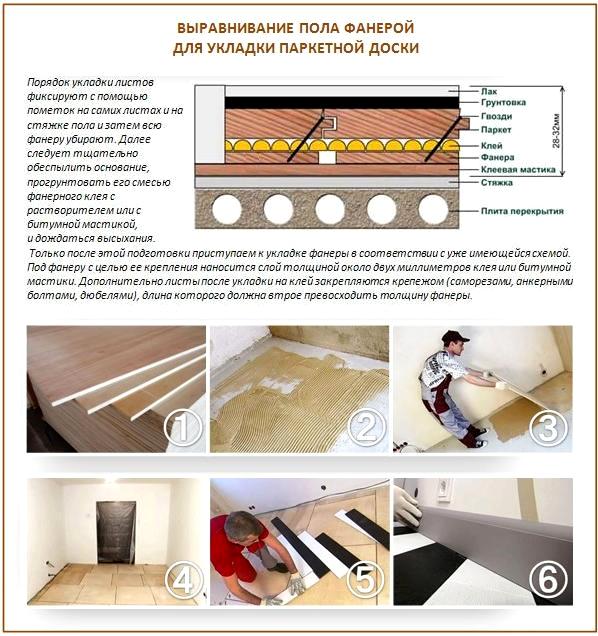
If the room has a wooden floor, then the best leveling method is to use plywood. The technology for installing such a coating is not very difficult, so you can do it yourself. The procedure is as follows:
- padding;
- screed manufacturing;
- priming;
- insulation;
- leveling the wooden floor with plywood.
Priming is a necessary procedure that allows you to get rid of cracks, chips, level out the resulting potholes. Otherwise, the coating will not last long and will begin to creak.
The screed, which is designed as a base for plywood, is made of concrete. After its complete drying, priming is carried out, i.e. base primer. With this procedure:
- the surface of the base is cleaned, including from dust;
- the base is impregnated with a primer made of the same material with which the plywood will be attached to the screed.
Then the insulation is laid, and on it - the sheets of plywood marked for laying.
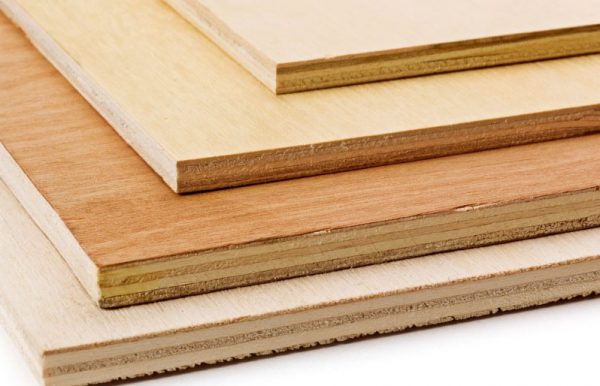
Plywood is great for leveling wood floors.
How to choose the right plywood?
When choosing the right material, you need to pay attention to a number of significant nuances that determine the key properties of the sheets and the possibility of their use. For greater ease of perception, information on this matter is given in the form of a table.
Table. Plywood selection
| Evaluation criterion | Plywood grades and their properties |
|---|---|
| Moisture resistance | FSF is a material with increased moisture resistance. Despite the impressive indicators of moisture resistance, such plywood is still not suitable for arranging the floor in bathrooms, saunas, kitchens and other rooms with a high level of humidity. FC - characterized by average moisture resistance. Safe glue based on urea resins is used for gluing layers of material, which makes it possible to use sheets without unnecessary fears when repairing residential premises. Plywood of the FOF brand is also on the market, but it is mainly used in industrial construction, therefore it is not considered separately. |
| Manufacturing material | Conifers. Such plywood is characterized by high indicators of resistance to fungi and other pathogenic microorganisms, however, this material is not suitable for use in residential premises and is mainly used for roofing work. Larch. FK birch plywood is an ideal option for flooring in residential premises. |
| Formaldehyde content | E1. The plywood of this brand contains about 10 mg of formaldehyde per 100 g of material. E2. The average formaldehyde content is 10-30 mg / 100 g. For work in residential premises, it is preferable to use E1 plywood. |
How to choose the right plywood
Thus, FC plywood is the most preferable for interior work. This material is additionally divided into 4 groups. The classification is carried out according to the following characteristics
- external flaws are absent or present in an insignificant amount;
- there are knots and veneer inserts;
- the material has a large number of cracks, knots and other flaws;
- the lowest quality plywood with a very large number of defects. Along with this, the sheets, as a rule, are glued together of a fairly high quality, which makes it possible to use them for performing some construction activities.
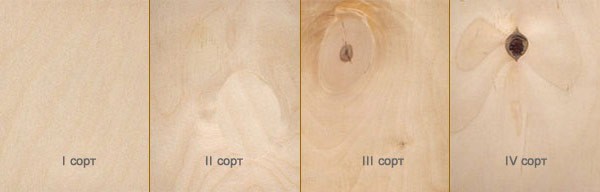
Plywood grades
Plywood of the latter group is practically not used for interior work.Making a subfloor from the highest quality plywood is financially impractical. Thus, the most optimal option in terms of the ratio of quality and cost indicators is the material representing the second group, which has a small number of knots and veneer inserts.

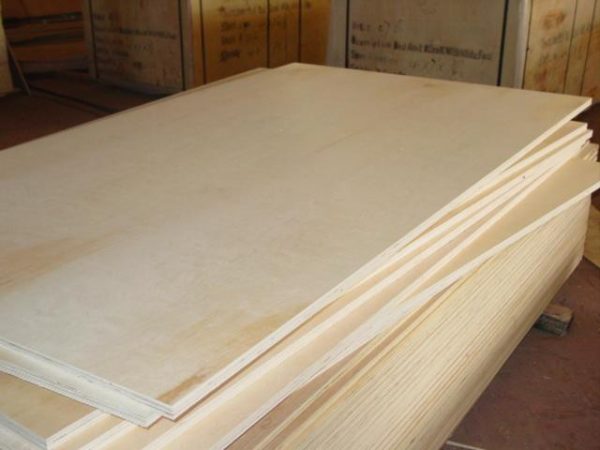
Plywood for floor
Summing up, we can highlight the ideal plywood for the floor. This is a material based on larch wood grades FK and E1, second grade. When choosing a thickness, be guided by values in the range of 12-16 mm.
Birch plywood FC
| Plywood type | Description |
|---|---|
| Plywood FC | moisture resistant appearance, urea resin is used for gluing veneer sheets. This plywood is intended for indoor use. |
| Plywood FKM | has increased water resistance, is made on the basis of melamine resins. This type of plywood is unique as it uses environmentally friendly melamine resins. Due to its environmental characteristics, plywood is used in furniture production and for interior decoration. |
| Plywood FSF | veneer sheets are glued together using phenolic resin. This type of plywood is also highly water resistant. It is not recommended for interior decoration as phenolic resins are harmful to health. Typically used for outdoor decoration |
| Laminated plywood | It is based on FSF plywood, which is covered on both sides with a special film. Film faced plywood is used for the manufacture of formwork. This type can be used multiple times. |
| Bakelized plywood | Bakelite resin is used for gluing veneer sheets. This type of plywood is used in aggressive climates, sea water, aggressive environments, sometimes for performing monolithic works |
| Marine plywood | analogue of bakelized, but less durable. Made from foreign wood species |
| Plywood Flexible | foreign version. A distinctive feature is the ability to bend well in the transverse and longitudinal directions |
Comparison of characteristics
To choose the most suitable option for a rough or final finish of a floor structure, it is necessary to take into account the main parameters of the product.
Environmental friendliness
Health safety is one of the main factors. The indicators of wood-based materials comply with the standards that are reflected in the standardization documents.


- Plywood. Eco-friendly option. The most harmless products are those for which natural resins are used.
- OSB. Does not pose a threat, but only if the production technology is observed. It is better to choose trusted manufacturers.
- Chipboard. This variety causes the most controversy over health risks, since formaldehyde resins are used for gluing. Products must comply with standards (E1 or E0.5 marking).
- Fiberboard. Does not pose a threat, provided that quality raw materials are used.
- MDF. An environmentally friendly material made using urea resins. These products must also comply with E1 or E0.5 class.
Since the outside of all materials is finished, harmful fumes are minimized.
Strength
To choose the most reliable option, you need to take into account the density and structure of the product:
- OSB and plywood. Oriented strand boards withstand serious loads well: the layers are placed in different directions and are glued together extremely firmly. But a wood-laminated board can have a significant disadvantage - the possibility of deformation due to non-compliance with technology.
- Particleboard and fiberboard. Have sufficient hardness. The spheres of their use are somewhat different. Wood-based parts are very thick, and fiber-based ones are very unstable to bending, therefore they cannot be used for leveling voids.
- MDF. Relatively soft material that is not used in places with increased stress.
It is difficult to compare all products by this parameter, since they have different sizes.
Dimensions (edit)
The length and width of all varieties are approximately the same, so it is necessary to compare the thickness:
- Hardboard. The thinnest material. Its thickness can be up to 7 mm, but most often 3.2 mm.
- Plywood. Products with a thickness of 12–15 mm are selected for the floor.
- OSB. It can be of different sizes, but options from 10 to 22 mm are used for the floor. If you want to level the existing base, then a thickness of 1 cm is suitable, but in order to lay the material on wooden logs, the parts must be more durable.
- MDF. Due to its softness, the recommended board thickness ranges from 18 to 25 mm.
- Chipboard. For horizontal structures with increased load, a tongue-and-groove version with a thickness of 16–22 mm is used.
The thickness and structure of the parts also affects soundproofing and heat retention. If the noise pollution is very strong, it is recommended to give preference to medium density fibreboards of maximum thickness. They also serve as additional thermal insulation, which is similar to OSB.
Price
The difference in the price of materials depends on many factors: the method of production, the raw materials used, additional processing, size and even the place of sale.
- The most expensive is high-grade plywood.
- The cost of MDF is calculated from square meters and depends on the manufacturing method.
- The price of OSB-3 and 2 corresponds to wood-laminated boards of 3 or 2 grades of a smaller size.
- The lightest and cheapest option is fiberboard.
So that the total budget of work does not amount to too much, it is necessary to immediately determine the scope of each type of product.
Ease of installation
Laying wood-based panels is not difficult, it does not require professional skills and complex tools. The order of work depends on the specific situation:
- If a frame structure is being erected, then the OSB would be the best option.
- The light weight and thickness of the hardboard make the processing the fastest, but it is not suitable for serious leveling.
- Chipboard and OSB panels are cut and fixed in almost the same way. They are much easier to trim than MDF, which has more resistance due to its dense structure.
- The most laborious in terms of processing is plywood. It will take much longer to put the product down. It is more difficult to drill or adjust it to size due to the presence of layers of natural wood in the structure.
All floor slabs are mounted on glue or logs, the only exception is the fiberboard cover: these sheets are not intended for flooring on logs, they need a flat and strong base
Materials for work
In addition to the rules for the selection of tools, there are some criteria for choosing the wood itself:
- It is impossible to fasten the lag of a curved shape.
- The material doesn't have to be the most expensive. Reliable and durable options can be chosen among budget raw materials.
- Spruce, pine and fir are considered to be of sufficient quality wood species to solve this problem.
- With a small budget, you can get by with wood products of category B, as well as BC. The only condition is that the maximum moisture content should be 18%.
- Products must be carefully inspected for damage from insects and mold. If such traces have been found - do not take such bars.
What plywood is used for the floor
Plywood is produced in various thicknesses, quality of grinding and processing. Therefore, an inexperienced builder is always faced with the question: what kind of plywood to lay on the wooden floor so that it is a reliable basis for decorative coating.
The plywood brand is not an easy choice for the DIYer. Usually the choice is made between FS and FSF brands. FC - plywood, in which the veneer sheets are glued together with a less toxic glue than the FSF brand (read: "Which plywood is better for the floor - choose the brand and grade of material").However, the quality characteristics of FC are weaker: it is not too moisture resistant. Therefore, if environmental friendliness and safety are a priority (floors in the children's room, bedroom), then it is better to buy FC. For rooms with high humidity and traffic (entrance hall of an apartment, country house), choose the FSF.
- The quality of the material also matters: the higher the grade of plywood, the better, the smoother the surface, which means that the decorative coating will lie better and last longer. For leveling the floors, plywood of the 1st and 2nd grade is used.
- Plywood can be sanded on both sides (Ш2), on one side (Ш1), not sanded (NSH). For alignment, take Sh1.
- Material thickness. Experts believe that for floor work, this material should be at least 8 mm thick, and preferably more (in more detail: "What thickness of plywood is suitable for the floor"). How thick the plywood to lay on the wooden floor is regulated by a simple rule: the thicker the better. At a minimum, the plywood should not be thinner than the finish flooring.
Sometimes plywood is used as a subfloor, laying the sheets directly on the logs. In this case, the thickness is needed from 2 cm.
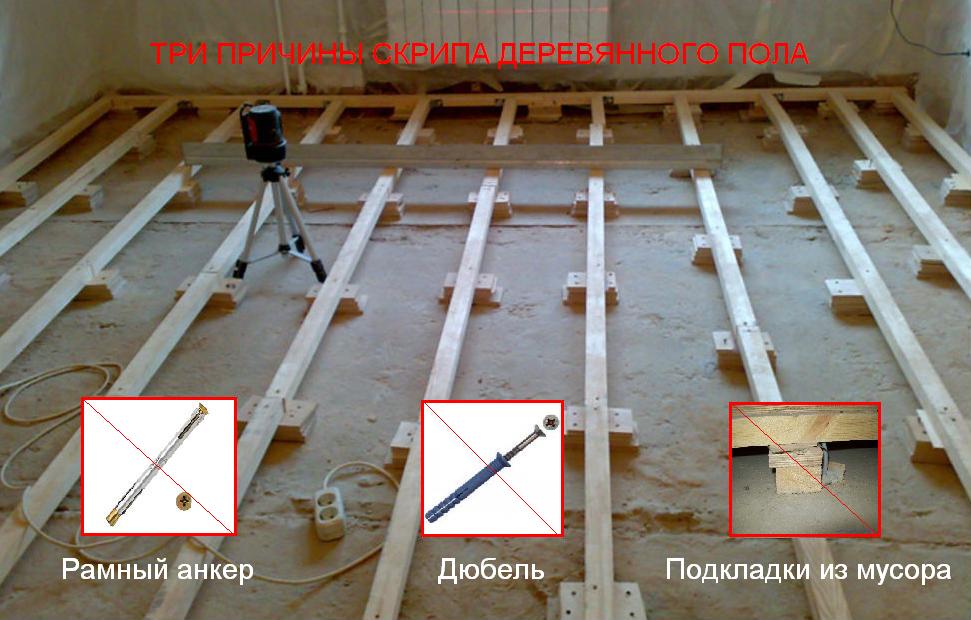
Fixation with iron corners
It is difficult to work with high logs (100 mm and higher), so they are fixed to concrete with iron corners. With one shelf, they are attached to the beams with self-tapping screws, and the second is fixed to the concrete with dowels-nails. The main thing is that the entire load goes to the gaskets, and not to the corners, since their main function is to fix the position of the beam.
- First, the corner is screwed to the logs with self-tapping screws, which need to be deepened in the wood by 3 cm.
- Next, it should be fixed in concrete with dowels.
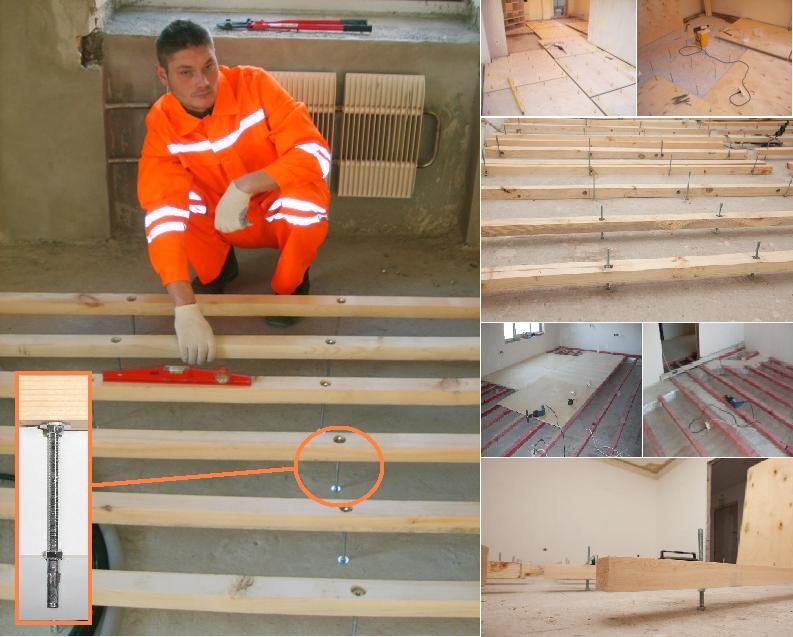
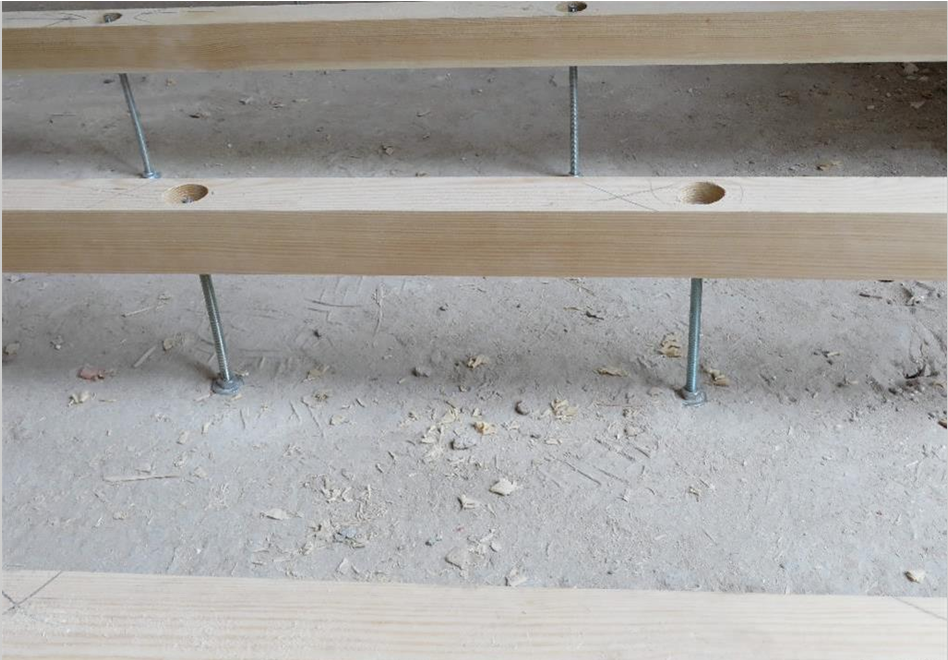
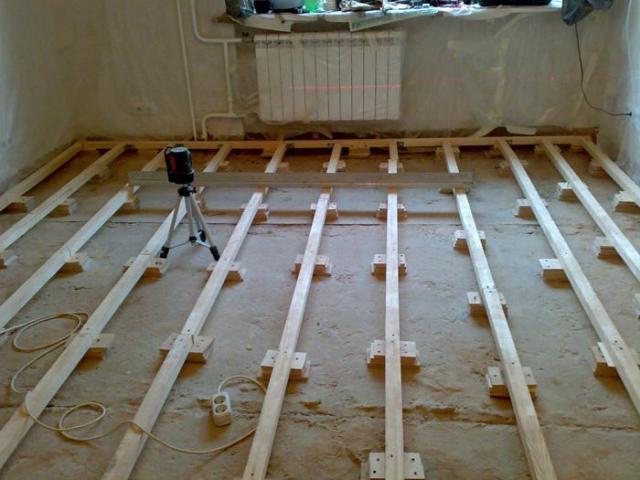
Adjustable lags
This fastening of the log to the concrete floor provides for the installation of rectangular supports under the beams, which are attached to the base with four dowels. In the center of this fastener is a hairpin, which attaches the log to the concrete. The nuts placed under the bars allow you to accurately set the height of the log, and the nuts located on top allow you to reliably fix their position.
The step of the stands installed under the beams depends on the size of the profile of the beams, but experts advise not to make it longer than 1 m. This fastening of the lathing for the floor is not in demand due to the high cost.
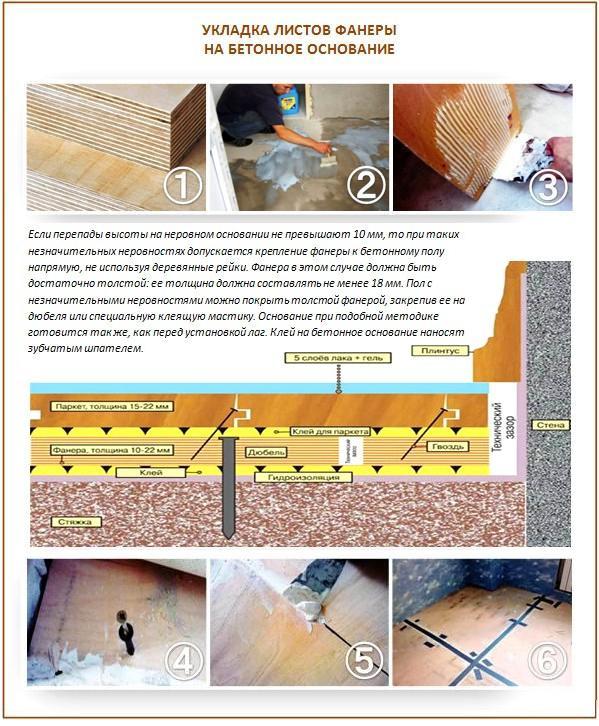
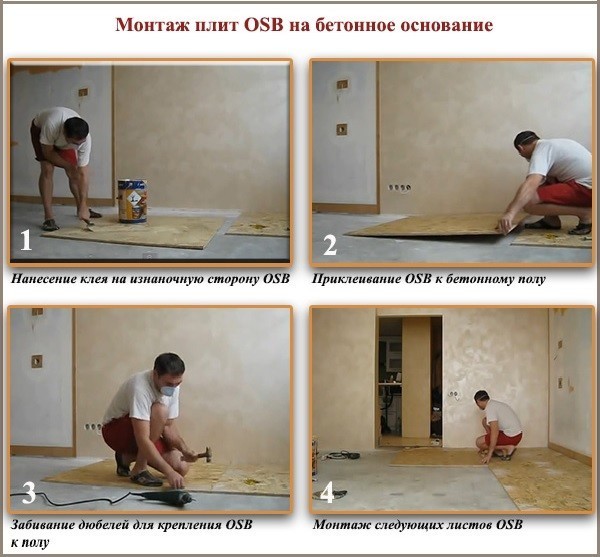
Laying plywood on the floor under the laminate on the screed
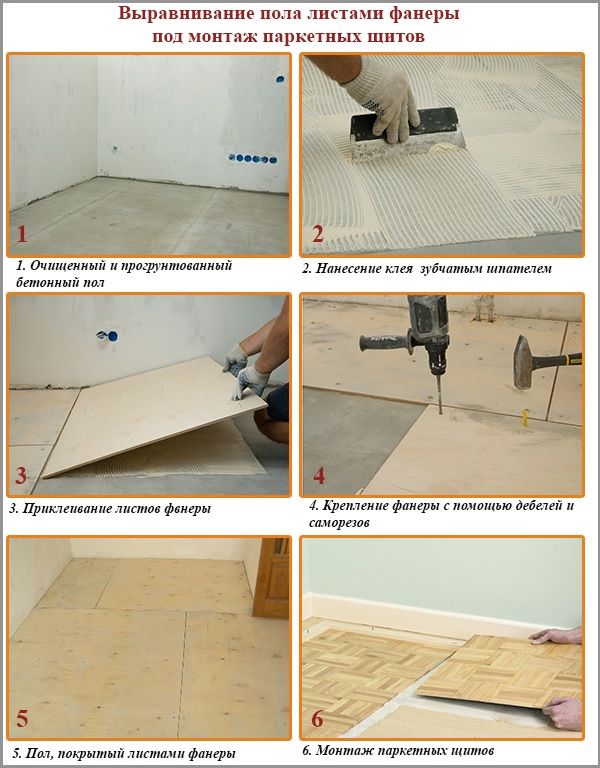
Laying plywood on a concrete floor
Precondition - the screed must be made with high quality, the height difference over the entire surface should not exceed ± 2 mm. The concrete must be completely dry.
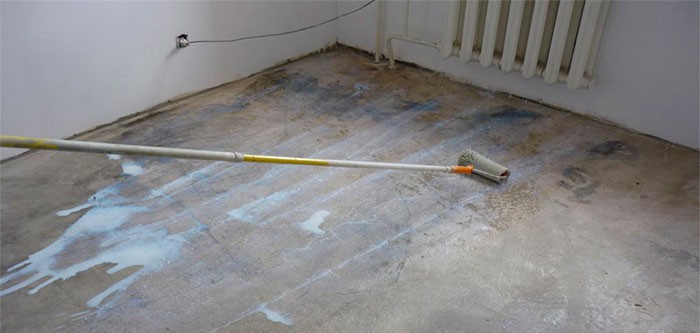
You can check the humidity using an elementary method. Lay a piece of plastic wrap on the concrete overnight, press it tightly around the perimeter with any objects. If the concrete is wet, then the evaporation of water from the surface will continue all night, it itself keeps heat for a long time. The plastic film will cool down quickly, high humidity under it and low temperature will create conditions for condensation, a so-called dew point will appear. In the morning, look at the film, there is condensation - take active measures to dry the concrete, there is no condensation - you can start laying plywood.
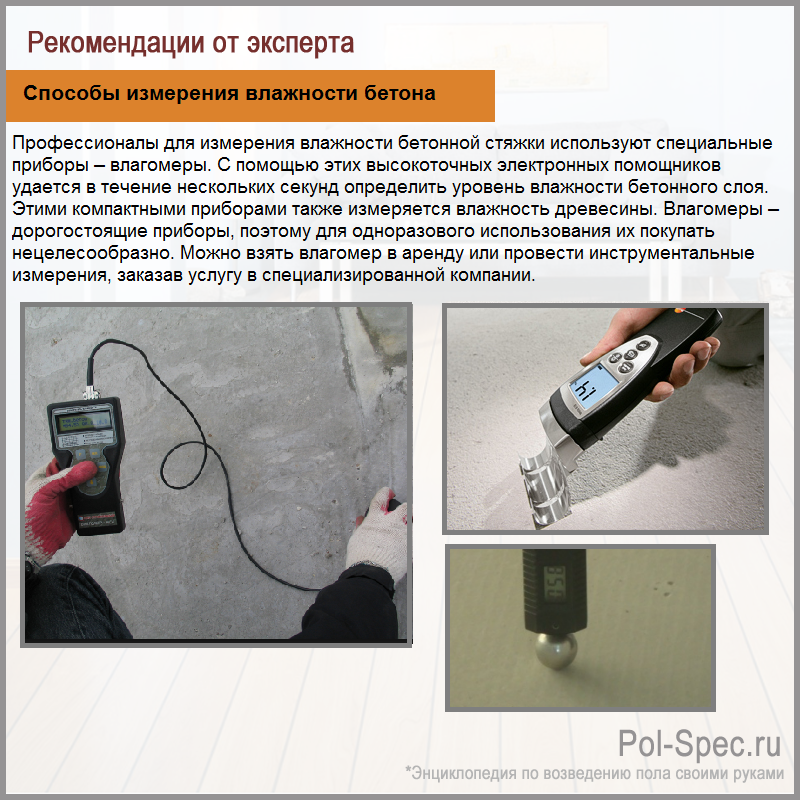
Methods for measuring the moisture content of concrete
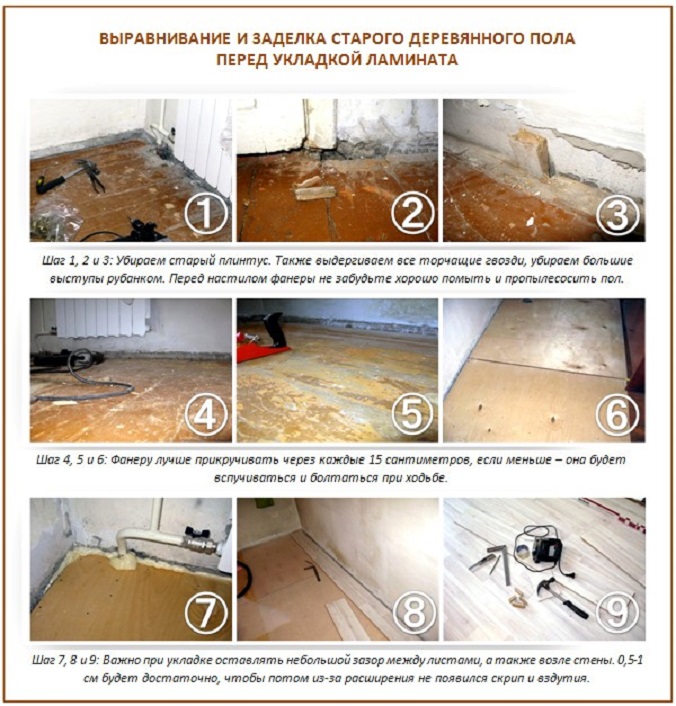
Step 1. Inspect the condition of the concrete screed surface. Small cracks do not need to be repaired. Additionally and more carefully, it is worth checking the uniformity of the dry screed. To do this, tap it, places with a dull sound indicate the presence of voids, here the builders allowed a marriage.

The decision will have to be made independently: if the sound is very deaf and the air pocket is large, then repair work will have to be done. At this point, a thin top layer of the screed is removed, the recess is repaired. Time, of course, will be lost, but it is better and cheaper than redoing the entire floor later. If there is heavy furniture in this place, then the finishing laminate will be deformed.
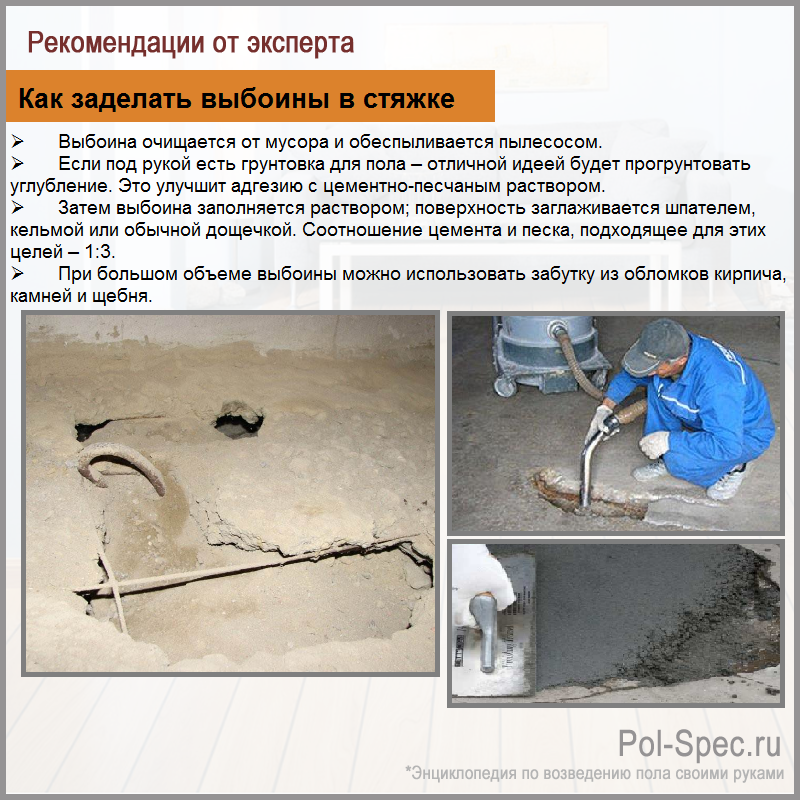
How to repair screed potholes
Step 2.With an even spatula, scrape off the protruding sharp parts of the cement-sand mortar a little, the dust should be thoroughly swept up or it is better to vacuum it.
The screed needs to be swept and vacuumed.
Step 3. Apply a primer. If it is expensive and of high quality, then it is enough to soak the surface once. There are doubts about the quality - it is much safer to do a double primer. Conclusion - don't buy cheap materials. As a result, you will lose more time, and you will not achieve monetary savings. We'll have to do all the work twice.
Concrete priming
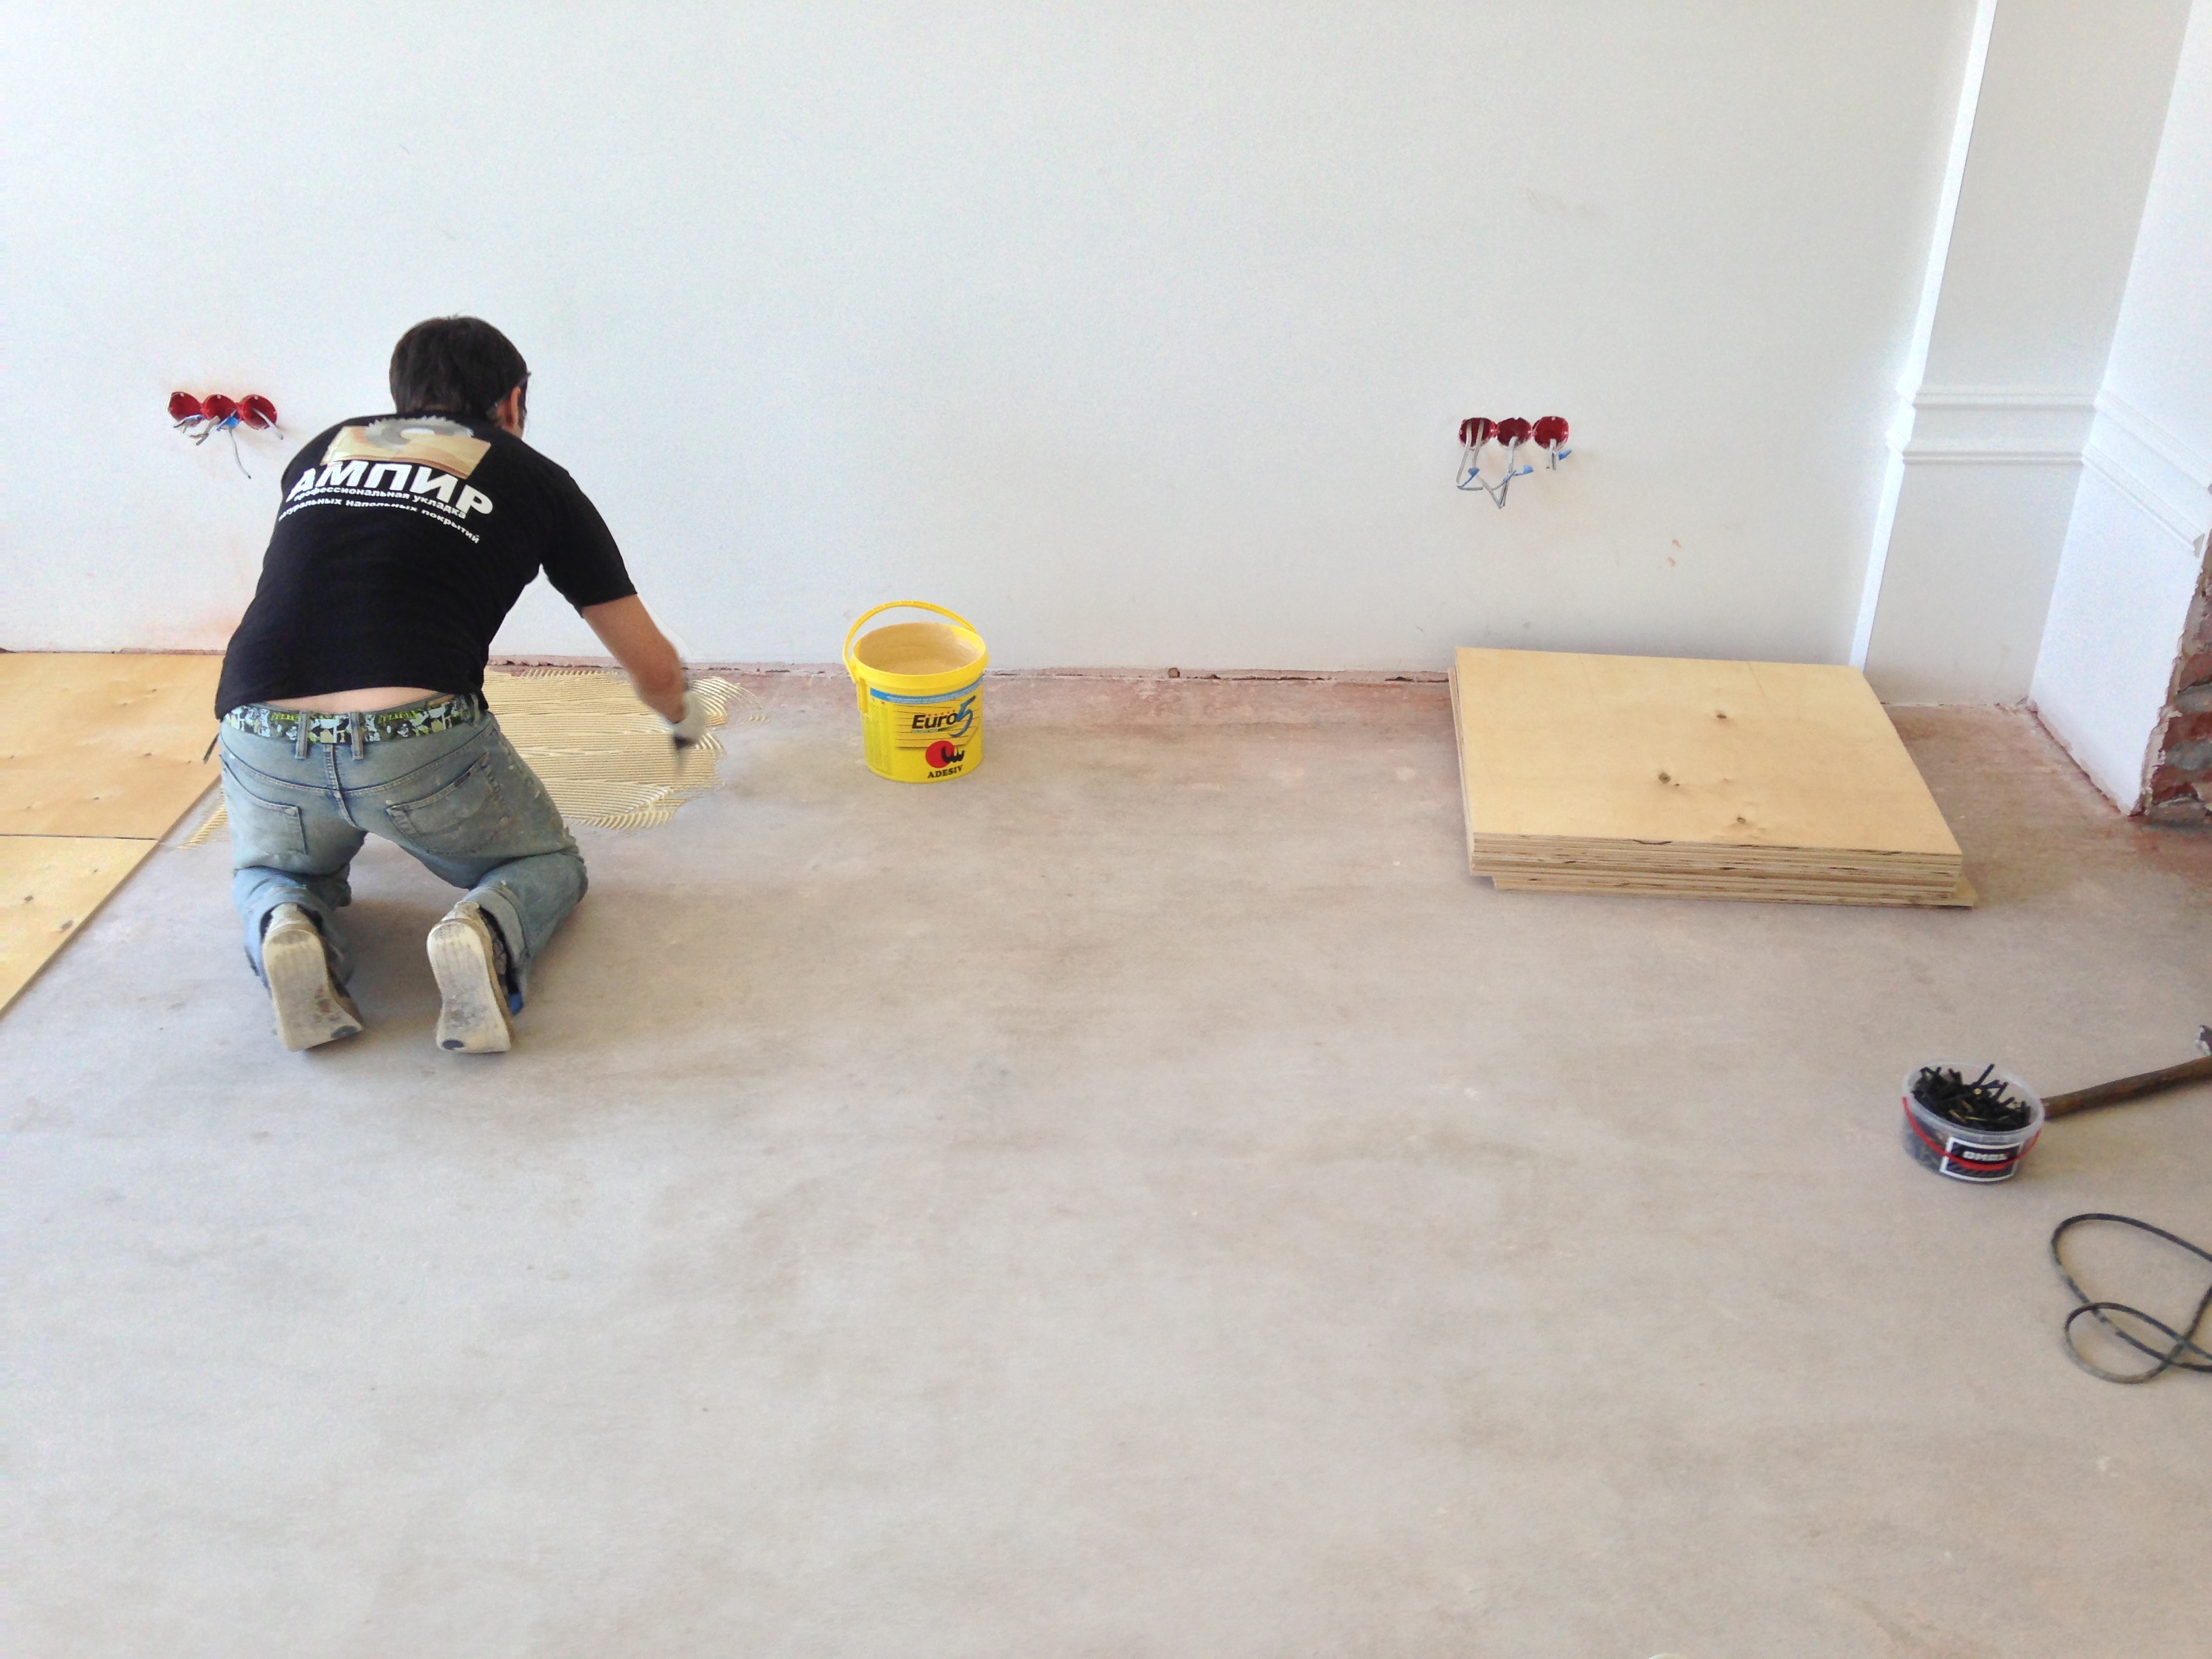
Step 4. Prepare construction adhesive. When all the preliminary work is done correctly, then any glue will perfectly cope with its tasks. Moreover, the loads on plywood sheets are only vertical, and even then insignificant. No effort, no displacement. Before using the glue, read the manufacturer's instructions and follow its recommendations.
plywood glue
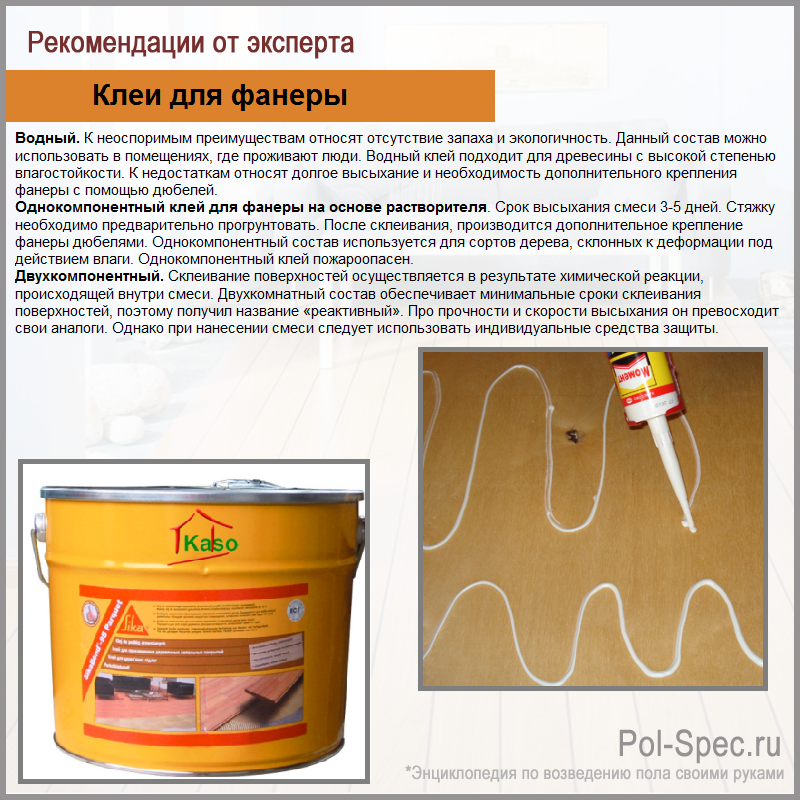
Plywood adhesives

Fastening plywood with dowels
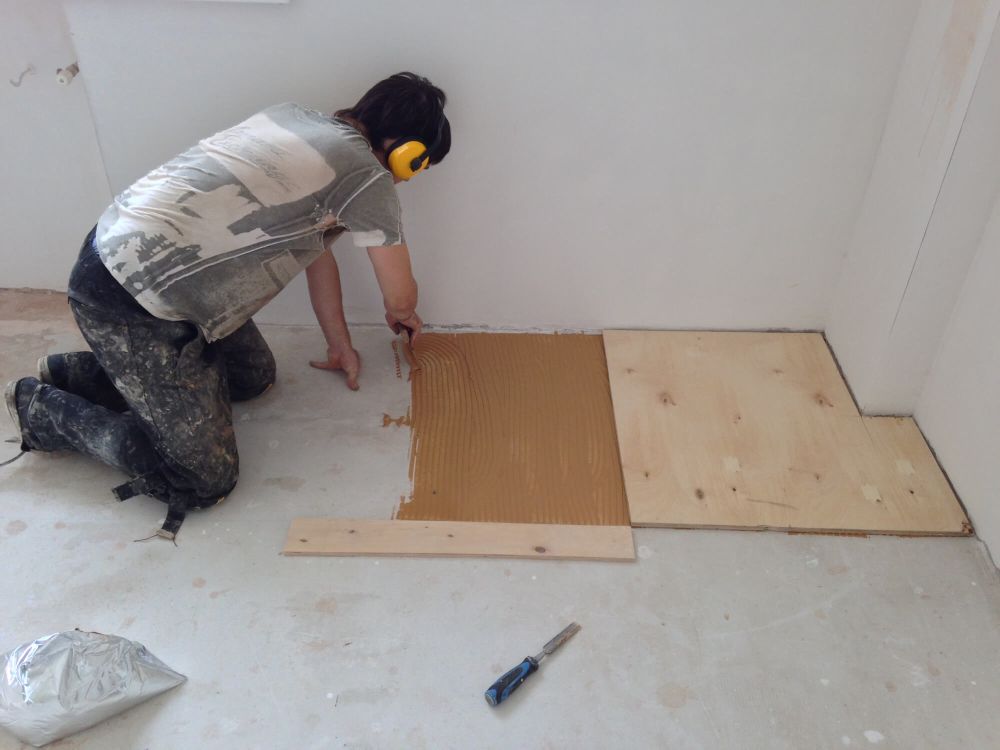
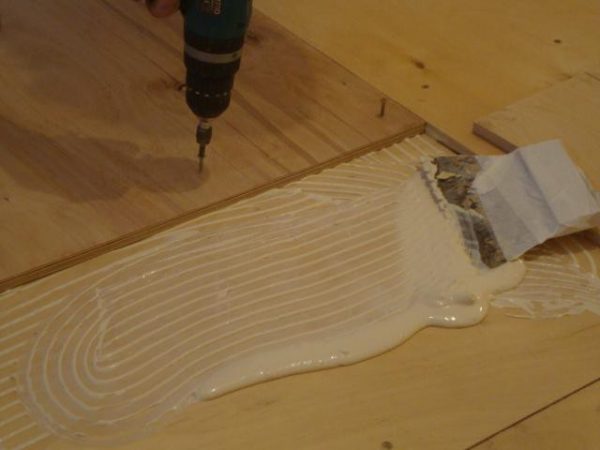
Step 5. Apply glue to the floor area and use a comb to remove excess. The glue should be thick, similar in consistency to a putty solution. Let the prepared area slightly exceed the dimensions of the plywood sheet. Place the plywood carefully on the prepared place and fix it with dowels. You will have to work with an assistant, one will definitely not be able to put it down.
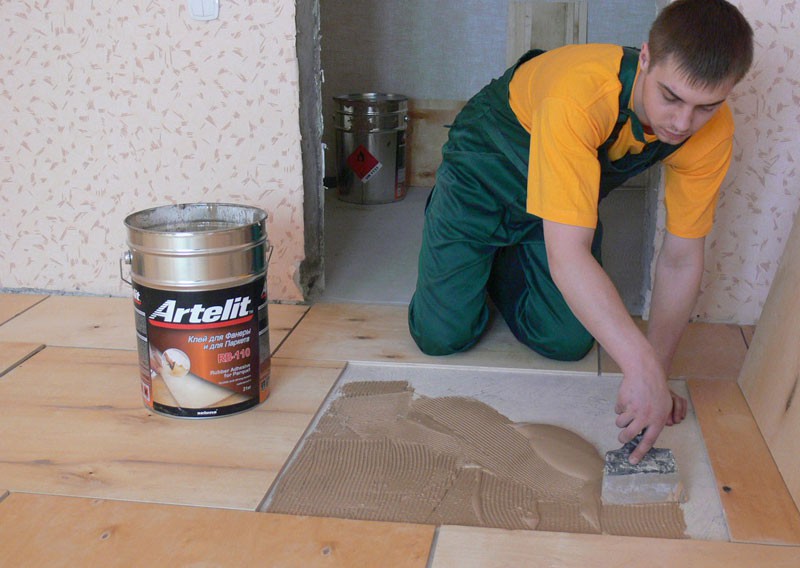
Applying glue under plywood
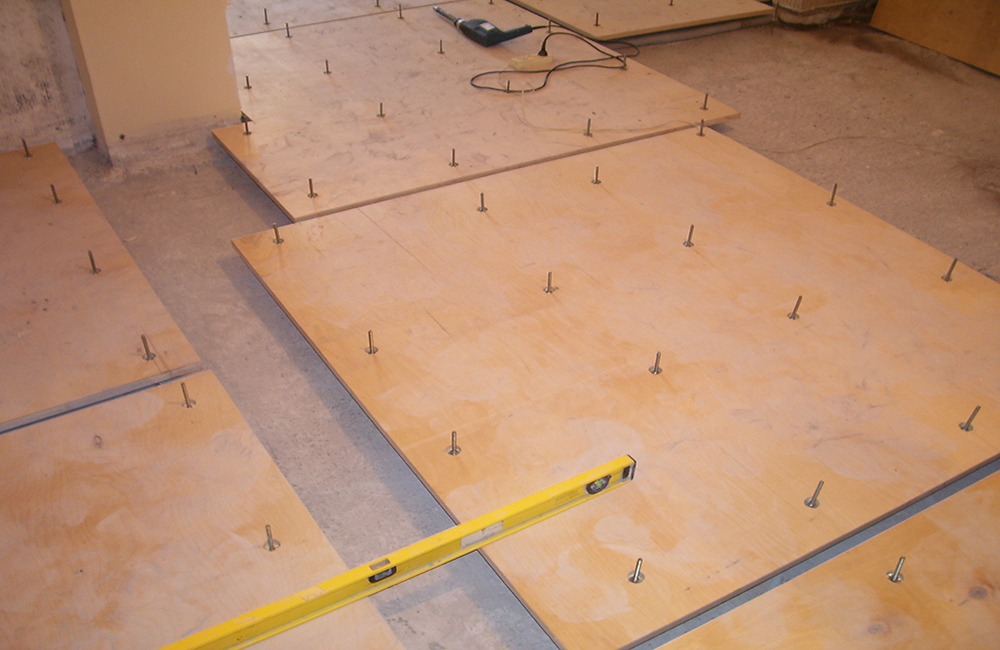
First fix the corners and then the rest of the surface. To set the gap between the plates, use cardboard spacers; their thickness is 2-3 mm. The holes will have to be drilled immediately in plywood and concrete; you need to use drills with victorious solders. To make the plywood easier to drill, do not be lazy to periodically grind the solders.
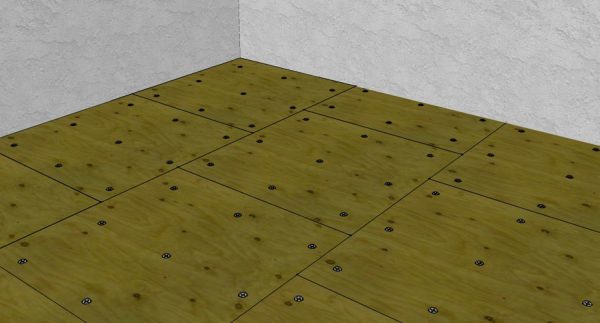
Fixation of plywood sheets
Before fixing the next sheet, do not forget to align the bottom edge with the previous one with a straight ruler. This will help you avoid additional cutting of the plywood, reduce waste and speed up the installation process. If the tie is strong, then you can use the simplest and cheapest hardware. They should go into concrete by about 3-4 centimeters. If the concrete is of poor quality, then you need to use special dowels with spacers.
We screw in self-tapping screws
Lay the next row of sheets a little with a shift in a checkerboard pattern, do not allow the four corners to be at one point. It is not necessary to seal the holes from the dowel caps under the laminate, putty the gaps and scrape small irregularities in the base, such work is done only under the linoleum.

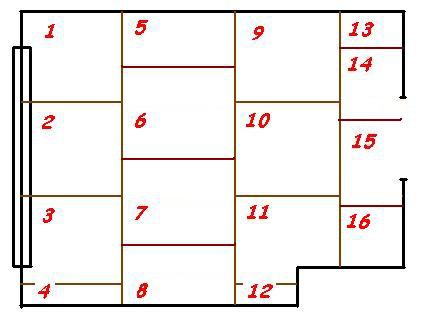
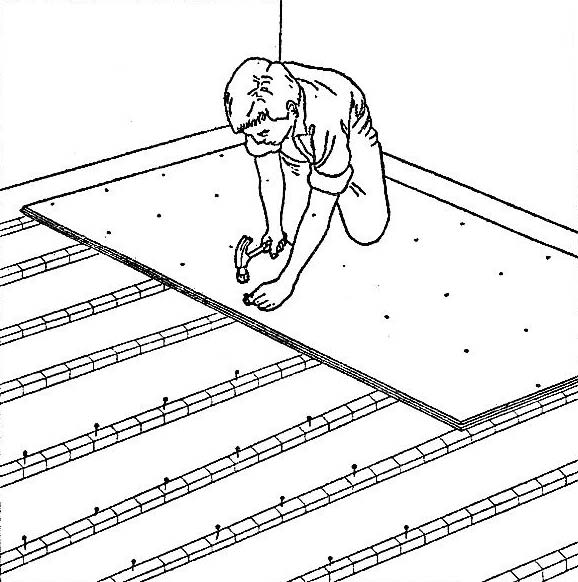
Scheme of the sequence of laying plywood on the floor
DIY plywood laying
Step 6. Sew up the cracks near the wall, do not forget to leave an expansion gap.
This completes the preparation of the plywood base, you can start laying the laminate floor.
Particleboard or plywood?
Plywood is not the cheapest material for flooring and wall cladding. Particleboard is even cheaper. But let's leave alone phenol-formaldehyde resins - volatile carcinogens, on the basis of which chipboard is made.
Let's do the following experiment: put two cut pipes on the floor and lay a sheet of plywood 12 mm thick on them. Let's stand on it, let's get off. What happened? Nothing. He bent over and straightened up. And the chipboard? Most likely cracked at greater thickness. And it certainly will crack if you jump on it.
You can do two more experiments: hold the plywood and chipboard scraps in water and see how soon they swell and sag. There is no need to knock on the edge with a hammer: everyone knows that chipboard is fragile. Therefore, the question: "Particleboard or plywood?" unambiguously decided in favor of plywood.
Types of floor leveling with plywood sheets
In order to make the base of the floor even, you can use two methods:
Method 1 is alignment with an additional crate (using a lag);
Method 2 - without the use of crate.
The floor base is of two types:
- concrete;
- wooden.
Leveling the floor on a concrete base
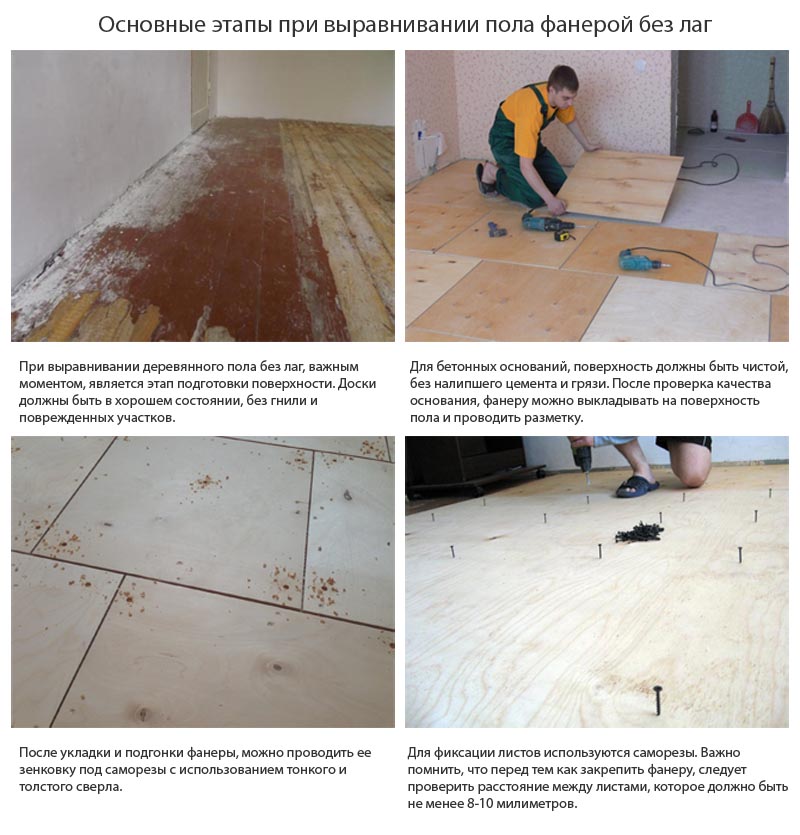
When laying plywood on a concrete floor, careful preparation is required.After all, concrete is a rather complex material. Before starting work on leveling the base, you should determine how wet this surface is. To do this, lay a small piece of film on the concrete and press it, after a couple of days you should check if condensation has formed on the inside of the film. If this happens, then the plywood surfaces should be treated with additional means from fungus and mold.
Technology for leveling the floor along the joists
For this job you need tools:
- building level;
- roulette;
- puncher;
- self-tapping screws;
- jigsaw;
- electric or cordless screwdriver.
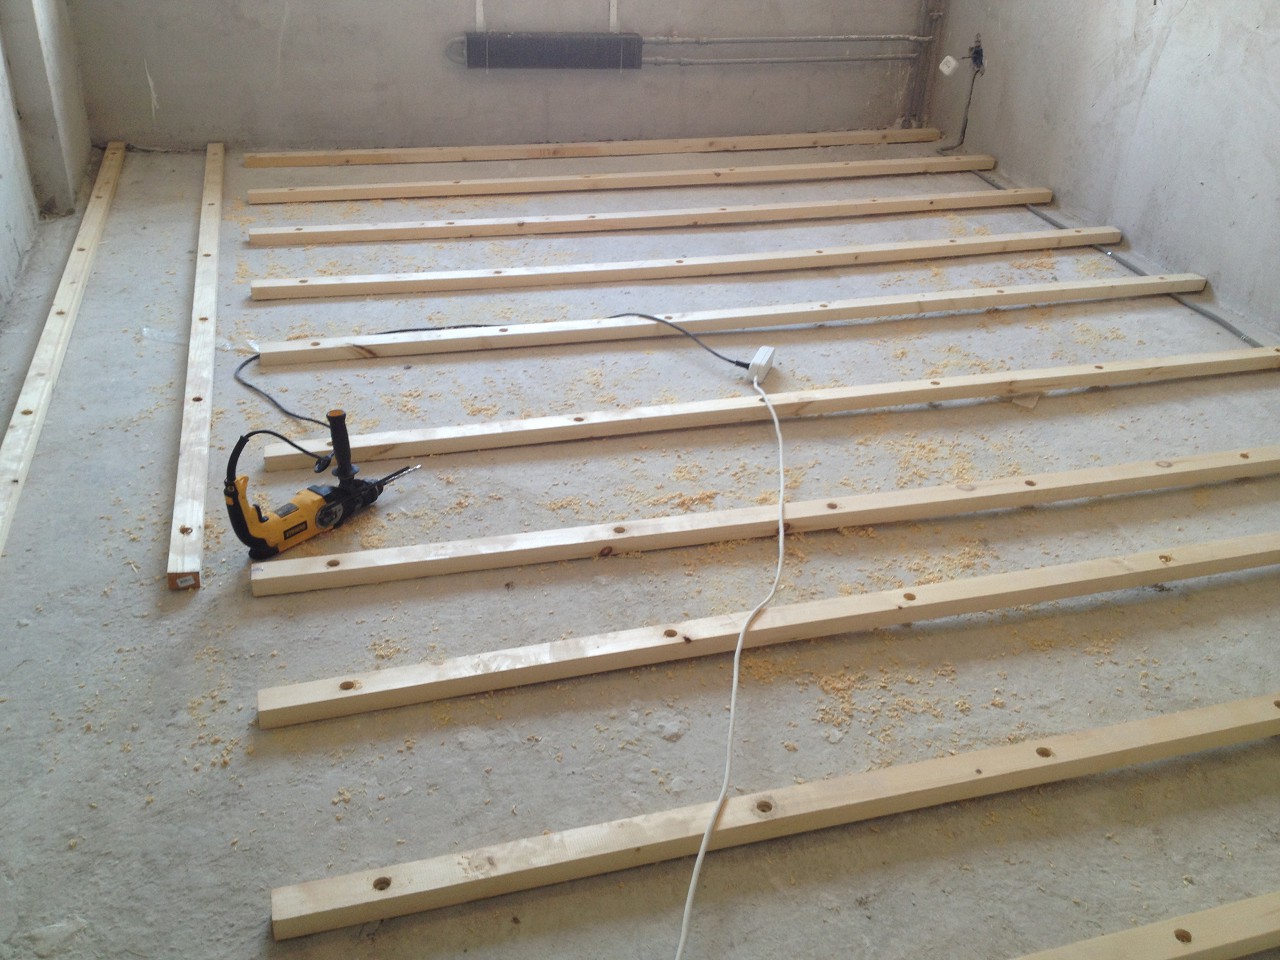
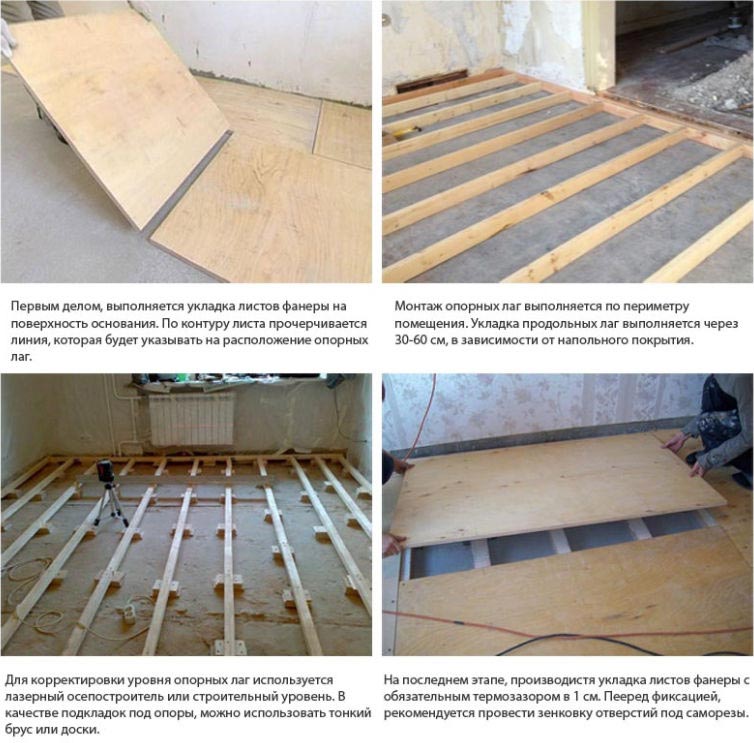
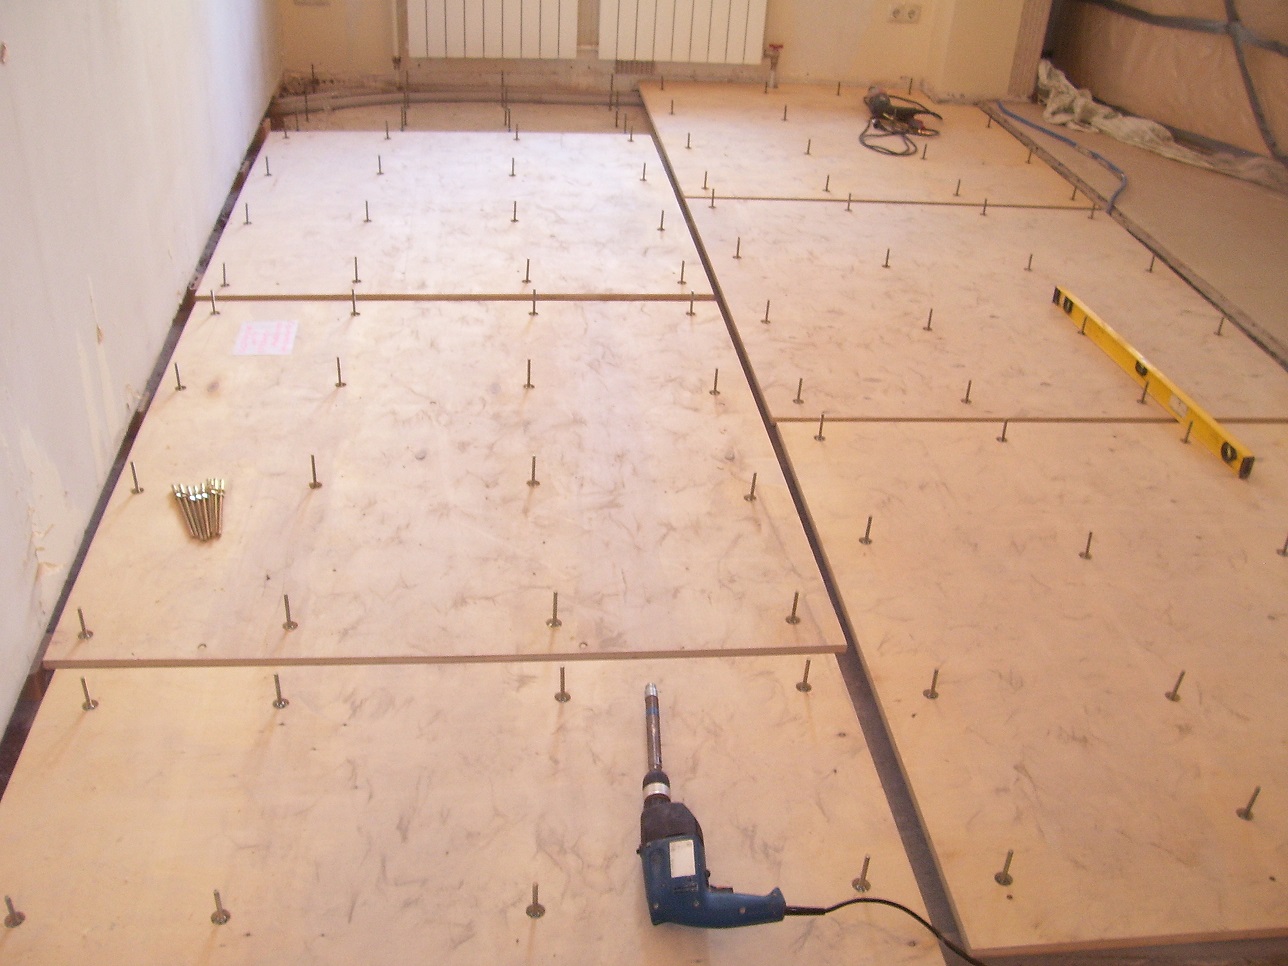
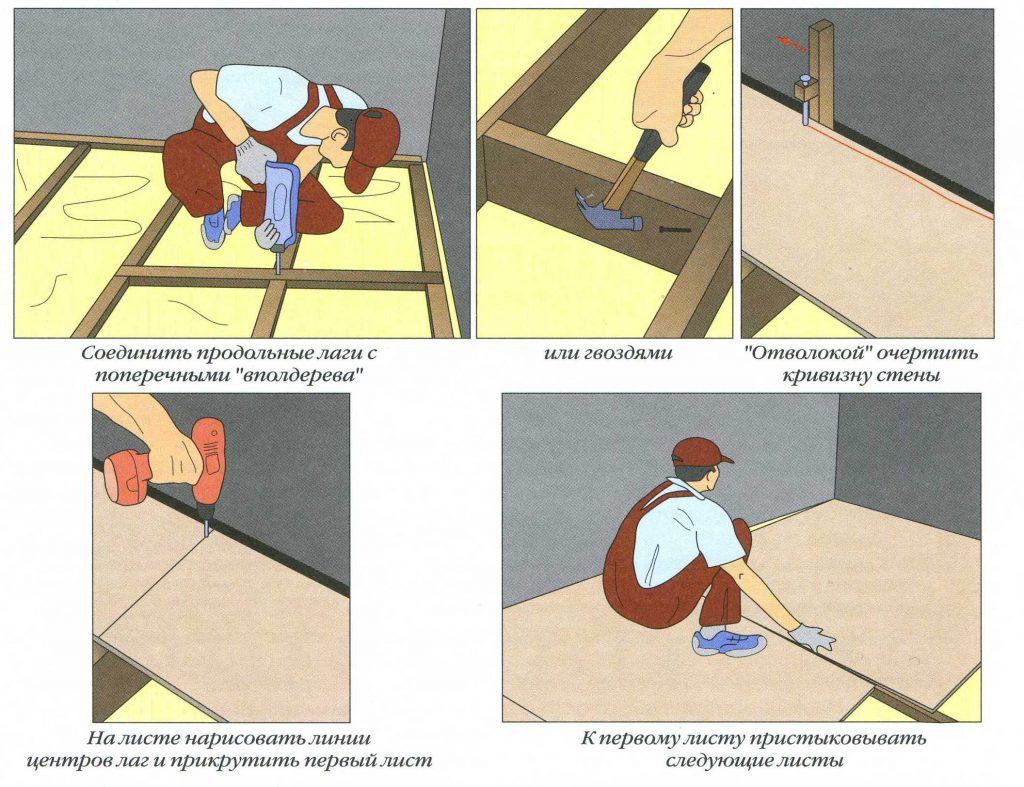
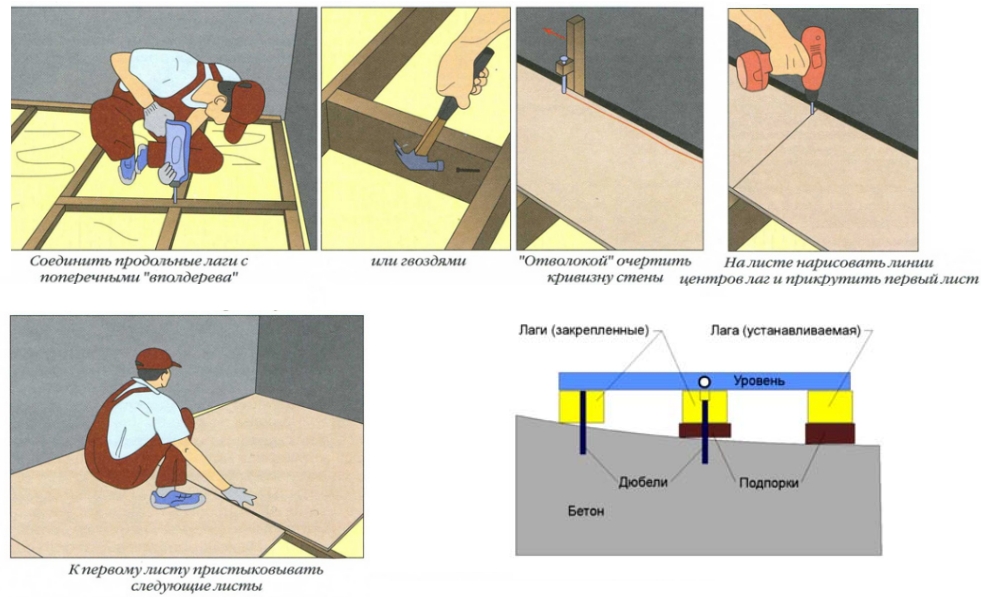
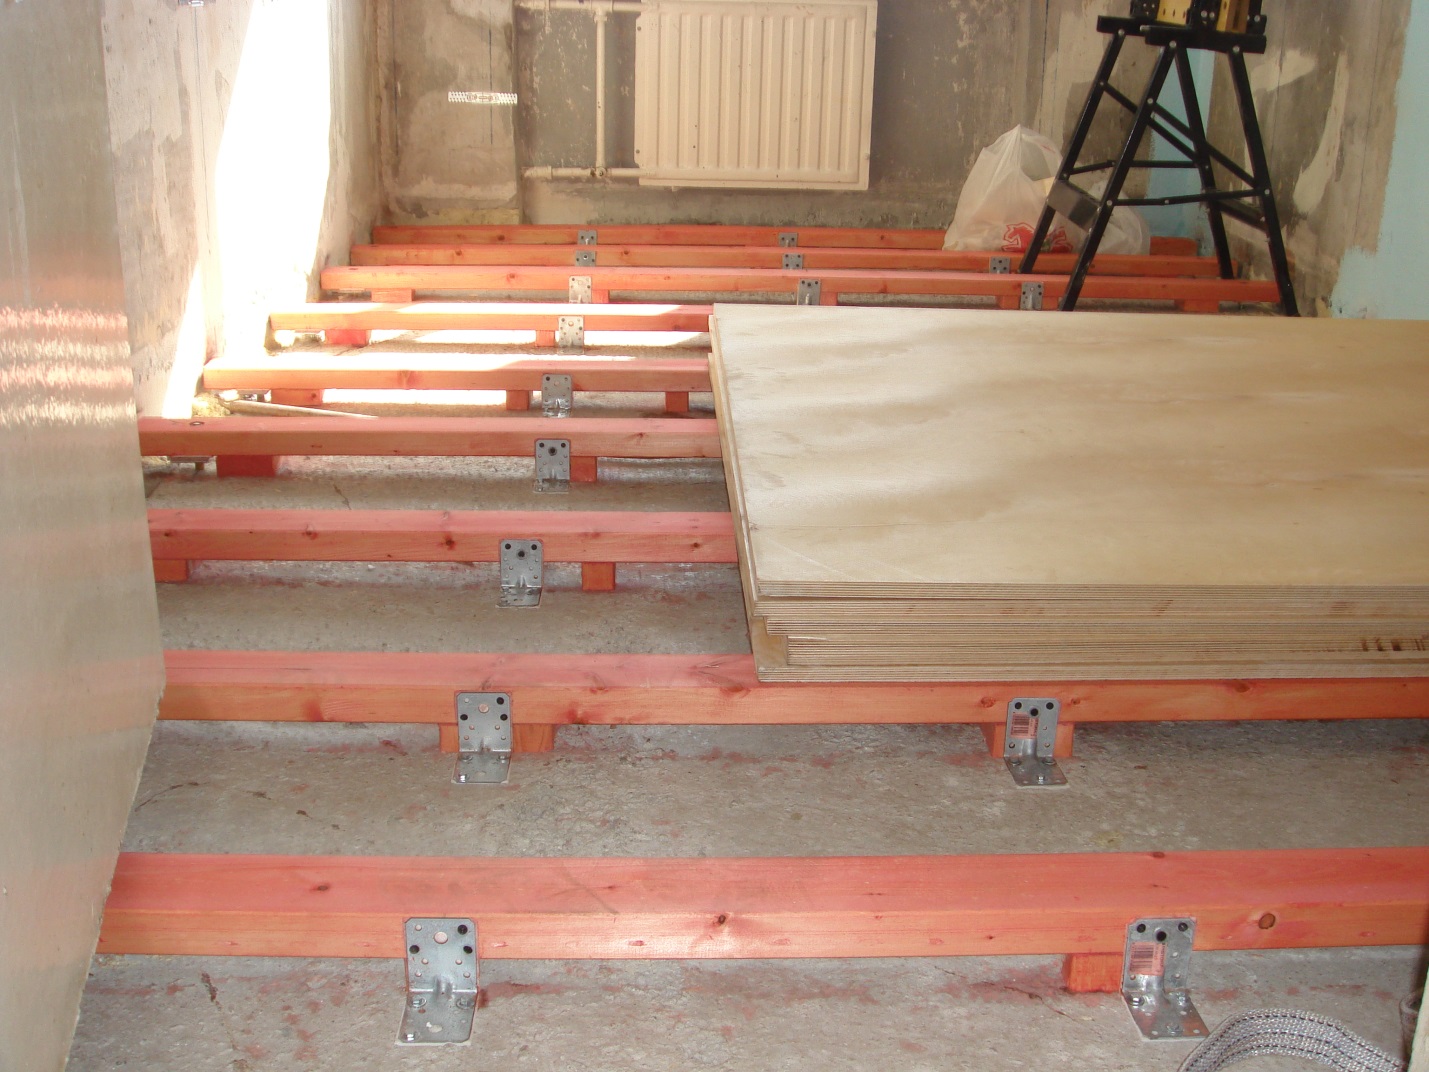
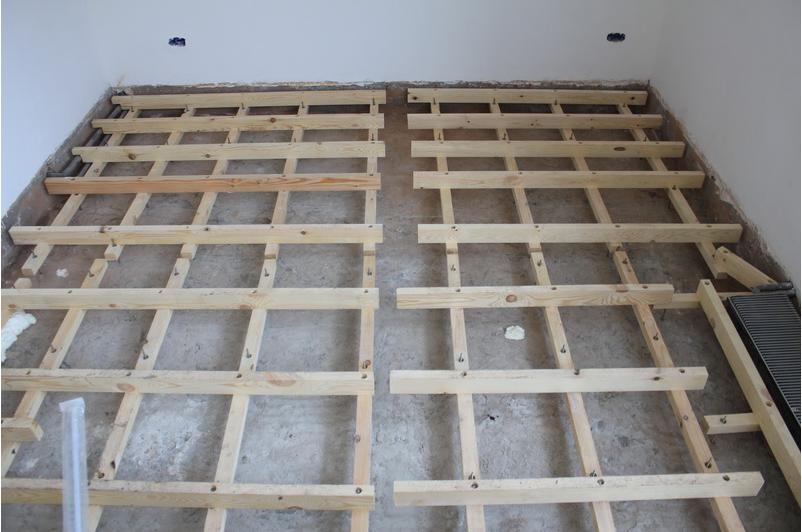
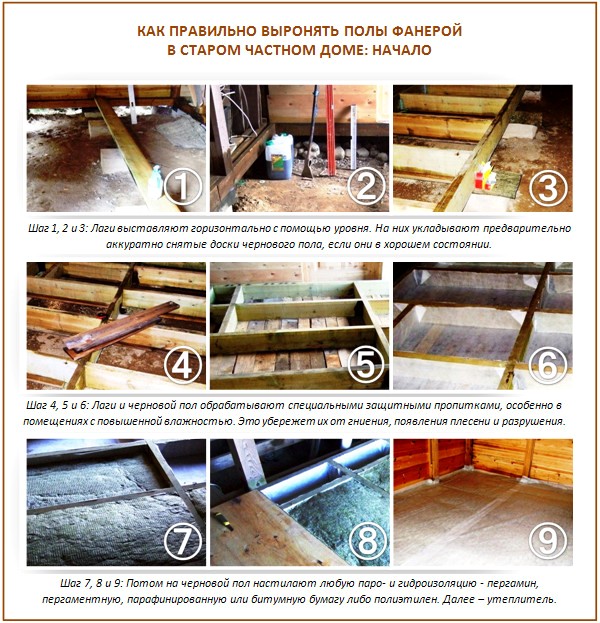
Front stacking plywood sheets preparing the base. Remove old surface to concrete, clean, vacuum. The concrete surface must be perfectly clean and dry. Now, using the level, you need to determine the boundaries of the new surface, and you can proceed to the preparation of the lag. For them, you need to purchase ready-made wooden blocks. They can be purchased in specialized stores or construction markets.
When buying, you need to pay attention to what kind of wood they are made of, determine the degree of dryness
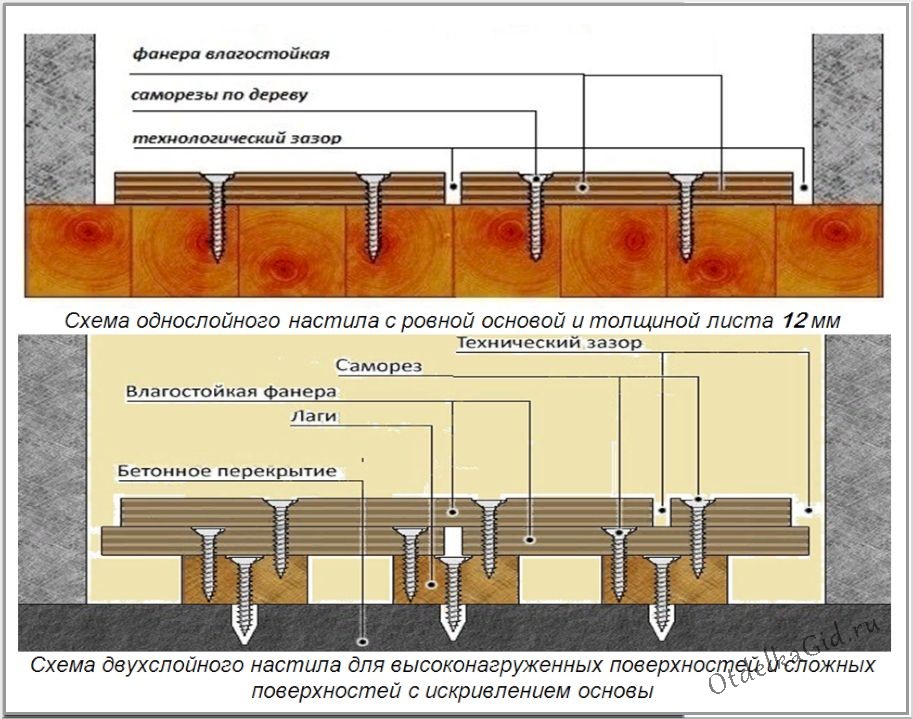
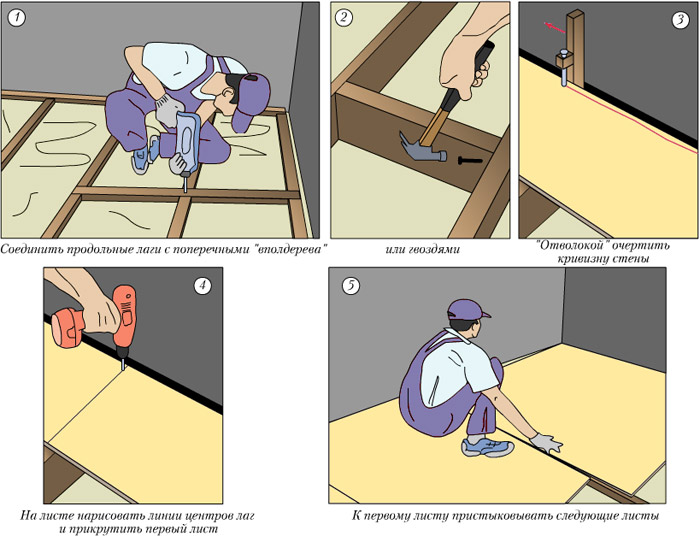
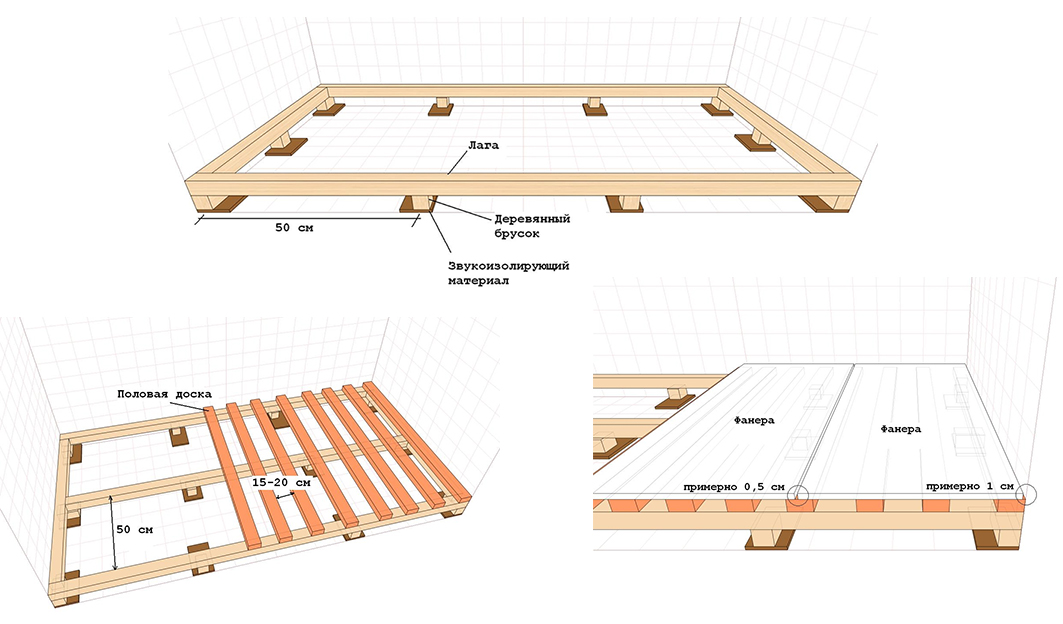
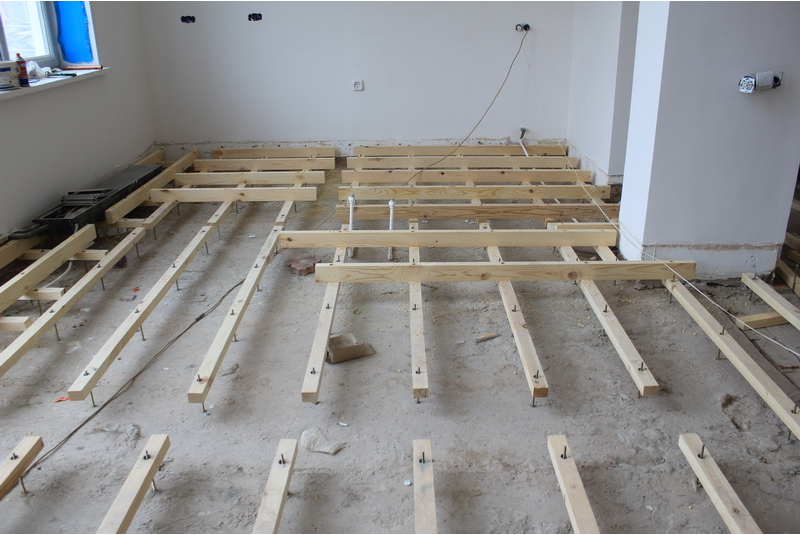
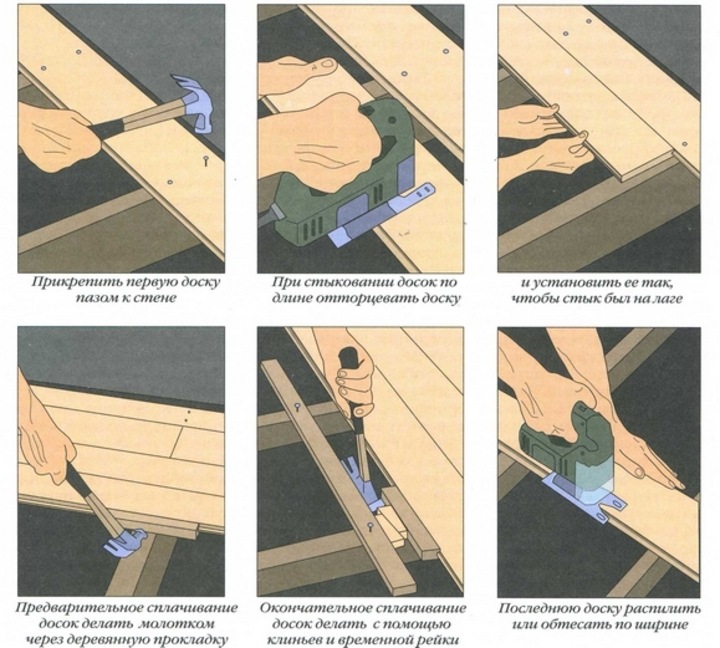
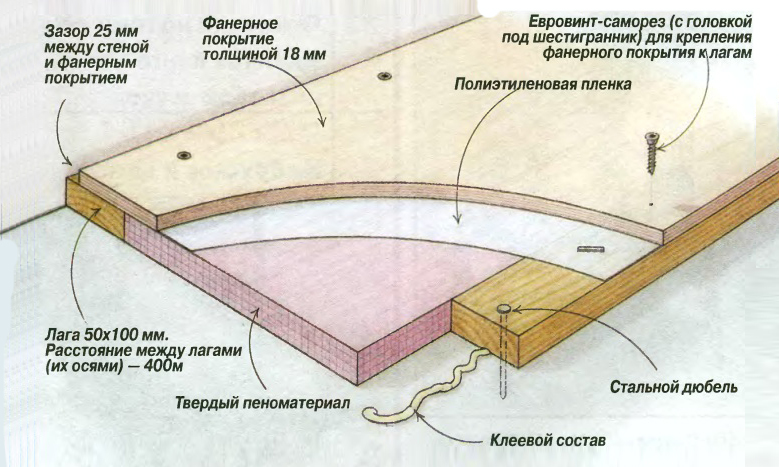
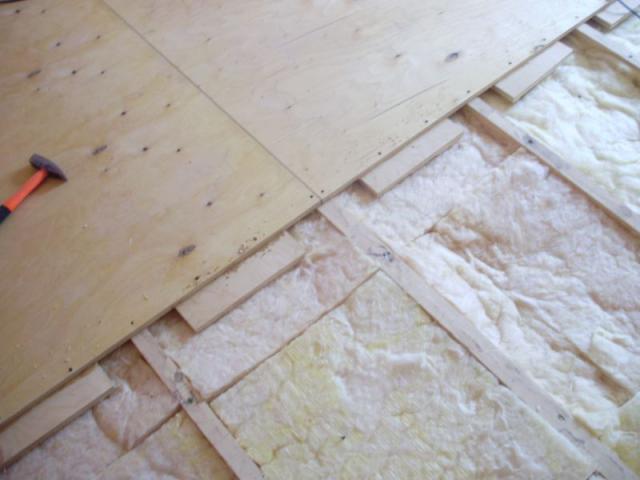
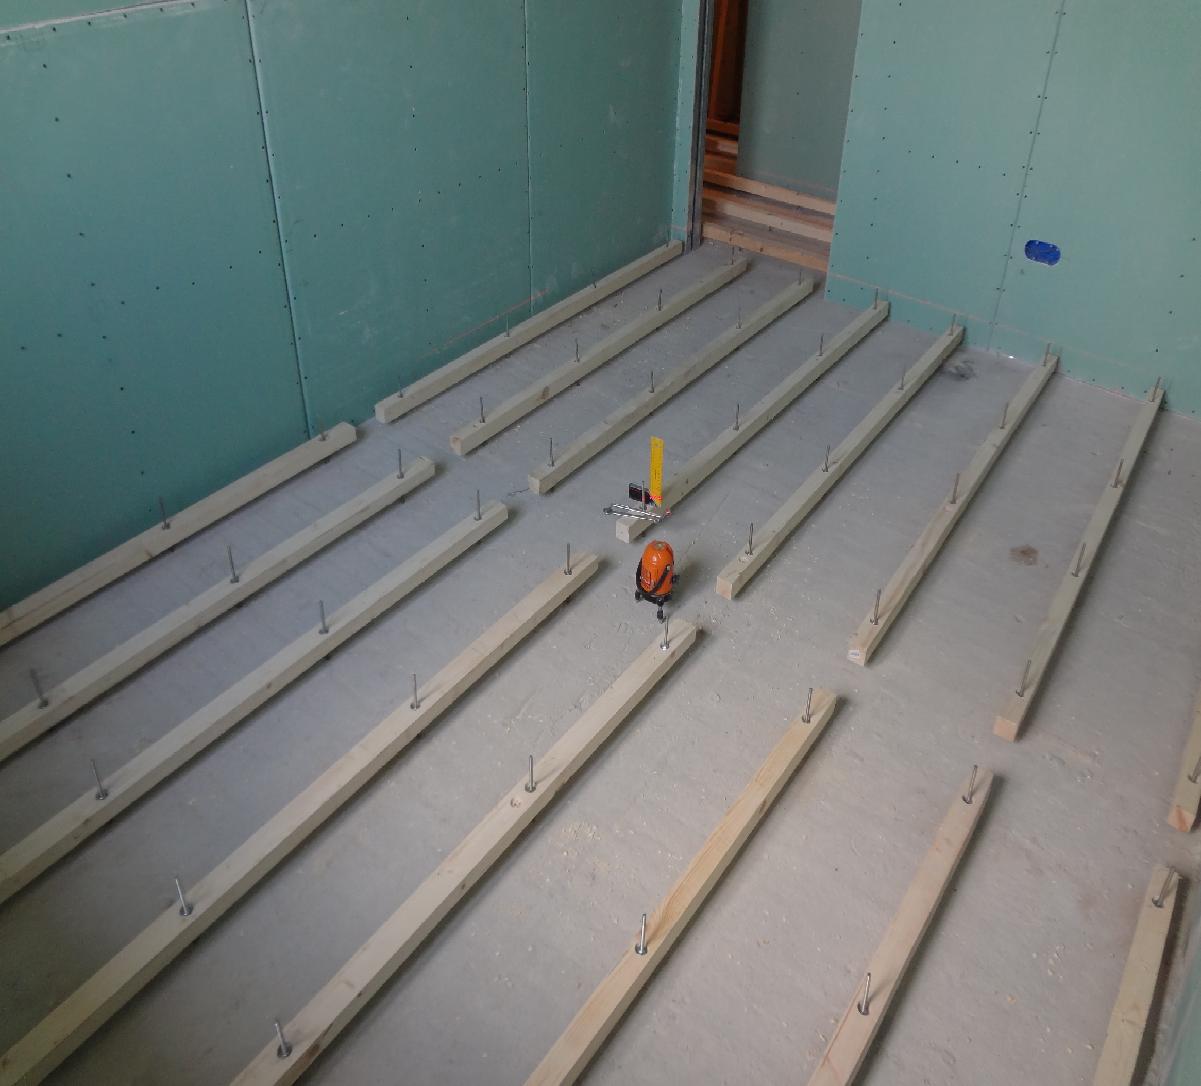
Under the beams, it is necessary to prepare wooden linings with a width of 10 to 15 cm, and a length of up to 20 cm, a thickness of 2.5 cm.The logs are laid across the direction of the light that falls from the window, observing a distance of 40 to 50 cm.
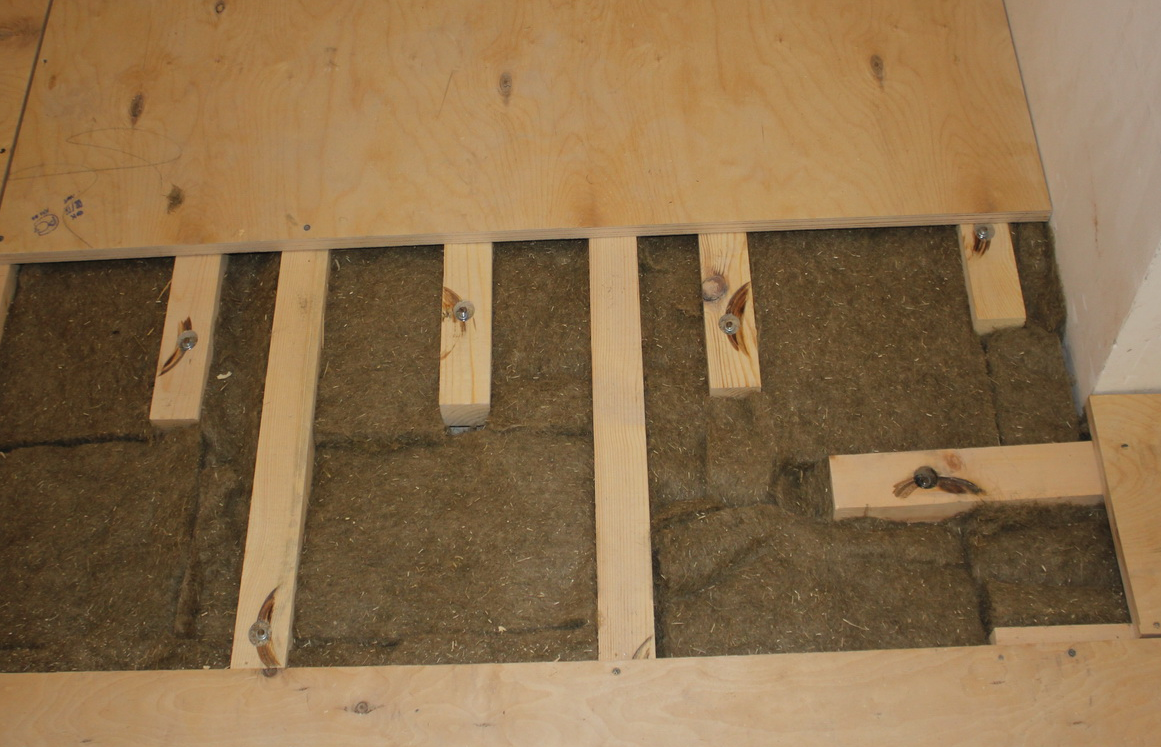
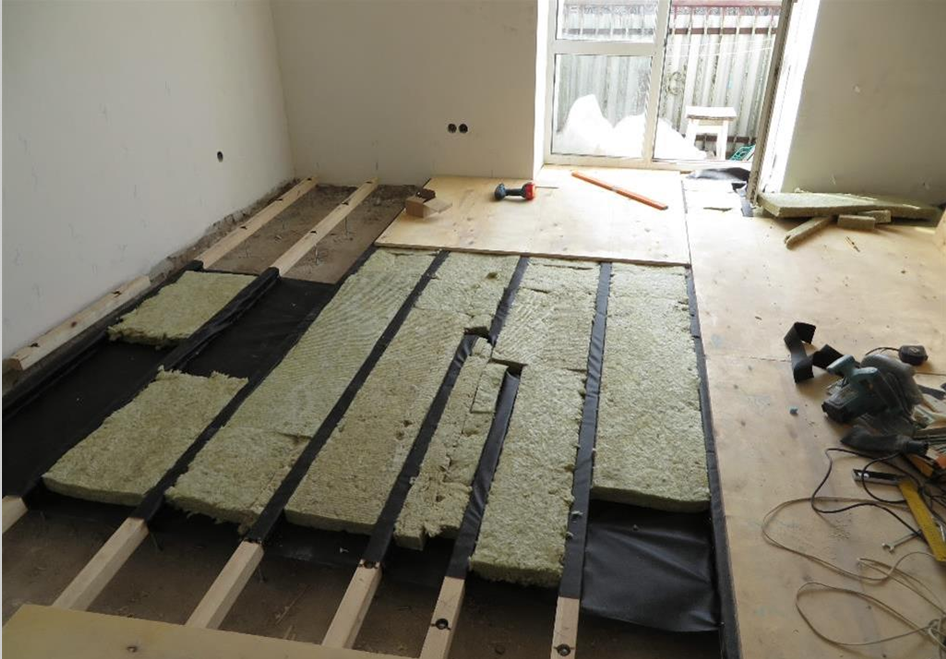
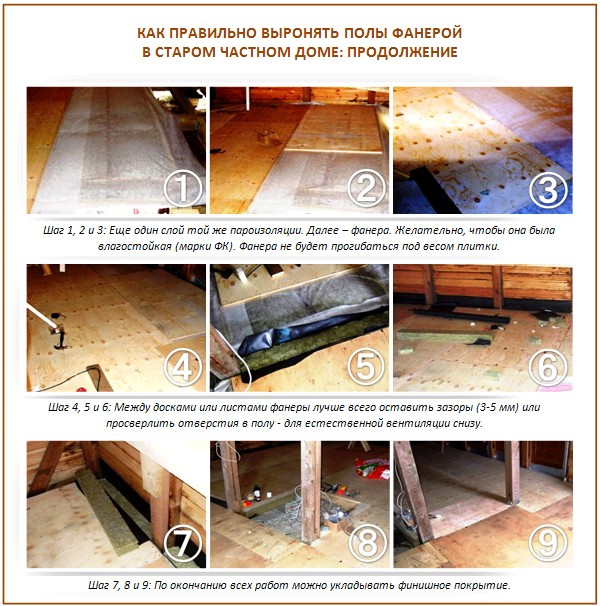
The space between the wooden blocks can be filled with sound and heat insulating materials, so that as a result, the floor surface is not only warm, but also quiet. When installing the lag, a little space should be left between the wall and the bar so that changes in the room temperature do not deform the floor covering.
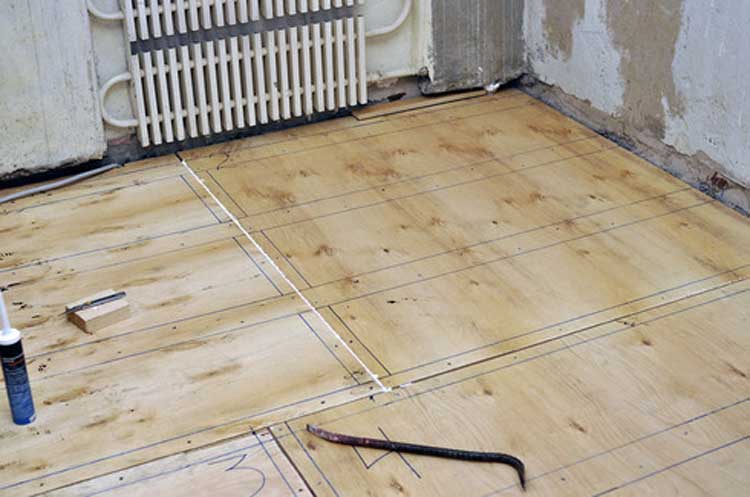
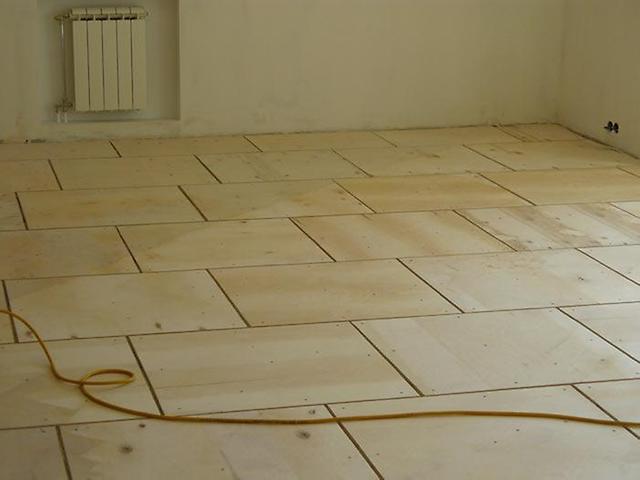
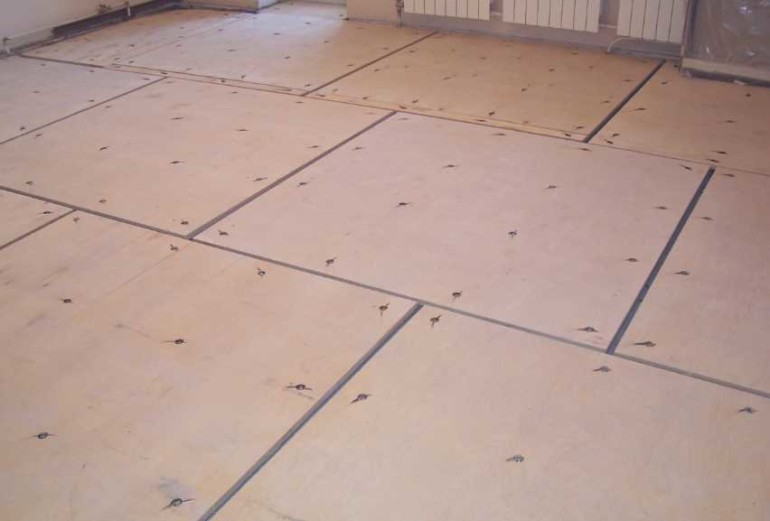
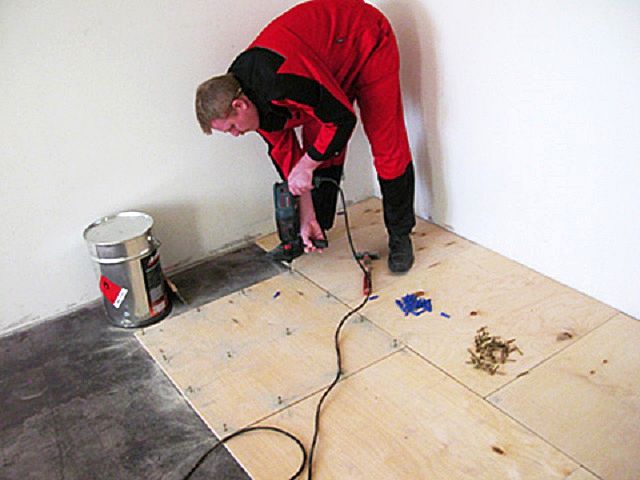
It is necessary to make the crate exactly according to the floor level marked in advance. After the concrete surface has been sheathed with a lag, you should proceed to fastening the plywood itself. The prepared surface of the plywood sheet should be divided into pieces approximately 75x75 cm using an electric jigsaw.
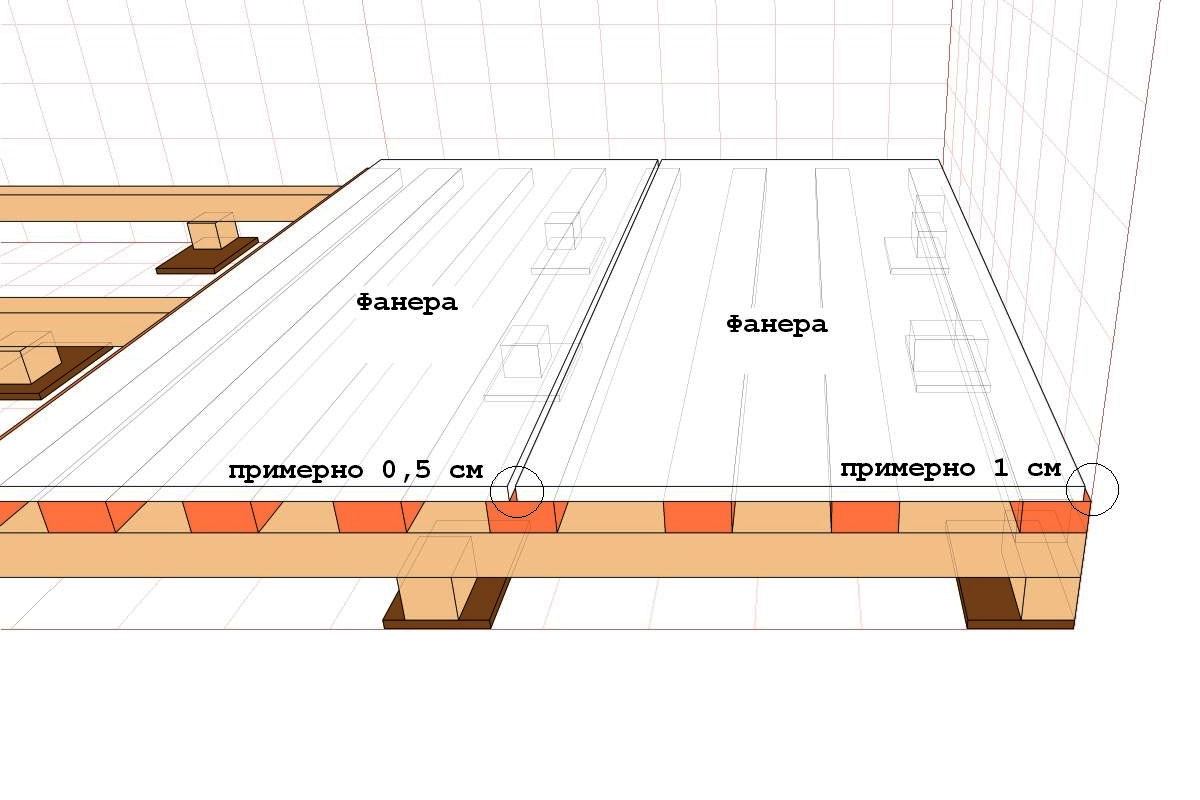
These small pieces of plywood must be screwed onto the prepared joists. Be sure to leave a gap of 2 to 4 mm between the plywood. If this is not done, then the floor will creak after a while.
This is because timber structures can change their volume. The process depends on the season, on the level of humidity in the room. And the gaps will allow the tree to freely change in size, while not changing the integrity of the floor.
To screw on the plywood, you need to use self-tapping screws and a screwdriver. This should be done, leaving a distance of 50 to 100 mm between the screws.
If you have to level the floor in the hallway, then you need to lay out the logs across the movement. This will make the floor surface more stable and reliable.
Leveling on battens should be used if the floor surface drops are more than 50 mm.
If the floor differences are not more than 10 mm, then it is possible to attach the plywood directly to the concrete surfaces without preliminary lathing.
Concrete floor leveling technology without the use of logs
Plywood for such cases should be chosen with a thickness of more than 18 mm. This is the simplest method compared to the previous one.
The following methods can be used to secure plywood to the floor surface:
- with glue;
- regulation.
To attach plywood sheets using adhesive solutions, it is necessary to take into account that there should not be significant level differences on the required floor surface. The concrete surface must be perfectly dry with minimal moisture before applying the glue.
What I will never do on my next renovation (collection of reviews)
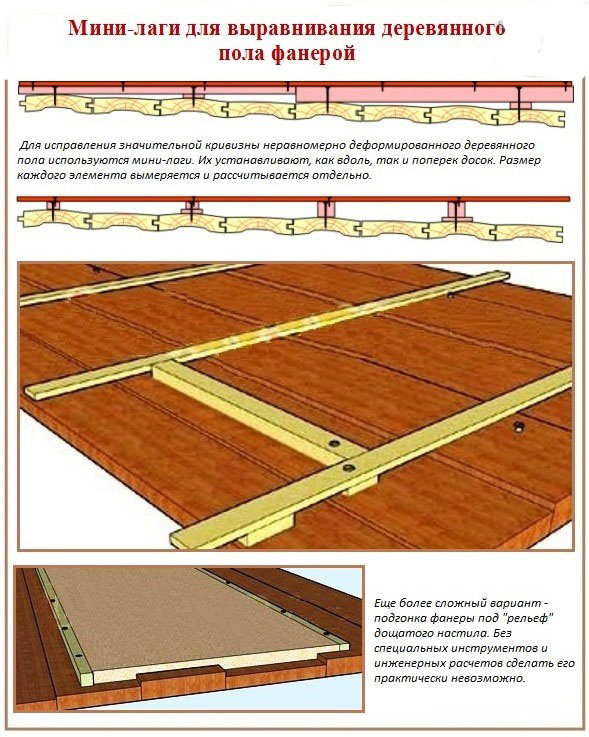
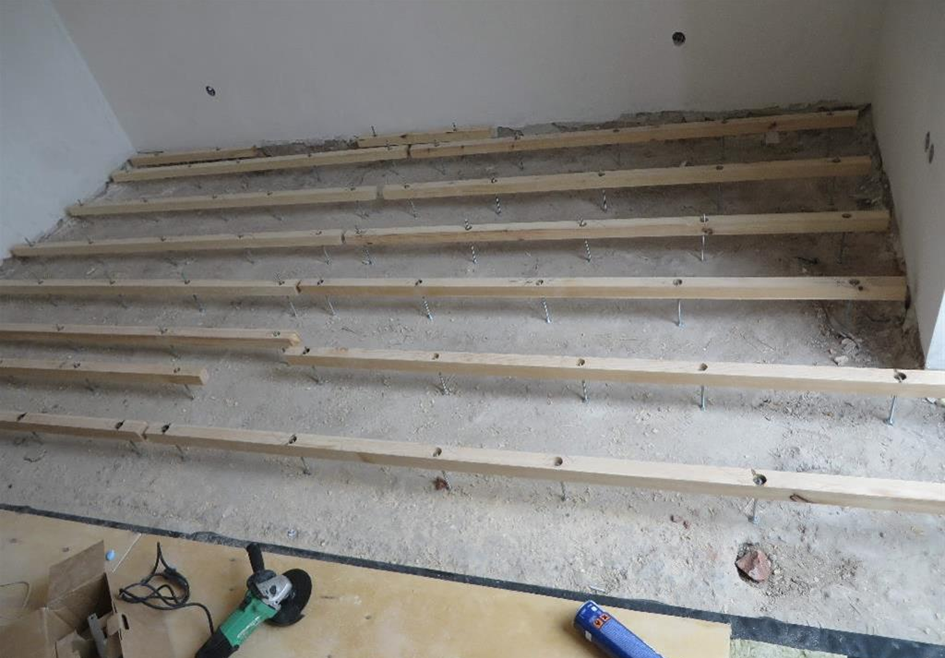
The adjustable method is not very popular. For it, specialized adjustable racks are used to level the surface. The plywood is laid in two layers on wooden blocks. The thickness of the first layer is 0.2 cm, and the second layer should be slightly less.
Stage 7.We attach the plywood to the base correctly
Wood, of course, is a hygroscopic material. Therefore, the maximum humidity of the room, where the floor was leveled in this way, should be only 68%. And if the plywood has not yet been processed before, then even up to 60%. At air humidity up to 85%, plywood will begin to exfoliate in a month... This is about the working conditions. And now about the technology itself.
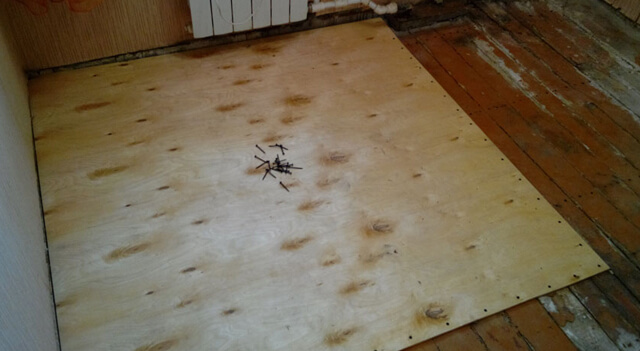
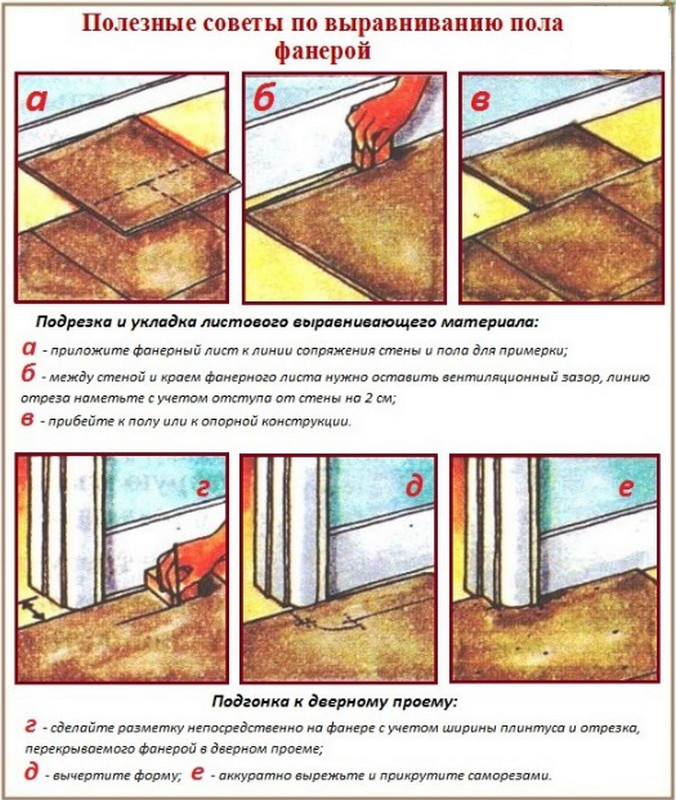
Aligning plywood to the base
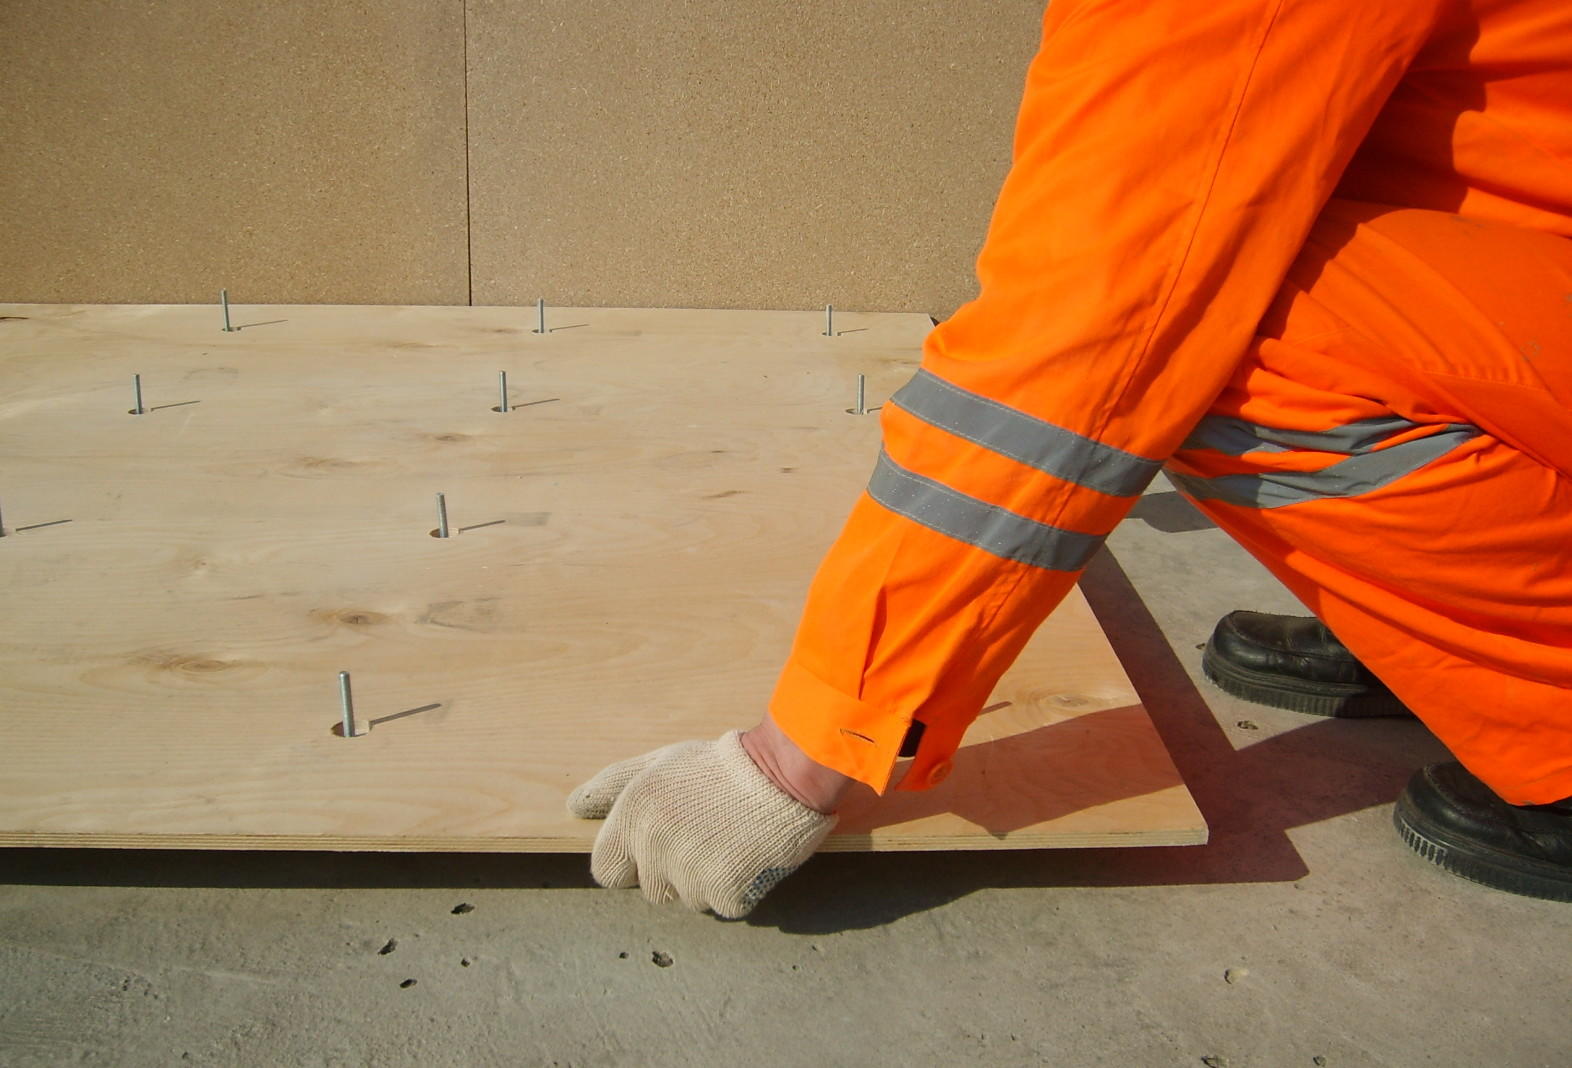
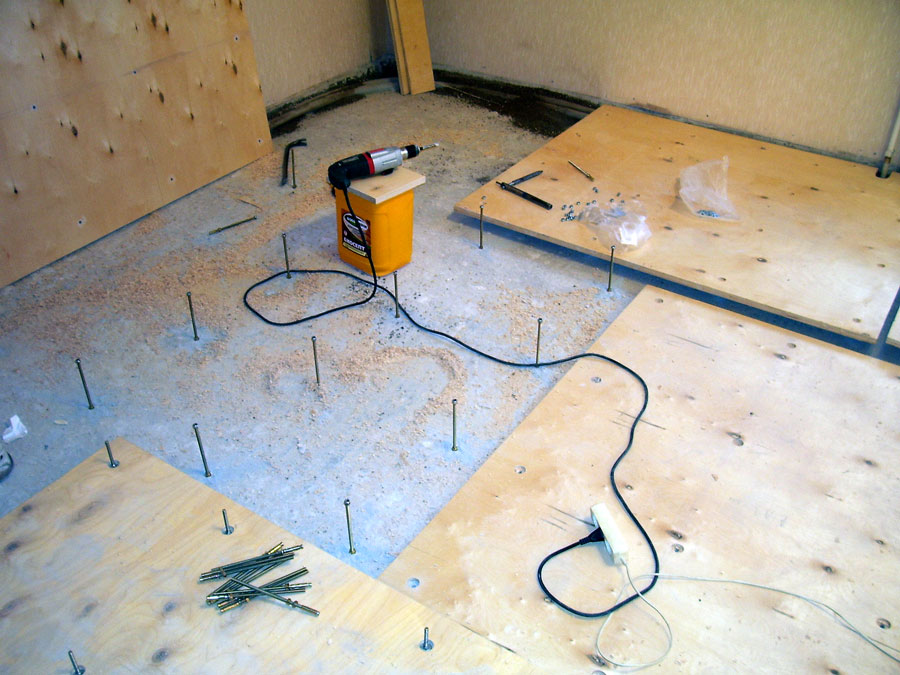
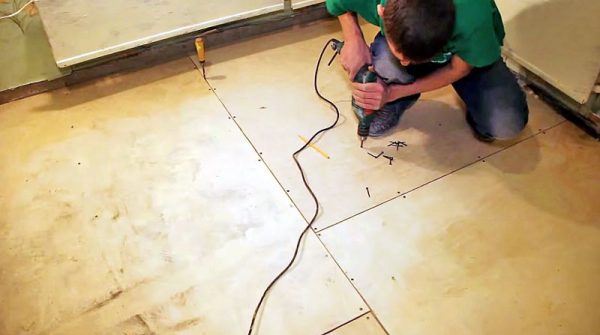
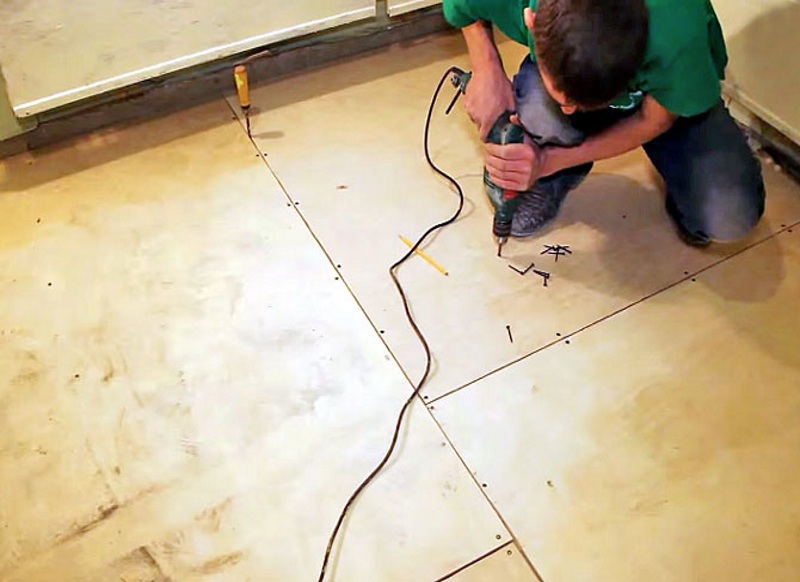
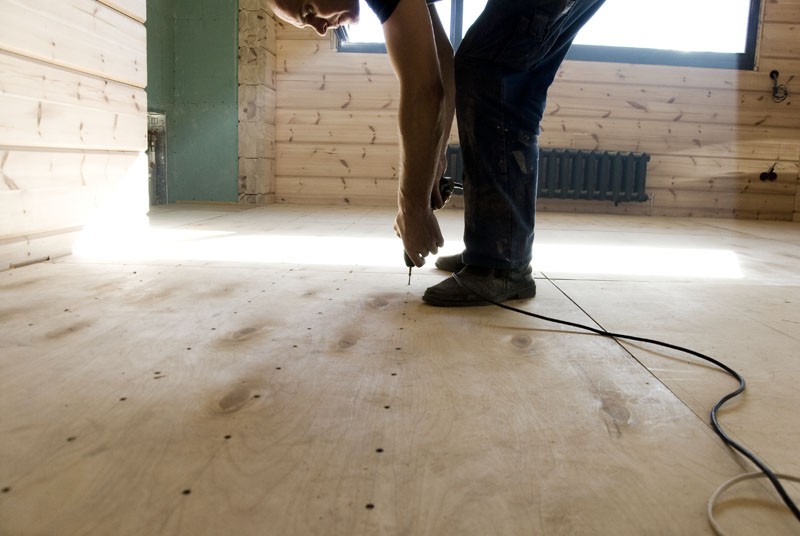
Plywood must be properly attached to a concrete or wooden base. This method is called "envelope": we drill in the corners, in the middle of each side, and in the very center. For a concrete floor, use a carbide drill bit - a regular one will immediately dull.
Next, the sheets are removed, and blind holes are drilled in the concrete floor for dowels according to the marks from the previous ones. The dowels are driven into them, after which the plywood is put in place, and the screws are driven into place with a drill and a screwdriver with a special insert under the slot-cross until the head is drowned. Use self-tapping screws for fastening plywood with a length of 32, 41 or 55 mm, dowels are more suitable for SORMAT 6. Drill the hole with ¾ of the self-tapping screw. Although some builders do not complicate their life with such subtleties, and drive the head of the screws into the plywood with strong hammer blows. As a result, the strength of the fasteners is compromised.
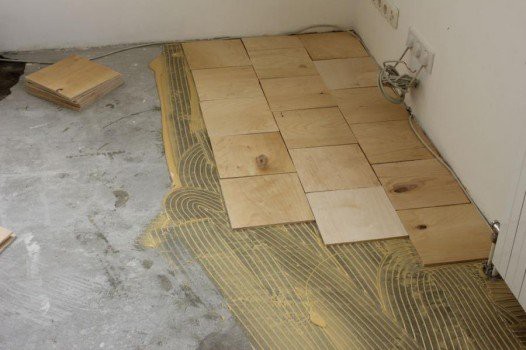
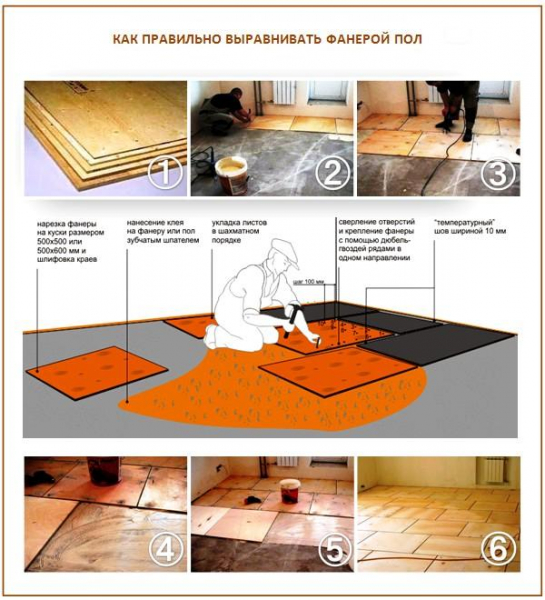
Here's how to properly lay plywood with glue only:
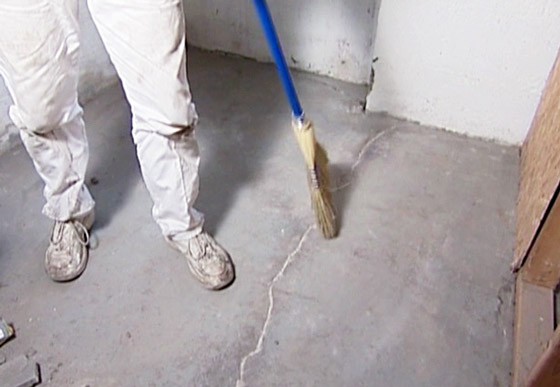
Step 1. Thoroughly clean the room from dust and dirt. This should be done not so much for hygienic reasons, but because even small debris can prevent the plywood from laying evenly.
Step 2. We put an insulating layer: glassine, polyethylene or an ordinary substrate under the laminate.
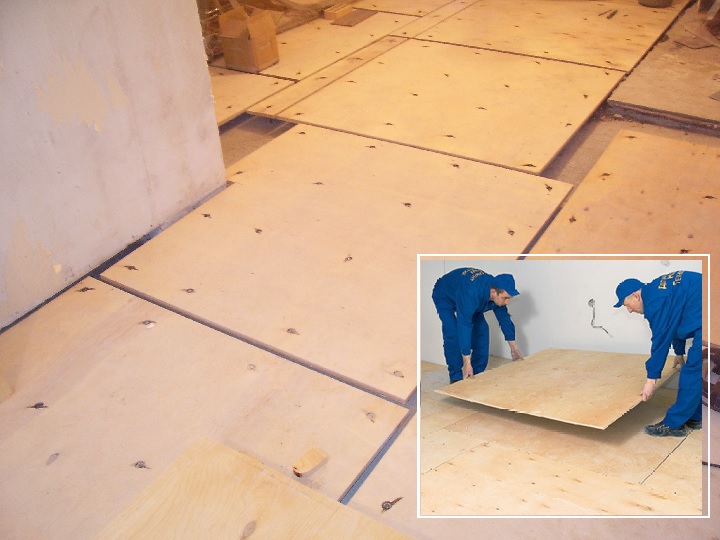
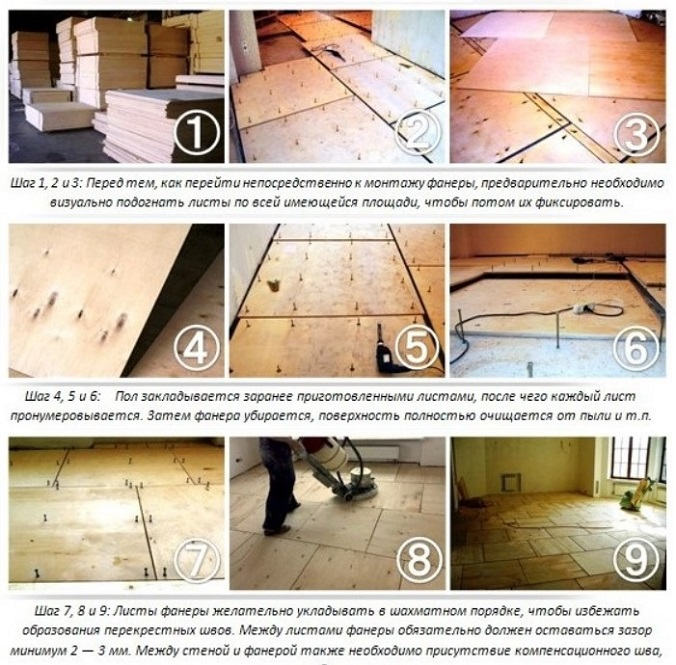
Step 3. Now lay out the sheets of plywood without fastening - the way it will be mounted later. Match items to size, trim as needed, and label all sheets to avoid confusion.
Step 4. Remove the plywood and cover with linseed oil if necessary
Better in two layers, and special attention should be paid to the ends
The drying oil does not allow the plywood sheets to deform, but at the same time the seam between them leaves sufficient to compensate for thermal expansion
It is important!
Step 5. As soon as the sheets are dry, you can lay them
When laying, make sure that all four corners do not come together.
Step 6. If you will be laying thin linoleum, and not laminate, then additionally fill the plywood joints with sealant. They will not push through, as well as interfere with thermal expansion.
Step 7. All that remains is the underlay and the finishing coat - the floor is ready!
And to glue the plywood to the subfloor, take a Bustilat-type glue or use ordinary parquet mastic. Do not leave gaps - this is a kind of "floating plywood floor". You can only glue the ends of the sheets. But under the parquet, plywood must be glued and fixed with self-tapping screws 5x60 mm in dowels, and the sheets should be laid with mounting slots of 2-3 mm. For this purpose, it is better to use carbamide glue, which in essence is a solution of carbamide resin, which includes hydrochloric and acid hardeners, and gypsum or starch filler.
Aligning plywood to logs
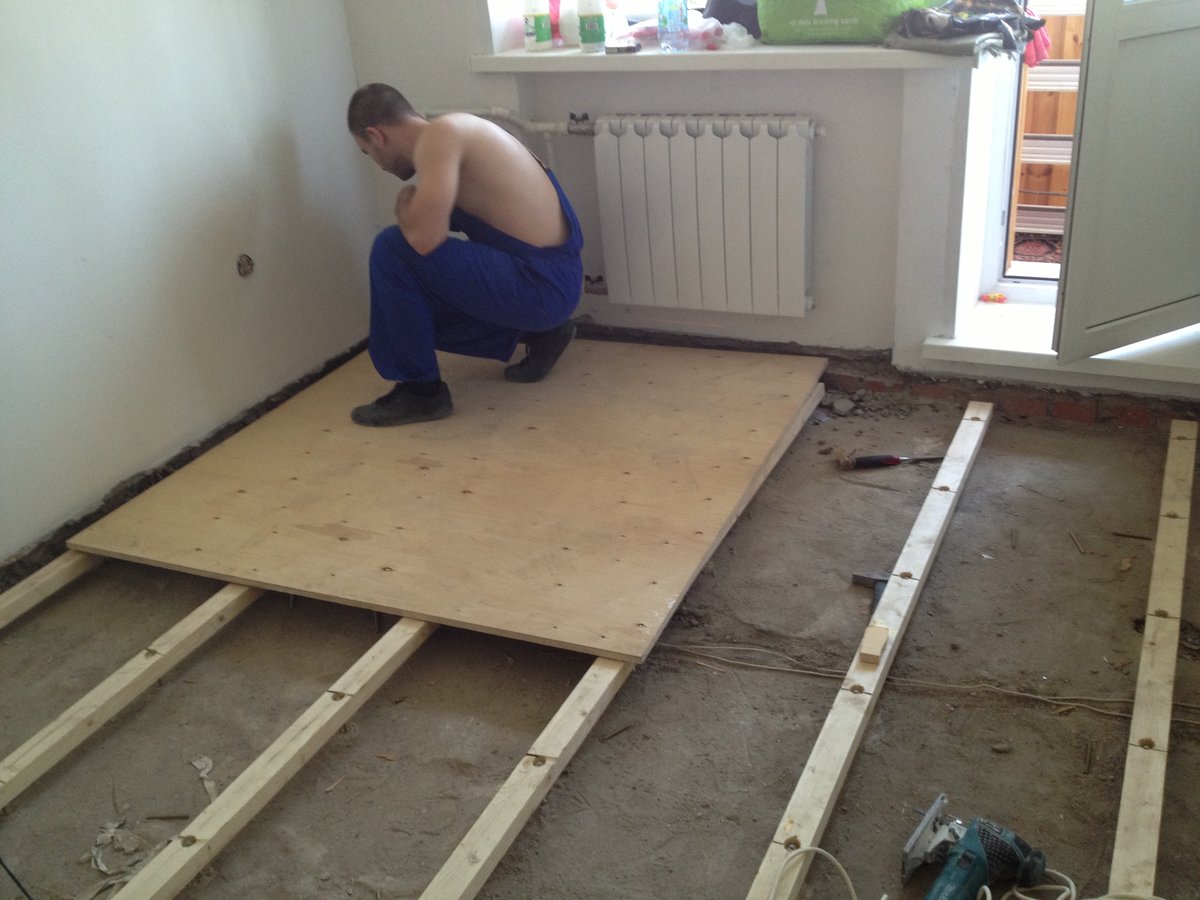
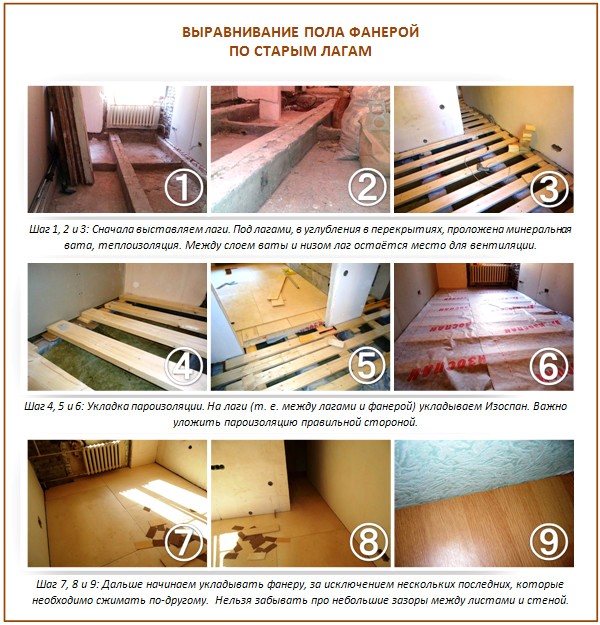
And now about the installation by lags. The plywood floor on the logs is good because it is convenient to hide any communications under it, and even arrange additional heat and sound insulation. You can arrange it without any problems, there is nothing complicated here:
- Step 1. We set the logs by level and fasten them to the floor slabs. Use screws with anchor bolts or plastic dowels for this purpose.
- Step 2. If the bars themselves have not been processed by anything before, now is the time. High-quality waterproofing will allow them to last much longer.
- Step 3. Mark and drill holes for fastening in the plywood sheets. If you will "sink" the hats, drill holes for them a little larger than necessary.
- Step 4. Lay the plywood sheets across the log. On adjacent sheets, screw in the screws only in a staggered manner. Leave a gap of up to 3 mm between the sheets - for thermal expansion.The edges of all plywood sheets must fit exactly on the logs, and in no case "hang" in the air.
- Step 5. Now you can lay linoleum or laminate.
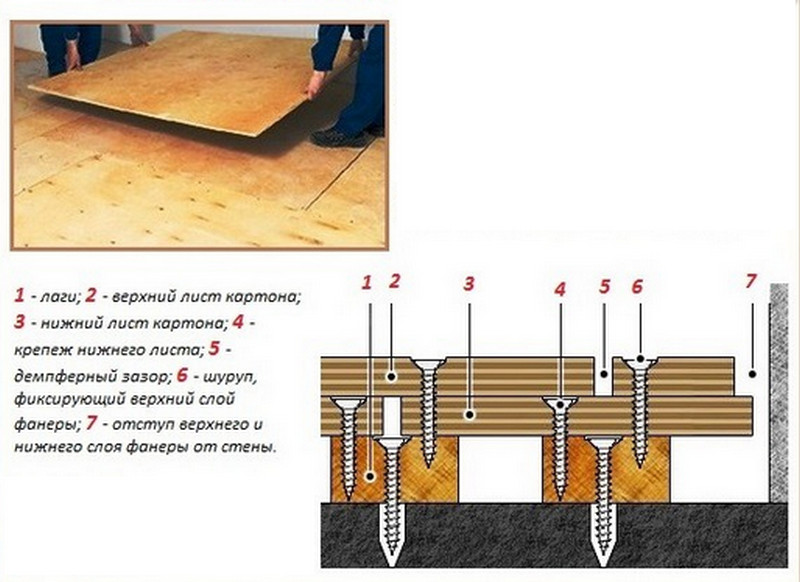
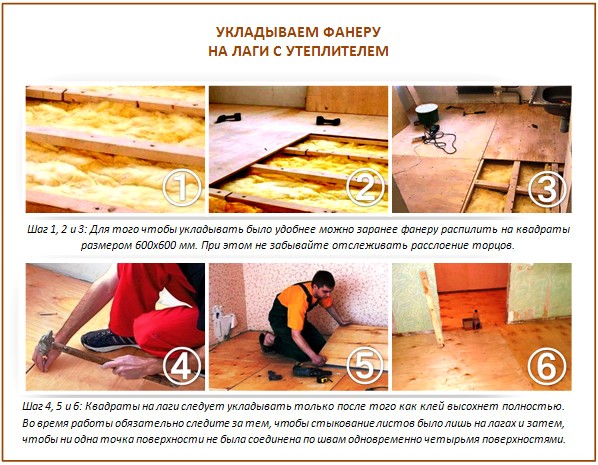
But it is more convenient to fix plywood not just on logs, but on a crate made of beams - cells of 40x50 cm.On top of such a structure, lay glassine, which will well protect the floor from condensation, and only then - sheets of plywood about 18 cm thick and cut into squares 60x60 cm. For a house with a complex floor structure, this is an indispensable option:
You can also level the floors with plywood using old logs:
And even with insulation:
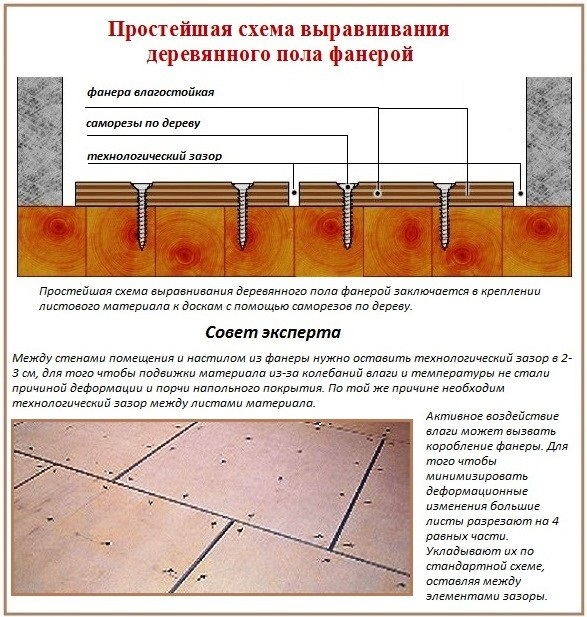
And here are the standard requirements for the width of the gaps between the sheets:
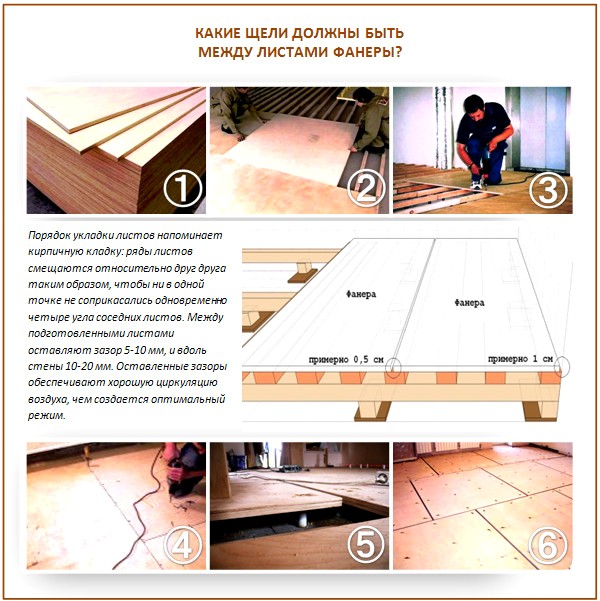
Although many experienced builders are sure that it is better not to leave large gaps between plywood sheets - small gaps of 1 mm, filled with elastic glue or sealant, are enough.