Terms of use
Tandoor is a unique and multifunctional oven. In it you can bake cakes and pies, fry meat, bake potatoes and cook many more dishes.
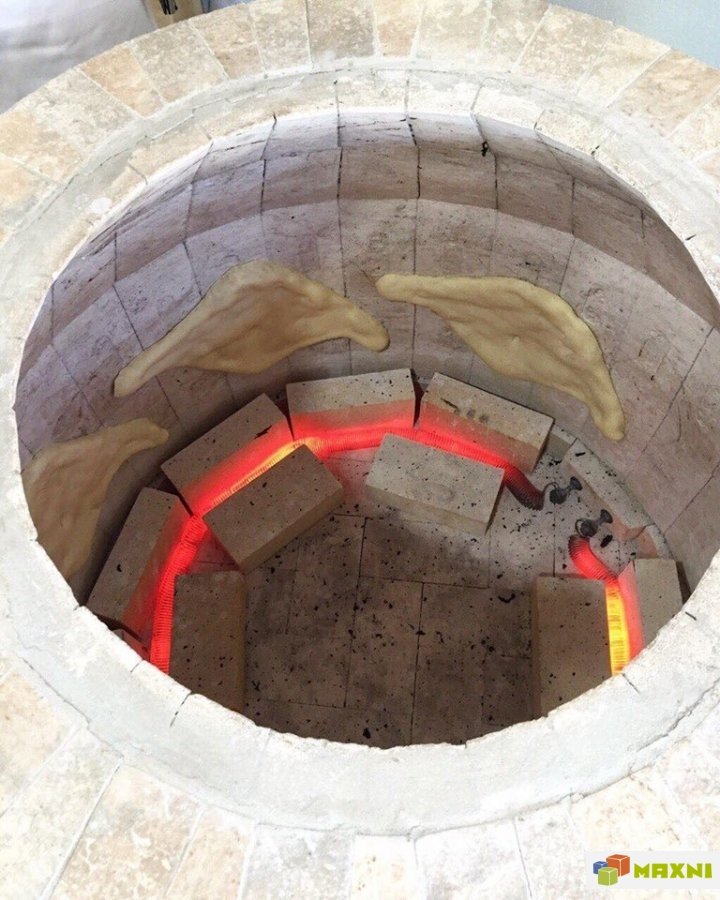
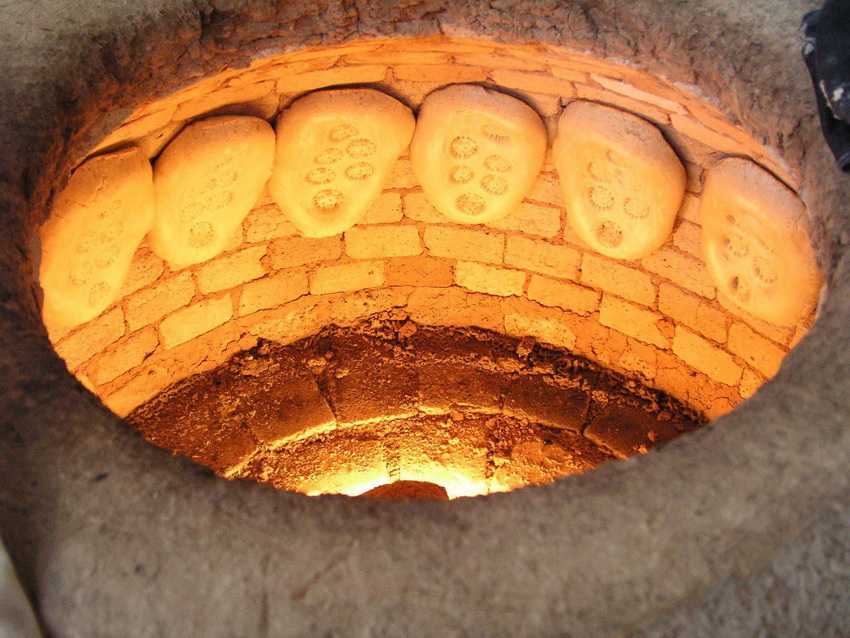
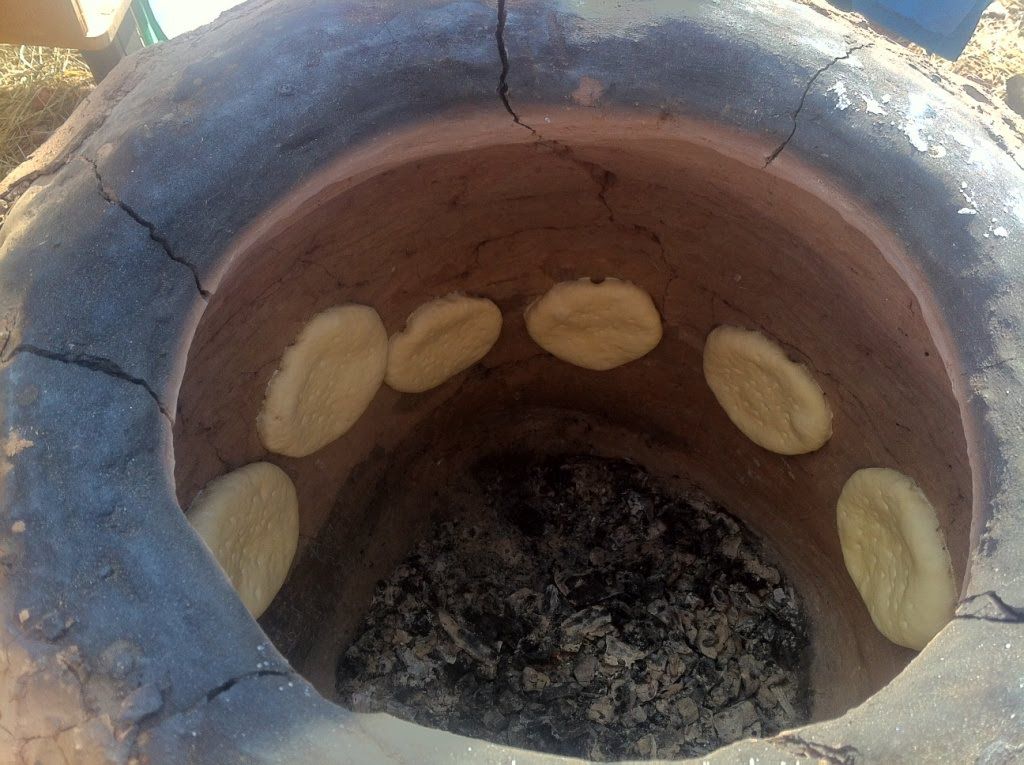
Flour baked goods are "glued" to the walls of the tandoor. This is how the process of making samsa looks like:
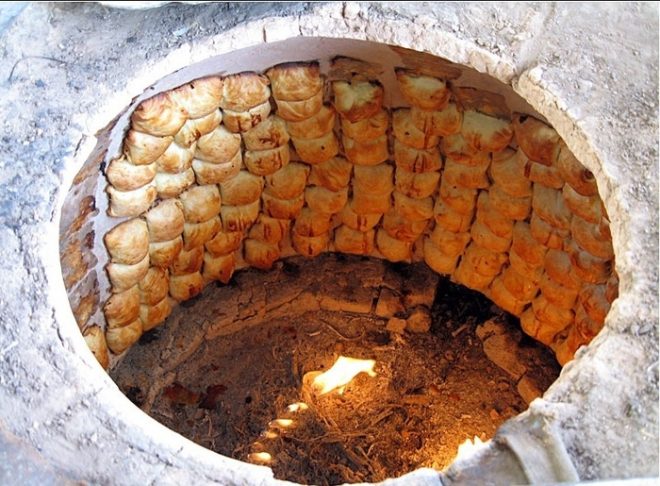
The finished pies are pried with a special metal spatula, substituting a metal sieve with a long holder. The pastry falls into a sieve and is taken out.
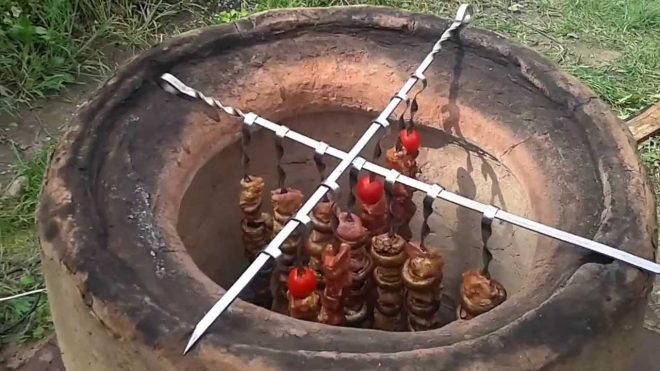
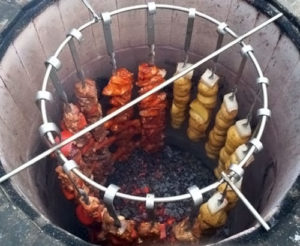
The kebab is prepared by hanging the skewers vertically on a special stand and closing the top with a lid. In the absence of such, you can build just such a structure from two empty skewers or thick metal rods:
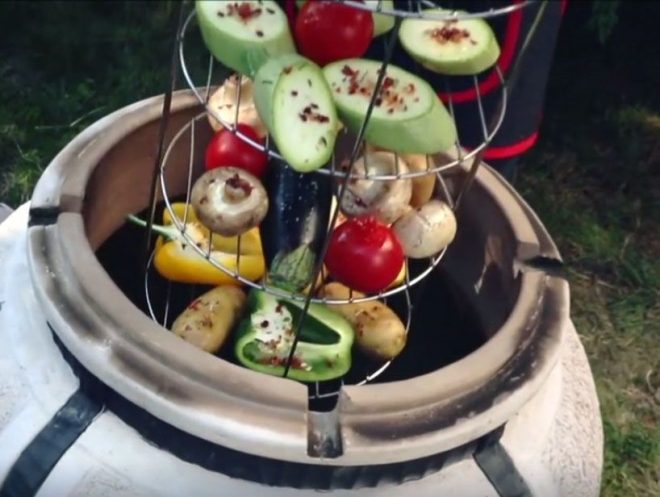
Vegetables are baked, laid out on special grates. You can also put pizza, a large pie with a filling, or put in tin bread. Assembling such a device with your own hands is not difficult. The grill is suspended in the same way as skewers with barbecue:
Cooking begins after the wood burns out and only the coals remain, giving heat. The tandoor heats up to a temperature of about +450 ° C and gradually cools down. It stays hot enough for cooking for 6-7 hours.
It is important to remember that there is a risk of getting burned, so work with the tandoor should be done carefully and in no case should children be allowed near it. A tandoor built near a private house or in a summer cottage can easily replace both a grill and an oven. It can be used at any time of the year, and the consumption of firewood is so economical that it cannot even be compared with other stoves.
If the question is what to build - a tandoor or a barbecue, the choice is obvious
It can be used at any time of the year, and the consumption of firewood is so economical that it cannot even be compared with other stoves. If there is a question about what to build - a tandoor or a barbecue, the choice is obvious
A tandoor built near a private house or in a summer cottage can easily replace both a grill and an oven. It can be used at any time of the year, and the consumption of firewood is so economical that it cannot even be compared with other stoves. If the question is what to build - a tandoor or a barbecue, the choice is obvious.
DIY tandoor, budget option
If you decide to build a tandoor in the country with your own hands and do not want to invest a lot of money in it, then pay attention to the following example.

First of all, an Asian stove needs a high-quality foundation. The standard for it is 100 * 100 cm. The thickness of the slab is 10 cm. It is necessary to dig a hole 15 cm deep. Use sand at the bottom, and fix a reinforcing mesh at a distance of 5 cm from it. For the formwork, 15 cm roofing boards were taken (10 cm should remain in the ground, and 5 should rise above the ground). Concrete is poured only when everything is leveled. It will have to dry for at least 72 hours.

Refractory bricks were chosen for the base and walls.
Important! Fireclay bricks are ideal for tandoor, as they do not lend themselves to temperature changes and does not collapse.
The base of the stove will be round, so you will need tandoor blueprints to cut out a 75 cm diameter piece.
Advice! The excess parts of the bricks for the circle can be removed with a cut-off wheel.
The brick is laid on roofing material and attached to a refractory kiln mixture.

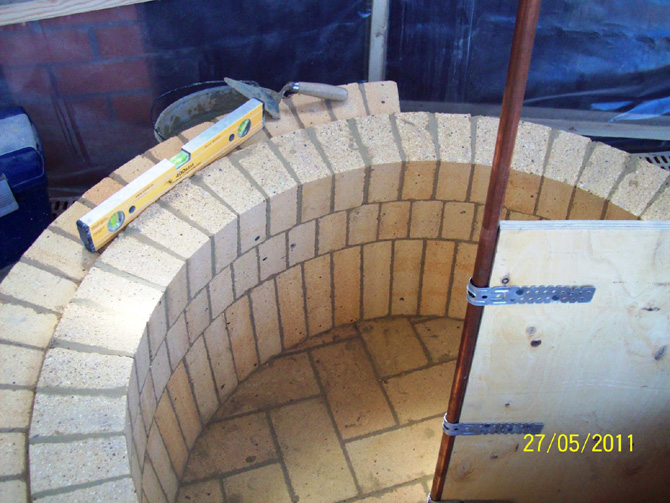
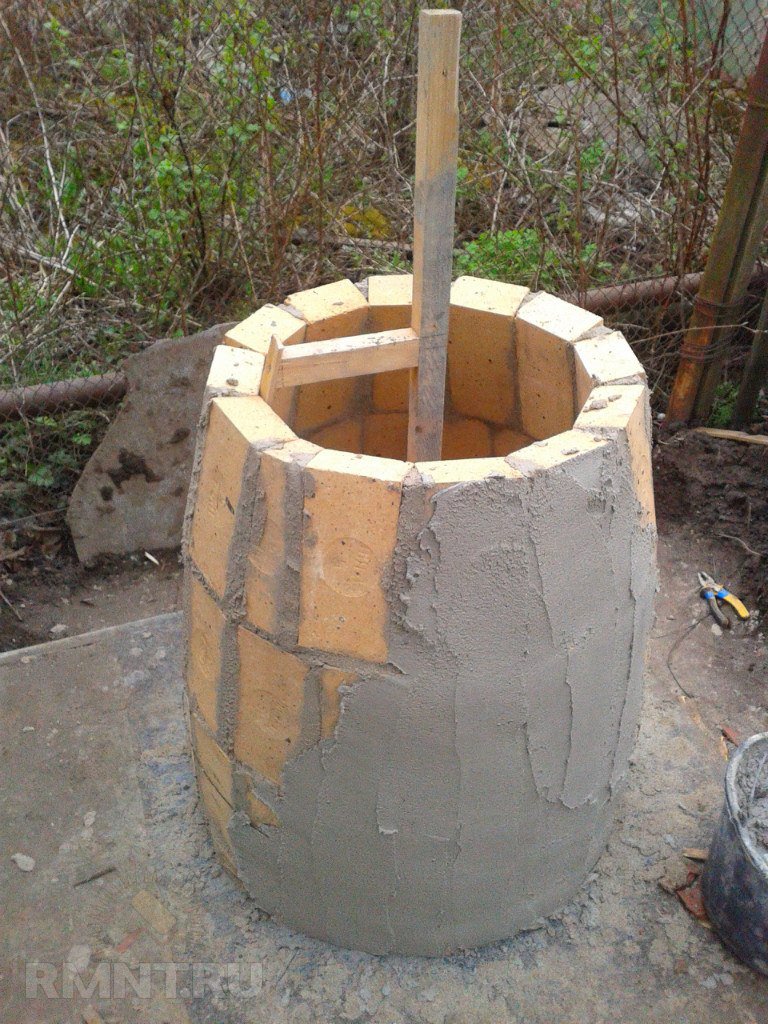
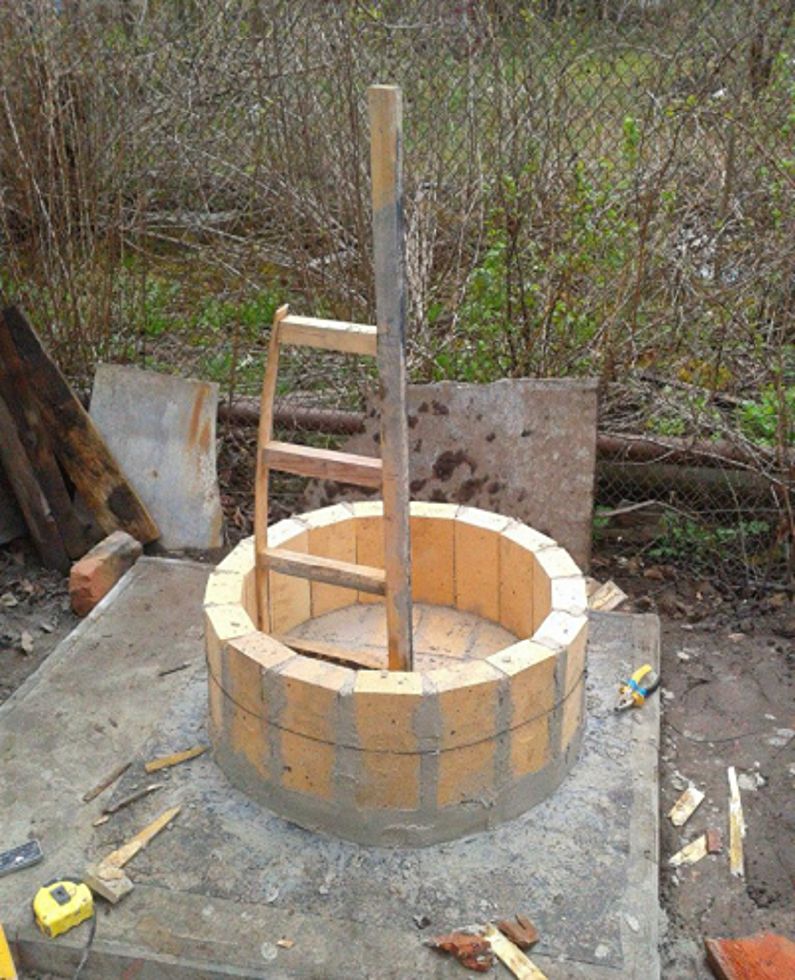
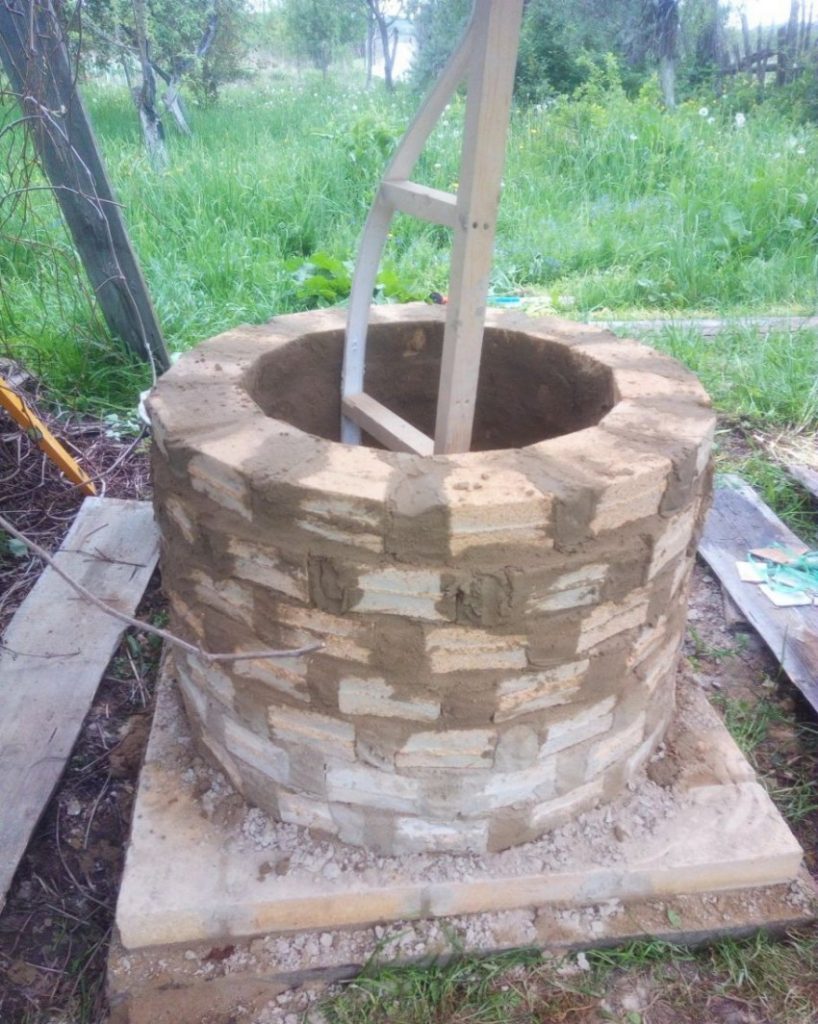
To make the walls look smooth and beautiful, you need a template for their construction.
Important! According to the rules, the tandoor has a height equal to the width of the base, and its neck should take 2/3 the size of the base.
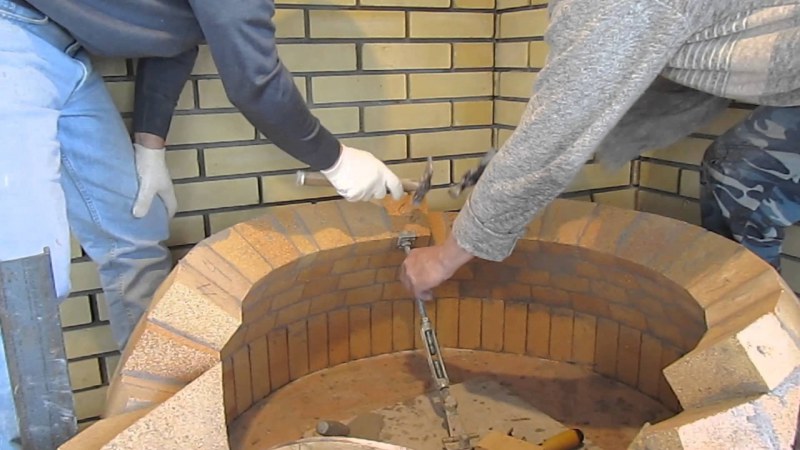
Bricks are laid in a vertical position. All seams are coated with mortar. The first row is covered with wire.
The second and third rows are laid out in the same way. Inside, the edges should fit as tightly as possible, and on the outside, they should be carefully smeared with a solution.
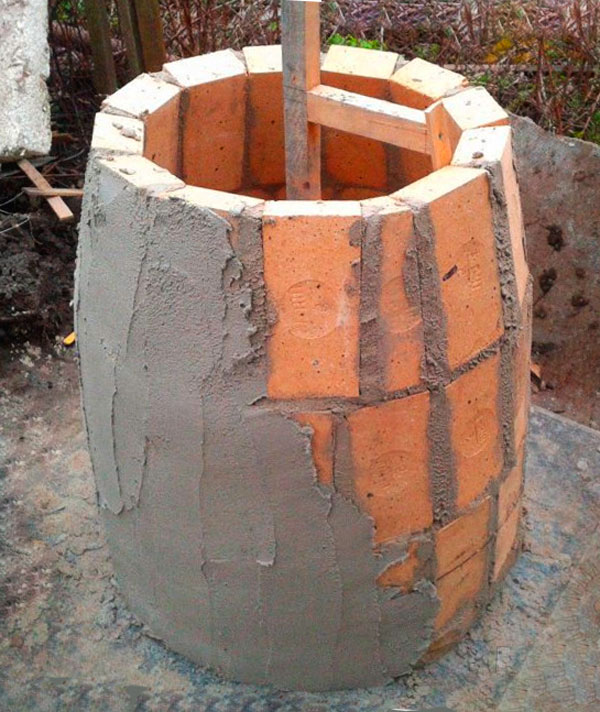

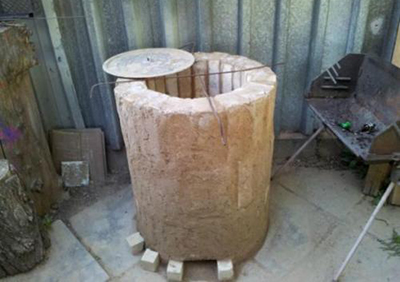
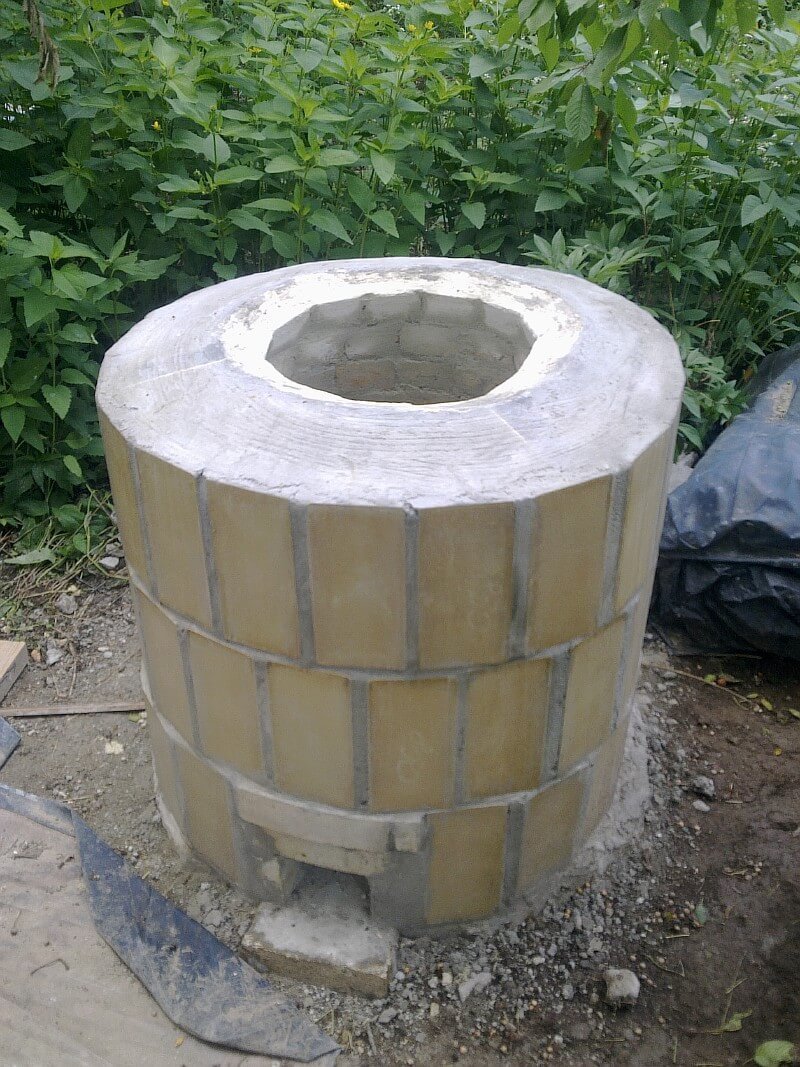
Do-it-yourself tandoor budget option. Photo

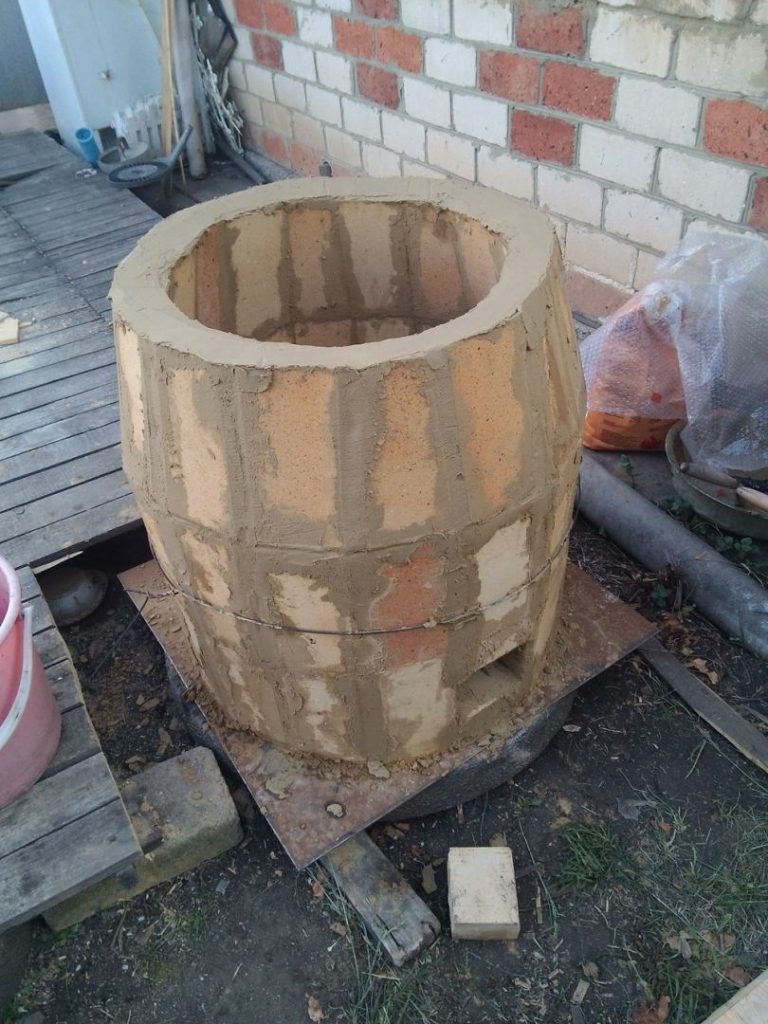
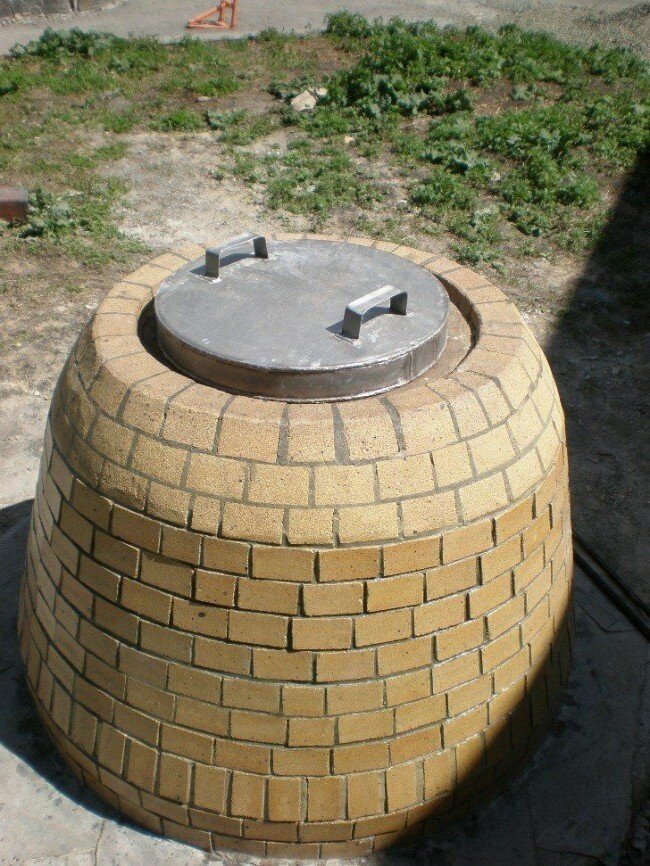
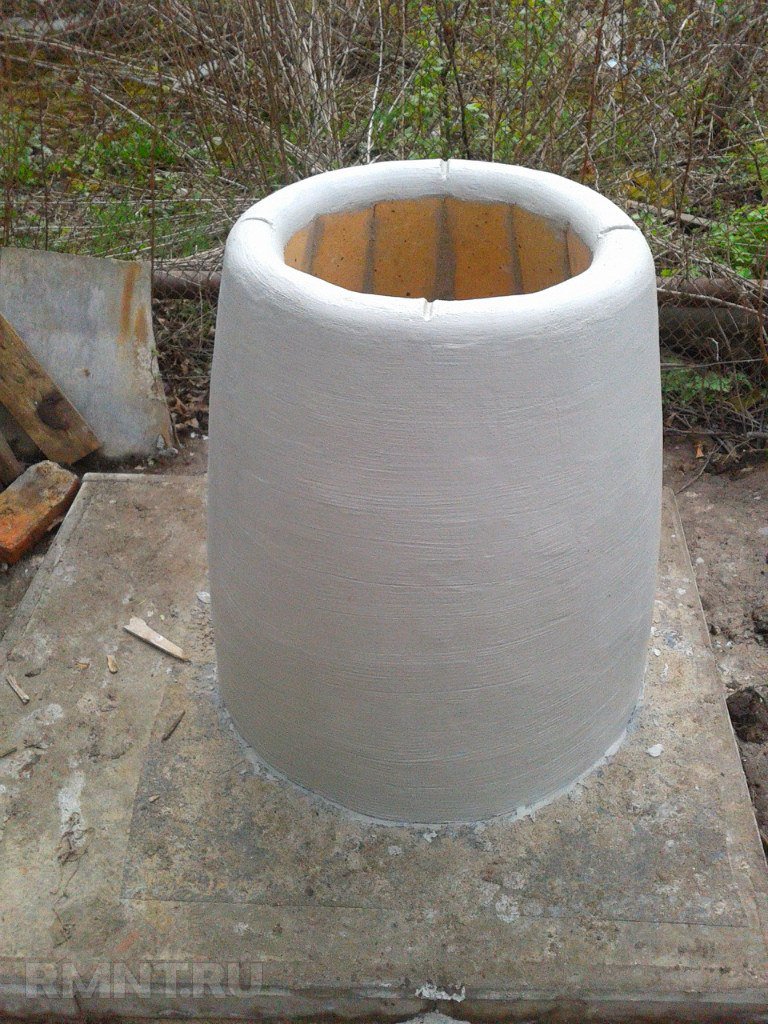
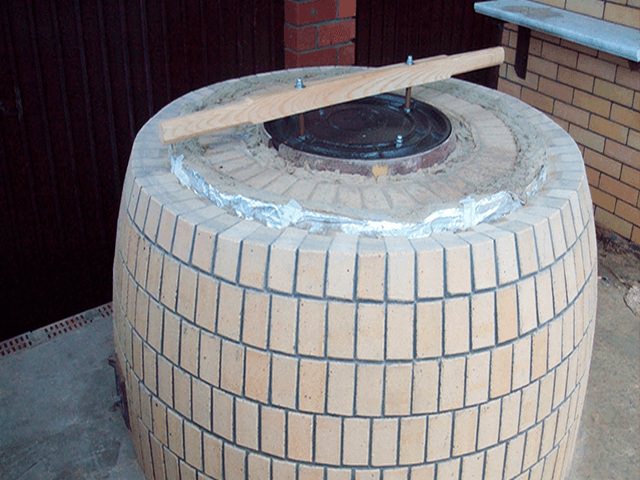
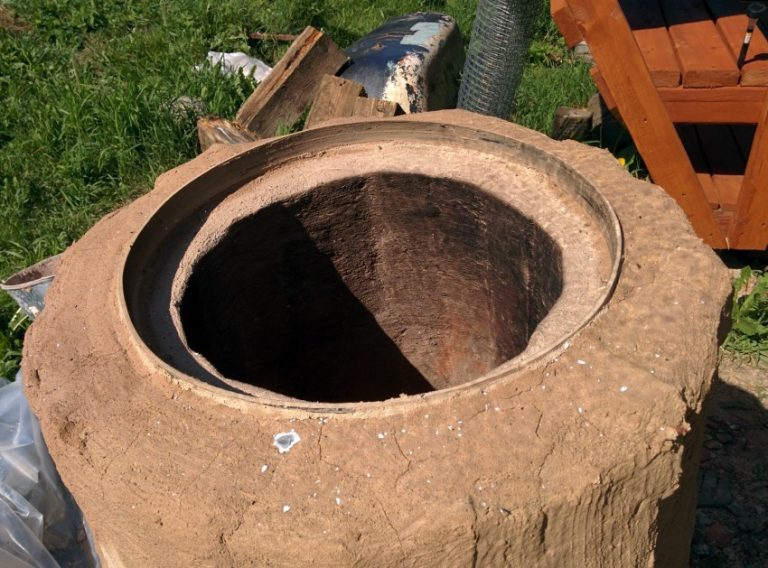
The finished barrel is plastered outside with oven mixture. The layer should be 1 cm.

Advice! While the budget tandoor is drying with your own hands, cover it from the sun or bad weather.
When the solution is completely dry, the tandoor is covered with refractory acrylic paint.
It remains to clean the finished oven inside from dirt after construction and dust and use it for your own pleasure.


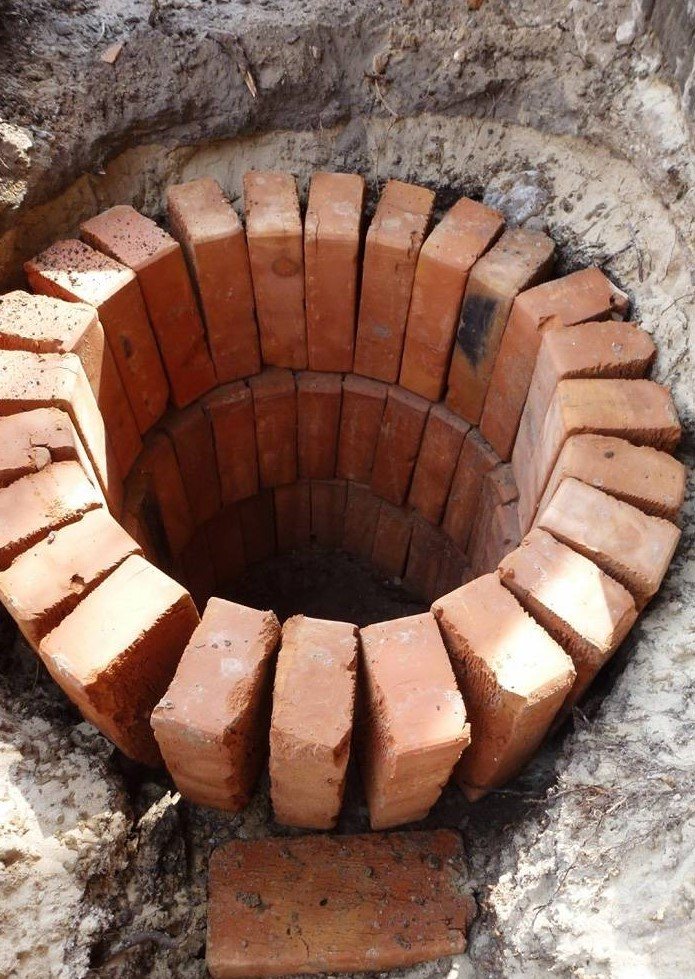
Stages of work on the manufacture of earthen tandoor
Choose a sandy place or dig a small pit, fill it with sand ten centimeters and tamp it. It will keep the heat.
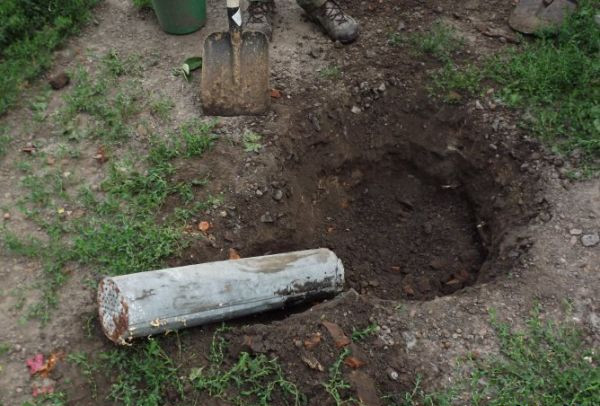
Photo 1. A small pit dug in a summer cottage must be covered with sand and tamped down.
Now take the foundation of the earthen kiln: place a steel grate on top of the sand layer, fill it with concrete. Level and check with a building level. After a week, the base of the tandoor will finally solidify, then it will be possible to start the main work.
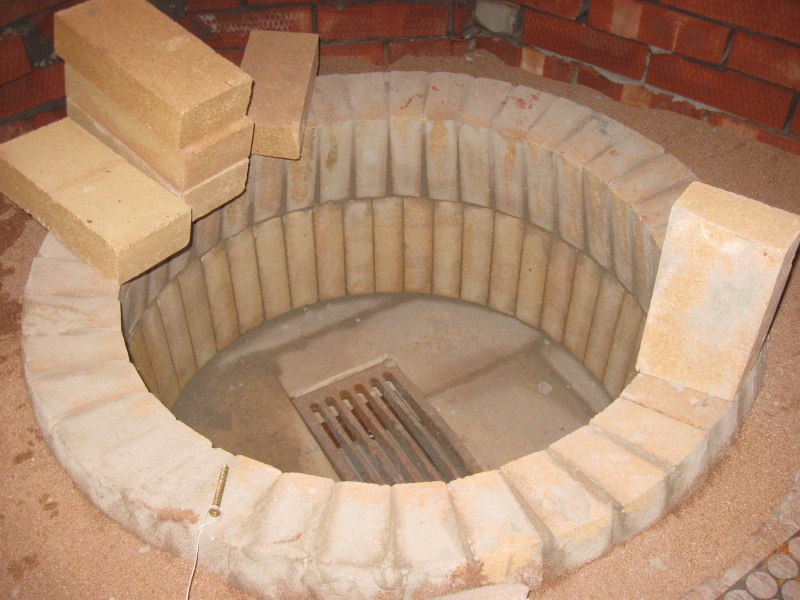
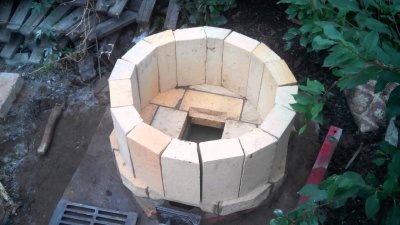
Draw a correct circle on the foundation. Lay it out with fireclay bricks and start filling the inside of the tandoor. When laying the first row of brick, remember to leave a free space for air inlet. There, place the end of the asbestos-cement pipe at a forty-five degree slope.
It is necessary to make a hatch for it in order to block the air during the firebox. The other end should be above the soil surface. The bottom edge is five centimeters from the brickwork.
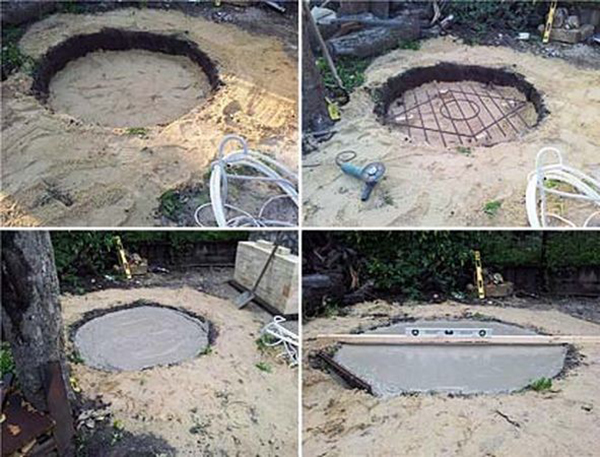
Photo 2. A metal grating is laid on the sand layer, it is poured with concrete, which is carefully leveled with a tool.
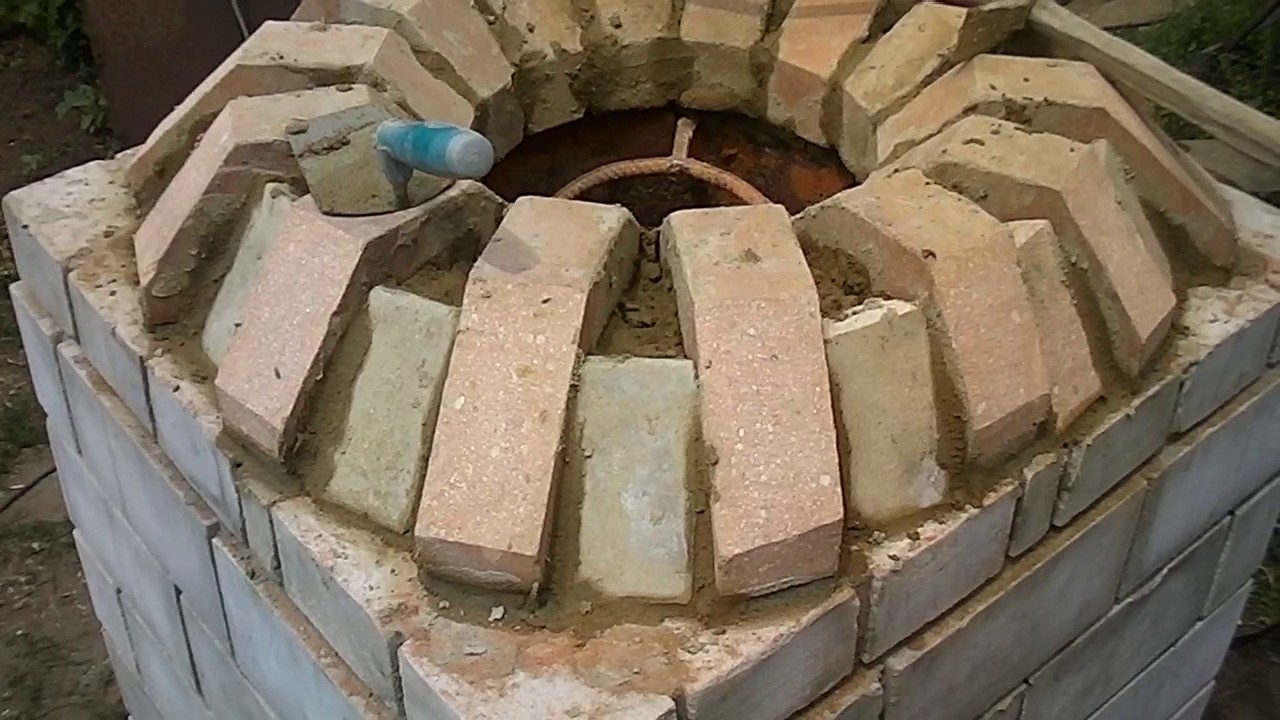
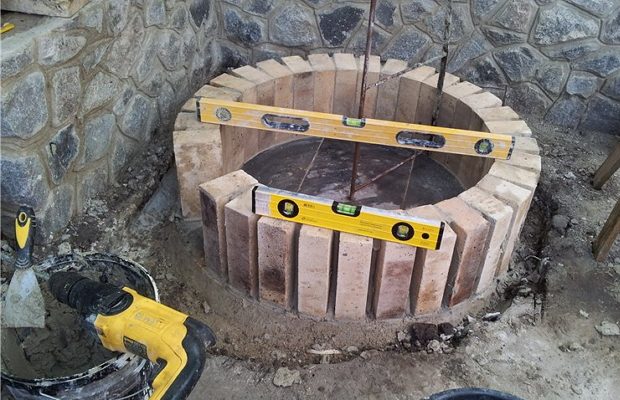
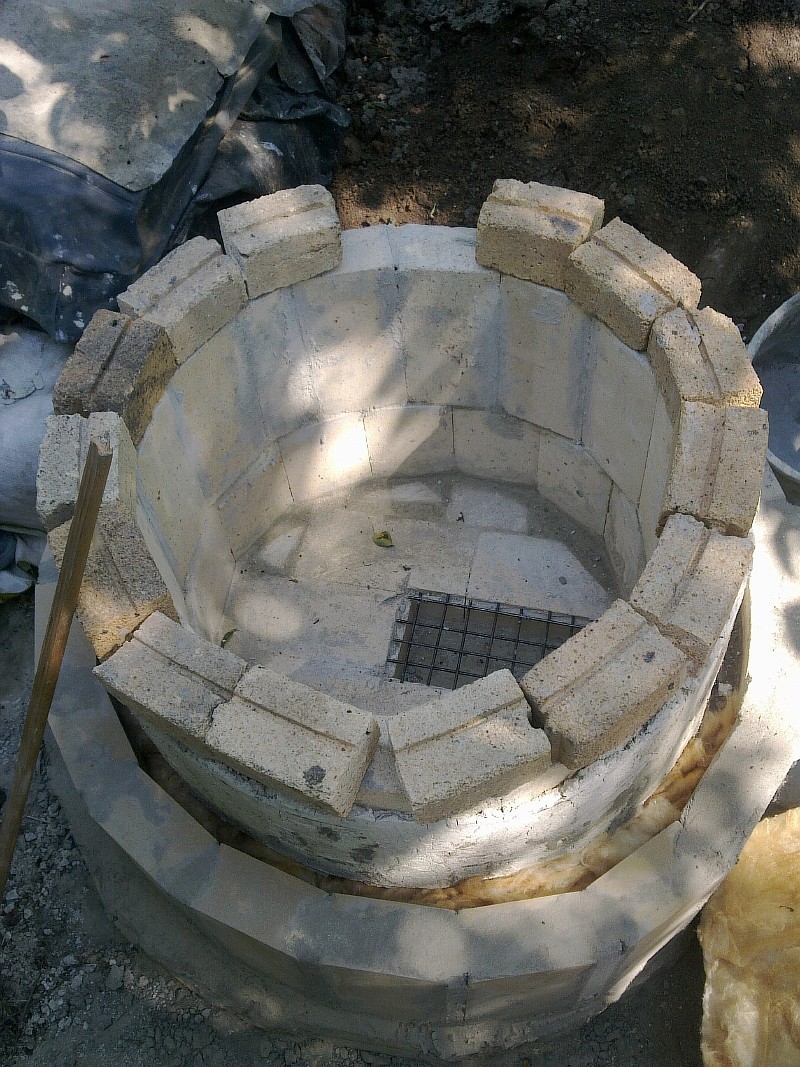
Lay the second row of bricks in a circle with a half shift (this will make the stove stronger), without gaps. Lay down the grates and return to the vertical stacking of bricks. From the eighth row, begin to shift them half a centimeter inward to narrow and achieve the shape of the dome. The "neck" of the hearth should eventually have a diameter of half a meter with a meter base.
Attention! Coat the inner walls of the earthen oven with clay; the consistency should resemble thick sour cream. Level with a spatula
Wall construction and exterior decoration
When the finished device is dry, seal all joints with white refractory clay (kaolin). At the same time, wet the bricks so that they do not extract moisture from the solution. After the first layer has dried, apply the following: straw mixed with clay. It will serve as a reinforcing and insulating wall.
In the end, you will need another cement-clay layer. If it starts to rain during operation, cover the materials and area with plastic. It is advisable to make tandoors under a slate canopy.
Fill the voids between the brick and the pit walls with heat-accumulating materials: salt, sand, clay.
Once completely dry - this usually takes three days - the device should be hardened. Fill halfway with brushwood or dry hay and light. When the walls are cool, line them vertically with bricks from the outside.
Immediately cover all cracks in the masonry with a solution of sand and cement. When it hardens, fill the gap between the tandoor and the outer masonry with a dense mixture of cement, expanded clay, fine sand and water.
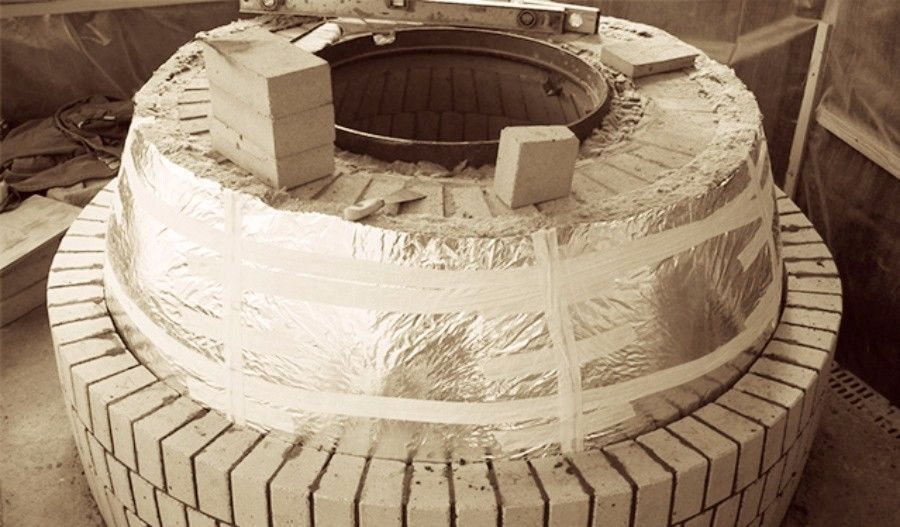
Reference! The disadvantages of the earthen tandoor include the fact that during downtime it can become damp. Therefore, when you are not using the oven, cover it with a protective foil.
Finish by clearing dirt and stones from the sides of the brazier. Tamp tightly. Fill the area around the neck with a mixture of expanded clay and cement mortar. Or cover with paving slabs.
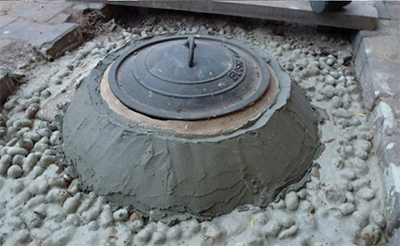
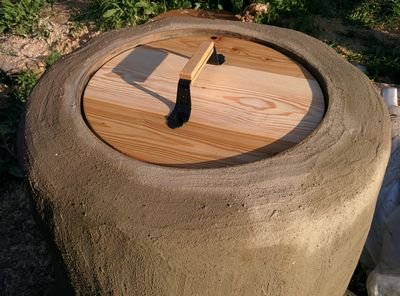
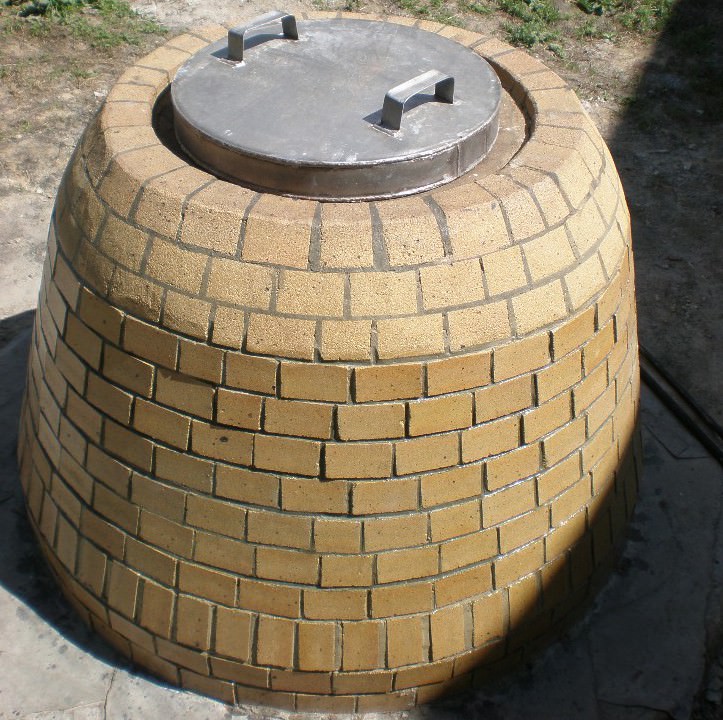
Put an iron sheet with a welded handle on the finished tandoor. It will become a lid, thanks to which the heat is retained as much as possible.
When making an eastern earthen stove with your own hands, difficulties may arise:
- Uneven oven shrinkage due to improper drying. To prevent this from happening, coat all the bricks with clay mortar of the same density, level the layers. And best of all, use fireclay clay and do not overdo it with the addition of water: follow strictly the instructions.
- Drying and firing cracks. Close up with thick clay milk.
- Long drying time. To avoid this problem, tackle the fireplace on dry summer days.
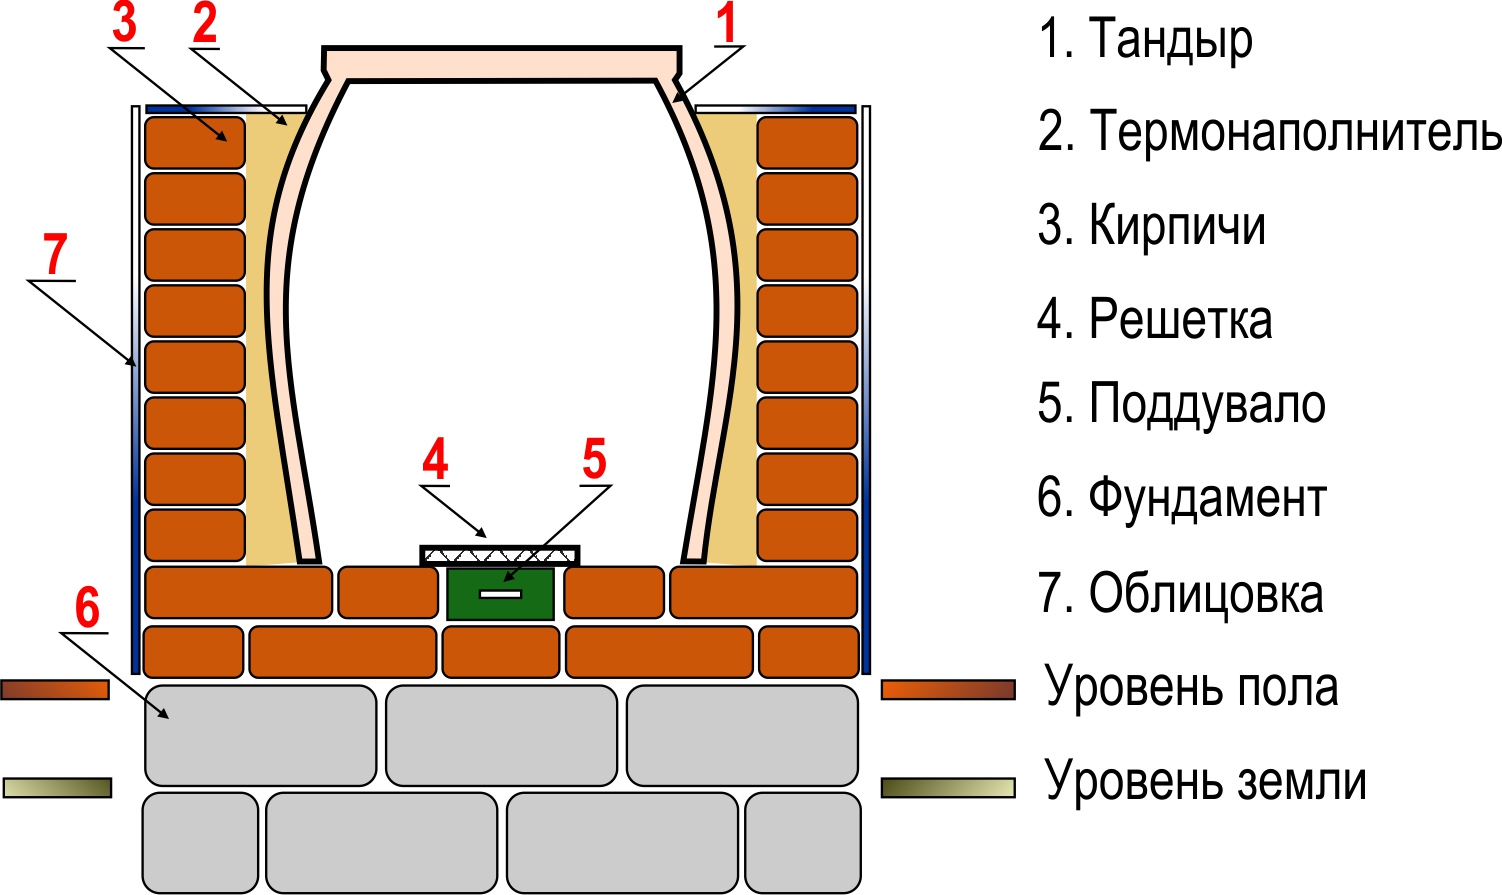
The device of the furnace and the principle of its operation
The tandoor is an earthen vessel (or brickwork) with a rounded upward shape, like a jug.
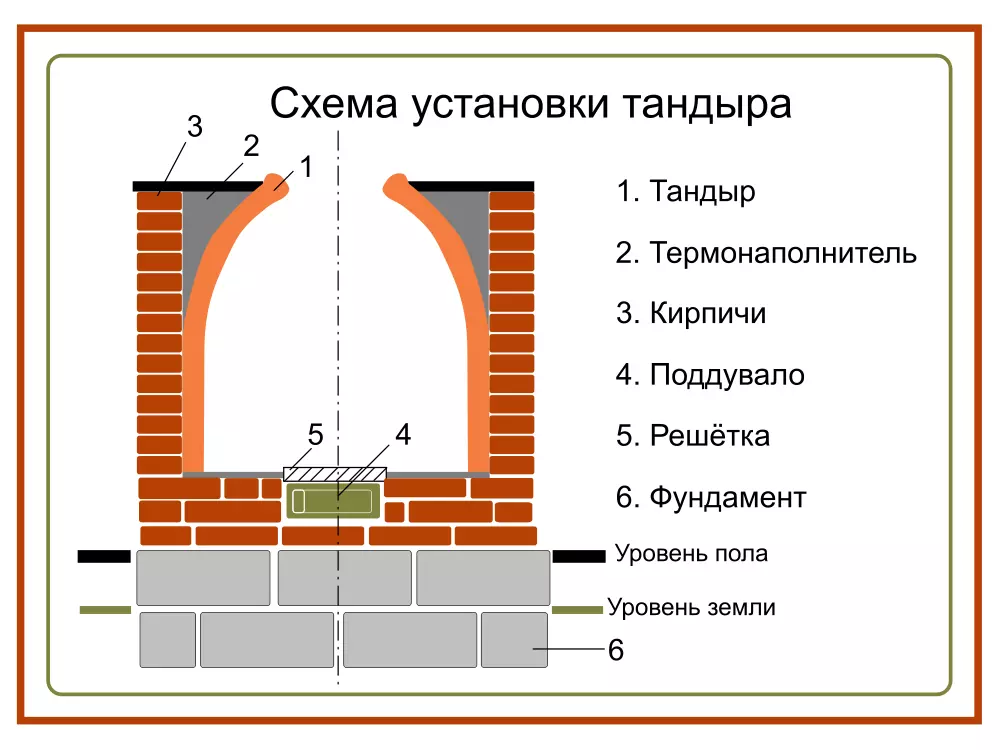
Tandoor device:
- In the lower part of the structure, there is a blower that provides traction in the process of fuel combustion. Firewood, coal, brushwood can act as fuel. At the top there is a hole through which fuel is placed and dishes are installed.
- The earthen vessel is lined with a brick frame on the outside, and between them a layer of heat-insulating material is filled in, for long-term preservation of heat, in the role of which sand, clay, salt and others are used.
Principle of operation:
- The heat released during the combustion of fuel accumulates, the walls of the stove are heated to a temperature of 250-400 degrees, which allows cooking food, for example, flat cakes, directly on the walls of the stove. For three or four hours, the oven is in working order, since the temperature conditions will remain all this time. This time is sufficient to prepare two dishes.
- Due to the design of the oven, the accumulated heat does not escape outside, but remains inside it, while being evenly distributed. That allows you to cook delicious, unique food. To fry food evenly, the oven opening can be covered with a lid.
- For convenience in cooking, a special grid is used, but which can be put not only meat, but also other equally tasty products.
- The disadvantage of the tandoor is that the removal of ash residues must be carried out through the upper opening.
Due to the tightness of the structure and the maintenance of a uniform temperature throughout the entire cooking process, food does not dry out. Shish kebab made in such ovens is much tastier than barbecue or grill.


Tandoor: historical background
According to the legend, which is passed down from generation to generation, the first clay oven was invented by a shepherd, whose name was Tandoor. Once he saw that at night all the flowers close their buds, and insects are hiding inside. In such a simple way, they protected themselves from the cold wind. The young man made a magnificent bud out of clay, only larger. In it, he cooked himself a simple dinner, lit a fire. The food from the bud was incredibly tasty and nutritious. It also stayed hot for a long time.

Subsequently, the young man became rich. He made clay buds and sold them to everyone. In honor of the talented young shepherd, these ovens were called tandoors. Tandoor himself became a respected person. In fact, he was a kind of analogue of the Greek Prometheus. He only gave people not fire, but delicious food and the opportunity to cook it at home.
According to another legend, a truly sacred meaning is attributed to the tandoor. There is an opinion that the laying of clay ovens was widespread as early as the 10th century among the Sart tribe. They lived on the territory of modern Uzbekistan, they worshiped fire. For the Sarts, the tandoor was the home of beautiful peri (analogous to fairies in Europe). Several centuries later, it acquired a different, now practical, meaning. By the way, the Mongols, who conquered the Sarts and took away all inventions, were able to see an excellent way of cooking in a clay structure.
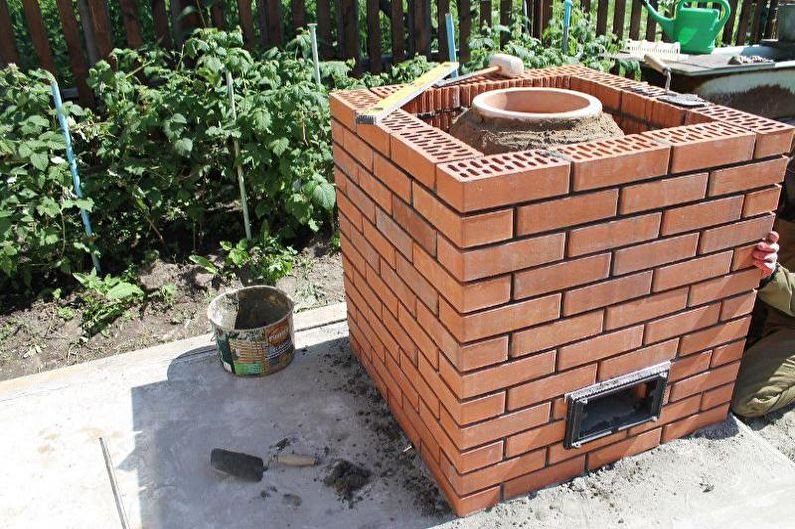
How to make a square brick tandoor with your own hands
This type of stove is quite simple to build, as it does not require any special skills. The vertical structure reaches 1-1.5 meters in height.
Reference.With the proper skills, the device can be laid out even without a template in just half an hour or an hour.
Project selection
In this case, it is not necessary to search for a detailed construction scheme. The main thing is to choose the appropriate size of the structure, for example, 2.5 by 2.5 bricks. If a large-sized oven is planned, the technology of its creation will not change from this.
List of tools and materials
To build a square tandoor, you will need:
- brick;
- mortar for masonry;
- spatulas;
- grate;
- clay;
- sand, crushed stone, cement, reinforcement and form (pit) for the foundation.
Arrangement of the foundation
Select the dimensions of the oven, fill the base plate with the desired shape. To do this, dig a hole of suitable size: the foundation should be slightly larger than the base of the structure. Place ten centimeters of sand at the bottom, pour concrete on top. Reinforcement for fastening is placed in the middle of the base.
Important! Remember that brick structures are heavy, so the foundation must withstand the entire structure.
Laying out the base
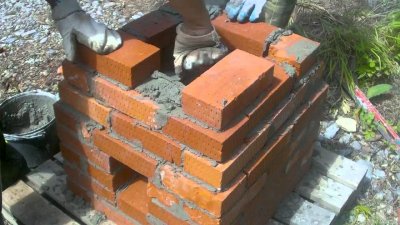
After the concrete has frozen, you can start laying the bottom row. Bricks are laid out on concrete, a square base is built. If the size of the structure is 2.5 × 2.5 bricks, the bottom layer is laid in a spiral inward.
The bricks of the next row overlap the joints of the lower level. This principle is followed when laying out each new row.
The second level completely covers the first.
Wall masonry
When constructing furnaces, the opening of the furnace door is usually taken into account. In a square tandoor, instead of a door, only a small hole remains, so you also need to lay out bricks there.
On the third level, the walls of the bricks are laid out, leaving the inner space empty. The grate is installed on the same layer.
In the center of one of the walls of the third level, a half-brick space is left for blowing.
The fourth level repeats the previous one, raise the blowing hole. The next row closes the blower.
All subsequent rows should be narrowed, creating a semblance of a chimney. With a size of 2.5 × 2.5 bricks, five rows are enough to raise the chimney. The narrowest row reaches 20 × 20 centimeters. After him, a row or two should be wider than the previous ones. This is where the skewer holding device is installed. In this version, the skewers with meat will be positioned vertically.
After the completion of the work, the inner walls are cleaned from the cement solution.
Insulation and exterior decoration
Outside, the walls can be plastered or covered with clay mortar.
If you cover the tandoor with clay, it will take several days to dry before the appliance can be used.
In the scheme of a square tandoor, the chimney is open. In order for the heat to be better kept inside, you need to create a heat-resistant steel lid.
Homemade earthen brick tandoor
A buried structure does not need additional cladding. The construction of an earthen tandoor is not difficult and proceeds in much the same way as the construction of a hearth on the platform.
Materials and calculations
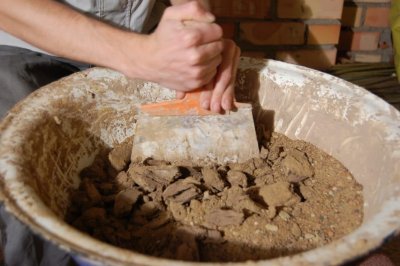
For construction, only traditional masonry stones and clay mortar are required. It can be made from clay and sand by mixing the ingredients in such proportions so that the dough rolled into a ball does not crack when dropped on a hard surface. A properly prepared solution flattens when dropped, but the edges remain even. To reduce the time for the production of the solution, you can buy ready-made mixtures with heat-resistant additives.
The walls of the hearth are laid out of solid bricks. Its amount depends on the arrangement of the elements (with a spoon or poke, horizontally, vertically, etc.).
To install a blower in an underground furnace, you will need to pick up a pipe with a diameter of 10-15 m or a sheet of tin.
Stages of work
The erection of a structure includes simple steps:
- digging a hole;
- laying a stroke for the blower;
- pipe laying;
- furnace construction;
- decorating the hearth.
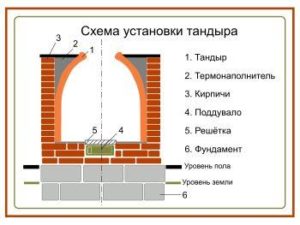
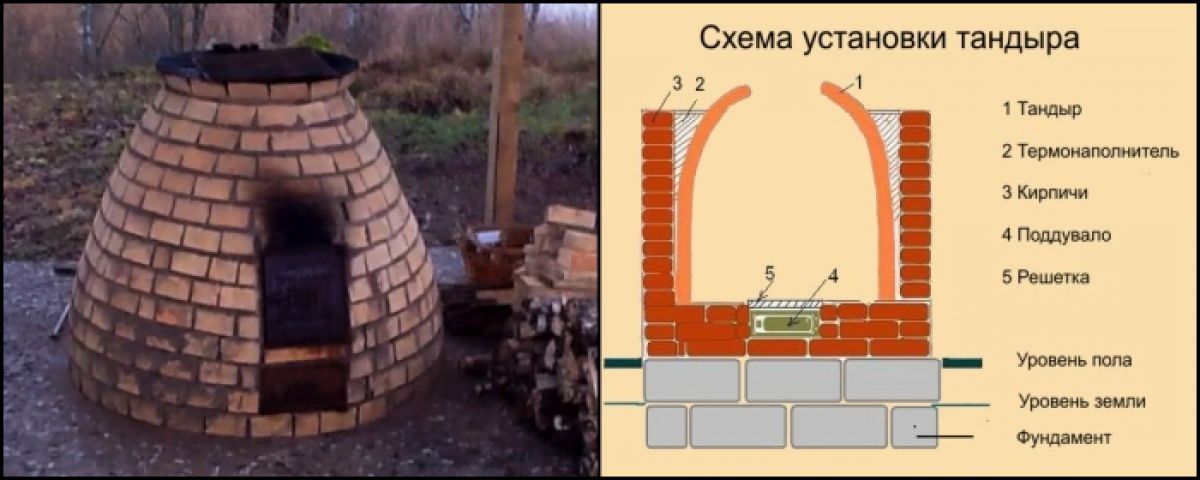
Scheme
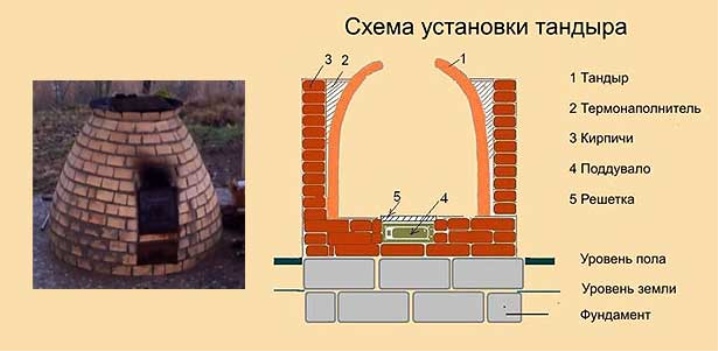
The diagram shows the structure of a hearth dug into the soil. Its main difference from other designs is the installation of a pipe through which air will flow. If there is a slope near the place of installation of the stove, then the pipe can be laid horizontally. On a flat area, the blower pipe is placed obliquely.
The depth of the pit is calculated taking into account the convenience of working with such a furnace. It is irrational to make the internal space deeper than 50 cm. Taking into account the blower device, the depth of the pit should be about 25 cm more. The edges of the stove must be raised above the ground by at least 15-20 cm.
Step-by-step instruction
To make a recessed structure, do the following:
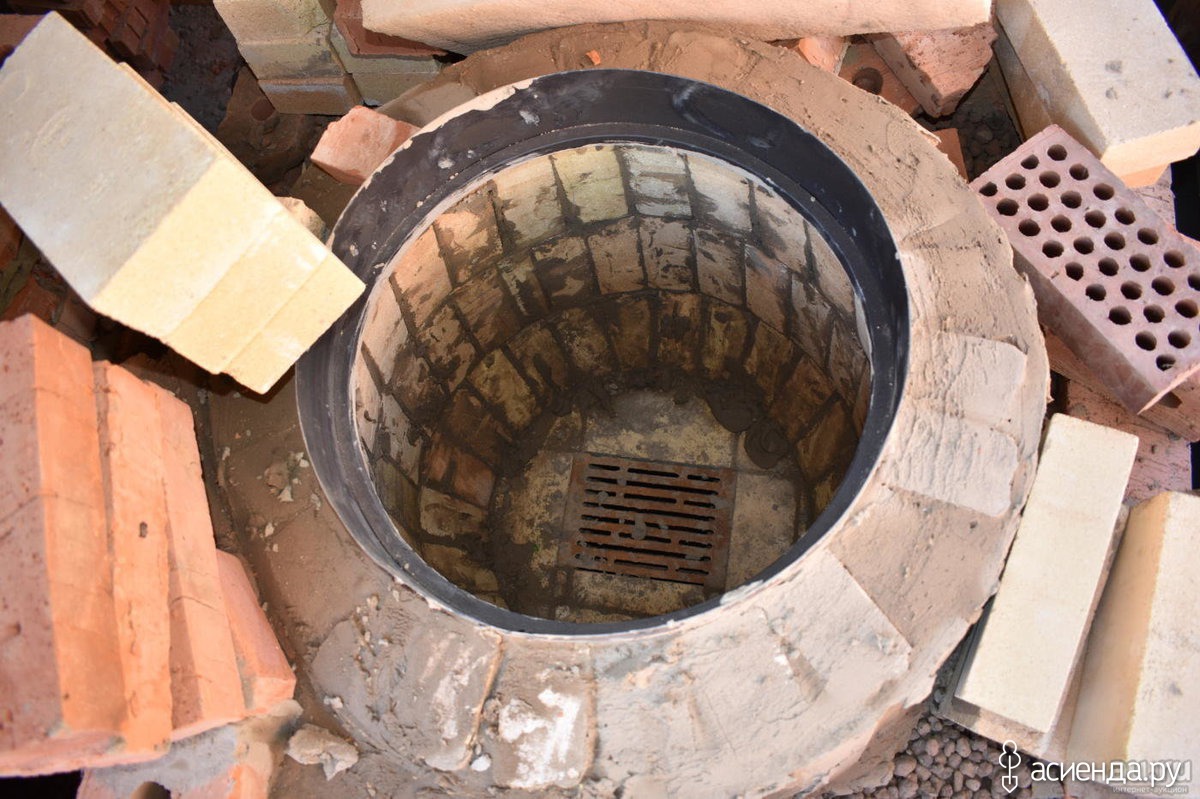
- Dig a hole taking into account the dimensions of the inner cavity and the thickness of the walls. At the bottom, they arrange a pillow of compacted sand. A pipe is brought out to the lower layer, digging a trench of the required length under it, but not too large: ash will have to be removed through the hole.
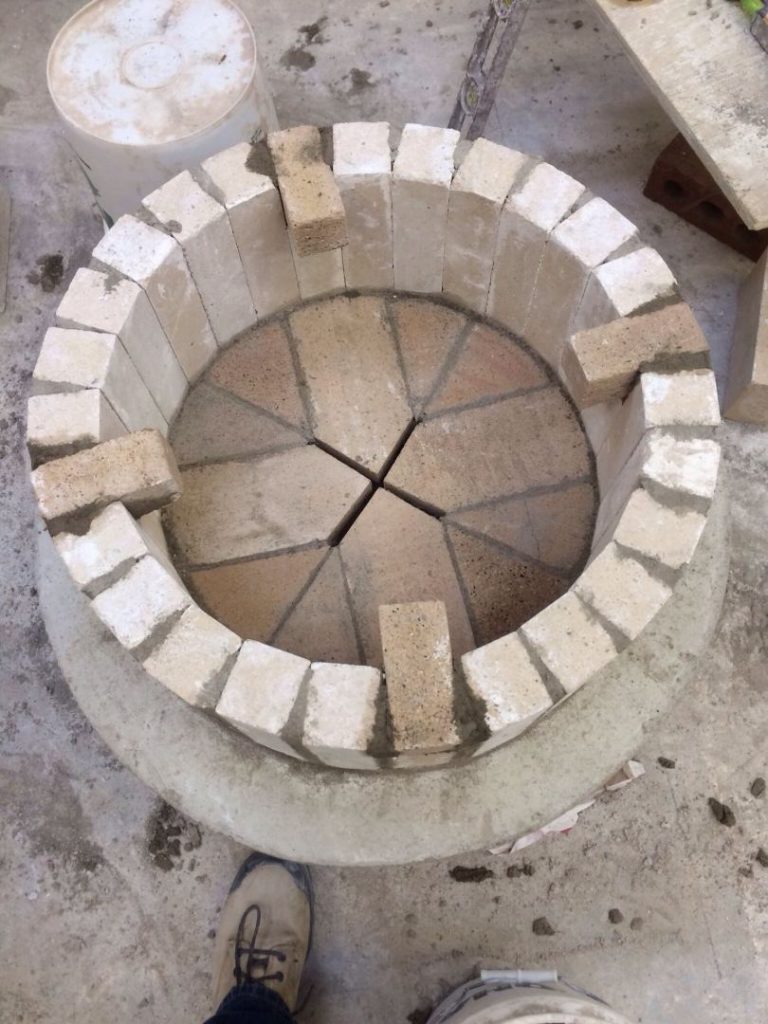
- The base is laid, leaving a hole in the center of the circle for the grate. Base height - 2 rows of bricks. A grate made of cast iron or thick steel is placed on top of the hole left.
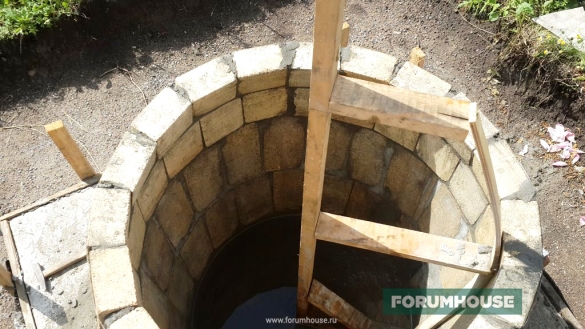
- Using the template, they erect the walls in a circle, raising them above the soil level to the desired height.
- It is necessary to dry the product for 2-3 days, and then cover the space around the walls with dry sand.
How to build a tandoor with your own hands?
The construction of the tandoor takes place in several stages and differs depending on the type of material from which the device is made.
How to make the foundation yourself
For the tandoor, you will need an empty platform with an elevation (not clay!). Crushed stone is poured onto it in an approximately fifteen-centimeter layer. The depth of the foundation will be 0.4 m, the protrusion above the ground - 0.1 m. All this is covered with sheets of waterproofing material.
Attention! The distance from the tandoor to any buildings is at least 15 m!
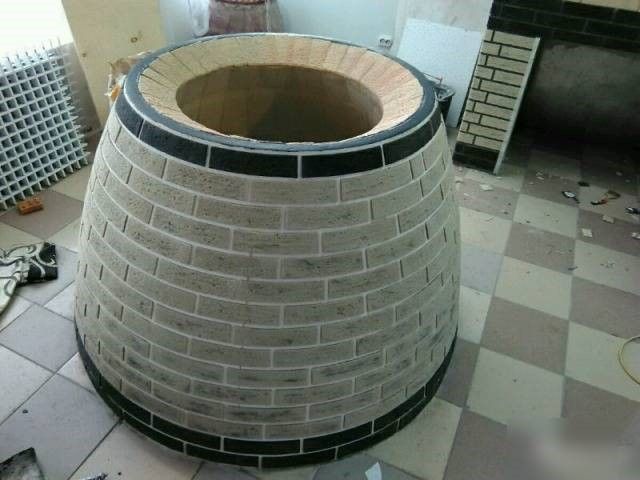
How to build a brick device, its installation
A stationary tandoor is placed on a dry stone platform, preferably with an elevation. Ceramic clay or white refractory bricks, stone blocks are suitable for the construction of the device.
Construction begins from the foundation. A round hole is dug for it, with a radius of 60-65 cm. A thick (20 cm) sand layer is laid at the bottom.
The oven is then set up in the shape of an inverted jug or bowl. You can lay bricks horizontally or vertically.
Horizontal masonry keeps heat better, but it takes longer to tinker with it. The vertical one needs less brick, the building is being erected much faster.
In order not to be mistaken with the dimensions, first make the laying without mortar (the so-called ordering). In the right places, the brick is cut off with a diamond wheel.
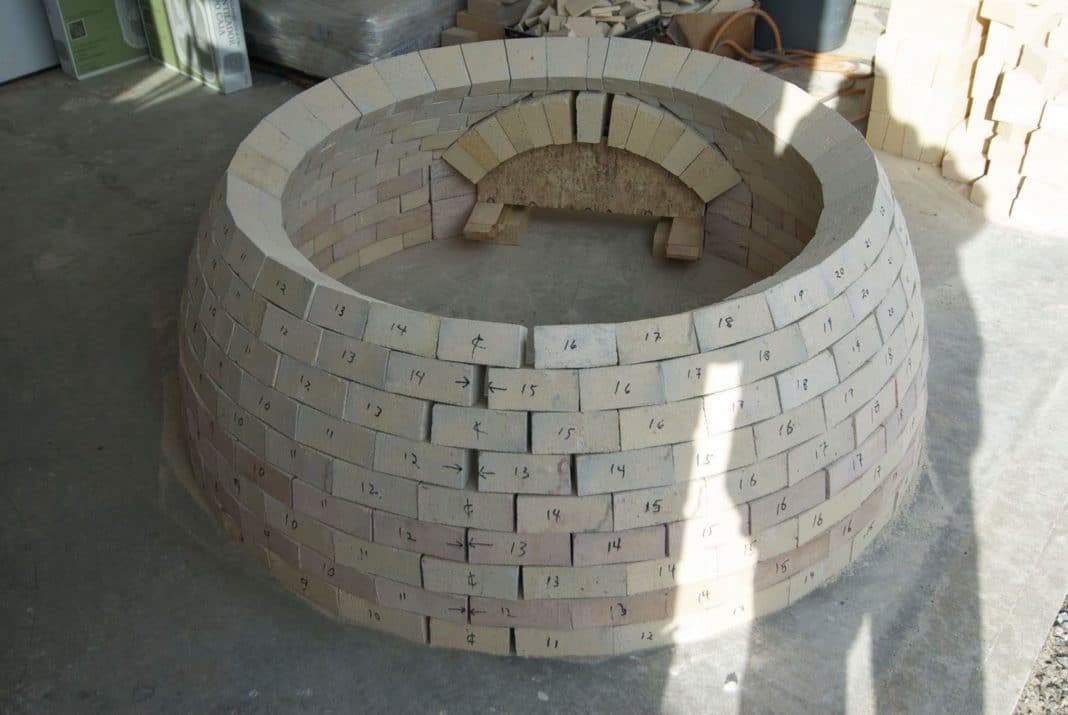
Important! Make sure that the shape of the inverted vessel is observed: the tandoor expands downward and narrows at the top. If this is neglected, the heat will not hold and the food will not cook properly.
At the end of the work, the inner surface of the tandoor is cleaned from adhering clay or construction mixture. The outer seams are closed with dry clay. Next, a layer of clay mixed with finely chopped grass is laid on top of the bricks in the working chamber. The outer part, if desired, is tiled or stone plates.
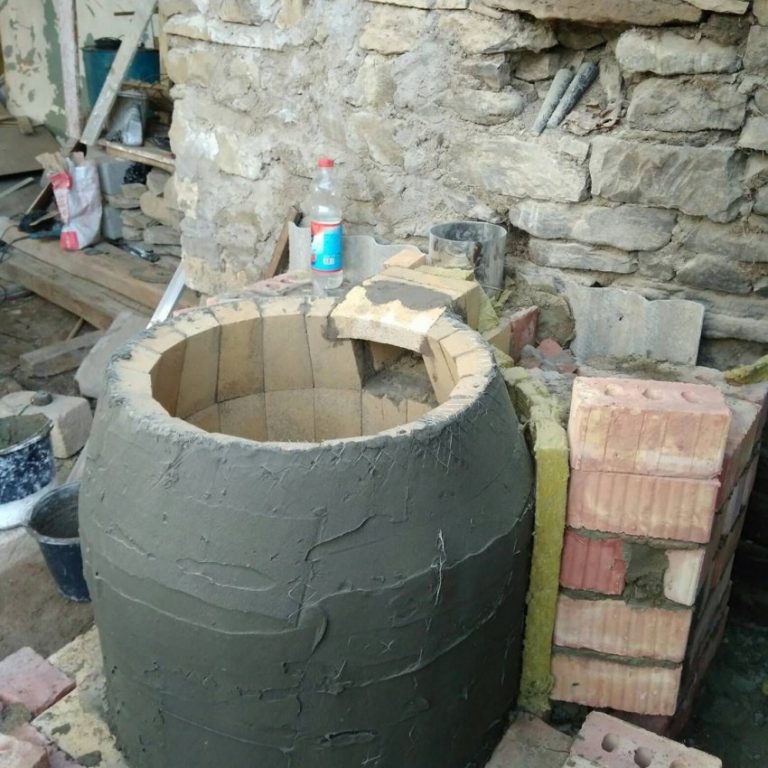
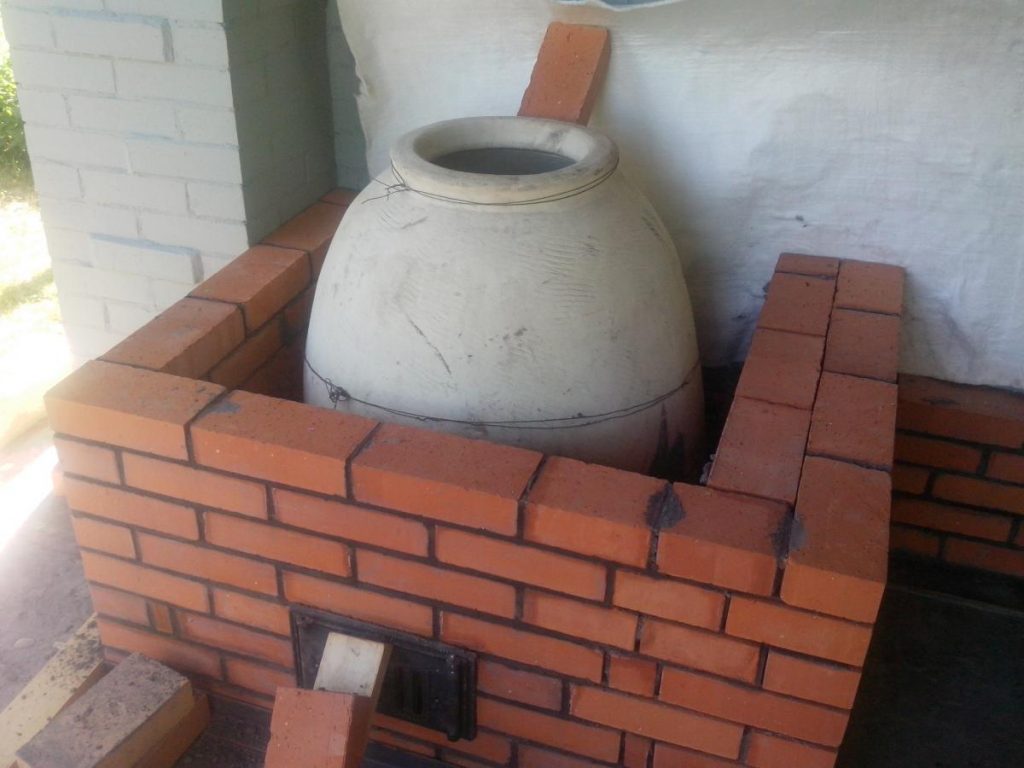
How to make a unit from a wooden barrel
For a tandoor, the most common two-hundred-liter barrel is suitable: metal, wooden or even plastic. The main thing is that it is intact, without cracks, corrosion and patches. It is better if the hoops do not hold well, this will greatly facilitate the work. From the inside, a wooden vessel is impregnated with cottonseed (if not, any vegetable) oil for about twelve hours.
Next, the body is coated with clay from the inside. The latter consists of chamotte clay, sand and sheep's wool (in its absence, a reinforcing mesh is used).
The walls are leveled, then the body of the future tandoor is dried for a week under incandescent lamps.
After that, the wooden template is removed and the body is fired.
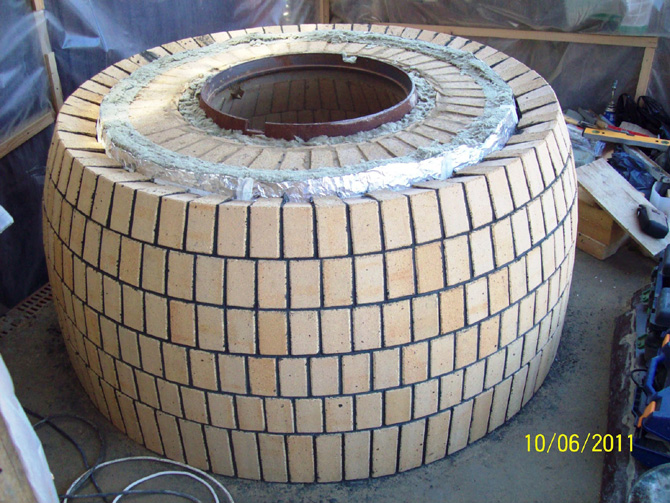
An iron barrel construction is the most budgetary option. How do I install it?
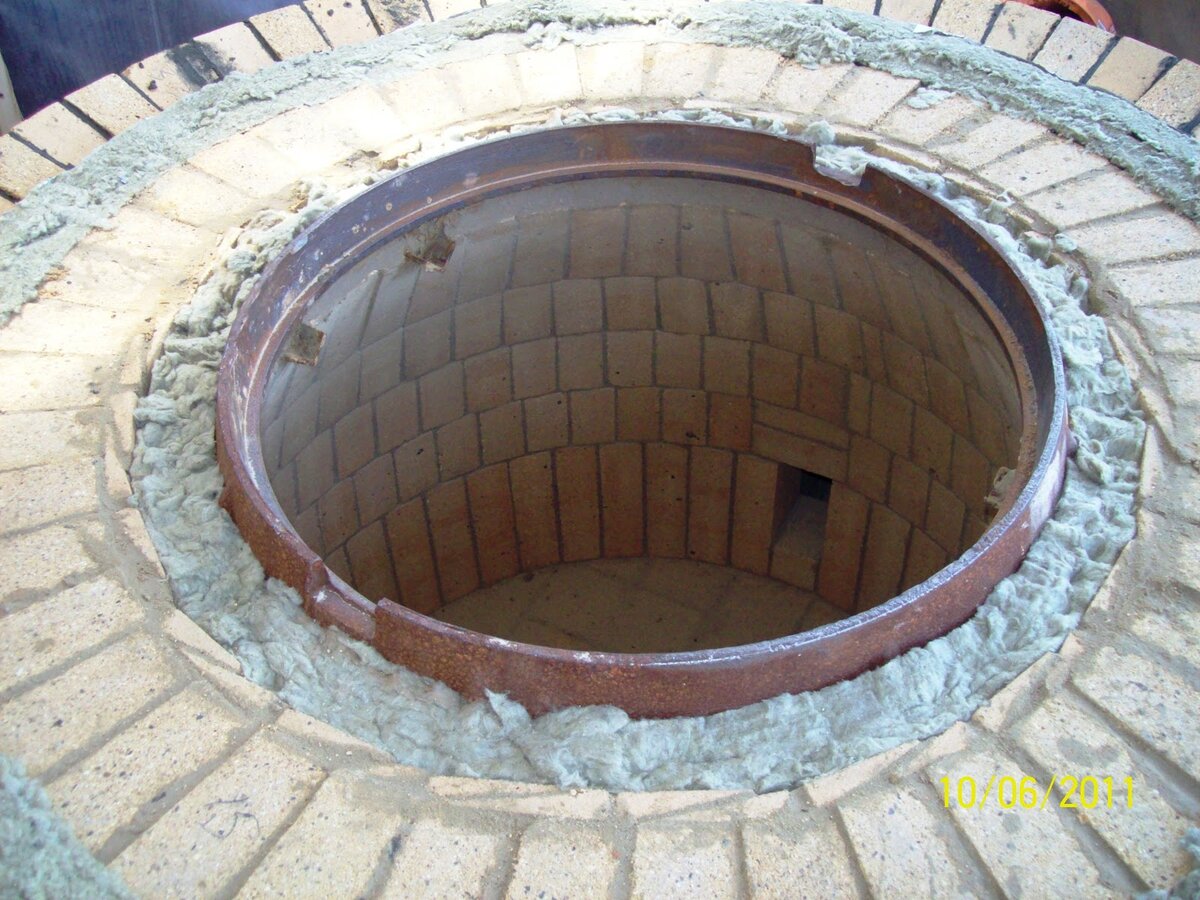
The bottom of the iron barrel is removed, the blower hole is cut. Inside, the container is finished with bricks, on top it is coated with building compound or clay.
Reference. Some stove-makers are sure that insulation is optional, others say the opposite.
Foil coating can be used as an insulating layer. Vata, as practice shows, greatly complicates the work, the brick "wanders" on it - it deviates from a given place, gets lost, it is difficult to strengthen it in the desired position.

The blower is lined with brick in the shape of a trapezoid, and the narrower part turns inward.
Outside, the iron tandoor may not be covered with insulation.
According to the builders, such a structure reliably keeps heat even without it.
If desired, wheels are attached to the device, on which it can be rolled, for example, into a gazebo.
Attention! It is permissible to move the tandoor only after the firewood has completely burned out!
What you need to make your own hands
The classic tandoor is a traditional oriental oven. If it is made by immigrants from Asia according to ancient technologies, it can be considered an example of the culinary culture of the East. At first glance, making a tandoor with your own hands is quite difficult. Certain tools, materials, a little experience are required. But in fact, most homeowners can create such a stove.
Tools and materials
To build an oriental tandoor in the courtyard of your own house, you will need a certain amount of consumables. Their number depends on the planned dimensions of the oven.
- A mixture of gravel and sand.
- Cement.
- Mesh mesh.
- Fireclay brick.
- Refractory paint on a water-based or acrylic base.
- Fiber made from asbestos.
- 6mm fiberglass reinforcement.
- Steel wire. Basic requirements: diameter - 3 mm, when twisting it should bend easily.
- Refractory mortar for masonry.
We should also talk about tools separately. Tandoor production does not require professional installations or complex machines. A few products that are in every home are enough:
- Plastering rule.
- Paint brush 10 centimeters wide.
- Spatula 12 centimeters wide.
- Container (for example, trough) for batching.
- Bulgarian. The complete set should include a diamond wheel for cut-off ceramics.
The main material for the manufacture of tandoor is fireclay bricks. These building materials can withstand prolonged exposure to high temperatures (up to 1,000 degrees). Due to the low thermal conductivity of products, heat remains inside the tandoor.
High-quality refractory fireclay bricks have two important characteristics:
- High heat capacity. Stove walls accumulate a lot of heat.
- Increased thermal inertia. Fireclay bricks take a long time and thoroughly warm up and cool very slowly, which allows you to cook several portions of food.
Calculations
Tandoor is a clay or ceramic hemisphere with a round top or side opening. The working volume of the furnace is in the range of 0.25 - 1 m³.

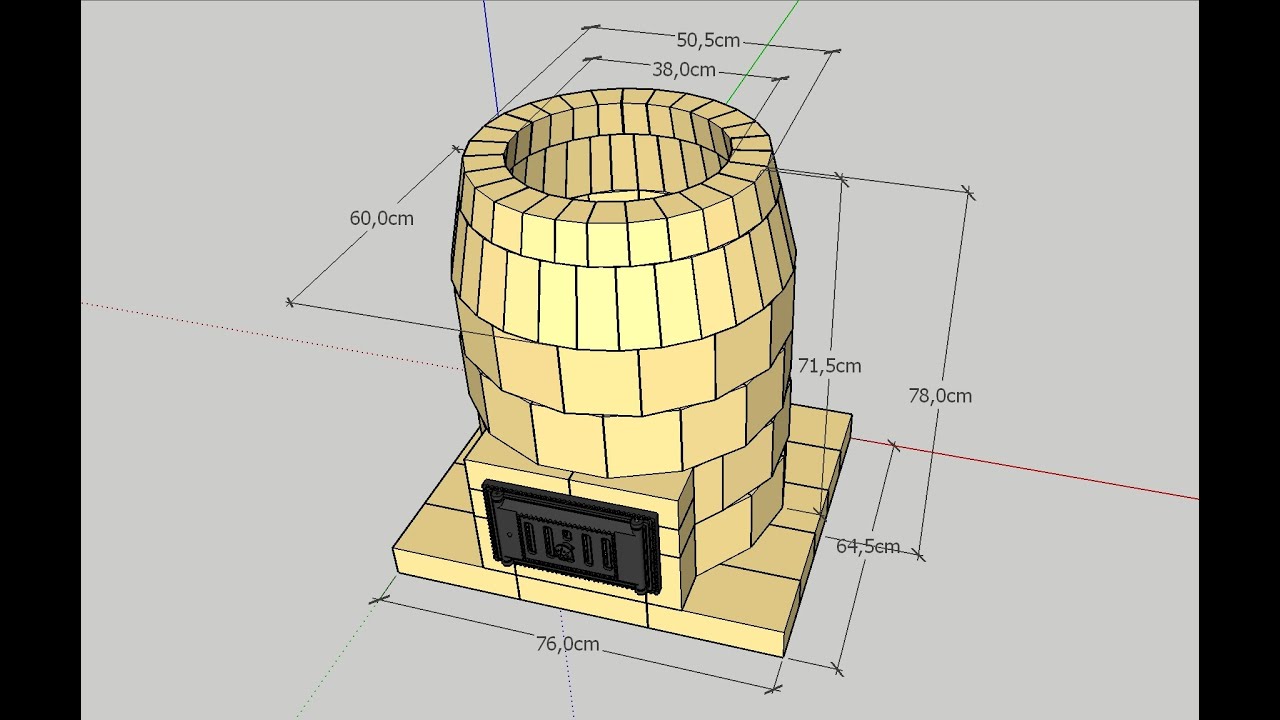
The upper part of the tandoor oven is tapering. If the diameter of the bottom is equal to a meter, then the same indicator of the top can be 0.7 m.
The traditional size of the tandoor is as follows:
- Height - 1-1.5 meters.
- The diameter of the base and body of the boiler is 1 meter.
- The diameter of the top or side (depending on the type of tandoor) is 0.6–0.7 meters.
When choosing a place for a tandoor oven, you need to take into account some nuances. The size of the platform for the base should be at least one meter, ideally one and a half. The distance from buildings, especially wooden ones, is 3-5 meters: a stove made by yourself can be fire hazardous.
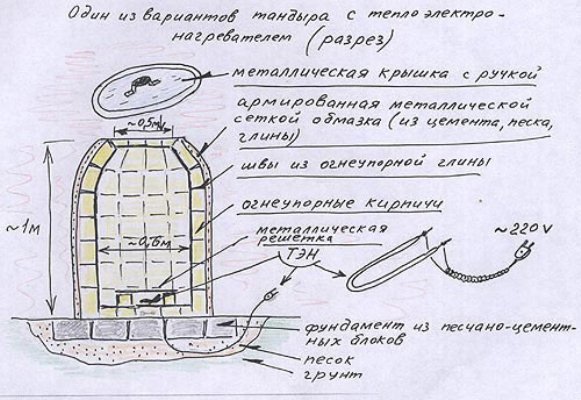
In addition to firewood, the tandoor can also operate on electricity.
Making a tandoor with your own hands
Since the brick tandoor has a fairly large weight and is installed in the open air, only the right foundation can provide its long-term service.
Before building it, you need to find out how high the groundwater is at the proposed location of the tandoor. If they are close to the surface of the ground, you will have to look for another territory. Next, the type of soil is determined. If it is clay or loam, you will need a reinforced columnar foundation. On sandy and sandy loam, as well as on sod-podzolic, you can do with casting a monolithic concrete slab. Since these soil types are the most common, a method for creating a concrete foundation will be described.
Pouring the foundation

The base for the tandoor has a size of 100 x 100 cm and a thickness of 10 cm. Do it like this:
- The grass is removed in the allotted area.
- A ditch 15 cm deep is dug along the perimeter.
- In the corners, holes about 70 cm and a diameter of 15 cm are drilled with a drill.
- The finished holes are reinforced with a fiberglass rod and poured with concrete 5 cm above the level of the pit. To do this, formwork is installed from a rolled-up packing tape.
- The pit is covered with sand to the height of the ring formwork and spilled abundantly with water to compact the layer and eliminate the presence of voids in it.
- Stakes are driven in nearby and a metal mesh is tied to them so that it rises 5 cm above the layer of sand.
- Formwork for the pit is made from boards 15 cm wide and installed. 10 cm of the formwork will be hidden in the soil and 5 cm will rise above the ground.
- The leveling of the pit is checked with a level, after which it is poured with concrete.
- Allow to freeze. On average, this will take three days or more. Experienced craftsmen recommend starting the installation of the tandoor on the foundation no earlier than in a week.
- If the preparation of the concrete base takes place in hot weather, during the entire period allotted for solidification, it is periodically moistened with water. This prevents cracking.
Making a rule
While the foundation is solidifying, it's time to start making the rule. In shape, it resembles a yacht sail and serves to ensure that the walls are smooth.
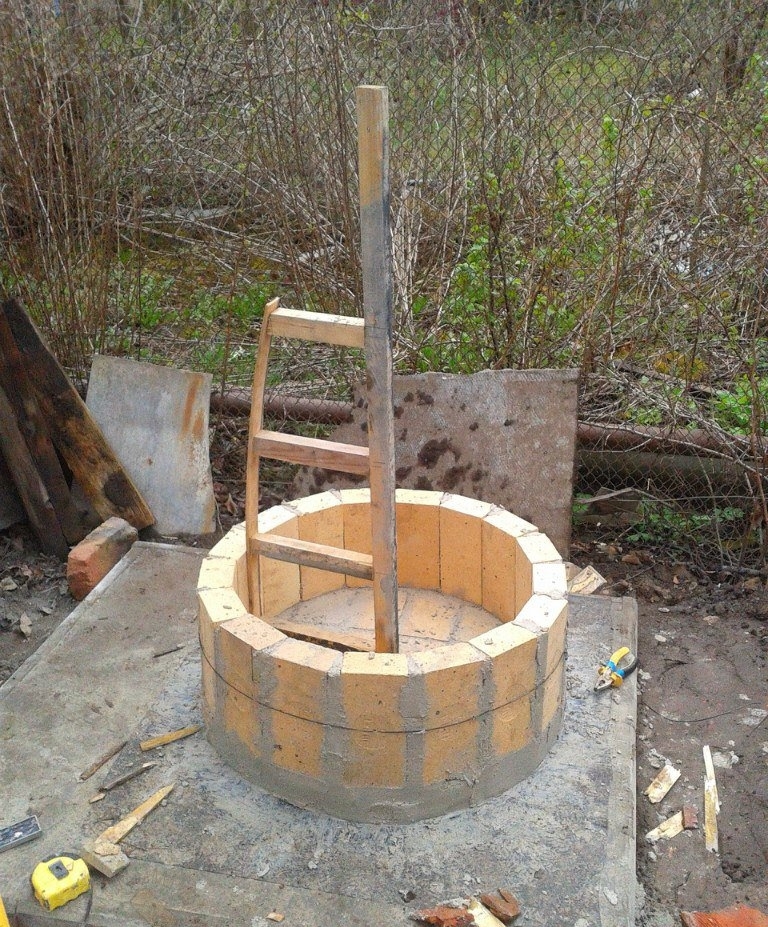
Since the regular tandoor has the same height and width at the base, the length of the lower part of the rule will be equal to half of its height. The throat diameter is one third of the base width. Based on these measurements, a rule is made, placing its transverse strips at a distance of 25 cm.
For convenience, you can draw a pattern on any sheet of paper or cardboard.
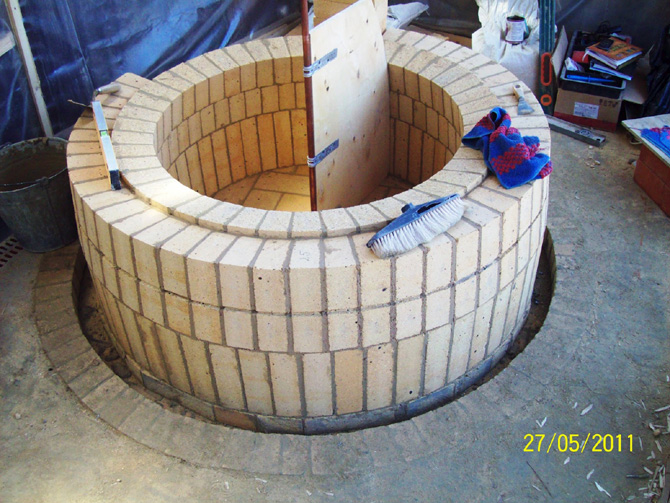
Erection of walls
When the foundation has acquired sufficient hardness, the walls begin to mutter.
This can be done in two ways - by placing the bricks vertically or horizontally. In the first case, a significant saving of consumables is obtained, and in the second, the tandoor keeps heat much longer and can gain a higher temperature. If it is planned to build a tandoor for domestic use, vertical laying will fully justify itself, moreover, it will take less time.
The process looks like this:
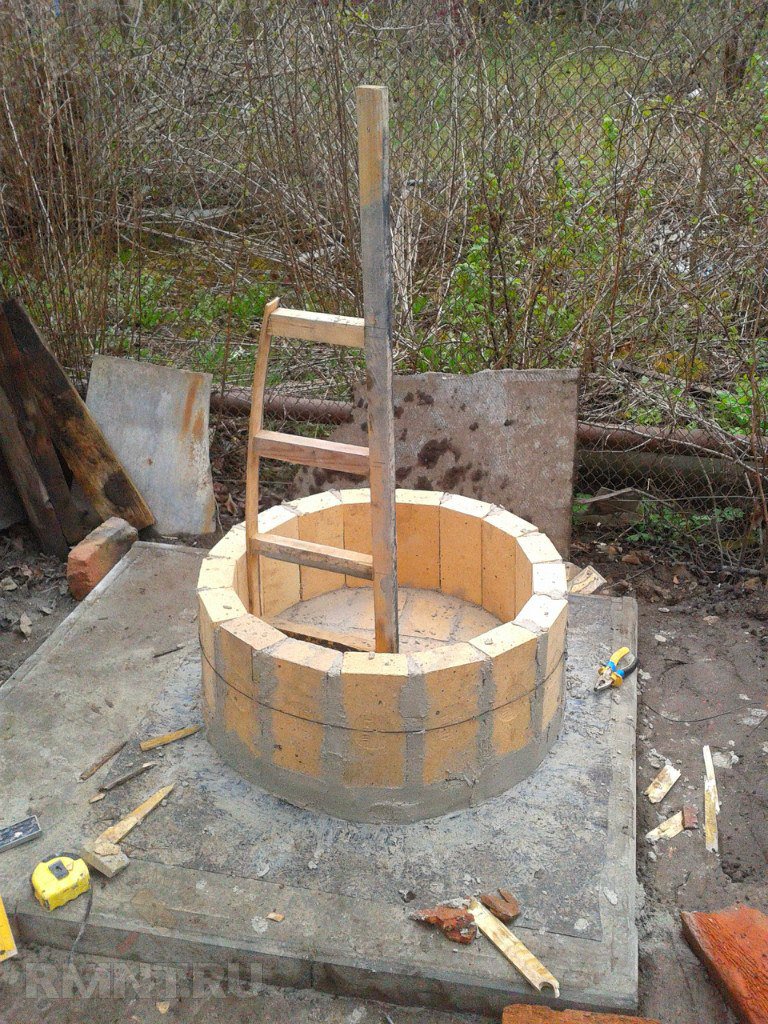
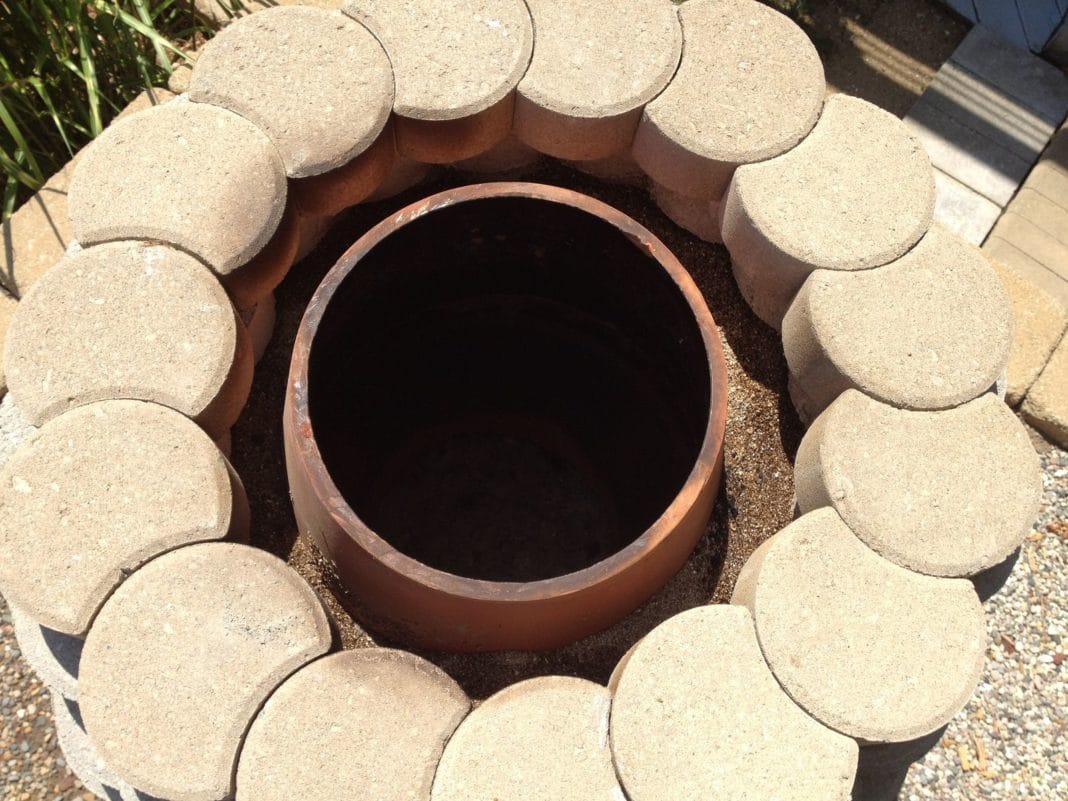
- First, they prepare a round platform for the tandoor. To do this, a circle with a diameter of 75 cm is drawn on the ground or on a sheet of paper and bricks are laid out on it, cutting off everything unnecessary with a grinder.
- For better waterproofing, roofing material can be placed under the round platform.
- When everything is ready, the site is held together with a refractory oven mixture. If roofing material was used, the mixture must also be applied to it.
- After that, they begin to muck up the walls, laying the bricks so that their inner edges are closely adjacent to each other. The outer edges can be cut with a wedge or the gaps between them can be well coated with an oven mixture.
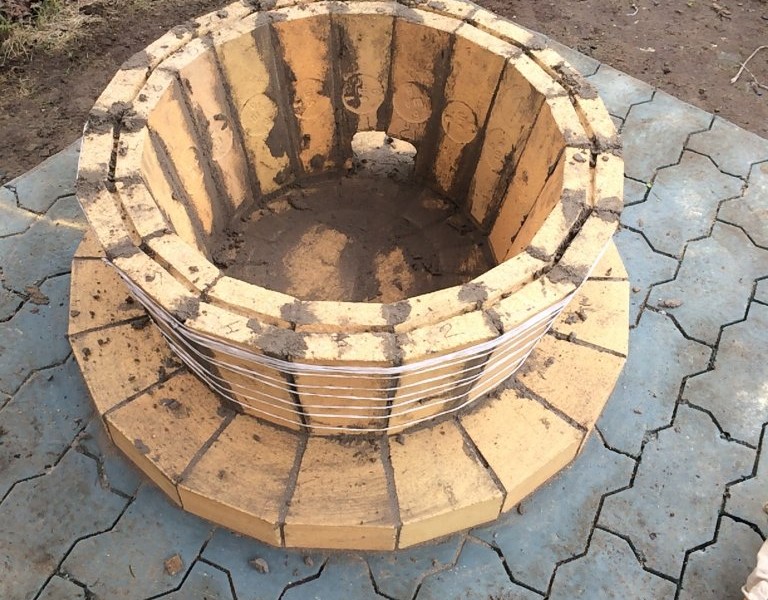
- From time to time, the evenness of the masonry is checked using a level.
- When the first row of bricks is laid, it is pulled over with wire, tightly twisting its ends and hiding them in the seam. Do the same with the rest of the rows.
There is no chimney in the classic tandoor. Some craftsmen include it in the design of their stoves and argue that this greatly facilitates the use. For example, it can be used in rainy weather, because air is supplied to create traction not through the slightly open lid (where water enters, which extinguishes the fire), but through a horizontally located pipe.
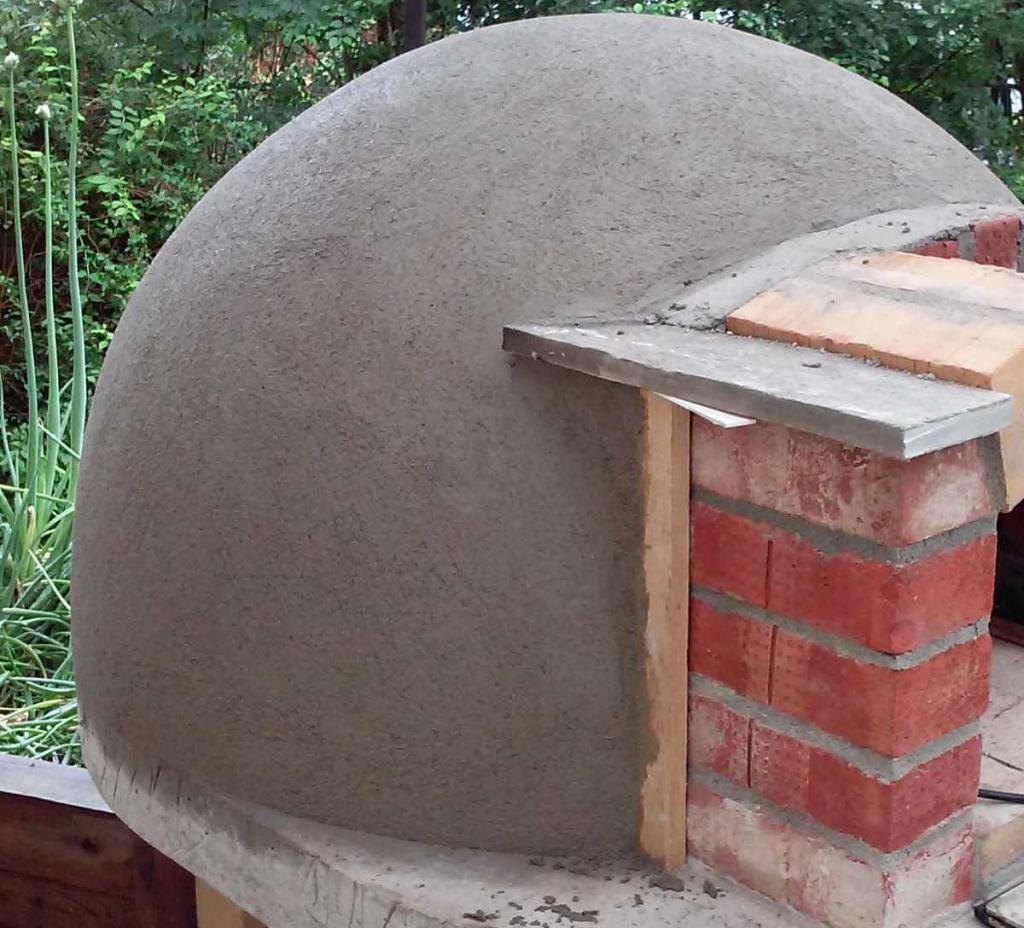
External processing
When the brickwork is finished, you need to start processing the outer part of the tandoor. It is plastered with an oven mixture, making sure that its layer is not less than 1 cm.
The upper edge is rounded and four recesses are made in it, into which the supporting parts of the lid are then placed.
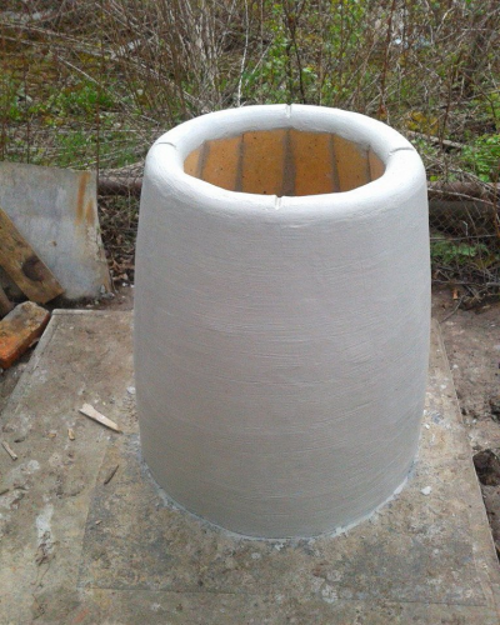
After that, the tandoor is covered with cellophane and left until the plaster is completely dry.
What is a tandoor?

The device of the Uzbek oven
Tandoor is a universal brazier oven, which the peoples of Central Asia use to prepare dishes from meat, fish, vegetables and national flatbreads.
In different countries, such a stove is called differently: "tonur", "tandoor", "tonir", but technologically this design is the same everywhere and consists of:
- grounds
- foundation
- inner inlay made of clay
- braziers with grid
- blown
- thermal filler
- external masonry (brick or stone)

It looks like a traditional authentic Uzbek tandoor
Due to its simplicity and versatility, the brazier has gained great popularity in the European part of the mainland.
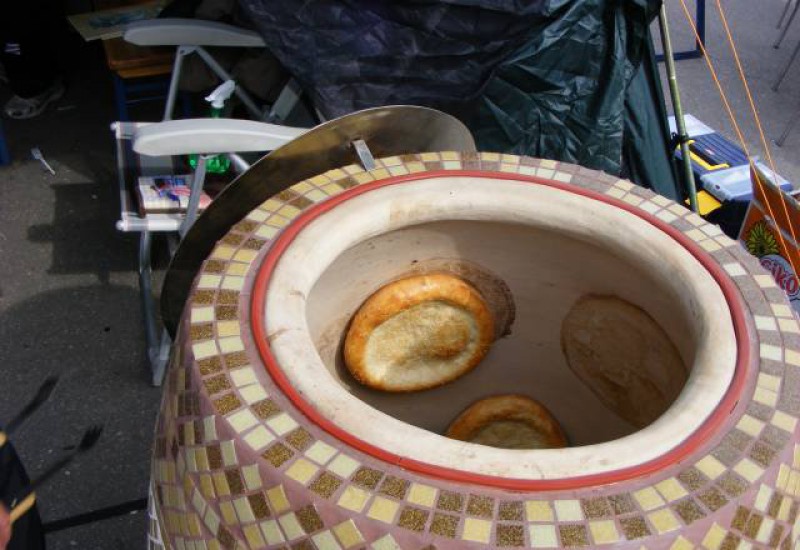
Outwardly, the tandoor looks like a large clay jug or an inverted pot, the neck of which is located on top or on the side. This kiln has been known since ancient times and was built from clay, sheep's wool and sand.
When erecting modern tandoors, more functional building materials are used: brick, cement, ready-made refractory mixtures.
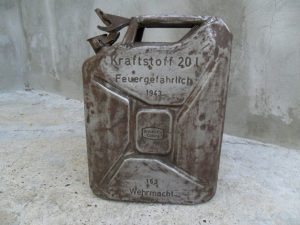
DIY mobile super stove from a fuel canister
How to use
Aerated concrete house: a review of the material, advantages and disadvantages, we build with our own hands (Photo & Video) + Reviews

Due to the design features, dishes cooked in the national oven are very tasty
A ready-made homemade tandoor is heated idle for 5-6 hours before the first use. At the same time, the clay walls are coated with vegetable oil so that the cakes do not stick later.

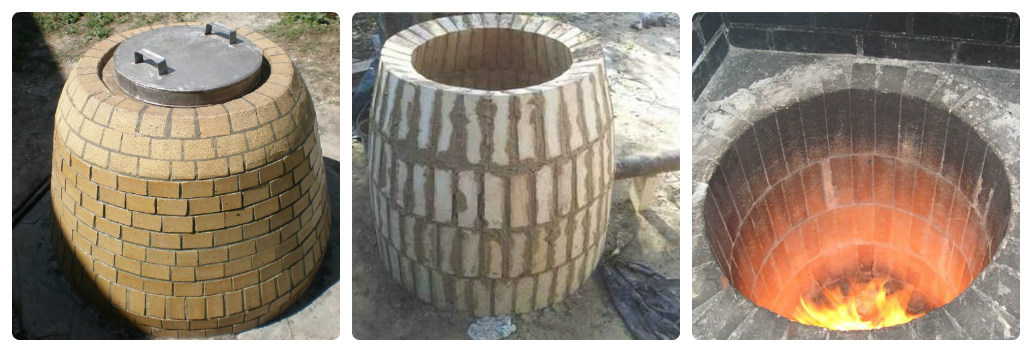
Meat, poultry, vegetables and fish dishes are cooked on a wire rack or on skewers directly over the fire. To prepare cakes, the oven is first heated, then the coal is removed, the walls are wiped from ash and soot. Only after that, they begin to sculpt the clay dough.
Even a person without construction skills can build a universal brazier oven - an Uzbek tandoor - at his summer cottage.
It is important to use quality materials and strictly follow the recommendations above
If the work is done correctly, then a personal tandoor in the country or near the house will delight the whole family for a long time.
An inexpensive way to build a tandoor from improvised means for 1 thousand rubles is described in the video -
Tandoor from improvised means for 1 thousand rubles
Tandoor: device, step-by-step instructions on how to build a famous Uzbek oven from bricks, do-it-yourself barrels | Photo & Video
A blogger shares his personal experience of building a tandoor oven at a summer cottage in the video -
Personal experience of building a tandoor oven at a summer cottage
Tandoor: device, step-by-step instructions on how to build a famous Uzbek oven from bricks, do-it-yourself barrels | Photo & Video
8.3
Total Score
Tandoor
Ease of implementation
7.5
Convenience
9
Originality
10
Material costs
6.5
Terms of use
The heating of the furnace is carried out by loading firewood into the neck. Ignition can be done from above or through a hole at the very bottom of the dome. It serves for blowing and removing ash after firing. The vertical structure has no chimney and combustion products are removed through the neck.With a horizontal arrangement of the firebox (bread oven), the chimney is arranged in the back of the dome, as far as possible from the throat. In this case, the thrust is provided by the air flow from the throat to the pipe; the blower in the tandoor of the horizontal type is not made.
You can cook dishes in the tandoor in the following ways:
- Cooking - takes place in a cauldron or saucepan installed on the open top of the vertical hearth. During the preparation of soup or pilaf, after kindling, firewood is placed through the lower hole or the dishes are removed for a while. They put enough wood to ensure a low to medium boiling point of the liquid.
- Baking. It is convenient to lower meat, fish, vegetables directly into the mouth of the oven when the coals in it are almost extinguished. To do this, use special lattices with handles, for which they can be easily lowered and raised. The meat on skewers is put into the firebox. In this case, you can rest the tip of the spit against the bottom of the oven or make a special disc-ring according to the size of the hole in order to hang the skewers in the slots.
- Bread baking. Flatbreads and samsa in a tandoor are tastier than in a simple oven. But the baker will have to master the method of attaching products to the wall of a heated hearth. When the baked goods are ready, they can be easily removed by slightly moving them. For such work, thick gloves are needed.
In addition to special cooking methods, you can install both a frying pan and a kettle or a kettle on a vertical tandoor to cook dishes like on a stove or fire. The horizontal oven is used as a kitchen oven.
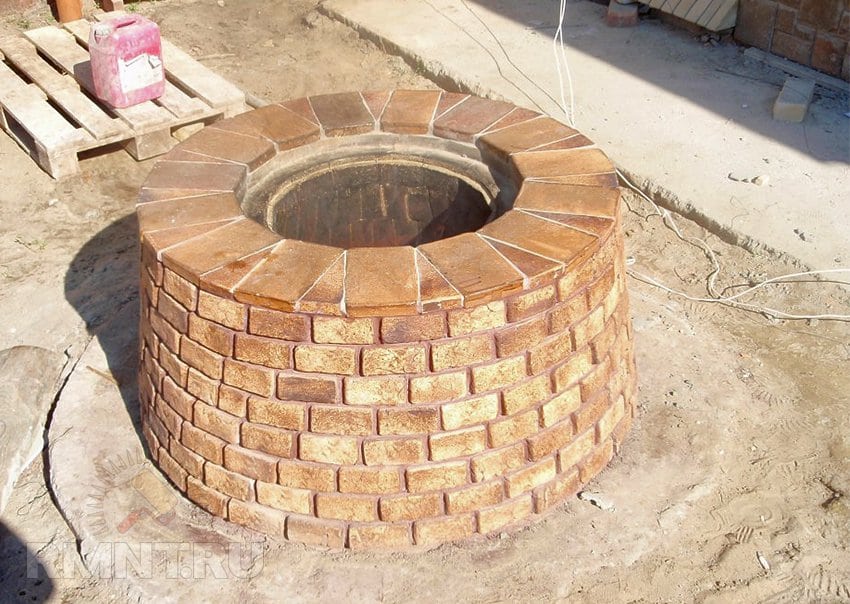
Simplified way

The simplified way of laying the stove does not involve coating with clay
An easy way to build a brazier on your own is to lay out a 75 cm high tandoor with refractory bricks. You cannot bake bread in such an oven, because no clay is used, but barbecue is easy to fry.
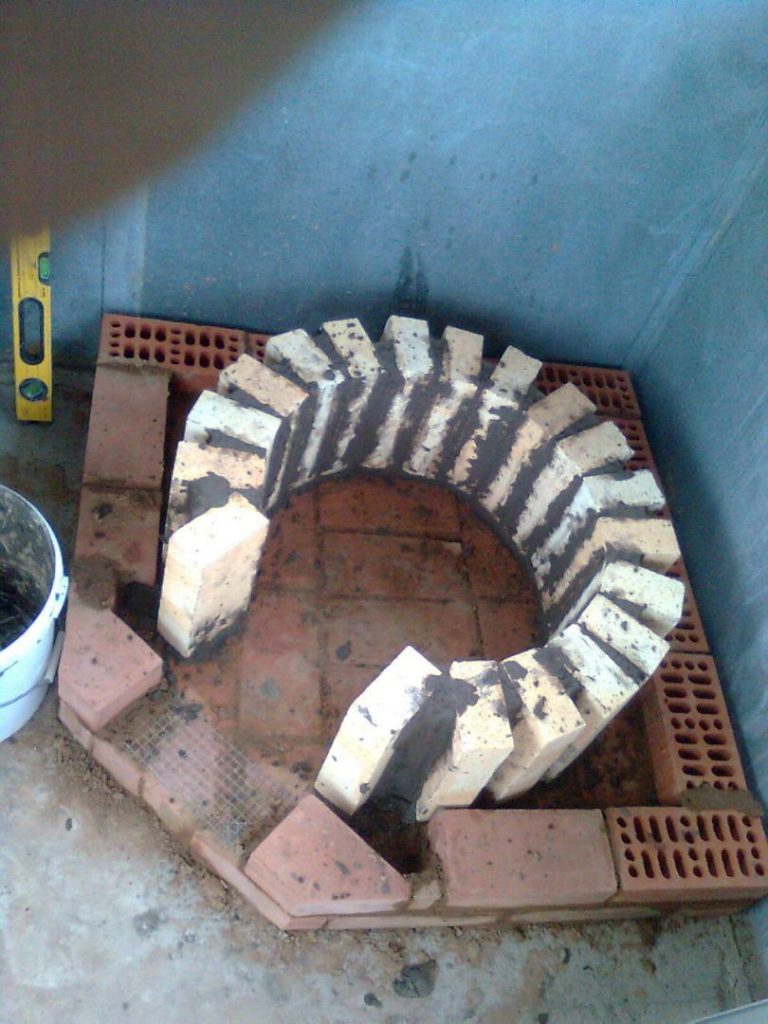
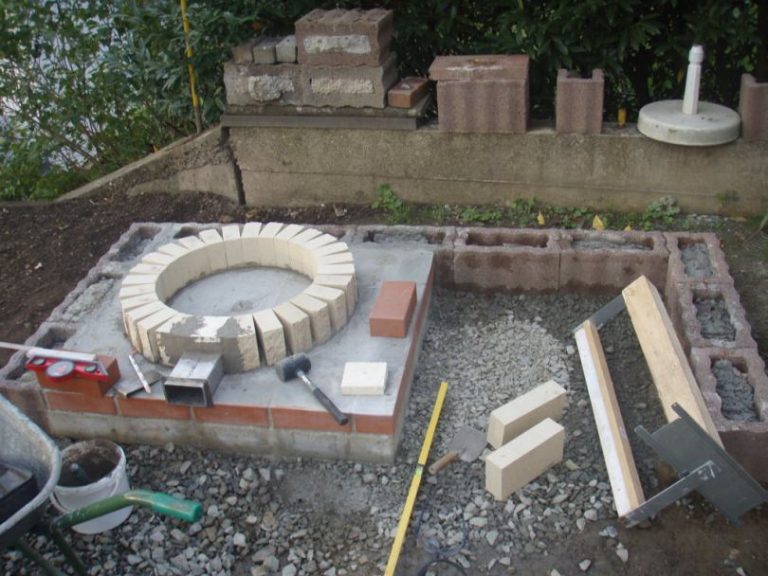
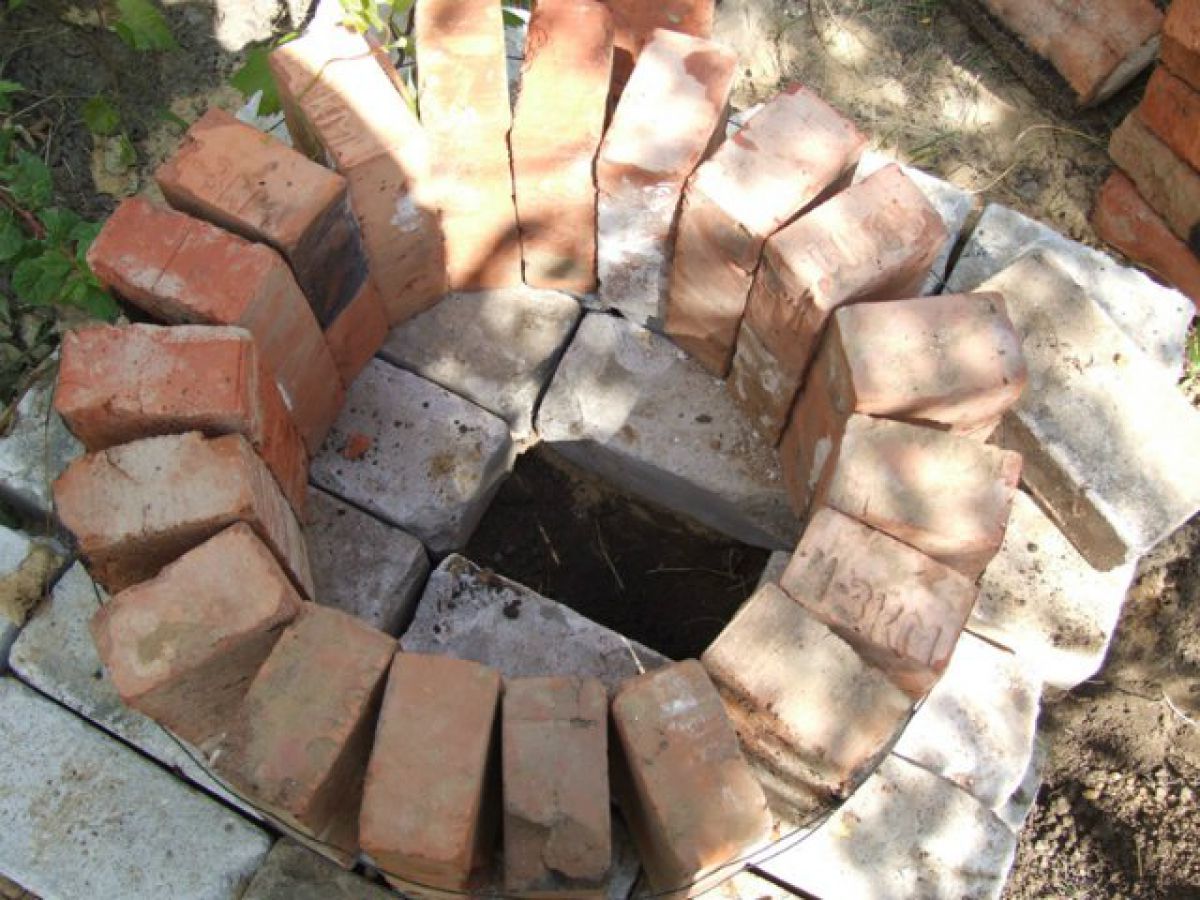
The tandoor is built on the basis of 3 rows of silicate bricks laid along the pattern along, across and again along the dug pit. Then the refractory bricks are laid out on the edge, forming a circle.
The first row and 2 subsequent ones are fixed with steel wire. The finished structure is coated with a fire-resistant mixture for laying stoves and fireplaces, and after drying it is plastered.
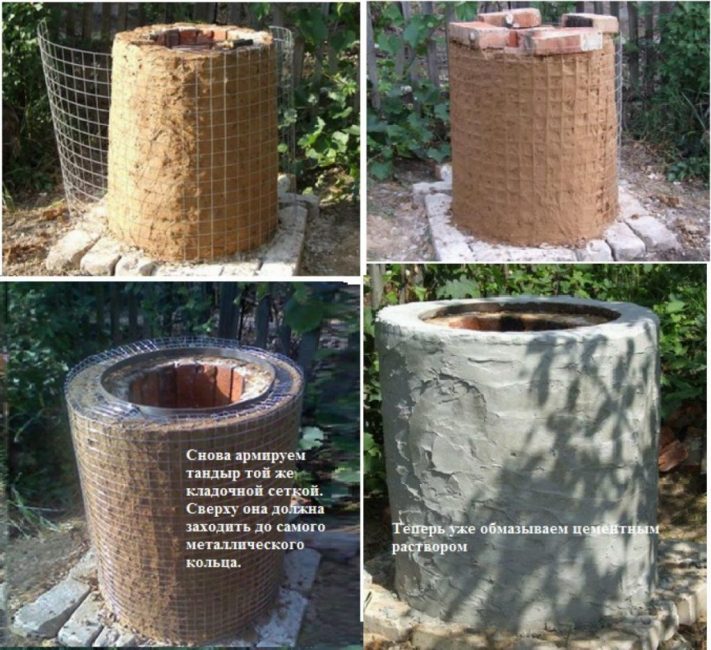
The procedure for working with a simplified construction method
Next, the outer walls are twice coated with clay with a layer of 2 cm, wrapped with a reinforcing grid, covered with cement mortar (a mixture of 3 parts of sand and 1 part of cement).

The outer walls of the kiln are equal to cement mortar
Optionally, a metal ring 5 cm high is installed at the outlet to install the protective cover. For hanging skewers, a metal bar is often welded in addition to the sides.
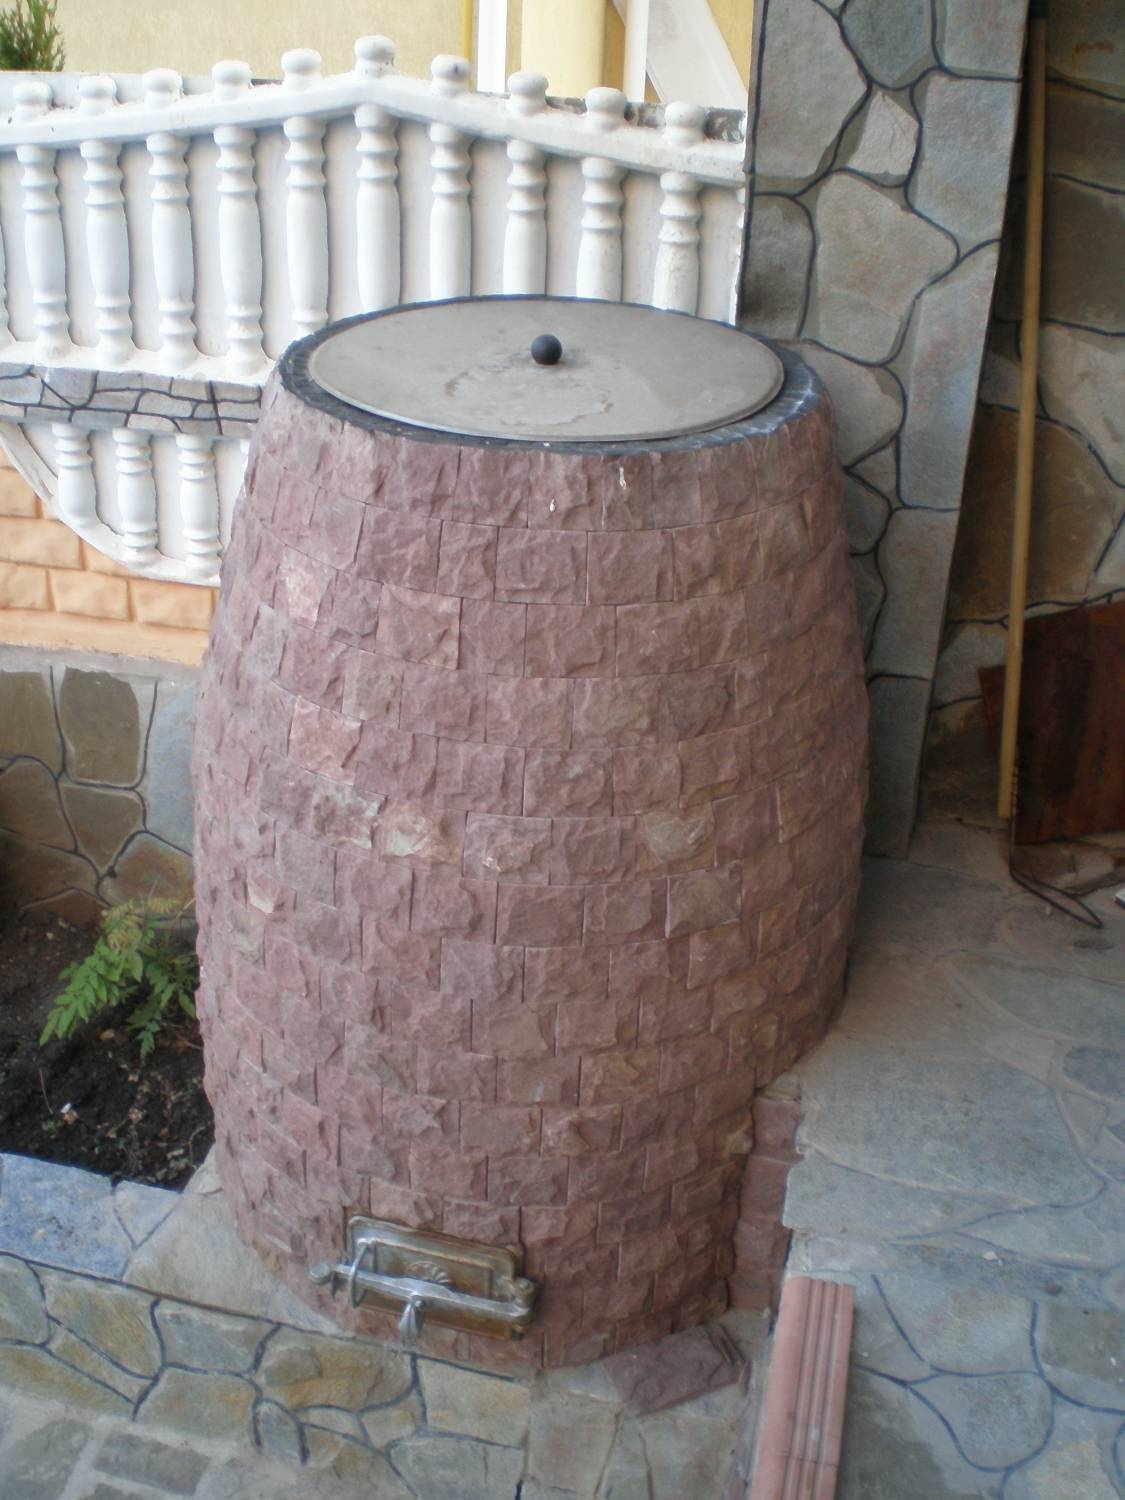
For decorative purposes, the outer walls of the tandoor are finished with stone or painted with refractory paint.

Azalea - description, care, reproduction and possible diseases (35 Photos & Video) - We follow the cultivation technique
Advantages and disadvantages
In total, there are more than 30 types of this device for cooking. The content is different, but the principle of operation is the same for all. Food is prepared not from fire, but from the heat that the walls have accumulated.
Brick oriental miracle oven has its pros and cons.
Pros:
- does not require the use of expensive materials;
- a properly folded stove serves for many years;
- processing food at high temperatures;
- high heat transfer;
- allows you to preserve the juiciness and useful qualities of products;
- due to high efficiency, fuel is significantly saved;
- low requirements for fuel quality;
- easy maintenance;
- can be made by hand.
Minuses:
- the vertical arrangement of the barbecue is not usual for a Russian person;
- soot constantly forms on the walls when melted;
- there is a risk of scalding when removing cooked food;
- food is cooked in the same cauldron where the wood is burning.