How to choose a seat
Brick brazier is a stationary structure. After construction, it will no longer be possible to move it to another location. Therefore, the place must be chosen for the long term:
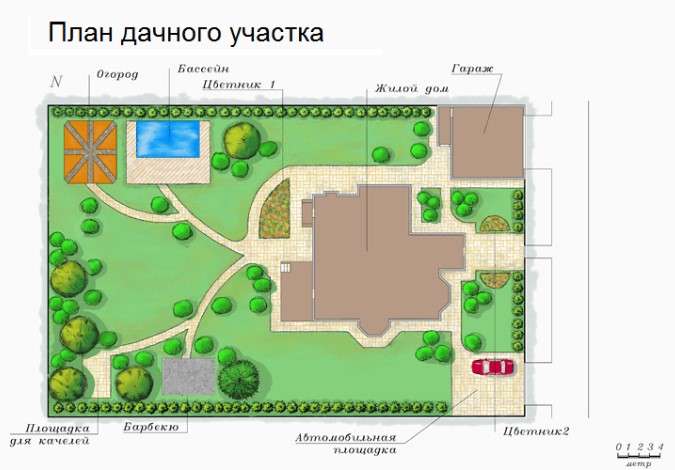
- near the gazebo, terrace, veranda where it is planned to relax or receive guests;
- at a safe distance from wooden buildings to avoid sparks and fires;
- away from neighbors who may be obstructed by smoke;
- in an area protected from wind and precipitation.

It is good if there are communications nearby - electricity, water supply, sewerage. Then the whole process of cooking can be carried out in the fresh air, combining business with pleasure.
By the way, friends, recently we wrote an article on how to make a brazier from a gas cylinder, it is much cheaper and faster, if you have time, be sure to read it.
Simple Gazebo BBQ Oven with Cutting Table
Projects of such structures are presented in large numbers in the public domain. In the proposed version, the walls are single-layer (unlike the previous model) and are made of ordinary hollow bricks.

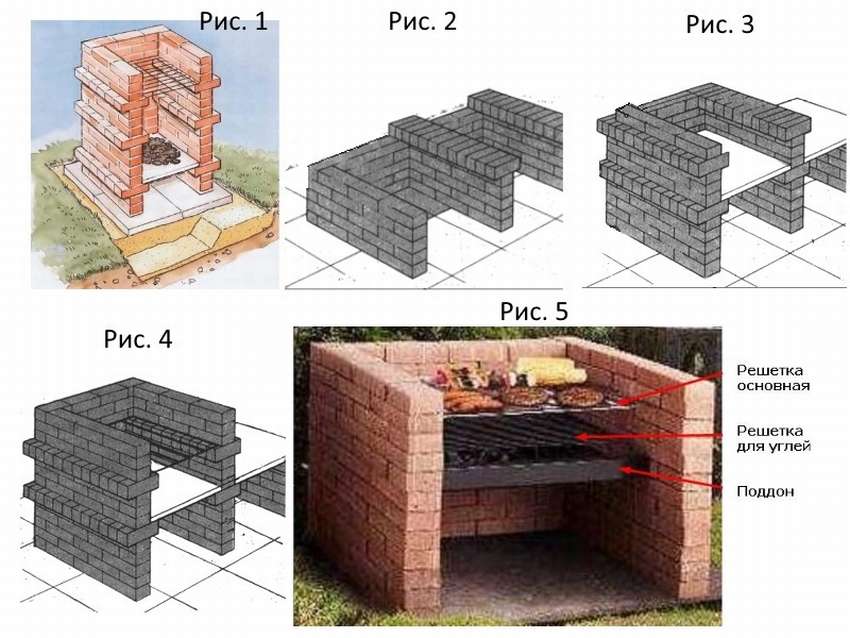
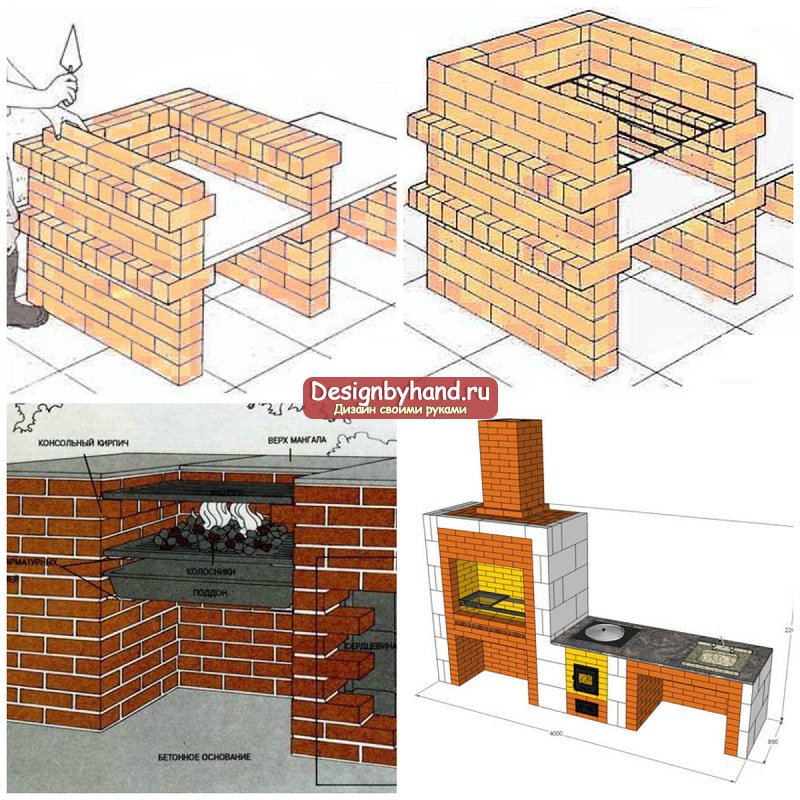
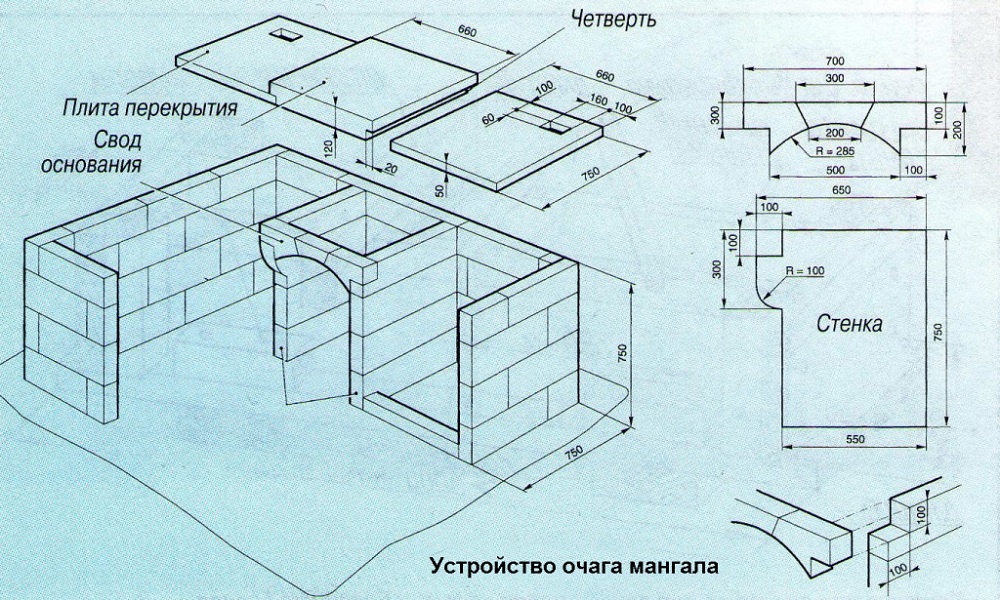
Preparation and marking of the base are carried out as usual. To mark out the dimensions, you can use the lattice (s) and the countertop plate, which will be used later. The brick is cut if necessary.
Please note: the cut hollow brick is placed in the masonry so that the voids face the neighboring block, and not outward!

After marking, the first layer of mortar is laid on the prepared base and the first row of masonry is mounted.
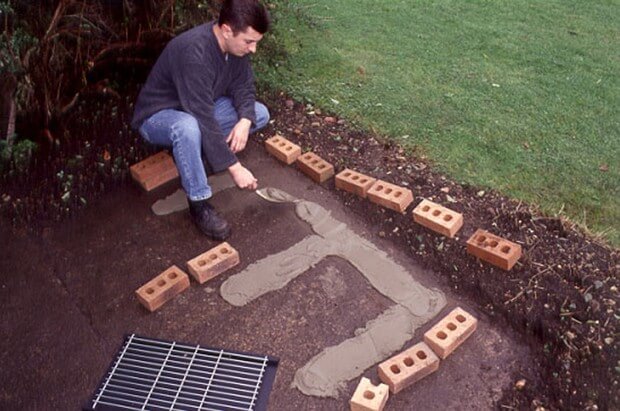
The edges are carefully leveled.
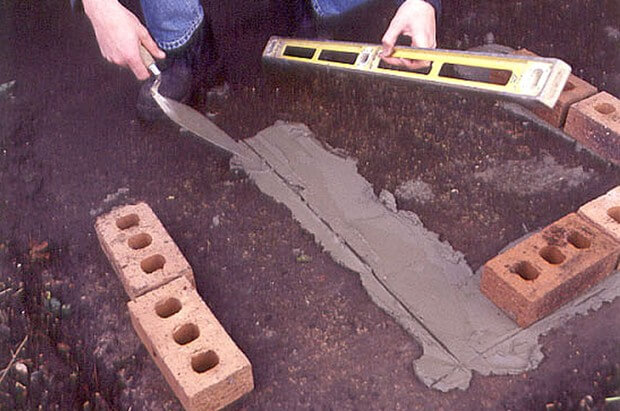
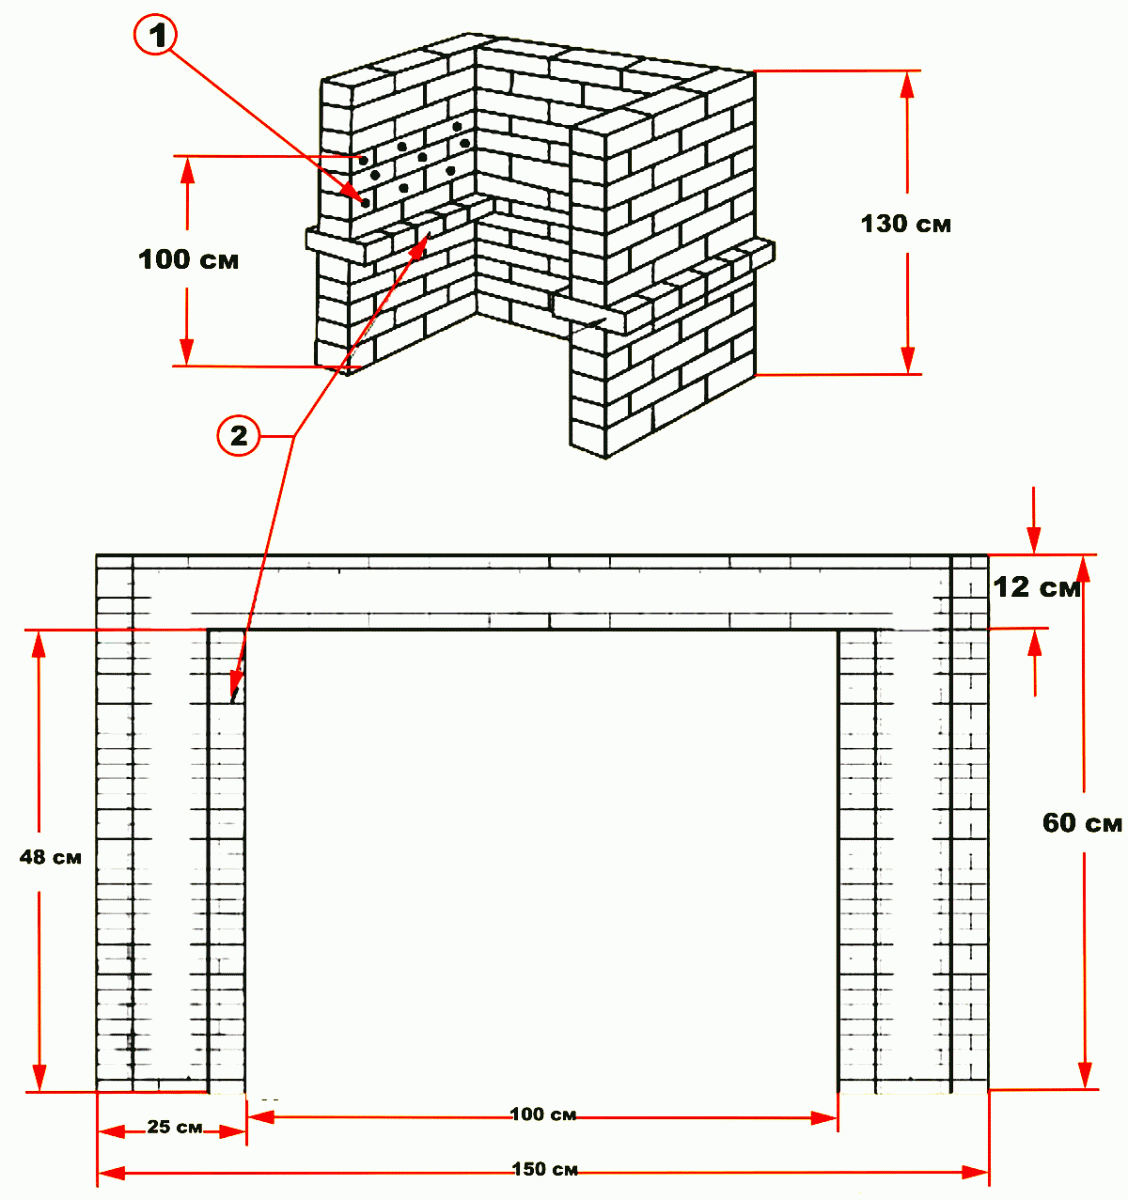
To strengthen the joints of the perpendicular walls, reinforcement wire inserts are mounted in the first row.
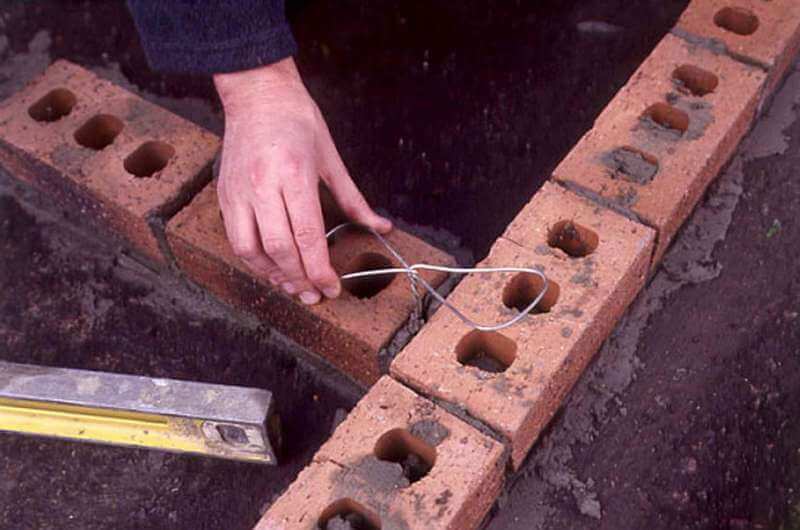
The laying of each next row starts from the corners.
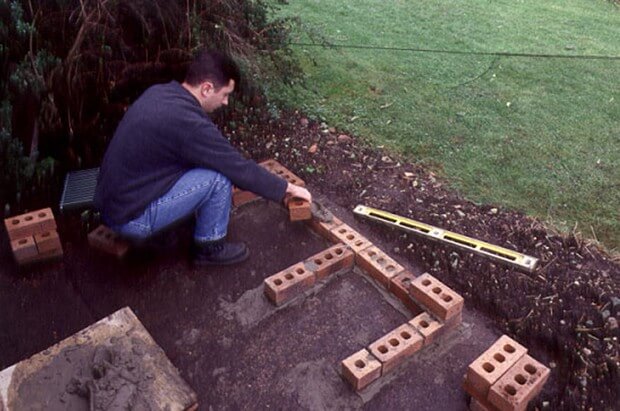
At a level convenient for installing the lattice, some of the bricks in the masonry are turned perpendicular to the common line. The bricks of the upper row are also mounted on the side walls.

The table top is made of large paving slabs or other suitable material.
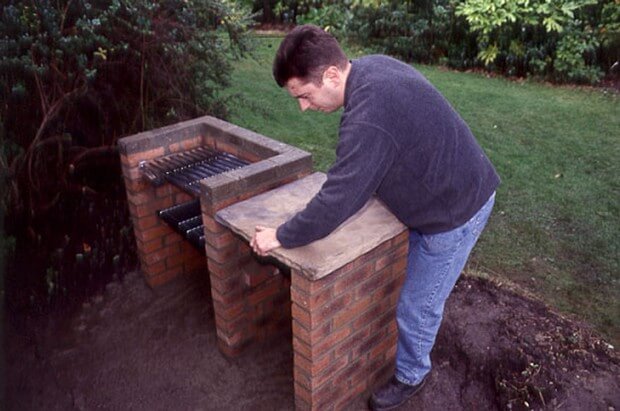
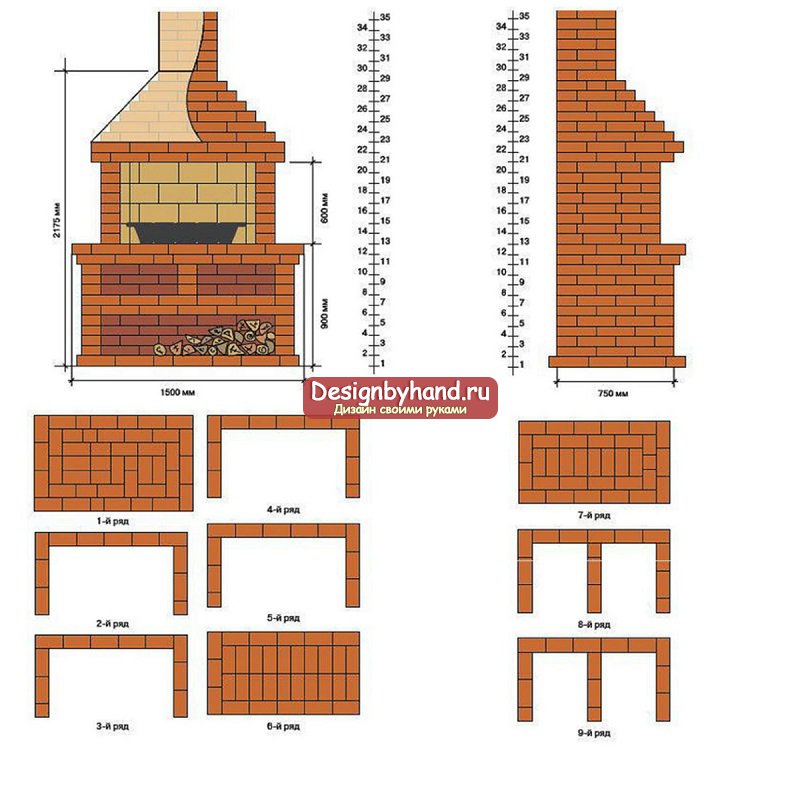
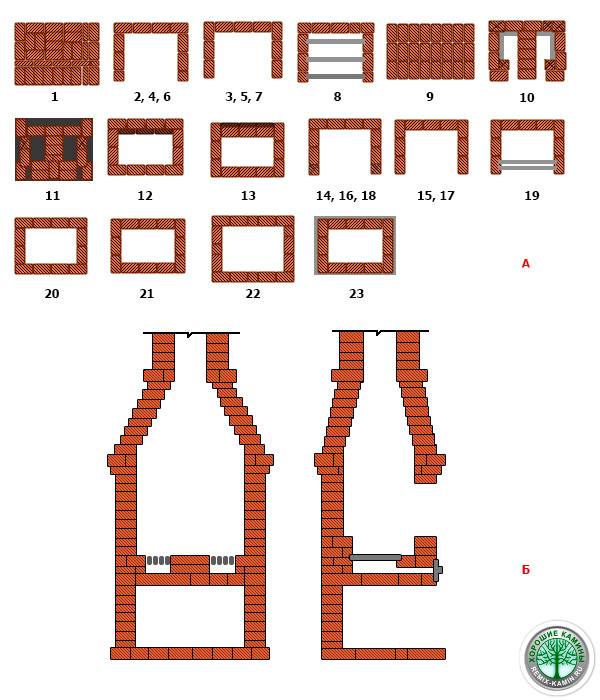
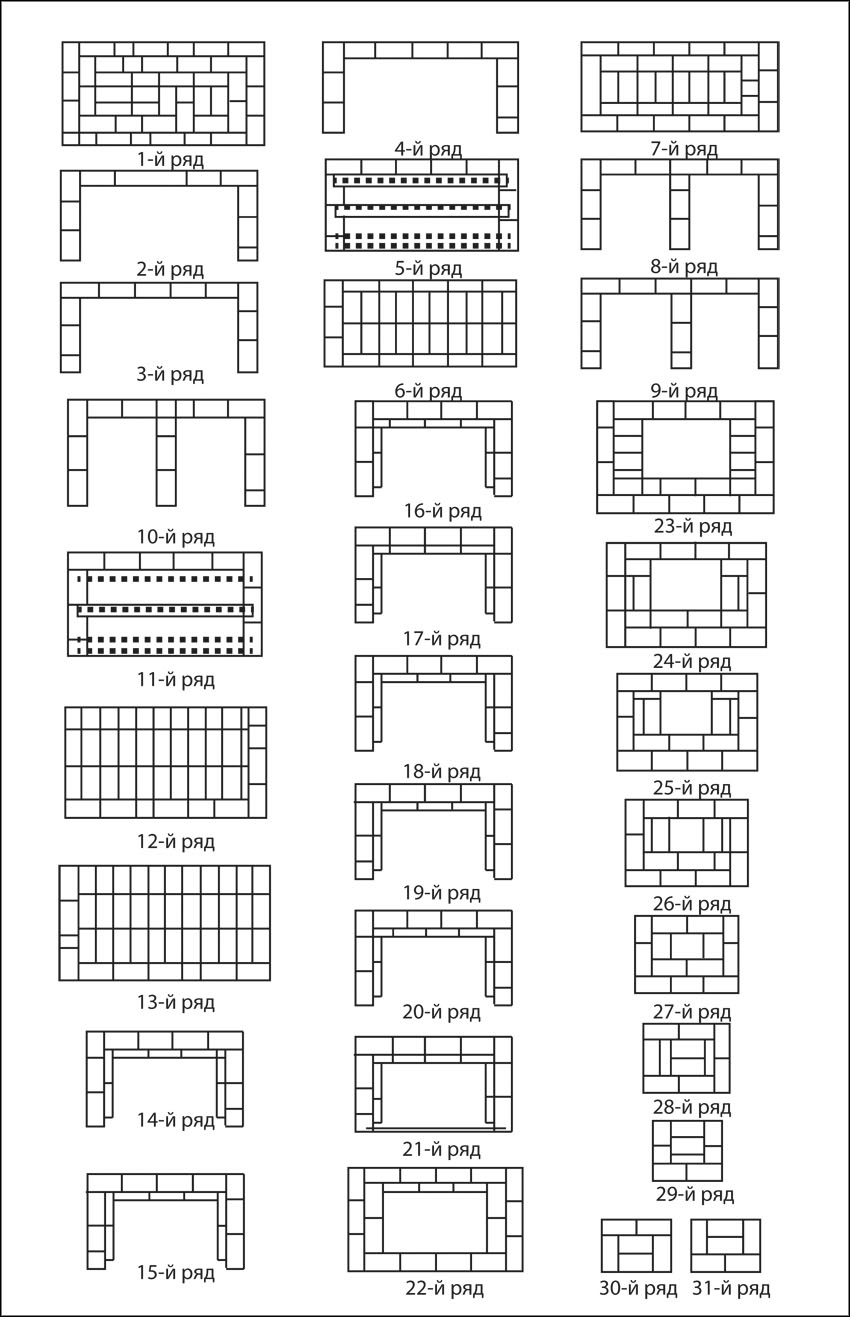
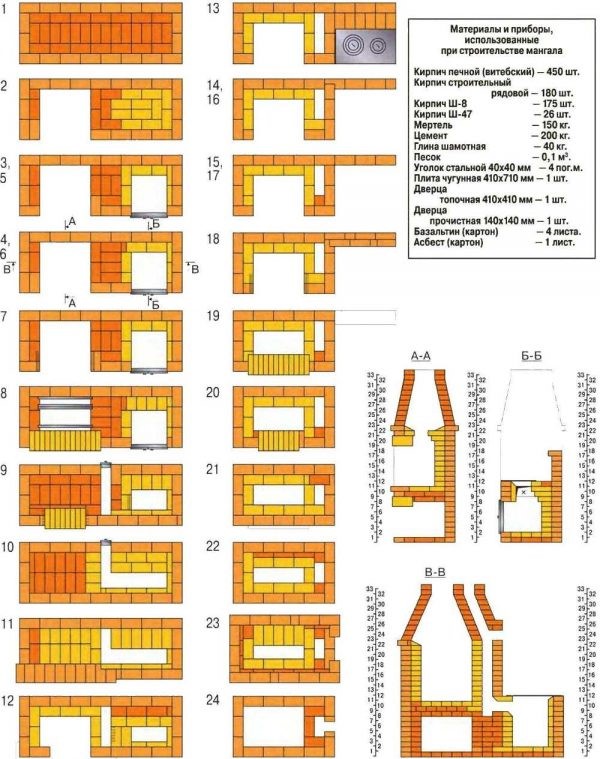
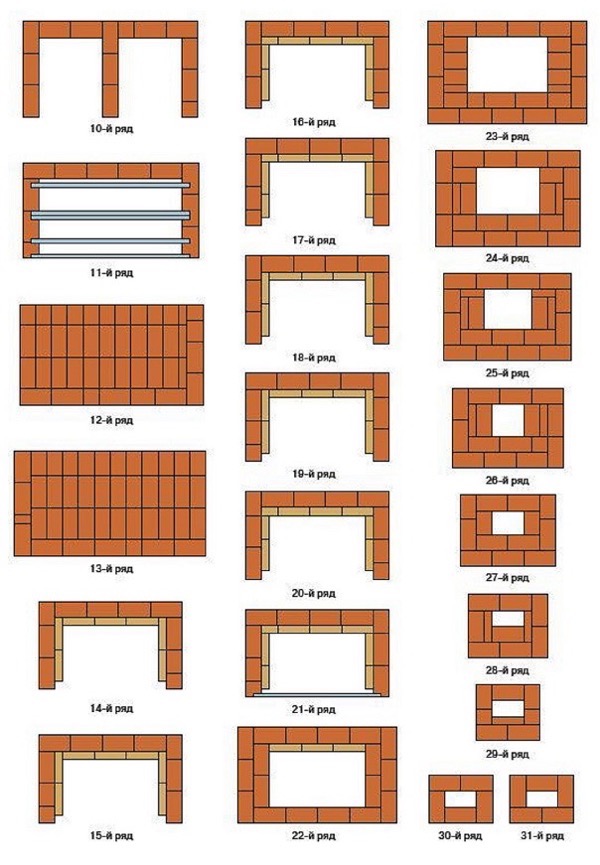
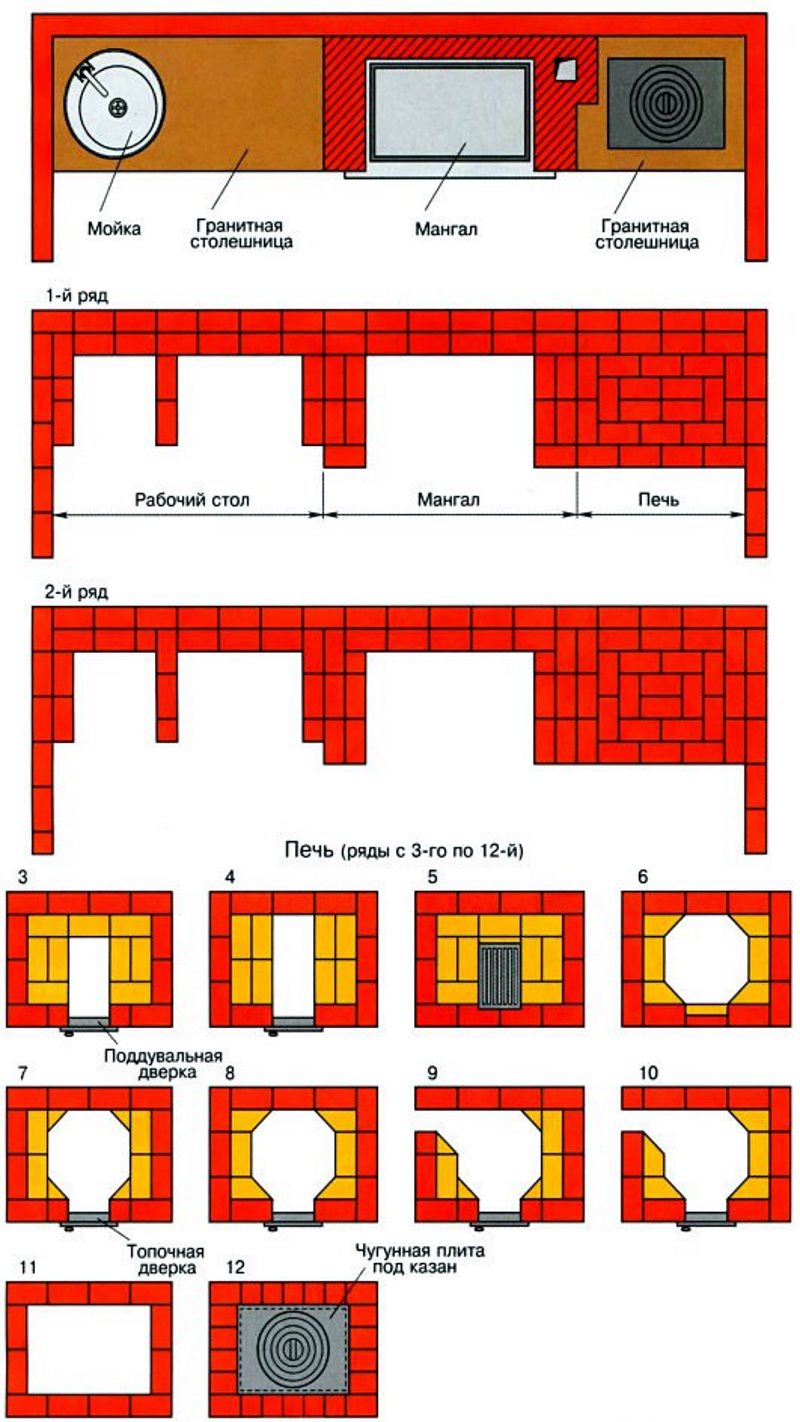
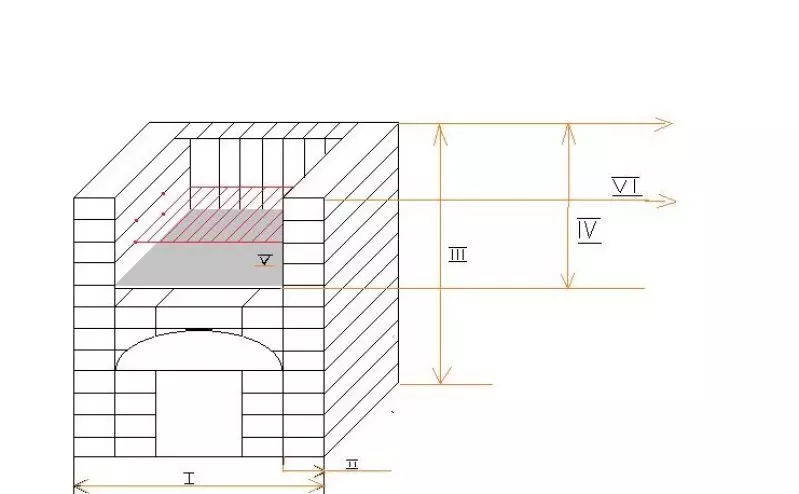
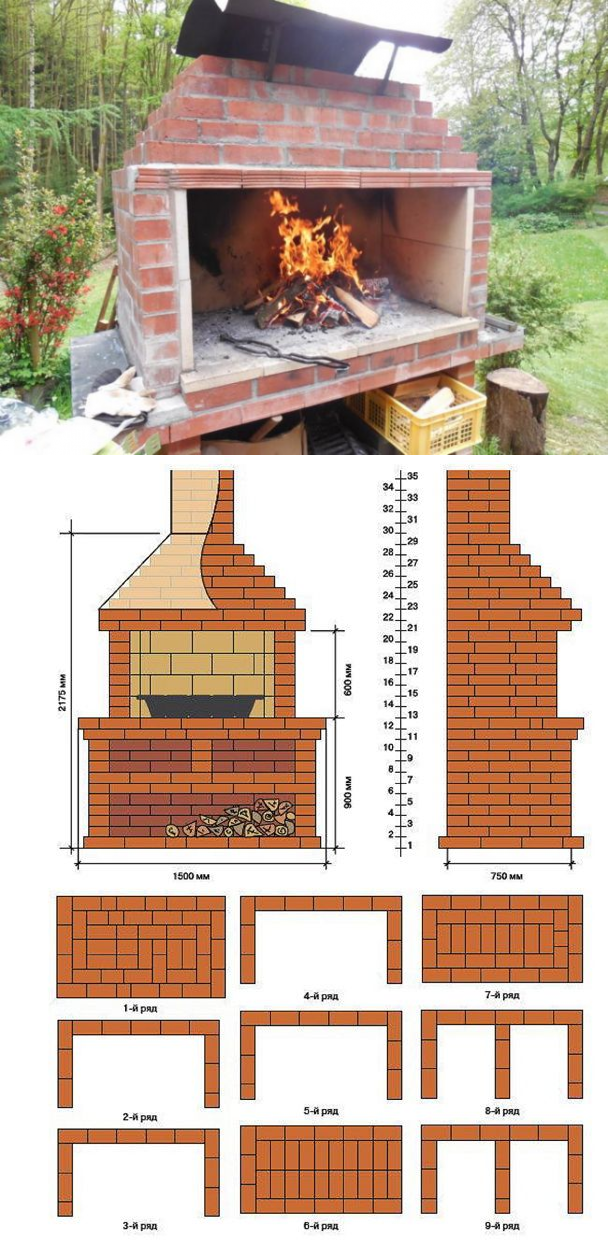
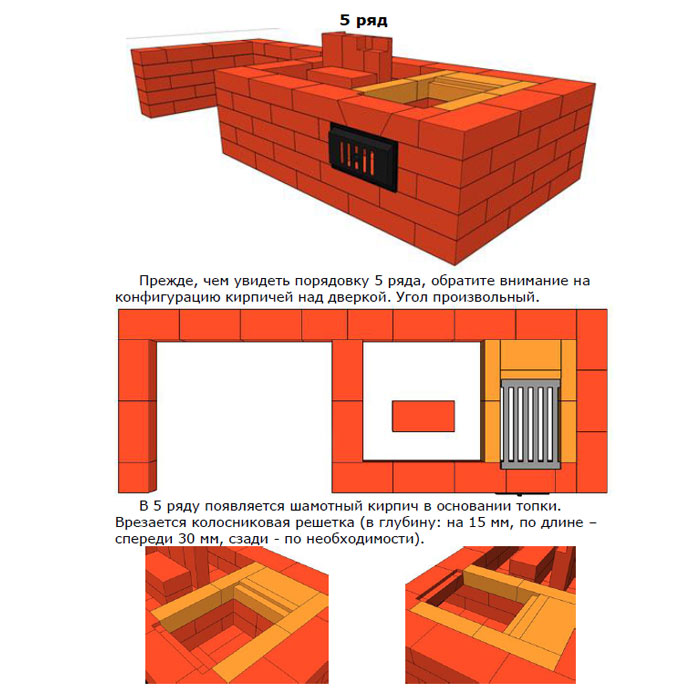
If you still have questions with the brick laying scheme, you can use this order.

Determination of optimal dimensions
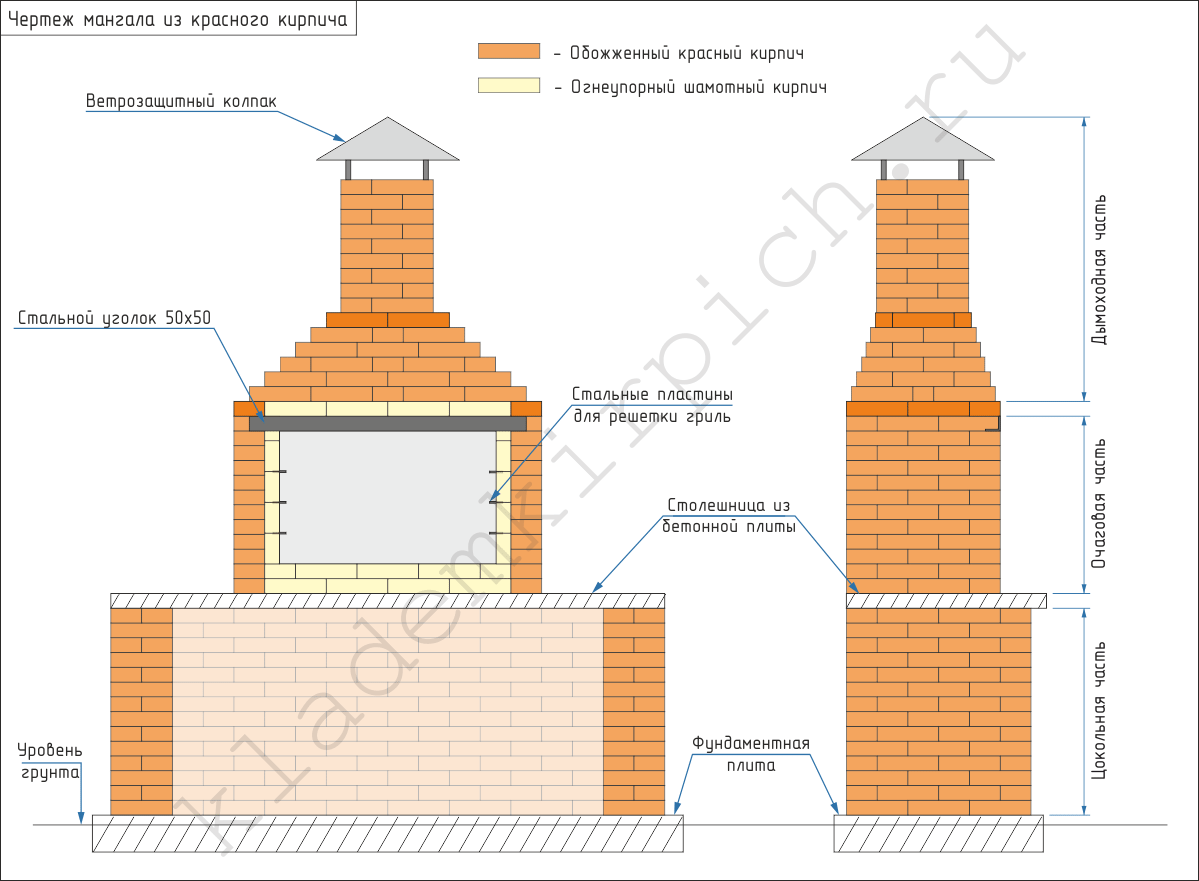
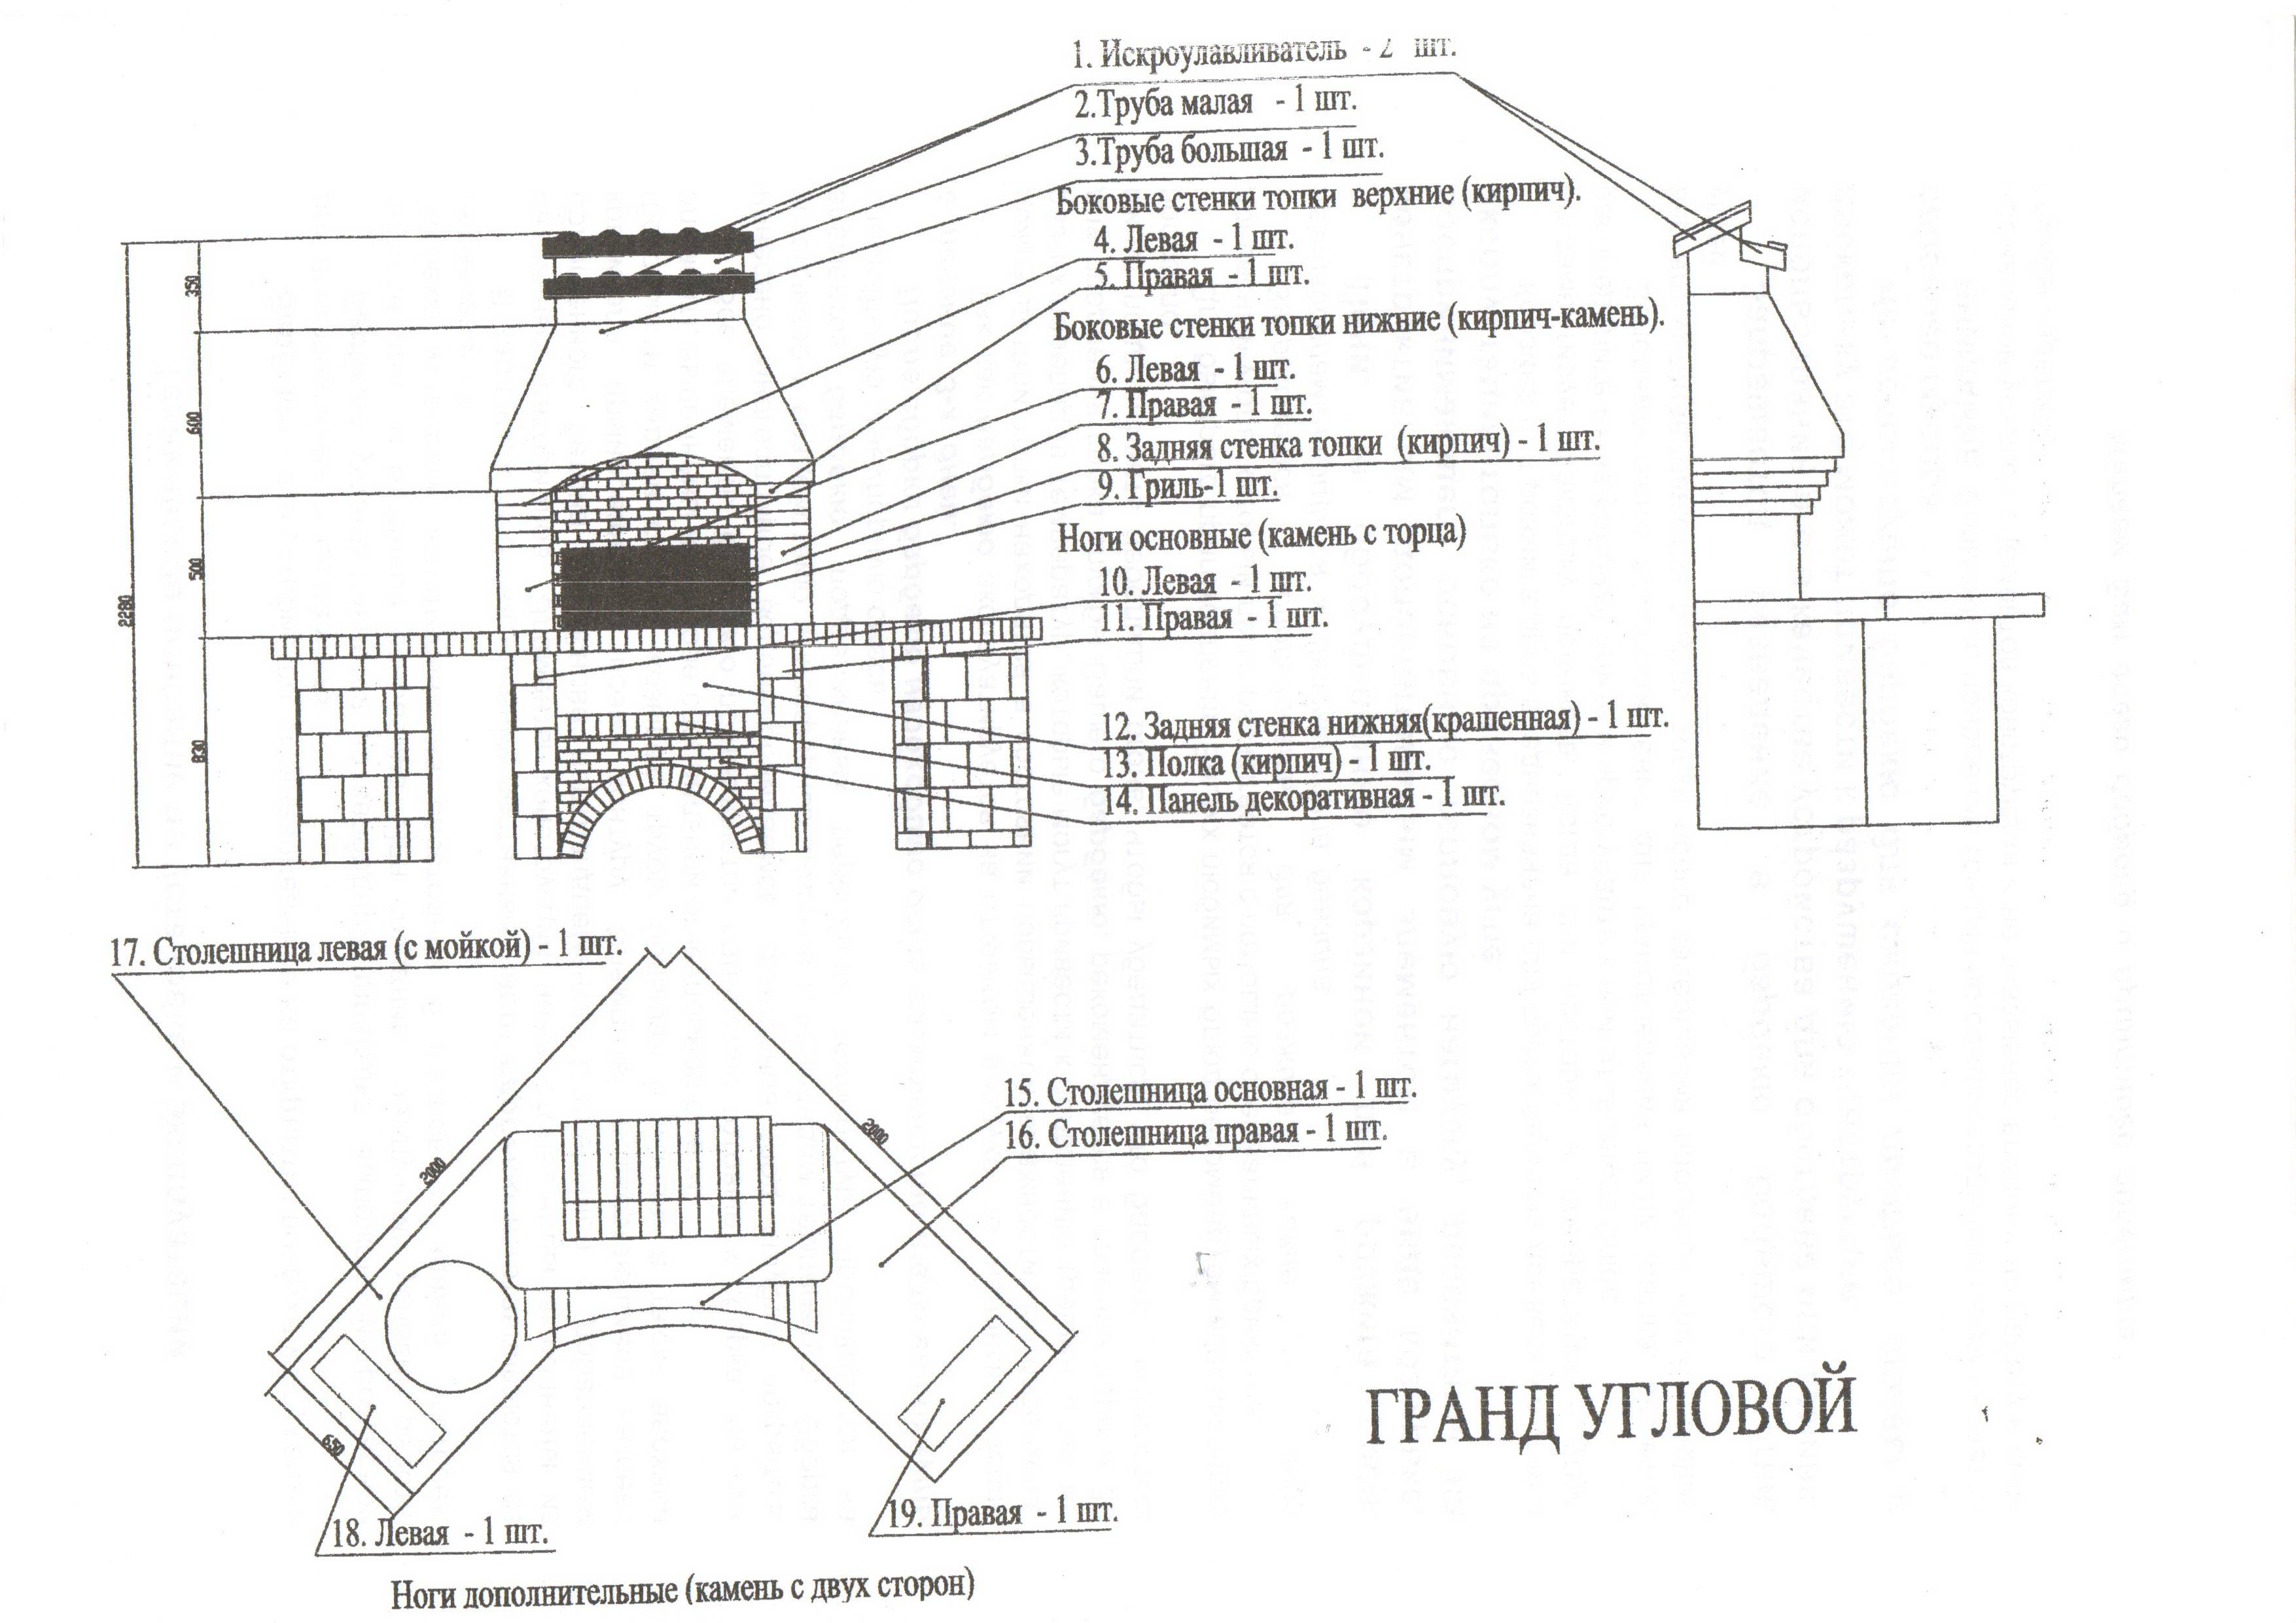
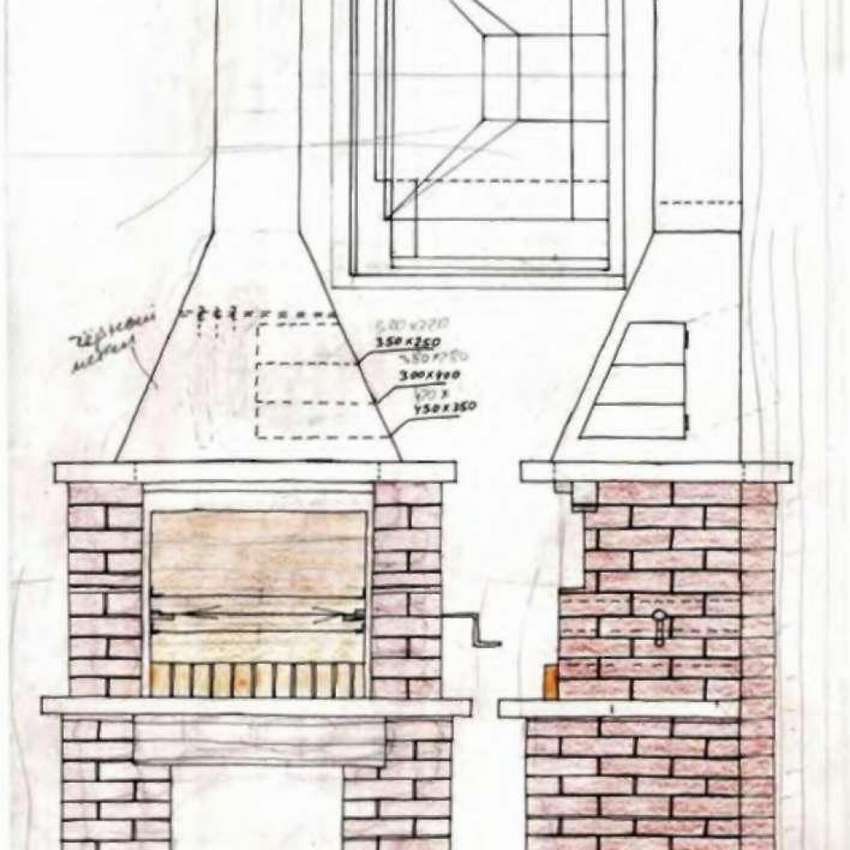
An important condition is the choice of the dimensions of the future structure. If desired, you can add a Russian stove, sink, smokehouse, work table. Before starting, it is recommended to draw a schematic drawing that will help take into account the smallest details, correctly calculate consumables. You can draw the project yourself by hand.
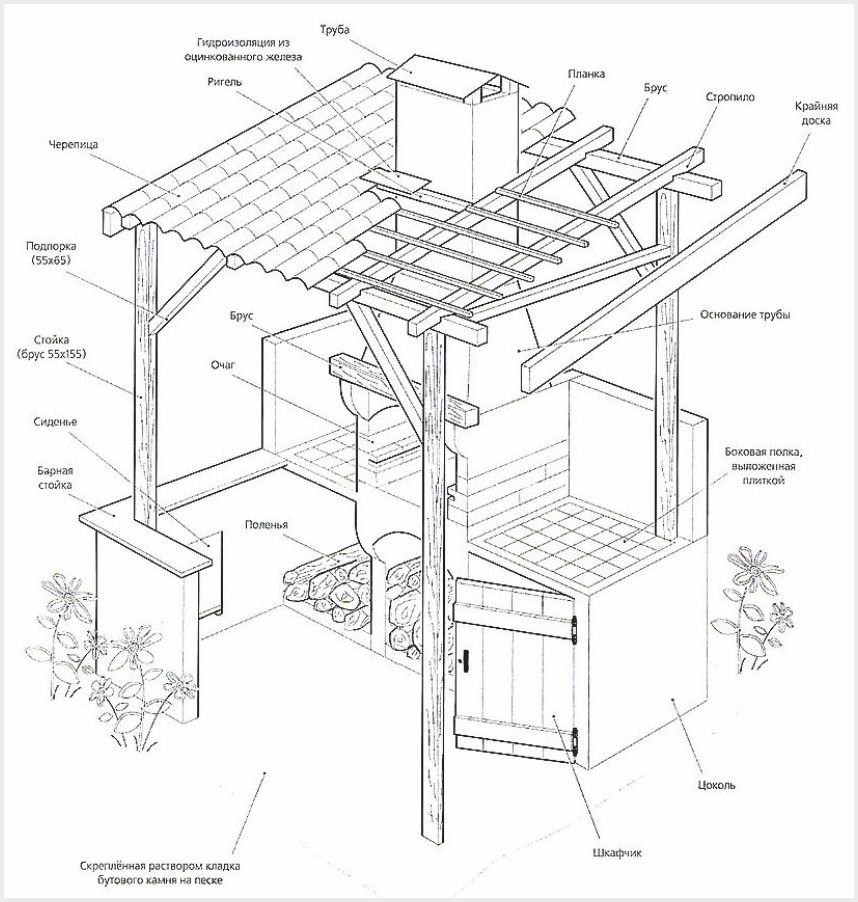
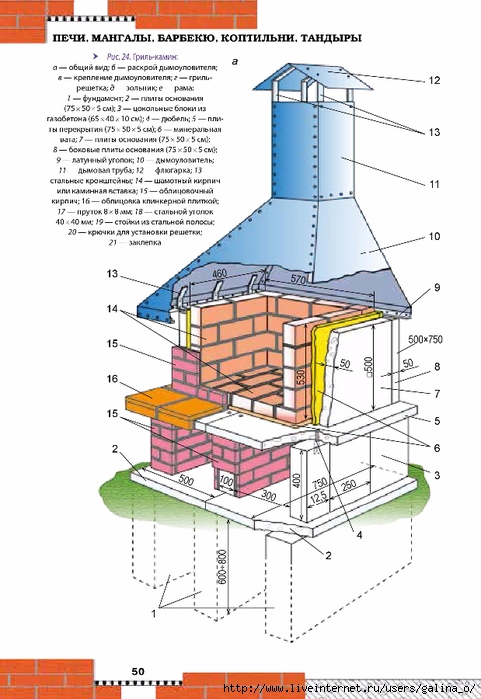
It is worthwhile to provide in advance a compartment for ash, air blowing, a chimney, a place for storing coal and firewood. It is good to equip an outdoor grill with a canopy to protect the hearth from getting wet. You should choose the size of the metal grill for cooking, think over where the skewers will be stored.
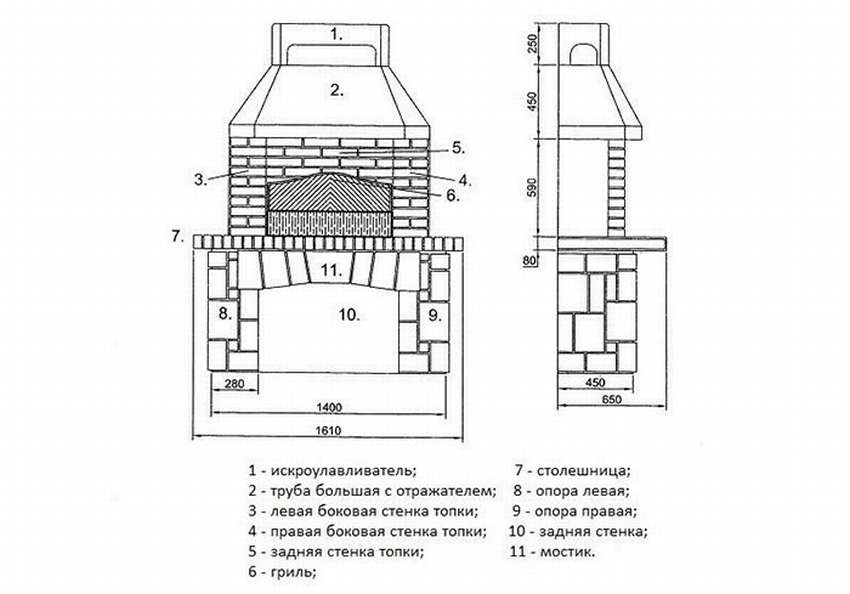
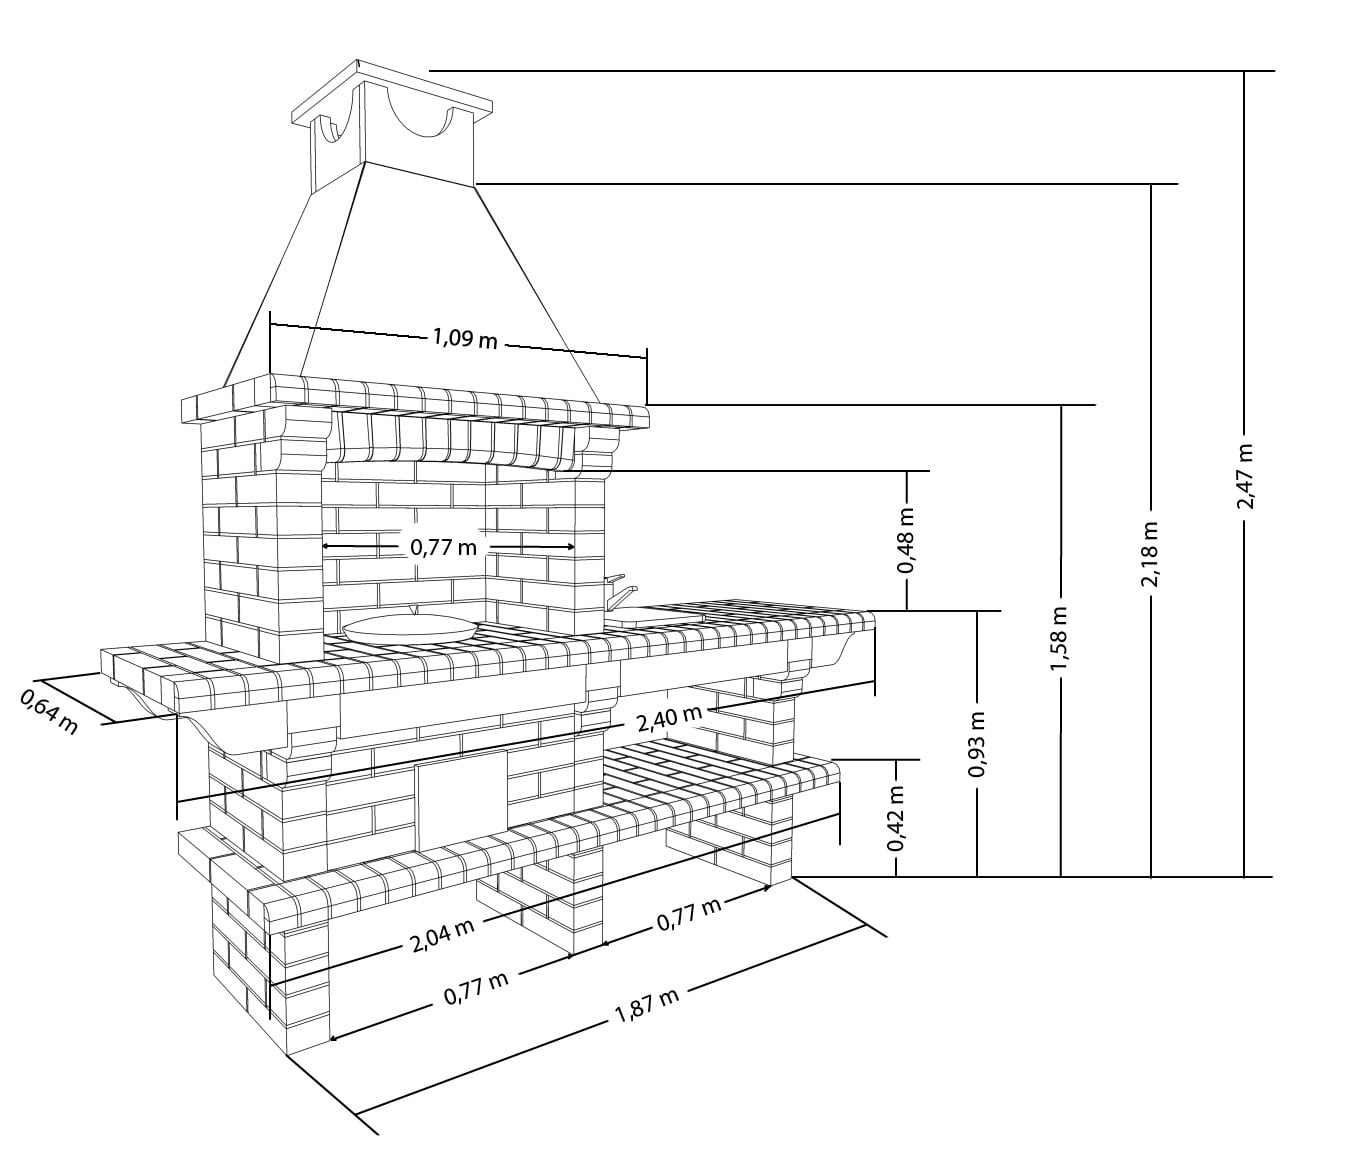
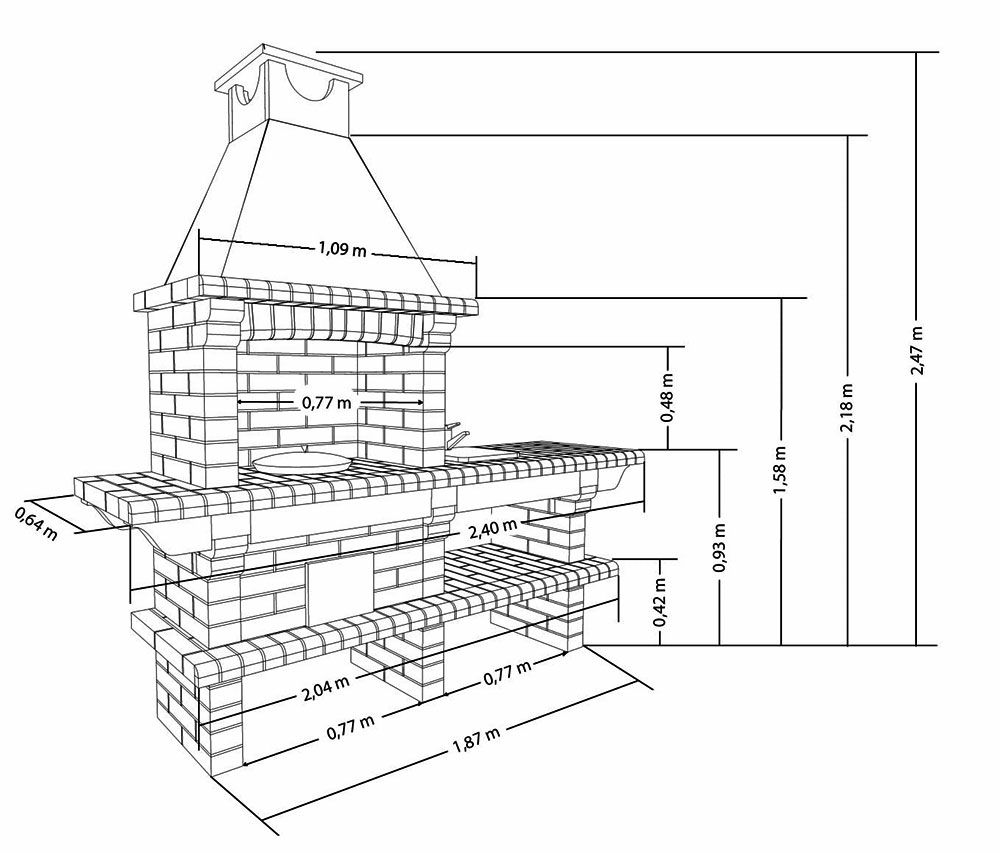
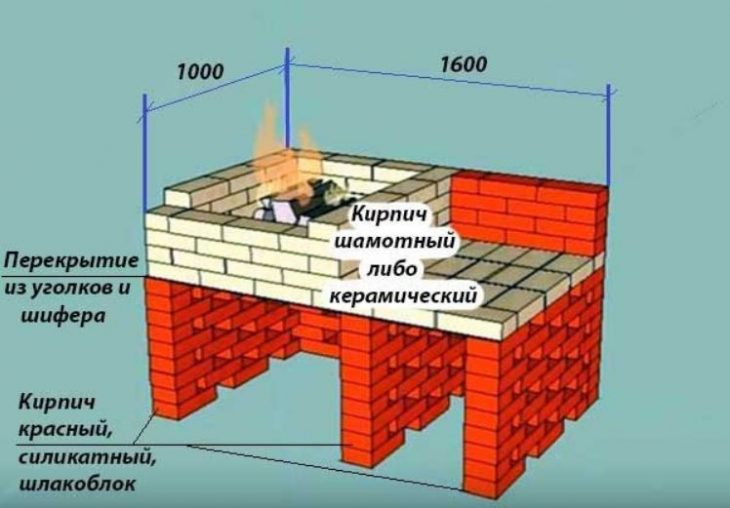
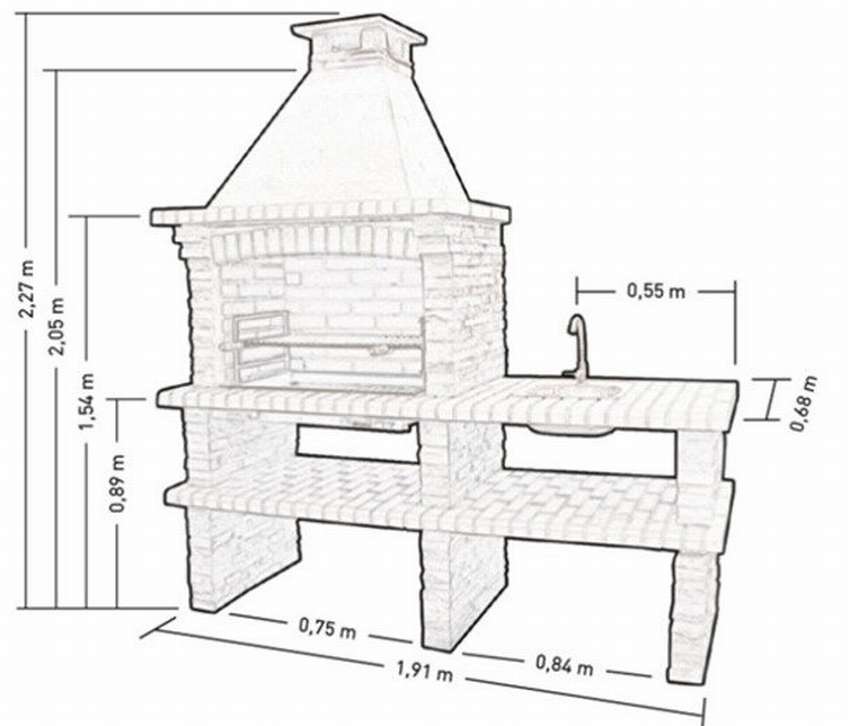
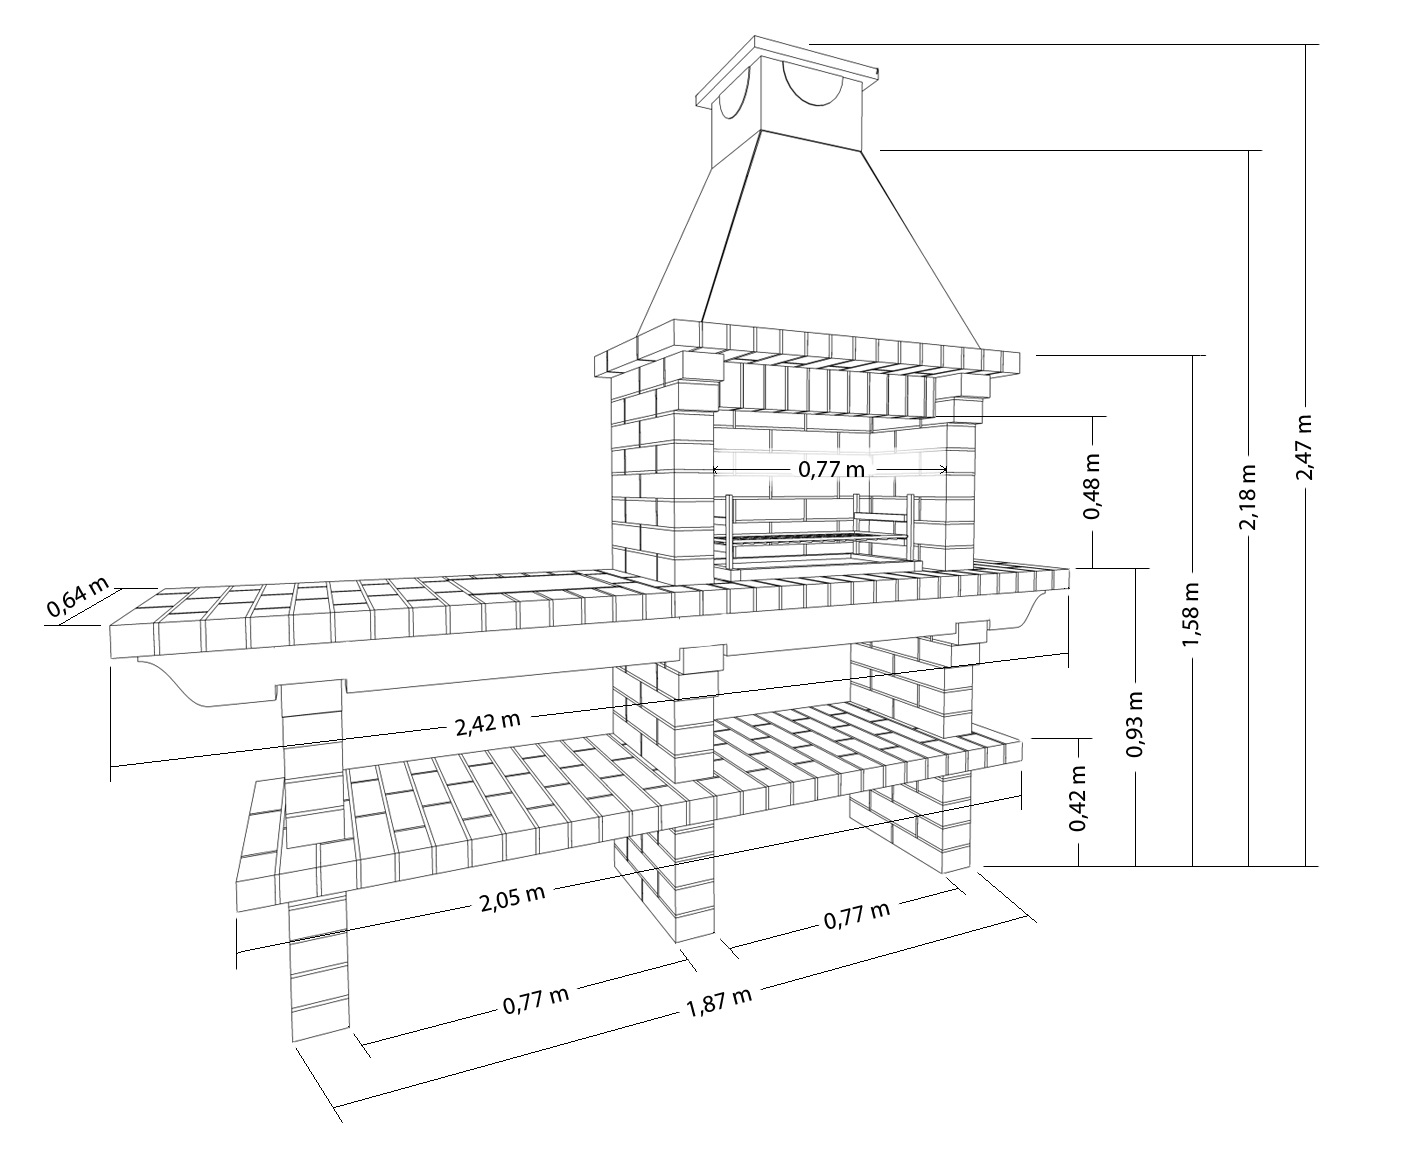
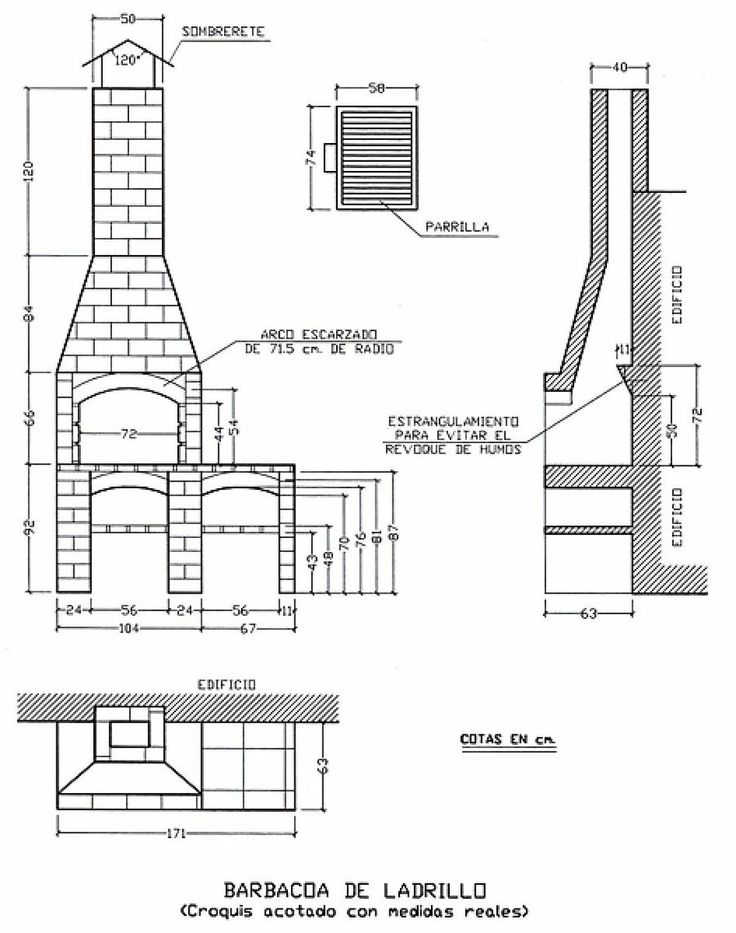
When choosing the dimensions of the building, you must first of all decide on the height of the barbecue. To make the cooking process as comfortable as possible, the grill should not be higher than the kitchen table. The length is usually not much greater than the size of the furnace (up to 1 meter). These dimensions will be enough to accommodate a large number of skewers or grates.
Preparatory stage of construction
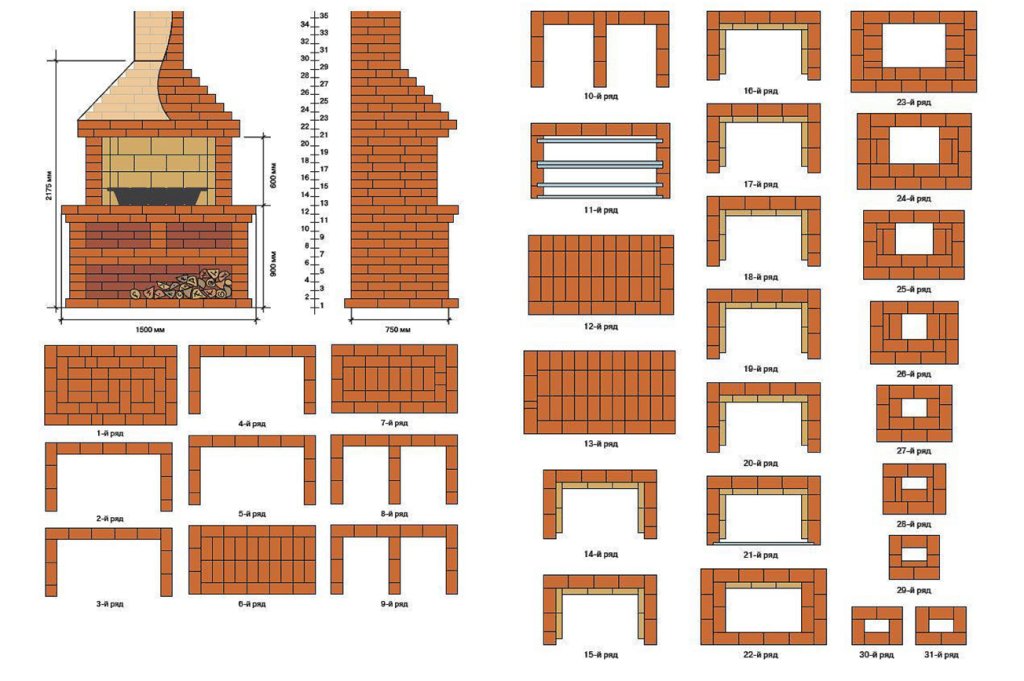
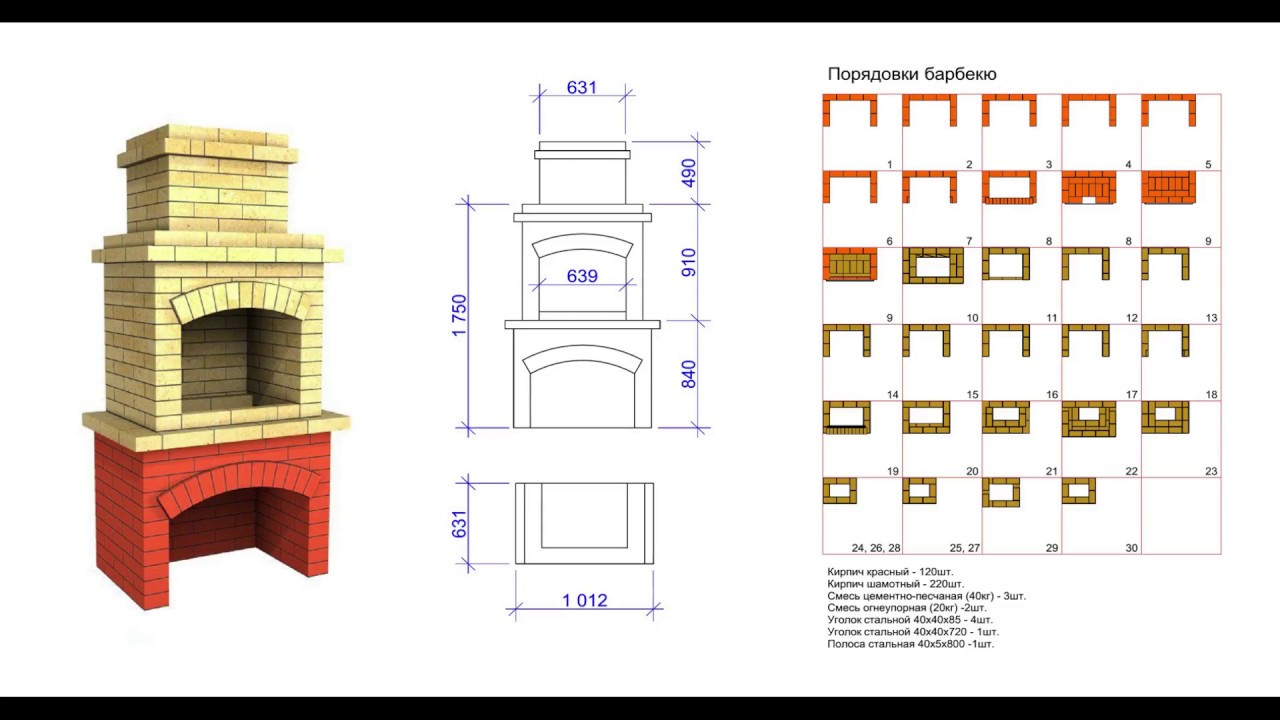
An important step is the choice of a drawing of the future barbecue. You can lay out simple U-shaped structures yourself. When preparing drawings, the amount of required bricks, rows and types of bricks used are also taken into account.

Brick
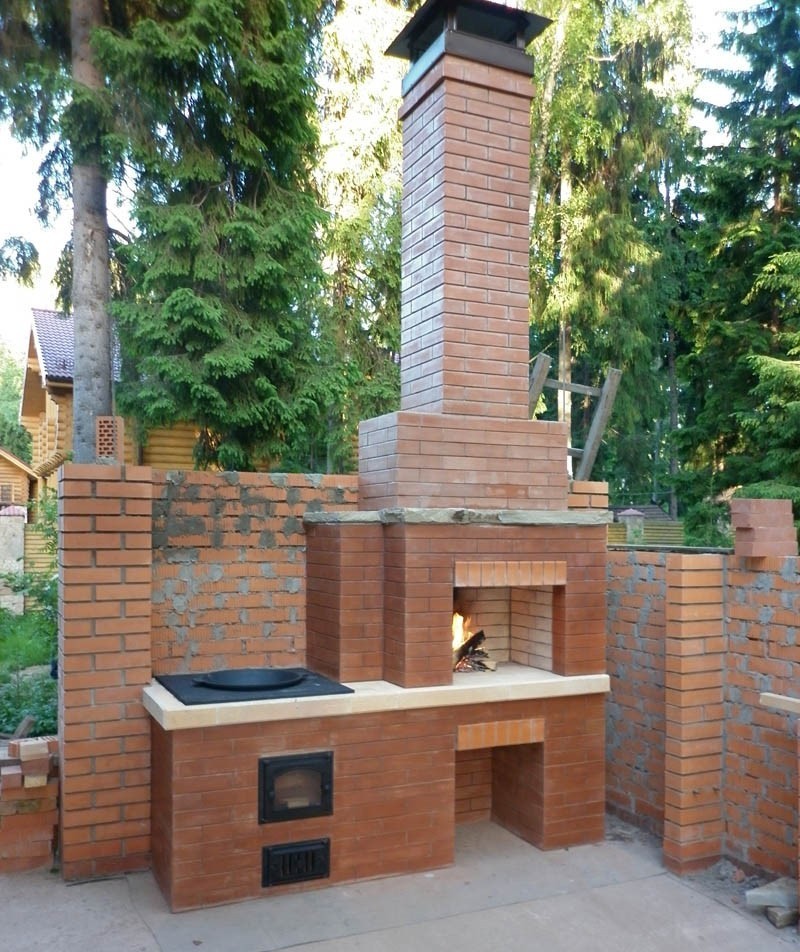
To build a brick barbecue, you need to purchase a special heat-resistant brick, which will be needed in parts of the structure heated by a flame. For surfaces that do not experience heating, you can use the most ordinary red brick.

The flight of imagination when creating this structure is almost unlimited, and you can revet the surface with other materials, sometimes stone is used for construction.
Foundation
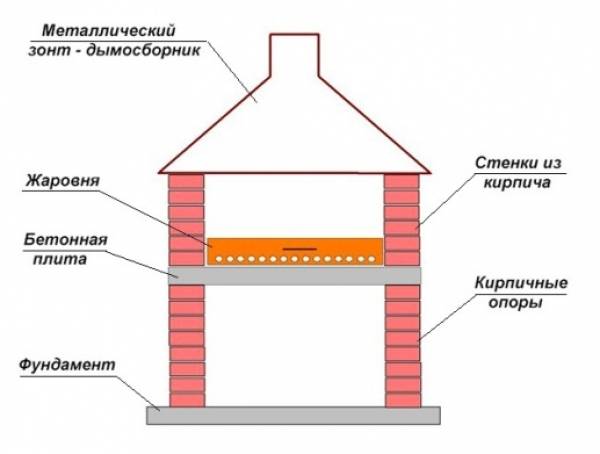
When creating a drawing, it must be borne in mind that a brick brazier is heavy and must stand on a solid foundation. If your design involves a barbecue under the roof, then the area of the foundation should be larger. The same applies to projects with additional surfaces.


All work is done in layers, and reinforcement serves as an interlayer. At the end, cover the entire work with plastic wrap and leave to dry for several weeks.

5 Making a brick barbecue oven with a chimney
Consider the step-by-step instructions for laying a brick barbecue.
Required tools
- Master OK.
- Rubber mallet.
- Basin or trough.
- Construction mixer or stirring shovel.
- A long rail with a flat surface on which you can check the quality of work in the process.
- Roulette.
- Building level.
Material selection
For the street, facing and solid ceramic stone are suitable. It is recommended to use chamotte indoors - it withstands high temperatures better and conducts it worse. Outside, the stove cools faster than indoors.
Masonry mix preparation
Mix cement with sand in a ratio of 1: 3. To make the mass more mobile, lime or a special additive that increases plasticity can be added to the composition.
There is another recipe for masonry mortar. Clay is poured into the basin and filled with water. After 5 days, it is stirred by adding a little sand and cement.
Installation of walls
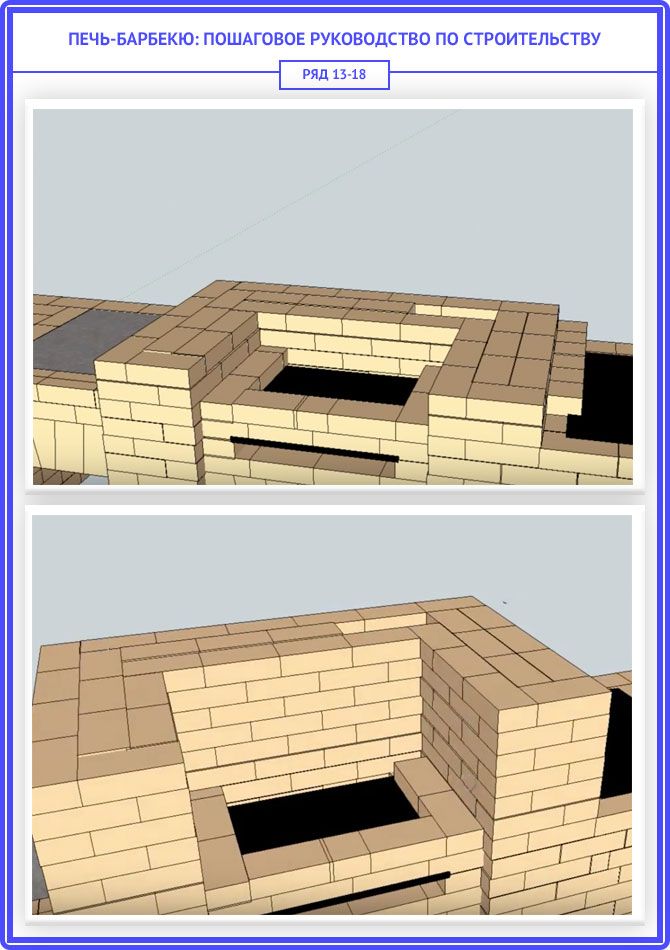
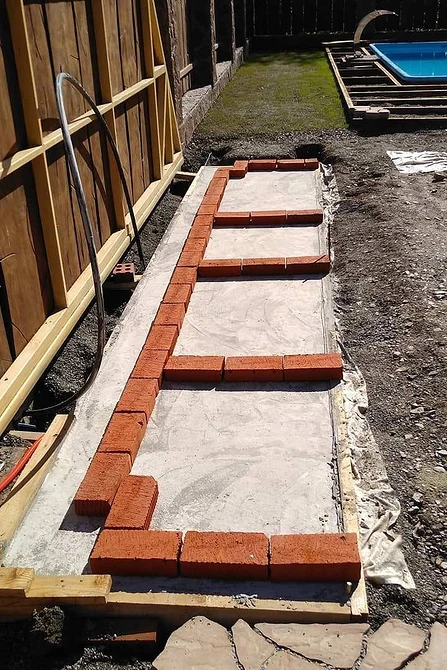
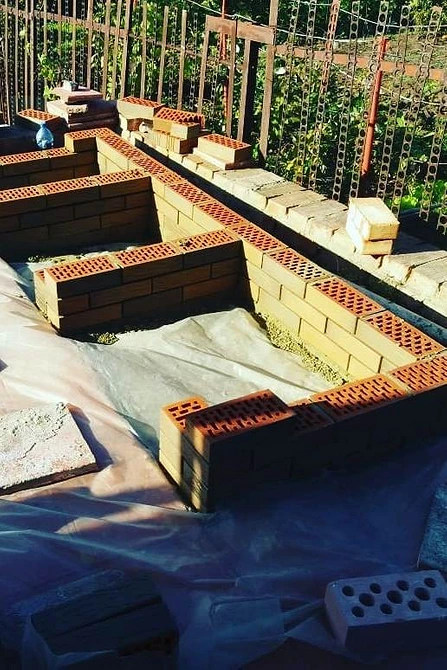
It is better to lay out the first row first without mortar, as shown in the photo gallery. This is to ensure that the dimensional calculations are correct and that the number of prefabricated elements corresponds to the length and width of the entire structure. To mark the seam, leave 1 cm gaps.
The foundation is a reinforced concrete foundation. The bricks are laid in length. Each subsequent row is shifted so that the seam falls on the center of the product located below. It is difficult to break the ceramics into two equal parts. It is better to make a cut with a grinder with a concrete disc. The solution is laid in the same layer of 1 cm. For verification, use a reinforcing bar with a cross section of 1 cm or an order - a rail with dimensions applied to it. Every three tiers are checked with a tape measure and a building level. In order to correctly position the precast element, a rubber mallet is tapped on its sides and on top.
Instagram @besedkibarbecue
Instagram @ofensteinbbq
If the dressing cannot be done at the corners, they are reinforced with wire or perforated tape.
Installation of jumpers
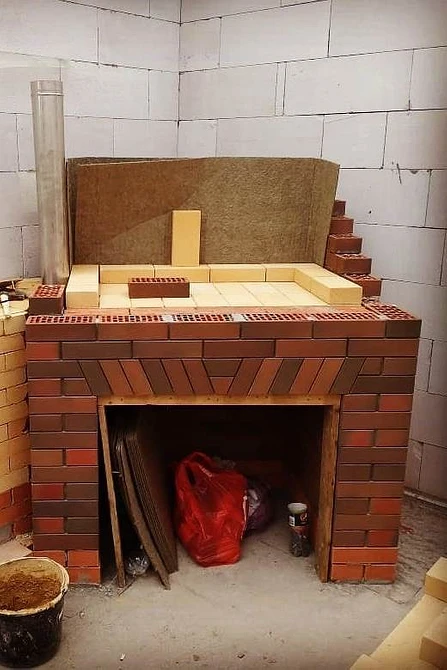
When the walls reach the design height, horizontal supports are laid on them under the hearth and the countertop.
Methods for creating supports
- The row is placed on a metal plate embedded in the sidewalls. The blocks can be grooved and placed on steel corners, folded sides together. The sides should face up. They are placed in the grooves facing the bottom. A profile with a cross section of 45x45 mm has sufficient strength. Its edges should not protrude beyond the masonry. The depth of the slot is taken with a margin - steel expands when heated and can destroy ceramic products.
- Hollow products are strung on a reinforcing bar or frame and fastened with a cement-sand mixture.
The spaces between the lintels can be used to store firewood or kitchen utensils. Drawings and photographs of a brick barbecue will help you find a solution to how else to use this area.
Instagram @kamin_mangal_moscow
Instagram @ofensteinbbq
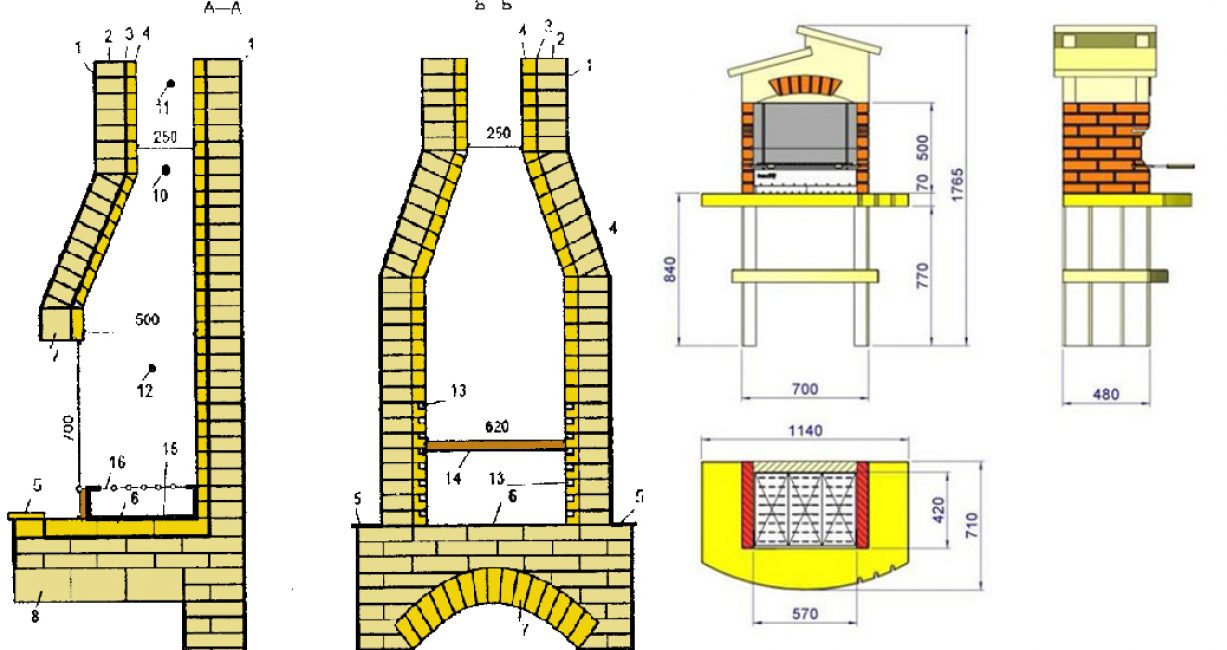
Layout of the firebox
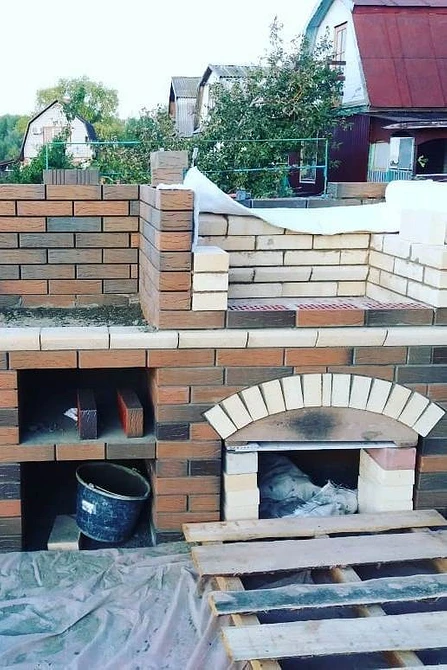
It is located at the level of the jumpers. Its bottom is supported by steel profiles. They are embedded in the walls. The hearth is a vault or rectangular chamber made of fireclay bricks. The binder is a special heat-resistant solution. It is sold in powder form. To properly dilute it with water, you need to study the instructions.The bricks are placed horizontally in two rows with a bandage protecting the lower seams. Instead of bricks from below, you can make a concrete screed.
The walls of the chamber are erected at the same time as the external ones - it is more convenient to work this way. A gap of 1 cm is made between them. It protects the outer coating from high temperatures, and the inner one from cracking with uneven thermal deformations. Prefabricated elements are connected in length.
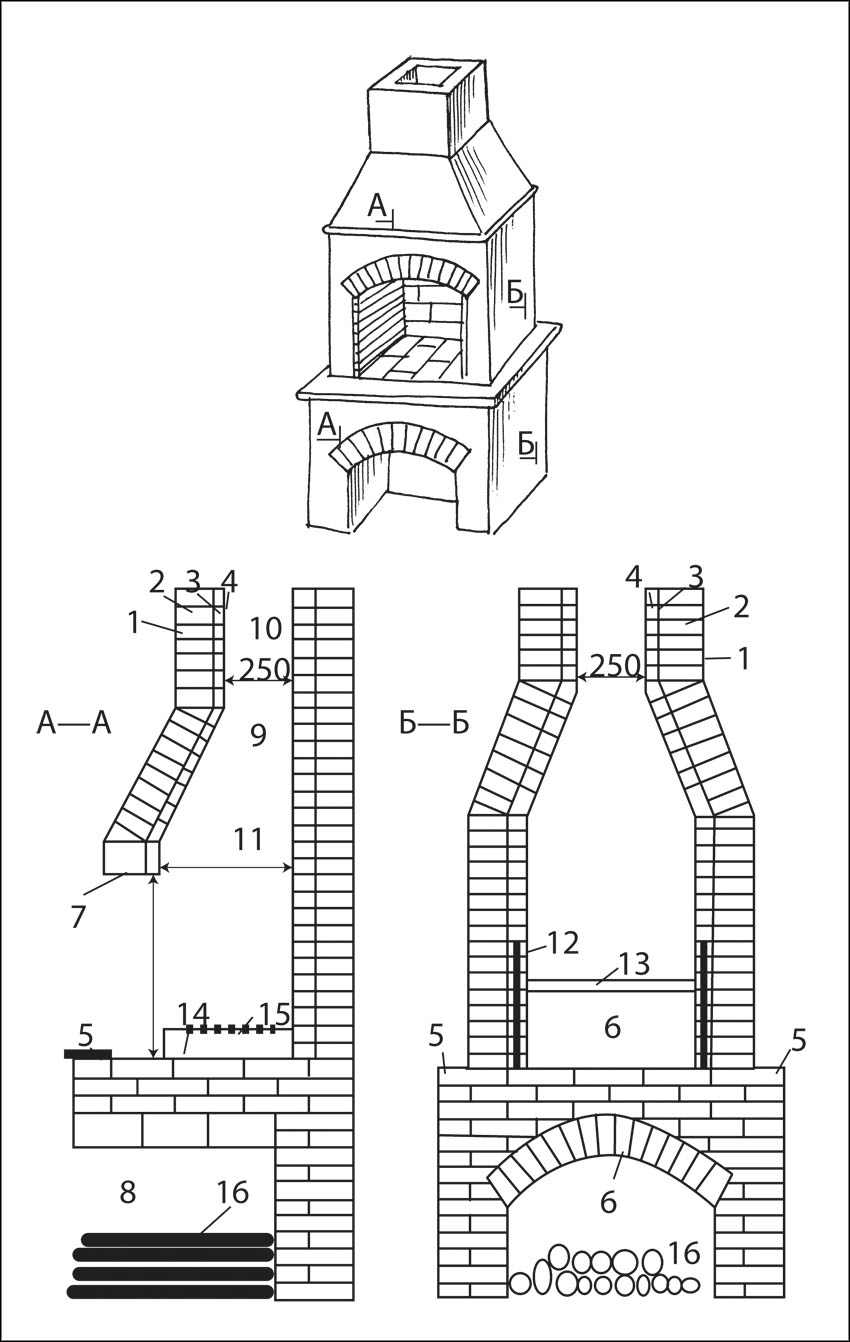
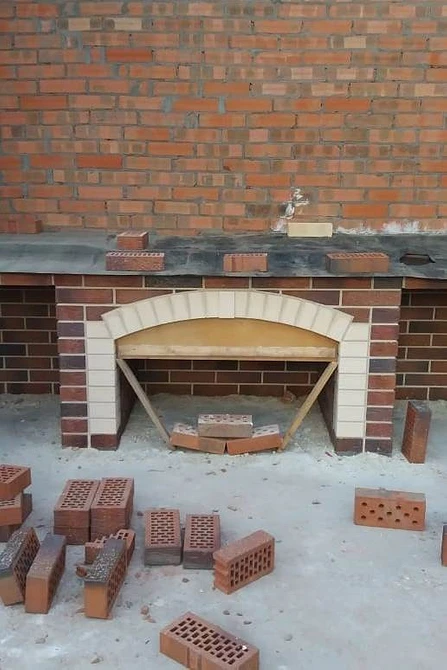
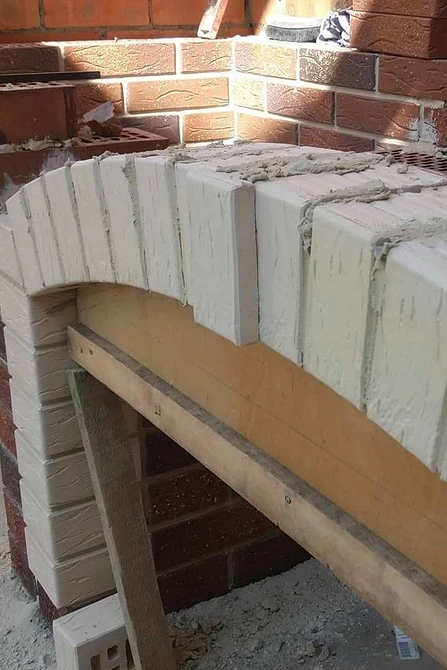
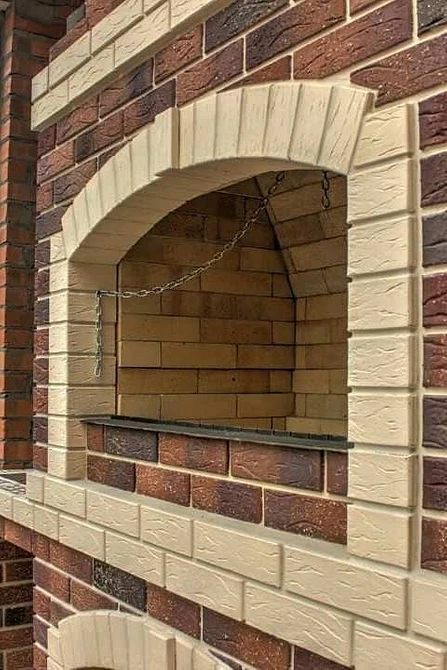
To create an arch, you need a circle - a metal or wooden arch. It is fixed in the opening, and a row is installed on top, repeating the shape of the arc. The top brick is placed last in the opening. The neighbors rely on it and therefore do not fall. The arch is protected from the inside by a fire-resistant layer.
Instagram @kladkakamina
Instagram @kladkakamina
Instagram @mangal_kamin_rostov
Pipe erection
No refractory materials are required. The rows are arranged with an inward offset by a third of the width, creating an elongated pyramid. At a certain level, they switch to flat vertical masonry.
The ribbed inner surface is more difficult to clean, so sometimes the ribs are cut or covered with flat shields.
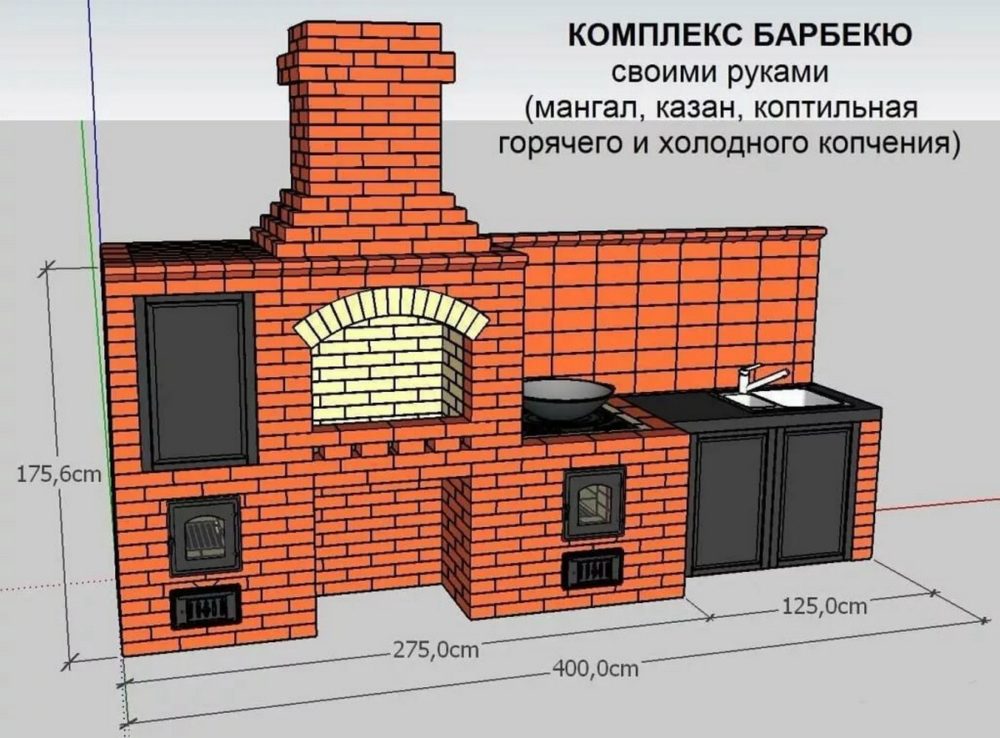
Construction of the furnace complex
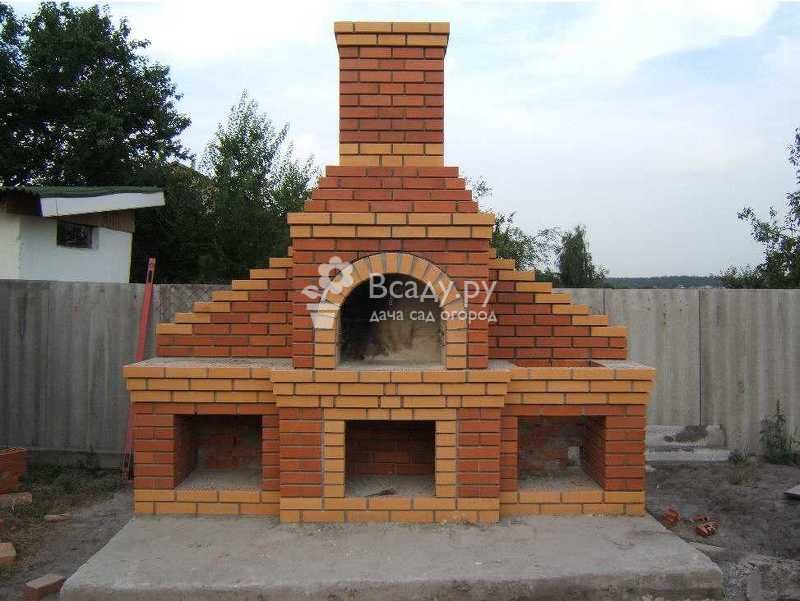
This is a versatile grill with multiple fireboxes. The structure must have a solid foundation. Several cooking zones are planned in the central part. One large tabletop should be placed at the edges. The stoves can also be used for cooking on a flat surface. The central chamber should be equipped to accommodate the grates, and traditional Russian stoves are best done on the side. The first stage of construction is digging a foundation pit. Then a sand cushion is created. It is covered with a layer of rubble, twice or three times more than sand. Since the object will be large, the foundation must be "left" for 2-3 weeks to fully solidify. It needs to be watered from time to time with a little water. The main stage is brick laying. The stoves are distinguished by 4 columns or 3 walls, except for the front one. The process of erecting several stoves is more complicated than a conventional design with one brazier and additional sections.
Ready-made options for furnace complexes:

The principle of operation of the barbecue oven, its differences from the barbecue
Experienced braziers, through whose hands many kilograms of cooked meat have passed, know well that on the brazier the product is fried only from the bottom due to the rather hot infrared radiation of smoldering charcoal. The top layer of meat on the skewer is blown with fresh air and therefore the skewers with food must be constantly turned.
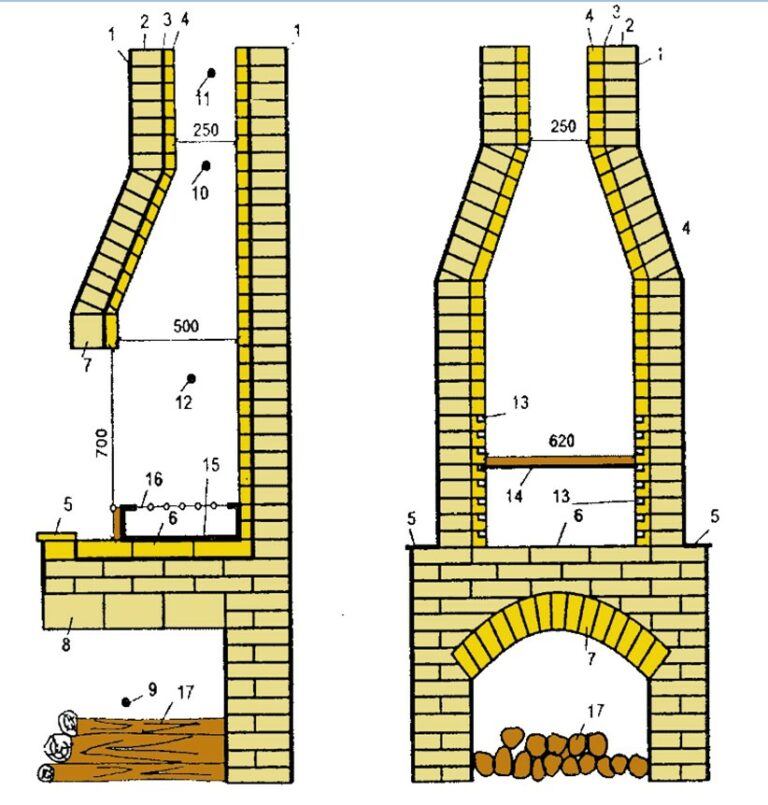
Food is cooked in a completely different way in a barbecue oven. The lattice on which they are laid is placed 20-25 cm below the level of the side walls and this is of great importance. Unlike a barbecue, the charcoal pan in a barbecue oven is made solid, without holes to obtain traction.
Coal smolders, not burns. Products gradually "reach" in the cool radiation of glowing coal and heat reflected from the walls of the structure. Moreover, the soot on the walls of the structure, like a mirror, reflects back all the thermal radiation, and the products are evenly heated from all sides. Thanks to the height of the walls above the food, a warm air and smoke cushion is created, which gives the food a special smoky aroma.
If only the softest meat is suitable for barbecue, then there are much fewer restrictions for barbecue. And the dishes, as a rule, turn out to be more tender and juicy, uniformly baked throughout the entire thickness. Even the old tough beef, properly cooked in the barbecue oven with your own hands, hides the most tender meat under the crispy baked crust, which is obtained by roasting and at the same time roasting in its own juice.
It would seem - only 25 cm, a completely imperceptible difference in design, but in culinary terms it plays a colossal role. Apparently, therefore, for organizing light picnics in the country or for equipping a resting place in the courtyard of a country house, in recent years, barbecues are more often chosen than barbecue ovens.Moreover, there are so many stone barbecue designs today that it is not difficult to choose the right one among them. And in terms of their functionality, these designs can already compete with traditional brick ovens.
Tools and materials
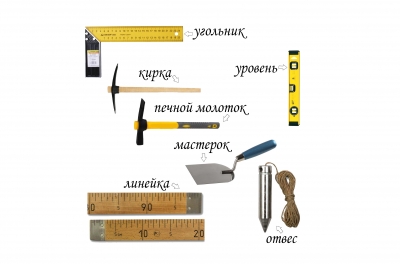
Before you build a brick brazier in the country, you need to independently calculate the required amount of materials according to a ready-made or pre-prepared project.
This is necessary in order not to face their shortage, or vice versa, excessive remaining surpluses. Based on the quantities of material calculated for the project, an estimate is made.
The calculation is done so that the material is with a small margin. Of the tools you will need:
- shovel;
- trough or concrete mixer;
- mortar buckets;
- Master OK;
- level, plumb;
- Circular Saw.
- fireclay (oven) brick that can withstand temperature changes without cracking;
Expendable materials:
- foundation material (rubble stone, cement, sand, crushed stone, boards or smooth plywood for formwork);
- reinforcing mesh;
- iron sheet;
- metal grilles, latches, corners, doors.
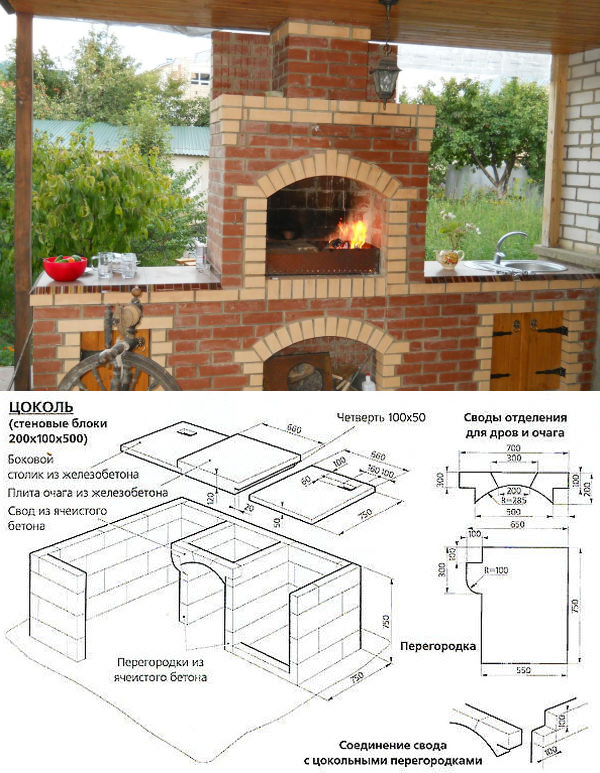
If the grill is designed with niches and a working area, you will additionally need a stone countertop. As a masonry mortar, a mixture of clay and sand is usually taken, at least for the firebox.
The cement mortar will quickly collapse and crack when exposed to high temperatures (it can reach 1000 ° C in the furnace) and temperature extremes. The clay must be pre-soaked for several days. Clay and building mixtures with it are offered in hardware stores.
Reference: refractory material is required for laying out a firebox that is in direct contact with fire. In order to save money for the construction of a basement and elements that are not exposed to an open flame and high temperatures, you can take an ordinary brick - incl. remaining from the parsing of any structures, cleaned from the remnants of the solution.
Features of the construction of a barbecue in a gazebo
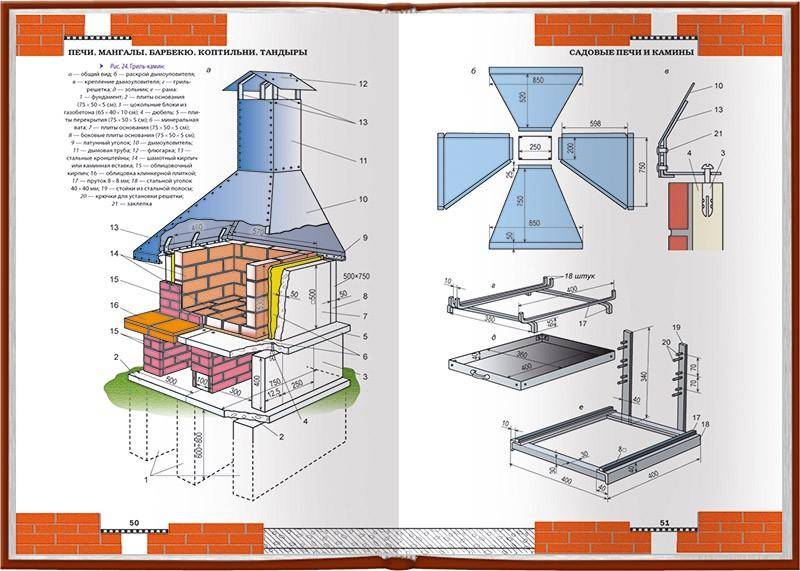
You won't be able to dig a foundation hole here. If the grill is needed in the gazebo, then it will be easier to order a finished product with subsequent installation. There are enough companies on the market that are engaged in field work on land plots. But there are several other options. You can make a brazier with your own hands or purchase a prefabricated model. Such products are assembled from several large concrete blocks. For them, you do not need to dig a hole under the base, and a fire-resistant plate in the gazebo itself is enough to install. However, this building can be built simultaneously with the barbecue. Given the standard height of the gazebos, you will need to equip a place for smoke exhaust - the pipe is mounted so that it goes outside the building. If desired, the chimney can also be led through the top. The site is supplied with electricity and water. The surfaces in the gazebo must be protected from temperature effects, especially the floor. If the gazebo is being erected simultaneously with the barbecue, then for its construction will come in handy:
- Refractory bricks.
- Metal.

Choosing and preparing a place for construction
The place where you can build a barbecue oven with your own hands is selected based on comfort and fire safety. Trees, bushes, grass should not grow at a distance of 3-4 meters from the stove. If annexes, a bathhouse, other buildings are built on the site, the stove must be built at a distance. The prevailing wind direction should not be in the direction of your own and neighboring buildings.
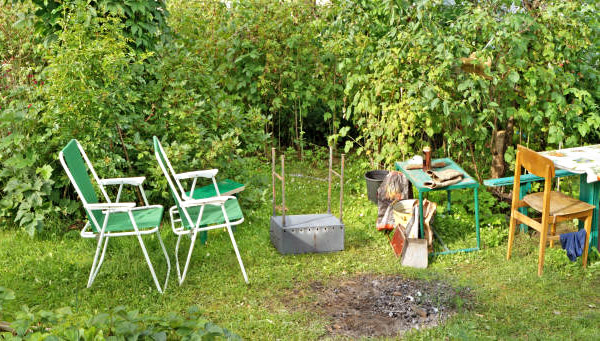 Photo 2. An impromptu resting place with barbecue in the garden thickets. Surely you have a corner on your site where a brick barbecue will fit perfectly. The photo does not allow us to estimate the size of the site, but even a small stove will look better than such a scorched piece of earth.
If we are discussing the comfort of using future cooking in an outdoor oven, it is most convenient to place the structure next to the recreation area - a patio, a gazebo, a terrace.If there are no such places on the site, you can choose any place for the barbecue woman, and place a table with chairs next to it. Keep in mind that you will need a lot of water and wood for cooking and oven maintenance. The size of the working zone of the furnace is selected depending on the financial capabilities and the size of the site.
- being on the leeward side of a residential building. Otherwise, the smoke will go to the house, penetrating inside and leaving traces of soot outside;
- undesirable presence of plants next to a barbecue grill made of bricks - their vital activity will be disrupted due to high temperatures.
Once the site has been selected, a site should be prepared for the oven area. The soil is cleared of the fertile layer: grass, bushes, trees. It is allowed to remove trees from your site without the consent of local authorities, provided that there are no environmental restrictions.
Attention! Remember that roots left in the ground can sprout, damaging the flooring of the oven area. Usually, during planning and clearing the area for future construction, coniferous and fruit trees are planted.
After that, you can proceed to the stage of pouring the foundation according to the shape and dimensions that the barbecue drawing scheme you have chosen suggests
Usually, during planning and clearing the area for future construction, coniferous and fruit trees are planted. After that, you can proceed to the stage of pouring the foundation according to the shape and dimensions that the barbecue drawing scheme you have chosen assumes.
The general device of a barbecue oven with a cauldron
A cauldron is a round cast iron boiler. Aluminum cauldrons are undesirable, they burn out rather quickly and do not keep the correct temperature.

For cooking on fire, it is better to use a cast-iron cauldron - it keeps the optimal temperature well
In a cauldron on the site, you can cook anything you want, but the optimal dishes: pilaf and cauldron kebab. In an ordinary kitchen, it is difficult to cook them - the smells are too unpleasant and intense when the oil is ignited.
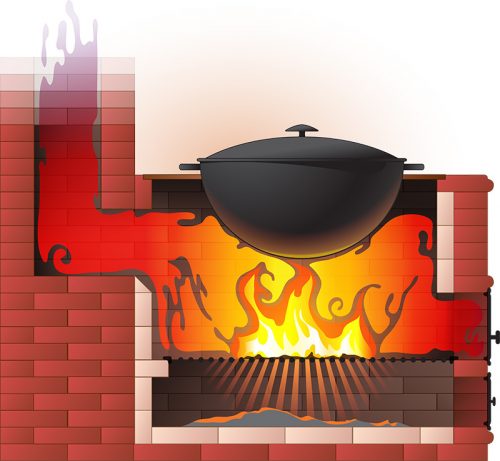
In a brick oven with a cauldron, the container is directly heated from the flame
A brick oven with a cauldron is universal: if you remove the cauldron, you can fry a barbecue; if you try to lay out the round underneath evenly and neatly, then you can use it as a tandoor; If you cover the round hole with a cast iron sheet with hotplates, you can fry in pans and cook in pots on them.
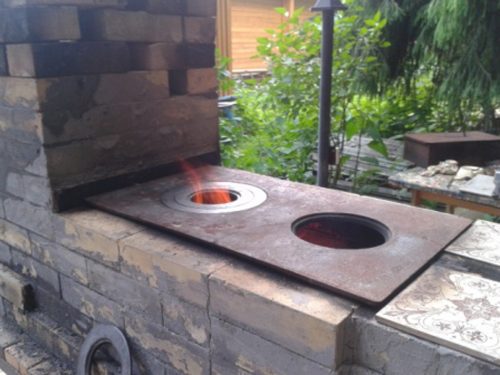
By removing the cauldron, you can adjust the strength of the fire with cast iron burners
The fourth stage: the construction of the arch and the roof of the woodshed
in the correct making of the arch
When creating a barbecue firebox, keep in mind that the process of its formation starts from the bottom. After that, the bottom component of this structure is smoothly laid out, which is placed directly on the dried mortar using Vetonit TM. In the center, you need to provide a small free space where the grilles will be placed in the future. After that, a layer of solution is applied to the seams, and then the process of constructing the firebox is continued. Having reached the level at which the height of the firebox reaches the required edge, they pause, which is used to grout the joints on the new masonry.
It's time to turn to the middle of the barbecue. When creating the floors in it, we used galvanized iron sheets. It is this material that will be used to overlap the firewood. The standard overlap is usually 5 cm.
Next, the process of building the back wall of the barbecue continues, and now we need to lay out several rows above the front arch for the firewood. As a result, we should have a construction that resembles a brazier, which was common in ancient times.
Design
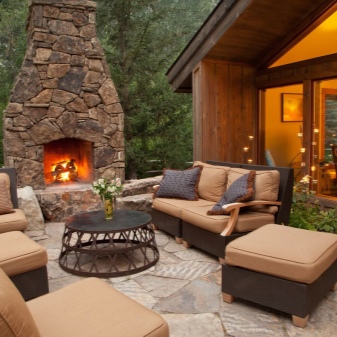
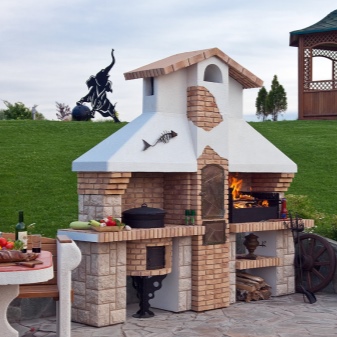
When choosing a design for a future garden fireplace or fireplace, one should take into account the design of the facade of a residential building, as well as outbuildings on the territory.For harmonious unity on a suburban area, you can use the same finishing materials that were used even for paving paths (for example, natural stone, which has heat-resistant characteristics).
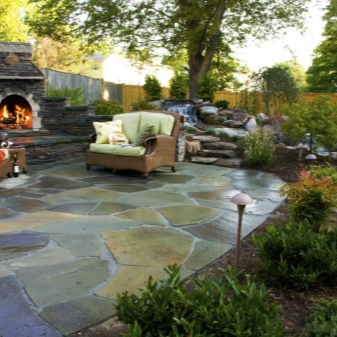
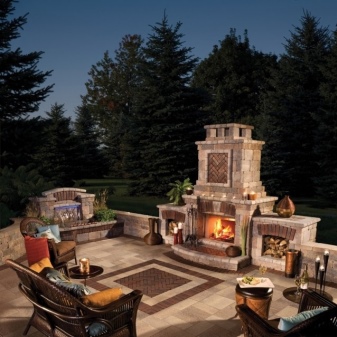
The design of an outdoor fireplace is strongly coupled with its functionality. To create comfort in your dacha, to design a recreation area, as well as to maintain landscape design, you can pick up a portable outdoor fireplace. Such products are very popular in creating a special atmosphere in the courtyard of a private house or townhouse within the city with its own small plot of land of a couple of hundred square meters.
Due to the fact that there are models that do not require heating with wood, your own house and neighboring buildings will not suffer from the smell of burning, as well as from acrid smoke.
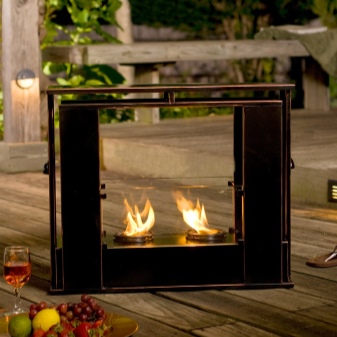
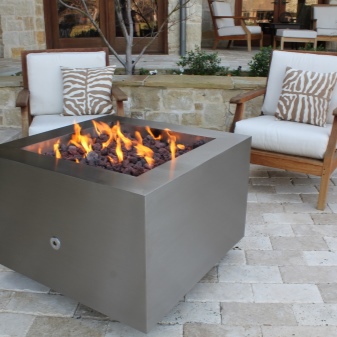
Due to the variety of designs, such a garden hearth can be made in any style. Models made of metal and glass will be a good addition to the landscape design and the facade of a high-tech residential building, ornamented bowls will complement the classic style, and stone forms - Provence or country styles.
If, in addition to visual pleasure, you want to inhale the aroma of a burning tree from the flame, then you should consider the option of a portable wood-burning fireplace. Designer finds have something in common with models without a wood-burning stove, but there are also some peculiarities. These include stove stoves. They look very modern, take up little space, and some models have special fixtures to hold the barbecue grill and skewers.
Portable outdoor fireplaces are good in that they do not take up much space; their location can be changed. But their functionality is not great. By and large, apart from decorative properties, they no longer possess anything.
A small hearth can be laid out on your own from stone or brick. A popular shape is a circle. Typically, this type can be used for cooking. An equipped fireplace is a great way to warm up in a cool evening by the fire in a friendly company. Monolithic execution - a paved seating area, seating areas laid out of stone in a semicircle, the proximity of an alpine slide or an artificial reservoir with waterfalls or a fountain and, of course, an open flame are good components of relaxation that go well together.
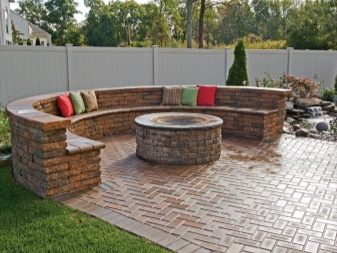
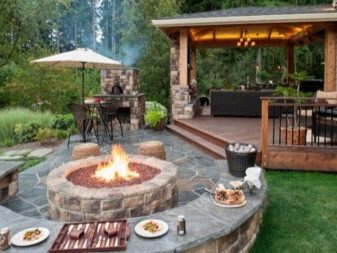
Real home comfort in the yard or on a large suburban area can be created with the help of an overall stationary outdoor fireplace. Popular high-tech and minimalist styles are considered the main directions in the arrangement of the exterior in modern small yards. Simple geometric shapes, finishing with heat-resistant tiles in cold tones, a minimum of decor - the embodiment of strict elegance of styles.
Delicate shabby chic, simple country style for gardens and courtyards can be complemented by a small outdoor stove, plastered and whitewashed. As a decoration, you can lay out a pole and an arch with a stone, or leave some bricks without covering them with plaster.
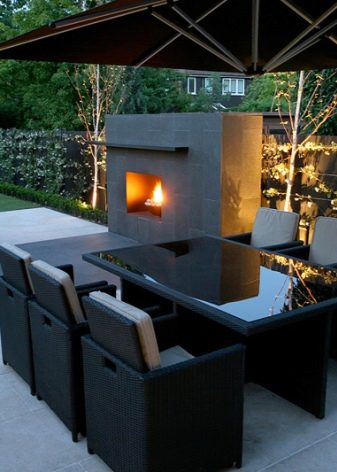
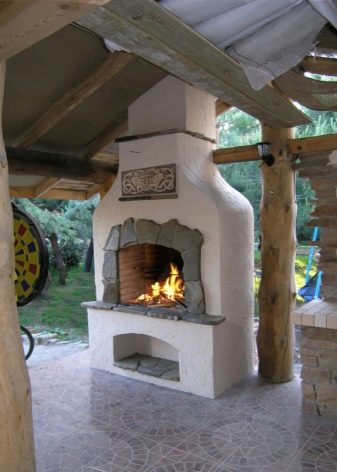
Light in execution, and most importantly, harmonious in the exterior, rustic style is an excellent option for decorating a recreation area with a fireplace. Rough raw natural materials blend harmoniously with fruit trees, shrubs and flower gardens, and are complemented by elegant and graceful elements of decor and garden furniture.
For those who like to cook and gather a large number of guests, ovens combined in functionality, made in a purely Russian style, are best suited. You can cook several dishes at once or change the menu every day. In addition, such a design fits perfectly into the local landscape, nature, and is combined with the peculiarities of our architecture.
Stage three: installing the oven door
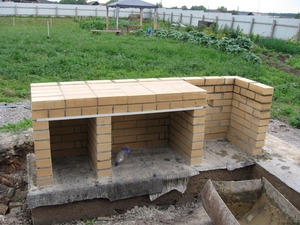
For the example under consideration, a ready-made structure was chosen, presented in the form of a small monoblock consisting of several doors. You can do the same by taking it from old stoves or neighbors who have such an item.In our case, in order for the door to fit well into its place, we had to slightly raise the oven contour.
During this work, it must be remembered that, when exposed to high temperatures, the metal begins to expand. For this reason, the door must be placed between the brickwork and the doors not close to each other, providing a small gap. It is recommended to insert an asbestos cord into this space.
When determining the height of the cooking floor of the barbecue being created, it is necessary to proceed from the dimensions of the cooking door. Let us remind you once again that the optimal height is 84 cm. As for the firebox, you should not make it as high. Because of this, the capacity of the firewood stove will be much smaller.
Care should also be taken to leave room for the heat to pass through the brazier. This gap can be quite small, corresponding to two or three bricks. If you do everything in accordance with this recommendation, then you will not experience problems with raking the coals out of the oven.
If the laying of the barbecue is made in accordance with the requirements of the technology, then you can easily fix the cleaning door. During masonry, you will need to build a separate wall for the firewood.
To make the structure look more aesthetically pleasing, it is advisable to first divide the bricks into quarters and place them on the upper part of the walls for the firewood.
During this step, you must take steps to secure the door. An ordinary wire will help you to cope with this task. To do this, you need to evenly stretch it along the upper edges of the door, while each end of the wire should be stretched over the surface of the masonry. A couple of new bricks are used to fix the wire.
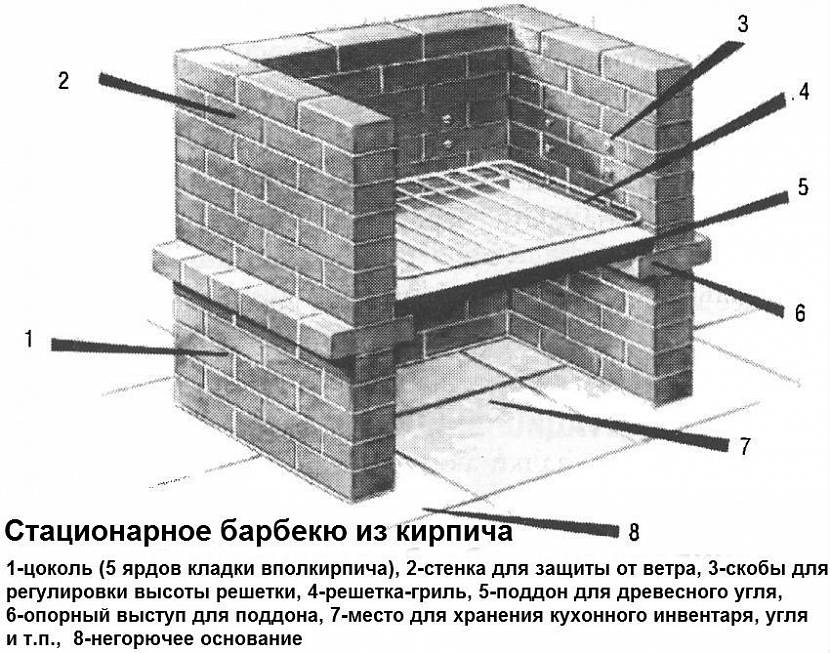
Simple brick brazier
Any brick structure requires a foundation. And even such a small barbecue, as presented below, is very undesirable to put directly on the ground. The foundation will have to be poured. You can make it tape or slab. The slab is safer: in winter it will not lead and the masonry will not fall apart.
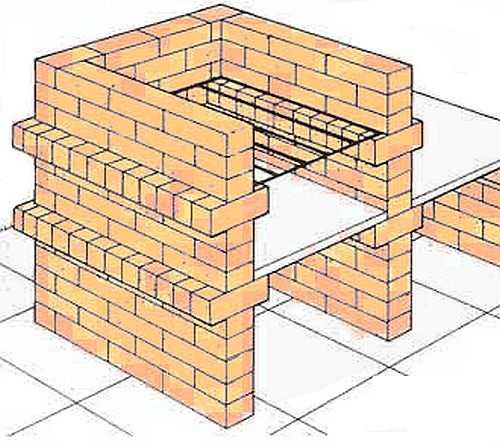
Even a beginner can fold this simple brick brazier with his own hands.
The dimensions of the foundation for a brick brazier are 10-15 cm larger than its dimensions. First, the vegetation layer is removed, if necessary, the pit deepens by 10-15 cm. Its bottom is leveled and rammed. A layer of crushed stone 10 cm is poured and rammed again. It is advisable to use a vibrating plate in this case: you will not compact enough soil with a manual rammer. The height of the tape is 20-30 cm, the thickness of the slab foundation is 10 cm.
Depending on the type of foundation chosen, an appropriate formwork is constructed. For greater strength, reinforcement is made with a rod of 10-12 mm in diameter. For the tape - two threads are laid along the perimeter, a "cage" is made for the slab: the bars are laid along and across with a step of 20 cm. Everything is poured with concrete of a grade not lower than M200.
If the temperature during construction is around + 20 ° C, work can be continued after about a week: the concrete has gained more than half its strength. Two rows of waterproofing (roofing felt, roofing felt, modern roll waterproofing) are laid on it, coated with bitumen mastic or other liquid waterproofing solution. After that, you can start laying.
Dimensions and materials
This small brazier made of bricks with your own hands can be folded even without any experience. It is a structure in the shape of the letter "P". There are two parts: the brazier itself and a table next to it. The design is simple and easy to modify. You can add another section side by side, make it wider or narrower, deeper or shallower. You can make two ledges under the grates - this is if a large number of kebabs will be prepared.
In the basic version, the dimensions are as follows:
- width 180 cm;
- depth 90 cm;
- barbecue height 100 cm.
For the laying of this garden barbecue, you can take a solid ceramic brick, you can also use fireclay SHA-8. For the order given below, 202 bricks were used.
For the lower part - up to the 5th row - the mortar is used cement-sand 1: 3 or with the addition of one part of lime to it. Further, where heating will already take place, a clay-sand mortar is used. Its proportions are selected based on the qualities of the clay (oily, normal, skinny). In terms of density - it should not be too liquid, but not too thick. About how good thick sour cream is.
Order and order of work
This country grill is made up of bricks laid on the bed. Two protruding rows (bricks are laid across) serve as a support for a brazier sheet and a brazier mesh. Here you can put it on a spoon (put on a narrow part), then the sheet will rise a little higher. In the lower part, you can stack firewood or use it for other household needs.
The rows are put in a dressing - with an offset, for this you need halves of bricks. They can be cut with a grinder. The first six rows form the brazier and table on the right. Starting from the 7th row, the laying goes only in the part where the brazier itself will be located.
Seam thickness 5-8 mm. It should be the same.
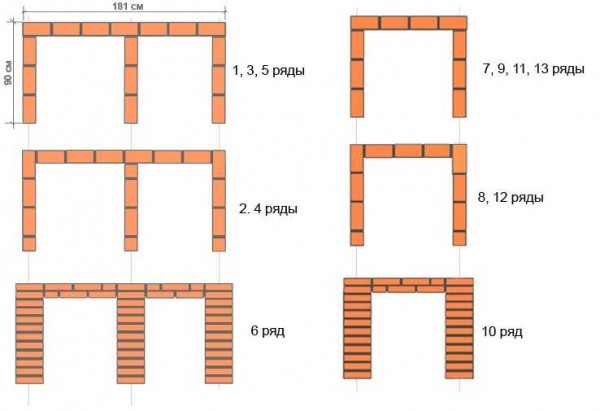
Ordering a small summer cottage barbecue made of bricks
In order not to break the geometry during construction, you can pull the cords and align all the rows along them. But each brick and each row are controlled by the level for horizontalness. You constantly need to check the verticality of the walls and corners. To do this, use a construction plumb line (a cord with a load at the end). You can check the verticality with the level, but it has an error, especially if it is not a professional, but an amateur instrument. So with such a check, there is a solid likelihood of getting a brazier with oblique, heaped walls.
The order of this brick barbecue is simple, and does not require additional explanations. Questions about drying may arise. If the weather is dry, leave the grill to dry for three to four days. Then you can start a fire little by little. Heat for a couple of days in a gentle mode, using thin firewood and a little. Then you can fry the first batch of kebabs.
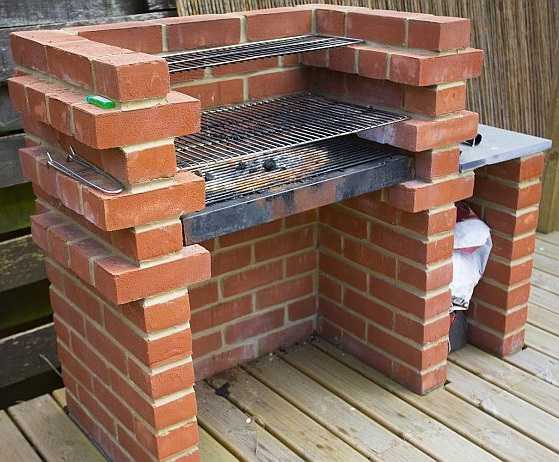
One of the options for a simple brick barbecue. It differs from the basic version in that there are two rows of protruding bricks. Another difference is that the table is smaller.
If rain is foreseen, and there is no canopy over the barbecue, cover it with oilcloth. After about a week, you can start slow drying: light the fire small and briefly. Drying will also take 2-3 days. Then a brick brazier, folded with your own hands, can be tested.
Perhaps you will be interested in reading "How to make a brazier out of metal with your own hands"
Projects of brick braziers: drawings, photos
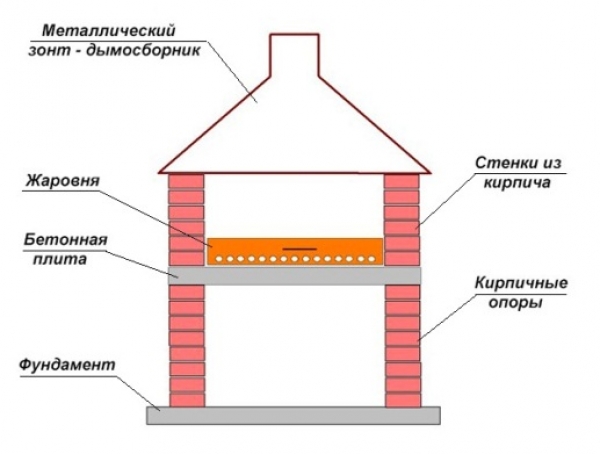
Features: the length of the firebox should not exceed 1 m - this is enough for 8-10 skewers at a time. The width should be consistent with the length of a standard skewer - 47-62 cm. Ideally, the height of the frying platform is just above the waist of the person who will be cooking.
Since a stationary barbecue often becomes the central decorative element of the site, this should be taken into account when designing and choosing a place. Its reverse side looks like a solid brick wall, so it is advisable to position the structure so that it cannot be seen from the reverse side. Or provide for its decoration taking into account fire safety.
Conclusion
The mangal area is a traditional resting place in the country. In the summer they spend several hours a day there. Barbecue complexes prepare barbecue, steaks, sausages and other baked and smoked fish, poultry, meat and vegetable dishes. That is why it is worth considering the type and shape of the structure. An ordinary brazier is exposed to the wind to a greater extent than a multi-tiered brick one. Additional outbuildings are useful for storing kitchen utensils and coal. As a result, a lot of time is saved: there is no need to transfer everything from one place to another. Large structures can have several stoves, many additional chambers for coal and firewood.Self-creation of a brick barbecue is a long and difficult task. A beginner can make a small building, but for the design and construction of a multifunctional structure, you will need to invite a specialist.

