Types of tools for knitting reinforcement
The knitting method involves the use of steel wire to manually fix the rods perpendicular to each other at their cross-like intersections.
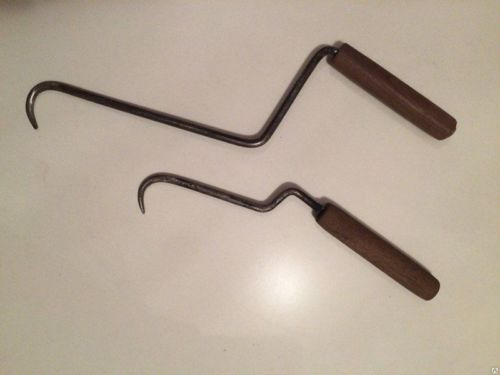 The crochet hook is a simple and safe tool that allows you to tie the rebar quickly, securely and evenly.
Today there are three types of ready-made crochet hooks that can be purchased in the store. In addition, you can make your own rebar hook.
Manual
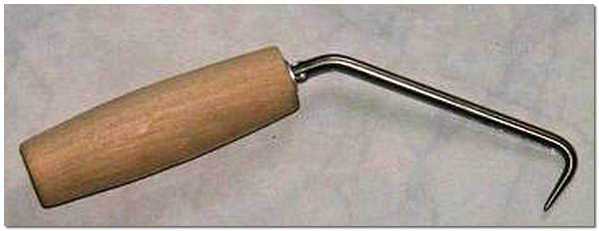
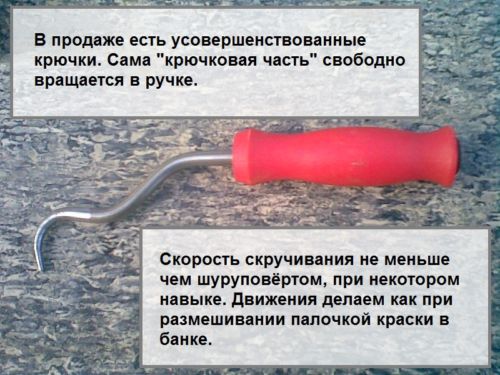 Photo of a purchased hook. The handle rotates freely.
A simple hook is a rod with bends attached to the handle, which grips the wire. The hook for tying reinforcement manually rotates. The advantage of hand tools is their availability, durability and ease of use.
A hand hook is a great option for novice builders, which will allow you to understand the knitting algorithm, to feel the optimal degree of wire tension to obtain high-quality knots.
Screw
 The knitting wire is selected with a diameter of 0.8 to 2 mm.
The semi-automatic hook is a reversible tool that works with the forward movement of the handle. The device has a rod with a hook in the form of a drill, which enters the funnel of the handle along the thread, tightening the wire.
The cost of such a tool is higher than a manual one. But the screw tool makes it possible to cope with a wide range of work in a short time - in order to completely tighten the knot, it is enough to make only a couple of movements.
Mechanical
Builders who value every second choose an automatic hook (gun) for knitting reinforcement. The principle of the pistol is based on a fully automatic rotation of the hook. This device - the most modern and perfect, allows you to achieve maximum results and speed without much labor on the part of the builder.
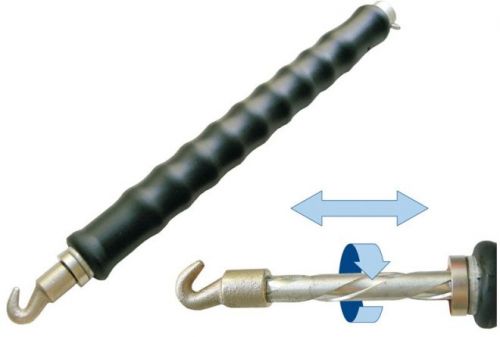 Operating principle.
The purchase of such a hook for domestic purposes will not be justified: working with a gun requires a fairly large wire consumption, and the cost of the device is high. But at large facilities or when performing work that needs to be completed in an extremely short time, this option is ideal!
Homemade
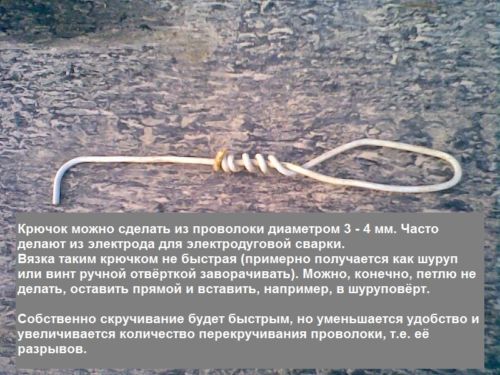 Photo: hook made of wire with a diameter of 3-4 mm.
Purchased hooks are not always able to fully satisfy construction needs. Often, the shape of their rod has irregular bends, and the length of the tools is made too small, which significantly affects the quality of work. So how, then, to make the crochet hook correctly?
To make a device for knitting reinforcement with our own hands, we need electrode for welding or steel wire with a diameter of 4 mm.
In order to make a hook, you must:
- Make a handle for the device from a piece of thin hose to the size of the rod or trowel without a spatula.
- Insert the electrode into the hose or insert into the funnel with a trowel and fix (eg with epoxy resin).
- Bend the rod at an angle of ninety degrees at a distance of about 5 cm from the handle (the bent rod should look like a rocker).
- Bend the end of the rod in an arcuate manner.
- Before work, sharpen the sharp edge of the electrode with a file or sharpener.
The hook can be made from an unnecessary screwdriver or a handle from a construction roller by bending the sharp end at the required angle and slightly sharpening it. An automatic mechanism can be made by inserting an electrode rounded at the end into a screwdriver.
A homemade tool is perfect for household purposes, saves money and allows you to quickly knit even and reliable knots.
Laying reinforcement in a slab foundation
The standard TTK card for the installation of reinforcement in the formwork of the foundation slab provides a sequence of actions:
- formwork control - linear dimensions, correspondence to the axes of the walls;
- the first row of the lower mesh - polymer clips for the lower protective layer are placed on the footing, the longitudinal rods are laid out in their nests (they are extended along the length with an overlap of 40 cm, if necessary);
- second row - ladders are laid on the rods, shifted as necessary, transverse rods are sequentially laid out with the design grid spacing;
- knitting - at the intersection, the reinforcement is tied (less often welded);
- stands - have several names (spider, frog, table, supporting frame), structures, are tied to the bottom grid in a checkerboard pattern;
- upper grid - is made in the same way or large-format maps connected in a building spot are stacked;
- knitting of U-shaped clamps at the ends of the plate;
- under load-bearing walls, the grid spacing is reduced by 1.5-2 times.

Longitudinal overlap of at least 50 reinforcement diameters.
Depending on the design of the foundation slab (smooth, with tape, side walls), at the last stage, vertical rods are mounted to connect with structures that will be concreted on its surface. These are L-shaped or U-shaped clamps with design dimensions. When self-bending the rods, it is forbidden to use metal heating in order to avoid changes in the structure. All elements of the slab foundation must be bent in conductors, clips or manual pipe benders.

From the ends, the plate is reinforced with U-shaped clamps.
Various shapes of plastic supports can be used to provide the side protection layer. This is necessary to prevent accidental displacement of the frame at the time of placing concrete, walking on ladders of workers.
The reinforcement is knitted in several ways:
- hand hook - standard twist;
- mechanized hook - has a spiral handle, doubles the tying performance;
- a gun for tying reinforcement - it is expensive, it is more often used by professional teams at large volumes.
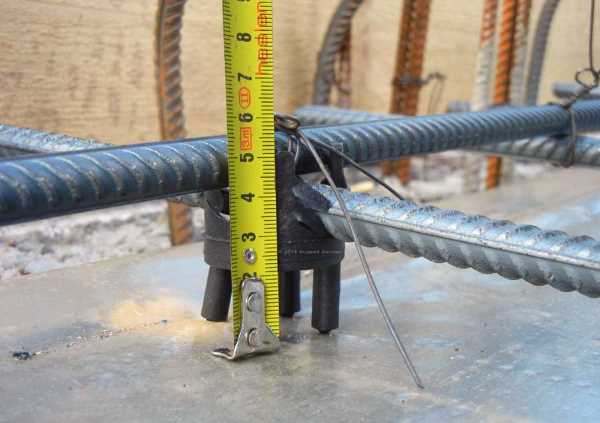
A special plastic cup provides a protective layer.
Specialists often soak the reinforcement to improve adhesion to concrete. In the regulations of the joint venture, exclusively peeling rust is prohibited, there is no information about a fresh coating of corrosion. For example, in ACI-318 this item is highlighted, rusty reinforcement is allowed inside concrete.
This guide covers the key points of reinforcing slab foundations. This will allow an individual developer to implement the project on their own to reduce the construction budget.
We recommend reading: Do-it-yourself slab foundation.
Good publicity
How are the fittings connected?
Before getting interested in how to properly knit reinforcement, it does not hurt to consider all the ways to connect the elements of the reinforcing frame. There are now three methods. It:
- welding;
- wire knitting;
- use of plastic clamps.
Each option has not only disadvantages, but also advantages, so they are used depending on specific conditions.
Welded connection
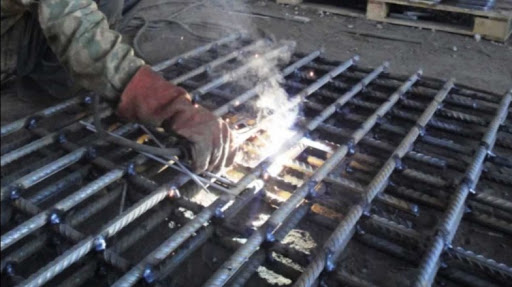
This method has been known for a long time. More often it was used (and is used) in the construction of super-strong foundations for multi-storey buildings. However, welding has several weak points.
- In order to bring the work to a high quality, you need experience in handling a welding machine. Since not every craftsman who has conceived the idea of building a house with his own hands is familiar with such work, to perform the operation you will have to hire a professional welder, and this promises additional costs that you want to avoid during large-scale construction.
- Unreliability of the reinforcing frame. During welding, the metal heats up to temperatures that provoke a violation of the structure of the steel in the heating zone. In addition, the welded joint does not react to bends in the best way, therefore material deformation is possible even at the compaction stage, when using vibrators. The result is a partial loss of stiffness by the framework.
It is not recommended to bend metal near the welding site. Complete destruction of connections during vibrator operation is another potential and serious problem, therefore this method is not recommended, despite the speed and relative simplicity of the solution.
Wire knitting

The biggest plus of this method is its simplicity, since there is no need for additional equipment, and no special skills are required from the builder either. In case of an error, it is very easy to fix it. The entire reinforcement process is easy to carry out in the formwork. The cost of the work is minimal, but the master still needs to know how to properly knit the reinforcement on his own.
The disadvantage of wire knitting is the relative instability of the created structure.
If the reinforcing frame is made outside the formwork, then during its subsequent installation, maximum care is required.
Using plastic clamps

The main advantages of the method are the highest speed of work, reliable fixation of reinforcement, simplicity that does not require skills. Such plastic ties also have drawbacks. These include:
- the large amount that will be spent on the purchase of this material, if you compare these costs with the purchase of a practical, inexpensive knitting wire;
- possible marriage: if the clamp was incorrectly fixed, then it will have to be bitten off, and this promises unnecessary expenses, since the element will become unusable;
- negative impact on elements at low temperatures: such plastic clamps, especially inexpensive ones, can burst in frost.
If you make a choice, then any method of the last two options can be considered as the main contender. However, wire knitting outperforms plastic competitors, since in this case the work will cost less. In addition, not all professional builders approve of plastic products. They say that good screeds are expensive, and cheap products simply do not stand up to criticism: they tear quickly.
What kind of reinforcement is used for knitting the frame
There are two main types of reinforcement - metal and composite. Diameter is the main indicator that determines its brand. The thicker the rods, the more load they can withstand. The diameter is calculated at the design stage, taking into account the mass of the future building, as well as the heaving of the soil.
When constructing a building made of concrete, brick, which is massive, the use of thick rods is required. They can handle the enormous weight of the structure. It is forbidden to use rods with a diameter of less than 12 mm when laying the base - they will not withstand such a load. When building small houses and garages from gas, foam and heat blocks, you can use not so thick reinforcement, enough rods with a diameter of 12 mm.
 Metal reinforcement for foundations
In the construction of massive structures, class A-3 is used. The rods of this brand can be bent up to 90 °. Much less often, class A-2 is used for laying foundations. When cold, they can bend up to 180 °.
Reinforcement of corners and junction points of the strip foundation
As a rule, the assembly sequence of the foundation reinforcement cage consists of a sequential assembly of straight sections and their connection at the corners of the foundation and at the junction of internal partitions
It is worth paying special attention to these areas, since the main bending and shear stresses arise here.
Reinforcement of the corners of the strip foundation and places of abutment of the walls is carried out using rigid legs, G and U-shaped clamps.
When using a rigid poker-like foot with a length of at least 35d of the working rod, the bent part of the reinforcement is positioned in such a way that the outer rods are connected in both directions, and the inner rods are welded to the outer rods. This way you can avoid a common mistake in reinforcement - the lack of connection between the outer and inner members. In places of bending, vertical reinforcement is placed on the inside.
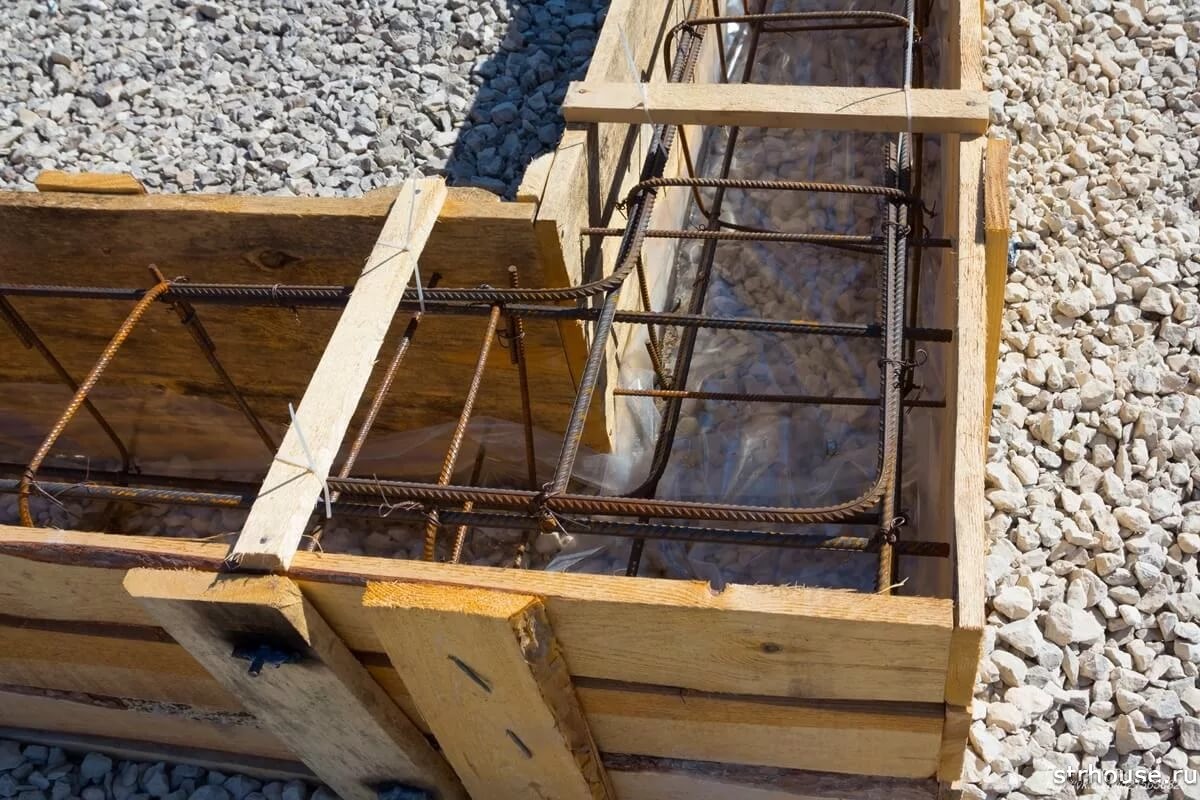
The principle of installing the L-shaped clamp is similar, only instead of the foot, a bent rod is used with a side of at least 50d of the working reinforcement. Here, too, the inner rods of one direction are connected to the outer rods of the other side. U-shaped clamps allow connecting parallel outer and inner rods in one direction to connect to a perpendicularly located outer rod in the other direction. At the corners of the foundations, two such clamps are used, at the junction of the wall there is only one.
Diagrams of junction of corners and joints of reinforcement are clearly shown in the diagrams below:
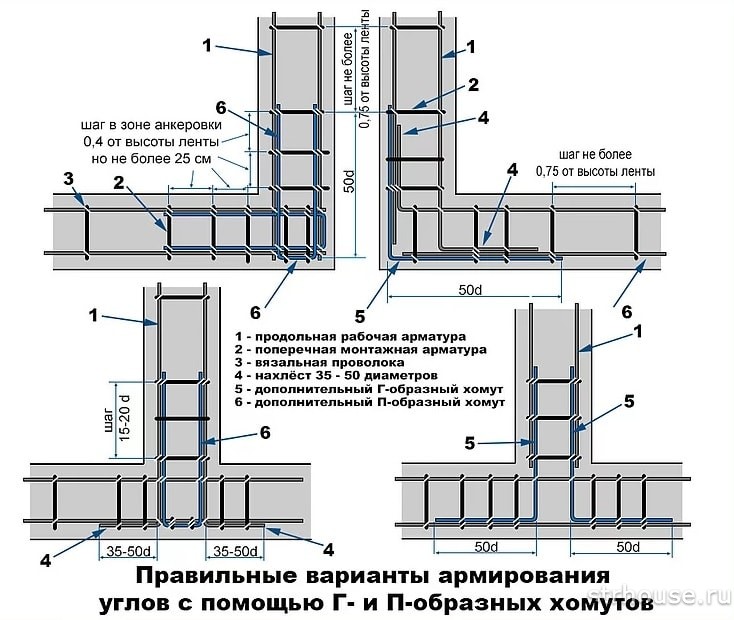
This raises the question of how to properly bend the reinforcement for the foundation. To do this, use a special device - an armature bender, consisting of three rods of different diameters, rigidly fixed to a stable, mainly steel base. Such a device can be made independently or purchased at a store.

What materials and tools are used for knitting reinforcement
Previously, when pouring the foundation, only steel wire was used, made in accordance with the corresponding GOST, in several layers. This guaranteed the necessary strength of the foundation in the future. But today there is a sufficient variety of knitting materials that can also be considered reliable.
Steel wire
Steel (or as they say - knitting) wire is the most acceptable material for knitting reinforcement. In its manufacture, annealed steel with a low carbon content is used, which makes the wire strong enough, and at the same time soft. Knitting wire is divided into 2 types:
- Black. The most practical and convenient. If a black wire of insufficient softness was purchased, then it should be calcined in a fire for 30 minutes, cooled, and you can start working.
- Galvanized. Very rarely, this type of wire is acquired for tying reinforcement, since there is no oxygen current in it, and, accordingly, there can be no corrosion processes. Therefore, extra spending is useless here.
Plastic clamps
A fairly popular consumable today, which will help you quickly understand how to quickly knit any reinforcement. But it cannot be said that professional builders are of the opinion of the majority, since plastic products have a lower price, but they are not able to withstand the force that steel wire can withstand.
Plastic clamps differ from knitting wire not only in their lower price, they are also extremely easy to use - just wrap the product around the reinforcing rods, pass one end of it through a special eyelet and tighten. A common problem is stirrup rupture, for example when a builder steps on reinforcing bars. Therefore, for greater reliability, you should wear 2 or more layers located in different directions.
Instruments
You should not use materials at hand when knitting reinforcement, as this will not allow you to achieve high reliability of the frame, respectively - the foundation will not receive the required strength.
The most popular tools used for tying reinforcement:
Hook for tying reinforcement. This tool is used quite often, since the hook for knitting reinforcement has an affordable price policy and is easy to use. It has 3 types: simple, screw and semi-automatic.
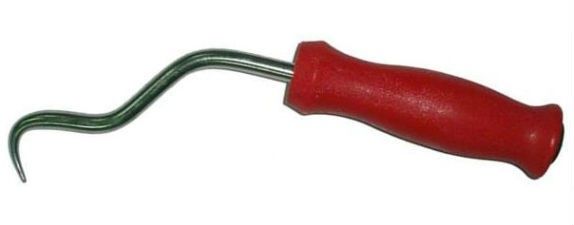 Crochet hook
Knitting pliers.Not too different from a crochet hook. They are slightly longer and have additional nippers in their design. With the reversible pliers, you can use the tying wire directly from the coil.
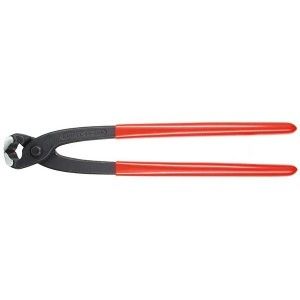 Knitting pliers
A gun for tying fittings. Refers to the type of professional tool, it is important to acquire it only when it is necessary to knit reinforcement in large quantities for any type of foundation. The gun for tying reinforcement is lightweight and very easy to use, the tying process is fully automated and takes no more than one second. The main disadvantage is the high price.
 Rebar tying gun
Tying the frame of the strip foundation
At the bottom of the trench, on supports (bosses) with a thickness of 4-5 cm, the calculated number of longitudinal rods (diameter 12-18 mm) is laid. The distance between them depends on the size of the foundation and can be from 5 to 20 cm. If the standard length of one steel bar (6 meters) is not enough for the entire "tape", then several rods are used. They are connected to each other, observing the normative overlap.
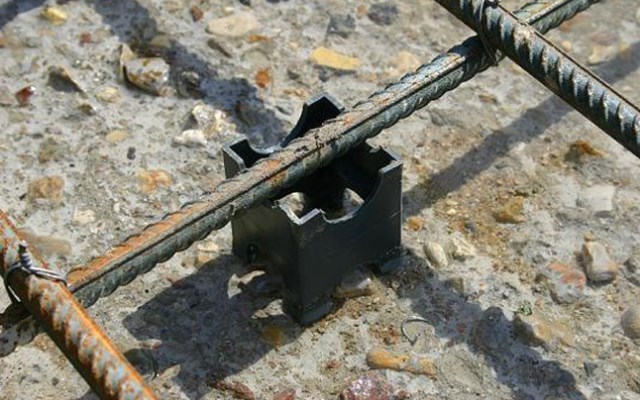 Reinforcement cage stands
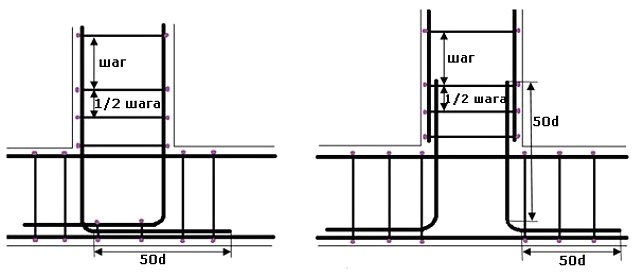
Clamps made of smooth or corrugated steel with a diameter of 8-10 mm are vertically attached to the working rods. The step of the clamps according to building codes must be at least 3/8 of the height of the foundation (20-50 cm).
Having installed the clamps, the upper belt of the working reinforcement is attached to them with wire, observing the design distance between the rods.

At the corners and junctions, the clamps are placed more often (1/2 step), and the working reinforcement is bent, connecting with the rods of the intersected section of the "tape".
The bend length must be at least 50 diameters of the working reinforcement.
Making a reinforcement cage in a trench is laborious and inconvenient work. Therefore, experienced builders use such a simple device.

Having laid the longitudinal whips on wooden supports, the clamps and the lower belt of the working rods are tied to them. The finished structure is transferred and placed in a trench.
The assembly of the reinforcing cage of a monolithic slab is simpler than a strip foundation. The construction here consists of two flat meshes. The lower rods are laid perpendicularly with a predetermined pitch and tied together. Then, at the points of their intersection, they put supports made of steel bars and screw the upper mesh to them.
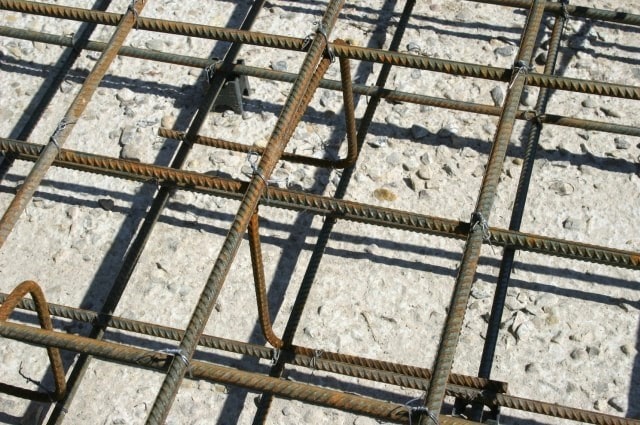
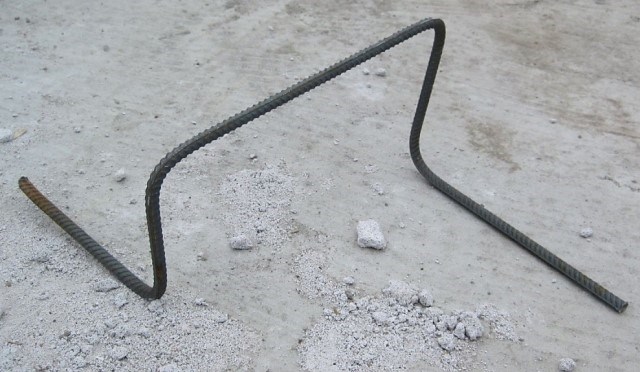 Stand for mounting the upper frame of a monolithic slab
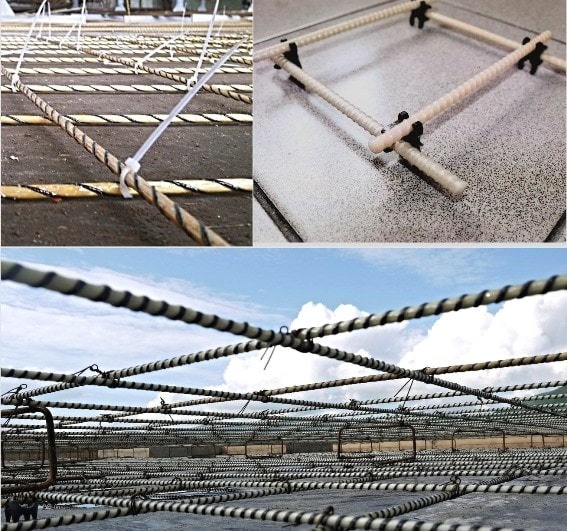
In recent years, fiberglass reinforcement has been used to assemble frames.
You can knit it in several ways:
- annealed steel wire;
- plastic cable ties;
- plastic clips.
Hook selection
The following factors influence the choice of a crochet hook for knitting reinforcement.
- The remoteness of construction stores and household markets, where you can buy a ready-made industrial hook. In many cases, it is made from a large nail (with a working pin diameter of up to 5 and a length of 100 mm). The hook should be long enough for the knitting wire to twist more easily. The longer the lever, the easier it is to wind it.
- Unwillingness or inability to incur unnecessary expenses. There is no need to purchase a tool made of low-quality steel, which breaks down in several tens or a couple of hundred uses, if a high-quality analogue is not found. This does not only apply to hooks.
- The desire and ability to get out of numerous small difficulties on their own. If you don't want to stretch the construction for extra hours and days, buying a ready-made device is considered a quick option.
- Product performance. If the construction process, for example, the arrangement of foundations, is a permanent duty of the master (and not a rarely solved matter), then it is recommended to purchase a high-quality knitting crochet hook. Such a tool will last ten years, or even more. The best material is hardened tool steel or stainless steel.A slightly worse option is considered to be tool steel with the addition of chromium, molybdenum, cobalt and other additives. It is not recommended to purchase products from low carbon alloy steel.

Correct knitting of fiberglass reinforcement
Fiberglass reinforcement is usually called products, the structure of which consists of glass fibers. This type of reinforcement belongs to the category of composite reinforcement and is highly popular today. In terms of their shape, fiberglass products are practically no different from metal ones.
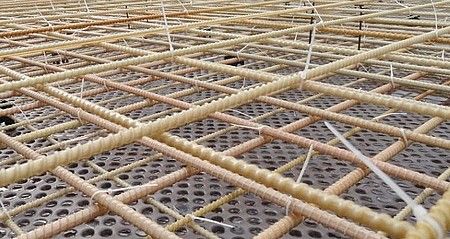 Knitting of fiberglass reinforcement using clamps
Among the advantages of fiberglass reinforcement, the following should be noted:
- Lightweight. The process of transportation and installation is automatically simplified.
- Elastic. If necessary, the composite reinforcement can be laid in rings, which is very convenient for loading and transportation.
- Strong. In terms of its technical qualities, it is in no way inferior to metal products.
- Long lasting. Composite reinforcement has a long service life.
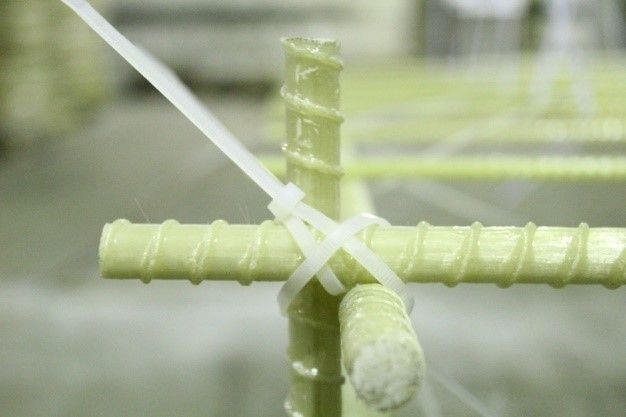 An example of tying fiberglass reinforcement with several clamps
The binding of fiberglass reinforcement is practically no different from standard metal products. Here you should also use a crochet hook or special gun, and as consumables - knitting wire or plastic clamps.
Youtube video:
First, the horizontal sides of the structure are prepared, on which vertical rods are subsequently applied. When knitting fiberglass reinforcement, it is necessary to accurately monitor the size of the cells; for greater simplicity, you can make notes in advance with a marker. Reinforcement knitting points should be located in the inner part of the frame. It is not enough to know how to knit fiberglass reinforcement correctly, you should also make accurate calculations.
It is necessary to pay increased attention to the corners of the structure, since fiberglass reinforcement is poorly susceptible to heating, therefore it is not recommended to bend it on its own. A larger amount of knitting wire or plastic clamps should be spent on the corners of the frame.
Welding or strapping
At the initial stage of laying the reinforcing elements, when erecting a preliminary frame, the skeleton of a reinforcing belt, you can use a welding machine. This will significantly speed up the installation work. They are carried out by tacking using welding equipment at low currents, up to 150 amperes. The field of installation of guides, the so-called trolls, the joints of the reinforcement are completely tied with a special wire, manually or mechanically.
Steel of class A-3 has two stiffening ribs, which are very easy to damage (melt) during welding. Because of this, the bearing capacity of the section of the reinforcement deteriorates. For example, 12 mm rods will be as effective in concrete as 10 mm diameter metal. This should not be allowed.
In addition, the use of welding when reinforcing in a strip foundation is not justified, it will not be possible to save a lot. You should not risk the supporting parameters of the frame, speeding up the delivery time of the object or making it easier for yourself to work.
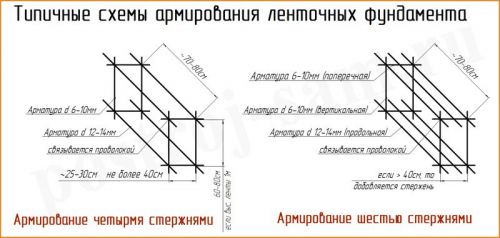 Typical reinforcement schemes.
Other ways of connecting fittings
Rebar tying is considered the most reliable way to connect reinforcement bars when creating a frame for a strip foundation. However, there are other options for mounting a metal skeleton:
- Using welding equipment. Having a welding machine in your arsenal and some skills in working with it, you can quickly and easily create a frame for a foundation from metal rods. But in this case, it is worth considering the features of such a connection of the reinforcement. First, welding helps to thin the metal, making it more brittle. Secondly, the welded frame will be reliable only if the metal and electrodes are correctly selected, as well as all the rules and regulations are observed.
- Lap joint. This method assumes not a transverse, but a longitudinal connection of the rods. In this case, the individual ends of the reinforcement have an outlet of at least 15 cm for subsequent wire winding.
- With plastic band clamps. This method can be used when building a foundation for small structures. The connection with plastic clamps makes the knitting process somewhat easier. However, it is worth remembering that such a frame is less resistant to stress, and plastic may burst under the influence of low temperatures.
- With clamps or brackets made of plastic or steel.
Knitting of fiberglass reinforcement
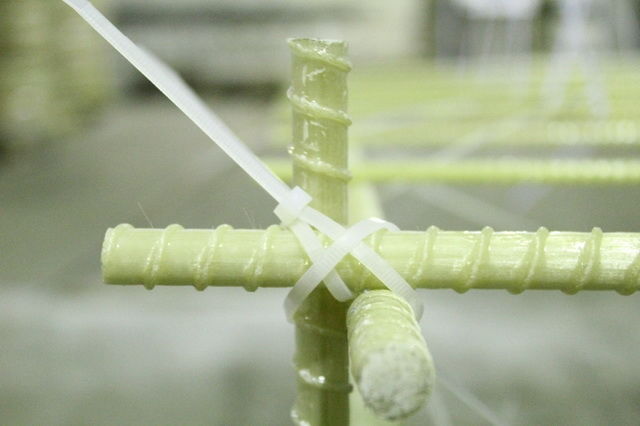
Fiberglass reinforcement is a relatively new material in the construction market, which is intended for domestic use, low-rise construction. Unlike steel reinforcement, it is more resistant to corrosion, characterized by low thermal conductivity, therefore it does not create cold bridges, is strong when stretched and has no seams. The disadvantage is a low fracture strength.
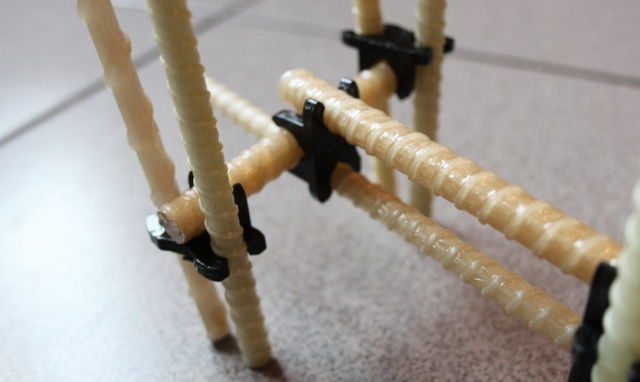
The material is used for the manufacture of enclosing concrete structures, foundations, aerated concrete masonry, foam block. What are its features and how to knit fiberglass reinforcement correctly?
For knitting you can use:
- Knitting wire. The wire must be thick enough not to break when the concrete is fed to the frame. The wire is fixed with a hook.
- Plastic clamps. These are ready-made items, they are sold in the store and are easy to use. When using clamps, tighten them tightly.
Great attention is paid to the processing of corners. In their place, special elements are installed, which are sold in specialized stores. It is worth noting that such reinforcement must be knitted strictly without heat exposure.
It is worth noting that such reinforcement must be knitted strictly without heat exposure.
Methods and methods of knitting reinforcement for the foundation
When creating a strip base for a private house, reinforcement for the foundation plays a very important role, it excludes the possibility of its deformation during seasonal ground movements and ensures integrity.
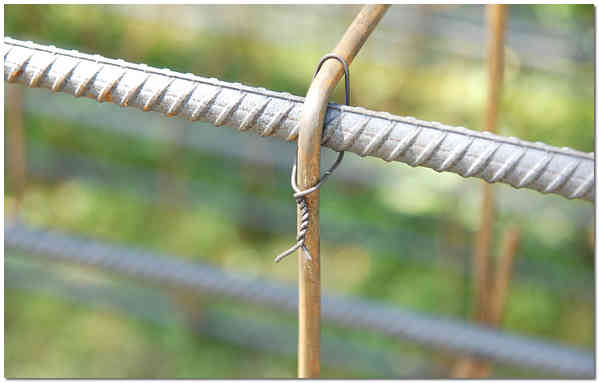
Each metal frame in a strip foundation consists of two or more horizontal tiers, which are fastened together with transverse rods (crossbars). All elements of the frame are connected to each other using electric welding or wire for tying reinforcement.
Reinforcement calculation

Before purchasing the required amount of reinforcement for the frame, it is necessary to carry out some mathematical calculations that will help determine the amount of material.
It is also important to consider some features, such as:
- Corrugated reinforcement (metal rods with ribs) withstands a greater load on horizontal structures than smooth ones and provides a better quality of adhesion to concrete;
- When calculating, it should be borne in mind that the frame should not rest against the formwork, but is located at a distance of 5-10 cm from it. This will protect the metal from exposure to air and moisture. For example, if the width of the concrete foundation tape is 60 cm, then the frame width will be 45-50 cm;
- Smooth bars can be used as crossbars to support longitudinal tiers.
If it is planned to build a one-story house, then the distance between the transverse and longitudinal bars is approximately 50-55 cm.But if the building has two floors or a massive attic, then this distance is reduced to 20-30 cm, which significantly increases the material consumption.
Rebar bundle options
In order to connect all the elements of the metal structure with each other, a mounting wire with a diameter of 0.8 or 1.2 mm is used, which is pre-cut into small pieces of 20-25 cm. The installation of reinforcement for the foundation can be done in several ways, depending on the tool used:
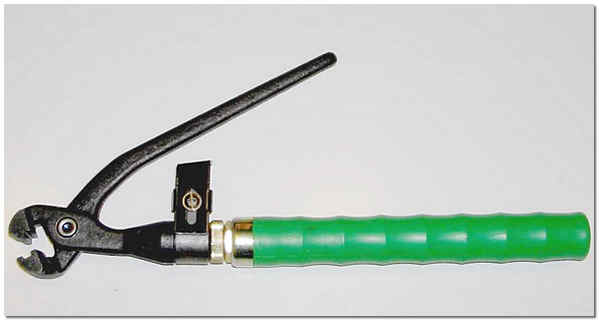
- crochet hook for reinforcement, this knitting method is described below;
- special clamps. In this version, special plastic or metal disposable clamps are used. This is how fiberglass reinforcement for the foundation is usually knitted.
Before knitting the reinforcement for the foundation, you must provide yourself with protective gloves and use only serviceable tools.
Step-by-step hand-twisting process
The fastest and most common method in private construction is to knit reinforcement under a strip foundation using a special crochet hook for reinforcement.
In order to do everything correctly and quickly, you must strictly follow the procedure below:
- the wire for tying reinforcement is cut 20-25 cm long and folds in half;
- we start the wire under the junction of the rods and insert the hook for knitting the reinforcement into the loop;
- with the second end of the wire we tie the reinforcement connection and put it on the hook;
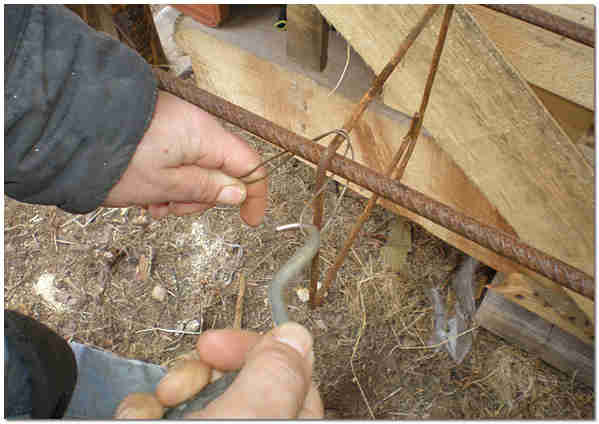
- then we rotate the crochet hook for the reinforcement clockwise, holding the other end of the wire so that the ends are intertwined;
- remove the hook from the loop and bend the ends of the wire into the frame.
Using this simple procedure, tying strip foundation reinforcement with a knitting gun is much faster and more efficient.
P.S. And for dessert, I suggest watching a video clip: We knit reinforcement cages with a screwdriver
Wire
For reinforcing cages, it is necessary to use wire produced in accordance with GOST 3282-74, which indicates that this material is classified according to several positions.
- Processing method: untreated or annealed.
- Precision processing.
- Resistance to loads.
- With or without protective zinc coating.
The diameter of the product ranges from 0.16 to 10 mm. It can be black or steel. Since we are interested in knitting wire, that is, soft with a large bending cycle, it is better to choose the annealed option.
Someone may say that galvanized wire will last a long time, and no one will argue with that. But it is more expensive than usual, besides, inside the hardened concrete, corrosion processes practically do not occur.
For knitting a reinforcing frame for foundation structures, a wire with a diameter of 1.2 - 1.4 mm is used, less often 1.8, if only the diameter of the reinforcing rods is chosen for the frame as the largest (18 mm).
Its advantages and disadvantages
But taking into account knitting with wire, other positive aspects of the design are also determined.
The wire connection maintains the volumetric and linear shape of the frame structure.
In this case, the connection place is not firmly fixed, as is the case with welding.
There remains a place for balancing the reinforcing bars with each other, which is very important when pouring, vibrating and hardening concrete mortar. That is, the connection of the reinforcement makes it possible to displace by millimeters in the knitting area, taking an ideal position when the loads from the concrete mix occur.
As for the disadvantages, they mainly relate to the time characteristics and laboriousness of the process itself. That is, welding the frame is faster than knitting it with wire. And the difference is significant. Tying the reinforcement cages of the foundation is not an easy task. This requires knowledge of methods and the ability to use a special tool. Although, as practice shows, several knots already give the necessary experience, which reduces both the complexity of knitting and the time spent on it.
