We install a chimney in a wooden house. Brick pipes. Passage through the ceiling and wall. Coaxial chimney
The traditional material for making chimneys in wooden houses is refractory bricks.
When laying chimneys, it is necessary to pay special attention to the binding of bricks to each other. To connect the elements of a brick chimney in the interior of a house, you can use a mixture of cement and limestone, but when laying bricks in a chimney in an open space, clean cement mortar should be used
The thickness of the seam between the bricks in such masonry should not exceed one centimeter. At the same time, the brick should be red and not hollow.
The inner surface of a brick chimney is exposed to aggressive effects of combustion products, condensate. As a result, chips and collapses can occur on the inner surfaces. To avoid such negative moments, an asbestos-cement pipe is placed inside the brick chimney, and the space between the brick and the pipe is filled with concrete. Thus, you will carry out the so-called "sleeve" of the chimney ".
The figure given in the article shows how you can run a chimney through a wooden ceiling.
You can use asbestos layers when passing the floor. In this case, the distance between the pipe and the floor tree will be 25 centimeters.
In the event that an asbestos gasket is not used, then the distance between the pipe and the tree will have to be increased to 38 centimeters.
As well as when passing through a ceiling - when adjacent to wooden walls - the chimney pipes must be reliably insulated.
adjoining the chimney to a wooden wall

The entire structure can be laid with brickwork from the sides.
If you are installing a chimney in a new, not yet settled log house, then it is better to place it on a wooden board that can move relative to the wall. In this case, the subsidence of the log house over time will not lead to the destruction of the brickwork of the chimney and pipe.
When removing the chimney through the roof, the distance between its heating elements and the rafters should not be less than 13 centimeters. A heat insulator must be installed in the gap between the pipe and the rafter tree. Basalt wool can be used as it. When choosing wool for thermal insulation, make sure that it is free of organic binders and that it is resistant to high temperatures.
chimney passage through the roof
If materials with a low ignition threshold are used as a roof on the roof, for example, sheet roofing material, then the distance to it should not be less than 25 centimeters. The space between the combustible material and the chimney must be covered with a fireproof roof. Slate can serve as such a protective material. It will not transfer heat from the pipe to the roofing felt. Roofing steel can also be used as a protective coating.
The chimney head on the roof of a wooden building should rise above it to a height of at least 20 centimeters from the top of the ridge if the chimney is located directly next to the ridge or just on a flat roof.
If the chimney is less than one and a half meters from the ridge, then its height should also not be less than 50 centimeters.
If the chimney is located at a distance of one and a half to three meters from the ridge, then its head should not be below the level of the ridge.
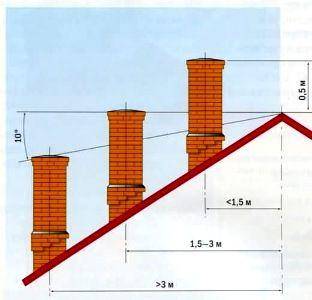
pipe height above the roof
Sheathing for ceiling and walls
In addition to treating elements of wooden structures with fire retardants and mastics, you can protect them from the hot parts of metal furnaces by upholstery with refractory materials.When preparing for this procedure, it should be borne in mind that the filing of the ceiling in the area of \ u200b \ u200bthe exit to the roof is carried out only with non-combustible materials that do not spoil the interior of the room.
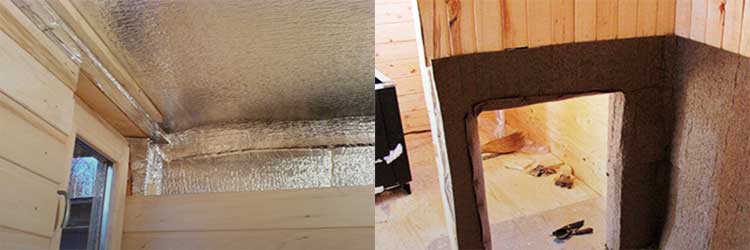
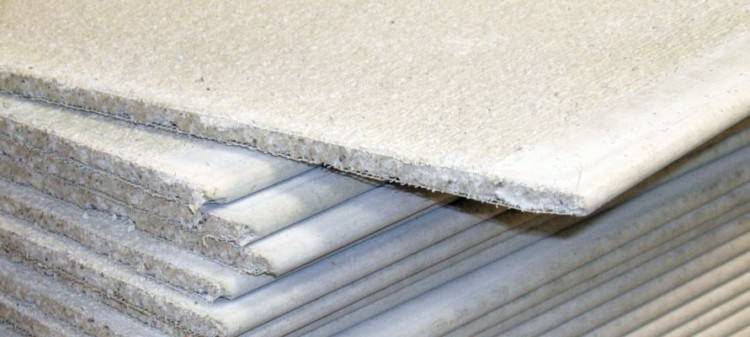
The optimal cladding option is fibrous gypsum boards treated with refractory putty. To protect the walls, basalt cardboard can be used, sheathed with steel sheets on top. Most often, special decorative screens made of stainless steel are used. They not only protect surfaces well from burning, but also look quite aesthetically pleasing.
Another option for protecting the walls from red-hot stove parts involves covering them with bricks placed on the edge.
Chimney requirements
The selection of elements is carried out taking into account the requirements of the technical characteristics of the heater. In order for the system to work smoothly, the basic principles of chimney design must be observed:
- A round shape is preferable, since combustion products and dust accumulate in the corners of the pipe. Round chimneys require less cleaning than rectangular and square ones.
- The section of the pipe must not be less than the diameter of the pipe of the heater. It is calculated that for every kilowatt of power, 8 kW is required to ensure the proper level of thrust. see section. Usually, information on the required chimney size is contained in the instructions for the heater.
- Each heater requires the installation of its own chimney. In some cases, you can deviate from this rule, but then the devices should be located at a different height, the distance between the connection points is 1 m or more. And the size of the pipe section must take into account the total power of the heat generators.
- The total length of the horizontal sections of the chimney cannot exceed 1 m, violation of this rule reduces the thrust force.
- The chimney ends 0.5-1.5 m above the ridge, on a flat roof - 0.5 m above the surface.
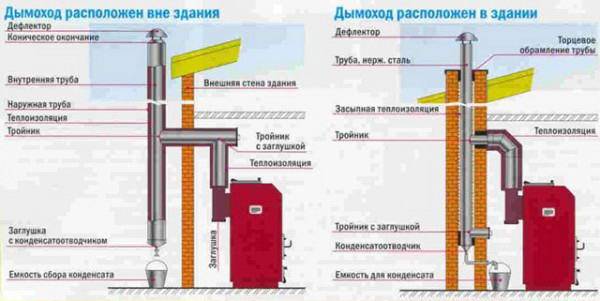 External and internal chimney diagram
Advantages and disadvantages
Before working on installing a solid fuel boiler in a wooden house with your own hands, you need to familiarize yourself with the strengths and weaknesses of the unit.
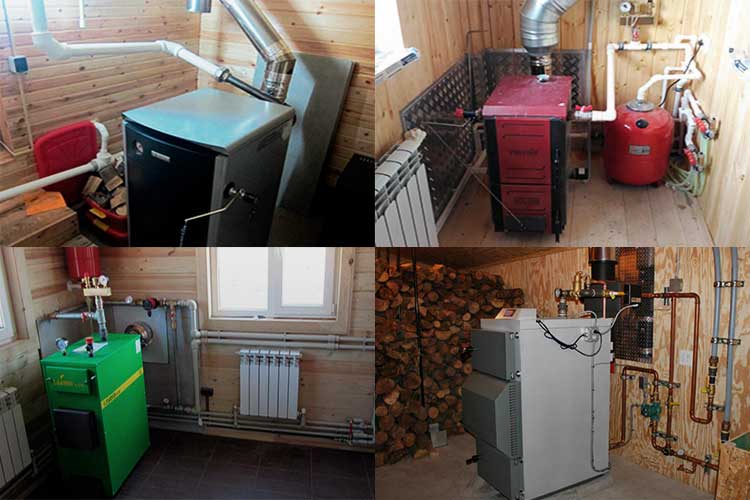
The main advantages of the equipment in question include:
- Heating operation when the electricity is turned off - just open a special tap and start up the coolant directly.
- Affordable, almost free fuel, especially for people who live near forested areas.
- Easy installation of a wall-mounted boiler in a wooden house.
- Low price of equipment.
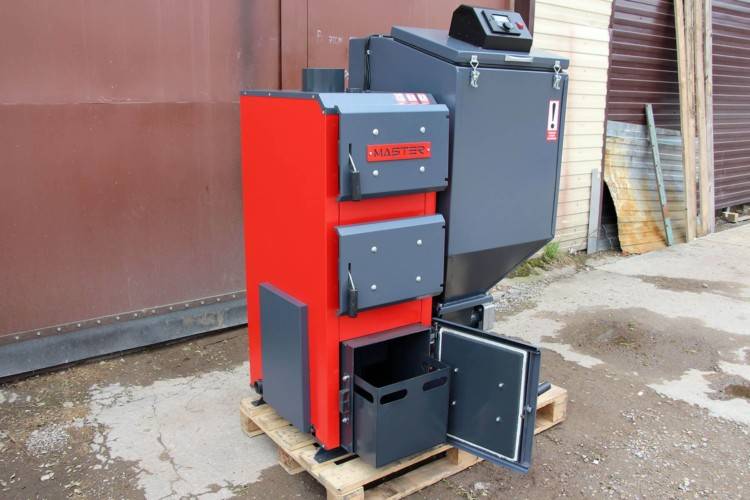
In addition to the advantages, the scheme with solid fuel wood-burning boiler there are several disadvantages:
- a significant mass of the unit, because cast iron is used for its manufacture;
- a person must constantly look after the boiler, adjust its operation as necessary, for example, when the electricity is turned off;
- increased fuel consumption, softwood produces little heat during combustion;
- low efficiency, maximum 80%;
- large dimensions of the unit.
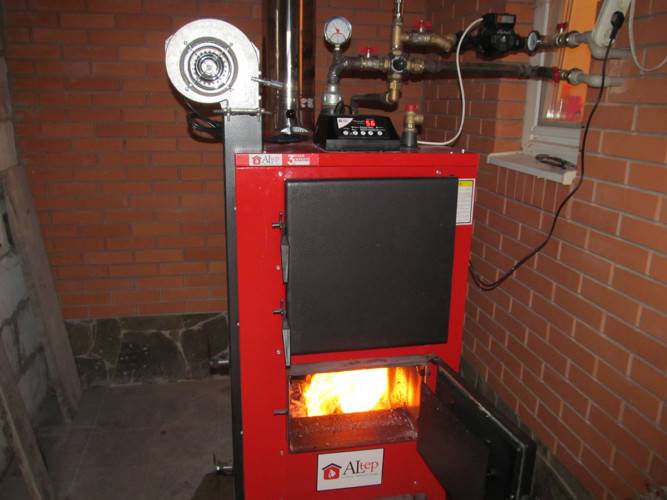
Many owners are installing a wall-mounted gas boiler in a wooden house, but this is only possible with the immediate vicinity of the gas main. Most owners of private country houses use a solid fuel wood boiler to heat their homes. Its installation has its own nuances.
Features of the operation of brick chimneys
After the construction of the chimney has been completed and the pipe has been successfully put into operation, it is advisable to familiarize yourself with the features of using a brick stove. In order for the heating unit to serve for a long time and without accidents, simple but important rules must be followed.
- The main enemy of bricks is sudden changes in temperature. It is better to heat more often, but for short periods of time.It is not recommended to make more than 2 fuel inserts per one furnace. This is especially true for coal, the combustion temperature of which exceeds 1000 degrees.
- Timely cleaning of the pipe from soot extends the service life of the chimney indefinitely.
- If cracks appear on the body of the stove and chimney in particular, you should immediately take measures to eliminate them. Launched cracks tend to progress rapidly and pose a threat not only to the integrity of the brickwork, but also to human health. Carbon monoxide, which is colorless and odorless, penetrates through small cracks into the living space, but is poisonous to all living things.
- The slightest malfunctions in the doors of the firebox or blower (ash chamber) first significantly reduce the heat transfer of the furnace, and then lead to an avalanche accumulation of soot on the chimney ducts. If you find a loose door, view or latch, you should immediately repair or replace them.
- At least once a year, it is necessary to carry out the oven maintenance. This is best done at the end of summer, before the start of the heating season. The daily preventive procedure includes opening the blower door for 15–20 minutes. This simple action will allow you to create a short-term maximum thrust, which will pull the soot deposited on the walls into the external environment.
- The use of damp firewood is detrimental to the cleanliness of the smoke ducts, especially in winter. It is more rational to use fuel briquettes, the moisture content of which is much lower. Firewood should be harvested ahead of time - drying wood in a natural way is a long process (from a year to two).
Installation sequence
The installation of an internal chimney begins with drawing up a diagram and calculating the required number of pipe segments. To complete the assembly correctly, the device is performed in the following order:
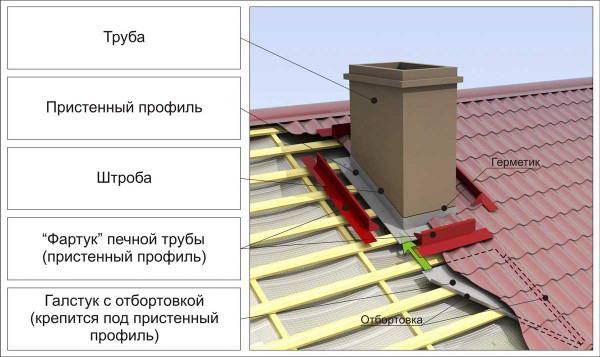 Chimney outlet scheme through the roof from corrugated board
- The surface of the walls and floor behind the heater and chimney is protected from heat with a fire-resistant material such as asbestos sheets.
- The first pipe segment is connected to a pipe of a heat generating device or furnace. If there are gaps at the junction, use an adapter or seal. A fire-resistant sealant and a metal clamp are used to seal the joint.
- Each subsequent segment of a single-circuit pipe is put on the lower one so as not to impede the passage of smoke. The connection of sandwich pipes is performed differently - the elements of the inner circuit are inserted into the underlying module, into the outer one, on the contrary.
- It is recommended to observe an overlap between the pipes equal to a quarter of the radius. To make it more convenient to handle with a sealant and tighten the joints with clamps, you should not place them in the places of passage of interfloor floors and roofs.
- If it is necessary to turn the pipe, the modules are connected using a swivel elbow with an angle of 45 or 90 degrees.
- To lead the chimney through the ceiling and the roof, you need to make a hole in them and mount a passage box or pipe, into which a refractory insulation is poured.
-
After the pipe is brought to the roof, it is protected with an elastic funnel-shaped seal that reliably protects against water penetration.
- The pipe is completed to the calculated height and a protective umbrella is put on top to prevent debris, branches and birds from entering the chimney.
- The pipe outlet is finished with a decorative apron that matches the color of the roofing material.
After the installation is completed, it is necessary to start the heating systems, check the traction and tightness of the joints - even a slight small smoke indicates serious problems, the solution of which is unsafe to postpone.
Installing a chimney in a house is a responsible event, the quality of which depends on the comfort and safety of the heating system, so follow the recommendations of the manufacturers, the technology of installation work.
Ceramic chimneys for wooden buildings
Modern industry produces high-strength and fireproof modular chimneys from high-quality ceramic materials. They are a kind of constructs that are assembled in place from several elements.
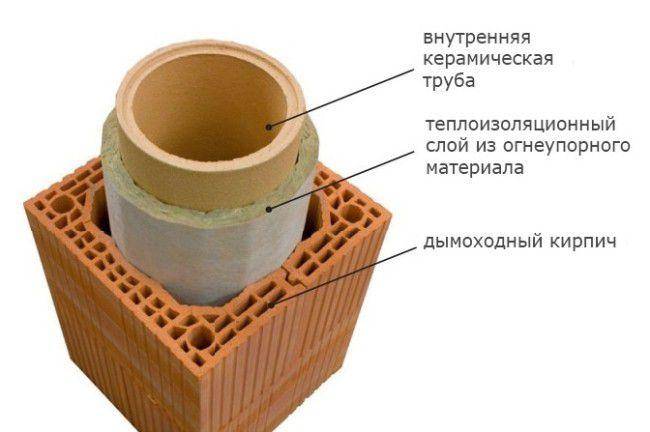
ceramic chimney

Such a chimney can be made of multilayer material. Its inner surface is made of ceramic material, which is particularly resistant to heat and acids formed during the reactions of combustion products. Their inner surface is very smooth, which prevents soot build-up and creates even and powerful traction. But such a chimney system has considerable weight and requires special skill during installation.
In addition to ordinary metal pipes for chimneys, made, as a rule, of stainless steel or cast iron, so-called "sandwich pipes", which are a multi-layer composition, have recently become popular.
The inner surface of such chimneys is made of stainless steel, then there is an insulating material - and then a galvanized pipe. Together, this complex performs its functions quite successfully and is very easy to assemble. The smooth stainless steel surface on the inside gives even traction, preventing the formation of turbulence.
However, when choosing such a pipe, it is very important to remember that different heating devices have different combustion temperatures and, based on this, choose the required thickness of the inner wall. When building a chimney for a gas, diesel or pellet boiler, it must be at least half a millimeter
Chimneys for baths or fireplaces are usually equipped with an inner pipe of 0.8-1.0 mm, but for coal-fired stoves this figure should be at least a millimeter.
As well as ceramic chimneys - chimneys made of sandwich pipes have a modular design and are easily connected to each other. So, special elements are produced for passing through interfloor ceilings. But even in this case, it is necessary to ensure that the joint of the pipe is not in the thickness of the ceiling.
Chimney insulation
External insulation of the chimney is designed to eliminate the main enemy of the pipe - condensate, which forms in the cold season as a result of condensation of water vapor on the inner walls. A particularly large amount of moisture is contained in wood - up to 25% in dry wood and up to 60% in freshly sawn wood. Coal does not contain vapors, but since the combustion process uses air from the living quarters, its humidity can reach 8-10%. Passing through a cold pipe at a low speed, the vapor is deposited in the form of droplets on the inner walls and, mixing with soot, turns into a reactive acid.

Insulation of the chimney pipe avoids the formation of condensation on its inner walls
There are three main methods of insulation:
-
Plastering. The easiest and most affordable way that does not require special skills. It consists in the fact that several layers of slag-lime mortar are applied to the chimney, which, when solidified, forms a strong protective "coat". To strengthen the adhesion of the plaster to the masonry, use a metal mesh, securing it to the pipe with anchor nails. After applying 3-4 layers (at intervals for drying) the insulated surface is covered with whitewash or lime. As practice has shown, such protection is able to reduce the heat transfer of the pipe by 20-25%. This method is fast and does not require large financial costs.
-
Warming with wooden boards. Boards with a thickness of 30–40 mm are required. Around the entire chimney (from the otter to the head), a wooden frame is mounted and completely sheathed with a board. From above, the wood is protected with slate.The distance between the brickwork and the boards (5–7 cm) is filled with any non-combustible insulation - earth, sand or mineral wool. To avoid spillage of the insulation, the gaps between the boards are closed with plastic wrap or putty with sealant. This method is effective in regions of the steppe zone, where dry winds often blow, and prolonged rains are rare.
-
The third method requires certain expenses. It consists in the fact that the walls of the pipe are insulated with mineral wool, which is resistant to the effects of solar radiation. The best option is considered to be basalt wool, which has a very low thermal conductivity. A layer of adhesive is applied to the chimney, to which the basalt slabs are attached. For good adhesion, the entire array of insulation is fixed with plumbing tape and covered with reinforced polypropylene film. After the glue has completely dried, the cotton wool is covered with granular facade paint using a masking net. Another option is siding or cladding with profiled metal sheet. This pipe insulation allows you to save up to 50% of the heat inside the chimney. And, as a result, ensure the absence of condensation on the inner walls.
Types of chimneys and their features
Chimneys in a house, especially a wooden one, or in a bathhouse must be made of various refractory materials. Brick chimneys are resistant to high temperatures, strength and aesthetics, but at the same time, the porous and heterogeneous structure of the brick contributes to the accumulation of moisture, the deposition of combustion products - soot and soot. As a result, the lumen of the chimney becomes overgrown, the draft deteriorates, and the operation of the furnace becomes unsafe. It is especially undesirable to use brick chimneys in systems for removing smoke from solid fuel, including pellet, boilers with a closed combustion chamber.
Ferrous metal pipes are not recommended for use in wooden houses and baths, as well as when installing a gas or solid fuel boiler: they get very hot and quickly burn out, which can lead to a fire. Sometimes chimneys from such a pipe are mounted in brick garages and other utility rooms, but even there they are ineffective, as they are prone to corrosion and condensation.
The most successful solution is insulated sandwich chimneys made of stainless steel and ceramics. The circular cross-section of the pipes facilitates the passage of smoke and provides good draft. Less soot settles on the smooth inner surface. Due to the insulation, the formation of condensation is excluded. Thanks to the modular system, their installation is easy to do with your own hands. Structurally, sandwich chimneys made of stainless steel and ceramics are somewhat different.
The ceramic sandwich chimney is a system of modules, each of which consists of an internal ceramic pipe element and a hollow foam block. For thermal insulation, they are separated by a layer of basalt insulation. Modules are delivered disassembled; assembly is performed on site using special glue and sealant. To install a ceramic chimney, a foundation is required due to their significant weight.
Stainless steel sandwich chimneys are sold as ready-made modules. They are two pipes of different diameters, nested one inside the other, and separated by a layer of insulation. The inner pipe is made of stainless steel, the outer one can be either stainless steel or galvanized sheet. They are collected much faster than ceramic ones. In addition, due to its low weight, for no stainless steel chimney needed foundation.
In terms of fire resistance, ceramic chimneys are superior to all others, they can withstand temperatures up to 1200 degrees Celsius for a long time, some models are equipped with ventilation systems. The service life of such chimneys is at least 50 years. But the price of ceramic chimneys is high, so their installation is advisable only in residential buildings, cottages and other capital buildings.
Brick chimney
Despite the mass of new materials for the execution of chimneys, brick still remains quite popular and in demand.
Let us remind you that:
- The laying of the pipe should be with bandaging, inside the house on lime or cement-lime mortar, cement mortar is used above the roof.
- According to the "Rules for chimney and furnace work", chimneys must be of solid red brick, the seam is not thicker than 10 mm. It is forbidden to plaster the inner surface of the pipe.
- Serious weight requires a foundation.
- The brickwork is destroyed by acid condensation, fragments of brick can collapse inward and narrow the channel section.
- Due to the roughness of the brick, soot accumulates inside the chimney.
To reduce the negative aspects, the brick chimney device is carried out as follows: an asbestos-cement pipe is inserted into the smoke channel and the space between it and the brick is poured with concrete. This event is called sleeve.
Interfloor overlap
The picture below shows the passage of the chimney through a wooden floor. On the left is a passage device using 2 layers of asbestos, then the distance from the pipe to the wooden floor beam is 1 brick, that is, 250 mm. And on the right is shown an option without asbestos, in which case the distance from the chimney to the wooden floor beam should be at least 1.5 bricks, that is, 380 mm.
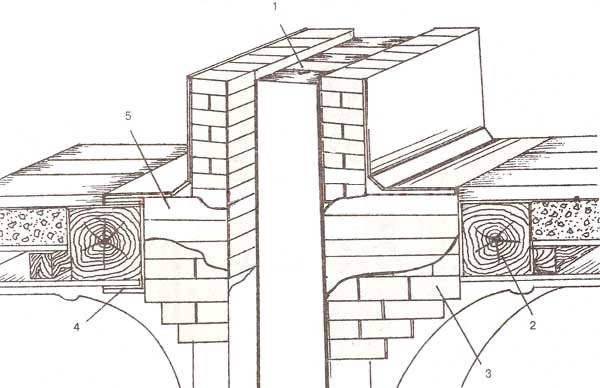
Rice. 1. Cutting the chimney passage in the interfloor overlap: 1 chimney; 2 wooden beam; 3 cutting with a thickness of one and a half bricks; 4 double layer of asbestos; 5 groove to the width of asbestos-insulated bricks.
Adjacent to a wooden wall.
Wall
- The wooden wall must be insulated from the chimney, the distance from the "smoke" to the tree must be at least 25 cm. If there is no asbestos insulation, then this distance must be at least 38 cm. This indentation can be closed with quarter-brick walls from the sides.
- In new log cabins, it is customary to install a boardboard attached to the wall on a sliding landing to compensate for the inevitable settlement of the log house. And the side covering wall must adjoin the quarter in this shield.
- Holes are made in the side walls for air circulation. Up and down.
- Recessed wooden floors are covered with one row of bricks, tiles or other non-combustible materials.
A very important question: how to get the chimney through the roof? A properly organized chimney passage through the roof is shown in Fig. 2.
- When planning to bring the pipe through the ceiling, you should make sure that the distance between the outer surface of the brick pipe and the wooden rafters is regulated at least 130 mm.
- This space is filled with stone (basalt) wool, made without organic binder.
- If the installation of the roof was carried out from flammable materials, for example roofing material, the distance should be doubled to 260 mm.
- In the place where it is planned to remove the chimney, the roof is covered with non-combustible materials, for example slate, or better with roofing steel, at a distance of at least 500 mm from the pipe and carefully fit the pipe to the otter.
Rice. 2.passage through the roof
Pipe height above the roof
The figure below shows a general diagram of the height of a pipe above a pitched roof.
The height of the chimney above the roof is taken as:
- not less than 500 mm when located near the ridge of a pitched roof or in the case of a flat roof;
- not less than 500 mm above the ridge of the roof with a distance of the pipe axis outlet less than 1500 mm from the parapet or ridge;
- not below the ridge of the roof when the chimney axis exits from 1500 to 3000 mm from the ridge;
-
not lower than an imaginary line drawn down from the ridge at an angle of 10 ° to the horizon, when the chimney axis extends more than 3000 mm from the ridge.
In conclusion - how to increase the efficiency of the furnace
A smart chimney can improve the efficiency of any potbelly stove. There are several ways to take away the heat of incandescent combustion products and reduce the heating of the pipe:
- the simplest is to organize the blowing of an open section of a single-wall pipe with a fan;
- turn the horizontal section of the flue into an inclined one and lay it along the entire room;
- weld an air heat exchanger, connect a turbine to it and install it on the chimney;
- make a samovar-type water heater and mount radiator heating.
The latter method allows you to solve the main problem of such furnaces - to arrange heating of the adjacent room
It is important here to ensure the constant movement of water through the heat exchanger using a circulation pump, otherwise the coolant may boil.
