Foundation
A stove made of bricks has a large specific gravity, therefore, the structure cannot be installed without a reliable foundation.
The foundation for the furnace can be monolithic reinforced concrete, pile, columnar, lined with blocks, pile-screw.

Block foundation diagram
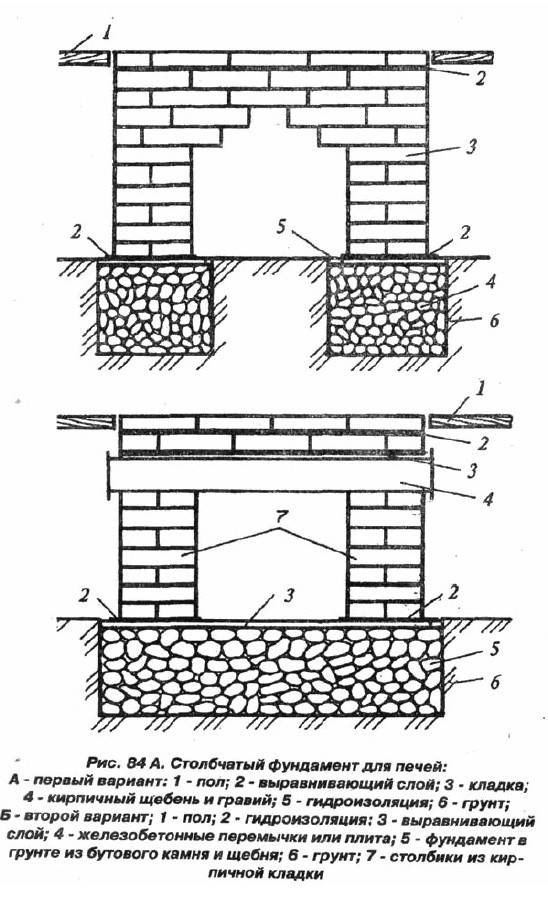
Columnar bases for ovens
Regardless of the type, the foundation of the stove should not be tied to the foundation of the house. The type of foundation is chosen, as for the house, starting from the type of soil.
Gravel-sandy soil allows you to equip a shallow foundation.
If the soil is clayey or sedimentary, it is better to fill the foundation on a crushed stone pad, while deepening it to the level of freezing.
In permafrost zones, a pile-screw foundation is equipped, with special attention paid to the thermal insulation of the piles.
On dry rocky soils, the foundation may have a minimum thickness or be absent altogether.
Filled soil is not suitable for installing a brick oven.
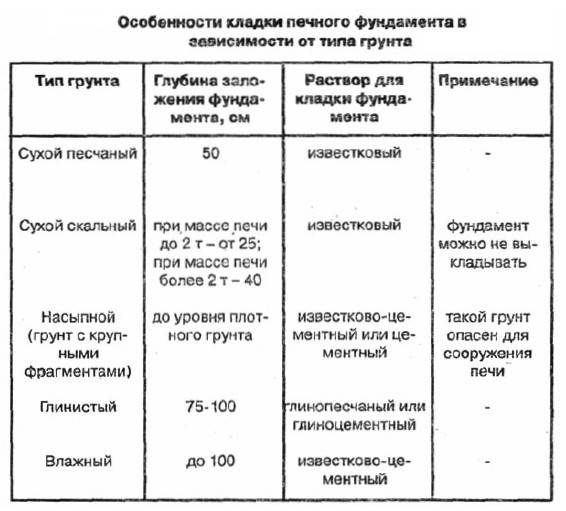
Features of foundations depending on the types of soil
Consider a method of arranging solid bases for a brick oven.
Step 1. Depending on the type of soil and the level of its freezing, we dig a pit. We take the width and shape based on the dimensions of the furnace and add 10-15 cm to its length and width, respectively
Immediately pay attention to the location of the ceiling beams - a chimney pipe will have to pass between them, and taking into account the indentation regulated by SNiP. It is also recommended to make a drainage (drainage) from the foundation of the furnace in order to reduce moisture and soil heaving.

Foundation pit
Step 2. We ram the bottom of the pit and align it horizontally as much as possible. We fill in a ten-centimeter layer of fine broken brick, rubble stone or rubble. We repeat the ramming procedure.
Step 3. Prepare a slurry (the ratio of cement and sand is 1 to 3) and fill the embankment with it.

Scheme of a monolithic foundation for a brick oven
Step 4. Then you can go in three ways:
- to combine ten-centimeter layers of crushed stone backfill with cement filling. This option is acceptable for bases of shallow depth, namely up to 50 cm;
- install the reinforcement cage and fill it with concrete. The frame is knitted with a wire made of reinforcement with a diameter of 10 mm. The size of the cells is 10x10 cm. A formwork is installed in the pit, the frame must be 5 cm away from its walls and bottom, for which plastic clamps or pieces of brick are used. Concrete is poured inside, the mixture is compacted during pouring with a deep vibrator or a metal bar. The upper pouring point should be 15 cm below the level of the finished floor;
- pour a reinforced concrete slab, on top of which lay out the walls of the foundation of silicate or red brick, and fill the inner part with concrete with backfill (the loose aggregate should be less than or equal to the volume of concrete).
The first and third versions of the bases are completed with a layer of cement mortar. The filled layer is checked with a level and, if necessary, leveled with a rule or other suitable tool.
Further work is carried out after complete drying of the solutions used in the process of pouring the foundation.
Step 5. We lay the waterproofing in three layers, fix it with mastic (for roofing we use tar, for roofing material - bituminous).
Step 6. Lay out a solid row of bricks. We put whole bricks at the edges, halves inside. The brick base should be 5-7 cm of the existing foundation, but 5-7 cm wider than the oven itself.

Bricklaying

Foundation for oven from bricks
We do not use cement to bond the bricks together. On top of the masonry, which we also check for horizontalness, we put another layer of waterproofing, then we lay out the second layer of brick, observing the dressing between the two rows. The brick base, ideally, should be exactly level with the finished floor or rise above it by 3-4 cm.
We fill the space between the foundation of the furnace and the house with river sand.
Installation of oven doors. Advice
Before installing the door, it should be checked for a good fit and free rotation on the hinges.
We do the installation of doors
- In the presence of distortions or lack of smoothness of rotation, such defects should be eliminated, and if this is not possible, then replaced with new ones. You should also determine if there are mounting holes available.
- For fastening, a soft (knitting) wire with a diameter of 2.5-3 mm and a length of about 50 cm is used. The wire is inserted into the hole and twisted.
- It is impossible to install the door after laying the masonry, therefore it is installed during the masonry process. In order for the door to hold well, the wire must sit in the seams, between the rows of bricks. Since the masonry lies from bottom to top, the door is fastened in the same order. First, the lower ends of the wire are walled up, and then the upper ends.
- After laying the lower fixing ends, the door must be set strictly vertically and horizontally with subsequent fixation. After the door is exposed, you can continue with further work.
- This installation technique can be used to fix the combustion chamber doors, blower doors and other metal objects such as valves, carbon black, etc.
- A very important stage is the installation of the stove. It is installed on a clay mortar. The consistency of the mortar should be such that the excess mortar freely comes out from under the stove, as a result of the pressure of its own weight. Its amount should be such that it fills all the free space. It must not be allowed to be small. In the future, under the influence of high temperature, the clay is sintered and will reliably hold the slab on the surface.
We do the installation of the stove
- After finishing the work, the stove must be allowed to dry completely. This is not less than 14 days, after which the stove can be heated.
- To make the stove attractive, it can be covered with tiles. This is where the quality of the masonry can come in handy, especially if it was done by hand. It will be easy to lay tiles on a very flat surface, especially since high requirements are also imposed on its laying due to the presence of high temperatures.
Brick heating stoves: we select the drawings depending on the chosen design. It is best to lay the working part with clay mortar. You have the instruction and, having chosen the desired model from the photo, you can get to work.
Masonry methods and order
We do the masonry
Stoves can be laid in various ways. This can be masonry with empty seams or undercut masonry.
Attention: These methods are fundamentally different. When laying in undercutting, the seams are completely filled, and such a stove is not plastered
The thickness of the walls of the furnace can be made in brick or half brick.
Only red solid bricks should be used for laying stoves. In this case, you cannot use bricks, used bricks, slot bricks or other building materials that are not intended for this.
Masonry technology consists of several stages:
We cover the foundation with a layer of waterproofing. It can be a simple roofing material. We make the basement part. Its height is determined individually. Just don't make it too high. It is made by continuous masonry without voids.
We lay out the stove base
- The first row can be lined with bricks, without the use of mortar. After that, the bricks are aligned and the location of the front wall and the location of all doors are determined. After that, the laying is continued, but using a solution. As a rule, ordinary clay mortar is used for laying stoves.
- You can then install vertical beacons using plumb lines and ropes or fishing line.
- Furnace elements such as a blower, ash pan or combustion chamber are located depending on the design of the furnace. As a rule, the blower is located after the third row of masonry, and one row after it - the ash pan.
- Then the firebox is laid out. Fastening of the door of the firebox and the blower is carried out with the help of soft wire.
- The next in turn is the stove vault, which is formed after the second row of bricks laid above the firebox.
We make the combustion chamber only from refractory bricks
The combustion chamber is laid out with refractory bricks. To increase the efficiency of the furnace, it must be equipped with various valves that regulate the flow of heated gases.
Technological order of masonry
The order of laying out the oven is as follows:
- The first row is laid out without mortar and leveled using a building level.
- Bricks are laid out at the corners with mortar and strictly horizontally. After that, the space is filled with bricks, using mortar. This will be the first row.
- After laying out the first row, the evenness of the sides of the oven is checked using a tape measure. If there is a gap, then they are corrected with a mallet, knocking out one or another corner brick.
- After that, you can start laying out the second row. Layout starts from the corners and continues along the entire perimeter. After the perimeter is laid, the middle of the second row is laid.
- Then, at the corners, between the first and second row, nails 80 mm long are hammered in and using a plumb line they project an angle to the ceiling.
In the place of the projection of the corner, a nail is hammered and the rope is pulled from the bottom to the ceiling. This operation is done with all angles.
- The stretched cords will serve as a guide for further work. Subsequent rows, relative to the vertical, will be controlled by stretched cords that define the contour of the future furnace.
- All subsequent rows are laid out in the same way, controlling the horizontality with the help of a building level. During masonry, you need to ensure that there is no excess solution, and the walls of the chimney should be wiped with a wet rag every 4-5 rows. In this case, you need to ensure that the solution in these places completely fills the seams.
- The brickwork for the oven is made as thin as possible and the joint is 100% filled. Masonry with thick seams is less durable, as they may partially fall out.
- The laying of the stove is carried out with the binding of bricks, otherwise it will not hold. The meaning of the dressing is that the vertical seam of the next row is somewhere in the middle of the brick of the previous row. It does not always come out and the vertical seam "walks" from the center of the brick to the left, then to the right. This should be constantly monitored and adjusted in such a way that the center of the vertical row does not go beyond ¼ of the brick.
- The cut brick lies outside the chimney, since the cut surface is considered weaker and can collapse under the influence of temperature.
Using fireclay bricks
Fireclay brick has excellent resistance to high temperatures and therefore it is used to form a combustion chamber.
- Due to the different coefficients of thermal expansion, the bricks of the combustion chamber are not tied up with the bricks of the furnace. There should be a gap of about 5 mm between them.
- When laying out a fireclay brick firebox, you can lay out a full row or, after laying out, lining the firebox with fireclay bricks.
Masonry of the Russian stove
Before work, it is important to study the projects of Russian stoves. There are different options, because the masonry pattern may differ.
The drawings cannot be changed - the specified order must be strictly observed.
For the safety of the structure, complete tightness is important. This is ensured by the following points:
- Use a quality stone. There should be no cracks.
- The seams in the aisles are 0.5-0.8 cm thick.
- Do not coat the inner walls with clay - soot will deposit on them, therefore the thermal conductivity will decrease.
- Different sections differ in masonry thickness from ¼ of the brick thickness to its full length.
- If the brick is ceramic, then soaking is required so that moisture does not take away from the solution.
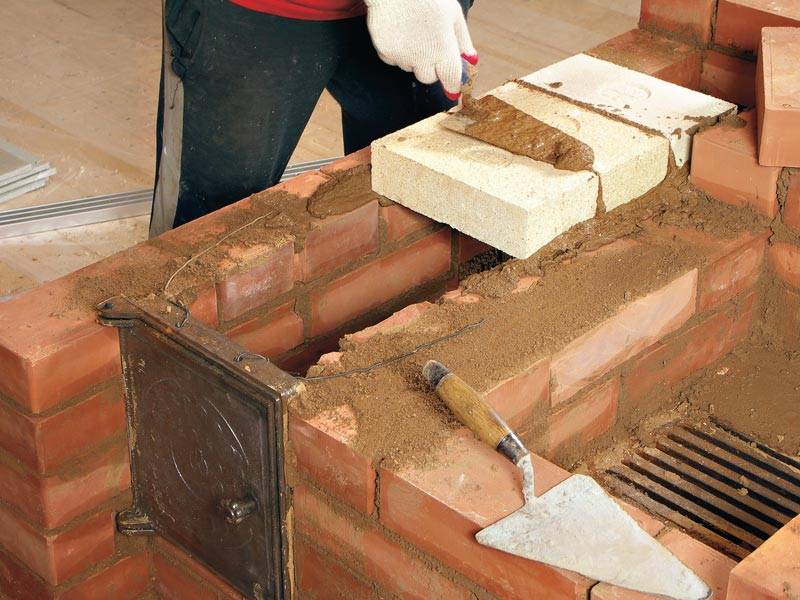
Scheme of the simplest brick oven for a summer residence and a house
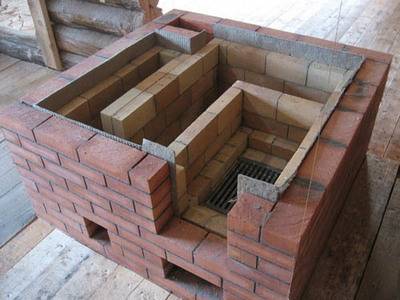
A stone heating stove in general looks like this:
- Below the floor level, a foundation is placed on which the insulation is laid.
- Trenches are installed on the floor - legs that provide heating of the lower part.
- Directly above them there is a blower and a strangler. It is needed for uniform heating in height.
- It is separated from the main room by a blower door.
- The firebox is located directly above it. At its bottom, a grate is laid, which is also the arch of the blower.
- Directly above the door of the firebox there is a firebox arch, behind which there is a hailo or a mouth.
- Above, cleaning, pass and convectors begin.
- There are two valves above the purge.
- Almost at the very top there is a strangler exit into the room, a smoke channel and a ceiling.
- The chimney is separated from the ceiling by an internal cut.
- At the very top is the chimney mouth.
Heating furnace schemes
Before choosing, you should familiarize yourself with the device options for each design.
Diagram of the heating furnace The device of the cooking furnace The device of the heating and cooking furnace
Immediately you need to think over the installation system. After all, each design has its own requirements. For heavy ones, a large foundation is required. For cooking, it will be possible to do with a small stovetop.
Preparatory work
First you need to decide on the place of construction of the future furnace. The first time the stove is erected when housing is being built, which means that shape and size the oven has already been identified, as has its location.
Photo of the foundation diagram for the furnace
- The location of the stove largely depends on the layout of the entire building, and its location should be such that it effectively heats the entire living space.
- If the place is determined, you can start building the foundation. Its dimensions should be somewhat larger than the geometric dimensions of the furnace. When building it, you need to put waterproofing.
- When laying, it should be remembered that the seams should be minimal, and the evenness should be maximal.
- When laying out the inner surfaces of the chimneys, there should be no overflow of mortar, and the surfaces should be flat. It is advisable to remove the excess solution that stands out from the seams. Both the side surfaces and the corners must be carefully laid out.
Attention: The foundation must support the weight of the structure. Therefore, it will need to be reinforced.This will give additional rigidity.
Stove masonry mortar
The fineness and elasticity of the composition, the absence of cracks after drying are important. You can use a ready-made mixture from the store or make it yourself. This requires refined clay. It must be soaked in water, after a day, knead with sand - first, several variations of the solution are made for the sample, changing the proportions. Cakes are formed from each, 1 cm thick. After 2-3 days, they are examined - where there are fewer cracks, the composition is better.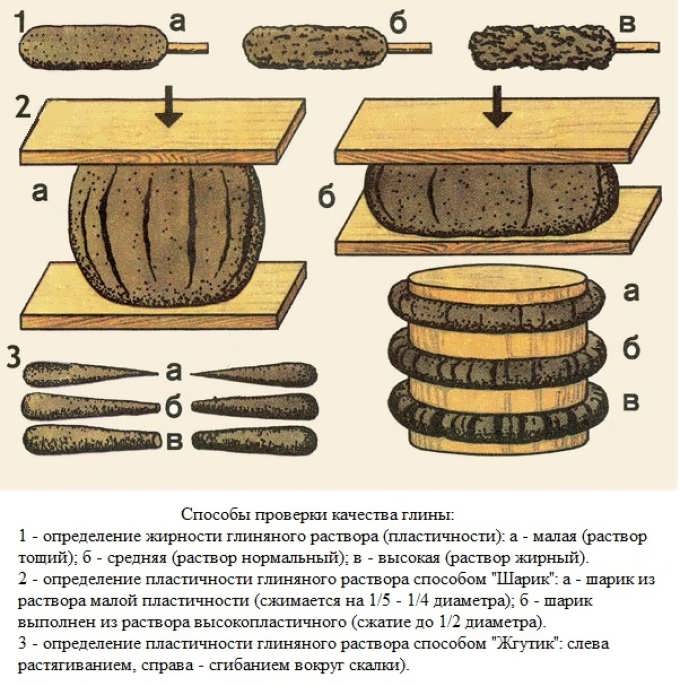
For homogeneity of clay, after soaking, it is rubbed through a mesh with cells of 0.5 cm. When preparing a solution for a furnace, it is better to replace ordinary sand with chamotte powder. Mix it with clay 1: 3 (4).
Schemes of brick mini-ovens
Small stoves occupy a small area, the sizes of their bases range from 50 to 70 centimeters in width and up to 65-100 cm in length. The height of the heating structure is from 1.5 to 2.3 meters. A cooking deck, an oven, and a hot water tank are built into the oven.Stove-makers have also developed appliances intended only for heating the house.
Small heating structure

This is the simplest heating facility. Let's analyze the model in the following sizes:
- base width - 51 cm;
- base length (depth) - 89 cm;
- height - 238 cm.
A mini-stove is installed in the middle of the kitchen or against the wall. The optimal heating area is 20-35 meters. Interior partitions are erected around the stove, which allows heating both the kitchen and the adjacent room.
Inside the device are:
- combustion chamber;
- blew;
- smoke channels leading to the chimney.
The furnace door of the mini-stove (cast iron or glass) is selected depending on the aesthetic preferences of the owners of the house. The heat-resistant glass door, through which you can see the firewood burning, gives the structure a similarity to a fireplace. Two smoke dampers are installed in the middle and upper parts of the furnace. There is one door for cleaning the channels. To build this model of the device you will need:
- 260 pieces of ceramic bricks;
- 130 pieces of fireclay bricks;
- grate (40x23 cm);
- furnace (30x20 cm) and blower (20x14 cm) doors;
- 2 doors for cleaning holes (20x40 cm);
- metal pre-furnace sheet (50x70 cm);
- two sheets of roofing material 60x100 mm in size;
- sand and clay (or ready-made clay-sand mixture for masonry), clay-chamotte mixture.
Reference. The masonry mortar increases the volume of the device by the thickness of the seams.
The base and upper part of the mini-oven is laid out with ceramic bricks and clay-sand mortar. The firebox is placed from fireclay bricks on a clay-fireclay mixture.
On the long side of the base, three and a half bricks fit, on the short side - 2 standard bricks 25 cm long. The masonry is 35 rows high.
Small heating and cooking stove

This is a mini modelstoves for heating and cooking - a convenient and very compact structure. The optimal area of a heated room at subzero temperatures is 20-25 square meters.
The device has the following dimensions:
- base length (depth) - 64 cm;
- base width - 51 cm;
- height - 215 cm.
The structure is being erected in the kitchen. The device includes:
- blew;
- combustion chamber;
- smoke channels leading to the chimney;
- cooking floor;
- niche for the oven.
The cast iron cooking deck has a hole that closes with a disc and a circle. There are also solid decking on sale. A metal oven or a hot water tank with a tap is placed in the niche for the oven. If a niche is left free, it serves to dry things. To build a stove you will need:
- 222 pieces of ceramic bricks;
- grate (40x25 cm);
- firebox door (20x20 cm);
- blower door (14x14 cm);
- cooking floor (35x38 cm);
- metal oven or hot water tank;
- iron pre-furnace sheet (50x70 cm);
- two doors for cleaning holes (20x14 cm);
- two valves;
- a piece of flat slate;
- steel corner;
- clay, sand or ready-made clay-sand mixture for masonry.
Operation of the device
After the structure is laid out, it is dried. In summer it will take 2 weeks. If the laying was carried out in the autumn-winter period, they begin to heat the stove with small chips for 30 minutes, once or twice a day. For additional ventilation, all cleaning doors and valves are opened (if it is raining, they do not open).
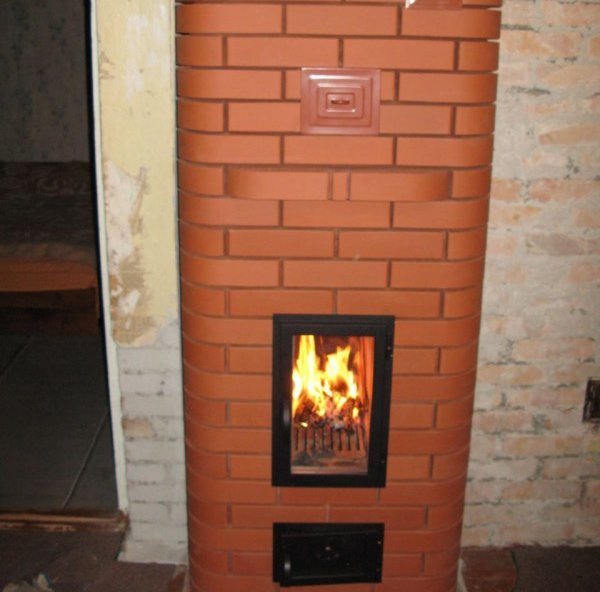
Photo 2. Finished furnace 3 by 3 bricks. The device is installed near a wall and has a very compact size.
When wet spots disappear from the surface, and condensation ceases to fall on the metal elements, the structure has dried out. After that, a control firebox is carried out - for several hours the stove is heated in full force at maximum draft. If there are no cracks in the masonry in the area of the firebox (small cobweb cracks are permissible), then the stove is ready for use.
Attention! You cannot immediately heat the stove strongly - this will cause cracking of the masonry and disable the structure even before the start of operation. As a result, the entire construction stage will take 1 month on average:
As a result, the entire construction stage will take 1 month on average:
- foundation preparation - 10 days;
- the laying of the stove and chimney - 1-2 days;
- drying of the structure - 14-21 days, depending on the season.
After this period, if no shortcomings have been identified, you can begin to heat the stove at full strength.
Features of the order of brick ovens
Stoves often serve as interior decoration, so they are faced with clinker, tiles, tiles. The diagonals in the first row are carefully measured, and a plumb line is suspended in the center of the chimney, which is removed on the last rows of the chimney. Also, the diagonals are controlled every 4 rows, and on each row a cord is pulled during laying, which is checked by the rule. Instead of a cement-sand mortar, it is recommended to use clay, regardless of the type of kiln under construction. Ready-made dry mortars significantly save time spent on clay preparation. To prevent the composition from drying out quickly, the brick must be moistened with water before laying.
Operating costs will be less if there are no rectangular ledges inside the structure. For this purpose, when creating an overlap (ledge), the stone is tried on without mortar, the overlap line is outlined, and the excess material is cut off with a grinder. Internal seams during laying are regularly checked and excess mortar is removed from time to time. The pipe is cleaned after completion of work.
Brick ovens are laid out from several materials:
- external cladding;
- masonry bricks (basic structure);
- chamotte - places that are exposed to strong heating are laid out with refractory material (firebox, under);
- bricks with high density edges - are located inside the furnace.
Clay brick cannot be mixed with fireclay, and ovens, hobs, rods and grates of grates, water tanks are not embedded in the masonry - this is due to different coefficients of expansion during heating. If the metal elements are rigidly embedded in the masonry, then the structure will soon collapse.
"Buslaevskaya" furnace: projects
The design has a built-in hood. The oven is small in size. It is ideal for any private home, as it allows you not only to heat the premises, but also to prepare food. Despite its compact size, the stove heats spacious rooms well, so there are ready-made house designs with a stove.
Special schemes for laying brick ovens will help you do the job without complicated calculations.
For styling, you will need the following materials:
- doors - furnaces (0.2x0.25 meters), VK (0.39x0.5 meters), blower (0.14x0.14 meters);
- refractory - 43 pieces;
- solid brick - 382 pieces;
- oven cabinet 28x33x50 centimeters;
- cast iron plate 0.7x0.4 meters with burners (removable rings of different diameters);
- valves - steam exhaust (12x13 centimeters) and smoke (12x25 centimeters);
- grate - grate 30x20 centimeters;
- corner - three blanks of equal-flange rolled stock 1 meter long and 45x45 mm in size;
- steel - a piece of 0.3x0.28 meters;
- strip - 4 pieces of meter (4-millimeter paper), 0.25 meters (2-millimeter paper), 0.35 meters (3-millimeter paper);
- cast iron plate - 0.4 x 0.25 meters; 40x15 centimeters.
Projects of brick ovens of this type are as follows:
- Complete row.
- The blower door.
- Window opening for cleaning.
- The bottom of the oven is laid out of refractory, three sides are covered with iron.
- Installation of a furnace door, grate, under the firebox - refractory, cleaning overlap, blower doors.
- Installing LH.
- Laying the refractory on the rib around the DS.
- Laying according to the scheme.
- The upper clay coating of the oven (1 centimeter) is performed, the diesel fuel is overlapped, a plate with burners is attached.
- Installation of smoke circulation with cleaning windows, the stove is not laid. In the future, the brick is placed on the edge.
- The cleaning is overlapped, channels are created, 25 cm strips are laid.
- The cleaning is finished, the fixing wire is embedded.
- The cap is laid.
- Installation of the VK overlap, while the hoods remain.
- Stoves are laid out according to the scheme.
- The small stove ends with sheet iron, the masonry is made in the order of the brick stove.
- The clean hole of the large stove is laid out, the edges of the side walls of the channels are constrained.
- Laying of ledges.
- The protrusions are duplicated and the corner is installed.
- The BP chimney overlaps in the same way as row 19.
- A three-row neck is made, the chimney size is reduced to a section of 26x13 centimeters for the upper valve.
- A chimney with grooves is created on this and subsequent rows.
The dimensions of the structure increase when using clinker facing bricks, therefore it is not recommended to use them instead of solid material. When finishing with tiles, durability is ensured (the material serves for tens of years), in addition, it can be dismantled for facing other heating structures.
The popularity of brick ovens
Unlike many heating methods, a brick stove tends to maintain optimal air humidity in the room. It's all about the porous structure of the brick, which, when heated, emits moisture vapor, and when it cools down, it takes it back.
Therefore, in houses with brick stoves, optimal humidity is maintained, which means that such a stove can be safely called environmentally friendly. Needless to say, bricks, clay and other materials of the stove are natural materials that are safe for health.
Thanks to the breathable structure, in a house with stove heating, you can feel comfortable already at 18-19 degrees, while with others types of heating devices 20-22. These are significant savings, but not all. The stove is inherently omnivorous and can work on anything that can burn - coal, wood, pellets, etc.
Some types of stoves, such as Kuznetsov's brick stoves, made according to the bell type, give such efficiency indicators (80–95%) that they can compete with the most economical Buleryans.
House layout
Initially, the plan of the house should take into account the stove - you can come up with many interesting masonry for different types of brick structures. What else should be considered when planning a house:
- For a stove with 500 or more bricks, with your own chimney, you need to lay an independent foundation, which should not be connected to the main foundation of the house - to have a certain distance from it.
- Some stoves, such as a low, large-width hob with a heating plate capable of withstanding 250 kg / sq. m (according to SNiP requirements) can be installed without a foundation. It is only necessary to provide thermal insulation and strengthen the flooring with additional joists.
- Ceiling beams should not touch the chimney, and the chimney should be half a meter or more higher than the roof ridge, and the distance between them should not be less than one and a half meters.
As a matter of fact, almost all stoves require from 1,000 to 1,500 bricks, so you need to rely on a separate foundation. There may be some exceptions to the foundation plan in the case of sectional strip foundations of the main building.
It is allowed to find a place in the plan of such a house and lay the foundation of the furnace at the intersection of the belts - under the inner walls. But before other fragments of the main foundation there should be no less than 1.2 m.
