Subtleties of pouring a tape-type foundation
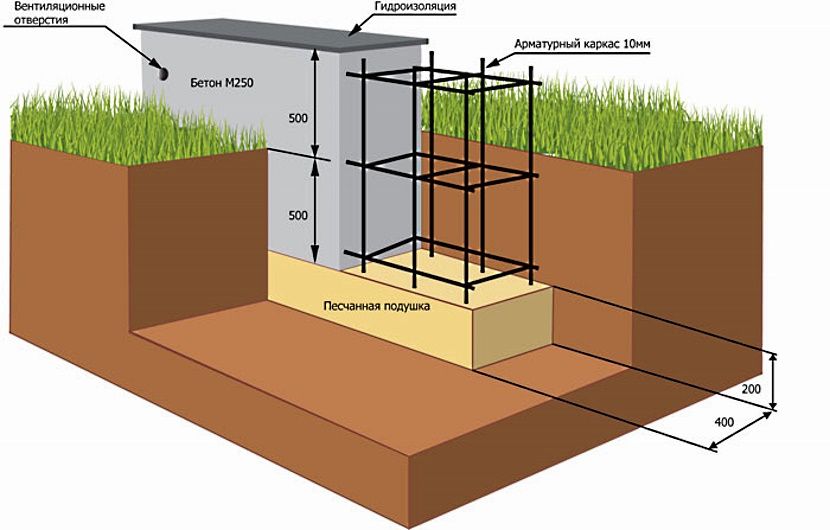
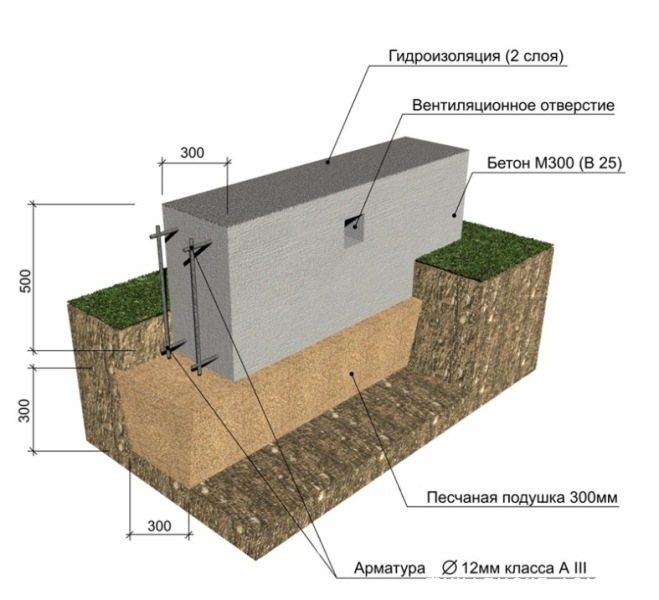
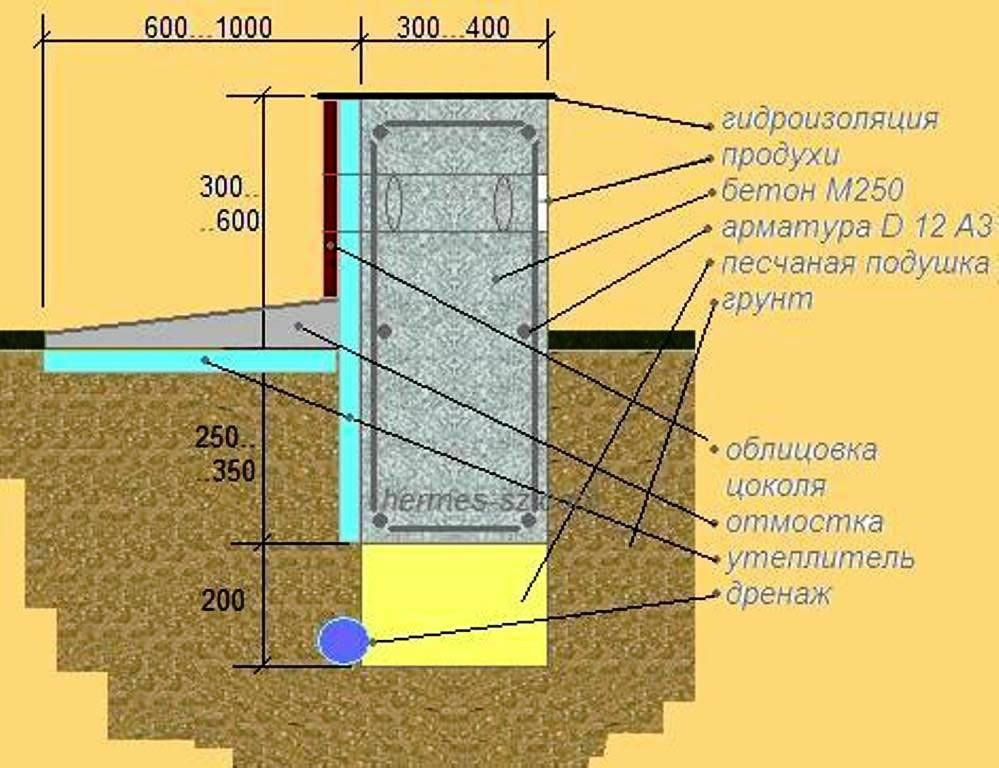
Pouring the strip foundation with your own hands requires strict adherence to the technologies recommended by professionals. If the foundation is being erected for residential housing construction, you need to treat following the standard rules with special care. Not only well-chosen parameters of filling, backfilling and concrete grades are important. The choice of fittings and their correct installation are also very important. For example, in housing construction, reinforcement for the strip foundation is laid after filling and tied in the form of a lattice, which is a long and transverse rods of short length. Then, vertical reinforcement, specially designed for strip foundations, is driven into the bedding itself. During the construction of this type of base, a second lattice is knitted on top of the vertical one, similar to the first one made after backfilling. In this case, the formation of large squares and cells from reinforcement is quite acceptable.
The technology of pouring the strip foundation is easy to understand, but it requires observance of all the nuances. Fulfillment of the requirements, building codes and regulations, makes it possible to build on our own the very foundation for the building, which will become a reliable support for any cottage, house or bathhouse.
In the event that heaving soil is found on a building site or the level of soil freezing in winter is very deep, independent construction of a strip foundation can be very costly. This is due to the fact that all work on excavation, trench reinforcement and concrete pouring will increase in volume several times. In the presence of this kind of specificity, it is advisable to give preference to other types of foundation. In all other cases, it will not be difficult to fill the strip foundation on your own. This option is more economical from a financial point of view than choosing a different type of foundation.
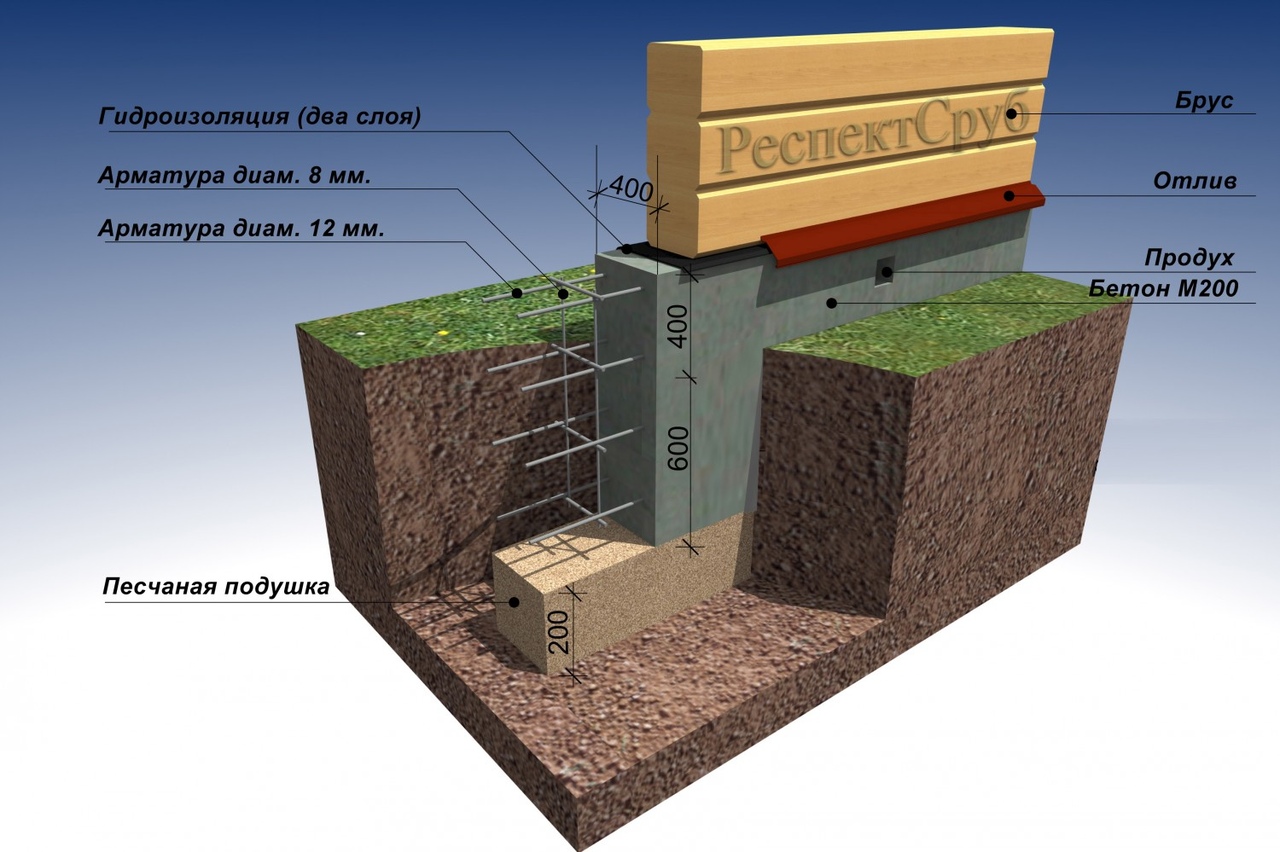
The formwork for this type of base for a building for wooden houses should be at least 40 cm, and when building a house made of bricks - 50 cm. The width of the formwork will be the thickness of the walls of the house in the future. Having broken the axles in accordance with a previously prepared plan, for example, using a theodolite or an ordinary cord and pegs, you can start preparing a trench, which, in the absence of special equipment, can be dug with an ordinary shovel.
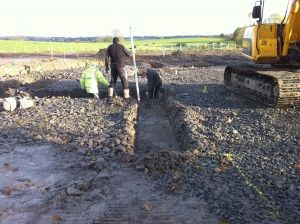
Main steps
The quality of the base made for the structure will determine its strength, reliability and durability.
Therefore, it is very important to follow the sequence of work and adherence to the rules for pouring the foundation.
Preparation and markup
 The correct filling of the base begins with the preparation and marking of the site. It needs to be cleaned of debris, large roots and stones.
Then make the markup based on the project. For this, it is recommended to use small wooden stakes and twine.
For square or rectangular foundations, special attention should be paid to checking the linear dimensions along the diagonal. The length of the diagonals must be equal
Digging trenches
You can dig a trench manually or with an excavator. In the latter case, the work will be carried out faster and cheaper.
However, the edges of the trench will be ragged, requiring more concrete to be poured.
Formwork
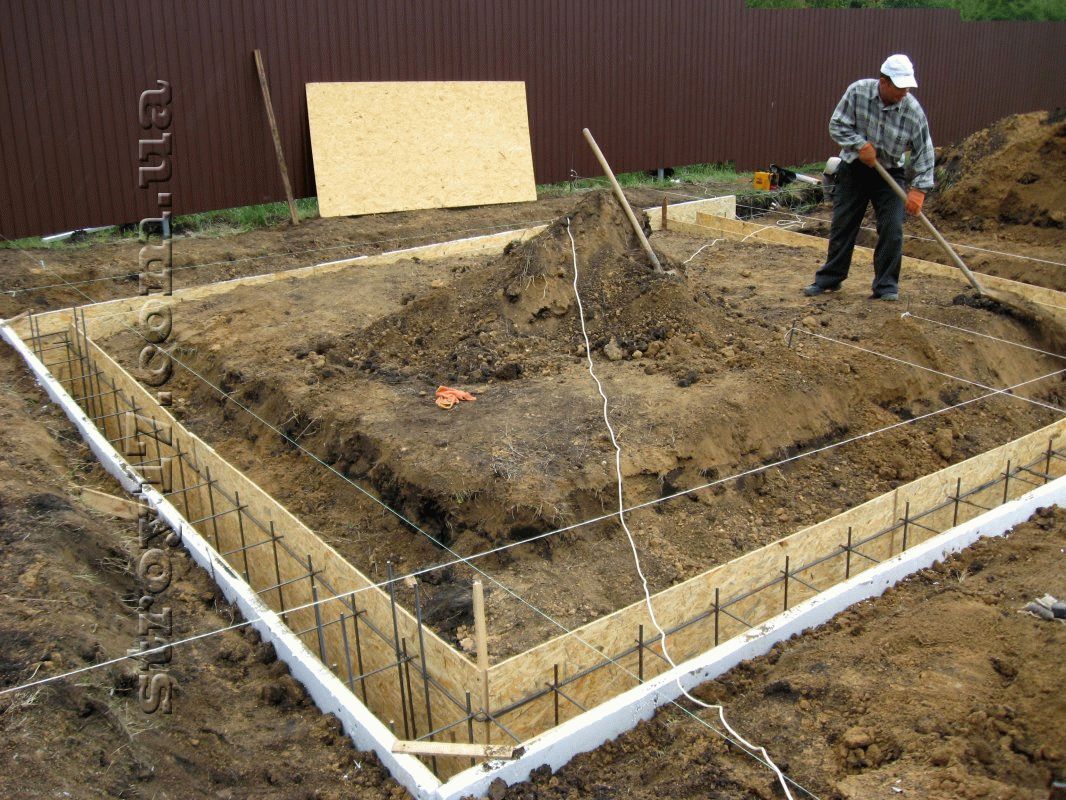
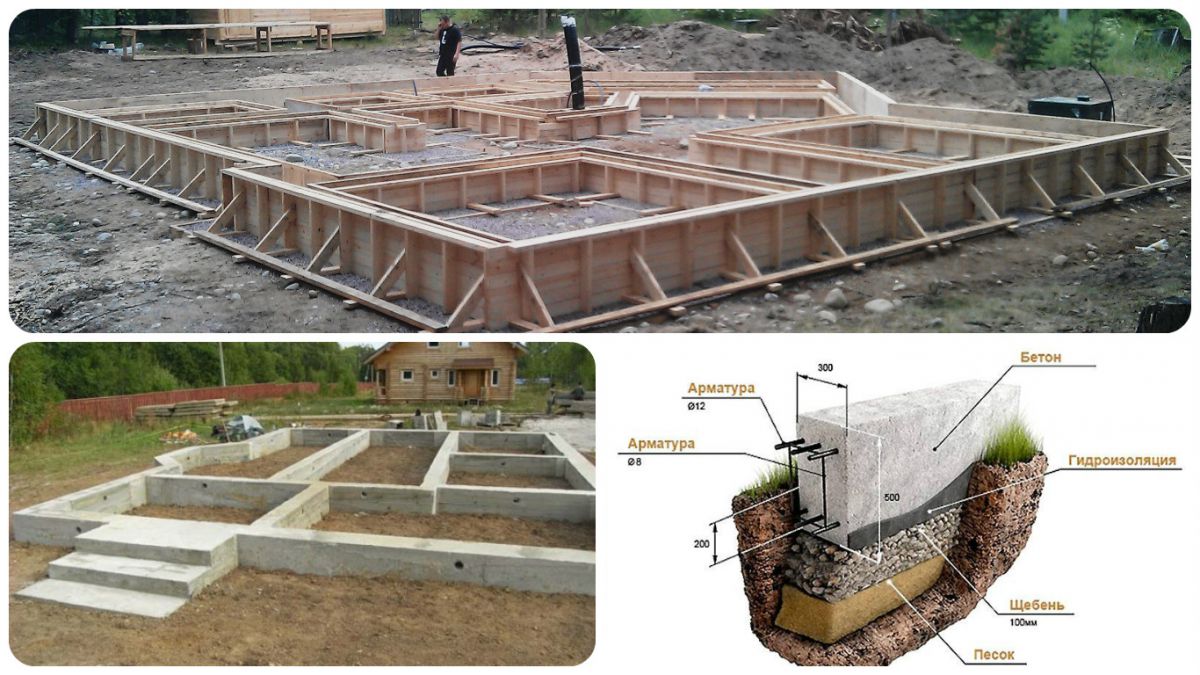
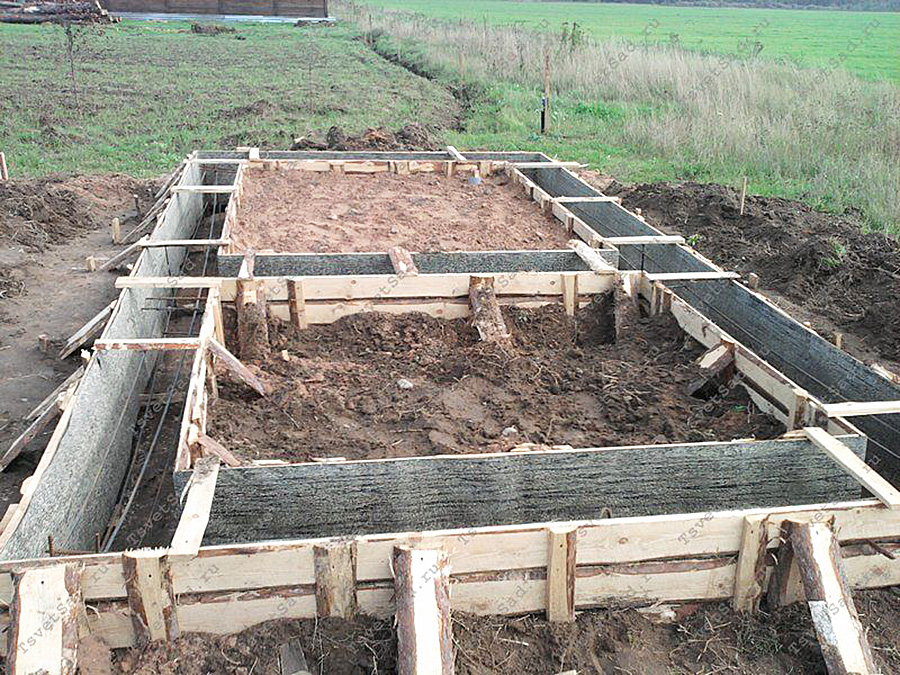
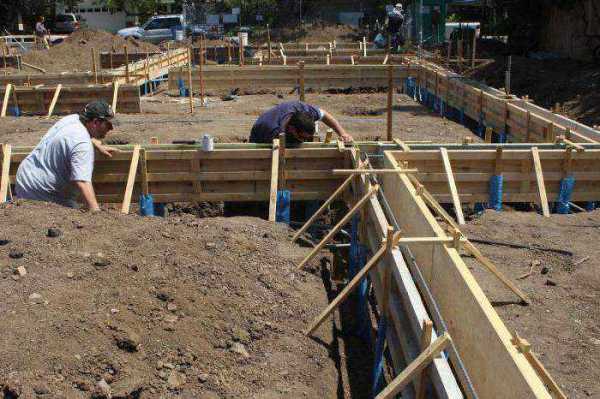
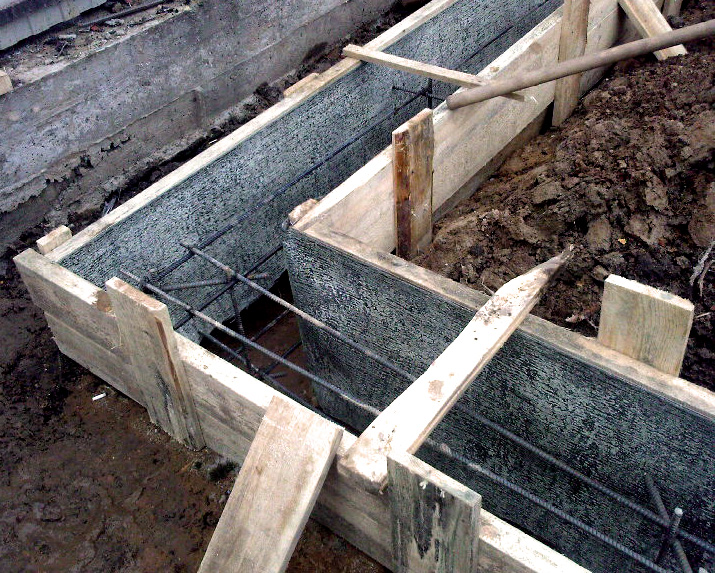
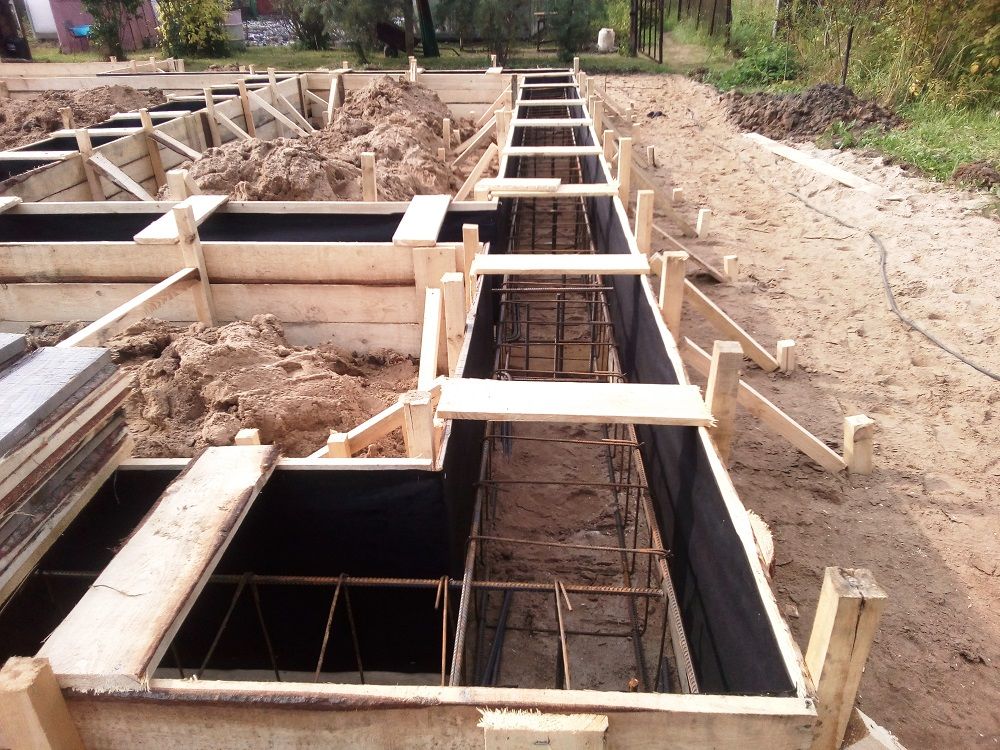
This stage consists in the installation of the formwork. The installation should be carried out according to the previously made markings. Formwork is needed to hold the concrete in the desired shape during its hardening. And for a foundation buried in the ground, the formwork continues the width of the trench in the ground in order to bring the foundation to the required height above the ground.
Concrete is composed of heavy components, so its mass is large. To keep the concrete in shape and to make a solid cast foundation, the formwork must be loosened.
It is recommended to use a wire tie for this. To add strength to the structure, you can put additional stops from the rack to the ground.
Installation of fittings
However, the concrete base can crack and break under fracture loading. This is why steel reinforcement is used, which is embedded in concrete to create a solid monolithic structure.
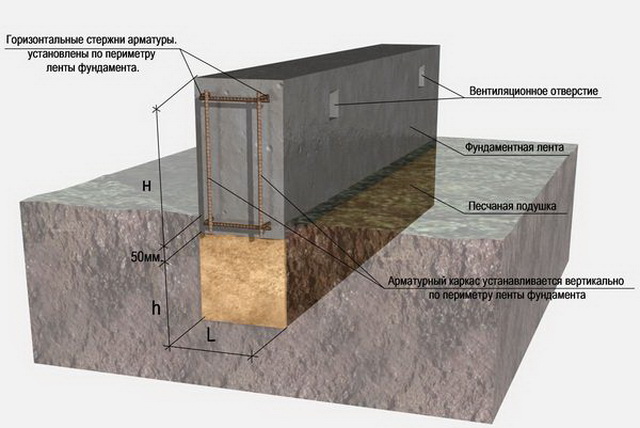
For a rectangular base, it is recommended to use four longitudinal reinforcement threads, which should be fastened together with a thick wire. The resulting frame should not change its position when pouring concrete.
Fill
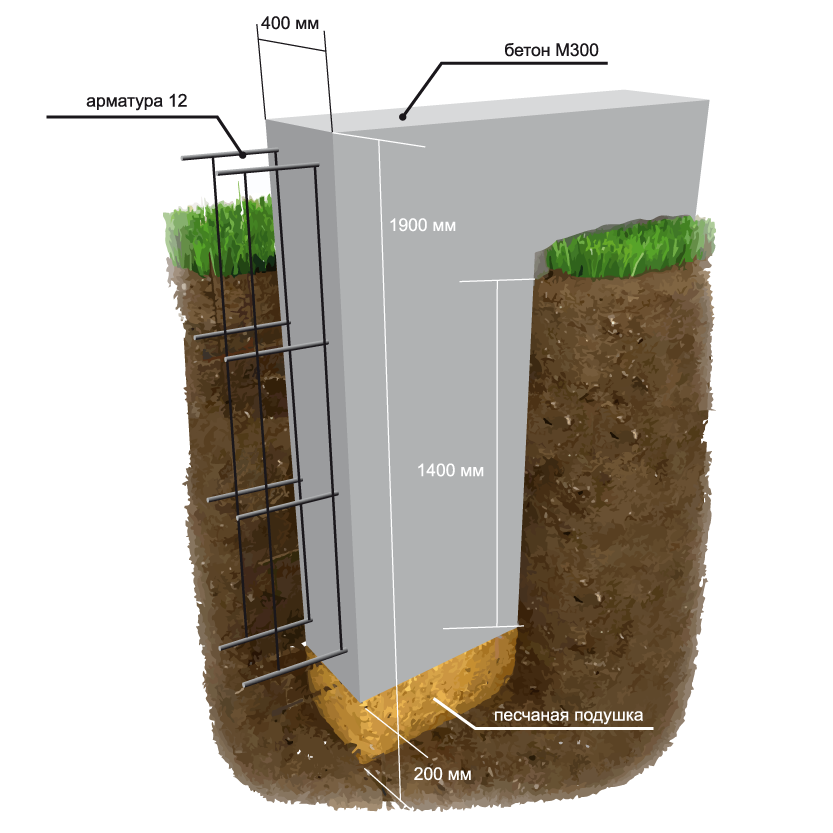
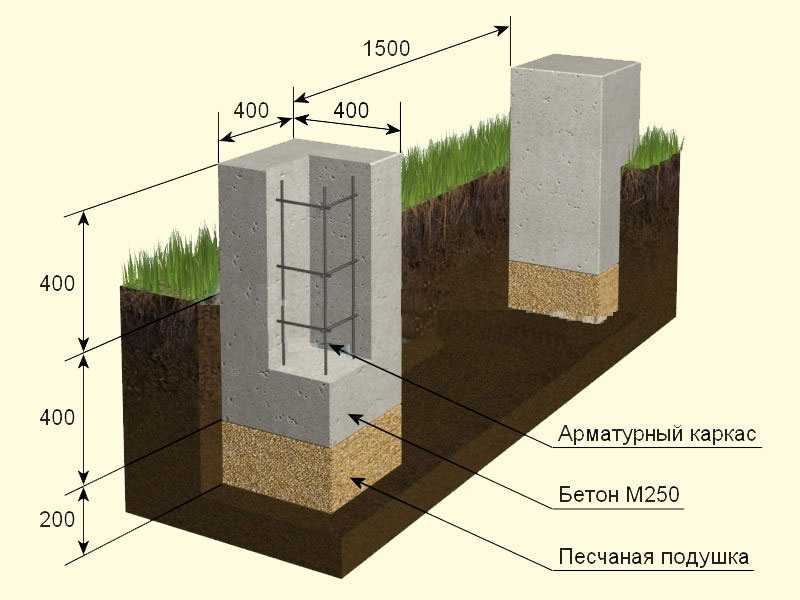
Before pouring the foundation under the house, it is necessary to pour sand at the bottom of the trench so that the concrete does not mix with the ground. There are two ways to pour the foundation.
The first is the order of ready-made concrete, which will be delivered by concrete trucks and poured into the prepared structures.
This method is recommended if the base is large and requires a significant amount of mortar. The second way is to make concrete yourself. This method is recommended for low solution requirements.
Regardless of the type of concrete, it is not recommended to pour the foundation in several stages. In addition, to remove air bubbles, the liquid mass should be compacted using the vibration method. Pouring the foundation in two stages, when the first part has already frozen, and the second has just been poured, can lead to the formation of seam joints, and they are the cause of cracks and breakdown of the base.
After the foundation is level and solidified, the formwork can be removed. Such a base will gain maximum strength only after three weeks. For the first 4 - 5 days, it is recommended to water the foundation with water to improve the crystallization process. The next stage of construction is the construction of the structure itself, so the base should harden well by this time.
Care
In order for the concrete to harden well and not crack, it must be covered with a film or other waterproof material. This is to protect the concrete from precipitation and also from drying out. In hot weather, it should be watered with water after pouring several times a day.
Otherwise, the foundation may dry out after pouring and its cracking, which will lead to the need for expensive repairs and even dismantling part of the base. Until the base has completely hardened, it should not be subjected to loads. Further construction work can be carried out only 3 - 4 weeks after the foundation is poured.
Waterproofing strip foundation
Waterproofing is a very difficult and responsible process. Its essence is in the maximum protection of the base from moisture penetration; for this, various materials are used. Waterproofing is divided into two types: horizontal and vertical. The first method is associated with the use of roll materials (primarily roofing material), and the second is directed against the effects of external moisture and is divided into anti-pressure and non-pressure.
Anti-pressure waterproofing is carried out using paints, plaster and various lubricating mixtures, which are applied to the insulated surface. Fluffy lime and bitumen mastic often act as insulation, which are applied to the entire surface of the foundation, and covered with a sheet of roofing material on top.
Non-pressure waterproofing is significantly different in appearance. To do this, a trench with a depth of 20-30 cm is dug along the entire perimeter of the foundation. This trench is then clogged with plastic clay, covered with sand, and all this is compacted. After that, the surface is cemented and a storm gutter is installed.
Let's start laying concrete
Scheme for the preparation of concrete solution.
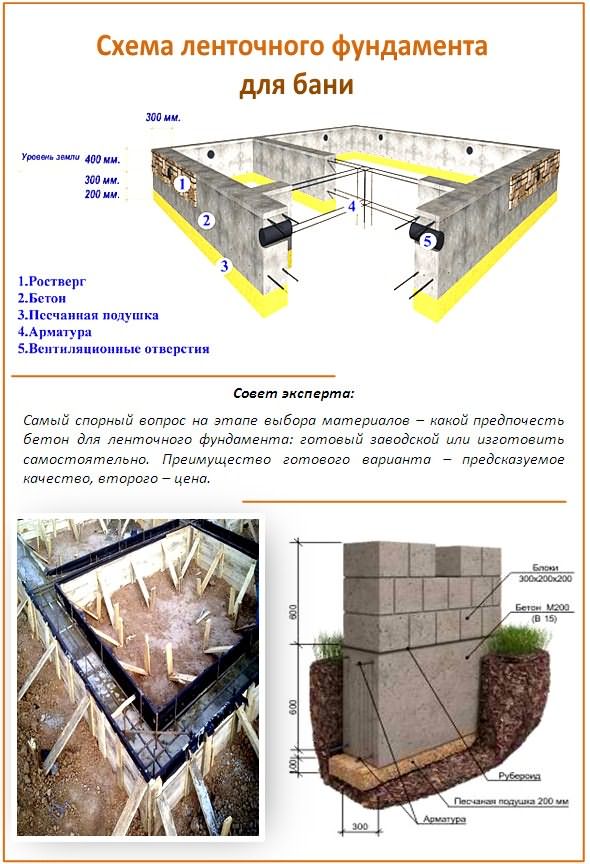
Before proceeding with the laying of concrete, it is necessary to make a protective screed. This is a thin layer of concrete, which is used to cover the trench; subsequently, a reinforcing "skeleton" will be installed. This step will significantly increase the service life of the strip foundation and protect it from deformation. The screed solution is made of concrete of the M200 or M300 brand, mixing it with sand in a ratio of 1: 4.
The next step is this. A metal mesh must be laid in front of it. The consistency of the concrete should be thick, and after pouring, the concrete is poured with water, achieving maximum impregnation of the entire structure. After that, the concrete should be allowed to dry for about two days, after which it should be covered with plastic wrap and left alone for a month.
In winter and in the rain
You should also consider when it is best to fill the foundation so that it turns out to be strong and durable. For example, the answer to the question whether it is possible to fill the foundation in winter is a categorical "no". If there is no other way out, and the work should be carried out in the winter season, then until the end of the pouring process, you will have to work around the clock. In this case, you need to fill in a segment that is small in length and height, and then immediately fill it with a new layer to avoid freezing. And so on until the structure is completely filled. If a helium shell has formed on the surface of the concrete, it must be chipped off even before the foundation is leveled.
It is necessary to adhere to the rules not only on how to properly fill the foundation in winter, but also how to prepare the object for filling. The pit or trench must be cleared of snow, and ice must be removed from the reinforcement. Then put a sand pillow and cover it with straw to protect it from snow and ice. An important step is heating the bottom between the walls of the formwork. It is forbidden to pour the solution onto the frozen ground. Needless to say, pouring a base in winter is not only difficult and expensive, but can also lead to subsidence and cracking of the base.
The optimal weather for pouring the base is high humidity and a temperature of 18 -20 degrees. Such weather conditions are optimal for fast and high-quality curing of the base. Therefore, pouring the foundation in rain or wet weather will not affect the strength of the structure in any way, and the process of setting the structure will occur faster and better. However, in this case we are talking about small precipitation.
But moisture oversaturation of concrete in the formwork can lead to the destruction of the base. Therefore, you can pour the foundation into the rains, it depends on their intensity. In addition, the temperature at which the foundation should dry should not be negative. If the water did not have time to react to hydrate the cement before the appearance of low temperatures, this can negatively affect the strength of the finished base.
Strip foundation
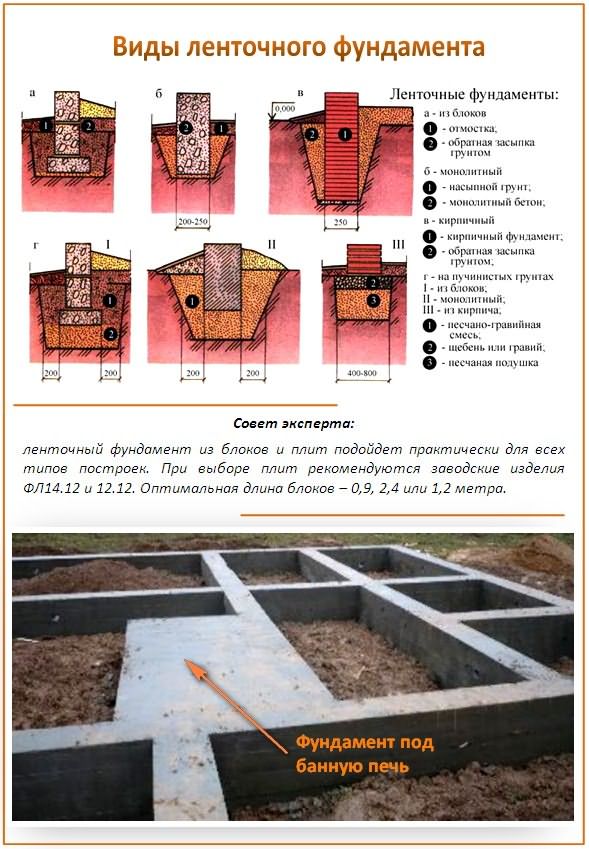
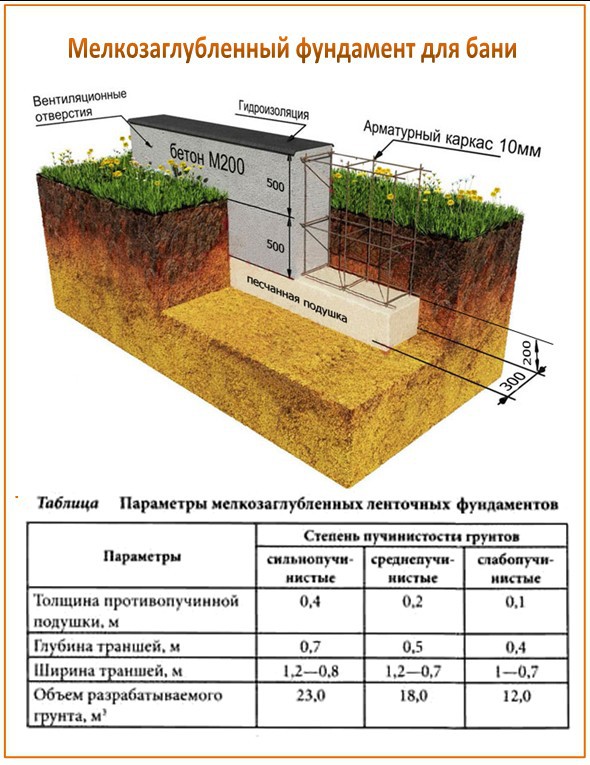
There are two types of foundations: shallow and deep.
Shallow strip monolithic foundation
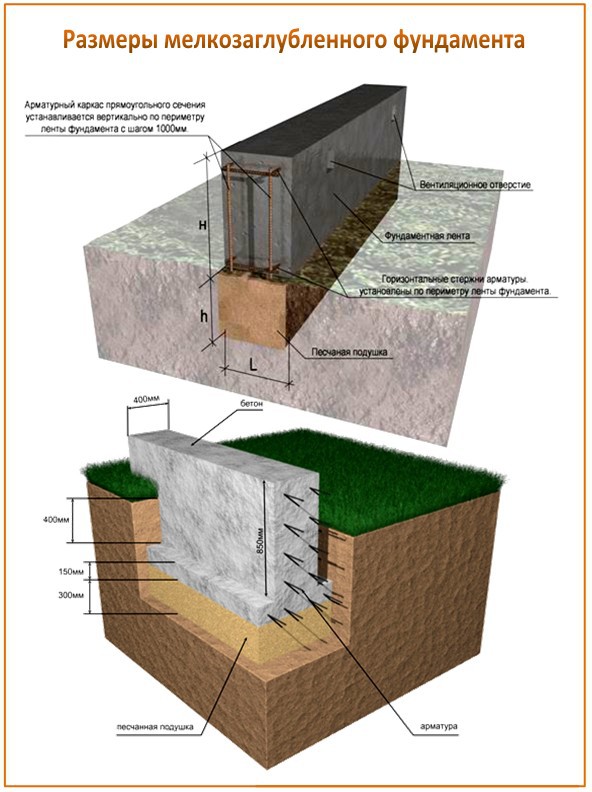
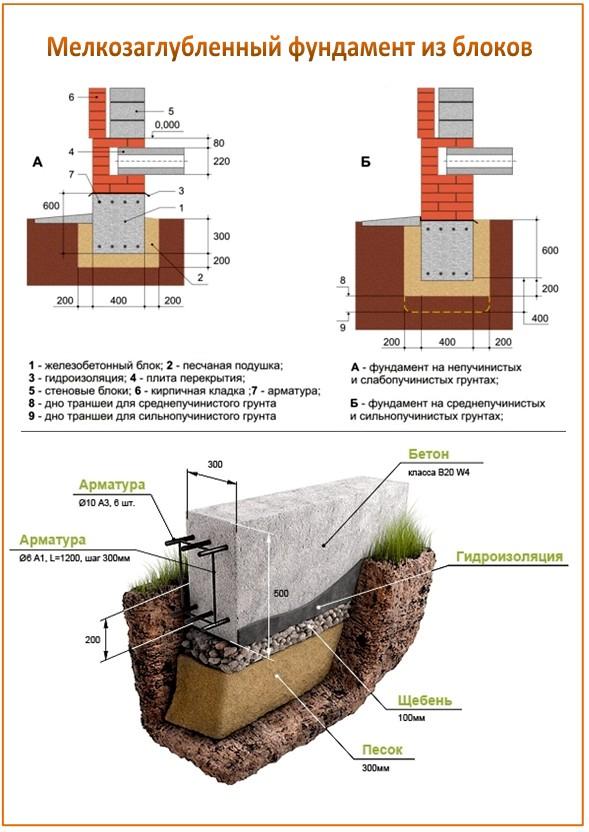
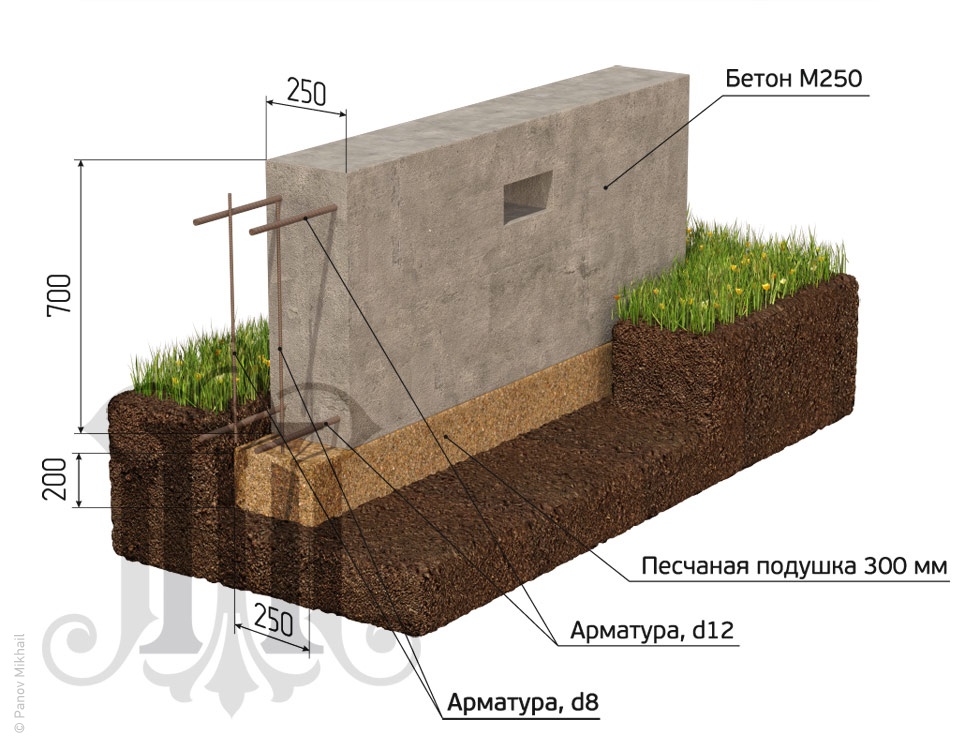
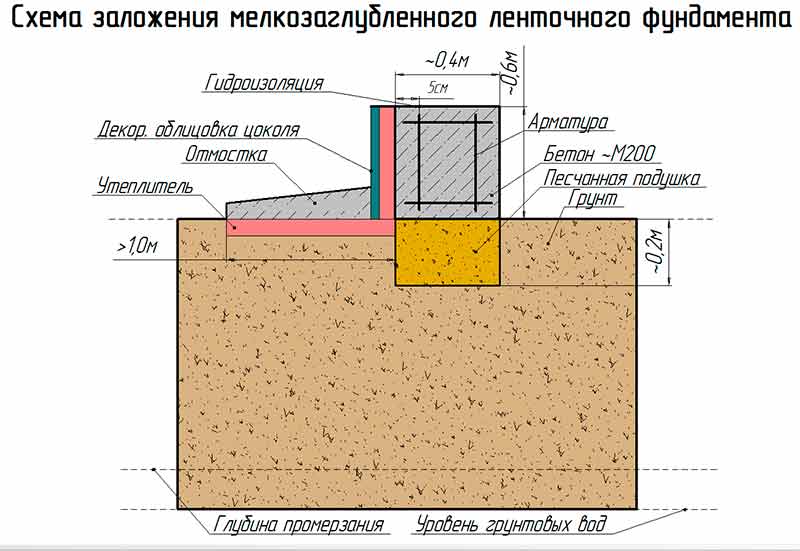
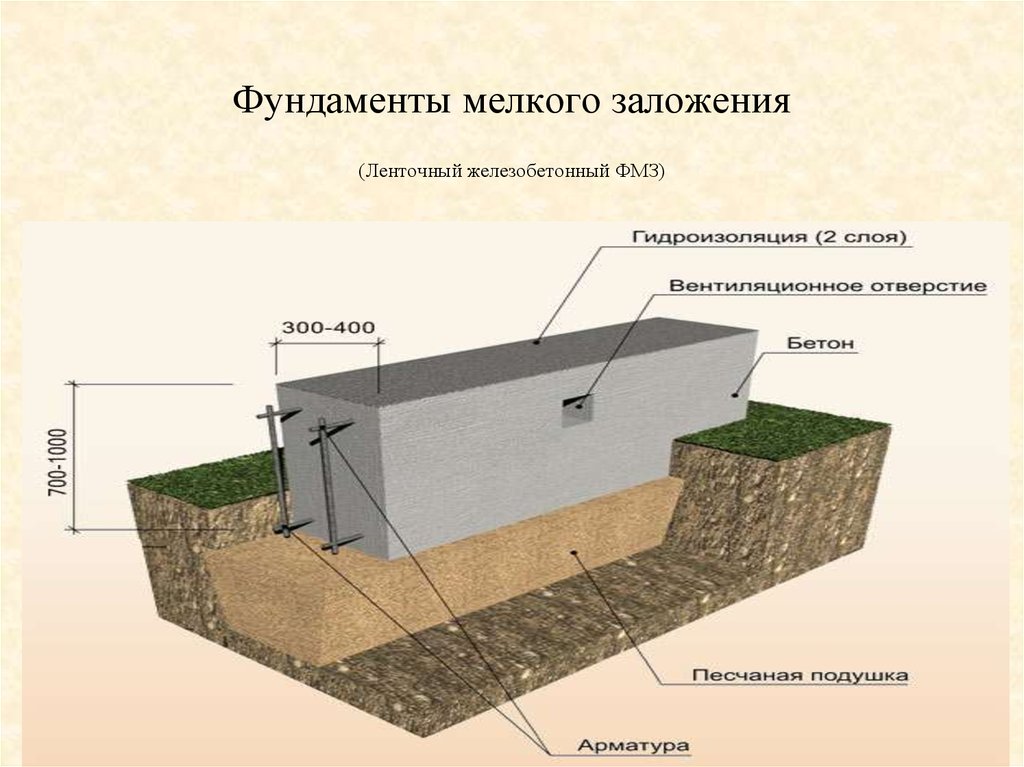
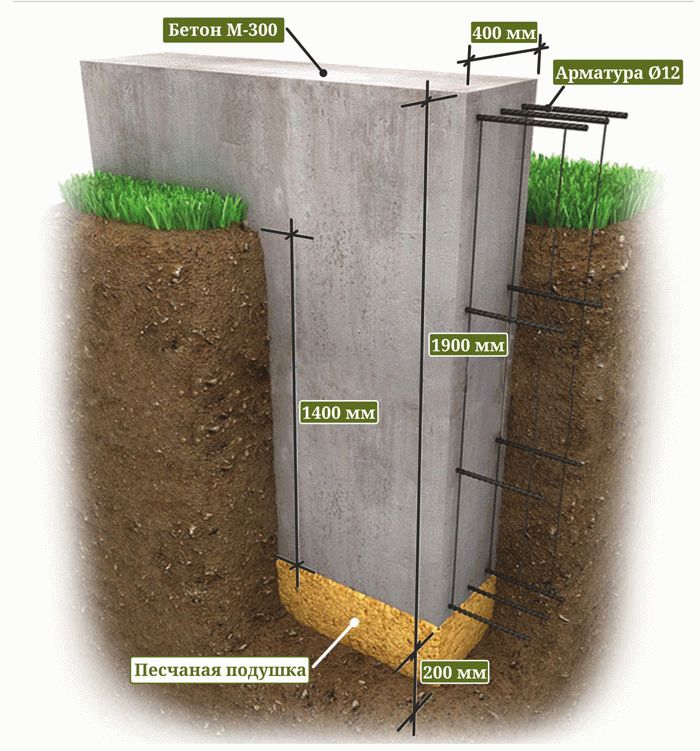
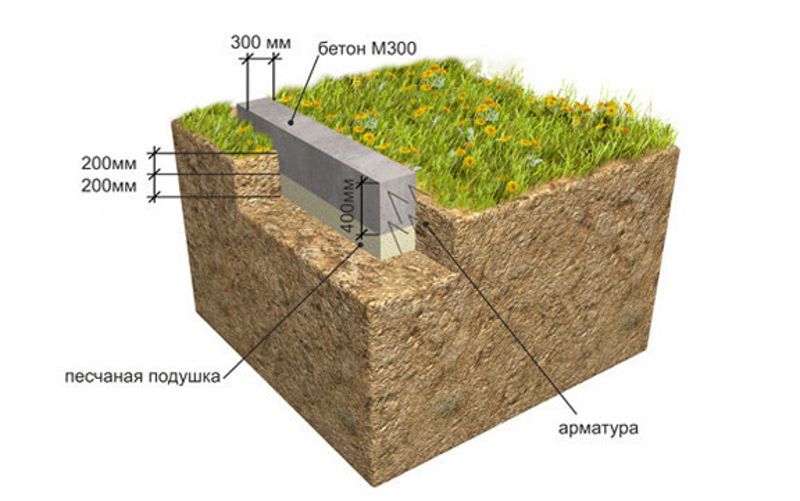
The trench for this type of foundation can be buried only 40 cm
The depth of such a base can vary from 40 cm to 150 cm.What depth you need to dig trenches are determined by several factors:
- The bearing capacity of the soil;
- The depth of soil freezing;
- Ground water level.
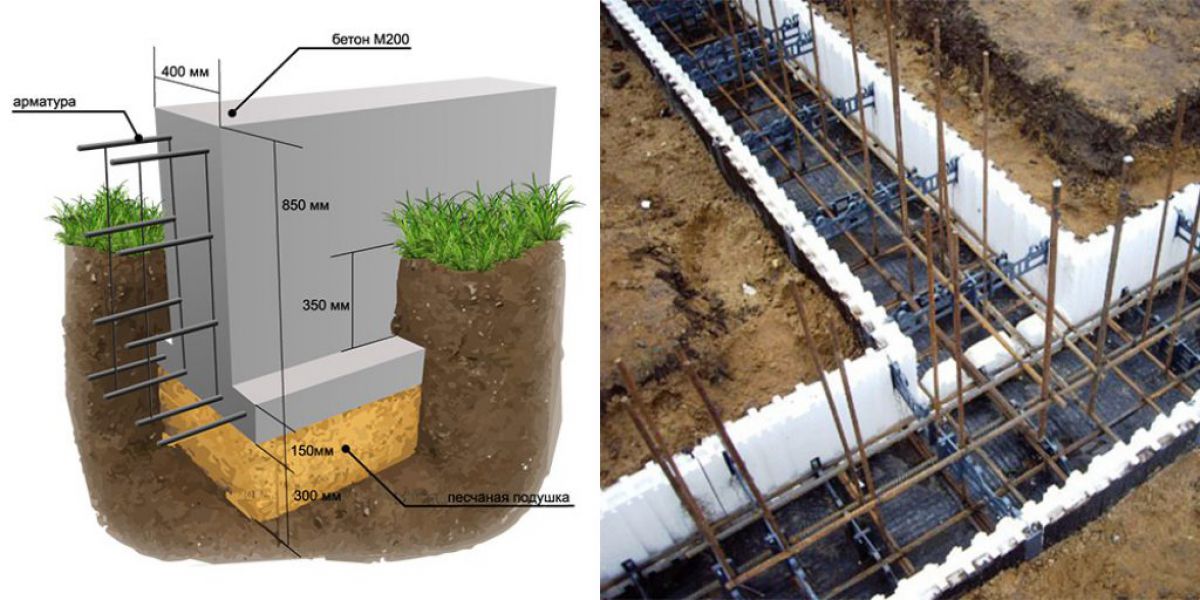
The optimal width of the monolithic tape should be from 40 cm to 60 cm. Before you start digging trenches, you need to take into account the thickness of the sand or sand-crushed stone cushion in the planned depth of the foundation. The filling layer should be below the level of soil freezing.
Precast concrete shallow strip foundation
Trench ready to lay material
The requirements for the conditions of the device of a shallow base are the same as for a monolithic tape. Sand and gravel pad should be below the freezing of the ground.If there is an opportunity to purchase substandard beams, columns or girders at a reduced price at a reinforced concrete structure plant, then they are perfect for such a foundation.
As a rule, precast concrete structures intended for industrial facilities have saturated reinforcement and are designed for high compressive and bending loads. They choose designs with a cross section of 40x40 cm, a length of 6-12 meters. They will serve as excellent foundation elements.
Deep-laid monolithic tape foundation
A pit for a deep foundation can be up to several meters deep.
A deep strip foundation is made on soft soils and when arranging a basement or underground garage. How deep to dig a pit under the base of the house depends on the height of the basement, the quality of the soil and the weight of the upper part of the house.
For example, for a multi-storey building made of bricks or prefabricated reinforced concrete, the foundation pit is made 4 meters deep or more. The width of the tape is usually 40 cm. The calculation of the depth of the base of the house takes into account the height of the underlying layer of sand and gravel.
If the basement base is below the groundwater level, then high-quality waterproofing of the walls and floor of underground rooms must be performed. What kind of insulating material to use is provided for by the project.
Precast concrete deep foundation strip
Using the same parameters as for a monolithic foundation, they determine what depth to make the base of the house when using tape. What the width of the top of the foundation should be is determined by the design engineers. The most commonly used widths of precast foundation blocks are between 0.4 and 0.6 meters.
Concrete foundation
A strip rubble concrete foundation has no less strength than a strip reinforced concrete. Rubble stones about 30 cm in size and more are stacked very tightly. The tighter the rubble stones will adhere to each other, the less concrete mixture will be required to hold them together. The depth of the crushed concrete is calculated in the same way as for monolithic reinforced concrete.
How to fill the strip foundation?
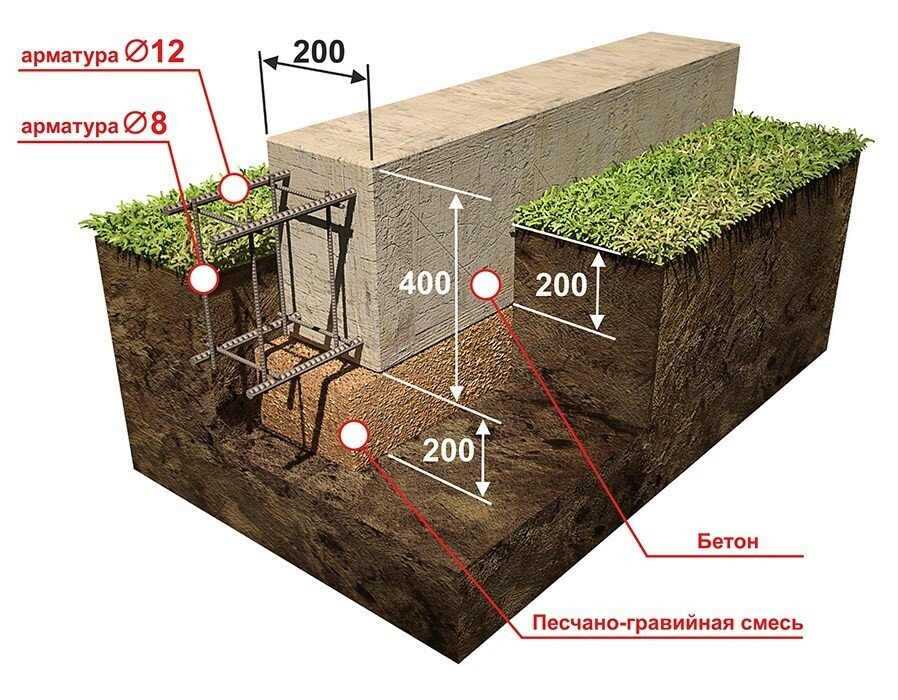
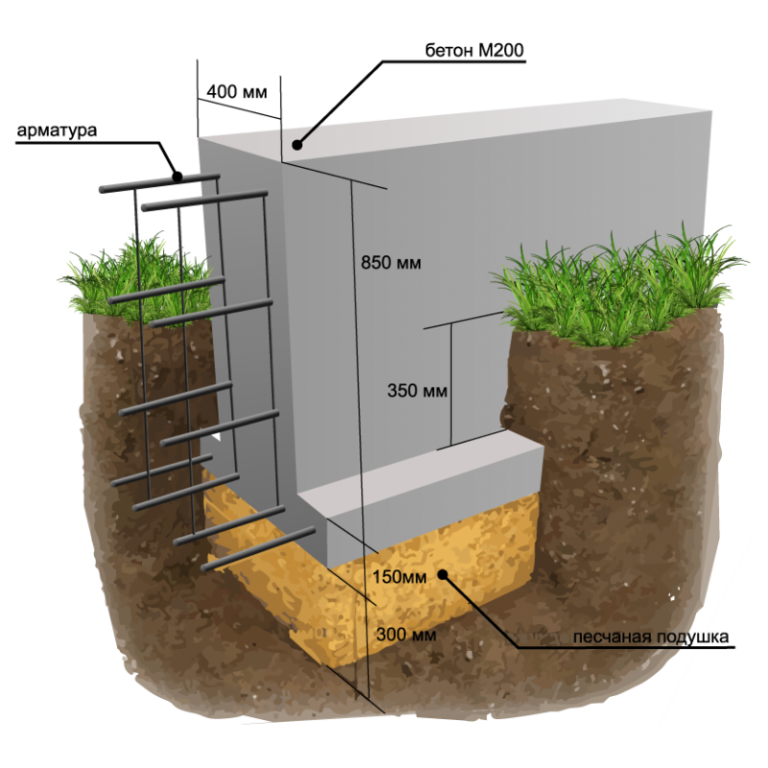
The strip foundation refers to shallow structures. It is laid to a depth of 50-70 cm.If you plan to build a building from a bar, the thickness of the belt belt should be about 30 cm.For brick buildings, this figure is increased to 35-40 cm.
Site preparation
To erect a strip structure, it is necessary to clear the area and remove the top layer of soil - the grass cover. Next, the perimeter of the future building is marked: first, pegs are driven in the outer corners and the twine is pulled along the contour of the outer walls, and then the inner perimeter is outlined, taking into account the selected thickness of the foundation. In the last turn, the internal walls and partitions of the building are marked.
It is very important to observe right angles between the walls, unless a different degree is provided for by the project.
Trenches
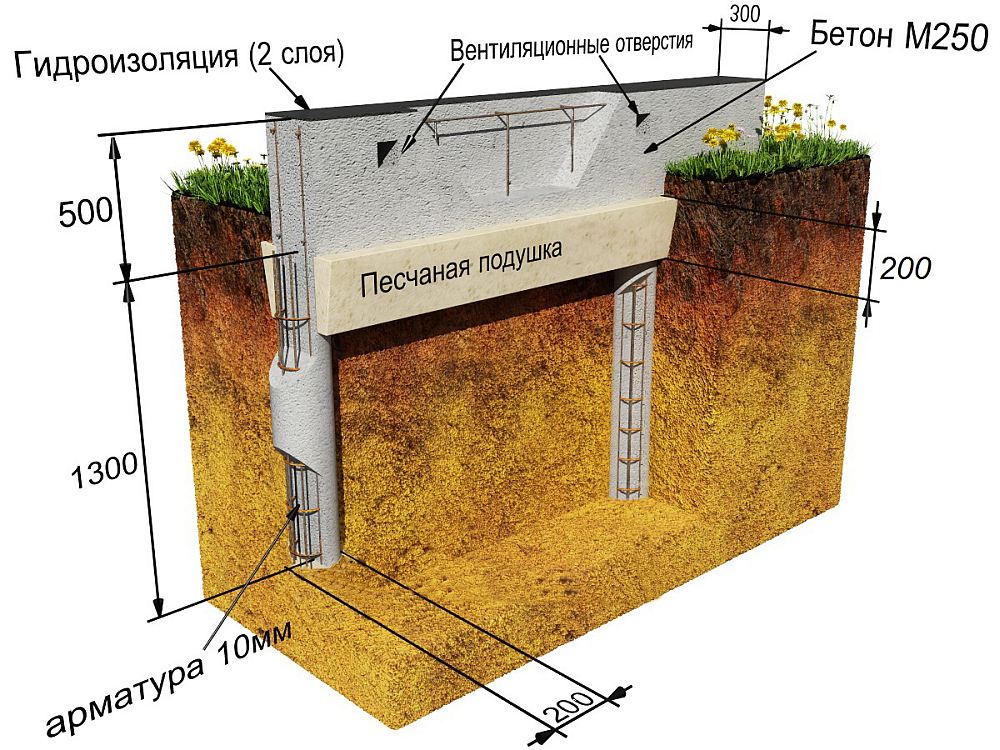
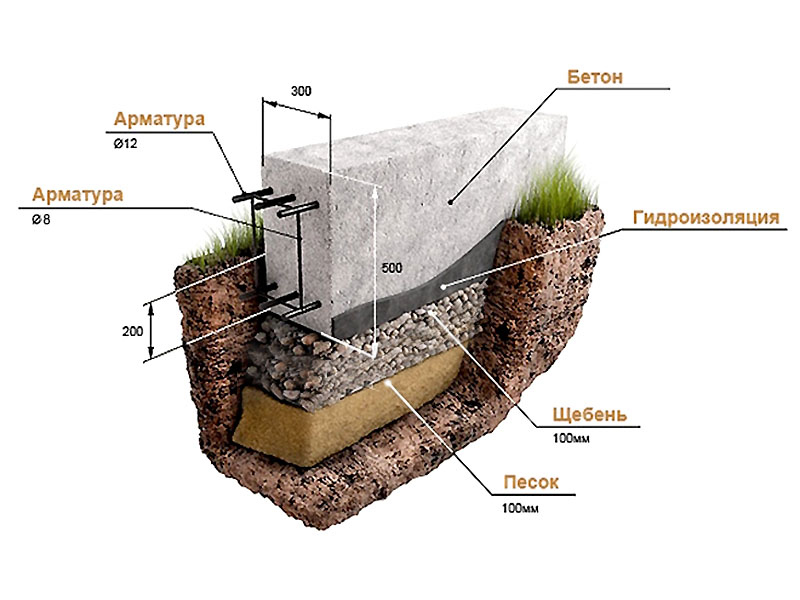
The next stage is digging trenches for pouring concrete. Their width should be 25-30 cm more than the thickness of the foundation you have chosen, and the depth should be 10-20 cm more than the level of deepening the foundation into the ground. The bottom of the trenches should be located strictly horizontally. The walls of the finished trenches are moistened to prevent soil shedding. 1-2 layers of coarse sand are poured onto the bottom. The thickness of one layer is 10 cm. Each layer is moistened with water and carefully compacted. The result is a kind of "pillow" for the concrete strip foundation.
Formwork creation
Further, in the finished trenches, formwork is formed. The material for its construction can be wood, metal or expanded polystyrene blocks. If the construction is carried out without the involvement of professionals, most often wooden boards and bars with a section of 40x40 mm are used. Shields can be knocked down from boards with a section of 40x100 mm or made of chipboard / fiberboard.The height of the boards should be 15-20 cm higher than the planned height of the foundation.
The walls of the formwork must be located strictly vertically
It is very important to ensure reliable fixation of the structure, because the poured concrete will exert a strong expanding effect on it. Outside, the formwork is reinforced with struts and struts, from above - with ties and clamps
The walls of the formwork must be airtight and smooth. In some cases, for this purpose, a polyethylene film or roofing material is used, which at the same time also serve as waterproofers.
Reinforcement
Reinforcement is the stage where your main goal is to create a reliable metal frame to give the foundation maximum strength and stability. The reinforcing belt is knitted directly in the formwork or in a free area from reinforcing bars with a diameter of 16 mm and steel wire.
The resulting frame is placed in the formwork so that a small gap remains between it and the sand formwork. For this, stones or fragments of bricks are placed under the reinforcing bars.
Pouring concrete
Speaking about how to pour the foundation into the prepared space, you should immediately point out the importance of the choice of material. It is best to use ready-made concrete grades M250-M300
Concrete is poured into the formwork in several stages. The thickness of one layer is up to 20 cm. It is good if you have at your disposal a construction vibrator for compacting the mortar. If you do not have such equipment, an ordinary reinforcing bar is suitable, with which concrete is pierced, as well as a hammer, with which the walls of the trenches are tapped from the outside.
When the concrete is completely poured, it is left to set for 3-4 hours. After that, the upper edge of the strip structure is covered with burlap and, for the first 2-3 days, it is moistened every few hours to avoid cracking.
The formwork is removed after a week. The gap between the reinforced concrete mass and the walls of the trenches is filled with wet sand.
Work process - steps and stages
The strip foundation is suitable for any type of building. All the work can be done alone, saving a lot of money. Due to the closed loop, the weight of the building is distributed evenly around the entire perimeter. The set of tools and materials is simple:
- Roulette, level
- Shovels
- Plywood sheets and formwork boards
- Cement, sand, crushed stone
- Blocks, bricks
- Roofing material
Start with a pleasant moment - marking, it is done with an accuracy of a centimeter, according to the project. We fill the pegs at the measured corners and pull the fishing line between them. The corners should be strictly 90 degrees. The size of the dwelling is now clearly visible.
- Digging a trench of the selected depth. The top fertile soil layer must be removed completely.
- A layer of sand is laid on the bottom. We level it with a shovel and trample it down, tamp it. It is best to fill the sand cushion with water and level the CC with a piece of wood.
-
We install the formwork. Using old boards and plywood, we make a perimeter edging. You can strengthen the outer part with wedges, as if propping it up for strength. The height should not exceed the underground part - this is a prerequisite
- To prepare the solution, it is better to get an assistant and a special machine for mixing concrete. In large cities, construction equipment is rented out. With her, things will go faster. But if this is not possible, you can use the attachment for a powerful drill or prepare the solution manually.
- Components of the mixture: cement, sand; crushed stone (1: 3: 4).
- Knead until thick sour cream
- We strengthen the masonry with broken brick, a large stone. We put it all in a trench
- We carry out the reinforcement of the base with metal. This will require reinforcement and special wire for the bundle. We make a cage inside the pit, cells of about 40 cm. Some fasten the reinforced mesh with welding, but this makes it less flexible.
- Now you can start filling.It is best to do this on the same day so that no air spaces form between the layers. This will create a monolithic base.
- Having reached the end of the soil, before pouring the formwork, you should lay a layer of waterproofing in the form of roofing material or use a special tool that is added to the concrete. This stage is mandatory, the foundation must be protected from mold and dampness.
- A solution is poured on top of the last layer
- The next stage is filling with hot bitumen in a thin layer
- Now we begin to draw out the formwork. Use a level to level the surface. Leave small openings on both sides for ventilation and sewer pipes
- Now you need to wait for complete drying. This takes one to three weeks. It all depends on the weather. If precipitation is not foreseen, every day the foundation should be sprayed with water. And if, on the contrary, the weather is too rainy, cover it with foil.
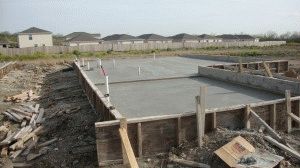
Installation of the foundation
This simple guide will guide you through the installation of your foundation.
Working with soil under a strip foundation
Depth of the trench under the house
The depth of the trench underneath depends on many factors. The first of them is the type of building, its dimensions and massiveness. For a frame-panel house, there is no need to make a deep trench, shallow foundations are prepared for this type of structure. If the walls of the house are brick, then the depth must be done 20 centimeters lower. The trend is quite understandable: the more massive the building, the more reliable the foundation should be, which means that it is necessary to make the foundation pit deeper.
Diagram of the types of strip foundations.
The second factor influencing the depth of the trench is the climate. In northern latitudes, in winter, the soil freezes quite deeply, and in this case, the strip foundation must be buried below the freezing point of the soil. In particular, if it is planned to make a basement or other room in the house, then the foundation should be 20-25 centimeters below the freezing level.
It is also necessary to take into account such factors as the composition of the soil and the mass of the floors. In addition, for the interior walls of the house, you can design a little less, they only need a depth of 40-50 centimeters.
It is also worth remembering that the strip foundation is profitable for its low cost, but is intended primarily for lightweight structures and reliable soils. If you are not sure about the ground or are building a house from heavy materials, then opt for a different type of foundation.
Digging trenches by hand or with an excavator?
The main work on working with the soil is carried out with the help of an excavator, especially if the soils have high plasticity due to the high content of clay and moisture. Such work should be entrusted to a professional excavator operator, it is better not to try on your own. The excavation work is best done during the dry season (summer or early autumn), when the soil contains a minimum amount of moisture. And wet soil requires more attention and effort to remove and transport. In addition, it is worth remembering that in winter the cost of excavator services costs twice as much. Therefore, it is in the spring that it is best to start construction work.
Diagram of the device for the foundation.
Before you start digging a pit for a strip foundation, you need to assess the situation on the site, whether there are other buildings or their remains nearby. If such objects are present, then the trench must be made 20-25 percent deeper than the base of the foundation of these buildings. It is worth deepening the pit by 5% if it is being built on the site of the old one. This is done in order to reduce the load on the foundation and prevent its premature destruction.
A trench for a strip foundation can also be dug manually. In this case, the cost of work will be lower, but the quality of work and speed will also be lower.It is better to use manual labor in the development of soil only in some cases when delicate and accurate work is required, for some types of communication, with loose soils, etc.
Leveling the base with sand
If you need to level the territory, if the soil on your site is problematic, heterogeneous and unpredictable, then we advise you to make a protective sand cushion. For a strip foundation, the sand cushion for the formwork should be about 40-50 cm high. But this figure should be reached by the cushion only after careful compaction. The thicker the pad is, the less deformation can be expected from the foundation due to the heaving of the soil. But the thickness of the pillow can vary significantly depending on the climate. For example, in the same England, the norm for a sand cushion is a height of 20 cm.
Concrete preparation for a strip foundation
Sand cushion device diagram.
Concrete preparation is a layer of "lean" concrete or crushed stone, lined under the bulk of the foundation. It is designed to protect the mass of the foundation from the loss of concrete milk, helps to quickly achieve the necessary conditions for the base of the house, helps to more evenly distribute the load on the ground and makes it easier to create a reinforcing base for the strip foundation.
For concrete preparation, cement of the M300 or M400 brand is used.
Advantages and disadvantages

Before talking about the fill, let's first understand the main pros and cons of the strip foundation (step-by-step instructions for construction will be described in detail later in this article).
Among the advantages are the following:
- the ability to withstand heavy loads;
- ease of installation;
- long service life;
- a wide variety of specific types of bases;
- low cost of construction;
- high thermal insulation characteristics.
There were also some drawbacks. These are:
- impossibility of installation on some types of soils;
- the need to fill the base throughout the entire thickness in one go;
- large physical and time costs.
Considering all the pros and cons, it is safe to say that the strip foundation is the best option for the construction of private residential buildings, since it has much more strengths than weaknesses.
Formwork construction
What is the peculiarity of this process? To give the base the desired shape, auxiliary wooden structures are installed in a trench or foundation pit. They can be removable or non-removable. The latter option is more preferable, since it allows you to additionally insulate the concrete base.
Most often, the installation of the formwork for the strip foundation is carried out from ordinary boards, from which peculiar shields are knocked off. They must rise above ground level. The height is selected depending on how much you will raise the basement of the building, however, the elevation should be at least 30 centimeters.
Shields are fastened with crossbars, and from the outside they are propped up with bars. So that the formwork does not disperse under pressure when pouring concrete, it is recommended to additionally reinforce it with steel wire. Some people plan to install pipes in the supporting structure for laying communications. This is very convenient, since free space inside the house will not be wasted. In this case, the pipe sections are installed as spacers between the individual formwork elements.
When erecting a wooden structure, it is very important that it is installed level. To do this, all work should be carried out using the building level.
If even minor errors are made, then the strip foundation will be filled unevenly. In this case, you will have to level it after hardening, which entails additional financial, physical and time costs.
To create waterproofing, the bottom of the finished formwork is covered with roofing material and high-density polyethylene. The ends of the roofing materials are fixed to the boards from the inside.
You can also build a combined formwork. In terms of its technology, it is almost completely similar to that described above, and the difference lies in the fact that the inner side of the shields is upholstered with insulation material, for example, expanded polystyrene or penoizol. Its thickness is selected depending on the climatic conditions of your region, but the minimum layer thickness should be 30 millimeters. This option is good because, in addition to additional thermal insulation, when the base is poured, the cement milk will not seep through the cracks, due to which the moisture will not evaporate so quickly and the supporting structure will turn out to be more durable.


