Knitting wire for rebar
The binding of individual elements into a reliable structure will not be accompanied by unnecessary difficulties and costs, if you decide on the criteria for choosing a fastening material.
- The low price per kg of metal knitting wire is one of the most important advantages. Therefore, even with large-scale work, significant financial investments will not be required.
- It must be strong so that the integrity of the frame is preserved during subsequent pouring with concrete.
- Adequate flexibility will simplify the execution of work operations.
- Corrosion protection in this case is not the determining factor.
 This characteristic will be important if long-term storage of products (assembled frame) in the open air is expected.
It is not difficult to find out which wire to knit fittings with is not difficult. To do this, you need to study the industry GOST 3282 74. The following are some provisions from this standard that will be useful in practice:
- The wire is produced as standard and annealed. After high temperature treatment, it retains its strength and becomes flexible.
- Products are divided into two groups based on tensile strength. The tests are carried out on products that have not undergone heat treatment.
- Also use 2 groups of accuracy (normal and improved). They control ovality, dimensions, power parameters.
- Produce products with a surface layer and without additional protection.
- To connect the reinforcement, you can purchase a specialized wire with a diameter of 0.16-10 mm.
It is possible to check the resistance to loads, the quality of galvanizing and some other parameters only in laboratory conditions. For this, special tools and techniques are used.
 Documented evidence of tensile strength tests carried out (temporary)
Some controls are available to the average user:
- The wire without heat treatment and a protective layer should not have any traces of scale or cracks.
- With a diameter of 0.5-6 mm, high-quality products retain their integrity after 4 bends.
- If galvanized wire is wound, the protective layer does not peel off. It is necessary that it completely covers the entire surface.
 Good quality binder wire is evenly laid. When winding up, the consumer does not have unnecessary difficulties
The price for a coil of wire with a diameter of 1.2 mm, weighing approximately 4.6 kg, and a length of 550 m, ranges from 500 to 600 rubles. A smaller thickness should not be chosen in order to provide the necessary strength of the frame. Products that are too thin (less than 1 mm) break when the knots are tightened with force. If you choose thick ones (over 1.8 mm), it will be too difficult to work. Approximate consumption per 1 ton of reinforcement is 20-25 kg of wire.
For an accurate calculation, it is necessary to clarify the number of connection nodes. Some of them create an overlap. In such places, you will need to create several mounts. The cross section of the reinforcing rods matters. Small wire diameters may require more turns to ensure a secure hold.
 In some places, reinforcement elements are installed. Here, the consumption of materials will increase, since you will have to use additional bundles
How much wire is needed per 1 ton of reinforcement is specified using the dimensions and features of a certain strip foundation. To simplify the calculation, specialized software is used.
 Fasteners for connecting reinforcement
The cost of one package (1 pc.) Is 1300-1450 rubles. These blanks are more expensive than coiled wire.But a more detailed study of technological processes will allow you to find out that it is more convenient and faster to work with such products.
Rod attachment rules
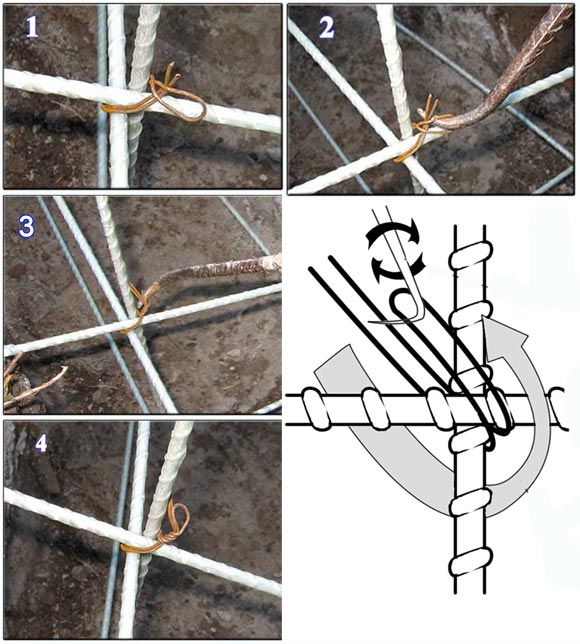
According to this scheme, you can tie the reinforcement:
- The wire is tied in half.
- A hook is pushed through the loop.
- On the reverse side, the end is wrapped around the intersection and is also put into the hook.
- The wire is twisted.

Recommended rules and methods for knitting:
- The rods are pulled up, twisted, the ends are bitten off with nippers;
- The wire is twisted in several turns with a strong tension;
- The rods and clamps are tied.
Using paper clips, staples, clamps
If necessary to speed up the knitting, use the aforementioned materials. In these situations, knitting is done by hand without using a tool. Small diameter rods can be tied with self-tightening plastic ties. Universal attachments suitable for all cross-sections. They are lightweight, set by hand and do not smear. Do not forget that they have low strength and at low temperatures they can be damaged.
Advantages of staples and other clips of the same type:
- Increased productivity;
- The density of connected nodes increases;
- Easy to use.

Knit rebar or boil
Knitting reinforcement for the foundation is performed using:
- wire knitting material. The technology of this type of installation is reliable and popular. There are many options for tying with wire, but many prefer knotted;
- threaded and crimped couplings. Application is possible in areas of mechanical joints;
- steel clips. Metal rods are connected without arranging wire knots;
- clamps and clamps made of plastic material. With such devices, installation work is carried out easily and quickly, fasteners are resistant to corrosion. But the use of such clamps is not approved by all builders.
Many people ask the question: knit or cook reinforcement for the foundation? The second method is faster, but there are some good reasons to ignore it:
reinforcing steel at the connection points overheats. The metal loses up to fifty percent of its strength if it is welded. This feature is very important when knitting reinforcement for the corners of the foundation, because in such places all the negative differences of this method most often appear;
- if the fixing of the supporting elements is made rigidly (with a welding unit), then the load forces on the frame base act unevenly. Anomalous stresses are created at the points of rigid couplings;
- if an error is made during the assembly process, then you will have to use a new material for the frame;
- working with a welding machine implies the presence of special skills and the cost of paying for electrical energy.
So, is it possible to cook reinforcement for the foundation, and not knit? There are situations when tying the foundation with reinforcement without the use of welding is not performed:
- if embedded elements are provided in the foundation. Such parts are mounted at points where the maximum load on the concrete structure is expected. Embedments are welded onto the reinforcement skeleton in order to provoke a uniform redistribution of the load;
- if there is a need to fix the longitudinal type connections. Double layers are created at the overlapping points of the reinforcement, which must be welded. The rods are not fastened end-to-end, since the sections will not be enough for a strong connection.
Payment
The consumption of reinforcement must be carried out at the stage of planning the foundation drawings in order to know with accuracy how much building material will be required in the future. It is worth familiarizing yourself with how to calculate the amount of reinforcement for a shallow base with a height of 70 cm and a width of 40 cm.First, you need to establish the appearance of the metal frame.It will be made of upper and lower armored belts, each with 3 reinforcing rods. The gap between the rods will be 10 cm, and you also need to add another 10 cm for the protective concrete layer. The connection will be carried out with welded segments from reinforcement of identical parameters with a step of 30 cm. The diameter of the reinforcement product is 12 mm, group A3.


The calculation of the required amount of reinforcement is performed as follows:
- in order to determine the consumption of rods for the axial belt, it is necessary to calculate the perimeter of the foundation. You should take a symbolic room with a perimeter of 50 m. Since there are 3 rods in two armored belts (6 pieces in total), the consumption will be: 50x6 = 300 meters;
- now it is necessary to calculate how many connections are required to join the belts. To do this, it is necessary to divide the total perimeter into a step between the jumpers: 50: 0.3 = 167 pieces;
- observing a certain thickness of the enclosing concrete layer (about 5 cm), the size of the perpendicular lintel will be 60 cm, and the axial one - 30 cm. The number of a separate type of lintels per connection is 2 pieces;
- you need to calculate the consumption of rods for axial lintels: 167x0.6x2 = 200.4 m;
- consumption of products for perpendicular lintels: 167x0.3x2 = 100.2 m.


As a result, the calculation of reinforcing materials showed that the total amount for consumption will be 600.6 m. But this number is not final, it is necessary to purchase products with a margin (10-15%), since the foundation will have to be reinforced in the corner areas.
Composite reinforcement binding
One of the types of composite reinforcement is fiberglass elements, which have recently been very popular in the construction of foundations. This is explained by the presence of some advantages:
- Lower price.
- Low weight.
- Corrosion resistant.
- High strength characteristics.
The connection of fiberglass reinforcement is performed according to the same rules as metal rods. But you should choose methods that exclude bending of the rods, since fiberglass is easy to break when bent.
You can knit modern reinforcing material with traditional knitting wire. However, the most effective is the use of special clamps, for the manufacture of which molded polyethylene is used.
Tying reinforcement under a strip foundation is not a complicated process, but it requires careful attention to each element. The strength and reliability of the base and the future structure as a whole depends on the correct knitting of the reinforcing cage.
Rebar Tying Tools
Correct knitting of reinforcement for strip foundations implies that the nodes must be firmly fixed with wire. If this is not done, then when the concrete mix vibrates, the nodes can finally untie. This will then entail increased loads and premature failure.
At the strip foundation, the reinforcement is knitted:
- Hands - crochet;
- Inertial hook;
- With a pistol.
Bondage hook
When asked how to properly knit reinforcement onto a strip foundation, you can answer that you first need to choose a good tool.
Crochet hooks vary in shape. The choice of tool is purely individual. Purchase it based on your own tying technique. With an inappropriate tool, your hands will get tired very quickly, and you run the risk of rubbing calluses.
They are small in size, suitable for tying in both hard-to-reach places and in ordinary situations. When buying a hook, take a closer look and try it right away.
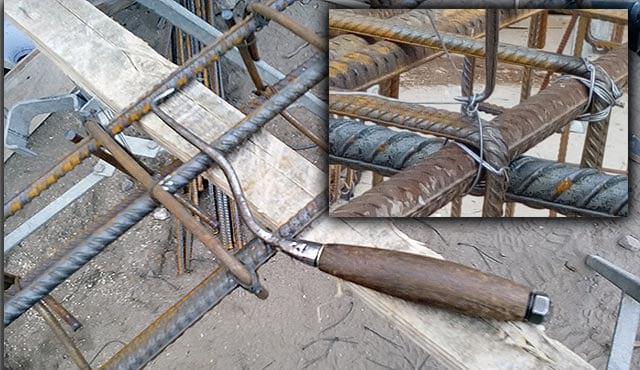
Homemade crochet hook
Homemade crochet hooks are made from a pattern, just like models made in production. In their production, reinforcement is used, which is sharpened from the side and bent in a vice. The handle is made of molten plastic, and then screwed on. A polymer tube can also be used for the handle.
The fittings are knitted by them schematically, reliably, with the obligatory observance of the distance between the nodes. Therefore, homemade crochet hooks are also great for crocheting.
Hook screwdriver
Using a screwdriver or other semi-automatic tool will speed up the work process, and may also help relieve your hands. By tying the strip foundation reinforcement with your own hands, you put more effort, and this, with a large amount of work, can significantly affect your productivity.
The hook is located on the leg. During operation, the hook catches the wire, pulls it upward, and the leg, turning, turns and twists the ends of the wire. The operation is performed until the required tightening of the knot is achieved.
Knitting gun
It is the best tool for the highest quality bonding. But it is quite expensive. It is used by professional builders who cannot afford to waste time. The device has a replaceable coil on which the wire is wound. These coils charge the device.
The big bonus of this tool is its so-called "autonomy". Working with it, you do not need to connect to the network, which makes it even more convenient. Also, in addition to the high cost, it has another significant drawback. The knitting gun is not used in confined spaces.
Tying with pliers
Another way to knit strip foundation reinforcement with your own hands. It is used when it is necessary to tie several wire knots, because with long work with pliers, hands will get very tired. For large volumes of work, it is much more preferable to use a different tool.
Slab foundation
Since the floating slab is considered the most expensive foundation, a sparse reinforcement can be used in the middle of the structure. However, this method of saving materials requires professional calculation in special programs. Therefore, individual developers most often use reinforcing mesh with the same mesh.
It is not difficult to correctly knit reinforcement into meshes, however, amateurs who do not have experience and specialized education make mistakes:
-
lack of connection at the ends - the rods of the upper and lower chords must be connected with U-shaped clamps along the entire perimeter of the slab;
- one mesh instead of two belts - the lower mesh works in tension solely from the weight of the building, at the slightest occurrence of frost swelling under the slab, tensile zones arise near the upper plane, therefore the second mesh is a prerequisite for normal operation (if the slab thickness is equal to or less than 15 cm, it is allowed to use one mesh);
-
non-compliance with protective layers;
- the size of the grid cells is too large, the cells should not exceed 40 cm, the optimal size is selected by calculation, in practice it is often no more than 20 cm.
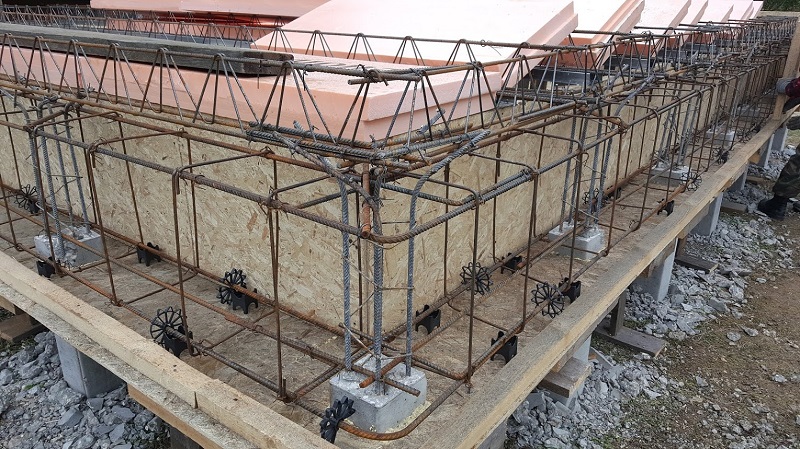
To assemble the reinforcing cage of the slab, the upper mesh must be fixed at some distance above the lower chord. For this, tables, frogs, spiders, and other elements with bent legs are used to support the lower cells, shelves that support the upper layer.

Rebar spider with a diameter of 8 mm.
When bending the reinforcement on the object, it is forbidden to heat the rods by gas welding. Bending machines or clips should be used that provide the desired bending radius. At the locations of the bearing walls, the slab foundation is reinforced with additional reinforcement, i.e. the cell pitch is halved.
In slabs with stiffeners under the load-bearing walls, frames are located by analogy with strip foundations, grillages. They are rigidly connected to the slab mesh and provide standard concrete protective layers.
More information in the article: How to properly knit reinforcement for a monolithic slab.
How to make reinforcement correctly
In order for the reinforcement to be done according to all the rules, the following requirements must be met:
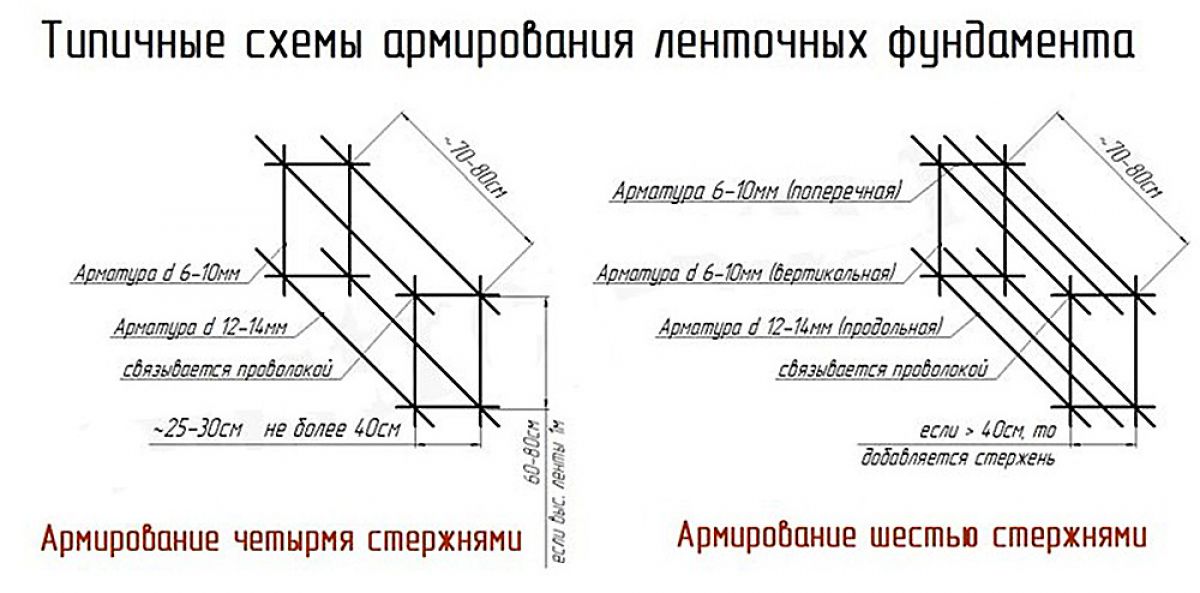
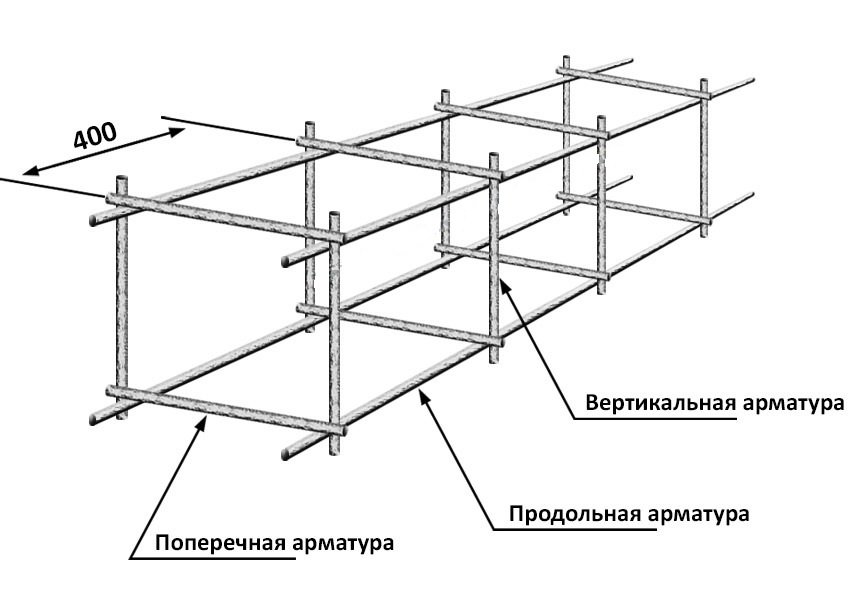
- The distance between the longitudinal belts of the reinforcement should not exceed 50 cm. The number of belts depends on the height of the foundation.
- Vertical and transverse reinforcement bars (that is, transverse belts) are installed in 30 cm increments according to the SNiP recommendations, but in practice they often take a 50 cm step. Sometimes the transverse belt is made in the form of a rectangular clamp.
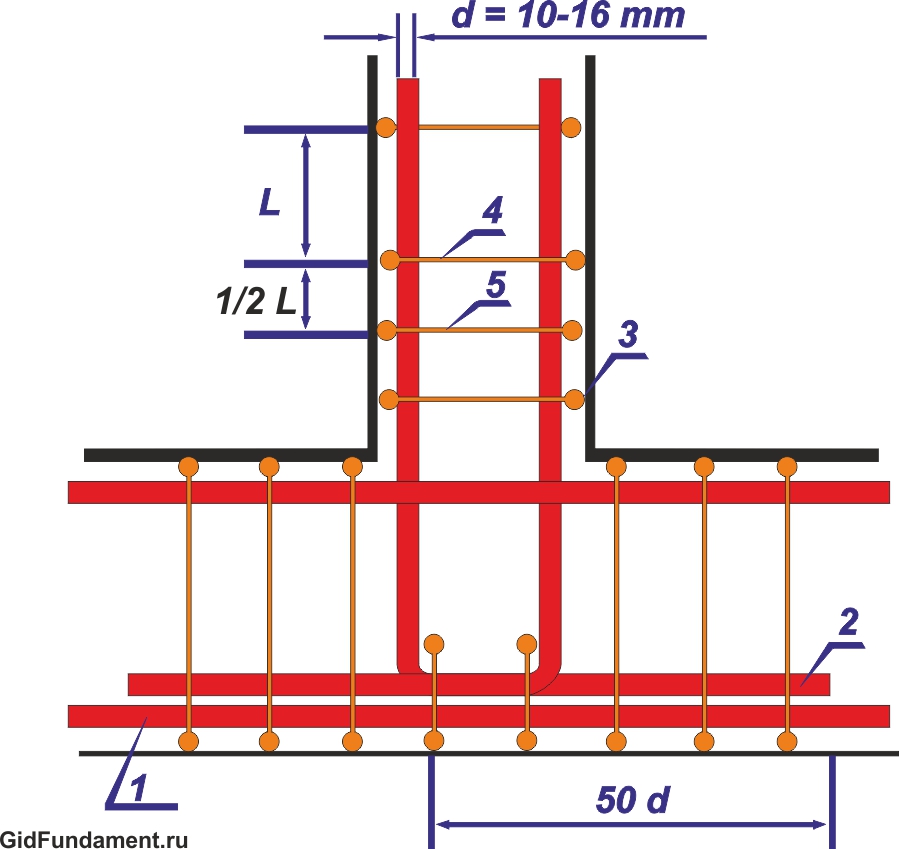
- From each corner to both sides, it is necessary to install 3-4 transverse belts with a step of 0.5 from the main one.
- From the junction in each direction, it is also necessary to make 3-4 transverse belts with a step of 0.5 from the main one.
- The choice of the diameter of the main longitudinal reinforcement depends on the load on the foundation, that is, the greater the load, the thicker the reinforcement.
- Only a special wire is used for knitting the frame.
- In order that after pouring the solution around the metal frame a protective layer of concrete 50 mm thick is formed on each side, it is necessary to install special devices: from the bottom of the frame “chairs” or “frogs”, and from the sides - “stars”.
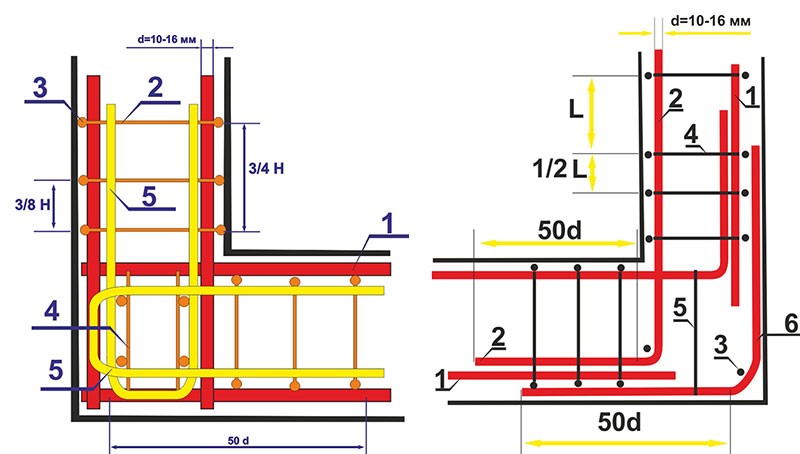
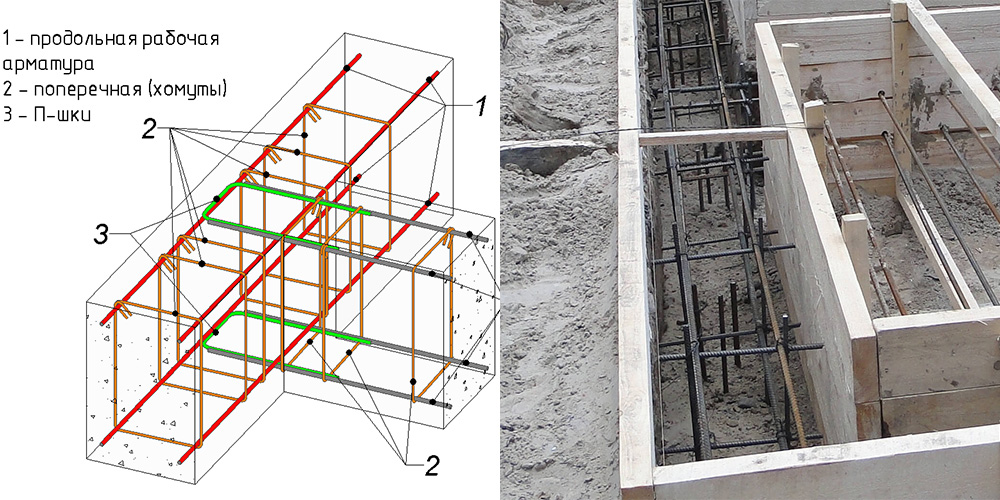
- It is necessary to reinforce the corners of the frame only by using special reinforcing structures of the scheme, and not by simple overlapping knitting of perpendicular reinforcement rods.
- It is advisable to make straight sections of the frame with solid pieces of reinforcement (standard factory length 11.7 m).
- When joining longitudinal reinforcing elements, it is necessary to strictly observe the dimensions of the overlap of one bar to another (for M200 concrete - 50 reinforcement diameters, for M250 - 40 diameters, for M300 - 35 diameters).
- It is inadmissible to dock the longitudinal reinforcement bars in the same place vertically (the spacing should be at least 60 cm or 1.5 overlap length).

Peculiarities
The strip foundation is a monolithic concrete strip without breaks on the doorways, which becomes the basis for the construction of all walls and partitions of the structure. The basis of the tape structure is a concrete mortar, which is made of cement grade M250, water, sand mixture. To strengthen it, a reinforcing cage made of metal rods of different diameters is used. The tape extends a certain distance into the soil, while protruding above the surface. But the strip foundation is exposed to serious loads (movement of groundwater, massive structure).

In any situation, you need to be prepared for the fact that various negative influences on structures can affect the state of the base. Therefore, if the reinforcement is performed incorrectly, at the first slightest threat, the foundation may collapse, which will lead to the destruction of the entire structure.
Reinforcement has the following advantages:
- prevents soil subsidence under the building;
- has an affirmative effect on the soundproofing qualities of the foundation;
- increases the resistance of the foundation to sudden changes in temperature conditions.
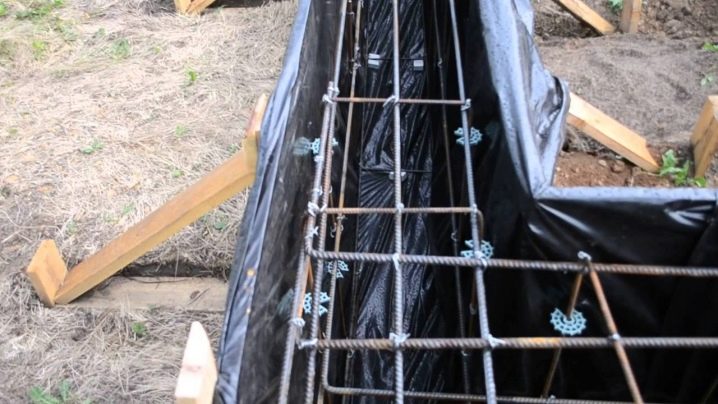
Method of knitting plastic reinforcement
 A material such as fiberglass is a very good variability for reinforcement of a linear base of a house.
A material such as fiberglass is a very good variability for the reinforcement of the linear base of the house. It costs much less, but it lasts much longer. You need to knit such a frame a little differently.
Before knitting plastic reinforcement, you need to perform detailed calculations, because even a small inaccuracy may not withstand pressure. When creating a foundation, bosses are used that protect the structure from subsidence. The knitting process follows the same principle - wire is used or various clamps are purchased.
The work on the tie strip is a very important element in creating the strength of the building. For the above material, we analyzed a large number of sources, video tutorials and highlighted basic information that can help you create a solid foundation for a building.
Reinforcement types
Today, in construction, ordinary steel reinforcement and new composite reinforcement are used to pour the strip foundation. Both types are used for the construction of frame structures, but the question of which is better is one of the most relevant today. So, let's figure out what kind of reinforcement you need to choose for pouring the strip foundation.
Metal
There are three types of material in this category: cold-worked, thermomechanical and hot-rolled.
It will not get into the jungle of production technologies for each type, we just denote that to create a high strength of the foundation, a hot-rolled type of class AIII is used.
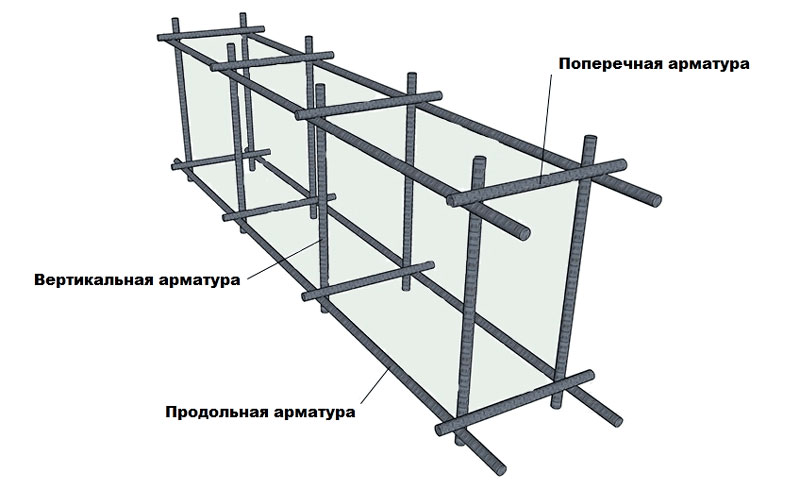
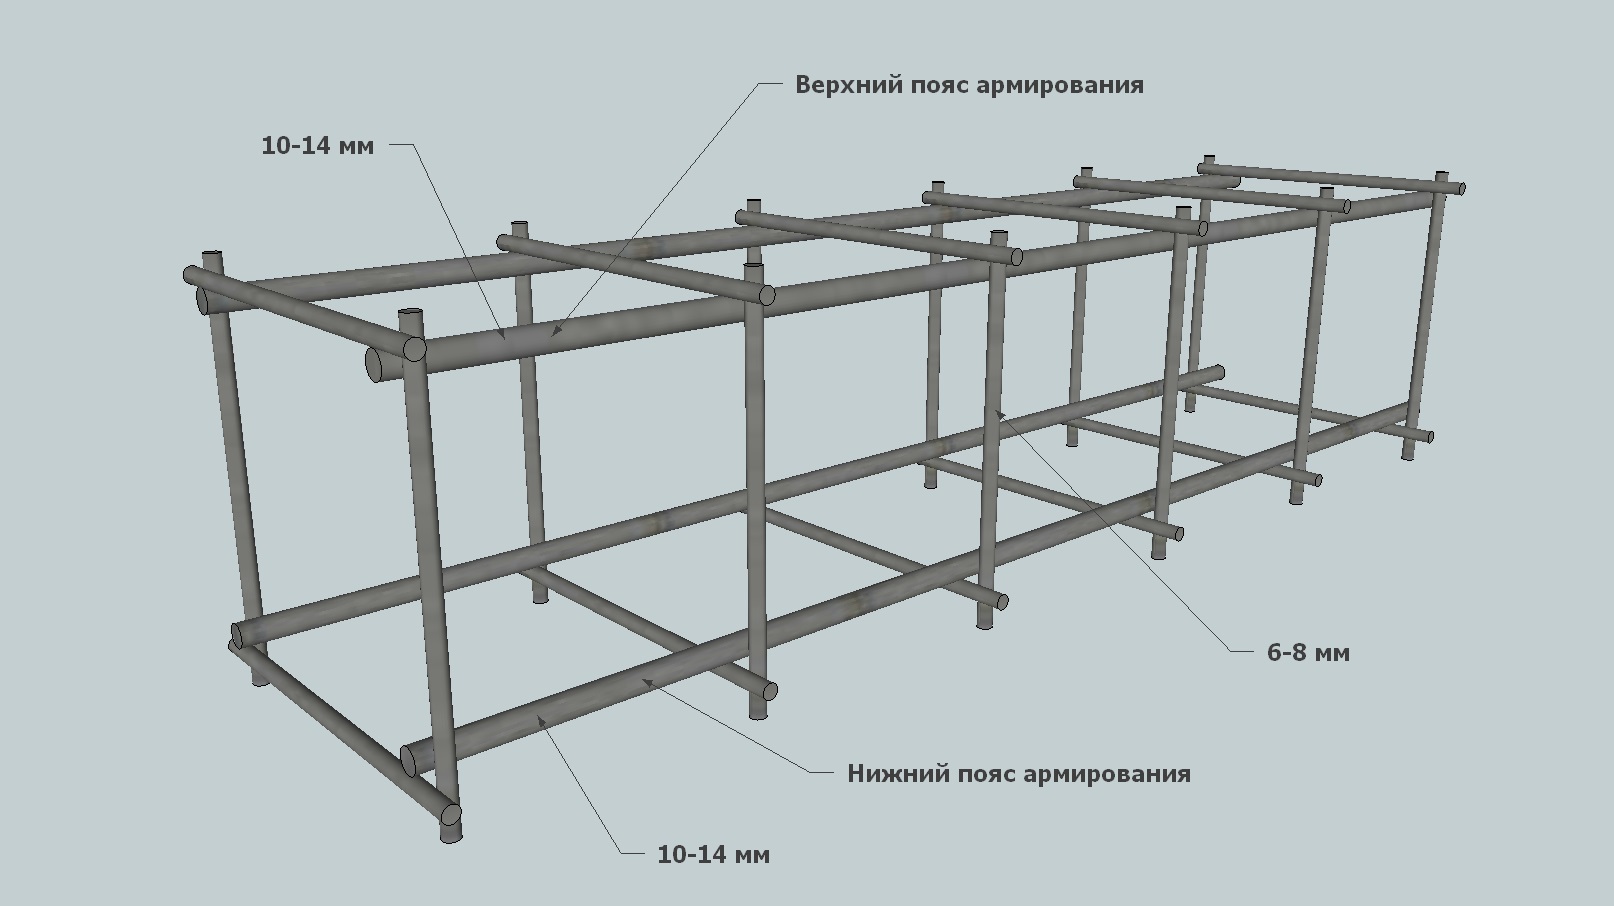
This is a reinforcement with a grooved surface, which is laid in the longitudinal direction. It is she who bears all the main loads (tensile and bending) that act on the foundation of the house.
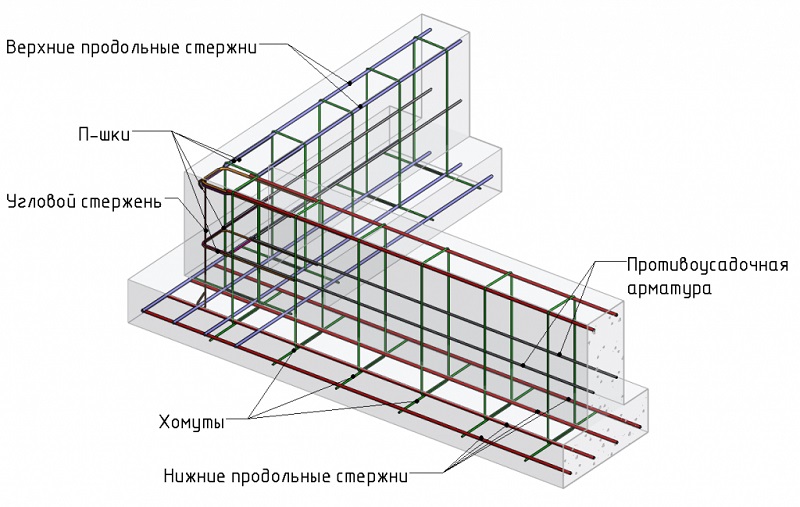
There are two more elements in the structure of the reinforcing frame: vertically installed rods and transverse ones. The former, together with the longitudinal ones, form the basis of the frame gratings, the latter are responsible for connecting several reinforcing meshes to each other.
Therefore, for these two groups, you can use reinforcement with a lower class and a smaller diameter. For example, for vertical elements, rods of class AII (also with a corrugated surface) are used, for crossbeams of class AI (smooth).
As for the diameter, in private housing construction, reinforcement with a diameter in the range of 8 - 18 mm is used. The same size is typical for vertical rods, but the crossbars can be made of 6 - 8 mm reinforcement or wire (wire rod) with a diameter of 6 mm. The most popular type for crossbars is wire rod. Let us add that the selected diameter of the cross members depends on the height of the frame to be assembled.
- If this indicator does not exceed 80 cm, then the frame is tied with 6 mm wire rod.
- If higher than this value, then 8 mm.
Steel-type reinforcement is strapped with special wire. It is soft and does not break with frequent bending cycles.
Fiberglass
Plastic rebar is often called composite because it consists of several different materials.
Their base, of course, is plastic, but the fillers can be different: basalt, glass and carbon.
The most popular among them are fiberglass fittings. She has excellent technical and operational characteristics, but the price is much lower than that of other types.
Here are the advantages of fiberglass rods over steel ones.
- They do not corrode, although these processes take place slowly inside the foundation.
- They have low thermal conductivity.
- They are not afraid of changes in temperature and humidity.
- Tensile strength - 1000 MPa. For steel reinforcement, this figure is 390 MPa.
- Fiberglass reinforcement is 3.5 times lighter than metal one.
- It does not conduct electricity.
As for the disadvantages, again in terms of comparison, the elasticity of fiberglass reinforcement is much lower. When heated, they quickly soften and lose their quality. In addition, fittings of this type can be classified as low-flammable materials. Today, special plastic rods are produced, which are better in terms of flammability. But all the same it is not included in any comparison with the metal counterparts.
In the building canons, there are still no specific standard approaches that could be relied on when answering the question for which foundations fiberglass reinforcement can be used. Just from personal experience, builders recommend that it is better to use this variety for assembling a frame for a strip foundation, if the latter is laid under small light buildings.
How to knit a reinforcing mesh yourself
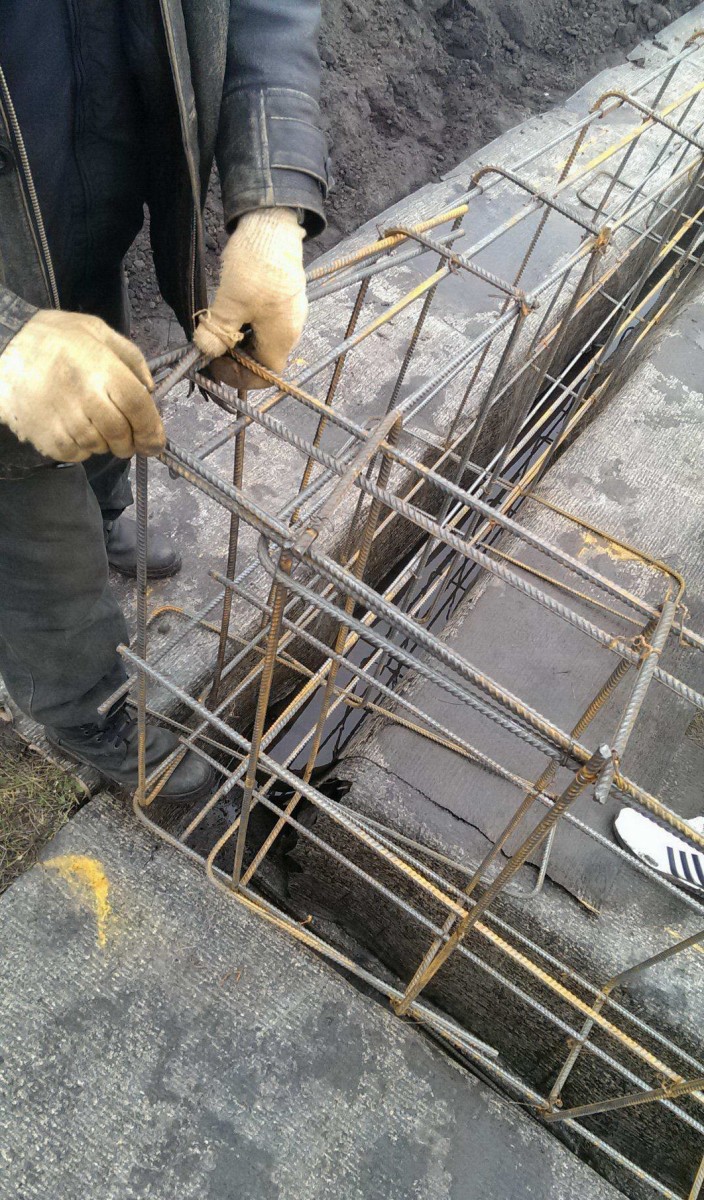
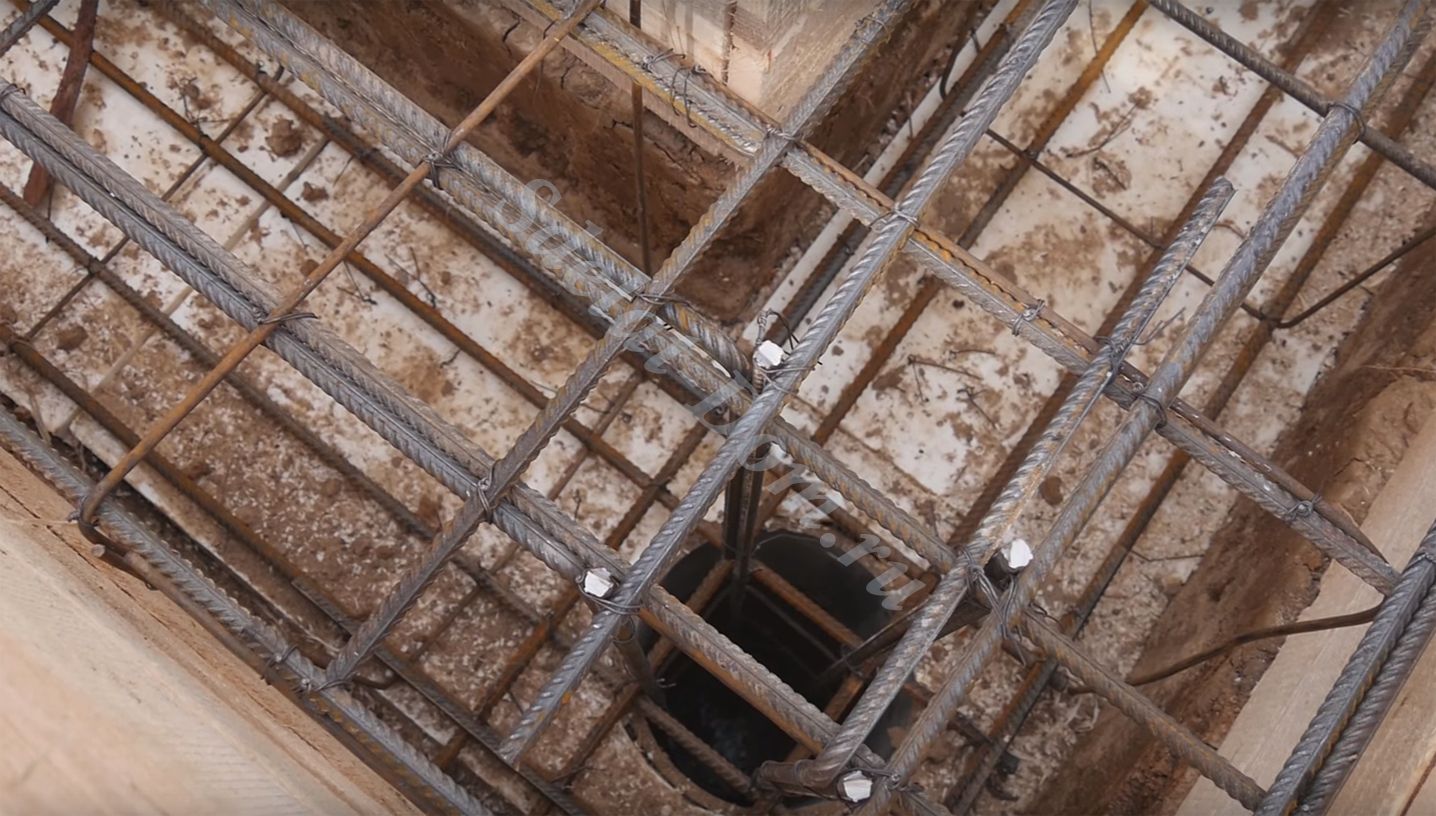
The following step-by-step instructions will give you the opportunity to learn how to make the frame correctly and provide the foundation with the necessary properties. The easiest way is to knit ready-made strip foundation fittings on the ground.Outside the structure, straight sections of the mesh are created, but the corners are knitted after lowering the frame into the trench.
- First you need to cut into pieces of rods. It is better to start knitting from the shortest section of the foundation in order to gain a little experience. Cut to a minimum, trying to use the full length of the working rods. If we take 40 centimeters wide and 120 centimeters high as an example, then the indicators are as follows.
- On all sides, the metal is poured with a layer of concrete at least 5 centimeters thick. Net dimensions of the frame in height - a maximum of 110 centimeters, width - 30. For knitting, add 2 centimeters on both sides for an overlap. It turns out that the blanks for horizontal lintels should be about 34 centimeters long, vertical ones - about 144 centimeters long. This is for tall foundations, but usually a base with a height of about 80 centimeters is used.
- 2 rods are placed on a flat platform, horizontal spacers are knitted at a distance of 20 cm from the ends on both extreme sides: the wire is folded in half, pushed under the attachment point and tightened by scrolling the hook.
- At a distance of about 50 centimeters, all horizontal spacers are fastened in turn, the structure is set aside, another one is made the same - this is the lower and upper frames that need to be tied together: adjust the stops for both meshes between the bars and vertically along the ends by 2 spacers, attach the rest of the pieces. You need to do the same with all straight sections of the structure.
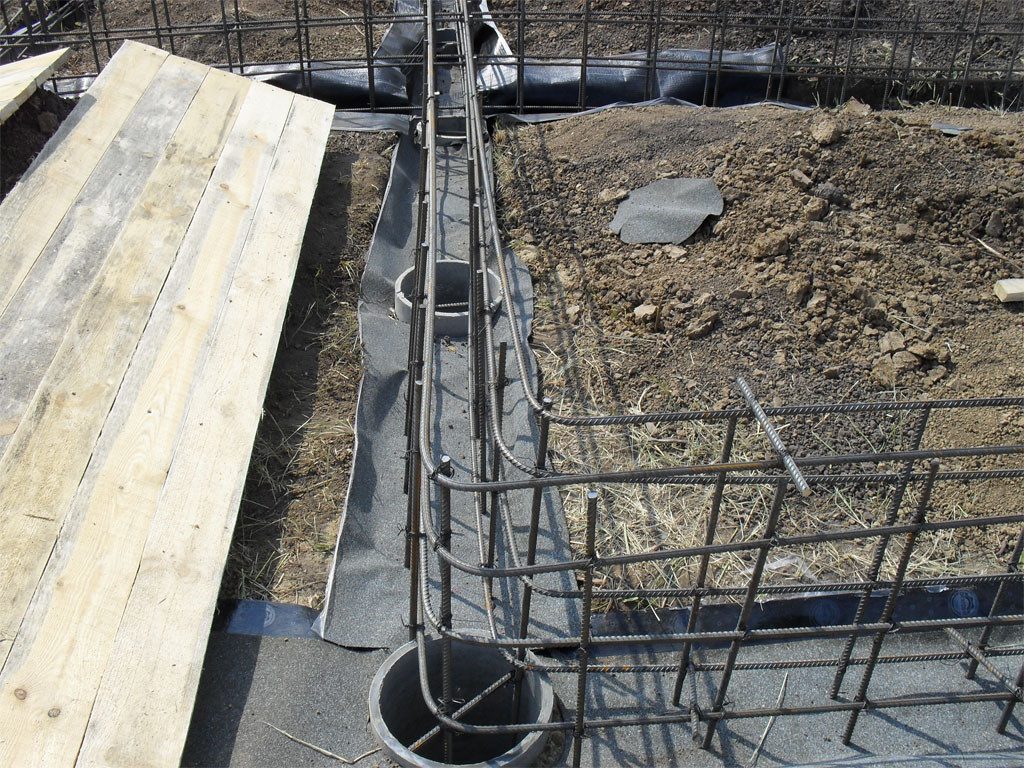
- Then, at the bottom of the trench, lining with a height of at least 5 centimeters is laid, side supports and a mesh are correctly installed. Now you need to knit each corner and joint, creating a single frame. The overlap of the ends of the bars must be equal to at least 50 bar diameters.
- Next, the lower turn is tied, vertical posts are attached, and the upper frame is attached to them. Then, on all surfaces of the formwork, you need to check the distances, indents, overlaps at the joints, so that everything is done correctly and clearly.
- The connection of the rods along the length usually does not cause problems, but the fastening of the frame parts in the corners must be done in accordance with the established norms. There are two ways: between two perpendicular structures or at the point where the wall joins another.
Corner knitting technologies:
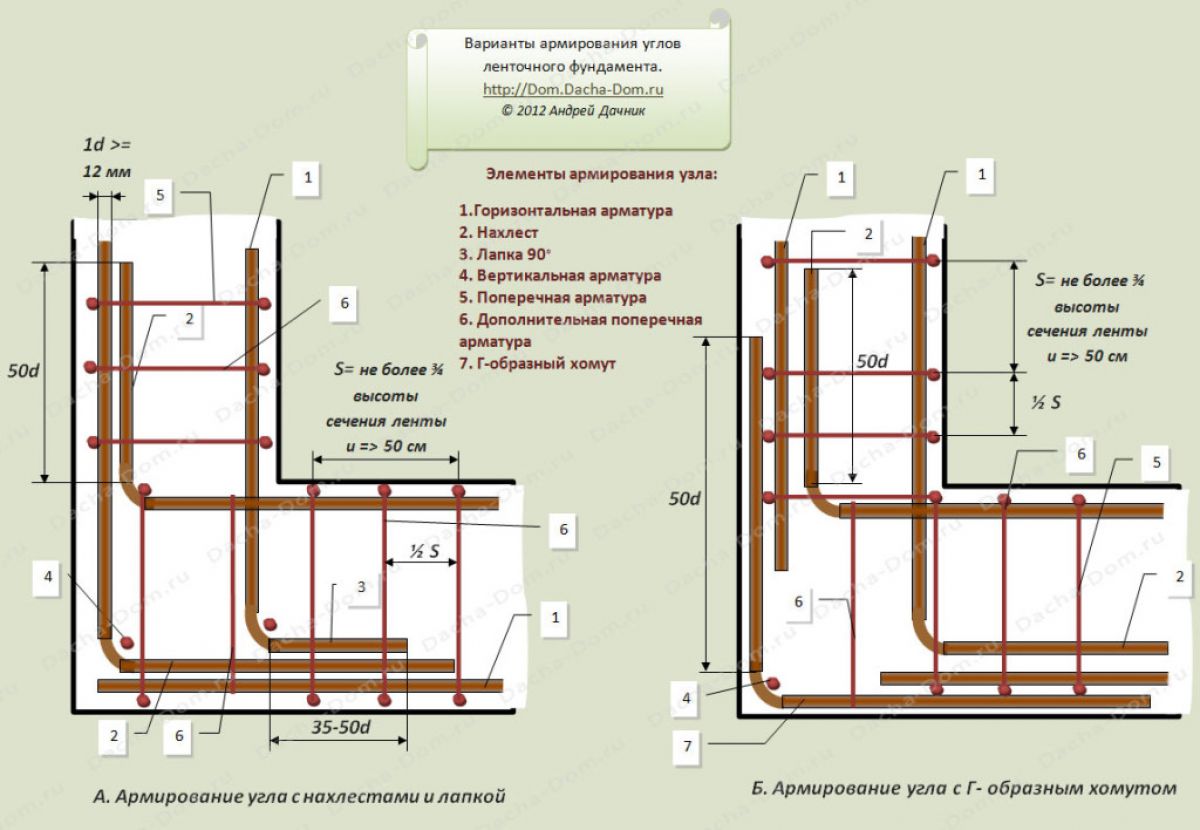
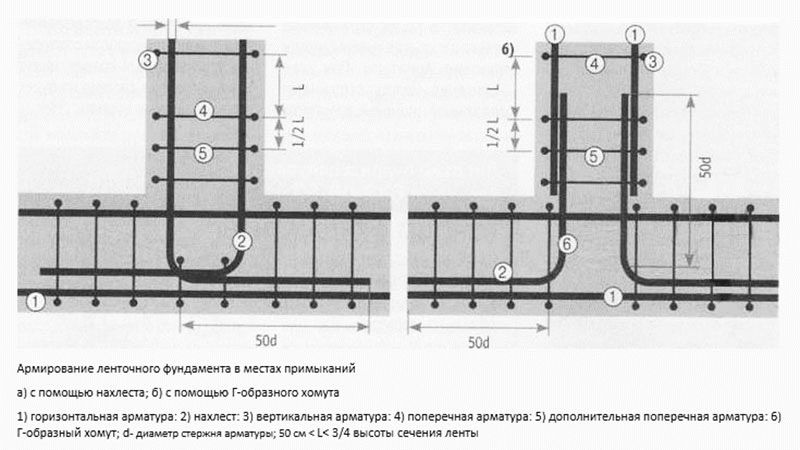
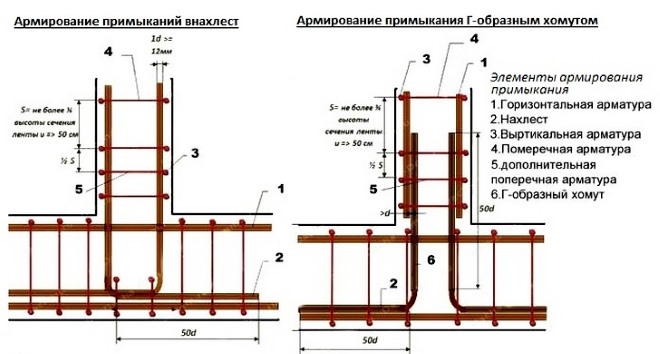
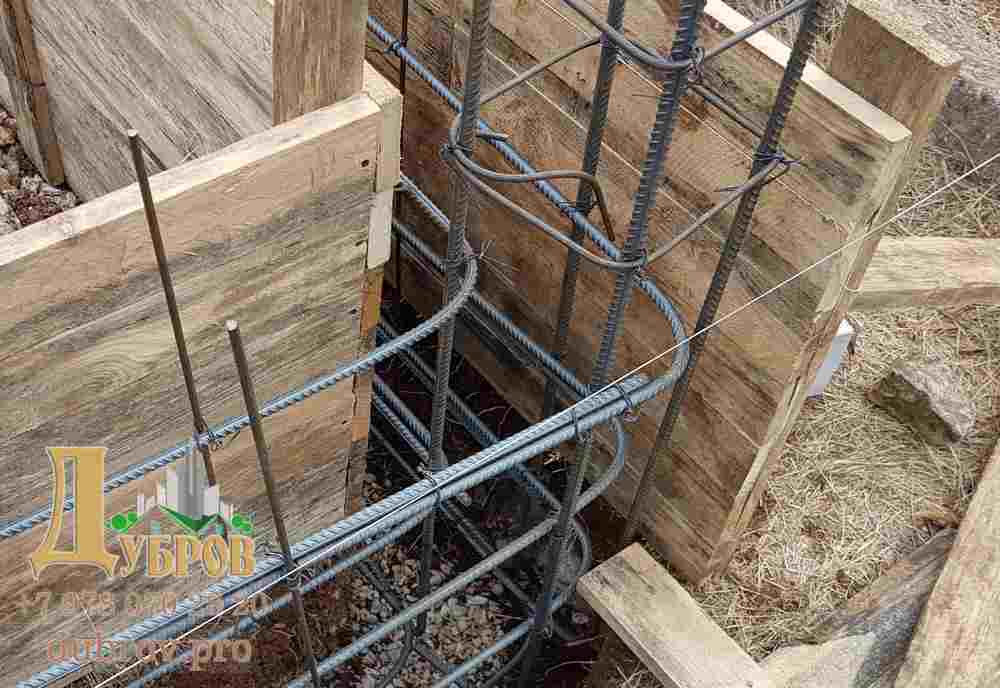
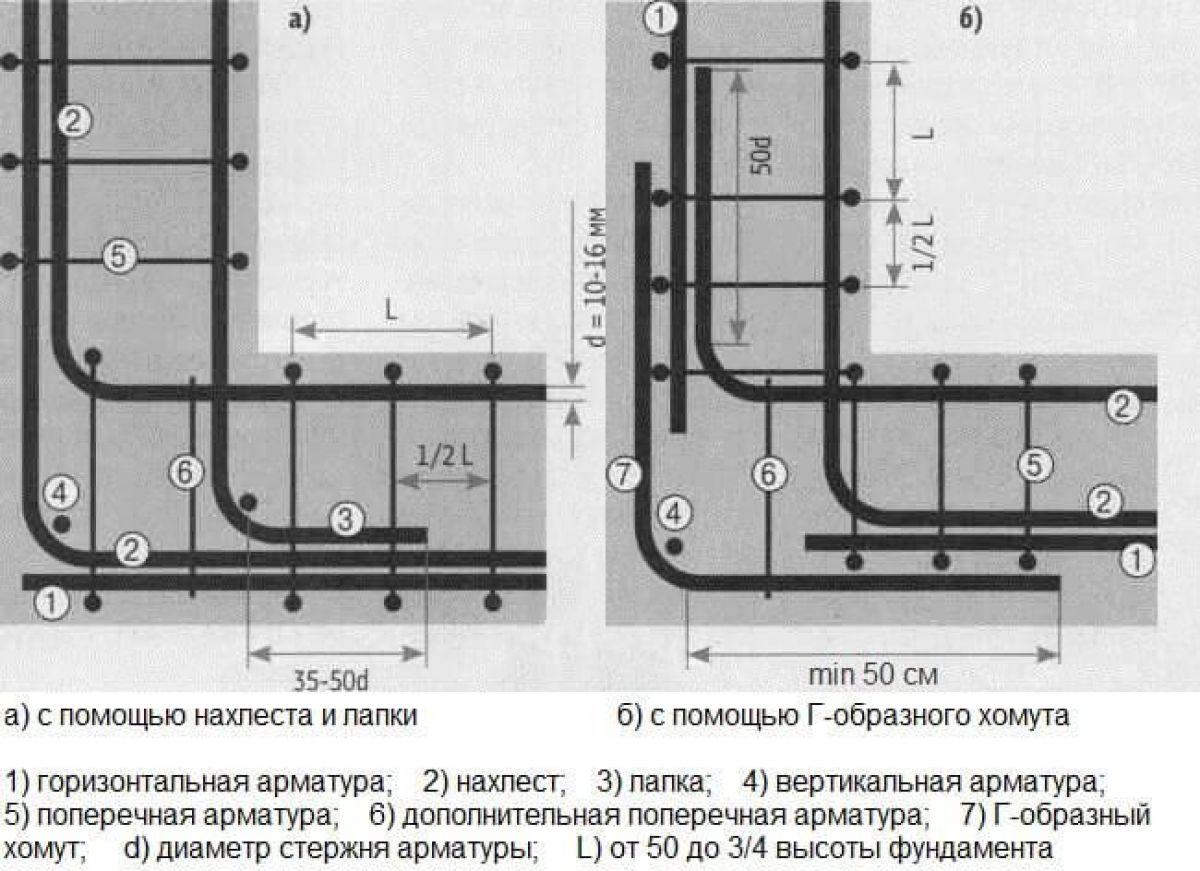
1) Rigid foot - at the end of each rod at a right angle knit a foot with a length of at least 35 rod diameters, connect the bent part to the perpendicular section. This is how the outer rods of the wall frame are attached to the outer rods of the other, while the inner ones are also welded to the outer ones.
2) G-clamps - instead of a foot, take a clamp with a length of at least 50 reinforcement diameters, one side is attached to the frame of one wall, the other is attached with a perpendicular one. The outer rods are connected to the inner ones, the step of the clamps is ¾ of the wall height.
3) U-clamps - for one corner, you need to install two U-clamps with a length of at least 50 reinforcement diameters, each is welded to one perpendicular rod and two parallel ones.
Joints are created using similar fastening methods.
Features of the strip foundation
Strip foundations are more common than monolithic ones. It can be used in construction from different materials, it is possible to make it with your own hands. Also, during its construction, money is trite saved. But it also has a flaw. The production of strip foundations is only suitable for dry, stony soils. In wet, unstable ground, the device at great depths will not be cost-effective.
The strip foundation is a reinforced concrete slab of any selected dimensions. The dimensions depend on the pressure of the future house exerted on it. During construction, the preparation of the base is important. In addition, the reinforcement knitting scheme must also be strictly observed.
In order to avoid subsidence of the base and premature destruction, and possibly the house itself, additional compaction is made for the necessary strength of the base. If necessary, the strip foundation is supplemented with internal load-bearing lintels.
The depth at which the strip foundation is installed depends on several factors. If the upper soil layers are unstable, then the base of the base is installed below the freezing level. It can also be combined with piles. If the compaction of the base is sufficient, then there is no special need to immerse the strip foundation below.

How to correctly knit reinforcement for a strip foundation
From the point of view of importance, the laying and knitting of the frame is in no way less important than the calculation. First of all, you need to understand why all these troubles for the preliminary collection of the frame
The task here is to arrange all the metal elements in space and fix them before pouring with concrete. And hold in place while pouring. Without violating the strength characteristics of the reinforcement itself - that is why the reinforcement is knitted and not welded.
Photo: Reinforcement knitting scheme for strip foundations
Heat treatment weakens individual areas at the edges of the joint and they become less durable to break. Although in seismic areas, welding is still used. But only vertical and longitudinal ties are connected. And the transverse ones still knit. True, as already mentioned, in this case it is worth using a special brand of fittings. The one with the letter C.
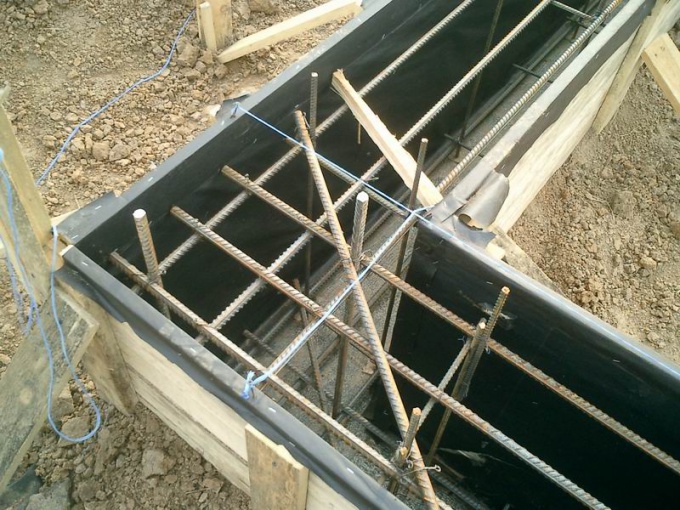
First, formwork is installed in the trench. Sometimes it uses the walls of the trench as a lower limiter, but this is not always convenient and possible. Therefore, it is still better to work with full-size formwork.
Any available materials are allowed into the formwork: boards, RSP sheets, metal
It is important that all structural elements dock with gaps of no more than 3 mm. Otherwise, the formation of shells is possible.
It is better when the strip foundation reinforcement scheme is drawn in advance - it will be easier to navigate when laying the reinforcement inside the formwork. If the formwork comes out high, then it is advisable to design it with a width of 50 cm or more, even if less massive structures are required in theory - just so that you can work inside it and connect the elements normally.
They knit at the intersection of any structural elements and, where they connect, build up. In this case, the knots go at least 25 cm apart, and the mutual overlap of the rods should be within 25 - 50 diameters. That is, with a thickness of 10 mm, the overlap should be from 25 to 50 cm. At the corners, the frequency of the clamps doubles.
It is impossible in the corners to simply overlap the longitudinal rods and tie them. To fix the corners, you need to use L-shaped or U-shaped (with a T-shaped abutment of the walls) bent elements. In this case, the overlap of the reinforcement when knitting is at least 50 diameters. In the corners, the number of transverse elements is also increased, launching them in increments of 0.4 of the element height, but at least every 25 cm.
Knitting reinforcement at corners
Technically, it looks something like this. Sand about 15 cm thick is poured into the bottom of the trench, spilled. Then the formwork is mounted and the first layer of concrete is poured in about 5 cm. To level the base. Then the formwork is mounted.
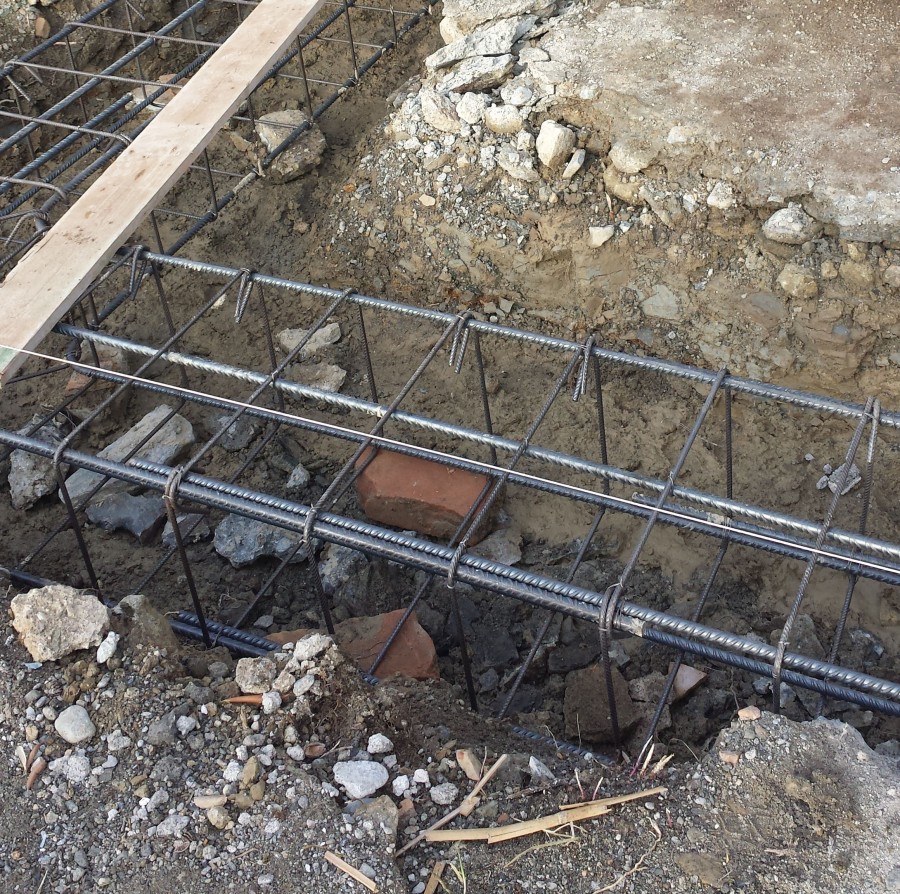
Longitudinal ties should be no closer than 5 cm from the walls of the formwork. Otherwise, they will rust. So that the reinforcing belt does not come into contact with the bottom of the mold, small stones or bricks are placed under it, which will then remain in the fill. But you can do it differently. In place of the transverse reinforcement bars, holes are drilled in the formwork along the entire lower belt, equal to the diameter of the reinforcement or slightly larger. In which then reinforcement rods are inserted, cut with a small margin. It turns out, as it were, small brackets, on which the longitudinal elements are then supported, and the vertical ones are screwed to them.
Corner knitting pattern
The fittings are mounted in belts. Better right in the formwork. It is much more difficult and physically difficult to twist all this outside, and then transfer it to the formwork. The rods are cut with a hacksaw for metal, a grinder, hydraulic shears - the more convenient what is at hand.
Connections
The traditional material for fixing reinforcement is soft knitting wire folded in half. It is considered to be more convenient
This is how they crochet the reinforcement
in total, the wire for tying reinforcement is in operation, the diameter of which is 1.2 - 1.5 mm. True, in construction manuals, the question is often raised whether it is possible to knit reinforcement with plastic clamps. This method is somewhat less budgetary, but preferable in terms of time costs.
Of course, the task of knitting is to fix a certain spatial structure before pouring it with concrete. And from this position, the use of clamps is permissible. But in fact, it is better to leave the method for some irresponsible and small-sized elements. For the foundation, it is still better to use wire, since somewhere you will have to rely on ties, somewhere you will need the most rigid fastening, which the plastic clamp is not able to provide. Moreover, there is a simple knitting device that significantly speeds up the process.

