Final stage of work

After pouring the foundation, the reinforced concrete strip is closed from above to prevent it from drying out and left to harden for at least two weeks. During cold weather, special additives are used, since at subzero temperatures, water turns into ice, which prevents concrete from hardening even after the temperature rises above zero again. In hot weather, concrete that hardens is poured with water because with excessive evaporation it stops the hardening process and turns into dust.
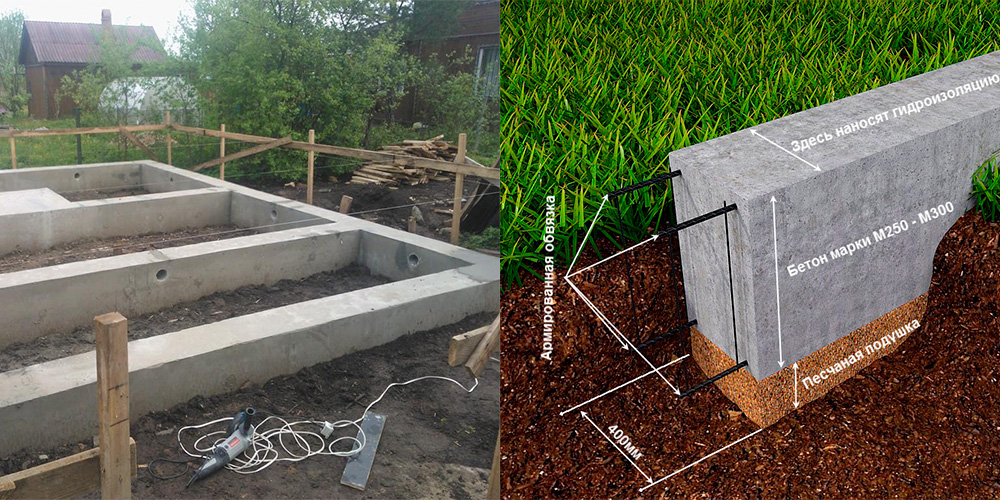
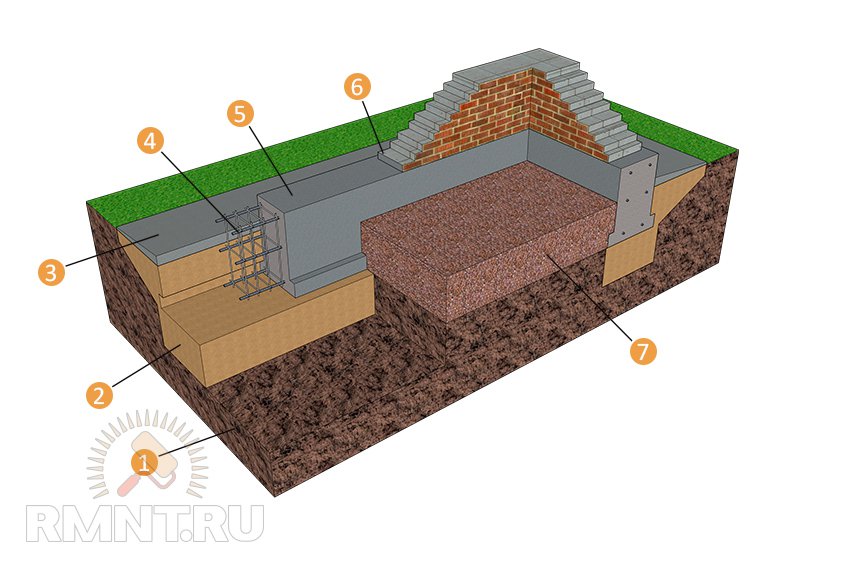
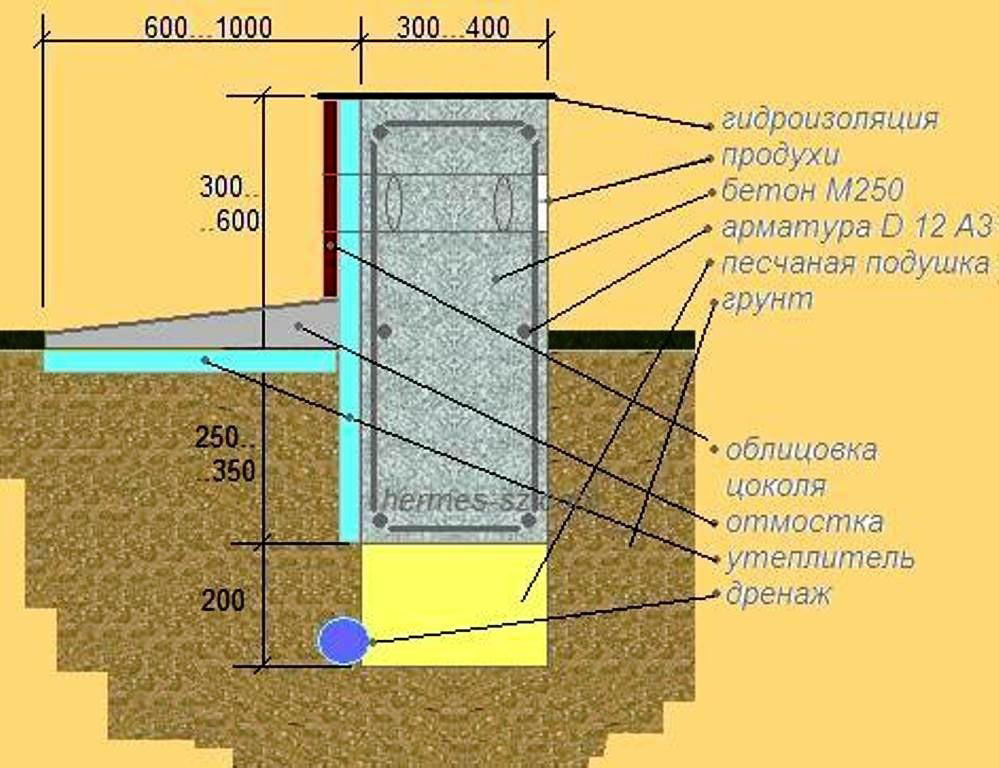
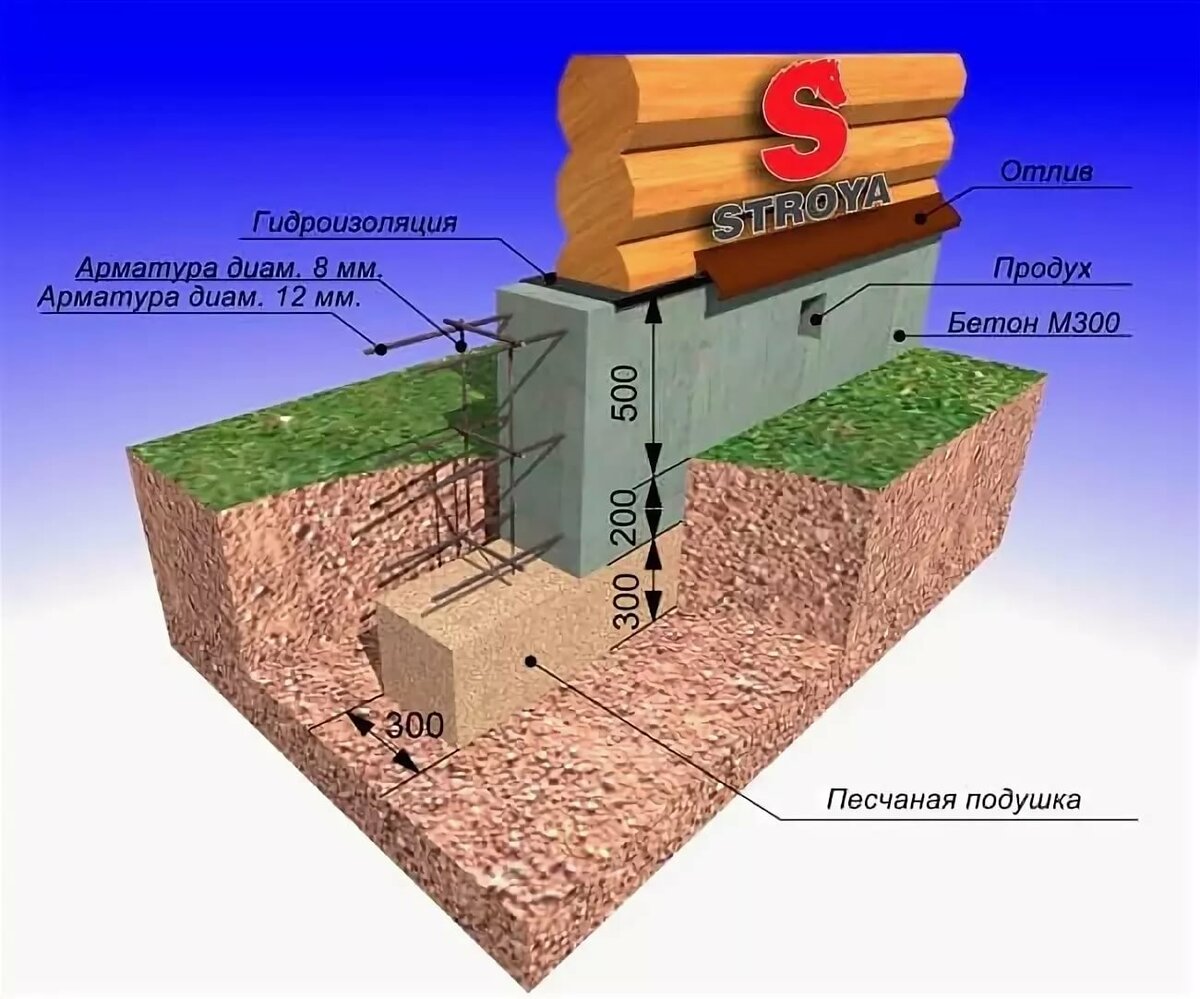
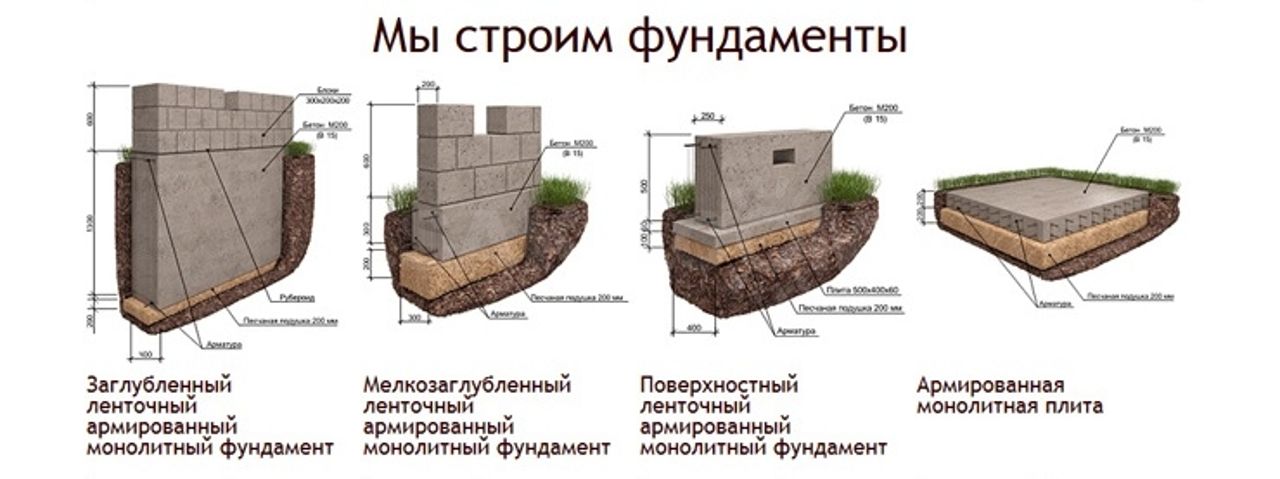
The strip foundation is poured under a low house, a bathhouse, or a panel house. It is attractive in that you can simultaneously cover all four sides of the house with the foundation. Before starting construction work on the installation of the foundation, the land is cleared, and the markings are carried out for it. Construction cords indicate the place of the future formwork, after which they begin earthwork. A trench is being dug, at the bottom of which drainage from gravel is filled up and compacted. Then the plank formwork is installed, where concrete is poured. To make the foundation stronger, concrete is reinforced by installing a lattice of metal rods in the formwork. The poured concrete is kept for at least a month, then the formwork is removed and work is carried out to waterproof the upper part of the foundation.
Construction technology
Once everything is calculated, it is time to start laying the foundation. It can be divided into several stages.
Markup
According to the plan, the site for the future building will be designated, and the scope of work will be determined using pegs and tensioned ropes.
Trench

A trench was dug to the correct depth. It is necessary to take into account not only the size of the base, but also the pillows under it. The width of the trench should be greater than the width of the base of the house so that nothing interferes with the formwork. After the floor has been completely dismantled, the installation of the pillows begins.
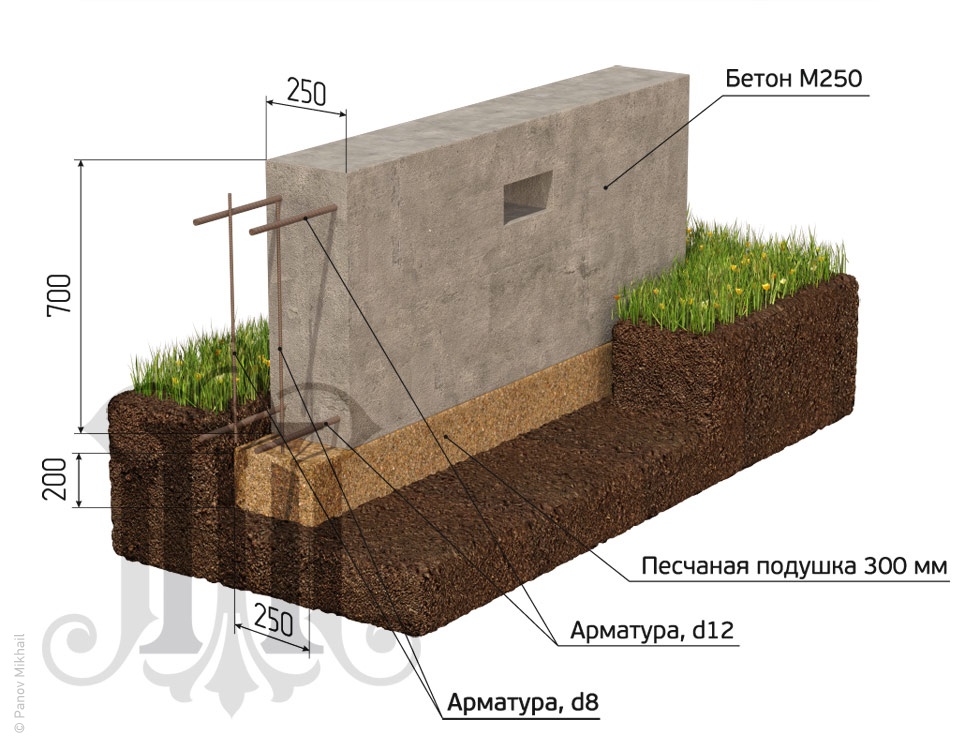
First of all, it is recommended to lay geotextiles in such a way that the sand does not mix with the soil. Previously moistened sand is laid in layers of 15-20 cm and carefully compacted with vibrating plates. After the completion of the formwork, you can proceed with the installation of the formwork.

It consists of plates, but you can buy it from a construction company made of metal or plastic. When installing the formwork, it is necessary to carefully monitor the verticality of the walls and maintain a constant distance between them. To enhance the use of the rods, rods are used that are nailed to the rods, which helps to hold the cast grout in place later on.
Formwork walls can be connected with wires. The inner walls of the panels must be smooth. Steel, asbestos-cement or other pipes must be laid in advance to allow ventilation of the substrate.
They are installed perpendicular to the formwork and filled with sand to prevent the penetration of concrete into the formwork and deformation during the installation of the foundation.
Reinforcement

After the completion of the formwork, the concrete must be reinforced before concreting. For light buildings, reinforcement can be neglected, otherwise it is strongly recommended to be neglected.
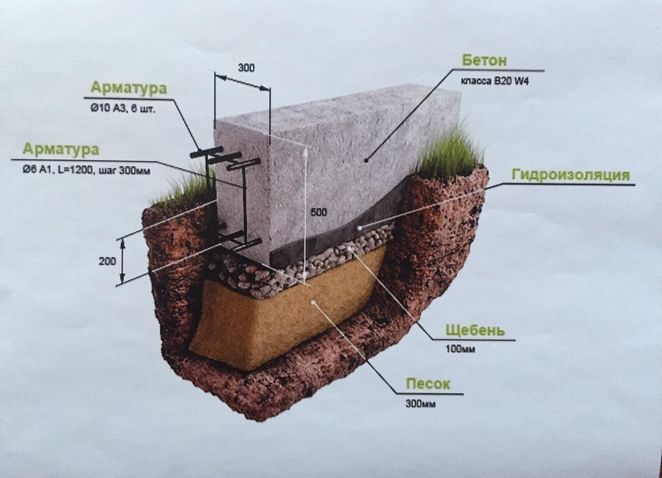
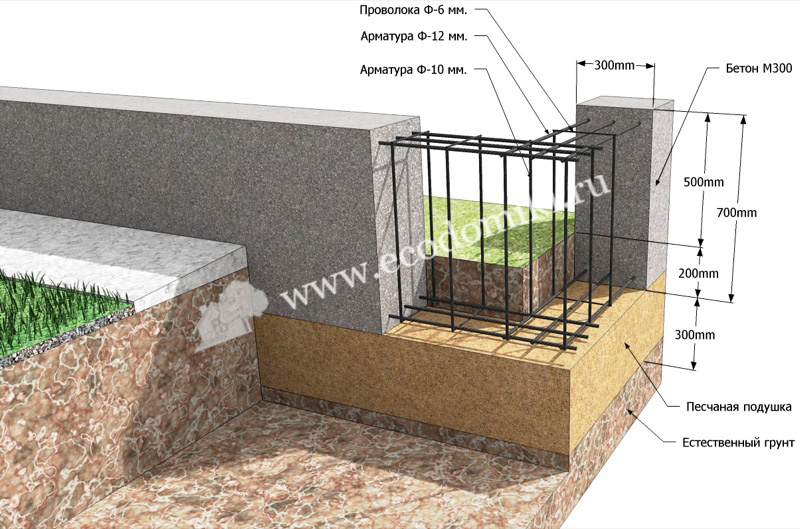
Fittings with a diameter of 10-16 mm are used, which are placed in the longitudinal direction along the entire length of the foundation. As a rule, in the lower and upper parts of the future foundation of the house, two reinforcing rods are laid, which are retracted a few centimeters from the edges, they are recommended for 5 centimeters. Steel rods with a diameter of 6-8 mm are laid transversely. They are connected with a wire.
For reinforcement, two reinforcing tapes are sufficient, but the number of tapes can be increased with a high foundation height and heavy loads.
In addition to the need to use welding equipment, this joining technology changes the structure of the metal and its mechanical properties by heating. Increased stiffness at the weld point can lead to breakage during concreting or create residual stresses in the foundation that impede response to temperature fluctuations.


Pouring with concrete
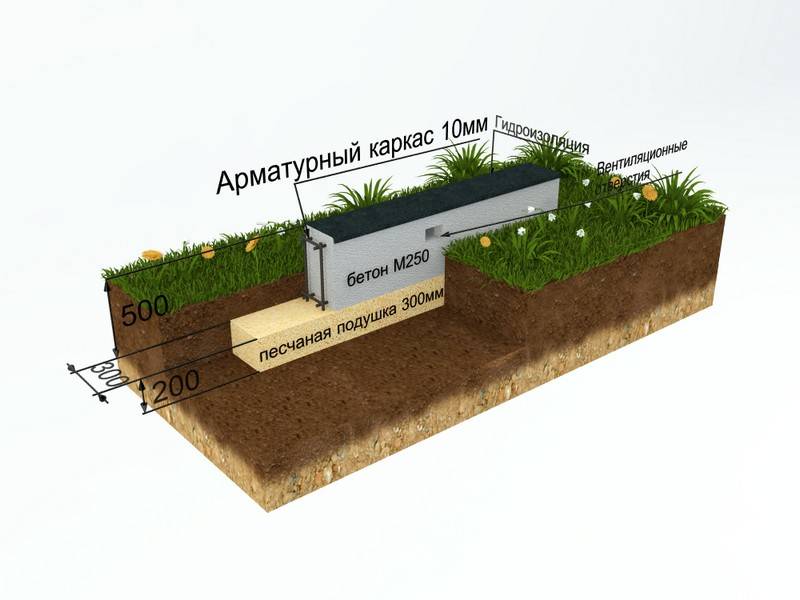
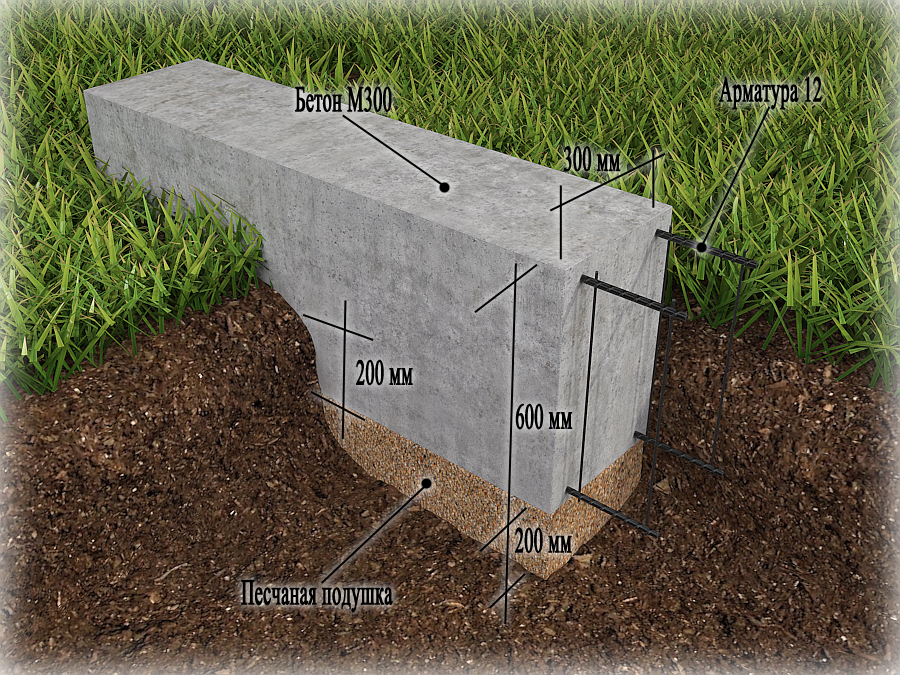
M200 concrete is often used in the construction of foundations. The finished mixture is poured in layers of approx. 15-20 cm.
Watch out guys! It is recommended to touch each layer with a vibrator or ram or at least a piece of reinforcement to pierce the surface and remove air pockets.

The next layer must be filled before the previous one hardens. After concreting, the foundation should be covered with a film and from time to time subjected to hardening, moistening with water.
The pre-curing takes 3-4 days, after which the formwork can be removed. The concrete will be suitable for further processing in 2-3 weeks.
Execution technology
 Before correctly pouring the strip foundation, it is necessary to prepare a land plot and perform a breakdown of the future structure on the ground
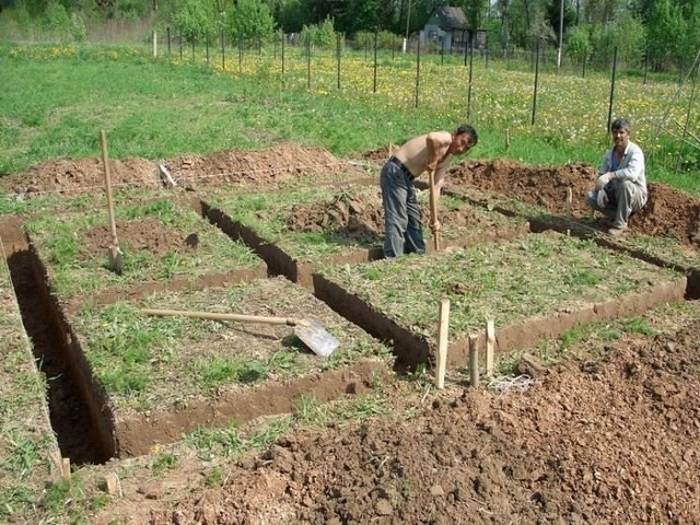
Before correctly pouring the strip foundation, it is necessary to prepare a land plot and perform a breakdown of the future structure on the ground. For this, the construction site is cleared of debris and unnecessary green spaces. Next, a breakdown of the axes of the future structure is carried out and their binding from the boundaries of the site. After determining the location of one of the corners of the house, a cord is pulled at a right angle to it. From it, the following corners of the building are marked and pegs are hammered. A cord is pulled over the pegs. The width of the foundation is measured from it and the second cord is pulled.
How the further construction of a shallow foundation is carried out, our step-by-step instructions and video at the end of the article will tell:
- We dig a trench with a shovel or construction equipment. We align the bottom of the trench to the level. At the bottom, it is necessary to make a sand cushion with a height of 200 mm. After laying, the sand is filled with water and rammed.
- Then a layer of insulation is laid. To do this, you can use a dense film, a concrete layer 10 cm high or roofing material. It is not worth using geotextiles in this case, since it will only reduce the strength of the base.
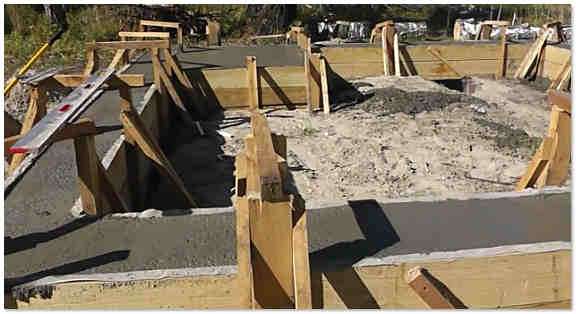
- Now we proceed to the construction of the formwork. To do this, you can use boards, moisture-resistant plywood, OSB or special boards. It is better to cover the inner surface of the wooden formwork with a foil. This will make it easier for you to remove the boards after the concrete has set, and they will become less dirty and can be used later.
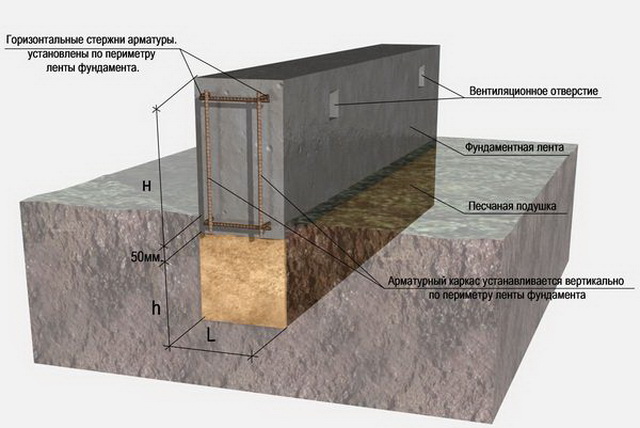
- The reinforcement cage is now being installed. For these purposes, we make a spatial frame from reinforcement with a diameter of 1-1.2 cm. The pitch of the transverse rods is 20 cm. The frame is installed in the formwork so that after pouring concrete from the edge of the concrete surface to the reinforcement there is at least 50 mm of the foundation body. This will reliably protect the frame from corrosion.
- Do not forget to install and tie pipes (sleeves) to the frame through which engineering communications will enter the house. It is also worth laying pipes for ventilation of the space under the house. To prevent concrete from getting into them when pouring, sand is poured there.
 After preparing or buying concrete mix, you can start pouring
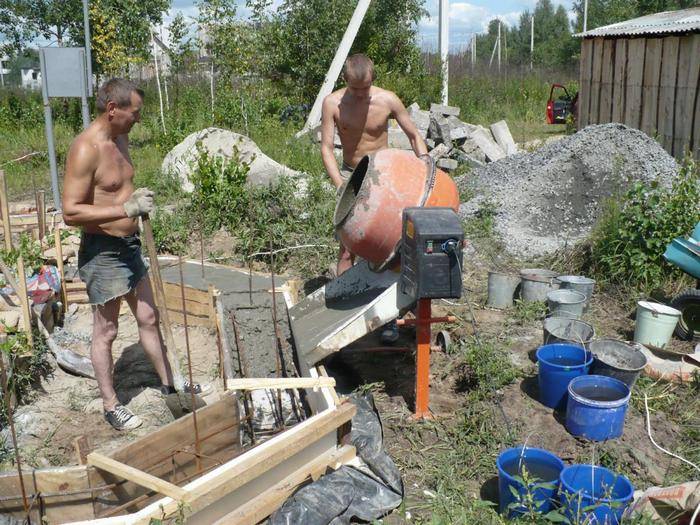
- 6.After preparation or purchase of concrete mix, you can start pouring. As a rule, pouring is done in layers. Air bubbles are removed in each layer using a deep vibrator. This will make the structure more durable. When pouring concrete, do not pour it from a height of more than 1.5 m, so as not to cause a decrease in the strength of the structure.
- 7.After pouring, the concrete tape is covered with plastic wrap for uniform evaporation of moisture. In addition, in the summer, it is necessary to wet the concrete for the first week to protect it from drying out. After a week, the film can be removed.
- 8. The formwork can be removed when the concrete has regained its original strength. This usually happens after two weeks. Complete solidification occurs after 28 days.
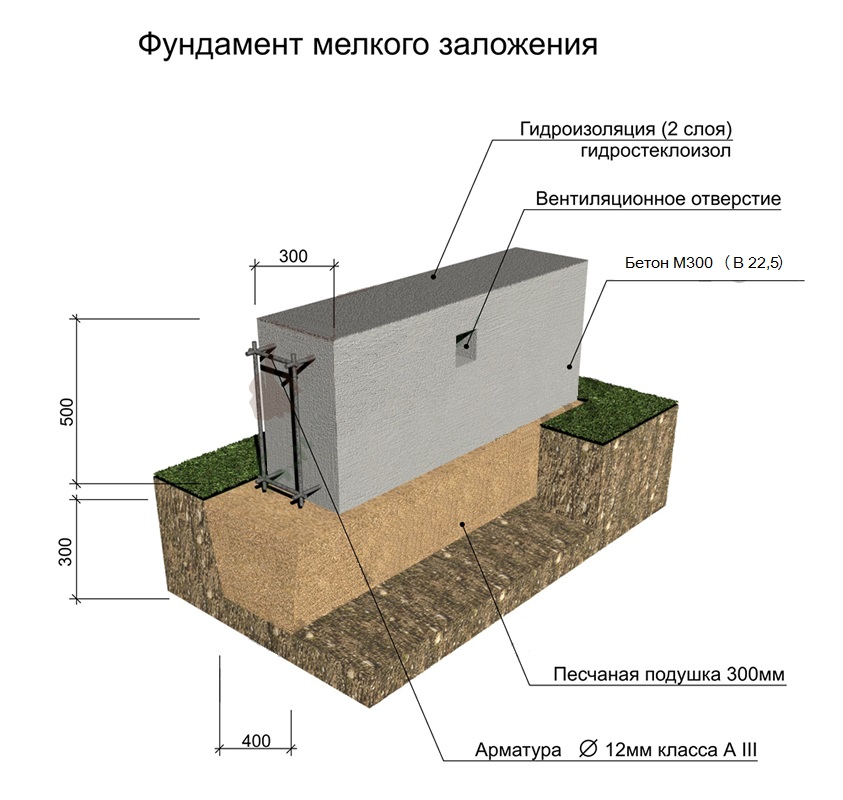
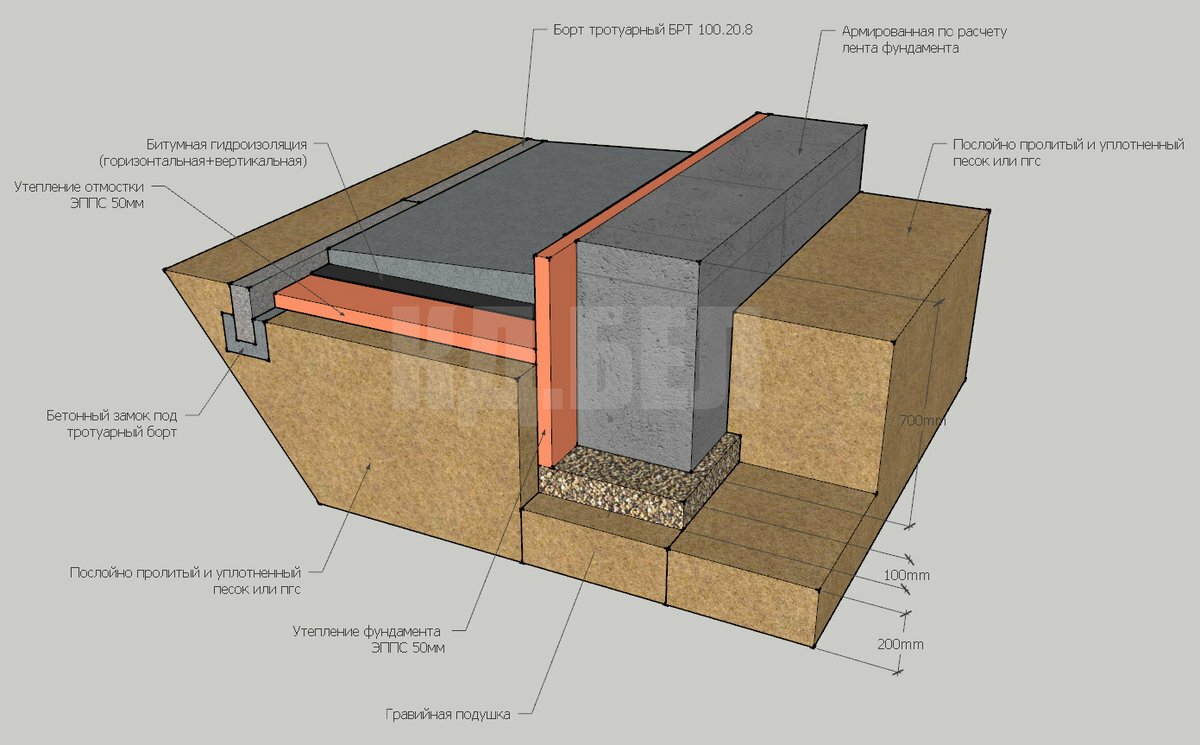
- 9. The walls of the foundation are protected from moisture using bitumen mastic, which is applied in two layers.
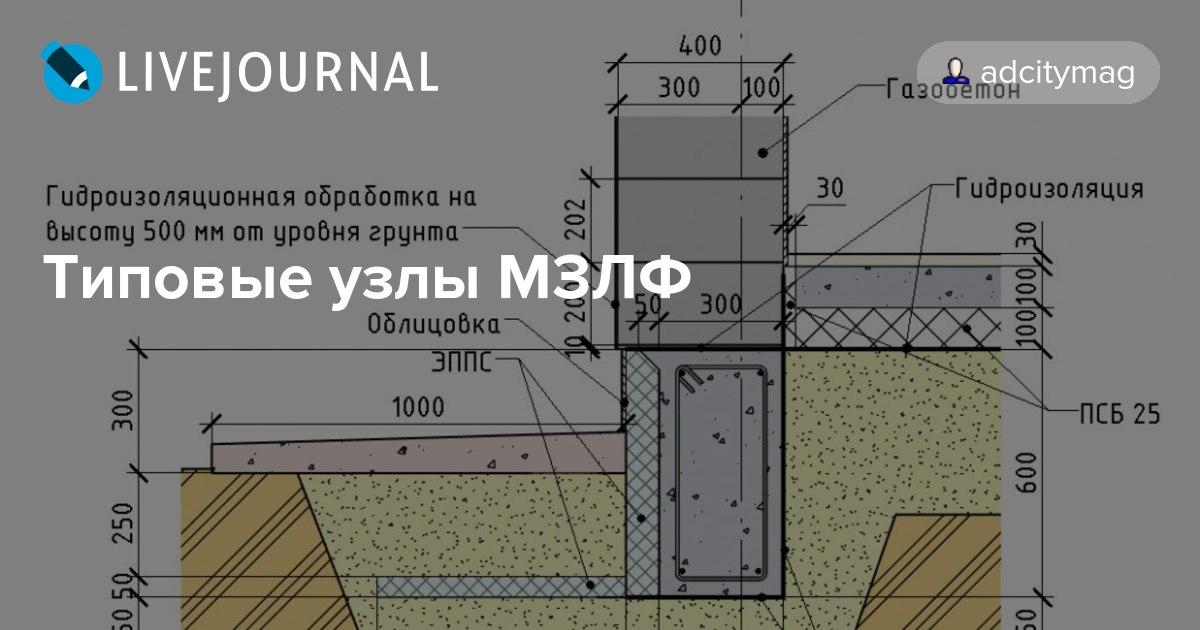
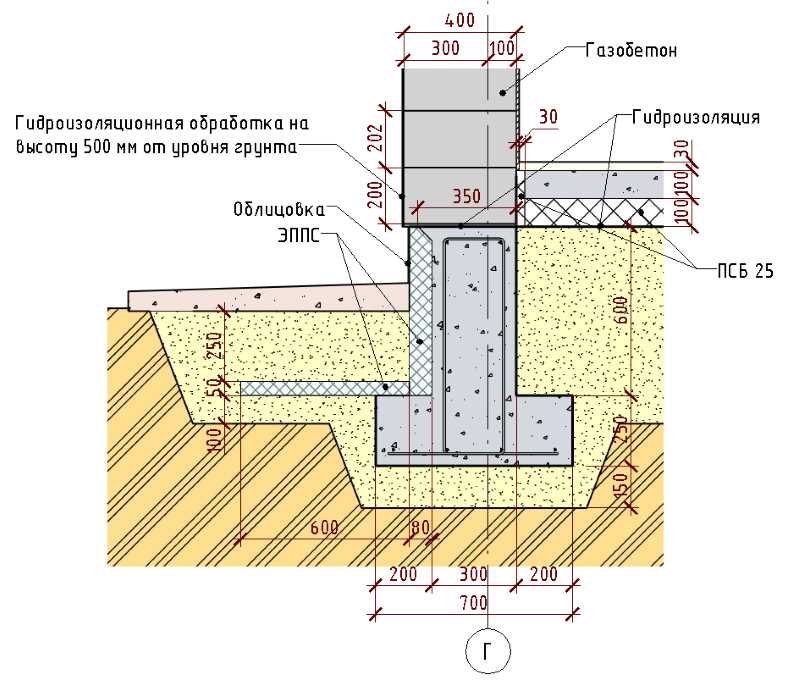
- 10. The base is insulated. For this, it is best to use extruded polystyrene foam. It is attached to the outer surface up to the freezing point of the soil. Thermal insulation of the basement in a house with a basement is especially important.
- 11. The foundation pit or trench can now be backfilled. For this, it is better to use a mixture of sand, clay and gravel, which is carefully rammed.
- 12. A blind area is made to protect the foundation from atmospheric precipitation.
You can find another option for performing a strip foundation in the proposed video:
Laying an unburied foundation
An shallow base can be made in three ways: monolithic, using a reinforcing knitting mesh, laying in separate blocks or bricks. All methods are practical and equally easy to perform. You can choose any option based on what material is available. To start doing construction work, you need to have an idea of where to start, as well as the sequence of further stages of construction.
First, marking and design is carried out, for this they conduct a survey of the area, study the properties of the soil in order to decide how deeply it is necessary to lay the foundation for the future structure. Having drawn up a project - cutaway drawings of the future building, you can proceed to further steps in building a house.
Step-by-step instruction:
- Markup. A cast-off of wooden bars is installed, which are nailed to the pegs - at a distance of 1.5-2 meters from the outer edge of the outlined corners of the base. Nails are nailed onto the bars, onto which a tape or rope is pulled - to indicate the lines of the future trench.
- Excavation. Trenches should be tried to dig initially even. To check, use a spirit level, a level and a tape measure. The subsequent material consumption, time and labor costs largely depend on the quality of work at this stage.
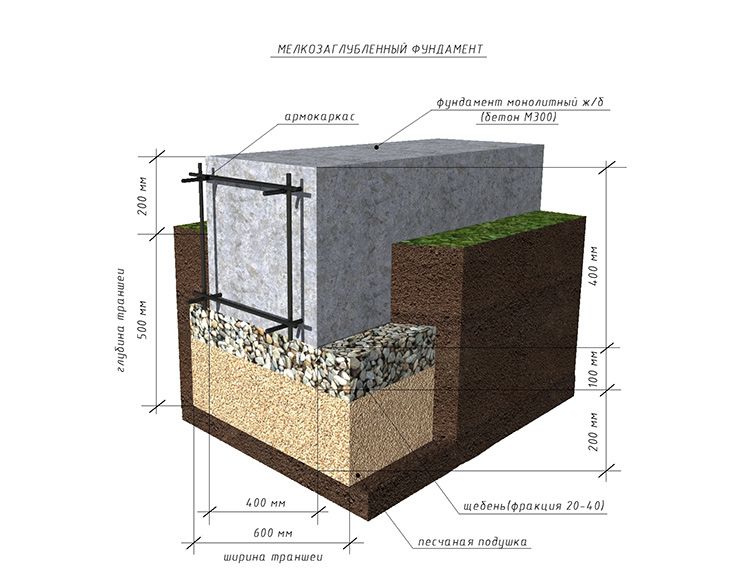
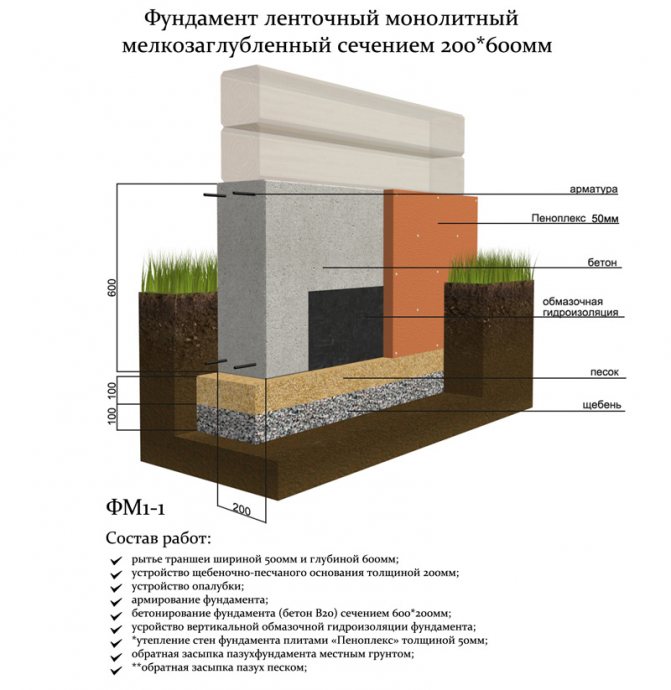
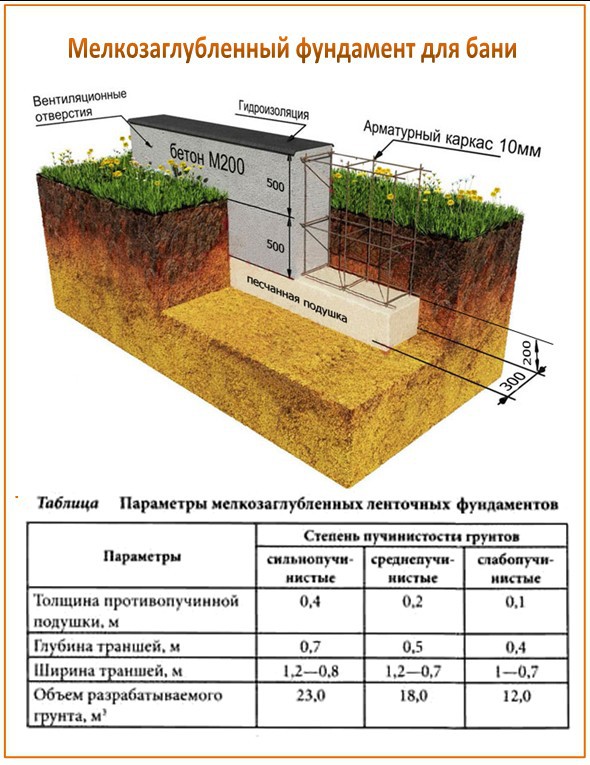
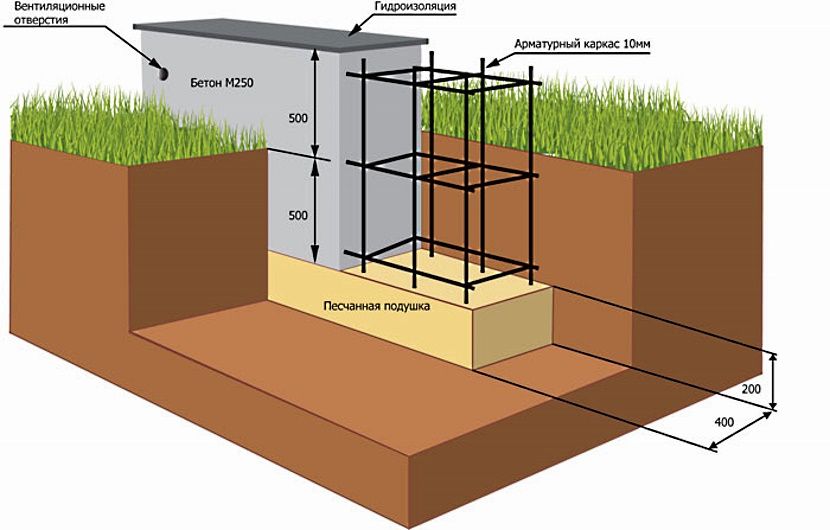
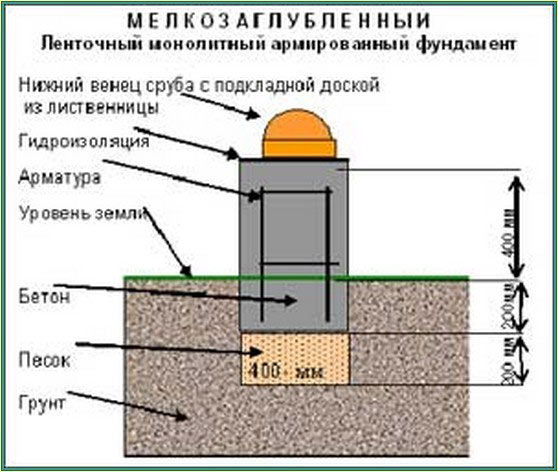
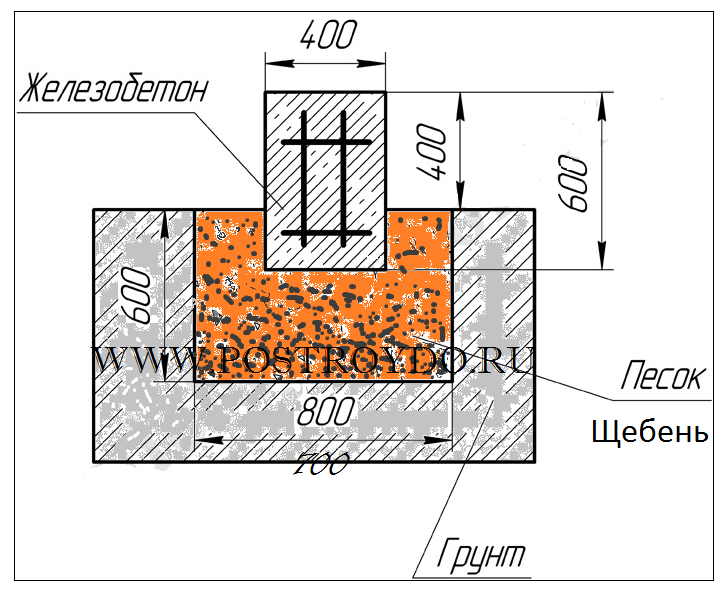
- Laying the pillow. Sand of a coarse fraction is poured into the bottom of the trench - 20 cm in order to compact the sand cushion, it is poured with water and tamped with a rammer. A layer of crushed stone, pebbles or expanded clay is laid on top - up to 20 cm.
- Reinforcement. It is not recommended to make a shallow foundation without reinforcing SNiP. To carry out the reinforcement, a rod with a cross section of 12 mm is used. The frame consists of 2-3 rows of reinforcement, horizontal rods are tied to the hammered-in scraps of the rod. Between the rods, a step of 15-20 cm is observed, the elements are connected to each other with a knitting wire.
- Formwork installation. Formwork is made from shuttering boards or boards. The formwork should rise 30 cm above ground level. After installation, the walls are fixed with spacers, pressing against the walls of the trench. "Sanitary" holes are made - sewerage, water supply.
- Pouring concrete. The mortar is prepared in the ratio of cement-sand 1: 3 - respectively. The metal frame should be poured with a layer of mortar at least 3 cm to prevent air accumulation and to give strength, the solution is compacted, air bubbles are expelled with a probe or stick.
- Dismantling of the formwork. Disassemble the shields after the concrete has completely hardened.
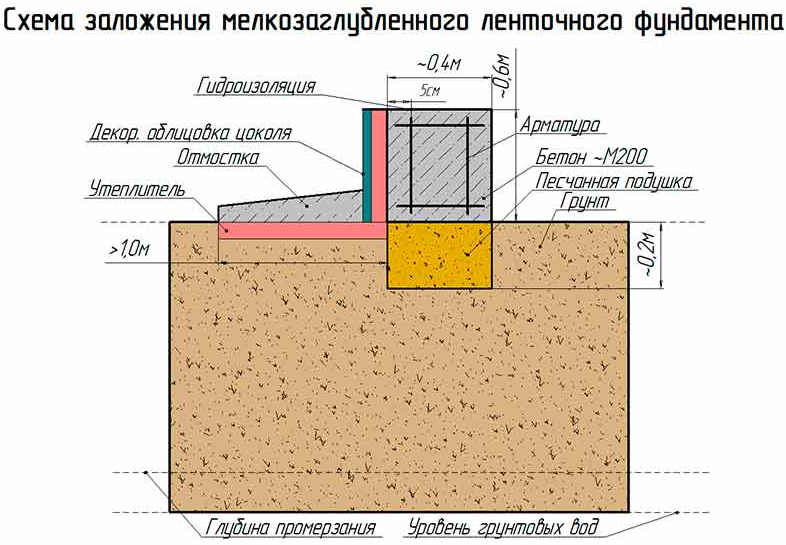
If the groundwater is close, you should think about waterproofing. An inexpensive way to produce high-quality waterproofing is to use bitumen.


Phased production
Like any type of foundation, a shallow strip foundation with your own hands is performed in several stages.
It is important to follow their sequence, since the quality of the future foundation depends on it.
Preparatory work
First of all, it is necessary to prepare a construction site. To do this, you need to clear the site of all dirt and debris, as well as remove the fertile part of the soil (about 15 cm). After that, the site is marked along the entire perimeter of the future foundation. To do this, pegs are placed in the corners of the house along the outer and inner sides of the foundation, and the twine is stretched. The corners must be checked with a square.
After the trench is ready, you need to lay a pillow under the foundation. So if the soil is heaving, a vibrating plate needs to be laid at the bottom of the trench, if the soil is normal, it is necessary to compact it with water impregnation, if the soil is mixed, then in order to tamp it it is best to replace it. If the site has fine and dusty sand, it is necessary to lay geotextiles on the bottom, and then make a pillow.
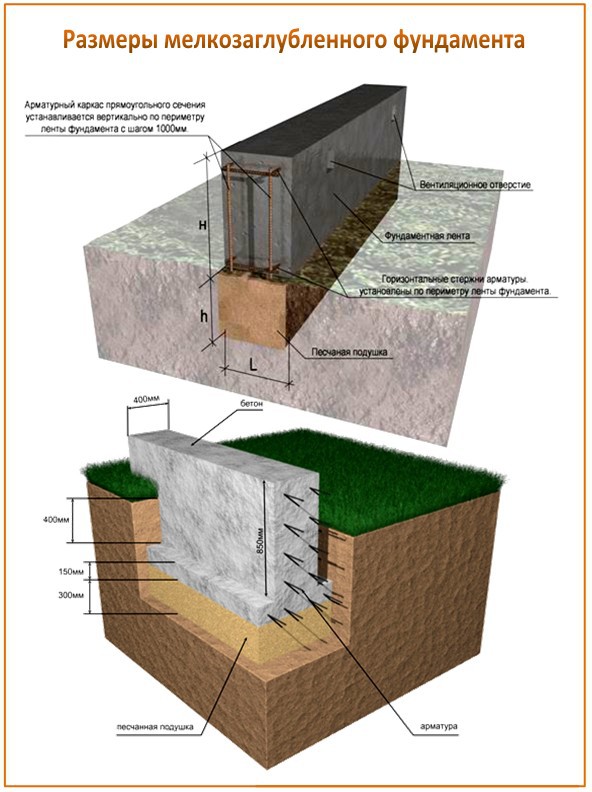
For a shallow foundation, it is important to know that the width of the pillow should be 30 cm wider. So the first thing to do is fill in the sand, which is well tamped.
10 cm of gravel is poured onto it and roofing material is poured over it. If it is planned to insulate the foundation, in this case it is best to purchase a permanent formwork.
Formwork construction
The formwork is being erected in order to get a part of the foundation protruding above the ground. It is usually made independently from plywood or edged boards. For this you need:
Drive vertical bars along the entire perimeter of the tape after a certain distance.
Knock down the edged board or plywood into the boards and attach to the vertical bars on both sides of the tape.
It is important that the caps of the screws remain inside the formwork so that the surface of the walls of the tape is flat.
After that, spacers are installed on the outside of the formwork, in order to avoid its deformation during the pouring of concrete.
With the help of a building level, it is necessary to check the horizontality and verticality of all formwork panels and, if there are any defects, correct them.
Finally, a cord is pulled along the entire perimeter of the formwork and a mark is made to which concrete will be poured.
Reinforcement
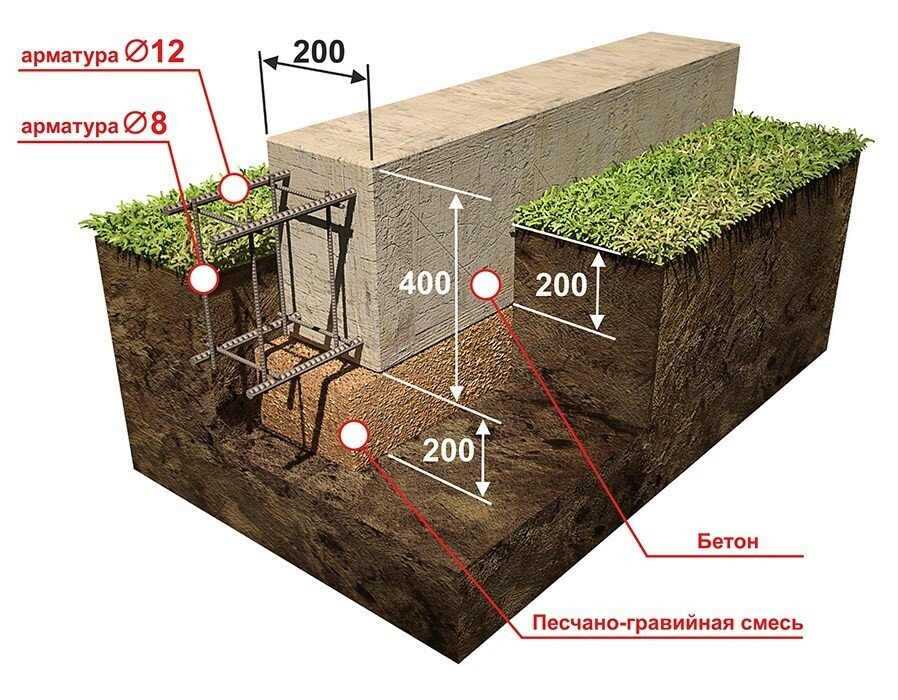
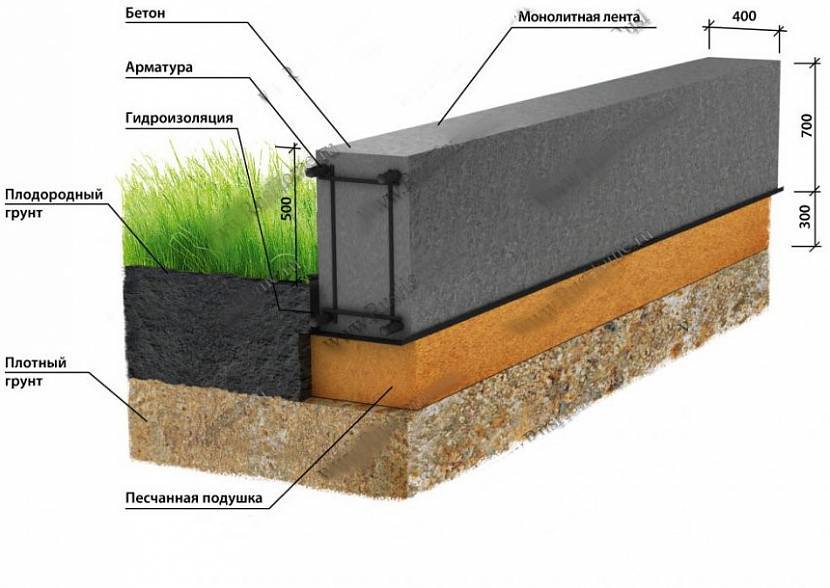
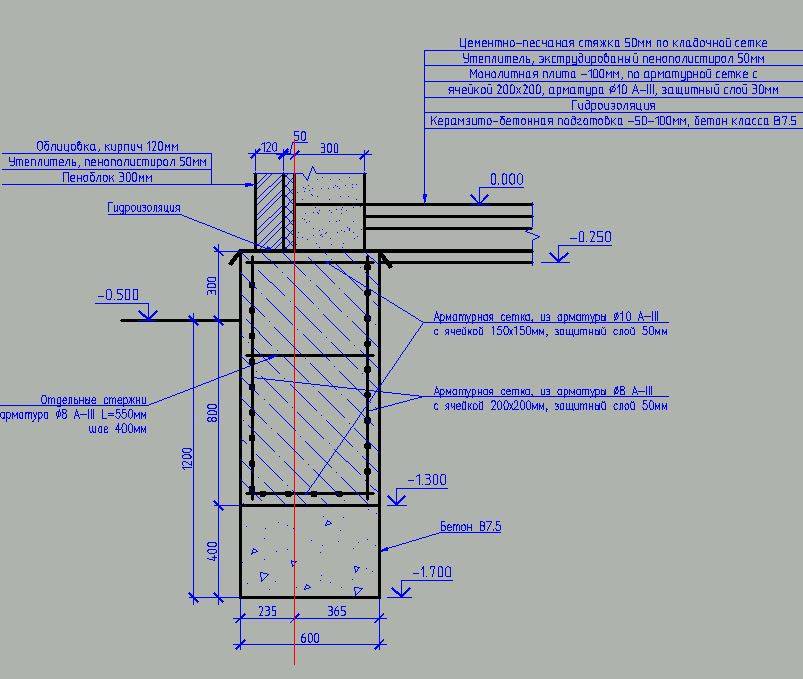
This stage in the construction of the foundation is very important, since it is the reinforcement of the foundation that increases the strength of the finished foundation. For reinforcement, steel reinforcing rods with a diameter of 14-16 mm and smooth reinforcement with a diameter of 8-10 mm are usually used. Steel rods are laid along the tape (as a rule, 2 rods in the lower tier with a foundation width of 40 cm and 2 in the upper tier are enough), after which they are fastened with vertical and transverse smooth reinforcement, creating a skeleton of the reinforcing cage. The result should be square or rectangular cells.
When reinforcing the foundation, it is very important to observe the distance between the rods, as well as to retreat from the walls of the tape by 5 cm on each side. This will avoid metal corrosion.
Knitting wire and a special hook are most often used to fasten the reinforcement. Experts do not recommend using welding, since in those places the reinforcement loses its characteristics, thereby reducing the strength of all structures as a whole.


How to fill a strip foundation with your own hands?
After completing the reinforcement, you can start pouring concrete
It is very important here to pour concrete at the same time, since the strength of the foundation poured in several layers drops significantly. For this, in most cases, a concrete solution is ordered at the factory, which is brought in a concrete mixer and poured immediately around the entire perimeter.
It is also very important to avoid the formation of air voids in the concrete solution, therefore, in the process of pouring concrete, concrete must be carefully tamped every 20 cm.To do this, you can use a special construction vibrator or tap with a hammer on the walls of the formwork
After 3 days after pouring the concrete, the formwork can already be dismantled, and the sides of the foundation can be waterproofed with special means (mastic, roofing material, etc.). The sinuses between the foundation and the ground are covered with sand, and from the outside they are protected with a blind area.
Stage 1: Preparation of trenches
The first step is to prepare trenches into which concrete will subsequently be poured.
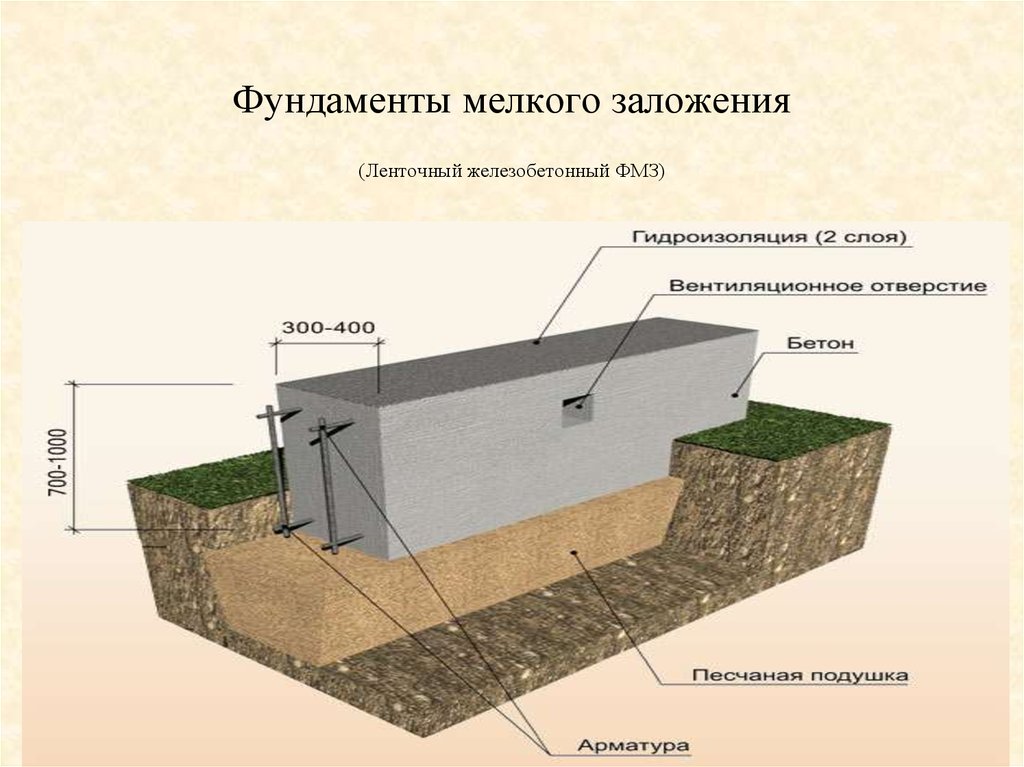
First, mark the site on which the foundation will be located. Then precisely determine the corners of the future structure - they should be as even as possible. Next, proceed to creating the base - dig trenches around the perimeter of the marked area. The optimum depth of the foundation is 50 cm. The width of each trench should be at least 60-80 cm.
When the grooves are dug, you need to compact the soil - equip a special pillow on it. If the basis of the site is dusty fine sand, the soil must first be covered with geotextiles - it will prevent siltation of the site and protect the foundation cushion from weeds, which are likely to grow in it due to high humidity.
 Trench preparation
The pillow itself should reach a height of 30-50 cm - this will be enough to give the foundation the necessary strength. First, sand is poured into a layer of 15-20 cm. It must be thoroughly moistened and tamped. Then add 15-20 cm of gravel. Moisten and tamp the base again. Next, waterproofing is carried out - sheets of roofing material are laid.
When the work is completed, check the level of the resulting base surface - it should be strictly horizontal.
Factors affecting foundation depth

The depth of the foundation is calculated by the specialists of the construction agency. The size of the submersion of the base of the house is influenced by the massiveness of the structure, the use of basement insulation and the depth of occurrence of spring waters. But, when installing the base, the depth to which the soil freezes is at the forefront. Taking into account the factors of freezing of the earth, the foundations are divided:
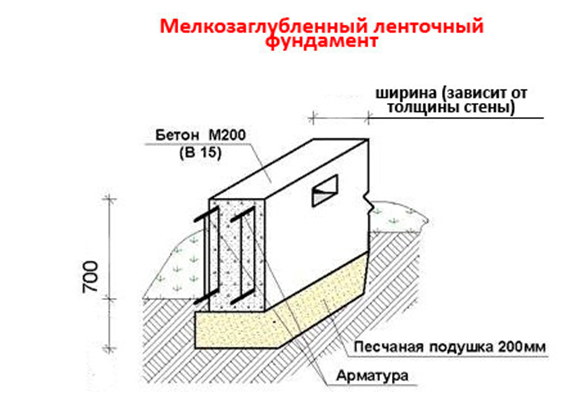
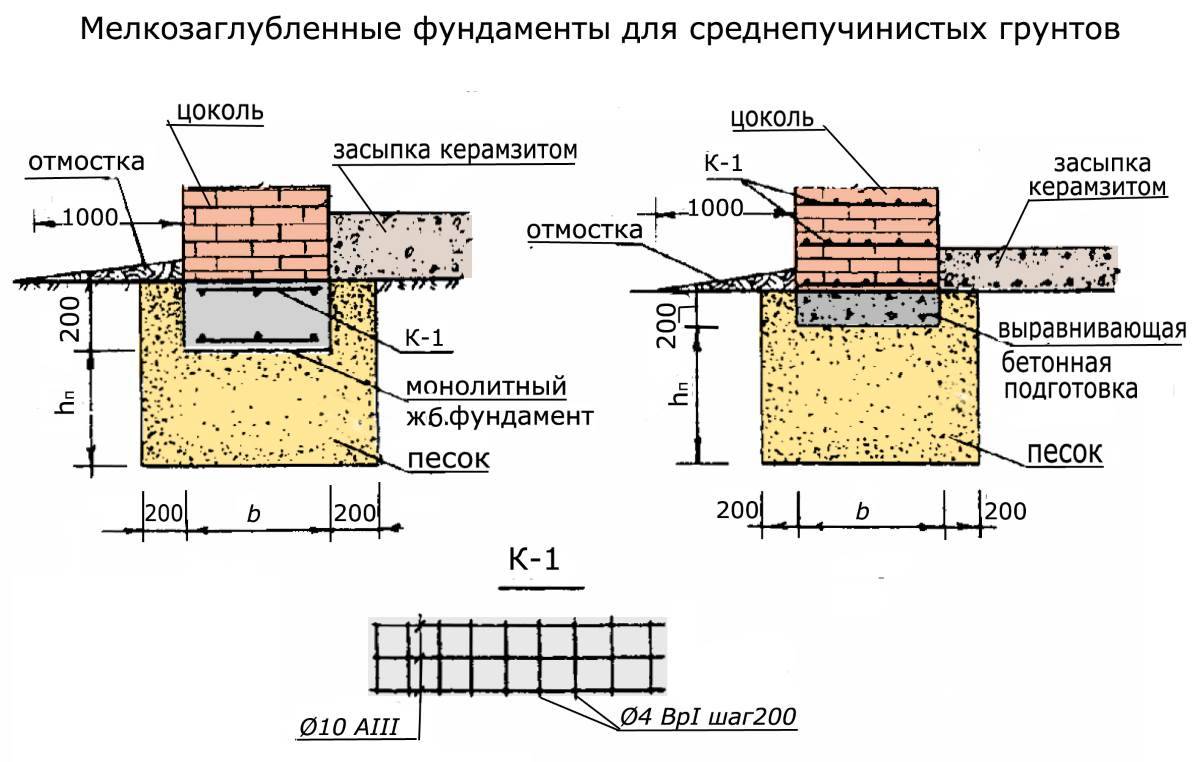
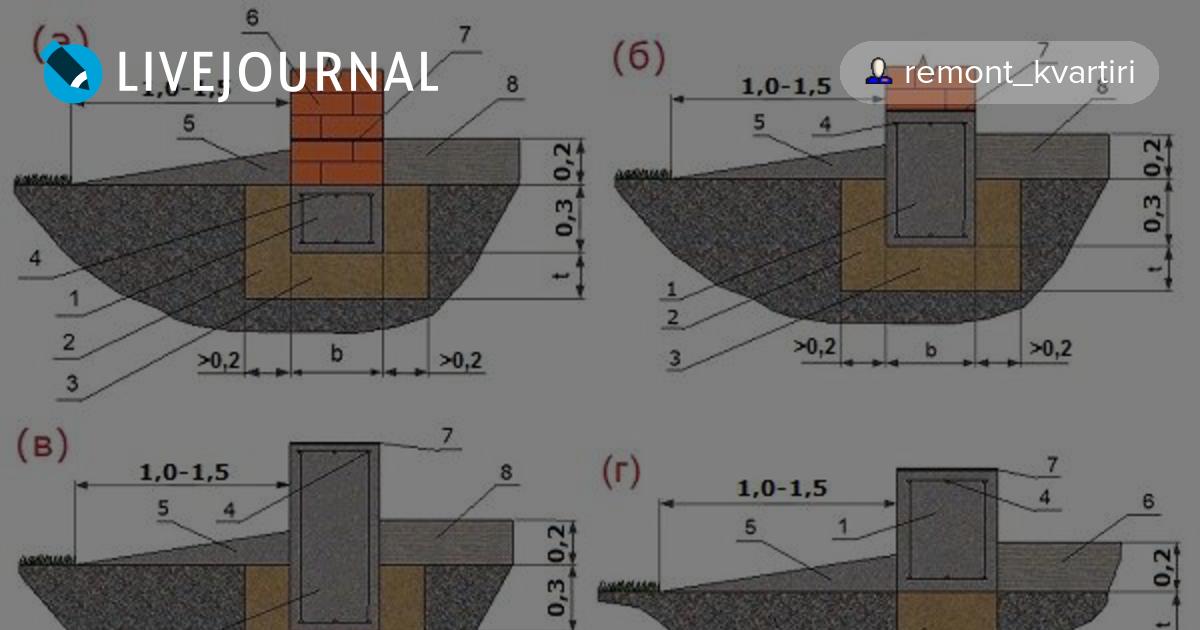
A shallow strip foundation with their own hands is placed in the ground at 0.4-0.6 m.It can be used in regions with a relatively warm air temperature, and a minimum depth of soil freezing. With external insulation of the foundation, the factor of soil freezing can be completely ignored. And, when a light house is built from frame panels sheathed with special materials, aerated concrete blocks and other light materials, it is the foundation with a shallow depth that is used;
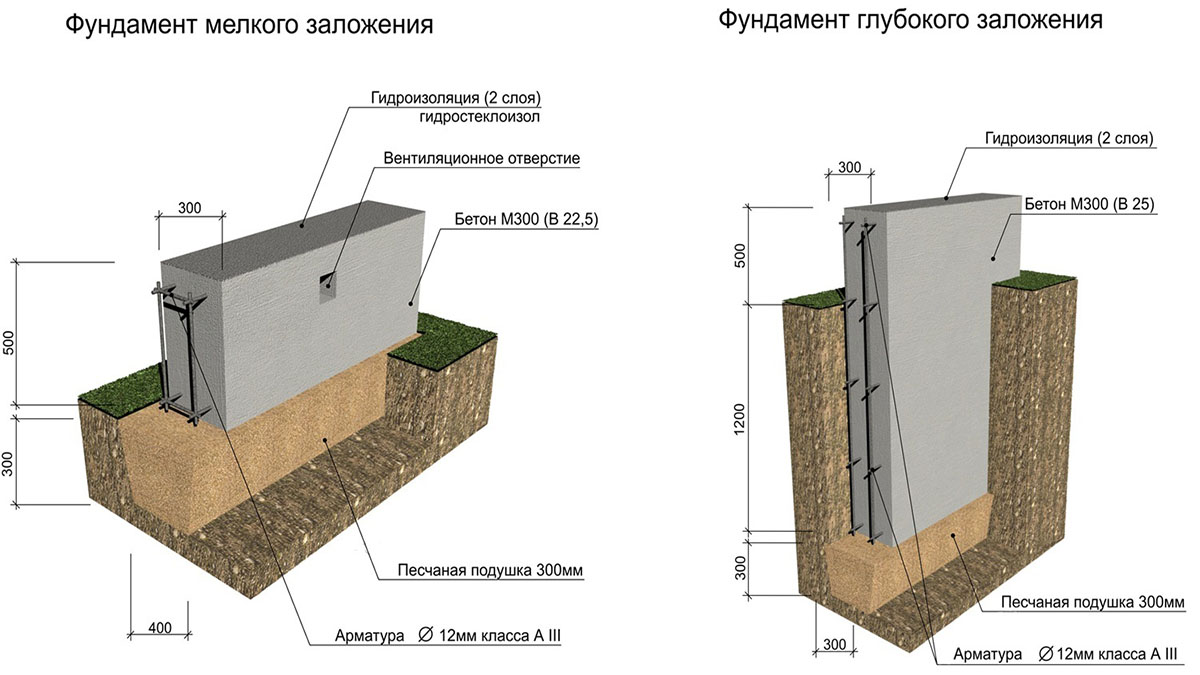


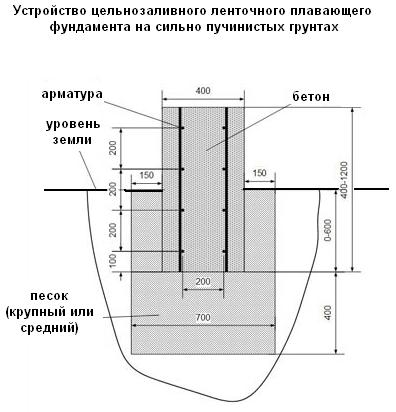


Do-it-yourself deep-buried strip foundation step-by-step instructions are more durable, and are located at a depth of 1-2 m.It is intended for massive houses and for areas with a cold climate, under brick houses of several floors, with overlappings made of monolithic concrete. Such a foundation is poured for construction on heaving fine-grained and sandy soil. Under the influence of low temperatures, loamy and sandy soils multiply their volume and swell, destroying the foundation. Similarly, it is affected by the occurrence of spring waters close to the surface.
Undoubted advantages and potential disadvantages of the strip foundation The frequency of using the strip foundation is dictated by a number of its positive qualities:
- only concrete cannot provide strength to the base of the house, therefore it is reinforced - before pouring concrete, a frame is mounted in the formwork, which is tied from metal rods. They work in harmonious interaction - the concrete provides resistance to compression of the foundation, and the frame resists tensile loads;
- the wide base of the foundation, which is deepened into the ground, ensures its strength and evenly divides the load on its total area;
- the long service life of the foundation allows the house to stand on it for more than a hundred years;
- the strip base of the foundation is used for any soils, even if they are able to crumble and absorb moisture - in winter such soil can form ice crystals and begin to swell.
The unfavorable factors of the strip foundation device include:
- the laboriousness of construction work associated with digging trenches, erecting formwork, tying a frame made of reinforcement and, in fact, pouring concrete;
- at least 15-20% of the cost of all construction work is spent on materials for the foundation;
- to reduce costs, the foundation goes deep into the ground, but only this depth does not affect the quality of the building.
Possible mistakes when building a foundation and how to avoid them
Very often, when building a shallow foundation, they can make mistakes and mistakenly believe that the higher the foundation tape, the better. In fact, this is not at all the case, and there are several reasons for this:
- The increase in the tape will entail the cost of increasing the reinforcement, otherwise the foundation will not be strong and easily deformed.
- When building a frame house on a shallow foundation, it should be borne in mind that the structure of the house is flexible enough, and in combination with a flexible foundation, they create one single structure that is not afraid of heaving of the soil. If you make the foundation much higher, then its flexibility is lost even when the house is pressed on it from one side, and heaving of the soil on the other hand, sooner or later the foundation will not withstand and crack.
I would like to note that if you need to raise the foundation higher, since its height is not enough, then it is best to do this by laying out the required height with a brick or an additional monolithic tape, which will be separated from the main layer of waterproofing.
Making a monolithic tape shallow foundation with your own hands does not make much effort, however, it is important to observe all the nuances and rules of construction. Only in this case, the result can be a high-quality foundation for any structure.
Features of the device
If you are choosing a foundation for a frameless house or a bathhouse on clay soil or black soil, then the device of a shallow strip foundation is best for you.
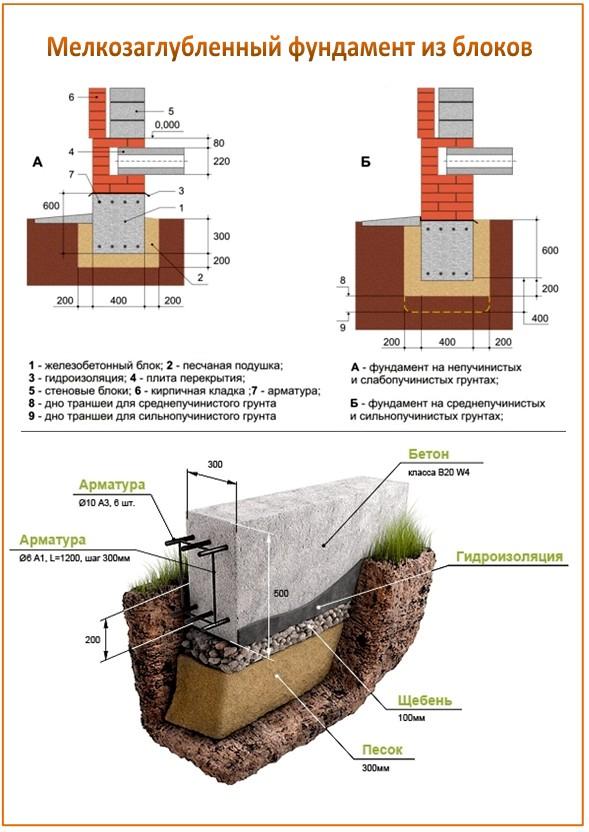
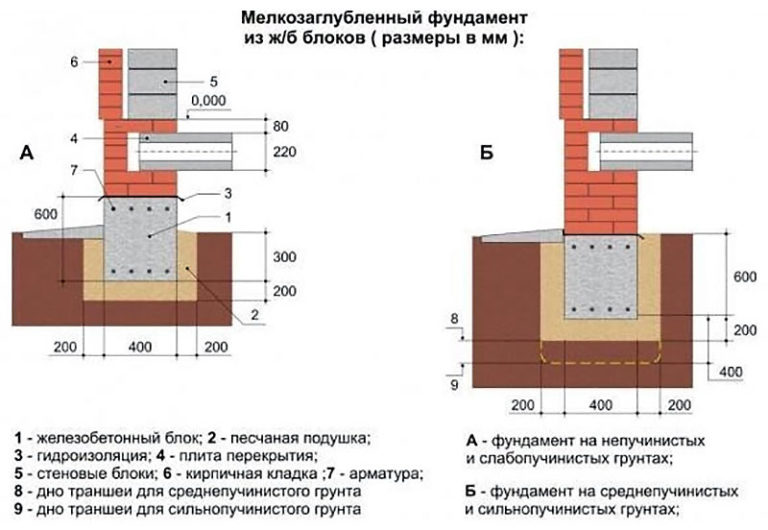
The types of strip foundations from aerated concrete blocks or FBS slabs are convenient for their design and method of transferring forces. They directly take the loads on themselves and transfer them to the soils that lie below. However, unlike foundations for a bath with a solid slab, concrete for the production of FBS blocks from aerated concrete takes much less time, as well as time.
Let's give an example when a shallow foundation is mounted directly under the load-bearing elements of a house or bath. If the house has a basement, then the loads are transferred between the block walls, floor slabs, and then the foundation.
If the house does not have a floor slab, and the floors of the house or bathhouse are filled with a conventional screed over pebbles, then the structural loads are transmitted directly through the walls of the house or bathhouse. In any case, the shallow columnar foundation of the building is considered universal. Even SNiP recommends building standard low-rise buildings or baths on tape bases made of FBS blocks of aerated concrete.
Appointment
Let's take an example, when a shallow foundation of aerated concrete blocks on clay soil or black soil differs from the usual one in that it has much smaller dimensions.
An example and calculation of a shallow strip foundation of FBS blocks made of aerated concrete shows that in this case, a slab on clay soil will be deepened by 60-70 centimeters, and the rest of its walls will serve as a basement. Such a solution can aggravate the problem of installing a basement for a house or bath.After all, the entire floor slab will not cover the space of blocks 1-1.5 meters high. But solving it is very simple.
You just need to finish building the missing part of the brick walls to the slab, and then insulate the shallow strip foundation from aerated concrete blocks (FBS). At the same time, the use of combined fences will help you avoid many problems that are associated with the excessive rigidity of the base of the house.
Schematic drawing of a shallow foundation
How many cases, when most of them are not even taken into account, however, houses made of blocks on heaving soils often face the problem of pushing or shrinking certain structures from the slab.
In this case, a deep reinforced rigid monolithic foundation made of FBS blocks can play a cruel joke with you. After all, his device will not allow him to extinguish the load, but rather will lead to the appearance of cracks.


Shallow strip foundations are placed on clay, sand, soft and hard ground. You have almost no limitations in this regard.
But immediately we note that if you plan to work on sandy soil or soil with a weak structure, then the calculation of shallow foundations does not recommend unnecessarily overloading the base by using a too heavy slab.
Anyway, shallow aerated concrete foundations are ideal when you need to build a relatively light house with a single solid floor slab.
For large cottages, you should still select more reliable and expensive options from FBS blocks. However, an accurate calculation will help you to choose how many to choose, it is better to turn to it.
Let us turn to the main pros and cons of such structures made of aerated concrete. They also matter, and quite serious.
Main pluses:
- profitability;
- practicality;
- the ability to extinguish loads from unstable soils;
- simplified calculation;
- construction is carried out using a simpler technology.
The main cons:
- not suitable for the arrangement of large, heavy buildings;
- in some cases it shrinks due to unstable freezing of the soil.