How to correctly knit reinforcement for a monolithic slab - general information
Slab foundation is an important element of the building, consisting of the following components:
- sand and crushed stone cushion, damping the reaction of the soil;
- branded concrete made according to a standard recipe;
- power grid, for the manufacture of which you can take reinforcing bars.
The reliability and durability of the foundation is determined by the quality of the slab, the upper part of which has to take the weight of the structure, and the lower one - to compensate for the reaction of the soil.
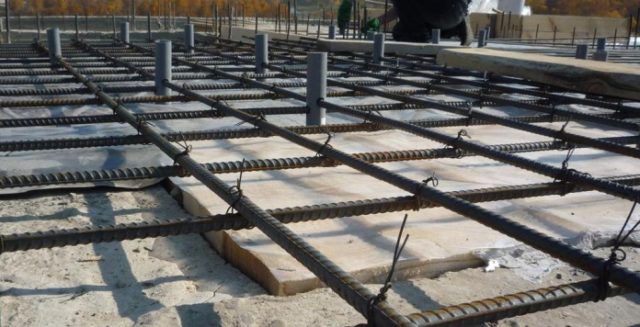 For a monolithic slab, tying reinforcement is much easier than for a strip foundation
The steel reinforcement load grid located inside the concrete mass fulfills a number of serious tasks:
- provides a margin of safety for the foundation;
- prevents the destruction of the slab and the formation of cracks;
- takes compressive loads and bending moments.
The solid slab is a floating foundation that ensures the integrity of the structure during ground movements. The design ensures the stability of buildings on problem soils, provided that the elements of the reinforcing lattice are correctly knitted and high-quality concrete is used. When performing knitting work, one should be guided by the requirements of the state standard, as well as building codes and regulations governing the features of knitting.
Let us dwell in more detail on the requirements for the reinforcement grid and the nuances of knitting:
- for the manufacture of the lattice, ribbed rods are used, which provide increased adhesion of the elements;
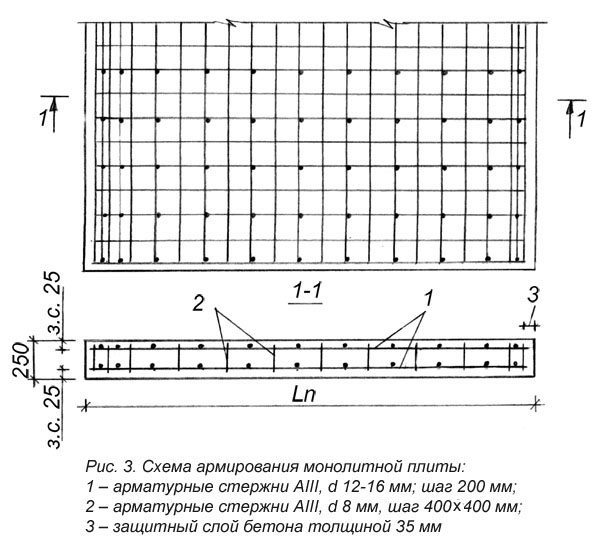
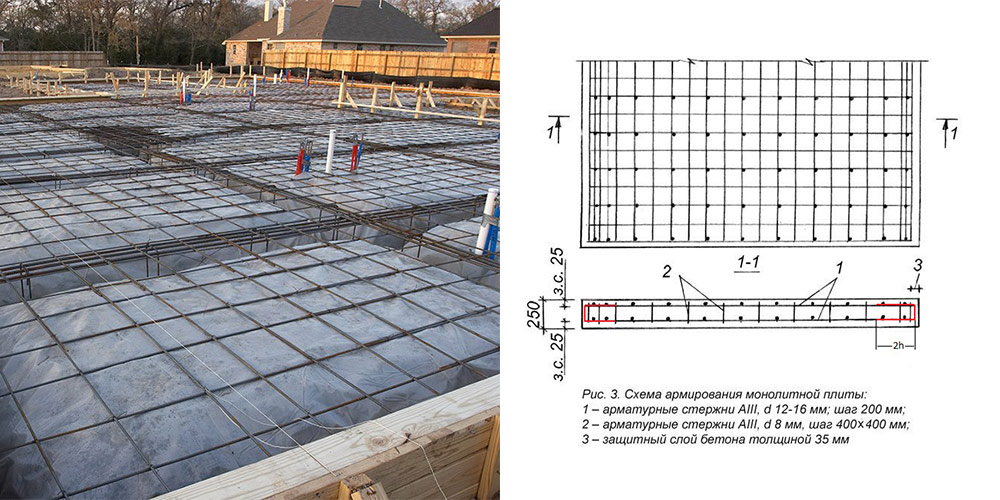
- form two tiers of power grids, interconnected by vertical rods with a concrete thickness of 15 cm or more;
- perform single-layer reinforcement with a grid with square cells ranging in size from 20x20 cm to 40x40 cm with a slab thickness of less than 15 cm;
- an annealed wire intended for knitting reinforcement is used for rigid connection of elements of the reinforcing cage.
Answering the question about the features of the correct knitting of reinforcing elements designed to strengthen the monolithic foundation, experts recommend using the following knitting methods:
 Rebar tying begins with the purchase of metal, the amount of which must first be calculated with the minimum possible margin
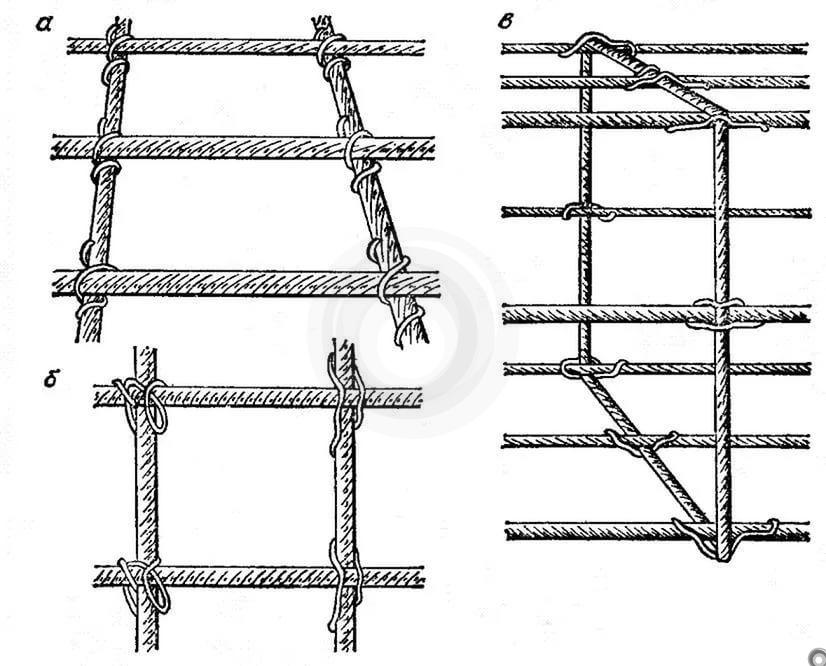
- manual, providing a secure fit at a minimum cost. To connect the rods, it is necessary to make significant efforts when performing work with pliers or using a crochet hook;
- semi-automatic, allowing to perform an increased amount of work due to the use of a special reversing device. The rotation of the hook occurs as a result of the reciprocating movement of the body;
- automatic, designed for accelerated tying of reinforcement at large industrial facilities. The use of a special knitting gun or screwdriver with a nozzle provides increased work efficiency.
The choice of a knitting tool is carried out individually, depending on the volume of work performed:
- for a one-time assembly of the reinforcing lattice, a crochet hook or a reversing device is suitable;
- when fabricating reinforcement cages on an industrial scale, an automatic gun should be used.
When performing work, a number of rules should be observed:
- to ensure a strong connection of the rods, correctly use a knitting wire with a cross-sectional diameter of 0.8-1.4 mm;
- the connection of individual rods should be made with wire in the areas of their mutual intersection;
- when twisting the wire, a force should be applied to ensure a rigid fixation of the reinforcing bars
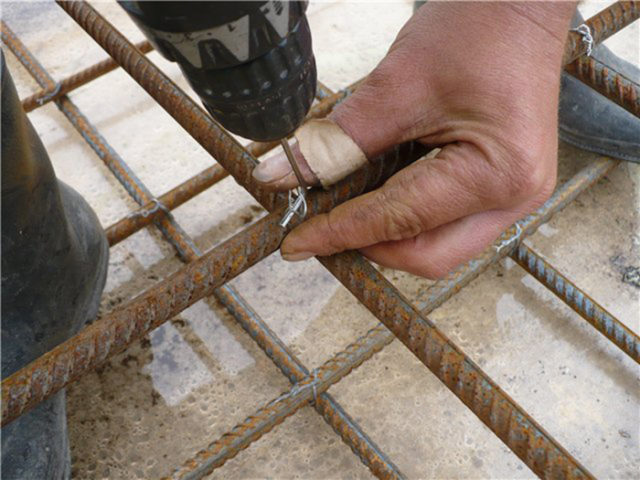 On the foundation, the reinforcement itself is laid and knitted, which is then connected into a common frame
How is the grillage and pillars reinforced?
- The columnar foundation is reinforced with rods. They are tied or welded using wire into frames.
- A layer of sand must be poured onto the bottom. Crushed stone is placed on top mixed with sand in the same amount. Further, in order for the metal to be reliably protected from moisture, approximately 100 mm of concrete is laid.
- Pre-prepared frames are lowered into the wells under the pillars.
- In cross-section, the dimensions of the frames should be at least the diameter of the well itself. Experts call such a layer of concrete a protective one, because, thanks to an alkaline reaction, it protects the metal from corrosion damage.
- During the manufacture of the frame, the outlets of the reinforcement must be bent horizontally, to a length of about 30-40 cm.If the work is performed by an experienced and competent specialist who knows how to properly weld (without overheating the reinforcement), in this case, bends will not be required.
As for the arrangement of the reinforcement rods, in such cases it is necessary to pay attention directly to the parts of the foundation:
- If a pile post made of reinforced concrete or bored piles is used - in this case, the load emanating from the displacement of soil massifs in a horizontal position is taken into account.
- If the grillage is monolithic and horizontal, the load is bending, since the beam is located on the supports at the ends, while there is practically no support under the middle part.
How should the reinforcement be positioned in the corners of the grillage?
The reinforcement of columnar foundations should be carried out according to a clearly indicated scheme. As for the corners, the bending of the rods should be at least 0.4 mm.
It is far from always possible to carry out welding - there are such grades of steel that cannot be welded with ordinary electrodes, since there is a risk of overheating of the rods, weakening of the seams, etc.
 How is the sole of the columnar foundation reinforced?
When choosing a reinforcing material, in any case, it is necessary to take into account the purpose for which the concrete will be used. For example, in order to strengthen the sole of the post, special nets are used.
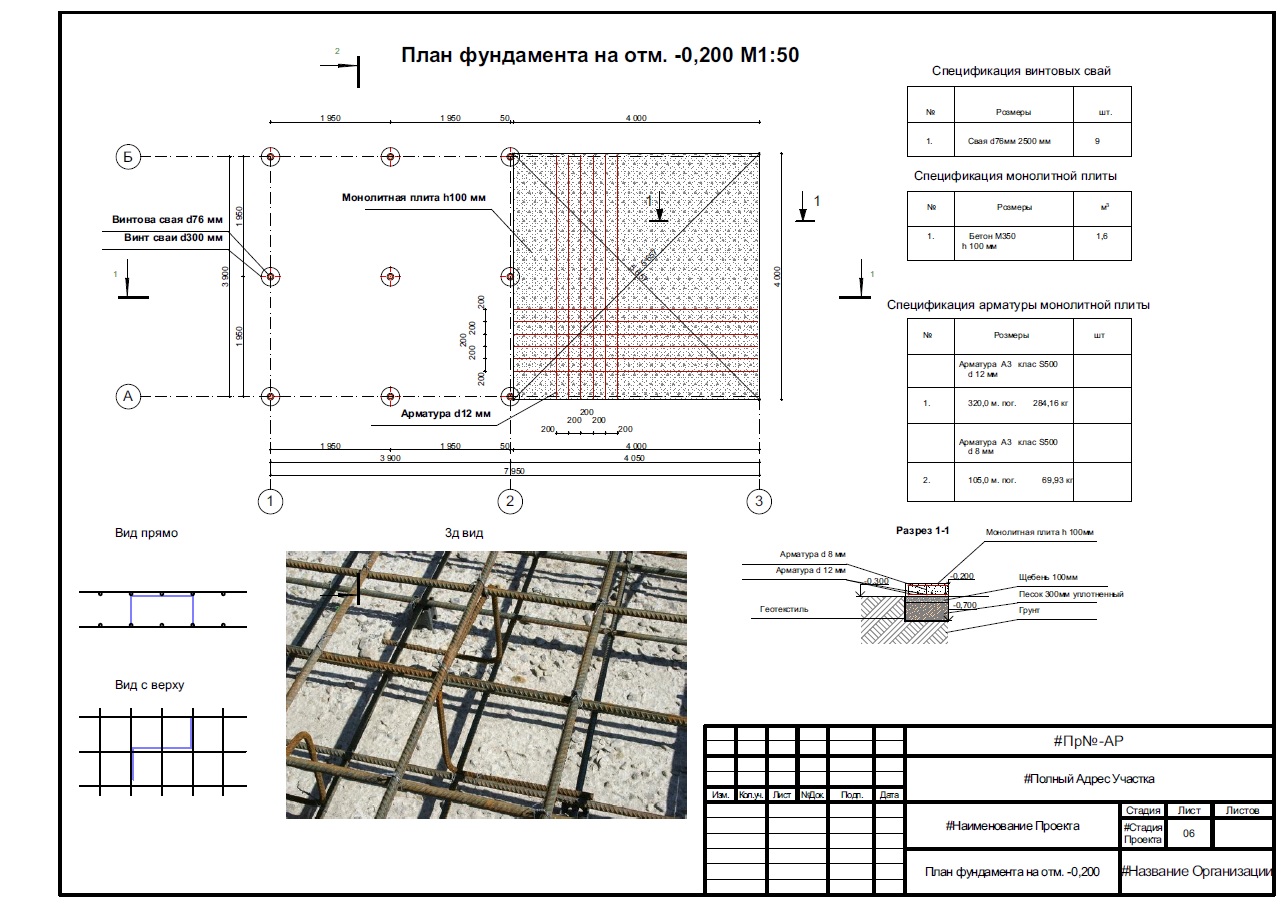
Calculations were made, thanks to which it was possible to establish that if the load is planned to be small - in this case, a reinforcing mesh will be sufficient, which has a diameter of about 5-6 mm. However, it is unacceptable in building codes to use a frame that will have a diameter of less than 12 mm. Therefore, if you need to carry out all the work in accordance with the standards, in this case, experts recommend a reinforcing mesh with a diameter of 12 mm, as well as a cell of 200 x 200 mm, for construction with low weight.
How is the grillage reinforced?
Before performing foundation work, the drawings should be carefully studied - regardless of who will be engaged in the construction: a specialist or a beginner.
In order for the frame to be spatial, horizontal grids must be connected to each other - using vertical segments. Choose the shortest length - otherwise there is a possibility that the frame will lose stability, while its strength may significantly decrease.
 The tape grillage is reinforced in the same way as the slab. But here it must be borne in mind that the installation conditions will be different - if you need to mount the tape, then the specialist's movements will be limited by the size of the formwork. But in any case, both times the binding of the frame must be carried out in the formwork.
The most common mistakes that should not be made when performing work are:
- installation of the frame on the ground;
- lack of centering of the frame during installation in the well;
- creating connections at the corners of the walls when welding rods;
- heating of the bending points of the rods during welding.
If you are not sure that you can do all the work correctly on your own, it is better to use the help of specialists, since the reinforcement of the columnar foundation is an important task that must be performed ideally
Reinforcement technology: the order of implementation and features of the stages
The frame for the future foundation is calculated and installed based on the dimensions of the trench, from the working reinforcement and auxiliary wire. Its parameters are calculated in advance, taking into account the expected load; it is convenient to assemble the structure on a long workbench. Installation of fittings takes place in stages:
Collecting vertical elements (clamps). The vertical position of the rods is checked using a plumb line.
The lower horizontal belt is mounted. The lower belt works to deflect the foundation downward. It is attached with knitting wire to the vertical clamps.
The upper horizontal belt is mounted. Its task is to resist the bending of the foundation tape upwards.
Corner elements are mounted
They need to be given special attention as they tie the sides of the foundation. Additional rigidity is provided by additional vertical struts, which are laid twice as often
Formwork for the foundation is being prepared.

Installation of a linear fragment of the reinforcing frame
The prepared reinforcing frame is being laid. In the process of laying, pipes are laid between the rods of the reinforcement (through which utilities and ventilation systems will subsequently be laid).
Concrete is poured. Filling is performed in several stages, with leveling of each layer (manually or with a vibrating platform). This technology ensures an even distribution of the concrete mix.
The foundation is being waterproofed. After the concrete has dried, the foundation strip is covered with bituminous mastic or roofing material
Such an operation is an important measure to preserve the foundation.
If the frame is assembled in a trench, into the ground, observing the calculated distances, rods are first driven in. On them, transverse jumpers, the lower and upper reinforcing belt are fixed.
What are punching shear zones and their effect on reinforcement
Scheme for calculating the punching shear of a slab with uniformly distributed transverse reinforcement
In places where the foundation is affected by the main load from the supporting structures of the building, additional stress arises. It affects not only the distribution of concrete, but also the degree of its depreciation. To neutralize the effect of the mass of the load-bearing structures, a continuous row of reinforcement is used at the junctions of the load-bearing walls and the base.
If the reinforcement in the center of the slab has a pitch of 200 mm, then in the punching zone the pitch will be already 100 mm or even less. In the calculations and the future slab reinforcement scheme, the maximum allowable distance between the vertical reinforcement links will be indicated.
The best solution in such cases would be:
- Development of a detailed design of the reinforcement cage with the specified distances between the chords.
- Implementation of the working reinforcement scheme.
- Extend the vertical bars above the base to connect the load-bearing walls and foundation with a reinforcement chord, rather than leaving only the concrete connection.
At the moment, in accordance with GOST 5781-82, there are the following types of steel reinforcement:
- A240 (AI). These are smooth rods, they are more used for vertical reinforcement, they are not used in monolithic bases.
- A300 (AII). Bars with a working diameter of 10-12 mm have an outer periodic profile with annular notches.
- A400 (III). It has a sickle-shaped profile, large working diameter and optimal for a monolithic slab.
The choice of reinforcement for a monolithic foundation depends on many factors.
How is the reinforcing mesh for the slab laid
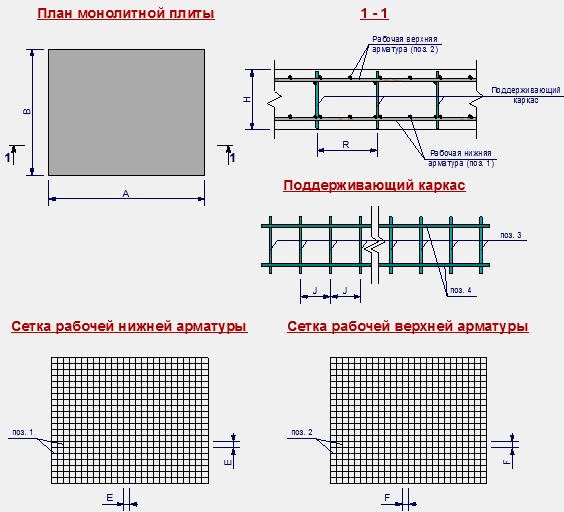
When laying reinforcement, it is important to ensure a constant distance from the reinforcement grid to the concrete surface, equal to 3-5 cm.This will prevent corrosive destruction of the reinforcement cage during capillary ingress of moisture.
To ensure the guaranteed thickness of the protective layer, special fixing elements made of plastic or metal supports are used.
 At the intersection of the rods and carry out the strapping
Procedure for laying reinforcement:
- Check that the dimensions of the formwork are correct.
- Place the lower grille elements on the catches.
- Lay the transverse reinforcement.
- Tie the bottom level mesh lattice.
- Attach the vertical rods to the bottom mesh.
- Tie the top wire in the same way as the bottom wire.
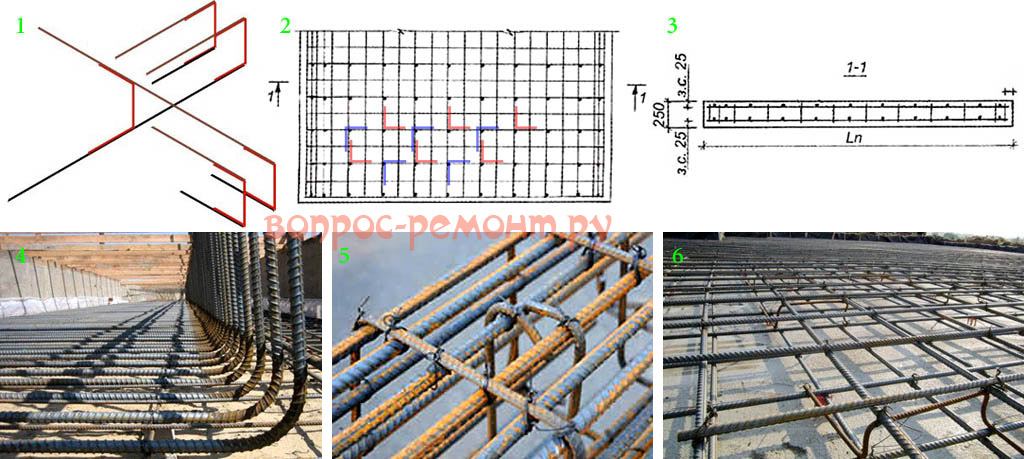
If the length of the reinforcing bars is insufficient, do the joining of the bars with an overlap, the value of which is 40 times the diameter of their section. So for reinforcing bars with a diameter of 10 mm, the overlap value will be 40x10 mm = 400 mm.
How to correctly knit reinforcement for a strip foundation
From the point of view of importance, the laying and knitting of the frame is in no way less important than the calculation. First of all, you need to understand why all these troubles for the preliminary collection of the frame
The task here is to arrange all the metal elements in space and fix them before pouring with concrete. And hold in place while pouring. Without violating the strength characteristics of the reinforcement itself - that is why the reinforcement is knitted and not welded.
Photo: Reinforcement knitting scheme for strip foundations
Heat treatment weakens individual areas at the edges of the joint and they become less durable to break. Although in seismic areas, welding is still used. But only vertical and longitudinal ties are connected. And the transverse ones still knit. True, as already mentioned, in this case it is worth using a special brand of fittings. The one with the letter C.
First, formwork is installed in the trench. Sometimes it uses the walls of the trench as a lower limiter, but this is not always convenient and possible. Therefore, it is still better to work with full-size formwork.
Any available materials are allowed into the formwork: boards, RSP sheets, metal
It is important that all structural elements dock with gaps of no more than 3 mm. Otherwise, the formation of shells is possible.
It is better when the strip foundation reinforcement scheme is drawn in advance - it will be easier to navigate when laying the reinforcement inside the formwork. If the formwork comes out high, then it is advisable to design it with a width of 50 cm or more, even if less massive structures are required in theory - just so that you can work inside it and connect the elements normally.
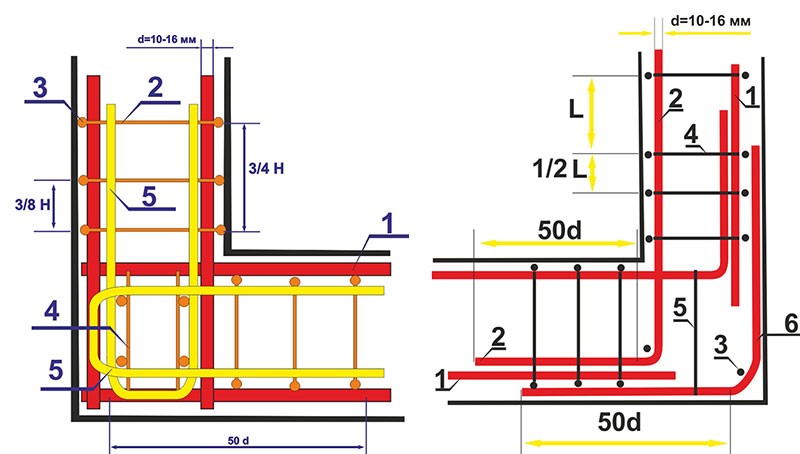
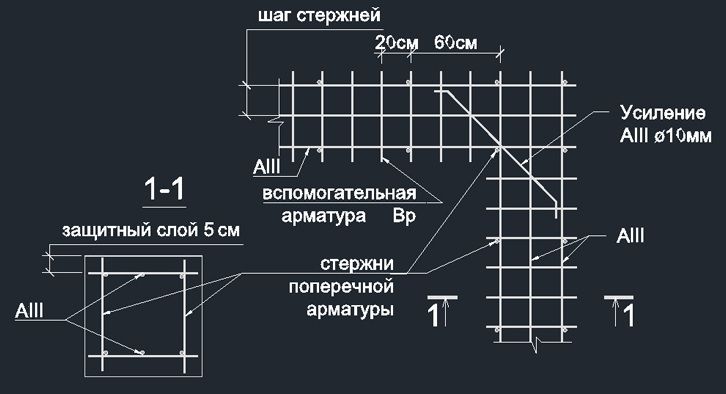
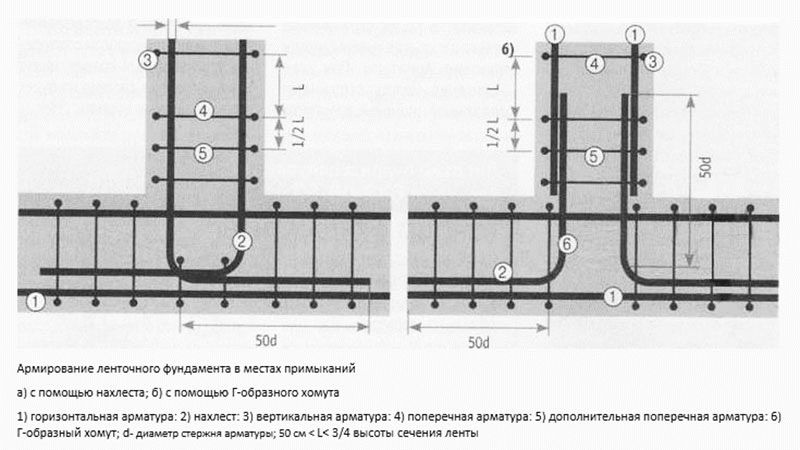
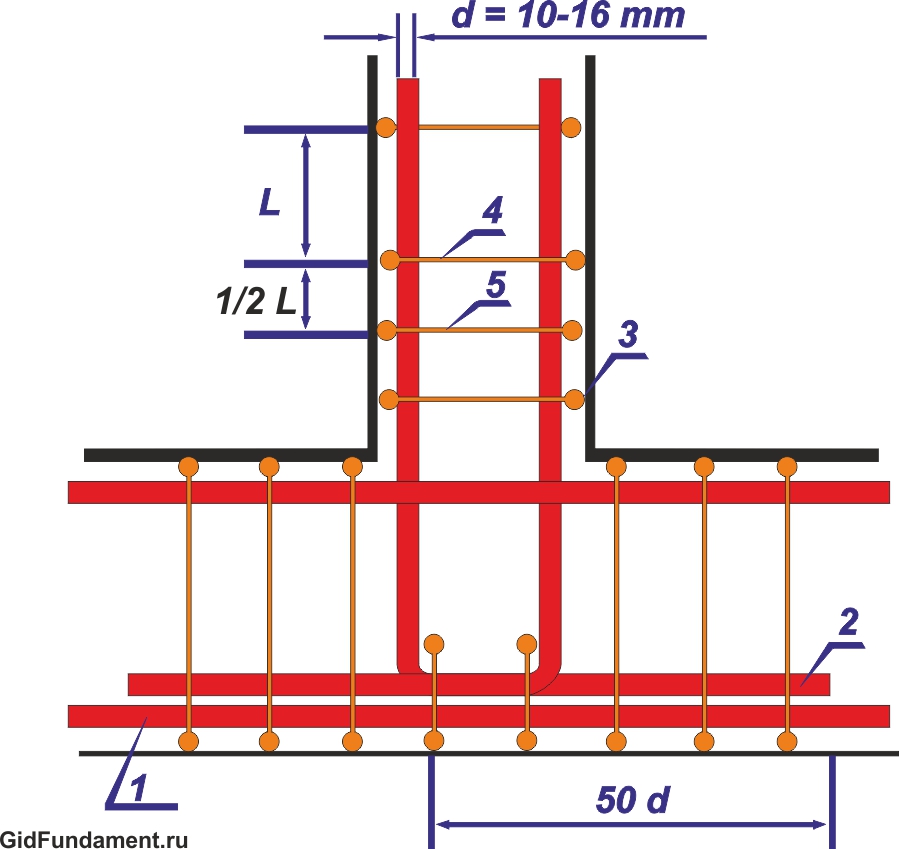
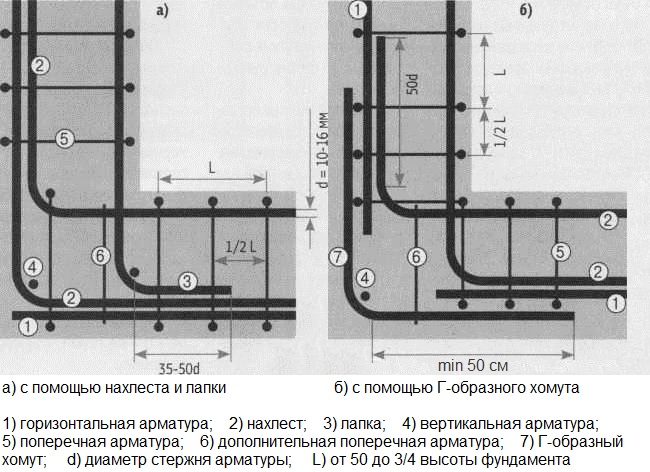
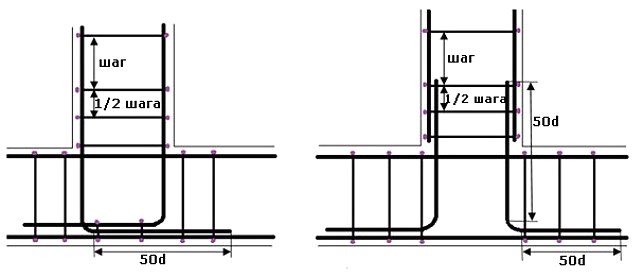
They knit at the intersection of any structural elements and, where they connect, build up. In this case, the knots go at least 25 cm apart, and the mutual overlap of the rods should be within 25 - 50 diameters. That is, with a thickness of 10 mm, the overlap should be from 25 to 50 cm. At the corners, the frequency of the clamps doubles.
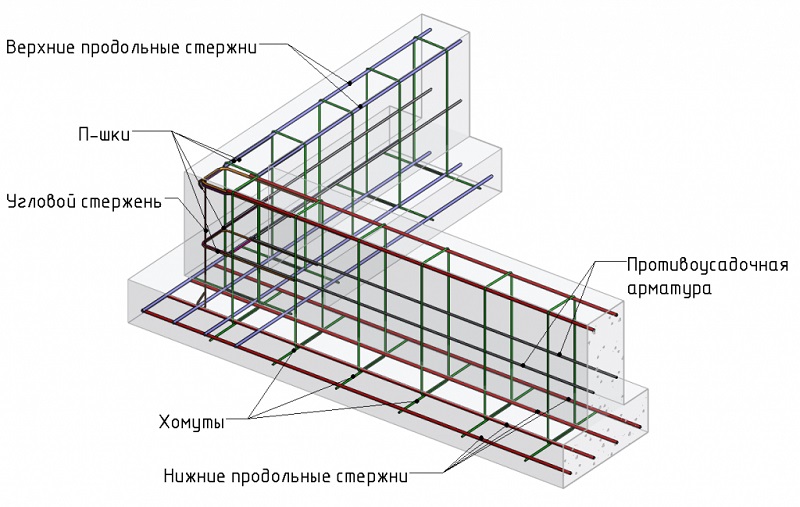
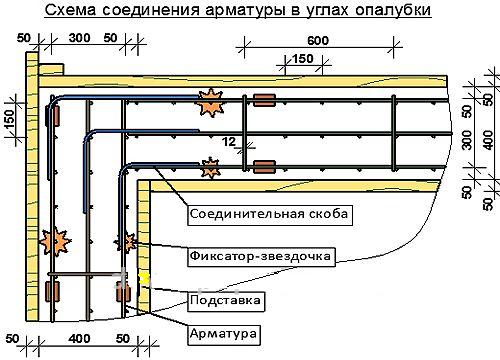
It is impossible in the corners to simply overlap the longitudinal rods and tie them. To fix the corners, you need to use L-shaped or U-shaped (with a T-shaped abutment of the walls) bent elements. In this case, the overlap of the reinforcement when knitting is at least 50 diameters. In the corners, the number of transverse elements is also increased, launching them in increments of 0.4 of the element height, but at least every 25 cm.
Knitting reinforcement at corners
Technically, it looks something like this. Sand about 15 cm thick is poured into the bottom of the trench, spilled. Then the formwork is mounted and the first layer of concrete is poured in about 5 cm. To level the base. Then the formwork is mounted.
Longitudinal ties should be no closer than 5 cm from the walls of the formwork. Otherwise, they will rust. So that the reinforcing belt does not come into contact with the bottom of the mold, small stones or bricks are placed under it, which will then remain in the fill. But you can do it differently.In place of the transverse reinforcement bars, holes are drilled in the formwork along the entire lower belt, equal to the diameter of the reinforcement or slightly larger. In which reinforcement rods are then inserted, cut with a small margin. It turns out, as it were, small brackets, on which the longitudinal elements are then supported, and the vertical ones are screwed to them.
Corner knitting pattern
The fittings are mounted in belts. Better right in the formwork. It is much more difficult and physically difficult to twist all this from the outside, and then transfer it to the formwork. The rods are cut with a hacksaw for metal, a grinder, hydraulic shears - the more convenient what is at hand.
Connections
The traditional material for fixing reinforcement is soft knitting wire folded in half. It is considered to be more convenient
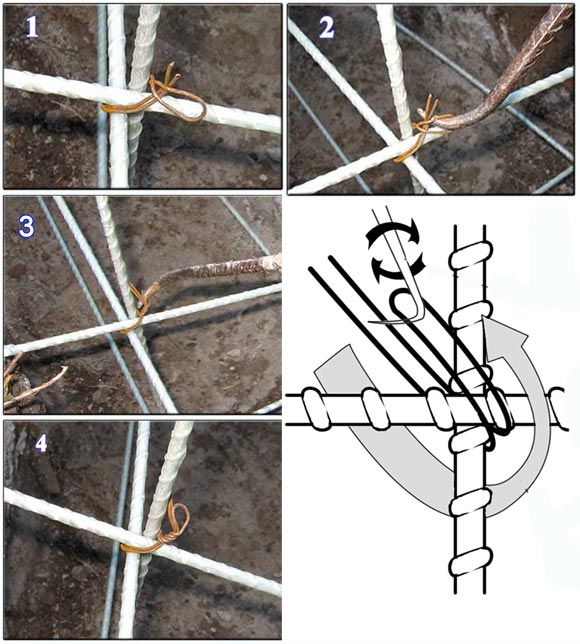
This is how they crochet the reinforcement
in total, the wire for tying reinforcement is in operation, the diameter of which is 1.2 - 1.5 mm. True, in construction manuals, the question is often raised whether it is possible to knit reinforcement with plastic clamps. This method is somewhat less budgetary, but preferable in terms of time costs.
Of course, the task of knitting is to fix a certain spatial structure before pouring it with concrete. And from this position, the use of clamps is permissible. But in fact, it is better to leave the method for some irresponsible and small-sized elements. For the foundation, it is still better to use wire, since somewhere you will have to rely on ties, somewhere you will need the most rigid fastening, which the plastic clamp is not able to provide. Moreover, there is a simple knitting device that significantly speeds up the process.
Diy calculation of strip foundation reinforcement
Any construction work is standardized by GOSTs or SNiPs. Reinforcement is no exception. It is regulated by SNiP 52-01-2003 "Concrete and reinforced concrete structures". This document indicates the minimum amount of required reinforcement: it must be at least 0.1% of the cross-sectional area of the foundation.
Determination of reinforcement thickness
Since the strip foundation in the section has the shape of a rectangle, the sectional area is found by multiplying the lengths of its sides. If the tape is 80 cm deep and 30 cm wide, then the area will be 80 cm * 30 cm = 2400 cm2.
Now we need to find the total area of the reinforcement. According to SNiP, it must be at least 0.1%. For this example, this is 2.8 cm2. Now, by the selection method, we determine the diameter of the rods and their number.
Quotes from SNiP, which relate to reinforcement (to enlarge the picture, right-click on it)
For example, we are planning to use reinforcement with a diameter of 12 mm. Its cross-sectional area is 1.13 cm2 (calculated by the formula for the area of a circle). It turns out that in order to provide recommendations (2.8 cm2), we need three rods (or they also say "threads"), since two are clearly not enough: 1.13 * 3 = 3.39 cm2, which is more than 2.8 cm2, which SNiP recommends. But it will not be possible to divide three threads into two belts, and the load will be significant on both sides. Therefore, four are laid, laying a solid margin of safety.
In order not to bury extra money in the ground, you can try to reduce the diameter of the reinforcement: calculate under 10 mm. The area of this rod is 0.79 cm2. If we multiply by 4 (the minimum number of bars of working reinforcement for the strip frame), we get 3.16 cm2, which is also enough with a margin. So for this version of the strip foundation, you can use class II ribbed reinforcement with a diameter of 10 mm.
Reinforcement of the strip foundation for a cottage is carried out using rods with a different type of profile
We figured out how to calculate the thickness of the longitudinal reinforcement for the strip foundation, you need to determine with what step to install the vertical and horizontal jumpers.
Installation step
There are also methods and formulas for all these parameters. But for small buildings it is easier. According to the recommendations of the standard, the distance between horizontal branches should not be more than 40 cm.They are guided by this parameter.
How to determine at what distance to lay the reinforcement? In order for the steel not to corrode, it must be located in the thickness of the concrete. The minimum distance from the edge is 5 cm. Based on this, the distance between the bars is calculated: both vertically and horizontally, it is 10 cm less than the dimensions of the tape. If the width of the foundation is 45 cm, it turns out that there will be a distance of 35 cm between the two threads (45 cm - 10 cm = 35 cm), which corresponds to the standard (less than 40 cm).
The step of reinforcement of the strip foundation is the distance between two longitudinal bars
If our tape is 80 * 30 cm, then the longitudinal reinforcement is at a distance of 20 cm (30 cm - 10 cm). Since for foundations of an average foundation (up to 80 cm high), two reinforcement belts are required, then one belt from the other is located at a height of 70 cm (80 cm - 10 cm).
Now about how often to put jumpers. This standard is also in SNiP: the step of installing vertical and horizontal dressings should be no more than 300 mm.
Everything. We calculated the reinforcement of the strip foundation with our own hands. But keep in mind that neither the mass of the house, nor the geological conditions were taken into account. We relied on the fact that these parameters were used to determine the size of the tape.
Construction stages of a reinforced foundation slab
The construction of the foundation slab is a rather complicated process, since the entire structure is responsible for the strength of the entire structure in the future. How to make the reinforcement of the foundation slab qualitatively, we will analyze the points.
So, the whole process can be divided into the following stages:
- Pit construction (with a recessed slab design);
- Laying and tamping sand bedding;
- Laying and tamping of gravel bedding;
- Pouring a thin layer of concrete;
- Installation of a waterproofing layer;
- Installation of reinforcing mesh;
- Formwork installation;
- Pouring the base plate;
- Top waterproofing of the slab.
-
The foundation pit is required only if the foundation is deepened, or the creation of a basement is planned. A slight deepening of the slab also adds strength to the structure. However, the need for such a method directly depends on external factors and individual wishes.
- The laying and tamping of sand and gravel bedding is necessary to prepare the base of the foundation. This approach avoids the adverse effects of groundwater and structural deformation. Both layers should not just be filled up, but well tamped. This will give the structure an additional fortress.
- Pouring a thin layer of concrete is necessary for a high-quality arrangement of the waterproofing layer. This concrete layer can be about 10 cm thick.
- The device of the waterproofing layer, as mentioned above, directly depends on the availability of groundwater. However, whichever method is chosen, it is worth taking this stage very seriously, since the presence of moisture in the foundation can lead to irreversible destruction, even of the highest quality structure.
- The installation of mesh reinforcement is the most important step in all foundation construction. The strength of the structure depends on the quality of this work.
Here it is worthwhile to correctly calculate the size of the cell in the reinforcing mesh, since the larger the construction scale, the smaller the cells should be. Having decided on the frequency of laying the rod, you can start creating the gratings themselves.
The rods can be welded together or tied with wire, but here it is necessary to take into account the class of reinforcement. If the reinforcement has a class with marking C, then it is quite possible to weld it, but if not, then it is better to tie, since the properties of metal of other classes are lost during thermal interference
It is also worth paying attention to the quality of the reinforcement, it must be clean - without traces of dirt and dust, since the presence of contamination significantly impairs the adhesion of the metal to the concrete mass.
The above option describes the reinforcement of a monolithic foundation slab, however, there is another way to construct a foundation by reinforcing the slabs. This method involves the creation of a foundation in parts and is called strip.
Reinforcement of the strip foundation slab is carried out using separate sections of reinforcing mesh. However, it is better to fill them at once in order to obtain monolithic concrete.
The installation of the formwork can be carried out both before the installation of the reinforcing material, and after
The main requirement for this stage is good adhesion of the formwork elements to each other, since concrete milk can flow through the existing cracks, which is important for the concrete bond. It is necessary to install the formwork very efficiently in order to avoid displacement of its parts and deformation of the foundation slab.
The foundation slab should be poured only after all the details of the reinforcing mesh and formwork are properly fixed.
This process is very important because the quality of the monolith depends on it. The entire pouring, even if the area is large enough, should be carried out continuously, otherwise there is a risk of getting a sandwich plate, which will greatly affect the quality. A break in pouring for more than one hour can negatively affect the condition of the slab.
Top slab waterproofing is the final step in the construction of reinforced foundation slabs. This stage guarantees the isolation from moisture, not of the foundation, but of the building itself.
Methods and methods of knitting reinforcement for the foundation
When creating a strip base for a private house, reinforcement for the foundation plays a very important role, it excludes the possibility of its deformation during seasonal ground movements and ensures integrity.
Each metal frame in a strip foundation consists of two or more horizontal tiers, which are fastened together with transverse rods (crossbars). All elements of the frame are connected to each other using electric welding or wire for tying reinforcement.
Reinforcement calculation
Before purchasing the required amount of reinforcement for the frame, it is necessary to carry out some mathematical calculations that will help determine the amount of material.
It is also important to consider some features, such as:
- Corrugated reinforcement (metal rods with ribs) withstands a greater load on horizontal structures than smooth ones and provides a better quality of adhesion to concrete;
- When calculating, it must be borne in mind that the frame should not rest against the formwork, but is located at a distance of 5-10 cm from it. This will protect the metal from exposure to air and moisture. For example, if the width of the concrete foundation tape is 60 cm, then the frame width will be 45-50 cm;
- Smooth bars can be used as crossbars to support longitudinal tiers.
If it is planned to build a one-story house, then the distance between the transverse and longitudinal bars is approximately 50-55 cm.But if the building has two floors or a massive attic, then this distance is reduced to 20-30 cm, which significantly increases the material consumption.
Rebar bundle options
In order to connect all the elements of the metal structure with each other, a mounting wire with a diameter of 0.8 or 1.2 mm is used, which is pre-cut into small pieces of 20-25 cm. The installation of reinforcement for the foundation can be done in several ways, depending on the tool used:
- crochet hook for reinforcement, this knitting method is described below;
- special clamps. In this version, special plastic or metal disposable clamps are used. This is how fiberglass reinforcement for the foundation is usually knitted.
Before knitting the reinforcement for the foundation, you must provide yourself with protective gloves and use only serviceable tools.
Step-by-step hand-twisting process
The fastest and most common method in private construction is to knit reinforcement under a strip foundation using a special crochet hook for reinforcement.
In order to do everything correctly and quickly, you must strictly follow the procedure below:
- the wire for tying reinforcement is cut 20-25 cm long and folds in half;
- we start the wire under the junction of the rods and insert the hook for knitting the reinforcement into the loop;
- with the second end of the wire we tie the reinforcement connection and put it on the hook;
- then we rotate the crochet hook for the reinforcement clockwise, holding the other end of the wire so that the ends are intertwined;
- remove the hook from the loop and bend the ends of the wire into the frame.
Using this simple procedure, tying strip foundation reinforcement with a knitting gun is much faster and more efficient.
P.S. And for dessert I suggest watching a video clip: We knit reinforcement cages with a screwdriver

