Vertical insulation: technology
It is advisable to apply this method not only at the stage of foundation construction, but also on already constructed structures. In the second case, you will have to dig out the foundation to the depth at which it lies.
The following actions are performed:
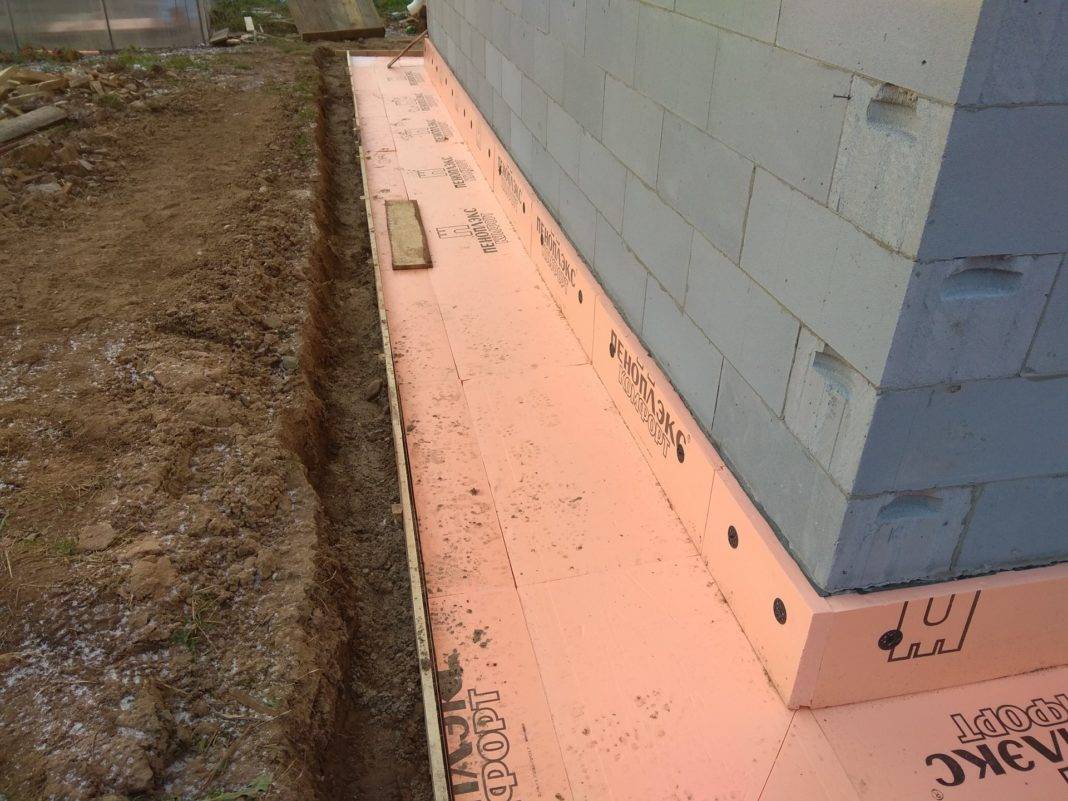
- The foundation is pre-cleared of soil and other contaminants. If the surface is uneven, it must be leveled. For this, a cement solution is used. It is forbidden to use mastic made with the addition of a solvent, otherwise Penoplex may interact with it and collapse.
- Then you need to dilute the glue intended for polystyrene foam. It is mixed and left to swell. Further, it is necessary to mark on the foundation the lower border of the arrangement of the slabs. It is worth noting that they can be placed below the base level, this will not bring harm.
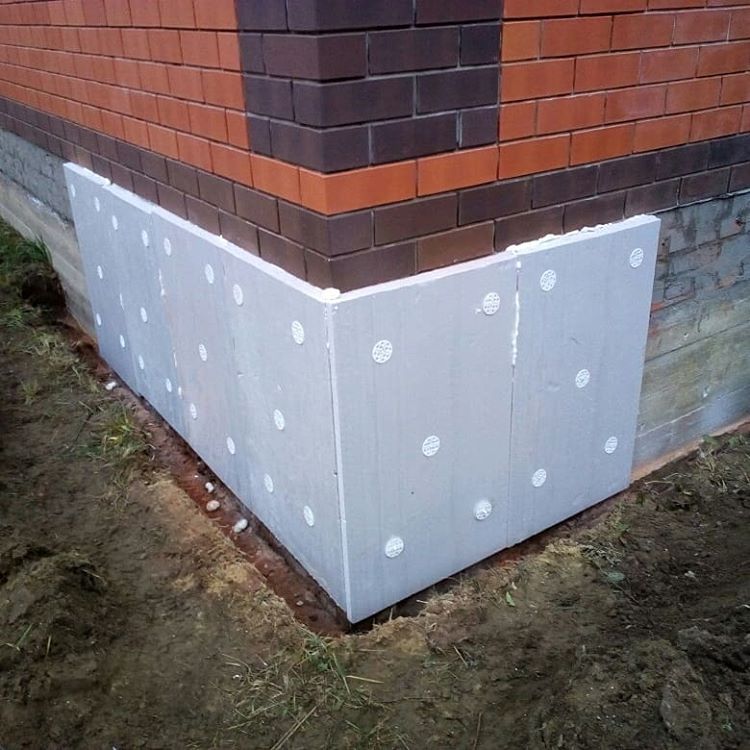
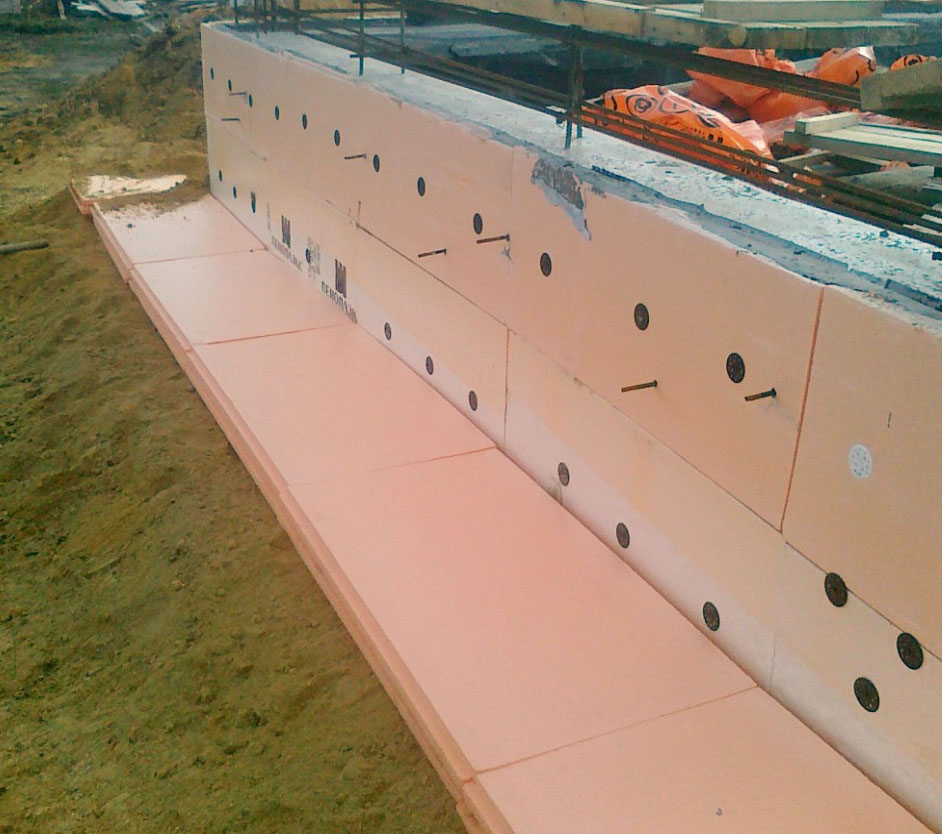
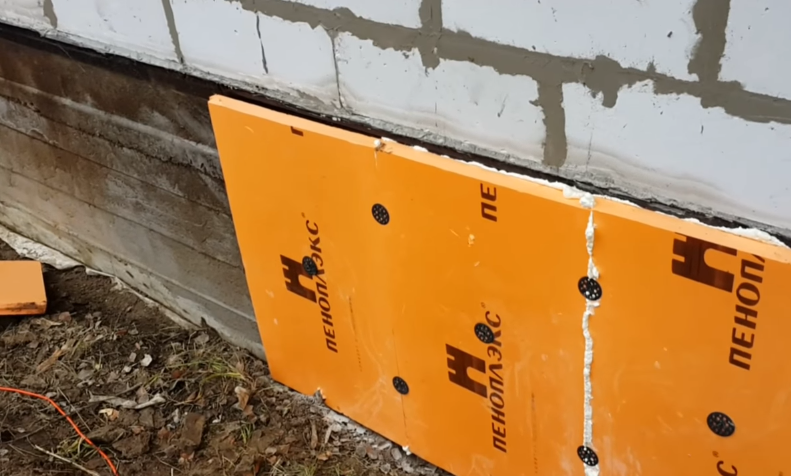
- When the glue is ready, it is applied to Penoplex in dots. If the surface is perfectly flat, it can be applied in an even layer. Then the plate is pressed and leveled, if necessary. A mounting groove is used to secure the next plate. If it is necessary to place several layers, a checkerboard sequence is used. It should be provided that the subsequent seam overlaps the previous one. As a result, better thermal insulation can be achieved. As for fixing the next layer, the technology is similar, the same glue is used.
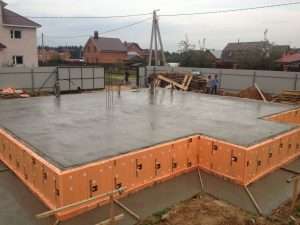
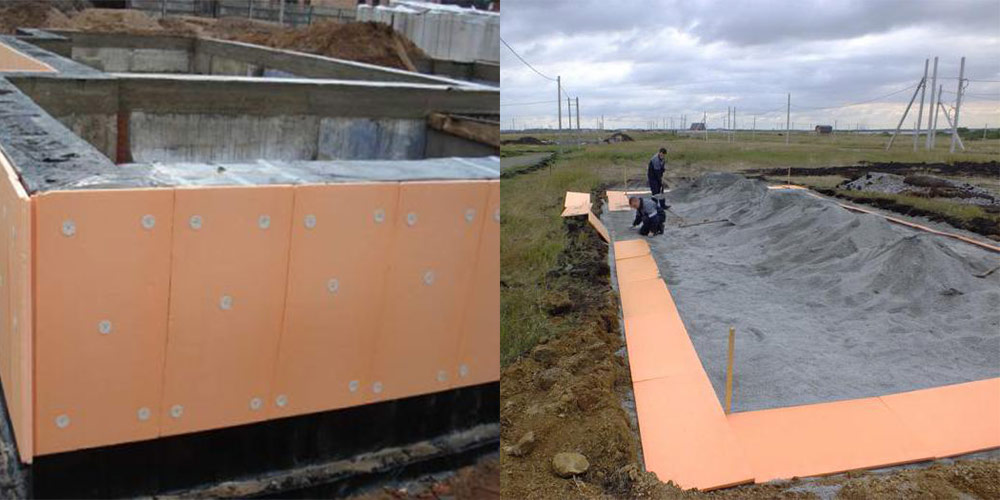
The underground part of the base does not require additional fastening, since the insulation plate will be completely pressed by the ground. When arranging slabs in the basement, it is necessary to use dowels-nails. Thanks to the wide head, they hold the material tightly and do not rise above the surface. Before hammering in the dowel-nail, a hole is drilled in the expanded polystyrene. It is through, with about 4 cm entering the concrete. In the case of decorative finishing, plaster or special tile adhesive is applied to the insulation, providing for reinforcement with a mesh.

Additional insulation elements
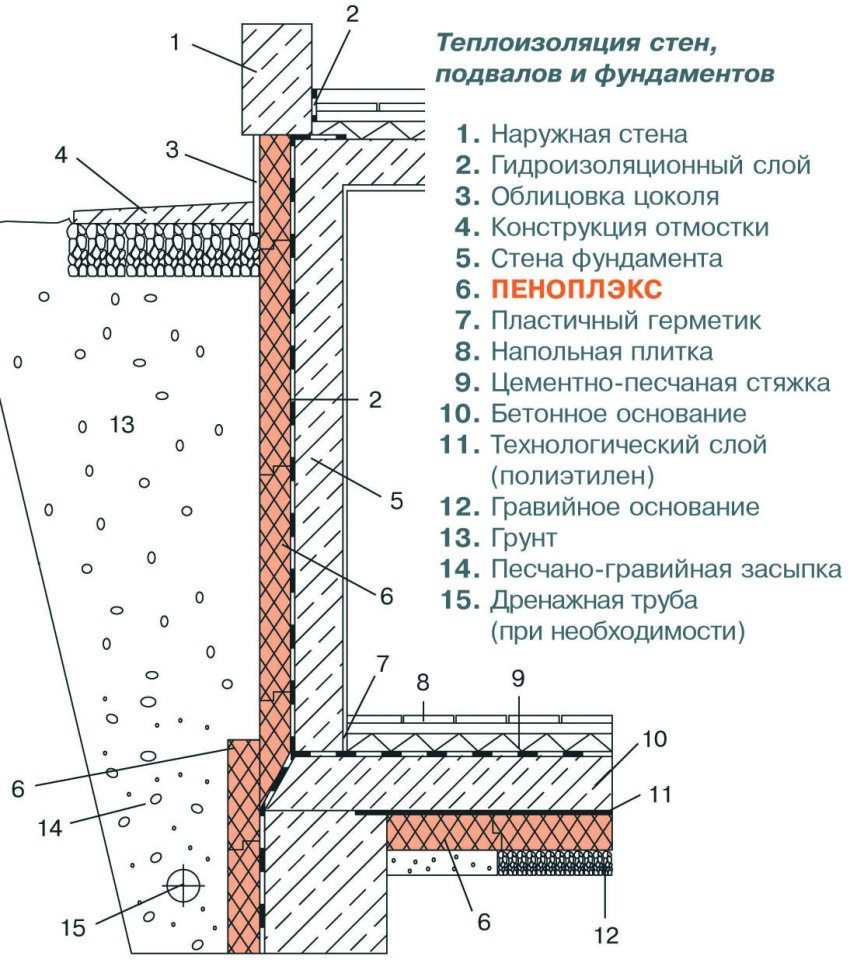
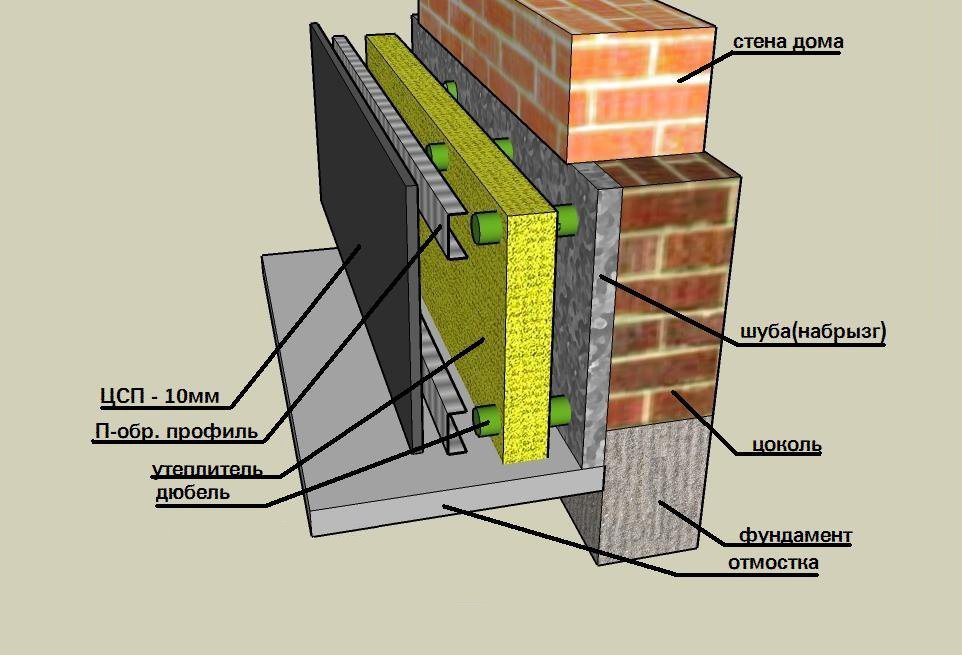
When planning the thermal insulation of the underground part of the building using expanded polystyrene, you should also think about how to insulate the basement of the house from the outside. Of course, it is possible to arrange a "wet facade" or "ventilated facade" system using mineral wool or other insulating materials. But it is more logical to continue working with penoplex.
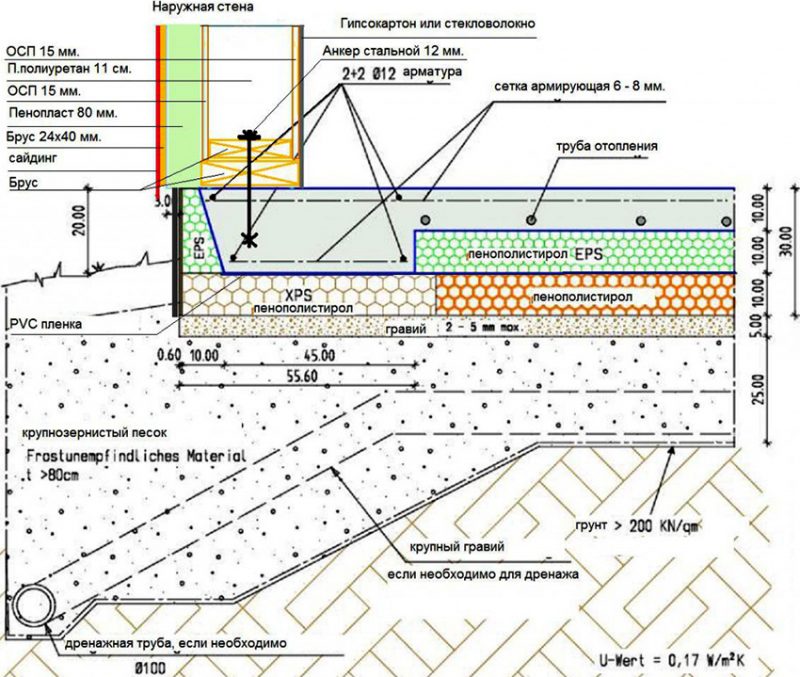
They can - and should! - insulate the blind area near the house, garden paths, porch and entrance groups. Thanks to this, the thermal radiation of the house into the space will be noticeably reduced, thereby reducing the cost of heating and air conditioning the building.
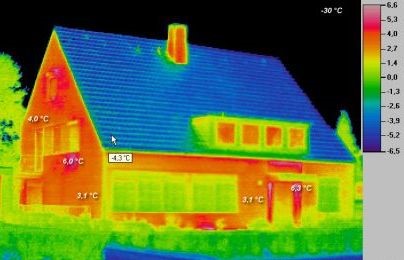
Nuances to consider when insulating a basement
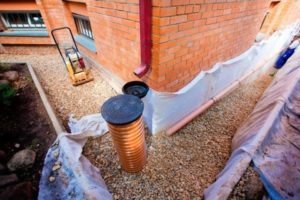
If the foundation of the house is deepened, then before carrying out the insulation work, it is necessary to dig a trench along the entire basement, deep to its base, and from half a meter to one and a half meters wide.
Upon completion of the work, the trench is buried with the same soil or it will be replaced with expanded clay and sand, which improve thermal insulation.
at a depth of about 30 cm from the top of the trench, a ten-meter layer of sand is poured and compacted tightly. After that, roofing material is laid, with a width slightly exceeding the width of the dug trench, its joints are coated with bitumen.
When the bitumen hardens, over the roofing material at the bottom of the trench, penoplex is glued with acrylic glue, its joints are coated with polyurethane foam or the same glue. After the glue has dried, a concrete screed should be made with a slope from the basement - which will allow excess moisture to be removed from the house.
The base / plinth can be finished with clinker tiles, stone or other materials.Insulation of the basement base helps to reduce heat loss by more than 20%. Carrying out work also protects the base from mechanical damage, protects it from cracking and the appearance of mold, the development of fungus.
If you do not make external thermal insulation, then the service life of the foundation is significantly reduced due to the fact that it is exposed to harmful factors - frost, moisture. You can do the external insulation of the basement of the foundation with your own hands; for this, you should purchase materials and carefully study the technology of the work.
A master class on insulating the basement basement from the outside, step by step, look at the video:
Insulation of the basement from the outside
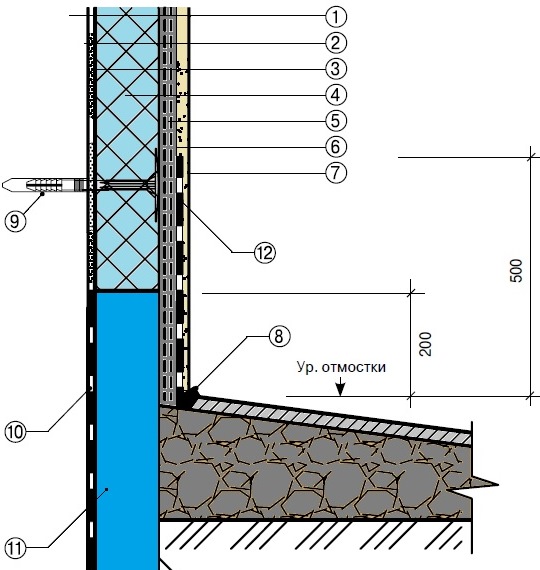
1. Application of plaster on a metal mesh
- Building wall
- Basement overlap
- Mineral wool slabs
- Cement-sand plaster on a metal mesh
- Basement wall
- Blind area
- Insulation PENOPLEKS FOUNDATION
- Waterproofing
- Foundation
2. Facing with clinker tiles
- Building wall
- Basement overlap
- Mineral wool slabs
- Clinker tiles
- Basement wall
- Blind area
- Insulation PENOPLEKS FOUNDATION
- Waterproofing
- Foundation
3. "Heavy" cladding (natural / artificial stone)
- Building wall
- Basement overlap
- Mineral wool slabs
- A natural stone
- Basement wall
- Blind area
- Insulation PENOPLEX FOUNDATION
- Waterproofing
- Foundation
4. Facing with facade panels (basement siding, block house)
- Building wall
- Basement overlap
- Mineral wool slabs
- Plinth panel
- Basement wall
- Blind area
- PENOPLEX FOUNDATION
- Waterproofing
- Foundation
Insulation of the basement from the inside
- Building wall
- Plaster on metal mesh
- Basement overlap
- Mineral wool slabs
- Facing tiles
- Blind area
- PENOPLEX COMFORT
- Basement wall
- Waterproofing
Table No. 2 "Required PENOPLEX thickness for insulation of basement floors, including those located below ground level"
Cities PENOPLEX thickness mm
| Anadyr | 100 |
| Arkhangelsk | 70 |
| Astrakhan | 40 |
| Barnaul | 70 |
| Belgorod | 50 |
| Birobidzhan | 80 |
| Blagoveshchensk | 80 |
| Velikiy Novgorod | 60 |
| Vladivostok | 50 |
| Vladikavkaz | 50 |
| Vladimir | 60 |
| Volgograd | 50 |
| Vologda | 70 |
| Voronezh | 60 |
| Grozny | 40 |
| Ekaterinburg | 70 |
| Izhevsk | 60 |
| Yoshkar-Ola | 60 |
| Irkutsk | 80 |
| Kazan | 60 |
| Kaliningrad | 50 |
| Kaluga | 60 |
| Kemerovo | 70 |
| Kirov | 60 |
| Kostroma | 60 |
| Krasnodar | 40 |
| Krasnoyarsk | 70 |
| Mound | 70 |
| Kursk | 50 |
| Kyzyl | 90 |
| Lipetsk | 60 |
| Magadan | 90 |
| Maykop | 40 |
| Makhachkala | 40 |
| Moscow | 60 |
| Murmansk | 70 |
| Nalchik | 50 |
| Nizhny Novgorod | 60 |
| Novosibirsk | 70 |
| Omsk | 70 |
| Eagle | 50 |
| Orenburg | 60 |
| Penza | 60 |
| Permian | 70 |
| Petrozavodsk | 60 |
| Petropavlovsk - Kamchatsky | 50 |
| Pskov | 50 |
| Rostov-on-Don | 50 |
| Ryazan | 60 |
| Salekhard | 100 |
| Samara | 60 |
| St. Petersburg | 50 |
| Saransk | 60 |
| Saratov | 50 |
| Smolensk | 60 |
| Stavropol | 50 |
| Syktyvkar | 70 |
| Tambov | 60 |
| Tver | 60 |
| Tomsk | 80 |
| Tula | 60 |
| Tyumen | 70 |
| Ulan-Ude | 80 |
| Ulyanovsk | 60 |
| Ufa | 60 |
| Khabarovsk | 70 |
| Cheboksary | 60 |
| Chelyabinsk | 70 |
| Cherkessk | 40 |
| Chita | 90 |
| Elista | 50 |
| Yuzhno-Sakhalinsk | 80 |
| Yakutsk | 110 |
| Yaroslavl | 60 |
Technology
How to carry out the very insulation of the foundation with Penoplex? You need to start with the situation in which the installation is carried out:
- If you are just building a house, most likely its foundation is freed from the soil and you do not need to do anything in advance;
- If we are talking about an already arranged foundation, you must first free it from the soil. Clean the surface and only then carry out the insulation.
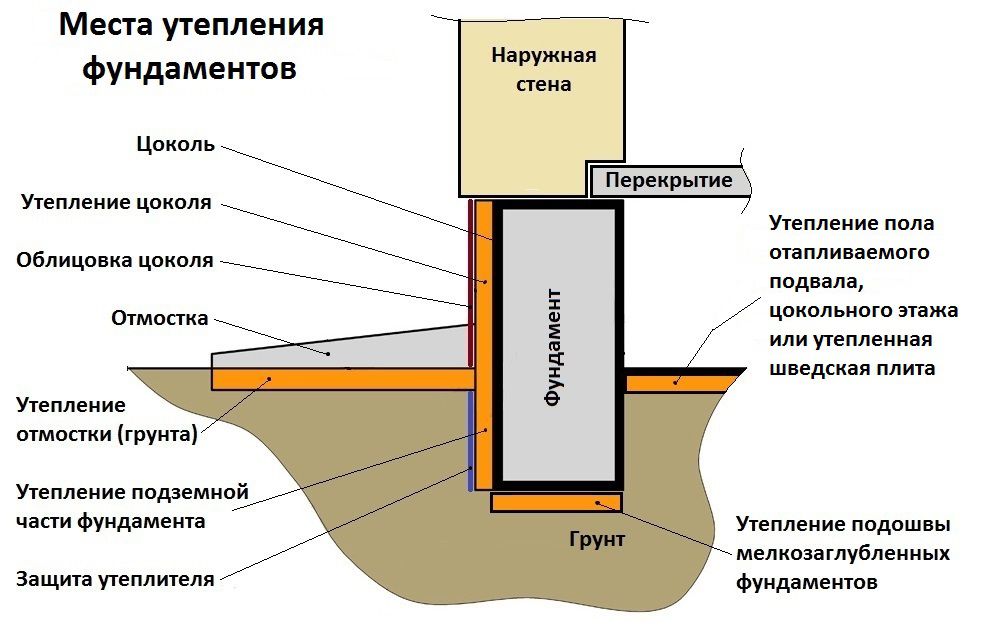
Also, it is worth noting that when insulating the foundation of a house, three components are insulated outside:
- Blind area;
- Horizontal insulation on the pillow of the future foundation (carried out only during construction);
- Vertical installation of panels on a plinth.
We talked about how to make an insulated blind area cake separately, so here we will describe in more detail only the last of these three points.
Preparing the workplace
If you need to insulate the foundation outside an already built house, you will have to dig it out. To do this using:
- Your own shovel
- Special equipment,
A trench is being dug around the entire perimeter of the building. The depth of the trench should be equal to the depth of the foundation.The width should be such that you can work safely. Please note that when you fix the foam to the foundation, the width of the trench will narrow, in our example by as much as 120 mm.

After that, you need to let the foundation dry, then the insulation will take effect. For this, at least 2 weeks are allotted. By the way, this nuance imposes some restrictions on the time of year in which work can be carried out. In autumn, a dug trench can be filled with sedimentary waters. Inspect the foundation and assess its condition. Plaster large irregularities, if any.
Waterproofing
We talked about this step, important for the foundation, separately, here it is only worth repeating that waterproofing is required for the foundation of the house with a basement. If there is no basement, it is possible that Penoplex itself can handle it, because it repels moisture
If you will be using waterproofing, choose a non-alcoholic composition so that it does not corrode the insulation.
Installation of slabs
Although you can find examples of the fact that the penoplex is attached to the dowels, this approach is considered unacceptable. Nails break the waterproofing layer, and even the insulation itself, which, unlike a "wet" facade, will not be particularly protected. You need to fasten the material with glue foam or other adhesive for fastening.

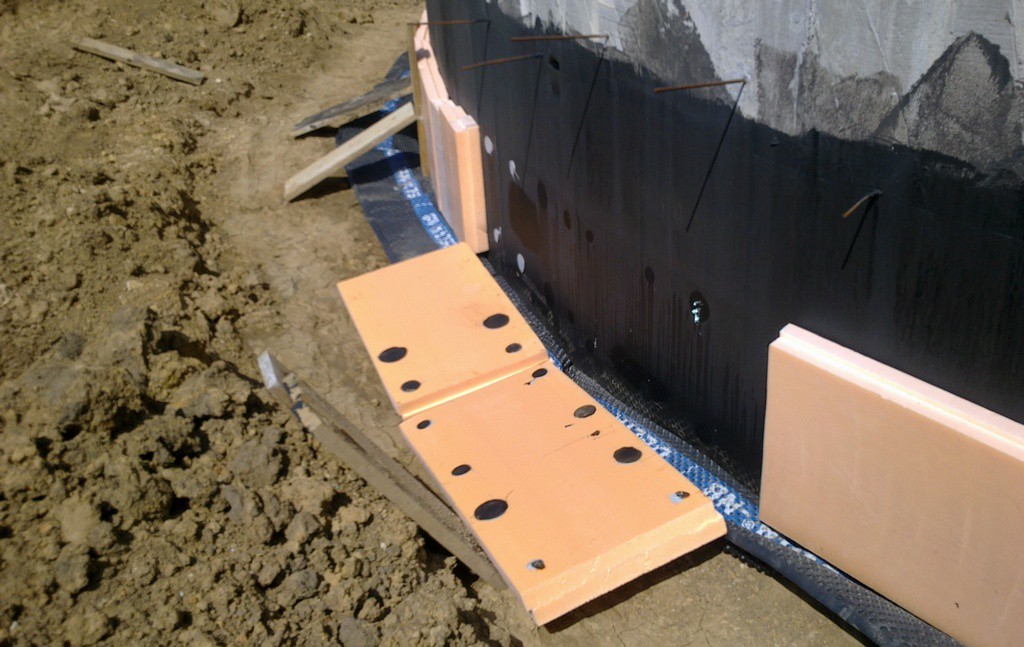
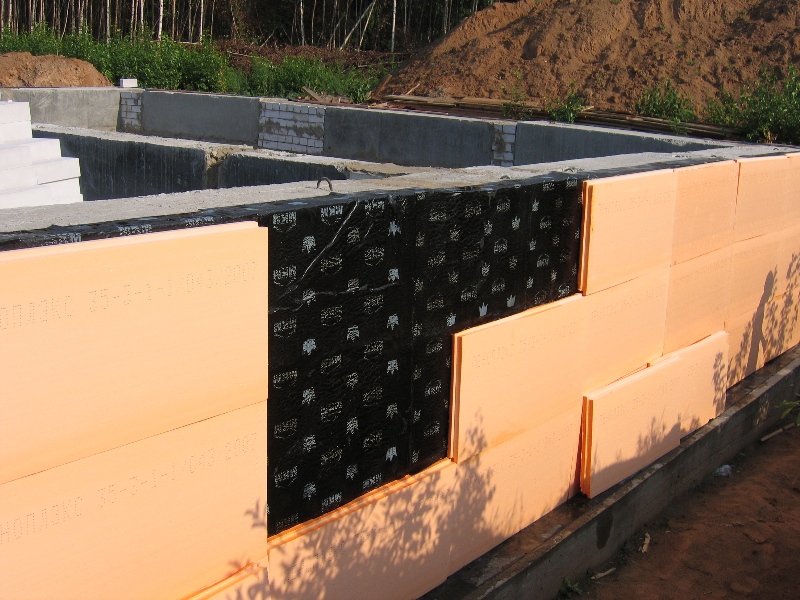
The fixing of the slabs starts from the bottom row. Using a level, mark the strip of the upper edge of the slab. The bottom of the slabs is trimmed so that the top edge is always level.
If, as in our example, installation from the outside with penoplex occurs in 2 layers, the second layer needs to be fixed only after the first one is completely fixed (solidified), usually not less than 2 hours later. That is, at first, the entire foundation tape is covered with the first layer, then with the second. Sheets are stacked in a checkerboard pattern, without joining seams.
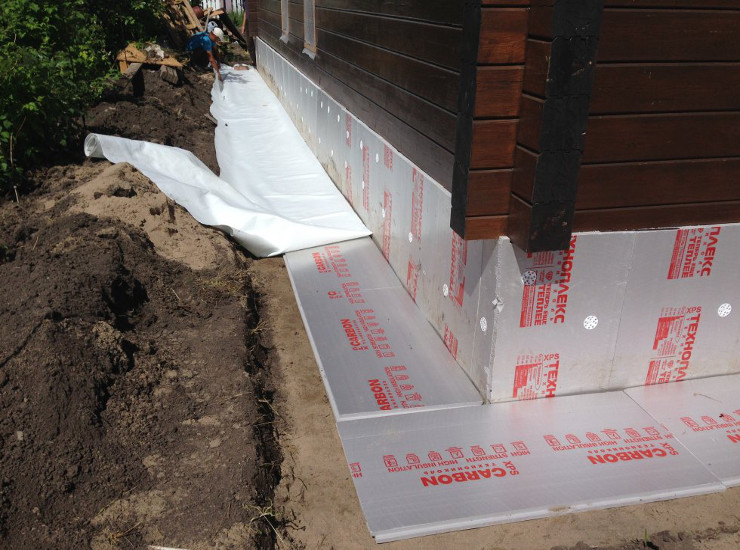
After the insulation is covered with a membrane for additional protection against moisture and mechanical damage.
By the way, outdoor insulation is considered the most effective.
Finally, a video: how to insulate the foundation of a house with Penoplex.
How to insulate the foundation of a wooden house
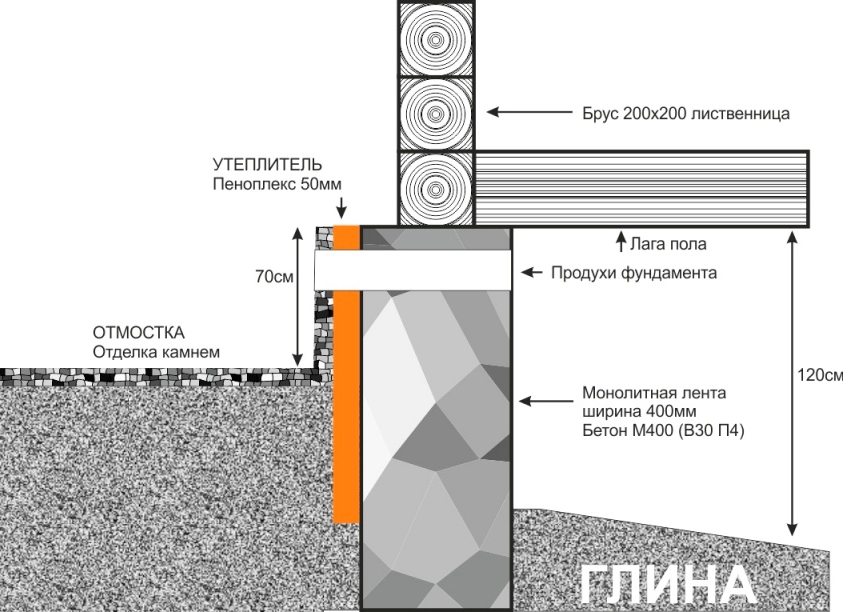
Many owners of wooden houses believe that it is enough to insulate the walls and floor to ensure favorable living conditions. However, this is not the case, because serious heat loss can occur through the wooden floor - up to 20%. Therefore, thermal insulation of the foundation is a must, especially if the house is located in an area with harsh weather conditions.
Insulation of the foundation of a wooden house from the outside will not only create favorable conditions in the room, but also prevent adverse effects on it. For this purpose, polystyrene foam and its varieties are usually used, as well as expanded clay.
 Stone decoration
Insulation of the foundation PPS or EPS
Expanded polystyrene has excellent consumer properties, such as a low degree of thermal conductivity and moisture absorption, resistance to negative weather conditions, affordable cost, ease of installation, etc.
These and other characteristics have made this material one of the most relevant and in high demand among many consumers.
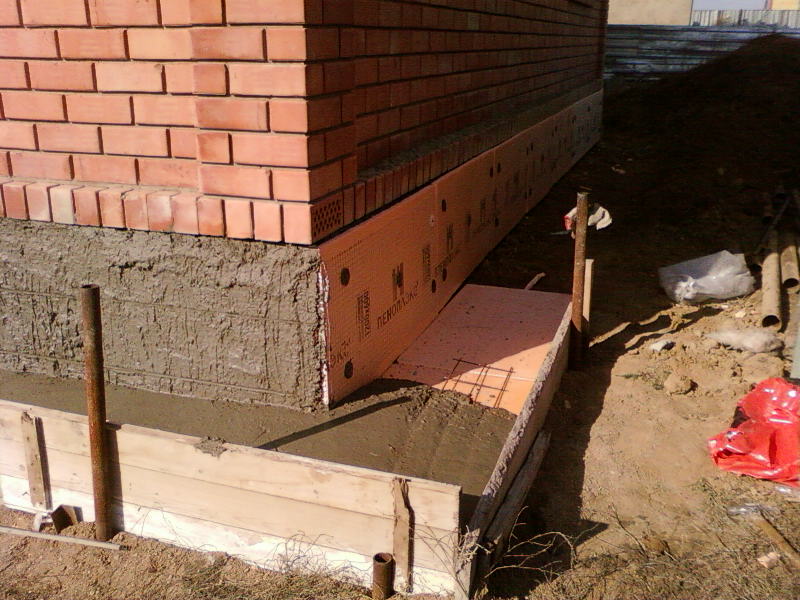
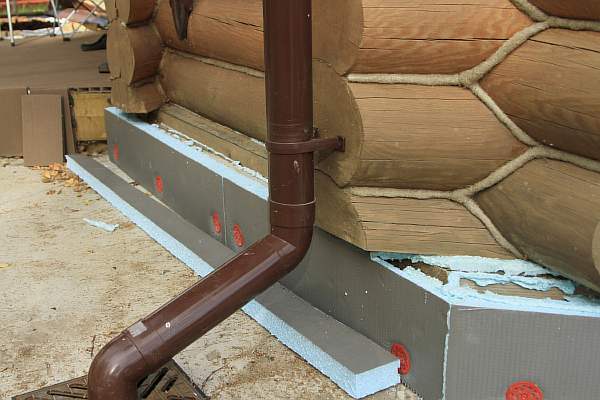
To insulate only the ground part of the foundation or plinth, a fairly simple installation is required. PPS sheets are simply attached to the surface using glue or special fasteners.
After that, cladding or plastering is performed. In this case, you should be aware that the installation of a heater does not mean complete waterproofing, therefore, it should be carried out separately in order to avoid the penetration of groundwater under the floor.
 At their summer cottage
In this case, it is necessary to carry out complete waterproofing of the walls. For this purpose, a trench is dug around the wooden house, then the foundation is cleared of soil and debris. Further, panels made of PSP are attached to the surface, after which all this is filled up and rammed.
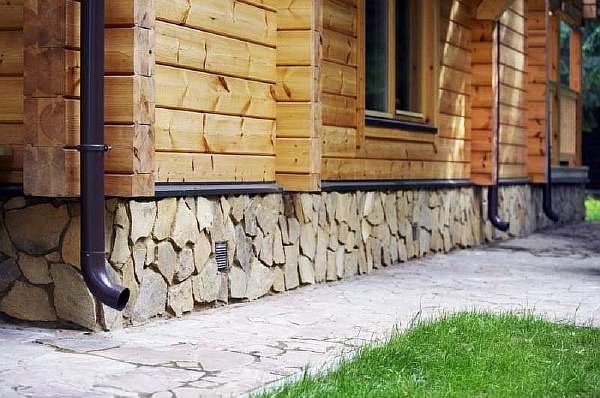
The insulated base can additionally be finished with bricks or other types of cladding that can withstand the adverse effects of weather conditions.
Warming the foundation with expanded clay
Often a wooden house is insulated from the outside with expanded clay. However, it has increased moisture absorption.
To avoid the negative effects of this phenomenon, a trench is dug around the house and formwork with waterproofing is installed, after which the expanded clay itself is filled up.
 Blind area
This method is no less effective, but it requires special attention and the need to adhere to all installation rules.
We insulate the foundation on our own
The high cost of the required materials and the simplicity of the process allows you to carry out the insulation of the foundation with your own hands, minimizing the total cost of this type of work. we will dwell on the features of each option for installing a foam plex foundation in more detail, which will avoid inevitable mistakes in the future.
We insulate the slab foundation
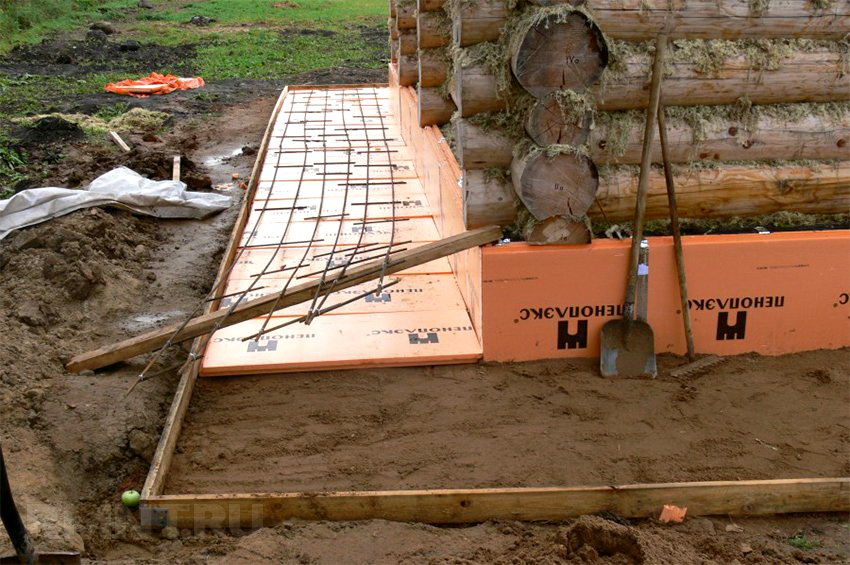
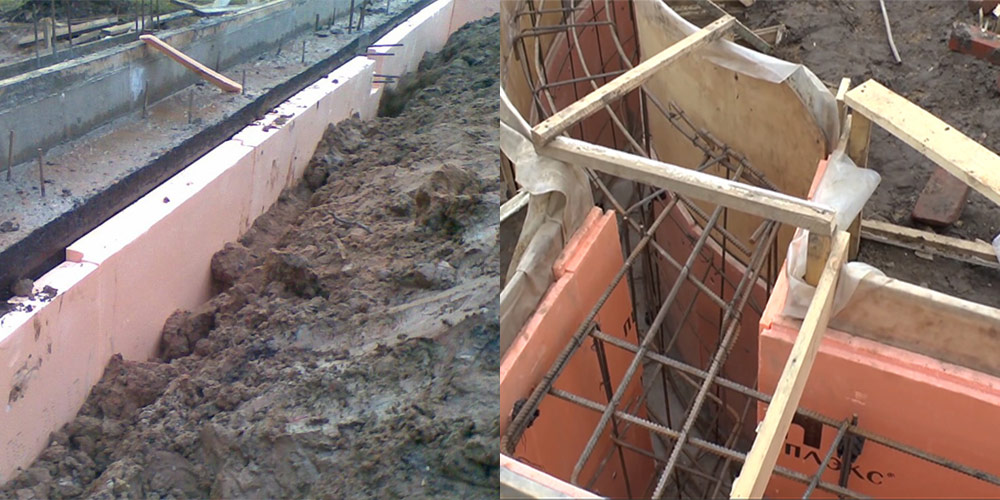
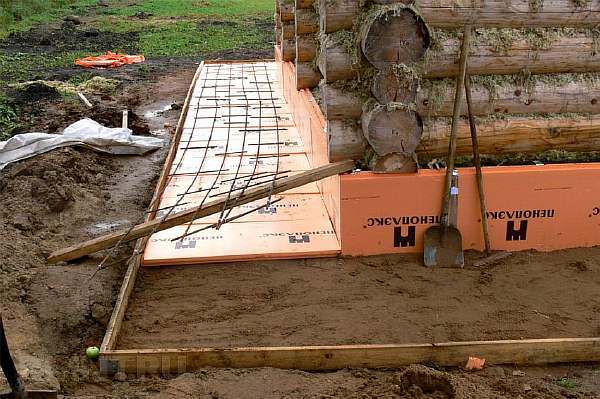
The technology of warming the foundation with penoplex with your own hands is not complicated and is similar to working with the simplest version of a children's designer. Plates are laid on a previously prepared base, tightly joining them to each other. As a rule, additional fastening is not required for this. A prerequisite is the laying of a polyethylene sheet to prevent the flow of concrete mixture into the seams.

Penoplex for slab foundation
Calculating the required amount will also not be difficult for any home master who has not yet forgotten the elementary school mathematics course. The area of a standard penoplex slab foundation, with its dimensions of 1200x600 mm, is 0.72 m2. Therefore, to determine the required amount of material, it is enough to divide the total area of the future slab by 0.72, rounded to the nearest integer. Do not forget, when calculating, to determine the amount of Penoplex insulation for the side walls of the slab base of the house.
Often, to determine transport costs, it is necessary to calculate the number of packs of material. For this, in addition to the total number of slabs, it is necessary to know their required thickness. This is due to the different complete set of foam packs with a standard thickness of 400 mm. So, plates with a thickness of 50 mm in a package will contain 8 pcs., And plates with a thickness of 20 mm - 20 pcs.
We insulate the strip foundation
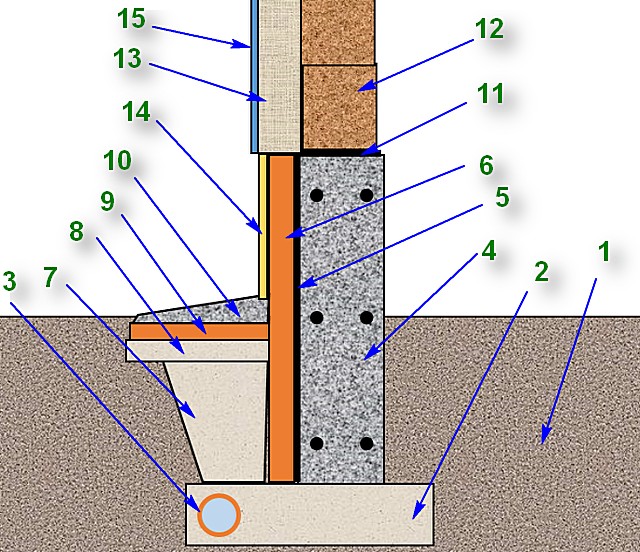
Since the tape type of bases is the most common, it is necessary to dwell on the technology of its insulation in more detail. Penoplex slabs allow you to finish the walls of the foundation of a new house or one that has stood for several decades. The sequence of work will look like this:
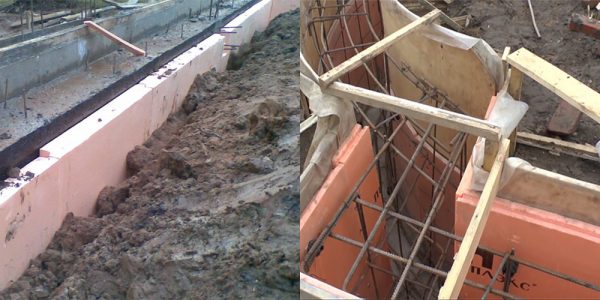
Penoplex for insulation strip foundation
- it is necessary to completely remove the soil from the base strip at a distance convenient for two people to move. Usually, this value is 1 meter.
- the surface of the tape is thoroughly cleaned of various debris and lagging parts of the concrete mix. This is especially true for foundations with a long service life. Plastic brushes fixed in a drill chuck or on a grinder are recommended as tools.
- In the event of the formation of deep depressions on the surface of the foundation walls, they must be filled with fresh cement mortar and plastering performed.
- Before fixing the foam plates to the foundation, it must be insulated from moisture. For this, the dried walls of the tape are covered with a coating mastic, on which roofing material is glued. Waterproofing the foundation with penoplex, even given its low moisture transmission, is not recommended.
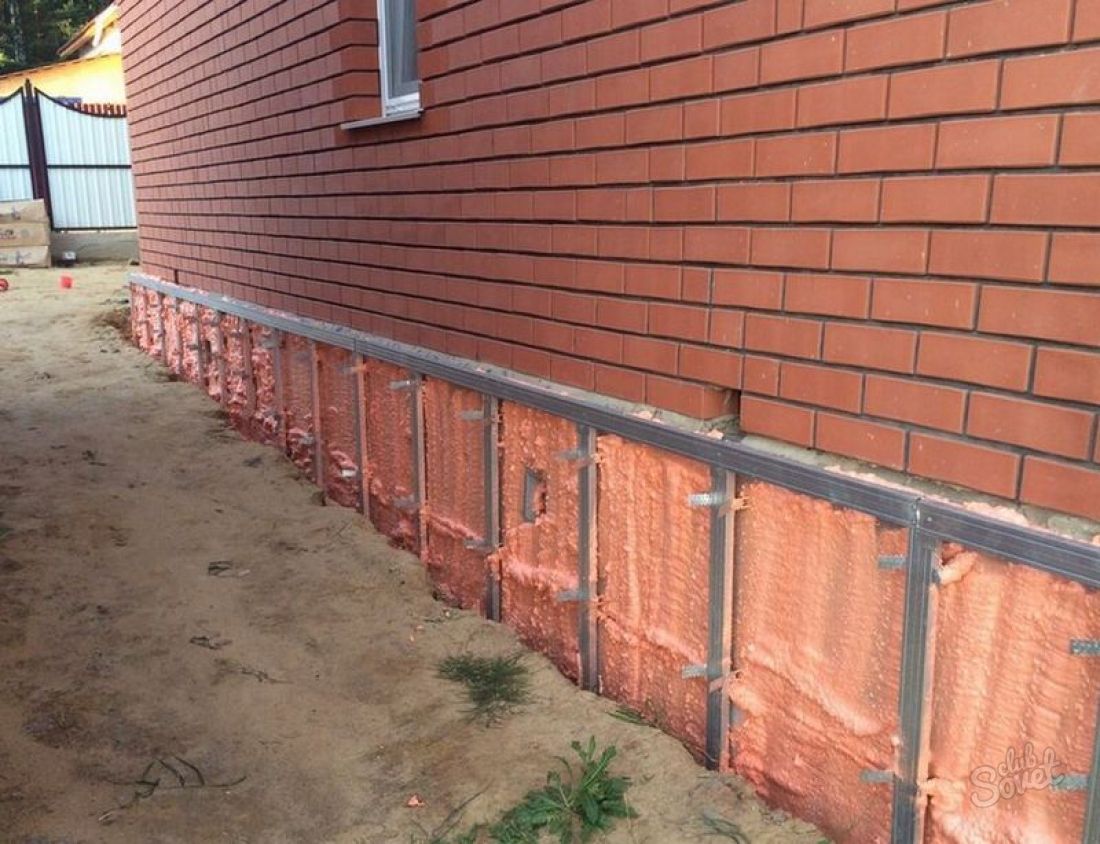
- Having decided on the basis of preliminary calculations, which foam is suitable for the foundation in your conditions, we carry out its installation. In the lower, underground part, a special adhesive for slabs is used, realized in the form of a dry mixture and prepared directly at the construction site.For the above-ground part, builders advise using dowel nails.
- The outer surface of the insulation must be covered with one or another composition. Before closing the penoplex on the foundation, wait until the adhesive is completely cured. The best option is considered to be plastering using a plastic reinforcing mesh.
The described technology has wide application, and, for example, correctly insulating the base of the bath with penoplex, as well as the outer surface of the summer cottage pool, will now not present any problems for you. Observing consistency and striving for high quality work, it is not difficult to get the result you are going for.
This can be helpful:
- Construction technology of rubble concrete foundation Installation of a foundation for a fireplace - types, technology, features
Additionally, we recommend reading:
Ventilation in the dressing room
Ventilation in the lobby is similar to ventilation in any other room and is designed to provide fresh, oxygen-rich air and remove air that has already been removed.
In this case, the air circulation must be designed in such a way that not only the room, but also the decorative and furniture elements are well ventilated and dry.
The most important "disease" in the front bench is condensation on the walls and ceiling of the room. This leads to dire consequences, namely the formation of various fungi and mold, which lead to the premature decay of wood.
Sometimes an oven is installed in the antechamber, and then the issue of air exchange disappears by itself when air enters and exits through it.
After bathing, the front room is usually ventilated and all windows and doors open. Despite these measures, experts still recommend installing at least the simplest ventilation system on the front bench.
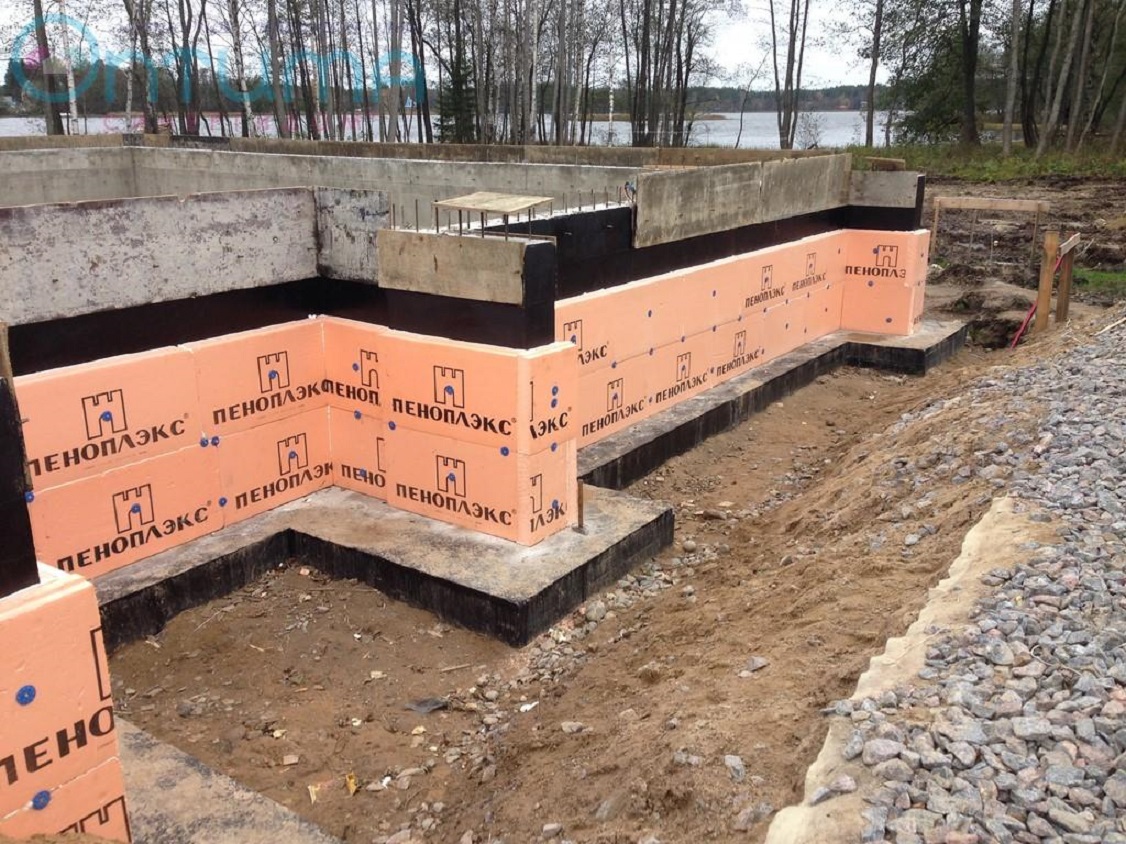
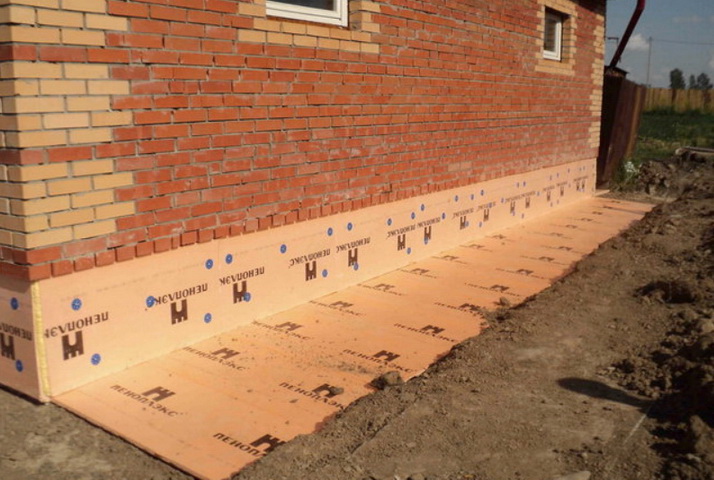
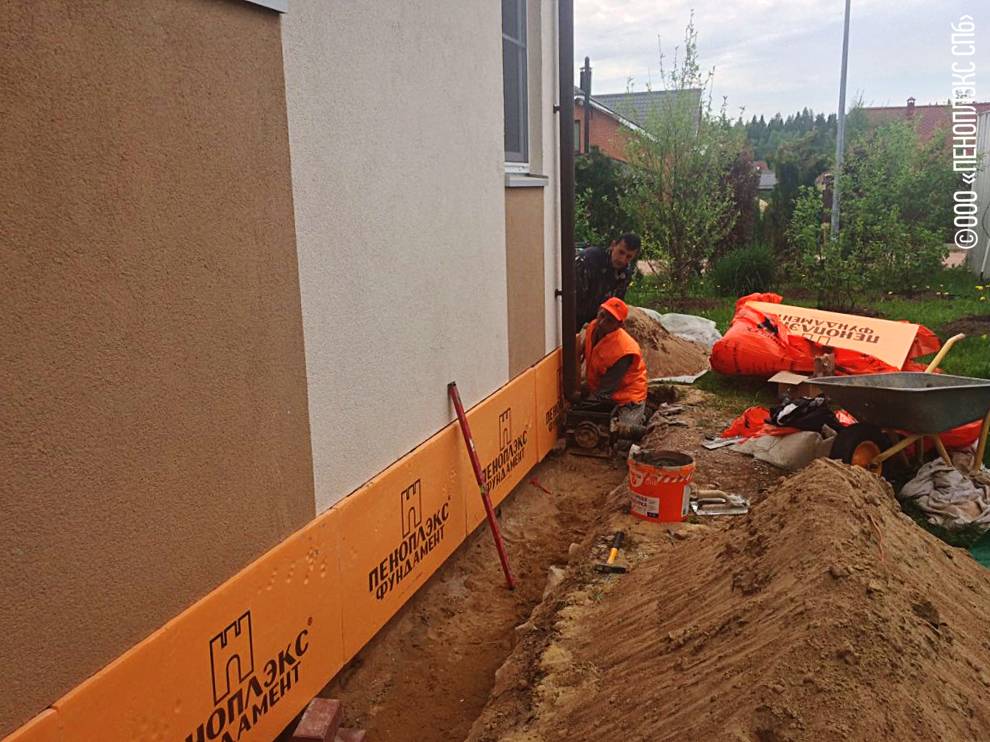
Technology of vertical insulation of the foundation with Penoplex
This method can be used both on the foundation under construction and for already constructed buildings. In the case of warming the foundation of an existing building, you must first dig it out to the depth of occurrence.
The process of vertical insulation of the foundation with penoplex
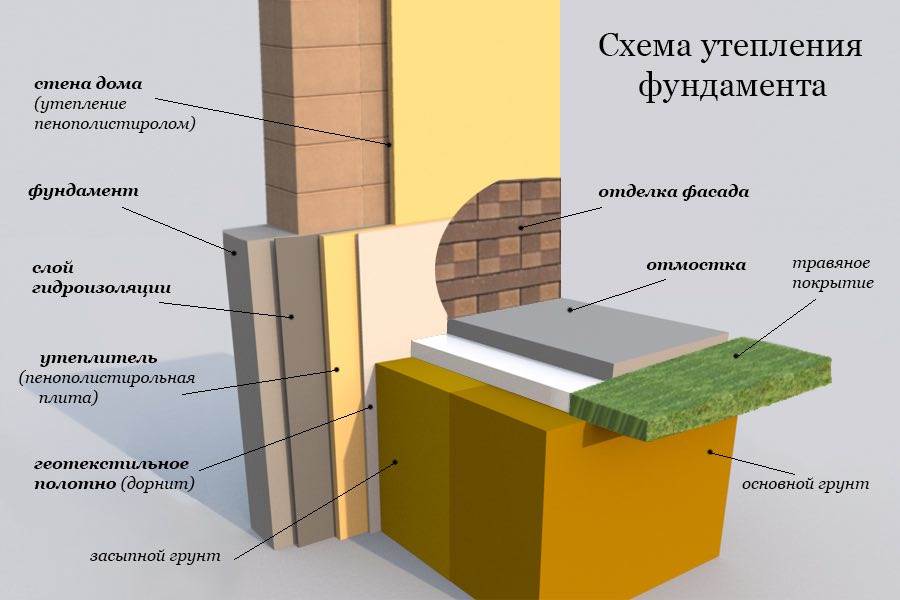
- The foundation is cleaned of soil residues, dust and other contaminants. If the surface is uneven, it is leveled using cement mortar. Carry out a coating waterproofing of the foundation using a water-based polymer or bitumen mastic. It is impossible to use solvent-based mastic - Penoplex is destroyed from contact with it.
- Dilute the glue for expanded polystyrene according to the instructions on the package. Mix it thoroughly and leave to ripen. On the foundation, the bottom line of the slabs is marked at the level. If the base of the foundation is uneven, the insulation can be deepened below the level of the sole, it will not hurt.
-
Apply glue to the Penoplex board pointwise in several places. It is possible to completely level the glue only for an absolutely flat plane to be insulated. Press the Penoplex slab to the foundation for a few seconds, after which it is leveled if necessary. The next plate is attached by aligning the mounting slot. If it is necessary to fix several layers of Penoplex, they are staggered, so that the second layer overlaps the seam of the first. This contributes to better thermal insulation. The second layer is attached to the same glue, the technology is also no different.
-
In the underground part of the foundation, additional fastening of Penoplex to the foundation is not required - when backfilling, it will be tightly pressed with soil. In the basement part, Penoplex, after the glue dries, must be fixed with special dowel nails. The dowels for fastening the insulation have a wide plastic perforated head that allows you to tightly hold the insulation on the wall without rising above its surface.Holes are drilled through the slabs, going into the concrete by 3-4 cm, after which the dowel-nails are hammered. The length of the drill must be selected depending on the thickness of the insulation plate.
- If it is necessary to decorate the basement, plaster or tile adhesive can be applied directly to the insulation plates, reinforcing them with a mesh.
Materials for insulating the blind area and foundation
The purpose of the blind area is to prevent rain, snow and condensation (dew, fog) from entering the walls of a private house. In addition to this function, the blind area is often constructed for:
- Protecting the base of the house from atmospheric water and moisture;
- Compliance with cleanliness around the base;
- Creation of a pedestrian zone in the form of a sidewalk path;
- Protecting the soil from freezing.
Blind area slope
Work on the construction of the blind area requires compliance with some rules, requirements and parameters:
- The material of the blind area must be waterproof and durable for wear, therefore, paving slabs of an arbitrary configuration, asphalting or concreting of the surface are most often chosen;
- The width of the blind area is not an arbitrary parameter. The tape should be 15-20 cm wider than the width of the cornice overhang on dense soil, and 100 cm wider - on shrinking soil;
- Brick or gravel (crushed stone) blind area is made with a slope from the wall ≥ 5, the concrete tape should have a slope ≥ 3;
A blind area can be omitted for buildings on a columnar foundation, but in this case, a system of gutters should work, diverting water from the walls by more than 1.5 meters, and a waterproof coating should be laid in places where water is collected from the roof.
Also, the basement is insulated from the outside in order to protect it from the effects of low temperatures, which turn water into ice, destroying the building material of the blind area. In the spring, thawed ice can contribute to deformation and displacement of the soil.
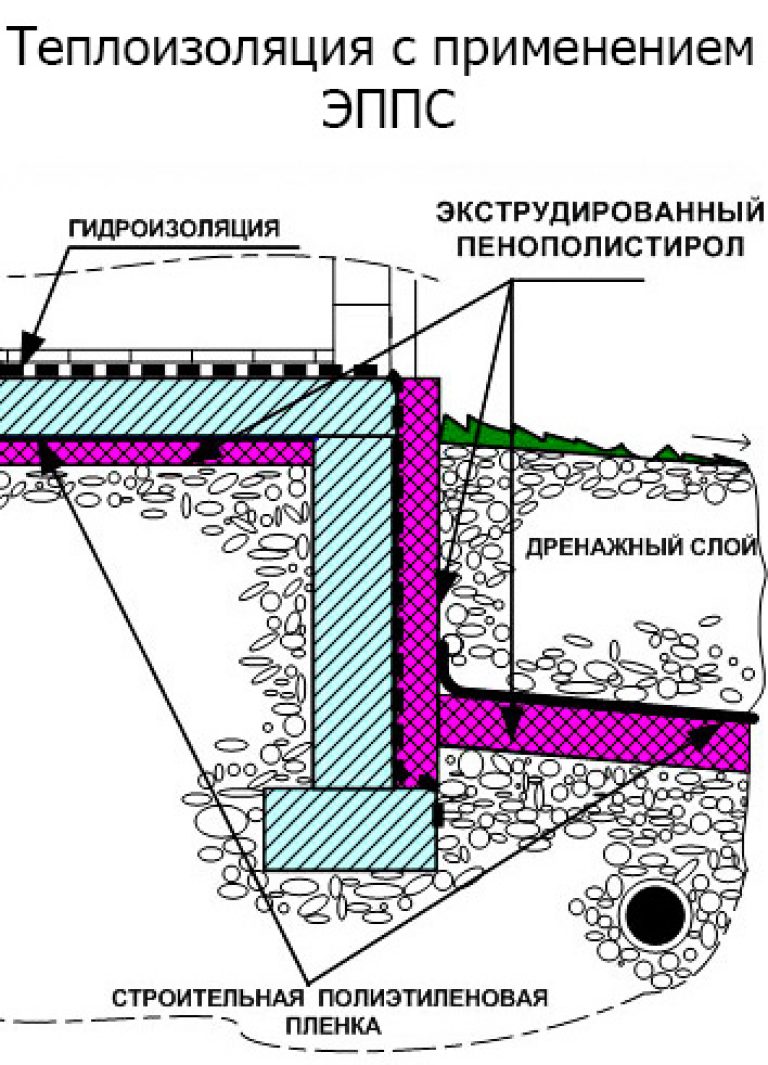
Insulated blind area scheme
Penoplex occupies a leading place among heaters in the construction of a house due to the high efficiency of heat conservation and environmental friendliness. According to the principle of implementation, the insulation of the foundation and the blind area with penoplex is a simple laying of sheets of insulation in one or more layers, depending on the requirements and design of the structure. Standard sheets are 100 mm thick.
Material advantages:
- Low moisture absorption;
- High thermal insulation properties;
- Strength and durability due to the high density of the material;
- Temperature stability over a wide range;
- Passivity to chemicals and fungal infections;
- Ease of installation and ease of machining.
Disadvantages of Penoplex:
- Fire hazard;
- Fragility;
- High price;
- Additional waterproofing.
Features of installation of insulation on the foundation
As a rule, the foundation needs to be insulated in the same way as the walls. Various methods of foam insulation of the base of the building are used.
- Vertical way.
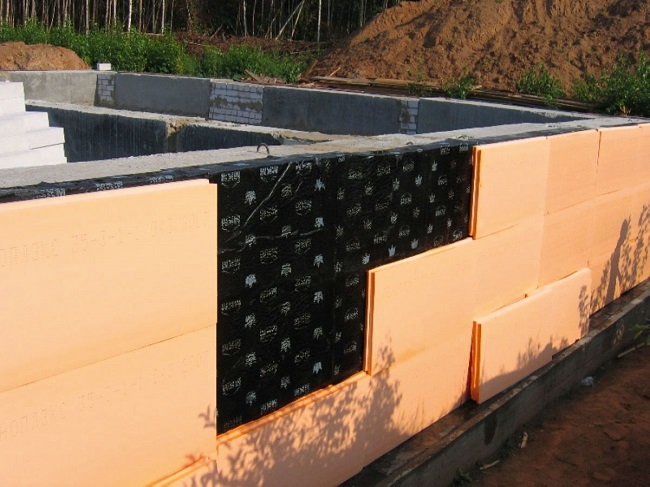
Along the entire foundation, a lower level is marked for laying insulation.
The slab is covered with an adhesive and pressed in the right place.
The entire foundation is pasted over with the same method. An exception may be places that are in the ground. The slabs in this place are tightly pressed against the foundation with soil.
- Horizontal way.
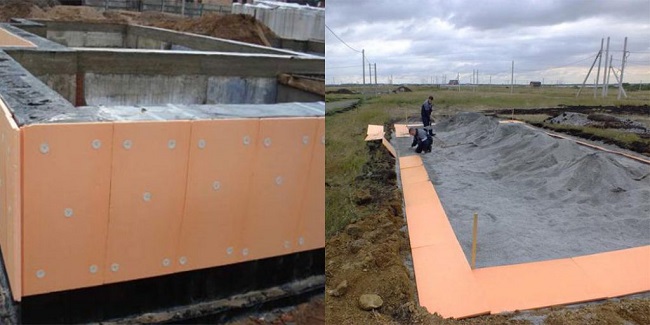
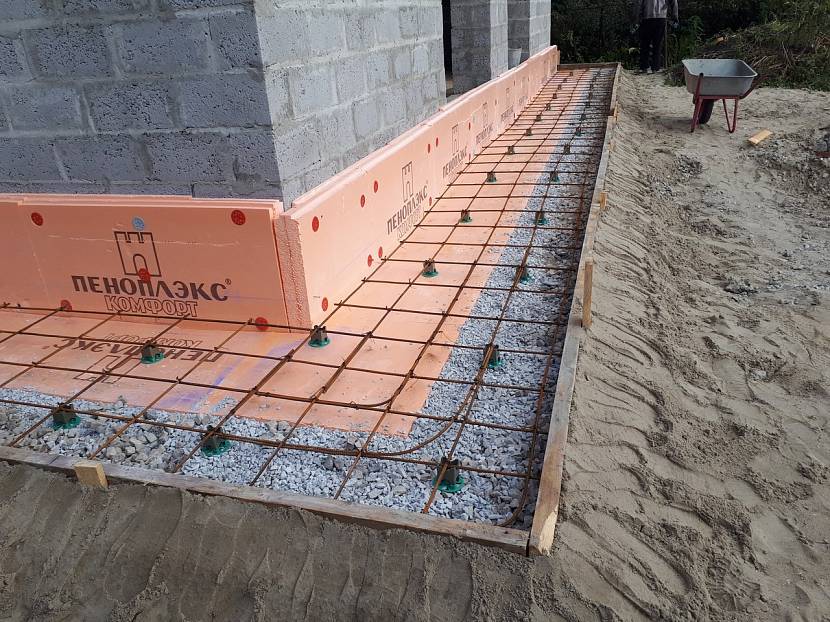
In this way, the foundation from below is protected from freezing. Work is carried out at the initial stage of construction, when the foundation is just being laid.
The slabs are tightly positioned on the concrete base of the formwork.
Waterproofing is laid on the insulation, and then the foundation is poured and reinforced.
After removing the formwork, the sides of the foundation are insulated.
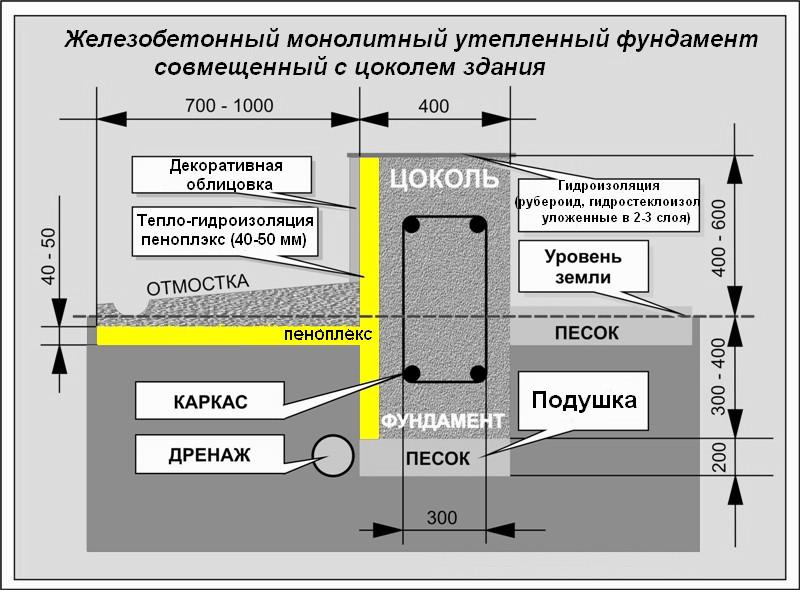
- Heat protection around the house.
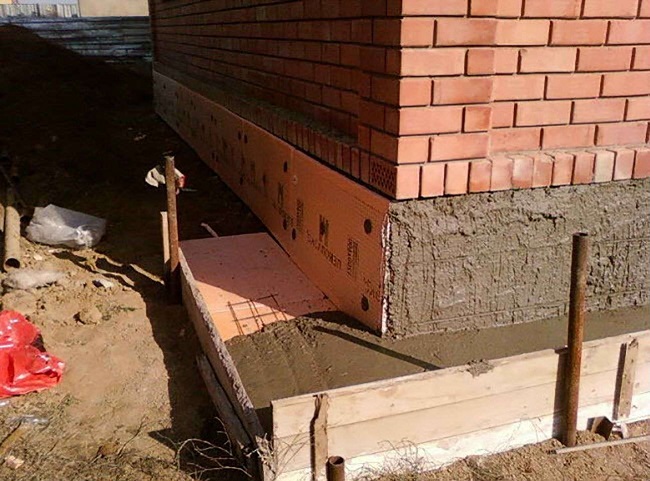
In this case, the foundation and the adjacent territory are simultaneously insulated.
First of all, the foundation is insulated in a vertical way.
Then formwork is made around the foundations with an indent of 100 mm, and the blind area is being prepared.
Insulation is laid on the tamped surface between the foundation and the formwork in a dense layer.
On top of the insulation, a waterproofing film is mounted with an overlap on the foundation, after which the formwork is poured with concrete.
Thermal insulation technology of a tape-type structure
How is the basement insulation carried out with expanded polystyrene? Preparing the supporting base of the house, as mentioned above, is the most laborious and physically difficult process. First, you need to dig out the foundation with your own hands.
To do this, a trench is dug outside, along the perimeter of the construction site. Its width must be at least one meter.

The depth will depend on the place to which the soil freezes when the temperature drops. Usually, with this calculation, the strip foundation is initially laid.
Despite the fact that the technology of insulation with extruded polystyrene foam from the outside becomes an obstacle to moisture, it is recommended to equip drainage during heavy floods.
Having retreated from the strip foundation of the house about 60 cm, they dig out another shallow trench for laying drainage pipes.
Having properly equipped the drainage system, they begin to prepare the dug base for insulation with their own hands.
The walls are cleaned from adhered pieces of soil and broken off pieces of concrete. Then, using a cement-sand mortar in a ratio of 1: 4, the strip foundation slabs are plastered.
Having leveled the surface in this way, you can not be afraid that the plates will damage the waterproofing material, and this problem will subsequently affect the life of the house.
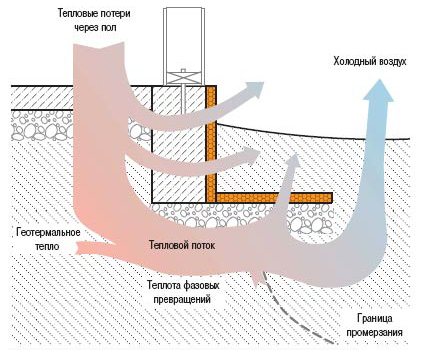
In the next step, the leveled slabs are insulated. Several layers of waterproofing are applied to completely dried plaster with their own hands.
As the first layer, bituminous mastic is used, and the second is TechnoNicol sheets.
This is followed by insulation of the foundation with penoplex, which is fixed on the walls in a vertical position, from bottom to top.
The fixing of the foam is carried out using any glue made on the basis of inorganic components.
The space at the joints and seams is sealed with polyurethane foam. If the thickness of the insulation seemed insufficient, then on top of the first layer of expanded polystyrene plates, the second is applied in the same way, so that the thickness increases slightly.
This layer is attached with an offset, which will additionally isolate the joints.
At the final stage, insulation of the foundation with penoplex requires plastering the surface. For this, a reinforcing material is overlapped on top of the insulation layer.
Then a plaster cement-sand mortar is applied. After the plaster layer has completely dried, the trench is buried, but not completely, since it will still be necessary to leave room for a warm blind area.
Additionally, we suggest watching a video material on this topic (including about the device of the blind area).
Video:
Insulation cost
How much will it cost to insulate the walls with this material?
To do this, you need to calculate the geometric plane that needs to be insulated.
If the house has a perimeter of 42 meters, and the depth of the foundation is 1 meter, then 42 squares need to be insulated.
Sheets with a thickness of 120 mm do not exist. But, there is Penoplex Foundation 100 mm and 20. We'll have to insulate it in 2 layers. A sheet with a thickness of 100 mm costs about 375 rubles and has an area of 0.72 m3. And a sheet with a thickness of 20 mm costs about 70 rubles. In total, we need 59 sheets of each type. Weaving will cost us 22,000 rubles and the second layer 4200, a total of 26,000 rubles for insulation.

If you add a few cans of glue-foam, then 30,000 can be exactly kept.
How to insulate the foundation with penoplex with your own hands
The installation of such an insulating material is quite simple, the mass of the sheets is insignificant, and therefore it is not a problem to insulate the base with your own hands. All fasteners can be bought at any hardware store, as well as bituminous grease, waterproofing and glue.
Let's consider the process in stages:
- Excavation.It is necessary to dig out the existing foundation or expand the foundation pit of the future foundation.
- Drainage. Despite the fact that this insulation does not allow moisture to pass through, waterproofing in any case needs to be done.
- Preparation of the foundation surface. It must be thoroughly cleaned of earth and sand, remove all artificial irregularities, because even a small sharp angle can damage the insulation material.
- Plastering the surface of the foundation. It is better to use a cement mixture with the addition of lime.
- Installation of a waterproofing layer. Here it is recommended to make two layers at once: the first from bitumen, and the second from roofing material or TechnoNicol sheets;
- Insulation of the foundation. A distinctive feature of such plates is that they all have special grooves. Therefore, the first sheet of the lower layer is glued to the base of the foundation with ordinary inorganic glue or acrylic. All other sheets are similarly fixed according to the “thorn-groove” system. All gaps between the boards are closed with glue or sealant. But the second layer of insulation must be glued in the same way, but the sheets should overlap the cracks of the first layer in the center. To fix the sheets, you can use special mounting fasteners, they are commercially available and are relatively inexpensive;
- Leveling the surface of the insulation. For such purposes, a classic concrete mix is excellent, but the sand must be carefully sieved. You can also use acrylic glue, but this technology is too expensive.
- Backfilling the pit and creating a warm blind area from insulation. For filling the pit, it is better to use a mixture of sand and expanded clay, because this is an extra ball of thermal insulation. But you can do without it and fill the foundation with ordinary soil, but not to the very top. A warm blind area will be made there.
The technology for creating a warm blind area is relatively simple. To do this, about 30 cm from the top edge of the foundation, sand is poured and rammed. Then waterproofing is rolled over the sand (for example, roofing material with bitumen).
After the roofing material dries, foam-plastic slabs are put on top, which are fixed with acrylic glue. The blind area is made of concrete at a slight angle of inclination from the level of the foundation (for drainage of storm and waste water). It is recommended to decorate or process the visible foam layer.
Penoplex insulation technology is not complicated. But, nevertheless, it is recommended to do the insulation immediately, when the base is just being built, then there will be less financial costs and the quality of the insulation will be better. Penoplex is an excellent and durable insulation material, it is easy to install and does not need maintenance.


