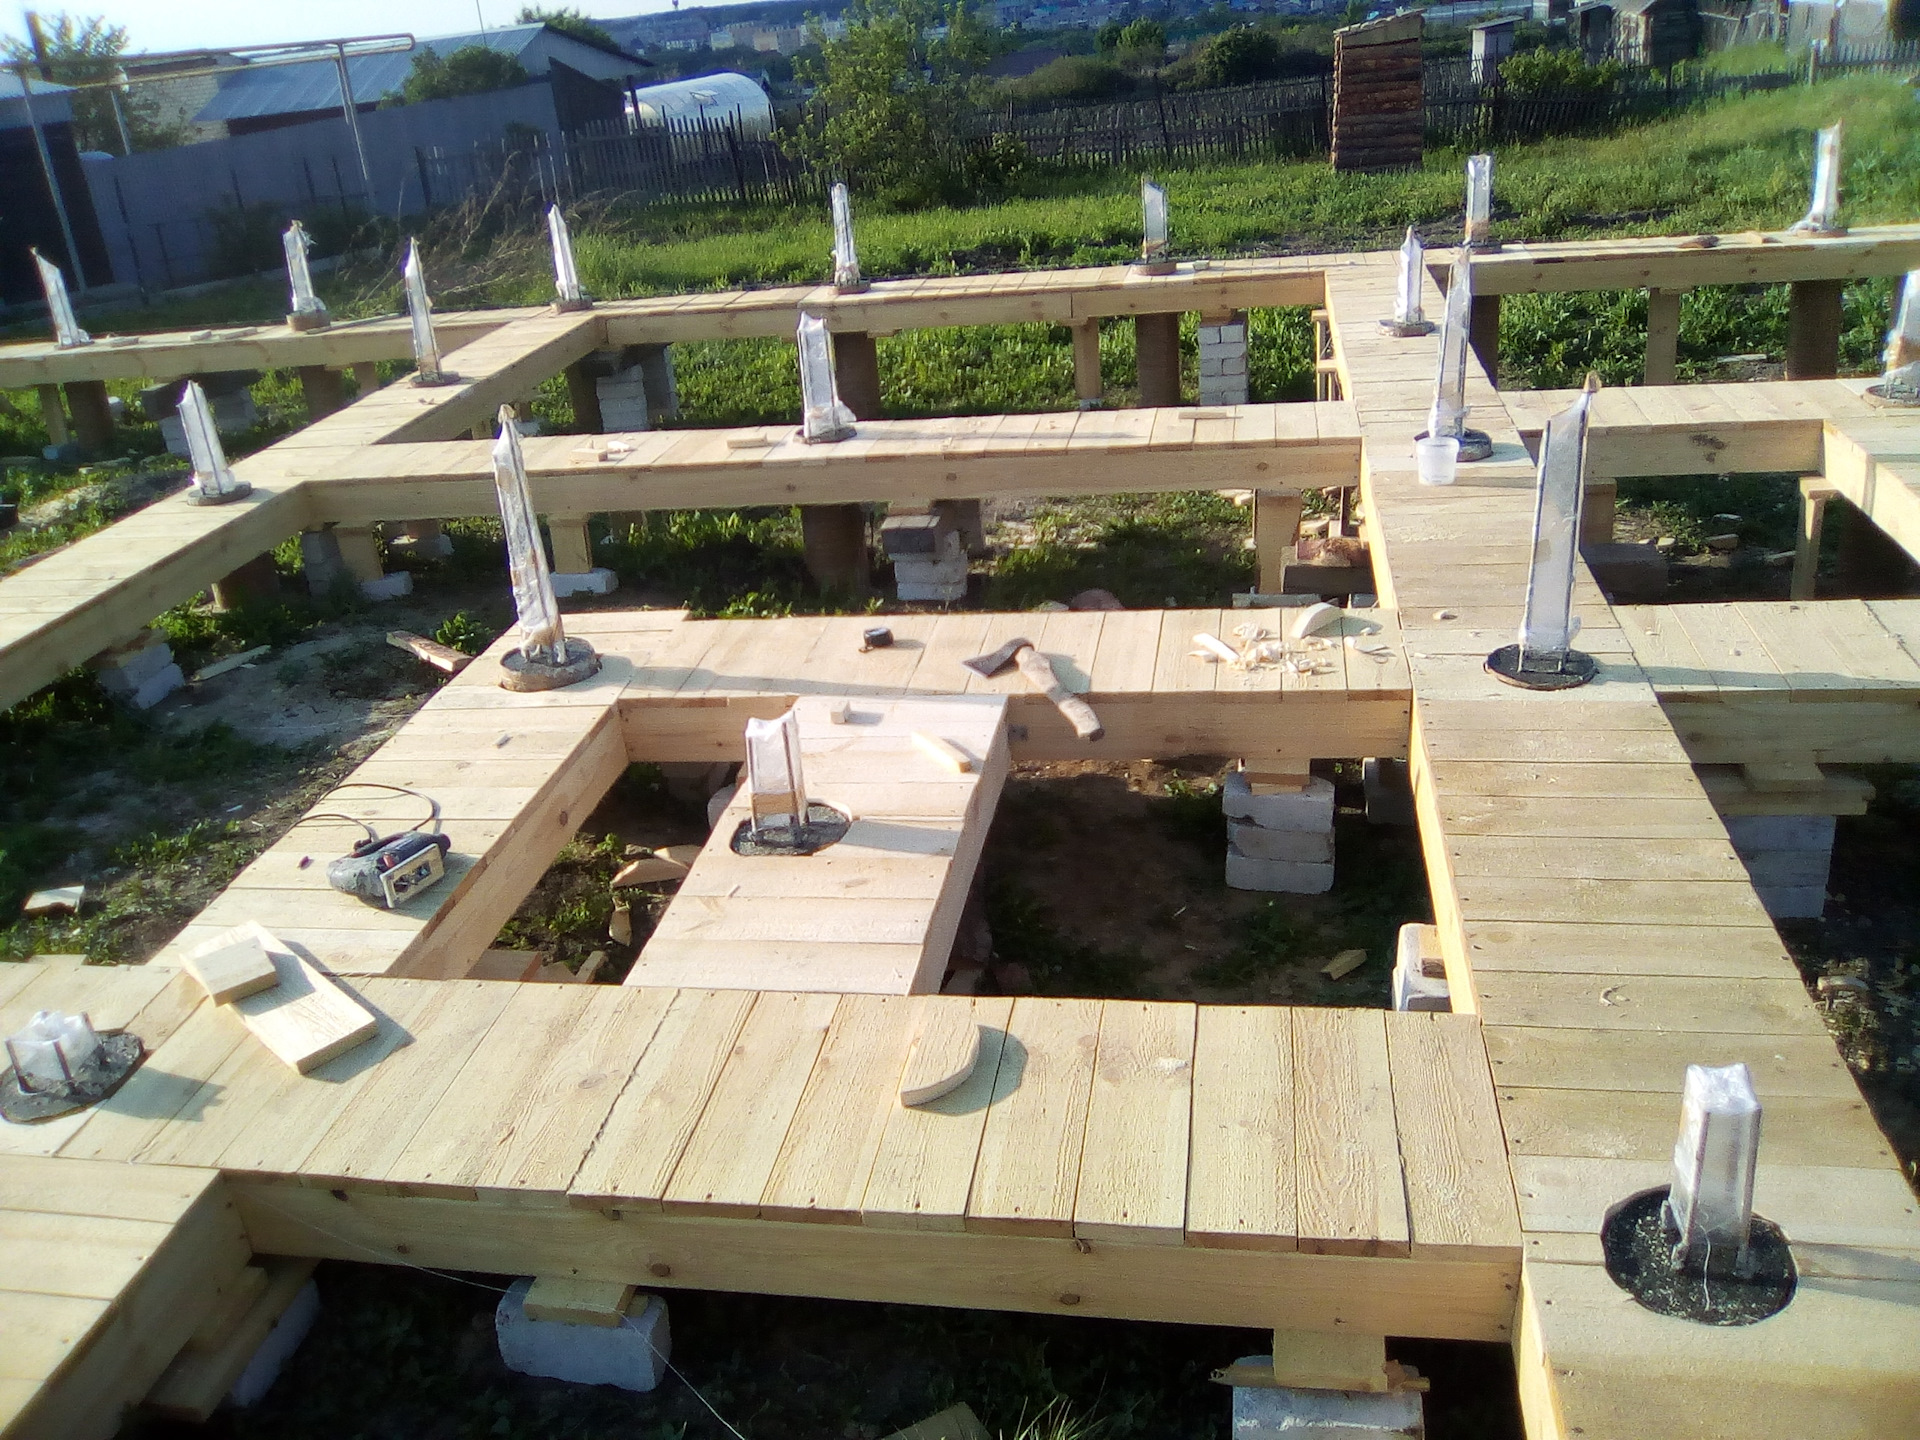
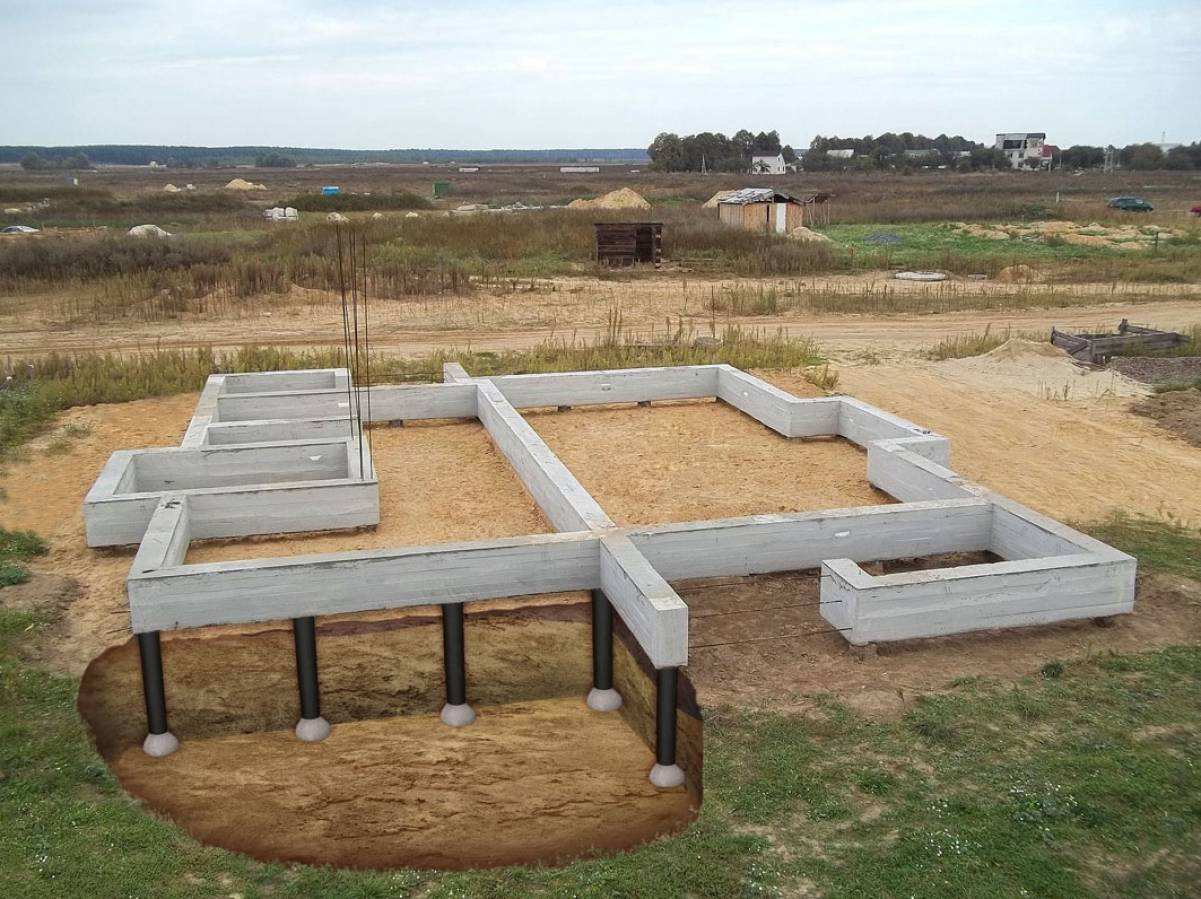
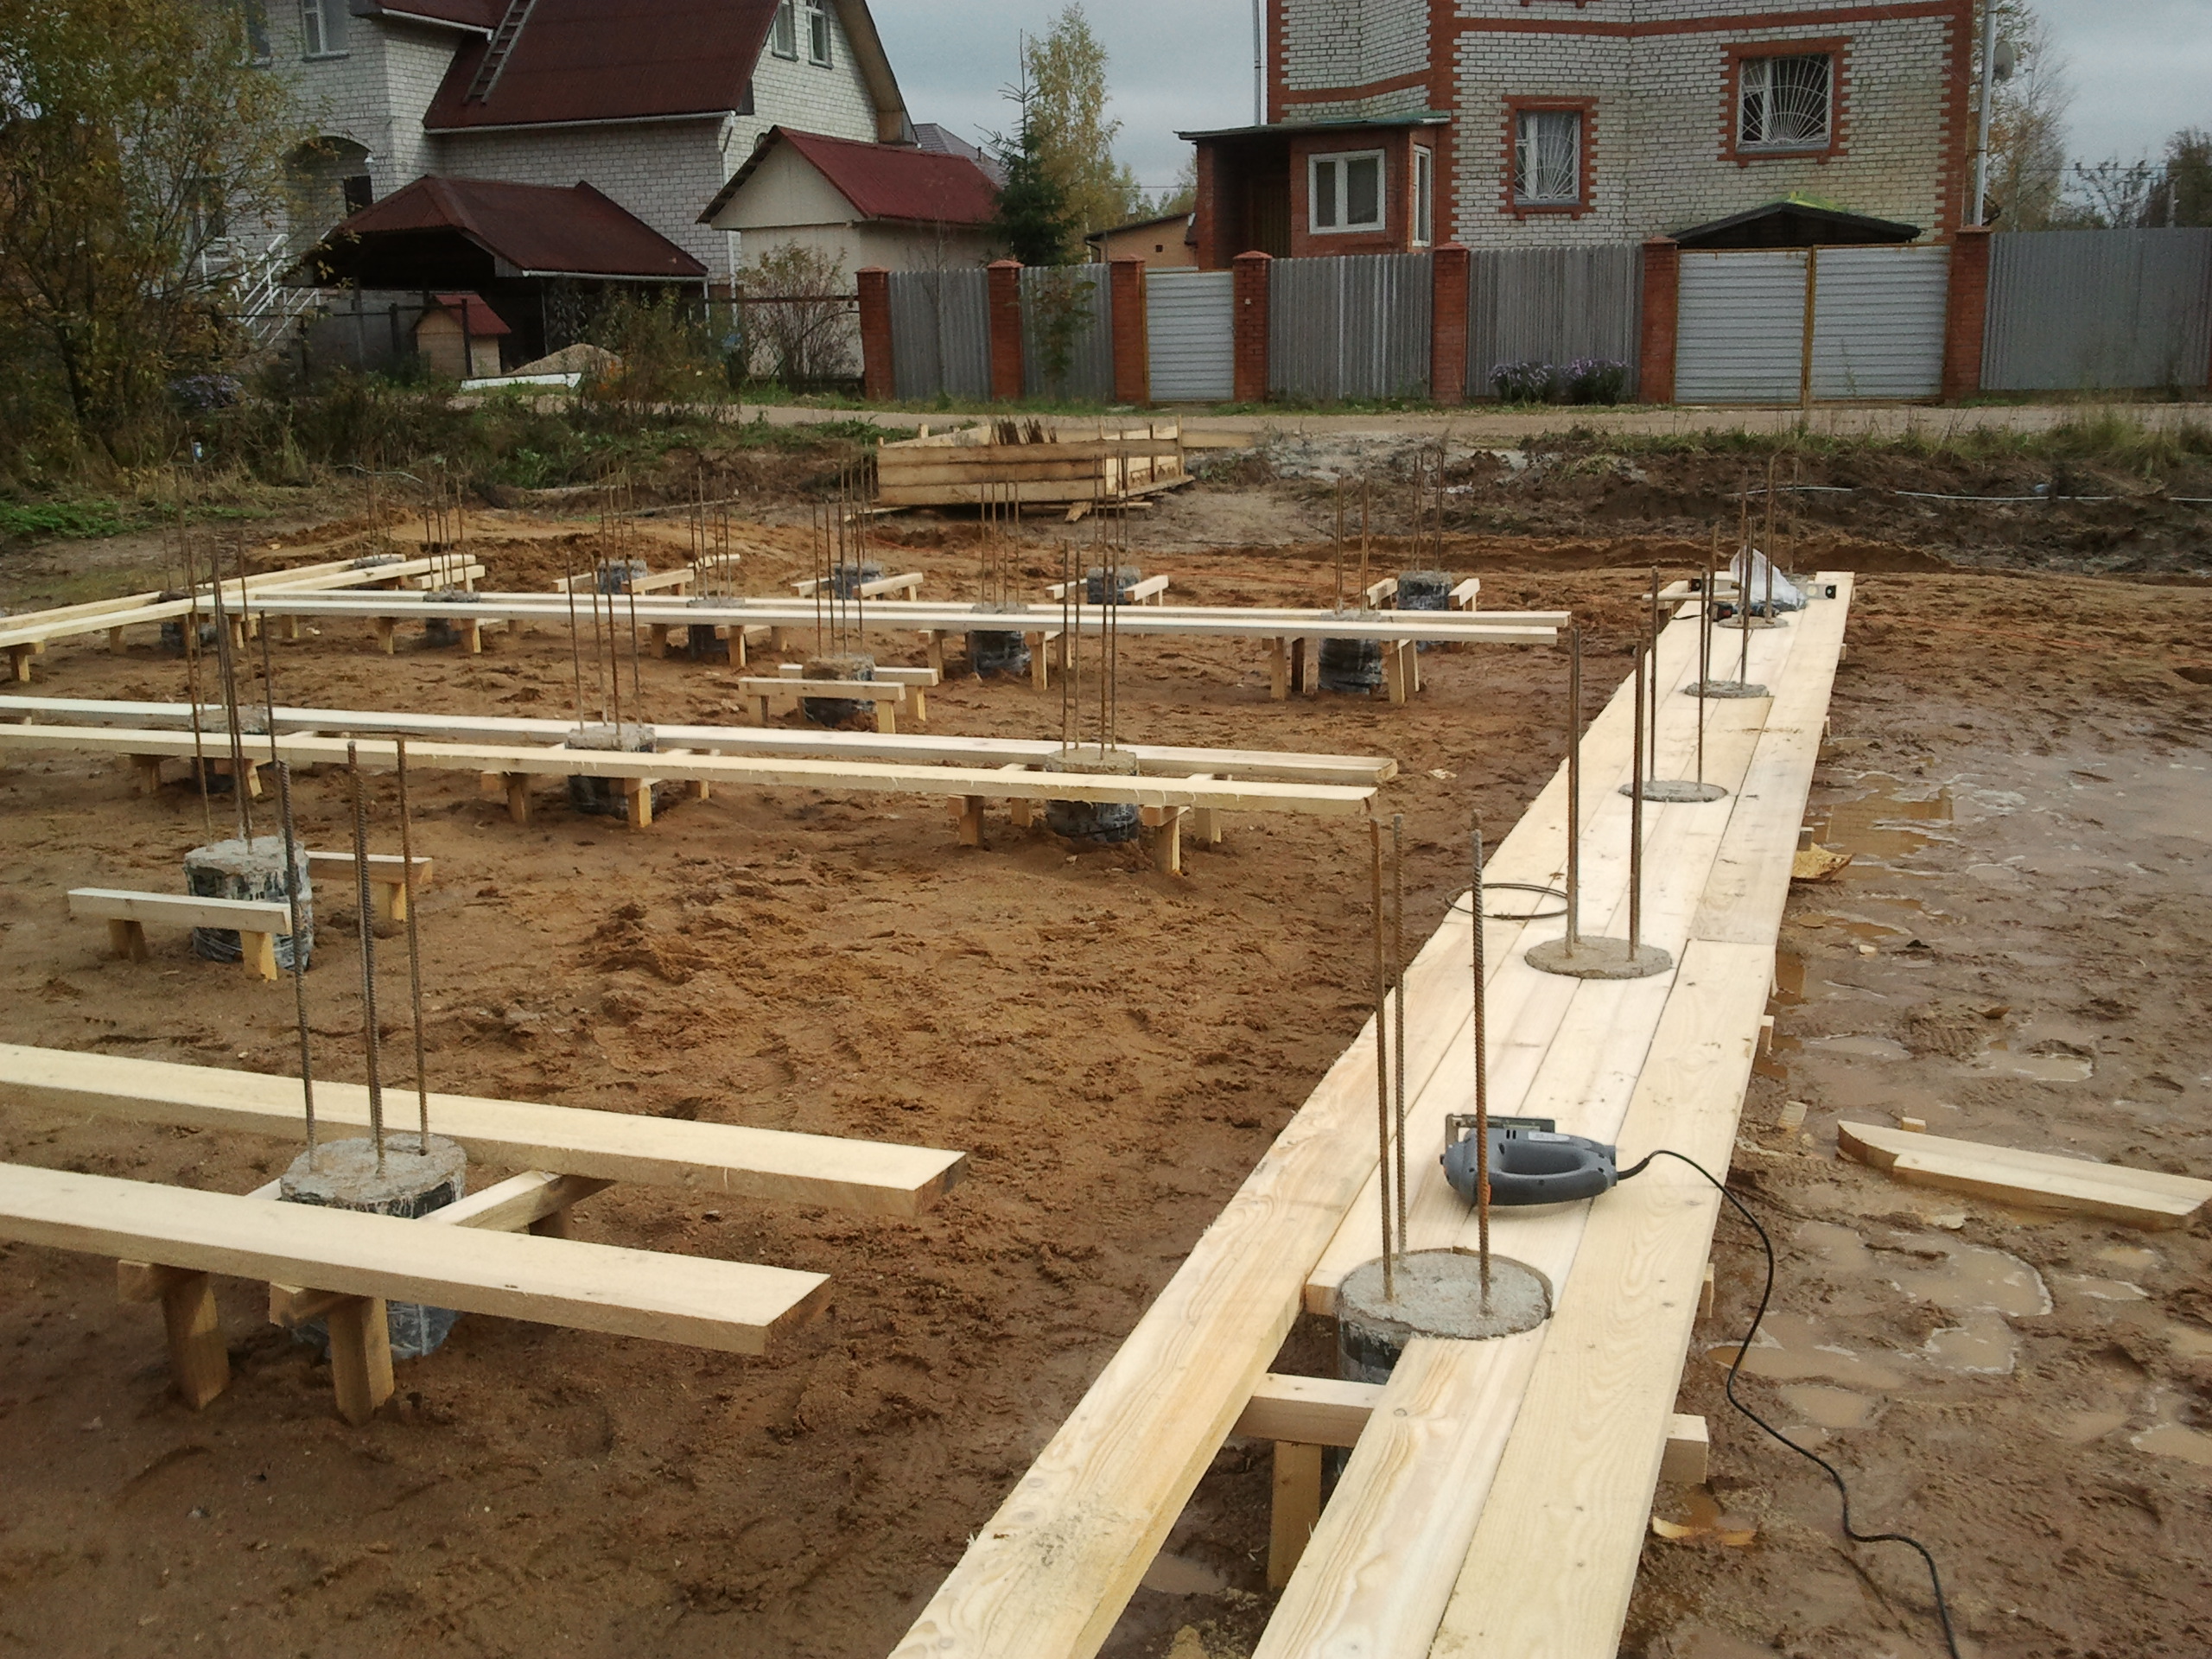
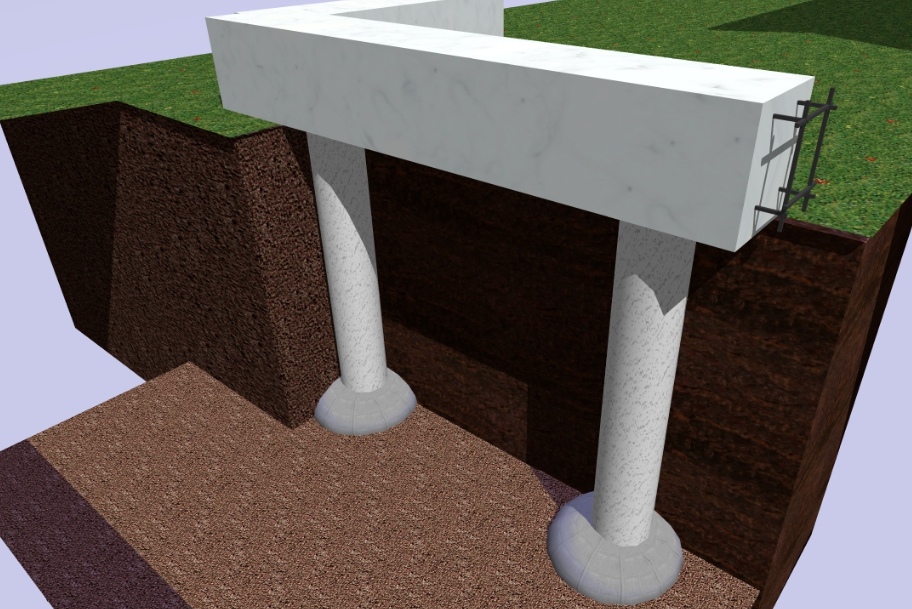
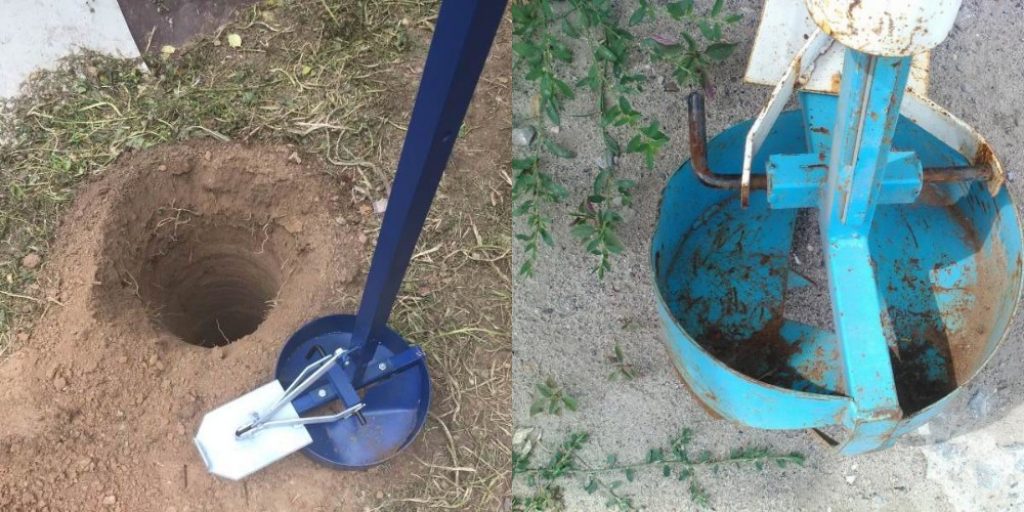
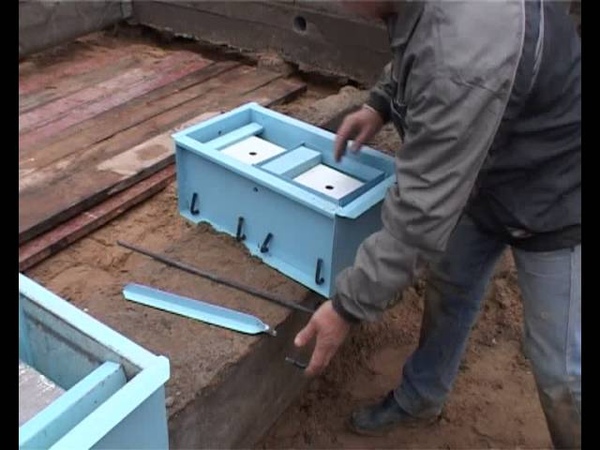
TISE pile foundation. Step 2. We drill holes for piles.
After marking the territory, I took a TISE drill with a diameter of 250 mm from a neighbor (but without broadening, just a drill). He drilled all the holes with him, with a few exceptions. As you understand, without the TISE drill, there will be no TISE foundation.
Before drilling, I found the center of the future pile with an overhang (or the edge at the perimeter of the piles), and then, using a galvanized pipe with a diameter of 250 mm, marked the place of the future pile. How exactly is shown in the video:
To fill 35 holes with a depth of 1.6 meters and make TISE-broadening at the bottom of them, I spent 9 days 4 hours each, between which there were also 4 days of rest (i.e., I spent 13 days in total):
Day 1 - 14 holes of 0.5 meters and 21 holes of 0.2 meters were manually drilled (a kind of marking, but in depth);
Day 2 - manually drilled the remaining 21 holes up to 0.5 meters;
Day 3 - 11 holes were manually drilled up to 1.6 meters and 8 widening were made;
Day 4 - a motor-drill was rented for two operators and 24 holes were drilled up to 1.1 meters;
Day 5 - 10 holes were manually drilled up to 1.6 meters and 2 widening were made;
6th day - 5 more broadenings were made, the drill was broken;
Day 7 - the drill was repaired;
Day 8 - 7 more broadenings were made;
Day 9 - the remaining 6 broadenings are made (hurray).
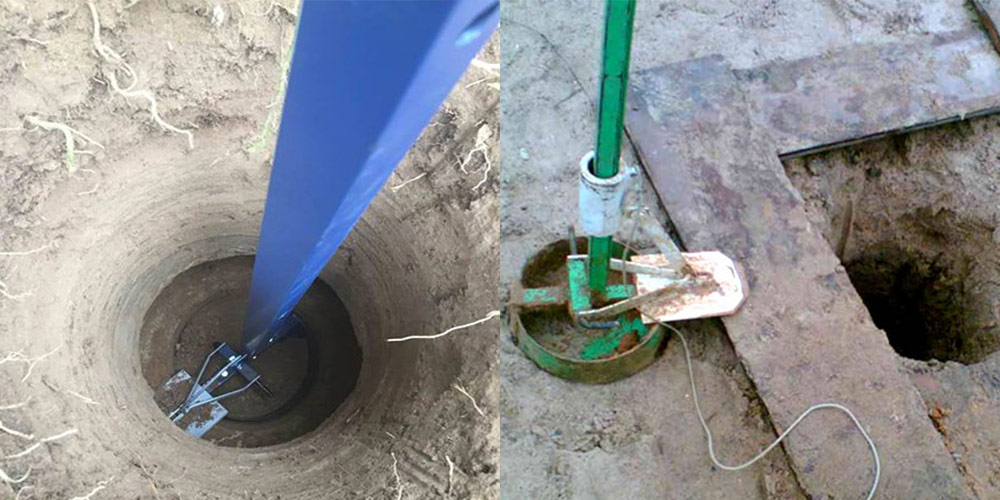
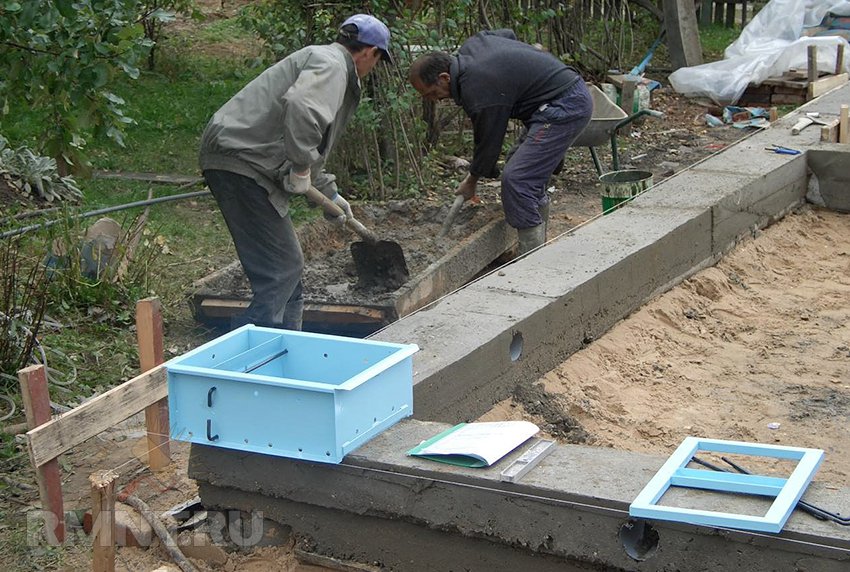
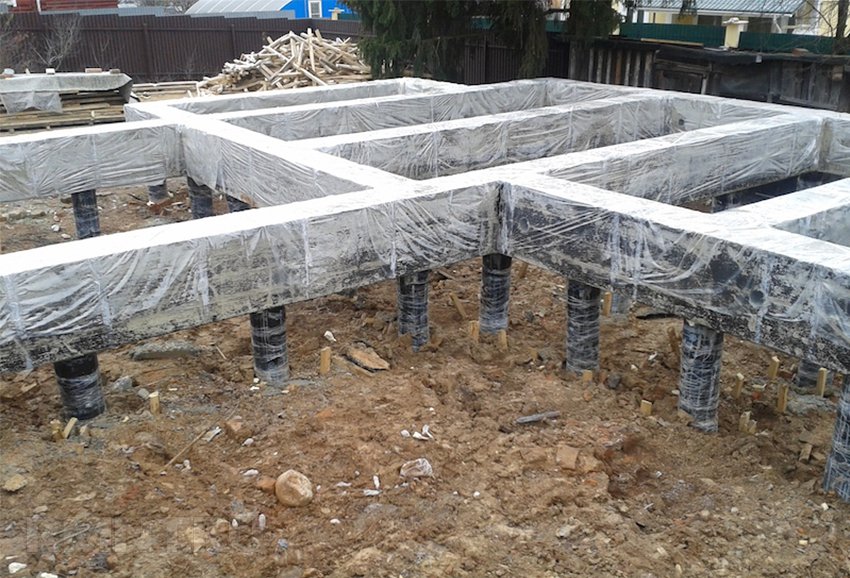
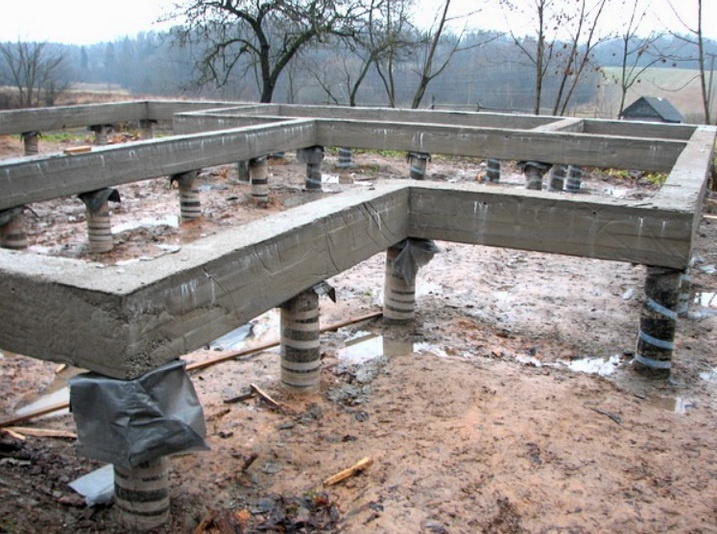
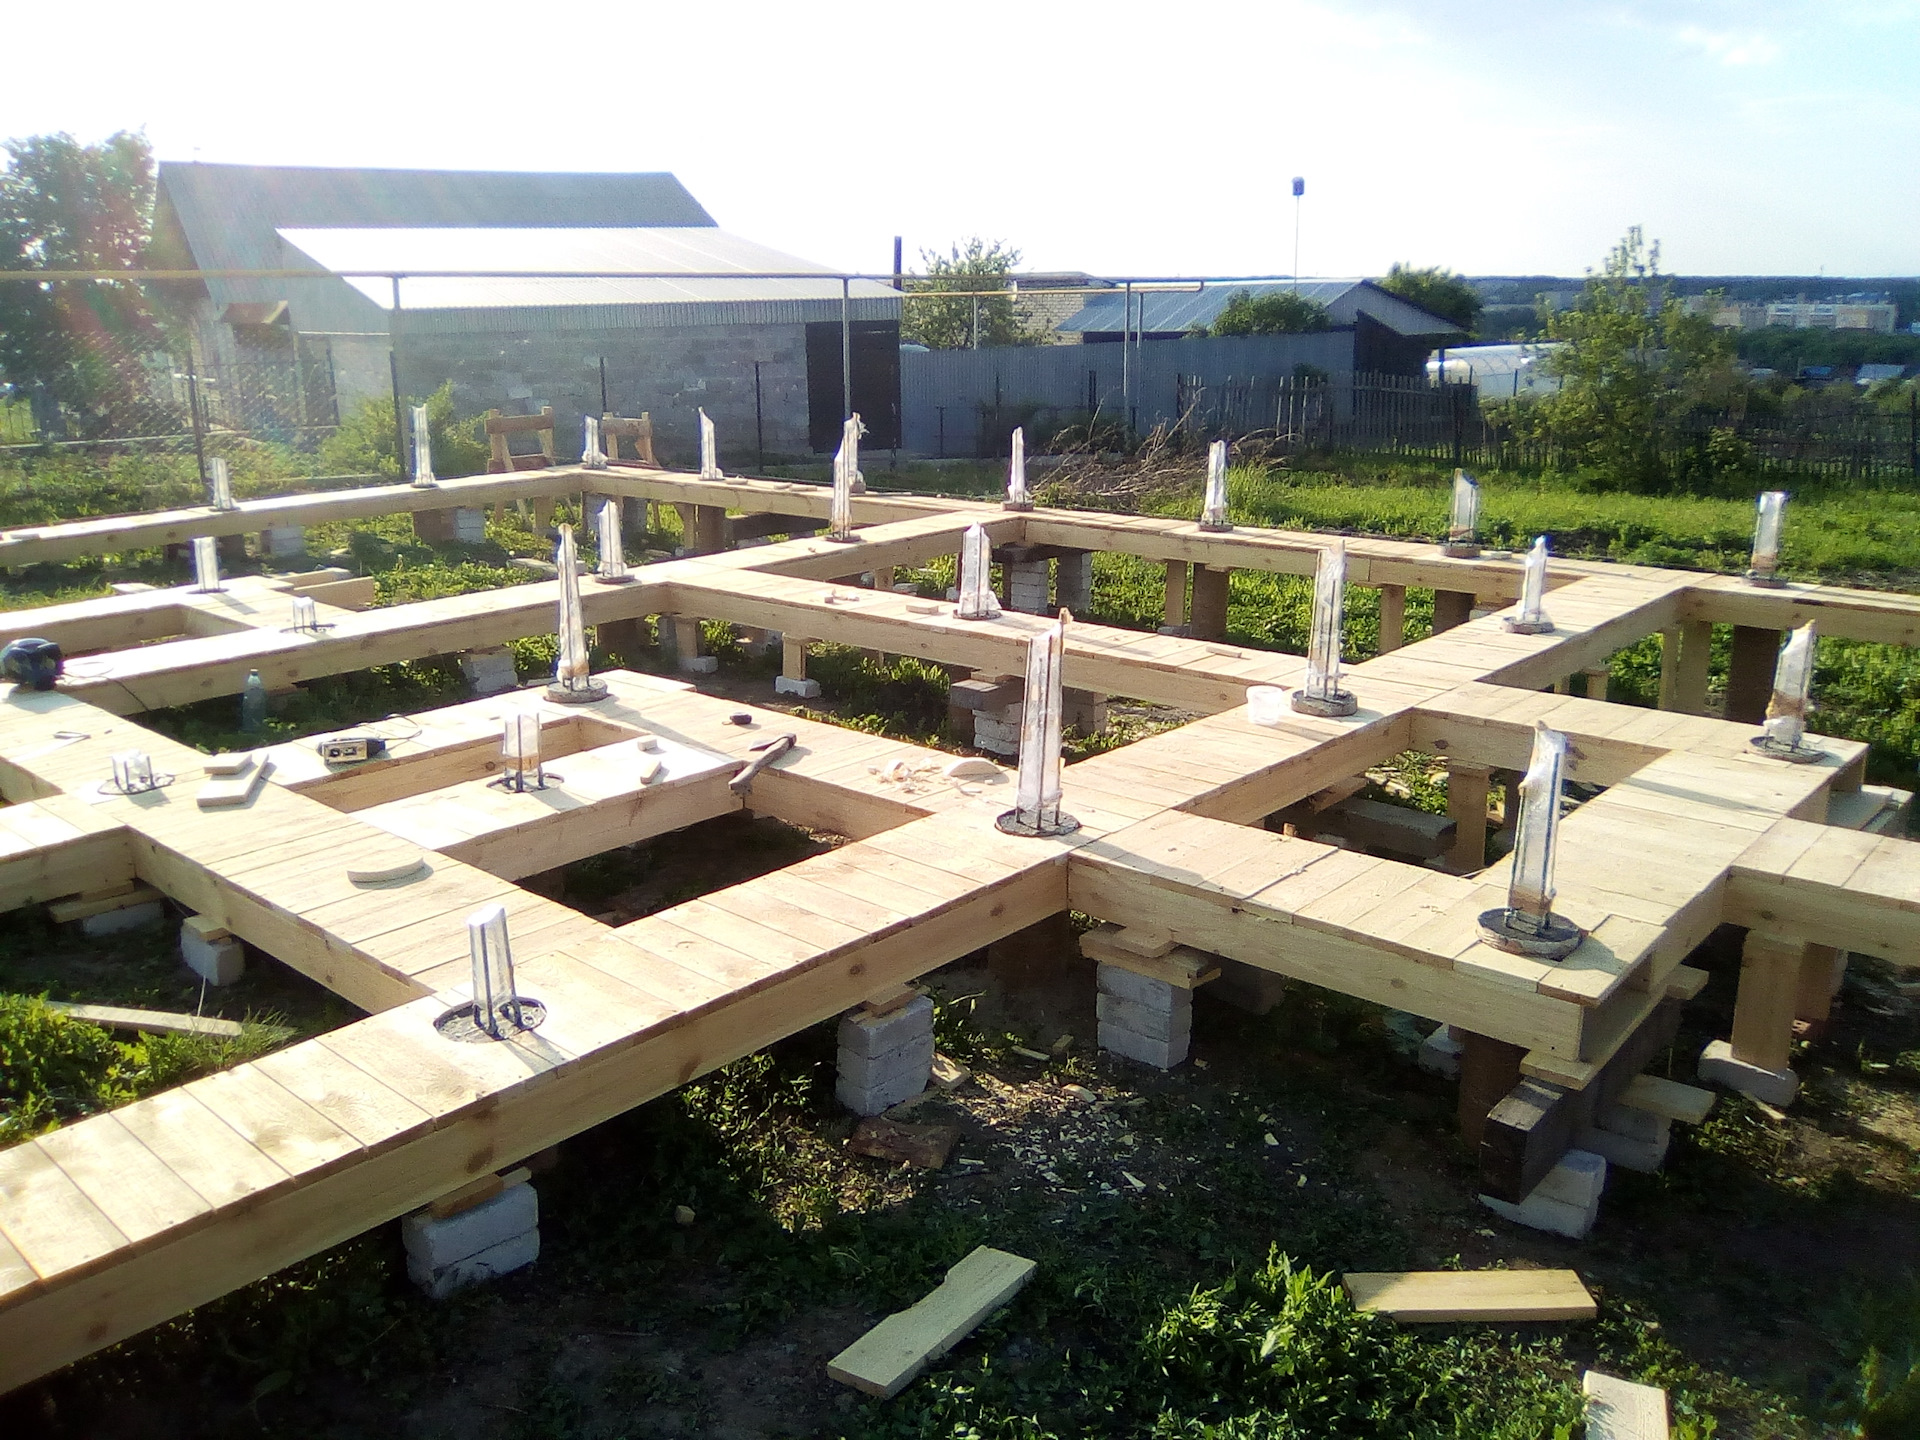
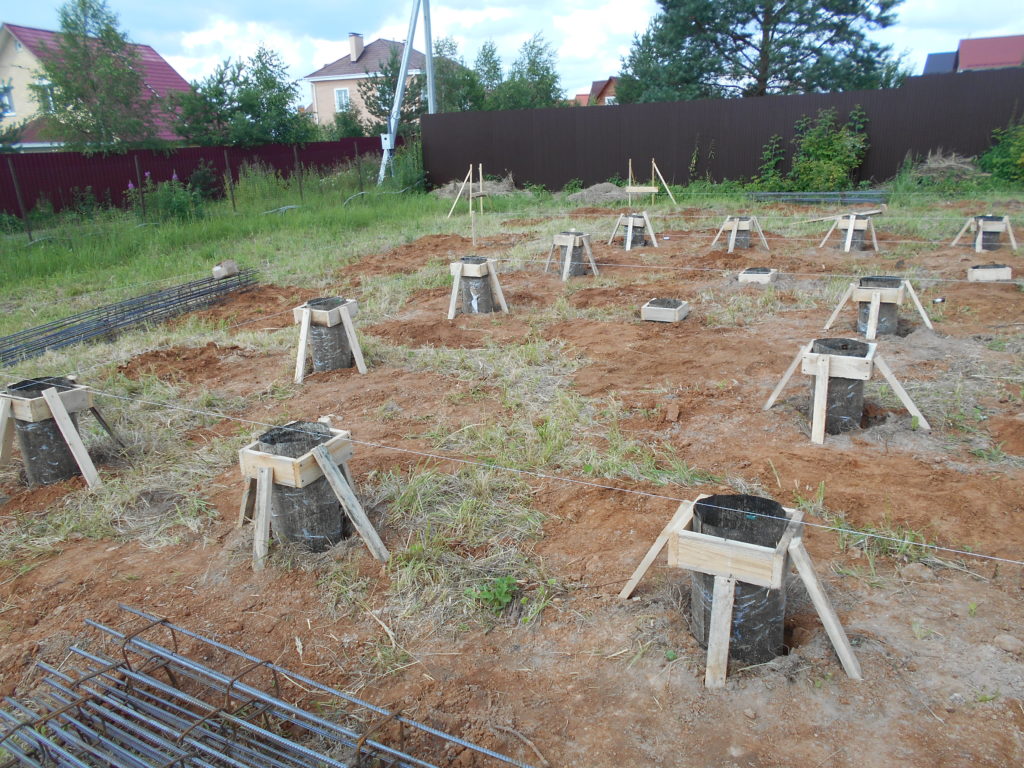
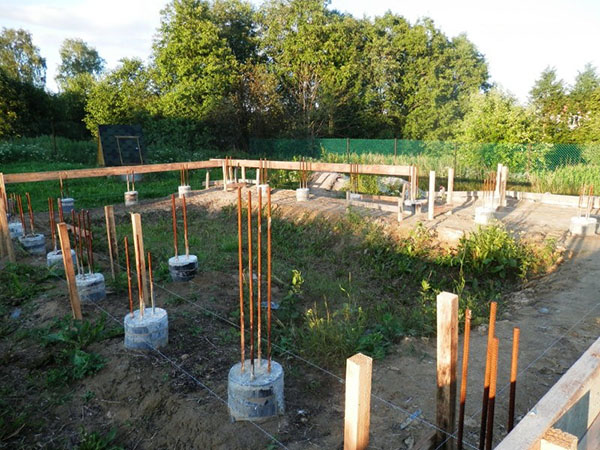
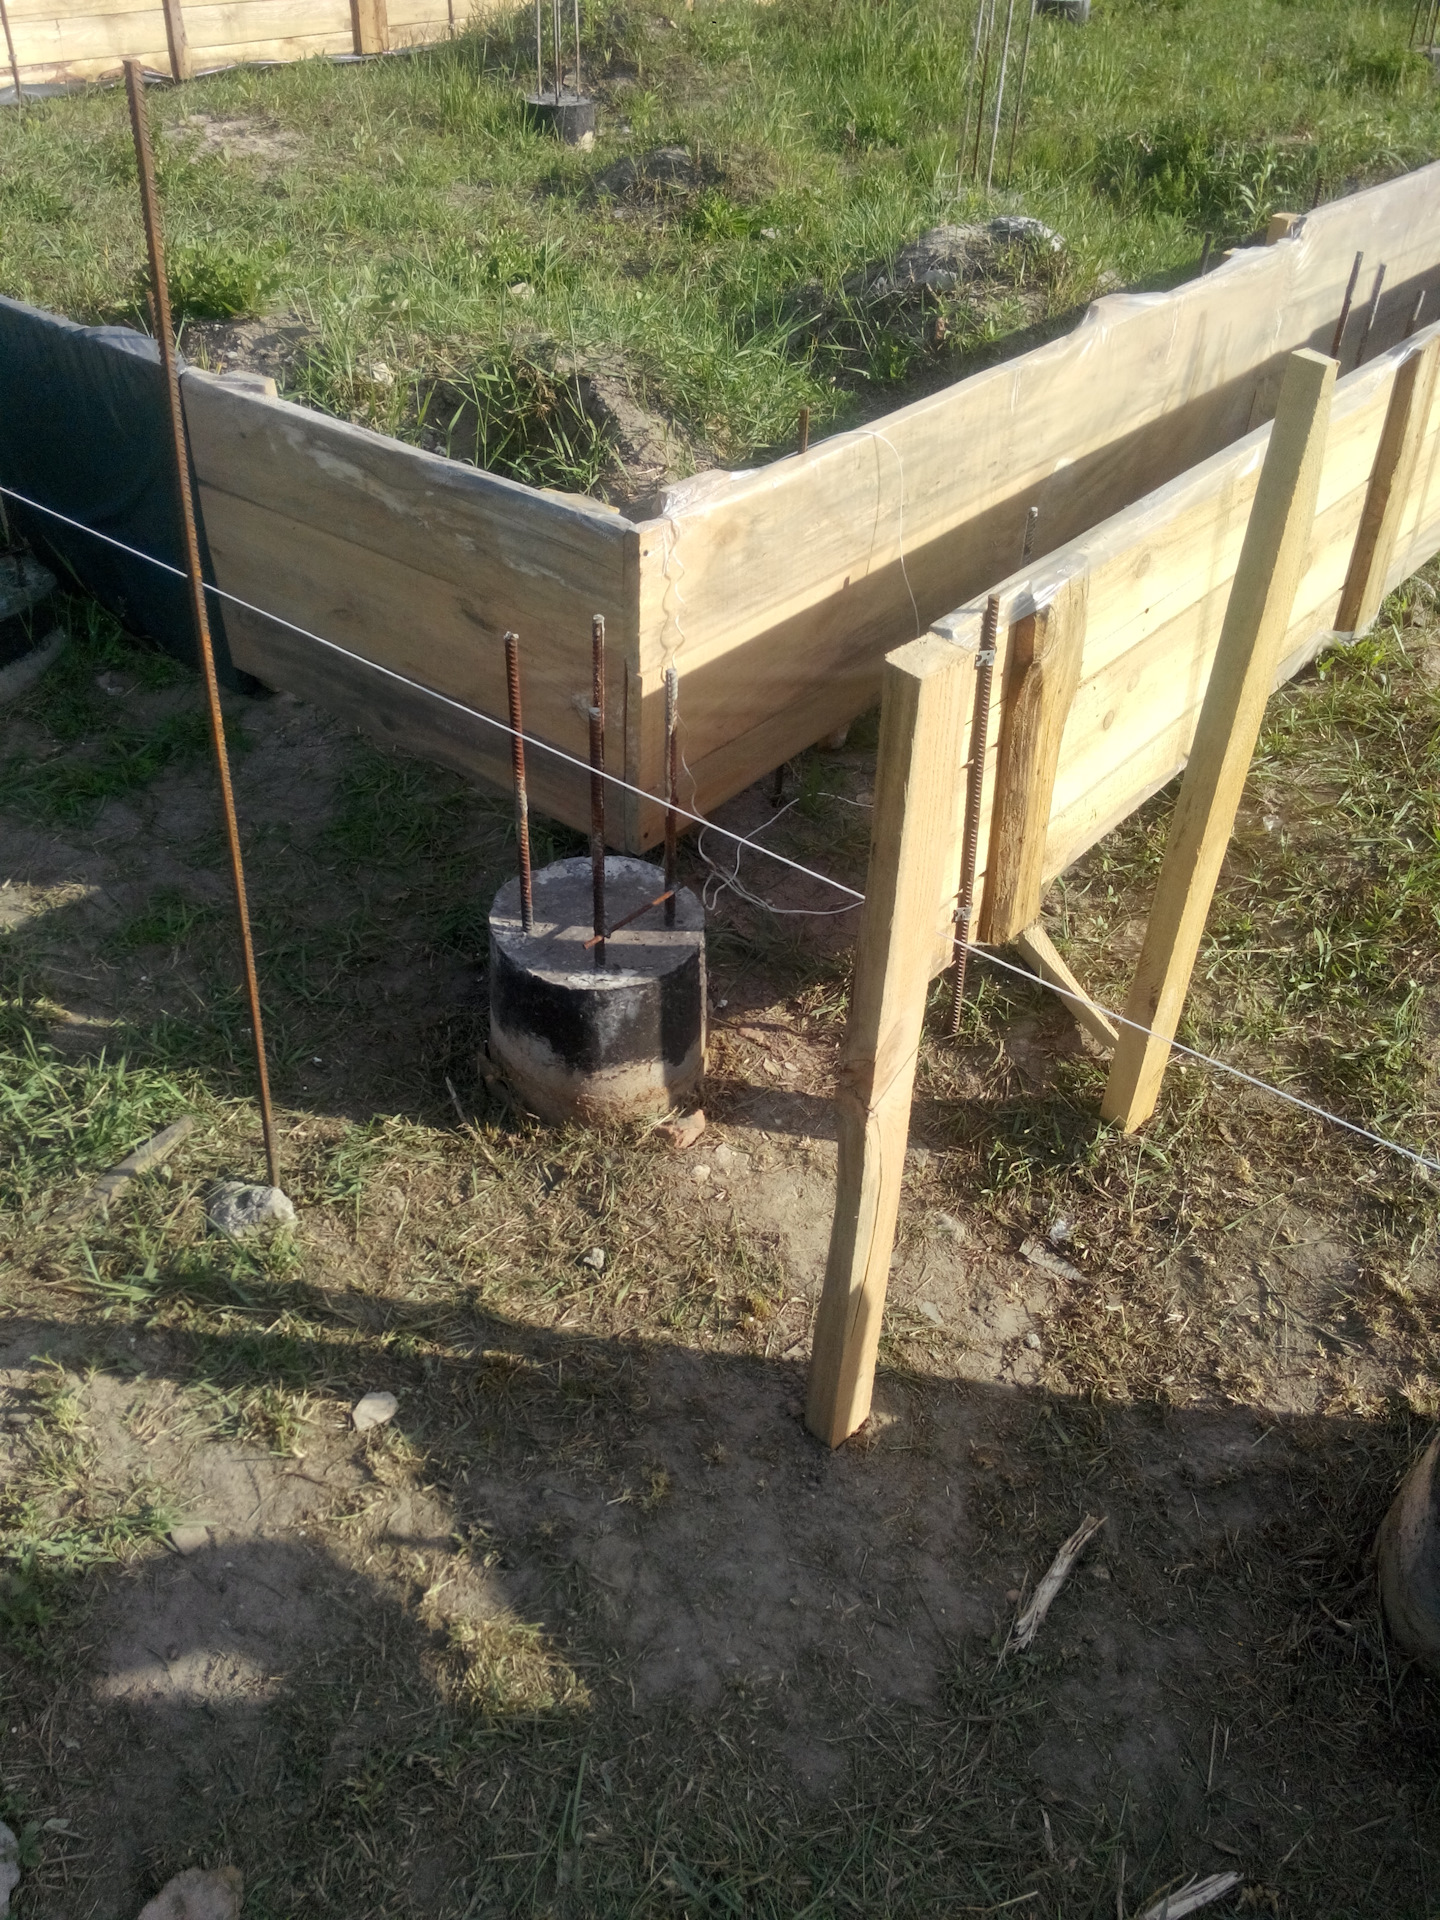
Photos from this stage:
A storm hole, after each release of soil I apply a level from 2 sides to the drill: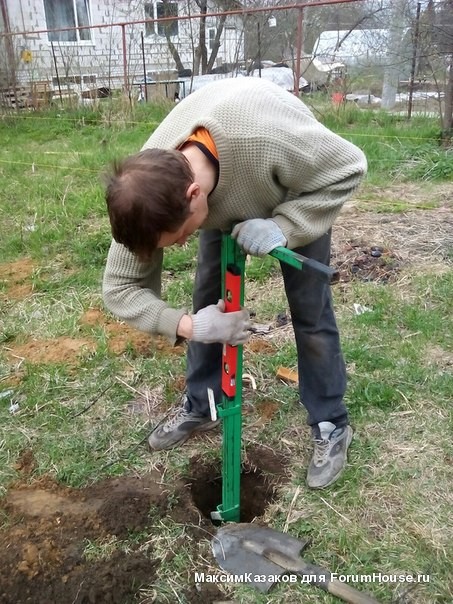
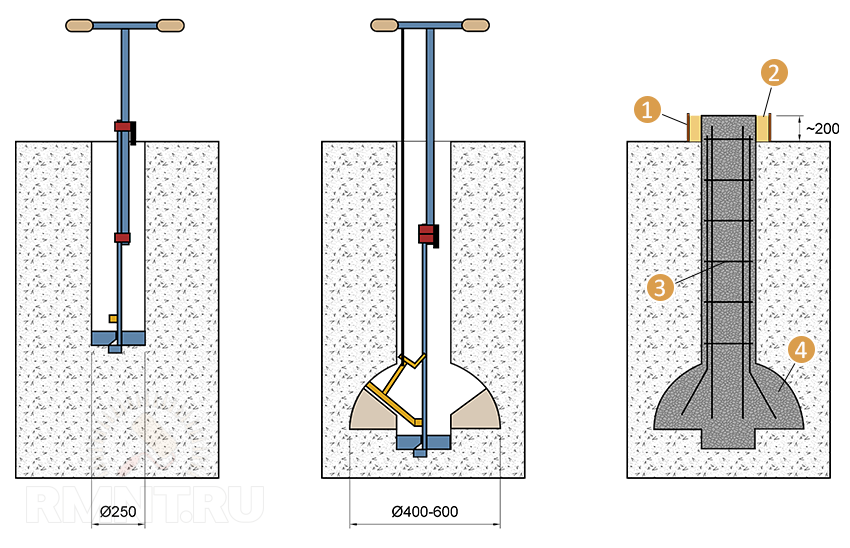
I make the TISE pile widening: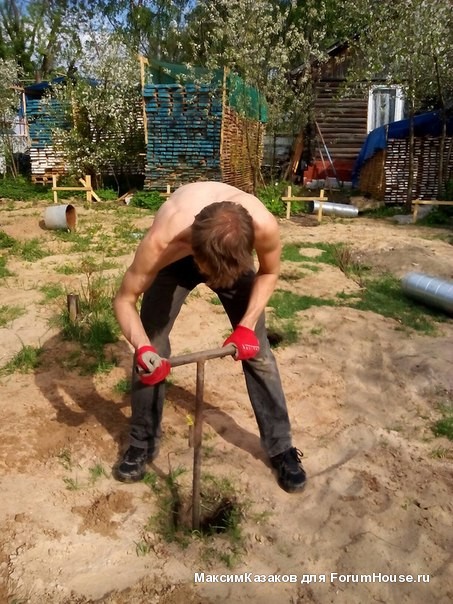
But with such a homemade 3-meter drill, this broadening was done: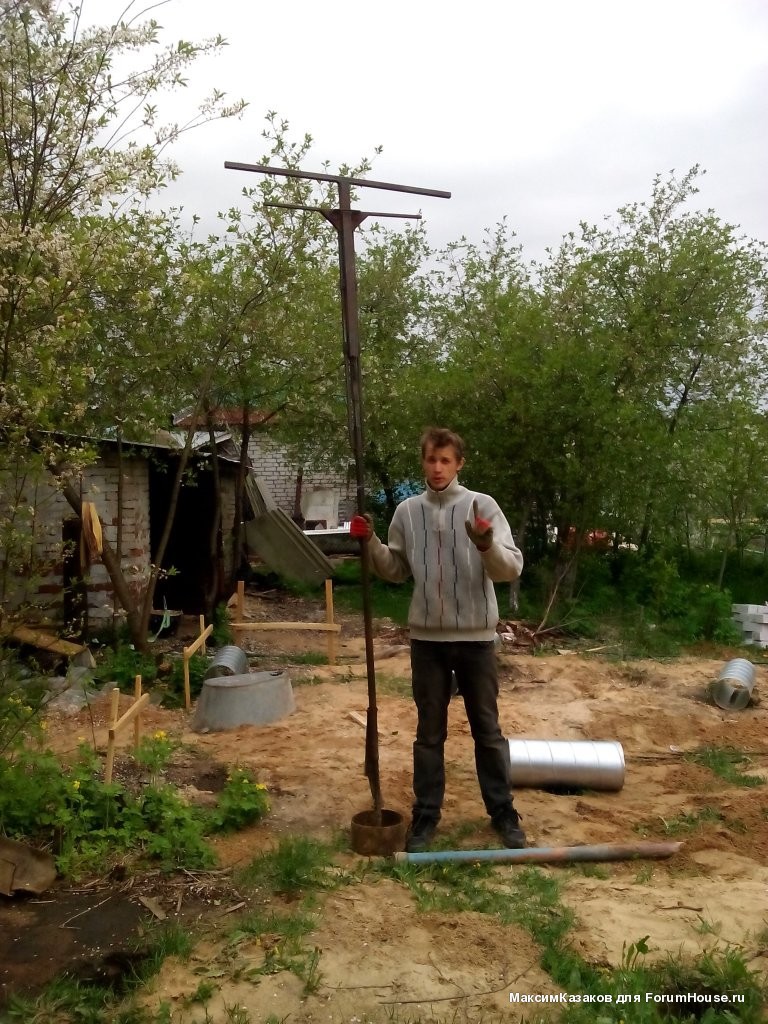
Errors of the TISE drilling stage:
1. Now I would not make a 250 mm TISE foundation, but would make 200 mm, there is enough strength for a 1-2-storey frame house, and 20% less work and material would be needed
Plus, most importantly, you can take a motor-drill for one operator by 200 mm, which would facilitate drilling and its accuracy. But some people like to play it safe.
Believe me, in a frame house, excessive reinsurance is simply not needed, this is an extra expense of effort and money.
2. It was not worth taking a motor-drill. He does everything very inaccurately, it would be better if he did everything with a hand drill. I had to fix a lot and redo it anyway. But this applies to a motor-drill for two operators, for one, they say, it is much better. But at 250 mm it is rarely possible to connect a 250 mm auger, so again we come back to mistake number one with the pile size.
3. It was necessary to immediately close the drilled holes. After a couple of rains, 30-40 cm of sand went back into the holes. It is also better to immediately take the sand away from the holes, and not leave it next to the piles, as I did. But not too far, because then you will need to sprinkle the piles (if they are high above the ground).
I still left the drilled holes for a long time due to injury, if left for a few days, this problem will not arise.
Foundation construction technology
First you need to provide the construction site with the necessary materials and tools. For this you need:
- drill TISE-F;
- shovel;
- cement with sand for mortar;
- metal fittings;
- hydro level or laser.
The constructive scheme of the TISE drill F.
The project for the construction of such a foundation begins with the calculation and marking of places for drilling wells. When marking the site, it is recommended to use a water level or a transparent hose with water. The level of the formwork should be at a height of 35-45 cm from the edge of the ground.
After setting the zero level, a platform is created, bounded by pegs and ropes stretched between them. But for the horizontal line, it is better to use thick fishing line, it is more elastic. Then the contours of the internal load-bearing walls are exposed, because the load from the walls and ceilings also falls on them.
For the frame, you can use logs, 5 cm thick boards and a garden drill. The boards are fixed with pegs at the zero level, a diagonal is formed. A small depression is made in clearly marked places and drilling can begin.
We make widening in the holes.
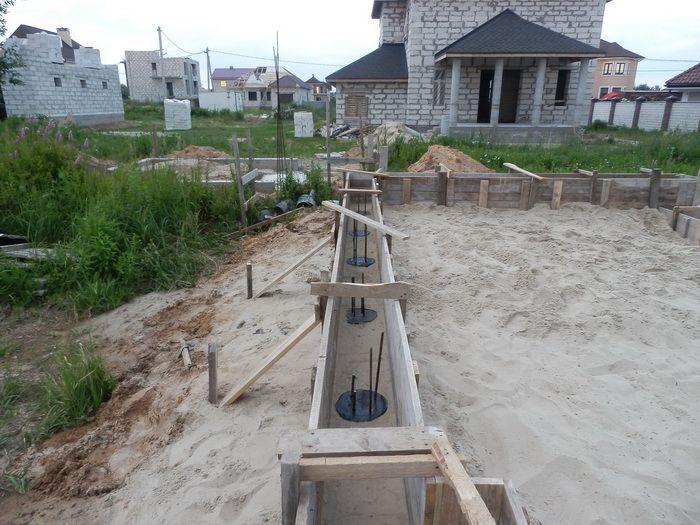
Then the scheme was like this. After work, he made widening and knitted frames from reinforcement, and on weekends he poured concrete.
It took a lot of time to broaden, especially at the beginning. At first, I did the broadening by 50, then I increased it to 60.
So I did so while at the bottom of the holes there was sandy loam, and when the holes with loam containing pieces of clay went, the drill refused to make the last part of the broadening. The spatula simply glided over the surface and did not remove a single drop of soil.
I tried to press on top of the blade with reinforcing bar. It is very inconvenient and desirable to have a third hand :) The effect was also weak. Then he remembered one of the tiseshniks from the forum and did as he advised, namely, he bent the edge of the scapula just a little bit.
Not really hoping for the effect, he sent the drill into the hole and lo and behold - the blade powerfully bit into the ground, breaking it in whole pieces. Now the speed of broadening production has greatly increased and I began to drill immediately by 60. True, now it looks more like shredding the soil with pieces than removing shavings, but the drive fills up in half a turn. One broadening now takes an hour and a half.
In general, the blade needs to be adapted to its soil. If you have sand, you can do nothing, otherwise I recommend bending it slightly. The main thing is not to overdo it, otherwise the blade will cut too deeply and you will not turn the drill. Now it happens with jerks and other twitching, but I like it better.
It is also useful to sharpen the blade periodically. But there is a trick here. While drilling the main part of the broadening, the blade is sharpened against the ground at the "wrong" angle and when it comes to the final part, the cutting edge is slightly bent upwards, as a result of which the blade begins to slide.
To eliminate this effect, the blade must be sharpened by changing the angle of attack of the cutting edge (it is better to make it parallel to the horizon).
In order not to constantly undermine the scapula, it is better to develop several holes. First, bring the extensions to the final stage (until the scapula starts to slip), and then grind the scapula and finish the whole batch of broadenings.
Boers
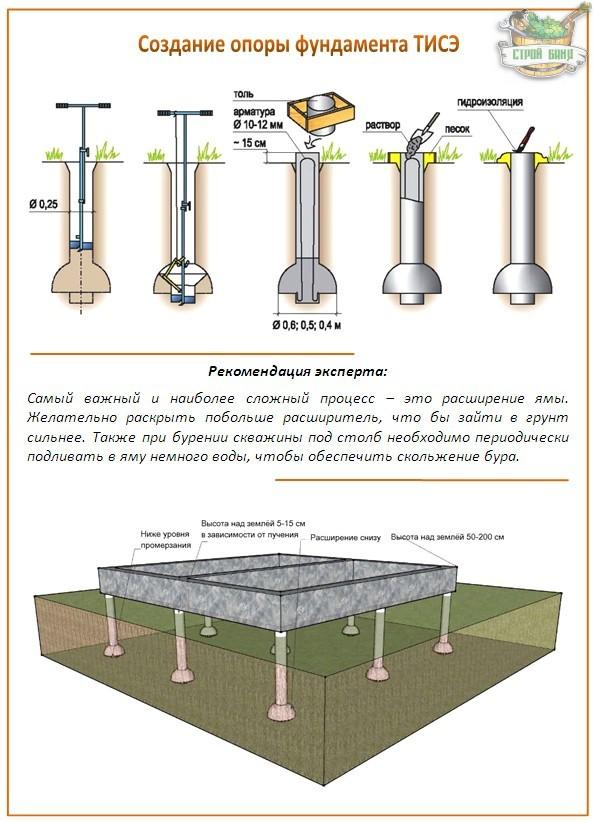
For the device of bored piles, special manual drills of the TISE-3F type are used. The construction of such tools is very simple.
Telescopic rod 1.4 meters long. A handle is installed on top of the bar. Additionally, a 1.0 m extension cable is included.
To expand the bottom of the well, a plow is mounted between the rod and the drill on a movable arm. It is released at the depth where expansion should begin.
The drill itself is attached to the bottom of the rod. He has 4 cutters for different areas of work. The drill body itself is a container for collecting and removing soil.
After marking the location of the piles, the sod is removed at the drilling site. Then, exactly in the center of the future pile, a round hole 0.15 m deep along the diameter of the drill is dug with a shovel or a special device (included in the kit).
We remove the plow from the bar and set the handle on top.
We set the initial length of the bar. In its body, 3 holes are drilled for gradual lengthening as the depth of the well increases. If you need to use an extension cord, remove the handle, add an extension cord to the bar and put the handle back on.
During drilling, as the soil accumulates in the container, it is lifted, released and the process continues.
During operation, pay special attention to the verticality of drilling, constantly check the level. The diameter of the pile will be small, and the concrete does not work well for bending loads.
The pile might just break!
When you reach the design mark, start reaming the bottom of the well. Unscrew the two bolts on the container. Install and secure the plow. It should be noted here that the plow can be set in three different positions. For extending the bottom by 400, 500 and 600 mm (see instructions). Attach a rope to the bracket and raise the plow to transport position.
It remains to lower the plow into the hole, release the rope and, turning counterclockwise, expand the bottom.
It is desirable to work together.
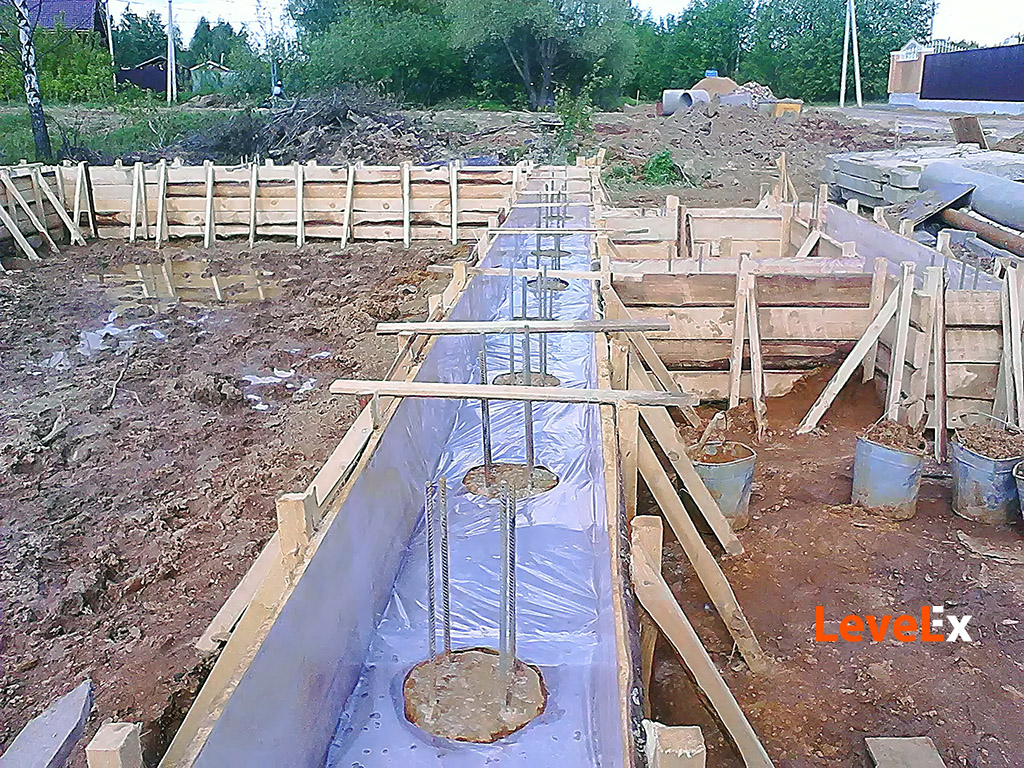
Making a tape contour
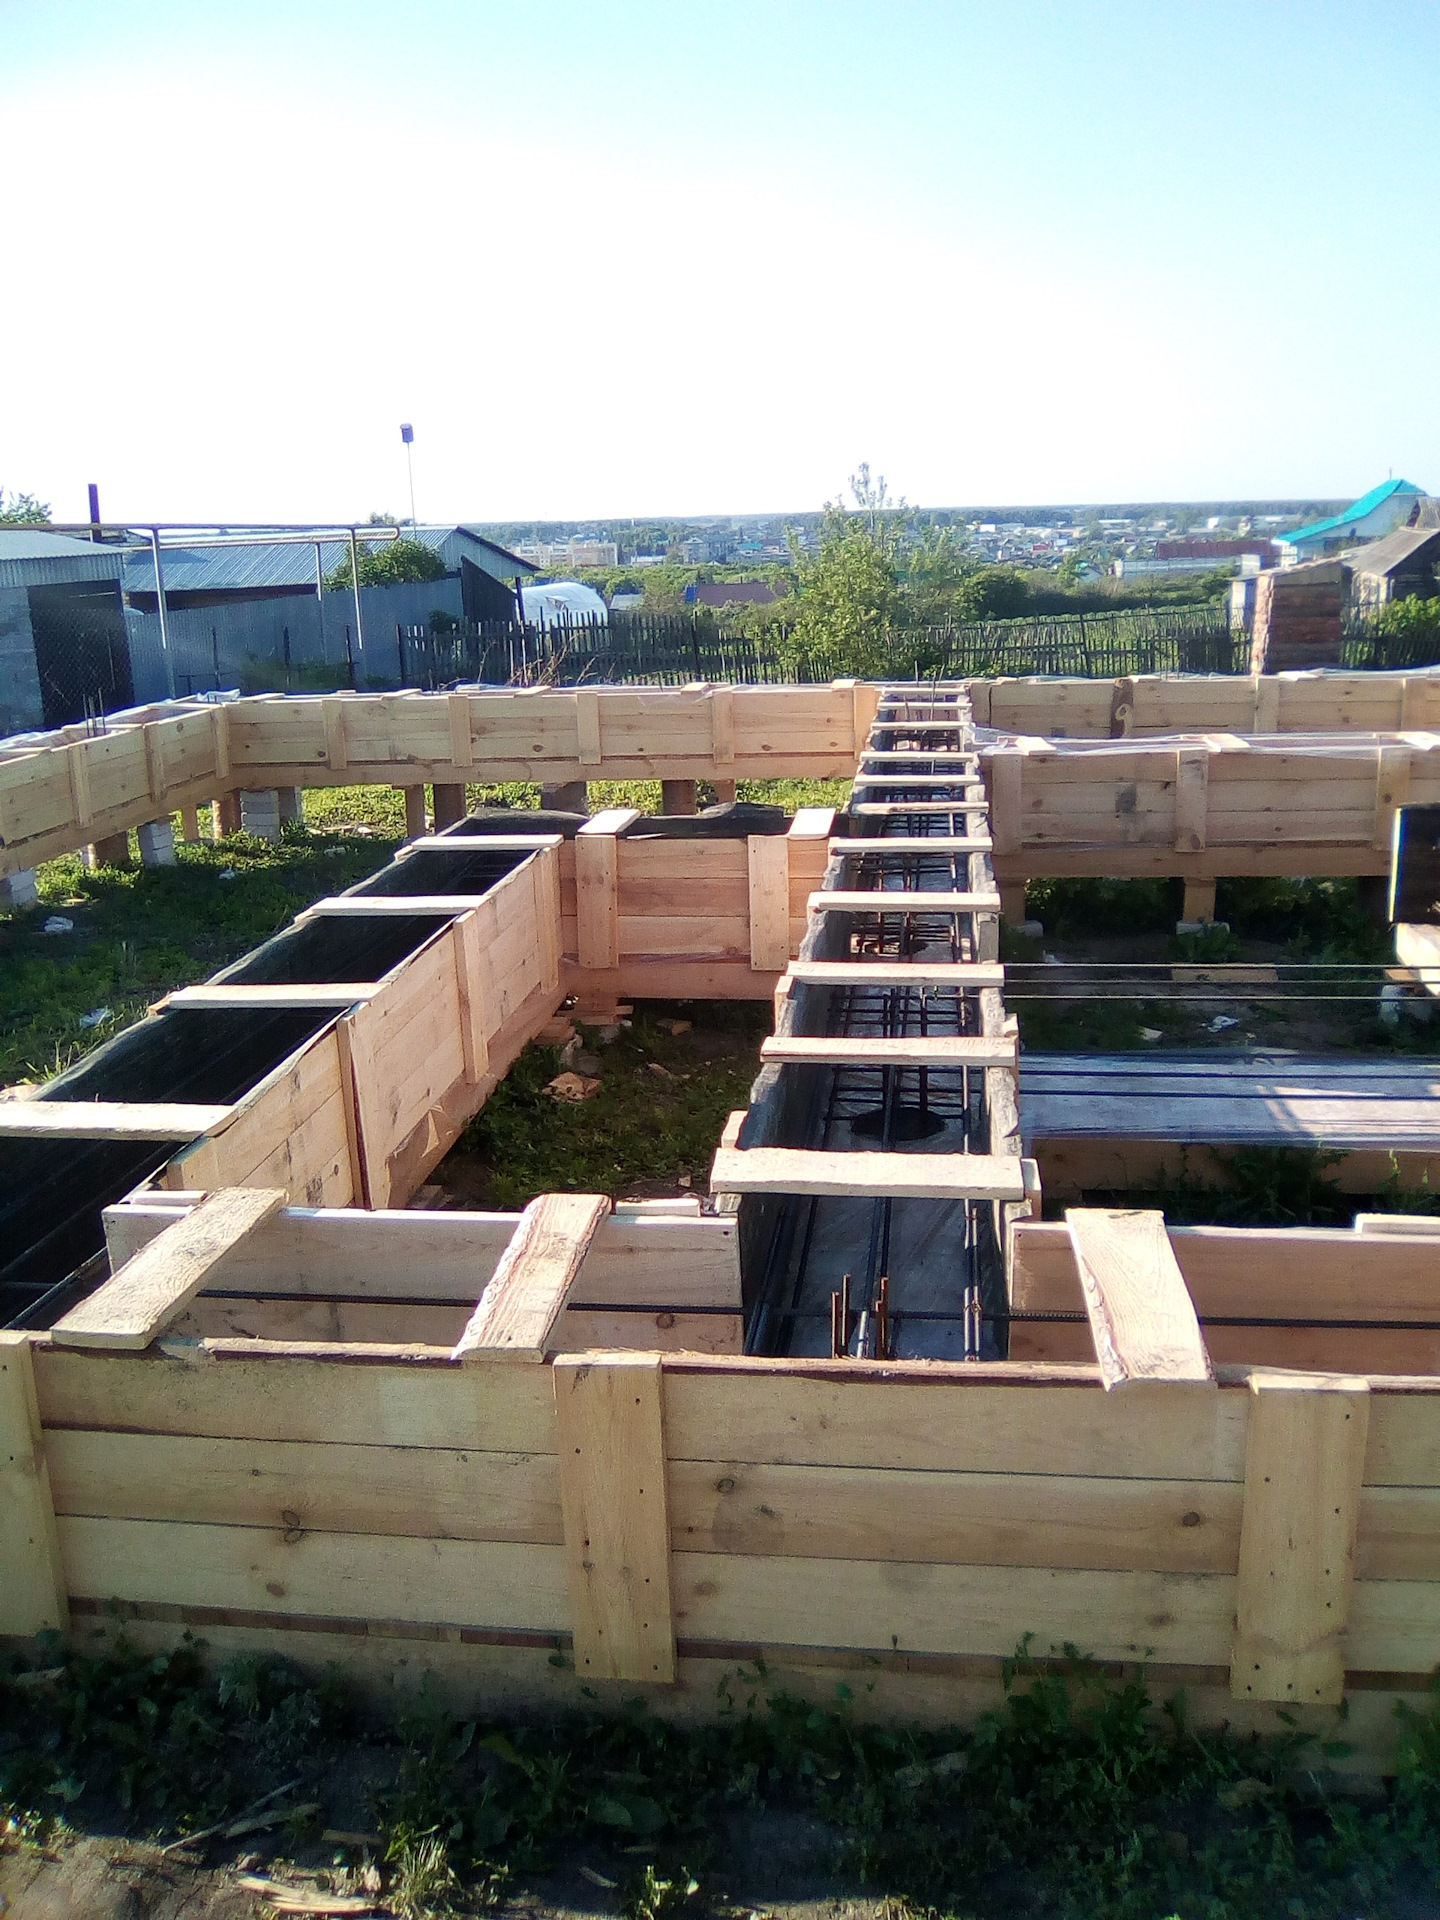
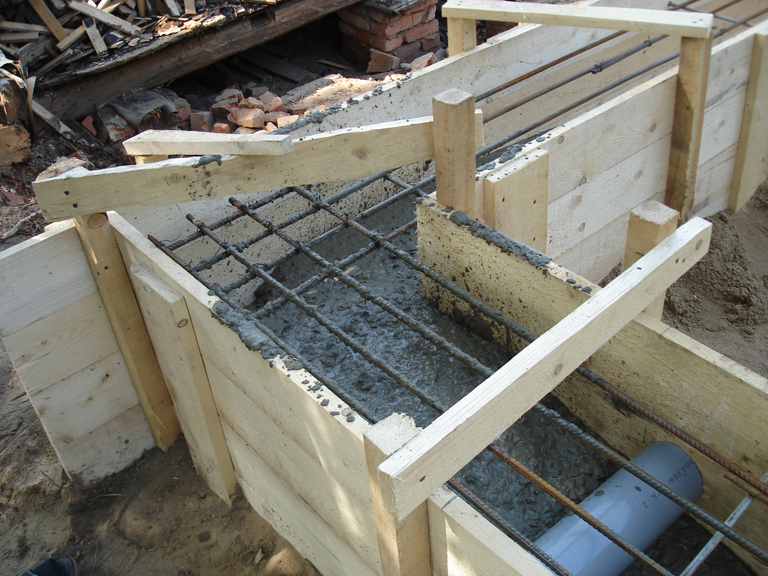
When pouring the grillage, remember that it must be a solid concrete structure, reliably reinforced around the perimeter
Pay attention to the quality of the mixture, the reliability of the reinforcement connections. Sequence of events:
- install and level wooden shields;
- wrap the inner surface with plastic wrap;
- install the reinforcement cages by connecting them with wire into a rigid contour;
- fix the immobility of the formwork using steel pins and transversely arranged bars;
- fill the prepared contour with concrete, remove air from the array;
- ensure that the concrete mixture hardens for 4 weeks.
Purchase of materials for piles.
I called the nearest concrete plants. After all, I wanted to buy the best ingredients for concrete, but later it turned out to be not so simple.
At the first plant I was told that they would not bring me sand, however, as well as crushed stone. Rather, they certainly can, but with a scow of 30m3. But I learned everything about their concrete.
The weekend was useless and I thought that if I continue to slow down like this, it will take a long time to build. In the morning of the next weekend I called another place and agreed that in an hour they would bring me both seeded sand and granite crushed stone, fraction 5–20, 10 cubic meters each.
I barely reached the site when the driver called and brought rubble. I unloaded it at the indicated place without any problems and left for the sand. The crushed stone is excellent, not like my previous one with a lot of dust and with poor geometry (very flaky).
The new crushed stone also has a geometry close to a cubic shape.
The sand was much worse. The sand is heavier and Kamaz is stuck tightly, and resting against a heap of rubble. Why the hell did the driver go there at all, it is not clear. Had to unload right there. A plastic wrap was thrown over the sand to separate it from the rubble and the carrier unloaded the body.
The empty truck somehow managed to crawl out of the formed rut and crawled away.
I do not know where the carrier got this sand. The manager assured me that they make concrete and sifted sand out of it. I do not know through what they sifted it there, but the sand was not seeded and contained many stones the size of an orange.
Made my own sand analysis. I mean, I scored half a liter can of sand. Filled it to the top with water. Shaken and left for 15 minutes. The contents of the jar were clearly divided into fractions.
Next, we take a ruler and measure the thickness of the layers. Then we convert it to percent. The analysis is of course very approximate, but it gives an idea of the sand. My sand turned out to be about 4-6% clay (depending on the location of the sample).
Lousy for good concrete. I will sift. You should get normal sand, as it is otherwise good. Quite large. There is extra work to be done, but it is my own fault. They didn’t promise me pure (absolutely no clay) sand, but I bought something that wasn’t sown so I got lost myself, I bought it without documents.
Next was the purchase of fittings. Here I went nuts. I ordered a reinforcing mesh and six-meter reinforcement of different diameters immediately on the piles, grillage and basement floor. And besides, 48 meters of stripe on the fence, so that the mesh does not sag, although it did not sag anyway, contrary to the predictions of everyone.
It turned out about three tons. I freaked out to unload it, helped drive it well. Leaving the reinforcement and the mesh, at random, we said goodbye. Then I put it all in even piles for another three hours, dividing the reinforcement by diameter.
For the next weekend I decided to buy cement M500d0 20 bags for a start, roofing material and little things.
On Saturday it was raining, and on Sunday morning it was raining, then it was damp for the truck and late for the order. I didn't want to wet the cement and the plans had to be revised. I have to go on vacation.
Drilling rigs TISE-F
Photo of the TISE-F drill.
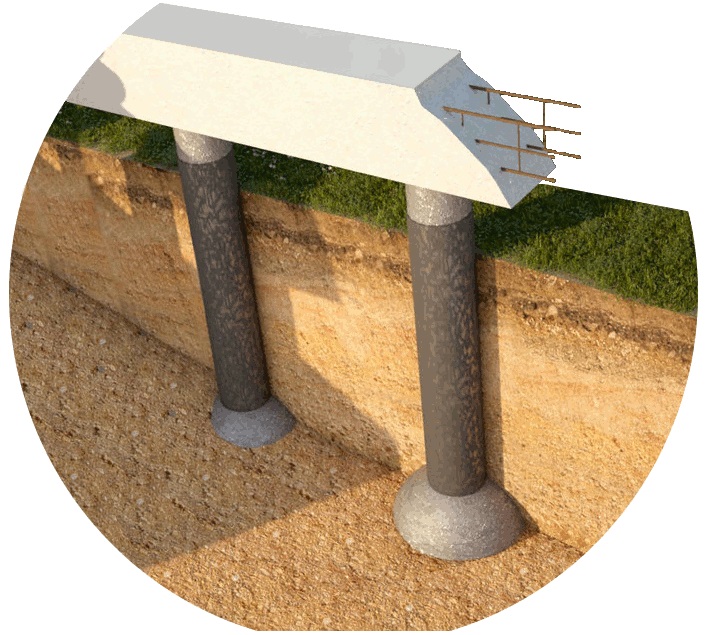
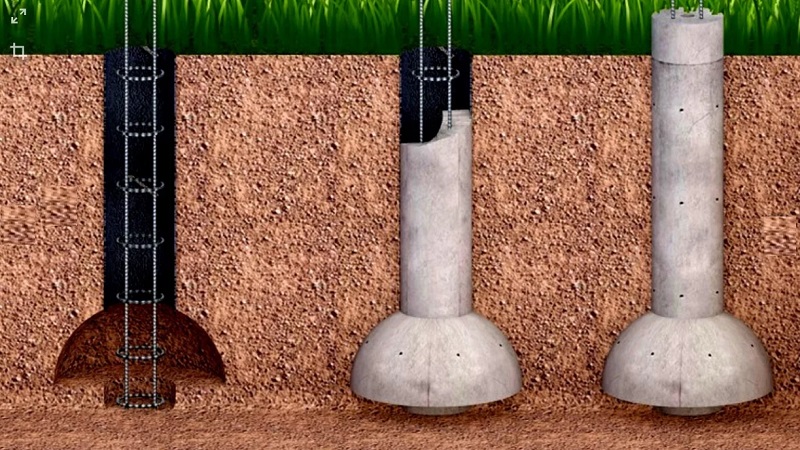
The drill consists of a cutting-loosening bowl and two rods. A special folding plow is provided in the lower part of the device, which slowly unfolds during drilling and forms the shape of an inverted cone.
Accordingly, the diameter of the recess at the bottom will be substantially larger than at the top edge. It is thanks to this design of the well that the high strength of the constructed foundation is achieved. Such a foundation has proven itself perfectly even on small slopes, but it is not recommended to use the technology on quicksand.
Types of drill TISE-F
With a cutting edge diameter of 200 mm, the extended length is 225 mm. Structurally, it consists of a storage device, a plow and a rod. This is the TISE-F model. TISE-2F also has a diameter of 200 mm, but the lower edge of the expansion, due to a different design of the plow, provides a diameter of 500 mm.
TISE-3F has a diameter of 250mm, there should be two operators through a large mass. The peculiarity of all models of TISE-3f drills is that their length can be longer due to the use of additional rods.
Stages of creating a project for a house with foundations on TISE piles
- Calculation of the maximum permissible loads on the supporting structure of the piles;
- Obtaining a detailed soil map with data on density, moisture level and composition;
- Calculation of the maximum area of the base of the foundation;
- Calculation of the number of TISE piles required to create a uniform redistribution of the structure mass onto the pillars;
- Site preparation;
- Start creating the foundation;
- Putting the finished dried structure into operation.
Benefits of using technology
- Significant cost savings;
- No need to use motorized excavation techniques;
- Design versatility;
- The ability to carry out construction work with frequent sudden changes in ambient temperature;
- This is the only technology where you can complete the construction of a house from the foundation to external facade work completely independently;
- Maximum free space on the construction site and a minimum of involved workers.
TISE foundation drills
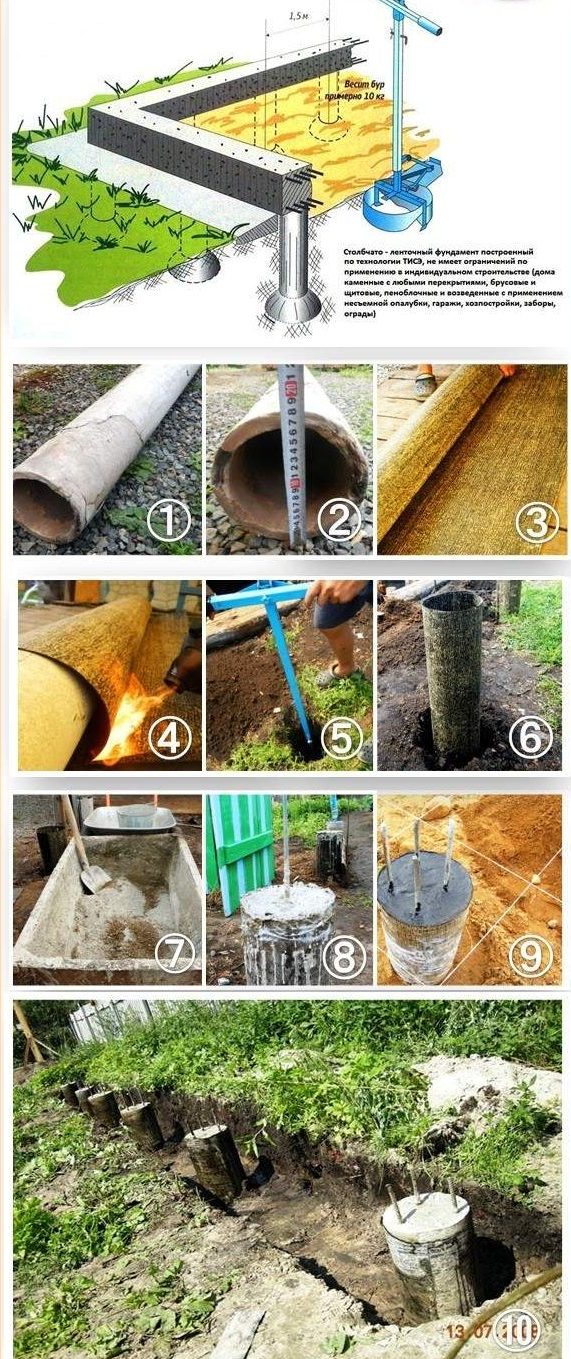
An integral part of this foundation erection technology is the use of a special drill, which allows the formation of a spherical expansion at the base of the well. Its initial modification is shown in the figure.
The borehole was drilled by two cutting edges with cutters located in the accumulator. The formation of the expansion at the bottom was carried out by a folding plow fixed on the bracket. The bar was sliding, its height could be changed.
The drilling process looked like this: first, with the plow removed, the well was drilled directly, then the plow was put on and the expansion was drilled. The plow was lowered by its own gravity, and when the auger was raised to extract the earth from the drive, the plow was lifted with a cord.
A drill of this design was considered by many to be inconvenient primarily because of the method of raising and lowering the plow. Therefore, it was later modified. Now on the official website of TISE, drills of a different design are offered for purchase (see figure).
In them, the plow is lowered by pressing the handle of the drill vertically down, and the more you press on the handle, the more intensive the drilling takes place, but at the same time, the more difficult it is physically to perform the work.
I would also like to separately mention the use of special foundation drills from the Master Bur company for drilling wells with expansion. According to many builders, they are more technological, they are easier and faster to work with. Unfortunately, this tool has one significant drawback - it is its price. So the original TISE drills at the time of this writing cost 4500-5200 rubles. Drills from the Master Drill company are 9500-16000 rubles, and before using them, you need to drill wells with a simple drill, the price of which is 5200-5800 rubles. In total, it turns out to be a rather tangible figure.
Layout and cast-off for the foundation.
after throwing cement and everything else into the shed, they began to put the cast-off for marking the piles.For this we used the old-fashioned method with a hose level and cones, this is to determine the height difference, otherwise the markings will not be correct.
When marking the rectangular parts of the house, the fitting method turned out to be the easiest. We measure everything stupidly with a tape measure and having calculated in advance the hypotenuse (diagonal of the foundation) of a right triangle, we adjust so that all the lengths agree with the plan.
It is better to start with a baseline, exactly extending from the border of the site to the desired distance.
Be sure to check the diagonals, they must be equal in the rectangle. They are also equal for an isosceles trapezoid :) But we measure the sides too.
We made a specific cast-off, not as is usually done for a tape, but sharpened for TISE. I think it will be more convenient. In general, our marking lines passed through the future pile centers. Then the distances between the centers of the piles were measured along the stretched strings and the center of the piles was transferred to the ground with the help of a plumb line.
By the way, if you are not yet familiar with the TISE technology, at the end of the article, follow this link a little, but it is better to start by studying the books of R.N. Yakovlev "Universal foundation - TISE technology" and "New construction methods - TISE technology".
On the ground, he marked the centers of future piles with a hammered nail 150 with a bright flag made of colored electrical tape.
Further, I did not manage to get to the construction site after work, and I realized that it was time to go on vacation. After taking two weeks of vacation and purchasing food, I settled into the shed according to the scheme: night in the shed, night at home.
Cool flashlight in the photo above. Very bright. I ordered it from the Chinese somehow. Since then, he has constantly helped me out at the construction site.
Measuring from the nail (nails marked the future piles) 12 cm "in all four directions" dripped with a shovel. It turned out to be a square hole with a side of about 24 cm. It is much more convenient to start drilling from the hole. Especially when the soil has dried up in the sun and turned into "concrete".
Comparative characteristics of the estimated cost of TISE technology with other methods of foundation construction
This method is successfully taking root in the construction services market. Many companies offer to perform work on this technology. The average cost of 1 running meter of TISE foundation is from 3,500 to 5,000 rubles, taking into account the cost of the material. By doing this work yourself, costs can be cut by about half. The benefits are clear. An even greater difference is found when comparing with traditional foundations. The cost of 1 running meter of the capital base, made using conventional technology, can reach 10,000 rubles and more.
In some cases, costs can differ significantly, up to 4 times. With a limited budget, the TISE pile foundation will be an excellent alternative to traditional technologies. The money saved can be spent on more expensive, high-quality finishing materials or the total estimated cost of the object can be reduced
A Sensitive Advantage That Can't Be Overlooked
Step by step guide
Since the technology, first of all, is intended for a wide range of developers who want to independently perform this operation, you should pay attention to the order of work and the requirements for each stage. The main difference from the usual method of foundation installation is the configuration that the TISE pile has
Focusing on the method of obtaining the desired shape, one should not forget about the general construction requirements. The order of operations is as follows:
- Soil analysis.
- Territory marking.
- Installation of beacons horizontally above each pile location.
- Drilling a well to the desired depth.
- Widening the hole in the base.
- Removal of soil and control of the performed operation.
- Installation of fittings.
- Filling the hole under the pile with concrete.
- Making a foundation, grillage.
The technology allows the installation of piles in any landscape. The construction of an ordinary foundation is always associated with serious earthwork. Leveling the site, removing vegetation.It is not necessary to do this when using TISE technology.
It is important to observe the vertical direction when drilling. You can use a conventional plumb line to control the position.
The smaller the deviation, the more reliable the pile will be. The blade, which carries out the expansion, is brought into the working position by means of a cord (cable).
The auger mechanism of the soil lifter must be periodically cleaned by lifting the device. The container fills up quickly. The time of unloading the rock is calculated empirically. The drill does not work when the hoist is full. The work will be done idle.
Features of filling wells with concrete
The constructions must be strengthened. The fittings are prepared in advance. The length is calculated in such a way that it is possible to make high-quality mating with a grillage. In some cases, it is wise to release metal rods with a surplus. So it will be easier to make horizontal level marks, after which the excess is cut off with a grinder. It is not recommended to use cement grades below 400. The proportions of sand, crushed stone are standard, used when mixing mortar for load-bearing structures. 1 part cement for 3-4 parts filling.
Foundation making
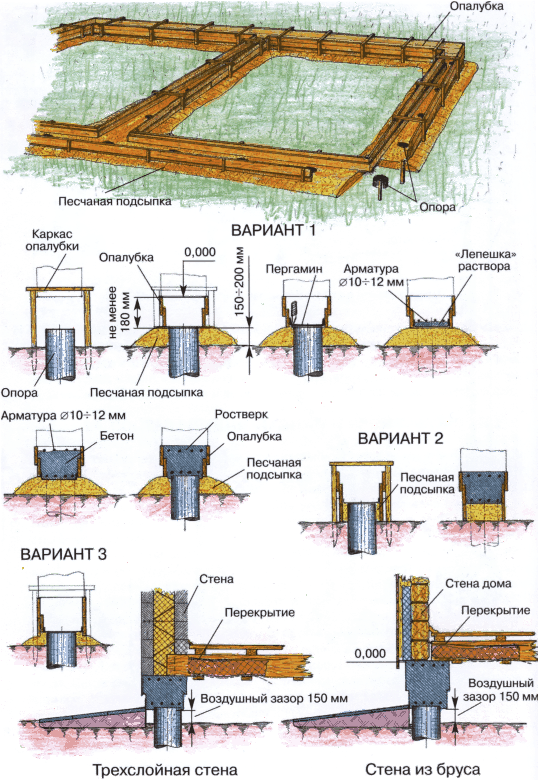
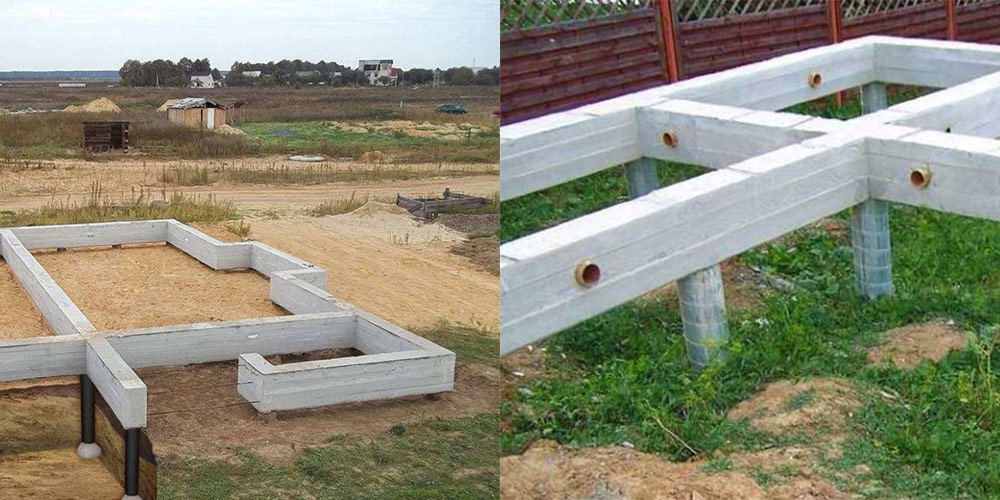
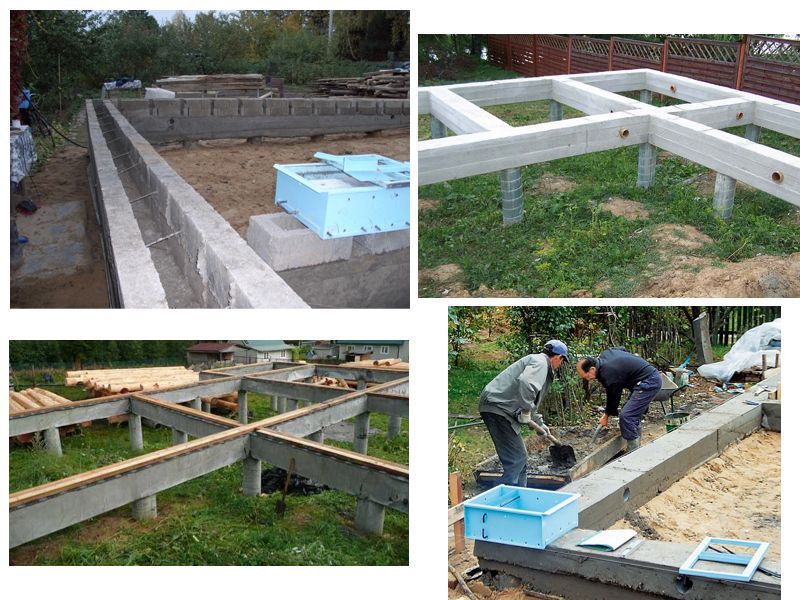
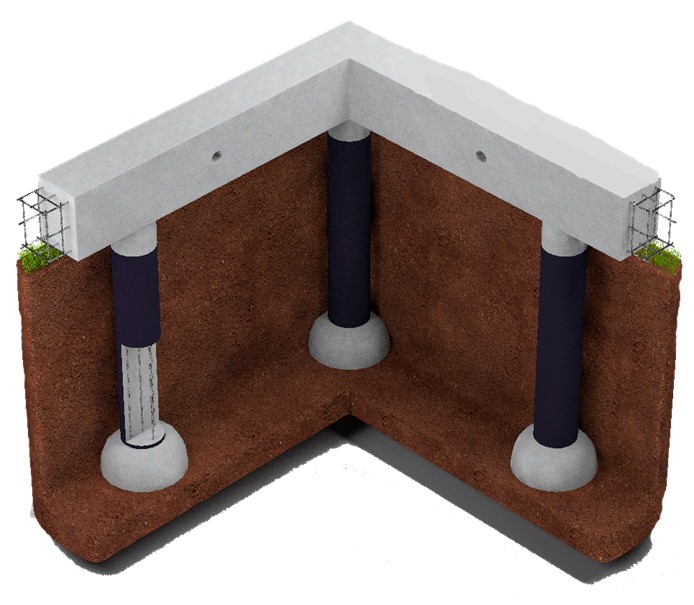
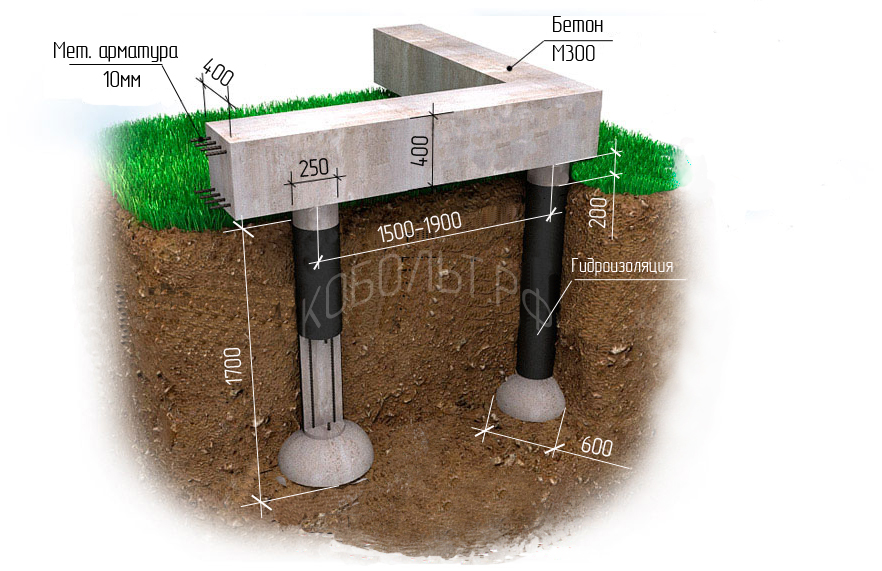
Next, they begin to form the strapping around the perimeter. Two options are offered according to the principle of the device.
- The strip foundation is made of ready-made slabs, poured concrete supported on the ground. For this, a trench is made around the perimeter. A cushion of rubble and sand is being prepared. Then the formwork is installed, into which the concrete mixture is poured.
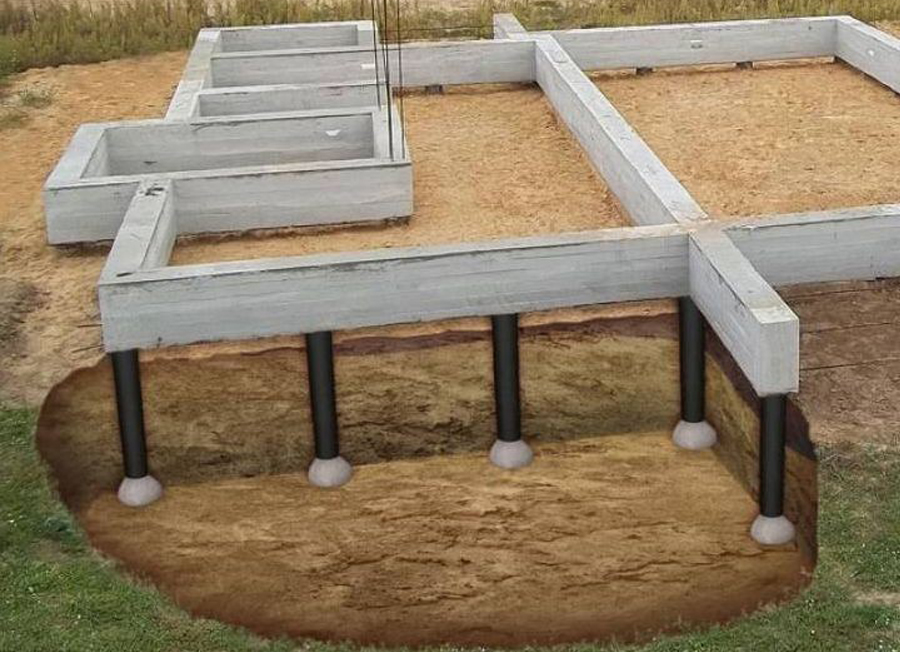
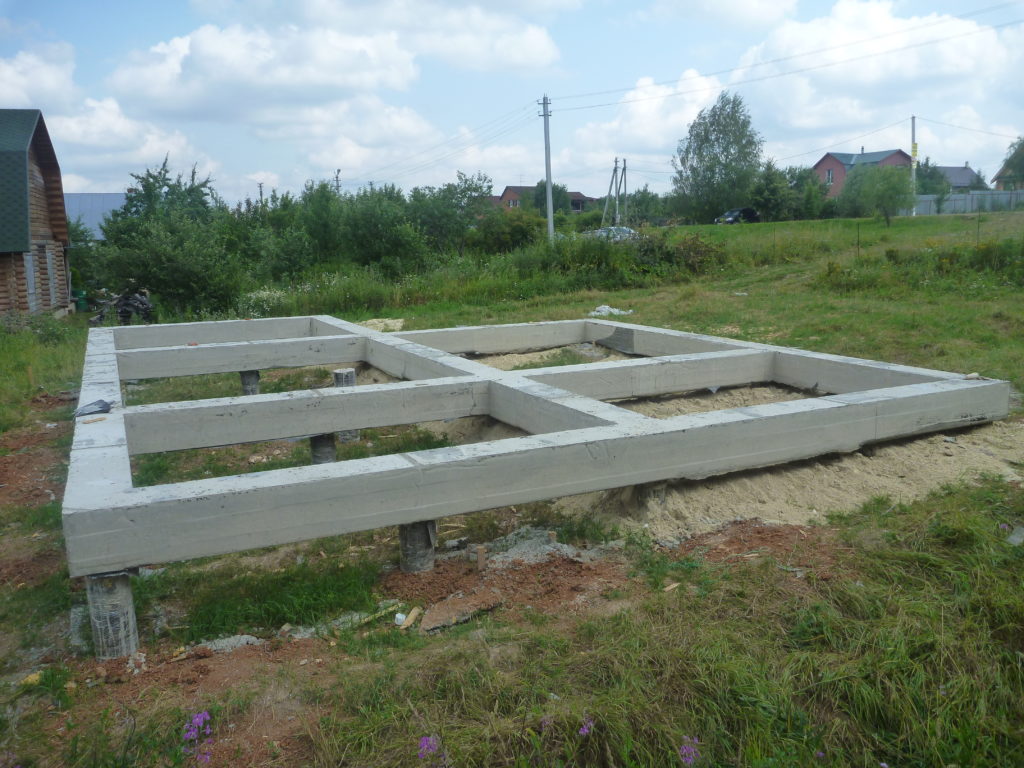
- The second option is to install an independent pile-based support system. Such a support structure is called a grillage. With the correct calculation and high-quality performance, the load on the piles is evenly distributed. The structure is mounted on a strapping on a grillage and has weight restrictions. An excellent option for frame houses and structures made of SIP panels.
Manufacturing jobs
The technology for the construction of TISE foundations includes several stages, each of which is important, requires attention and a responsible attitude to the performance of work.
Preparatory work
At the first stage, the fertile layer of land is removed from the entire construction site. The work is not difficult, but it takes time and significant labor costs, therefore it is best to perform it using specialized equipment.
In parallel, you can calculate the foundation of the house and transfer to nature the design position of each pile, mark the site.
At the initial stage, a cast-off of planks is also being built, depressions are made at the locations of the piles.
Drilling of the wells
Wells for piles are arranged using a special drilling device
The deepening of the pits must be assigned, taking into account the depth of freezing of the soil in a particular region. In the video you can see the well drilling process with detailed comments.
Sandy soils lend themselves best to drilling; it will take a little longer to tinker with clay and loams. When drilling, large stones can be caught, which cannot be bypassed. In order not to damage the drill, the stones should be removed by hand.
Reinforcement
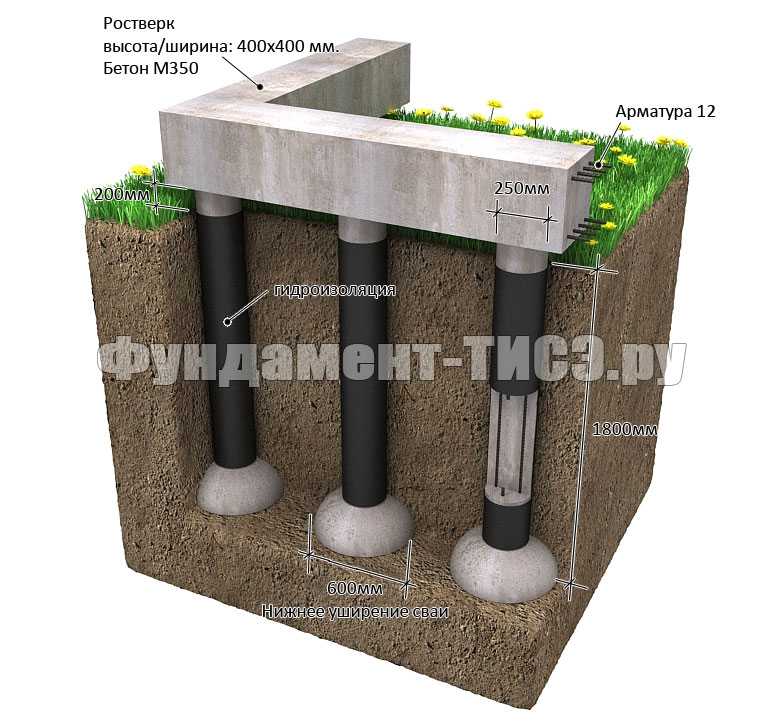
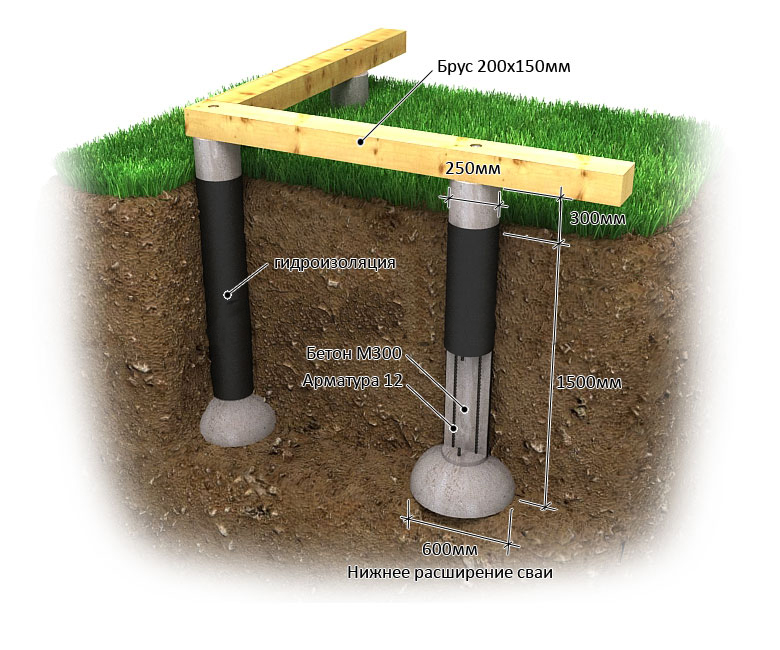
Reinforcement work is carried out to prevent the support from coming off. When performing them, reinforcing elements with a diameter of 10-12 mm are used, bent in the shape of the letter "P", their upper part is tied with wire. Any long metal rods, except pipes, can be used as reinforcing elements.
Internal expansion device
This work can be considered the most difficult and responsible, the reliability of the foundation under load from the mass of the house depends on the quality of its performance.
Its essence lies in the device for expanding the volume of the well in the lower part of the pit. The amount of expansion is primarily affected by the density of the soil.For example, when building the foundation of a house on hard soils with sufficient bearing capacity, the increase in the volume of the well at the bottom of the pit can be made small.
Waterproofing and pouring concrete
As a waterproofing material, you can use ordinary roofing felt, which must be laid immediately after installing the reinforcement.
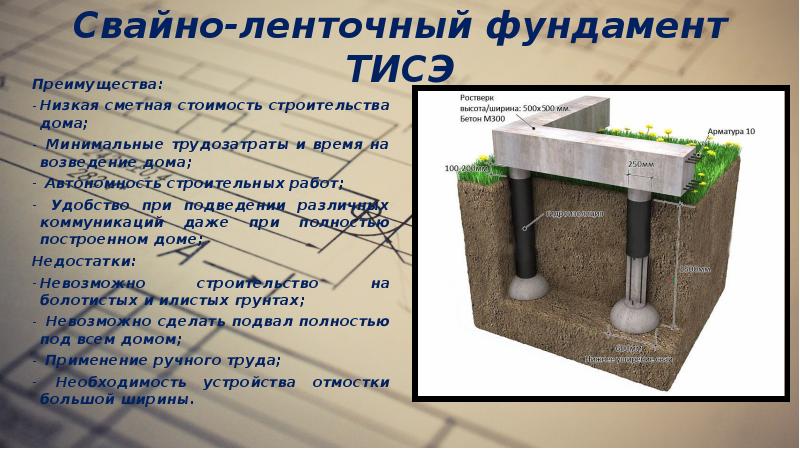
Pit concrete should be poured quickly. After the well is completely filled, a TISE column is obtained, the bearing capacity of which is about 10 tons. At a depth of 1.5 m for the foundation of the house, the concrete consumption is 0.1–0.12 m3.
Grillage making
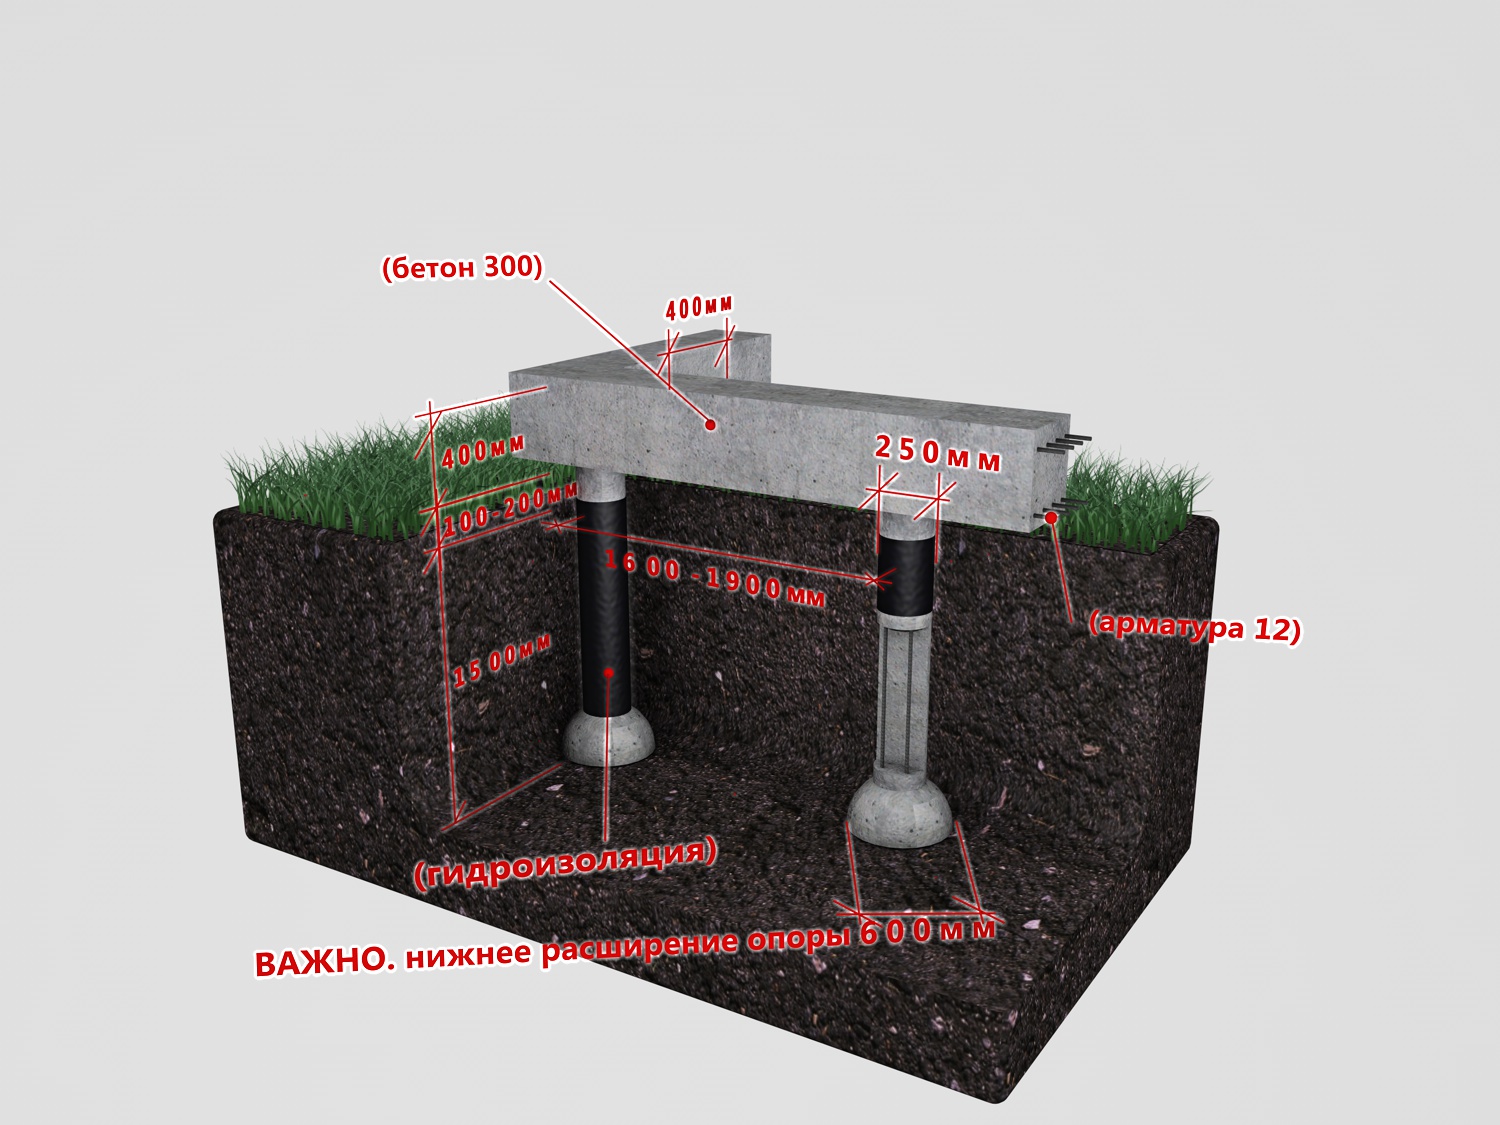
For the device of the grillage, reinforcement and concreting are also performed in the formwork from boards. It is recommended to use fittings with a diameter of 10-14 mm. By watching the video, you can find out a lot of useful information about the process of installing the grillage.
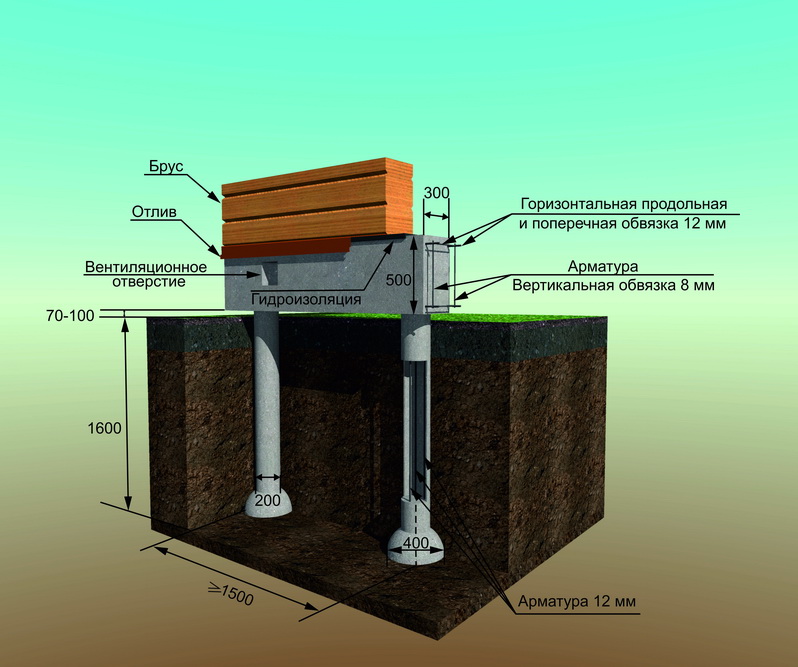
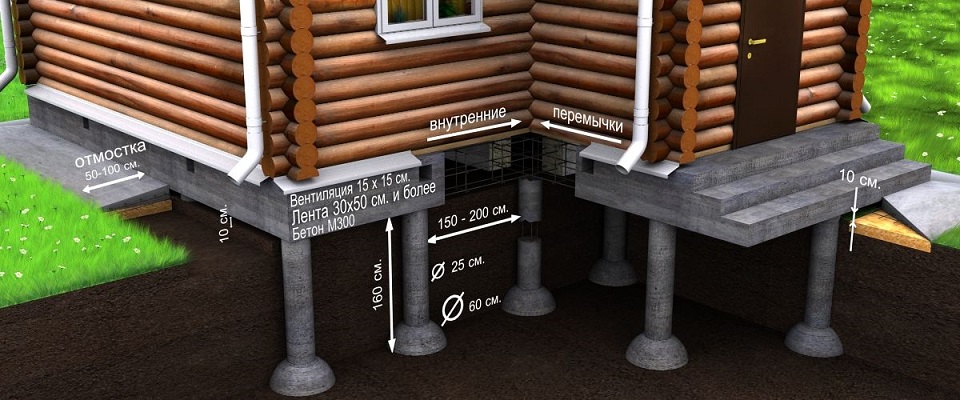
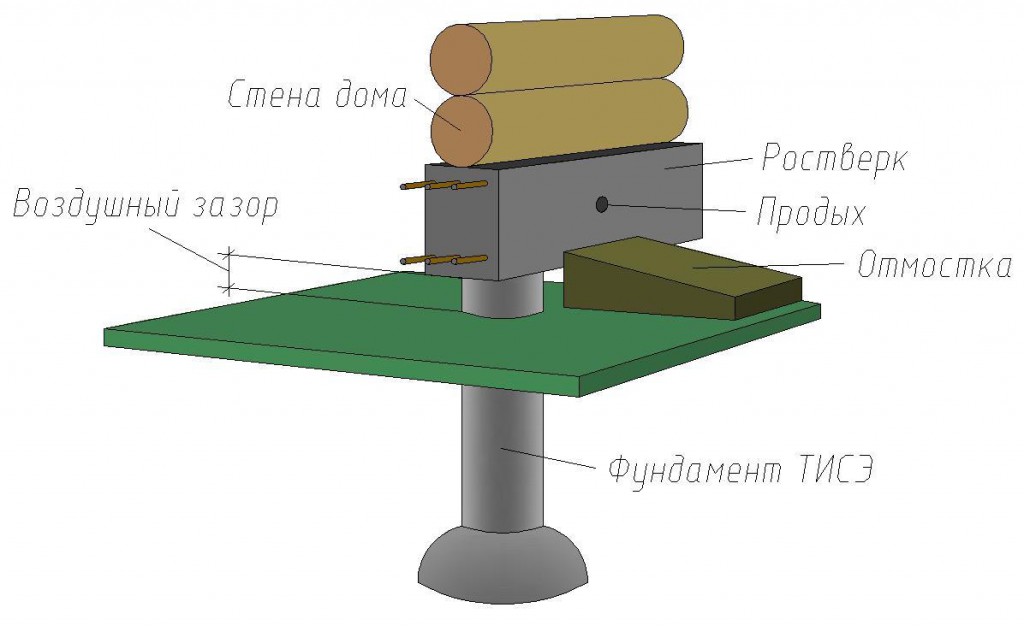
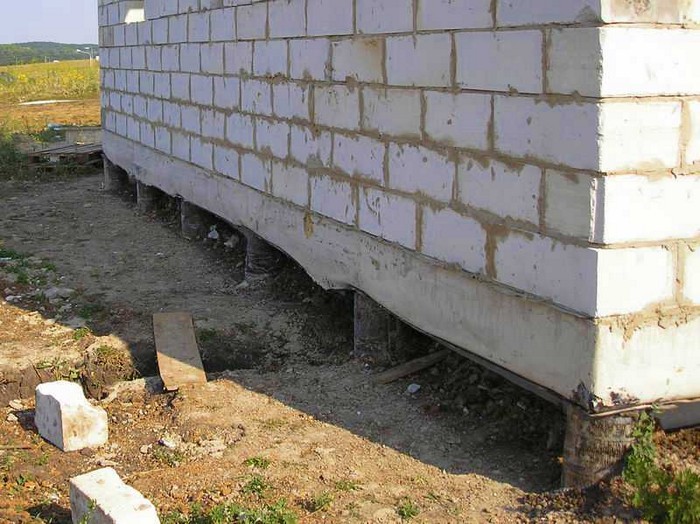
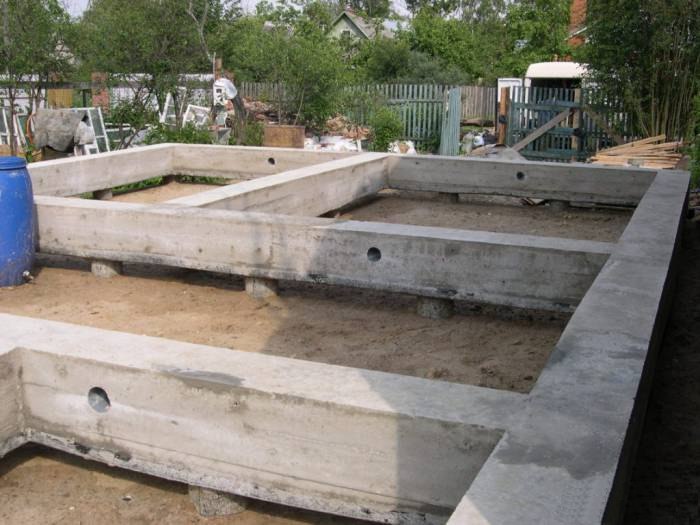
In the grillage, all piles are connected in one structure, which makes it possible to evenly distribute the load from the house between them. The grillage must be made in such a way as to prevent it from touching the ground, leaving a gap of 10-15 cm. The presence of such a gap neutralizes the effect of buoyant heaving forces on the foundation.
If the house is being built on a plot with a slope, then the grillage should be stepped.
When building a private house, the main goal is to reduce the cost of work as much as possible without losing quality. The TISE technology foundation fully meets this goal and can be independently erected by a skilled craftsman, even with very mediocre construction skills.
The costs have already been completely minimized, therefore, one should not save on the quality of reinforcing materials or concrete. The good quality of the materials used will allow the foundation to serve several generations of residents of the house.
TISE pile foundation. Step 1. Marking the pile foundation
Before marking the foundation, I designed drew it in Archicad (Archicad 16).
Here's a video that shows you how to do it (in just 3 minutes):
If you do not want to make a project of a frame house yourself, you can always buy a ready-made one or order an individual one from us.
How I marked out the TISE pile foundation in practice.
I put these rags and pulled the threads (extreme along the edges of future extreme piles, not extreme ones - along the centers of future internal piles):
First I pulled 1 thread parallel to the fence at 3 meters. The second was pulled already according to the Pythagorean theorem with the help of a 3-4-5 triangle. First I measured 4 meters along the already stretched thread, marked 3 meters of a new thread (running perpendicular to the first one) and changed the position of the second until there were exactly 5 meters between these points.
Then the threads are obtained at 90 degrees to each other. So I pulled on all the threads. We spent about 6 hours together on this all without experience. The next time I had to deal with this kind of markup, it was much easier.
By the way, I made a HUGE mistake in the markup of this columnar foundation. It was necessary to pull the threads immediately into the level, this would then save me from many hours of jumping with the rule and level to equalize the height of all the piles, and also allowed me to put the piles much smoother than they are in the end. Well, when I build the next frame house with my own hands, I will take it into account!
The main thing is to measure not only the diagonals after stretching, but also all sides of the resulting quadrilateral, because an isosceles trapezoid can have even diagonals.
There are no final marking results yet, I will say for sure later on the diagonals. At the moment "before drilling", the diagonals of the house and its sides converged to each other up to mm (at a diagonal length of 14 meters). When you drill holes, it is very difficult to do everything exactly to mm, so there will obviously be an error. At the moment, all 35 holes have been drilled, 8 piles have been poured, 27 are left. Then I will take all measurements again.
You can watch a video about my pile field here. The pitch of the TISE foundation piles is 1.8 meters in the length of the house and 2.3 meters along the gables. For 100 sq.m.it turned out 35 piles.
Do-it-yourself TISE columnar foundation costs
Here is my cost estimate for TISE (house 100 sq.m.):
- Galvanized ventilation pipes with a diameter of 250 mm 40 pcs. (cut to the desired size from 50 to 100 cm, because there is a slope on the site) = 7800 rubles.
- Reinforcement 40 rods of reinforcement, 11.7 meters each, each cut into 6 pieces of 1.95 meters = 6700 rubles.
- Cement 2 tons = 10,000 rubles.
- Plasticizer S-3 15 kg. = 1000 rubles
- Studs and nuts with washers for piles - 2200 rubles
- Roofing material 10 pcs - 3000 rubles
- OPGS 15 tons - 14,000 rubles (can be replaced with 5 tons of crushed stone, it will be cheaper)
- Deep vibrator = 2500
- Concrete mixer - (they just gave it for the first time, then I had to rent it, and so add 250 rubles a day or 7-10 thousand rubles for a purchase - prices for 2015 are probably more expensive now).
Total: 48 thousand rubles + concrete mixer. To summarize, then 50 thousand + your own work. With a hired force of about 100 thousand.
I remind you about our services - we will develop a technical specification for the construction of a house for your builders or you, we will develop a high-quality project of a frame house at an inexpensive price, and we will also bring Finnish-made Izoplat for you to any region.


