Construction stages

- Calculation of the future foundation: the location of all piles, their dimensions and the required length.
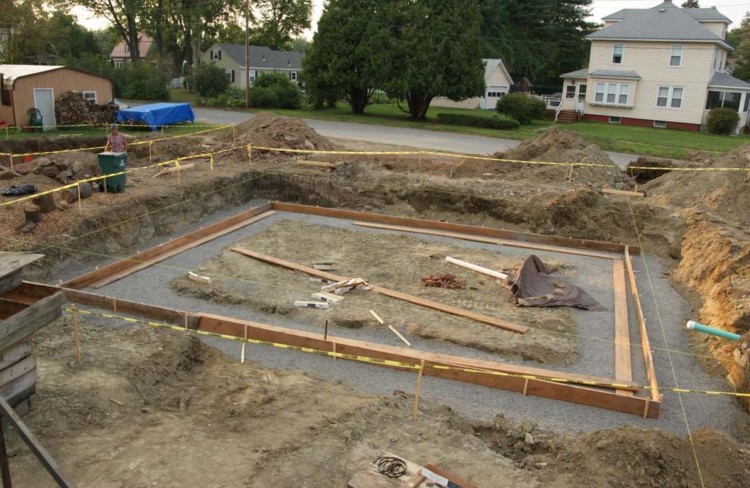
- Layout of the site in accordance with the project. Milestones are installed in the corners, connected with a rope and the pile mounting points are marked according to the scheme.
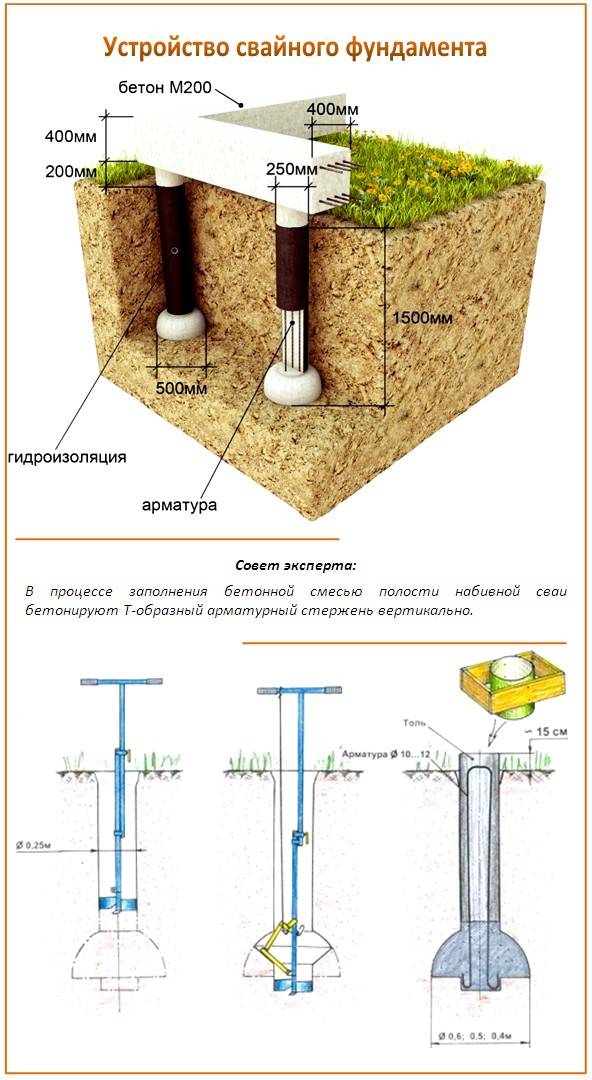
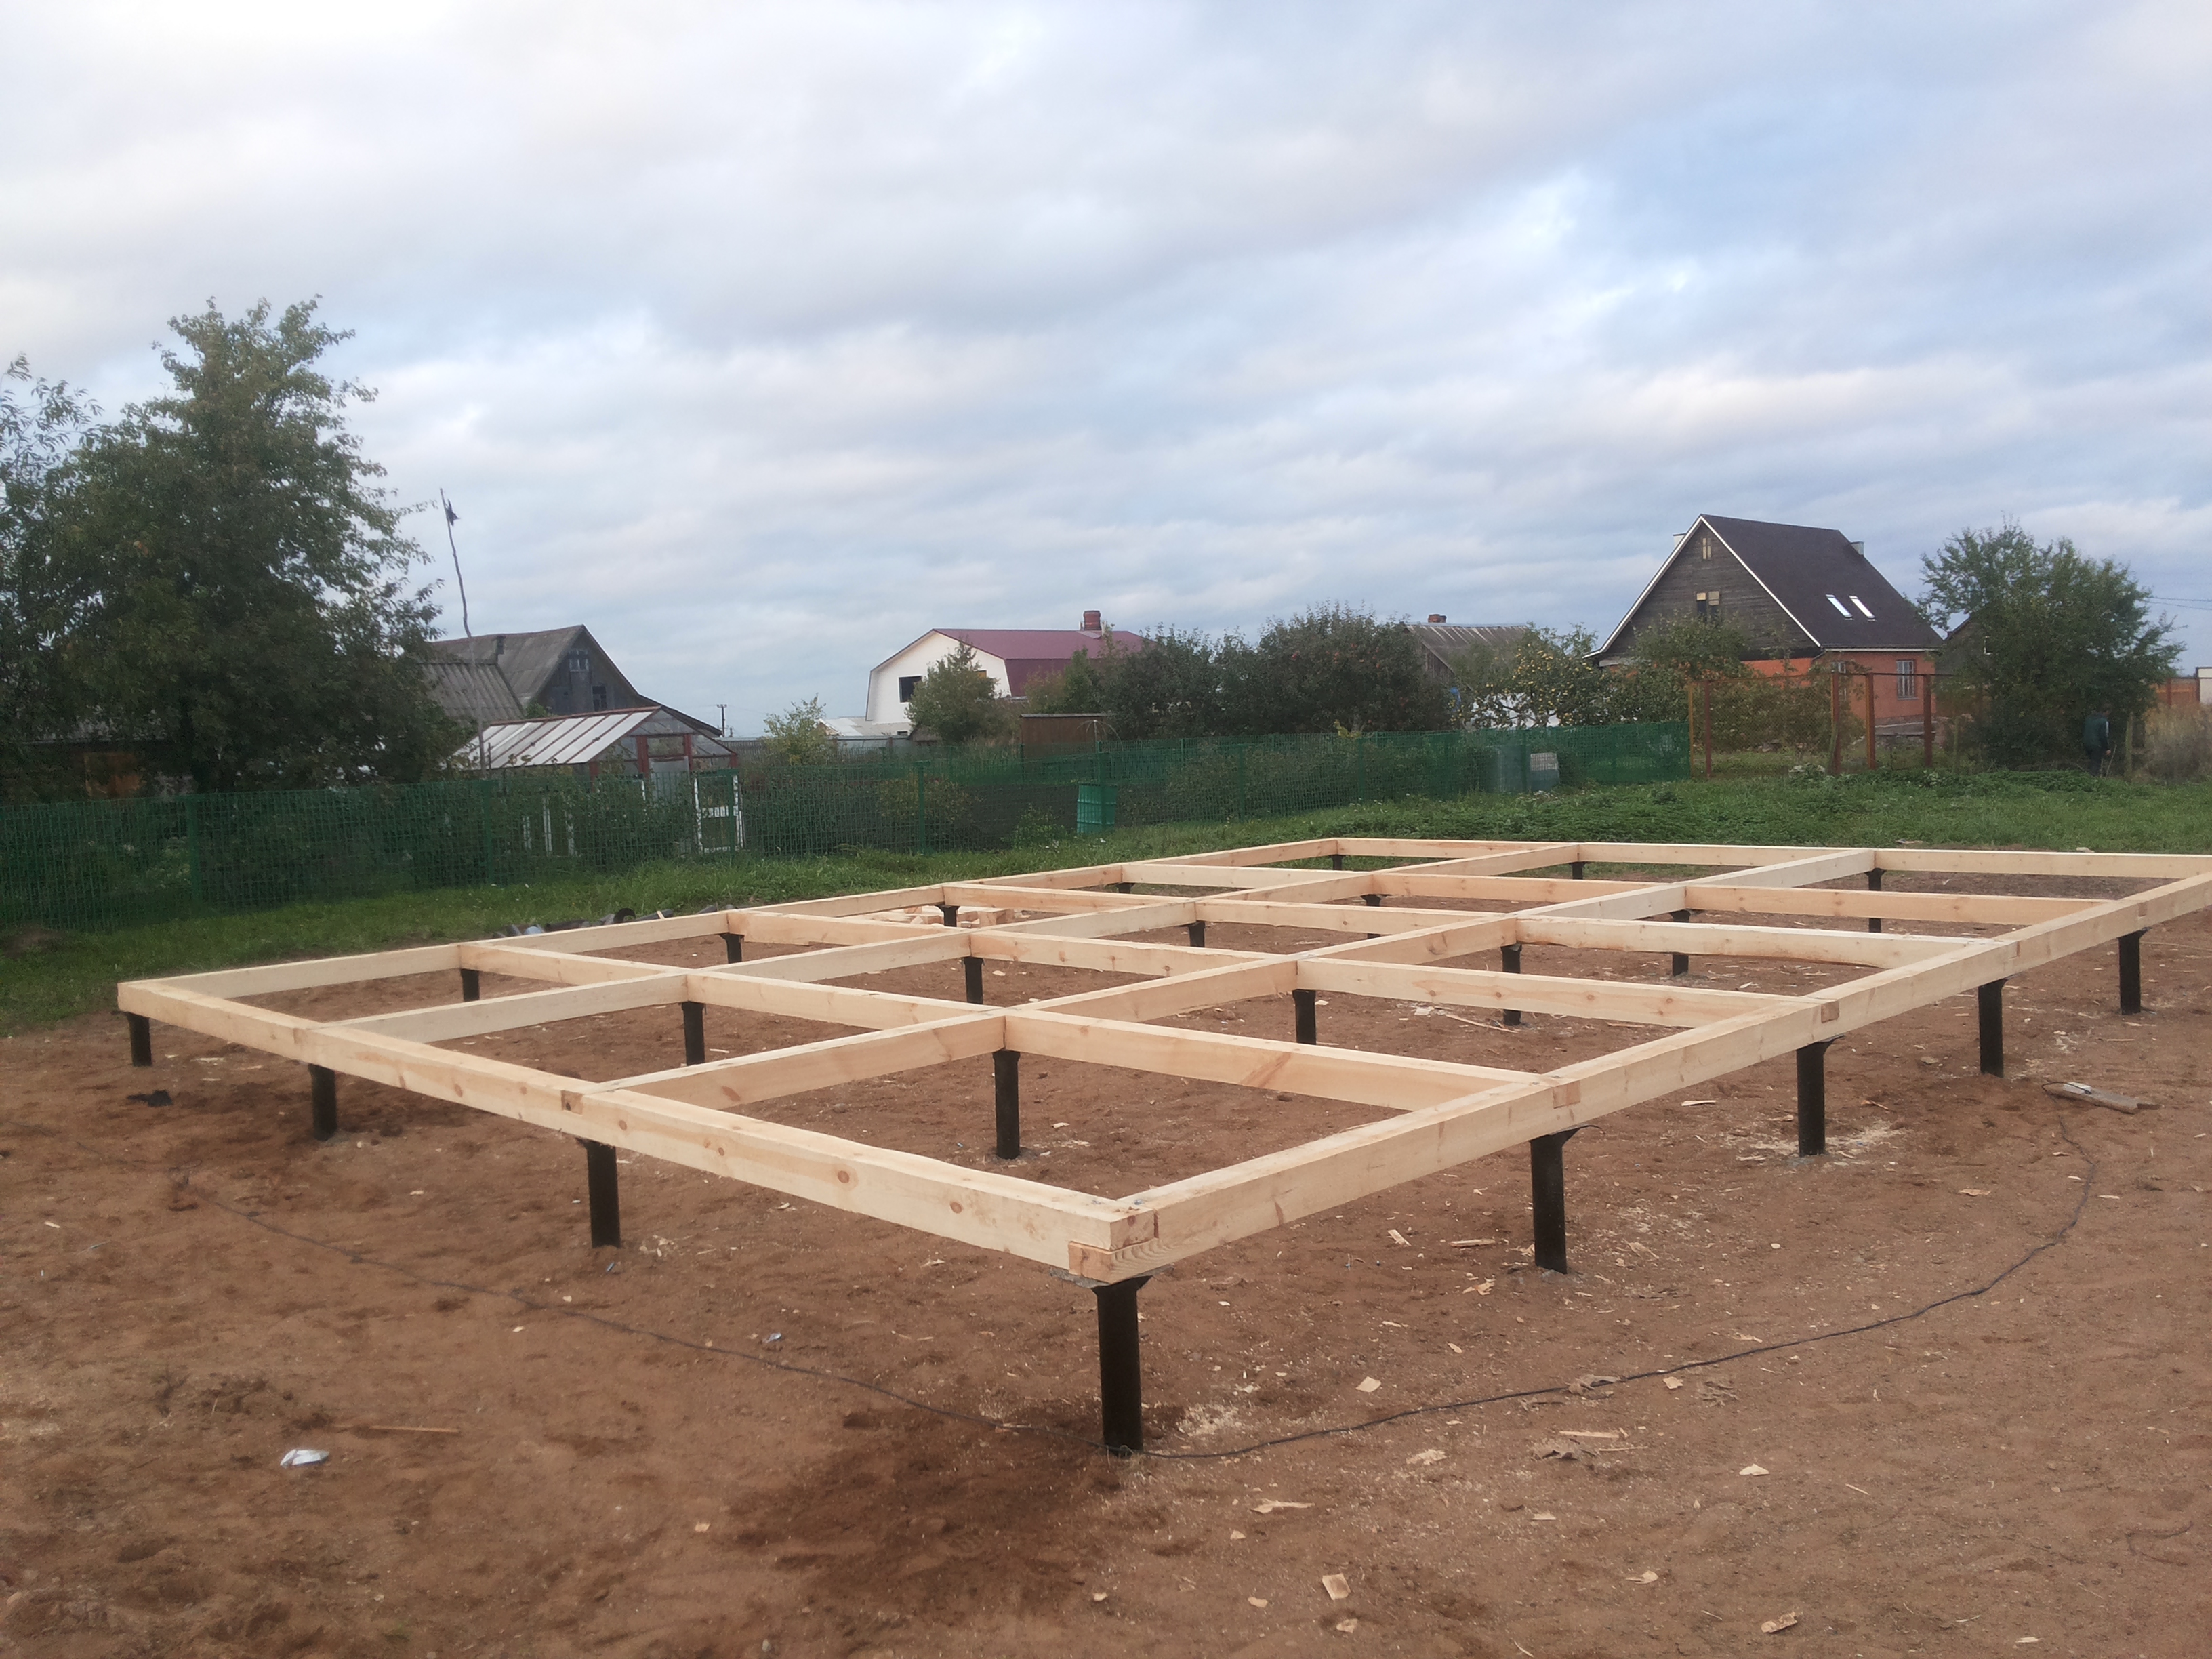
- Installation of supporting structures. Wells are drilled to a predetermined depth according to the scheme and marking. An asbestos pipe is lowered into the finished wells, a reinforcing frame is installed. Piles must necessarily protrude from the level of the ground surface to a height of at least 20 cm at the highest point;
- Filling the piles with concrete (you can use crushed stone or brick filling);
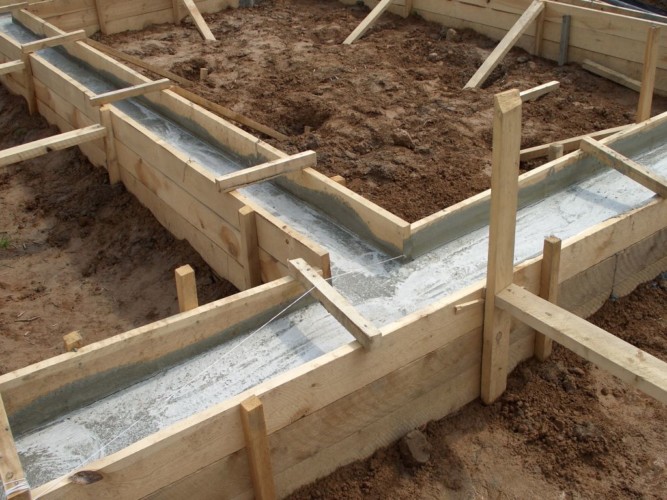
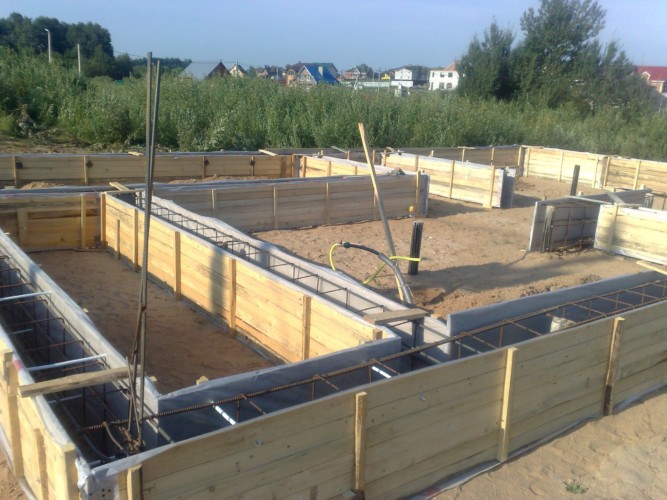
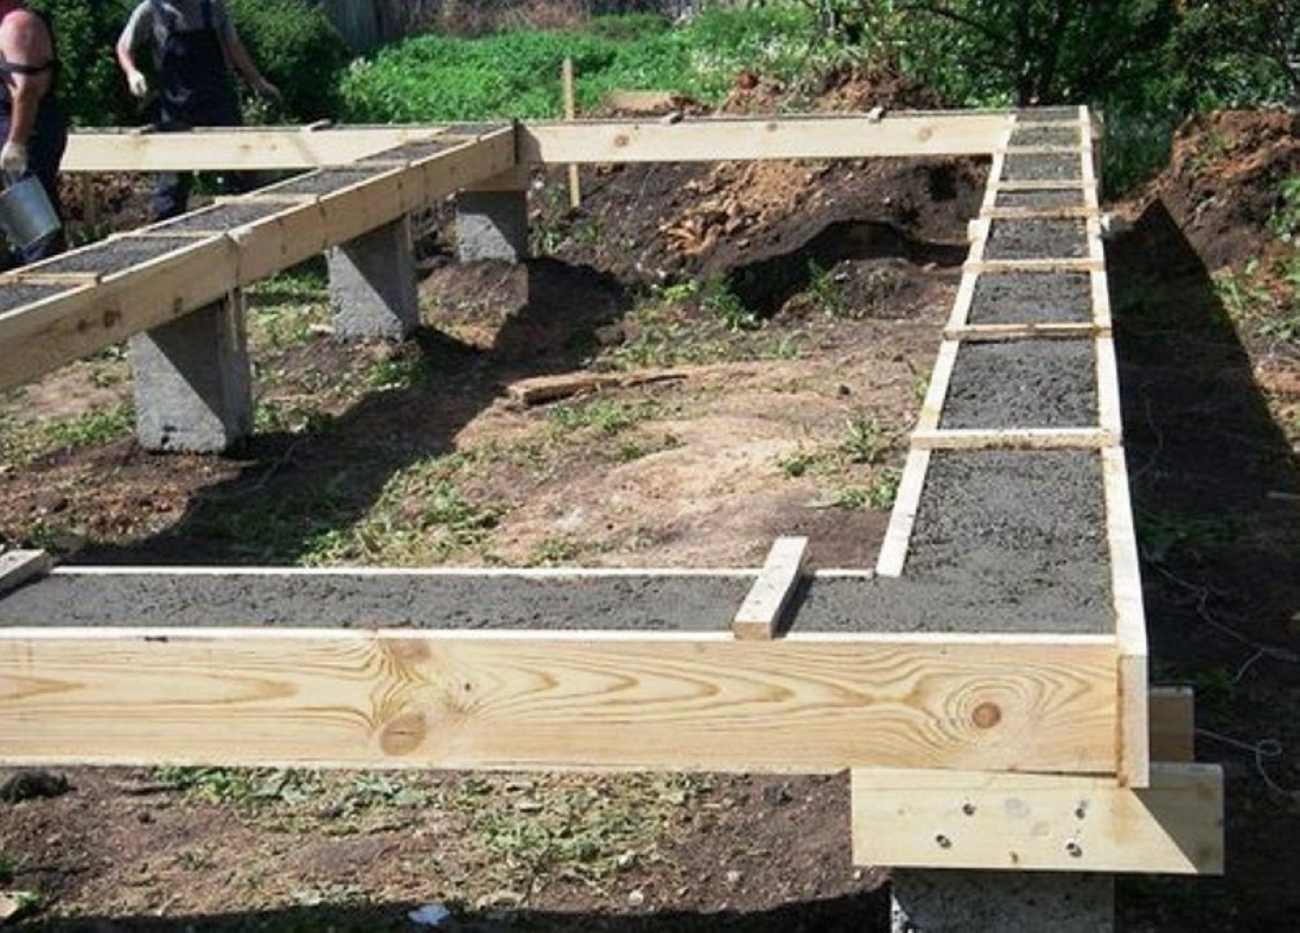
- Formwork. It is recommended to waterproof the upper balls of the supports first. A sand cushion is being prepared under the level of the upper horizon of the piles. The formwork is made of wooden stakes, which are installed along the outer and inner perimeter of the grillage. Then, a layer of waterproofing must again be laid in the formwork;
- Reinforcement of the grillage. Here, rods with a diameter of 10-14 mm are used, the length is selected optimal for overlapping the length of all load-bearing walls. The number of rods is calculated individually, depending on the type of building and its structure;
- Foundation concreting. There are no special requirements for frost resistance to the grillage. Therefore, it can be made from brick fight, foam blocks or aerated concrete and even wooden beams filled with concrete. When pouring the grillage, you need to constantly monitor the horizontal and vertical angles of the formwork so that it does not expand. After pouring, you need to give the concrete a few days to dry. This requirement does not apply to grillages made of aerated concrete or foam blocks.
- Stripping and cushion removal. When the base is dry, you need to remove the sand bed. This forms an air cushion, which should be plastered.
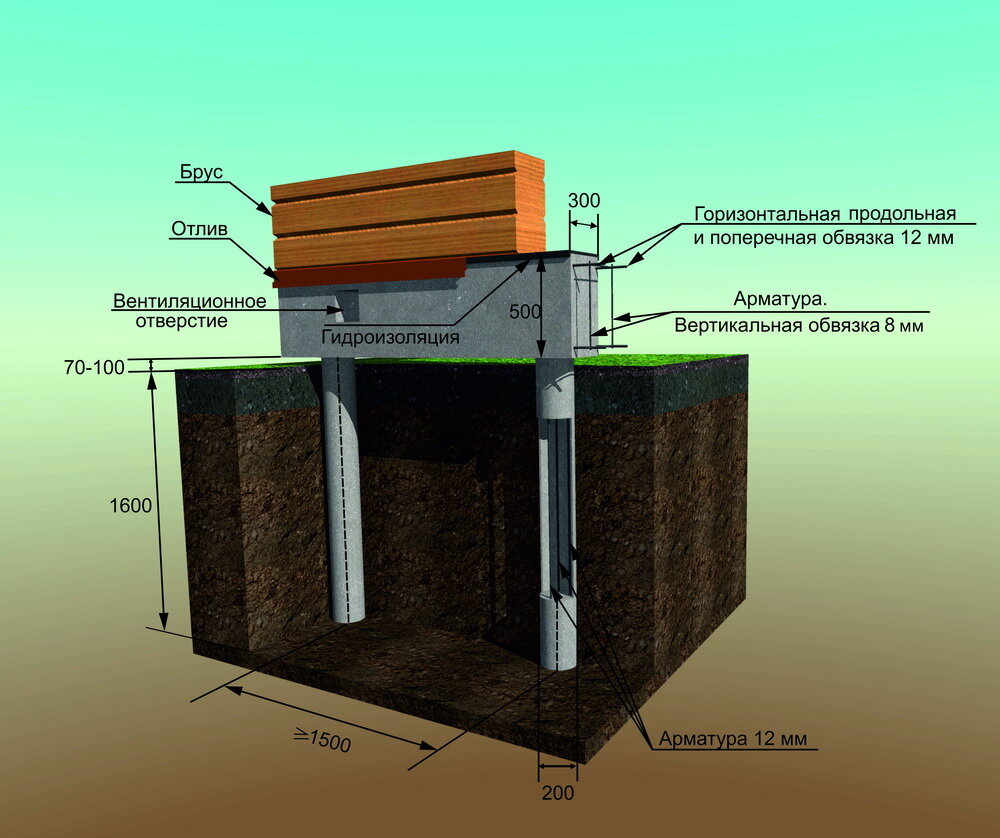
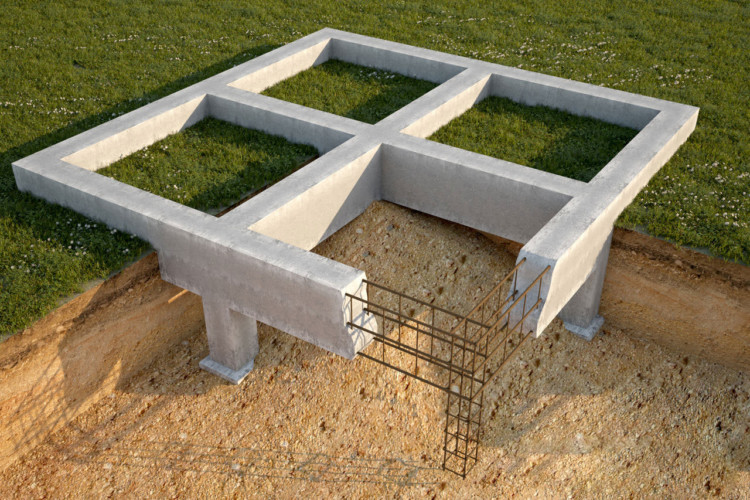
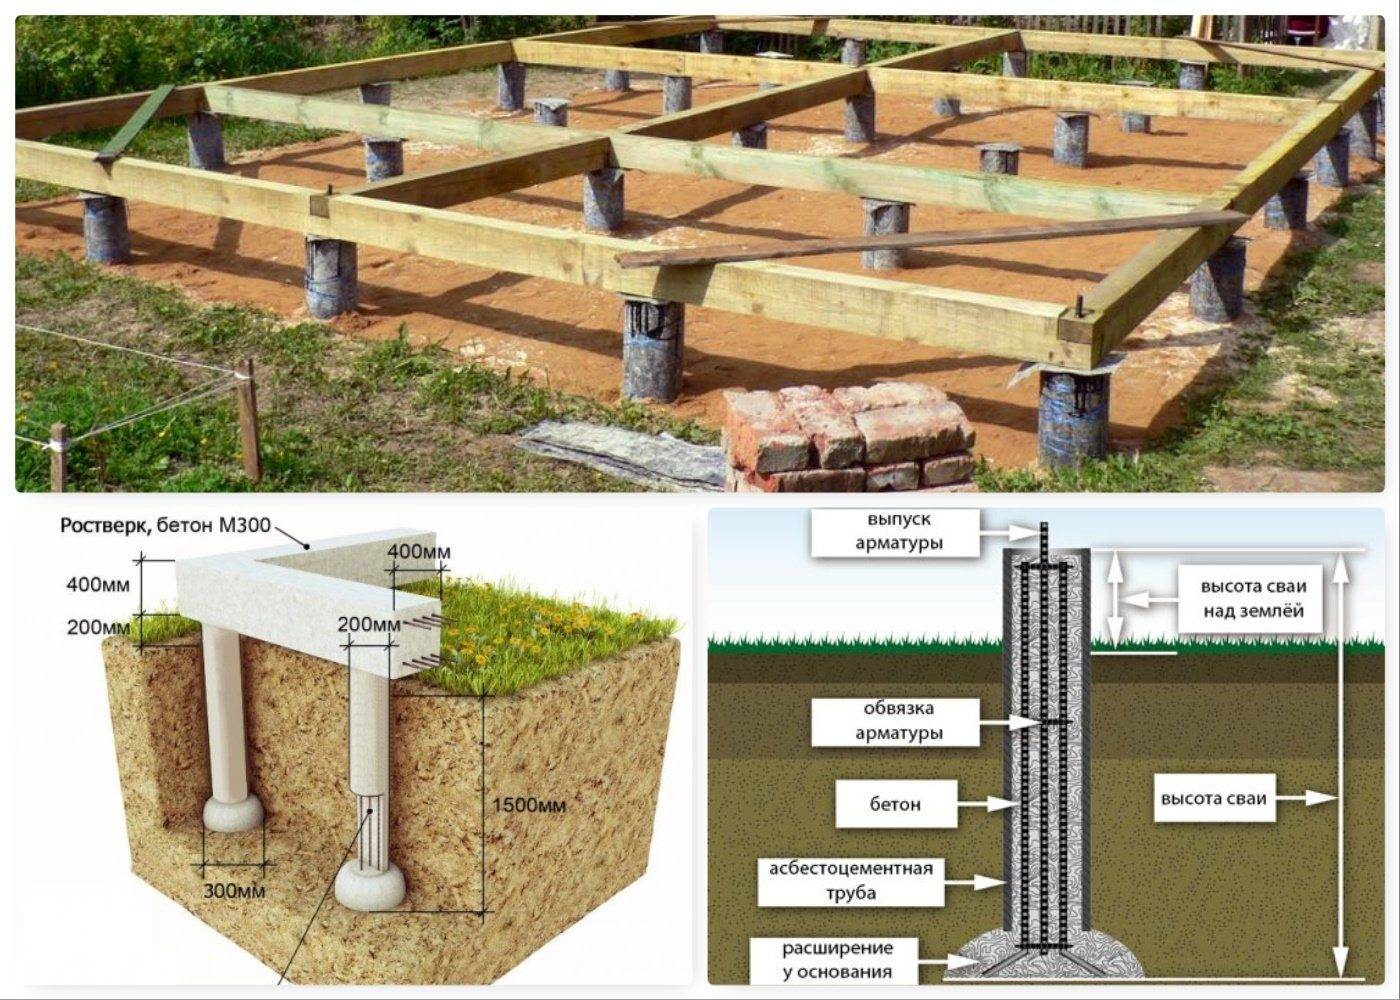
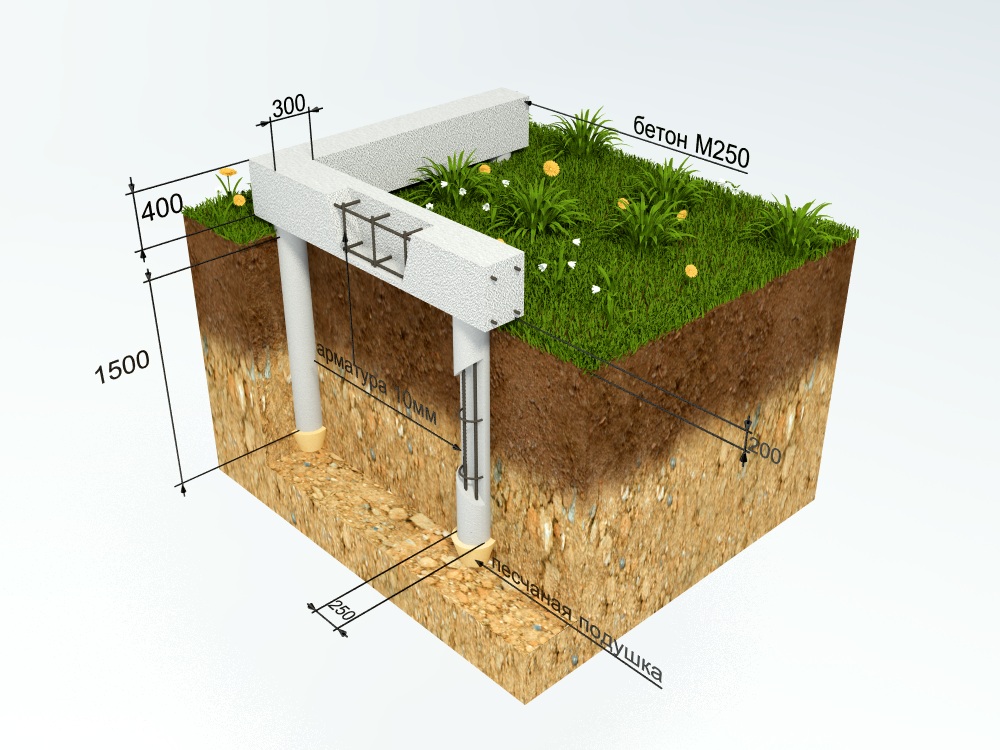
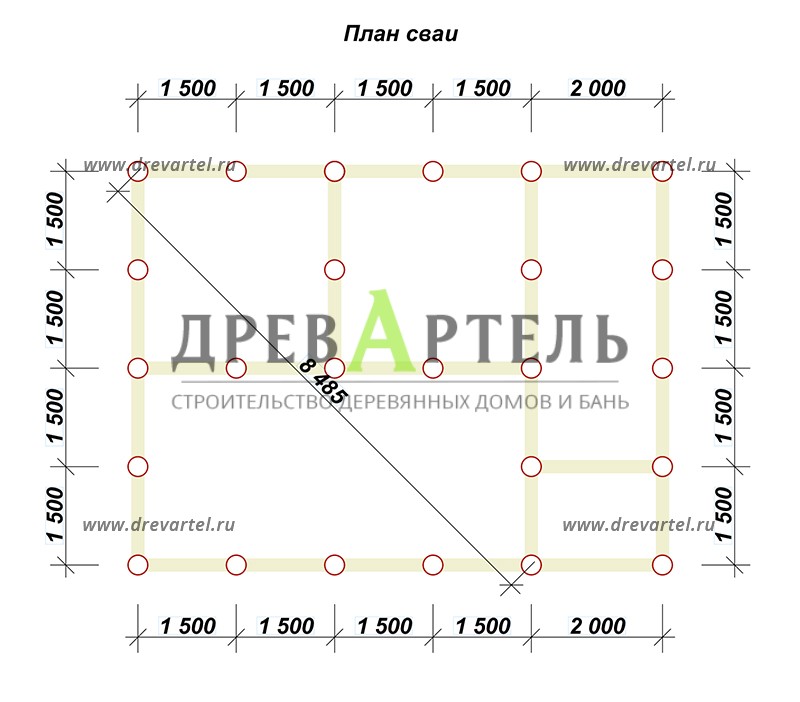
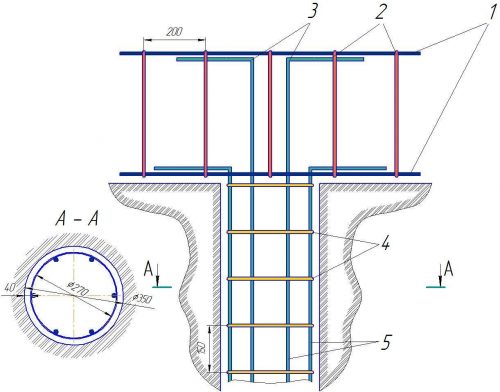 The figure shows a drawing of the pile foundation, reinforcement of the grillage-pile joint.
Everything, the pile-grillage foundation for a wooden house is ready. As a rule, it is the structures with fixed formwork that will be optimal, because then the grillages are made from improvised building materials.
How to choose a foundation design for a wooden house
The support base for the house is arranged taking into account many different circumstances. Indeed, the durability of the structure and the safety of living depend on its design. With an improperly built foundation, the house will have constant dampness, accompanied by mold and a nasty putrid smell.
When constructing a foundation, the following factors must be taken into account:
- Place of installation of the building. After choosing it, it is necessary to carry out exploratory drilling in order to accurately determine the composition and characteristics of the soils at the site of the installation of the support base under the wooden house. It is undesirable to install a house near natural bodies of water or ravines, since the soils in such places are unstable. It is also necessary to clarify the possibility of laying communications: water supply, power supply, sewerage.
- House size. This factor directly affects the amount of load on the foundation, and both the height of the building and its number of storeys are important. The dimensions around the perimeter are not so important, because as they increase, the supporting surface also increases.
- The presence of a basement or basement floor.
- Surface relief at the installation site. For example, when building on a slope, the use of a strip foundation is associated with a large amount of earthwork.
- Subsoil properties.The quality and composition of the soil can be determined by the nature of the water flow after rain:
- clay soils slowly let water through, and if they come to the surface, then a dense crust forms on them;
- loams quickly allow moisture to pass through, but dry slowly;
- sandy soil quickly passes water;
- peaty soil dries up for a long time, grass grows poorly on it.
Each type of soil has a different bearing capacity. The depth of the groundwater and the freezing point of the ground are of great importance.
The simplest foundation for a wooden house is a columnar
Recommendations for a practical wooden foundation
In general, the whole range of works on the installation of wooden piles can be do it yourself without the involvement of specialists. Watch the video on how to build a wooden foundation.
For wooden foundations from piles, a list of tips has been formed, following which you can build a house with your own hands without any problems and problems in the future:
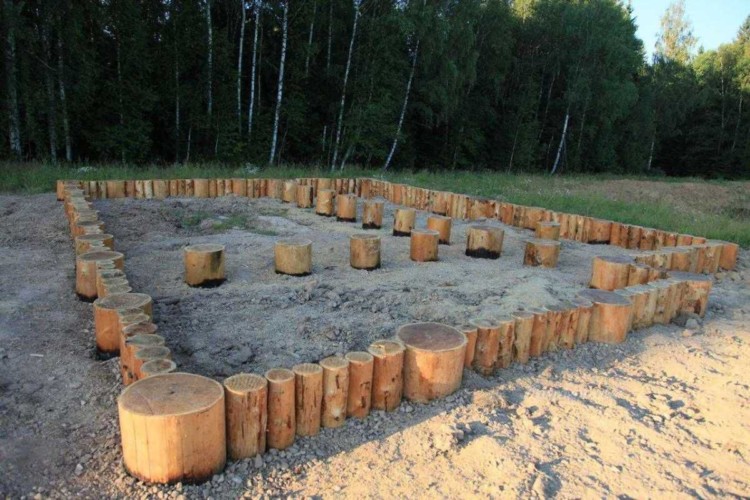
- The corner pile must be formed from a log with a diameter of at least 30 cm,
- A set of auxiliary piles according to SNiP is allowed to be made from a log 15-20 cm in width,
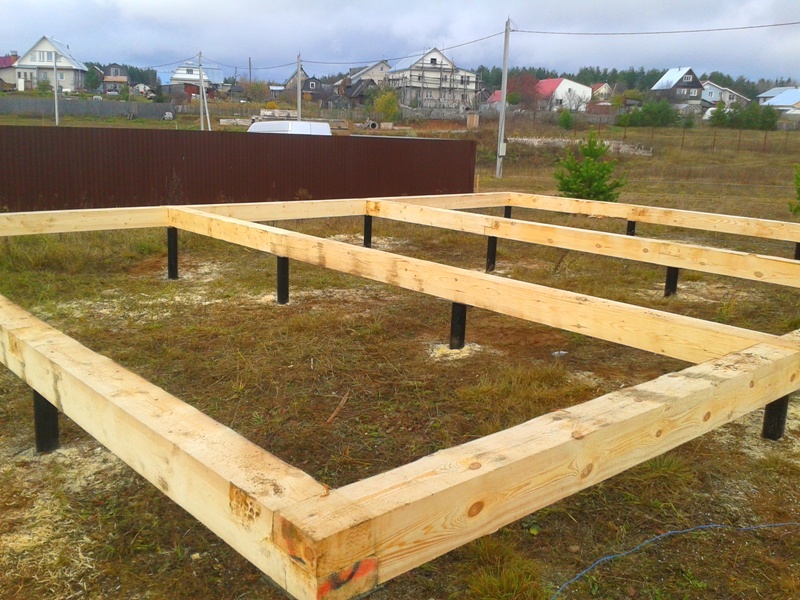
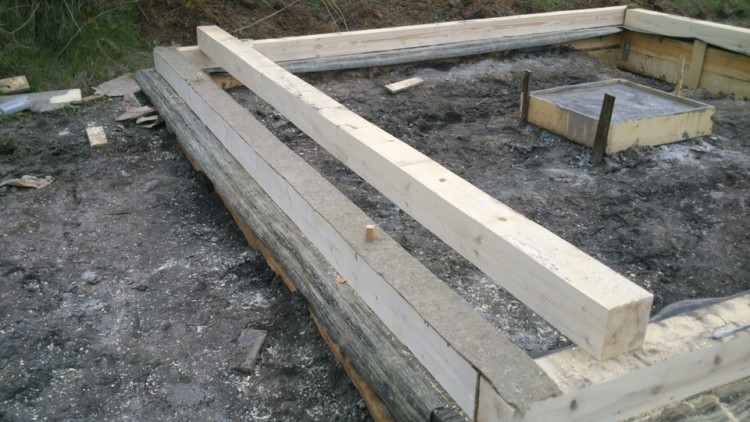
- Install a set of stands over the entire area so that the logs look 30 cm above the established ground level. This is necessary to create a full-fledged grillage, on which the floor will be laid in the future.
-
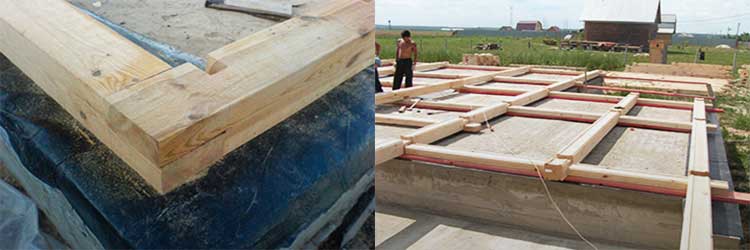
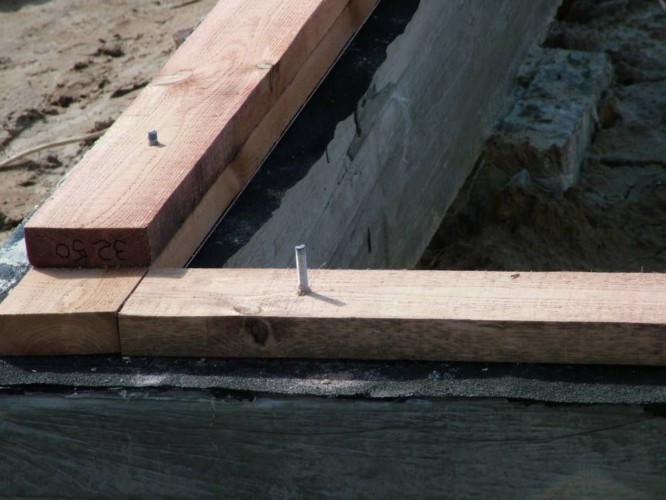
To strengthen the foundation structure in the case of a 2-3-storey building, a special spike is created on the surface of the upper cut of the log, and holes are drilled on the horizontal beams lying above, thereby forming a strong spike-groove connection.
- While the foundation of the house is settling, the logs may be subject to being pushed out from the ground during the constant thawing and freezing of the soil. To eliminate problems with the base, first wrap all the piles in PVC films, with the help of which it will be possible to create less adhesion between the soil layer and the log.
- At the end of the installation of wooden piles for the house, be sure to fill the pit with a mixture of sand and gravel, and do not use clay or black earth for these purposes.
- When the piles harden at the base of the house, carefully enclose them with a metal grillage, after which you can safely proceed to the construction of the walls with your own hands.
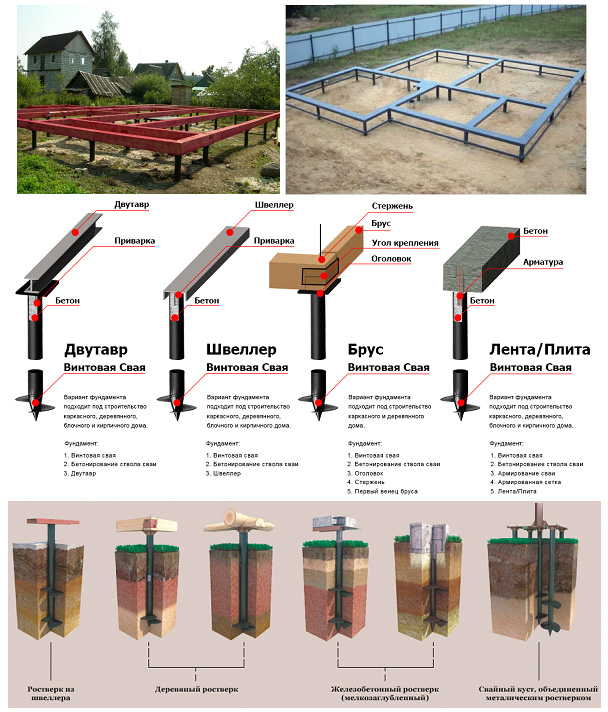
Types of columnar base - the pros and cons of each material
The properties of construction raw materials, of course, will affect the quality of the columnar foundation, its cost and labor input. For example:

- Brick. A popular material often used in related construction. Inexpensive, durable. However, it is not suitable for too damp soils, as it absorbs moisture and collapses. It is not suitable for heaving areas - a pillar made of bricks is easily deformed under pressure during the cold season, and the structure will collapse at the seams of the masonry.
- Wood. A short-lived and fragile material for the construction of a columnar foundation. Base elements - a bar or a log of a large section. It is not used for residential buildings - the maximum for the construction of a bath. In addition to waterproofing, you will need to protect the log from fire, rot and parasites, so the affordability turns out to be mythical. The advantage of the foundation is the ability not to delay the construction of the facility even a day.
- Reinforced concrete. The foundation can be made in ready-made structures or poured on its own. The complexity of installation pays off with its strength and durability. But at the same time, such a foundation requires formwork, a reinforcing bar, and the finished structure requires reliable insulation and waterproofing, since the temperature difference between the material of the house and the supports will lead to the formation of condensation, which is bad for any raw material. The wood starts to rot, the concrete crumbles. Given the size of the foundation, the overall cost is high.
- Asbestos-cement pipes. It is required to drill holes for them, therefore, the price increases by the cost of attracting equipment.In operation, such a columnar foundation for a house from a bar shows satisfactory results - it is stable on problem soils, is durable and strong.
- Combined foundation - pillars and filler tape. The cost of foundation elements is high. They are usually homogeneous, monolithic. The platform is strong and durable. Suitable for residential buildings of 1–2 floors and heavy construction materials.
Structural differences of columnar foundations
Examples:
- Columnar. These include prefabricated structures made of bricks, rubble concrete, flood columns and plastic formwork. The disadvantage of a columnar foundation is that the design is suitable only for light structures - baths, gazebos, frame buildings. The advantage is the speed of construction and low cost.
- Supporting and columnar foundation. This foundation has significant pros and cons. It is a free-standing pillar with a concrete platform. One of the features of this foundation for timber houses is the creation of a solid foundation for the crown and logs, which serve as the basis of the floor. The advantage of this design is its special stability on capricious soils. Such a foundation is capable of supporting objects of more than one floor. The disadvantage is that it takes much more time and money to install it.
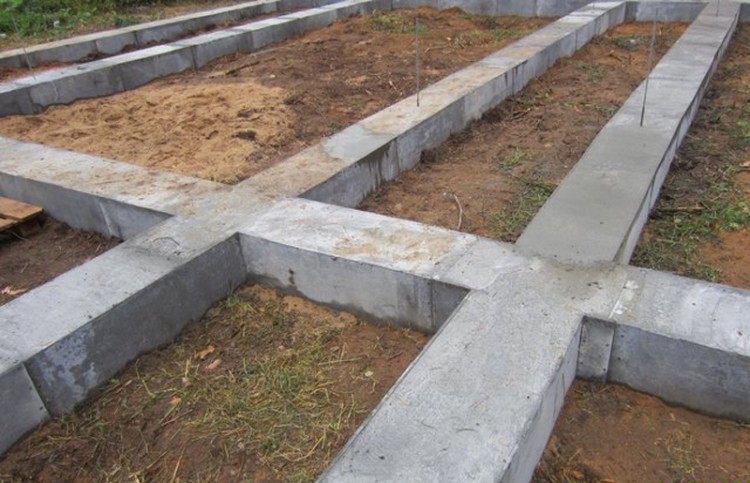
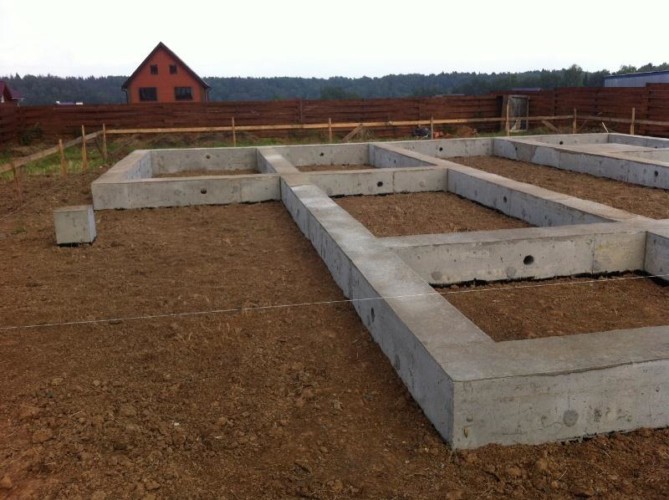
- Columnar base with grillage. A powerful, reliable belt appears near the house from a bar, which allows you to arrange a two-story structure on any soil - heaving, floating, with a high level of groundwater. A similar columnar foundation for a house made of timber will cost more than without a grillage, but for a residential object of a large area it is more often chosen.
 Structural differences of columnar foundations
Regulatory aspects
The correct arrangement of the foundation of a private log house is a guarantee of the safety of residents. All parameters of the future foundation are regulated by regulatory documents - SNiP 2.02.0183 and GOST 24022-80, 24476-80. They indicate the following:
- The position and number of storeys of the house. The proximity of cliffs, reservoirs, passing mines, wells or wells is taken into account. The total area of the building is not taken into account - only the weight of the house affects the load and pressure of the base on the ground.
- Bearing capacity and soil type. There are only 5 of them - clayey, loamy, sandy, peaty, limestone. The behavior of the soil during rain will help to distinguish one from the other.
- The depth of soil freezing and the level of groundwater. In the first case, the sole of the pillar should be lower, in the second - higher in order to avoid heaving during seasonal changes.
In addition, GOST on a columnar foundation regulates the use of a brand of cement for flood pillars or grillage, coupled with the characteristics of the soil. Ideally, calculations and selection of the optimal foundation for a specific log house the surveyor is engaged. A private builder should also inquire about the foundations of nearby facilities.
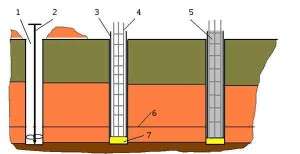
Types of piles
So today there are several types of piles that can be used to equip a pile foundation:
- Driving.
- Bored.
- Reinforced concrete drilling.
- Screw.
Driven piles are driven into the ground using special equipment, so this type is very rarely used in private housing construction. In the second case, the piles are made at the construction site, for this they make a borehole, reinforce it and pour concrete. In the third case, already the piles made at the factory are inserted into a pre-prepared well. In the fourth case, the pile structure is a metal long pipe, at the end of which special blades are welded, with the help of which the pile is twisted into the ground like a large self-tapping screw. They can be screwed in both independently and using technology.
For private housing construction, the most optimal piles are screw and bored.
The foundation can also be classified by the presence or absence of a grillage, that is, a structure that connects all the pile heads into a single whole and distributes the resulting load from the building.
General information about screw piles
Screw piles under the house are the main element of the foundation. They are made of a steel pipe with a metal thickness of at least 4 mm. On the one hand, it has a sharpening. At this end of the pile there is a cutting blade, with the help of which the support is screwed into the ground. Many people think that the use of such building materials will require the use of special equipment. In fact, the ideal shape of the blades of screw piles allows them to be screwed to the required depth by 3-4 workers.


For the construction of objects with differences in height or with the presence of various lateral loads, piles with two blades are used. This design gives the foundation additional reliability. The diameter of the blades of screw piles ranges from 200-850 mm. The supports themselves have a diameter of 50-350 mm. The length of screw piles can be 2–11 m. Not only hollow piles, but also solid piles are available for sale.
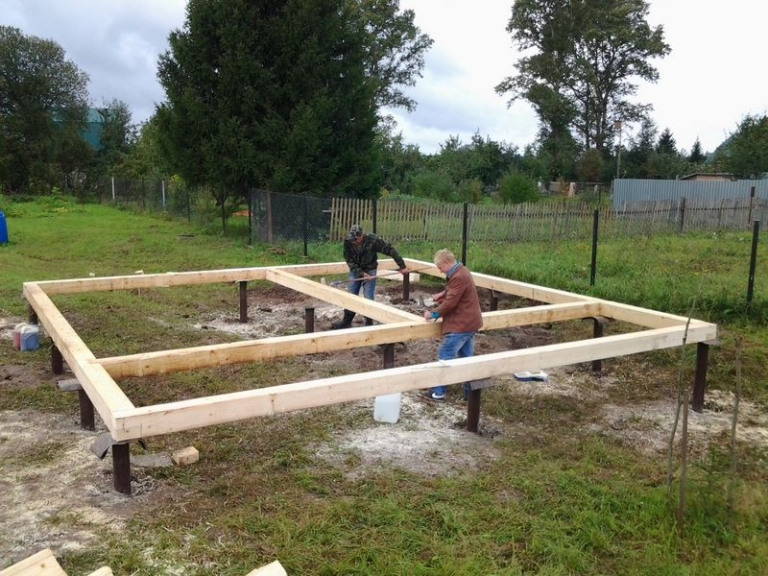
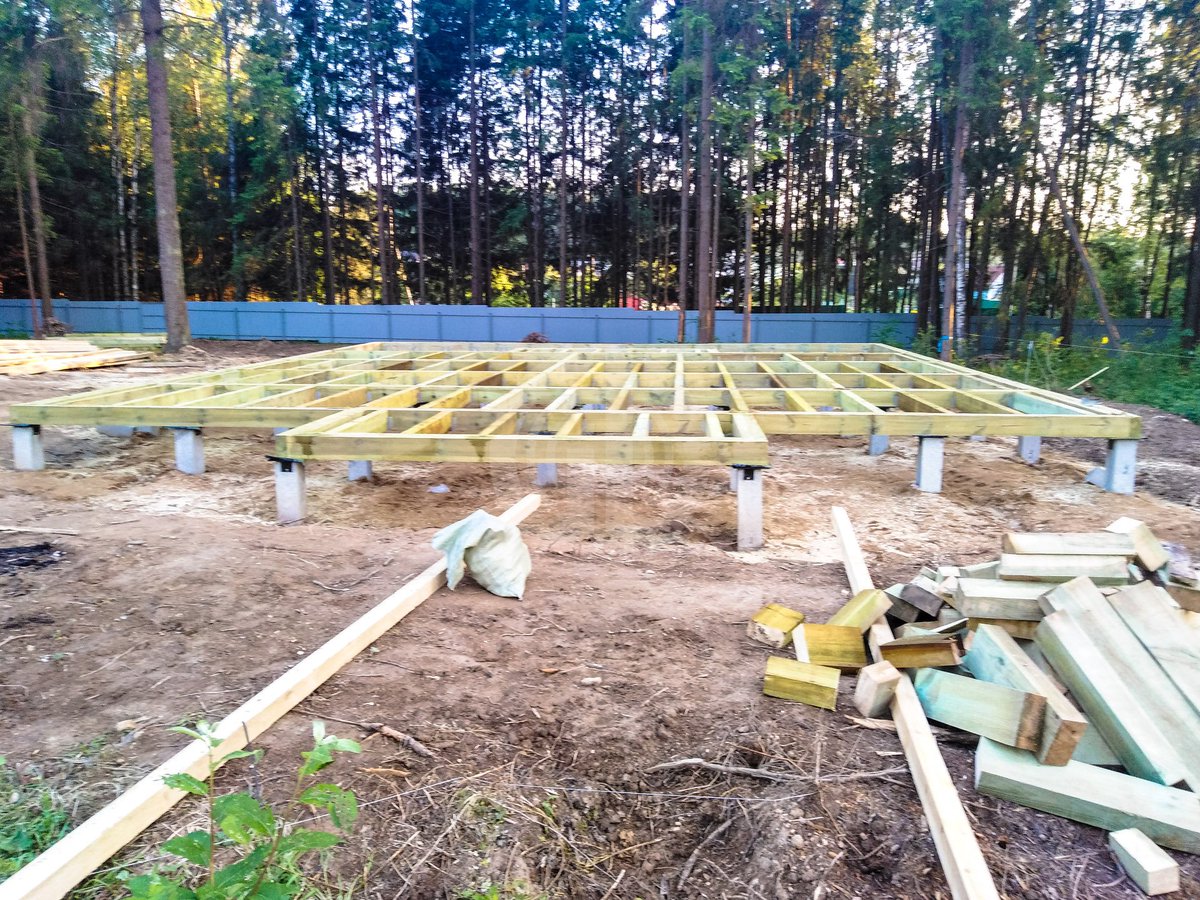
Laying and fastening the first row of beams to the foundation
Another important task that needs to be solved at the stage of creating the foundation is the connection of the concrete base with the lower beam (creating a crown). If in the construction of brick or concrete everything is simple - adhesion is provided by mortar, then in the case of a timber it will not work, other solutions are needed here.
The best way to ensure a reliable connection between the walls and the foundation is with anchor rods. These are threaded metal rods that are placed in the foundation body before the concrete is poured. After it hardens, a flat platform is obtained with pins sticking out of it.
Wall construction begins with waterproofing. Two layers of roofing material or other roll material are laid on the foundation. In the lower bar, holes are drilled along the diameter of the studs. The wood is impregnated with an antiseptic or bitumen mastic.
The beam is pushed onto a stud to ensure maximum strength of the connection, a nut and washer are used (under which you first need to make a recess in the tree). Subsequent rows are laid in the standard way, samples are taken at the corners.
Drilling holes for posts
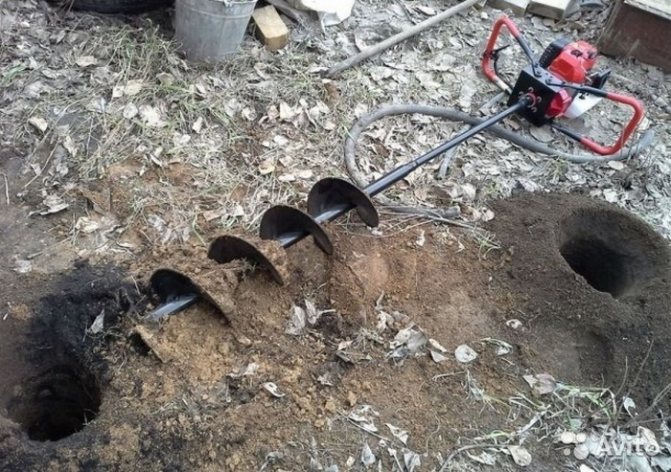
You can just dig a hole with a shovel, or you can use a garden drill of the required diameter
The next stage of work in the construction of a wooden foundation is digging holes for supports. You can simply dig a hole with a shovel, or you can use a garden drill of the required diameter.
After the pits are ready, it is imperative to make a solid sand pillow 15-20 cm thick. It must be slightly moistened and well tamped.
Installation of a columnar foundation for a garage and advantages
Before installation, it is worth making a special waterproofing bandage for each pillar. To do this, use roofing felt or roofing material, with which they wrap the underground part of the support in several layers, gluing them with bituminous mastic. As a result, even when the soil moves in a horizontal plane, the soil layers will simply slide along the supports without harming them.
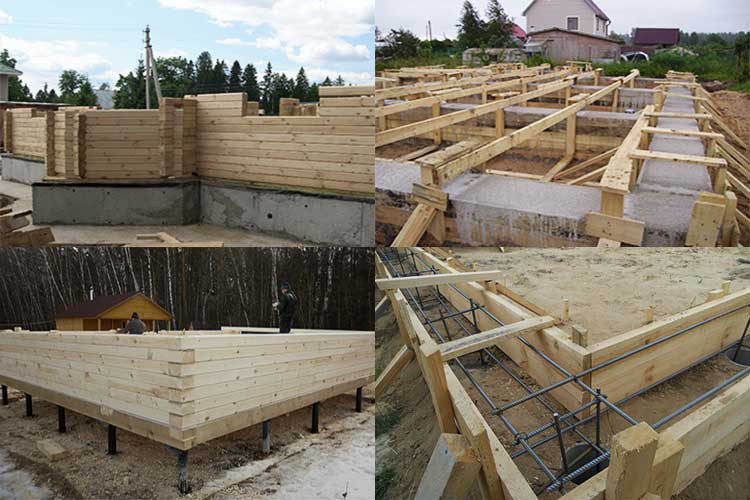
Types of foundations for the house
Columnar base - these are the most popular devices for bar buildings
Today, there are such types of bases for a wooden house, which have their own distinctive characteristics. So let's take a look at them:
- Strip foundation - this type is characterized by a cross section equal to the shape and size of the entire structure. Most often used in the construction of heavy large buildings. Materials are used for work: bricks, concrete blocks and flagstones
- Columnar base - these are the most popular devices for bar buildings. For construction work, a minimum amount of materials is required. Pits need to be made along the perimeter of the site every two meters.
- The foundation for a slab-type wooden house.Such a device has gained popularity in classical construction projects. To complete the process, you need a large amount of concrete and reinforcing mesh. It is worth noting that a lot of physical strength is needed to complete the work.
Pros and cons of columnar type
The columnar type of the building base has a structure suitable for laying under light or wooden buildings
The columnar type of building base has a design suitable for laying under light or wooden structures that place little stress on the soil. It should be noted that the simplicity of such a device is not reflected in any way on the reliability of the supporting ability. Schematically, the view of the foundation resembles a system of pillars installed at the highest pressure points. The norm between the pillars of the columnar structure is 2 meters.
The posts are made from brick, concrete, stone and other materials. Insulation and waterproofing must be carried out together with the filling, that is, connecting the walls with the pillars. Installation work begins with the preparation of a pit 50 by 50 by 50 cm. Further, it is filled with rubble, which creates a pillow, and a pillar of blocks is installed. The columnar view of the base has the following advantages:
- High level of reliability;
- Durability;
- Low installation costs;
- The ability to erect buildings in almost any conditions;
- There is no need for additional processes such as waterproofing and insulation;
- Low level of labor intensity of the construction process;
- It is possible to build a columnar mechanism on freezing soil
With all these advantages, let's find out what is the disadvantage of this type of building? And there are several of them, so:
- Lack of the possibility of building a basement;
- Not suitable for installation on mobile soils;
- Withstands the load of light buildings only.
Bored pile foundation: pros and cons
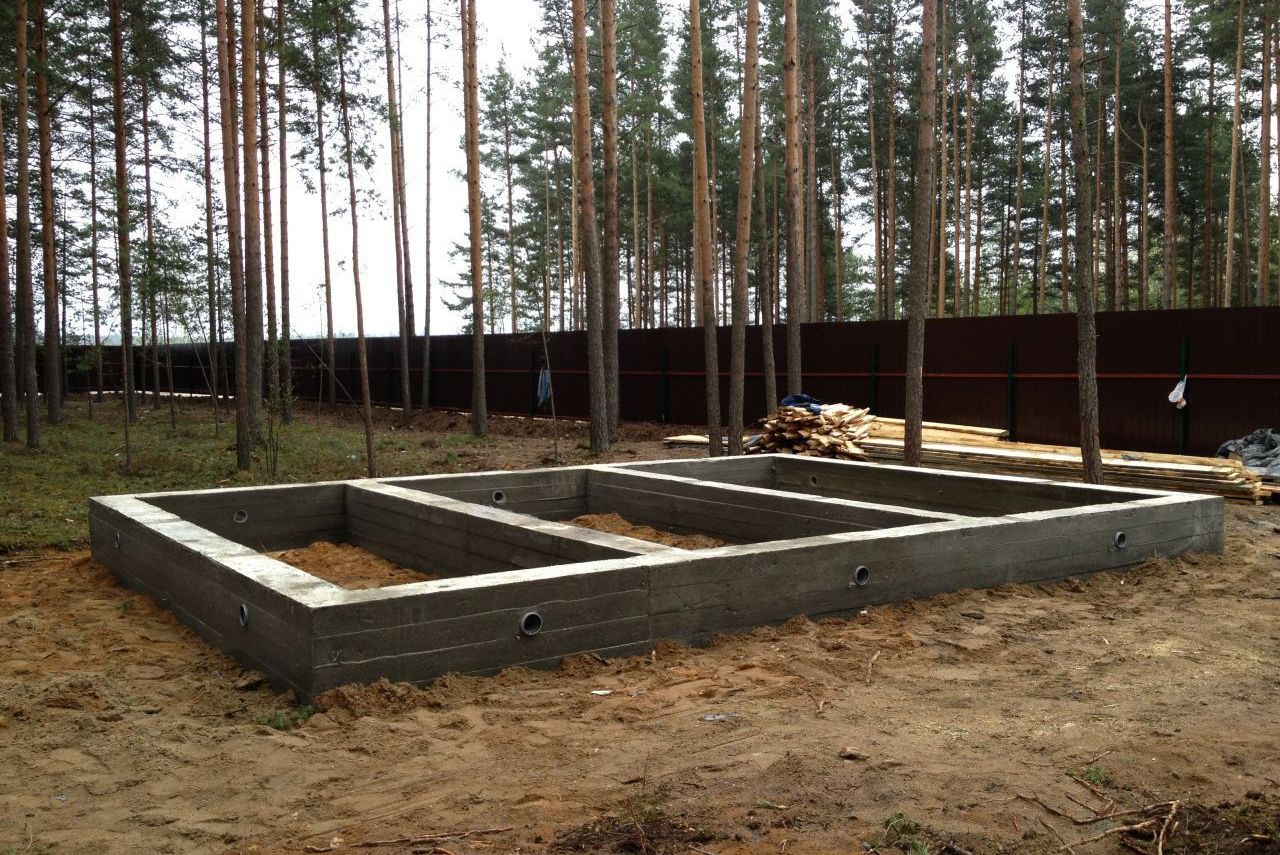
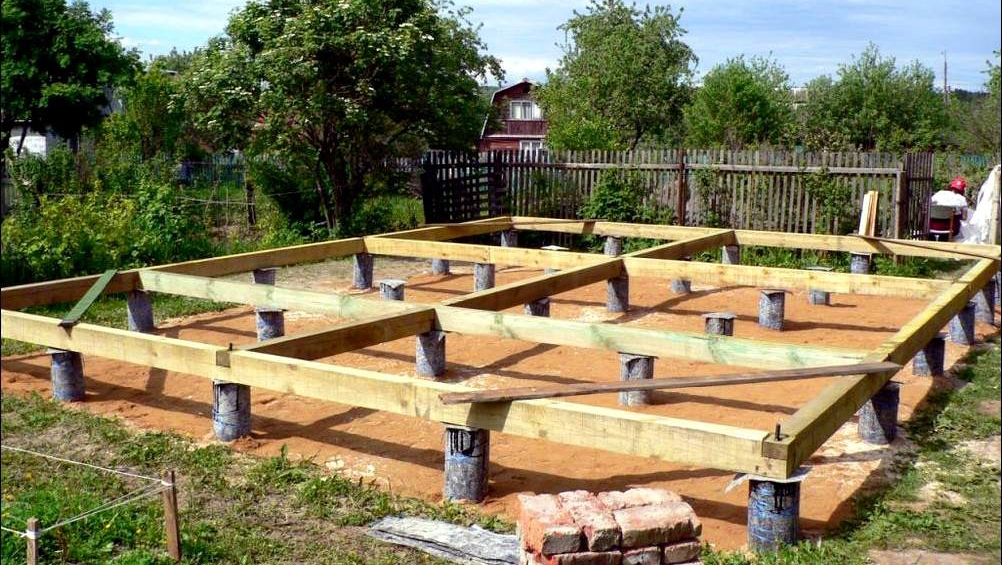
The base of the bored asbestos cement foundation is a type of columnar type, where pipes serve as pillars
The base of the bored asbestos cement foundation is a type of columnar type, where the pipes function as pillars. Structurally, they consist of piles and a grillage connecting them to each other. The load-bearing components of the bored foundation are placed at the pressure points of the building. It is worth considering that the structure can be influenced by horizontal forces, then the installation of piles can be installed at an angle. The advantages of this type:
- Can be erected on all types of soil;
- Not influenced by surface waters;
- Low consumption of materials;
- The installation process is more labor intensive than the columnar view.
Installation of screw piles
After completing the project documentation (a simple plan), purchasing the necessary tools and materials, they begin to build the foundation on screw piles. The pillars are pre-coated with an anti-corrosion coating to extend their service life. This is done in the absence of a protective layer on the purchased products.
Installation of supports is carried out in the following sequence:
- clearing the area intended for construction;
- according to the plan, mark the site;
- piles are installed in the marked places, screwing them to the design depth, which should lie below the freezing mark in the given region: 1.5 m or more;
- after the installation of all the supports provided for in the plan, if necessary, fill them with concrete;
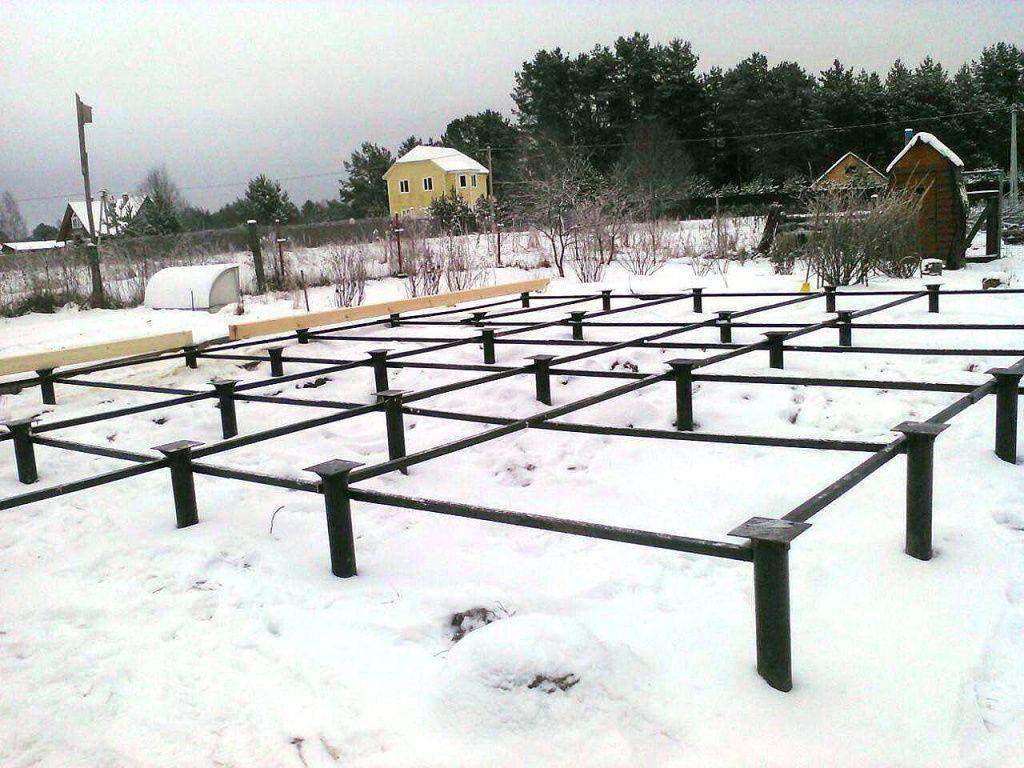
- cut the installed pillars to the level and welded to each head to create a strapping.
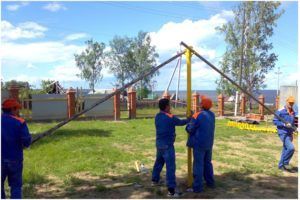 Screwing in screw piles
Having made a grillage, they erect a house, a roof and equip a basement.
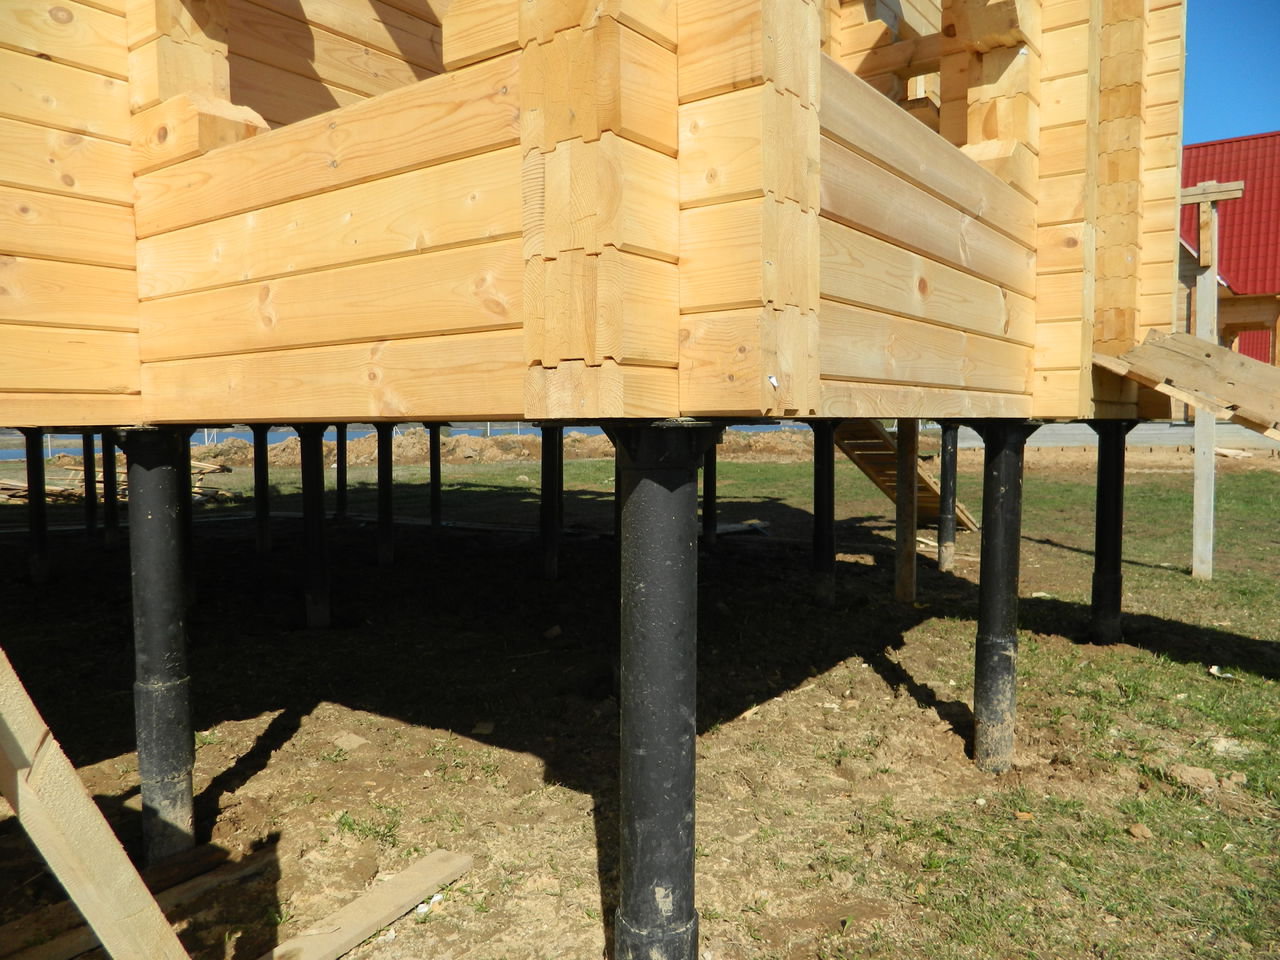
Above the flat surface of the earth, approximately 40-50 cm of columns are left, and with significant differences in height, the length of the parts left is determined by the project.
The screws are screwed in manually or with the help of special equipment.It is recommended in the first case to work three together: two workers twist, and the remaining one controls the level of the installation.


The exposed pillars are poured with concrete if permanent residence in the house is planned. For a temporary building, this can be omitted.
What you need to know in order not to make a mistake when choosing
Buildings made of wood have been built for more than one hundred years, during which time methods have been developed for performing all work from digging a foundation pit to creating a roof. Several types of foundations are suitable for a house from a bar, in order to choose the optimal one, a detailed study of the site allocated for construction will be required. This is a costly measure, but only it guarantees the durability of the building and its safety.
It should be determined:
- type and bearing capacity of soil;
- the presence and depth of groundwater;
- elevation difference on the site;
- the depth of soil freezing.
Another significant circumstance that cannot be ignored when choosing the type of foundation is the presence or absence of a basement under the house.
Priming
The task of the foundation is to evenly distribute the mass of the building over a large area, thereby providing it with maximum stability. The weight of the house (even if it is wooden) is significant, therefore a lot depends on the characteristics of the soil.
With all its diversity, three main types of soil can be distinguished:
- homogeneous;
- fine-grained (clay or sand);
- peat.
The best in all respects is a homogeneous soil. It has a high density, good load-bearing capacity, as a result of which the building does not sag. The foundation can be of any type.
Fine-grained soil is clay or sandy. It is characterized by high shrinkage, which is especially noticeable with heavy rainfall. It is possible to build on such soil, but the foundation must be based on stable layers. The best option for this situation is piles or a solid slab.
Soils of the latter type are most often found in wetlands, near water bodies, in wooded areas. If possible, it is worth avoiding construction in such areas, the building may collapse under the influence of moisture.
The groundwater
Groundwater is a significant obstacle in the construction of a private house. They are encountered by those who build on the lakeside or in swampy areas. A high-lying aquifer manifests itself by undermining the foundation, water penetrates into the basement. In addition to discomfort, this entails a loss of strength of the base of the house, high humidity inside, which will certainly affect the durability of the building as a whole.
It is worth refraining from construction on such sites. It is possible to deal with groundwater, but for this it will be necessary to create complex engineering structures, a water drainage system. It's expensive and not likely to pay off.
Relief
Modern technologies make it possible to build on almost any site, regardless of its relief and height difference. Of course, it is easier to work on a flat area, but you can build a beautiful and reliable house even on a steep slope.
For building with a slope, it is important to ensure that the foundation is on a stable foundation, otherwise the house will slide. The optimal type of foundation for building on a slope - piles
The depth of soil freezing
An important characteristic of the building plot. In essence, this is the depth to which moisture freezes, saturating the soil. Regardless of the chosen project, the depth of the foundation for the house made of timber is selected in such a way that the base of the base is below the freezing line.


It is not difficult to find out the average value of this indicator from the tables, focusing on your region. You can also get it yourself, for this it is enough to dig a hole in early spring and measure the layer of frozen soil with an ordinary tape measure.
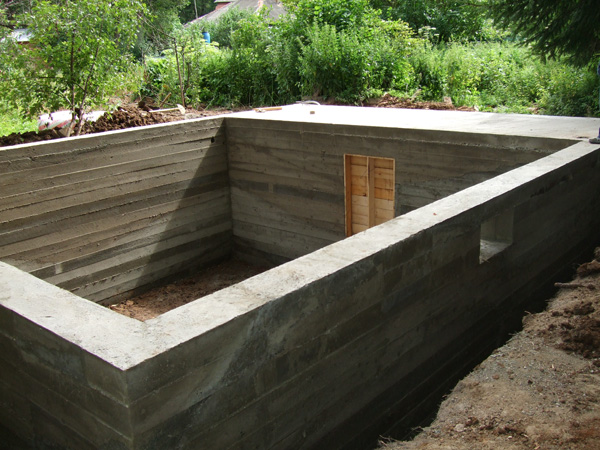
Basement
The construction of a house made of timber makes it easy to build a basement, if necessary, make a full basement.This is justified, since it allows the rational use of the area of the site - most of the auxiliary premises can be arranged under the living rooms.
A house with a basement has its own characteristics. The foundation is made with significant deepening
It is important to ensure the stability of the structure and create a barrier to moisture that can penetrate from the soil. The best option for a house with a basement would be a high strip foundation.
It will become a pillar of the building, will serve as the walls of the basement.
Stages of erecting a pile foundation step by step
Geological exploration and foundation design. This stage is very important because soil types affect the stability of the foundation. Also, it depends on the choice of piles and the installation method how smoothly and reliably the house will stand.

The main point is the calculation of the building load. The number, depth and method of pile location depend on all these indicators. If you not if you want to spend money on specialists, consult with the residents of the area about how high the groundwater rises, what is the thickness of freezing, from which rocks most of the soil.


Cleaning the territory. Clear the area, under the future foundation from trees, bushes, remove the sod.

Markup. Make markings with wooden pegs and a stretched rope, be careful, otherwise the skewing of the structure cannot be avoided.

Well drilling, reinforcement, insulation and concrete pouring. The ability to do this step manually involves the purchase of a drill (sometimes up to 300 mm). Even an inexperienced builder can do this stage, but still, if the hole width is more than 600 mm, use an electric drill.

Next, you should prepare insulation from roofing material, along the width of the well (roofing material is needed so that the contact between concrete and earth is minimal), plus 30 cm above the ground. If water appears at the bottom of the pit, it is better to pump it out.

For reinforcement, insert 3 rods 6 mm thick, with transverse joints at a distance of 50 cm. To attach the grillage to the posts, leave 30 cm above the poured product.

It is recommended to pour concrete halfway, then seal with a vibrator and continue pouring. Those. the pile foundation in section looks as follows: waterproofing - concrete - reinforcement - concrete - waterproofing.


Driving piles and pouring concrete. The structure is deepened into the ground, 2 pipes are inserted into the upper part, which serve as pivot levers. Control the strictly vertical entry of the pipe, the stability of the structure depends on it.


Installation of piping, grillage. The grillage is tape and tiled. The belt consists of metal (channel), reinforced concrete or wood beams located along the perimeter, as well as under the load-bearing walls. Tiled is used when the piles are evenly spaced over the entire area of the future house.

The foundation is the basis of the future structure; the service life depends on the stability and reliability. Take this question seriously. Having carried out thorough preparation, you will learn how to correctly calculate the pile foundation and how to create the desired building with minimal labor costs.

DIY foundation device
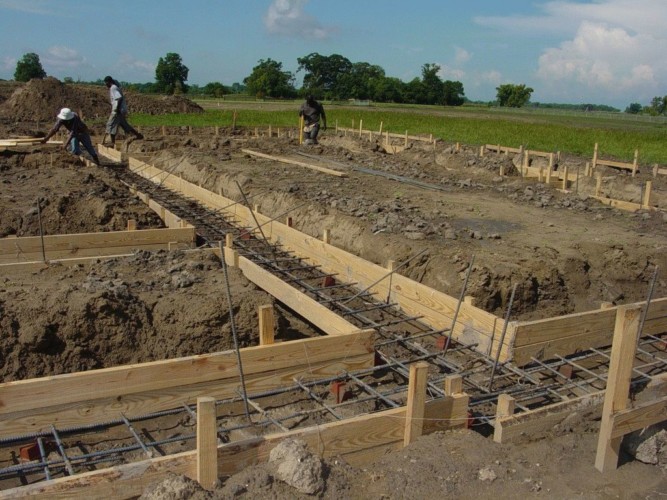
It should be noted right away that it is impossible to make a high-quality support base alone. Already at the marking stage, you will have to invite an assistant to check the quality of the work performed. But the main difficulties lie in the installation of formwork, reinforcement and concreting.
It is important to fill the foundation in one step, otherwise a seam will form, which can subsequently become a source of crack initiation
To perform all operations quickly and efficiently, you will need the following equipment:
- Trenching tool for digging trenches.
- Measuring devices for checking horizontal and vertical surfaces. It is desirable to have a plumb line and a construction laser level.
- Joiner's tools for the manufacture and installation of formwork: saw, ax, hammer, nail puller.
- Vibratory plate for soil compaction.
- Concrete mixer for solution preparation.
- Vibrator for compacting concrete mortar.
It should be noted that all equipment can be rented.
Tips & Tricks
- When preparing a solution on your own, you need to control the quality of water if it is taken from natural sources. The water should be free of small insects and vegetation.
- When concreting, it is necessary to carefully compact the concrete and pierce it with a pin, avoiding the formation of air bubbles.
- Pouring with concrete should be done along the "beacons", set strictly horizontally. To do this, you can use wooden blocks, metal corners of the desired size or pipes. All of these materials can be useful in further work, so they need to be removed from the concrete a few days after pouring. The remaining cavities in the surface of the foundation must be sealed with mortar.
- The distance from the frame of the house to the ground must be at least 50 centimeters.
- Waterproofing must be applied to the surface of the foundation. Under the first timber, it is necessary to lay a moisture protection in the form of a double layer of roofing material.
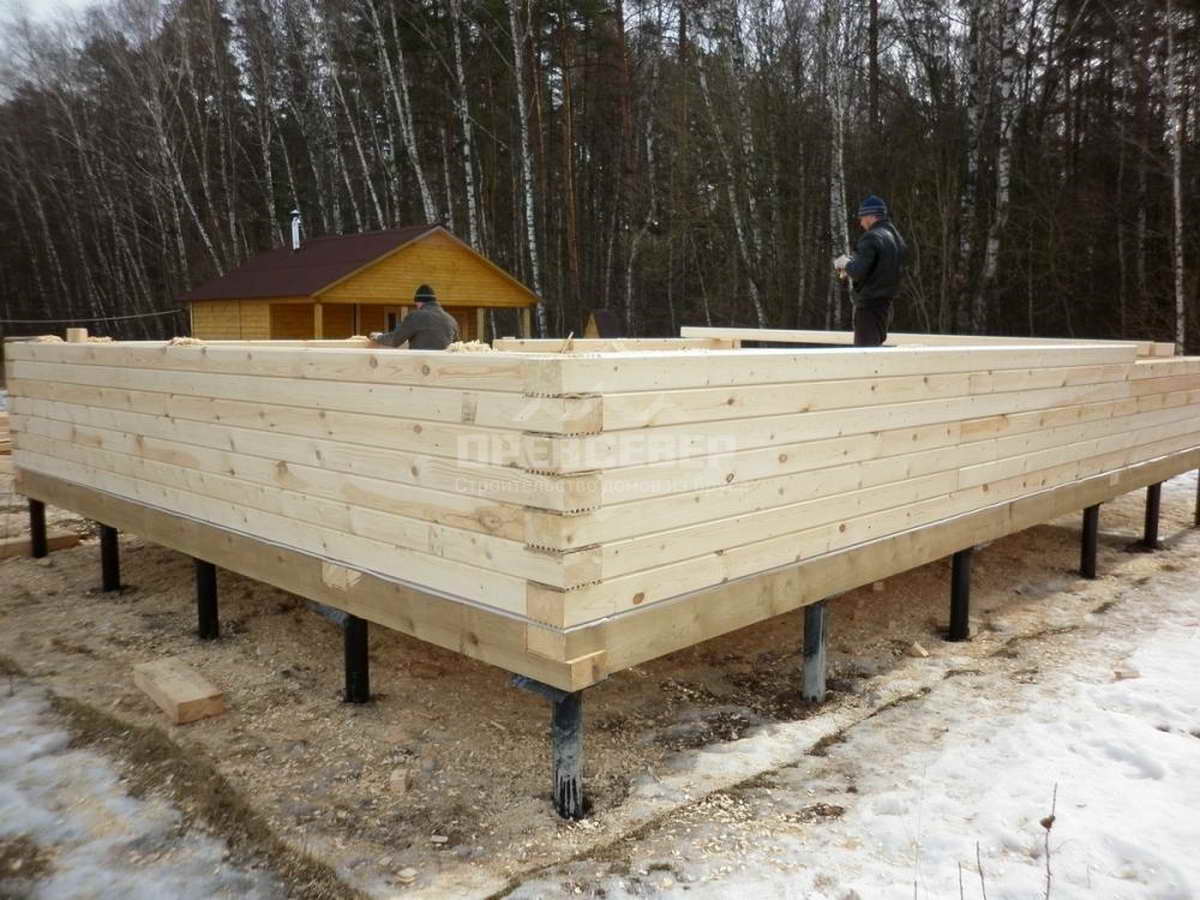
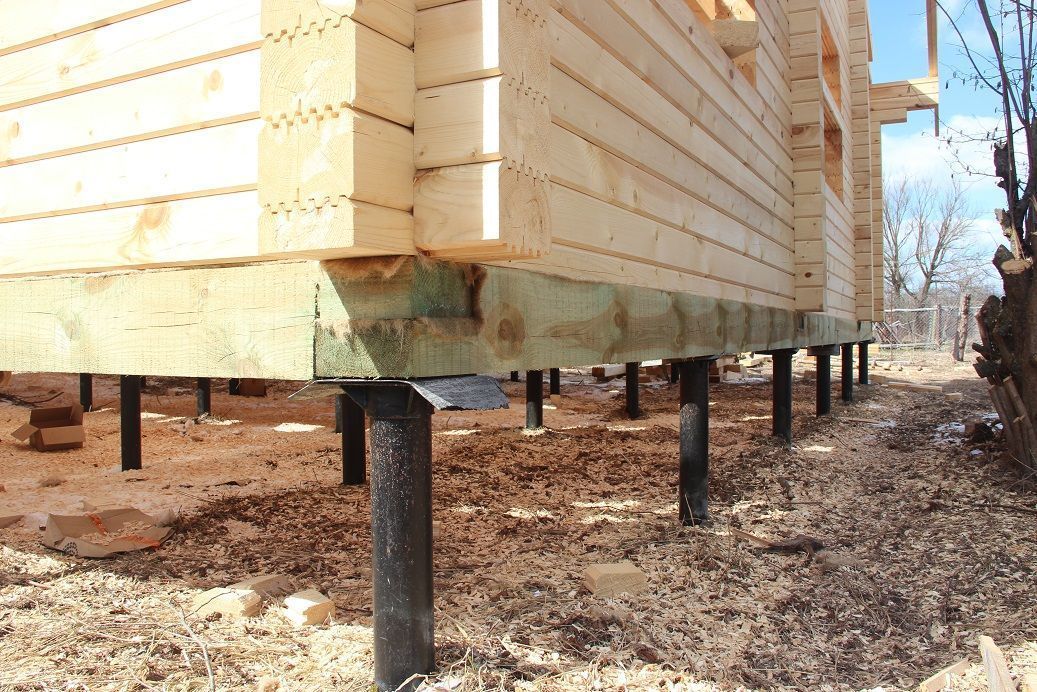
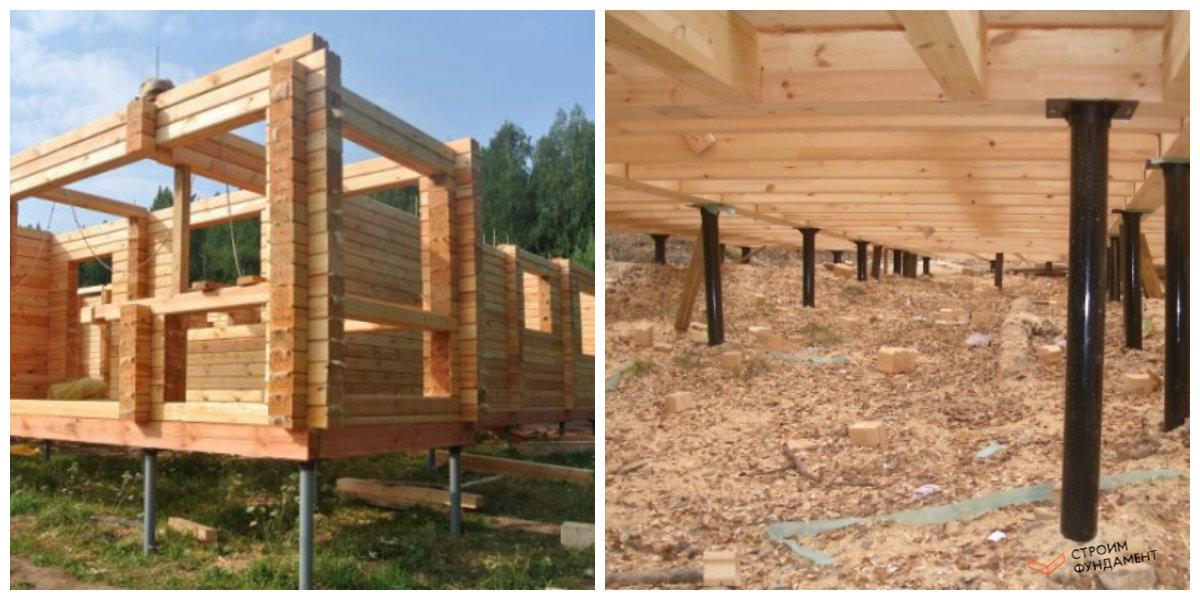
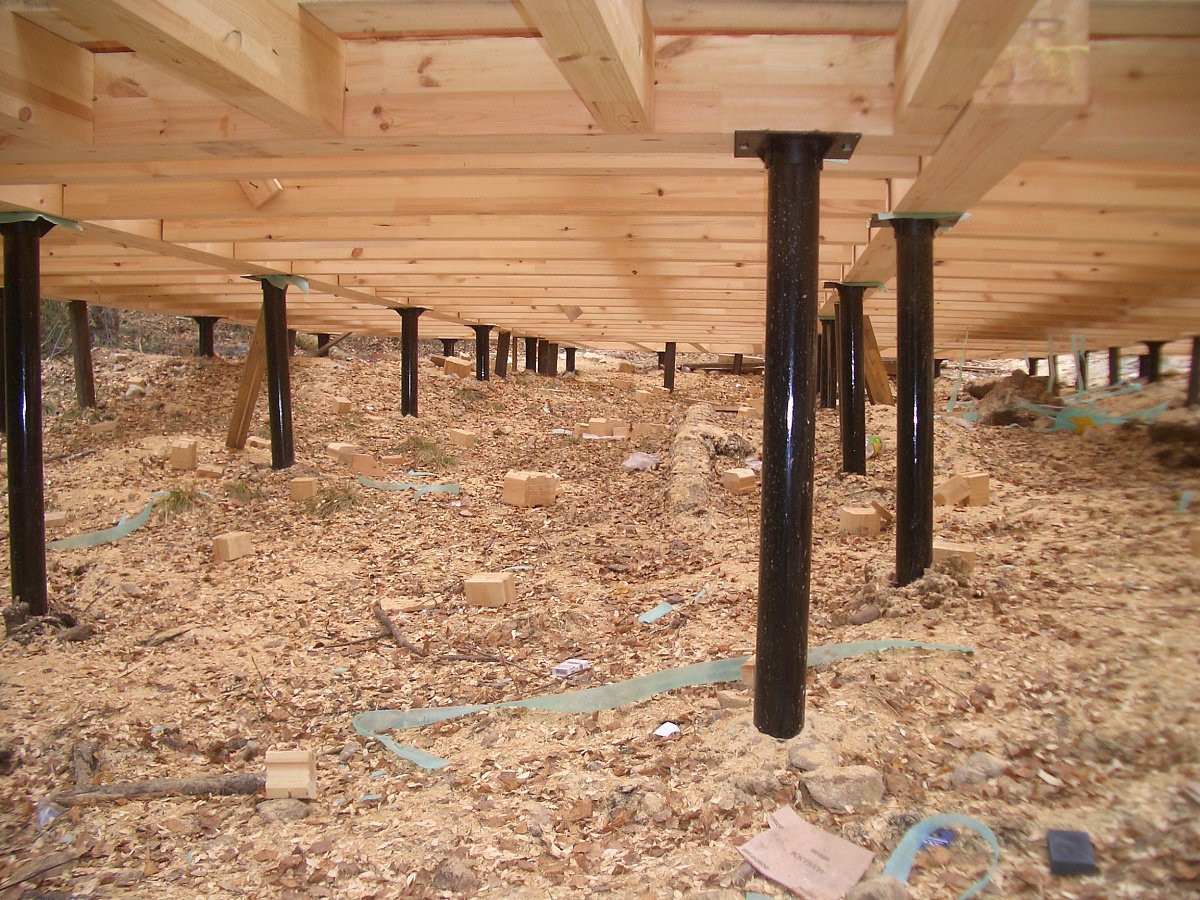
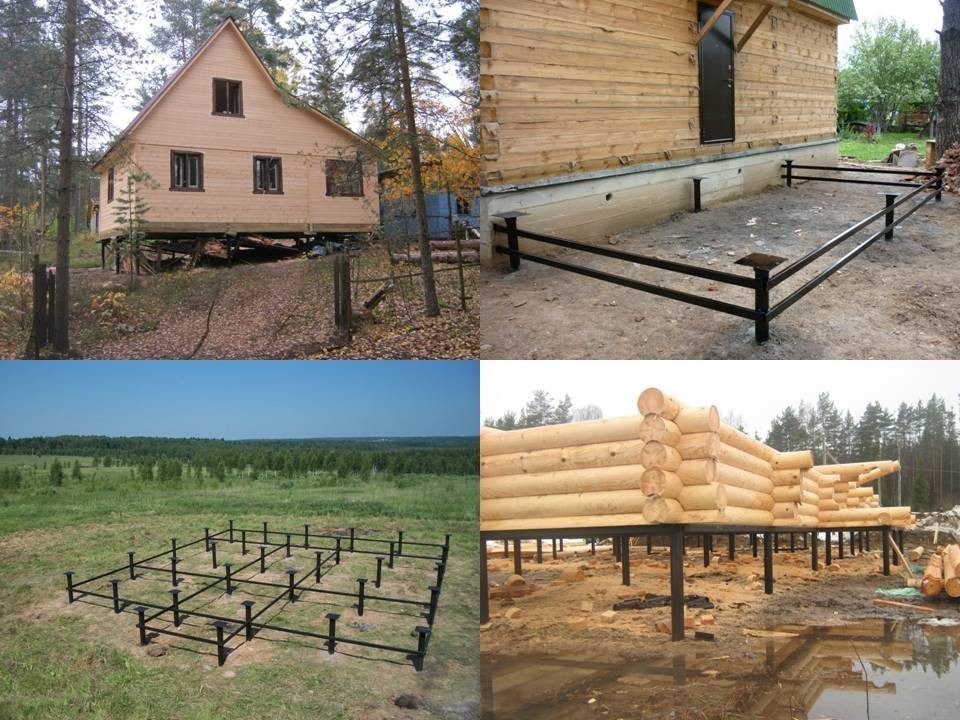
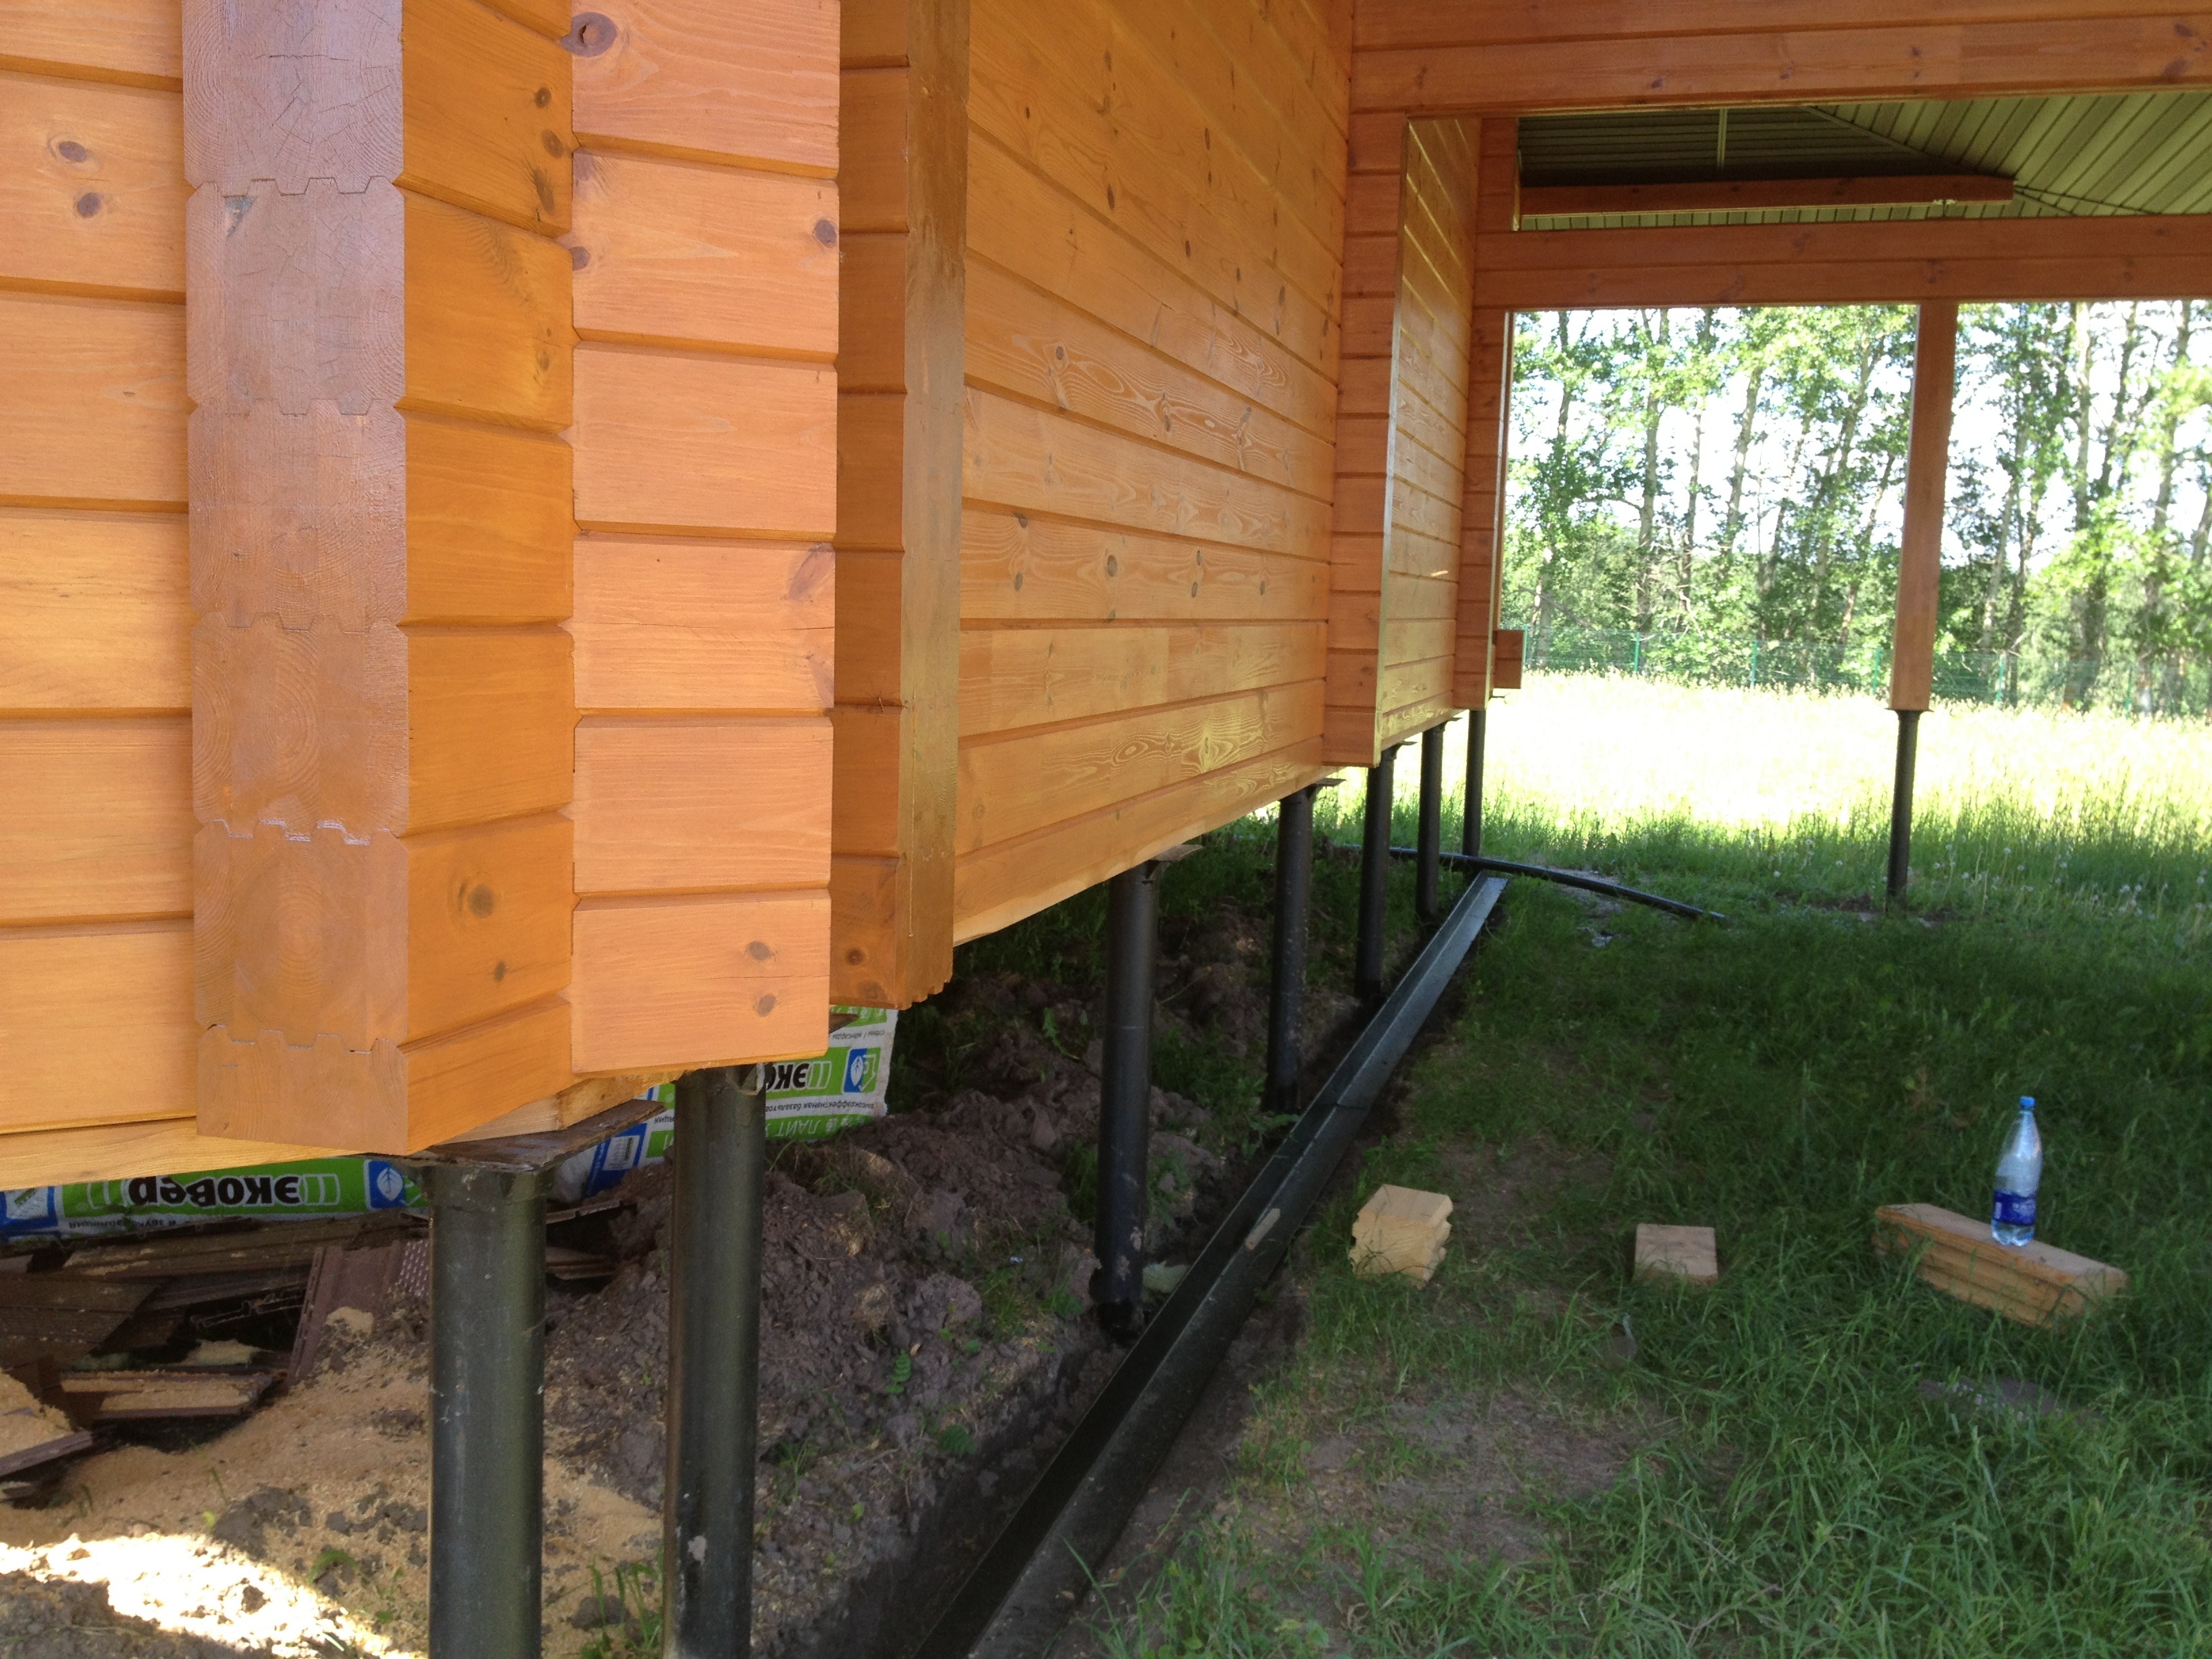
Houses on screw piles
 A home screw pile is a hollow pipe with a pointed tip and screw blades.
Before starting the construction of a house on screw piles, it is necessary to develop a project that takes into account all the features of this type of foundation.
When choosing a support, it is necessary to study the relationship between the type of soil and the bearing load of the pile, depending on its diameter and length.
The data are shown in the table.
| Soil type | With a diameter of 76 mm | With a diameter of 89 mm | With a diameter of 108 mm | With a diameter of 133 mm |
|---|---|---|---|---|
| Clay | 3.5 m | 2.5 m | 2.5 m | 2.5 m |
| Loam | 3m | 2.5 m | 2.5 m | 2.5 m |
| Peat | Determined by trial drilling | Determined by trial drilling | Determined by trial drilling | Determined by trial drilling |
| Sand | 3m | 2.5 m | 2.5 m | 2.5 m |
When building a house on screw piles, it is necessary to correctly calculate the number and diameter of the supports, depending on the area and weight of the building.
| Base dimensions, m | Number of supports, pcs | Support diameter, mm |
|---|---|---|
| 10 x 10 | 25 | 89 |
| 9 x 9 | 16 | 89 |
| 8 x 8 | 16 | 89 |
| 7 x 7 | 16 | 108 |
| 6 x 6 | 9 | 108 |
| 5 x 5 | 9 | 108 |
| 4 x 4 | 9 | 108 |
| 3 x 3 | 4 | 108 |
Preparatory work
Consider how to build a house on stilts with your own hands. Screw piles for building houses can be used on any soil except rocky and rocky. The parameters of the supports depend on the design of the house and the bearing load. To determine the location of the piles, it is necessary to sketch a drawing according to the design of the house.
The building plan is divided into rectangles, after which their size is calculated. There should be a support at each corner of the rectangle and in the middle of each load-bearing wall. Then the distance is divided into equal intervals, at which the installation of piles is also provided.
Site marking
According to the drawing of the location of the piles, the marking of the construction site is carried out. We mark the locations of the supports with pegs, between which we stretch the rope along the perimeter and diagonal. We check that even rectangles are formed, the perimeter of which is located strictly along the line.
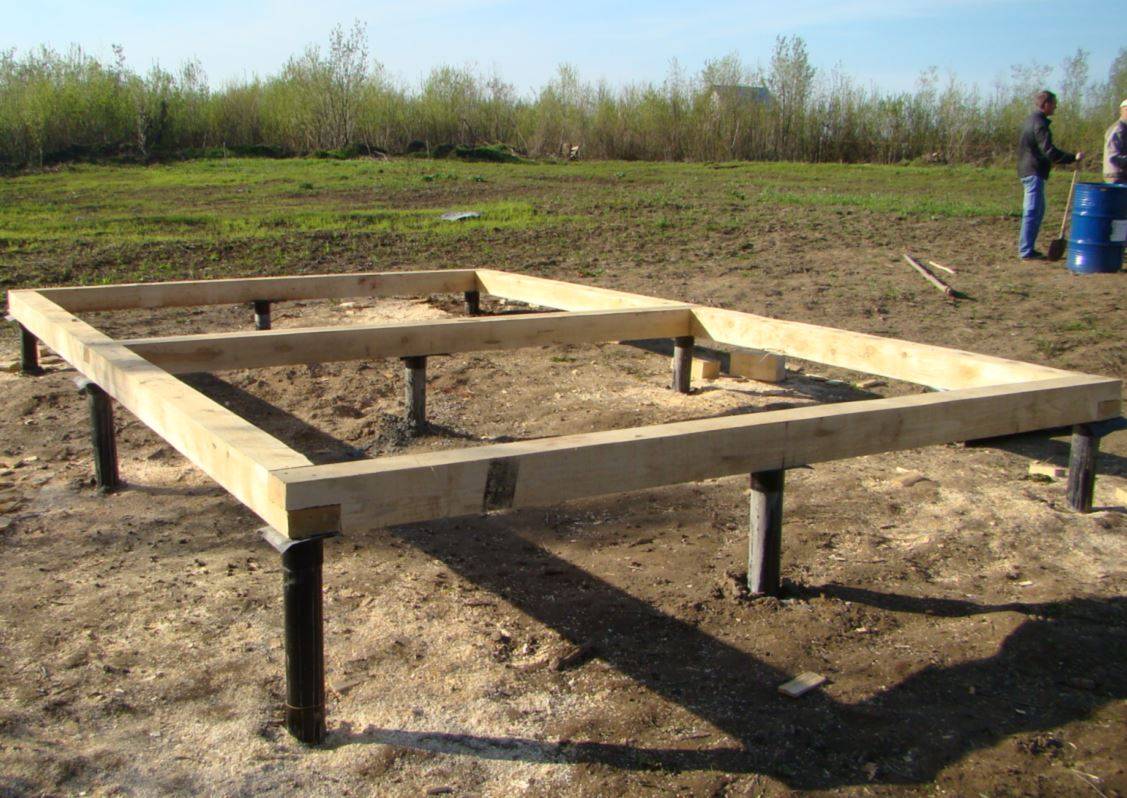
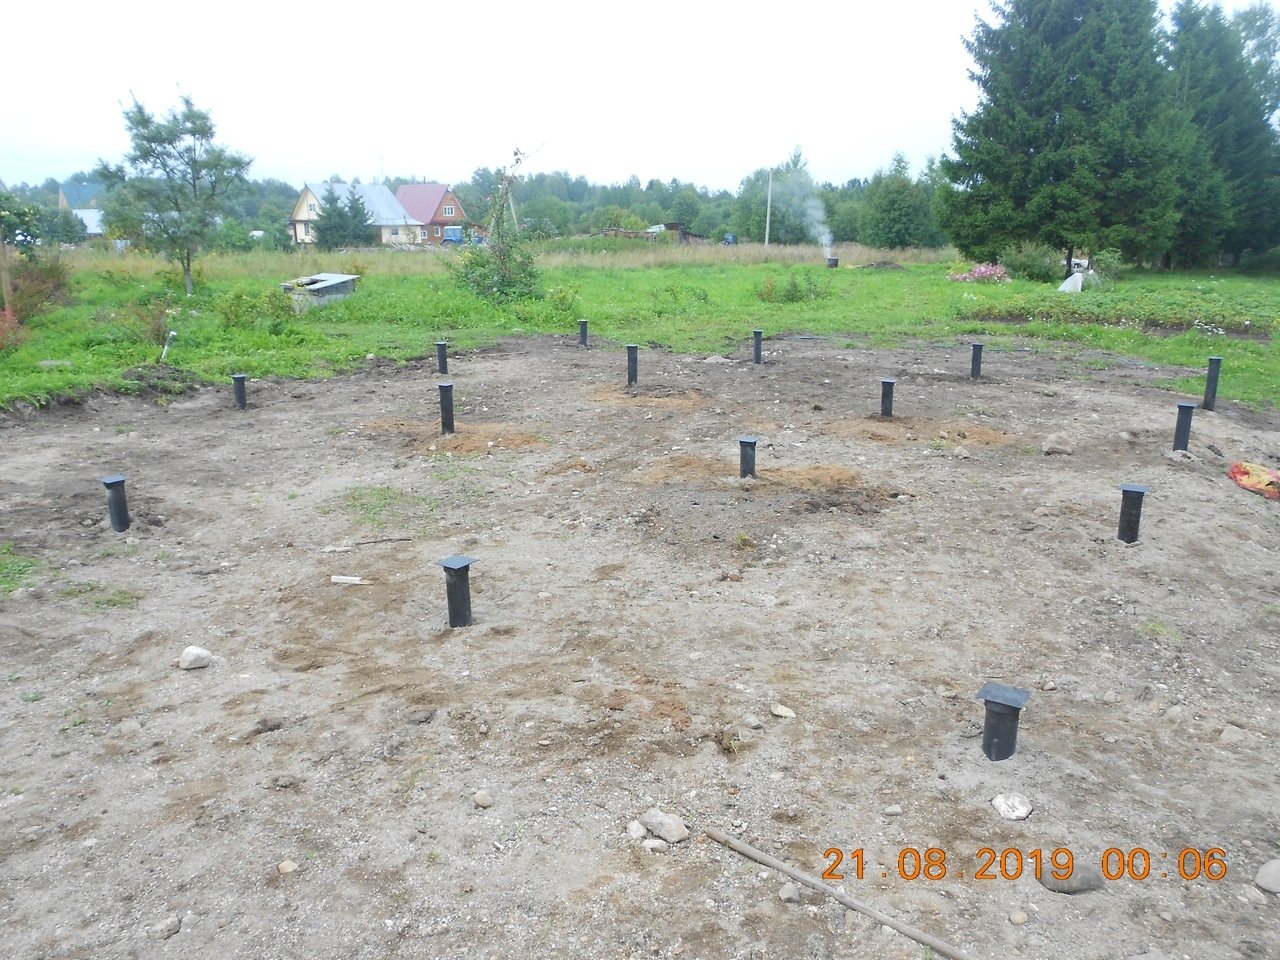
DIY pile installation
 The support must enter the soil strictly at the level
For the foundation of houses on screw piles, you need to invite several assistants. Three people are enough to complete the full cycle of work.
Stages:
- At the location of each support, a hole with a depth of 500-700 mm is drilled with a hand or power drill.
- A lever is inserted into the hole at the upper end of the pile to rotate. When screwing in the support after several turns, it is checked that it enters strictly according to the level. If the supports are installed at an angle, their bearing capacity will be significantly reduced.
- The upper ends of the piles are cut so that they are in the same horizontal plane.
- For greater reliability, durability and corrosion protection, the hollow supports are filled with cement mortar.
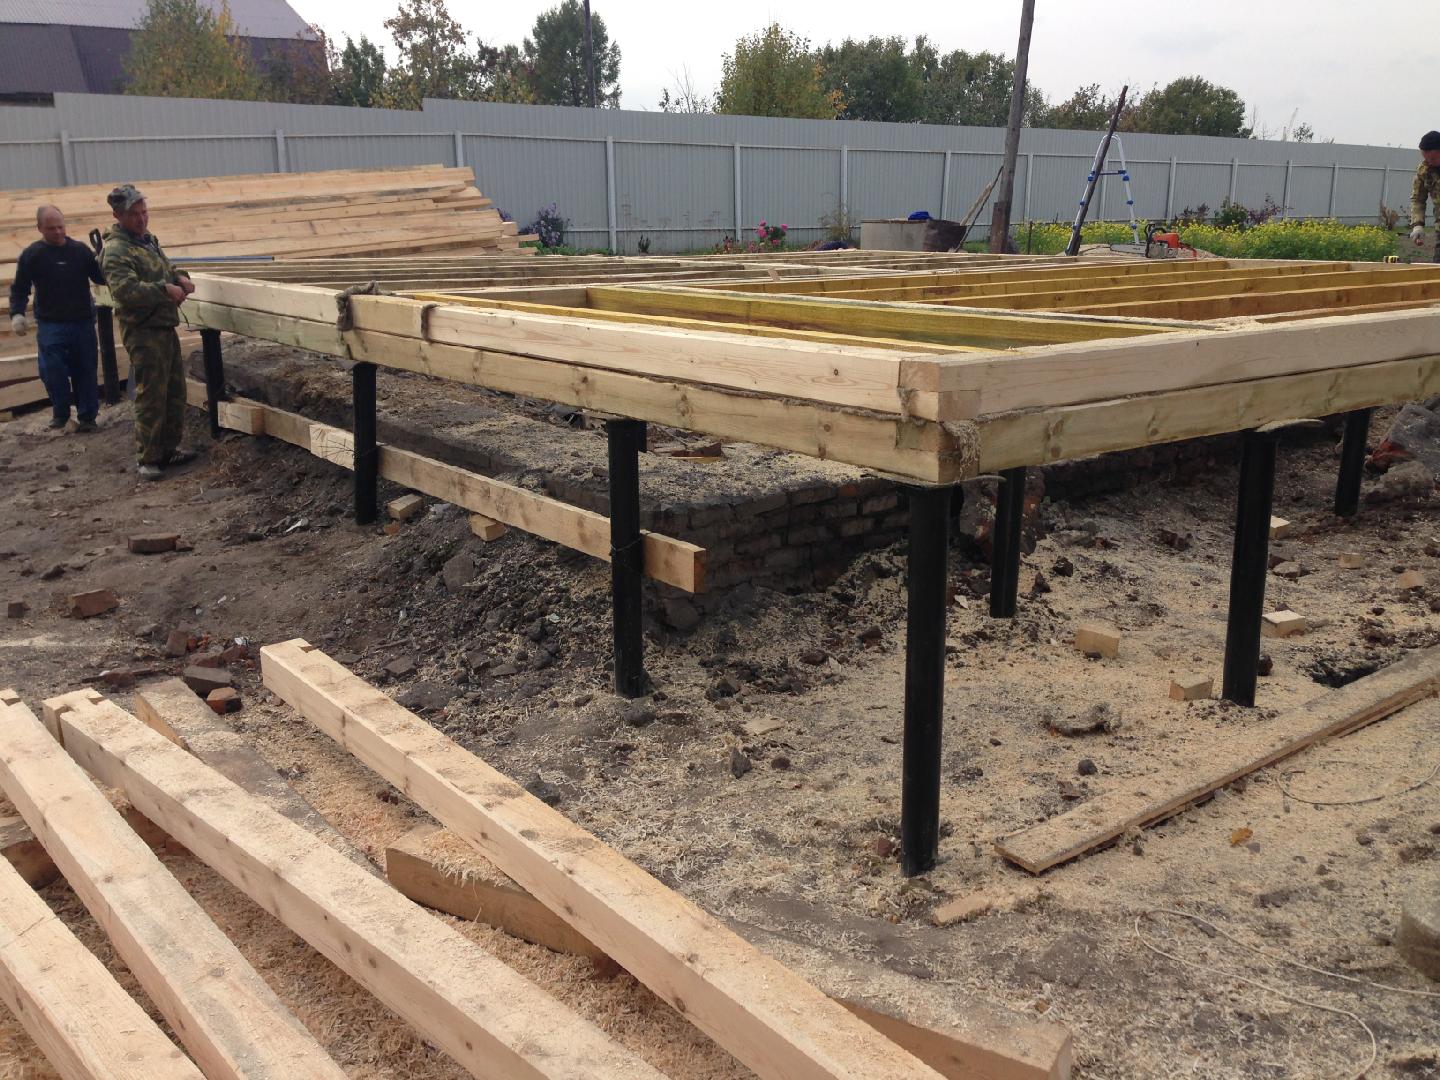
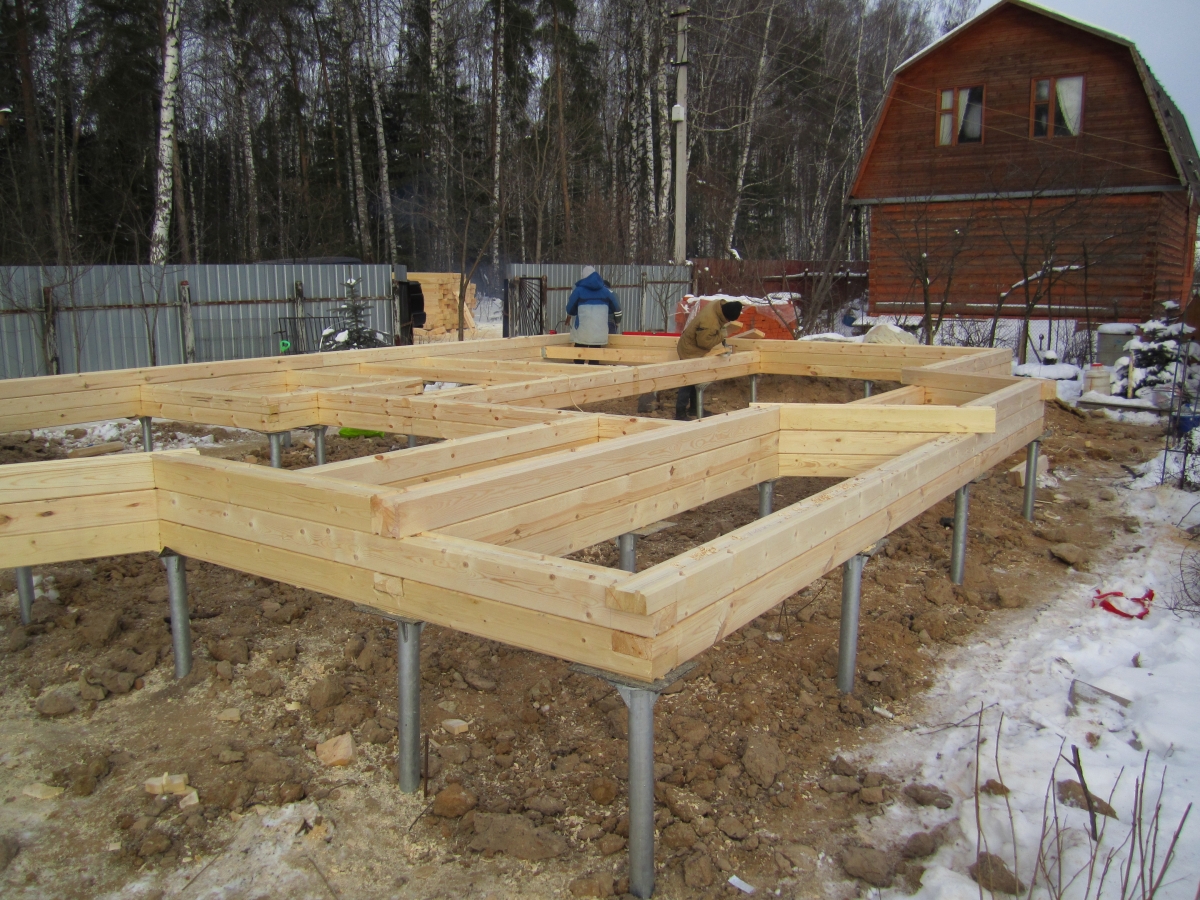
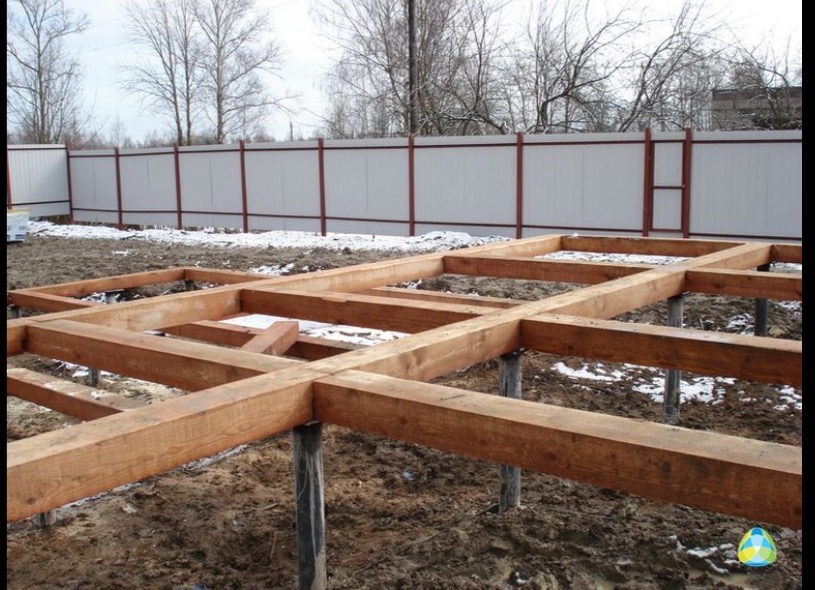
The last stage is the installation of the grillage, which serves to evenly distribute the load from the building.
Installation of piping
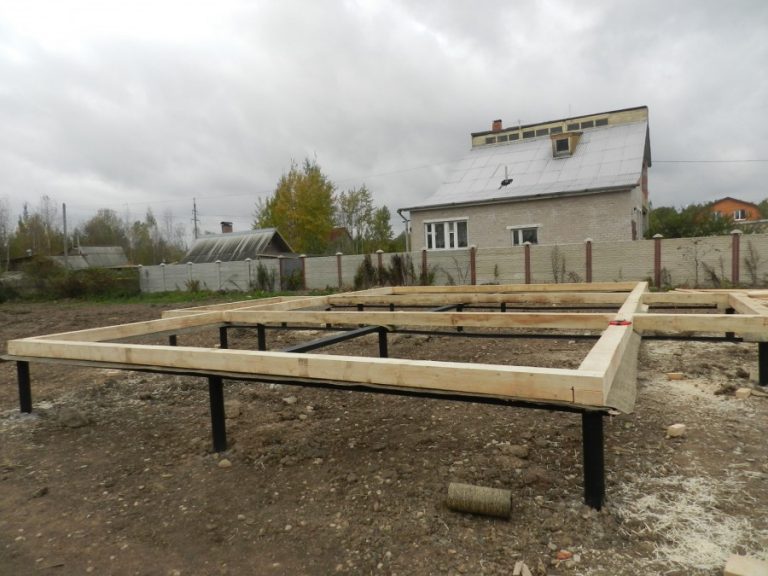
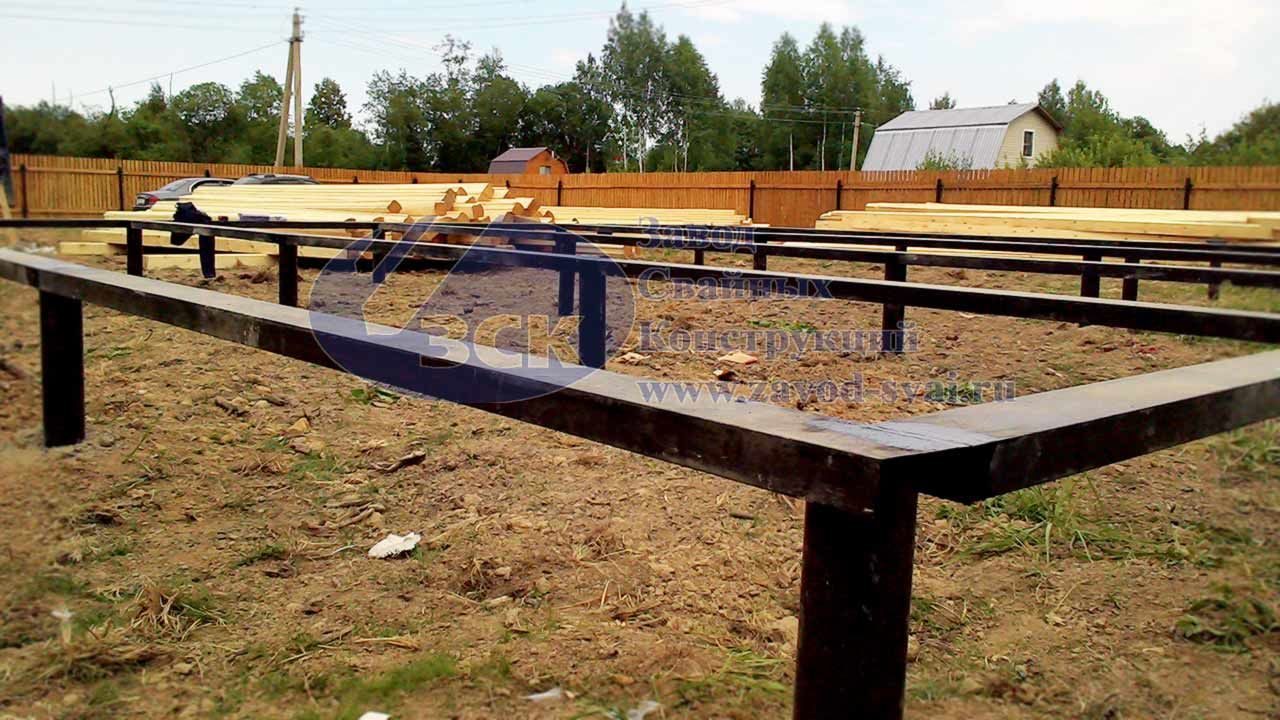
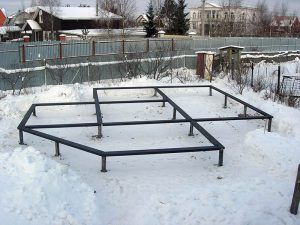 Popular strapping made of thick timber or metal
The type of grillage is chosen depending on the material that will be used in the construction of the walls. Before installing the piping, it is better to carry out communications so that the jumpers do not interfere with their installation.


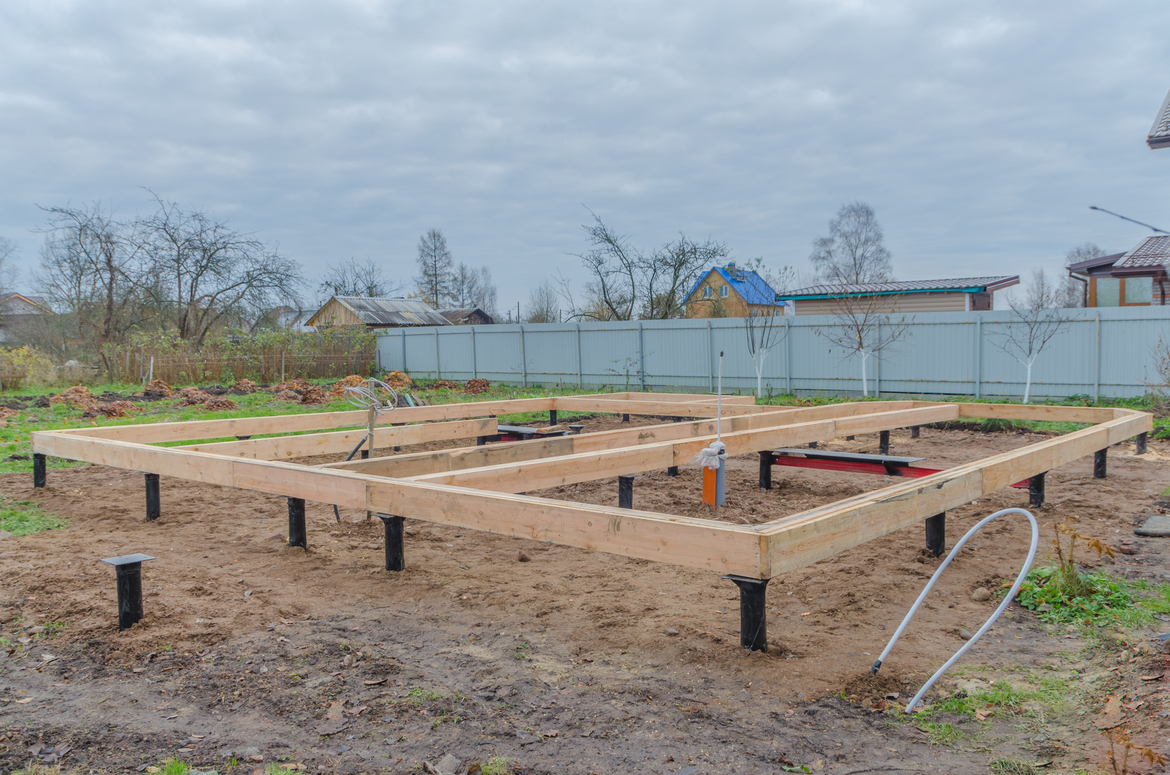

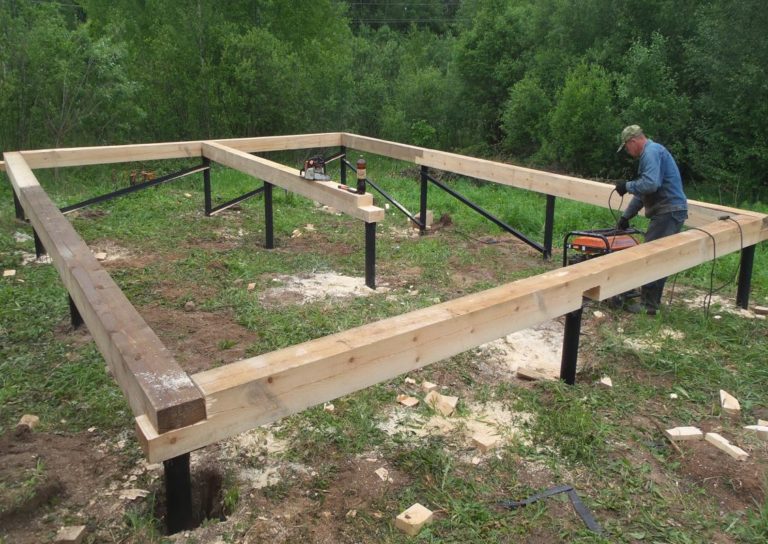
For a wooden house, it will be enough to install a strapping from a thick bar. A flat metal head in the shape of a square is welded to the head of the pile, to which the timber will be attached. Then a waterproofing layer is laid and the beam is attached. Wooden elements are interconnected by the cutting method and strengthened with nails. The locations of the joints should be above the pile.
For a house with an attic, reinforced heads with stiffening ribs are installed.
For the construction of a one-story house made of brick or foam concrete, a metal grillage is used. The I-beam is mounted to the head of the pile with its lower part, the channel is placed on the support with its lateral ribs down.
When building a house on stilts, it is imperative to adhere to the installation rules. Taking into account the strict observance of the norms and the use of high-quality materials, a residential building will stand for more than 70 years. If necessary, one or more supports can be replaced with new ones without changing the entire structure.
Pile foundation from bored piles
This type of foundation is a structure of monolithic reinforced concrete piles, which is made directly on the site. It is necessary to start the construction of this type of foundation in the same way as the previous type, that is, with preparatory work.
Pile making
In fact, the manufacture of this type of pile is no different from the manufacture of a columnar foundation, but the main difference is still the greater depth of the pile.
First of all, after marking the territory, it is necessary to make wells; for this, a hand drill is used to make wells of the required depth. After that, the walls of the well, as a rule, need to be waterproofed, for this I take roofing material or any similar material, twist it into a pipe and insert it to the entire depth of the well. In addition, asbestos pipes can be used instead of roofing material.
Reinforcement is inserted inside the pipe or twisted roofing material, which is tied into the frame. It is made from several reinforcement rods with a diameter of about 12-14 mm. The fittings can be connected together with special clamps or with fittings of a smaller diameter. In the presence of a reinforced concrete grillage, it is necessary to ensure that the pile reinforcement protrudes to a level of 15-25 cm.If the wooden beam is attached directly to the piles, then the reinforcement should not protrude, but, on the contrary, should be recessed into the concrete by a few centimeters (5 -7).
The final stage is the pouring of the concrete solution and its compaction. To do this, use a special construction vibrator, or a long armature. When the concrete is completely poured, it needs to be allowed time to dry (about 1-2 weeks), after which you can start strapping it.
Pile binding
The bored pile is strapped in exactly the same way as the screw, however, the basement strapping of the log house is performed directly on the bored piles. To do this, in the process of pouring the piles, you need to take care of installing the embedded pins, with the help of which the strapping will be carried out.
In conclusion, it should be noted that it is quite easy to make a pile foundation for a wooden house from a bar. However, it is recommended to adhere to the rules for its manufacture and control the verticality of the piles.