Partial and complete formwork
Arrangement of the formwork of the bored base of the structure
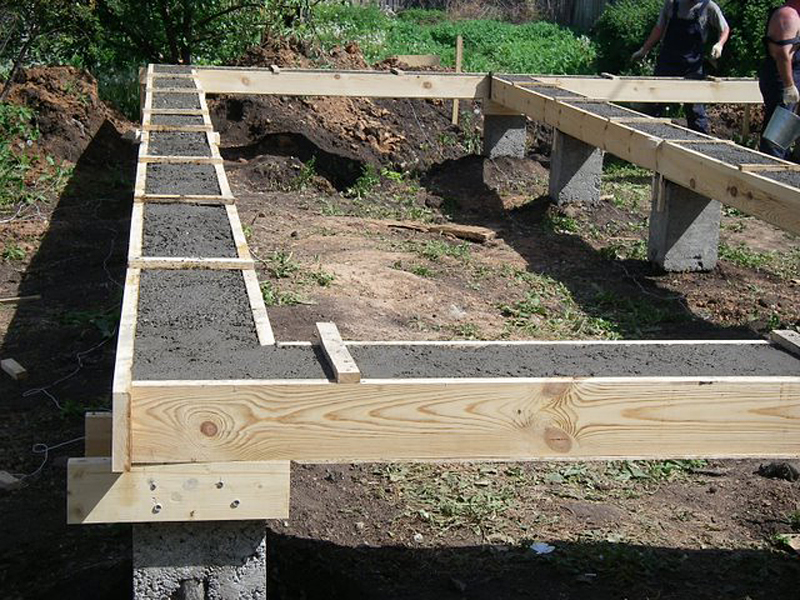
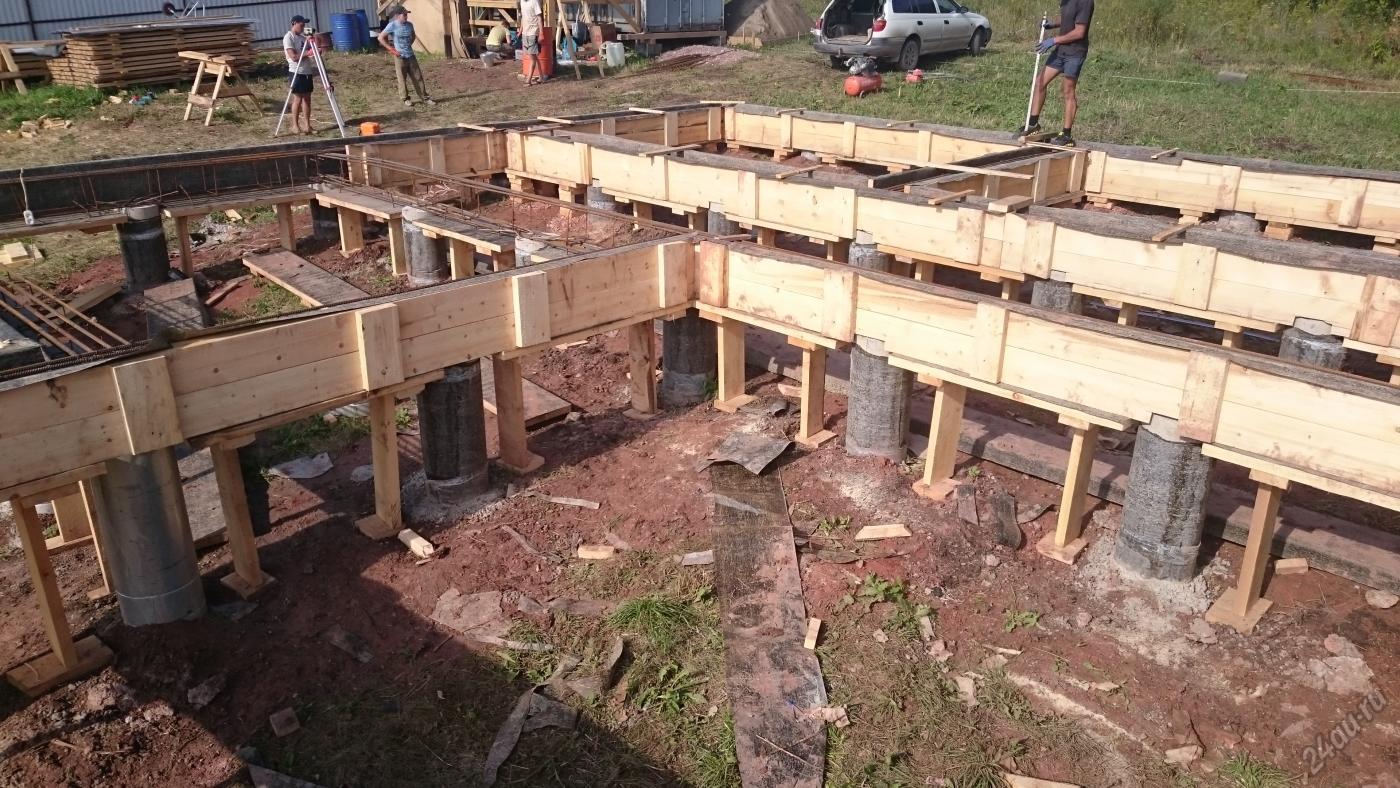
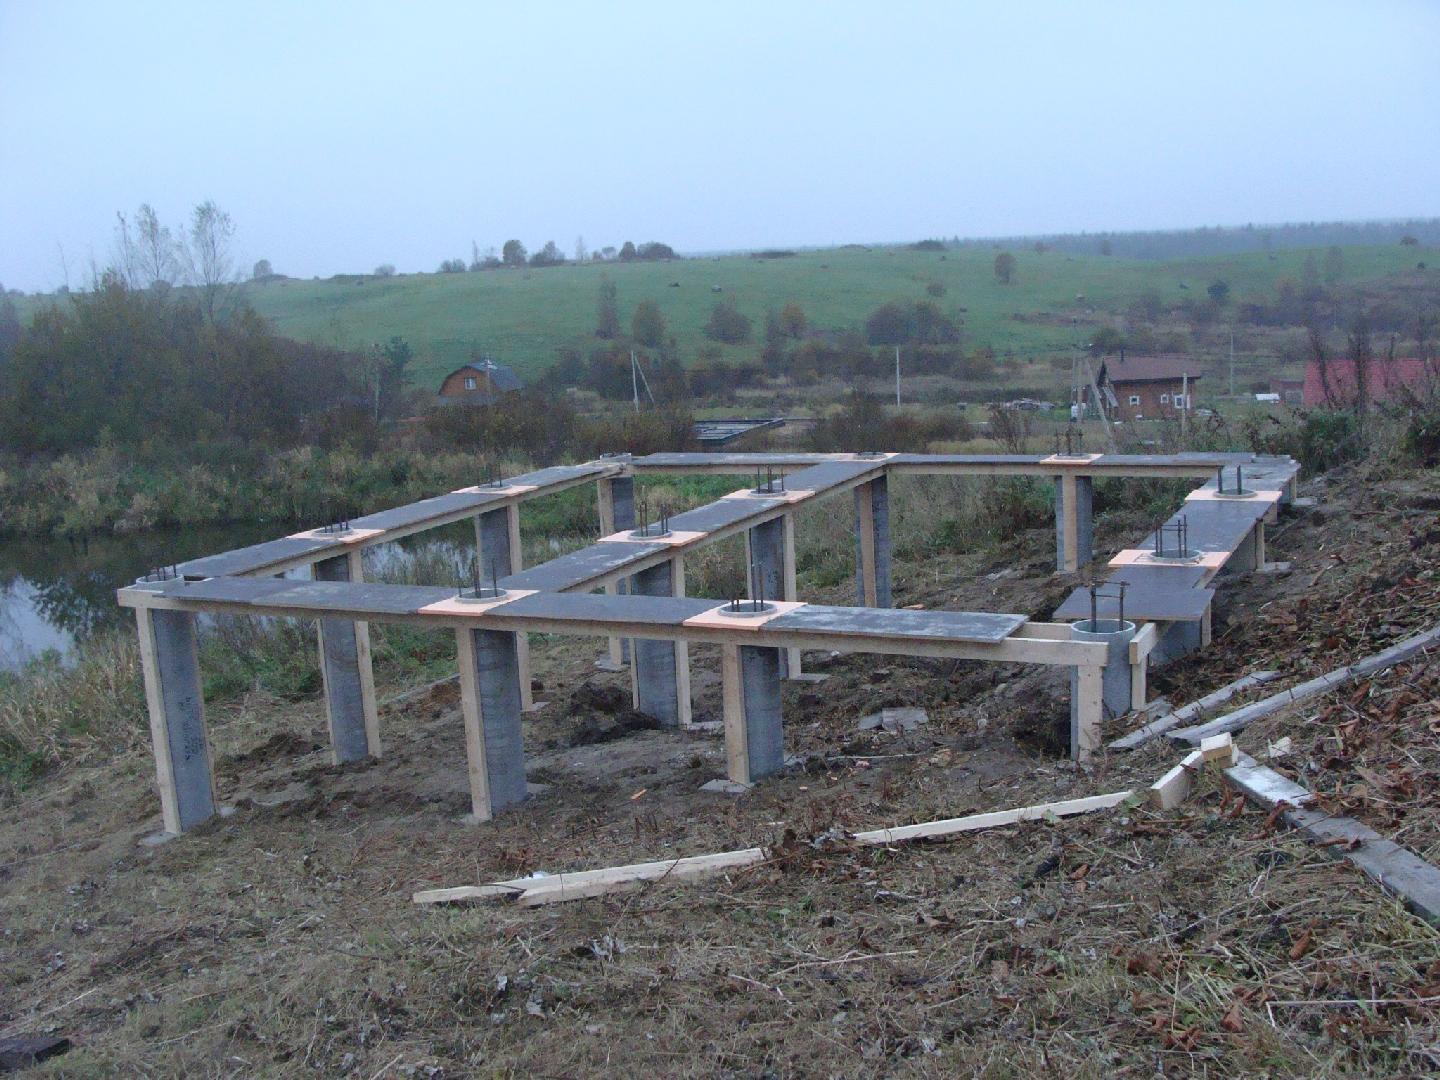
Next, the formwork is installed in the drilled well. But, its function can be performed by the soil itself, if it is dense enough and does not sprinkle. Then only the upper part of the formwork is exposed to make the pile heads.
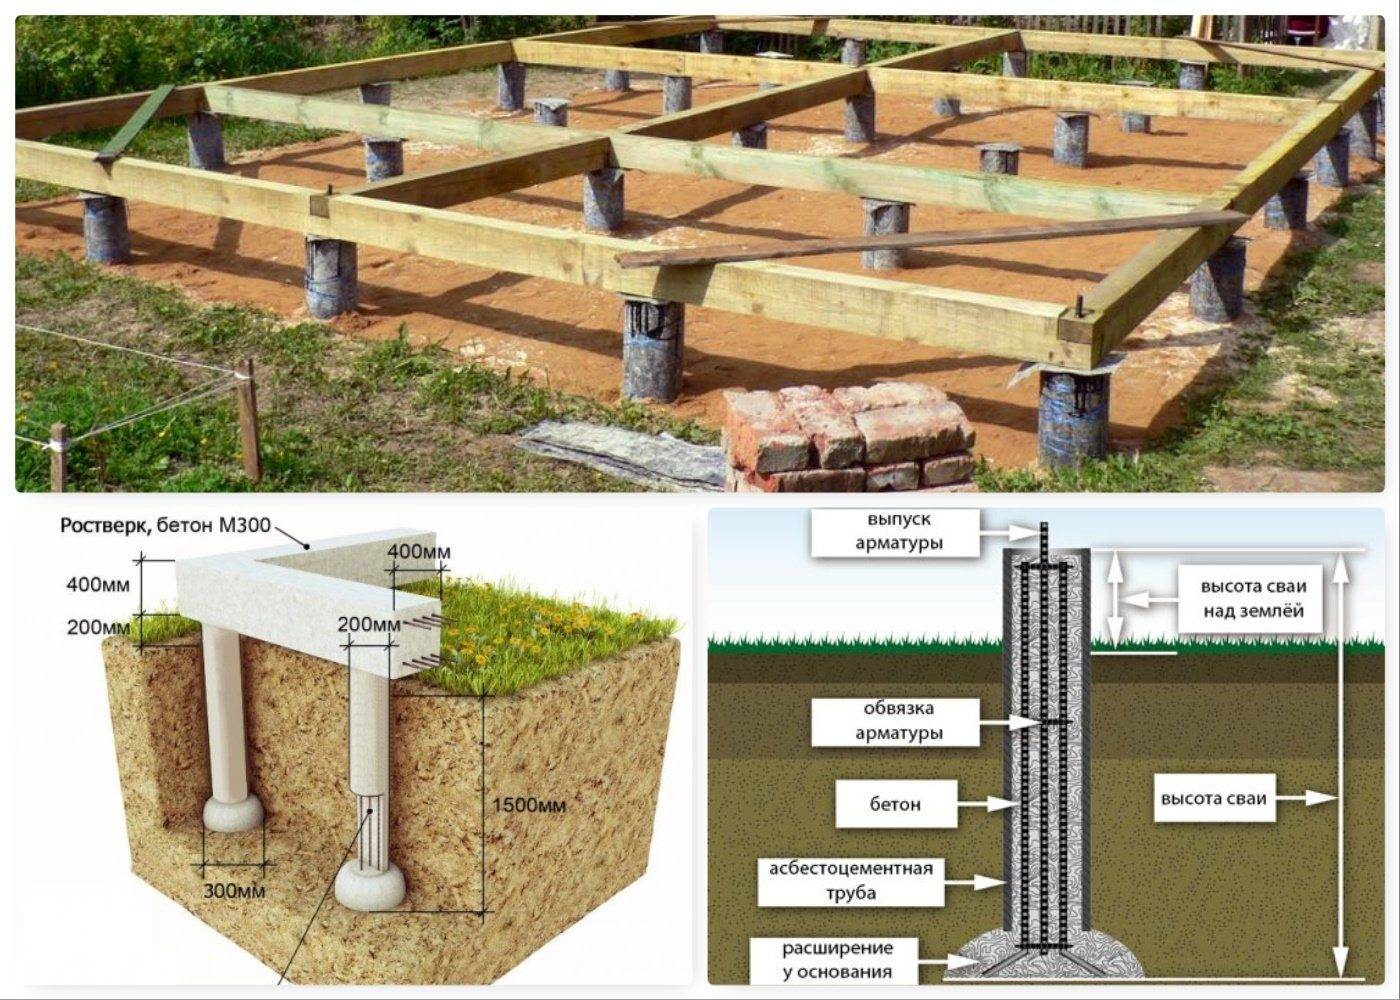
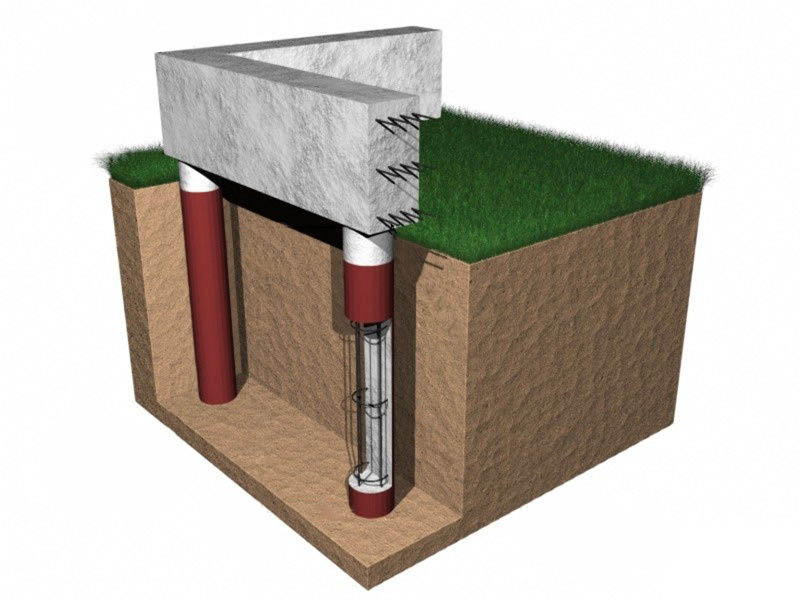
So, the formwork can be the soil itself, drilled with a tip of 200-250 mm by 90 and up to 150 mm in depth, taking into account the state of the soil. If, due to the peculiarities of the soil, it has to be dug out, then metal or asbestos-cement pipes of the corresponding section can be taken as formwork. When arranging a bored base with your own hands, you can roll up roofing material, turning it into a kind of pipe.
Experts call this cover a "shirt", which they advise to do to the entire depth of the pile. The reasoning behind this action is as follows. The raised ground "slides over the installed protection or raises it, leaving the base itself motionless." In addition, the "shirt" does not allow the laitance to flow into the ground, therefore, the strength characteristics of the concrete are not reduced.
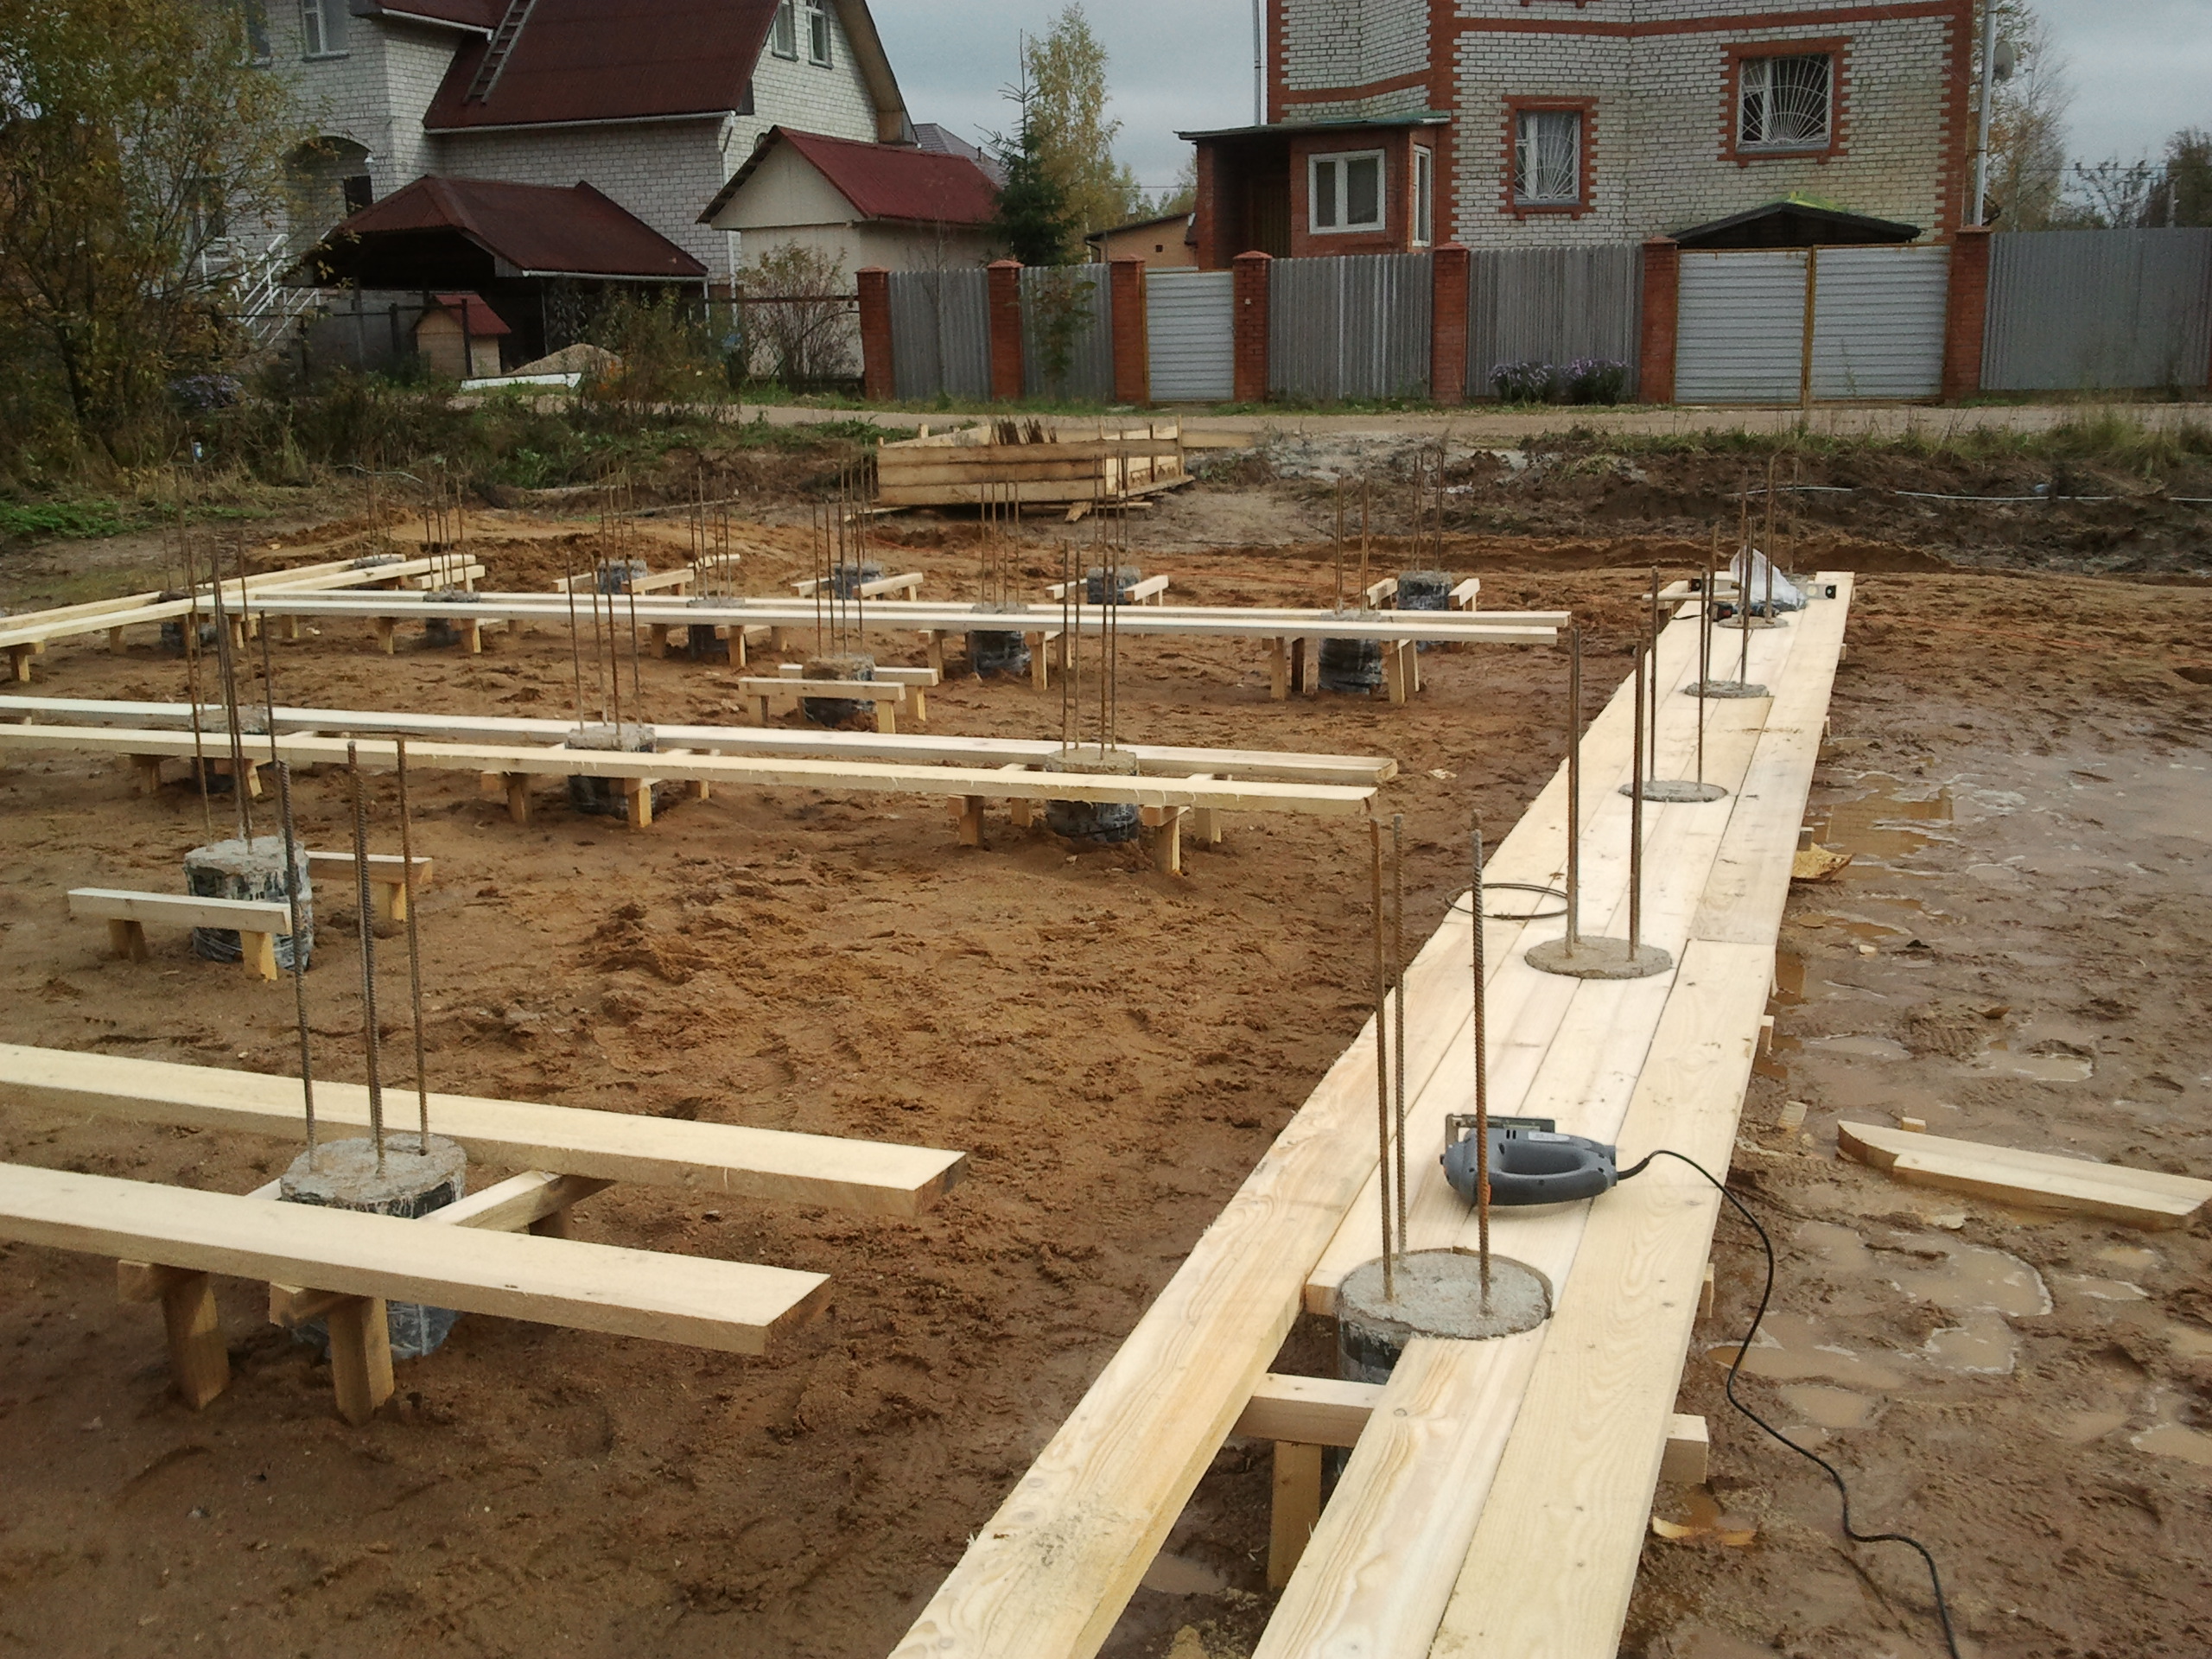
When constructing the frame, it is necessary to take measures that will not allow it to shift and contact the reinforcement with the soil. To do this, you can install temporary wooden supports or wedges with your own hands. They can be deleted as filling wells.
Before placing concrete, it is required to calculate the mark of the lower edge of the strip foundation, or, in other words, the grillage. This will require the use of a level or construction hydraulic level.
Self-production of piles
When creating piles with your own hands, earthwork is performed using an earth drill. If necessary, drill holes over 0.3 m in diameter and 5 m in depth, use a motorized apparatus.
You can make piles yourself in the following sequence:
- Construct "glasses" from roofing material, the width of which will be equal to the diameter of the wells. They are made 25 cm longer than the immersion depth of the supports. Several layers are made from above and tightened with wire. The result is a formwork. The pipe will be installed in it.
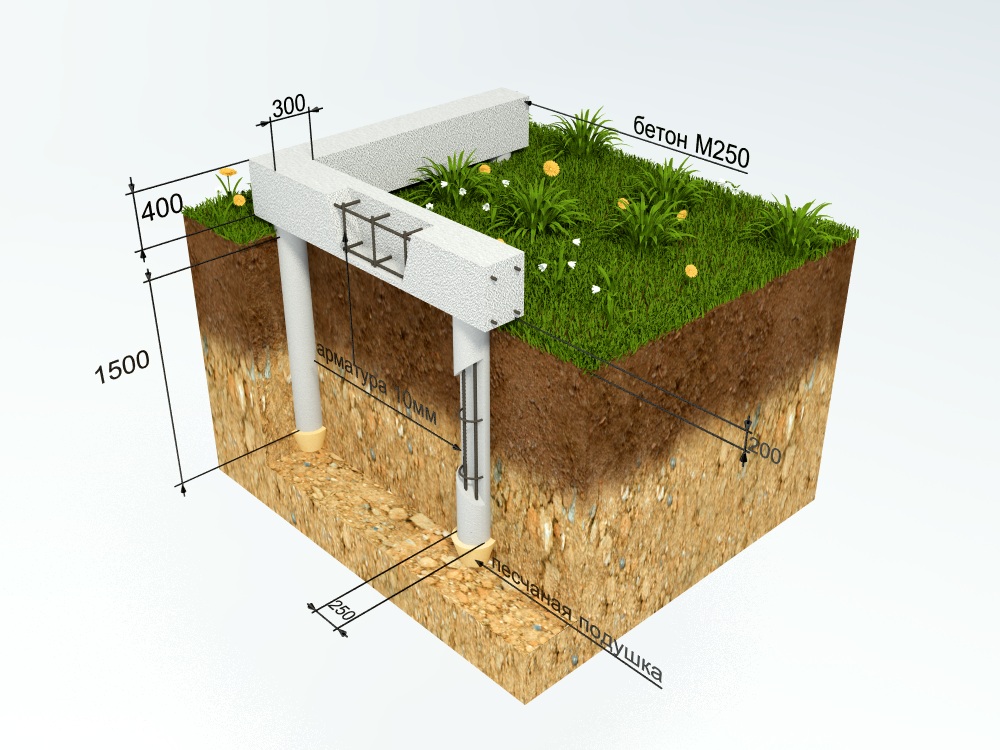
- After installing the pipe, a reinforced frame is made. It is placed inside the support. Three rods with a diameter of 8 mm are enough. They are connected to each other with jumpers. The vertical rods should be extended 4 cm above the edge of the grillage.
- Concrete is poured into the pipes, compacting it with a vibrator.
- Equip the grillage.
When creating a feed, several recommendations are taken into account. For example, the grillage should not be crossed by pipelines. Piles are installed strictly vertically. The permissible deviation is 5 cm. Each seam and joint, which was formed during the creation of the grillage, is filled with concrete.
The grillage must be reinforced. For this, rods with a diameter of 1.4 cm are used. They must have a length equal to the length of the walls. In the absence of such rolled metal, rods of at least 60 cm are chosen.Their number is determined by diameter:
- 1 cm - 8 rods are required;
- 1.2 cm - 6;
- 1.4 cm - 5.
Before installing the walls, make sure that the grillage surface is horizontal. Flaws are corrected with concrete mortar.
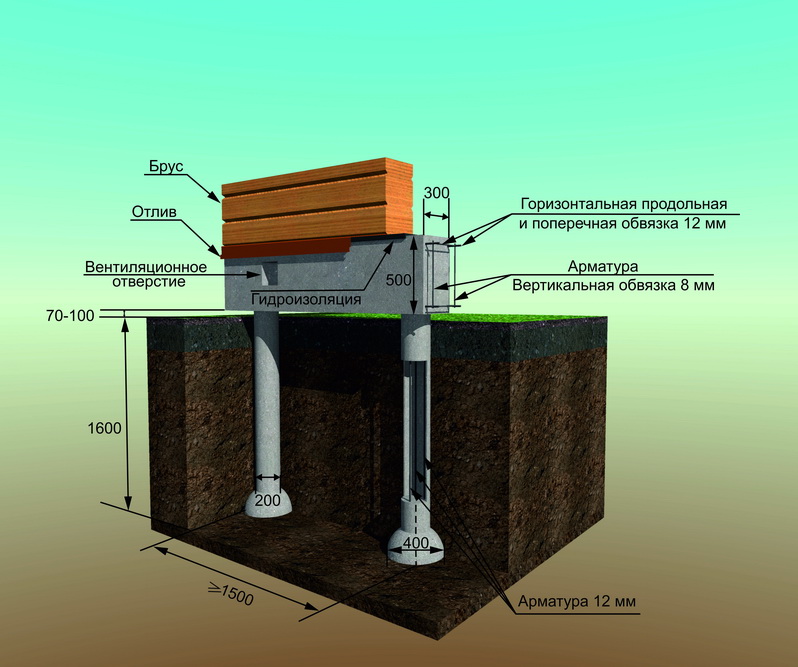
After the completion of the construction of the foundation on piles with a grillage, the basement is finished. The upper edge of the finishing elements is attached to the lower part of the building wall. From above, the edge is closed with an ebb. From below, the finish does not reach the ground surface by a few centimeters.This avoids deformation of the base during frost heaving.
Important! Drainage should be provided to drain sediment. Equip and a blind area 70 cm wide
It is better to lay it with paving slabs.
If you follow all the recommendations and correctly calculate the grillage, you can create a reliable foundation with your own hands. It will not be affected by frost heaving or shrinkage forces.
Construction of a pile-grillage foundation
- Determination of the type of soil and its structure. Here it is desirable to obtain a geodetic section of the soil with detailed data for each layer of soil. After all, piles are often driven to a depth of two meters;
- Preparation of a pit or trench. It is desirable to do it on flat surfaces, on slopes it does not give any efficiency. The optimal solution is to prepare small depressions in which a sand cushion is made;
- Formwork installation. It can or may not be done. If a private owner is ready to make a foundation with a fixed formwork with his own hands, then such a foundation will have excellent waterproofing characteristics;
- Now you can carry out the process of deepening the finished piles or pour the reinforcement with a concrete mixture. The holes for the piles are drilled with special equipment, then the outer contours are closed with roofing material. Inside the wells, asbestos pipes are installed, which are additionally reinforced to increase the strength of the supporting structure. After the complete installation of the piles, the procedure of pouring the piles with concrete and creating an intermediate backfill begins;
- After the piles gain the specified strength, the frame is reinforced along the entire horizontal perimeter. Reinforcement must be filled with concrete.
Calculation of piles and grillage
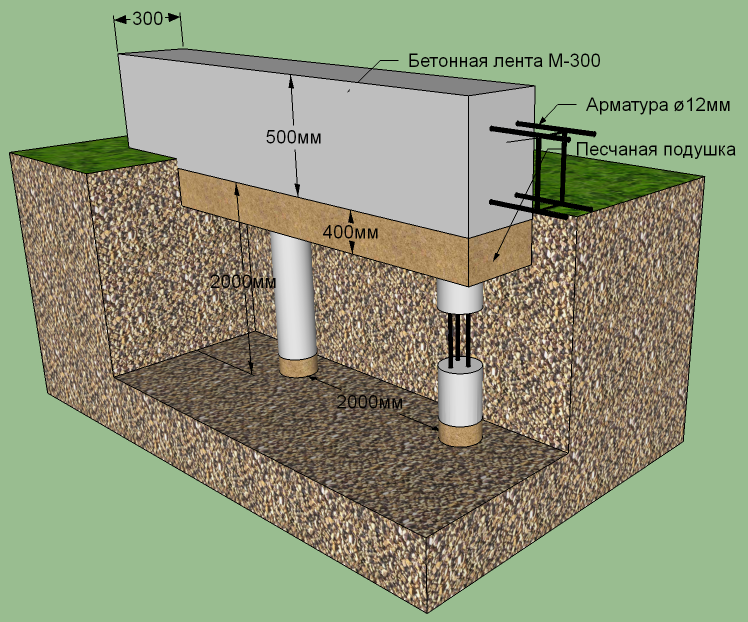
What will be the distance between the piles, the indicator of their bearing capacity and the installation depth, depends on preliminary calculations. If you correctly determine the number of supports and the way they are located, you can make the foundation strong and durable. Traditionally, a gap of 1-1.5 m is left between the piles. The immersion depth of the supports is 1.5-2 m.
Pay special attention to the calculation of the grillage. It is he who determines the reliability of the foundation.
Usually, the height of this element does not exceed 25 cm. The width is determined by the width of the basement or the thickness of the outer wall. The minimum value is 40 cm.
Separately, the calculation of the tape for bending should be performed. It is produced along the edges of the support in sections, the outer edges of the armrest. For this, the formula is used:
The total bending moment is calculated for all sections. In this case, the moments from the reactions of the piles and local loads on the overhang of the grillage are taken into account.
The calculation of the foundation on the piles should be entrusted to an experienced civil engineer. You can't do it yourself. Only after receiving the necessary data, you can proceed with the installation.
Design and calculation
An important point before laying the foundation is its accurate calculation. For this, a project and a plan of the future building are created. Then a drawing of the base is drawn, and the scheme of pile tabs must be indicated, taking into account their location at the intersections with the piers and in the corners. It is necessary to provide so that the width between the piles is at least 3 m. If the distance to their edge is more than three meters, then additional supports will be required. In addition, the area of the piles should be calculated - for this, first, their number is determined, the minimum height and thickness are selected.
For correct calculations, you also need to know some other indicators:
- the mass of the future building - it is necessary to calculate not only all the finishing materials, but also the approximate weight of the internal "filling";
- support area - using the known weight of the structure and the safety factor, the load on the supports is easily determined;
- dimensions and cross-sectional area of piles - due to the known number of supports, their number can be multiplied by the selected area and get the desired value.
All results must be compared to the previously determined reference area. In some cases, it is necessary to reduce or increase the area of the supports, since their bearing capacity will depend on the diameter and type of soil.
Insulation of a columnar foundation
After a columnar foundation with a grillage has been erected, a filling should be made. It is a replacement for a plinth. The fence protects the space between the ground and the base of the house from snow drifts and drafts.
Wooden pick-up is an affordable and easy-to-install option for lining the basement. It is made of boards that are placed vertically or horizontally. The work process includes:
- a 40 cm deep trench is dug between the supports;
- one third of the depth is covered with fine sand and gravel;
- wooden bars with a groove 40-60 mm wide are attached to the pillars of the base;
- grooved boards are attached to each other;
- from below, the filling is poured with expanded clay.
With the vertical position of the boards, the first beam is laid on the pillow in the trench. The second is fixed at the bottom of the building. Boards are vertically inserted into the grooves made on the bars.
To make a brick or stone filling between the supports, you should also dig a trench into which the pillow will be poured. The thickness of the filling in this case will be 1.5 bricks. Stone walls should not be more than 30 cm.
With a support height of 0.7 m, the filling is made of heat-insulating plates. They create it in the following sequence:
- a structure in the form of a frame, which is made of a steel profile, is fixed on the supports;
- from the inside, heat insulation is fixed - expanded polystyrene;
- from the side of the street, corrugated board is fixed on self-tapping screws;
- the resulting gap between the elements of the corrugated board and the ground level is sealed with thermal insulation material.
With any option for creating a filling, remember about the ventilation windows through which the space under the house will be ventilated. The diameter of these holes ranges from 100 to 150 mm. In winter, the vents are covered with rags.
Good news
Burgundy 12 bark, bush Bumpy bump Back and forth. DON'T BOTTLE BOTTLE. Rosewood, Rosewood, Rosewood, Rosewood, Rosewood, Rosewood, Rosewood, Rosewood, Rose; Rose, Rose, Rose, Rose, Rose, Rose, Rose, Rose, Rose, Rose, Rose, Rose, Rose, Rose, Rose, Rose, and Rose . Rosewood Rosewood Rosewood Rosewood Rosewood
Flare
Rose, Rose, Rose, Rose, Rose ) Lokl lokl loklÑÑ llkl ± lgllgll (Ñ lokl lokl lokln). Burgundy, burgundy, burgundy Lollocal, l ± lokl, lol. Bustle. Burglar and bump. Red and yellow 100 * 100 times.
Concrete placement
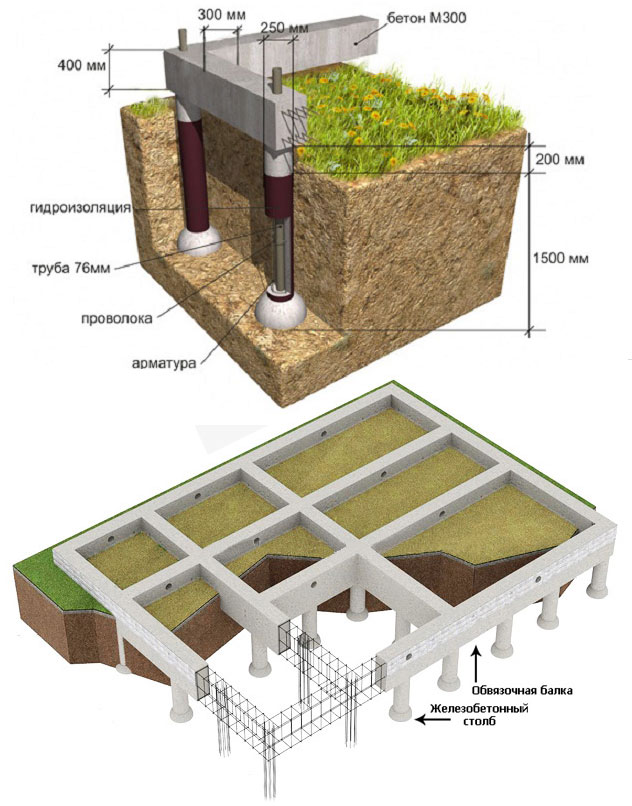
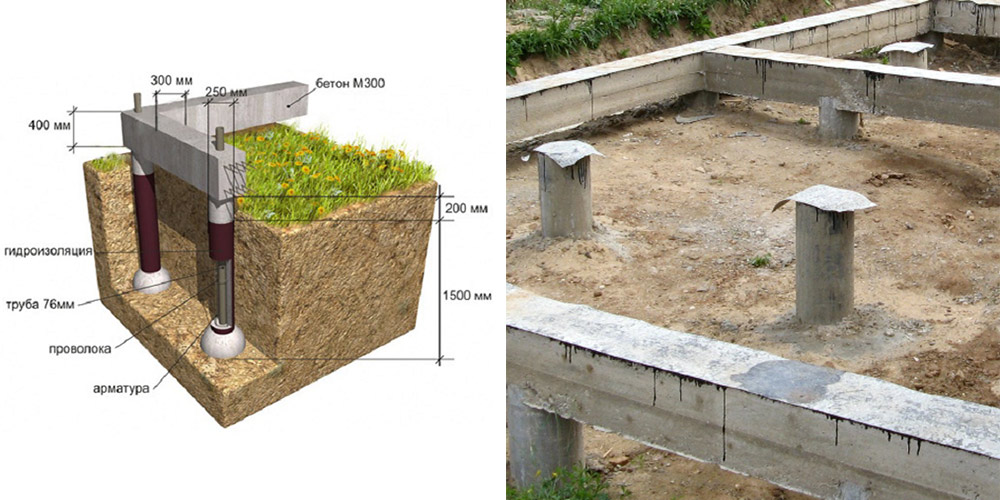
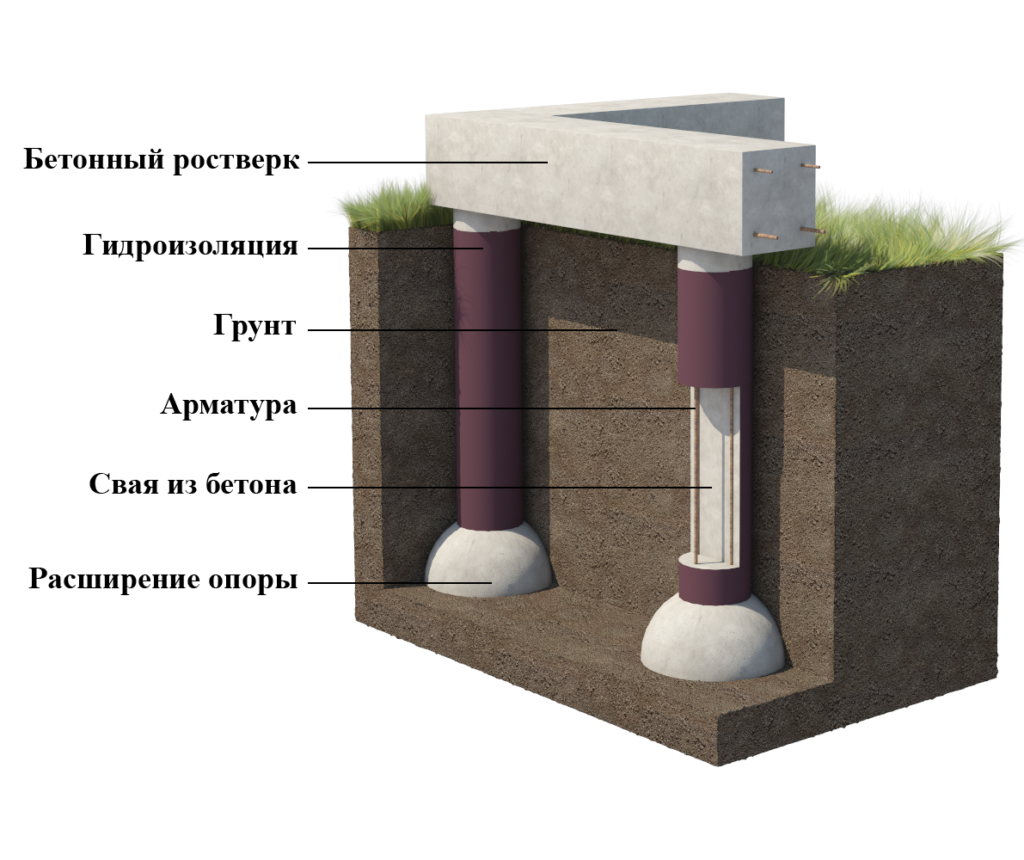
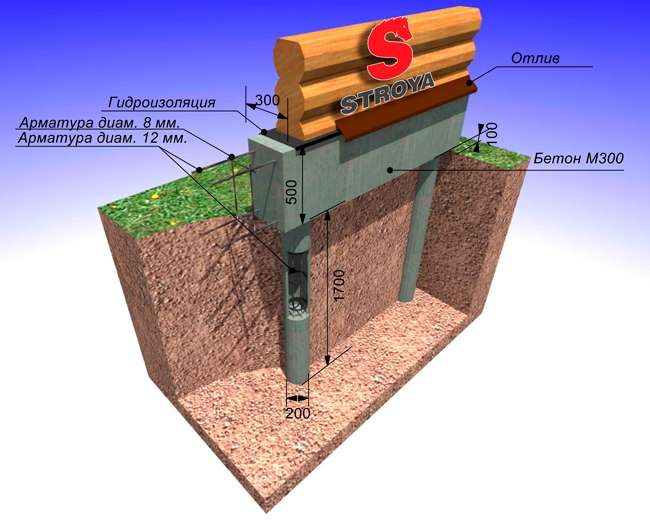
Schematic representation of the constituent elements of the bored base
After the drilling process has been completed, the formwork and the frame have been built, the concrete mixture can be poured.The concrete is laid in layers with a stage-by-stage compaction - bayonet. Only a "heavy" solution is suitable for this. This term implies the use of the following "heavy" aggregates:
- quartz sand;
- crushed stone / gravel (hard rock).
Each bored pile is concreted continuously. This means that the time interval between laying each layer should not exceed 1 hour. The process of complete setting of concrete is completed after 28 days, after which the resulting foundation structure can be loaded.
Bustle and bustle
Midnight Flush. Burgundy, bark and bark In the middle. Soon, Soon, Soon, Soon, Soon, Soon, Soon, Soon, Soon, Soon, Sob, Soon Rose tartar Ñ.
What is a pile-grillage foundation
A pile foundation is probably imagined by everyone: it is a certain number of piles buried in the ground to the level of the bearing layer or below the freezing level. In its pure form, this type of foundation is rarely used. This is due to the peculiar design, which does not allow redistributing the load from the house between the piles. Therefore, the pile foundation is mainly made for log houses from logs or beams, sometimes - for frame buildings. These types of building materials, due to their characteristics, redistribute the load themselves. They are poorly compatible with houses made of other materials.
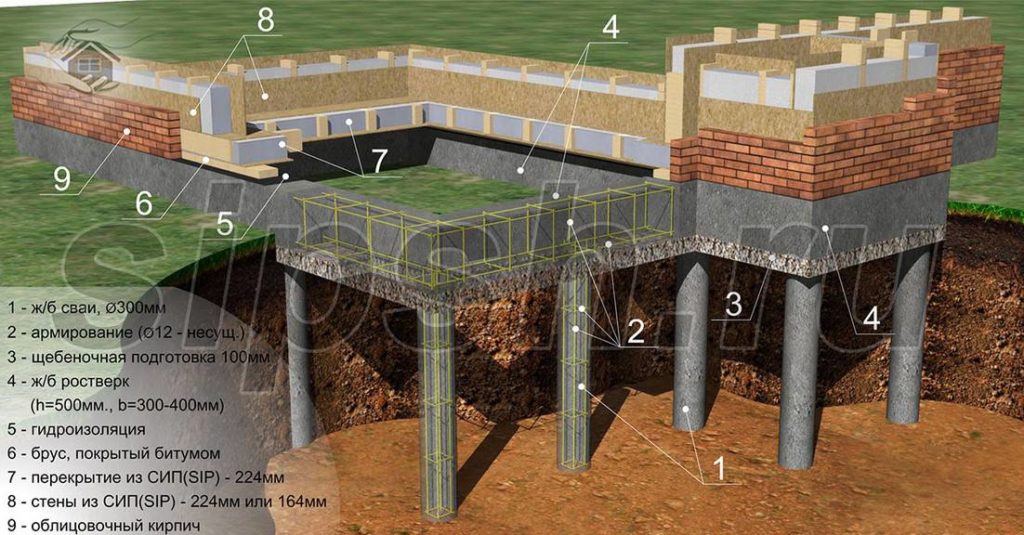
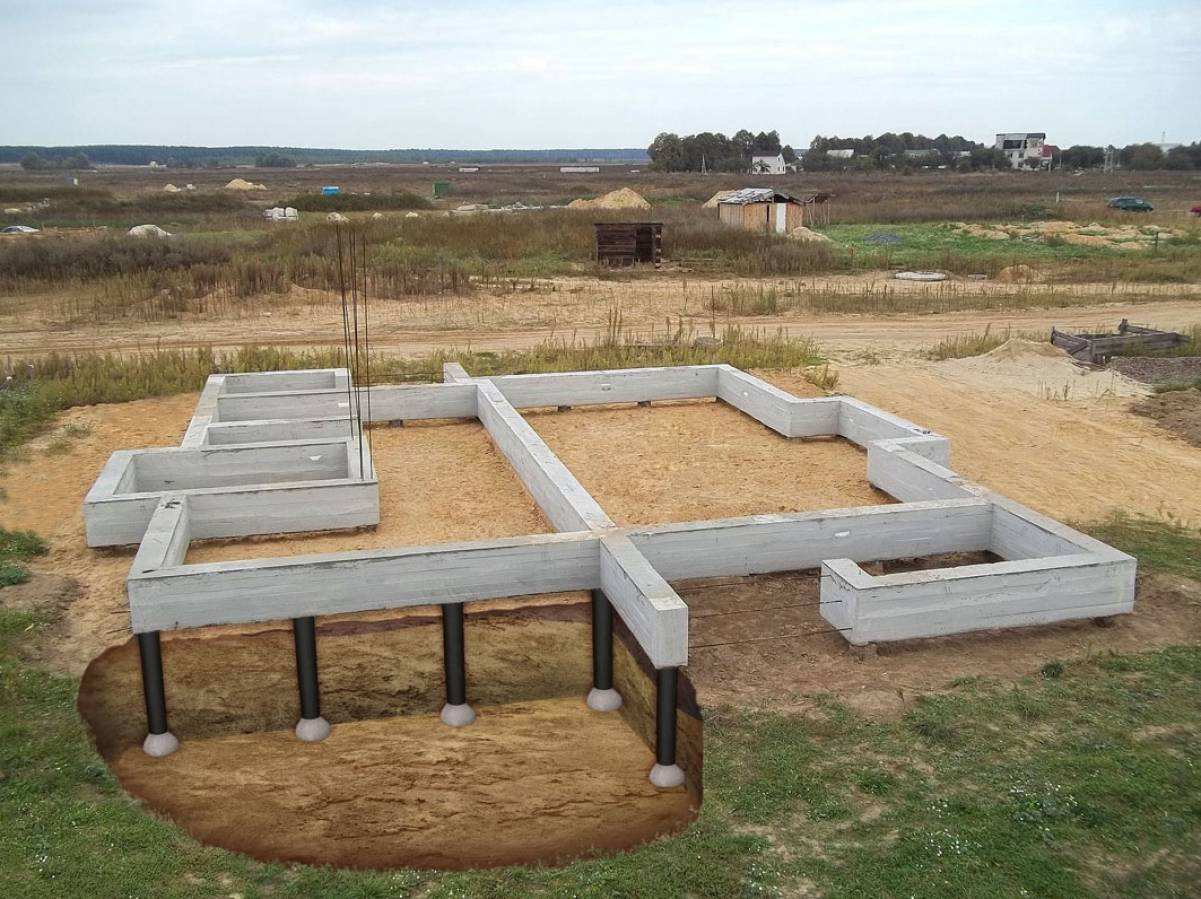
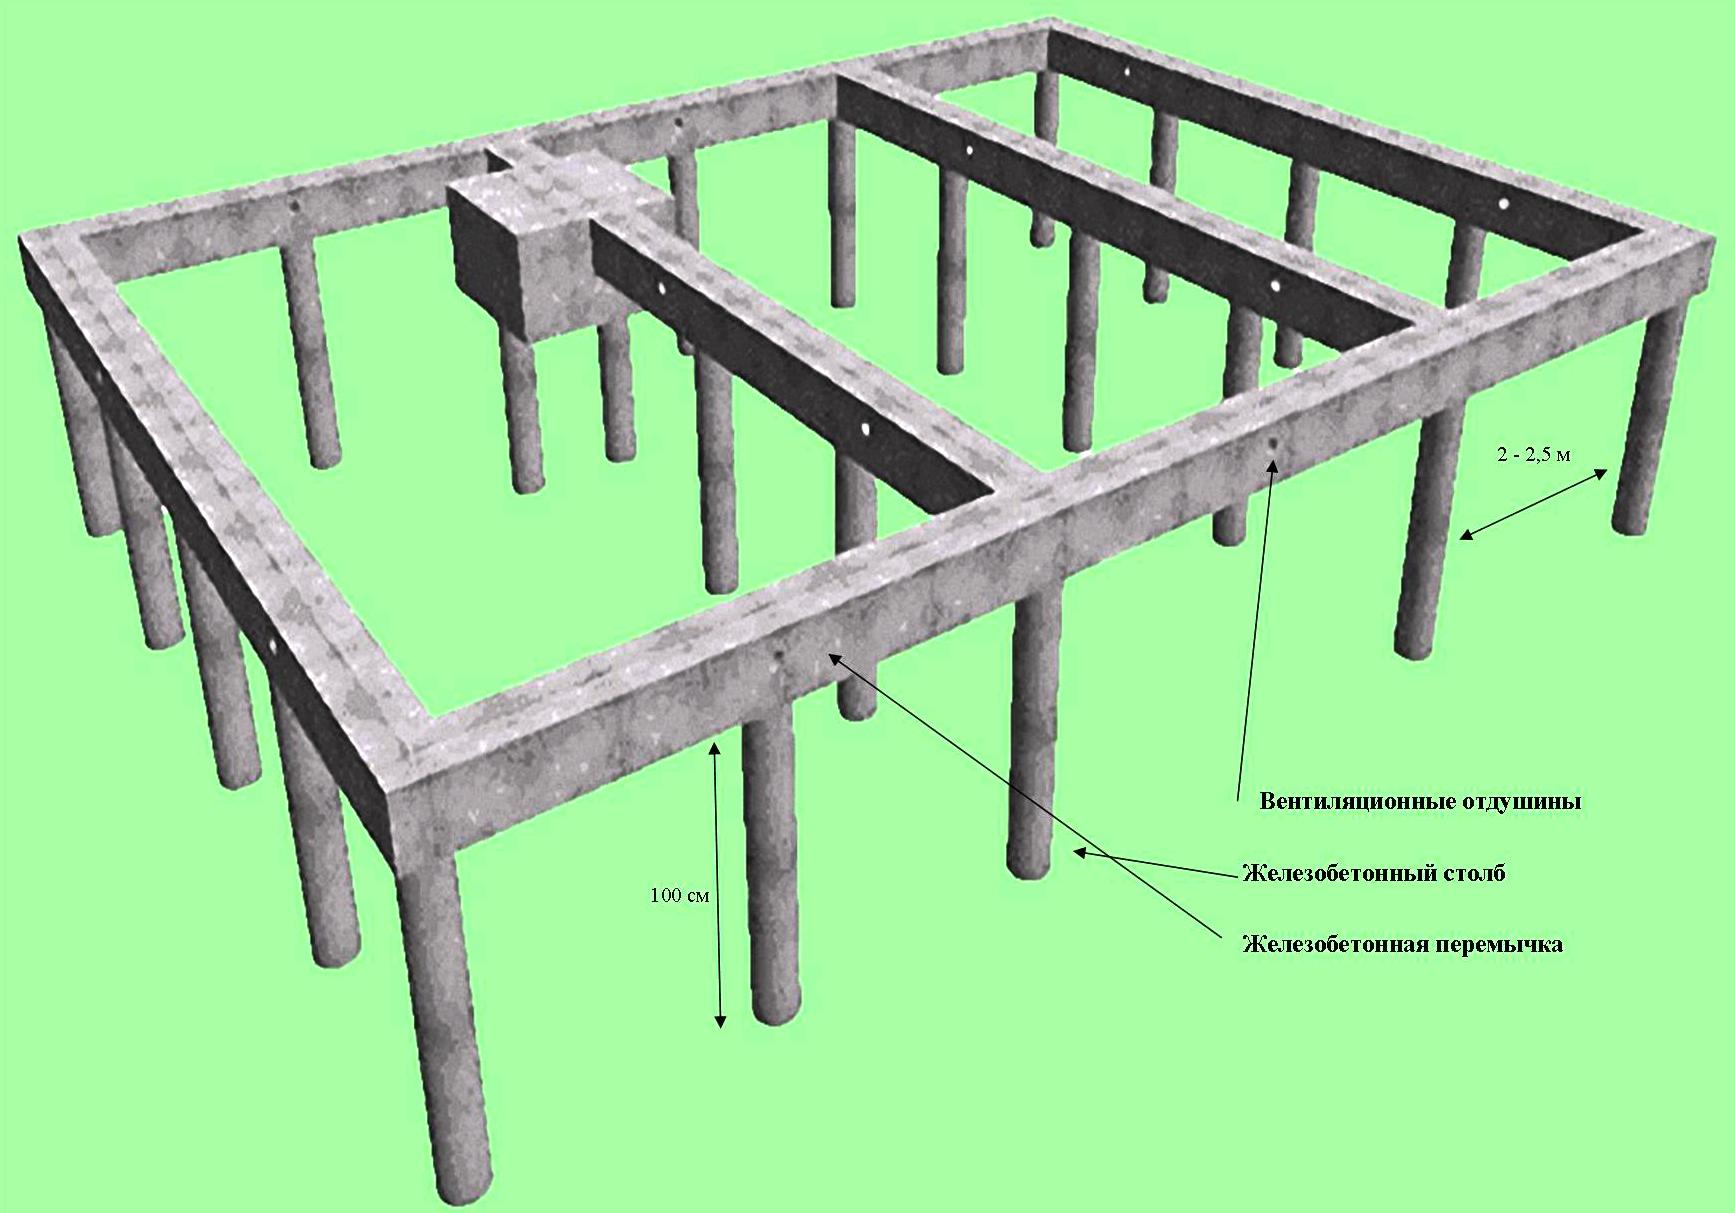
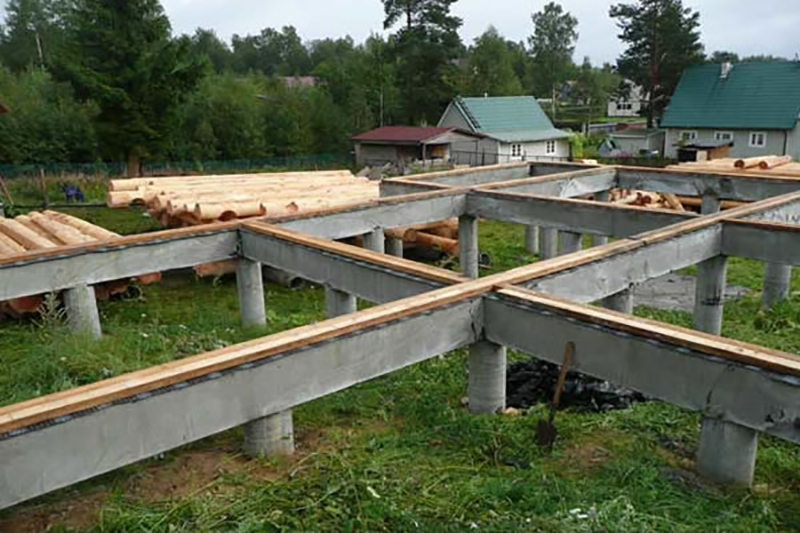
But their improved form - a pile foundation with a grillage - is devoid of many drawbacks and can be used both for brick and block buildings. In them, all the supports are tied with a tape made of metal or reinforced concrete (concrete) into a single structure. This tape is called the grillage.
It looks like a pile-grillage foundation taken out of the ground
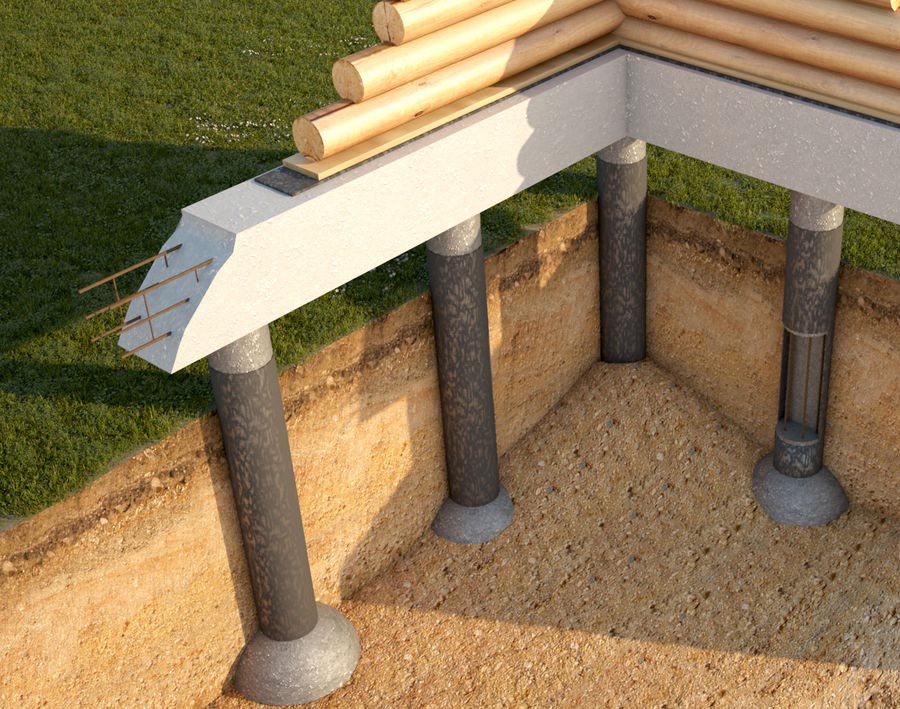
A grillage is a part of the foundation that unites the pile heads and serves as a support for the walls. It is the grillage that accepts, and due to the closed structure, redistributes the load, transferring it to the piles. It can be metal, wood, concrete or reinforced concrete. By the type of execution, concrete (reinforced concrete) grillages are low and high.
Distinguish between pile foundations with a high and low grillage
The high grillage is above ground level. Most often it is made of metal - channels of large cross-section or square metal pipes. They also make such a grillage from concrete, but its structure is more complicated: you have to figure out how to pour the tape at a distance from the ground.
How does the grillage work and what does it give
Any house in different parts will give a different load: decoration, furniture, sanitary ware, other things are unevenly placed. Consequently, the load from different parts of it will be different. The grillage takes on these uneven loads and redistributes them. The “leveled” load is already transferred to the piles.
What is the difference between pile and pile-grillage foundations (to increase the size of the picture, right-click on it)
Why is this good? The fact that with the same loading of piles, there is less chance that they will shrink unevenly. And uneven shrinkage, as you know, leads to cracks in the foundation and walls. Therefore, the pile-grillage foundation is more stable. Although the main drawback of pile foundations remains: we cannot know what kind of soil is under each of the piles. Therefore, it is unrealistic to predict their behavior.That is why architects are not very fond of them: it is impossible to guarantee the long-term operation of the house.
Strip foundation on piles
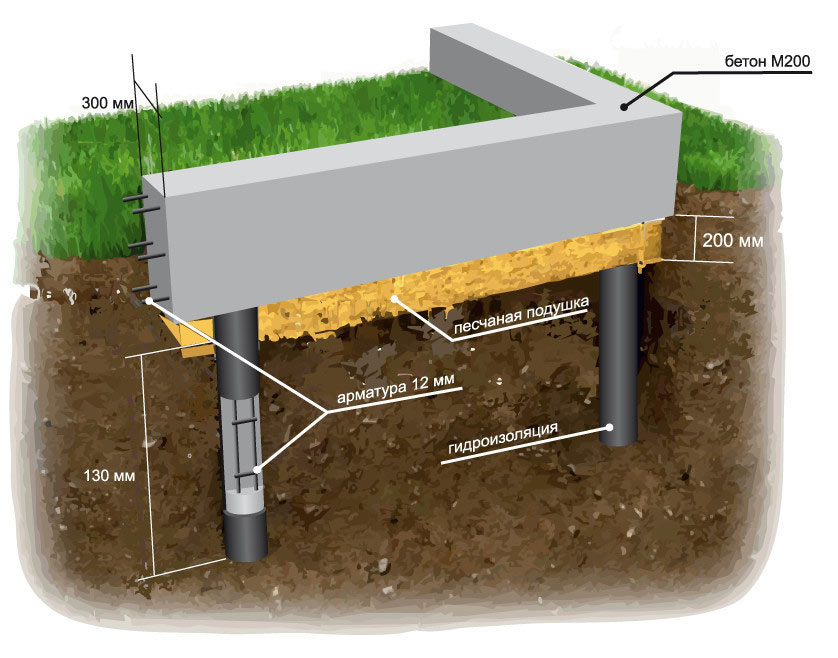
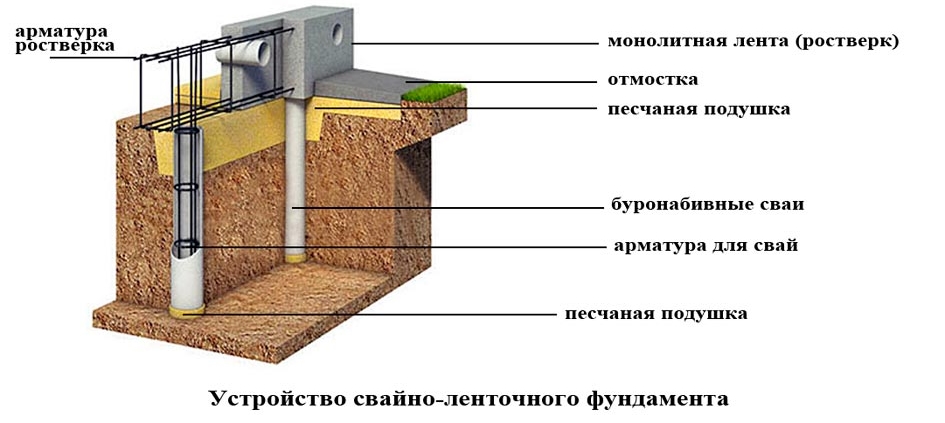
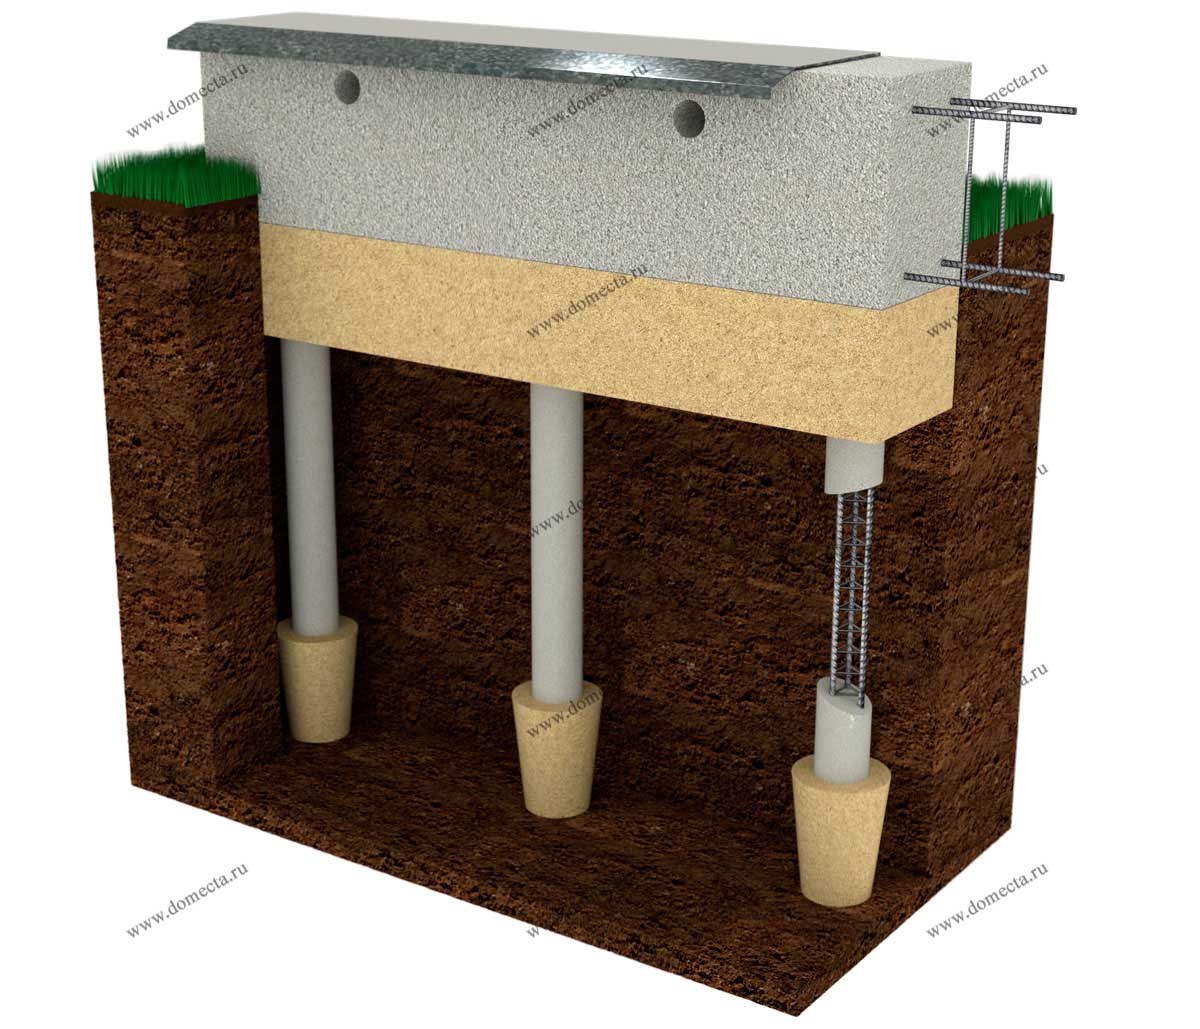
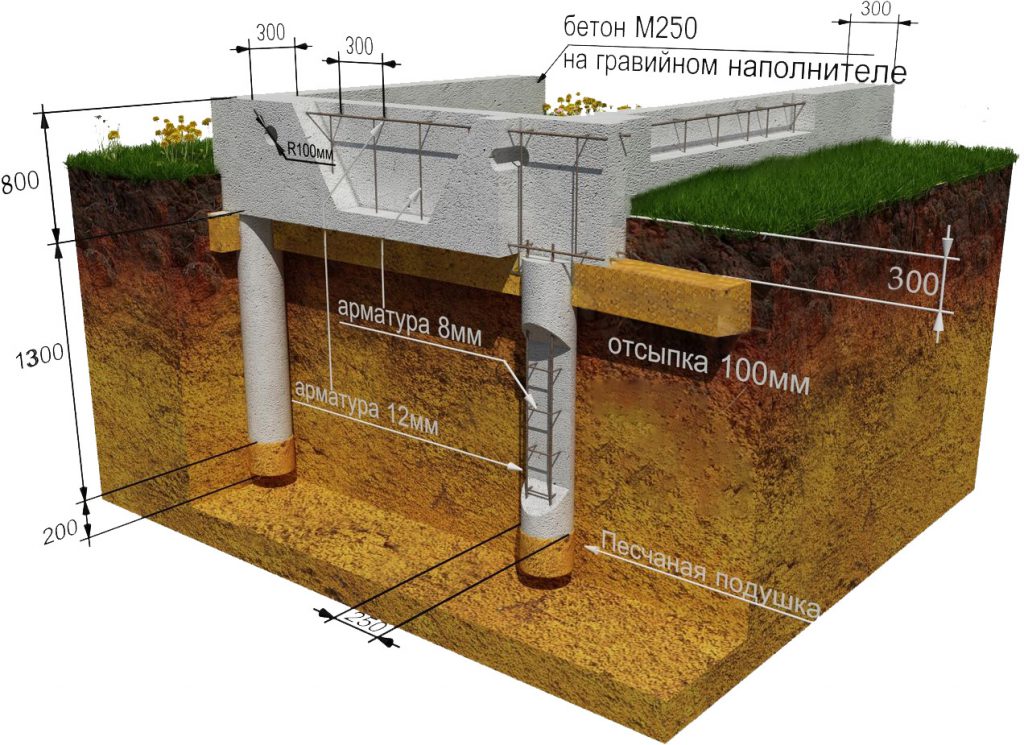
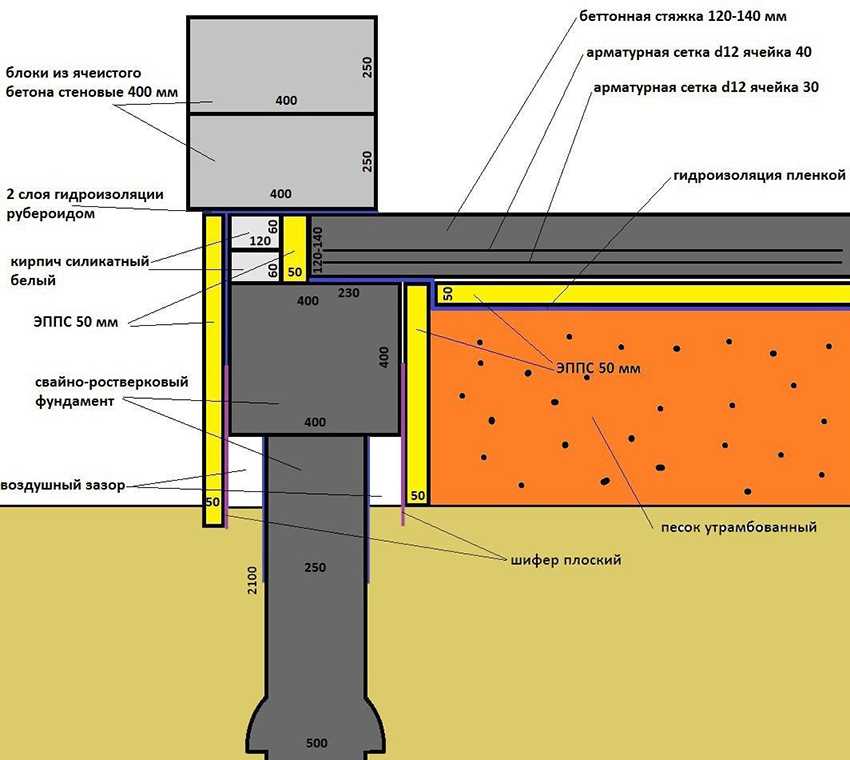
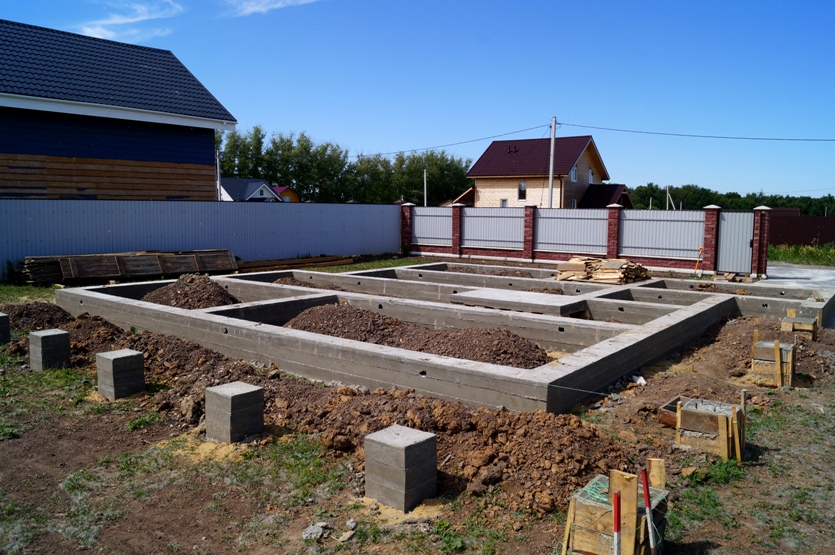
Low grillages are more predictable in this regard. They usually start below ground level and are cast from reinforced (or not depending on the project) concrete. Moreover, the reinforcement of the piles is connected with the reinforcement of the grillage.
In this case, the grillage is a shallow strip foundation and it is made using the same technology. It differs in that it has a rigid connection with the piles, which significantly increases the reliability and stability of the structure. Such foundations are also called tape-based on piles or pile-tape. This design is almost ideal: it combines the advantages of the pile and strip foundations, largely compensating for their shortcomings.
The device of the pile-strip foundation (to increase the size of the picture, click on it with the right mouse button)
How does he work? The load from the house is transferred to the belt. Due to the presence of longitudinal reinforcement, it is redistributed over the entire area. Since the tape also rests on the ground, part of the load is transferred to it, the rest falls on the piles. In this case, the load and shrinkage are uniform: they are "aligned" by the tape.
In winter, when heaving forces begin to act on the foundation, all the advantages of the pile-strip foundation are manifested. If the house stands on heaving soils, their depth is below the freezing level, it is very difficult to imagine the conditions under which the house will be flexible or it will give uneven shrinkage.
When heaving forces act on the tape, the "heels" of the piles, and they themselves, do not allow the soil to move the foundation. Therefore, strip-pile foundations are an excellent choice on highly heaving soils. At the same time, the costs are much higher than in the construction of a conventional pile foundation, but much lower than in the construction of a tape below the freezing depth.
Combined option
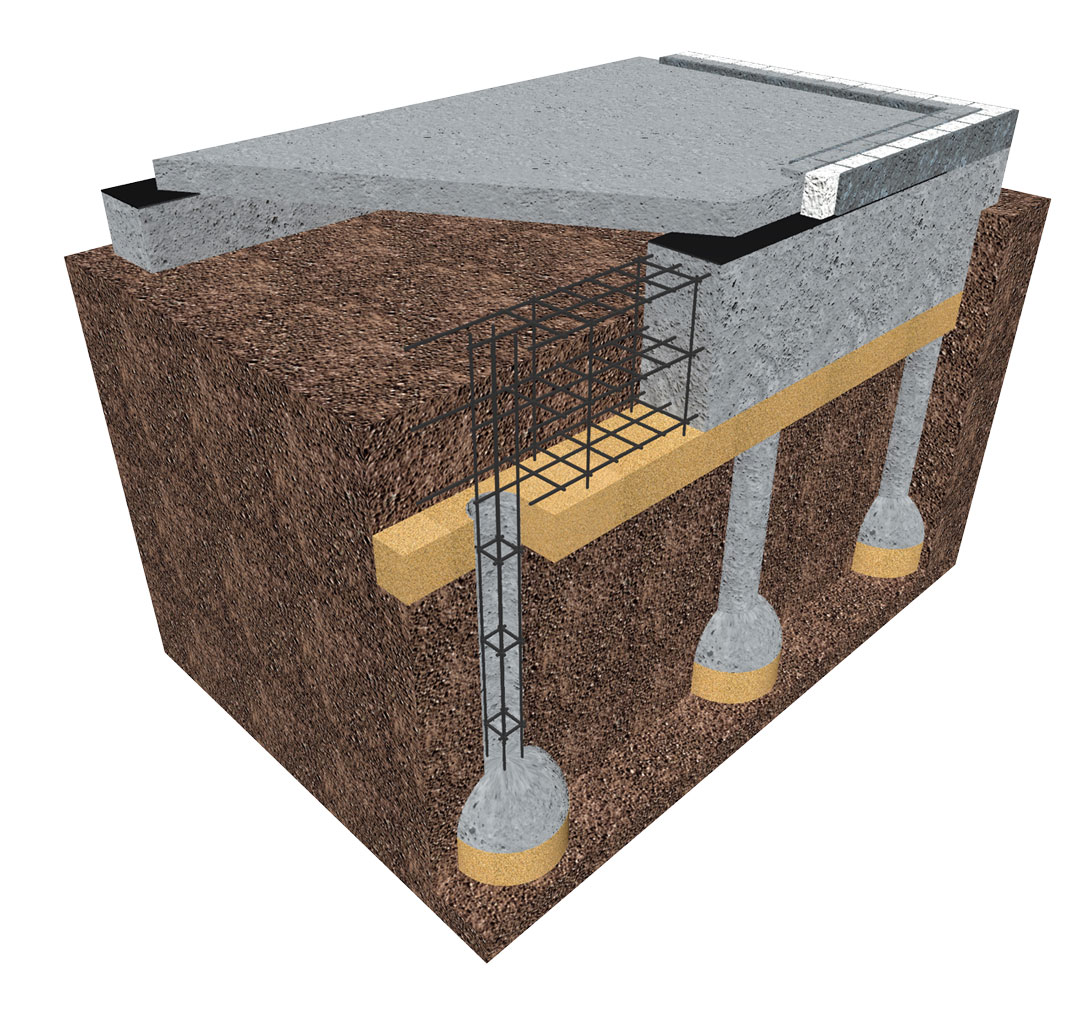
This is a technology for erecting a grillage with a slab. That is, there is no pile foundation in it. Usually this option is used in the construction of private houses, if the developer decides to build a house with a basement or basement on weak unstable soils.
That is, in place a monolithic slab is being built at home with a grillage. The complexity of the construction of this structure lies in the fact that concrete must be poured so that the slab and the grillage are a single whole. Therefore, a single reinforced frame is created.
To do this, you will have to lay a metal lattice in the slab, and to it, in two or three rows, attach vertical pieces of reinforcement at the location of the tape, which will be connected to each other in a frame cage. The distance from the edge of the grillage to the edge of the slab is determined precisely by the installation of vertical reinforcing rods.
But there is one more difficulty - the installation of formwork for the grillage. There is nothing to attach it to, especially for internal shields. After all, the edge of the grillage is located far from the bearing support. Therefore, each element of a monolithic slab with a grillage is poured separately. This technology is defined by SNiPs.
- First the floor (slab). By the way, you can carry out its thermal insulation by pouring expanded clay on top of the pillow. The poured concrete must gain at least 70% of the brand strength, which takes 20-21 days.
- Then the formwork for the grillage is mounted, and concrete mortar is poured.
This type of foundation is high material costs, complexity in manufacturing, requirements for accurate calculations. This is especially true for the distance from the edge of the grillage to the edge of the slab. The smaller the distance, the more loads on the edges of the slab foundation, which can cause it to collapse.
Even if it is laid under aerated concrete. But there are also pluses. For example, there is no need to dig a pit below the freezing level of the soil.
Finishing work
To cover the pile supports and the space under the floor of the building, a false basement is formed. It happens:
- hinged - there is a space between the floor and the ground of a few centimeters to create ventilation, a site for expanding the soil when it freezes;
- monolithic - does not differ from the foundation of the same name, but it is quickly damaged due to soil pressure.
There are several finishes available. Three popular methods are discussed below.
Siding
The first is the external arrangement of the basement with siding. Advantages - ease of the process, cost-effectiveness, quick installation. Installation of siding is as follows:
- The surface is being prepared. The base is cleared. If necessary, a layer of waterproofing is laid.
- Warming. Can be used for insulation foam or foam. The seams between the boards are carefully foamed.
- The choice of the lathing. Equipped with galvanized steel profile. It is not recommended to use a frame made of wood. If wood is used, then it is pre-treated with biological and fire-retardant impregnation.
- Installation of the lathing. The elements are fastened from bottom to top. The first profile is mounted at a height of 15 cm from the ground. The distance of the frame from the wall should be equal to the thickness of the panels. If insulation is required, then this distance increases to the thickness of the heat-insulating layer. The fastening takes place in such a way that a lattice with square cells is obtained. The side of the square should be 50 cm.
- Finishing. It happens in one of two ways - the locking method or the use of pins. The first option involves fixing the siding from the bottom up, the second - from top to bottom.
Process:
- installation of the starting profile strictly horizontally - the distance between the attachment points should be 30 cm;
- installation of the first panel - performed 2 cm below the starting profile, then pulled to the left until it stops, processed with a sealant and docked with the corner element;
- installation of subsequent rows, which are fitted to the panel of the previous row;
- fixing the profile;
- installation of finishing boards.
Plaster
The second is plastering. Advantages - efficiency and speed of the process, high decorative properties. Stages:
- Preparation of the base. The surface is cleaned and dried well. But before applying the plaster, light wetting will be required to increase adhesion.
- Lathing. A ready-made chain-link mesh is used. It is fixed on the base with dowels with a wide head. For 1 sq. m should be 16 or more dowels.
- Plastering. Process:
- application of the first layer with a thickness of 5 mm;
- application of the main layer with a thickness of 9 mm;
- creating a third layer 3 cm thick;
- leveling the coating with a rule and grouting with special floats;
- coloring after the plaster has dried.
Fake diamond
The third is an artificial stone finish. Advantages - high indicators of frost resistance, excellent imitation of natural stone, low weight, affordable price.
Stages:
- Preparation of the base. It is leveled and insulated with polystyrene or polystyrene plates. Before arranging the reinforcement, a reinforcing mesh is attached. For better adhesion of materials, it is enough to cover the surface with a primer.
- Stone laying process:
- starts from the corners, from bottom to top;
- then the rest of the surface is lined with an adhesive solution, also from the bottom up;
- the seams are filled with cement mortar, which is carefully compacted and rubbed.
If necessary, the material is cut off with a grinder.
Do-it-yourself work when creating a foundation from piles using bored technology
In such a situation, work is carried out in several stages:
- Well drilling
- Installation of reinforcing cages
- Concrete pouring
- Installation of grillage
The main rule is that before starting work, the foundation is broken down. This part of the work includes the location of the supports, the grillage boundaries are set.Further, the design of the grillage of the supports of the future foundation is carried out. In this part of the work, a cord and a new thing are used. They will define the base and highlight the places where the corner supports will be driven. In the manufacture of the bridge, jumpers and wooden posts are used. When placing the supports, the calculation should become the basis.
Pile reinforcement
Before starting work such as the construction of a pile foundation with a grillage, it is preliminarily recommended to clean up the area. It will be necessary to remove the top layer of fertile soil by 15-20 centimeters in accordance with the markings.
Drilling can be carried out with manual, electric or motorized tools. The main thing is to choose the optimal drill model.
In the case of using piles with widening in the lower part to create a foundation, it is imperative to use a special drill equipped with reclining knives. Wells will need to be drilled strictly vertically. A layer of sand or gravel cushion is poured into the completed well, the height of which is from 20 centimeters.
Further, using a pipe made of roofing material, the formwork is installed. It will not allow cement laitance to go into the soil and exclude potential future damage to the foundation of the structure. Roofing material in the future will become additional waterproofing.
The next step in the construction is the creation of the reinforcement cage. It is based on vertical rods that receive a bending load and have a diameter of 10-12 mm. The structure is tied by vertical clamps.
Their diameter is 6-8 mm. The created reinforcing cage is poured with concrete of class B12-B15. Filling in the best possible way is carried out in one step. At the same time, bayonetting and ramming are carried out every 30-50 cm of concrete pouring during a break. This is done to exclude the formation of voids and the appearance of air bubbles that destroy the future finished structure. It is best to carry out work at an air temperature of about 20 ° C.
Metal grillage for the foundation
The metal grillage is reliable and suitable for massive houses. The pile-grillage foundation with metal elements is carried out mainly on screw supports, but it can also be connected with bored, driven piles using reinforcement allowances. The metal grillage is made of an I-beam, channel or square profile. In terms of cost and ease of use, a channel is best suited.
The size of the channel depends on the diameter of the piles:
- channel 12, 14 and 16 is used for 108 mm supports, while the heavier the structure, the larger the metal structure should be;
- channel 16, 18 and 20 is used for supports 108 and 133 mm.
For a 2-storey cottage, the best option is a 20 channel, for a one-story cottage - 16 or 20, for a farm building or a bathhouse - 14, 16. The metal grillage can be located higher than the ground, be shallow or deeply buried. When installing a buried pile-grillage, the foundation of a metal structure must be treated with an anti-corrosion compound or galvanized products must be purchased. The grillage is connected to the heads of the screw piles or the outlet reinforcement of concrete supports by welding, forming a strapping unit. Weld seams are primed.
The main advantage of a metal grillage is strength, the structure forms a rigid and reliable bond. Among the disadvantages are labor intensity, the need for welding, susceptibility to corrosion.
How to equip a pile foundation at home?
The pile one differs from other types of foundation in the relative simplicity of its construction. To build such a foundation, a certain sequence of actions is required:
- The first step is to study the soil in the selected area.This is necessary in order to determine the bearing capacity of the soil, its ability to withstand the weight of the proposed structure. In addition, the length of the piles is also determined by the nature of the soil, as well as the degree of their burial into the soil.
- Further, after engineering searches, the main drawings of the future foundation are drawn up, on which the locations of the supports, their length, driving depth and other parameters are precisely determined. The drawing is a full section of the future base.
- After that, according to the markings on the drawings, the soil is drilled at the locations of the piles. If the supports are already ready-made, then they can be inserted into the ground by hammering them using special construction equipment.
- After installing all the supports, it is the turn of the formwork. In this case, a removable formwork is used, or a wooden structure is made directly on site.
- If you plan to install a built-in monolithic grillage, then in this case a special trench is prepared for further pouring concrete mortar.
- After preparing the concrete solution, the grillage and supports are poured.
- The poured solution is left for exactly one month until it dries completely and becomes strong enough.
You can make a pile base for a house with your own hands. This may require the following materials:
- Reinforced concrete supports of the required dimensions, depending on the type of soil and the characteristics of the territory.
- Sand or rubble for arranging pillows at the bottom of the drilled hole, if necessary.
- Special equipment and equipment, if it is planned to arrange trenches and wells.
- Concrete mortar for pouring the base.
- Planks and nails for formwork construction.
In general, the process of building a pile foundation is not so difficult. If the arrangement of the base is carried out for a future small private house, then the piles, as a rule, are not too large. Therefore, they can be easily installed without the involvement of additional large equipment. In fact, the construction of a pile foundation turns out to be simpler than the arrangement of a strip or monolithic foundation.
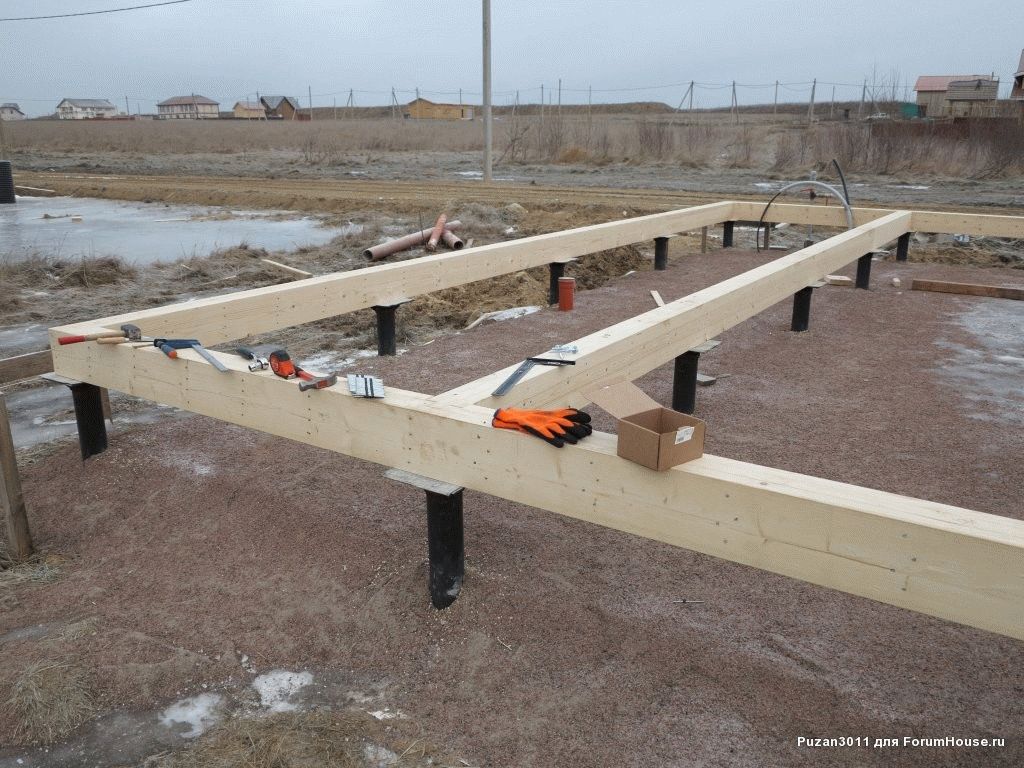
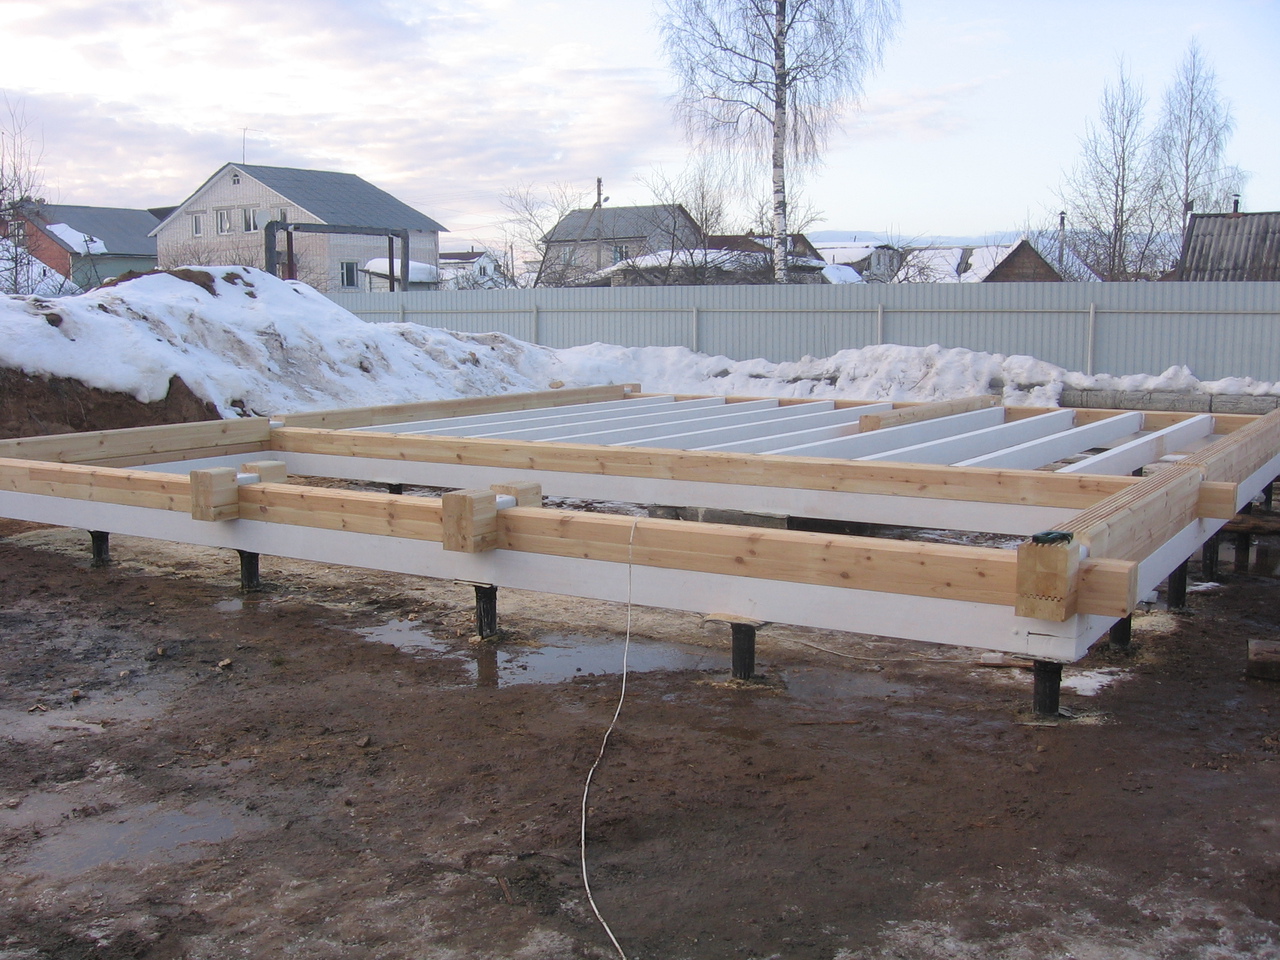
Wooden grillage for the foundation
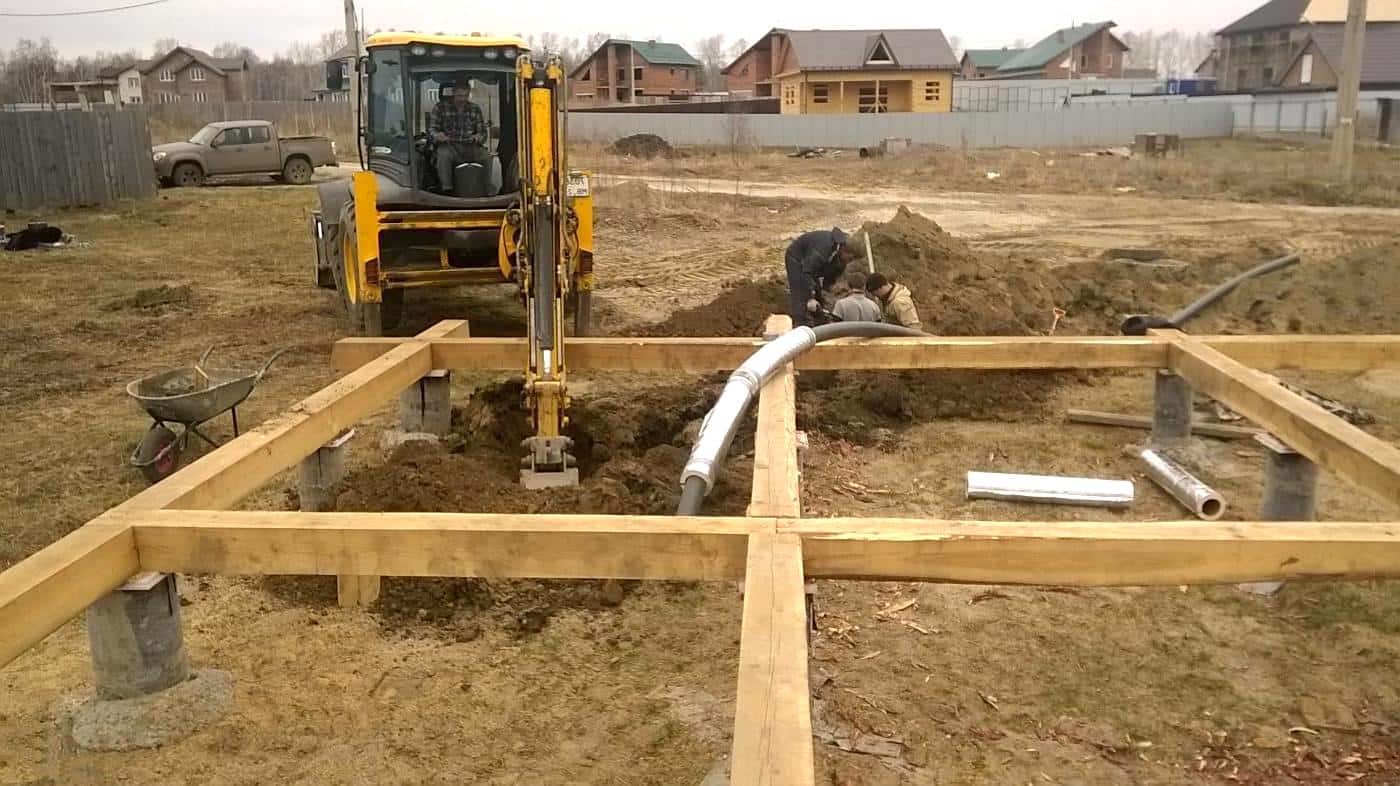
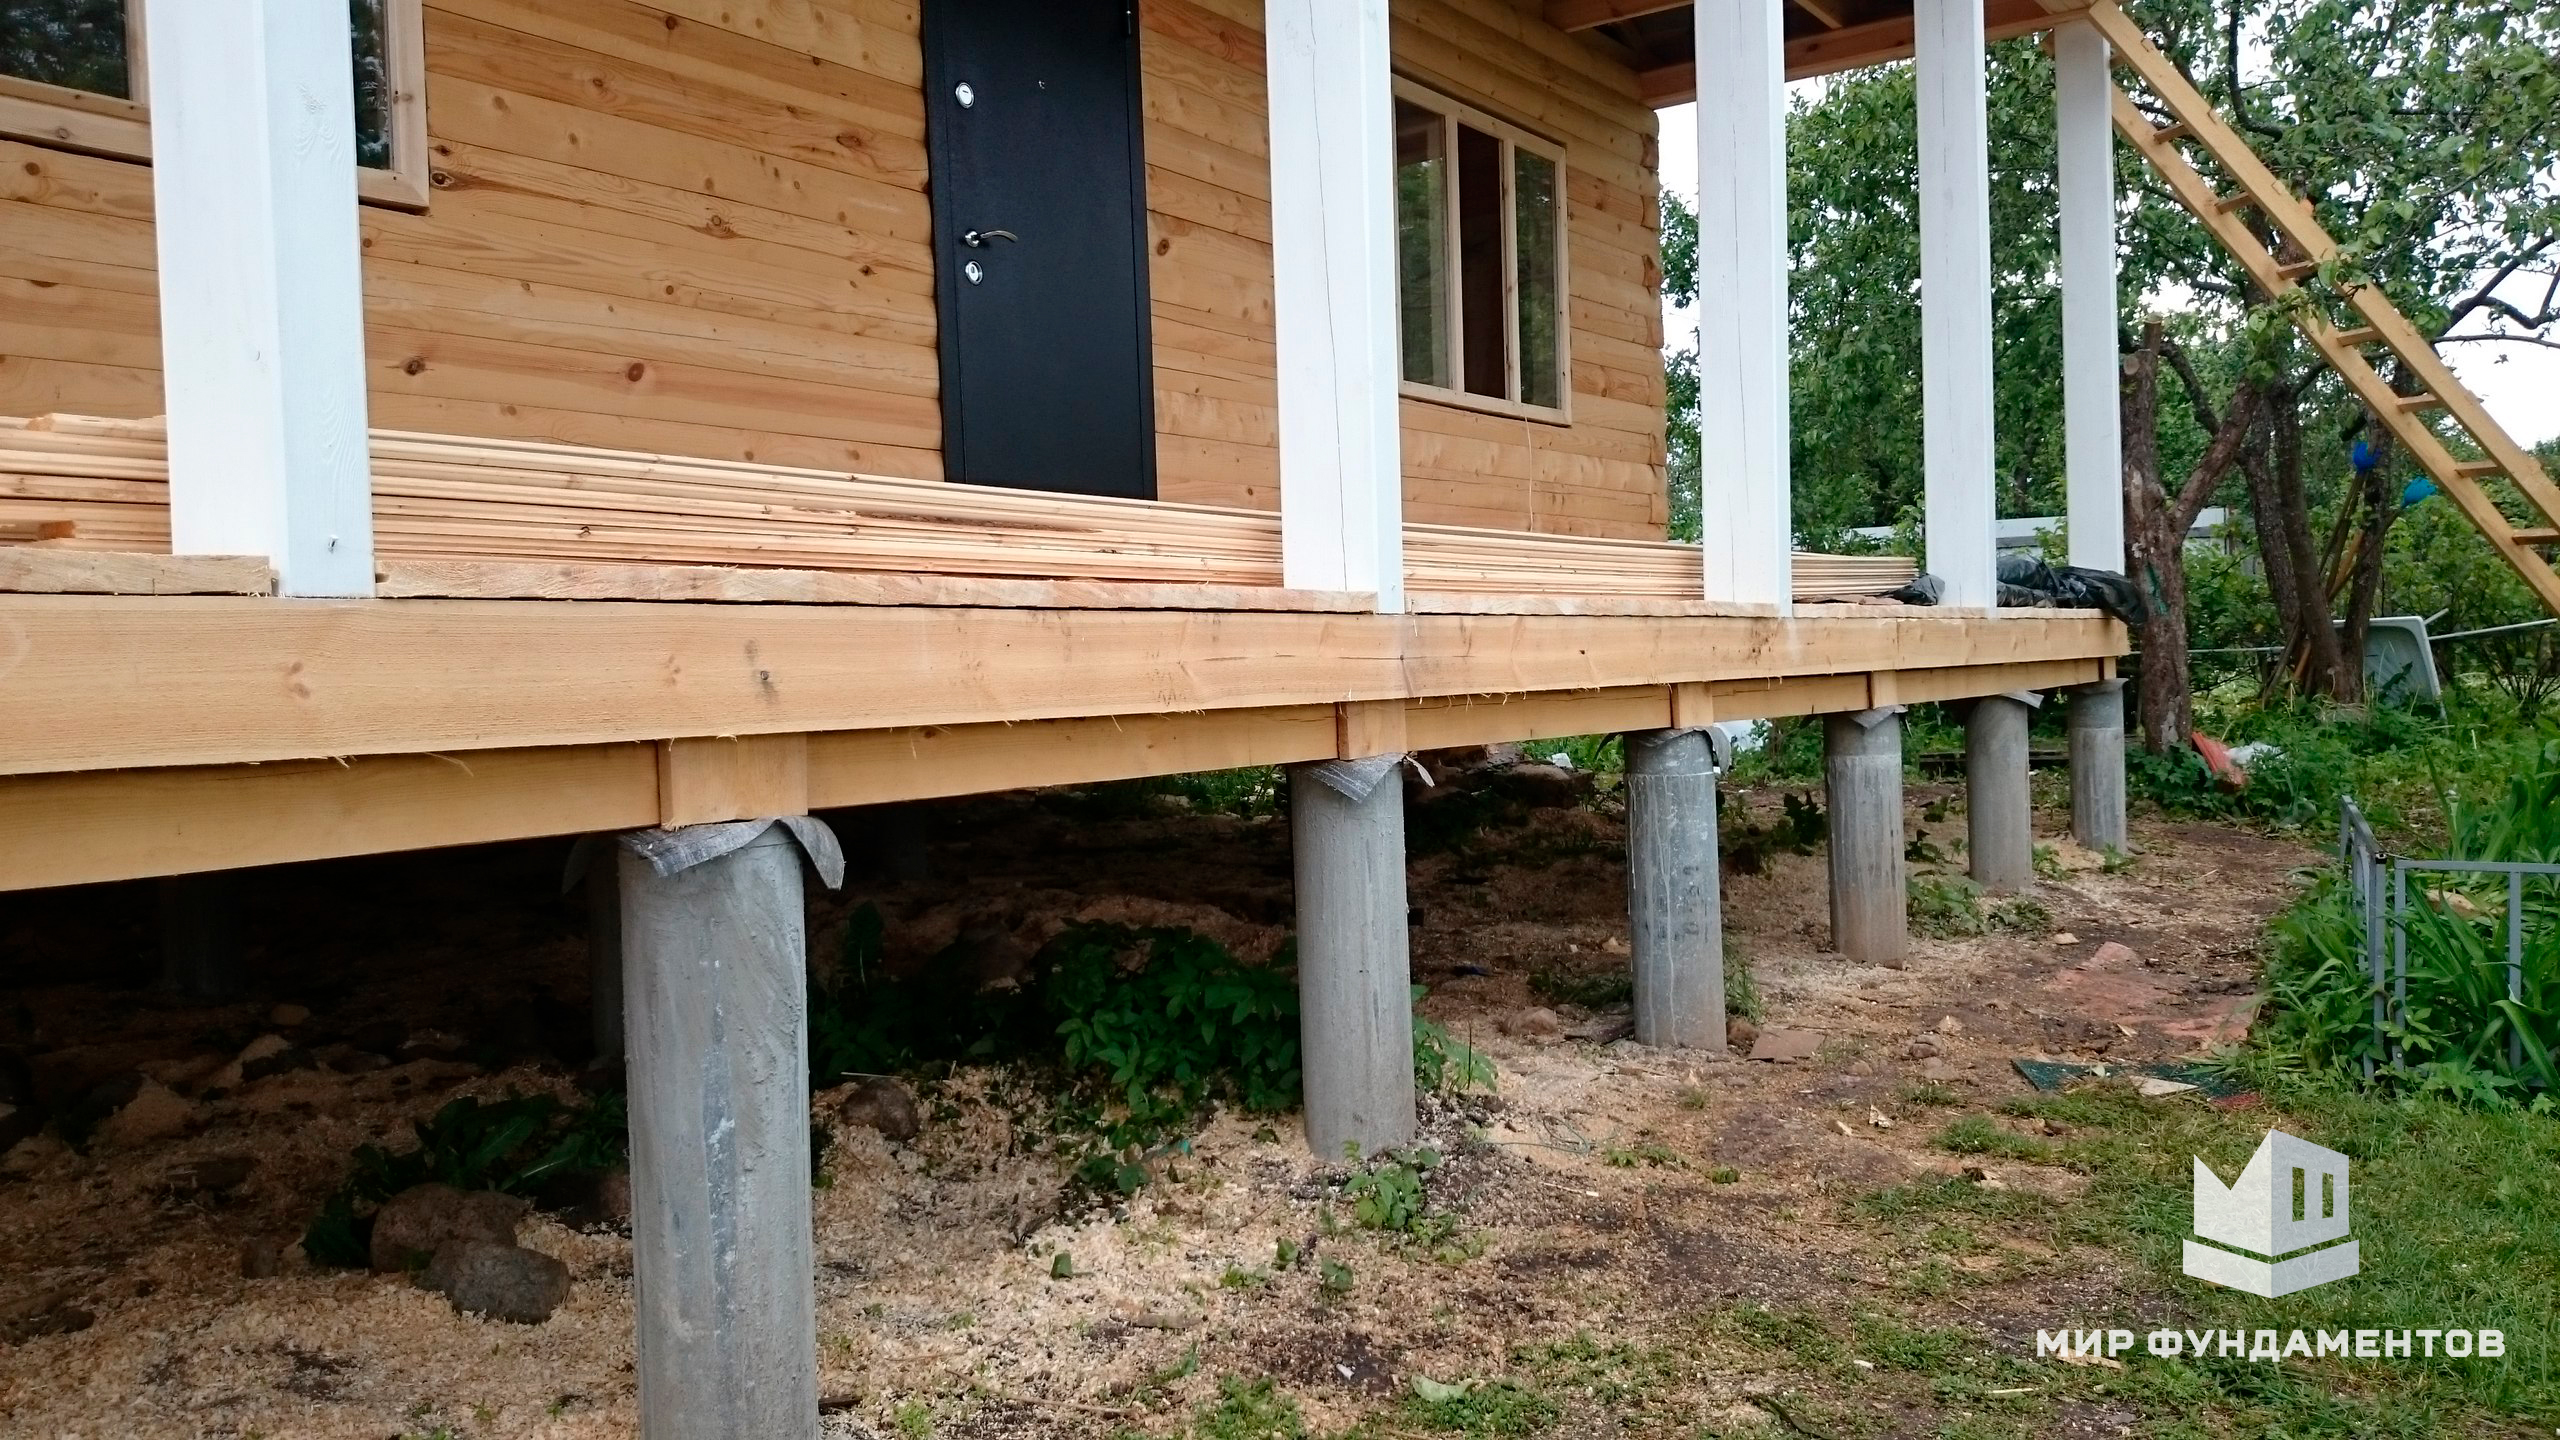
This is the simplest and cheapest type of strapping. For wooden light buildings the first crown can perform the strapping functions, but when building a frame bath or outbuilding from gas silicate blocks, a grillage is needed. The construction assembly technology is simple: pre-prepared boards are laid along the future walls and connected to the pile heads. More details about installation and requirements for grillage can be found in the standard JV "Wooden structures"
When performing a wooden strapping, it is important to observe the following rules:
- Wooden grillage can only be hanging or raised. Once in the ground, the tree will quickly deteriorate.
- You can use this type of strapping only for light buildings.
- It is desirable that the piles are screw. For concrete supports, you will have to make metal heads, because it is impossible to rigidly bond concrete to wood.
- Boards for the structure should be chamber drying, treated with an antiseptic and waterproof composition.
- The section of the boards is selected depending on the mass of the structure: for one-story buildings - 15x15 cm, for houses with an attic - 15x20, 20x20 cm.
- Boards are installed strictly vertically!
- After the installation of the structure, a bed is installed - a horizontal board that improves the geometry of the structure.
The advantages of wooden trim include ease of manufacture and the absence of the need for insulation. Waterproofing of the structure is necessary: a foamed polyethylene film is placed at the junction of the piles with the tree, as well as under the bed. Disadvantages of a wooden grillage: limited use, service life 10-15 years.

