Protection of the foundation from excess moisture, arrangement of drainage
Regardless of the type of tape used, in order for it to serve for a long time, it is recommended not to neglect the arrangement of the waterproofing layer. It is done in two ways:
- Roofing material. A budgetary, fast, but not so reliable way to protect against moisture, because after 2-3 years it begins to flake off. The bottom of the trench is laid out with this material and the finished solidified base is covered. For fixing, they are passed from above with resin or hot bitumen.
- Adding a Penetron-type agent to the concrete solution. This is an excellent protection for strip foundations of any depth. Its advantage is that the entire base becomes impervious to moisture. Penetron is added to the solution at the kneading stage. The finished base does not need additional coating with waterproofing material.
If you need to fill foundation for the fence in areas with a high level of groundwater, then you should worry about creating drainage in advance.
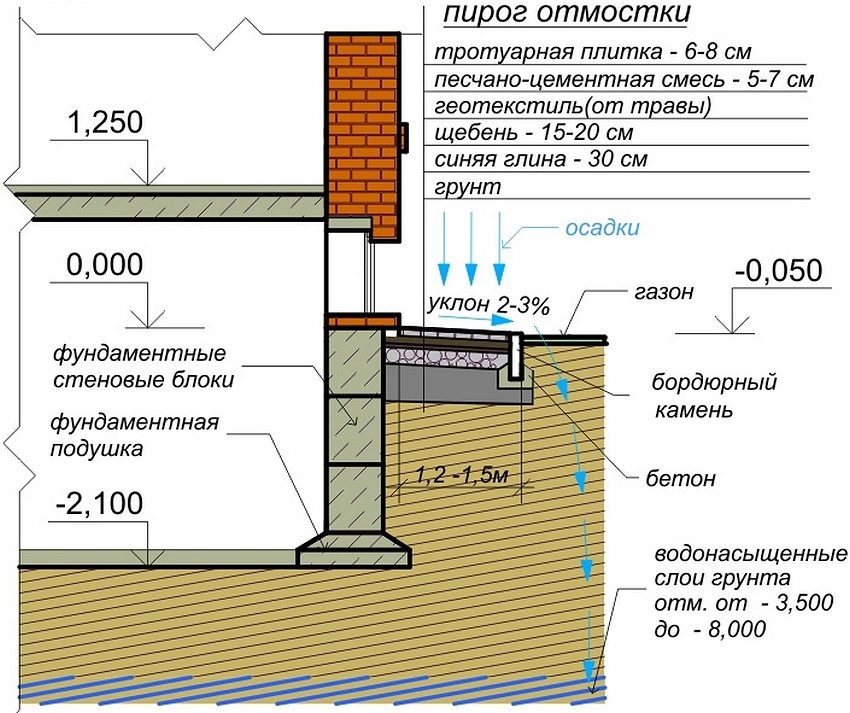
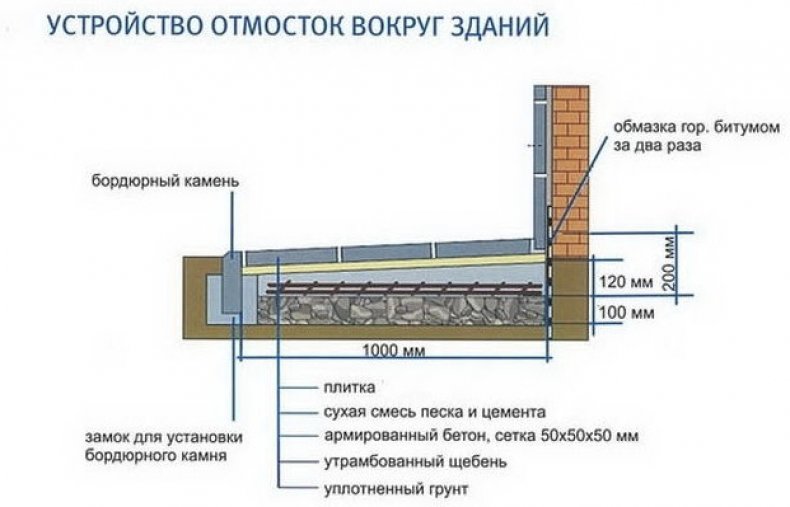
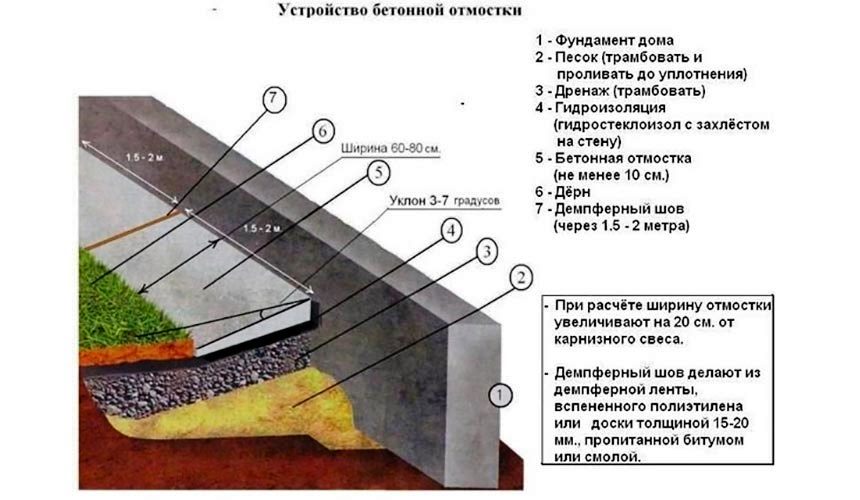
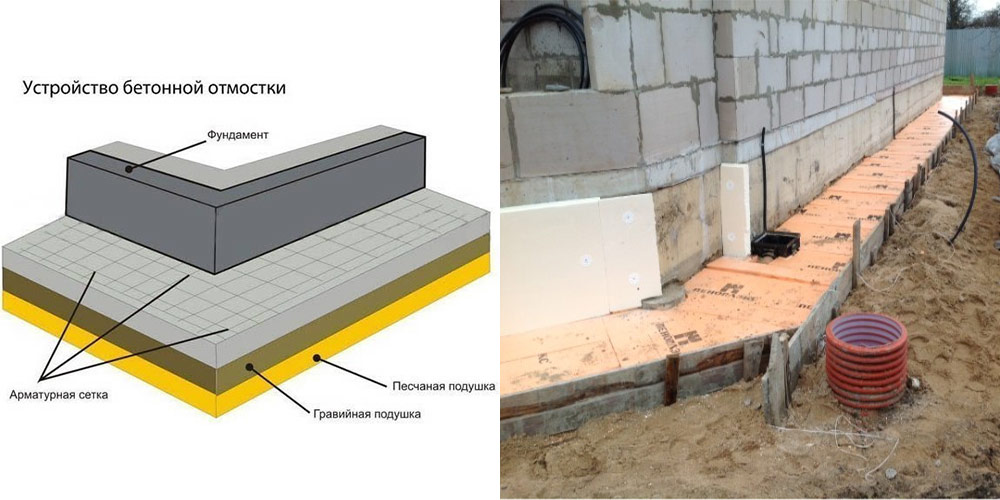
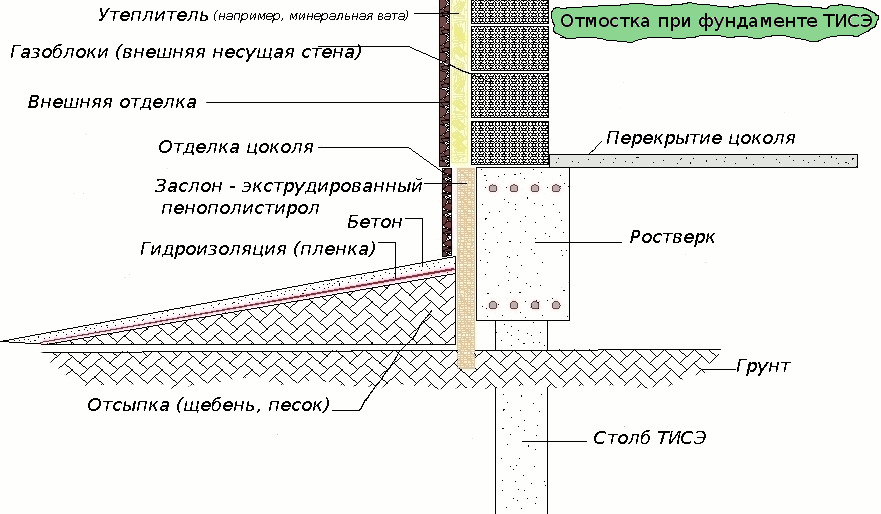
Starting the process of erecting a concrete blind area with your own hands, you need to make sure that it has the same width, 20-30 cm higher than the overhang of the cornice. In most cases, architects adhere to dimensions of about 1 m (this value can be deviated from when placing tape bases on sagging soil).
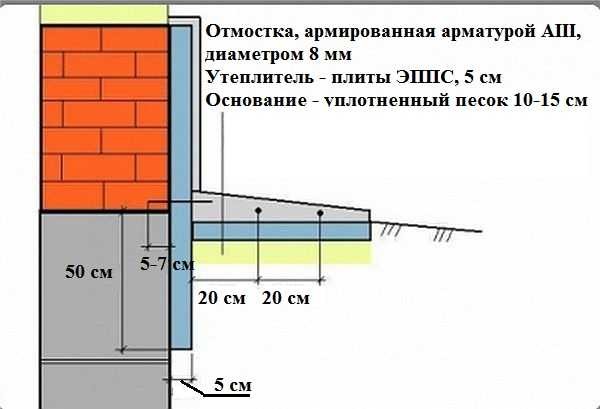
The optimum slope of the blind area is 92-94 degrees from the load-bearing wall. The plinth can be raised by 50 cm. The outer bottom side is raised 50 mm above ground level to ensure effective drainage.
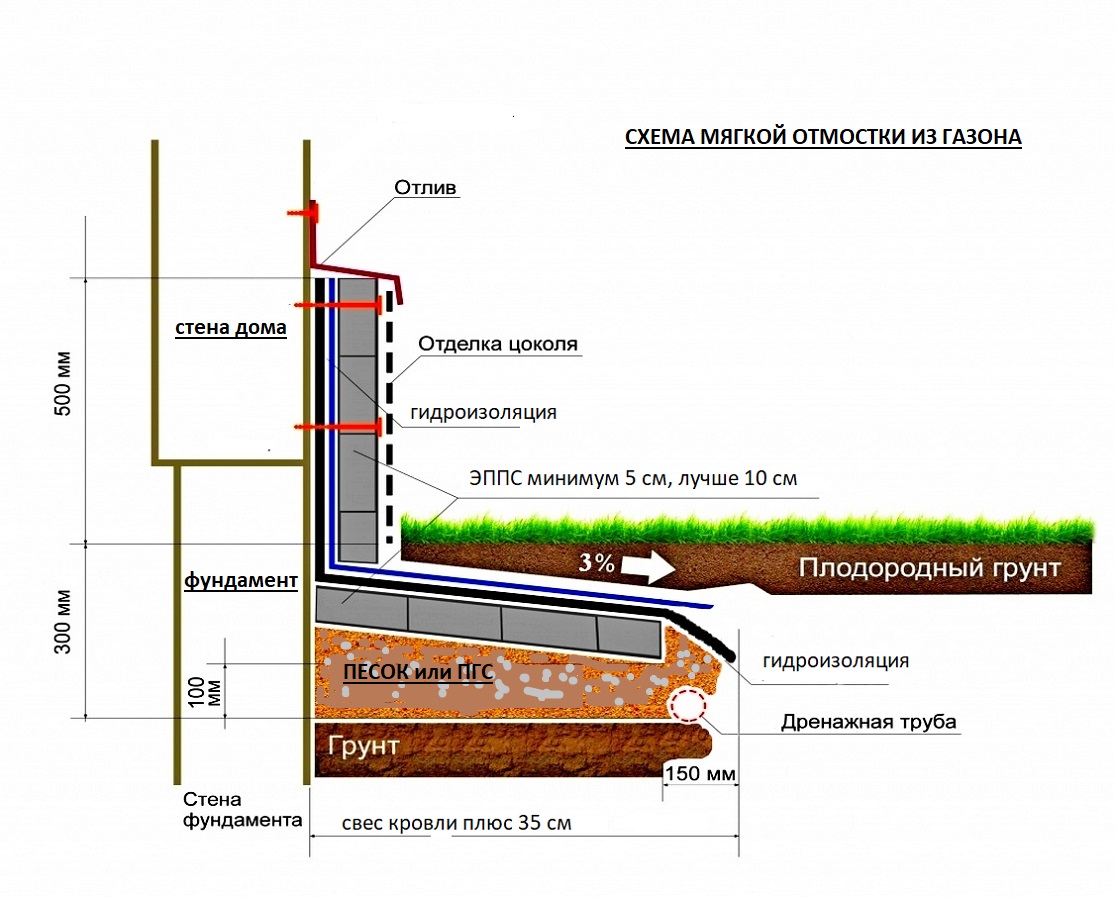
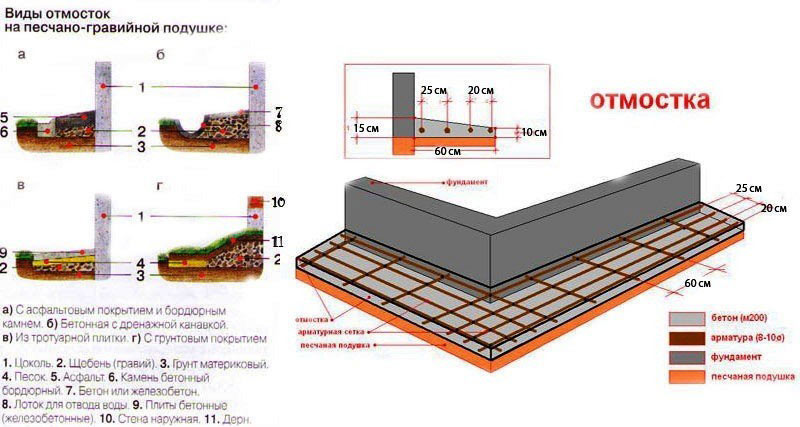
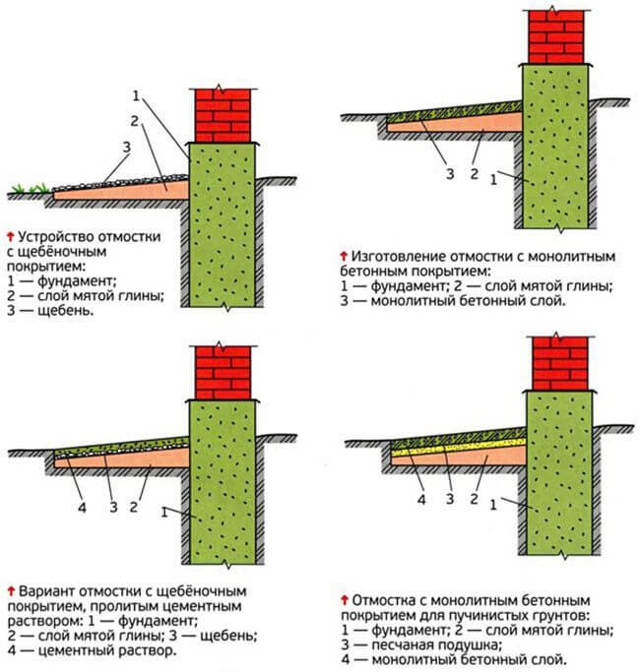
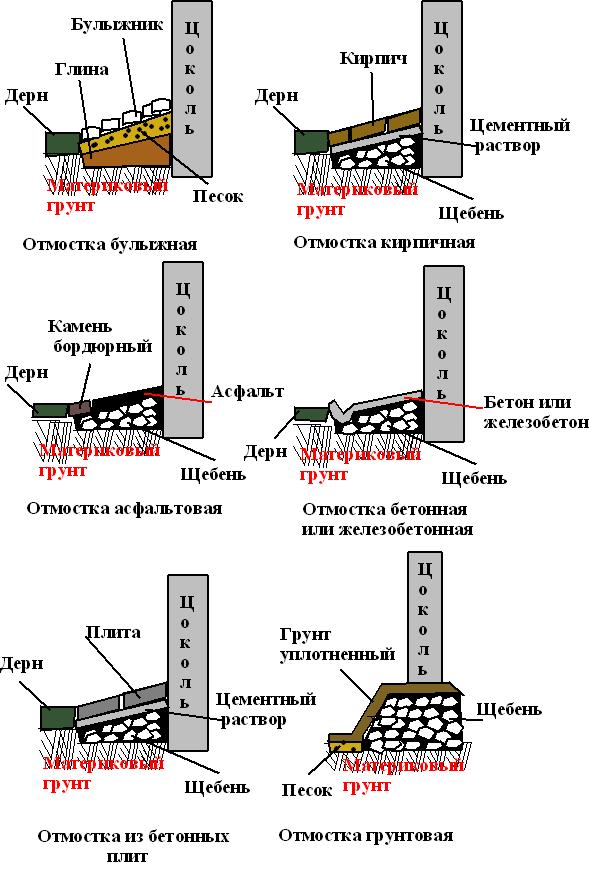
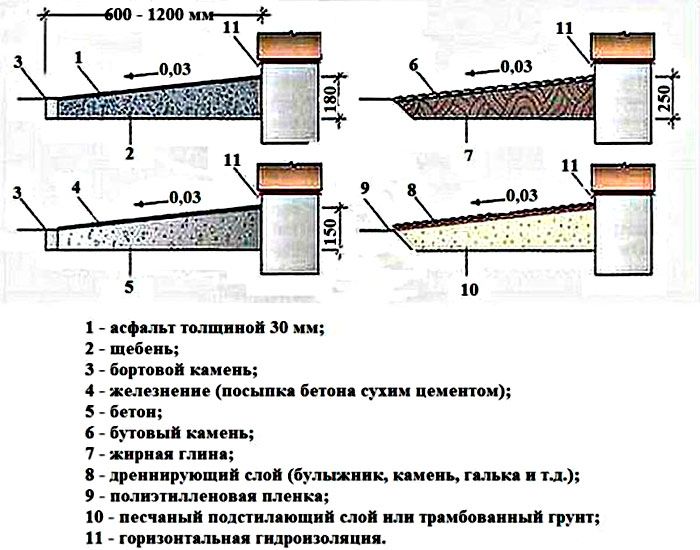
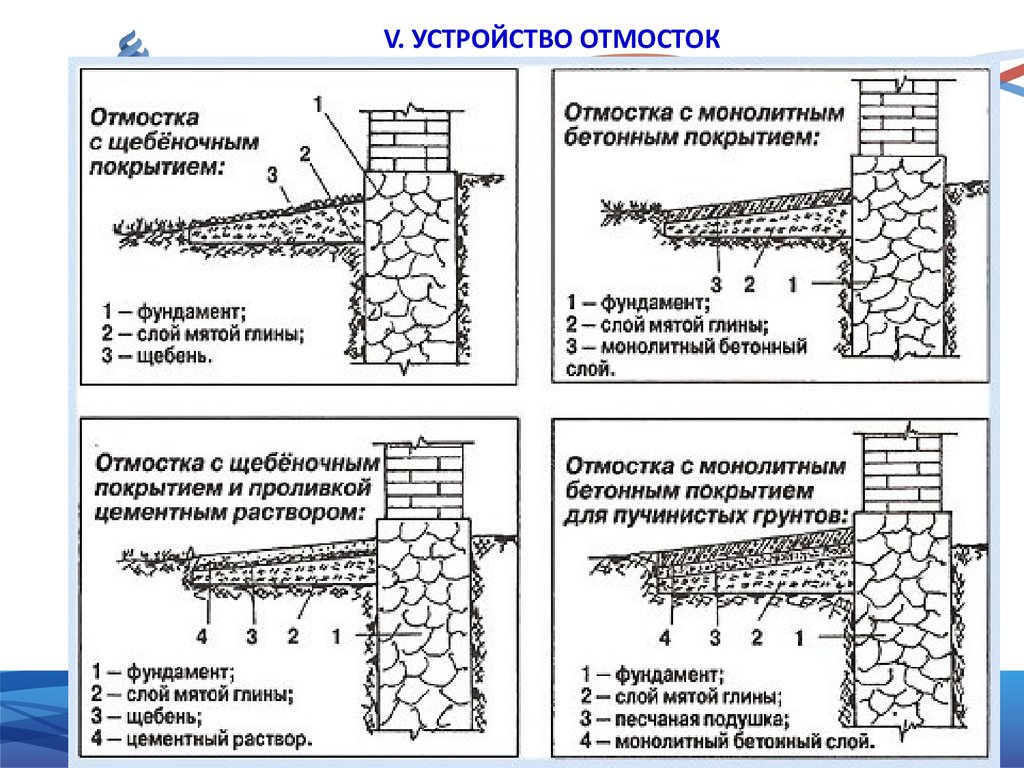
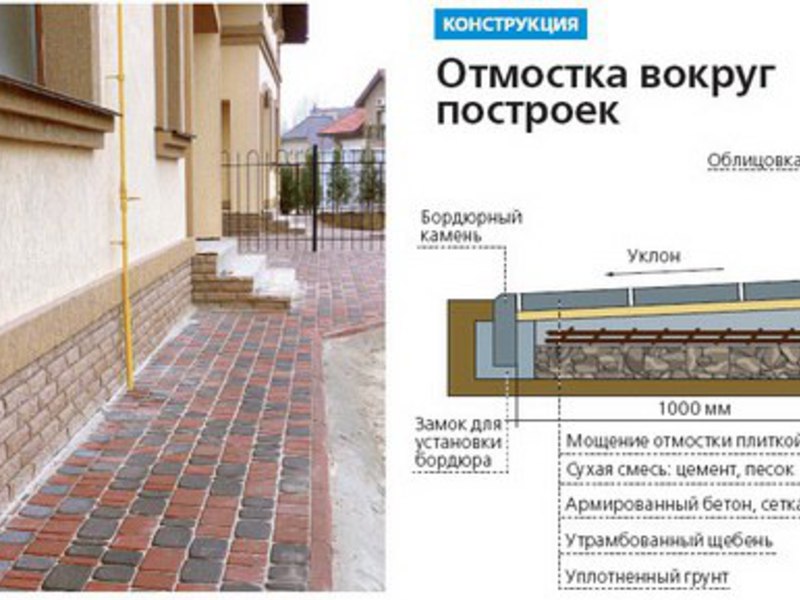
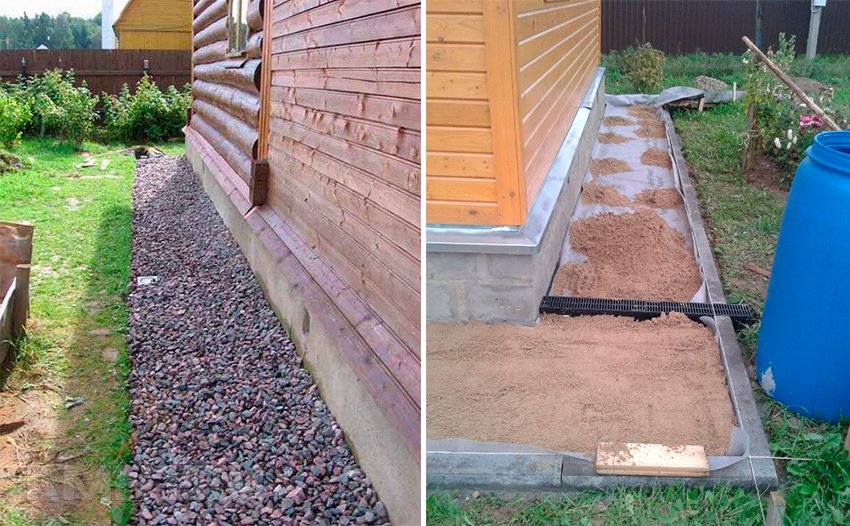
There are two types of blind area - hard and soft. When covering the first, concrete, asphalt, stone, paving slabs are used, and for the second - gravel, lawn, light tiles.
You can use a lawn to cover the soft blind area
First of all, as I think, it is necessary to exclude the typical technological mistakes that inexperienced builders make when constructing both types of blind area.
We do the blind area ourselves
Blind area technology includes several stages that even a beginner in construction work can handle.
Preparation
To start creating a protective covering around your home, prepare:
- pickaxe;
- twine;
- roulette;
- ramming;
- pegs for marking;
- waterproof film (geotextile);
- concrete mix;
- formwork boards;
- hacksaw;
- level;
- nails;
- reinforcement material, welding machine and wire cutters;
- usually a trowel, spatula;
- joint sealant (it is better to purchase a polyurethane compound).
Markup
Arrangement of the blind area around the house begins with the preparation of the area for construction. At this stage, it is necessary to mark the perimeter of the future "tape", or rather a trench for it, using a peg. There are several recommendations on this score:
- The distance between the beacons is 1.5 m.
- The depth of the trench will depend on the soil, but the minimum indicator for this value is 0.15-0.2 meters. If the land is "heaving", then the depth increases to 0.3 m.
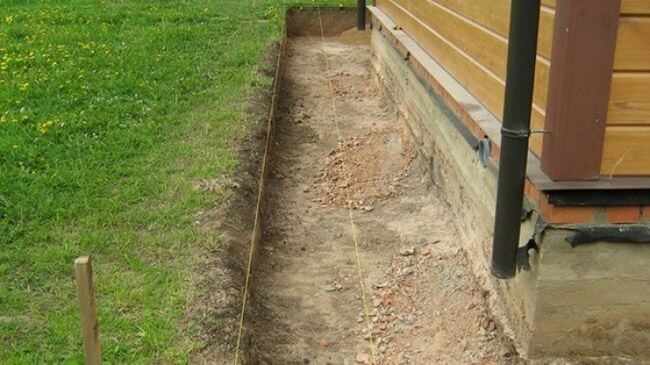
Marking for concrete blind area using pegs
The easiest way to apply the markings is to proceed in the following sequence:
- Drive metal or wood pegs into the ground in the corners of the house.
- Install intermediate beacons around the perimeter of the building.
- Tighten the cord or rope by connecting all the pegs.
Healthy! At this stage, a sealant can be used to separate the sheeting from the foundation.
After that, a slope of the system is formed, for this a trench is dug, in which the depth of one of its sides will be greater. To tamp the resulting ditch, it is enough to use a tree.First, the log must be placed vertically, raised and sharply lowered downward with effort. Thanks to this, the bottom of the trench will be compacted.
Formwork
Very often in the recommendations for the construction of this type of coating there is no description of the creation of formwork, but beginners should not neglect such a "helper".
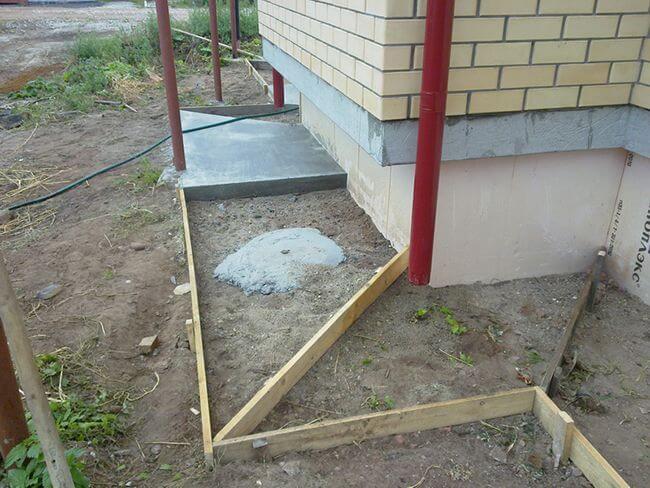
To prevent the concrete from spreading, it is necessary to prepare the formwork
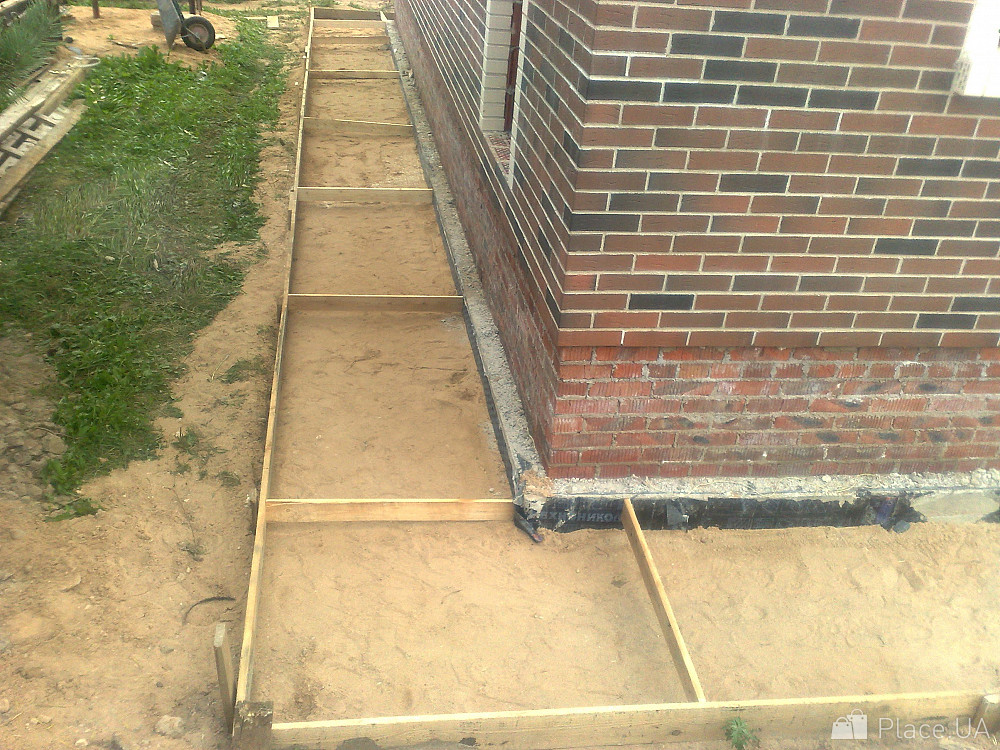
For formwork, boards will be needed, on which it is better to immediately mark the height of the future pillow. In the corners, fasten the improvised "box" with metal corners (bolts from the outside).
Important! If you do not want to remove the formwork, after the installation of the concrete blind area is completed, then be sure to treat the tree with an antiseptic composition, and wrap the boards with roofing material. Formwork scheme for the blind area
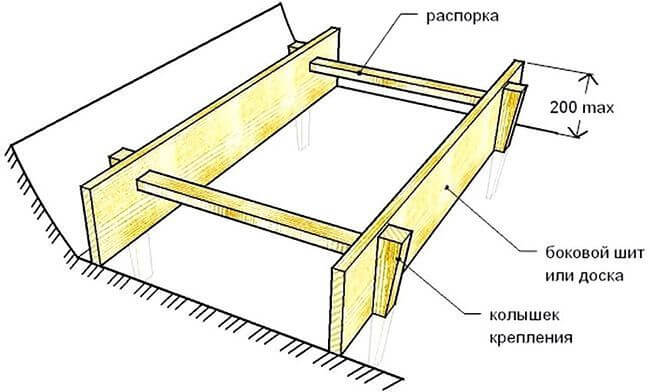
Formwork scheme for the blind area
Creating a pillow
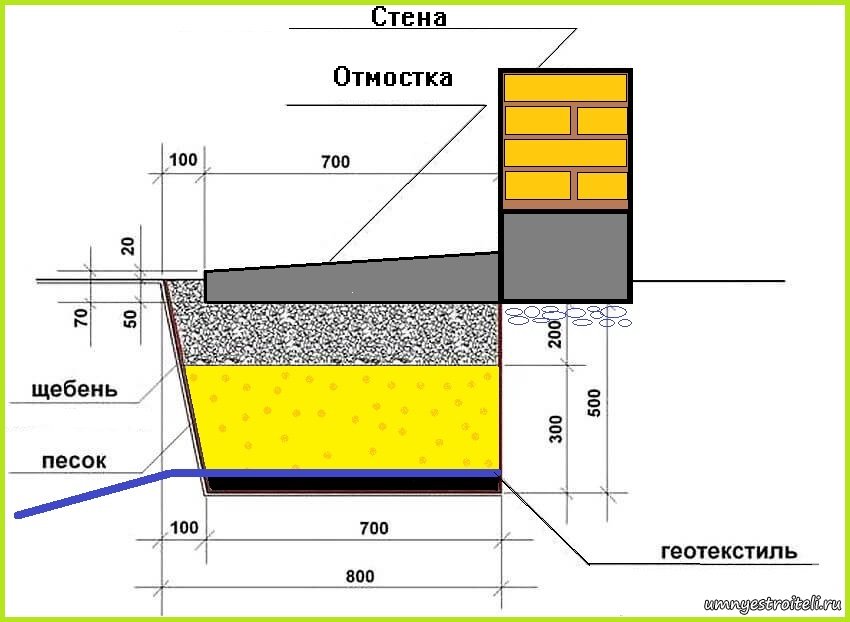
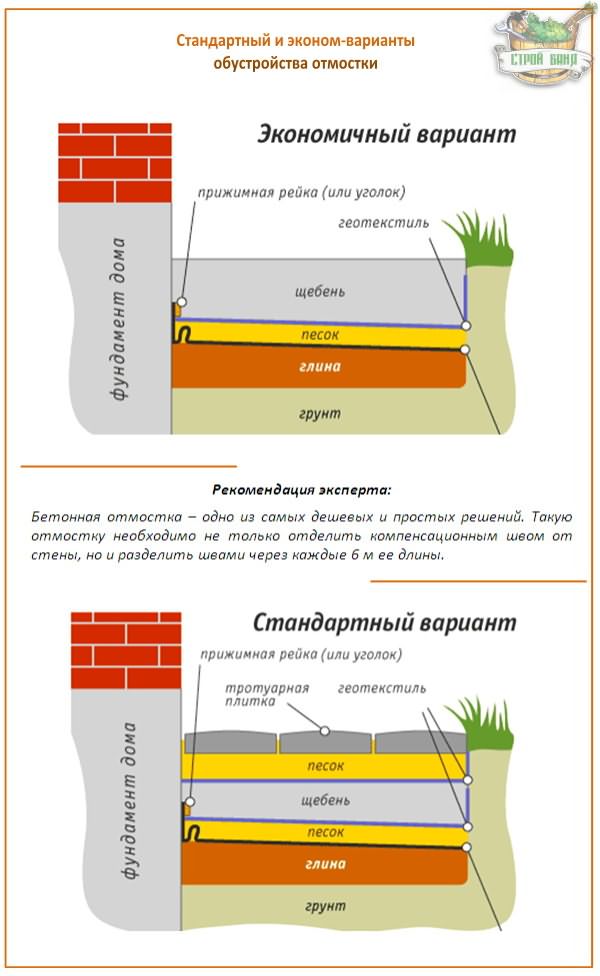
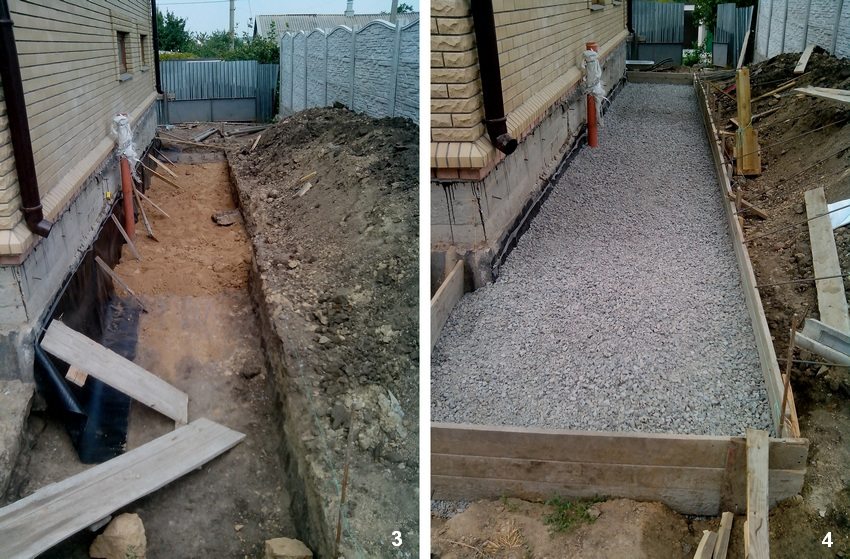
In order for a blind area of concrete to be made according to all the "canons" of construction, it is imperative to prepare a sandy or clay base for it. The thickness of the sand layer can be up to 20 cm. It is best to lay the pillow in several layers, moisturizing and thoroughly ramming each subsequent layer. At the final stage, the surface must be leveled.
Waterproofing
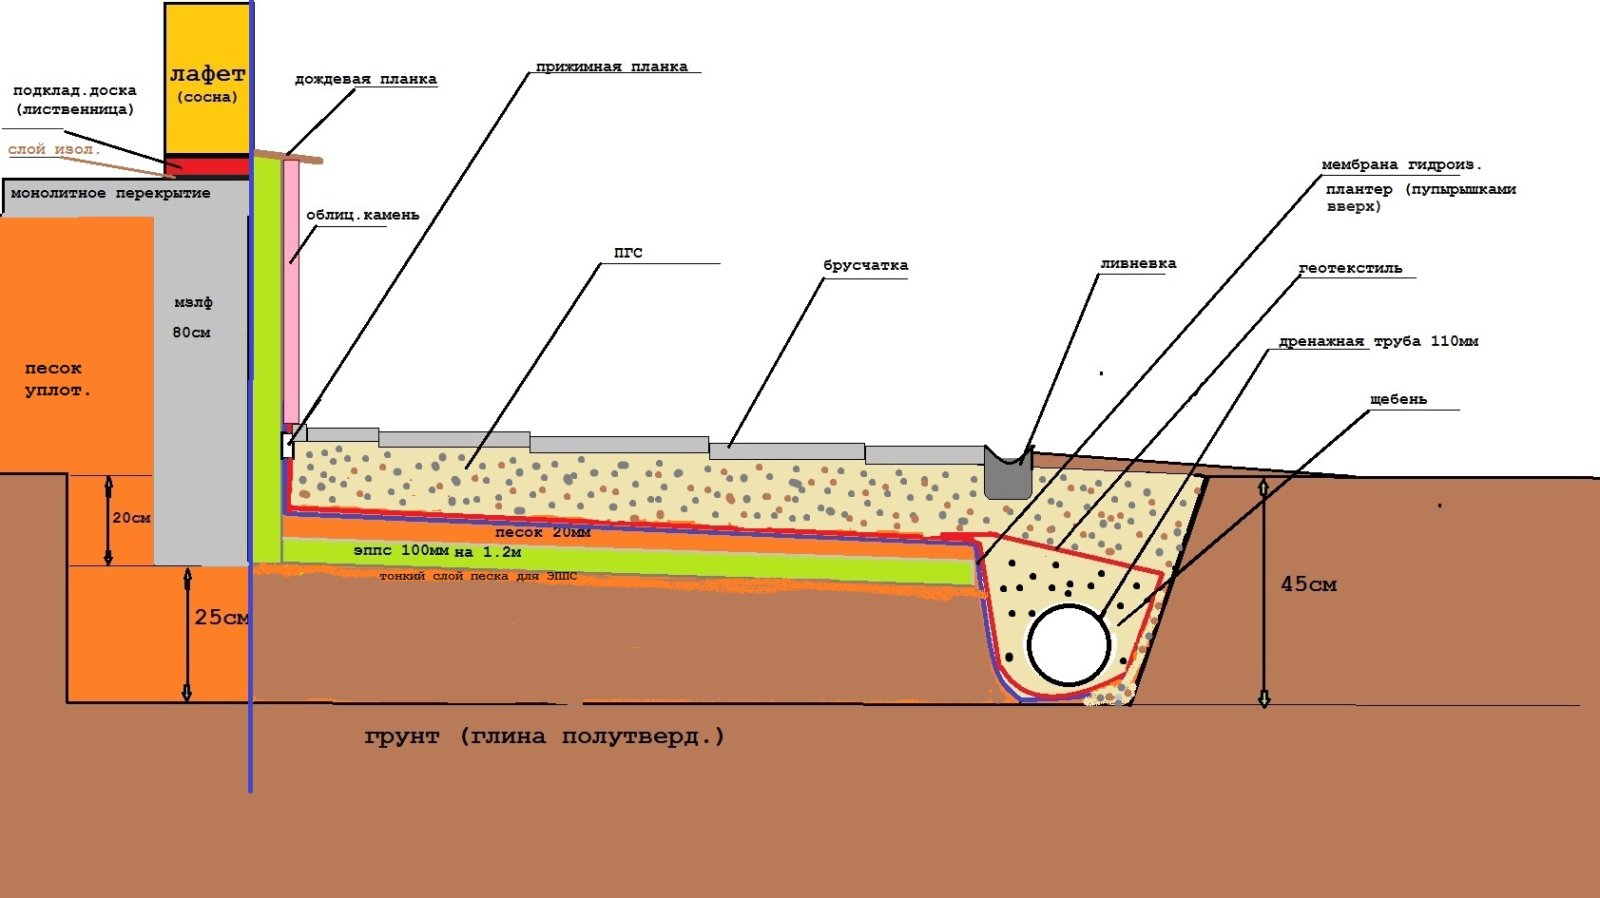
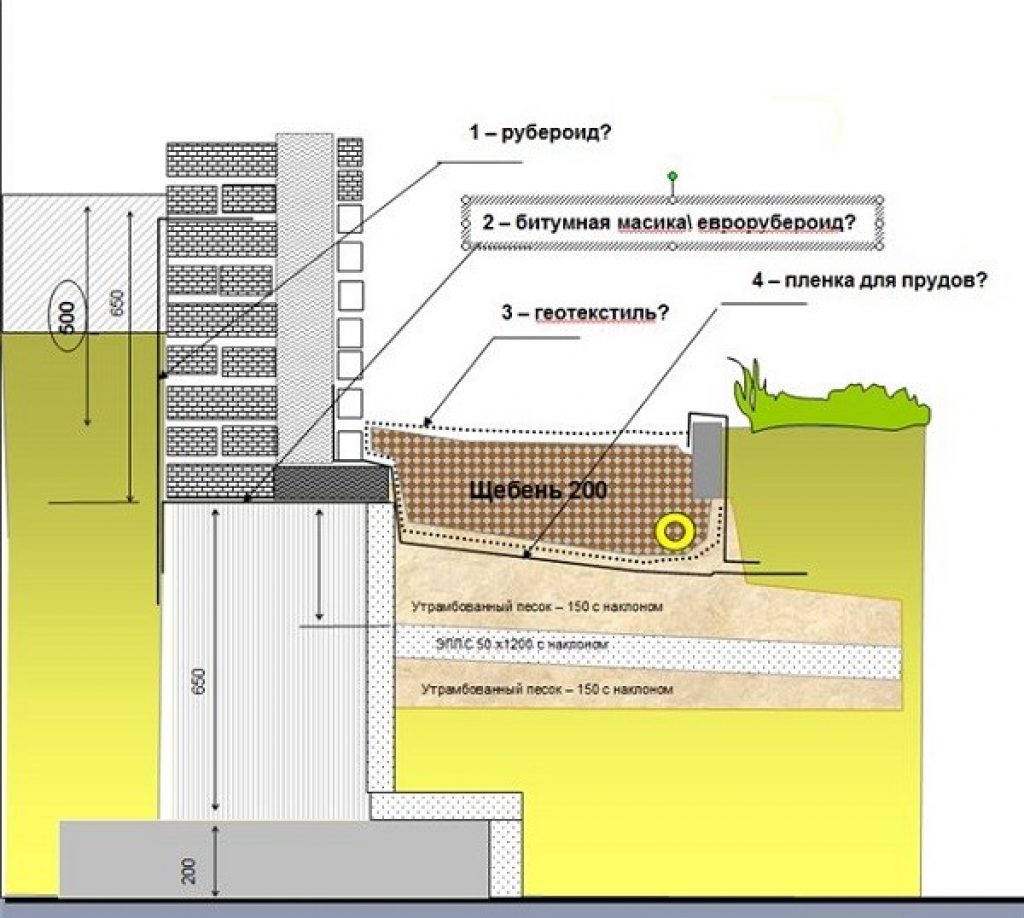
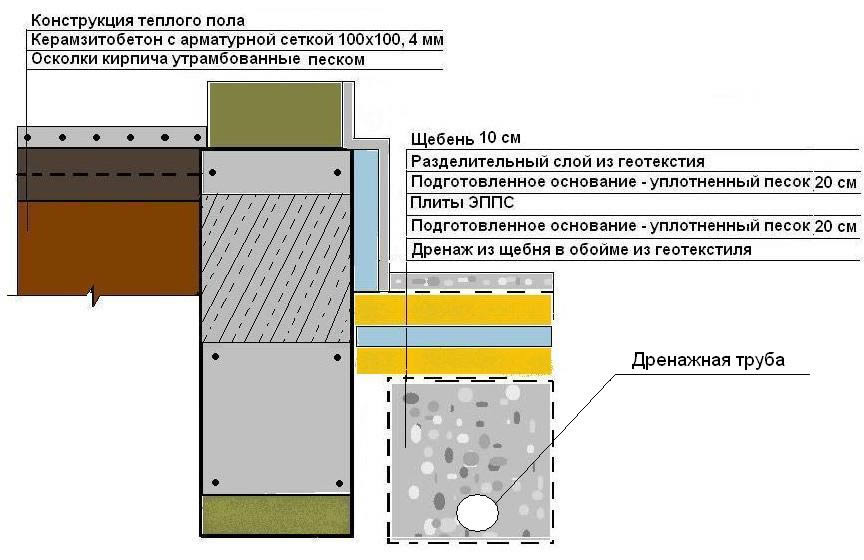
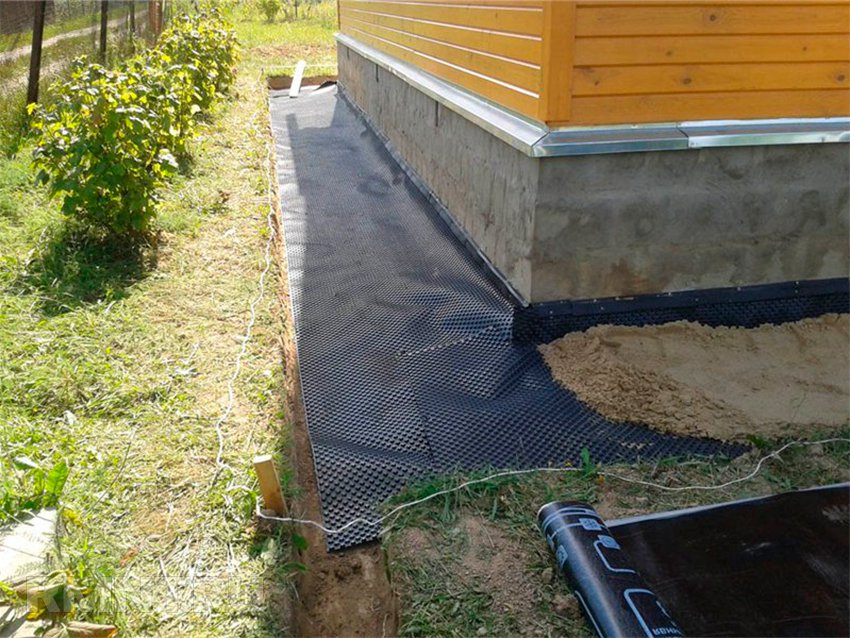
A waterproofing device involves laying several layers of roofing material or other geotextile on a pillow.
In this case, it is worth paying attention to the recommendations of specialists:
- The material must be wrapped a little on the walls in order to obtain an expansion joint.
- Roofing material must be overlapped.
- A thin layer of sand is poured over the geotextile, followed by 10 cm of gravel.
- If it is planned to install a drainage system, then it is laid close to the resulting "water seal".

Blind area waterproofing is performed using geotextile or roofing material
Reinforcement, pouring and drying
Above the level of 3 cm from the layer with crushed stone, it is necessary to lay a metal mesh with a step of 0.75 m. After that, you need to mix the concrete and pour it in equal portions into the resulting formwork sections. In this case, the poured composition must reach the level of the upper edge of the wooden "box".

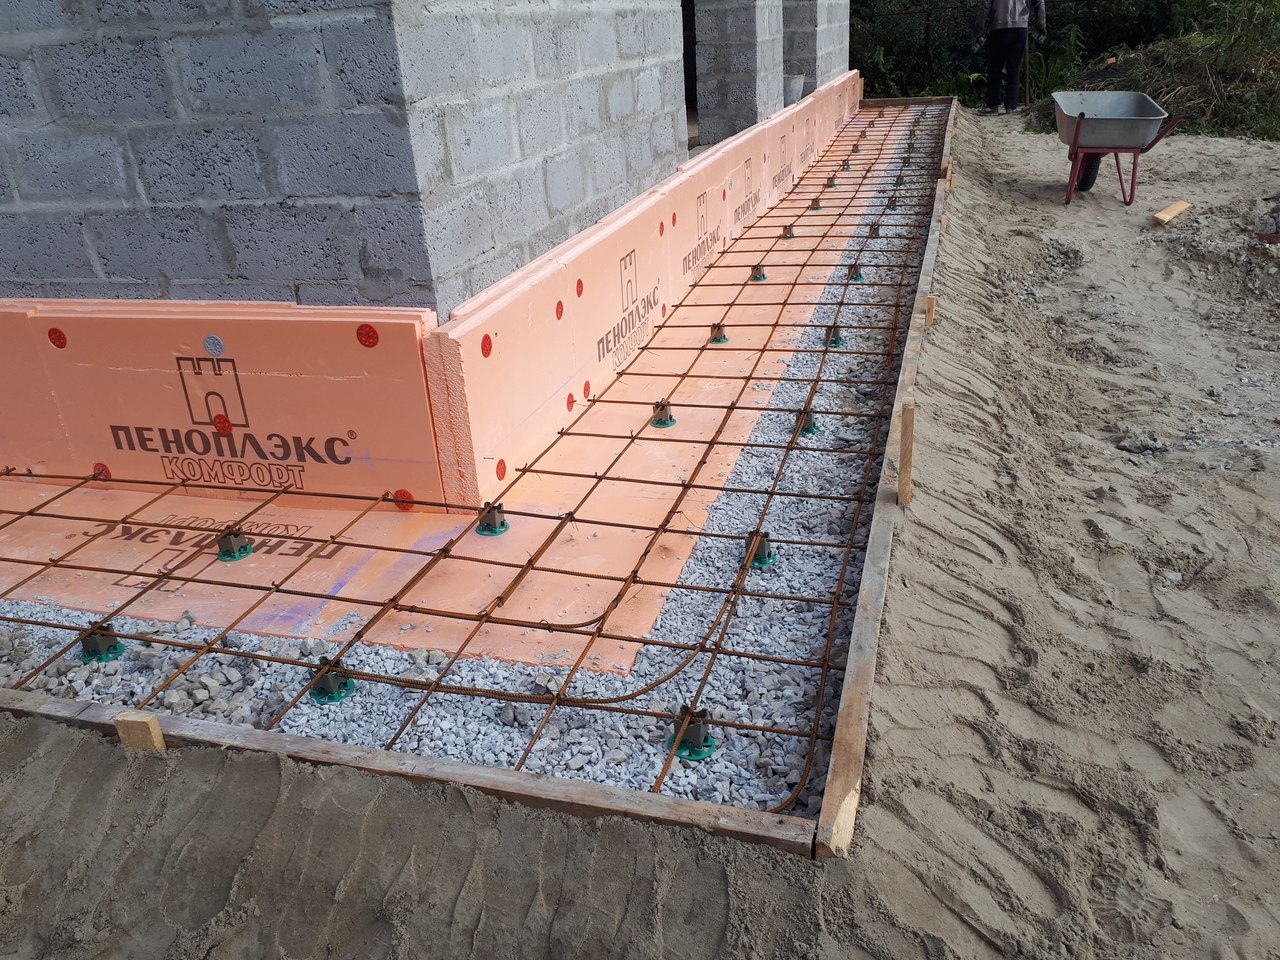
Reinforcement of the blind area for the house using a metal mesh
Healthy! After pouring, pierce the surface with an iron bar in several places to let the excess air out.
You can distribute the composition with a trowel or a rule. To increase the resistance of the concrete, 2 hours after pouring, "ironing" is performed. For this, the surface is covered with a layer of dry PC 400 with a thickness of 3-7 mm.
Healthy! To prevent the composition from cracking, it must be moistened with water 1-2 times a day.

After pouring and leveling the mixture, it must be covered with polyethylene
Besides, how to fill correctly blind area, you need to take care that it does not crack during the drying process. To do this, you need to protect the coating from precipitation and the sun with a plastic film. It is believed that the blind area completely dries out after 10-14 days. However, according to the regulations for drying, it is worth taking at least 28 days.
Knowing all these recommendations and the correct proportions of solutions, you can improve your home, without the participation of specialists.
Once and for all!
What are the advantages and disadvantages of a monolithic concrete blind area, mentioned above. In addition, it requires careful implementation. It must be said that the blind area of ready-made reinforced concrete slabs does not fully possess the qualities of a monolithic one, this is the same slab blind area, only more expensive and heavier. It is used more in industrial construction in the presence of a stock of concrete products or a source of their supply.
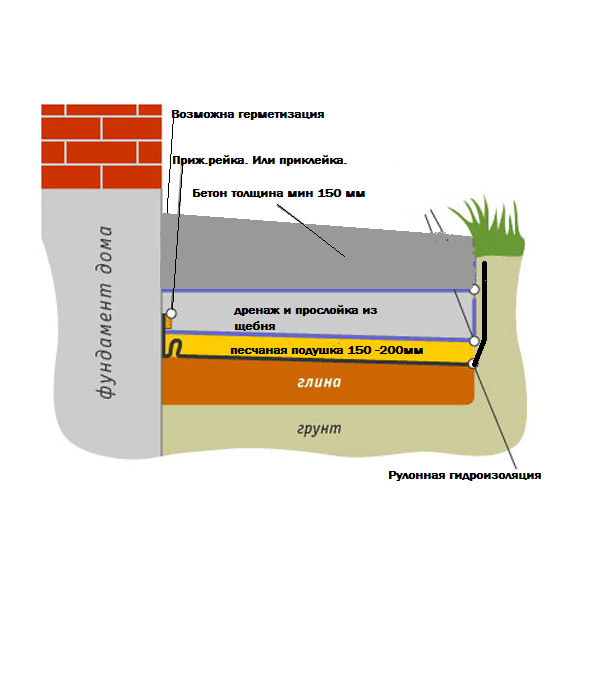
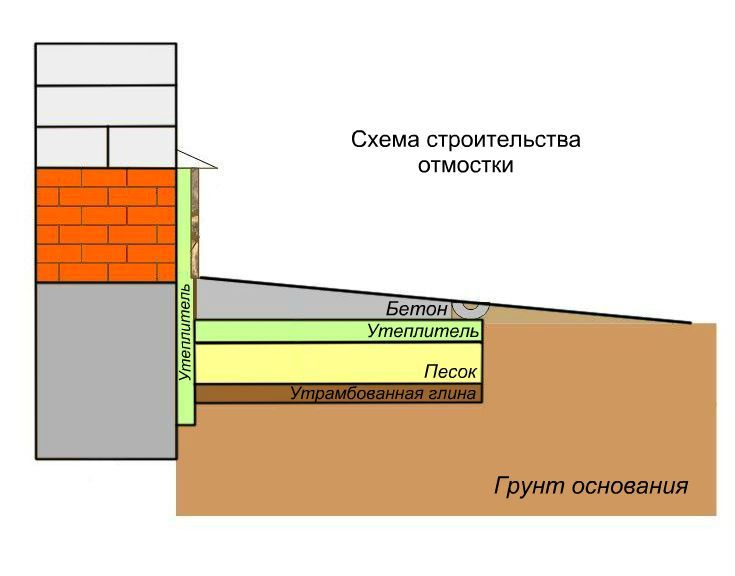
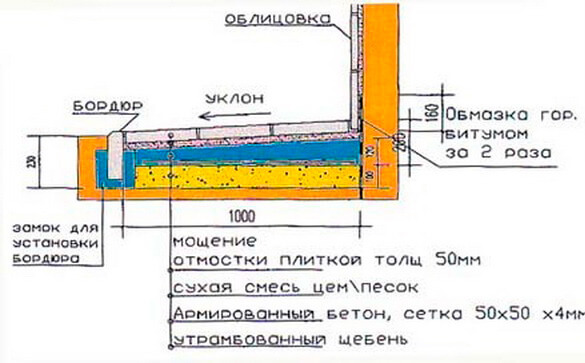
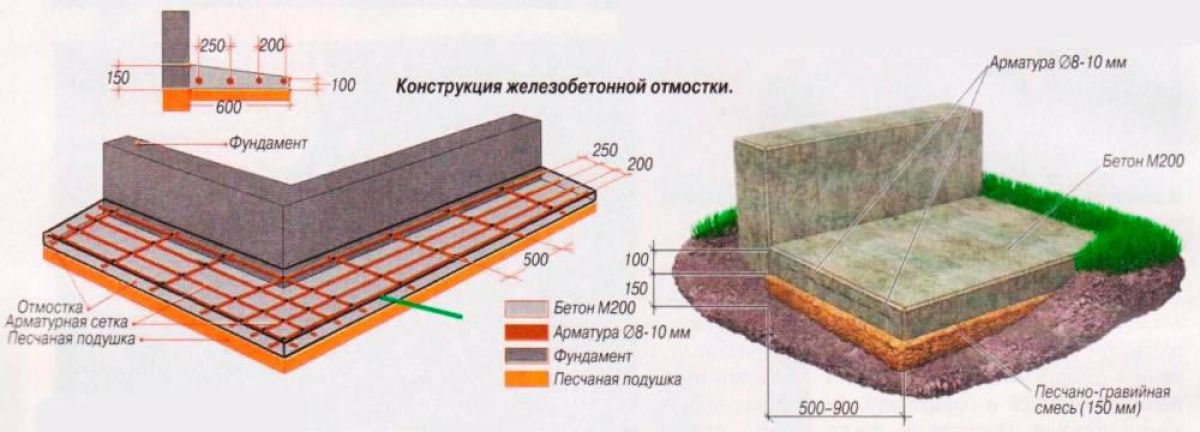
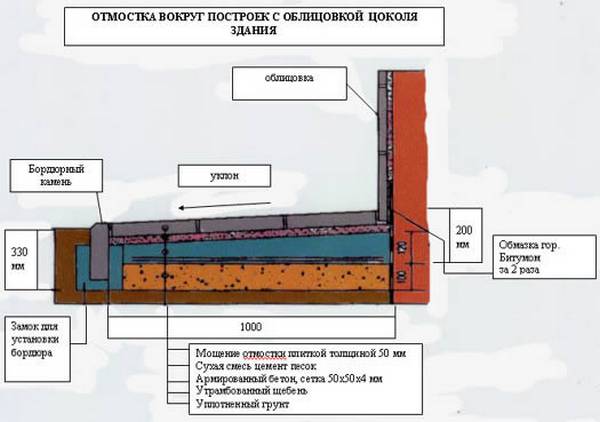
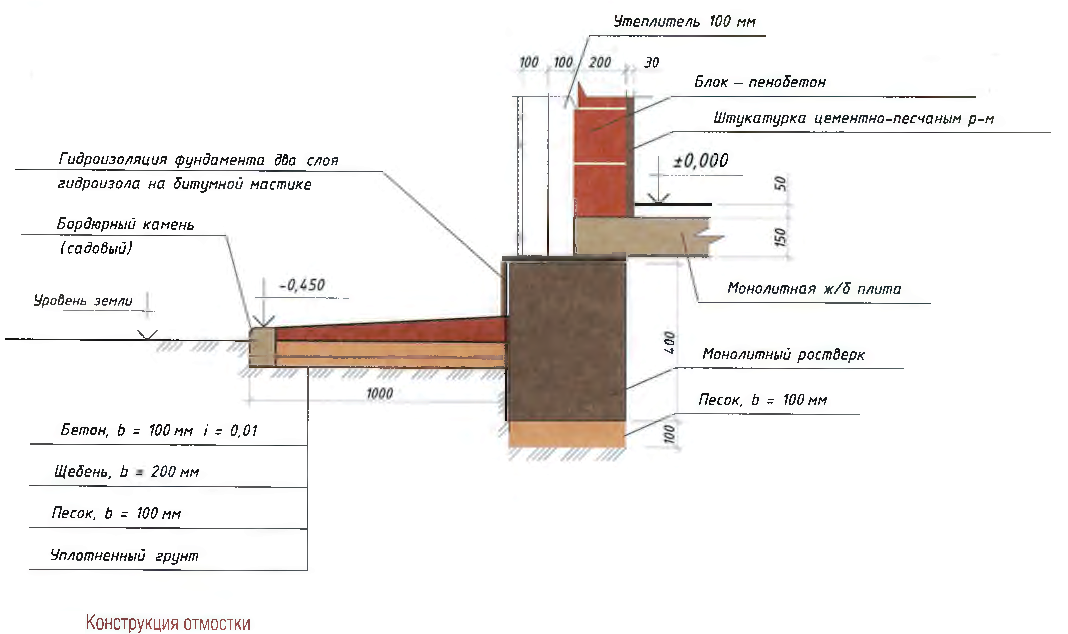
A summary diagram of a monolithic concrete blind area is shown in Fig. below. It only needs some explanation. Firstly, the casting formwork is installed after the waterproofing has been laid. Its external fold upward, as in a multilayer pillow, is not needed here. However, it is highly advisable before installing the expansion joints (see.below) and laying the reinforcement around the perimeter of the formwork, put geotextiles on the insulation so that the sand does not spread later. It is possible not to bring the textile tape to the wall, but to bring it up to the formwork to its edge, and then at least pin it with clerical buttons so that the mesh does not slide down during further work.

Scheme of a monolithic reinforced concrete blind area
Second, after filling the cushion, but before laying the reinforcement, the formwork must be divided into sections with thermal deformation compensators; without them, the continuous concrete tape will soon crack. The maximum section length is 3 m, but expansion joints, in addition, must be installed between all pairs of adjacent to the building and external corners, see fig. That is, each section of the blind area should be a convex in plan, without corners protruding into its contour, a geometric figure.
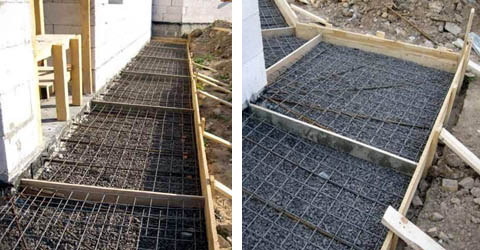
Formwork device for reinforced concrete blind area
Expansion joints are made of 15-30 mm thick wooden planks. Since they will not remain in the blind area forever, the blanks must be properly soaked twice with hot bitumen. It is better not even to soak, but to sprinkle: boil in bitumen, brought almost to a boil, for 10-20 minutes, turning over all the time. Expansion joints are installed immediately with the required slope - along them, like on beacons, a long rule or, in the presence of some building experience, with a half-rafter, the pouring surface will be formed.
The third is the pouring solution. The final grade of reinforced concrete must be at least M200, i.e. cement is needed from M400. But this is not enough, you still need to accurately maintain the recipe of the composition. Bulky parts "on the bucket", or even by eye, you will not manage here, the tape will crack after a while, and it is more difficult to repair a monolithic blind area than to lay a new one. Components should be measured by weight only! The monolithic concrete blind area is poured with a solution of the following composition, per cubic meter of finished:
- Cement M400-M600 - 280 kg.
- Crushed stone - 1400 kg.
- Building sand fraction 0.2-0.35 mm - 840 kg.
- The water is technically clean - 190 liters.
The mortar, as we can see, turns out to be very dry, even drier than on the floor screed. This is necessary because fresh fill should keep the given slope until solidification. Pouring is done in sections, in rather large portions of the solution, so you should not rely on an improvised tub and a perforator with a mixer, you need a concrete mixer. Kneading is done in the following order:
- The portions of the components required for the next section are weighed out.
- The dry cement is thoroughly mixed, not less than 20-25 revolutions of the mixer hopper; this is necessary to break up its clots and lumps.
- Sand is introduced in 3-5 receptions, mixing each dose with 5-6 revolutions of the hopper.
- In the same way, gravel is introduced.
- Water is added with a gentle stream for 3-5 turns of the hopper.
- Mix for another 10-15 turns of the hopper.
The poured section is compacted with a vibrating strip, trying not to touch the reinforcement with the working body, in order to avoid the formation of cavities with cement lait, they greatly reduce the strength and durability of the blind area. Then the slope is deduced along the compensators, as in beacons. After the mortar has set, it is advisable to iron it, as for a cement-filling blind area, and in the same way as it is, the monolithic area is covered with a dark film and periodically sprinkled with water. Do not cover with a damp cloth, such as a foundation! The solution from above will get wet, weaken and the entire blind area will crumble!
Repair
Serious damages on the concrete blind area are repaired in a timely manner. The recommendations are as follows:
- upon detection of strong and deep defects, a complete replacement of the coating is performed;
- small gaps are filled with sealants or fillers;
- wide cracks are treated with sand and cement with fine gravel;
- the surface is systematically primed.
Before work, it is recommended to clean the surface of dust and dirt, widen cracks and completely remove destroyed areas.For better fixation of the new composition with the blind area, it is necessary to treat the edges of the cracks with a primer.
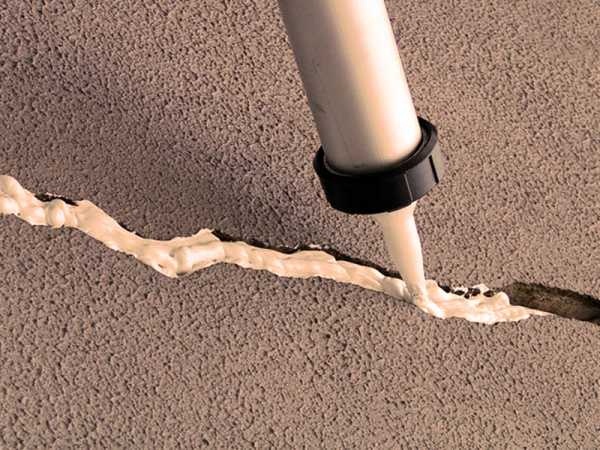
In the presence of large cracks, the following steps are performed:
- inspection of the damaged area, its expansion with a perforator;
- cleaning and priming;
- application of bituminous mastic;
- filling with a mixture with a grant weight;
- leveling with a wooden trowel.
Laying the blind area from paving stones with your own hands
Do-it-yourself high-quality laying of the blind area from paving stones gives the following advantages:
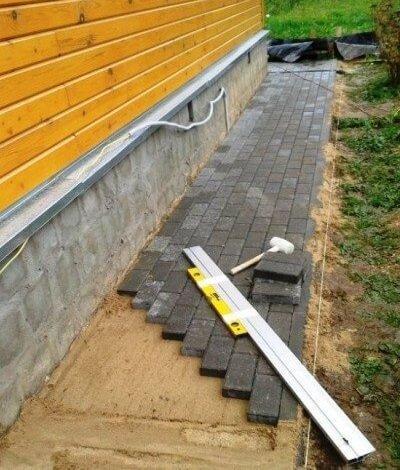
Laying the blind area from paving stones with your own hands
- Reliability of waterproofing. Building material, in the immediate vicinity of the foundation, does not allow moisture to quickly penetrate into the ground.
- Thermal insulation. This design, due to the presence of several layers, well protects against freezing. If this is not enough, additional insulation is available.
- Durability. This structure does not crack over time, like other building materials. For example, like concrete or asphalt. The stone, as a rule, lasts much longer, which means that reliable protection of the building is guaranteed.
- Maintainability. In case of damage to the drainage strip around the house, a blind area of paving stones, it allows you to quickly replace individual elements without dismantling the entire coating. It should be noted that such work is quite simple to do.
- No special equipment or tools required. To build a drainage strip around a house of concrete, you must order at the factory or prepare a mixture of cement, sand, gravel and water yourself. Yes, the process is not complicated, but if you order a concrete solution from the factory, you will need additional financial investments. If, however, cook by hand, then for mixing large enough volumes, you will need an impressive capacity. But for paving stones, there is no such need.
- The blind area of paving slabs is immediately usable. When filling the blind area with concrete, it must be understood that the structure will gain the proper strength within 25-30 days. As a rule, it is recommended to remove the formwork only when the strength is 70%. And this is at least 2 weeks of downtime. In addition, the concrete needs proper maintenance for at least a week. You will have to moisten the surface well every 2-3 hours. Otherwise, it will crack. All these additional actions, as a rule, significantly increase the construction time and significantly increase the labor intensity.
- Paving stone construction, no need to install plank formwork. When using concrete, one cannot do without such a device.
- Free access to storm sewers and drainage. In order to carry out maintenance or repair of communications, it is enough to dismantle several elements of the blind area, and after completing the required actions, return them back.
- Large assortment of colors and shapes of tiles. Laying the same blind areas around the house made of concrete does not give much room for imagination and the creation of unique branch structures.
As can be seen from the above, the device of the blind area from paving slabs, in many respects, surpasses the concrete structure. The only drawback of a cobbled canvas is the high cost of construction.
The blind area of the house from paving slabs - Tools and building materials
It will not be superfluous to draw your attention to a construction tool in the article, which will allow you to quickly and efficiently make a protective drainage strip around the house on your own. This requires you to have the following inventory: Tools for laying paving slabs

Tools for laying paving slabs
In addition to construction tools, for high-quality construction of a blind area from paving slabs with your own hands, you must purchase the following building materials:
- Paving stones and curb stones;
- waterproofing building material - film, roofing material, linokrom, waterproofing;
- clay for hydraulic lock;
- for proper leveling of the base, medium or coarse sand;
- crushed stone or gravel (this material, like sand, provides a drainage layer, levels the base and significantly improves the characteristics of the soil;
- geotextile (it prevents various debris from entering the drainage system;
- a cement-sand mixture (the joints of the paving stones are filled in and filled with it).
The above tools and building materials must be prepared in advance. This approach will allow, not to be distracted during the process of construction activities, to spend time and money on the purchase of missing materials
To make a strip for water drainage with your own hands correctly, you should pay special attention to the quality of consumables
Preparation for work
Before starting work, you need to decide on the main parameters of the future blind area. Set the correct width first. Most regulatory documents indicate that the blind area should be at least 60 cm wide.However, this is only the minimum recommended value. There are many additional important factors to consider before finally choosing the right width.
First of all, pay attention to the peculiarities of the eaves overhangs of the roof of your house. The outer border of the blind area should be approximately 25-30 cm further than the most protruding edge of the roof cornice. At the design stage of the blind area, one cannot but take into account the architectural and design features of the house
For example, if the site is decorated with all sorts of unusual design elements, the blind area can also be given an original look, competently and organically linking it with other elements of the landscape
At the stage of designing the blind area, one cannot but take into account the architectural and design features of the house. For example, if the site is decorated with all sorts of unusual design elements, the blind area can also be given an original look, competently and organically linking it with other elements of the landscape
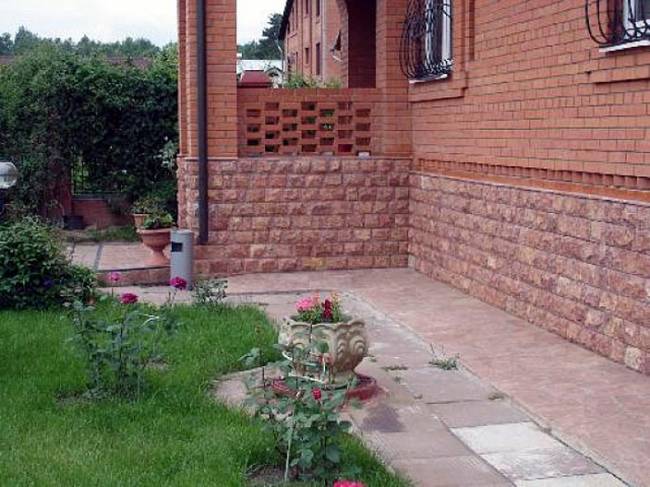
How to make a blind area correctly
A very important parameter is the type of soil at the construction site. For example, if the house is on collapsible soil, the width of the blind area should be at least 90-100 cm. Experts recommend that the blind area be more than 1 m wide.Under such conditions, the structure in question will be able to simultaneously drain water and perform the functions of a convenient path around the building.
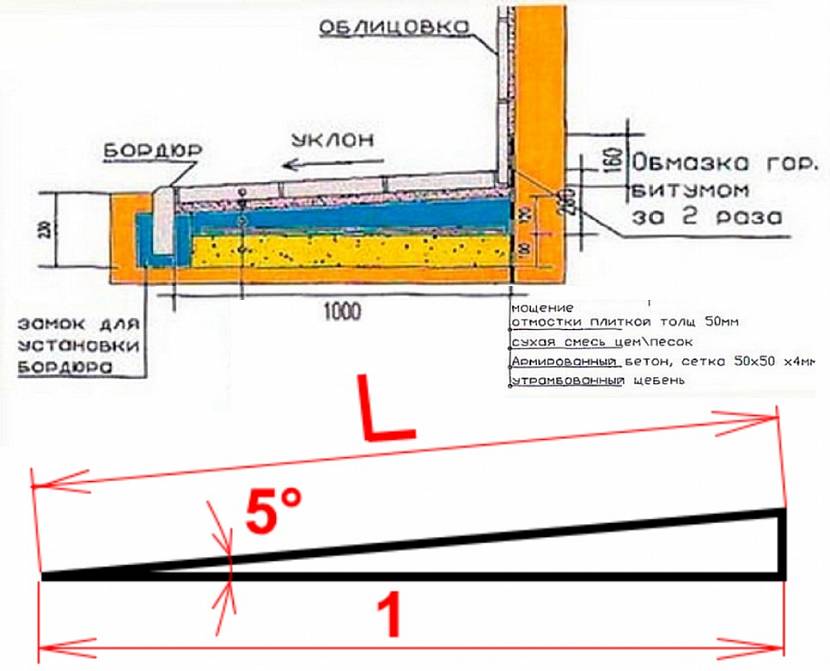
After determining the appropriate width, you will need to establish the optimal value for the slope of the blind area. In order for the structure to effectively cope with the tasks of water drainage, the slope must be at least 2-5 degrees away from the house.
To determine the exact value of the slope, you must also take into account the climatic features characteristic of the location of the house, and the type of material used to equip the upper layer of the structure. For example, if the covering layer is made of paving slabs, the slope of the blind area can be slightly reduced compared to the same indicator for a gravel structure.

Blind area
Directly the slope can be created at the stage of laying the lower layer or during the installation of the top covering. This moment depends on what specific materials are used to equip the structure in question.
After determining the optimal system parameters, calculate the required amount of materials and assemble the required tools. At the stage of creating the underlying layer, you will need gravel and sand or clay.
The top layer of the blind area is most often made of concrete. If you also decide to make your choice in favor of this material, first prepare a concrete mixer or a container for preparing mortar, reinforcement and wire, several shovels, a level and other small accessories.
Blind Filling Guide
The blind area makes a great contribution to the durability of the foundation, therefore, its creation must be approached with the utmost responsibility.
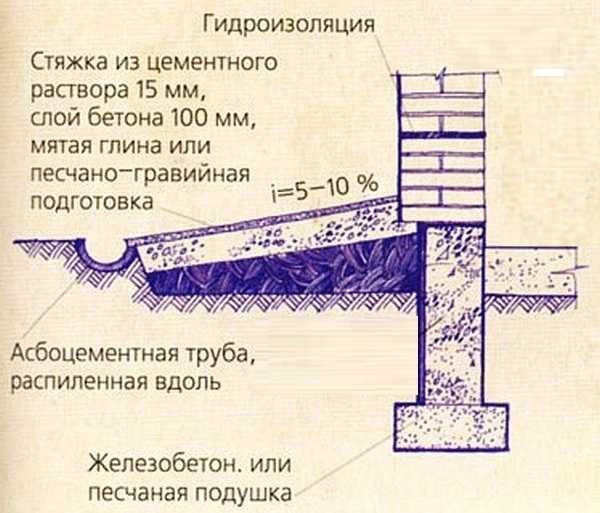
Blind area design
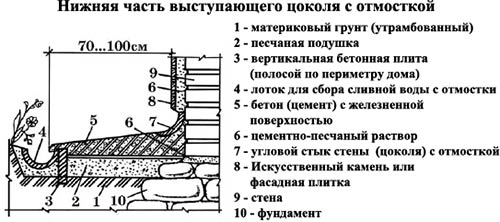
Blind area design
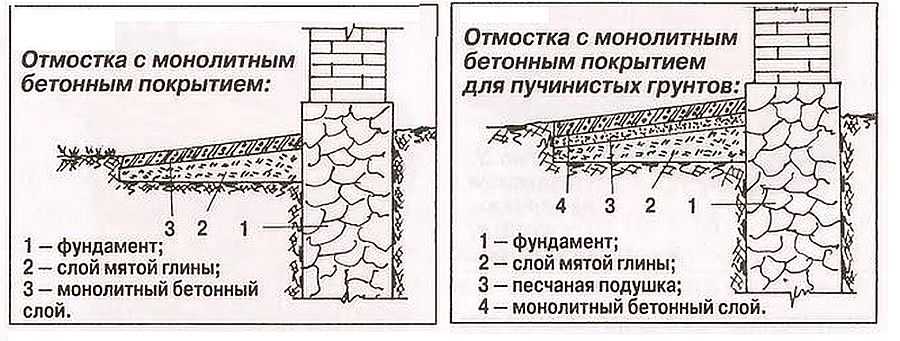
The structure consists of an underlayment and a top layer. The first is responsible for creating an even compacted base for the next layer. Created from sand and fine gravel. The total layer thickness is about 2 cm. You can also use clay. When choosing a specific bedding material, be guided by the material of the top layer.
The top layer is designed to create water resistance and increase the resistance of the structure to water. Can be created from small cobblestone, clay, concrete and other materials. The thickness of such a layer is about 10 cm.
The instructions will consider the procedure for arranging the most popular type of blind area - concrete. Having dealt with its construction, you can easily make a blind area from any other materials suitable for this purpose without any problems.
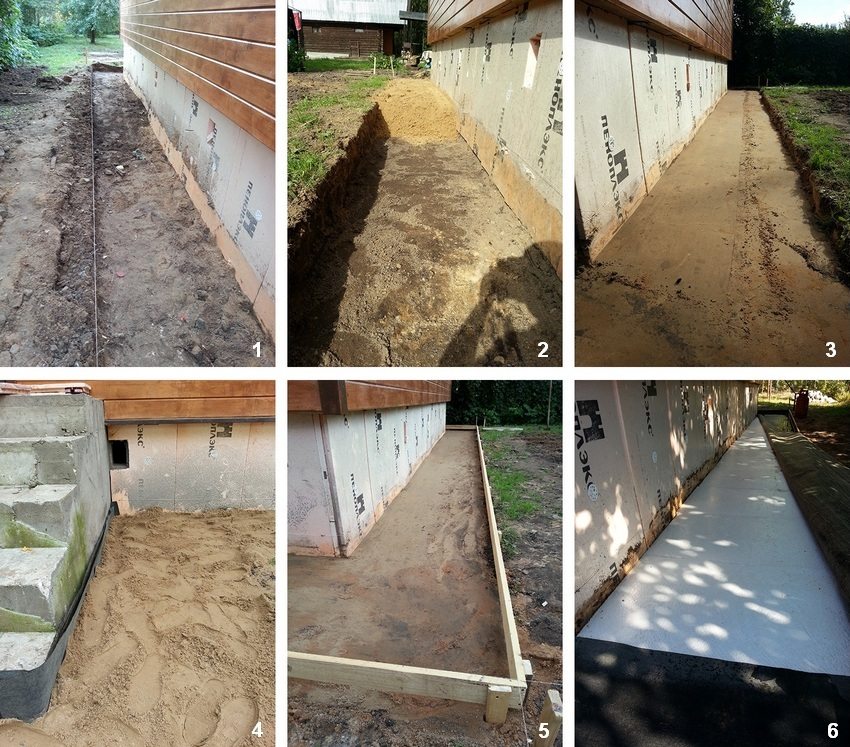
How to make a blind area with your own hands. Digging trenches and erecting formwork
-
Remove the topsoil. Select the thickness based on the characteristics of the bedding and top layers described above. In the case of a concrete blind area, about 20-25 cm of soil is traditionally removed.
- Prepare an even and tidy trench around the entire perimeter of your home. The bottom of the trench should be compacted.
-
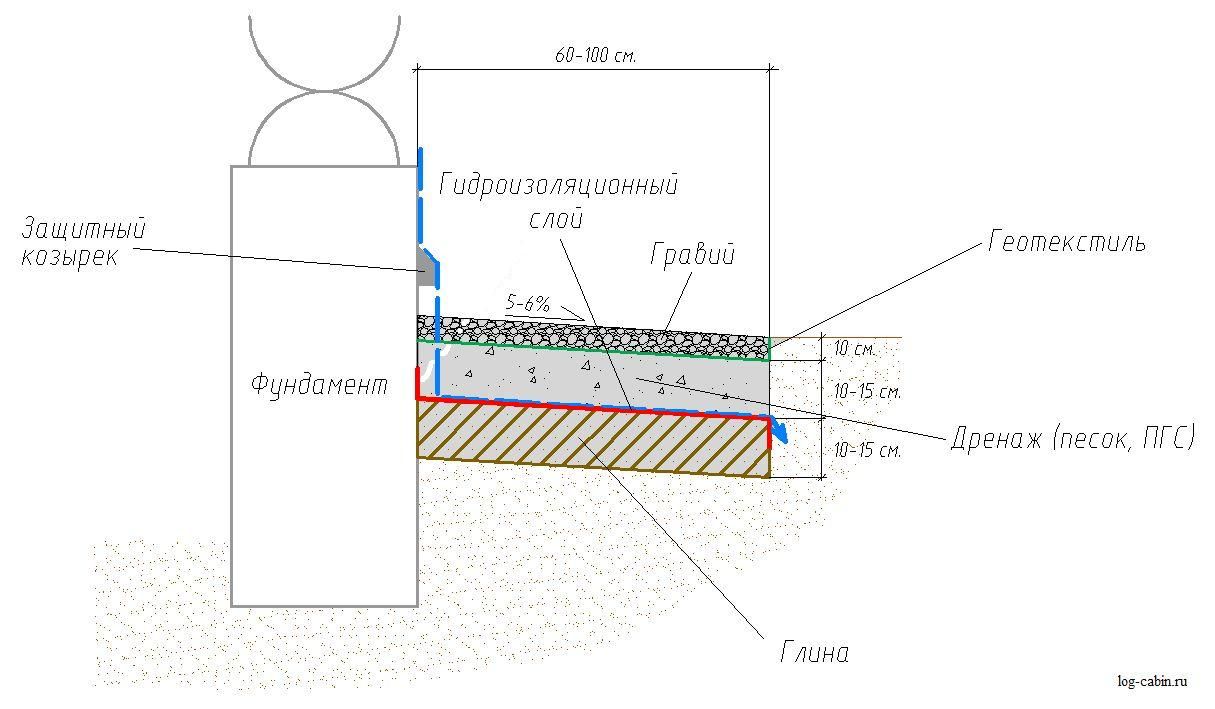
Start assembling the formwork. To create this structure, wooden boards with a thickness of about 2 cm are perfect.Place a thin layer of clay in the trench, level it and compact it. Fill in about a 10 cm layer of sand and compact carefully as well. Usually, it is enough to simply moisten the sand with some water. Do not overdo it with water, remember that there is clay below and it does not need excessive moisture.
- Finish with a 6 to 7 cm layer of gravel.
Reinforcement of the blind area
The technology of arranging the blind area around the house involves the mandatory implementation of reinforcement. Thanks to the reinforcing mesh, the rigidity and durability of the concrete structure will be increased. As noted, you can buy a ready-made mesh or assemble it yourself from metal rods. Cells with a side of 10 cm are considered optimal.
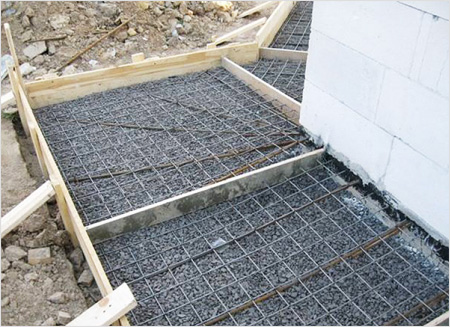
Reinforcement of the blind area
Expansion joint
Special attention should be paid to the expansion joint. It is created at the junction of the basement of the house with the blind area
Due to such a seam, the protection of the mentioned structures will be provided in the process of soil subsidence. That is, the blind area will be able to sag along the seam without damaging the basement of the house. The seam width of 1-1.5 cm is considered standard. The seam must be filled with roofing material, sand and gravel mixture or bitumen of your choice.
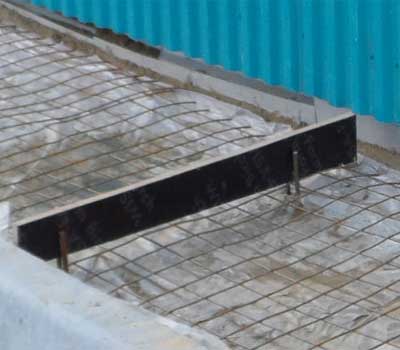
Expansion joint
Also, for filling, you can use a special tourniquet, for the manufacture of which foamed polyethylene is used.
The technology of the blind area requires that the seams are present and across the concrete structure, approximately every 200-300 cm. They will protect the blind area from rupture during frost. Cross seams are most conveniently done with wooden battens. It is enough just to install the battens in such a way that their top is on the same level with the upper boundary of the concrete pour. Also, expansion joints must be present in the corners of the structure. Do not forget to take into account the slope of the blind area.
Concrete for the blind area. Cooking and pouring
Concrete is prepared from 1 part of cement (it is best to use material of the M400 brand or less budgetary M500), two parts of sand and four parts of crushed stone.
After pouring, the concrete is compacted and leveled. The wooden slats previously used to create transverse expansion joints will at the same time serve as beacons by which you can navigate in the process.

Pouring concrete blind area
After completing the pouring, the concrete must be covered with a cloth, burlap is perfect. The fabric should be regularly moistened with water to prevent the concrete from drying out and cracking.
In the end, all that remains is to wait until the concrete gains strength. On average, this takes 1 month. If desired, you can perform the finishing facing of the blind area. An acid-resistant brick is perfect for this.
Thus, there is nothing difficult in filling the blind area around the house with your own hand. Just follow the instructions and everything will work out.
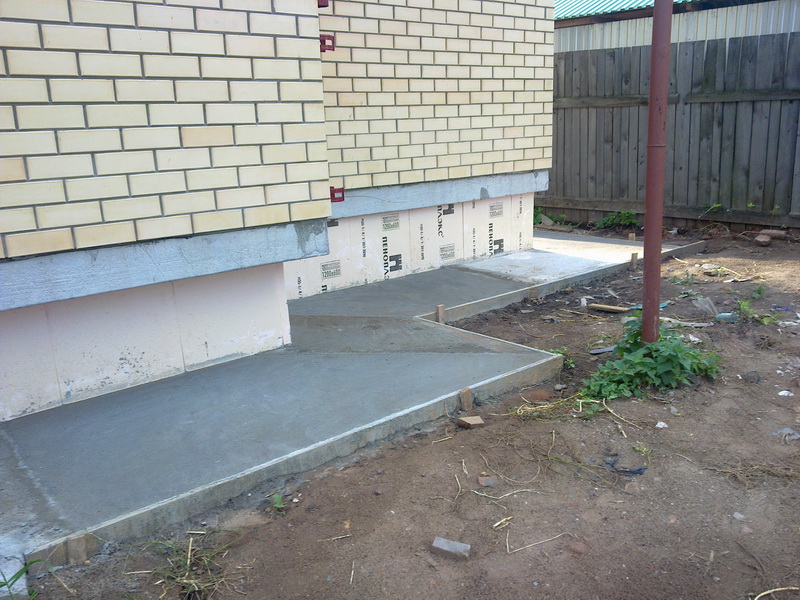
Flooded blind area
Happy work!
What crushed stone is suitable for the blind area
In the manufacture of the blind area, crushed stone of different fractions is used. The size of the granules of the building material determines how it will "behave" during installation:
- the smallest crushed stone up to 5 mm in size is used only as a "powder".
- small crushed stone (up to 20 mm) is easier to tamp;
- stones of medium size (from 20 to 40 mm) look better, but it will be difficult to walk on such a surface.
- coarse raw materials, from 40 mm in size, are used for the construction of massive structures (it is most difficult to work with it).
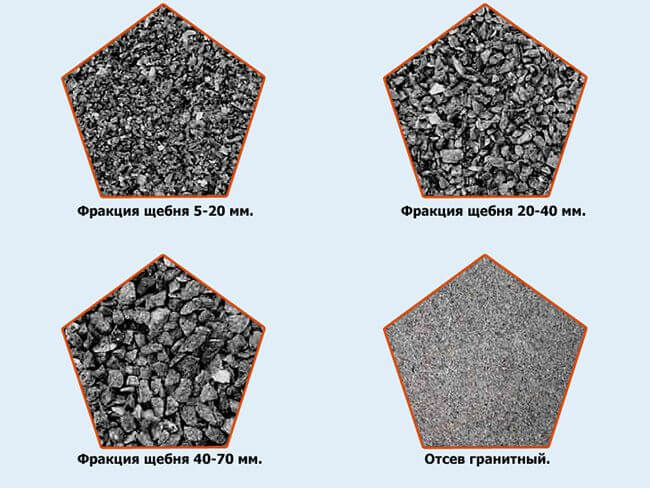
Also, crushed stone is distinguished by its shape, it can be: cuboid, acute-angled, wedge-shaped and flaky. The choice of one or another type depends on your preference.
To make a reliable, durable and beautiful blind area around the house, it is best to use mixed crushed stone of different fractions (from 5 to 40 mm). Such mixtures are much cheaper, and thanks to stones of various diameters, it will be easier to tamp the coating.
If you plan to make a blind area around a multi-storey building, then it is better to give preference to more durable granite crushed stone. For a private house gravel crushed stone or gravel is suitable.
Healthy! Lime and dolomite crushed stone is resistant to temperature extremes.
The gravel coating looks more aesthetically pleasing, so it is more often used when decorating flower beds, paths and artificial reservoirs. This material compares favorably with crushed stone, thanks to the method of its extraction. Gravel is obtained not by crushing rocks, but in the course of their natural destruction. Thanks to this, gravel stones have a smooth surface and are distinguished by their natural shape and variety of colors.
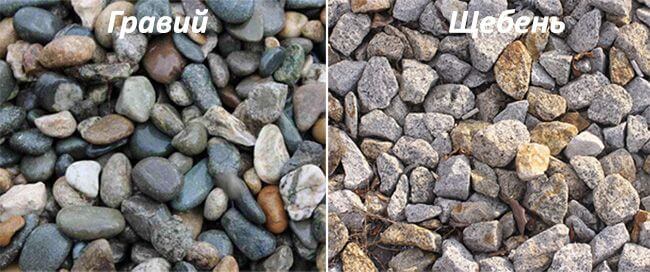
Healthy! Gravel has a high level of frost resistance and water resistance.
For a gravel blind area, it is also better to choose raw materials of different sizes.
Why the blind area can become unusable
The desire of our people to constantly save is not some kind of greed, but a forced measure. Well, we don't have the kind of income to afford everything that technology dictates. However, there are things on which to save money is simply a crime, since as a result, everything results in even greater costs. The list of such phenomena undoubtedly includes the blind area.
People tend to underestimate the strength of natural phenomena, due to ignorance or carelessness. And by the way, simple freezing of wet soil can squeeze out and split a whole concrete slab, if it is not strong enough - we remind you that concrete does not belong to the category of elastic materials. The integrity of the blind area is influenced by other factors that should be considered:
-
The most common mistake of builders is insufficient compaction of the soil backfilled back into the pit. This leads to its unplanned shrinkage, which can damage the waterproofing and even crack the rigid blind area. And okay, if it's just a crack that can be repaired and sealed. In some situations, the material is destroyed thoroughly.
- When the bottom of the trench is compacted, one must remember to constantly monitor its slope, since this is one of the most important conditions for the correct blind area. It is also worth taking care of the evenness of the bottom, otherwise, when filling the pillow, you will get uneven layers of rubble and sand.This leads to the fact that the base of the blind area has a different density and bearing capacity, and this already leads to the appearance of cracks in concrete. In general, everything is interconnected and requires strict control during execution.
- If the builders do not give the necessary slope, or even worse, they make it in the wrong direction, then the entire top-water will flock to the house. The effect of such a blind area will be directly opposite.
-
We have already mentioned expansion joints. Very often builders forget to make them, and this is also fraught with a violation of the integrity of the concrete. When heated, the material begins to expand in all directions, and it simply has nowhere to go - internal stress in its structure increases, which causes its destruction. Expansion joints should be made not only by the blind area and the house, but also with a certain step transversely to the direction of the tape.
- Another quality requirement that should not be forgotten is the use of only sand without clay impurities for the preparation of concrete. It is also not allowed to use dirty water. All this leads to a decrease in the strength of the concrete.
How thick should the blind area be
How thick should the concrete blind area be in order for it to cope with the amount of water that falls on it from above? We are not talking about the other options, since everything is determined by the thickness of the material used, while monolithic concrete must be accurately calculated. The essence of such calculations is not to determine the minimum thickness - it must be taken at least 7 cm, but, on the contrary, to calculate the maximum thickness near the house.
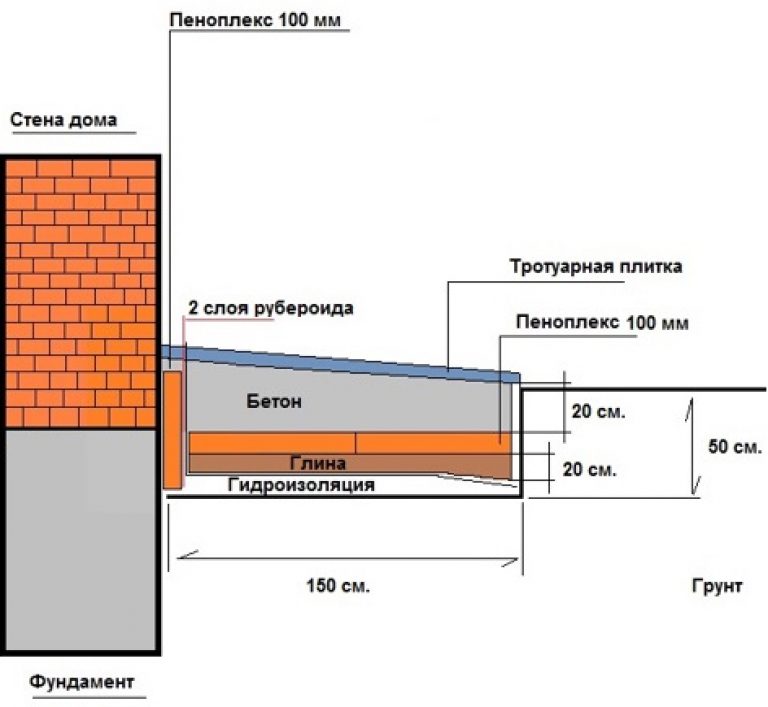
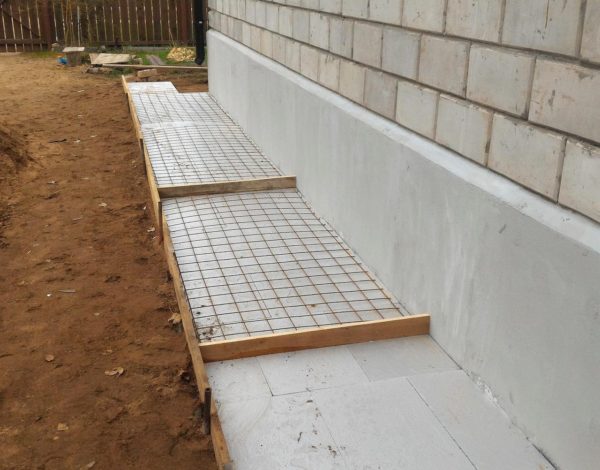 The blind area will be poured over the insulation
This is not difficult to do. You know the angle of inclination that you will give for the blind area. Next, check how much you want the blind area to protrude above the rest of the area, for example, 7 cm. We take into account the width of the tape, draw the resulting right-angled triangle and find the height of the back side. To do this, you can use the Pythagorean theorem or the rules for finding the lengths by the angle. If the calculations are difficult for you, then find the necessary online calculator and get the result in a few seconds.
How is the blind area arranged?
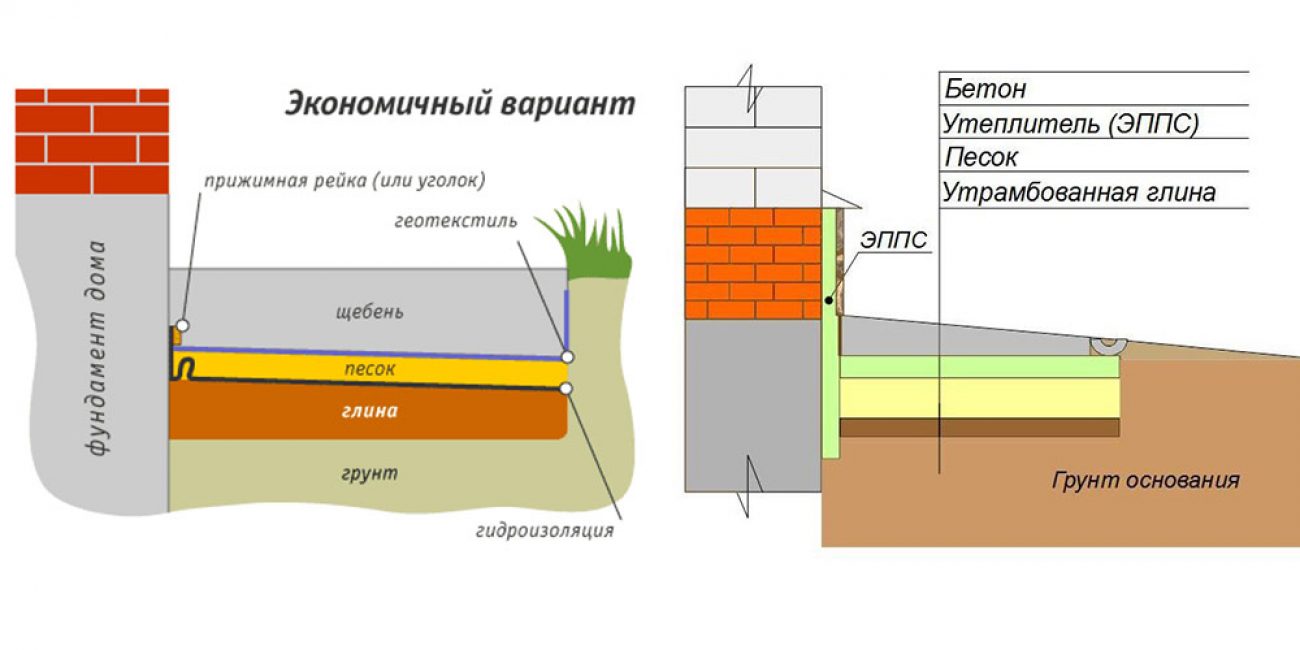
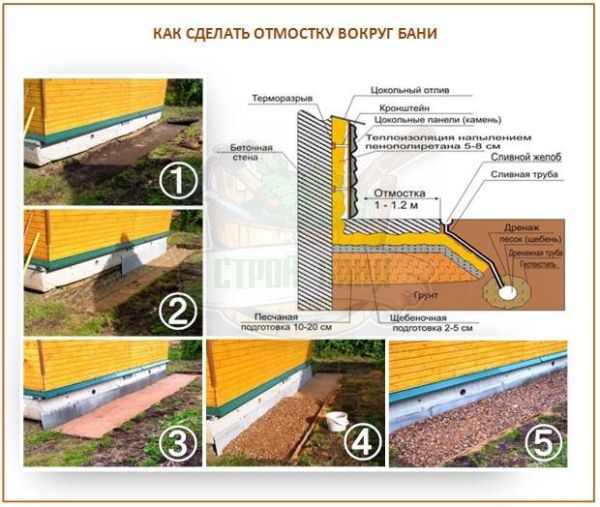
The installation of the blind area is also simple: it is a trench 20-50 cm deep, dug along the perimeter of the building close to the foundation. A thermal gap (expansion joint) is immediately made between the blind area and the foundation; for this, it is covered with a rubber-bitumen compound and immediately - with 2 layers of roofing material, the lower ends of which are bent into a trench by 50-70 cm.
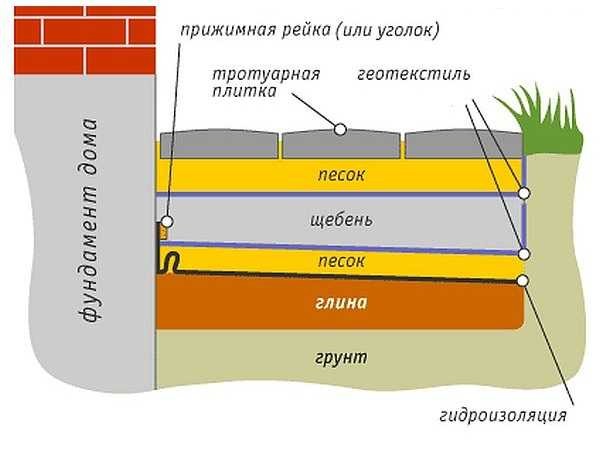
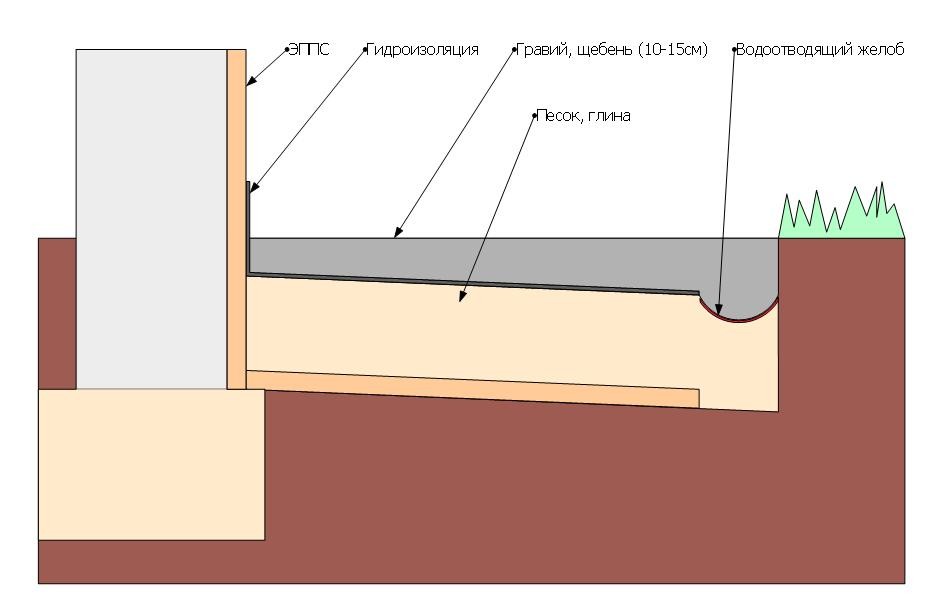
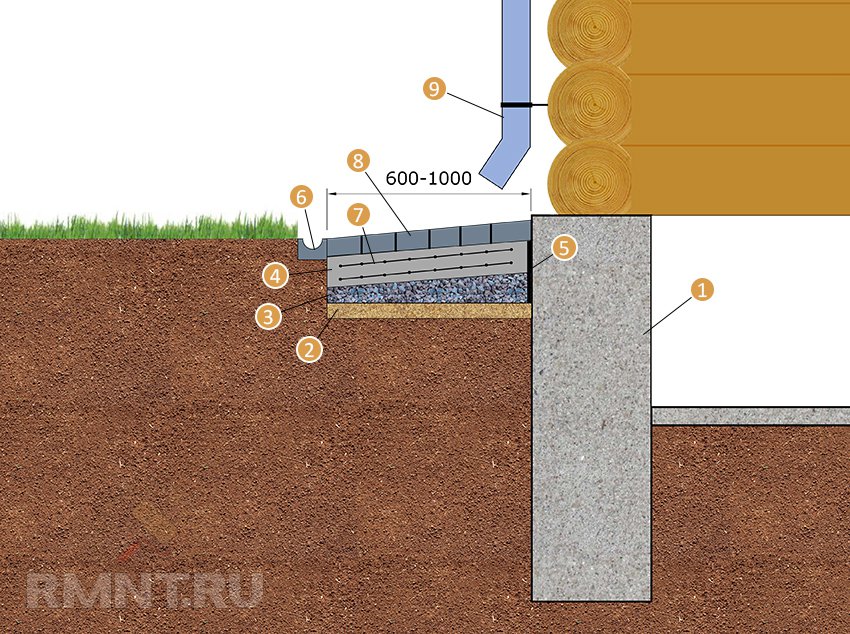
Then the trench is lined with polypropylene film waterproofing; it gives just the right gas permeability. A pillow of sand and gravel is poured into this gutter; in most cases - in a cage made of geotextiles (road mesh), which prevents the migration of the cushion material into the ground, but does not prevent the outflow of moisture from it to the sides. Modern technologies for the construction of a blind area involve the laying of multi-layer pillows. Alternating layers of sand and crushed stone can greatly simplify and reduce the cost of the blind area, at the same time increasing its efficiency.

A pillow under a monolithic coating is poured into the formwork, under a slab it is limited from the outside by a curb stone, and under a soft one it is placed either in the curb, or just like that. According to previous ideas, it is the coating that is actually the blind area, and the pillow only supports it. But multilayer pillows in geotextiles with propylene insulation are able to take on all the functions of the blind area, therefore, modern blind area coverings can only be decorative and ergonomic. In general, blind areas are divided into 3 types:
- Rigid - monolithic made of concrete, asphalt and cement-filled on crushed stone with an iron surface;
- Semi-rigid - with a multilayer cushion and flooring of paving slabs, cobblestones, porcelain stoneware, reinforced concrete slabs on an additional cushion;
- Soft - bulk from crushed stone on a multilayer pillow.
What does it take to get the job done?

In order for the foundation to serve for many decades, the created blind area must meet a number of requirements. Installation work can be carried out if the following materials are available:
Paving slabs intended for laying outside the building.
Roll special waterproofing or polyethylene film
When buying, attention should be paid to ensure that the material is free from defects.
Geotextile is represented by a material that can only allow moisture to pass in one direction. This reduces the likelihood of weed germination.
A curbstone is required to create the perimeter of the blind area
You can make it yourself, but it is recommended to purchase it.
Sand of medium or fine fraction. It is used to create mortar and substrate.
Cement of the M300 brand. It provides a solid base for tiling.
Medium crushed stone. The base for the tiles must not only withstand the load, but also effectively remove moisture. For this, a crushed stone pillow is created.
Clay. It is often laid out along the bottom of the ditch and has high insulating properties.
Drainage collectors. Complex projects involve the creation of gutters that significantly increase the efficiency of moisture removal from the foundation.
In the event that the work will be carried out independently, a set of tools should be prepared:
Strong nylon cord and pegs. They are required to mark the site.
Yardstick
It is important to make the blind area accurate, because the irregular shape will be evident almost immediately.
Building level more than one meter long
The tiles must be positioned correctly relative to each other.
Shovel and other tools designed for working with soil.
Rubber hammer and trowel. A special hammer is required to work with paving slabs. This is due to the fact that at the time of preparation, you need to make small blows, when using a metal hammer, you can inflict defects on the material.
Container for receiving the adhesive mixture. You can get a homogeneous substance using a special mixer or concrete mixer. There are a variety of mixtures on sale, manufacturers indicate recommendations for use.
The solution can be obtained using a special adhesive and a mixture of cement and sand. The curb is often made of bricks, but there are also special stones.
Formwork installation technology: step by step instructions
Formwork begins after the completion of the facade work. It is impossible to postpone the arrangement of the coating, since even a slight accumulation of water near the foundation will destroy it.
Installation is carried out at a positive air temperature; it is optimal to do this at the end of summer. When carrying out work, it must be dry outside. If it is too hot outside, the tree is periodically wetted with water. This is necessary so that the wood does not take moisture from the concrete.
Stage 1 - Marking
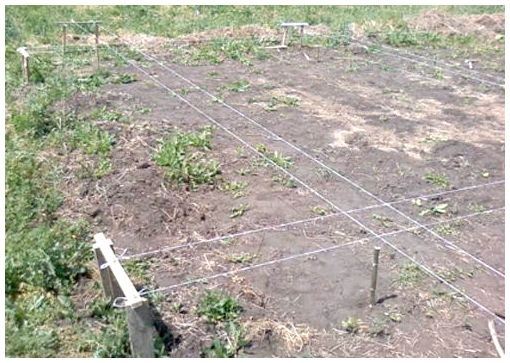
Before placing the formwork, it is necessary to mark it out. Knowing the width of the tape (how to determine it is written above), pegs are driven in at each corner of the house. A cord is tied to the pegs.
The place where the protective tape will be laid is cleared of debris and large stones after marking.
What you need to create a soft blind area with your own hands
A soft blind area around a private house is not difficult to equip with your own hands
In order for the final result to be not only attractive in appearance, but also reliable, it is important to comply with the established technology
Tools and raw materials
Let's figure out how to make a soft blind area around the house. This will require the following auxiliary elements:
- water-repellent membranes and roofing felt - creating waterproofing;
- geotextile - keeping drainage clean;
- shovel - creating grooves, filling materials;
- stakes - check the evenness of the surface;
- gloves - to protect hands;
- lace - pull between the stakes.

Clay for the main layer of the soft blind area must be selected exclusively without impurities.
Materials (edit)
Literally every detail for arranging a soft blind area around the house performs an important function. Having decided to equip it with your own hands, one point should be taken into account. All materials used must be of excellent quality so as not to spoil the entire structure.
For the waterproofing layer, which is to protect the foundation from groundwater, it is better to take materials in rolls. For example, it can be roofing material or PVC films.

It should be understood that waterproofing and drainage are two different layers. For the drainage layer, crushed stone and sand are most often taken. Alternatively, the use of expanded clay and pebbles is allowed.
Geotextile is an equally important layer that prevents the formation of silt and allows you to evenly distribute the load on the structure. It should be chosen exclusively in accordance with the type of soil:
- for clayey - needle-punched;
- for stony - thermally bonded.

There is also a woven version, but it is used extremely rarely, since it cannot provide good waterproofing.
Additionally, you may need thermal insulation, which will relieve the blind area of the house from the harmful effects of cold. Insulation is an optional step, but it is advisable to complete it if there is a basement.
