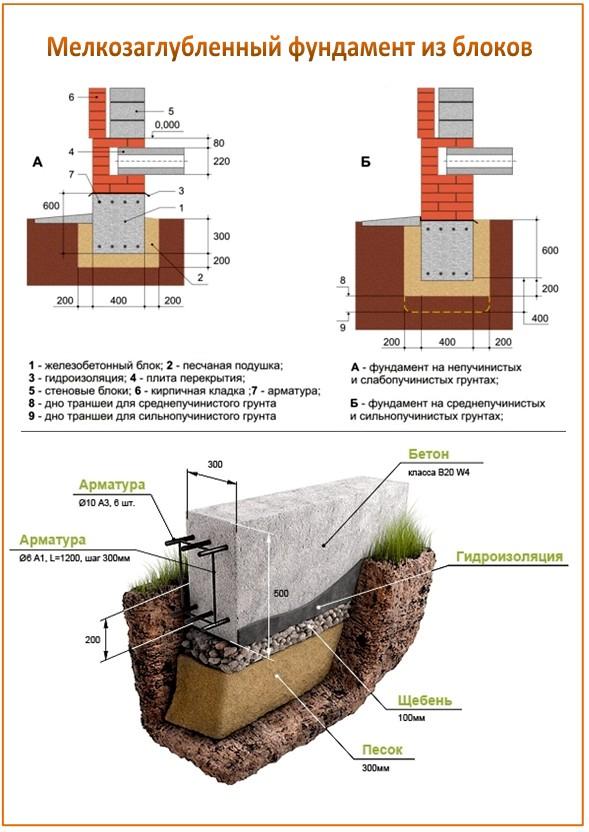
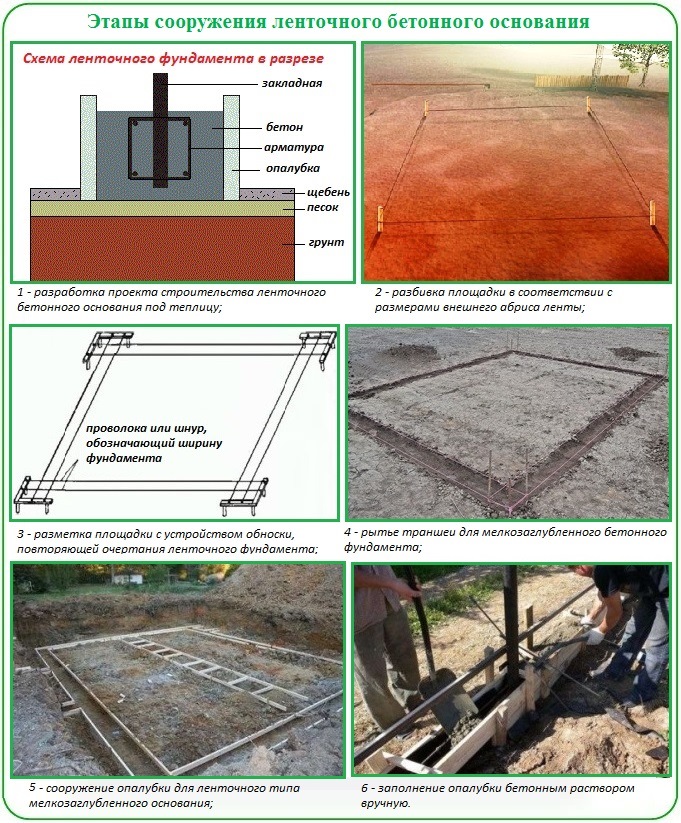
Technology for the construction of a strip monolithic base
The device of an easy base option is the construction of a monolithic strip foundation, which is easy to do with your own hands in a short summer period. Monolithic structures should be erected in the warm season so that the structure is not exposed to low temperatures at the time of pouring the concrete mixture and gaining strength.
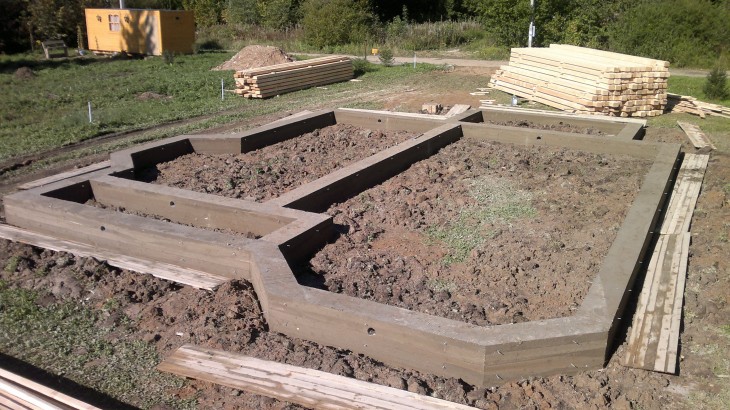
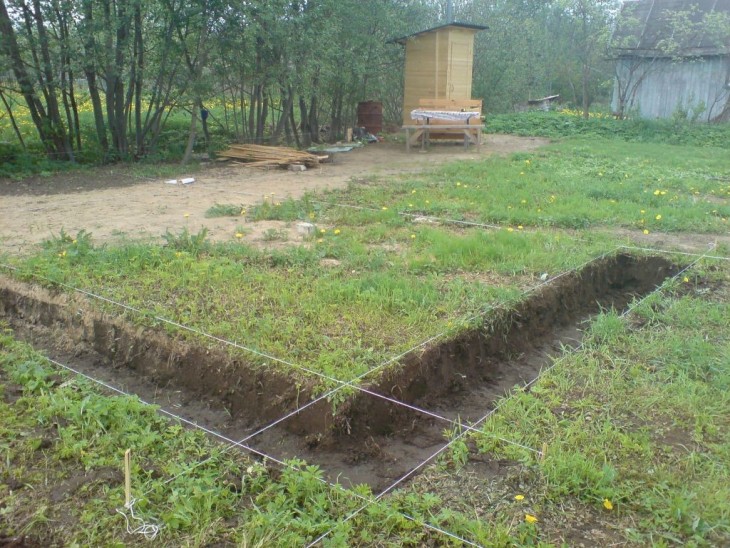
Site preparation and marking
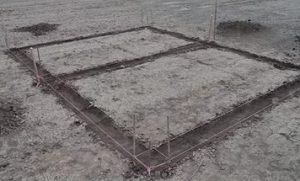 Layout of the site for laying a light foundation
The first stage of work is preparatory activities that must be performed very carefully:
- Clear the construction site from various debris, grass, bushes, trees. If necessary, remove old stumps.
- All pits and cuts on the building site should be covered with soil, the towering bumps should be leveled.
- Perform planning work on the site, storing the fertile topsoil separately.
- Mark the building on the planned territory, for which you should determine the perimeter by driving in pegs. The pegs can be made with your own hands from wood, or you can use rebar trimmings. If the building has a complex shape, pegs are driven in at all corners and in places of protrusions.
- A cord is pulled along the hammered pegs, which will help to more accurately determine the location of the future foundation.
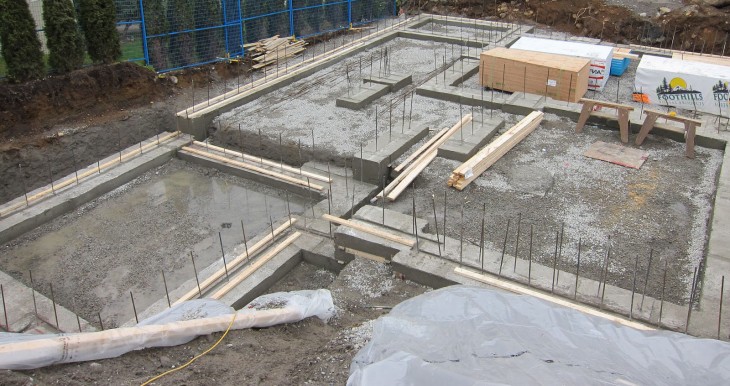
Earthworks and formwork
Trenches for pouring the foundation (tape type) can be dug by hand or using earthmoving equipment. It should be remembered that the walls and the bottom of the trenches must have a flat surface, therefore, after the excavator is in operation, you will have to level the trench manually.
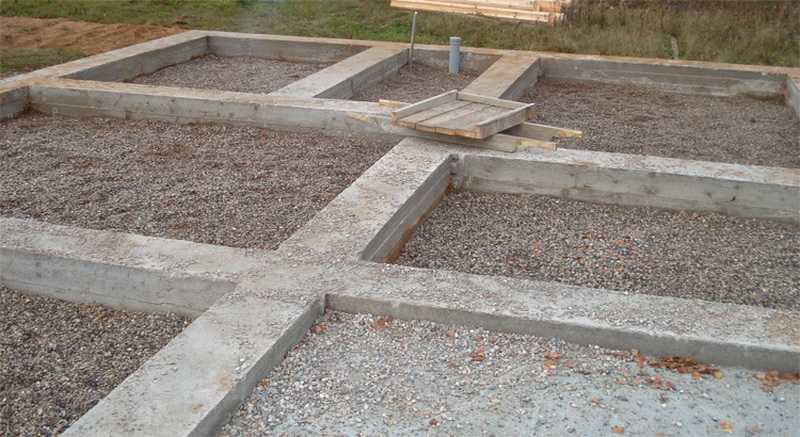
 Sand cushion under the foundation
Trenches will have to be made not only along the perimeter of the building, internal load-bearing walls and partitions must also be supported on the foundation. The bottom and walls of the strip foundation trench are compared and compacted.
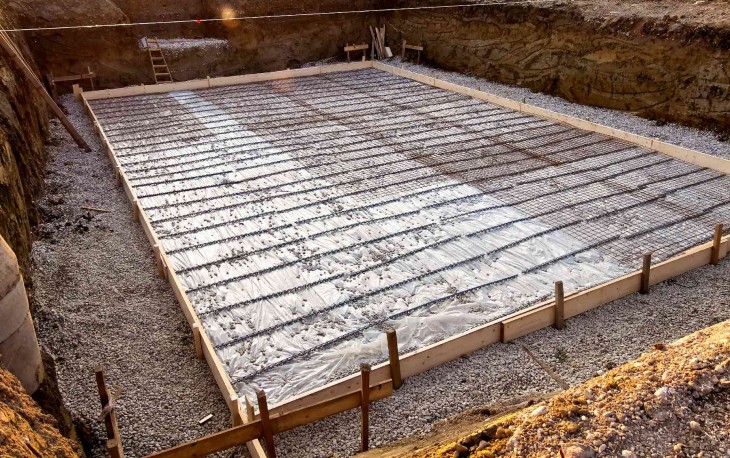
At the bottom of the trench under the strip foundation, they arrange a sand cushion with a layer of about 10 cm, the sand must be carefully tamped, pouring the layers with water. A layer of fine gravel is laid on top of the sand bed, constantly tamping the pillow. The device of the sand and gravel cushion must be done with special care; to increase the density, the backfill layers must be watered.
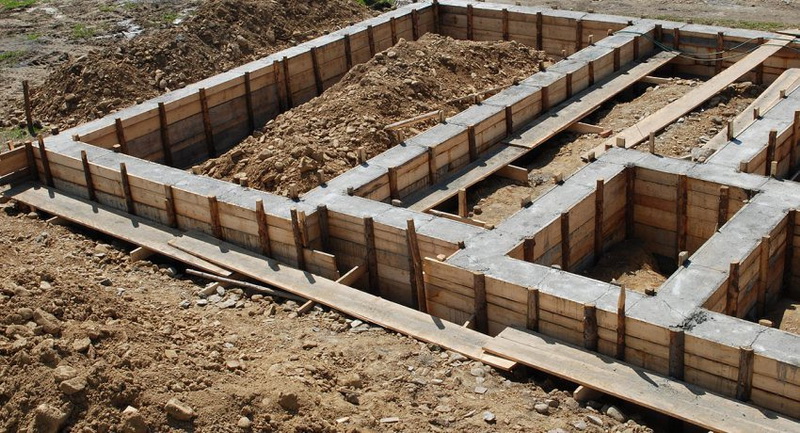
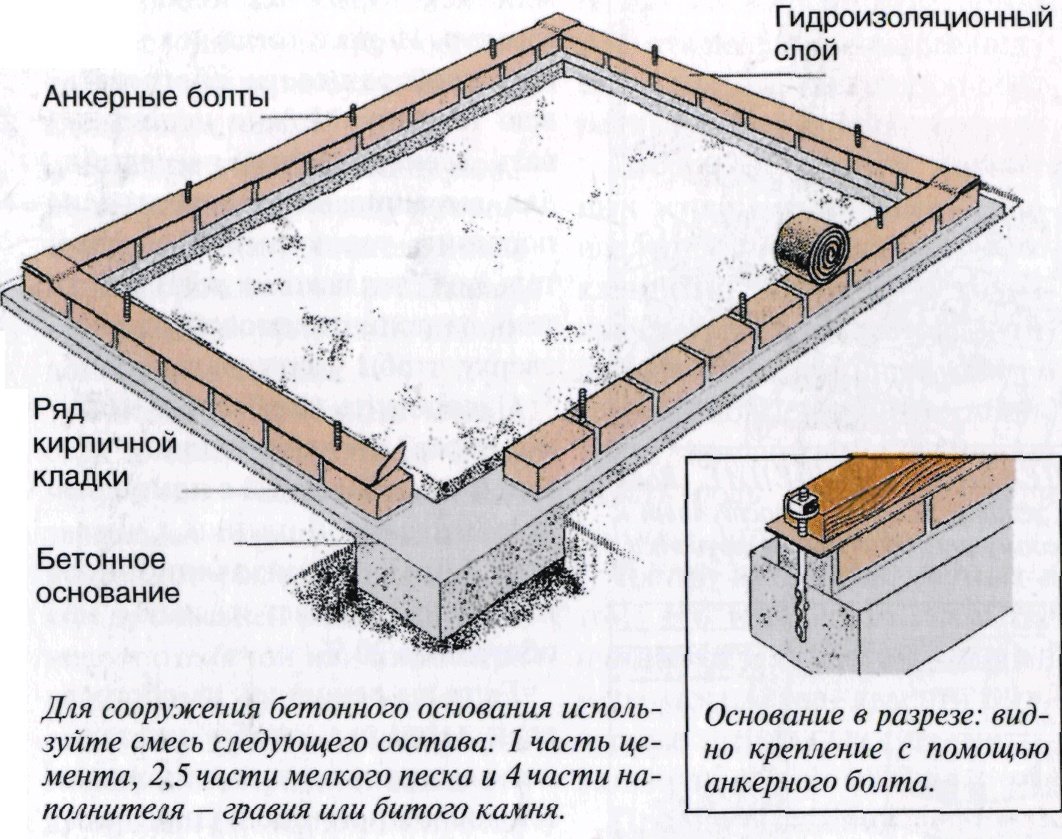
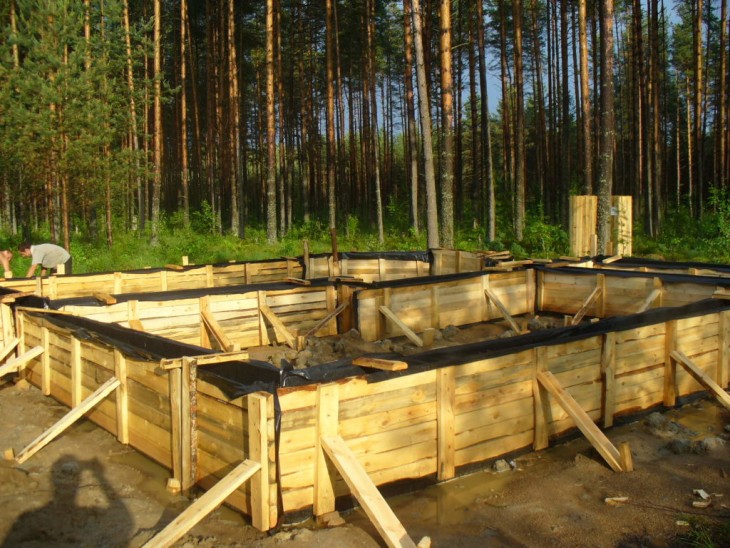
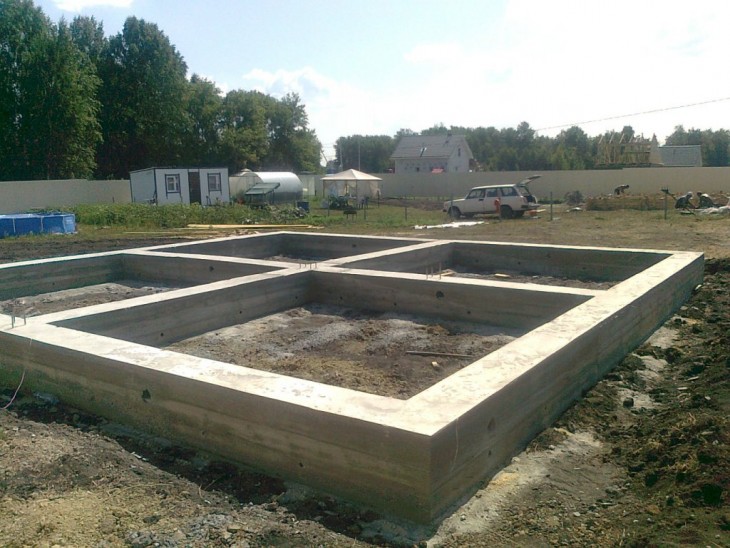
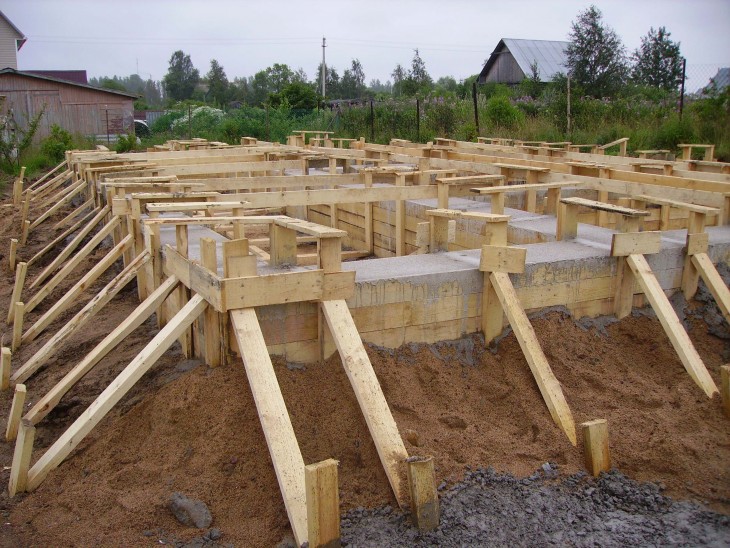
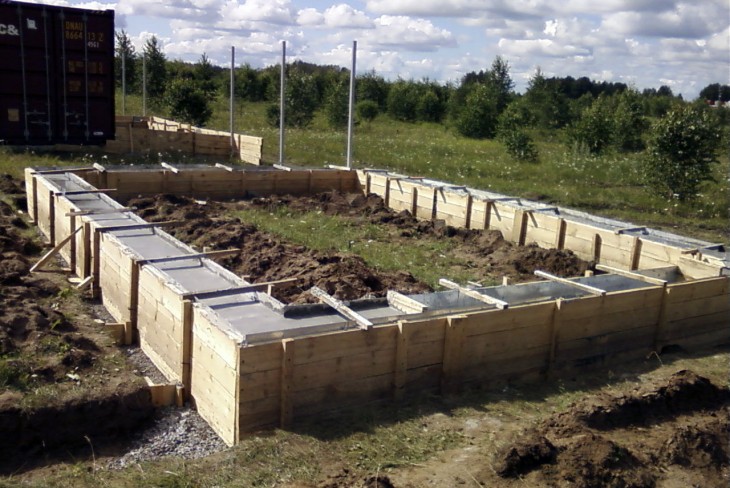
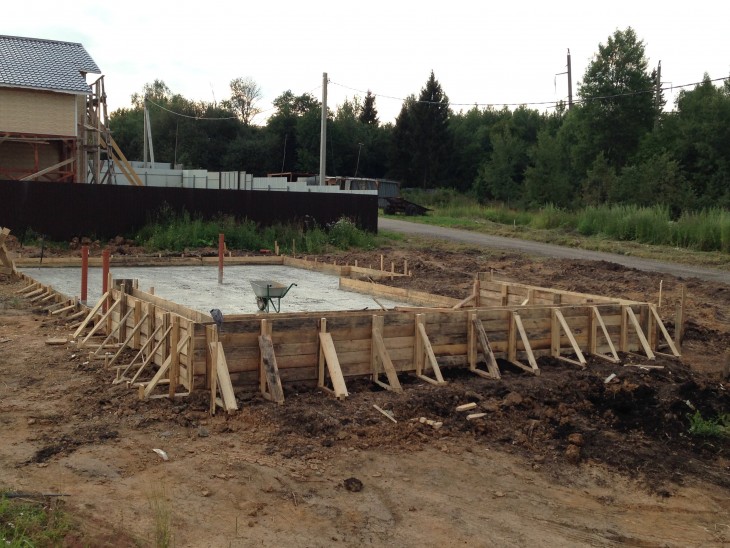
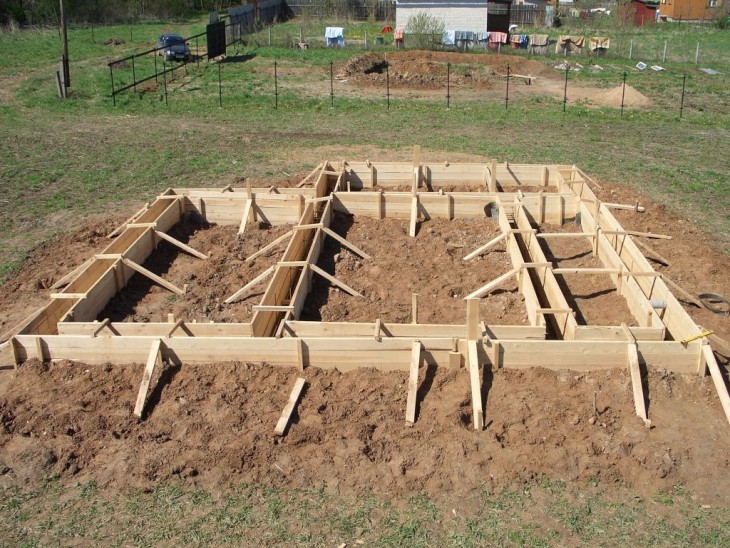
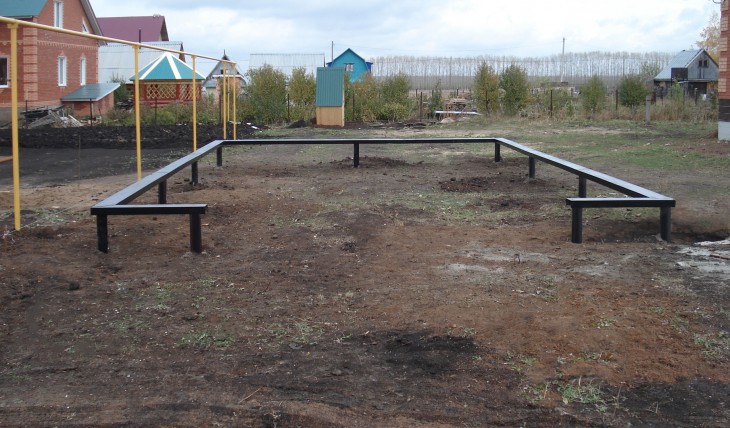
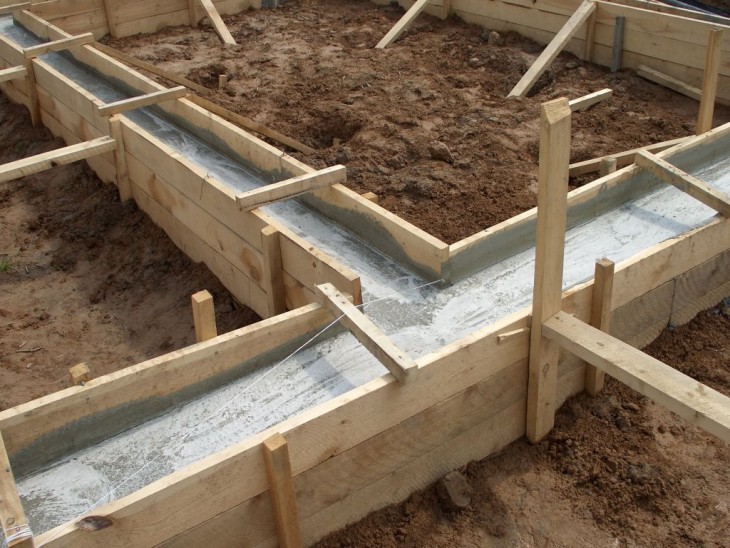
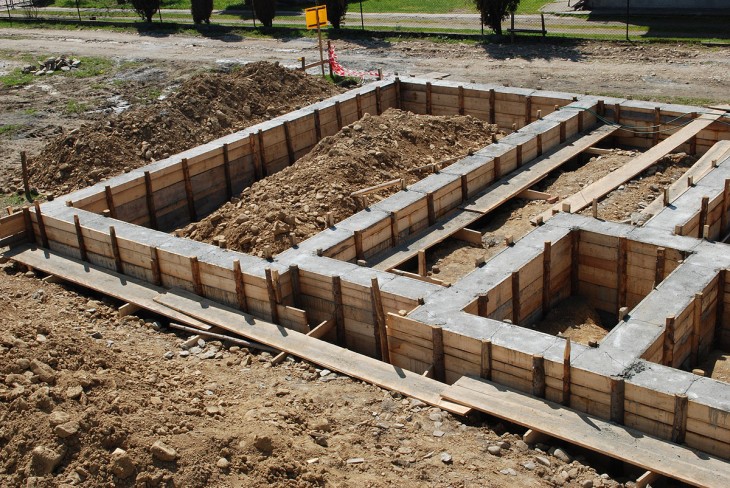
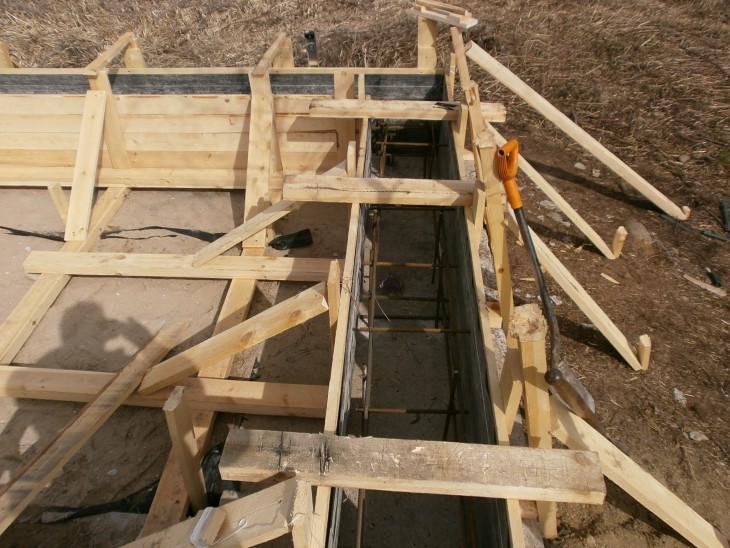
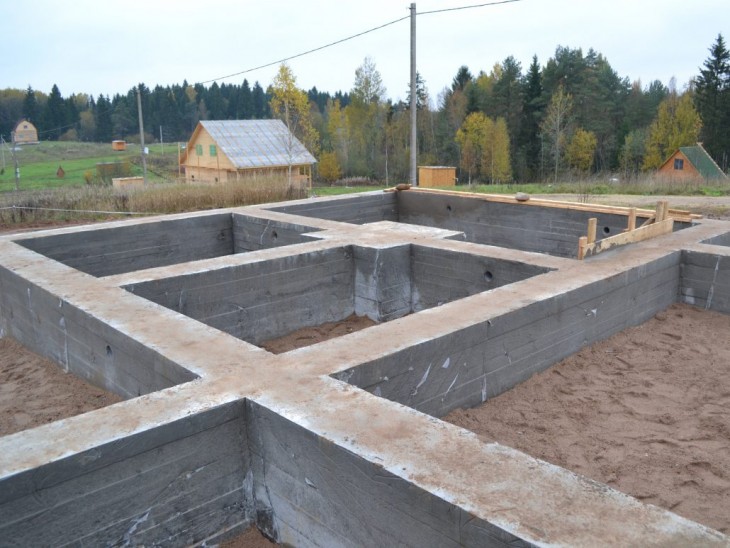
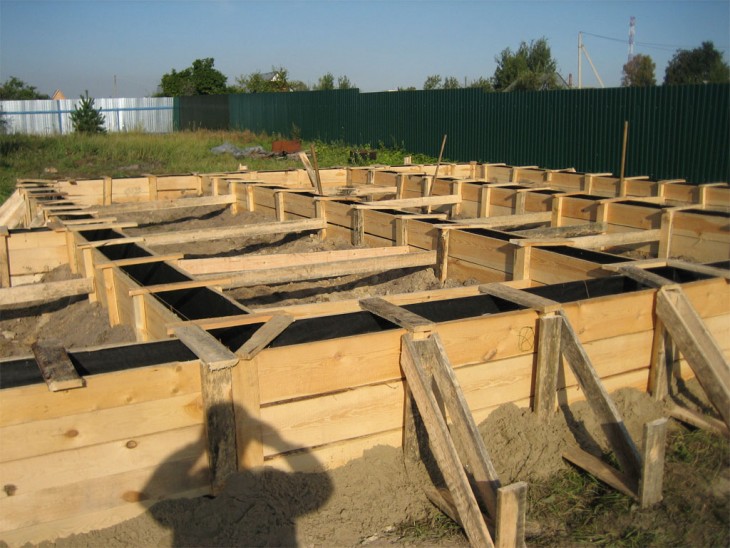
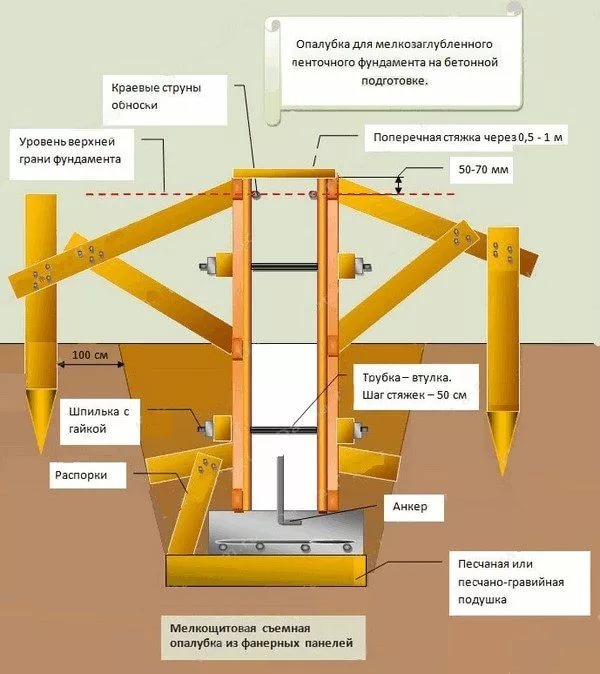
The formwork is installed in the trench very carefully, bursting the shields with props and braces
It is very important that the strip foundation made of monolithic reinforced concrete has perfectly even shapes. The formwork can be made with your own hands from wooden boards, plywood sheets or chipboard
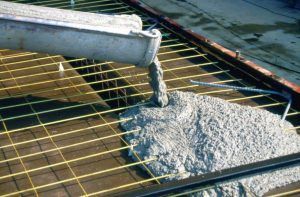
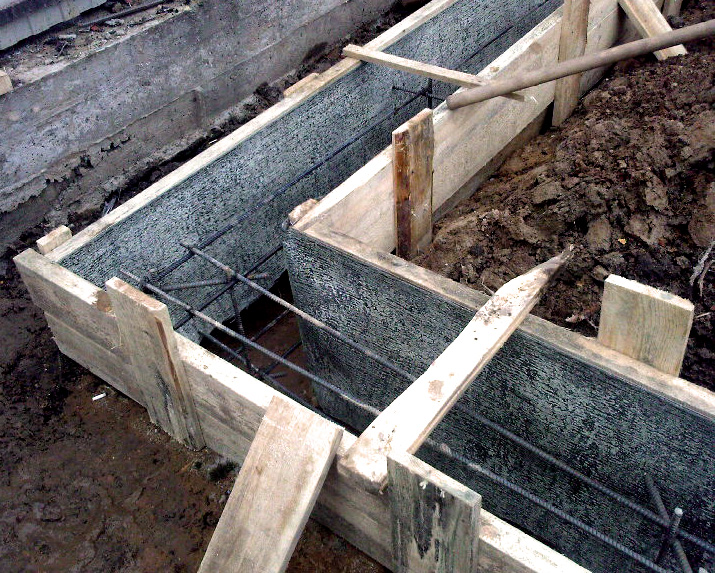
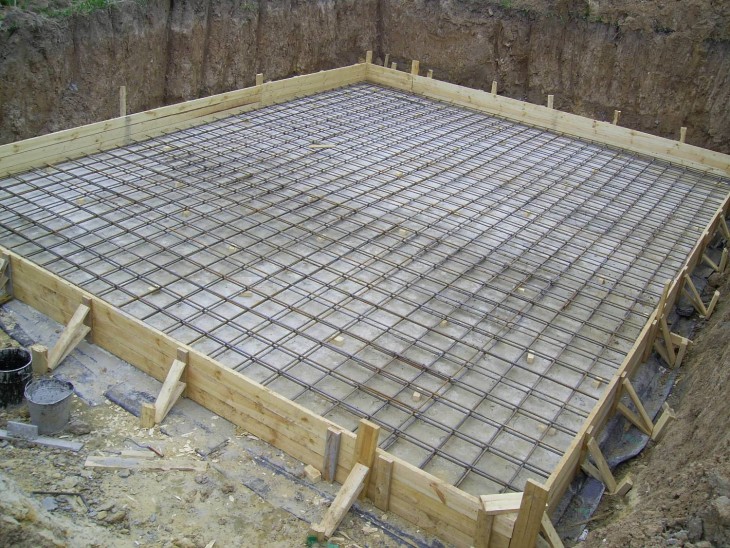
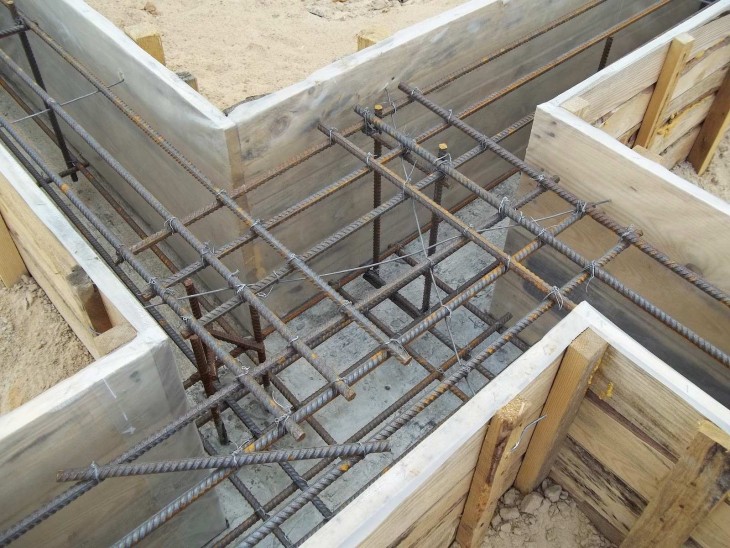
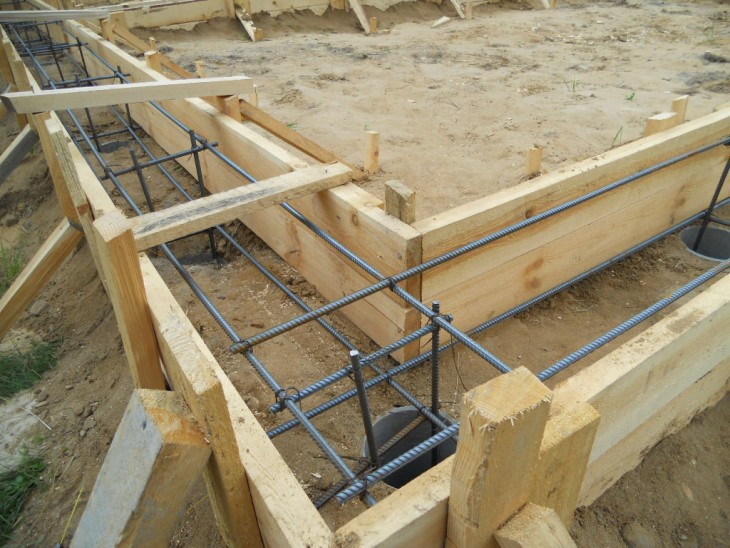
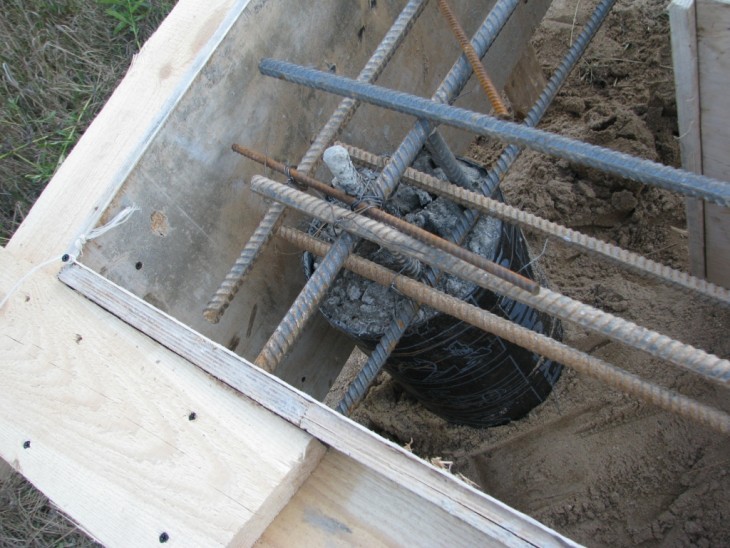
Reinforcement cage and concreting
To increase the strength of the foundation, its rigidity and bearing capacity, the structure is reinforced with a space frame made of reinforcing steel, which is laid into the formwork before concreting. Do you own a welding machine? Do you have the skills of a welder? This means that the frame can be made by hand. For the main structure, reinforcing steel with a diameter of 10 to 12 mm is used, the spatial connecting frame is made of wire with a diameter of 6-8 mm.
 Reinforcement of the strip foundation
The second option for connecting the reinforcement is with a knitting wire. In this way, it is easy to make a frame for DIY foundationwithout even having certain building skills.
The finished frame is placed in the formwork in such a way that the metal never touches the walls of the formwork.
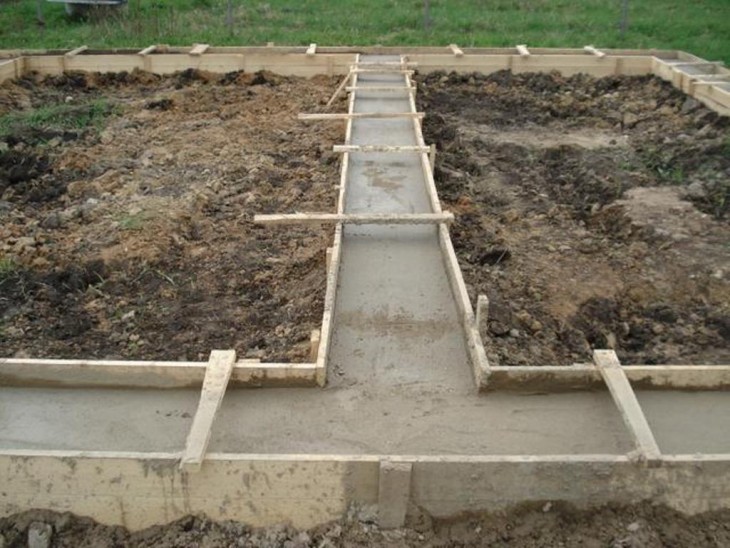
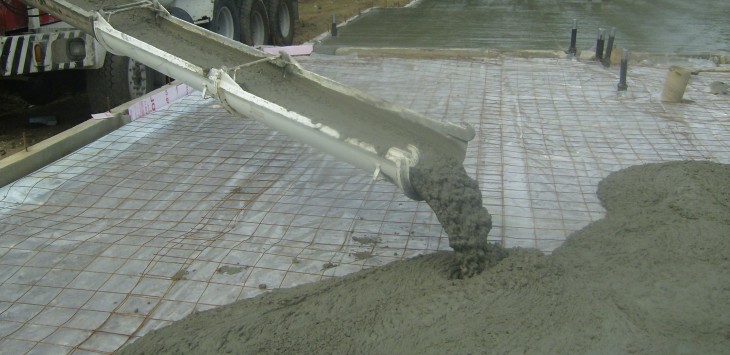
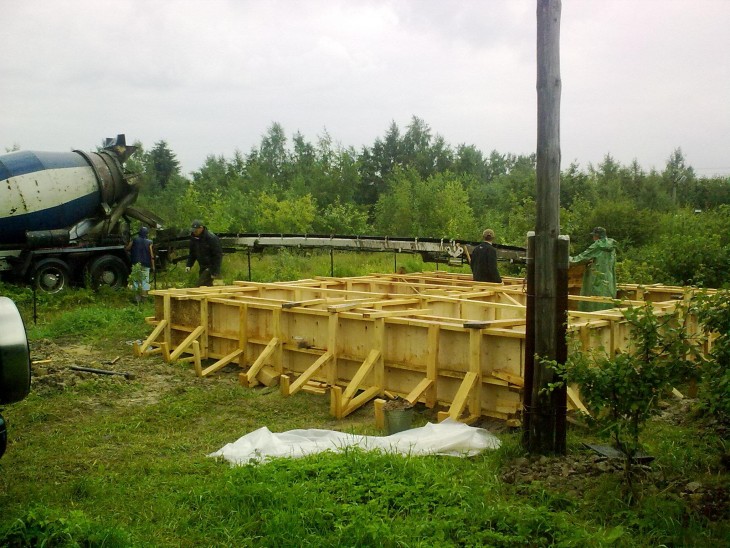
The concreting of the foundation strip is made with concrete mortar, which is best poured into the formwork within one day, thus, it is possible to avoid the appearance of cold bridges during the operation of the foundation. It is best to fill the formwork with concrete from both sides at the same time, constantly leveling the concrete.
Concrete maintenance and sinus backfilling
The foundation support must be sufficiently strong before the walls can be erected.Strength gain continues for at least 28 days, therefore, at this time, work on the construction site is suspended. The surface of the foundation must be frequently moistened by covering it from the sun and wind with plastic wrap.
Backfilling of the sinuses of the foundation can be started after the foundation has been set to full strength.
A budget option
In an effort to build a cheap foundation with your own hands, you need to make an estimate and find out all the upcoming costs. A special calculator will help you find out, which you can use by contacting the office of a construction company or by obtaining the necessary information on the Internet.
A strip foundation for a house is recognized as economical, reliable and durable, the construction of which can be carried out from a wide variety of materials, even if it is necessary to use concrete blocks, brick or stone.
 Builders are well aware of the types of strip foundations, the creation of which does not require the involvement of special equipment or specialists:
This is an excellent base for a block house. To create it, you will need to clean the area for the house, make markings, dig trenches for the tape, build a pillow of sand and gravel at the bottom, assemble and install the formwork structure.
 Screw piles are some of the cheapest
The strength of such a base is provided by a frame connected from reinforcing bars. This structure must be assembled separately, installed on the bottom of the trench and filled with concrete. Such foundations take time to shrink. It will take at least six months to wait for the start of construction.
Considering the various types of foundations, the advice of experienced craftsmen will help to determine which foundations are of the highest quality and affordable in terms of prices. In their opinion, the simplest and most inexpensive, one might say, the budget option for a frame house is a skeleton built on piles. This is not only the best and cheapest foundation in comparison with other types of bases, but it is:
- quite easy to manufacture;
- durable;
- durable;
- used on the weakest soils, loams. For more information on the most economical type of base, see this video:

 To create it, you will need to prepare pits, install formwork in them, reinforce with reinforcement and pour concrete.
Another type of pile is metal screw. Such a foundation can be easily built independently without the use of construction equipment.
It is more difficult to cope with driven piles, but it is quite possible to perform these works in a short period of time, having built a high-quality supporting structure for a country house located on any soil.
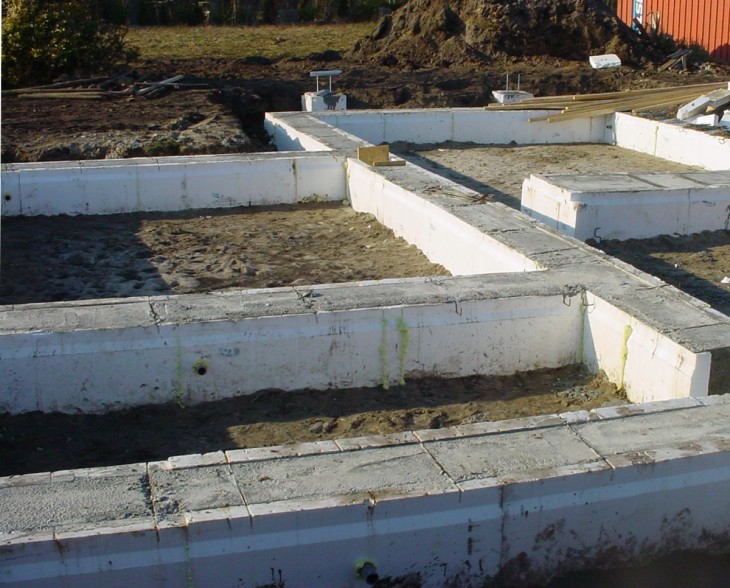
When floating foundations are used and their types
The floating type can be used in the construction of any object, but they are most in demand in the places where the construction object is located, where there is heaving of the soil, the close occurrence of groundwater to the earth's surface, and there are other negative factors affecting the operation of the finished structure.
Foundations of this type are classified by type as follows: Swedish and monolithic slab, strip and columnar structure.
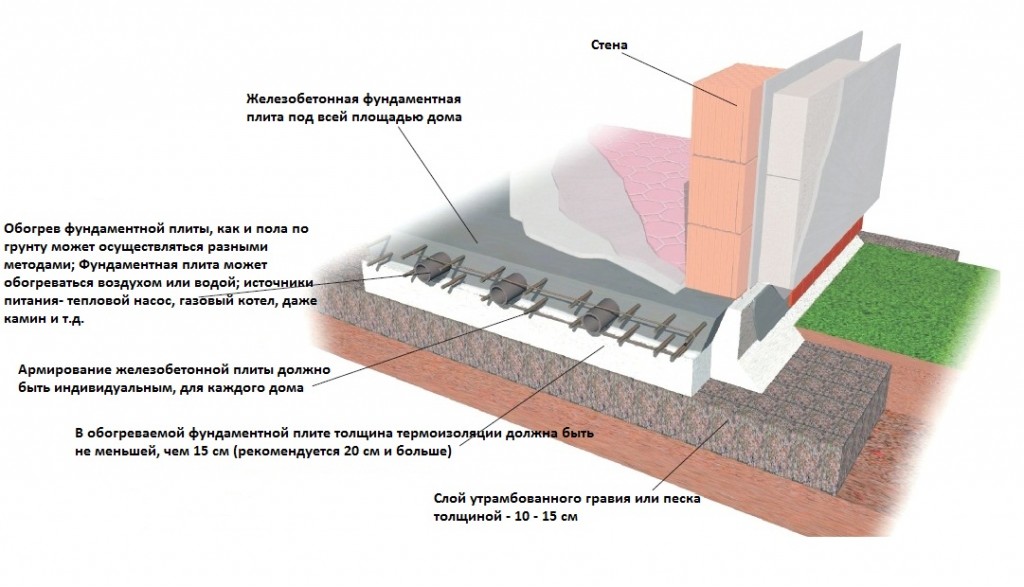
Swedish plate
The name of this type comes from the place of development of this technology for the manufacture of bases.
A distinctive feature of this type is the presence of thermal insulation on all sides of the base, as well as the placement in it of all utilities, including the heating system, "in the body" of a monolithic slab.
Scheme of the device of the Swedish stove
The advantages of this type of floating foundation slab are such indicators as:
- the possibility of using on various types of soil, regardless of the level of occurrence of groundwater;
- the presence of thermal insulation and the "warm floor" system ensure the absence of heat loss, as well as the formation of condensation on the surface of the foundation;
- a flat surface allows installation of the ground floor flooring without additional installation work;
- short terms of work performance without the use of heavy construction equipment.
Laying of the reinforcement cage during the construction of the USHP
Among the disadvantages of USWB, the following points should be noted, these are:
- the ability to use only on flat areas of placement;
- the need to perform accurate markings when laying engineering communications;
- inability to use on soils with low bearing capacity (peat and others);
- the complexity of maintenance and repair of engineering networks;
- high cost of insulating materials.
Monolithic floating slab
A distinctive feature of this type of foundation from the USP is the absence of insulation and utilities when laying the "pie".
A diagram of the device of this type of base is shown in the following figure:
Layers of the "pie" of the base type "monolithic floating slab"
The advantages of this design are:
- reduction in the volume of excavation performed in comparison with conventional types of foundations;
- ease of installation;
- long service life.
Disadvantages of the design are indicators such as:
- the impossibility of building basements;
- the ability to use on buildings with limited number of storeys;
- relatively high cost of work due to the large amount of concrete used.
Strip floating foundation
A distinctive feature of tape-type bases is the presence of only a closed lattice structure in the form of a tape, and not a solid plate, as in the above options.
The advantages of this type of foundations, in comparison with the slab structure, are the reduction in the labor intensity of the work and the consumption of building materials.
The disadvantages include the need to install more complex formwork and the construction of a sub-floor.
Floating strip foundations prepared for the installation of lightweight enclosing structures
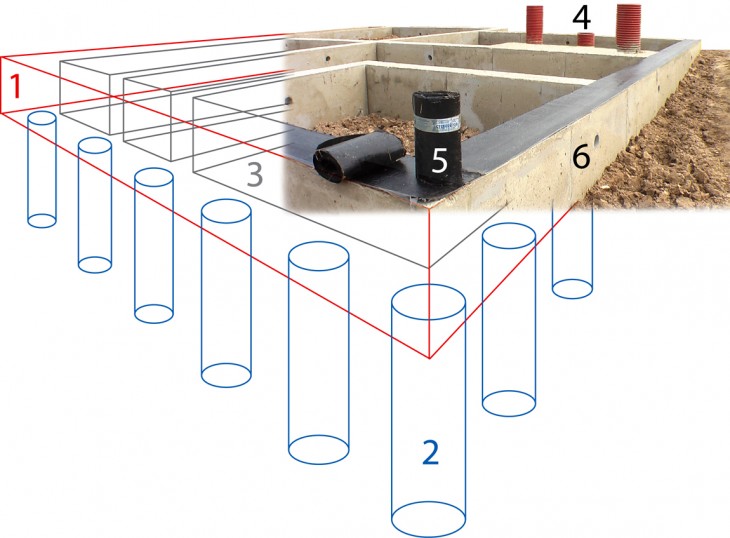
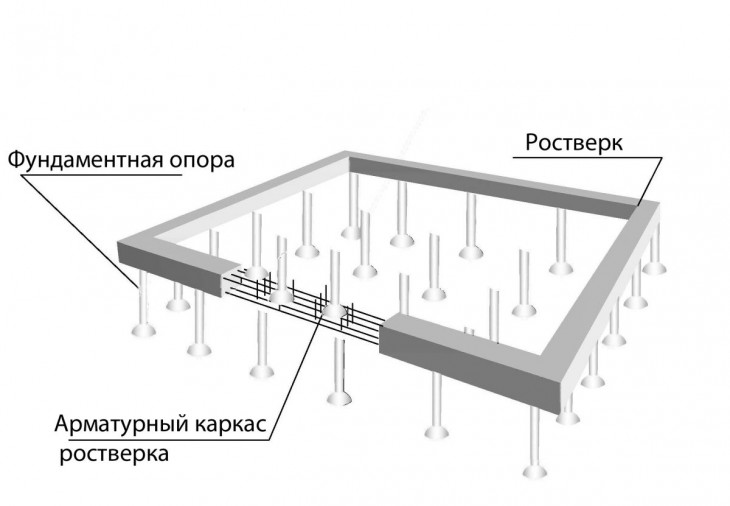
Floating columnar foundation
The design of the columnar foundation involves the construction of separate pillars, placed in the corners of the building under construction and at the intersection (conjugation) of the walls with each other.
A distinctive feature of the foundations of this type is their slight deepening into the surface of the earth, which simplifies the implementation of installation work and reduces the cost of construction and installation work, but, at the same time, the possibilities of use are limited by the types of structures built on them.
A variant of the device of a floating columnar foundation with a grillage made of wooden beams
This is interesting: Do-it-yourself concrete - we tell it on the shelves
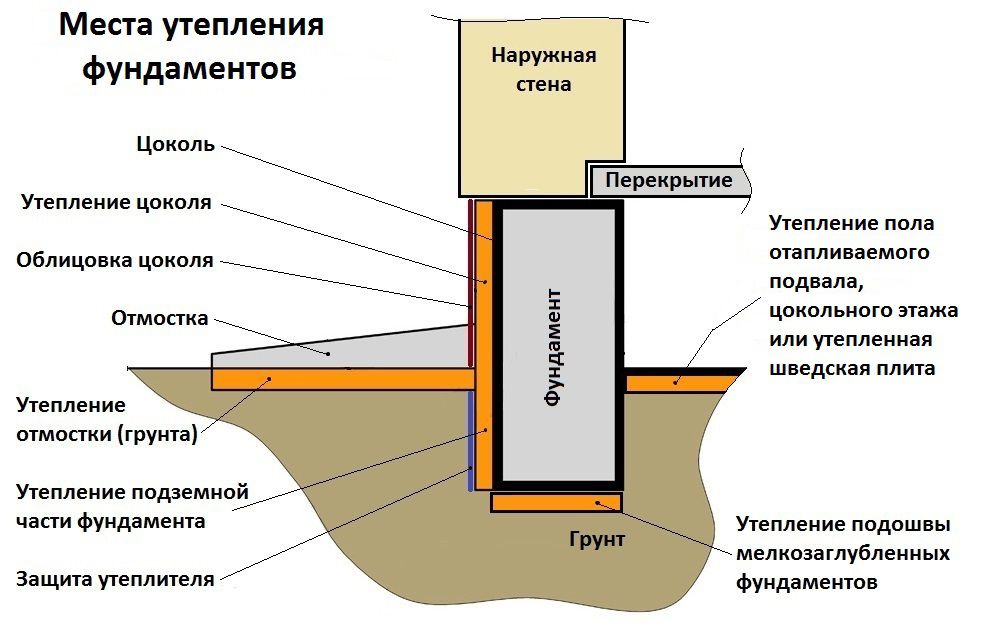
Frequently used protection methods
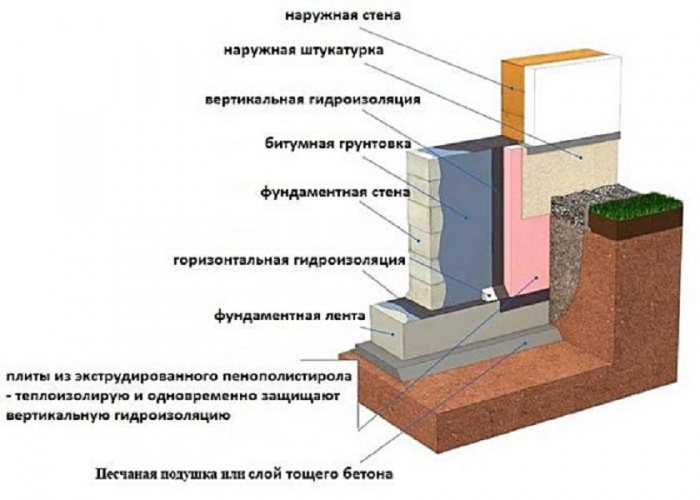
Spray-applied waterproofing.
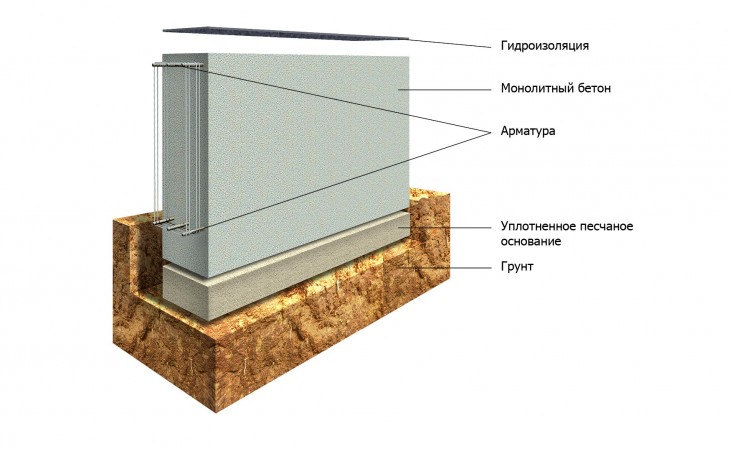
Diagram of a strip foundation with waterproofing.
This method does not require special surface leveling work. All that is needed is to remove the dust. For spraying liquid rubber, a special spray is used. The material is quite expensive and it is advisable to use this method of insulation for structures of complex shapes, which are very inconvenient to paste over with roll material. It is possible that a new building will be built in the immediate vicinity of an existing building, then the use is also justified.


After spraying, reinforcement with geotextolite having a density of at least 130 g / m² should be performed.
Drainage protection.
Such protection is almost always necessary. A trench is being dug along the perimeter of the building somewhat deeper than the bottom of the foundation. The trench is covered with crushed stone, on which corrugated drainage pipes are laid, with a slope towards the corner of the structure. At the corners (at least two), drainage wells are installed, the depth of which should be about 50 cm below the foundation. Wells must be equipped with pumps and a level sensor.
Isolating the base of the building and reliably protecting it from water is the main task when laying the foundation. This will ensure the strength and durability of the building.
Pros and cons of strip foundation
Before you make a foundation for a house with your own hands, you need to study the pros and cons of the foundation.
Pros:
- Simplicity. Any builder can handle pouring the foundation, even without experience. The technology is simple, even without clear calculations, you can get into the required strength and reliability indicators.
- Versatility. Such a foundation is suitable for a brick, foam block, aerated concrete and wooden house.
Minuses:
- Requires a rigorous geological survey of the soil under the construction site.
- Mandatory use of special equipment.
- It takes a period of 3 weeks to cure the concrete.
- You cannot build on antinodes and water soils.
Fill
The ideal option is a one-step pouring, in which the tape is filled without interruptions with the ready-made solution.
If a decision is made to independently prepare a solution for pouring, then it is important to remember that these works are required to be performed as quickly as possible, putting your solution into a tape. For more information on pouring the foundation, see this video:
 Add water in strict accordance with the instructions, otherwise the concrete may crack.
Making concrete with your own hands is quite simple. You will need sand, crushed stone and cement in a ratio of 3: 5: 1. Water is added in such an amount that the composition in its consistency is similar to not very thick sour cream.
Excess moisture, like its lack, can cause concrete destruction. Filling is carried out horizontally, the solution must be constantly rammed using the bayonet method.
Pour concrete up to the mark made earlier and showing the top level of the foundation. Then the surface is "ironed", that is, sprinkled with dry cement, sifting it through a sieve, and smoothed.
The concrete will gain strength after a month, after which the formwork is dismantled and the work related to the waterproofing of the base is performed. The surface of the connection with the wall is covered with roofing material, waterproofing or glass insulation.
What brand of concrete is used for the strip foundation
Before you start pouring a monolith, you need to ask yourself: what brand of concrete is most optimal for a strip foundation. This parameter depends on several factors:
- the weight of the entire structure;
- the presence of additional loads on the base;
- what kind of reinforcement is used;
- type of soil;
- climatic conditions of the area.
Step 5: Preparing the strip foundation slurry using a concrete mixer
For the device of a concrete cushion under the main foundation, the M100 brand will be enough. For light structures: panel houses, baths and outbuildings, the M200 is suitable. The construction of a wooden house or a structure from light blocks requires the use of the M250 brand. For massive structures and buildings, high-quality concrete of the M350 brand is prepared, with a strength of 327 kg / cm². Higher grades of concrete are used for the construction of geometrically complex structures and on construction sites in regions with harsh climates. Knowing these characteristics, everyone can determine for himself what brand of concrete is needed for the strip foundation.
Laying reinforcement and pouring the foundation
Having decided on the brand of concrete, you need to prepare everything you need for pouring. Some people order ready-made concrete from specialized firms. Most people prepare their own solution. For this, it is advisable to have a concrete mixer. All components are mixed in it. Their proportion depends on which brand of concrete was chosen for the strip foundation.
Step 6: Reinforcement of the strip foundation
A steel structure welded from reinforcement rods is laid at the bottom of the trench along the entire perimeter. The more such rods are used and the thicker they are, the stronger the entire foundation will be.
The prepared concrete is poured into the trench and formwork to the level mark and leveled so that its surface is strictly horizontal and even.
Step 7: Pouring the prepared concrete into the strip foundation trench
Step 8: Securing the foundation waterproofing with coating materials
After the foundation is completely ready, it is necessary to provide waterproofing of its walls with coating materials. A properly executed foundation will give a long and reliable operation of any object.
Step-by-step instructions - DIY foundation
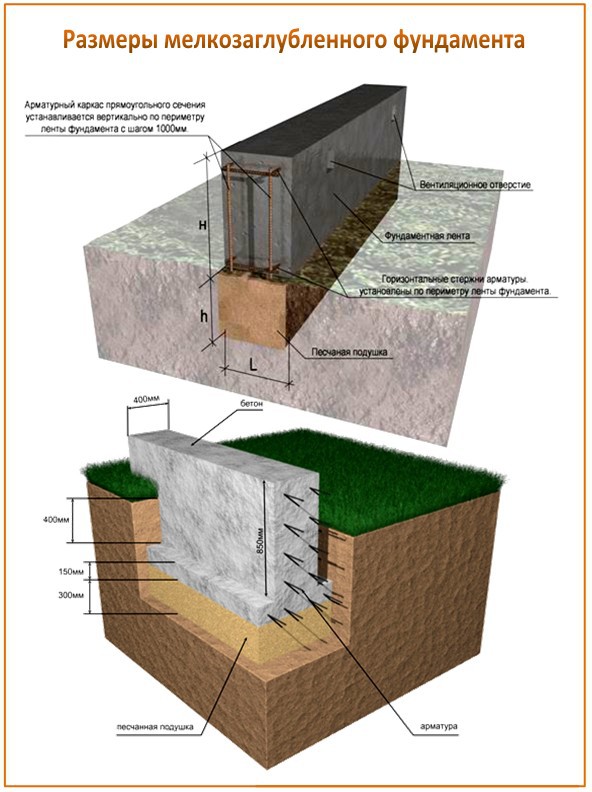
The thickness and height of the tape of the base under consideration, as well as the depth of its laying, are selected based on the analysis of the soil, climatic conditions of the area and the number of storeys of the house being built. Without knowledge in this area, it is better to entrust this design stage to a professional. There are many nuances and requirements of GOSTs that must be observed.
But it is quite possible to create a support for your house according to a ready-made project on your own. But in order to avoid mistakes, it is best to make the strip foundation yourself with step-by-step instructions, which are given below. It describes all the subtleties of building a similar design for a typical one-story cottage.
Stages of work
The first stage is marking and earthwork. Regardless of the depth, the sole must rest on solid layers of soil. It can be clay, sandy loam, stony layers or loam. They are usually hidden under turf and layers of ordinary earth. All this will have to be torn down and removed before starting to build the foundation of the house.
To mark the site, you will need pegs, a tape measure and twine. If the soil is dense, then an excellent formwork will be obtained from the walls of the dug trench. It will only be necessary to build it up later from above. If the soil is loose and constantly crumbling, then the trench will have to be dug a little wider in width so that the formwork boards can be placed inside the pit.
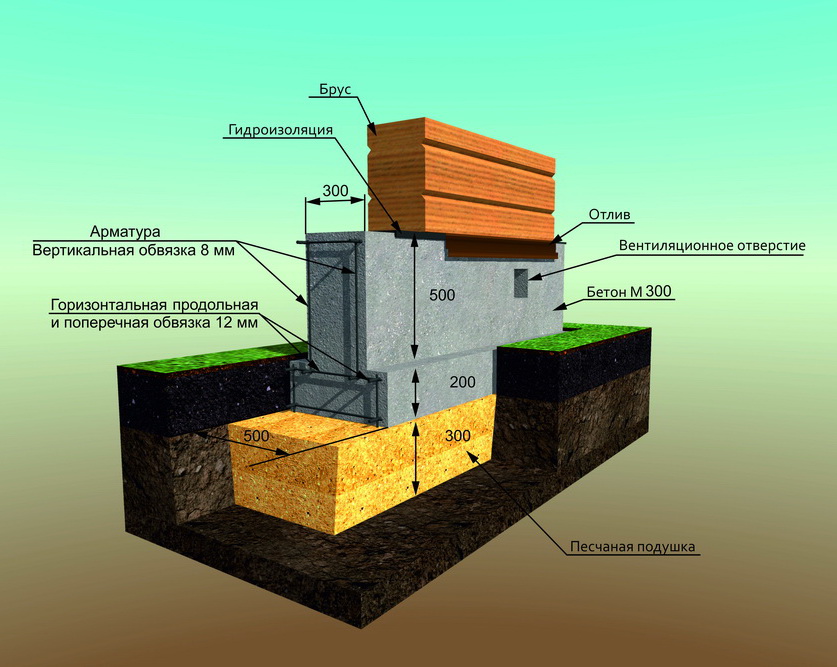
The second stage is the preparation of the pillow. The bottom of the excavated trench is leveled with sand and fine gravel. This sand and gravel layer should be carefully tamped, sprinkling with water as it is poured. In height, it should be in the range of 10-30 cm. This pillow serves to redistribute and reduce point loads on the strip foundation from below during seasonal swelling of the soil.
The third stage is the placement of the formwork. Here you will need bars with a cross section of 30 to 40 mm and boards 15–20 mm thick or laminated chipboard. The formwork created for the concrete base of the house will subsequently have to withstand a considerable mass of concrete poured into it. It should be made strong and reliable. If, after filling with concrete mixture, it collapses, then everything will have to start over.
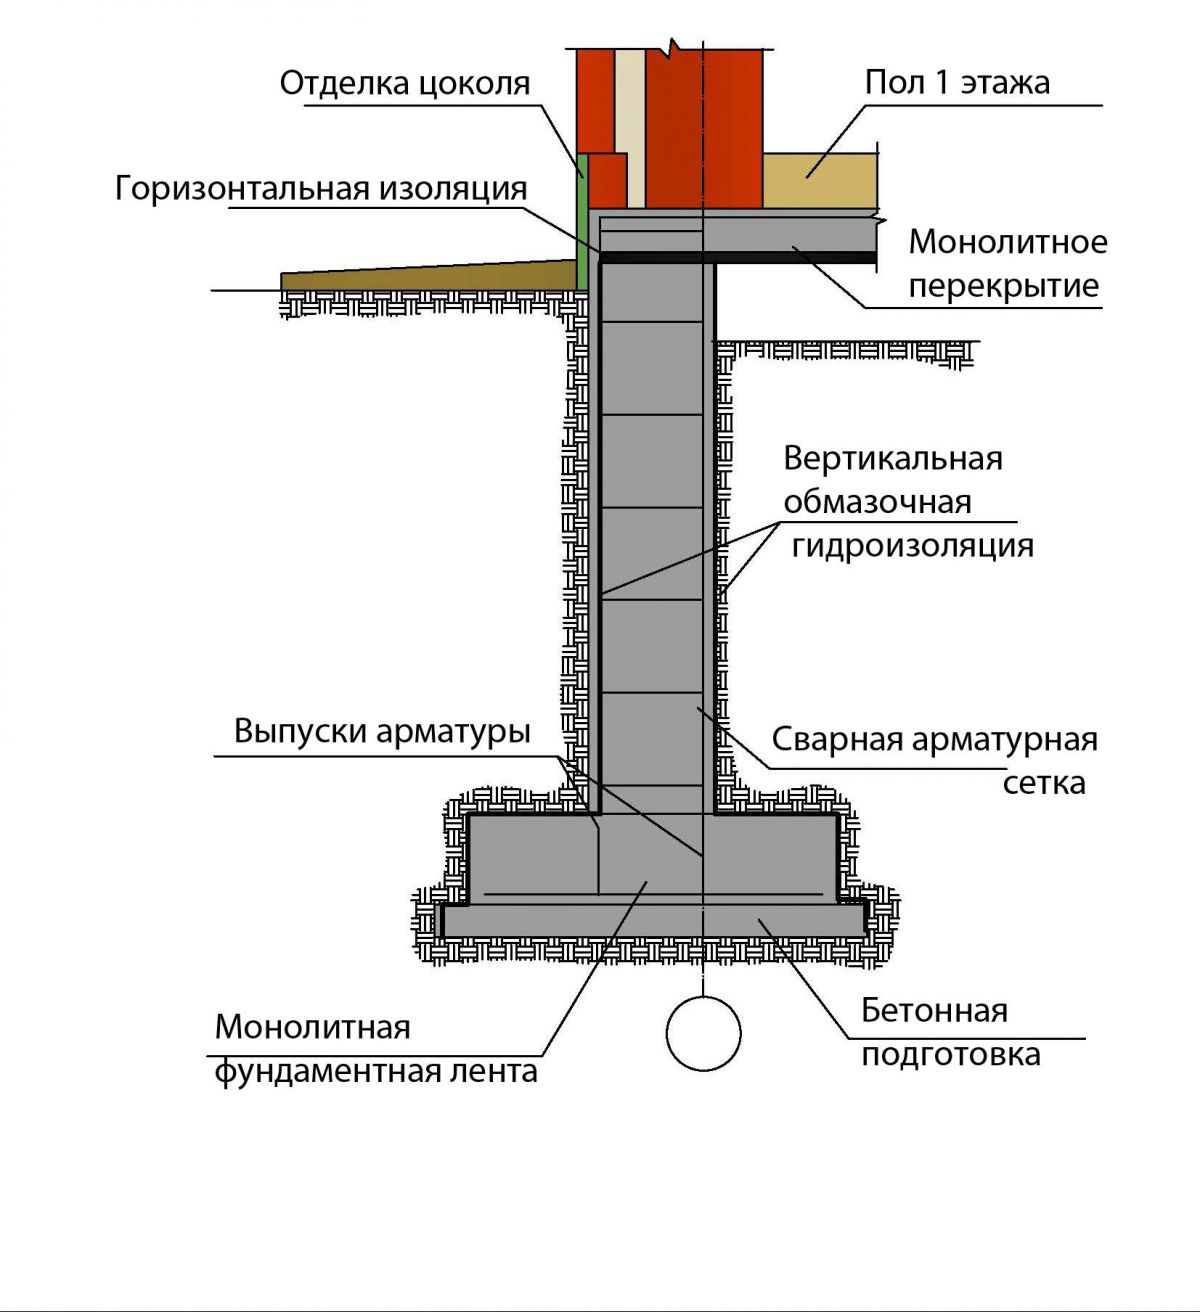
If the groundwater at the construction site is high, then the reinforced concrete will need waterproofing. From above, at the level of the basement of the house, it is usually done with a coating. And to protect that part of the base that remains in the ground, roofing material should be laid in the trench on the sides and on the bottom. It will reliably protect concrete from excess moisture in the soil at the stage of hardening and after.
The fourth stage is the laying of reinforcement. For reinforcement, steel rods of 14-16 mm cross-section and a thin binding wire are usually used. You can also fasten the fittings with electric welding. But in this case, experience with the welding machine and he himself is required. Plus, when performing welding, one must be prepared for the appearance of metal corrosion in the future.
As a result, a frame of reinforcement with cells of 25-30 cm should be formed inside the trench. Moreover, it is laid so that the steel is covered with concrete poured on all sides. Otherwise, the metal will inevitably begin to rust, then the house will definitely not stand for a long time.
The fifth stage is concrete pouring or FBS laying. If it is decided to equip the foundation for the house being built using block technology, then this greatly speeds up the process of its construction.Here you do not have to do the formwork and wait almost a month before the completion of the concrete setting.
However, support on foundation blocks will cost more than a monolithic counterpart. Plus, they will have to dig a trench of a larger size in width. To distribute loads for the lower row of masonry, FBS are made with an expanding base.
If a monolithic option is chosen for the support device, concrete should be poured immediately over the entire surface. No gaps in length and no layers in height. A monolith is a monolith. The house must be on a solid foundation.
When self-preparation of the concrete mixture, it is necessary to mix cement, sand and crushed stone in proportions of 1: 3: 3
But it is better to initially order a ready-made solution with the M300 brand and above.
When pouring concrete, it is extremely important to ensure that no voids form inside it. There are special vibrators for compaction.
However, you can also use a piece of reinforcement to pierce the filled mass and release air from it.
The sixth stage is waterproofing and blind area. It is allowed to start waterproofing works 3-4 days after the concrete is poured. It takes about three weeks to fully set. But you can already start to process the mastic, even if not completely frozen strip foundation for the house.
Also, around the entire perimeter of the structure, you will need to make a blind area to drain rainwater away from its walls.
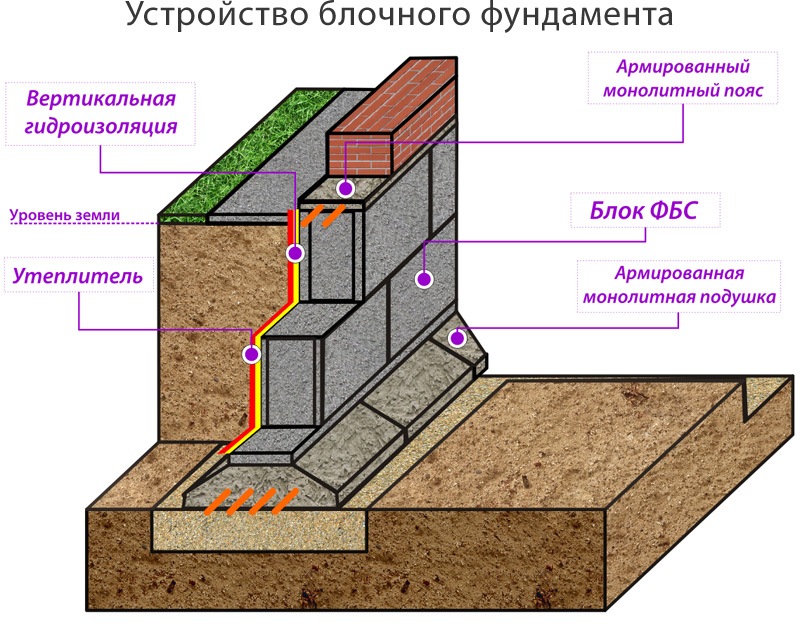
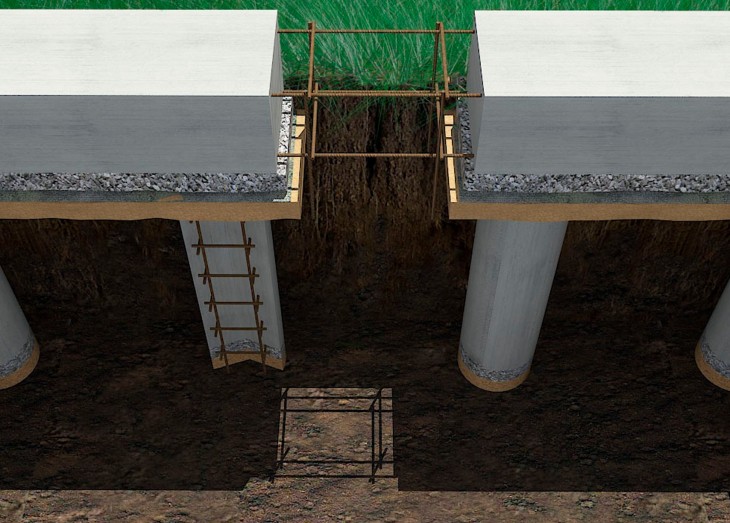
Basement walls made of blocks
Regardless of the fact that the basement under the house can be built from monolithic concrete or brick, the most common is the use of basement concrete blocks - GOST.
Basement walls made of blocks
The installation of a basement from blocks is distinguished by its speed. The main document that determines the construction of basements is GOST 13579 - 78. Number 78 indicates the year that GOST was put into effect.


Foundation blocks
For the installation of basements, solid blocks of GOST are used:
- solid foundation block (FBS);
- foundation block with a cutout (FBV);
- hollow foundation block (FBP).
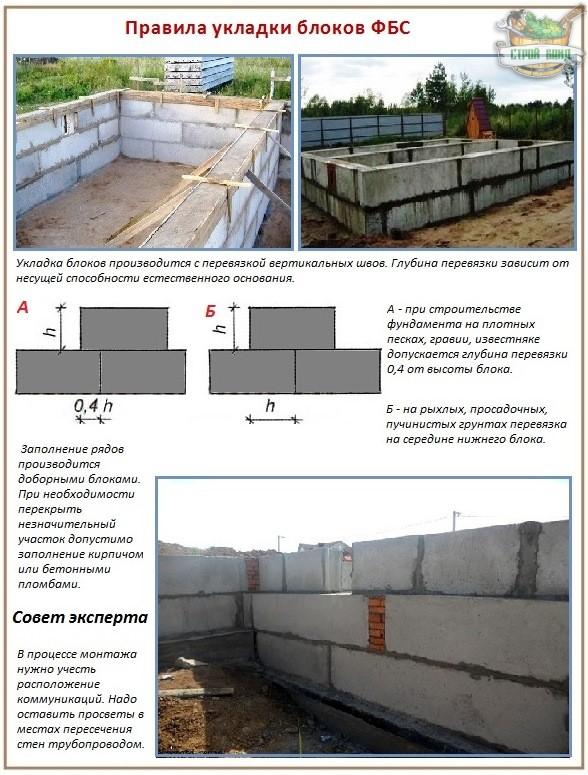
FBS is the most common and is used in all types of construction. These blocks can be of several sizes. The most used one has dimensions of length, width and height 2380x300x580 mm, respectively. It can be 400, 500 or 600 mm wide at the specified length and height. GOST FBS has an additional block of the same dimensions, but with a height of 280 mm. It can be 1180 or 880 mm long.
Stacking FBS blocks
FBV differs from FBS with a cut that runs along its entire length. This allows you to lay door ceilings and communication lines on the walls during installation. FBV has a length of 880 mm and the same width and height dimensions as FBS.
Installation of blocks
FBP has voids open at the top and bottom. Thanks to such voids, the amount of concrete for their production is reduced and the weight of the blocks is much lower. This type of block has a length and height of 2380 and 580 mm, respectively, and can be 400, 500 or 600 mm wide. Additional FBP blocks are not produced.
Strip foundation from blocks
GOST 13579 - 78 defines the alphanumeric designation of foundation blocks, which indicates the brand of the block, its rounded dimensions in decimeters, the type of concrete. For example, GOST 13579 - 78 defines the brand of the block "ФБП 24.4.6 - С". This means that we have a hollow foundation block with dimensions of 2380x400x580 mm, made of silicate concrete. The marking T or L can be used, which means heavy or light concrete. GOST 78 defines the strength class of concrete for foundation blocks. Blocks made of light or heavy concrete have a strength class of B 3.5, and their silicate concrete is B 12.5.
FBS type blocks
FBS are manufactured without internal filling with reinforcement. GOST defines in such blocks the presence of a mounting loop of a special shape made of metal of class 8AI and higher. The hinges can be installed on the surface of the block or located in a technological recess at a distance of 25-30 cm from the edges of the block. If the block has a minimum length of 880 mm, then GOST allows the manufacture of such products without loops.
Foundation blocks FBS
Installation of a basement wall from blocks
FBS is used in the construction of houses with strip foundations. They are installed after laying the foundation cushion and horizontal waterproofing.
Installation of basement walls from blocks
The process of installing a foundation wall under the house has its own technology:
- Roofing material is laid between the bottom row of blocks and the concrete surface using bitumen-polymer mastic. Depending on the density of the soil, a cement solution is laid, 25-30 cm thick, which will be a leveling base for the blocks.
- To connect blocks and joints between them, a cement mortar with waterproof and frost-resistant additives is used.
- Installation of blocks must be carried out using special geodetic equipment for the axial breakdown of the building.
- First of all, beacon blocks are installed. They are mounted at the corners and at the junction of the outer walls with the inner ones. If the house is long, then the installation of beacon blocks is carried out every 20-25 meters. When the beacon blocks are installed, a mounting thread is pulled between them to install other blocks.
- For the installation of the blocks, special equipment is required, since one FBS 2380x300x580 block weighs 980 kg.
- 6. Before assembling the next row, the upper part of the previous row of blocks is treated with water, after which the cement mixture is laid and leveled on it.
- The next row of blocks is mounted with the movement of the vertical seam within 30 cm. For this, marking is carried out on the lower row of blocks.
- The correctness of the installation is checked by the beacon blocks and the assembly thread.
- Minor displacements are eliminated on site. Raise the slab, remove excess cement mixture or add the required amount.
- When the plate has taken the required position, it is freed from the assembly slings. The excess solution, which has come out, is removed and placed in a vertical seam. The same seam is then completely filled with mortar to avoid voids and prevent water from penetrating into the basement.
How to build a foundation from FBS blocks
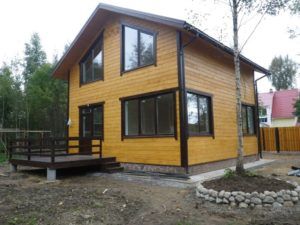
How to build a solid foundation with your own hands: tips and instructions from professionals (81 photos + video)
The basis of any structure is the foundation. The stronger and more correct it is installed, the longer any building will serve.

Therefore, in order to save a budget, many people want to know: how to make a foundation with their own hands.
First you need to choose the type of foundation, because there are several types of them: strip foundation, columnar, pile and slab options. How they differ from each other, we will tell below.


The most versatile and commonly used type of building foundation is strip foundations. It cannot be used only in permafrost and for structures “on the water”.

Such a foundation is suitable for any building and allows you to build a high-quality basement or basement.


The main disadvantage of this type of foundation is the large amount of earthwork and building materials.
For small buildings, in order to save materials, it is recommended to use a columnar foundation. It allows you to deliver a high-quality base for an easy building with less time and effort.


You can build supports from brick, concrete, or even wood (only resistant to decay - larch, for example). The depth for the pillars is chosen taking into account the material and type of soil.


After installing all the supports, you need to tie them into a single system for greater strength.
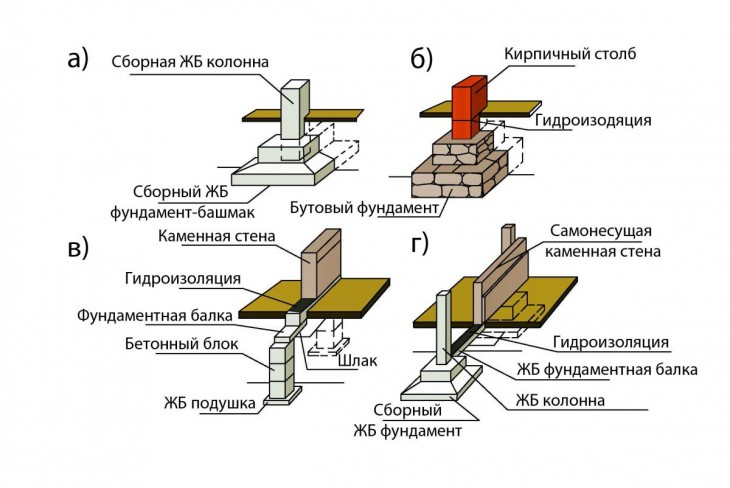


The disadvantages of the foundation can be called the impossibility of the basement foundation. The base is not suitable for heavy buildings, unstable soil also precludes its use.

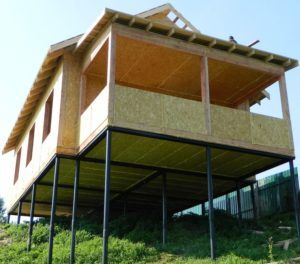
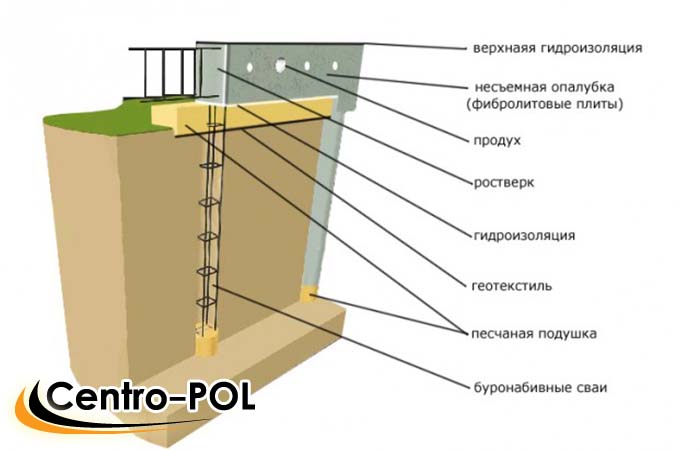
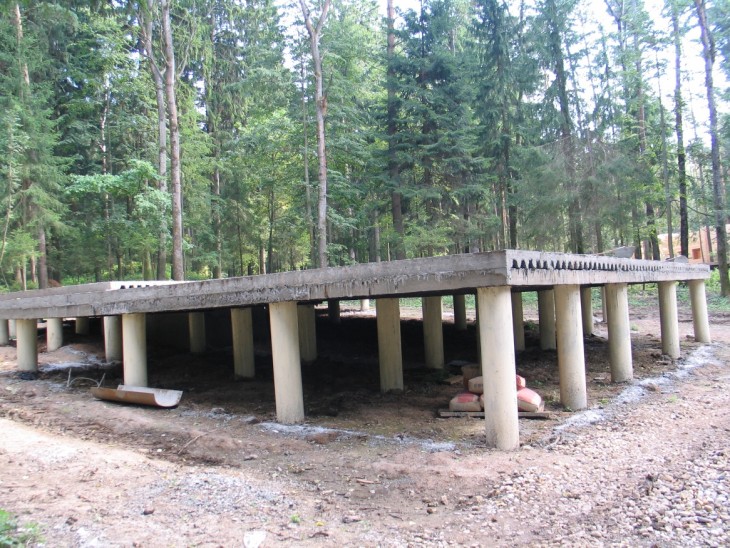
The foundation of a house on stilts looks like a columnar foundation, but it is not. The main difference is the depth of the supports. Due to its small diameter, in comparison with the pillars, the holes for the piles are not dug, but drilled. This allows the supports to be installed at greater depths and dug into more stable rocks.

Otherwise, the technology for placing and strapping the supports is identical to the columnar foundation.

The main disadvantage of this foundation is the use of special equipment.Recently, however, piles with a screw at the end began to appear, which allows them to be screwed, like a self-tapping screw, into the rock. This is what made the piles accessible to the layman.
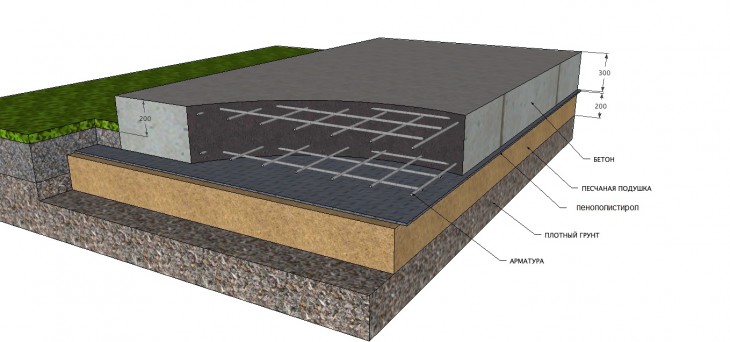
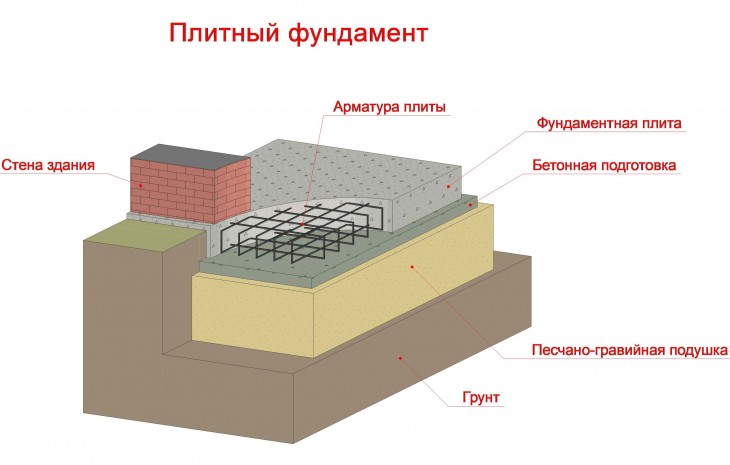
One of the most rarely used types of foundations. Reinforced slabs are commonly used for roads and boulevards, but some people also use them as a base for a house.

To create it, a gravel-sand cushion is first poured, after which reinforcement is placed and the foundation is poured. It turns out a "floating" base for the house.

Plus such a basis - independence from the type of soil and its freezing in the winter.

Now let's talk in detail about creating a strip foundation, as the most common and versatile in construction.


And here we will make an important clarification. It is best for a specialist to independently calculate these parameters.
The fact is that it depends on the correctly calculated depth and width of the base whether or not the foundation will withstand the future building, and therefore your life.


- Mark the territory.
- Carry out earthworks (dig trenches).
- Create a sand and gravel pillow.
- Make a formwork for the foundation.
- Lay the future foundation with a belt of reinforcement.
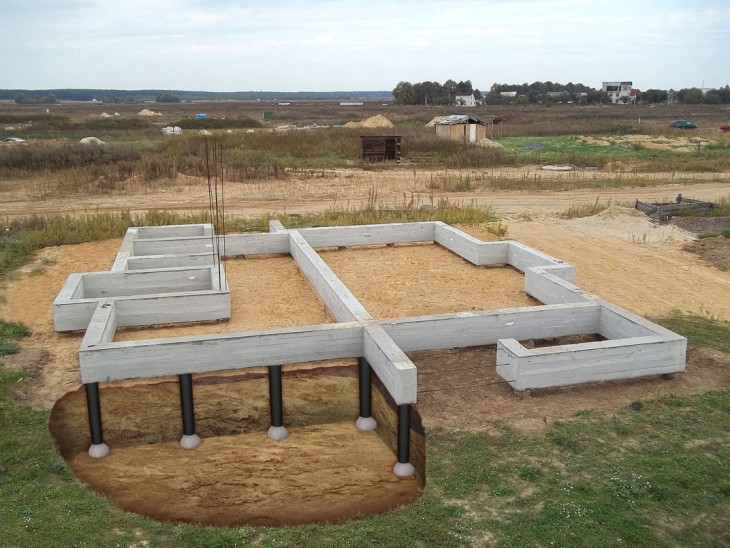
- Provide ventilation (if necessary) using pipe sections.
- Pour concrete.
- Smooth the surface until solidified.
- Remove the formwork after a week.
- After another 3 weeks, the concrete will completely harden and you can waterproof it with roofing material and hot bitumen.
- Lay the basement on top of the concrete with a brick and make waterproofing.
The foundation is ready!


Step-by-step instructions for pouring mortar
It is easier and faster to order concrete from a specialized enterprise than to make it yourself. Self-production is ineffective because the mixture will require a lot. In this regard, the fill will need to be divided into several stages, which will lead to additional problems. For example, cold bridges are formed, or the so-called. cold seams. The latter allow both cold and moisture to pass through at the same time.
Immediately before starting the pouring, you need to make sure that the special equipment that delivered the mortar to the object is working in normal mode. It must provide quick access to any corner section of the formwork. To avoid all sorts of force majeure circumstances, prepare another tray. It may not be needed, but if necessary, it will quickly solve the difficulties that have arisen.
Test the mixture. If the solution is dry, add a little water and stir again. Continuously tamp the material as you pour. If possible, stock up on a deep vibrator in advance.
After pouring, the installation of the strip base can be considered almost complete. Now all that remains is to take a simple trowel and carefully level the surface. If possible, it is better to use a vibrator. Pick a couple of spots and pierce with a reinforcing product or a feeler gauge. This will remove excess accumulated air. It is necessary not only to pierce the mixture, but also to tap the auxiliary product with a hammer.
While the base is gaining strength, it must be covered with moisture-resistant materials. To prevent cracks from appearing on the surface, the supporting structure must be moistened with water. It is best to dismantle the formwork after a month. Under favorable weather conditions, the analysis is carried out in a week. Happy and easy construction!
Pouring the foundation
When pouring a strip foundation with concrete, you must follow all the rules and requirements:
- the casting of the belt-type foundation is carried out in one day by continuous casting;
- it is advisable to move the concrete mixer from place to place during such work, and not to make the concrete liquid and pull it from one point to another;
- concrete should not reach the level of the upper part of the shields;
- it is not recommended to throw off ready-made concrete from a height of more than 2 meters;
- carrying out such work, it is imperative to compact the concrete using a submersible vibrator.
In order for the work to be carried out efficiently, it is advisable to regularly move the mixer with the solution and fill not one point of the formwork, but along its perimeter. Having filled the structure up to 50 cm, you need to walk around the perimeter with a vibrator and tamp the mixture. The normal depth for a vibrator is 1 meter from the length of the tip.