Why is it better to choose expanded polystyrene
Building technologies existing today enable developers to use several types of insulation: liquid (foamed), polystyrene, bulk expanded clay or slag, expanded polystyrene. Why do we recommend styrofoam?
- Low coefficient of thermal conductivity with relatively high indicators of physical strength. The production technology involves the use of special innovative additives to improve the performance of the material.
- Versatility of use. Expanded polystyrene can be used to insulate not only foundations (outside or inside), but also walls, ceilings, floors, etc. This greatly facilitates the process of building a building, minimizes unproductive losses for insulating the entire building. You can purchase the same type of insulation for all structures, including ceilings, walls and floors, and then use it, taking into account the need for each element of the building.
- Manufacturability. Expanded polystyrene is easy to cut and process, there is no need to purchase special tools and equipment for work. Plates can be fixed with dowels and large caps or glued. The shelf life in proper conditions is practically unlimited. If, for some reason, the insulation of the foundation is postponed to a later date, then the quality of the material will not deteriorate.
- Low price and long service life. In terms of the combination of these characteristics, polystyrene foam is unmatched among all heaters.
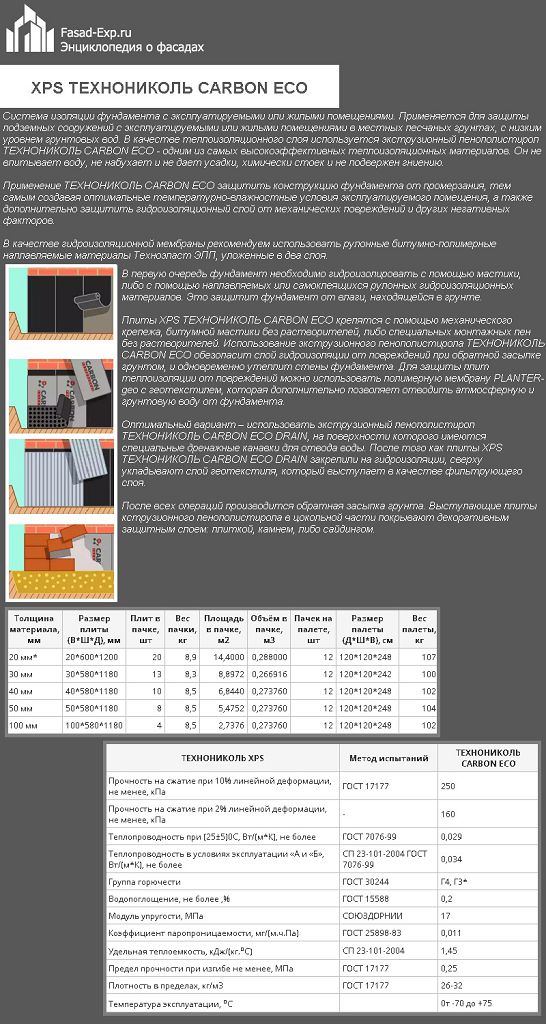
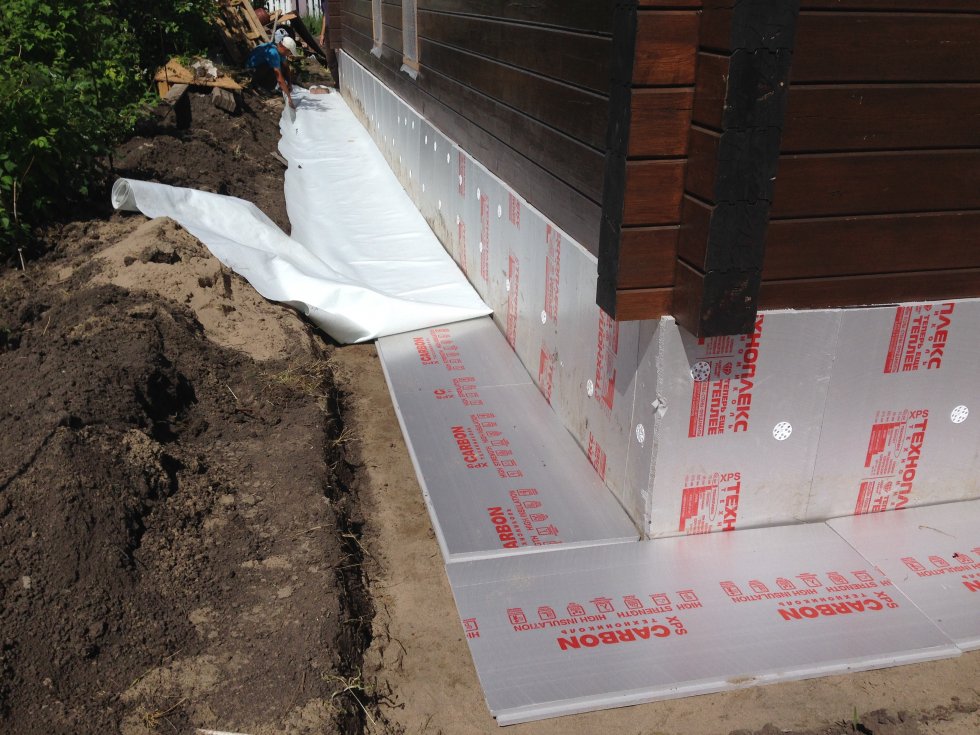
XPS TECHNONICOL CARBON ECO
Unfortunately, there are also disadvantages: flammability, risks of damage by rodents and insufficient environmental performance. But these shortcomings are easily eliminated by simple construction operations.

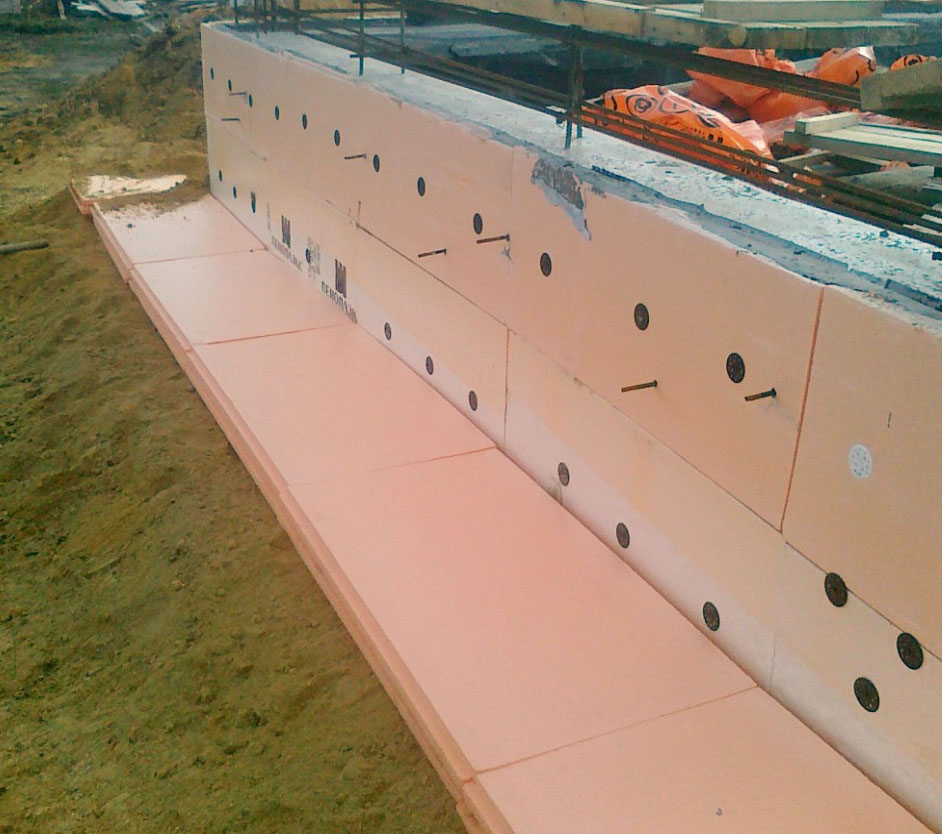
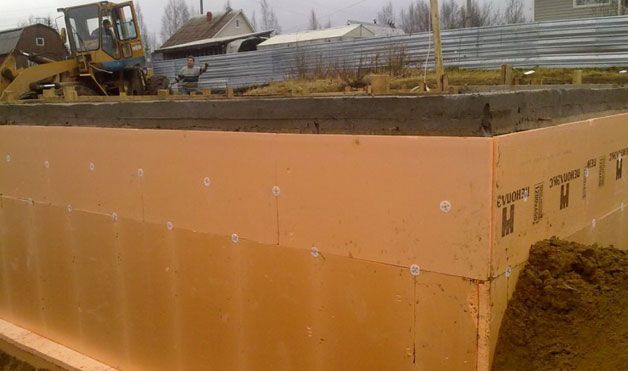
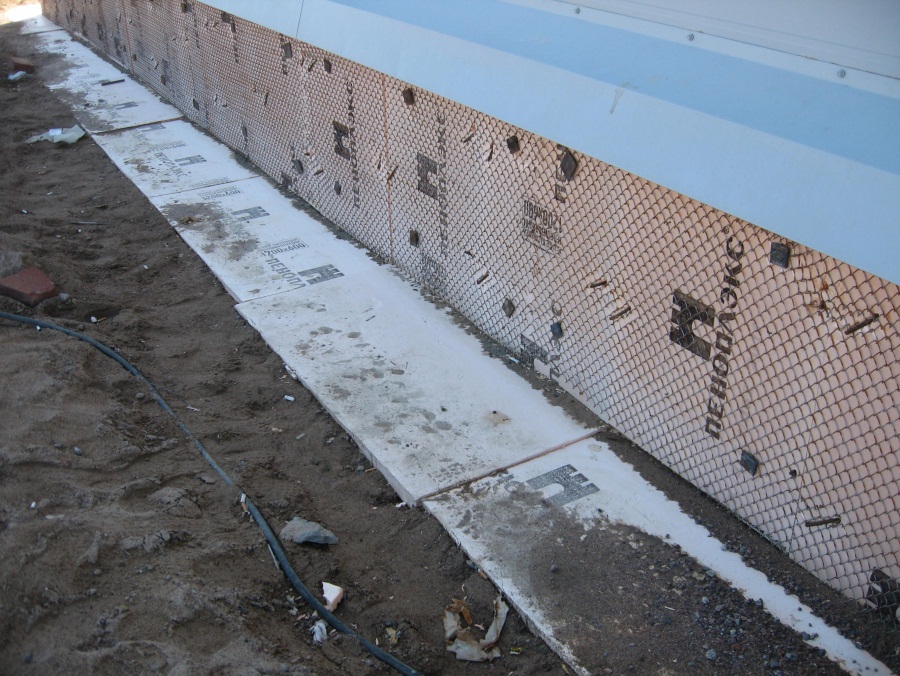
Insulation Penoplex Foundation
We will explain below how this is done.
We provide protection to the insulation
To prevent this, you need to provide the material with reliable protection. The easiest way to do this is with ordinary cement plaster. It is enough to lay it in a layer of 5-10 millimeters in order to reliably protect the expanded polystyrene from mechanical stress.
After applying the plaster, let it dry. Experts say that the optimal formula for determining the drying time is 1 day per 1 millimeter of thickness. Of course, it is worth considering the humidity and ambient temperature. But after 10 days, you can confidently bury the trench dug at the beginning of work.
Do-it-yourself insulation of the foundation with extruded polystyrene foam is completed. Now you can be sure that your home will always be warm and cozy.

In addition to expanded polystyrene, you will need:
- mastic or roofing material;
- gravel;
- glue;
- dowels, fungi;
- putty or polyurethane foam;
- level;
- notched trowel;
- cement mortar;
- sand;
- reinforcing mesh;
- roller.
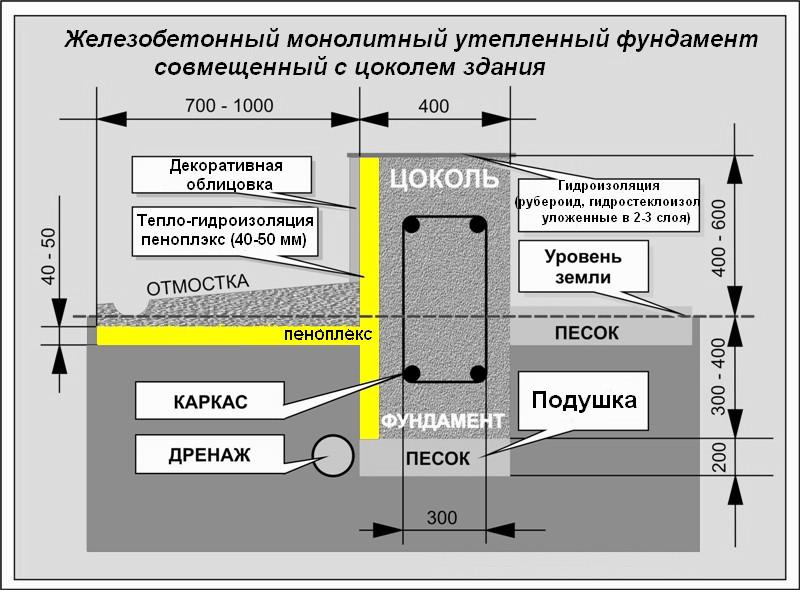
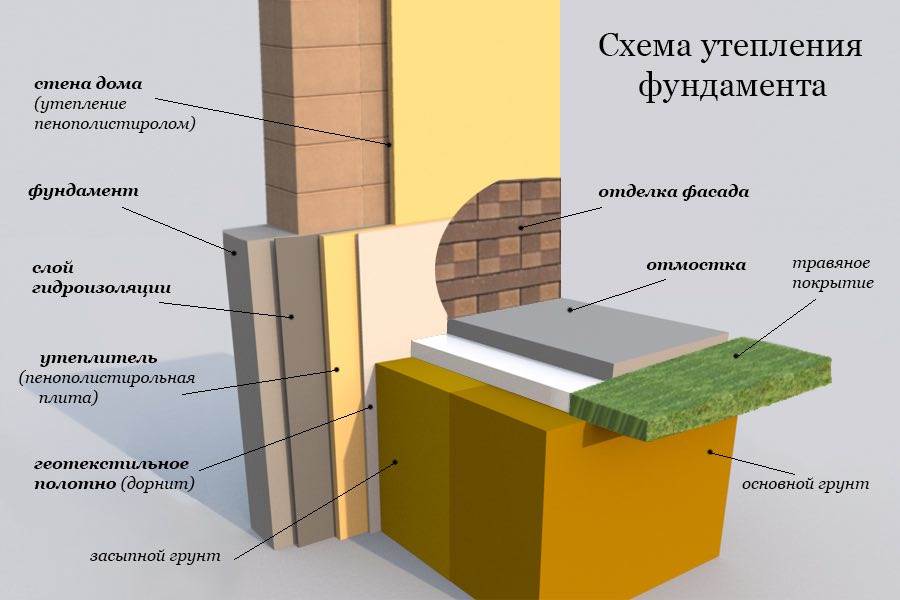
When all the materials are prepared, a trench is dug around the perimeter of the foundation. You need to dig to the level of freezing, that is, to a depth of 1.5-2 m. To make it convenient to work in a trench, its width should be 0.8-1 m. The walls of the base must be thoroughly cleaned of earth, bumps and cracks must be repaired with mortar.
The use of permanent formwork for a foundation made of expanded polystyrene

To fill the foundation, it is imperative to use the so-called forming element. For this, formwork is used. Removable formwork has many disadvantages. Therefore, today the fixed formwork made of expanded polystyrene is very popular.
Preparatory work
Let's take a look at the preparatory work first.First, a specialist must develop a project. After that, you need to level and clear the construction site. To do this, you need to use construction equipment. Then they mark the site. This allows you to define the contours of the foundation.
Assembling the formwork
Now let's move on to the most crucial stage:
- First, you need to hammer the reinforcing rods into the sand and gravel cushion.
- Then concrete is poured (on top of the pillow). Thus, the bottom is leveled.
- Now you need to wait for the concrete to harden.
- Blocks are placed on the reinforcing bars. The protrusions of one block are inserted into the valleys of the other. The structure is assembled from separate blocks. In this case, the jumpers are located inside. And also the blocks are attached with additional brackets. The blocks are cut in half at the corners.
- To increase the strength of the structure, special foam is used. Corner pieces are used to reinforce the corners.
- If a large foundation is being built, then additional fastening must be used. For strengthening, you can use ordinary boards. They are attached with spacers.
Reinforcement laying
Metal reinforcement must be laid in the box structure. Each block has a place for fittings.
First of all, you need to install steel vertical posts. They ensure the stability of the entire structure. After that, the horizontal reinforcement is installed. It must be installed longitudinally. The reinforcement must be tied with wire.
Places for communication
It is necessary to make the so-called through holes for the installation of communications. How to make them? Cross pieces of pipes are laid in blocks. Passages need to be done in different places.
Insulation of various types of foundations
The choice of materials and methods of work will depend on the type of foundation of the house. There are three main options.
Tape
The strip foundation consists of a closed system of beams placed under all the walls of the building. They are made of reinforced concrete, rubble stone or brick. Frame buildings are often built on this basis.
In this case, the choice of ways to insulate the foundation of the house is the widest. You can use any materials: PPP, EPS, PPU, expanded clay.
When carrying out work, the following sequence of actions is observed:
- Dig a trench around the perimeter of the building. If the foundation is shallow, then this can be done manually with a shovel. Otherwise, it is better to involve a special technique.
- The bottom of the trench is covered with layers of sand and gravel for better moisture removal.
- All surfaces of the foundation are cleaned. Leave to dry for a week.
- Apply a layer of waterproofing. It is better to use polymer or bitumen mastic. If the insulation is carried out with liquid polyurethane foam, then this stage can be skipped.
- After the waterproofing layer has dried, they begin to install the insulation. The material is laid from top to bottom in horizontal rows.
- The structure is left for several days to dry completely. After that, it will be possible to bury the trench. If necessary, finishing work is carried out in the aboveground part of the foundation.
Your home should be not only beautiful, warm, but also safe.
Therefore, it is important to take a responsible approach to the selection of the materials used. Purchase all goods only in specialized hardware stores. Always check that the seller has certificates, other accompanying documentation for products
Always check that the seller has certificates and other accompanying documentation for the products.
Columnar and pile
Columnar and pile structures are a system of free-standing supports. In the future, a grillage is laid on them - a frame on which the pressure of the bearing walls of the building is distributed.
Both types of such a base are similar, but have a number of differences. The pile is deepened at a distance of 5 meters or more. It has a smaller cross-section.Can be screw or driven. Its sole and lateral surface function. The pillars are dug in just below the freezing point of the soil. They have a large cross-section, rest only on the bottom of the ground.
Warming the foundation is carried out longer and more difficult than the others. First of all, you need to create a foundation wall, which is called a pick-up. It is on it that the insulation will subsequently be attached. It can be made from bricks or metal profiles on which a wooden board is laid.
An important stage in the work is the isolation of each pillar or pile from moisture. To do this, each support is wrapped with roofing material. It is good to coat metal structures with mastic, and wooden structures with a special solution that prevents rotting. It is also necessary to process grillage beams. The further process of warming will be similar to the strip foundation.
Platen
The slab foundation is a monolithic reinforced concrete structure. It is the most reliable and durable. It is erected on any kind of soil.
Insulation of such a base from the outside is possible only at the construction stage. There is no possibility to do it later.
The process is divided into several stages:
- The soil at the base of the dug pit is tamped.
- A geomembrane is lined to protect it from groundwater.
- A pillow is made from a mixture of crushed stone and sand. This will improve the bearing capacity of the soil.
- A layer of waterproofing is laid. For this, any roll material is used.
- Sheet insulation is laid. Better to use PPP or EPS.
- A plate is being made.
If insulation was not carried out at the construction stage, then the only option is to lay the material under the floor screed of the first floor.
Preparation for insulation of a foundation located on waterlogged soils
Builders use expanded polystyrene plates to relieve the bursting loads of the soil during freezing / thawing. But after that, expanded polystyrene gets significant damage, which lowers its heat-shielding properties. In our case, it is necessary to take special measures so that the plates fulfill their main task - they serve as a reliable and effective insulation. This can be achieved by removing excess moisture, the lower the relative humidity of the earth, the lower the coefficient of its expansion during freezing. Accordingly, the lower the compressive force on the plates.
The task of the preparatory work is to divert the groundwater. How to do it?

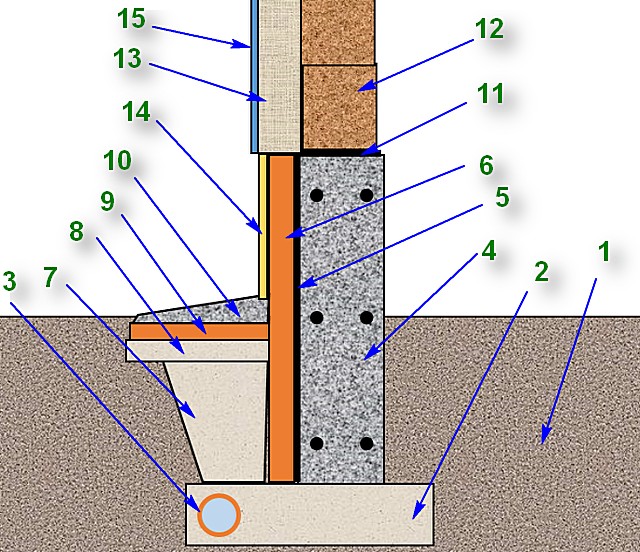
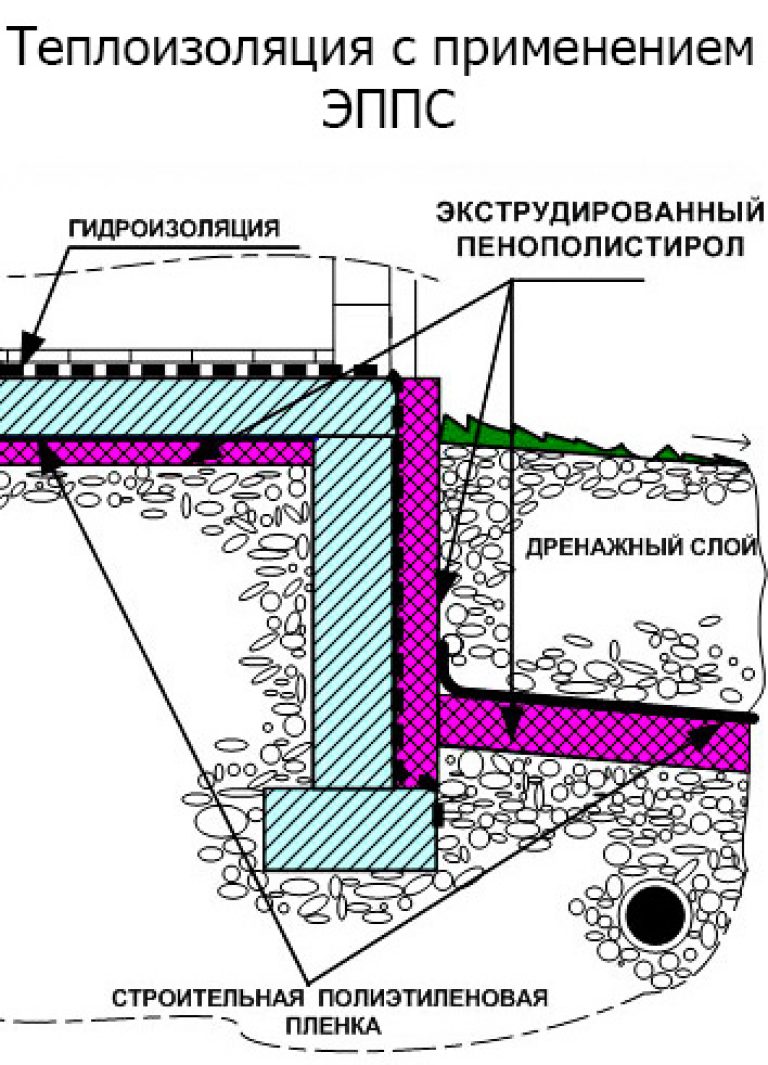
Foundation drainage scheme
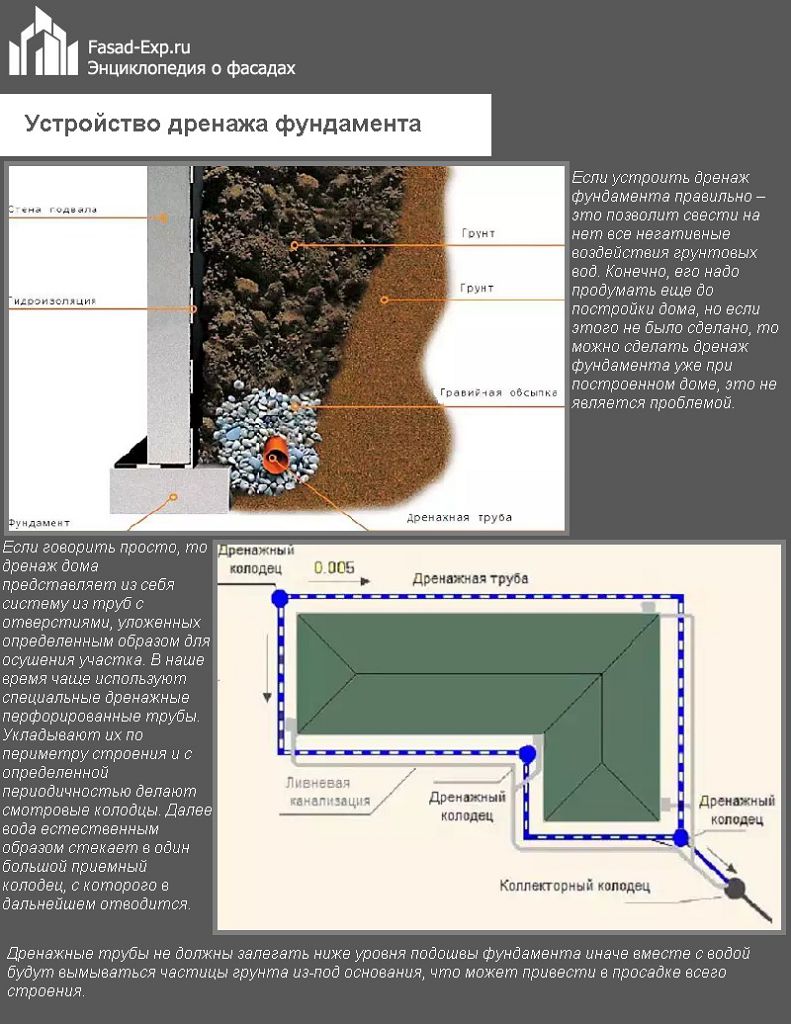
Foundation drainage device
Step 1. Dig a trench around the perimeter of the house to the depth of the foundation. Width within 40-50 centimeters.
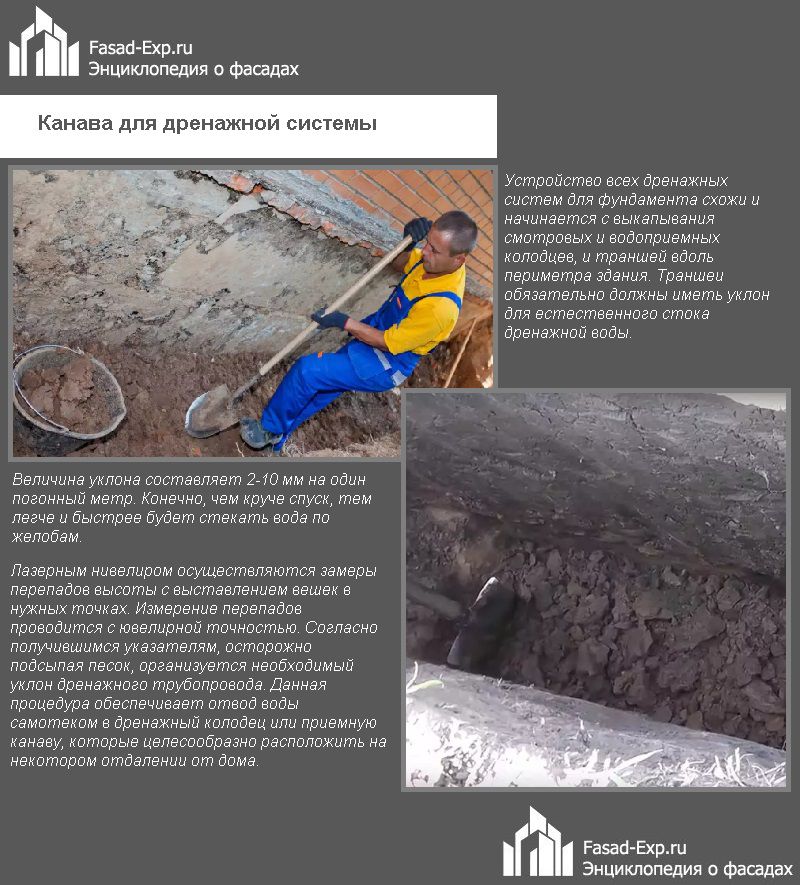
Drainage ditch
One more tip. Are there any concerns about the strength of the foundation? Do the work in stages, each wall separately. You can dig a second trench only after the previous one has been filled. This complicates the whole process, but it is not worth risking the stability of the building. The use of earthmoving equipment is not recommended. Let it be more difficult and harder by hand, but the risks of damage to the structures of the house are completely eliminated. It's hard to dig yourself - invite neighbors or acquaintances to help. There is no such possibility - use the services of construction crews. Just do not forget to control the quality of their work, outright hackers are often found. Especially in such low-skilled jobs.
Step 2. Consider a way to drain groundwater. They can be taken out directly outside the site or in special containers. It all depends on the terrain and the depth of the location of the drainage pipes. At the same time, keep in mind that the angle of inclination of the drainage system should be within 2-3 mm per linear meter. Dig a trench right away to lay the discharge pipe water from home... If possible, do drainage throughout the site, and not just near the house. It is expensive, but the comfort of living in a country house is much improved.

Tamping of gravel poured into the bottom of the ditch
Step 3. Lay drain pipes along the perimeter of the foundation, make sure that in all places they have the required slope. Drainage pipes have holes for water intake, do not allow them to become clogged. Cover the pipes with geotextiles and pour 20-25 cm thick sand on top. Then the water is drained off using ordinary plastic ones.
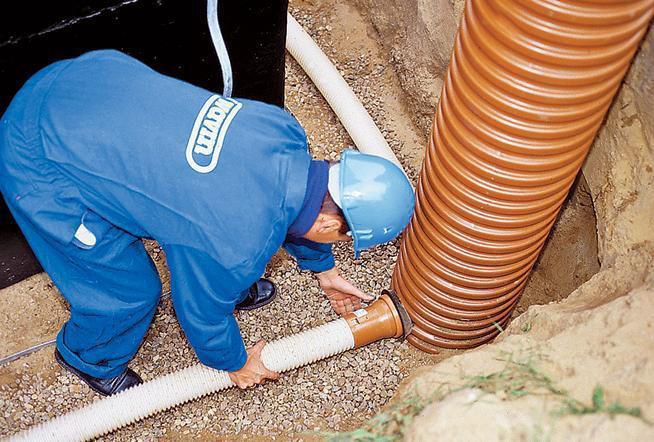
Laying pipes and connecting drainage wells
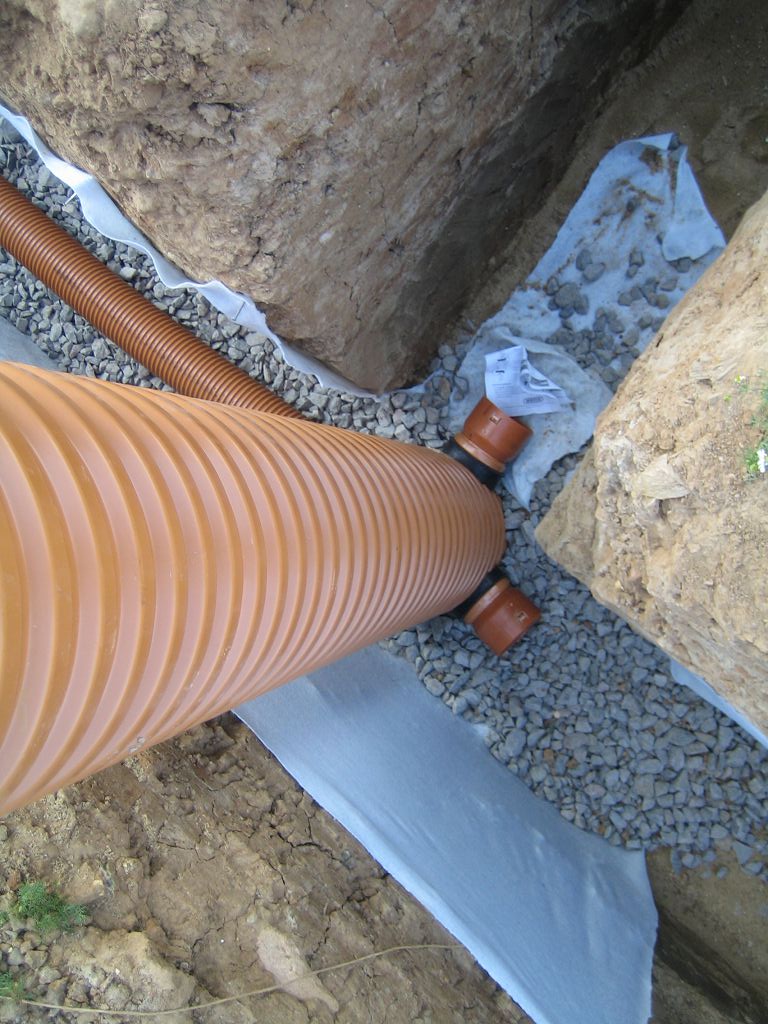
Drainage well

The pipes are covered with rubble
Step 4. Tamp the sand well and cover the remaining space with earth. Remove large stones, they can damage the pipes.
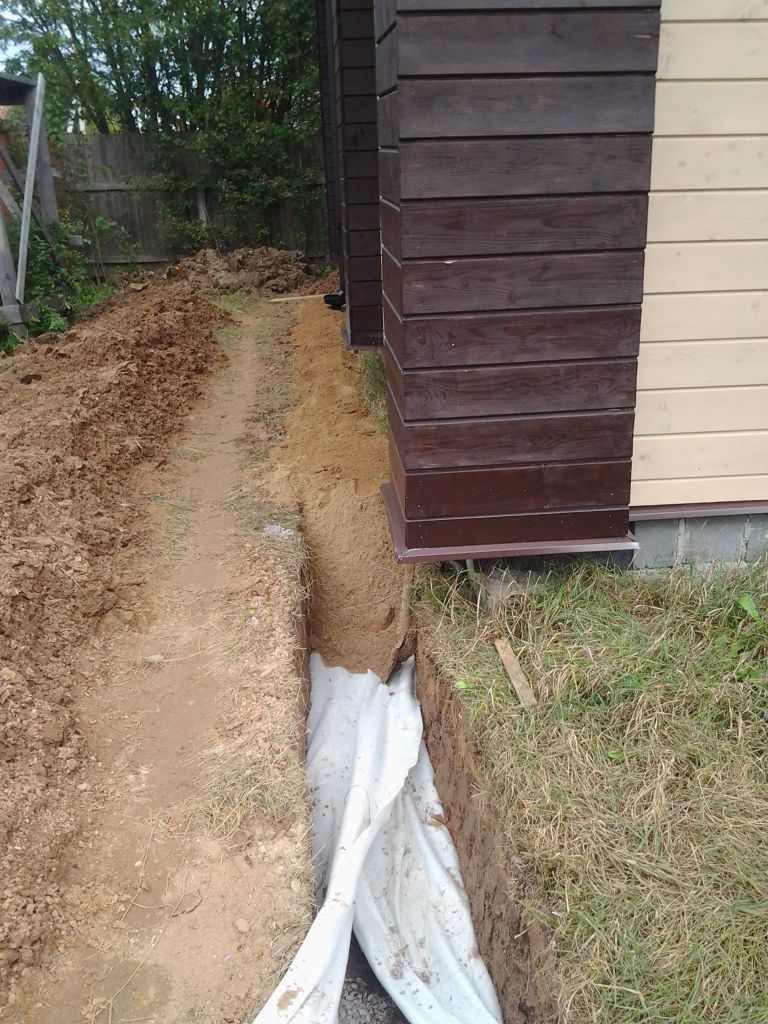
Wrapping the ends of geotextiles and backfilling
Varieties of foundations and features of their insulation
Belt at the stage of formwork
If you take care of thermal insulation in advance, during design, you will get a thoughtful, energy efficient and economical solution.
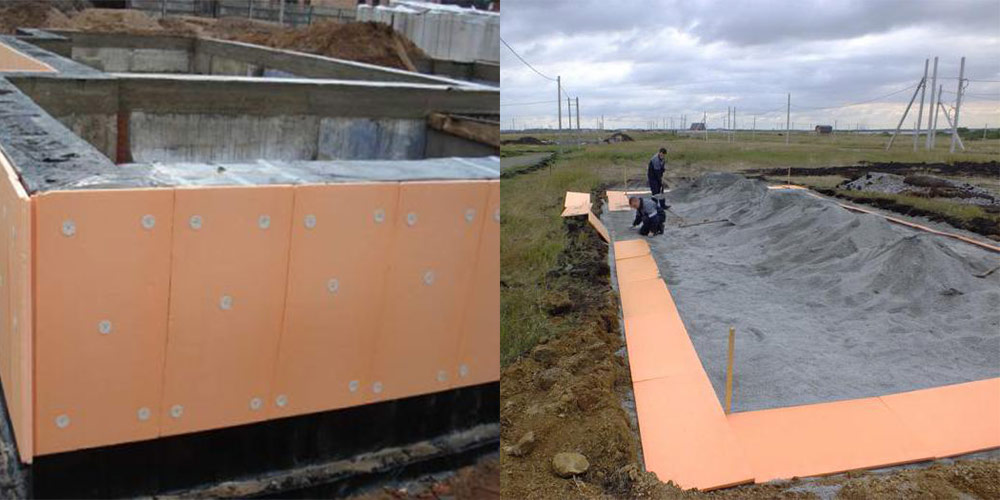
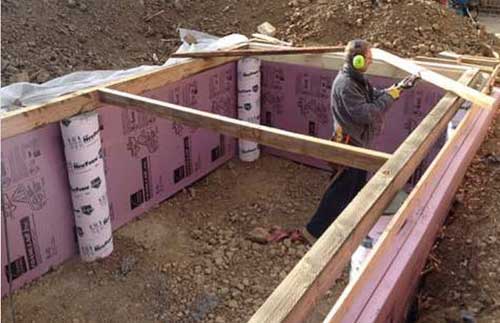
After the trench has been dug, it should be covered with sand and formwork made of expanded polystyrene sheet. Such formwork must be protected from bursting with concrete poured by installing supports made of boards or thick-walled plywood.
There are also special polystyrene foam blocks with cavities on sale. They are used for masonry, like bricks or foam blocks, connecting with glue. In the cavity of such masonry, reinforcement is mounted, concrete mortar is poured and vibration compaction is carried out.

Formwork of this kind will be non-removable and, remaining on the foundation structures, will serve as excellent thermal insulation
Concrete or stone tape
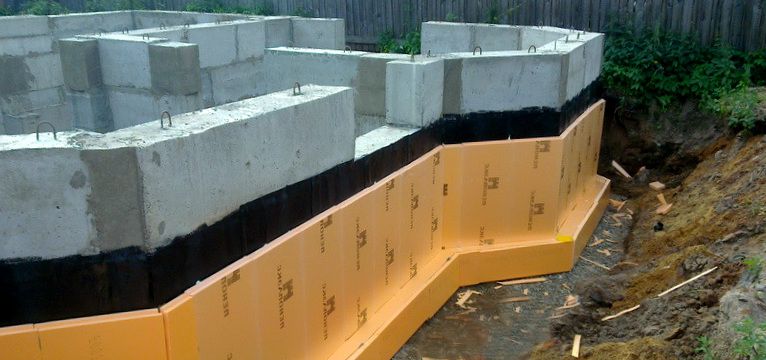
The insulated monolithic strip foundation will last much longer. First, the structure poured or folded from the foundation blocks should be waterproofed. For this, special bituminous mastics are used. The waterproofing layer must be allowed to dry until the solvents are completely weathered. It takes three days to a week.
Foamed plastic is glued to concrete with adhesives. Acetone based glue should be avoided - it dissolves the foam.
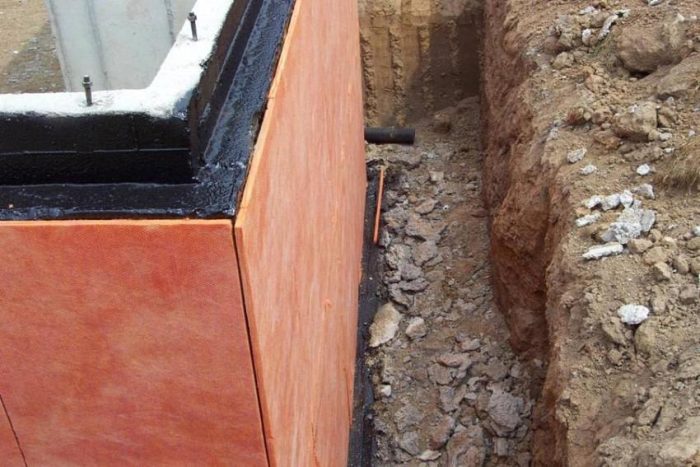
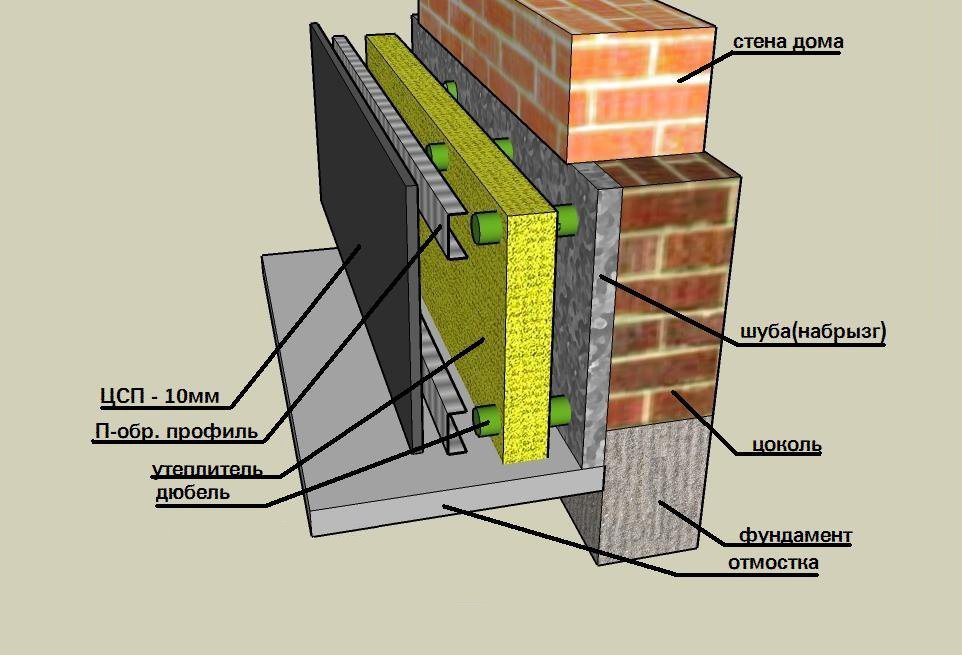
On top of the foam, protective sheets of asbestos cement can be installed or a layer of plaster can be applied, reinforced with a pre-installed support mesh.

For thermal insulation of the above-ground part, it is recommended to use sheets with a thickness of 100 mm.
How to insulate a foundation made of rubble stone? Before thermal insulation, it should also be leveled with a layer of plaster mesh.
Columnar
How and why to insulate a columnar foundation? Its thermal insulation is more difficult than tape, since there is no closed loop. Insulating each pillar will have less effect than insulating the closed outer contour formed by the tape. Most often, the insulated circuit begins with a log and a rough floor.
In order for the columnar foundation not to act as a conductor of cold into the house, it is necessary to arrange a thermal break between the top of the column and the floor structures. The material for such a gasket should:
- have low thermal conductivity;
- be strong enough - through this gasket, the weight load of the house will be transferred to the foundation.
For this, special finely granular high-strength foams are suitable.
Platen
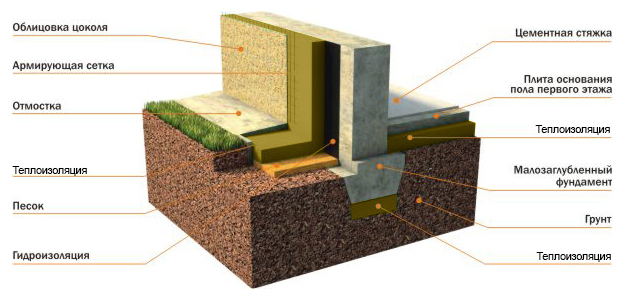
Foundation slabs are the most advanced type of support structure. The insulated Swedish plate, as it is called in everyday life, ensures the maximum strength of the structure and its resistance to seasonal fluctuations in the soil. Thermal insulation is carried out before casting, both from the bottom and from the ends of the slab, in order to exclude the formation of so-called. "Cold bridges".
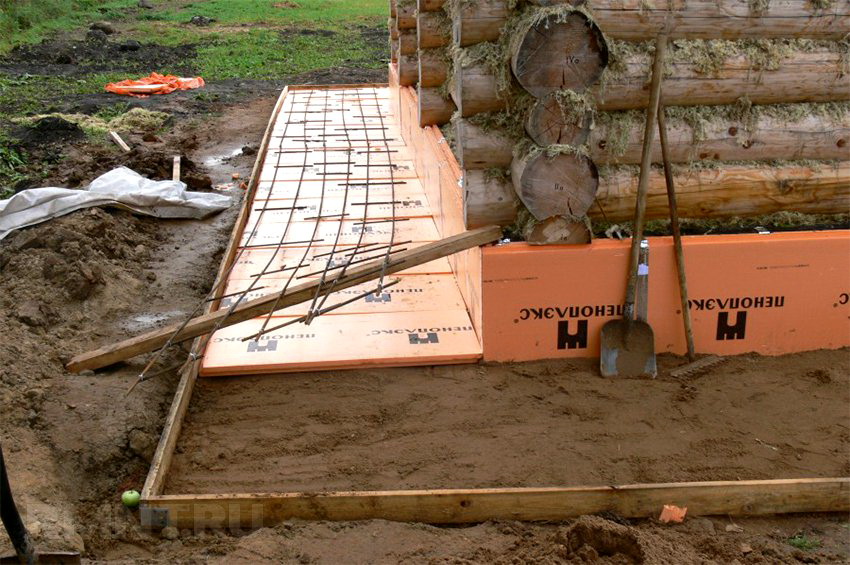
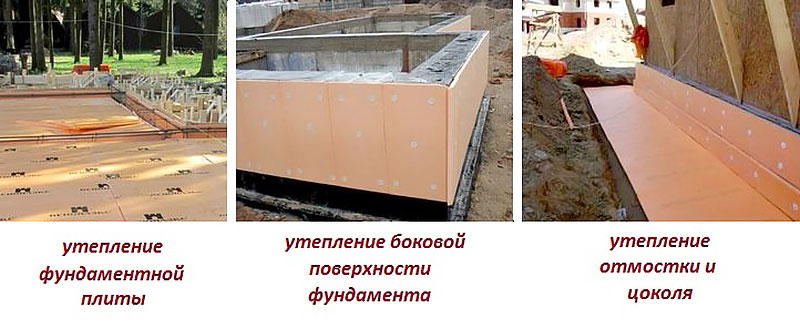
A layer of rolled waterproofing material is unfolded on a leveled and tamped sand cushion, then expanded polystyrene plates are laid out. A reinforcement system is mounted on top of them, after which the slab can be poured. From the ends, sheets cut through the thickness of the slab are fixed, which will serve as permanent formwork. From spacing, they are fastened with special squares.

Just in case, experienced builders for insurance put external supports of the end part of the formwork from boards and thrust beams.
The thickness of the plates in Russian sources ranges between 60 and 100 mm, Western recommendations say from 200-300 mm.
Pile-screw
The problems of insulating the pile-screw foundation of a house are the same as in the case of a columnar foundation. Theoretically, it is possible to dig the soil to the depth of freezing and make an insulated contour around the outer piles.
However, at the same time, the whole main advantage of screw piles is lost - the almost complete absence of earthworks and the installation of the foundation of a wooden house in one day.
Most experts agree that the piles themselves do not need insulation, and it is worth focusing your attention and efforts on insulating the walls, floor and contact points of the logs and the tops of the piles and strapping in order to exclude the transfer of cold through them. And the piles will have to freeze
What gaps does the insulation of the basement of the house have from the outside?
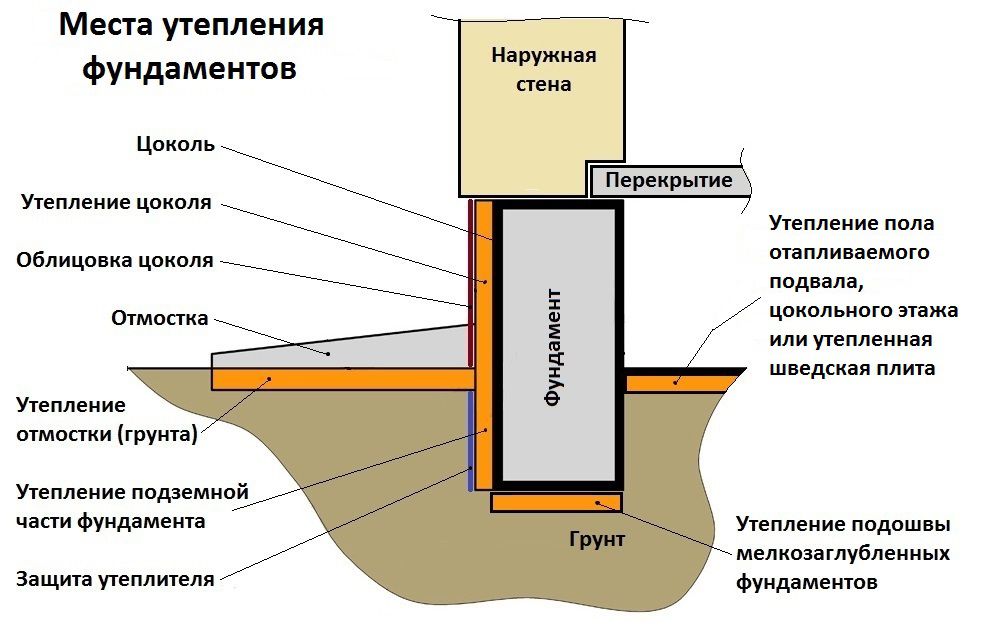
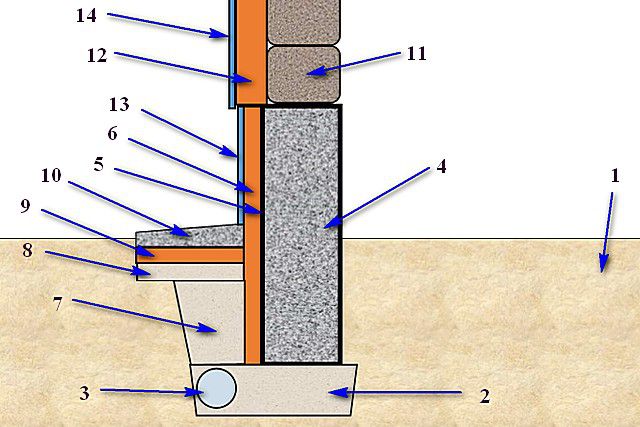
The biggest plus of the external insulation of the foundation is that it is easier to block all possible cold bridges at the junctions of the foundation and ground floor slabs:
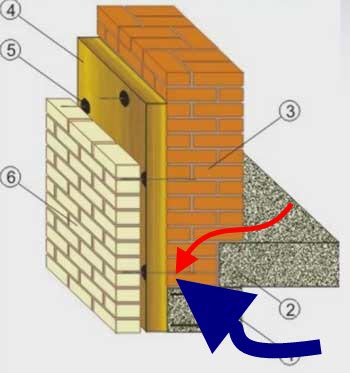
On the diagram, the numbers indicate: 1 ("hidden" by the blue arrow) - foundation; 2 - overlap (floor) of the first floor; 3 - wall; 4 - insulation; 5 - fastening the insulation to the wall; 6 - decorative cladding that protects the insulation from water, sun and mechanical damage, as well as just for beauty
So, please note that thanks to the external thermal insulation, it is possible to block heat leaks (shown by arrows). Now imagine that there is no insulation outside, but only from the inside, from the basement side. Heat will flow freely in the direction of the red arrow from the room
Heat will freely flow away from the room in the direction of the red arrow.
The second plus of external insulation of the foundation is protection from moisture of the foundation itself. When insulating from the inside, the foundation is still exposed to the environment (water, which can freeze, destroying the foundation). Therefore, it is better to use external insulation.
Insulation of the foundation from the outside. Step-by-step instruction.
Insulation of the foundation consists of several stages:
- Surface preparation.
- Waterproofing.
- Insulation installation.
- Plastering.
Preparation consists in cleaning the base from dirt and dust. If there are pits and cracks on the surface, then they must be sealed with cement mortar, and after drying, sanded. The surface must be smooth and free of dust. Therefore, it must be carefully brushed with metal teeth.
Waterproofing is carried out to protect the surface from moisture. After all, the liquid penetrating into the pores of the foundation surface leads to the formation of mold and mildew in the basement and on the first floor. To avoid this, a deep penetration primer is taken and applied with a brush and roller.
Examine the surface in a day. If pores are still visible, then it should be re-primed again.
In a day, when the primer is absorbed, you can start installing the insulation. If you use expanded polystyrene or polystyrene, then these materials will cost less than penoplex. But the latter is more durable. But if we talk about the insulating properties of these materials, then both of them do an excellent job of keeping heat in the house. The main thing is to attach and finish them correctly.
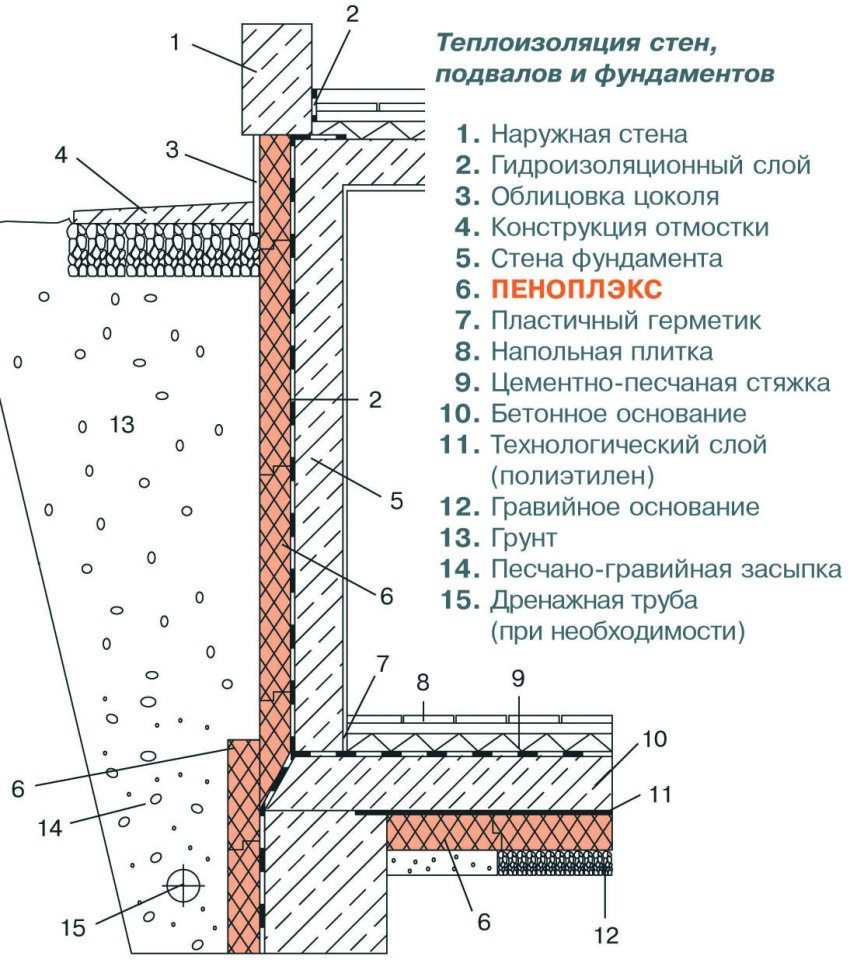
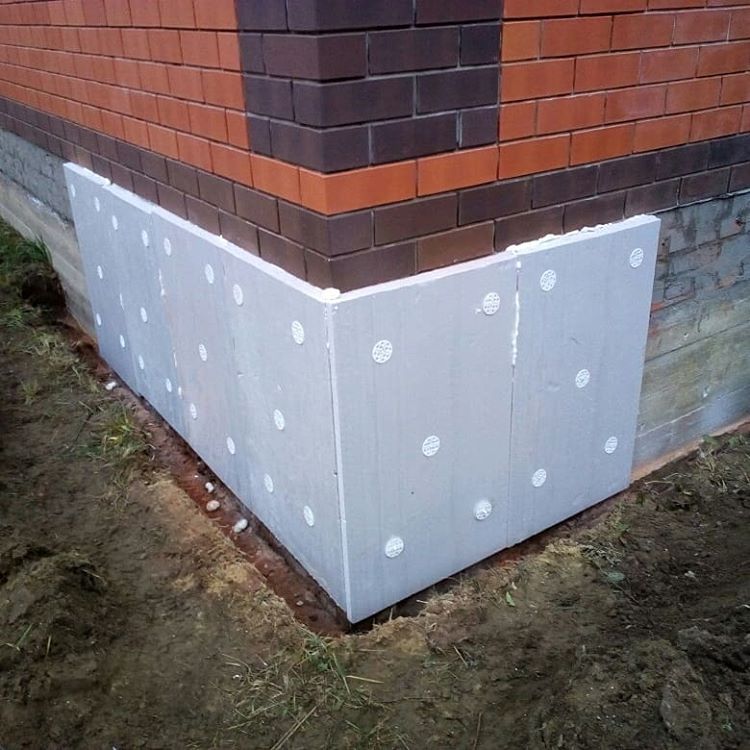
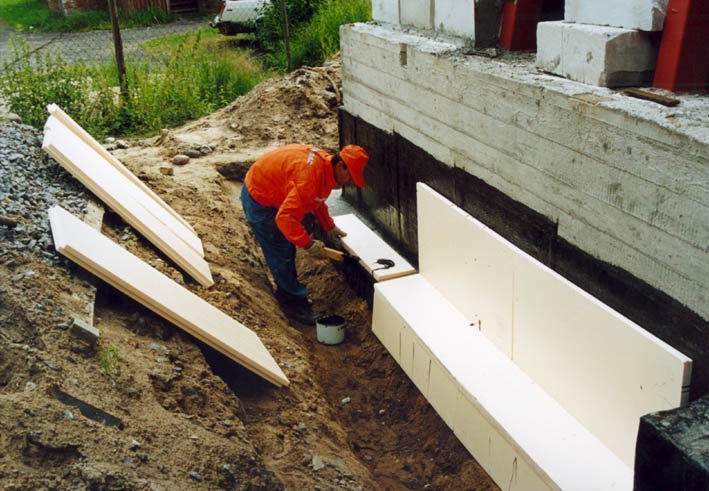
Insulation is installed from the bottom of the plinth on the poured sand. For this, a special glue for insulation is used, which is applied pointwise to the material. The sheets are glued end-to-end to each other so that gaps do not form.
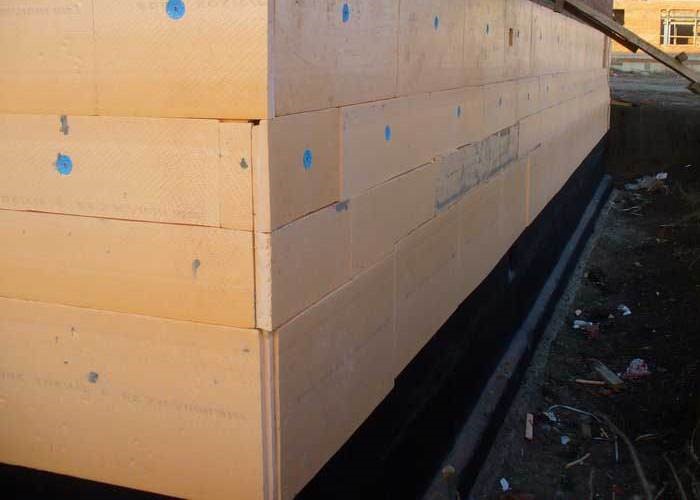
Sheets of material are adjusted to the required dimensions using a construction knife. After that, you need to treat the gaps between the insulation with a primer and fill it with polyurethane foam. It is also necessary to prime the entire surface of the insulation.
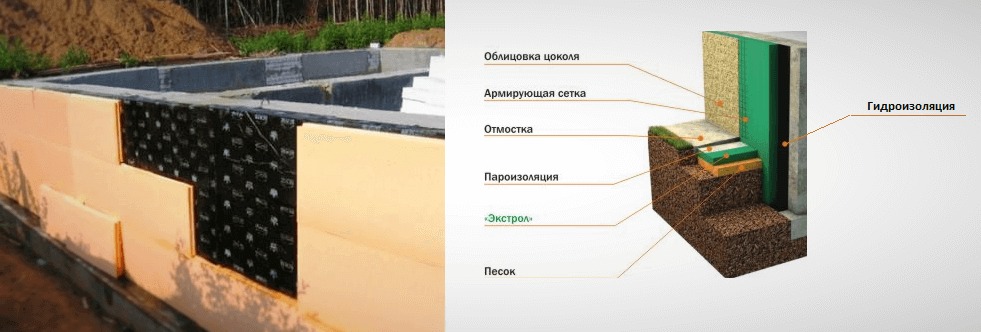
A reinforcing mesh is installed on the surface of the insulation. To do this, cement glue is applied to the foundation with a notched trowel, on which the mesh sits. The glue that has emerged through the mesh is carefully smoothed out with a spatula. After hardening, the wall is covered with a facade putty.
Then you need to start backfilling the trench. Gravel (20 cm) is poured onto the existing sand at the bottom, and then a reinforcing mesh is installed. After that, everything is poured with concrete.
After completing the work, you can start facing the basement. For this, artificial stone or tiles for facade work are used.
You can get acquainted with the insulation of the foundation from the outside with the help of foam plastic in the video. Detailed instructions for carrying out all stages of work are presented.
Insulation of the foundation with expanded polystyrene outside
During the construction of a new building, the insulation of the foundation of the house outside with expanded polystyrene is performed immediately after the installation of the floor slab above the basement or the installation of a concrete sublayer in the house without a basement, the execution of the basement. When insulating an existing structure, the foundation must be dug to the depth of soil freezing.
How to insulate the foundation of a house outside with your own hands? The technology for carrying out work differs little from wall insulation and is easier to perform, since no finishing is required.
Work on the basement insulation must be carried out at positive temperatures, in dry weather.
Stages of work:
- Preparatory.
- Waterproofing device.
- Crushed stone cushion filling and ramming.
- Fastening of thermal insulation.
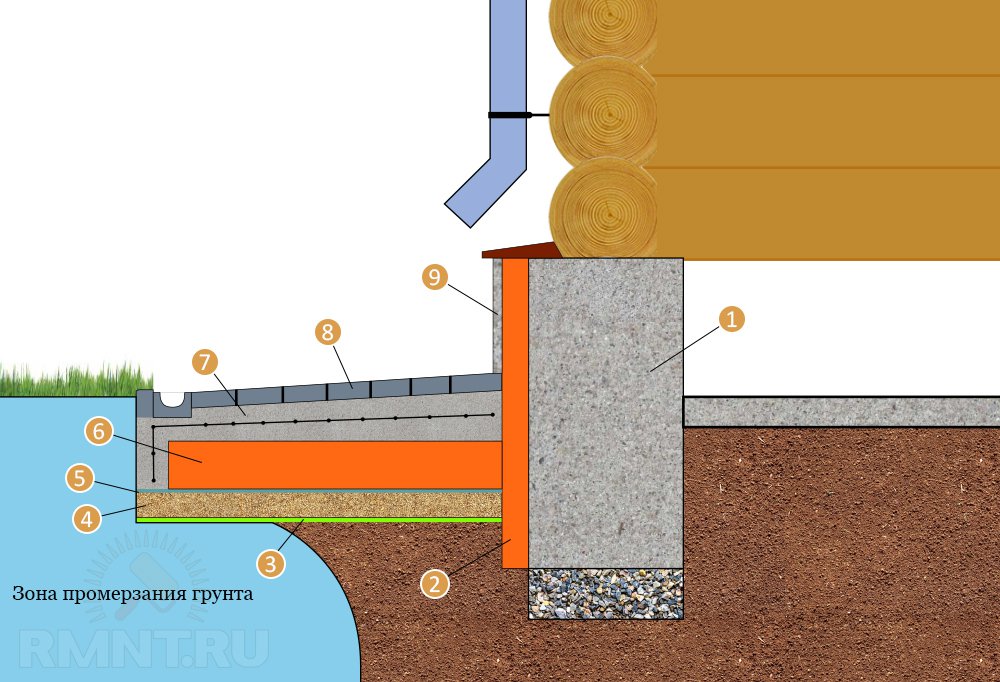
- Execution of the blind area.
The preparatory stage includes cleaning the base from dirt and remnants of masonry mortar, drainage at a high level of groundwater.
On a clean, dried base, the surface is primed with compounds that increase adhesion, and the foundation is waterproofed. Waterproofing can be coated or glued.
The coating waterproofing is made of bitumen or special polymer-cement compositions from dry building mixtures (CCC). Coating with bitumen is a budget option, polymer-cement compositions have a higher cost and are more reliable, they are more often used on the basement and at a high level of groundwater.
Glued waterproofing can be done with bitumen-polymer roofing materials, such as Technoelast, Krovlyaelast, or special waterproofing materials for outdoor use.
IMPORTANT: Before fixing the glued waterproofing, the surface of the foundation must be primed.
Before insulation, the surface of the waterproofing layer is also treated with a primer.
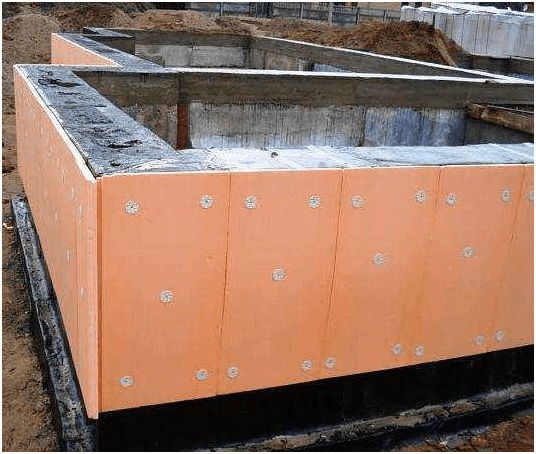
On the dried prepared base, a slab insulating layer is glued to the CCC glue or foam glue. After the glue dries, the plates are additionally fixed on the dowel - screws, at least 6 per plate. When gluing, it is necessary to ensure that the glue does not get on the end of the plate - this will create a cold bridge. Narrow seams are filled with polyurethane foam or glue with foam, wide seams - with scraps of insulation.
Next, the trench is filled with soil and a blind area is made around the perimeter of the house.
IMPORTANT: Particular attention is paid to the corner zones - here the insulation layer should be twice as thick
Insulation of the basement - the part of the foundation protruding above the ground level - is usually performed simultaneously with the insulation of the walls of the house.
Thermal insulation of the foundation
The use of modern methods of thermal insulation is of great importance, especially in areas with harsh climatic conditions. This prevents a significant part of heat loss and freezing of soils, which increase in volume, which leads to a rise in their level.
Insulation of the foundation with expanded polystyrene
Warming the basement of the house outside with expanded polystyrene is an excellent option to improve the thermal insulation qualities of the base of the house and prevent freezing.
Expanded polystyrene is an improved type of foam. Its use is more profitable and installation is easy.
The video tells in detail about the insulation of the base of a residential building with your own hands.
The process is carried out as follows:
Preparation of the base. This stage can be carried out both during the construction of the building and after its completion. To do this, you need to dig out the foundation, clean it of soil, debris, rust and grease.
Select Sheets
In this case, you need to pay attention to two factors: density and thickness. Basically, sheets with flame retardant additives and a density of 35 kg / m3 are used.
Waterproofing
This will prevent groundwater exposure and penetration through the insulating layer.
Fastening of expanded polystyrene sheets with contact adhesive. You can attach two layers, but so that the panels of the second layer cover the joints of the first.
Protection of the insulation with a reinforcing mesh to avoid strong mechanical stress and penetration of rodents. A layer of cement mortar can be applied to the protective mesh.
Providing drainage. This step is considered mandatory when erecting a building on wet ground.
Insulation of the basement. The base also needs to be insulated in the same way, followed by finishing. After the glue dries, the panels are additionally fastened with nails.
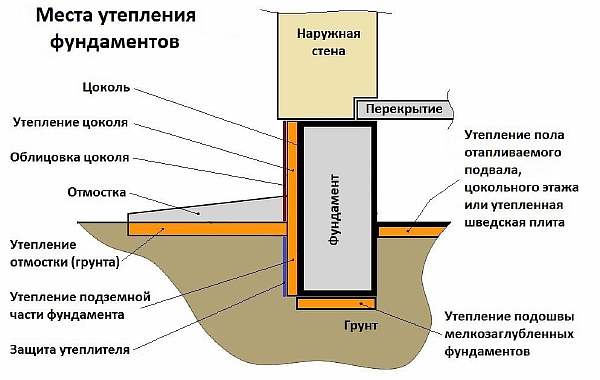
Warming of the soil. The event involves isolating the surrounding land with a blind area insulated with expanded polystyrene plates.
 Knot
Knot
Insulation of the foundation and the blind area can significantly increase the temperature in the structure and protect the base from destruction.
Insulation of the foundation with liquid polyurethane foam
It is considered a fairly effective method that reduces heat loss by 20-25%.
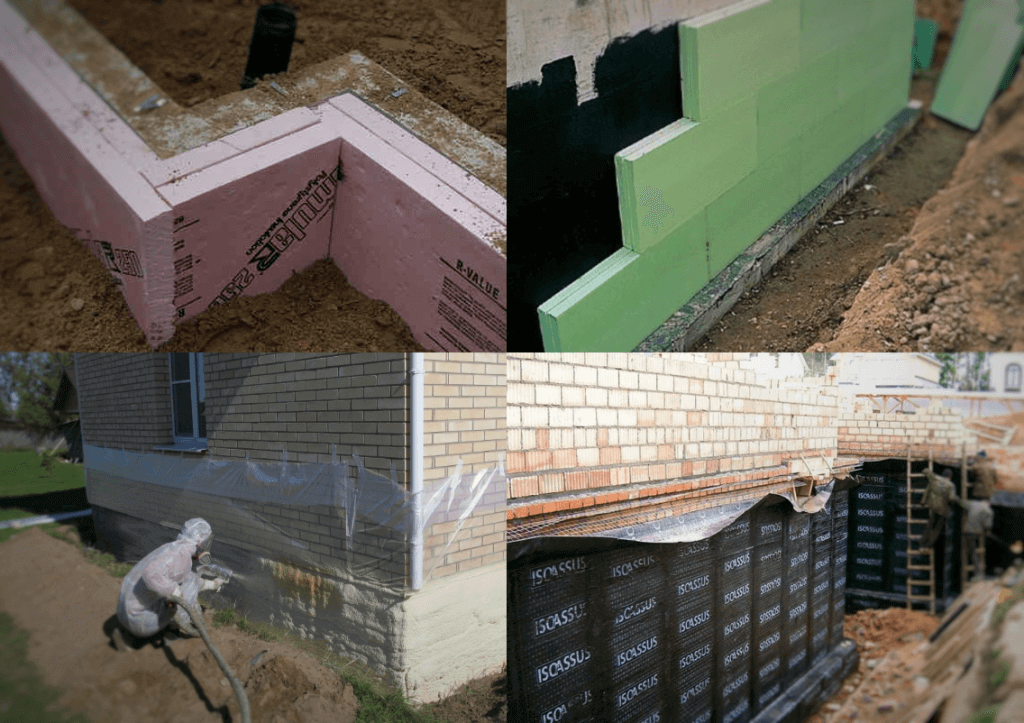
To do this, two liquid components are mixed with each other, forming a thick foam. When applied, it expands and hardens, forming a protective seamless layer with excellent thermal insulation and waterproofing properties. The optimal application thickness is considered to be 60 mm.
 Wooden structure
The polyurethane foam layer is allowed to be applied at a temperature not lower than +5 C. Surface preparation implies cleaning from contamination, and the surface quality is an unimportant factor.
When solidified, the foam changes color. When performing work, various problems associated with equipment and neglect of weather conditions may arise.
For example, when applied in subzero temperatures, cracks may appear, which must be repaired in the future, otherwise water may accumulate in them and freeze. After polymerization, the polyurethane foam layer has low plasticity.
 Incision
Insulation of the foundation using EPS
As a rule, not all heaters are suitable for thermal insulation of the base. To select the right material for this purpose, you need to consider its service life: it must be as durable as the building itself.
Thermal insulation with extruded polystyrene foam (EPS) is considered a more reliable method than, say, foam, since this material is more durable and has excellent performance characteristics.
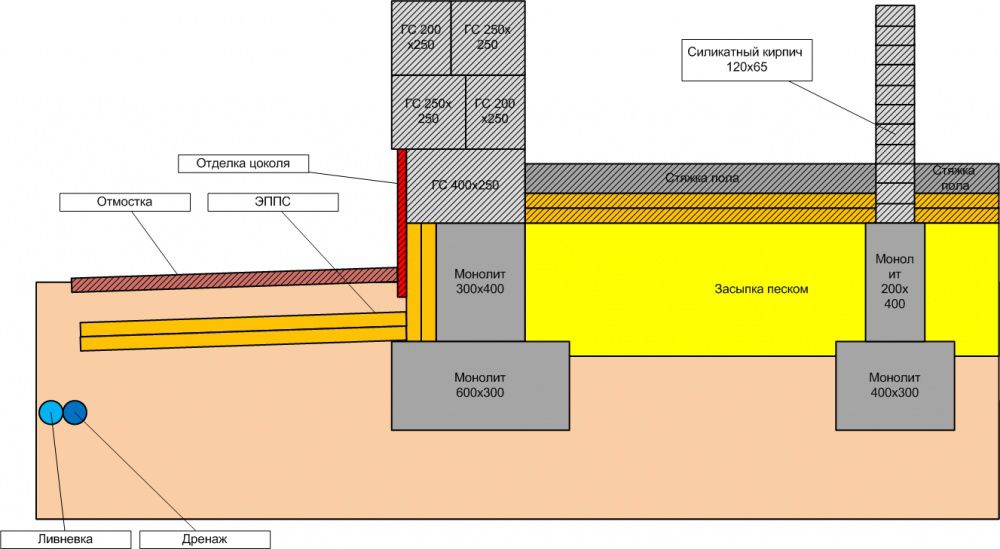
 Blind area with trays
For this purpose, you need to purchase thermal insulator plates and suitable glue for fixing it. After this, a number of preparatory measures should be carried out:
- Dig a trench around the foundation by digging in the ground.
- Apply EPS to the depth of freezing of the ground.
- Clean the foundation from debris and dirt.
- Apply a special primer in two layers, wait for it to dry and soak into the concrete.
- Provide waterproofing with bituminous mastic.
- Apply glue to the boards.
Fastening the slabs to the outer section of the foundation is allowed 1 minute after applying the glue. If the panels have a large area, the adhesive should be applied in several strips using a comb trowel.If the slabs have locks, then a few days later the seams are sealed with polyurethane foam, and the slabs themselves are additionally fastened with dowel nails.
 Two-story mansion
Materials for warming the base of the house
 It is customary to insulate the tape contour mainly from the outside.
It is customary to insulate the tape contour mainly from the outside. After all, it is there that cold and low temperatures have the most negative impact on the entire base of the house around the perimeter.
The following are used as insulating materials:
Expanded clay. In this case, the insulation technology consists in sprinkling the base tape with fine-grained material. Expanded clay has low thermal conductivity and retains heat well. However, such work is rather laborious. And in addition to expanded clay, the modern building materials market offers a lot of other options for insulating the foundation from the outside.
Expanded clay slabs. Here, the properties of the material are approximately the same as with bulk expanded clay. The only difference is in the installation technology. Plates are planted on a special adhesive around the entire perimeter of the contour.
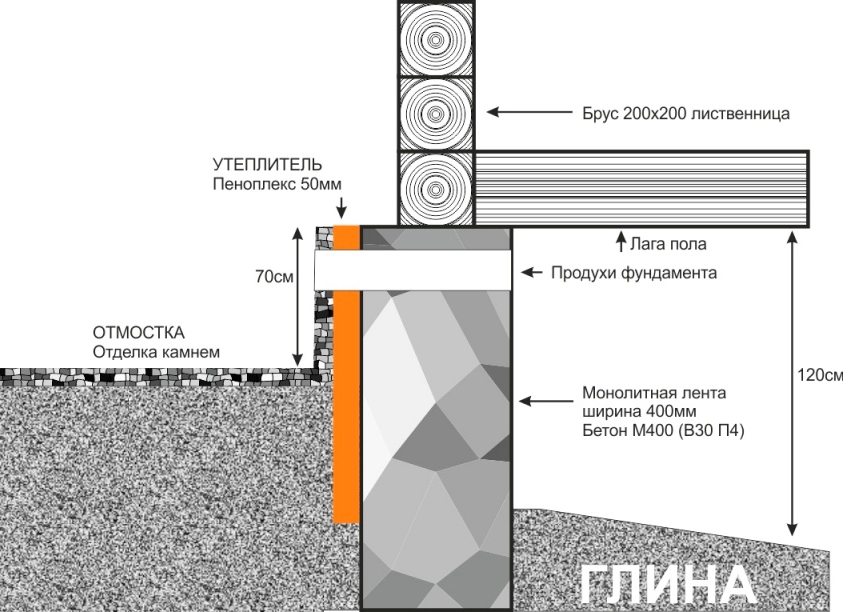
Styrofoam. A more modern insulating material, which is also very cheap. A distinctive feature of foam is its low ability to conduct heat. This means that the base will be reliably protected from the cold. With the help of polystyrene, the perimeter of the foundation is insulated from the outside. At the same time, both heated and unheated rooms can be insulated with foam. The material will cope equally well with dampness and with the functions of insulation. The technology for installing foam plates is to stick them on the foundation wall along the entire base. The most demanded for insulation are foam plates with a thickness of 50 mm. After gluing, such material must be additionally waterproofed.
Polyurethane foam. This material is a more expensive option for thermal insulation.
However, it has an important advantage - polyurethane foam does not require additional waterproofing after installation. In addition, polyurethane foam boards are not affected by moisture, water, fungus and low temperatures.
Polyurethane foam does not burn and is absolutely non-toxic. And rodents do not sharpen their teeth on the plates of this heat-insulating material. They just don't like it. To insulate the foundation, you can use both polyurethane foam plates for gluing, and a special polyurethane foam mixture for spraying onto the walls of the base. If the coating turns out to be not even enough, then you can simply cut off the protruding places and at the same time the heat-insulating layer will not lose its properties at all.
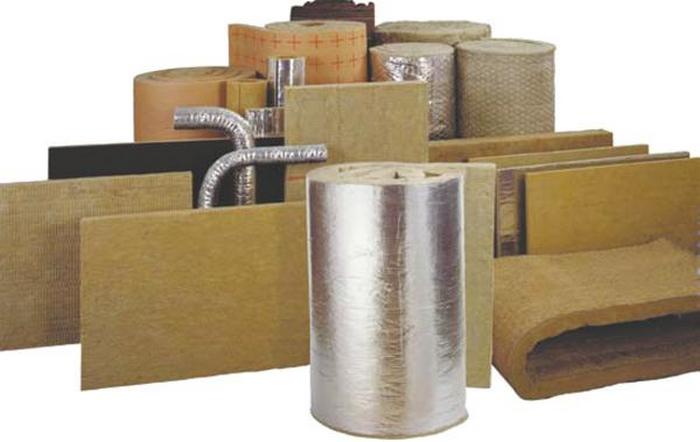
Mineral wool. One of the most impractical and economically unprofitable materials for basement insulation. Mineral wool slabs are made on the basis of fiberglass and rock slags. Such material tends to absorb moisture, as a result of which mold and mildew form on the walls of the foundation or basement. Therefore, to improve the thermal insulation layer, it is also necessary to apply a waterproofing layer.
Expanded polystyrene. The most practical material for insulating the foundation from the outside. Such a finishing material, as well as polystyrene, is resistant to low temperatures, moisture and fungus. However, there is one significant disadvantage - expanded polystyrene plates are subject to the destructive effects of ultraviolet radiation. Therefore, after the installation of expanded polystyrene plates, it is necessary to plaster the walls of the foundation. It is important to know that polystyrene foam is produced by extrusion (extrusion under high pressure). Thus, the density of the material is several times different from the standard foam.


