How to put a fence on an uneven area
On uneven terrain with a slope, the fence can be placed with the same slope along the upper level or stepped. If a profiled sheet is used for the fence, then in the second case it is easier to work and, in addition, such material is better suited for inclined sections.
Layout of the territory for construction
Preparatory stage for installing the fence
Before building a hedge on a slope, you need to carefully prepare so that in the future you get a beautiful and reliable fence that is not afraid of precipitation or strong winds. Preparation includes:
- marking uneven terrain;
- planning and calculating hedges on a slope;
- purchase of building materials.
Sketch of base options
To determine the consumption of building materials for a fence on an uneven area or slope, measure the perimeter of the area. To determine the consumption of a profiled sheet for the construction of a fence, one must not forget that the sheets are fastened with an overlap of 8-12 cm.
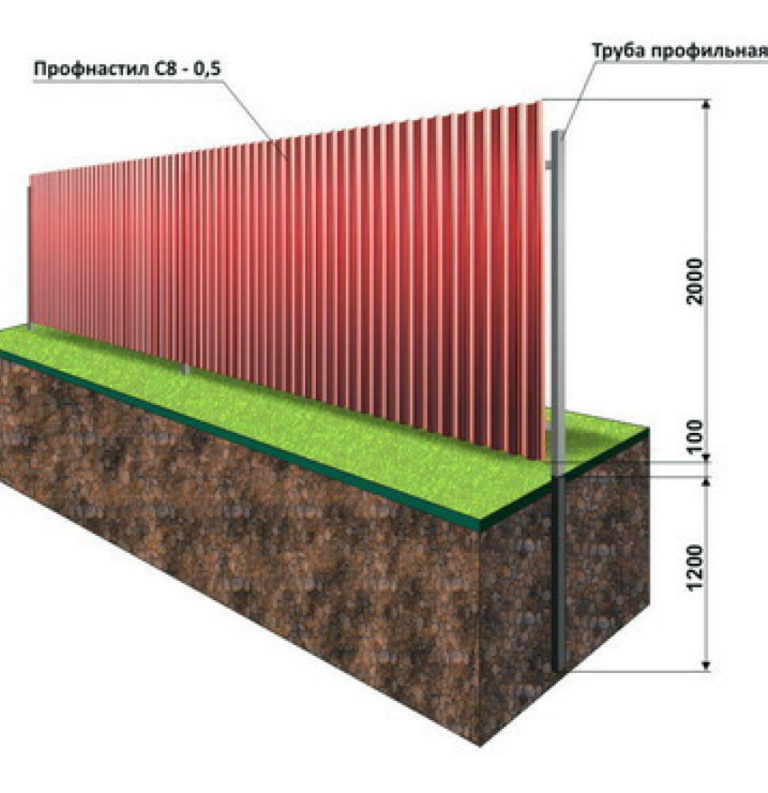
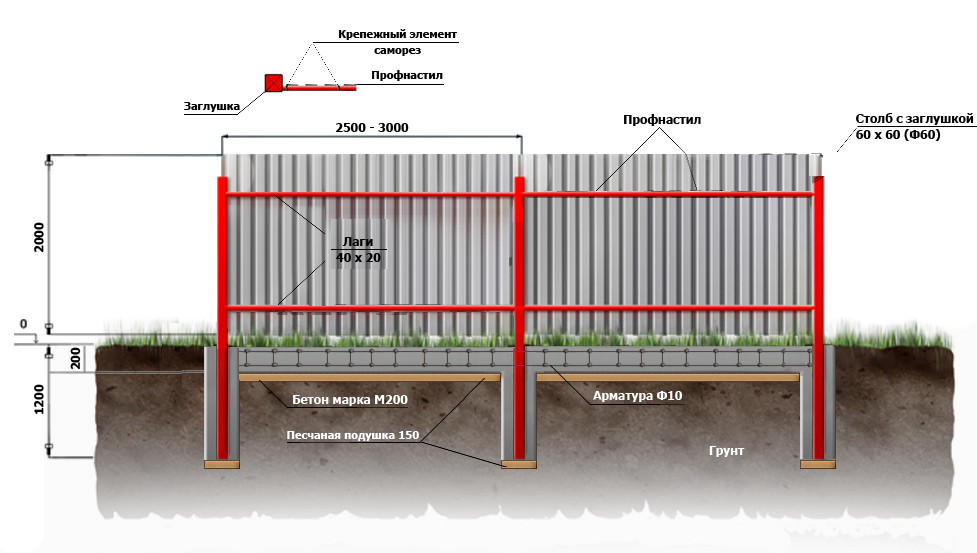
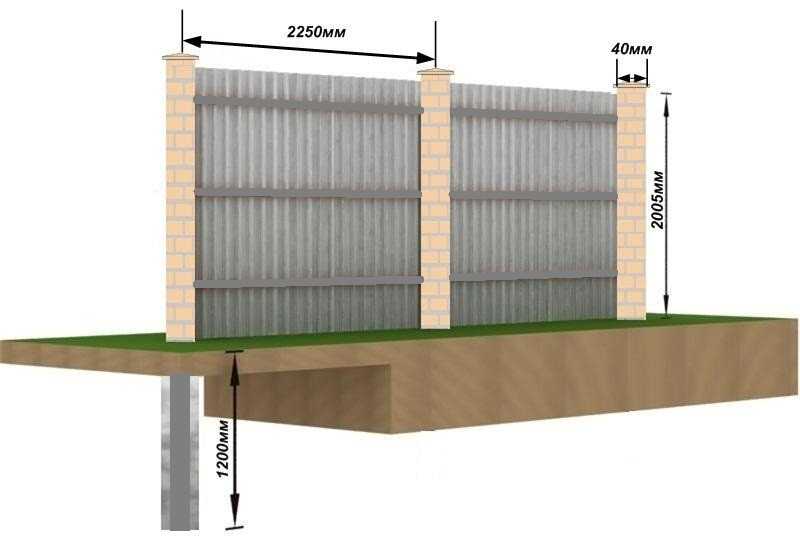
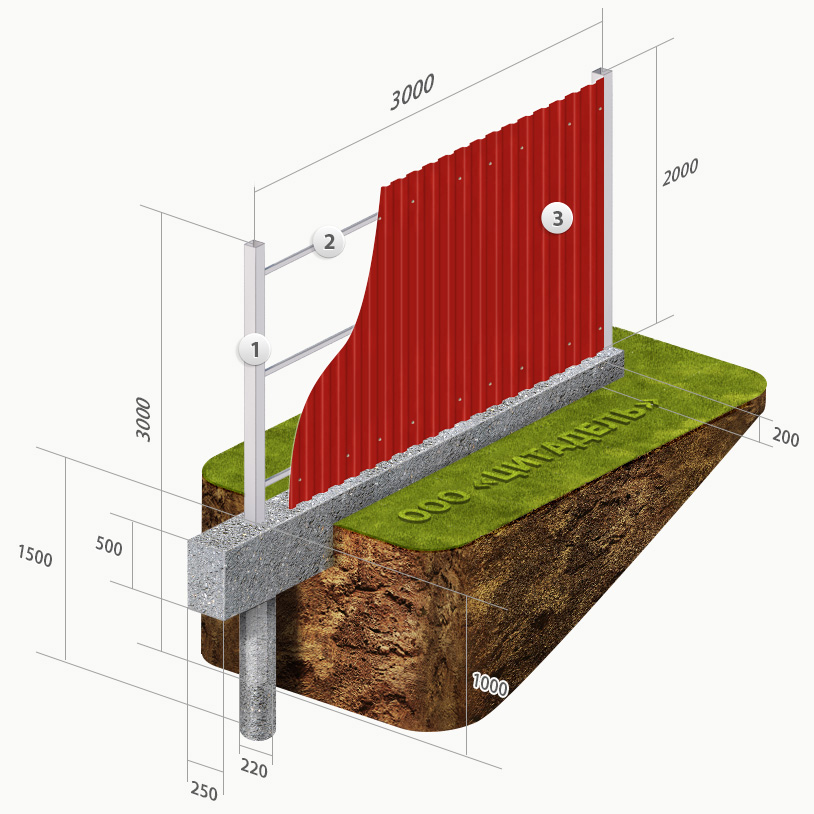
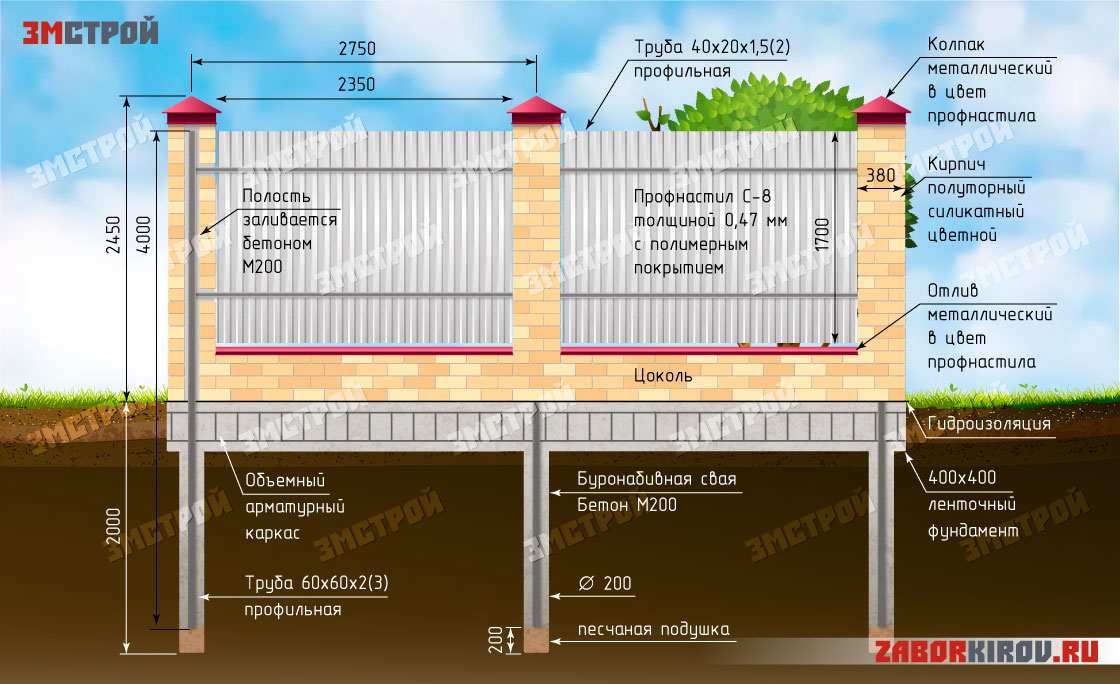
The number of support pillars and the required components for concreting are taken with the following account: one pillar per step of 2–2.5 meters, the depth of the base - from 0.9 to 1.5 m (taking into account the type of soil). For support posts, professional pipes with a section of 50x50 mm and a size equal to the height of the fence are chosen, adding a deepening of the base.
Installation of pillars for the installation of the netting of the chain-link and the sectional fence
Crossbeams for a fence on a slope can be made from a corner, but it is better from a professional pipe with a section of 25x45 mm. If the fence is not higher than 1.9 m, the logs are attached in two rows. If the height is greater - in three rows. To fill the fence posts with mortar on uneven terrain, M250 concrete will be required.
A rope is pulled between the extreme pillars of an uneven surface and the sections for fastening the intermediate supports are marked, taking into account the location of the street door and gate.
Sketch of fences on a slope in a village
The video shows the installation of a fence on an uneven area.
Installing a fence on a slope with your own hands
Do-it-yourself step-by-step instructions for building a fence on a site with a slope consists of the following steps:
- Land work.
- Fastening posts and pouring concrete.
- Fastening of crossbars and fixing of a profile sheet.
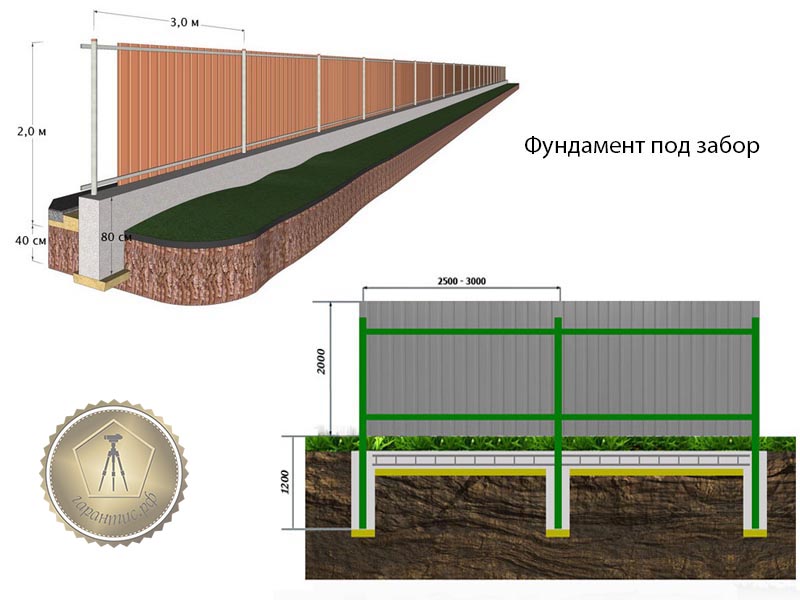
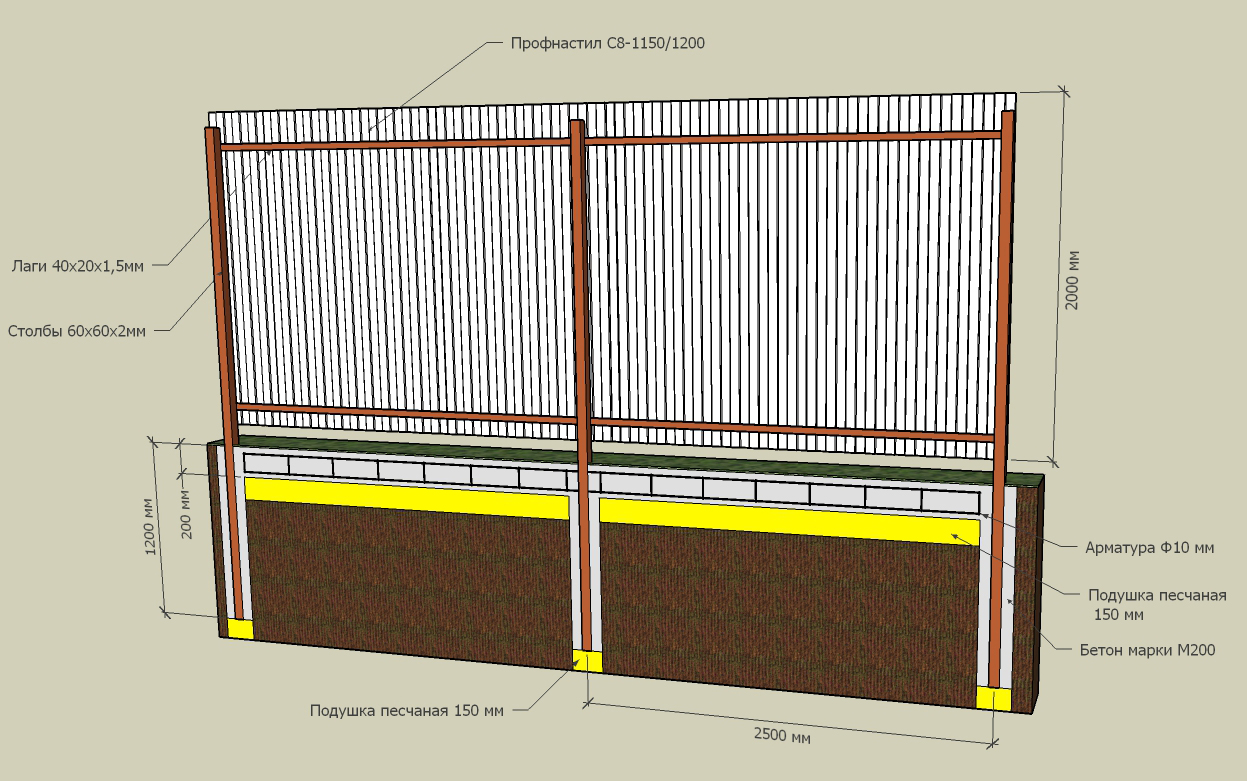
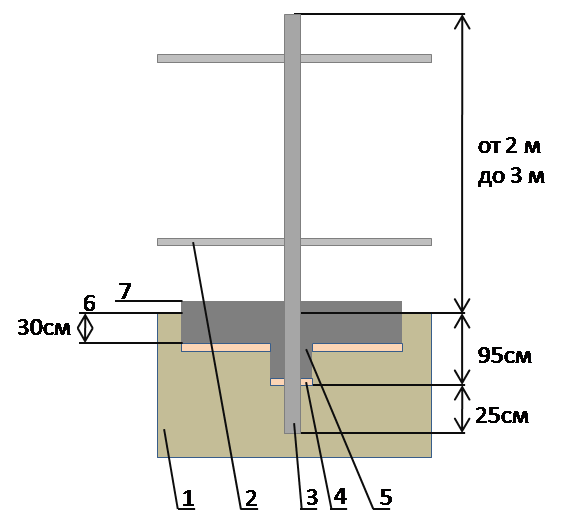
Pole mounting scheme
Digging trenches for the installation of poles on uneven terrain or a slope is best done with a gas drill, but you can also manually use a shovel. Measure the required size of the professional pipe (for different pillars on the slope, their length is different), put it in a vertical position according to the level. Then they are driven into the ground 1/3 of the length.
Pole sleeves can be supplied with an upper protective cap. In order not to deform it, the plug must be removed and driven through the block.
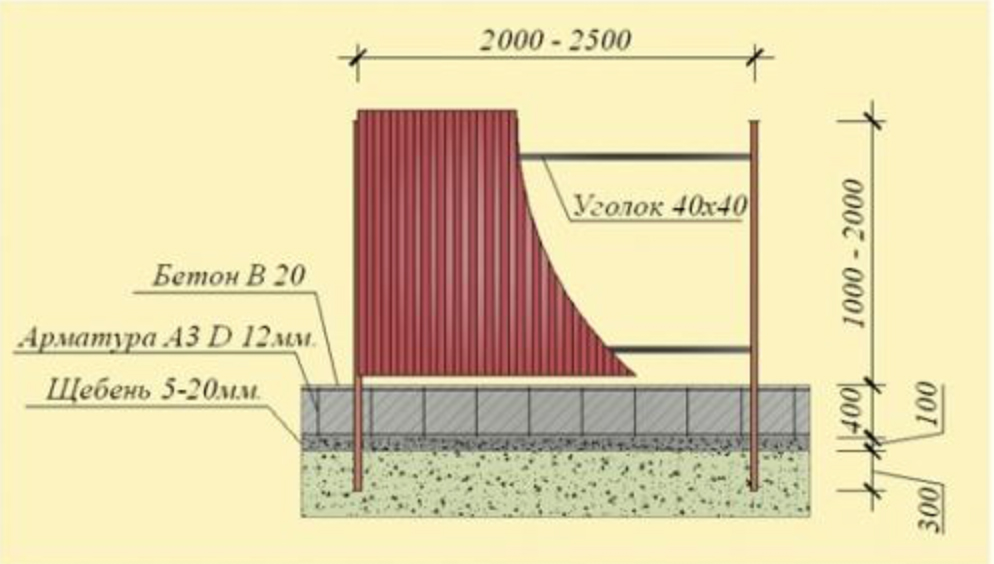
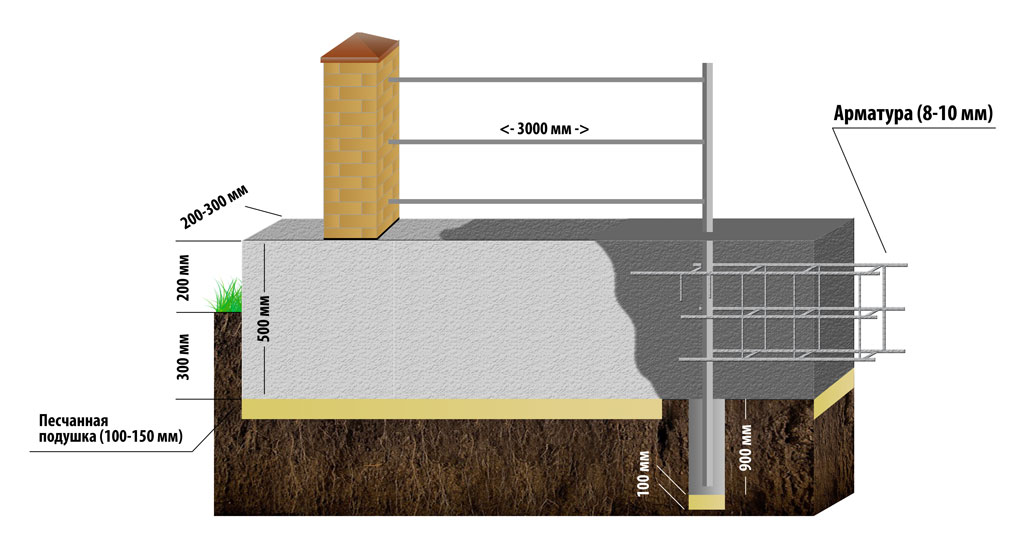
Drawing for the installation of a fence in the country
Then re-determine the correct installation of the post on a slope or uneven surface and, if necessary, level it. The space between the ground and the fence support is poured with concrete. The concrete is allowed to dry for at least a day.
The weld joints are then cleaned and coated with corrosion protection compounds. The frame of the railing on a slope is painted in a color that matches the tone of the material used. The profiled sheet is fixed at a small distance from the ground level with an overlap using self-tapping screws.
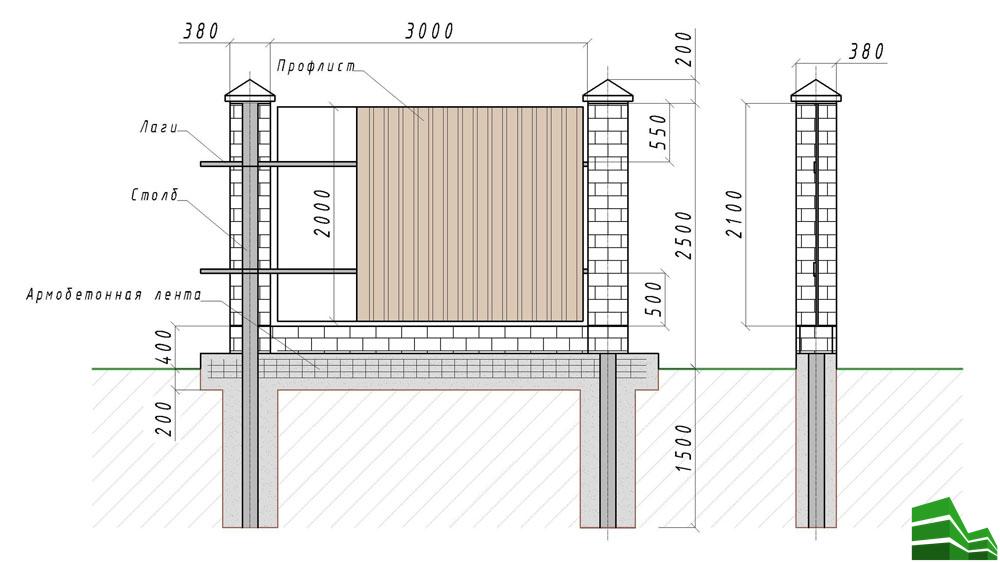
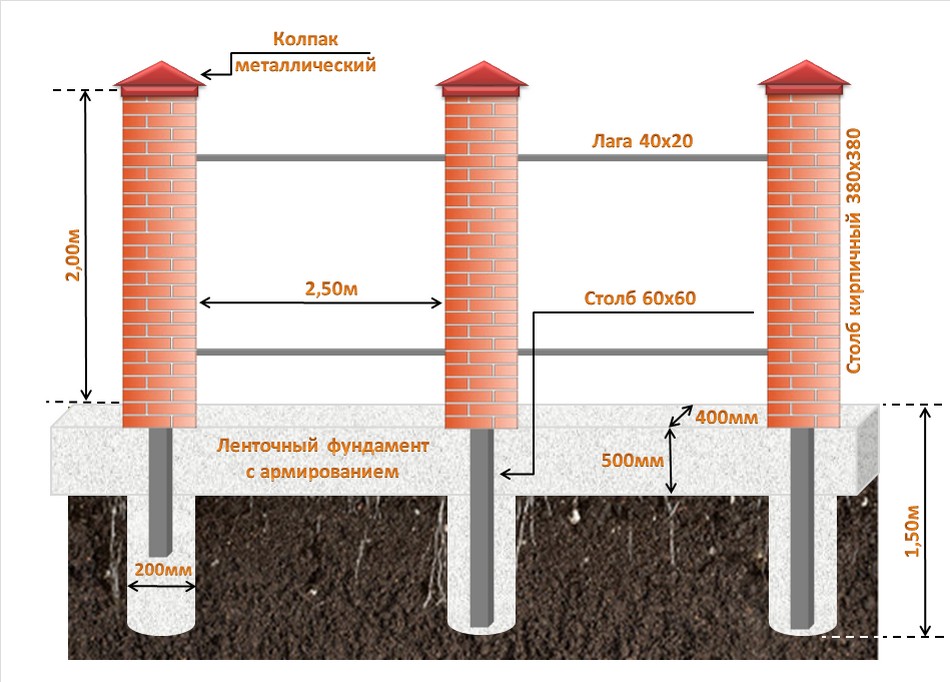
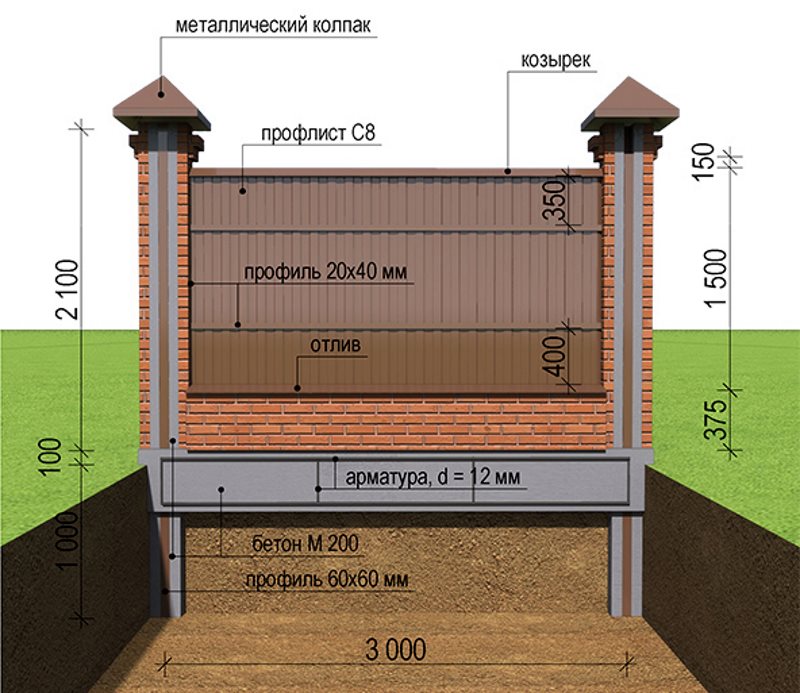
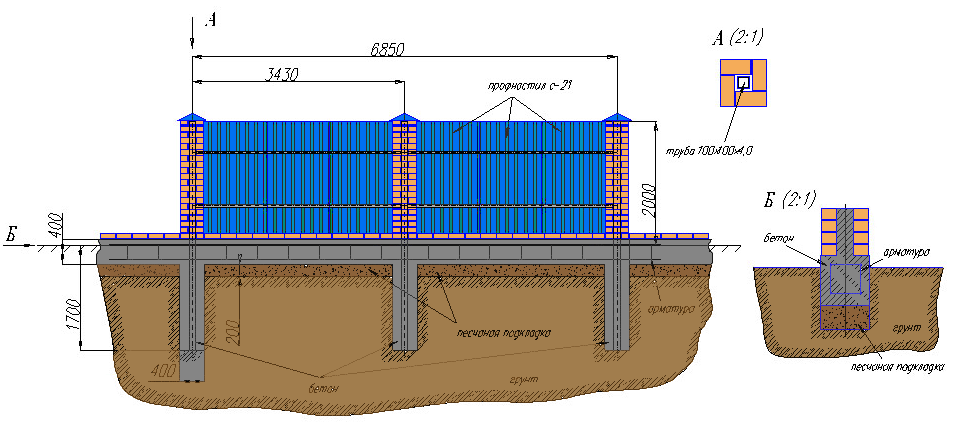
Drawing for the installation of a fence with brick pillars
Installation of a fence on an area where there is a slope or there are significant uneven surfaces is practically no different from erecting a fence on a flat area. This hedge on a slope will stand for a long time if you correctly choose the method of pouring the foundation for a particular area, described above.
Photo of the design of fences from a professional sheet
Often, a profiled sheet is combined with forging, sometimes a frame is cooked from a profiled pipe, a profiled sheet is mounted into it, and all this is decorated with metal patterns - forged or welded. Another option to make the fence non-standard is to install the wave not vertically, but horizontally. Seemingly small change, but the view is different. Some ideas in the photo gallery below.
Horizontal fence made of profiled sheet A beautiful combination of stone, forging and red-brown leaf
 Pillars made of a round metal pipe, strips are welded to them from the back side, to which the sheet is attached
 Forging and polycarbonate inserts
 More variations on the theme of forging
 Coloring may be uneven.
 Non-linear top needs to be tinkered with
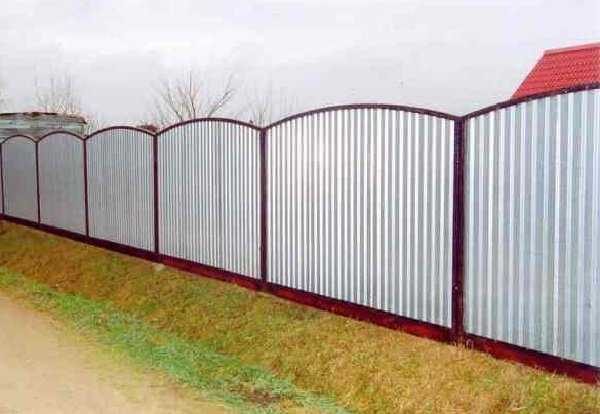
Photo of a fence made of corrugated board with your own hands
We also recommend viewing:
- DIY siding installation
- Do-it-yourself warm floor
- Bath with your own hands
- Self-leveling floor with your own hands
- DIY decorative putty
- Do-it-yourself toilet installation
- Do-it-yourself fence posts
- Do-it-yourself stretch ceiling
- DIY ceiling lighting
- Do-it-yourself loggia insulation
- Do-it-yourself partition
- DIY wiring
- DIY wooden floor
- DIY slopes
- How to make paint with your own hands
- DIY bricklaying
- DIY decorative plaster
- DIY fireplace
- Do-it-yourself home insulation and the main methods of thermal insulation
- Mesh fence
- Do-it-yourself installation of plastic windows
- DIY interior decoration
- DIY fence
- How to make a balcony with your own hands
- DIY oven
- DIY door
- DIY gazebo
- Pour concrete with your own hands
- Do-it-yourself formwork
- DIY liquid wallpaper
- DIY floor screed
- DIY foundation
- DIY frame house
- Do-it-yourself hallway
- DIY ventilation
- DIY wallpapering
- DIY concrete ring
- DIY roof
- DIY laminate flooring
- DIY stairs to the second floor
- Do-it-yourself blind area
- DIY bathroom repair
- DIY polycarbonate
- Do-it-yourself door installation
- DIY drywall
- DIY arch
- Sheathe clapboard with your own hands
- DIY house project
- DIY gate
- DIY shower cabin
- Laying tiles with your own hands
Foundation construction
You can put a fence on an uneven plot of land in different ways. Each landowner chooses the option that is optimal in relation to specific landscape conditions.
Foundation 1
If the slope of the site is below 30 °, you can build a foundation for a corrugated fence on the most leveled surface. Stages of work:
- Leveling the ground along the entire length of the fence;
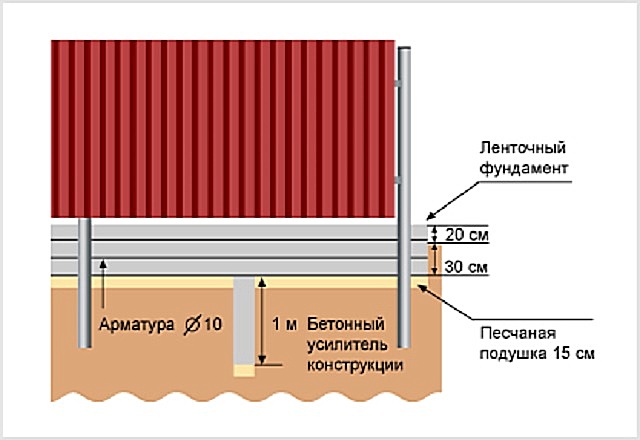
- Filling the strip foundation;
- Concreting of pillars (depth not less than 150 cm);
- Fastening of transverse pipes (lag);
- Fasteners of corrugated board canvases.
Thanks to the embankments of soil, such an installation will provide the fence with the same height of the lower level. This option has both positive and negative aspects.
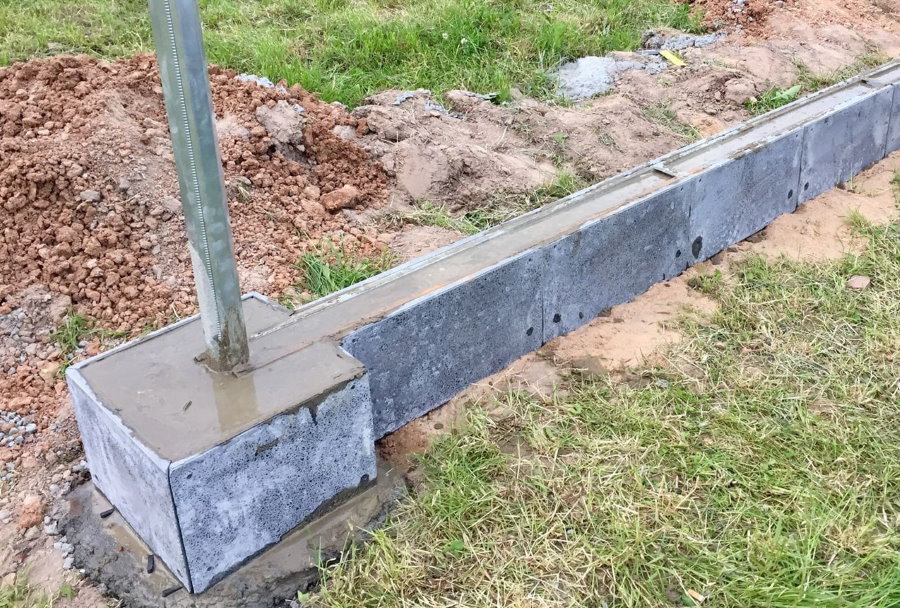
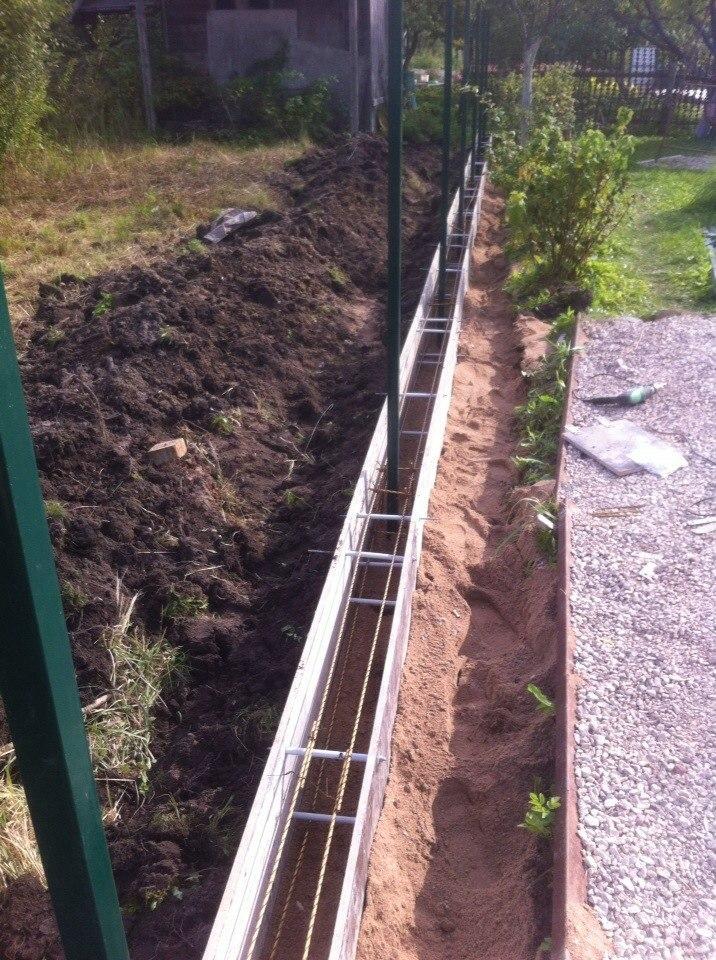
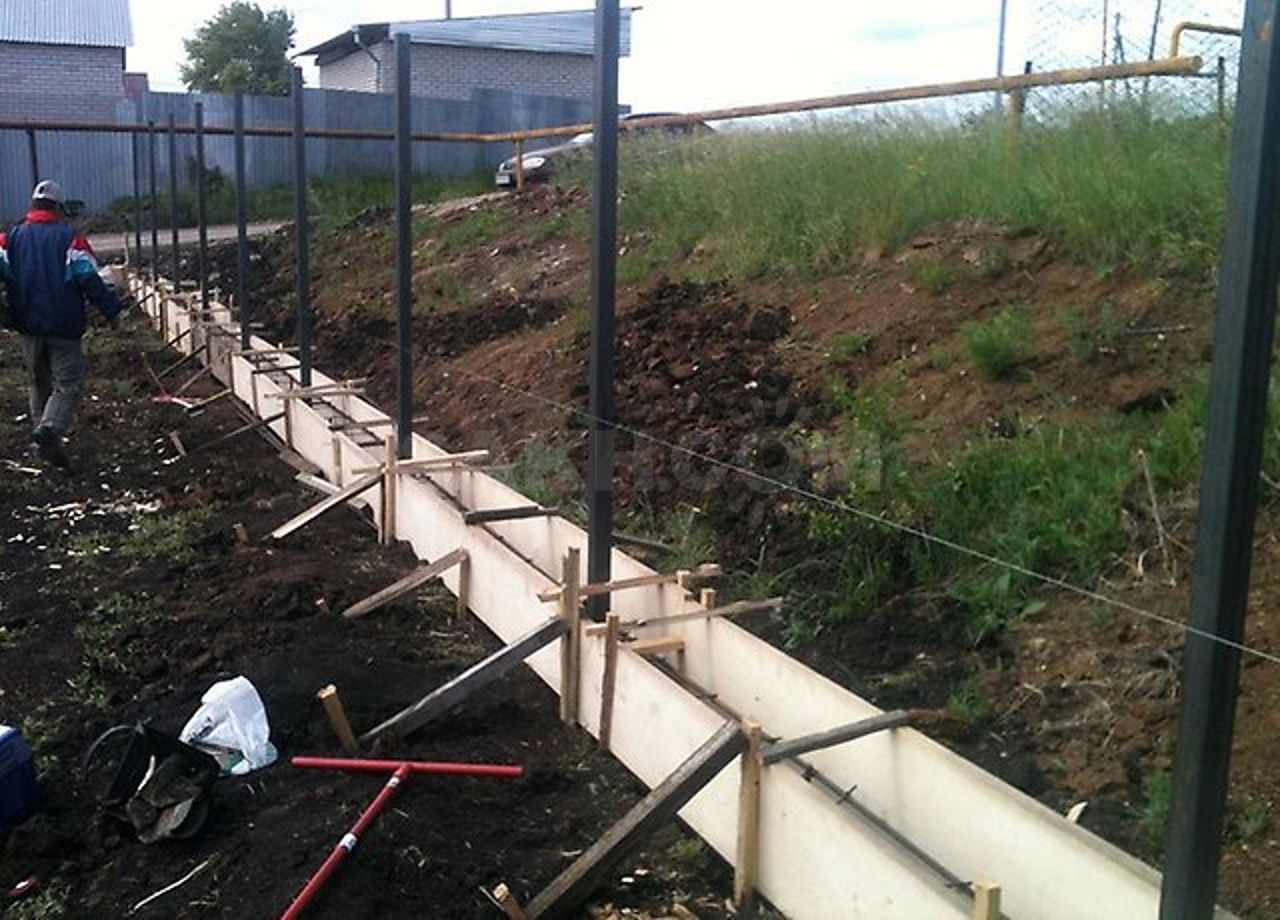
Assembled concrete foundation and fence posts on uneven ground
The advantages of such a construction include a perfectly flat fence and the absence of the need for joining sections of different heights. The disadvantages include the laboriousness of the work and the violation of the natural balance of the soil.
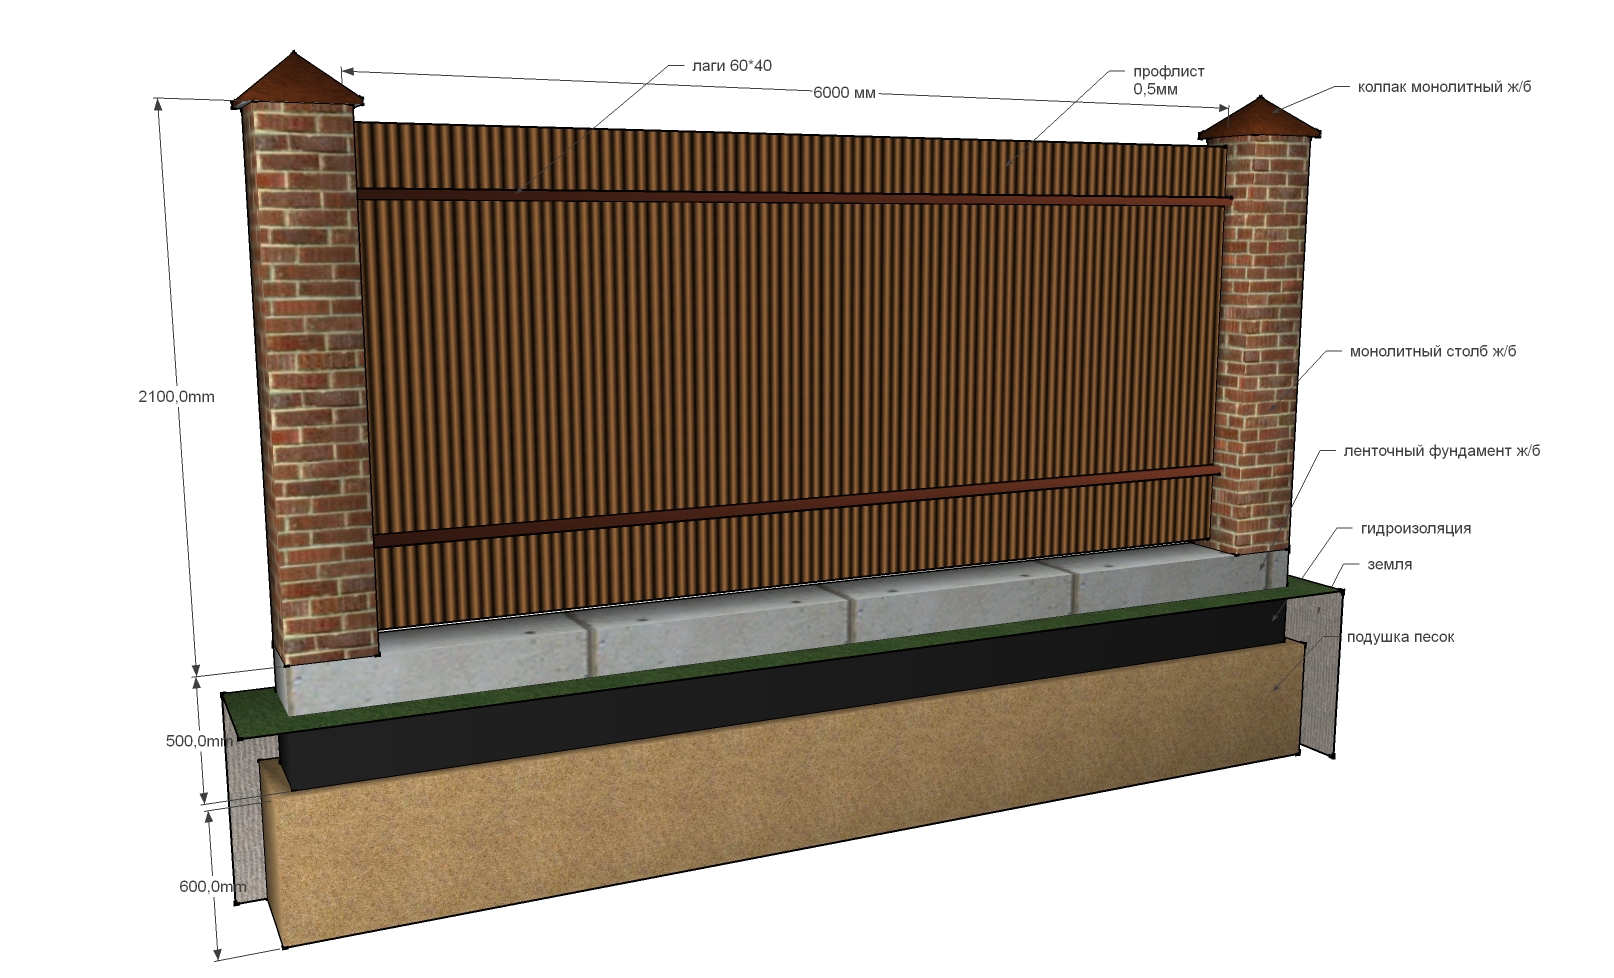
Instead of an embankment, a concrete base can be made from the soil. The bottom of the fence of this design has a minimum gap in the lower part, and at the top it runs parallel to the foundation. If the relief of the site is distinguished by strong drops, when installing the fence, you need to carefully consider the joining of the sections. A fence on such a foundation will stand for many years and will be reliable and durable.
Foundation 2
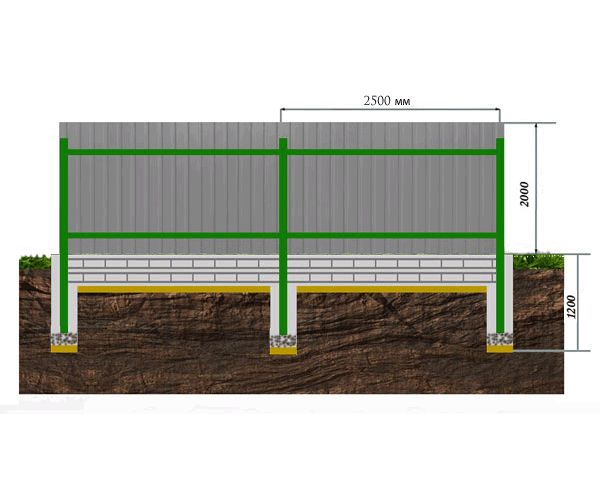
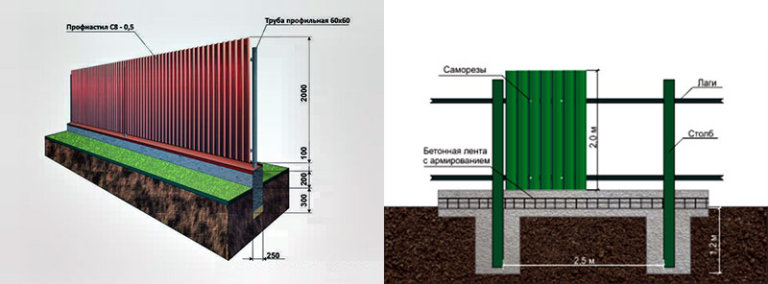
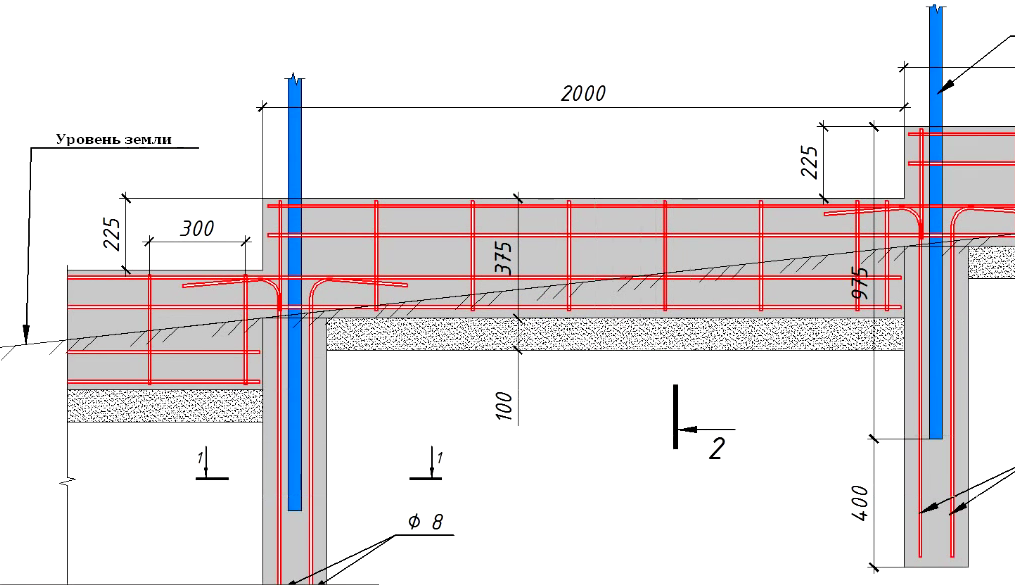
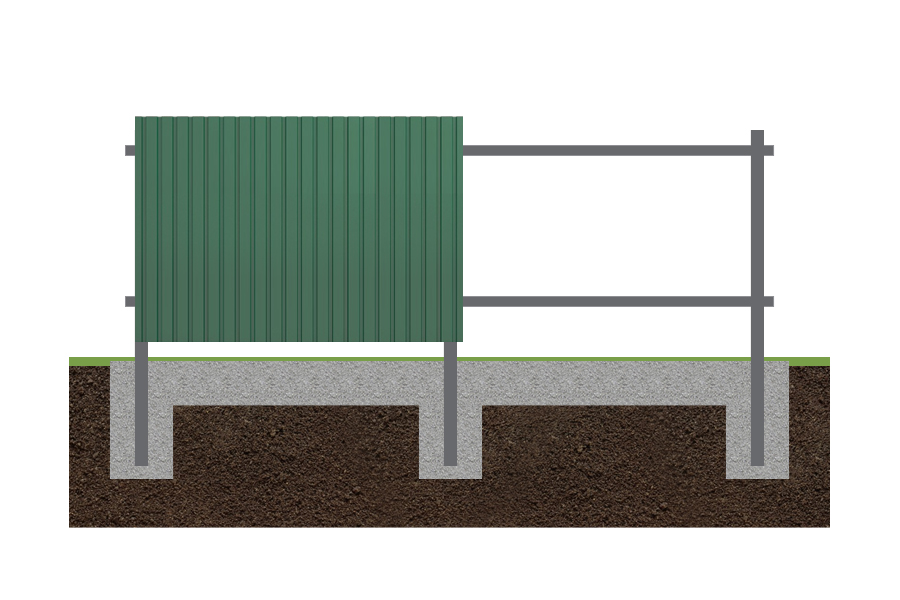
A fence on a site with a slope can be placed on a foundation built like a ladder, where each new span is built lower than the previous one.The scheme of such a base involves fixing the pillars, two per one span. If the slope of the section does not exceed 35 °, then the standard span length of 250 cm is maintained. In the event that the section has a higher slope, the difference is reduced by reducing the span step.
Foundation 3
The sections can be installed by focusing on the top of the fence. In such a fence, the lower part of the spans has different heights, but their upper line is kept at the same level. This option is especially relevant for corrugated hedges. Such material is lightweight and easy to use, which allows you to freely adjust and adjust them.
Foundation
A plot with a slope imposes special conditions on the construction of a foundation for a metal fence. Regardless of the presence of irregularities in the relief, the fence should have a clear geometric orientation. Even at the level of designing the landscape design of the site, it is necessary to make the correct calculations of the height of each span.
They must be reinforced into the foundation and have flat surfaces. The height of the foundation must be maintained so that the uniformity of each upper indent is ensured. All adjacent support piles are installed as close to each other as possible.
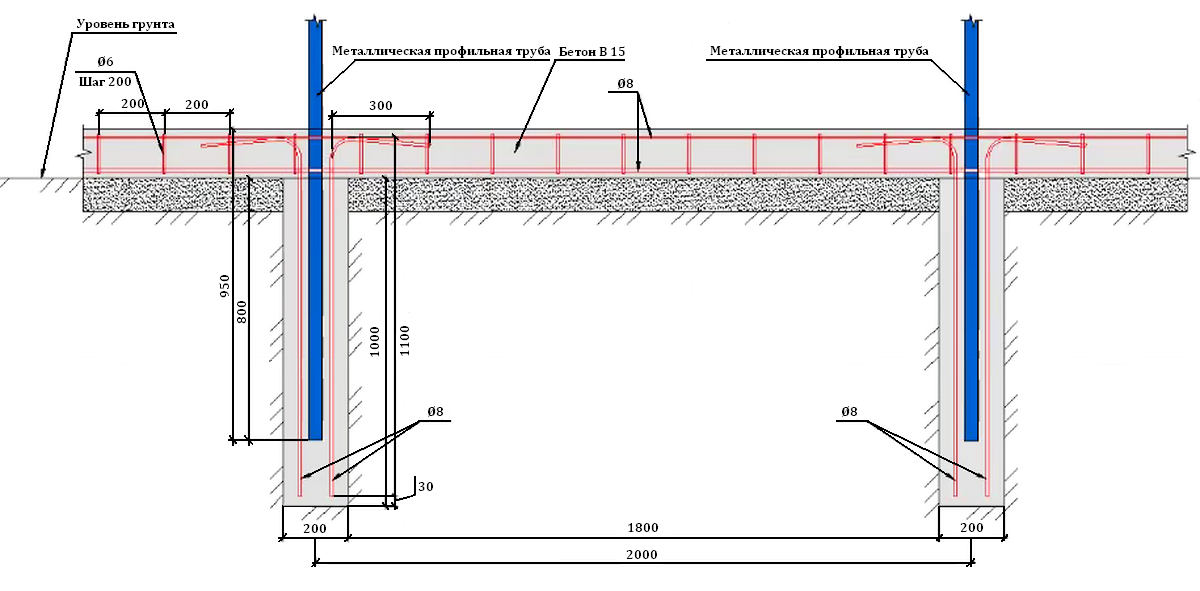
Foundation scheme with a slope
Manufacturing
Making a foundation for a fence with your own hands is not difficult. You just need to make all the necessary calculations in advance and strictly adhere to the step-by-step instructions when performing the work.
Payment
To calculate the depth to which it is necessary to lay the foundation under medium gravity and heavy fences, it is necessary to take into account the following factors: the design features of the fence, the depth of soil freezing, the slope of the terrain, the structure of the soil and the height of the groundwater.
In order for the calculation to be correct, it is necessary to calculate the area of the foundation. So, if we have a foundation 50 meters long and an assumed width of 30 cm, then we can easily determine its area (15 m2), which will later become the basis for calculating the depth of the foundation.
In addition, it is necessary to determine the reliable foundation area, which is determined by dividing the pressure of the above-ground part by the foundation foundation, corrected for the reliability factor, the soil resistance and the working condition factor.
Fill
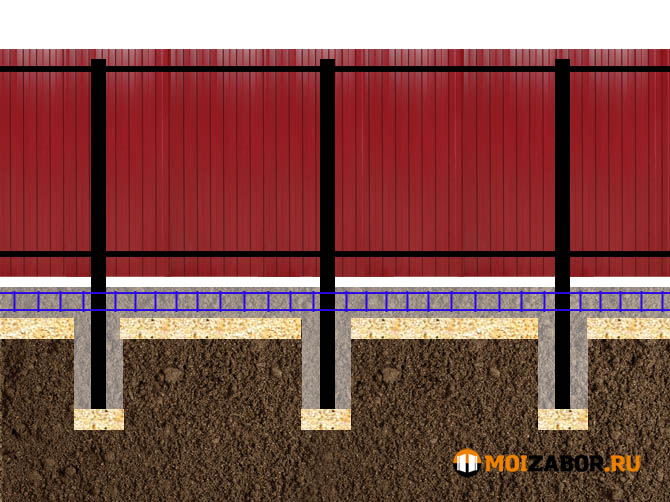
On heaving clay soils, it is best to perform a combined type of foundation. Before pouring the columnar-strip foundation under the fence, you must first dig a trench corresponding to the calculation of the depth and width. In the places where the pillars are installed, drill holes for the installation of the pillars.
Further, along the entire perimeter of the future base of the fence, wooden formwork is performed. At the bottom of each pit, under the pillars, roofing material folded in two layers is laid. Next, the pillars are installed and the foundation tape is reinforced with a mesh of reinforcement.
Now you can start pouring concrete. Fill it correctly - with horizontal layers. If it is not possible to fill the entire tape at one time, then it must not be allowed that in one place the formwork was filled to the top, and in another it would not be at all. The concrete will dry for 3-5 days.
Shallow tape foundation is even easier to make. It is laid above the level of soil freezing. Therefore, such a foundation is susceptible to seasonal ground movements. Such a base is more suitable for the device in areas where the soil has a homogeneous structure throughout the entire area of the fence.
For the construction of such a foundation, a shallow trench (0.5-0.7 m) is dug, at the bottom of which sand (0.15 m) is laid and tamped. A layer of crushed stone (0.15 m) is poured on top. Crushed stone with sand is a kind of drainage base, thanks to which water will be drained from the foundation. Further, holes are drilled into the trench for pillars with a depth of 0.3-0.4 m.
Next, the pillars are connected with reinforcement by welding. Install the formwork.After that, they start pouring concrete, adhering to the general rules described above. After the concrete is poured, be sure to once again make sure that the pillars are level.
There is another alternative device option foundation - from old car tires... But it is rather controversial and does not meet widespread use in the construction of foundations for fence structures.
In order for the foundation under the fence to serve for a long time, it is necessary not only to fill it correctly, but also to protect it from atmospheric precipitation. And for this, it is necessary to perform a blind area or ebb, which is a sill passing along the entire perimeter of the foundation with a slope to the side opposite to the foundation base.
Ebb tide can be done both simultaneously with pouring the foundation, and after. For this, a trench is dug out along the entire fence line to a width of about 0.5 m and a depth of 0.15 m, which is covered with gravel and compacted. When the ebb is performed simultaneously with the foundation, reinforcement bars are released from it towards the blind area. If the ebb is done after the installation of the base of the fence, then holes are made in it and reinforcement rods are inserted into them.
On a slope site
If it is necessary to carry out the construction of fence structures on a site with a large slope, then the foundation for it should not be inclined. In such cases, a stepped base is built, each section of which is strictly horizontal. In the lowest place, the foundation is made level with the soil. The transition from level to level is done by steps. The length of the ledges should be at least 2 times greater than their height. The height must be at least 0.6 m.
Price
As for the price, in this case the most important thing is to take into account the material of the canvas. For example, the price of a fencing made of professional pipes with a height of 2 m for one running meter is about 4,500 rubles. This cost includes the installation of poles, filling the spans and painting. The most common price range is:
- The cost of the simplest option is about 3000 rubles. for 1 running meter.
- The average level is about 4400 rubles. for 1 running meter.
- Business class - 5800 rubles. and higher for 1 running meter.
As practice has shown, if you correctly select the profile pipes and observe all installation technologies during installation, you can get an original and practical fence. And positive reviews and illustrative photos are a prime example of this.
Photo report on the manufacture and installation of the gate
This is one of the options for how you can make a gate from corrugated board with your own hands. The technology is not the best, but not the worst: everything has been functioning without problems for six years now.
Hinges are welded to the installed pillars of 80-80 mm, the counterparts are welded at the required distance on the vertical parts of the racks from a 40 * 40 mm pipe - on the right and left. We hang the racks on the hinges on the pillar, put an interlayer between them and the pillars of the required thickness and fix it with a clamp.
We measure the required height and cut off the excess, from above to the posts, not to the posts, weld the cross member from the same pipe 40 * 40 mm
Welding quality is not important at this stage. We are still grabbing the details, not worrying about the thoroughness of the suture - then we will bring it to normal. The main thing is that everything is even and sticks together.
Therefore, we grab with dots in several places
The main thing is that everything should be smooth and kept together. Therefore, we grab it with dots in several places.
In the same way, we grab the pipe along the bottom.
Find the middle of the cross beams. Set aside 3 mm from the middle to both sides. We make clear marks. We measure the distance between the upper and lower beam, cut off two segments, weld along the marks (a gap of 6 mm should remain between the two vertical pipes).
We measure the distance between the two posts of one half of the goal. They should be the same, but it is better to measure separately. Cut the pipes to the correct length and grab them at the correct height.If you need more crossbars, install them as well.
Along the marked center with a grinder above and below we make through cuts, dividing the gate into two halves. So very simply we got a gate that will open and close without any problems.
The frame of the gate leaves is ready. We remove it, lay it on a flat horizontal surface and weld the seams well
Here the quality of welding is already important, we monitor the fullness of the bath, we try not to burn holes. We clean the finished seams, prime, paint
We proceed to assembling the support for attaching the profile sheet. To reduce the windage, it was cut into two parts, so that the sheet is not solid, but cut. For this we use a profiled pipe 20 * 20 mm. We cut it into pieces of the desired length, so that it can be fixed along the inner perimeter.
We expose them in the same plane with the outer part - the sheet will be screwed on from the inside. We fix it on self-tapping screws, having previously drilled holes of the required diameter.
We paint the finished frame - inside with light gray paint, outside - red-brown, to match the color of the corrugated board. We leave to dry.
We proceed to the installation of the profiled sheet on the gate. It is cut to a slightly smaller size than the main frame - there should be an indent of 2-3 mm around the perimeter. They are laid on prepared supports and fixed from the inside along the perimeter with self-tapping screws.
You can take special ones, with hats and gaskets, but they put them on ordinary ones.
It remains to establish constipation. You can, of course, embed a lock and a handle, but the quality of inexpensive ones is very low, and taking expensive ones is an unaffordable luxury at the moment. Therefore, bolts are welded from the remains of pipes and fittings. They work exactly under any conditions.
One (upper) is set on self-tapping screws with a counterpart on the sash, the two lower ones are attached to the posts. Small holes were drilled in the soil in the right places, in which segments of round pipes were concreted, the diameter of which was greater than the diameter of the rod. The gate is made using the same method, only a lock is cut into it.
With this manufacturing technology, the gate wings are guaranteed to open and close. If there were some distortions during the installation of the pillars, they are taken into account. In a step-by-step presentation, the whole process does not look complicated, and it is. If you cook all the parts separately, the geometry should be perfect, and you also have to make sure that the pipe does not lead during welding. For several different technologies for making gates from corrugated board, see the next section, where video tutorials are collected.
Sliding gates can be made from a profiled sheet and equipped with automation.
DIY fence made of corrugated board: photo report
A fence was built from neighbors and a frontal one. The total length is 50 meters, the height is 2.5 m. On the front one is used a brown profiled sheet, on the border - galvanized, thickness 0.5 mm, grade C8.
In addition, the following materials were sent:
- on the posts a profiled pipe 60 * 60 mm, wall thickness 2 mm, pipes 3 m long;
- 80 * 80 mm with a wall of 3 mm were placed on the pillars of gates and wickets;
- lags 30 * 30 mm;
- gate and wicket frame 40 * 40 mm;
A ready-made fence made of corrugated board with his own hands was built by one person
The fence is installed on metal pillars, between which the basement is then poured. It is necessary for the owners, since it is planned to set up a flower garden in front of the fence (you can see the fence made under it). It is also needed so that water does not flood the yard during heavy downpours. Metal sheets are not attached immediately from the ground, but retreating a little. This gap is closed by a die cut - a tape that remains in some industries. This is done on purpose so as not to block the air supply, so that the earth dries out faster.
Inside view of the finished fence
Metal preparation
The first stage is the preparation of the pipes. The pipe comes from the warehouse rusty, so that it will serve for a long time, you have to clean it off, then treat it with "Anti-rust" and then paint. It is more convenient to first prepare all the pipes, prime and paint, then just start installation.The rust was cleaned off with a metal brush mounted on a grinder.
Pipes need to be cleaned of rust
The pipes in the warehouse were only 6 meters long. Since the height of the fence is 2.5 meters, you need to bury another 1.3 meters, the total length of the post should be 3.8 meters. To save money, they cut it in half into 3-meter pieces, and the missing piece was made up with various scrap metal available on the farm: cut corners, fittings, pieces of different pipes. Then everything was cleaned, primed and painted.
Installation of pillars
The first were two corner posts. The holes were drilled with a store-bought drill. The soil is normal, it took about 20 minutes for one hole 1.3 meters deep.
Drill hole for pillars
The first pillar was placed horizontally and so that it rose to a height of 2.5 meters above the ground. To set the second one, it was necessary to recapture the height. Used a water level. You need to fill it in so that there are no bubbles - from a bucket, not from the tap, otherwise it will lie.
They put up the second post along the broken mark (they put it on the bar, which was placed next to the hole) and concreted. When the cement seized, twine was pulled between the posts, along which all the others were aligned.
The filling technology was standard: a double folded roofing material was installed in the hole. A pipe was placed inside, poured with concrete (M250) and placed vertically. The level was controlled by a plumb line
Correctly placing the pillars is very important, otherwise the entire fence will skew
In the process of work, it turned out several times that the concrete was poured not inside the rolled roofing material, but between it and the walls of the pit. Raking it out of there is a small pleasure, because the protruding part was cut into petals, nailed to the ground with large nails. Problem solved.
So the roofing material was fixed
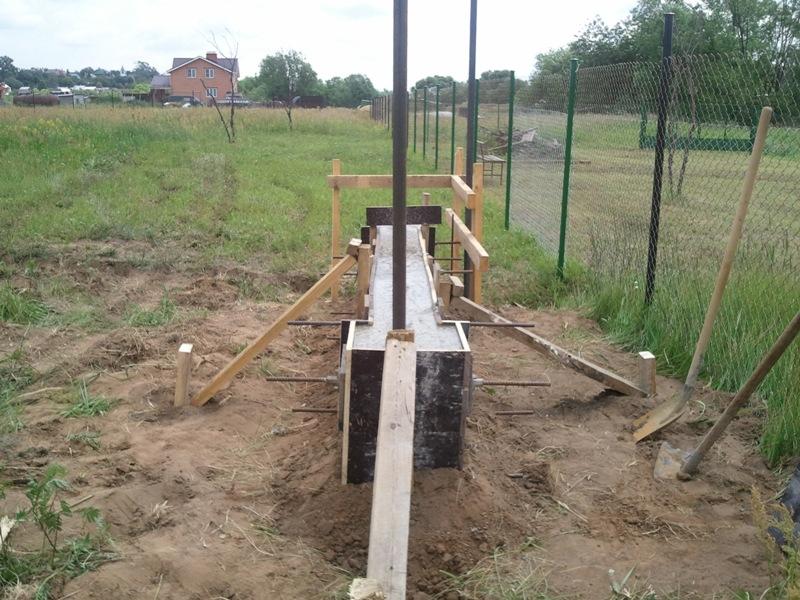
After the concrete had set, a portable formwork was made from boards covered with dense film. With their help, the basement was poured. To make it stronger, reinforcement rods are welded to the pillars on both sides along the bottom. Formwork was placed around them.
Plinth formwork
Installation of jumpers
The cleaned, primed and painted crossbeam pipes were cut and welded. Cooked between the pillars. They are also tedious to put in a level to make it easier to fix.
Cook jumpers
After the welding is over, all welds are cleaned with a wire brush, treated with "Anti-rust" and then painted.
Installation of a profiled sheet
Since the upper lintel runs along the very top of the fence, and it is welded exactly to the level, there were no problems with alignment and installation of the sheets. They were fastened first along the edges, then intermediate screws were installed. To make it easier to place them evenly, a thread was pulled between the extreme ones.
Smoothly installed fasteners are also beautiful
Then the gate was welded and attached. As a final touch, additional elements are installed on top - a U-shaped profile that covers the top of the fence and plugs on the pipes.
The final view of the fence made of profiled sheet, made by yourself
As you understand, there is nothing particularly difficult
It is important to set the pillars straight and weld the frame. This is the main task.
A lot of time - about 60% is spent on preparing pipes - cleaning, priming, painting.
Step-by-step instructions for creating a fence from corrugated board on a metal frame
All the work will turn out to be mastered by two or three. On small sites, there is no need to attract special equipment.
Installation diagram, drawings
A preliminary sketch of the future fence is being developed. If it is difficult to do it yourself, then look for it on the Internet. There are many examples of finished structures made of corrugated board, located both on flat areas and on sloped estates.
The diagram should show the dimensions of the sections, the height of the posts, the distance at which the logs will be attached.
The features of the soil and the distance from the highway, green spaces, farm buildings are indicated.
Elevation differences are shown schematically, if any. The type of foundation is applied.
The requirements for the materials are briefly indicated. The cost estimate is calculated.
Markup
Performed with rope and wooden pegs. The main pegs are driven into the ground at the locations of the pillars, the auxiliary ones are driven through each linear meter. A rope is pulled between them strictly at an angle of 90 degrees.
Foundation
Key factors when choosing a type of base:
- features of climate, soil;
- the depth of freezing and groundwater occurrence;
- load on the foundation (whether the materials will be light or massive).
The installation and fixation of the pillars occurs at the stage of arranging the base, regardless of the chosen foundation.
In this case, profile metal pipes are used under the supports.
Frame installation
It implies fastening the lag to the racks.
It is done in two ways:
- Welding. The grinder cut workpieces 5 mm less than the distance between the posts. The covering of the pillars is protected in the place of the fastener, the old paint is removed. The procedure is performed by three people: two hold the vein on the sides, the third one welds. The seams are cleaned. Defects and poorly welded places are eliminated. The process is repeated around the entire perimeter. The finished frame is primed. After a day, you can paint it.
- Fixing with brackets. The holder is installed on the post at the desired level on the sides or outside, it all depends on the design of the plate. Fastened with self-tapping screws. The jumper is applied to the other post. Another bracket is fixed according to the level. The process is repeated around the entire perimeter. The lags are mounted to the plates from the back side.
Methods for fixing the profiled sheet
Prepare sheets of the required dimensions. Remove the protective film.
The further procedure for work is described in this article: "How to fasten a professional sheet on a fence."
Installation of gates and wickets
When the sheathing of the sections is completed, you should start installing the gates and wickets. Reinforced pillars with a wall thickness of 3.5 mm are chosen under the gate. Garage sheds are welded to them. For lags, pipes with a section of 20 * 40 mm with a wall thickness of 2 mm are used. All connections are made by welding. Locking mechanisms are attached from fixing the sheets.
Installation of sheets to the frame is carried out in the same order as in the case of sections.
Users often search for:
- Metal fence gate
- Wooden gate for a fence with your own hands

