Strip foundation under the fence
When independently carrying out work on installing a fence on a site, most often when choosing a base, they give preference to a strip foundation device. It perfectly withstands massive types of fences installed on soils that are prone to seasonal swelling. The solid reinforced concrete structure of the strip foundation ensures its reliability and durability, as well as high bearing capacity - the strip foundation can easily withstand a monolithic or prefabricated fence made of concrete or natural stone up to 2.5 meters high.
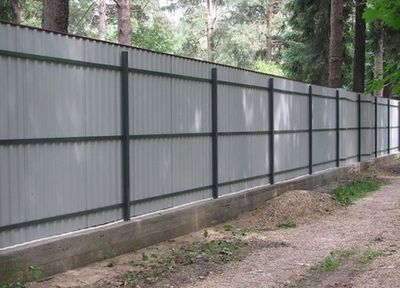
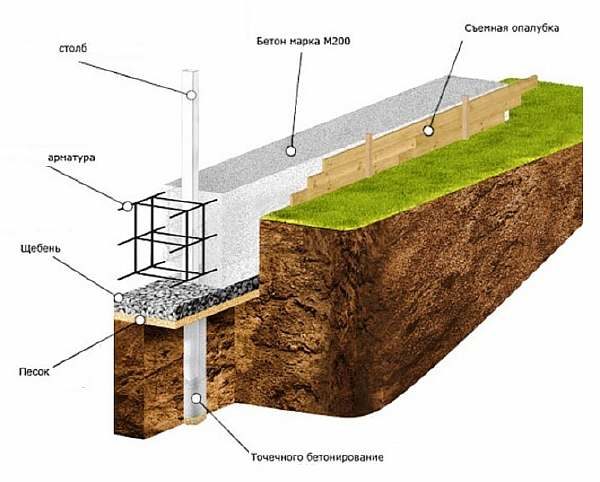
A strip foundation for a fence is a structure in the form of a monolithic tape of concrete up to 30 cm wide, in general, the width of the foundation directly depends on the size of the supports and the type of fence. The foundation is being erected along the entire perimeter of the fence, its depth is 0.5 - 0.7 m.
For pouring the foundation, concrete of the M200-300 brand is used. When erecting especially massive fences or when carrying out work on the foundation in the cold season, it is permissible to use concrete of the M-400 brand. From the inside, it is recommended to arrange a reinforcing frame made of reinforcement with a diameter of 8-12 mm, which will ensure the redistribution of the load and protect the foundation from destruction.
Device
Due to the fact that the depth of the strip foundation for the fence does not exceed the level of soil freezing, it is classified as a shallow foundation. When building a fence, it should be borne in mind that such a base may undergo deformation, the origin of which is associated with seasonal swelling of the soil, which rises during freezing and descends during thawing and increasing temperature.
With a homogeneous soil located within the entire perimeter of the abyss fence, you can not be afraid. If the foundation has to be arranged on heaving soil, then gravel or sandy filling of the base should be arranged, ideally if this is done to the full depth of freezing. Alternatively, with very heaving soils, you can consider the possibility of installing a more expensive pile-strip foundation.
The procedure for performing work when installing a strip foundation for a fence is as follows:
- Digging a trench around the entire perimeter of the future fence with a width of 20 cm more than the width of the tape obtained by calculation. The depth of the trench, as a rule, is in the range of 0.5-0.7 m and is determined by the type of soil and the mass of the structure.
- Preparing the bottom of the trench - backfilling a layer of sand 10-15 cm thick, followed by tamping. For better compaction, the sand should be moistened with water.
- If the sections of the fence will rest on the pillars, then holes with a diameter of 20 cm should be drilled at a distance of 2.5-3 m from each other. In this case, the depth of the hole should exceed the depth of the trench by at least 0.4 m.When installing the pillars on the bottom of the holes, you should also fill in a layer of sand 10 cm thick and compact it
- Installation of formwork for pouring the foundation. For the manufacture of formwork, plywood or planed and well-fitted boards can be used. The formwork should be leveled and secured with spacers. In order not to spoil the boards with concrete, the inner side can be closed with plastic wrap.
- The next step is to knit the reinforcement. For reinforcement, four horizontal rods arranged in pairs are used, fastened into a rigid frame using horizontal and vertical rods located with a step of 0.5 m. Vertical rods cannot be driven into the ground - they should be installed in special plastic cup holders. Knitting is done with a hook and special wire. In the corners of the future foundation, the edges of the rods are best taken into a clamp.The metal rods of the frame must be hidden under a layer of concrete with a thickness of at least 5 cm.
- For the installation of load-bearing pillars, it is necessary to provide for the device of reinforcing belts associated with the reinforcing frame of the foundation. The main task of such belts is to evenly distribute the lateral load.
- The final step is to pour the concrete.
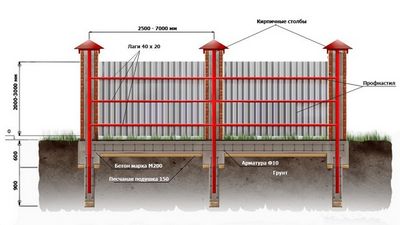
Diagram of a strip foundation for a fence
When erecting a fence on a slope, a stepped structure should be arranged - the construction of an inclined foundation is not allowed. Before pouring, the vertical position of the supports should be checked again, which will prevent problems with the installation of the fence sections. After pouring every 20-25 cm of concrete, it should be compacted. After the concrete has hardened, which takes 24-36 hours, you can start installing the sections.
Fence materials
I must say that progress is moving forward with leaps and bounds. Every year, a variety of new materials appear, the characteristics of which are much superior to those previously used. One from such materials has become a composite fiberglass reinforcement.
Fiberglass reinforcement is manufactured in accordance with the developed standards. Its minimum size starts with a diameter of 4 mm, and the maximum can reach 32 mm. For low-rise construction, fiberglass reinforcement is mainly used, with a maximum diameter of 10 mm. It is produced and sold in bays.
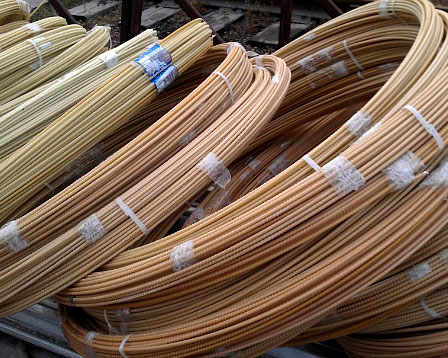
This is how fiberglass reinforcement is transported
Fiberglass reinforcement for construction has several groups depending on the type of reinforcing filler:
- glass composite;
- carbon composite;
- combined.
Fiberglass reinforcement can be used to reinforce a fence, to strengthen the foundation of a building. The most important advantages of this new building material, when compared with metal reinforcement, are:
- Small weight;
- Corrosion resistance;
- High strength.
In principle, using fiberglass reinforcement in a personal plot, you can get great savings in the construction of a wide variety of buildings. First of all, it has many positive characteristics.
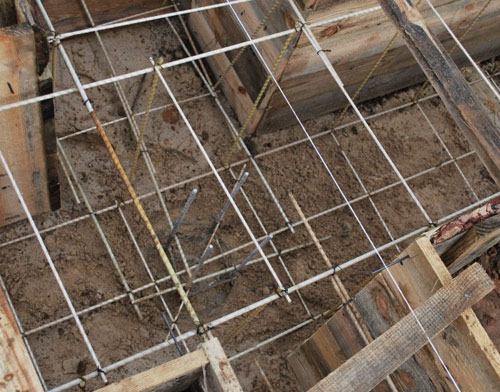
Reinforcement of the fence foundation with fiberglass reinforcement
It is very easy to install, such a fence can stand for tens of years, since the strength of such fittings is much higher than ordinary metal bars for a fence. To work with fiberglass reinforcement, you do not need to have special equipment and additional equipment. This material does not require painting, no protective equipment is required.
Solid slab
The overlap thickness is most often taken equal to 200 mm. The reinforcing frame in this case includes two meshes located one above the other. Such meshes need to be tied from rods with a diameter of 10 mm. In the middle of the span, additional reinforcing rods are installed in the lower part. The length of such an element is assigned 400 mm or more. The step of the additional rods is taken the same as the step of the main ones.
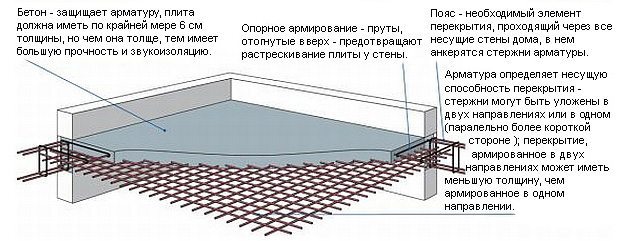
Additional reinforcement must also be provided in the places of support. But they place it at the top. Also, at the ends of the slab, U-shaped clamps are needed, the same as in the foundation slab.
 An example of reinforcement of a floor slab
The calculation of the reinforcement of the floor slab by weight for each diameter should be performed before purchasing the material. This will avoid cost overruns. To the resulting figure, add the stock for unaccounted costs, about 5%.
Tying reinforcement of a monolithic slab
To connect the frame elements to each other, they use two methods: welding and bonding. It is better to knit reinforcement for a monolithic slab, since welding in a construction site can lead to a weakening of the structure.
To perform the work, use an annealed wire with a diameter of 1 to 1.4 mm.The length of the blanks is usually taken equal to 20 cm.There are two types of tools for knitting frames:
- hook;
- gun.
The second option will significantly speed up the process and reduce labor intensity. But for building a house with your own hands, a hook has become very popular. To complete the task, it is recommended to prepare in advance a special template for the type of workbench. A wooden board with a width of 30 to 50 mm and a length of up to 3 m is used as a blank. Holes and grooves are made on it, which correspond to the required arrangement of reinforcing rods.
Diy calculation of strip foundation reinforcement
Any construction work is standardized by GOSTs or SNiPs. Reinforcement is no exception. It is regulated by SNiP 52-01-2003 "Concrete and reinforced concrete structures". This document specifies the minimum amount of required reinforcement: it must be at least 0.1% of the cross-sectional area of the foundation.
Determination of reinforcement thickness
Since the strip foundation in the section has the shape of a rectangle, the sectional area is found by multiplying the lengths of its sides. If the tape is 80 cm deep and 30 cm wide, then the area will be 80 cm * 30 cm = 2400 cm2.
Now we need to find the total area of the reinforcement. According to SNiP, it must be at least 0.1%. For this example, this is 2.8 cm2. Now, by the selection method, we determine the diameter of the rods and their number.

Quotes from SNiP, which relate to reinforcement (to enlarge the picture, right-click on it)
For example, we are planning to use reinforcement with a diameter of 12 mm. Its cross-sectional area is 1.13 cm2 (calculated by the formula for the area of a circle). It turns out that in order to provide recommendations (2.8 cm2) we need three rods (or they also say "threads"), since two are clearly not enough: 1.13 * 3 = 3.39 cm2, which is more than 2.8 cm2, which SNiP recommends. But it will not be possible to divide three threads into two belts, and the load will be significant on both sides. Therefore, four are laid, laying a solid margin of safety.
In order not to bury extra money in the ground, you can try to reduce the diameter of the reinforcement: calculate under 10 mm. The area of this rod is 0.79 cm2. If we multiply by 4 (the minimum number of bars of working reinforcement for the strip frame), we get 3.16 cm2, which is also enough with a margin. So for this version of the strip foundation, you can use class II ribbed reinforcement with a diameter of 10 mm.
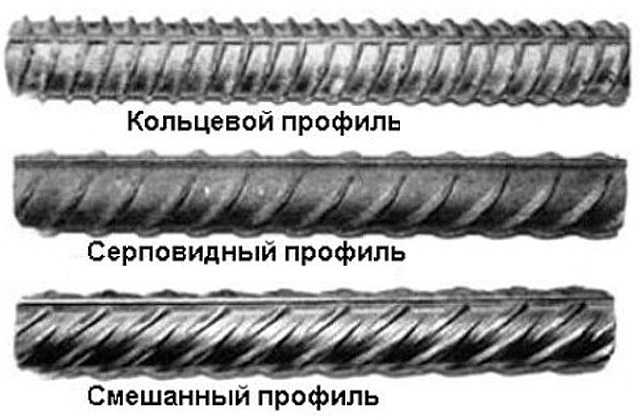
Reinforcement of the strip foundation for a cottage is carried out using rods with a different type of profile
We figured out how to calculate the thickness of the longitudinal reinforcement for the strip foundation, you need to determine with what step to install the vertical and horizontal jumpers.
Installation step
There are also methods and formulas for all these parameters. But for small buildings they do it easier. According to the recommendations of the standard, the distance between horizontal branches should not be more than 40 cm. They are guided by this parameter.
How to determine at what distance to lay the reinforcement? In order for the steel not to corrode, it must be located in the thickness of the concrete. The minimum distance from the edge is 5 cm. Based on this, the distance between the bars is calculated: both vertically and horizontally, it is 10 cm less than the dimensions of the tape. If the width of the foundation is 45 cm, it turns out that there will be a distance of 35 cm between the two threads (45 cm - 10 cm = 35 cm), which corresponds to the standard (less than 40 cm).
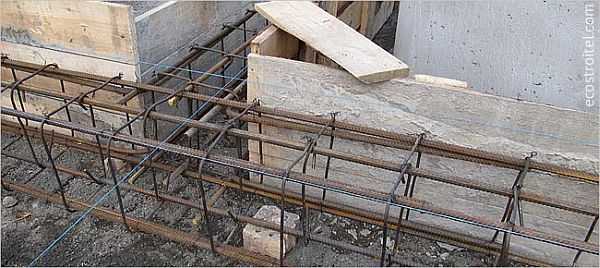
The step of reinforcement of the strip foundation is the distance between two longitudinal bars
If our tape is 80 * 30 cm, then the longitudinal reinforcement is at a distance of 20 cm (30 cm - 10 cm). Since for foundations of an average foundation (up to 80 cm high), two reinforcement belts are required, then one belt from the other is located at a height of 70 cm (80 cm - 10 cm).
Now about how often to put jumpers. This standard is also in SNiP: the step of installing vertical and horizontal dressings should be no more than 300 mm.
Everything. We calculated the reinforcement of the strip foundation with our own hands. But keep in mind that neither the mass of the house, nor the geological conditions were taken into account. We relied on the fact that these parameters were used to determine the size of the tape.
How to tie an armature
Of the whole variety of reinforced meshes and frames, several methods of their connection are used. Knitting is the easiest way to connect.
Important! The material is connected with a knitting wire 1.2–1.4 mm in size from elastic low-carbon steel at the joints. You will need a special hook
- Bend a wire 25-50 cm long in half;
- Skip the loop at the junction and grab it with a crochet;
- Using a hook, twist the loop around the other end of the wire.
Reinforcing rods are tied with a specially designed wire so that the sides of the square cells are equal to 30-40 centimeters. Knits horizontally to a vertically standing rod 10-15 cm from the bottom of the trench. The horizontal reinforcement runs in a solid line with an overlap at the bottom and top.
Sometimes welding is used at low loads, but welding has disadvantages:
- Welding can reduce the strength of the structure;
- Due to the increasing rigidity of the frame, the connections can be broken.
- A reinforced product cannot be welded if its diameter exceeds 20 mm;
- You have to hire and pay for the work of a welder. Accordingly, cash costs increase.
The structure is tied every meter. Squares are made with high reinforcing bars so that the formwork frame is firmly tied and well reinforced. Fiberglass is bonded with plastic clamps. You have to have patience in your work.
Otherwise, the process is not particularly difficult.
Helpful hints
Many people use a regular crochet hook when working with reinforcement. When, during the knitting of the reinforcement, a loop is crocheted around the second end of the wire, the end is kept under tension.
But you do not need to tighten too much. The wire may break and break. Reinforcement hook can be made with wire by hand. Steel d 0.3-0.5 cm is suitable.
The use of a screwdriver helps to speed up the knitting process. First, you need to set it up, otherwise the tool will break the wire during operation. If you work with large volumes of reinforcement knitting, a gun is used. With him, work is significantly accelerated. Pistols reduce human involvement during mating to almost zero. The quality of the connection is higher.
We recommend watching an interesting video:
One of the most dangerous reinforcement mistakes is incorrect installation in overlapping areas. When the foundation begins to bend over time, cracks may appear in the reinforcement under load.
To avoid mistakes, special attention is paid to the bond points and corners of the entire structure.
Foundation types and selection features
It is necessary to choose a certain type of foundation for a fence taking into account the following factors:
- Possibility of washing the constructed fence with groundwater.
- The composition of the soil and the level of its subsidence under the influence of negative seasonal factors.
- High corrugated hedges can bend in strong winds.
- With an insignificant weight of the fence, the total mass of the erected structure is taken into account.
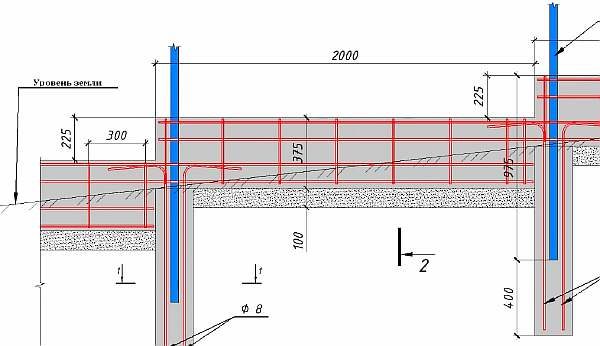
Base for a railing on a slope
When installing a fence near highways or railways, the foundation must withstand high vibration, as well as pressure from soil movement.
Fence strip foundation
During the construction of a fence on a personal plot, it is best to make a strip foundation. This structure can withstand both heavy fences and seasonal movements of different soil layers.
The strip foundation is a one-piece concrete strip with an installed metal profile frame. To create this type of foundation, cement mortar must be used.
Moreover, much attention must be paid to the brand of cement composition, since this significantly affects the quality of the concrete solution. Professional builders advise using M300 cement
In addition, the water for mixing the concrete composition must be purified and cool.
Ribbon reinforcement
The strip foundation belongs to the category of shallow foundations, since it has an insignificant depth of concrete pouring. To reduce the likelihood of deformation under the influence of seasonal swelling of the earth, the reinforcement of the tape under the fence allows. The scheme of reinforcement of a shallow base is as follows:
- During the transverse reinforcement, the rods are installed in increments of approximately 300 mm.
- The interval between the longitudinal bars of the frame is made no more than 500 mm.
- The distance between the reinforcement bars is at least 30 mm.

Before pouring the base of the fence
When arranging a tape base, certain rules must be observed:
- The depth of the trench, taking into account the climate of the region, the stability of the earth and the total mass of the fence, can be in the range of 600-800 mm.
- The trench width is chosen approximately 300–500 mm.
- The base tape should be 300 mm above the ground.
- For the construction of the formwork, a board with a thickness of 30 mm is required.
- Cementing can be done continuously without waiting for the bottom layer to set. But of better quality is the pouring of cement with a break for solidification.
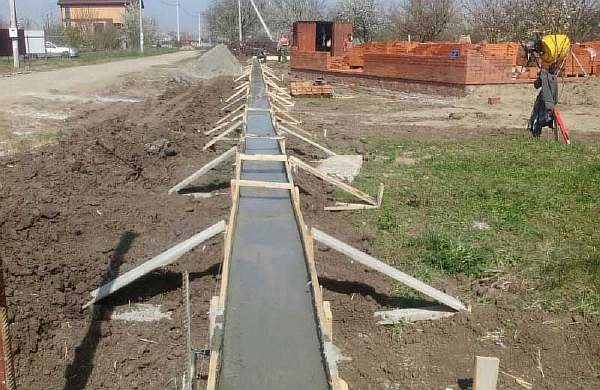
After pouring
Pile-strip foundation
During the construction of a fence on swampy soil, an inclined area, on heaving ground, professional builders advise choosing a pile-strip base.

Fence tape scheme
The main stages of work:
- The marking of the future fence is being carried out, the sections of the location of the support pillars are marked.
- Wells are made under the piles with a garden drill.
- Sand is poured onto the bottom with a layer of 200–300 mm.
- Then waterproofing is done. What are asbestos-cement pipes, dense film or roofing material used for?
- In the well, a vertical frame made of reinforcement made of 3-4 rods is connected. The length of the frame must be 200 mm higher than the pile in height. In the subsequent release, the reinforcement is connected to the main frame when reinforcing it.
- Wells are concreted. For the cement to harden, you need to wait 12-14 days, then proceed to the construction of the formwork under the base.
- A cushion of sand and crushed stone is poured into the formwork, reinforcement is made.
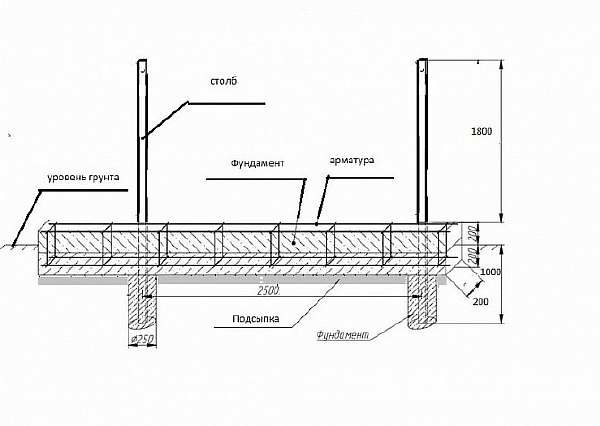
Fence base reinforcement scheme
Foundation for heaving soil
Arranging a foundation under a fence on mobile soils is a risky procedure. This is due to the fact that sometimes the heaving force can lift the whole structure. But, using certain technologies, you can pour the base on this soil.
The tape shallow reinforced foundation perfectly resists the movement of different soil layers. The high strength of the base provides the hedge with good durability.

Reinforcement of the base of the fence using TISE technology
During the construction of the fence in areas in which the ground freezes through to a depth of more than 1.2 m, a pile foundation is poured.
On clayey soil, wetlands and in areas with a high groundwater table, a columnar foundation is used. To create this base for the fence, asbestos-cement or metal pipes, reinforced and filled with a cement composition, are used.
A visual instruction with explanations on reinforcement and foundation pouring can be seen in the video.
2 Technology of reinforcement of monolithic grillage
The reinforcement of the grillage begins after all the previous stages of the arrangement of the pile foundation have been completed - the installation of piles, their trimming and the arrangement of the formwork. You must have a ready-made formwork, inside of which the reinforced frames of the piles protrude to a height equal to the cross-section of the strapping.
Formwork and piles before reinforcement
When assembling the frame, the reinforcement can be knitted with each other using a wire, or the rods can be connected by welding.There is no significant difference in the method of joining - it is often argued that a welded frame, due to the lack of elasticity, resists deformations worse than a connected viscous structure, however, in industrial multi-storey construction, the frames of pile-grillage foundations are always welded, so these fears are groundless. In addition, welding is a more practical and quicker way to implement.
Reinforcement of the grillage - step by step instructions:
- Horizontal rods are welded to the reinforcement protruding from the pile at a height of 5 cm from the bottom of the formwork.
-
On the rods with a given pitch, the reinforcement of the lower longitudinal belt is placed and welded.
- In the sections between the piles, pre-curved rectangular clamps are installed, acting as connecting lintels.
-
Elements of the upper longitudinal belt are fixed on the front faces of the jumper clamps.
The assembly of the reinforcement cage on the straight sections of the grillage is quite simple to perform. Difficulties arise when reinforcing the corners, which must be additionally reinforced, since this part of the frame experiences maximum loads.
Scheme of the correct reinforcement of the corners and abutments of the grillage
The corners and places of abutment of the inner walls of the strapping to the outer ones cannot be reinforced with an overlap of reinforcement. In these areas, it is necessary to lay solid rods bent in a L or U-shaped configuration. A diagram of the correct reinforcement of the corners of the pile grillage is shown in the image.
Reinforcement portal »Reinforcement» Technology of reinforcement of pile grillage
Fence foundation construction technology
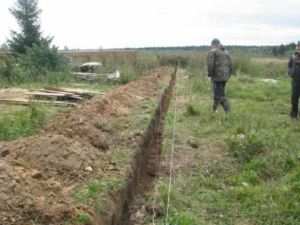 Preparing the trench for the installation of a reinforced guardrail belt
To begin with, you need to make a choice of the type of foundation, material of pillars and lintels, and it is also necessary to conduct geodetic exploration of the territory in order to determine the type of soil and the depth of their freezing:
- Then, the locations of the future fence are marked with an accuracy of half a meter, milestones and guides are installed.
- If necessary, alignment of the construction site is carried out.
- After installing all the milestones and guides, you need to dig a trench along the entire length of the fence and fill the bottom with a sand and gravel pillow.
- The depth of the trench, as well as the width of the formwork, depends on the stability of the soil, climatic conditions, the depth of soil freezing and the height of the groundwater. The mass of the structure also plays an important role, because monolithic brick fences on a concrete base weigh much more than columnar fences with a wire fence.
- Then you need to make the reinforcement of the future foundation. As a rule, rows of longitudinal and vertical reinforcement are used, which are connected to each other. The armature must be installed in such a way that it is covered with concrete mortar and does not come into contact with open air or water.
Then the formwork is erected. For this, wooden boards, ready-made boards or sheets of roofing material are used. The formwork is installed at a height of more than 30 cm from the ground level, reinforced with spacer beams and covered with soil or sand from the outside. The finished formwork together with the reinforcement must be poured with concrete.
Laying the foundation
This operation is performed in different ways. It can be done in whole or in part. When it is necessary to have a solid and reliable foundation, a monolithic concrete foundation is made. If the fence does not require a special, increased degree of reliability, you can only install the support pillars. To create a durable foundation that will support the fence for many years, it is necessary to perform work in accordance with the technological instructions:
- According to the perimeter markings, holes are drilled under the fence posts with a depth of more than one meter. This is necessary, since the soil can freeze to a great depth in winter;
-
A trench is being dug, the width of which reaches half a meter. The same depth is maintained.At the bottom of the trench and pits for pillars, gravel is poured, which is then carefully compacted.
For a more reliable and strong foundation, the masters recommend laying a reinforcing mesh, but this requires large additional financial investments;
- At the next stage, a mesh is made from reinforcement bars. Four rods are taken from which the pillar shape is made. Fastening such a structure can be done with a regular knitting wire using a metal hook. Thus, the frame is tied with a step of 0.5 m. Metal plates, which are called "ears", are tied to the lower part of the post. Fencing sections are attached to them;
- Similarly to the method described above, a reinforcing cage is made;
- All mesh parts are connected to each other with the same wire.
Professionals do not recommend using welding to fasten fittings. The fact is that when the soil freezes, a slight shift of the entire structure is possible. Even with an offset of two millimeters, severe distortion of the fence line can occur.
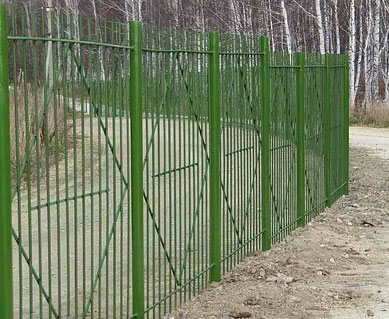
Fence option from fittings and pipes
As a result, the service life of the structure will be much reduced.
- To protect the reinforcement from corrosion, its surface is coated with hot bitumen;
- Then the formwork is made. For this purpose, the inner side of the boards is also covered with heated bitumen;
- A concrete solution is prepared in a ratio of 1: 3. The surface of the concrete will be flat and smooth;
- Filling layers should be very slow and very careful.
