Pros and cons of using car tires
Of course, the biggest advantage of tires is affordability. Buying them at any service station for a penny (or even picking them up for free) is not a problem. Starting the construction of a summer house, gazebo or bathhouse, even at the stage of budgeting, it turns out that the foundation is the most expensive part of the construction. Therefore, saving on material is only welcome.
In addition to availability, the pluses include:
- waterproofing properties of rubber, so the foundation on used tires in places with swampy soil is a very practical and reliable solution;
- durability of tires, because without the destructive influence of ultraviolet radiation, rubber can retain its properties for decades;
- the amortization properties of car tires, which prevent deformation of the house due to ground movements;
- the possibility of constructing the foundation of the building with your own hands, without the use of special machinery and equipment (and even alone).
The tire foundation, obviously, will not replace the traditional one for a massive multi-storey building. However, it is easy and practical to build such a foundation with your own hands under a small country house, garage, shed or bathhouse.
A significant, albeit slightly exaggerated, disadvantage is that rubber, when heated, releases toxic substances. On a hot day, the foundation on car tires may well warm up to a critical temperature.
Shed on a tire foundation
The way out of this situation is to apply an insulating material to the surface of the tires. Regular oil paint is fine. Yes, this is an extra stage of work, but complete safety is guaranteed. In addition, it is not necessary to paint all the tires, only those that are most susceptible to heating (open areas, the upper row of tires) are sufficient.
The appearance of car tires also cannot be called their competitive advantage. Although the same garage will look good, in other cases, cladding materials can be used. This will help to further insulate the rubber and reduce the concentration of emissions into the air.
Necessary equipment for the construction of the foundation
The construction of a tire foundation does not require the use of heavy equipment, except for solving issues of delivery of tires or bulk material. In order to build a base for a garage, a bathhouse, a summer house with your own hands, there are enough tools that can be found in every summer cottage, namely:
- shovel and rake - for removing and leveling the topsoil;
- building level - to check the correct laying of tires;
- timber or wooden board - for leveling concrete;
- concrete mixer or container for the preparation of mortar.
Such a basic set is enough for building a foundation with your own hands in a small area, without any special structural excesses (for a garage, a shed, a gazebo, a stove). If facing work or reinforcement of the foundation will be carried out, an appropriate tool will be required.
Outdoor shower on a tire foundation
In order to save time and money, experienced builders advise not to rent a concrete mixer or prepare the mortar themselves, but to buy concrete by agreeing with a construction organization on delivery. On the agreed day, the mixer will deliver the solution and fill the prepared foundation on car tires.
What materials will be required for the construction of the foundation?
In addition to tires, you need to stock up on such materials for doing work with your own hands:
sand or sand and gravel mixture for compacting and leveling the bottom layer, filling tire cavities, preparing a solution;
soil, broken brick or glass as backfill (here it is important not to use clay soil, which, although it is well compacted, is also easily eroded);
boards for the construction of formwork (if there is no such number of boards, you can rent a removable formwork, many companies provide a similar service);
roofing material, linoleum, dense polyethylene as a waterproofing layer between the rows of tires.
The listed materials are quite enough to make a small foundation of tires with your own hands, for a garage or a change house. If the goal is to build a more solid and reliable foundation for a massive building (for a house made of timber, for example), reinforcing elements, floor slabs will be required. In this case, the cost of the foundation increases and can even be compared with the cost of the traditional tape or pile option.
What types of soil are suitable for construction
Before you learn how to make a foundation for a shed and start construction, you should familiarize yourself with what kind of soil will be most suitable for it. In total, there are several types of soil, including:
- Rocky.
- Gravel.
- Sandy.
- Sandy loam and loam.

Barn on the site
Of all the above soils, rocky soil is considered the most suitable. This soil does not freeze and does not have the peculiarity of creating quicksands. In addition, the rocky soil does not sink or shrink. Of the minuses of rocky soil, it can only be noted that it is rather poorly processed. But this drawback does not greatly interfere, but on such a soil you can lay a not too deep foundation.


The worst and most unsuitable soil option for erecting a foundation is soil, which consists of loam and sandy loam. It freezes to a sufficiently large depth, as a result of which the base must be made too deep. In addition, this soil, like sandy soil, can form floaters. Clay soils are also unsuitable for buildings; they are too exposed to compression and swelling.
Most people can raise the question of how deep it is necessary to dig a pit in order to fill the foundation for the shed. Due to the fact that the barn is considered a fairly light and simple structure, a foundation that will be shallow and deepened will be excellent for it. It is great for those buildings that are erected from wood. In addition, the structure is placed on sand or clay. In addition, the depth of the foundation for the shed is calculated based on what kind of soil is, and how deep it can freeze in winter. If we take the average value, then it will be about 60 cm.
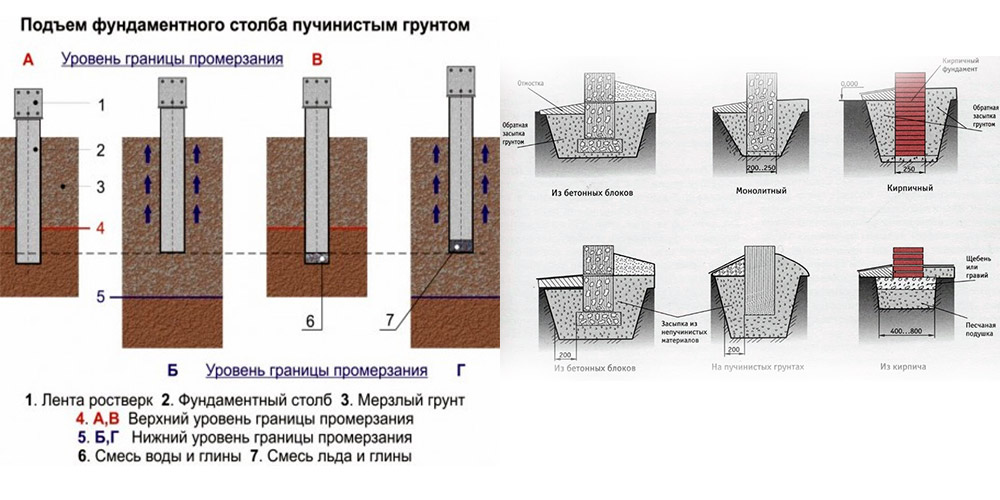
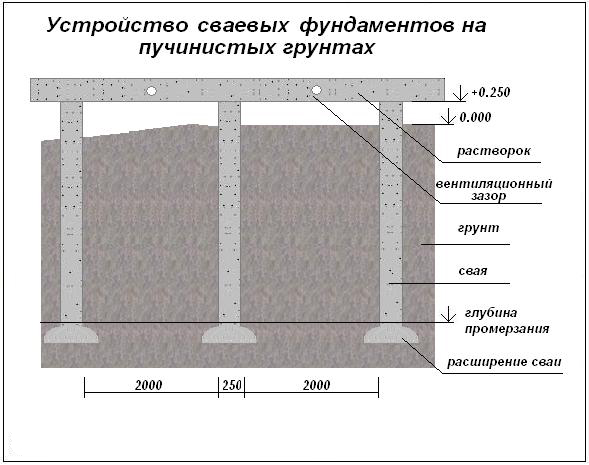
Risks of construction work on heaving soils
Swollen soil types are dangerous because in the first winter season of the building's operation, it can deform and shrink. Common defects include:
- deflection of the structure due to uneven shrinkage, which affects the quality of the roofing;
- soil shift during the subsidence of the middle part of the house, which is why cracks appear on it;
- roll of rigid structures erected without deepening the foundation;
- distortions as a result of the uneven shrinkage process of small areas under the house;
- horizontal displacement during heaving - parts of the base collide with each other.
Incorrect construction - non-compliance with the sequence of work, ignorance of the technology for eliminating the problem leads to the above deformations. The selection of a way to eliminate heaving will help to avoid defects.
Detailed step-by-step instructions from marking to finished foundation
The first stage of construction is the same for all types of supporting structures - marking and routing. To do this, using a tape measure and wooden pegs, the corners of the future utility block are outlined. The stakes are driven into the ground, a rope or cord is pulled between them and leveled to adjust the horizontal.Right angles must be checked.
Further, the construction processes are fundamentally different.
Column foundation
Future pillars are marked in each corner of the shed when building the simplest structure. If the project is more complex, then it is necessary to install pillars every 1 - 1.5 meters of the perimeter of the structure. With the help of a garden drill, wells about 40x40 cm wide are dug in the designated places.After that, a pillow of sand and crushed stone 20 cm thick is poured onto the bottom of each hole.
Further, the pillars are installed directly. Materials for use can be different:
- Brick - the pillars are laid out with a standard masonry of one and a half bricks to the desired height.
- Concrete blocks - this can be one large block or small blocks held together with cement mortar.
- Asbestos pipes - the required size are installed in the pits, later they are poured with concrete.
- Formwork made of wood or plywood - in this case, concrete is also poured into the prepared cavity. After drying, the formwork is removed.
For strength, reinforcement rods are fixed inside the pillars, if possible. Upon completion of the work, a layer of waterproofing is laid out on top to prevent moisture destruction.
Screw foundation
This design does not require additional soil preparation, because mounts even on the most difficult soil types. It uses special metal piles with a sharp tip and cutting blades. The installation sites are outlined similarly to the columnar view.
The piles are screwed vertically into the ground by two or three people. To facilitate work, a hole for scrap is provided at the top of each pipe. The entire structure must be vertically aligned. The parts that are superfluous in height are cut off with a grinder. For greater strength, it is recommended to fill the pile cavity with concrete.
Monolithic foundation
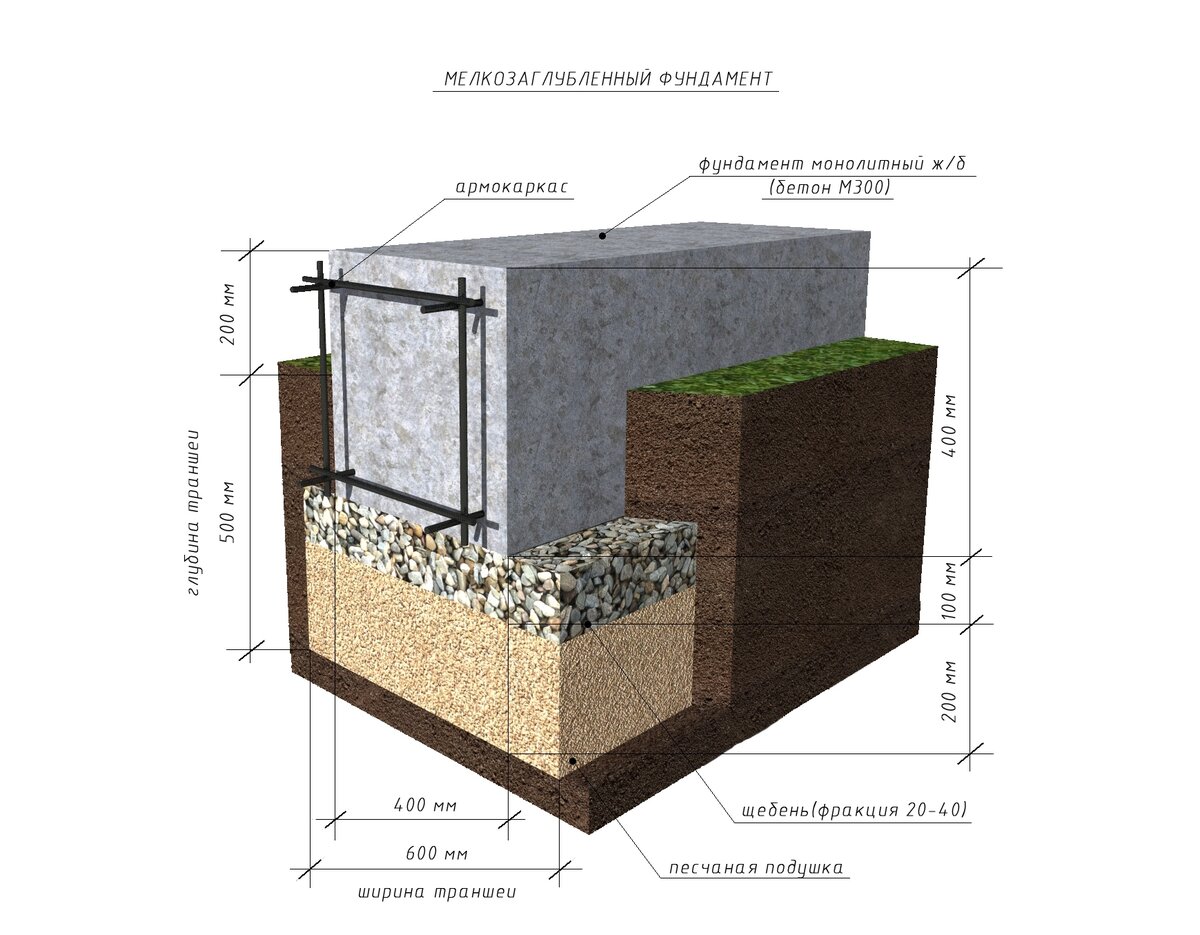
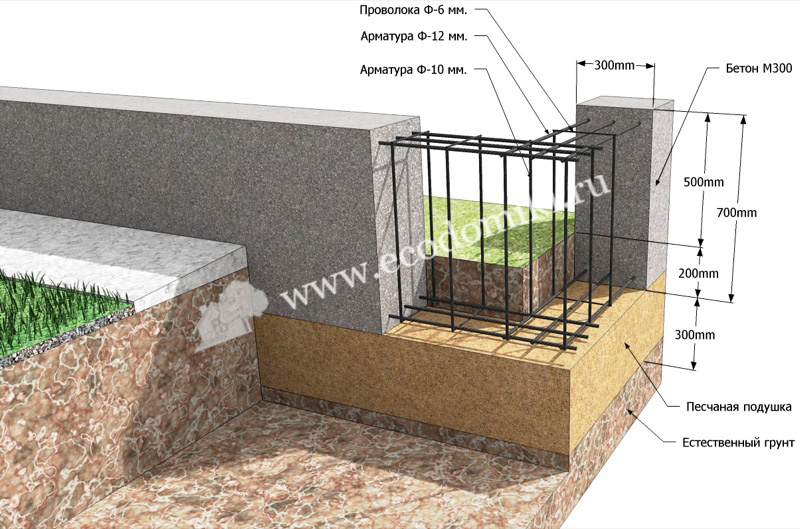
The most costly and time consuming, but the most durable and durable type of base. To build it, it is necessary to dig a pit according to the size of the intended barn. A layer of sand and a layer of crushed stone, 10 - 20 cm each, are laid on the bottom. Everything is carefully compacted. Next, you need to build a formwork with a height of 10 - 15 cm above ground level. Binding reinforcement or mesh is laid, and the solid space is filled with concrete.
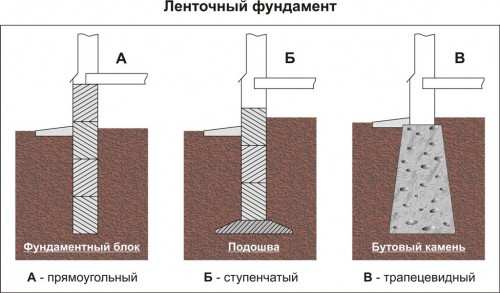
Strip foundation
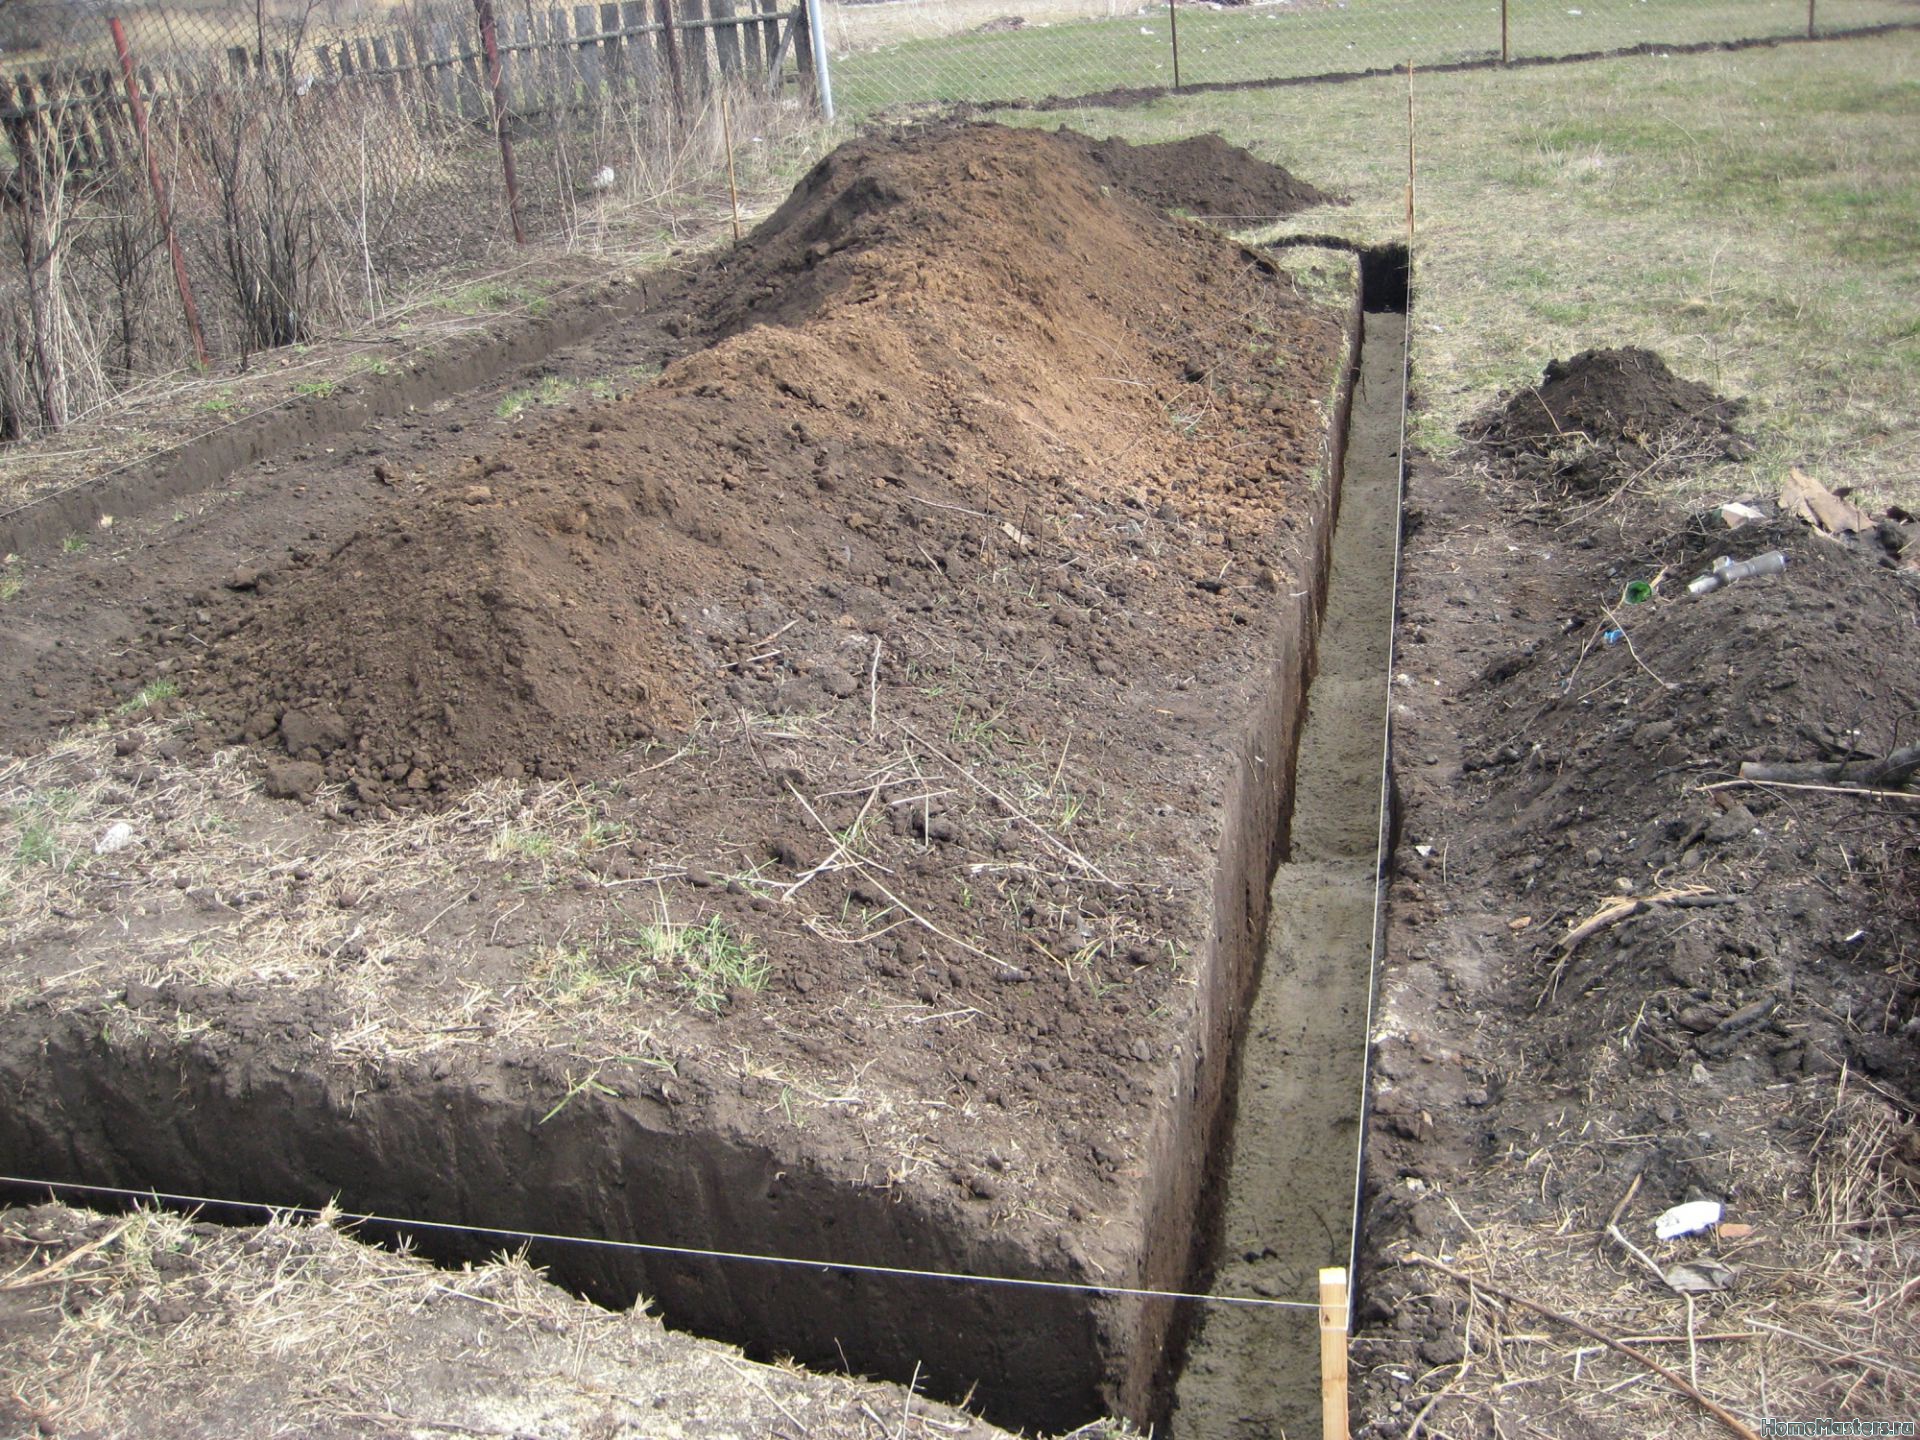
This type is intended for the basis of wall structures. A trench up to 50 cm wide is dug along the markings along the perimeter
It is important to respect right angles. The bottom is covered with sand, rammed
Next, a formwork is built, rising 20 cm above the ground. With the help of reinforcement and wire, a reinforcing cage is made. Then the entire tape is poured with concrete.
Block foundation
Installation of blocks in such a structure takes place on a monolithic base. If we are talking about a budget version of the basement, then it is allowed to use concrete blocks on a specially prepared pillow. In this case, a hole is dug to the size of the utility block, a layer of sand is filled up, spilled with water and compacted.
Then a layer of crushed stone, and also carefully compacted. On the constructed site around the perimeter, concrete blocks of the required size are installed, horizontally aligned with a level.

Varieties of sheds and soil features
 Barn "temporary house"
There are several types of foundations for a barn, which are advisable to fill, given the nature, structure of the soil. It is customary to distinguish the following types of buildings:
- A construction of the "chest" type. It is a light and low structure, where it is convenient to store garden tools. The area of the "chest" is small, therefore, pouring the foundation does not require a serious organization of labor.
- A shed with a gable roof. One of the preferred types of outbuildings in the country. The floor of the building is made of a grooved floorboard, the door structure is attached to three hinges. Construction involves pouring any kind of foundation.Pile is also suitable here.
- Shed with a pitched roof. The roof of such a building has a holistic flat appearance with a slight slope on one side. The area for the construction of a shed structure with a lean-to roof is somewhat limited. The building can have windows, several doors. To build a shed, it is preferable to fill in a strip-type foundation.
- Greenhouse combined structure. It is used when space in the designated area is in short supply. The shed is ideal for growing indoor potted plants, germinating seeds during their planting season in the country. The foundation for a combined greenhouse is suitable for both tape and columnar.
- The type of "temporary house". It is a full-fledged living space without amenities. The structure is used in summer cottages for seasonal use: in summer - living quarters, in winter - a place for storing tools, equipment for land cultivation. To create conveniences, electricity and other utilities are supplied during the temporary lodge. As a base, it is better to use a strip foundation, or make a columnar one or from foam blocks.
 Assessment of soil quality
When organizing construction, it is recommended to take into account the following soil characteristics:
- soil compressibility index;
- the level of groundwater rise;
- the presence of quicksands in the soil;
- deep soil freezing in winter;
- geographical features of the area (marshy, arid);
- the type of soil itself (for example, sandy, clayey).
For example, on loamy or sandy loam soil, which freezes by more than 2 meters and can "float", it is recommended to erect only a strip base. Sandy soil, which reacts to an increase in humidity, freezes strongly, but does not shrink at the same time, requires pouring a screw, monolithic or strip type of foundation.


Do-it-yourself foundation for a barn
If you have the opportunity to increase the budget for arranging the foundation, then you can choose a more solid type of foundation.
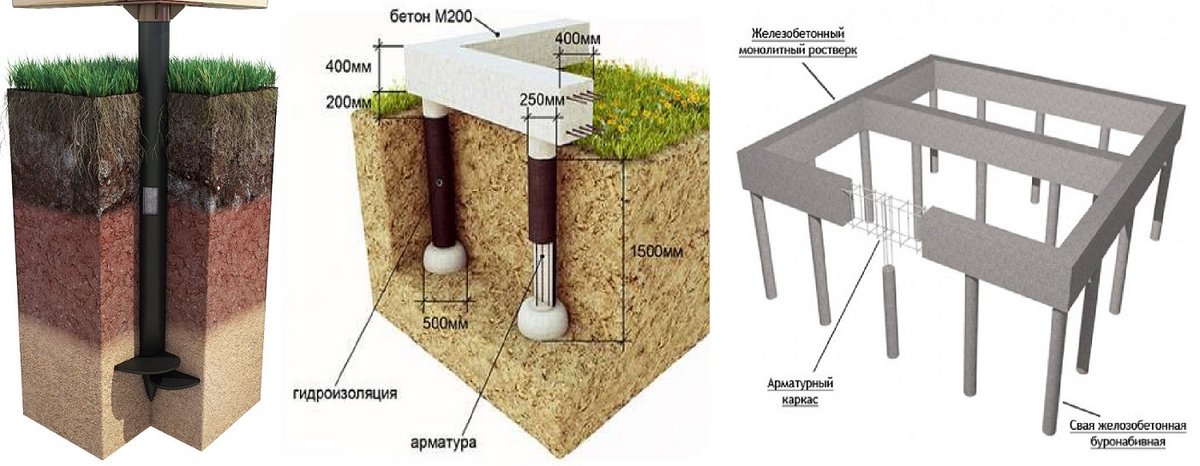
Pile foundation
When choosing piles for the foundation, it is necessary to take into account their bearing capacity, which differs significantly for each manufacturer.
Table: bearing capacity of screw piles
Since the mass of the entire structure of the shed rarely exceeds 2 tons, then, with certain calculations, one can come to the conclusion that it is necessary to use only screw piles. However, for greater reliability (remember that lumber or rolled metal, which is used for the grillage, has the ability to sag under its own weight), it is recommended to install piles at a distance of 1.5–2 m from each other. It is necessary to carry out work according to the following plan:
- Site marking. The rags must be taken out 1 m from the walls of the shed. Pull a strong cord between them.
- Drilling holes. This can be done with a hand drill or simply dig holes with a shovel.

Holes can be made with a hand drill or shovel

The head of the screw pile is required for the installation of a wooden grillage
When installing just this type of foundation, the shed requires cladding the underground with decorative material, but at the same time it is worth taking care of the ventilation holes.
Video: do-it-yourself pile foundation
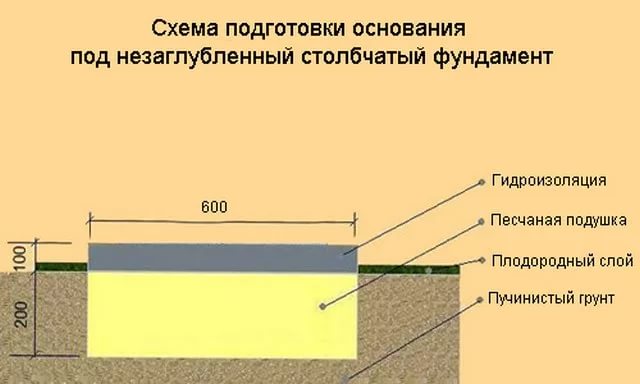
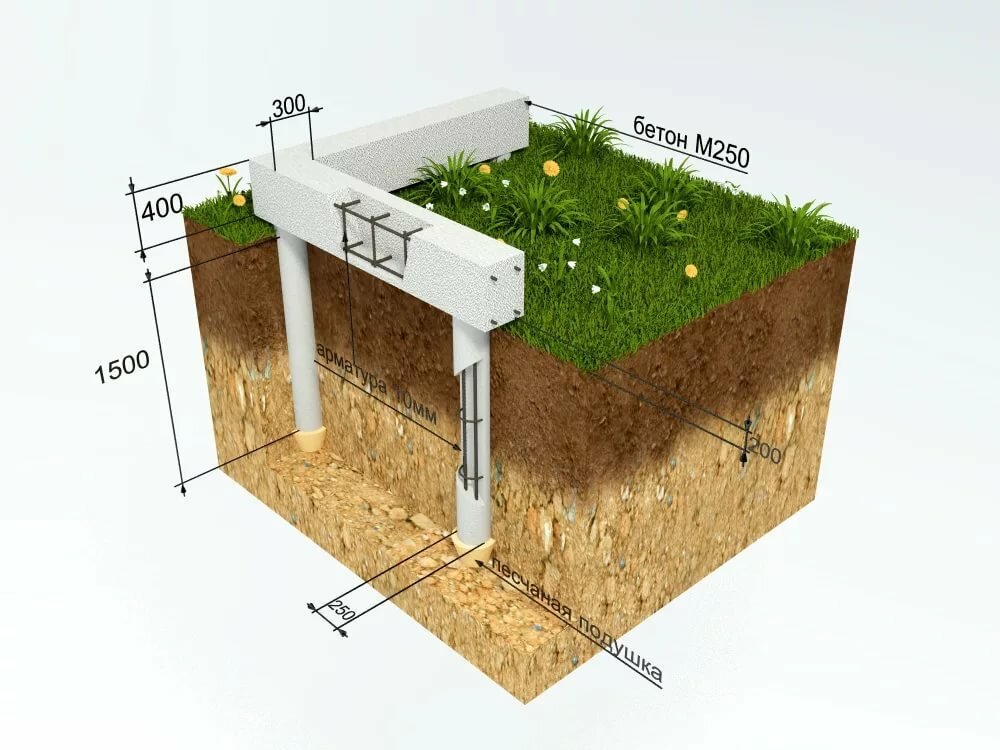
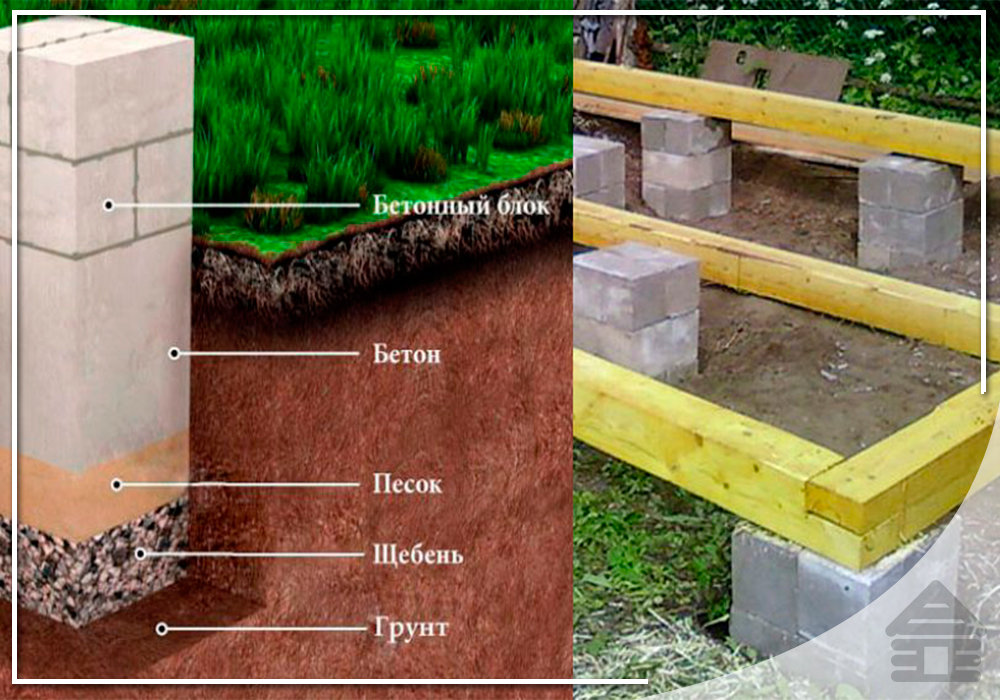
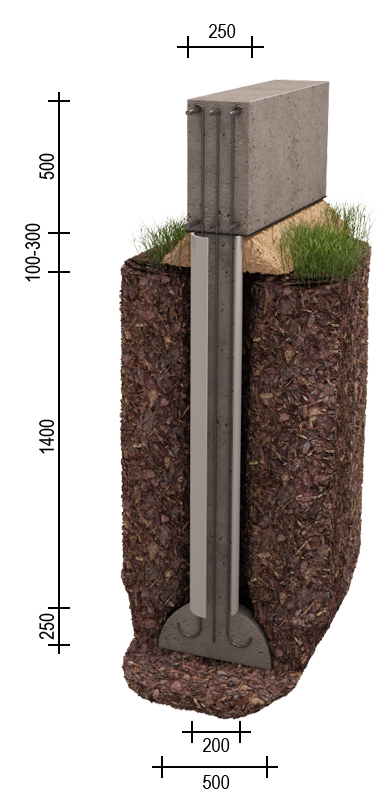
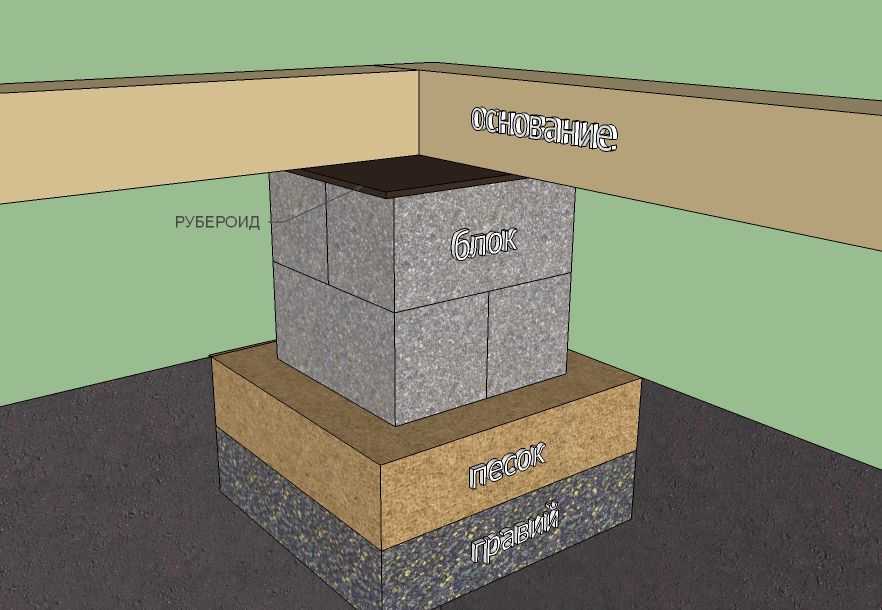
Column foundation
This type of foundation can only be used on soils where the heaving process is excluded. For pillars, you can use a wall block with dimensions of 40 * 20 * 20 cm.
If there is clay soil on the site, the installation process must be slightly changed:
- Make wall drainage, thereby eliminating the main cause of heaving, insulate the sole with expanded polystyrene around the entire perimeter.
- To deepen the pillars below the level of freezing of the soil (if the height of the block is not enough for this, then you can backfill with sand or gravel).

For pillars, you can choose both wall blocks and bricks.
These methods significantly increase financial and energy costs, so it is recommended to consider other options for arranging a columnar foundation on a flat surface:
- arrangement of pits - under each pillar it is necessary to remove a fertile layer of soil 40 cm thick;
- sand or gravel pad, depending on the moisture content of the soil, with compaction with a vibrating plate every 10 cm;
- drainage in the form of corrugated pipes along the perimeter of the blind area, which must be covered with rubble and covered with geotextiles;
- brickwork of pedestals, on which wooden grillage beams are laid.
The work takes place in the following sequence:
- Carry out the markup. The pillars should go deeper below the soil freezing layer, or you can use one of the above methods. If the first method is still chosen, then dig holes with a depth of about 1.5 m or more and a diameter of 1.2 m.

If necessary, the fertile soil layer can be removed

The columnar foundation must be waterproofed and drained.
For a barn, wooden beams can be used as a grillage.
Video: do-it-yourself columnar foundation
You can always choose a way to build a budget foundation for a barn and make it yourself. This will significantly save on the construction of a utility block.


How to choose a foundation for a lightweight building?
When stopping your choice, on any type of base, it is worth considering the main characteristics of the soil at the construction site.
The following soil properties are taken into account:
- the presence of groundwater;
- compressibility of the soil;
- the presence of quicksands;
- type of soil.
According to the type of soil prevailing in the personal plot, the following types of socle are selected:
- On sandy soil, which can "float" under conditions of high humidity, it is more expedient to erect a screw or columnar foundation. The characteristic of freezing of such soil is usually 40 - 70 cm, this should be taken into account when deepening the base.
- The worst option for construction is sandy loam and loam. Such soil has a high degree of freezing (up to 2 meters), the ability to swell and compress, often forms quicksand. For such soil, it is worth choosing a screw base.
- Gravel soil is much less susceptible to freezing, is not subject to deformation and destruction, and is not subject to erosion. Here it is allowed to use both tape and columnar, and block views.
- The most favorable option for a construction site is rocky soil. It will not sink, freeze, and float. The only drawback of this soil is the laboriousness of processing, so any foundation can be installed, except for the screw one.
Construction technology of typical types of foundations for a barn
Traditionally, in private households, houses and outbuildings are erected on a monolithic tape. But piles are not so rarely used. Next, we will consider the construction technology of precisely these types of foundations.
Pile foundation
 How to make a foundation for a barn from piles? The technology for performing work depends on what type of piles you choose: driven, bored or screw.
Private developers rarely choose driven piles: special equipment is needed to install them, therefore, it will not work to build a farm building on your own.
The cheapest way to build a foundation for a shed is to build bored piles.
Its essence is as follows:
- wells are drilled in the ground in the corners of the future shed with a hand drill. If there is a need to install intermediate supports, holes are prepared for them;
- sheets of roofing material rolled up with a pipe are lowered into each well: they will perform the functions of formwork and waterproofing of the finished pile;
- frames are installed in the pipes, consisting of three to four vertical reinforcing bars, connected by horizontal ties. The height of the frame should be such that its upper ends protrude to the height of the base;
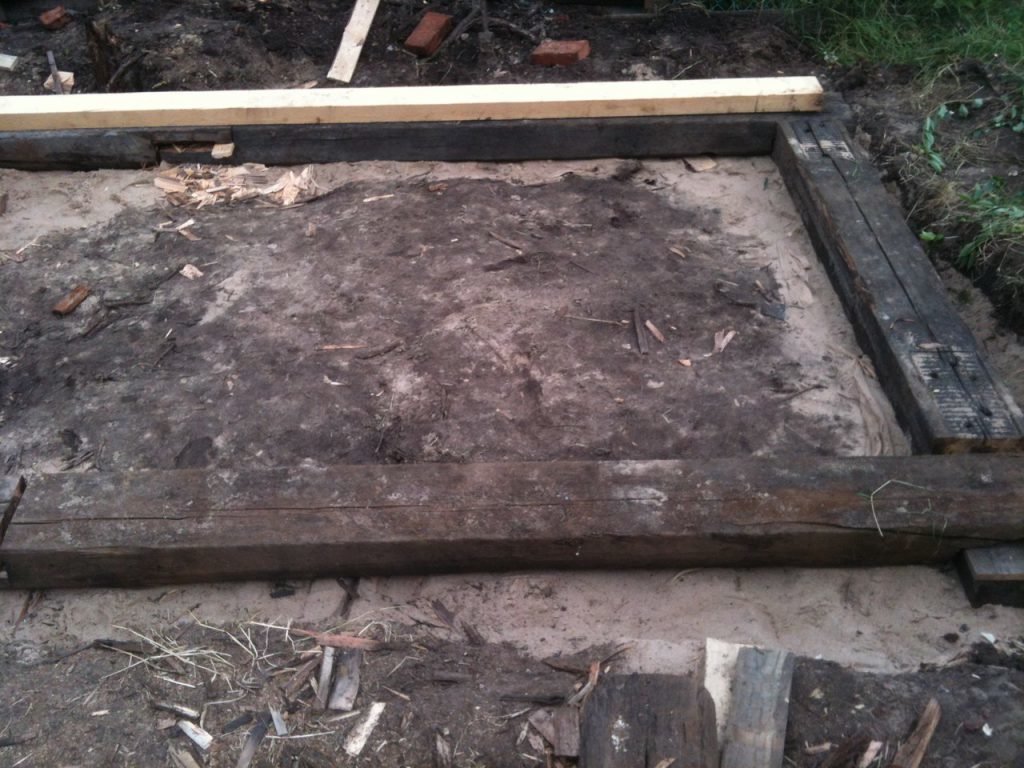
- formwork from wooden panels is mounted along the contour of the future foundation (choice of boards for foundation formwork);
- sand is poured onto the bottom of the formwork and prepared wells. It must be well spilled with water, followed by tamping;
- reinforcing bars are laid horizontally in the formwork and connected to vertical bars that protrude from the wells.
The last operation is pouring concrete into the formwork (how to make the formwork for the foundation correctly).
Screw piles are mounted in a slightly different way (how to make screw piles with your own hands):
- according to preliminary marking, holes are drilled in the ground in the places where the screws are installed, no more than half a meter deep. The maximum distance between supports is 2 meters;
- screw piles are inserted into the prepared holes and manually screwed into the ground. This operation is performed by at least two people.
The piles installed in the design position are connected by a grillage (pile foundation with a grillage). It can be assembled from a channel or wooden beams.
In the above way, you can build a foundation for a frame shed.
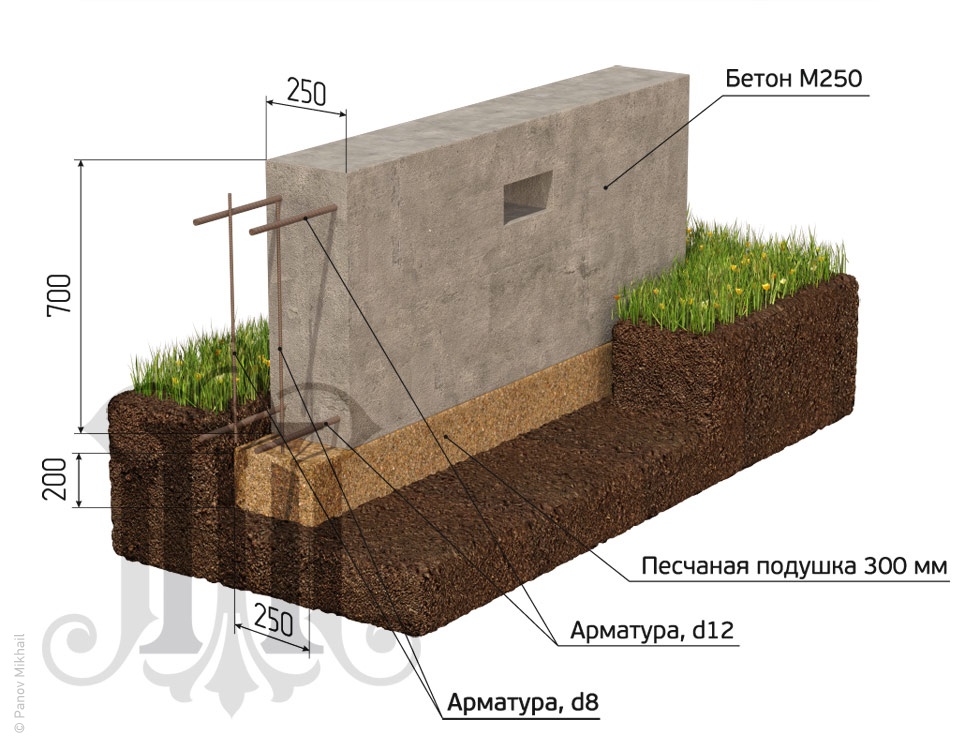
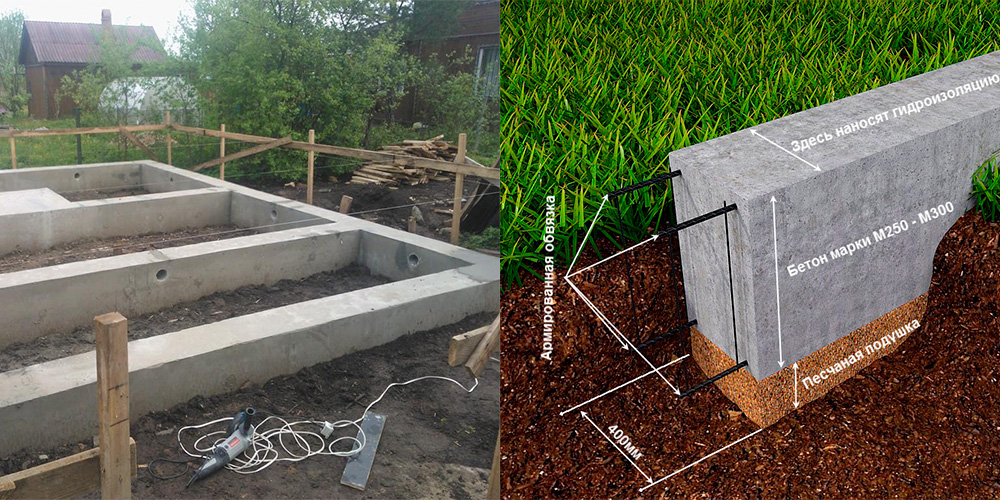
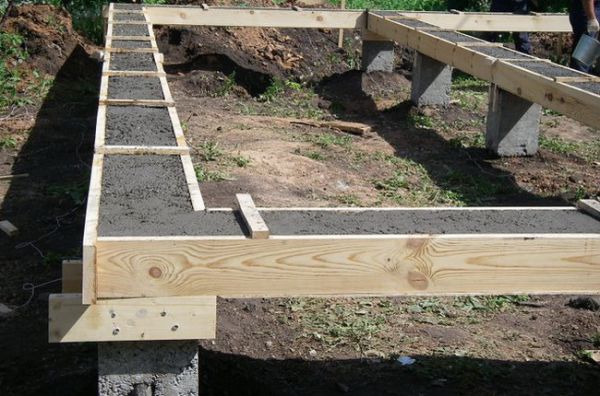
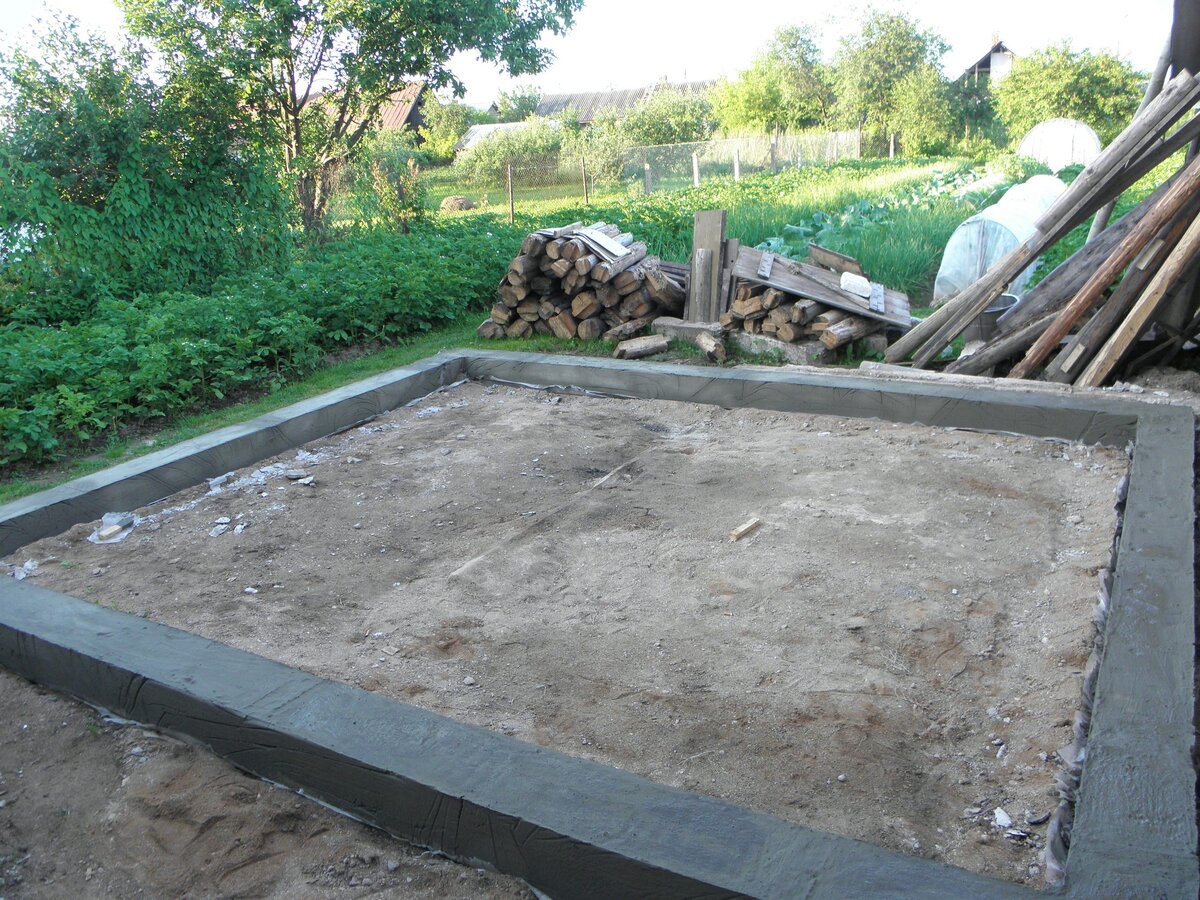
Strip foundation
 The strip foundation for the barn is built either from foundation blocks or by pouring concrete into the trench. In the first case, the base will be ready within one to two weeks, in the second - in a few months.
But manually laying blocks without a crane will not work, while concrete can be poured without using heavy equipment. Unsurprisingly, most owners prefer the latter option.
One of the most important parameters of a monolithic tape is its depth. In this matter, it all depends on what building material will be chosen for the construction of the walls. The foundation for a brick shed is immersed to a depth exceeding the depth of freezing of the soil by 150 mm.
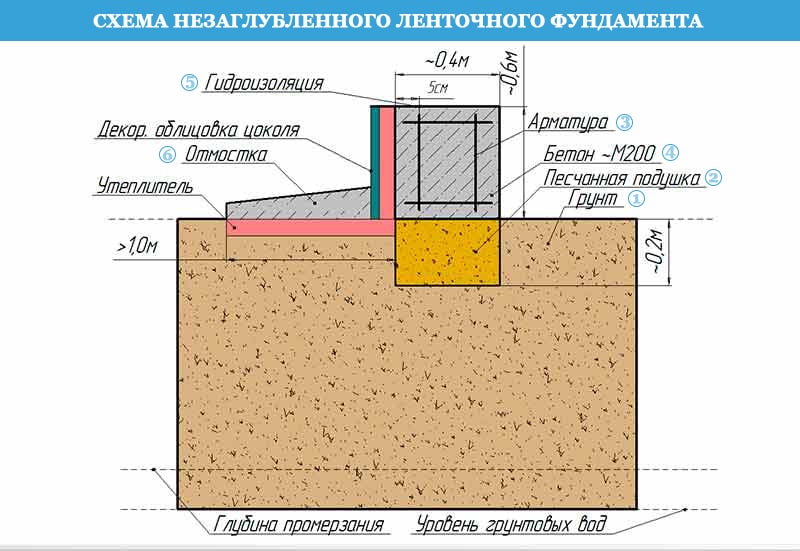
In private construction, the construction of outbuildings on a shallow foundation is practiced (how to make a shallow strip foundation). In this case, the depth of the foundation for the shed does not exceed half a meter.
Pay attention to the following point: with independent construction work, it is almost impossible to ensure a one-time filling of the formwork with a concrete mixture.
How to fill the foundation under the shed in several steps without impairing its strength characteristics? In this case, the filling is carried out in layers so that the seams between the layers are located horizontally.
But it should be borne in mind that the thickness of a separate layer should not be too small. However, the overall dimensions of sheds are rarely large, so this condition can be easily met.


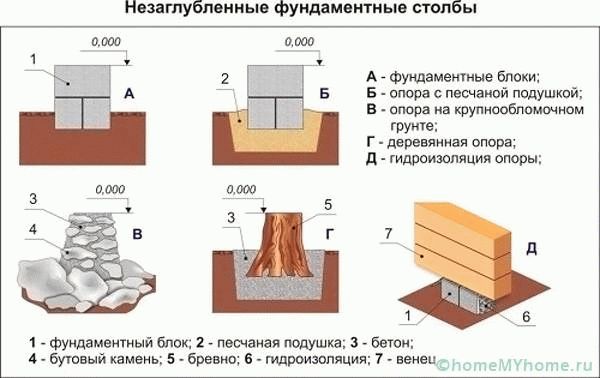
How to build a foundation on tires with your own hands
You can implement the idea as follows:
- by constructing a slab foundation of gravel-filled and concrete-poured slopes. They are installed in two layers. The process of building the foundation provides for backfilling brick fragments of stone and gravel inside the tires. A monolithic slab is constructed by pouring a concrete mixture inside the formwork, edging the tire structure;
- on the basis of slopes that serve as independent supporting elements of individual parts of the building. The structure resembles a conventional columnar foundation, where slopes installed in pre-prepared pits are used as support columns. As in the previous version, the cavities are filled with crushed stone, gravel or bricks and concreted.
To increase the strength in each of the options, a reinforcing grid can be used. Let us dwell in detail on the sequence of work and the features of each method.
The tire foundation will not cope with the load that the walls of large houses have
In what sequence is the tire foundation constructed?
Regardless of the design features and the chosen foundation scheme, the algorithm according to which the foundation for a house is built from tires provides for the following steps:
- Development of project documentation.
- Layout of the site.
- Surface preparation at the work site.
- Installation of ramps according to project requirements.
- Filling tire cavities.
- Installation, if required, of a formwork structure.
- Reinforcement, if necessary, with fittings.
- Pouring with concrete mixture.
Let's take a closer look at each option.
How to make a foundation from tires without digging into the ground
Consider how to make a slab-type foundation from tires. Perform work in the following sequence:
- Prepare a sketch of the foundation, corresponding to the dimensions and weight of the future building.
- Mark the outline of the building at the construction site with wooden pegs and twine.
- Check that the markings are correct by comparing the length of the diagonals.
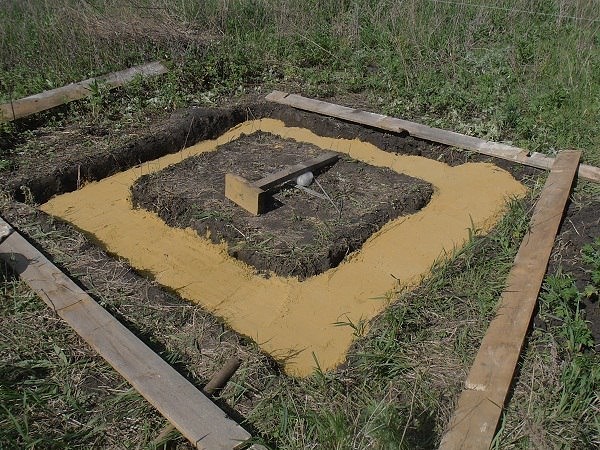
- Remove a 20 cm layer of fertile soil and move it off-site.
- Smooth the surface of the construction site and, if necessary, compact the loosened soil.
- Spread the tires over the surface so that their sides touch each other.
- Pour stones, brick debris, gravel or any material of mineral origin inside the slopes and compact thoroughly.
- Assemble the formwork from wooden panels or metal sheets, edging the laid out slopes.
- Lay sheet roofing material or polyethylene for waterproofing the structure being built.
- Prepare a concrete mixture based on Portland cement grade four hundred and fill the formwork with mortar.
- Tamp the formed concrete slab with vibrators and release air inclusions using reinforcement.
Durability, subject to correct installation of the base
After completing the activities, let the concrete slab sit for a month. After that, you can carry out further work on the construction of the building.
Do-it-yourself deepened tire foundation
The technology for building a recessed-type columnar base is quite simple:
- Develop a drawing for the placement of support columns from tires.
- Make a marking of the coordinates of the supports from car tires.
- Check the accuracy of the markings by comparing the diagonal difference between the corner supports.
- Plan your site and remove rocks, vegetation, roots.
- Prepare pits that are high enough to accommodate at least three ramps.
- Pour a layer of gravel into the troughs and install the slopes, ensuring that the upper planes are at the same level.
- Pour rubble inside the tires, moisten it and tamp it thoroughly.
- Pour with concrete mixture.
From tires, you can equip both slab and columnar foundations, while the technology of their installation is slightly different
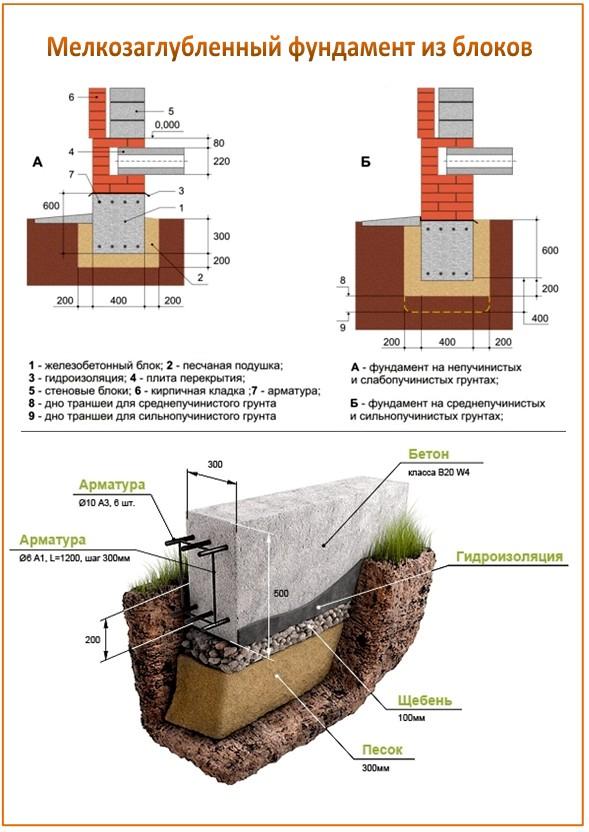
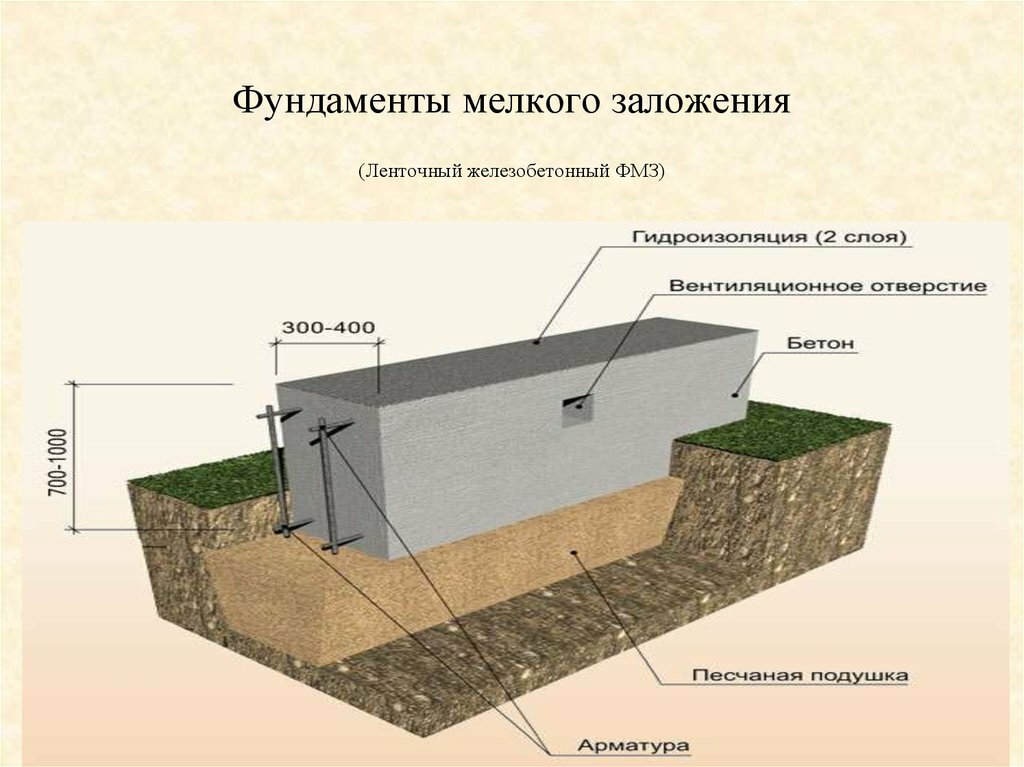
Tape deep foundation on heaving soils with a freezing depth
Such a foundation is often practiced when erecting small buildings, because it has a number of key disadvantages at once:
- Too large a side surface increases the load on the walls of the structure;
- The installation cost is too high, because it is necessary to dig deep trenches and protect the walls from collapse;
- Expensive building materials;
- It is necessary to carry out complex calculations of balancing the heaving forces and the mass of the building itself.
These are material-intensive and labor-intensive bases that are not able to provide optimal protection of the building from the effects of the soil. But at the same time, they are practiced in relatively cold regions, where the freezing line is high, and under it there is a solid ball of rock. If the technology is used correctly, the sole of the trapezoidal concrete base is installed directly inside the solid rock, which is no longer subject to heaving.
Protection against lateral movements is eliminated by the method of corner reinforcement using intermediate concrete beams. Also, strip buried foundations are often used when you need to build a building with basements.
Cinder block foundation
Cinder block is a cheap material that consists of slag, crushed stone, sand, cement and other components. As a foundation, it is perfect for small buildings.
But the cinder block foundation has its drawbacks:
- Hygroscopic due to the porosity of the structure;
- Has a high thermal conductivity;
- Not resistant to frost.
The scheme for erecting a foundation from a cinder block includes the following stages:
- Level the soil at the construction site;
- Dig a ditch for the strip base from the cinder block;
- Arrange a pillow at the bottom of the trench: it is necessary to pour out a layer of sand, gravel or limestone screening and tamp it;
- Spread roofing material - it will form the basis for waterproofing;
- A reinforced concrete block can be installed on the roofing material layer or a reinforced pillow can be poured;
- Lay the first row of cinder block. The next one needs to be laid apart, that is, from the corners to the center. The rows of blocks are connected with a centimeter layer of concrete mortar;
- For strength, the solution can also be poured into the cavity of the cinder block;
- When the foundation reaches the design height, the grillage must be reinforced with a reinforcing belt;
- The walls of the cinder block foundation can be covered with mastic, on which thermal insulation will be attached. For it, panels made of expanded polystyrene are used. The pit should be filled up and the walls should be laid.
Important! In order for the foundation to lie flat, reinforcement is installed in the corners and a rope is pulled along it. In the future, masonry is made at this level.
Preparation of concrete mortar
The composition of a classic concrete mix includes a uniform ratio of dry cement, sand, sand and clean water. To make the solution of the desired consistency and was tenacious, you need to follow a number of rules:
- the expiration dates of the cement must be observed;
- crushed stone must be clean, free of impurities;
- it is better if the water is drinking, softened;
- the sand should be dry, free from clay impurities.
Sand with crushed stone should be in a ratio of 3: 5, respectively. The finished mixture is combined with dry cement (about 1 part) and kneaded thoroughly. The correct mixture should be of a mushy consistency, free of lumps and other foreign objects. Watch a video on how to properly prepare a cement mortar.


Which shed foundation is decided based on many factors. It is impossible not to take into account the type of soil and the purpose of the building. Compliance with the technology for preparing concrete, as well as the rules for digging a trench and installing blocks, will allow you to preserve the durability of the building and make it as functional as possible.