Currently, every developer is trying to make the most of the entire available area of their home. However, it is almost impossible to climb into the attic without a ladder. A do-it-yourself attic staircase is the best option for safely climbing to the attic.
The attic staircase can be located both indoors and outdoors. Of course, when the staircase is located inside, it is much more convenient to use it - you do not need to go out into the cold in winter or get wet in the rain in autumn.


Views
There are several types of attic stairs, namely:
- folding;
- stationary;
- portable.

Stationary stairs with handrails and wide flights are the most convenient, but their use is limited due to the impossibility of operating in small areas.

Portable ladders are mainly used as a temporary option and serve to access rooms that are rarely used. The main disadvantage of such a ladder is low safety.

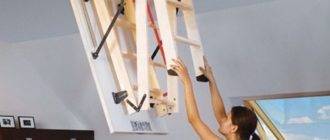
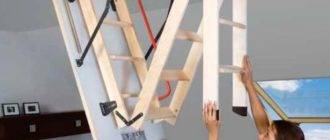
Folding loft ladders are the middle link between stationary and portable. In terms of convenience, they are almost not inferior to stationary ones, but they take up much less space. In terms of safety, they are significantly superior to portable designs.
The choice in favor of this or that type depends on several factors:
- the area of the room where the stairs will be located;
- the purpose of the attic space;
- possible tilt angle.

Standard sizes
There are a number of standards that an attic staircase must comply with:
- the optimal width of the march should be about 65-110 cm;
- the height should not exceed 3.5 m. This is due not only to the fact that the rigidity of the structure is significantly reduced, but also to the fact that a fall from such a height can lead to serious injuries;
- the number of steps should usually not exceed 15;
- it is customary to make a distance of about 19 cm between the steps;
- the thickness of the steps is usually 18-22 mm;
- the standard tilt angle is 60-75 degrees. A small corner requires a lot of space, and a large one is dangerous to use;
- a folding ladder must withstand a load of 150 kg;
- steps should be installed parallel to the floor and not slippery.
Manufacturing process
Making attic stairs with your own hands is not at all as difficult as it might seem at first glance. Of course, you will not achieve such beauty as industrial models have, but it's worth a try. Drawings of attic stairs with your own hands that you can make can simply be found on our website.

Further in this article, the question of how to make a staircase to the attic with your own hands will be considered.
The hatch is the basis of any attic staircase
You can make a hatch with your own hands using the following materials:
- bars 50 × 50 mm;
- plywood.

The order of work is as follows:
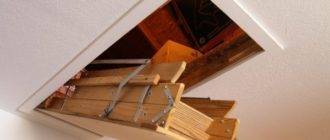
- we decide on the place and size of the future hatch;
Note!
7-8 mm should be added to the overall dimensions of the hatch so that the lid closes easily and without squeaking.
- we cut the timber into 4 parts of the required sizes;
- we cut grooves at the ends of the beams;
- grease the grooves with glue and connect the bars, reinforce the junction with self-tapping screws;

- so that the diagonal does not go away, we fasten the scarves;
- we fix the plywood;
- trying on a hatch in the opening;
- to close the hatch well, we cut a latch into the cover;
- to open the hatch, we will use a handle that is inserted into the hole and presses on the latch.

Required tools and materials
For self-made stairs to the attic with your own hands, the entire list must be present:
- hacksaw for wood;
- foam gun;
- a set of screwdrivers or a screwdriver with a set of bits;

- various self-tapping screws, anchors;
- roulette;
- card loops;
- bars 20-30 mm thick.

These are only the basic tools that will be needed for self-production, if there is already a ready-made attached wooden ladder 30 cm longer than necessary to the level of the opening.
Simple construction
As an example, consider how to make an attic staircase with your own hands.
The instruction will allow you to understand the principle of work:
- on the finished one-piece wooden staircase, we fix 2 bars in width, on the lower and upper parts. Moreover, we fasten the upper bar to the hinges, and the lower one rigidly;
- we saw the ladder into 2 parts. by measuring 2/3 of the length. The upper part will be longer, the lower part will be short;
- to stiffen it diagonally, we fix 2 slats;
- we connect both parts of the stairs with hinges;
- using anchors, we fix the upper bar under the hatch;

- so that the lower part does not open, it is fixed with a hook. The loop is located on the stringer above the cut.
- the finished attic staircase is pressed against the wall surface and fixed.

The main disadvantage that this attic staircase design has is its appearance and the fact that all the fasteners and bars are visible. However, even such a ladder to the attic, created with your own hands, will greatly simplify the difficulties with ascending and descending from the attic..
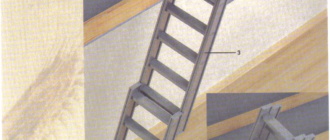
Folding design on bowstrings
To manufacture a structure, several steps should be performed:
- divide the total height into 3 parts. The first part will correspond to the dimensions of the hatch, the second is slightly smaller, and the third will cover the remaining distance to the floor;

- measure the angle of the hatch with a bevel;
- we transfer the corner to the boards, thereby marking the steps;
- at the site of the future hinge between the sections, we drill holes;
- we grind all the edges;
- we saw the boards in those places where the hinges will be placed;
- we cut and grind the steps;
- under the steps we make small notches in the bowstrings;
- we insert the steps into the recesses, planting them on glue and fastening them with self-tapping screws;
- we connect the sections with special loops. To do this, it is imperative to place the sections on a flat surface;

- we check the performance of each section;
- we collect the entire structure and mount it in the opening;

- if necessary, we carry out the finishing adjustment of the elements;
- we disassemble the entire system into parts;
- we carefully grind and varnish all surfaces;
- after the varnish has dried, we collect the entire structure and use it.

Note!
It is recommended to work at height with a partner.
This will not only help to avoid injuries, but also greatly speed up the whole process!
The price of a ladder made by yourself is much lower than the price of a factory design, so if the financial issue is acute, be sure to try to do everything yourself.

Output
Buying a ready-made staircase to the attic is the easiest option, however, with the necessary tools and initial skills, it is not at all difficult to make it yourself. In the video presented in this article, you will find additional information on this topic.