Stages of making a garden bench from pallets
The process of making a bench itself consists of several steps:
All matched pallets are sanded
Particular attention is paid to those places that will come into contact with the human body. You should get a smooth and even surface.
The ends of the pallets also need to be well sanded.
The pallets are sawn into two parts of different sizes for the seat and backrest. The ratio of these parts can be any, depending on your wishes. The wider part will be used for the backrest, and the narrower part will be used for the sitting.
The back and seat of the bench is assembled. To do this, you need to connect them at an angle using an iron corner and screws. Enough holes are drilled in advance. The screws are tightly tightened so that the product can withstand a lot of weight, be strong and not wobble.
Four legs 40-50 cm long are cut off from wooden bars. Experts recommend making them not very high, but rather wide for greater stability.
Legs are attached to the sides of the seat. To do this, you can take metal strips, and use them to connect all the parts. This method is more reliable and practical.
You can attach the legs with ordinary self-tapping screws or screws without metal plates.
Armrests for the bench are made. For this, you can use small wooden planks. The sizes are determined on the spot, as it will be most convenient. Two bars are taken (one is longer and the second is shorter), and the corners are sawn off from both sides by 45 °.
Shorter bars will also serve as an additional anchorage between the backrest and seat.
Screw them on both sides of the bench.
If you wish, you can use just ordinary thick ropes. Make knots on both sides and nail to the sides of the structure. They will perform a more decorative function.
Tips for finishing, processing and decorating
A pallet bench can be left in its natural form or slightly ennobled. After treating wooden elements with antiseptic agents, they can be varnished or painted.
Such a bench will look more aesthetically pleasing, and if it is red, yellow or green, it will become a wonderful bright spot in your summer cottage. If you like this design, then you can make a whole set of furniture, consisting of several benches, a table, sun loungers and sofas.
On top of the bench, you can put a soft mattress and some pillows. If you wish, then sew a cover from any dense and durable textiles: burlap, velor, jeans, tarpaulin, etc.

Garden furniture made of pallets with additional finishing looks no worse than a set from a store
Selection and preparation of pallets
The best option for making a bench from a pallet will be foreign pallets. Even used ones do not require long-term thorough grinding.
Be sure to pay attention to the markings and smell of the pallets. Some types are not intended for use as furniture, as they contain toxic impregnations
Other used pallets smell terrible due to use in grocery stores. Such a smell cannot be removed by anything.
In addition, one should not forget that for a long-term use of wood, it must be periodically processed. The first time this is done to increase moisture resistance and from bugs before starting any work on the manufacture of furniture.
Let's summarize:
-
Choose imported pallets new or used without toxicity and unpleasant odor marks.
-
Sand the unevenness of the wood.
-
Treat with impregnation from bugs, moisture.
-
After completing the construction of the bench, apply paint or varnish.
Pallet furniture: pros and cons
This is not to say that in the use of recyclable materials, which, in fact, are pallets, everything is so cloudless. There are pros and cons in this setting.The former should be actively used, and the latter should be dealt with.
| pros | Minuses |
|---|---|
| Furniture is assembled literally in a matter of hours. | Such furniture will not successfully fit into any interior. Loft or country style is best. |
| There are many constructive ideas from this material. | |
| The cost of the finished product is literally a penny. | It is not easy to care for pallet structures - dust accumulates under them, which is not easy to clean. |
| The pallets are made of high quality natural wood. | |
| The resulting products will be original and practical. | If you haven't spent enough time processing wood, you risk making an unpleasant impression on your guests. |
| Almost any technique can be used to decorate wooden furniture. |
garden furniture

Garden furniture will also look original. There is also where to roam, and in addition to tables with sofas, which can be successfully placed on the terrace or in the gazebo, you can build other items. For example, you only need 4 pallets to make a sun lounger. Three parts will go to make a sunbed, they are simply fastened together with nails or bolts. The last element is used to form the back. Color, place the mattress and enjoy your rest.
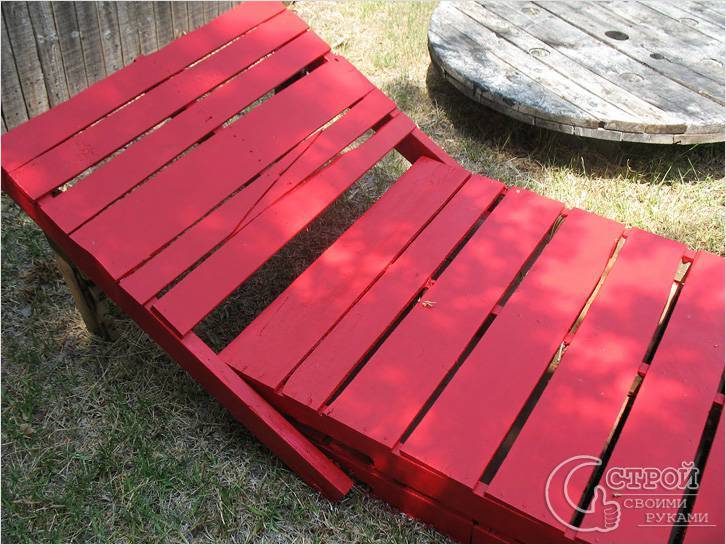 Sun lounger
More experienced specialists and professionals in their field will be able to perform the most unusual things from fairly simple pallets, from a suspended swing to a gazebo. This will require a large number of materials and tools. You can disassemble pallets and use the resulting planks to create crates and chests that will hold vegetables, fruits and crops. This is a great option for a summer residence.
Do-it-yourself pallet chair
Now you know how to make a sofa and a table out of pallets, a couple of chairs are not enough for a complete set. Not a problem at all. Here is an instruction with step-by-step photos of how to make a pallet chair with your own hands. The view in the picture is not very presentable, but the decor is a matter of taste. If you paint it, throw on a blanket, a couple of pillows, it will be what you need, you can even put it in the room in front of the TV.
For work, we need two pallets and the most common tools, and even bolts, nails ..
- First of all, we cut the pallet in half, this will be the seat and back.
- The second pallet for the armrests, we also cut it in half.
- Then we clean the whole thing with sandpaper in order to work with the finished material.
- We begin to assemble the structure, if you make the backrest inclined, cut it off in the place where it will be attached, it must be diagonally, we attach it to the seat, as shown in the photo.
- We fasten the sidewalls, it is better to make holes with a drill and put them on the bolts, this is more reliable, otherwise it will not last long on nails.
- In principle, everything, further varnish or paint, if it stands on the street, of course, it is better to cover it with a protective varnish.
Bench with a back from a pallet
For the street, you can still make just such a bench from pallets. The tools and material are the same. One pallet is enough for the bench, prepare more bars for the legs, strips for the sidewalls, metal corners and plates for fastening. By size, you can navigate according to this scheme.
The order of work is as follows:
- take a pallet, put it horizontally;
- sawn in half and also the lower board along with the props
- we apply the sawn-off part of the pallet (back) and fasten it with corners from the outside;
- on the sides we nail the prepared bars,
- we attach the cut board to the upper part of the back, as in the photo, and put in two more planks, nail them to this upper board.
- a bench and carefully sand it
- we attach the legs to the crossbars, from the inside it is desirable to strengthen them with corners or metal plates;
- the bench is ready, you can varnish.
See how easy it is, anyone can handle it.
Pallet chair
So, we go from complex to simple. From sofas and armchairs to a simple chair, so soon we will reach a stool. Making a chair from a pallet is quite simple, by the way, it's a good practice for those who have never made furniture with their own hands, and here is such a great chance to gain experience. As already mentioned, the pallet is an excellent semi-finished product; all parts can be made from its boards for a chair, from handles to legs.
The main advantage is that all the boards in the pallet are of the same thickness and size, so that by disassembling the pallet, we already have a bunch of finished material. Our only task is to correctly calculate the proportions. This is how it will look schematically in the pictures.
In these step-by-step photos, you can see a guy in camouflage casually assembling a chair from pallets. In general, there is nothing to add, in the pictures everything is perfectly visible
All the details of this chair were taken from one pallet, just pay attention to the slope of the back, in this case it was simply fixed with side slats, for reliability, the back can still be reinforced with oblique sawn bars
Pallet lounger
Another summer option if you want to bask in the sun. True, a large pallet is needed.
- Saw it in half
- cut off future legs from the back
- fasten the back perpendicular to the bed so that the "tail" remains, which will be the back support;
- nail in the front the legs sawn off from the back.
Simple, cheap and cheerful.
Pallet hammock
And how do you like this, completely exotic use of the pallet. Since we have a dacha theme, then what kind of rest in a dacha without a hammock. A very handy thing and does not take up much space, the main thing is that there is where to hang it. Making a hammock from a pallet is not difficult, but it will take time.
So, in addition to the pallet, we need a drill and a strong rope.
Further in order:
- disassemble the pallet into boards;
- we select 20 pieces (plus or minus a couple, look according to the situation) and make them the same length;
- we make a stencil from one board, that is, we mark future holes with a pencil;
- the distance of the holes from the edge is approximately 3 cm;
- use a stencil to make holes with a drill in all boards;
- with a cross we “lace” the boards together;
- we finish each "lacing" with a strong knot, singe the ends of the rope so as not to "fluff";
- at the corners of the hammock we make two holes for the rope on which we will hang the hammock;
- we hang the hammock, admire the result.
Another suburban attribute is ready. Photo source
A small selection of pallet chairs
I don't even know what else you can think of
Pallet headboard
The design of this headboard is quite simple. Wide planks that act as beams on a pallet will be used both for the main frame and as an external decorative frame. The frame for this bed is 122 cm high and 137 cm wide. Again, this is for a full size mattress, but you can easily adjust the dimensions to fit any mattress. The project was developed using the SketchUp program. The joinery used here were simple butt joints and were secured with pocket screws using the Kregs K5 Pocket Hole Jig.
When the headboard is assembled, these pocket holes will not be visible. Drill two pocket holes at both ends of the three horizontal rails. Then simply join the frame pieces together and attach each joint.
Read the full instructions on how to make a headboard on the website. Images from SketchUp and step-by-step photos of the assembly, see below in the gallery.
Illuminated pallet headboard
In order to make a pallet headboard, you don't need a lot of materials. You just need to find a few boards from disassembled pallets, buy polyurethane and lamps, this is if you want to make a beautiful headboard with lighting, as in the photo.
Start by measuring the bed frame to which you will attach the headboard. Then measure the desired height. In this case, it is 200 x 210 cm with a box of approximately 70 x 60 cm.These drawers can be adjusted to suit the width of your bed. How to make a shield is shown below step by step photos. You can drill holes for the light wires in the back of the frame, like house wiring, or in a different way. Then attach the bed frame to the headboard. This headboard is a little heavy due to the use of 2x4 bars for the frame. You can use lumber for a smaller frame.
Want to make a pallet headboard for your bed? This is no big deal! Here are some tips and tricks to help you do just that! Working with pallets is more of an art, but the author wants to share some tips and tricks, for sure they will help you when you discover your own methods of creating something beautiful from used pallets. For detailed instructions on how to make a headboard, as well as recommendations on how to choose the right pallets for such a project, read the author's website, link under the gallery. See the master class below for step by step photos.
Here's another example of how to make a pallet headboard.
This one is really easy.
Screw the plywood to two 2x4 blocks vertically. Then paint the plywood black to hide the gaps. Line up the first row of planks along the bottom of the plywood and screw them down from the bottom. Continue to lay the boards up. Try to keep boards of the same size in each row to minimize gaps. You may need to trim some parts to align the edges. For strength, screw 3 L-brackets to each of the two legs and secured them directly to the wall with screws and drywall anchors.
Read more about the assembly order on the website. Below are step by step photos.
If you're looking for a budget option, a bed with a pallet headboard would be the coolest option. The pallets are accessible, easy to clean, and can be disassembled fairly quickly. It took the author about 3.5 hours to break five pallets, including sawing, removing nails, stacking and cleaning. By the way, a good way to disassemble the pallets is to walk around the edges of the pallet with a circular saw just to free the pallet from the center nails. There are always a bunch of nails in these things! The headboard is assembled with a Kreg 5 Pocket Hole Jig. For those who don't know what a pocket hole is. This is a hole that cuts into wood at a 15 ° angle, allowing you to drill at an angle to attach a plank or timber. The length of the auger depends on the thickness of the material. Despite this, they are very durable and can be hidden to make the connection look clean. The instructions and the list of materials can be read on the website, below, see the master class in step-by-step photos.
Improvised tools from which you can make a bench
You don't have to go to the store to build a garden bench. You can use the following tools at hand:
- old chairs and stools;
- plastic furniture;
- stones;
- pallets or pallets;
- plastic bottles;
- baby cot.
This is an incomplete list. If you have imagination, you can use almost any material.
A simple option is to use logs. To prevent the logs from causing inconvenience during sitting, the surfaces must be sanded. The tree will need to be divided into several parts, covered with linseed oil and varnish.
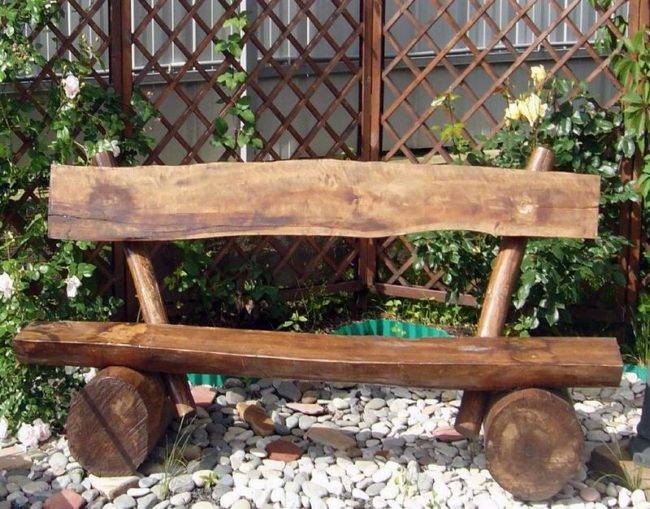
The easiest way to make a garden bench is from polished logs.
An equally simple option is a bench with a stone seat. The way of laying out and the shape of the product depends on the imagination of the summer resident. The advantage of this bench is that it is not afraid of snow, wind, rain or sun.
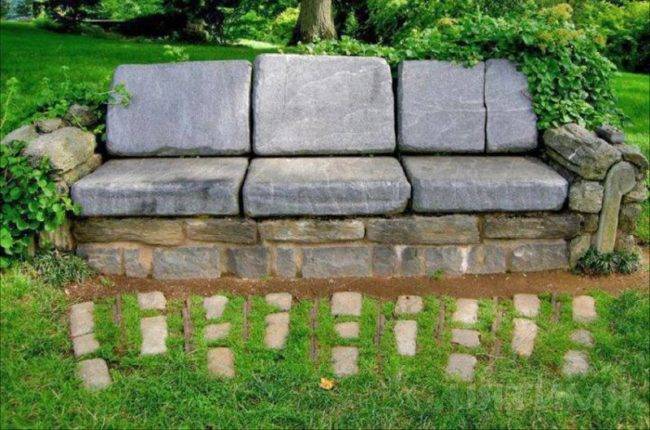
You can make a bench yourself from stone that is not afraid of rain, wind and sun
You can quickly make a bench using pallets or pallets. If there are many such materials in stock, then you do not need to throw them away. They can be used to make a beautiful corner sofa.

You can make benches of various shapes from pallets with your own hands.
If there are no pallets, you can use an old crib. To do this, you need to disassemble the frame, mark the headboard and footboard in height, measure and set the width of the seat. After that, you should fasten the parts together. All that remains is to decorate the bench.
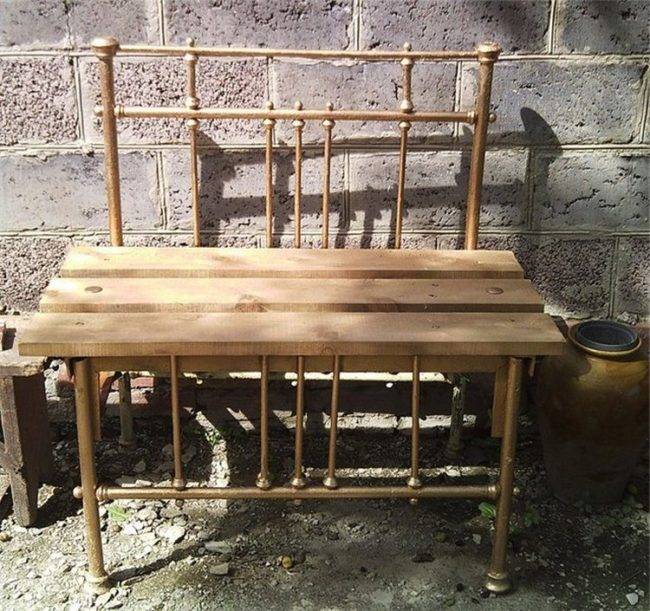
An old crib can make a kind of garden bench.
If making a bench from an old bed seemed like a tedious undertaking, then you can make a bench from old chairs. It is enough just to put them in a row, fasten the frame structure with a tie, cover with a solid seat in the form of a shelf and upholster with foam rubber in a case.
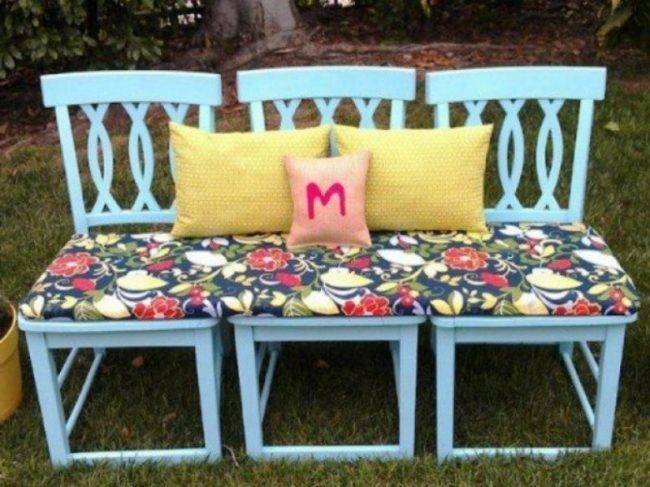
So that the structure does not move apart in different directions, the chairs must be fastened together.
It is also possible to use an old barrel. To do this, you need to prepare a container for 200 liters.
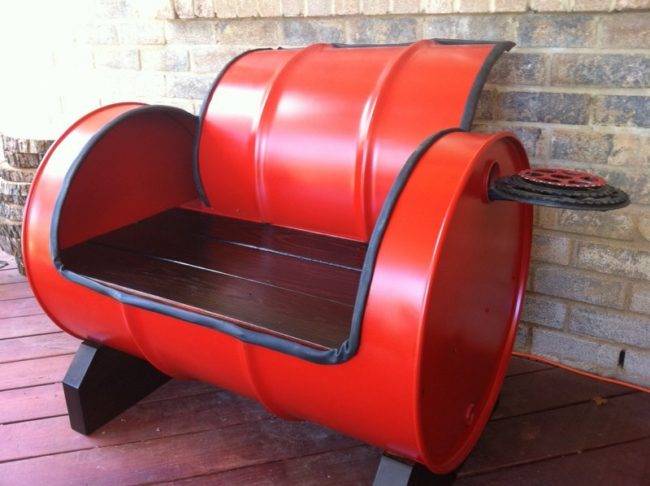
To make a bench from a barrel, you need a large capacity.
Next, you should perform the actions in the following sequence:
- Cut out a large indentation.
- Secure the seat.
- Add decorative elements.
Another option is to build a shop from plastic bottles. The difficulty lies in the fact that more than 150 bottles are needed for a full bench. Additionally, you can make a beautiful cover that will help to hide the origin of the structure. It is recommended to lay several layers of foam rubber so that the bench is not only beautiful, but also soft.
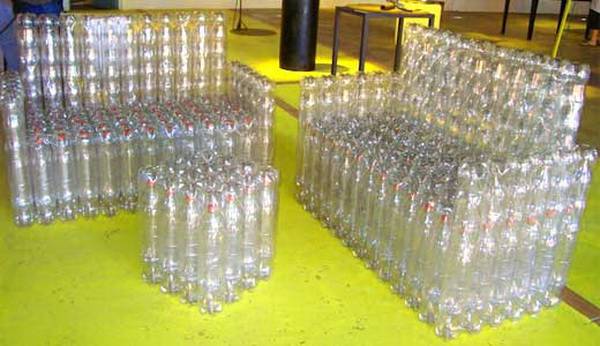
To build a bench, you need to prepare a large number of bottles.
Each of the materials has its own advantages and disadvantages.
Table: advantages and disadvantages of materials at hand for making a bench
| Material | Advantages | disadvantages | Recommendations for use |
| Pallets, pallets or wooden chairs | Wood is a lightweight and easy-to-use material. It is possible to decorate by any method - from simple painting to the use of carved details | The structure must be periodically treated with an antiseptic to protect it from moisture and pests. | The material should be impregnated with an antiseptic before use. |
| Stone or concrete | Resistant to bad weather conditions | Large weight of the structure, and therefore only a stationary version is possible | To sit comfortably on a stone, you need to arrange a bedding |
| Plastic bottles | The material is processable, lightweight and easy to carry. An additional advantage is minimal material costs. | Fragility, the need for a large amount of material | You will need to pull a cover made of dense fabric onto the frame |
| Old baby bed | Durability, long service life, stability | Large weight, the need for a mandatory decor. Construction requires coating with an anti-corrosion agent | In cold weather, you need to throw covers on the seats |
How to make a do-it-yourself pallet bench
You should start making benches for a summer residence with a simple design with a back. It is not necessary to disassemble the pallet into separate parts. All amateurs can make such furniture. Step-by-step instructions for making a bench with slats along the seat and a flat back.

Drawings and diagram of a pallet bench

- Use a hacksaw to cut the pallet along the edge of the middle board - cut 3 beams 120 mm thick.
- Cut off the lower planks on the narrow part.
- The wide part is the seat, set it on a flat surface.
- Attach the second narrow half perpendicularly, cut down. She will stand on the ends of the beams. There will be a gap from the floor to the board.
- Make a conical understatement with a drill under the heads of the screws so that they do not stick out.
- Screw the backrest strips to the seat bars with self-tapping screws.
- Reinforce the back on the sides with kerchiefs - obliquely spaced planks from the lower cut boards. Nail the ends of the kerchief to the different beams.

Pallet bench option
The height of the pallet is 156 - 162 mm, depending on the thickness of the board. Instead of legs, a second pallet is used, cut in the same way. Fastening is carried out with self-tapping screws along the edge. It turns out a bench made of pallets with a flat base. Height 8 - 10 cm lower than a standard chair.
If necessary, cut the remaining bars into cubes and substitute along the perimeter, adding the legs and increasing the height of the bench for the summer cottage.
The boards are fixed to the beams with ring nails or a spiral groove. It is impossible to get them out. Use a metal hacksaw to cut through the fasteners.
A wide, high-backed bench is made in the same way, all actions are performed step by step. Take 2 pallets and cut, having shifted by 1 plank, make the blanks for the seat and back wider.
Cut the boards from the narrow residues and make legs from them, nailing vertically on the sides.
Pallet bench option # 1
Such a bench with a pallet back is the most common design option.
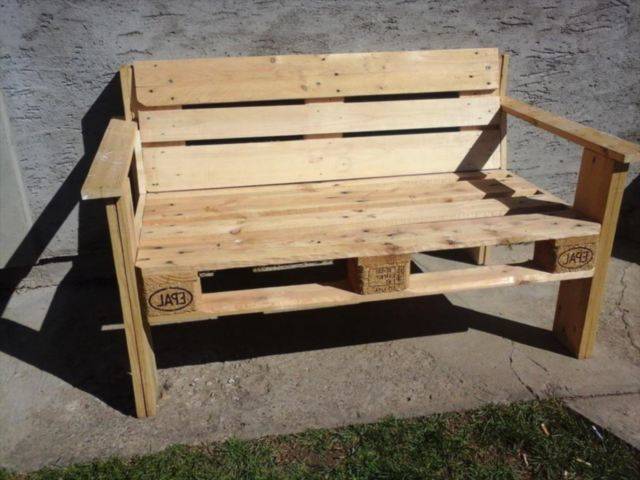
First you need to cut the pallet into 2 pieces. The one that turns out to be smaller will go to the seat, the second will go to the back.

Attach 4 bars of 40x40 mm or 50x50 mm to the base of the seat as legs. For fasteners, it is better to use metal strips from the outside. Desirable 2 for each leg.
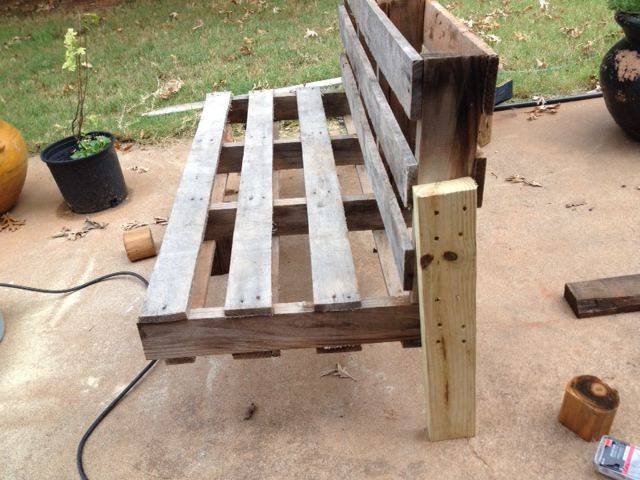

In order to attach the back to the seat, use 3-4 metal corners or 2 boards on each side. Attach a board on top of the back to cover holes and give the structure a neat look.
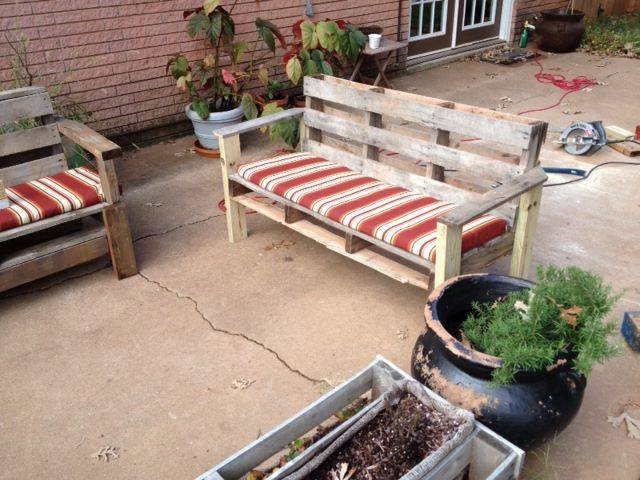
It is advisable to grind or cover the mounting holes with plaster or putty. Then - apply a primer and, after drying, paint with paint or varnish. If, before starting work, the wood was not sanded or treated with impregnations, this should be done before priming.
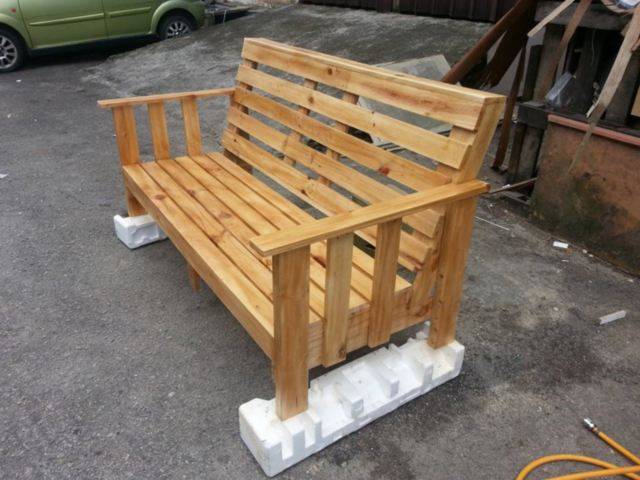

Unusual material - clay
Clay has unique properties: plasticity, environmental friendliness, ease of use. In addition, this material allows you to realize any creative fantasies and is ideal for a garden and personal plot.
The construction of a clay garden bench will not require from you significant financial costs or high qualifications in the field of construction. At the same time, the original clay bench will make your garden much more interesting and attractive. It can stand for more than a hundred years, delighting more than one generation with its aesthetics and originality.
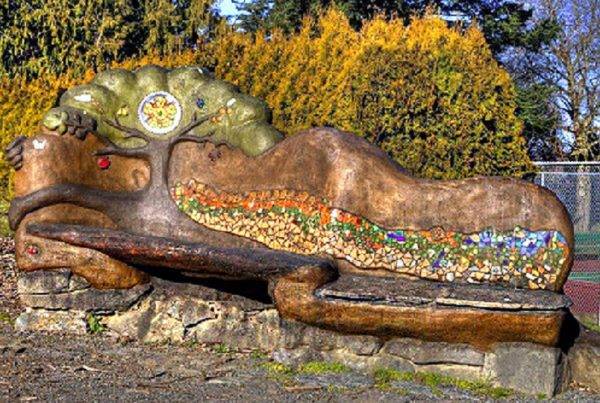
A clay bench can last for over a hundred years.
To work, you will need the following materials and tools:
- base for the frame (wooden pallets, remnants of bricks, used tires or plastic bottles);
- clay;
- straw;
- sand;
- water;
- brushes and paint for finishing.
First, you need to make a frame that will form the back of the bench and raise the structure above the ground. As mentioned above, any available means can be used to construct the frame. For example, wooden pallets can be placed on old car tires and wooden planks can be nailed to form the backrest. This is one of the frame options.
Another option is to make the base of the bench from plastic bottles. They need to be filled with earth or sand, laid in several layers on a gravel-sand cushion and fastened together with a wire. Instead of plastic bottles, you can use regular bags filled with earth.
The process of making adobe mortar and building a clay bench is as follows:
- mix 4 parts clay, 1 part sand and 1 part straw;
- add water and knead the solution, its consistency should resemble a very steep dough;
- from the solution we roll balls the size of a large orange in our palms;
- we apply clay to the frame, forming the outlines of the bench;
- overnight, cover the finished bench with polyethylene so that the solution dries gradually and does not crack during the drying process.
The clay bench can be installed anywhere on the site: in the garden, in the yard or right next to the house. If you install it in a gazebo, then to create a uniform style, you can decorate one of the walls with clay and build an earthen stove.
Clay furniture - video
Often, clay benches are built in the form of an ensemble with a stove. This allows you to enjoy hot meals from the comfort of your heated seat. In this case, it is necessary to provide air ducts in the shop.
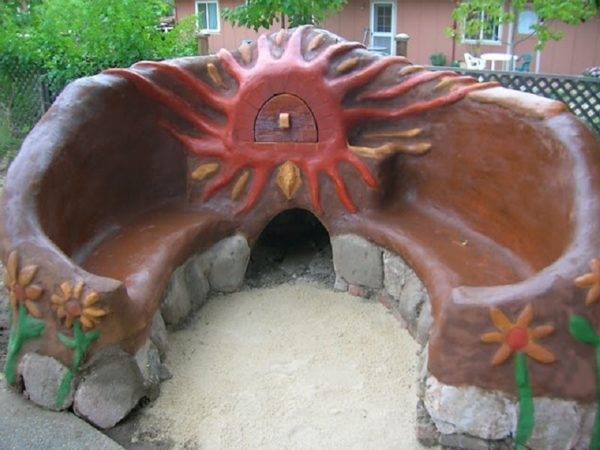
Often, clay benches are built in the form of an ensemble with a stove.
We use wooden pallets
Pallets, or pallets, are wooden planks fastened together in two rows. They are designed for the transport and storage of heavy loads. But such properties of pallets as stability, strength and practicality allow them to be used in non-standard options.
Most often, pallets are used as grates in country showers or stands for building materials. We propose to make an excellent reliable and functional garden bench from unnecessary wooden pallets, which will become the central element of your personal plot. To do this, you do not need to be a noble carpenter, it is enough to have the initial skills in working with woodworking tools and have a great desire to quickly create a unique thing with your own hands.
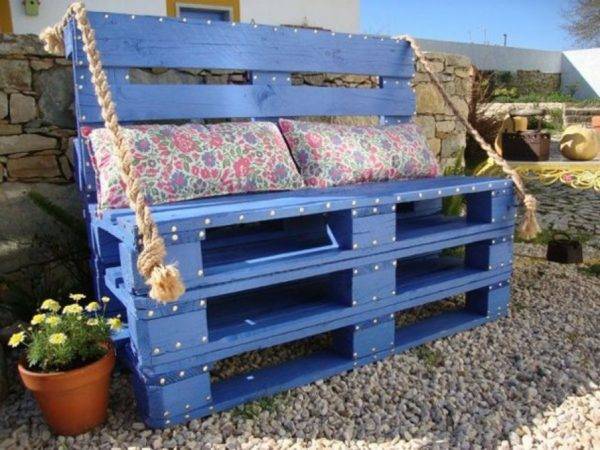
The finished pallet bench is able to withstand significant loads
Materials and tools
For work we need:
- 3-4 standard wooden pallets;
- wooden blocks for creating legs (if desired);
- metal corners;
- a small electric saw, which is usually used to cut branches in the garden or trim bushes;
- electric screwdriver;
- sander or sandpaper;
- hand saw;
- pencil;
- square;
- sets of bolts, screws and washers;
- nails and screws for fastening structural elements;
- drill;
- assembly gloves and safety goggles.
If you want to build a more comfortable and functional product, you can use additional elements: wooden bars or metal pipes for armrests, rollers as legs. In addition, you will need mattresses or soft pillows for a comfortable seat, varnish or paint to protect the wood from external influences, and a small table for laying out tools and workpieces.
Before starting work, you should create a drawing of the future bench, or you can simply rely on your imagination.
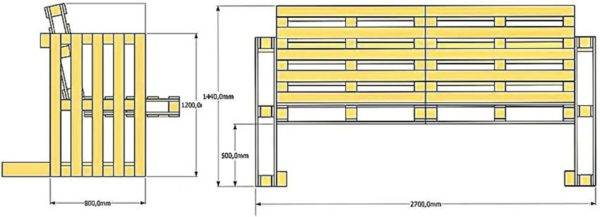
Before you start work, you should create a drawing of the future bench
Assembling the structure
- We carefully grind those parts of the pallets that will be used for direct contact with the human body, that is, for the construction of the seat and back, so that the unpolished surface does not spoil clothes and does not scratch the legs and back. In principle, it is possible to grind all the details of the future bench as a whole, but this will take more time and does not seem advisable.
- Using a screwdriver and self-tapping screws, as well as metal corners, we fasten two pallets together at a right angle, if necessary, having previously cut them to the required size. The horizontal pallet will be the seat of our bench, and the vertical pallet will be the back. For successful fastening of pallets with screws in structural elements, we pre-drill holes, insert screws, and then tighten them tightly.
- We reinforce the sidewalls with additional planks - scraps of pallets left after cutting the structure.
- To create a longer bench, we use two pallets and fasten them together with screws and corners.Such a bench will be more functional, but less attractive.
The finished pallet bench is capable of withstanding significant loads. If you remove the back from the structure and attach the legs to the pallet with the help of nails and self-tapping screws, you get a simple but very nice bench.
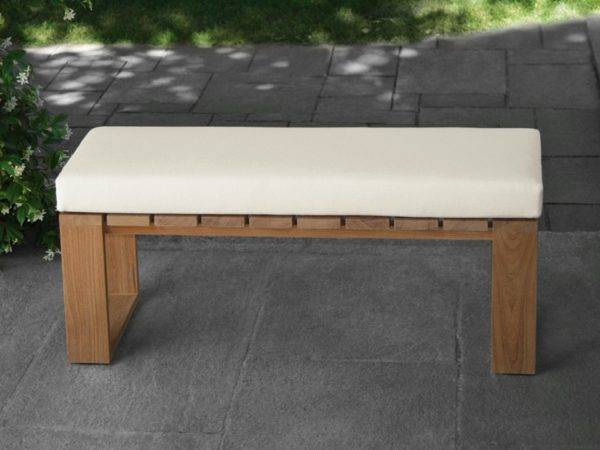
If you remove the back from the structure and attach the legs to the pallet with the help of nails and self-tapping screws, you get a simple but very nice bench
Features of the use of pallets and their advantages.
The average weight of a standard pallet is 15-20 kg. There are two main types of pallets, their overall dimensions, depending on the purpose of use, can be as follows:
- 120x100x12 cm (standard pallet);
- 120x80x12 cm (euro pallet).
The wood used in the manufacture of these structures must be strong and durable, so that they can withstand a load of up to one ton. After one or two transports, pallets often remain intact, without cracks and chips, despite this, they are usually written off or sold, so even used pallets can find a new life, serving faithfully as unusual and functional pieces of furniture in the improvement of the site for more than one year.
Pallet kitchen table
At the moment, pallet furniture occupies a leading position among design solutions in the popularity rating. Some decorators produce entire collections in an eco-style, embodying the most unusual ideas in them using standard transport pallets. Taking your favorite ideas as a basis, you can easily put them into practice in their own way.
Benefits of pallet furniture.
Do-it-yourself pallet furniture has a number of undeniable advantages:
1. Fashion trend, popularity, gaining momentum. When creating interior images, more and more unusual elements made from pallets appear, and this stylistic branch continues to actively develop, representing a new stylish trend.
2. Practicality, accessibility and versatility. Everything made from wooden pallets will be much more efficient to use and much cheaper than manufactured in an industrial environment. Typical chipboard models are significantly inferior both in design non-standard and in quality characteristics.
3. Naturalness, 100% environmental friendliness. The boards from which the pallets are made are not specially treated with any paints and varnishes (stabilizers, impregnations, stains and antiseptics), so they do not carry any hidden threat. Only wood, and nothing superfluous - what is not the main tenet of eco-style?.
4. Complete freedom of creativity, the ability to realize all your bold design fantasies.
5. An interesting activity for all family members. In the process of processing pallets and making furniture from them for a house, a summer residence or a plot, everyone can find a job within their capacity, thereby making a contribution to the common cause.
