Features of the construction of a pitched roof
There are ventilated and non-ventilated pitched roofs. When choosing a specific option, focus mainly on the purpose of the building. Non-ventilated pitched roofs are usually placed over terraces. In such a situation, it will be enough to tilt the slope by 3-5 degrees.
However, in winter, the owner of a terrace with such a roof will have to pay extra attention to cleaning the roof from snow embankments.
Ventilated roofing systems are installed on houses, saunas and other buildings that require a favorable microclimate. To ensure ventilation, it is enough to create a gap between the layers of insulating materials and prepare technological holes at the side ends of the roof. Ventilated roofs last significantly longer than their non-ventilated counterparts.
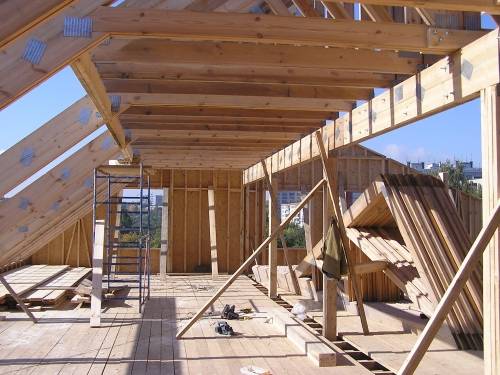
Single-pitched roof structures are equipped with the simplest rafter systems. The technology for the construction of such a roof requires the mandatory presence of a Mauerlat - this is a support bar fixed to the outer walls. The racks of the rafter system will rest on this beam.

The slope of the structure is created due to the difference in the heights of the walls of the house. If the load-bearing walls of the building have the same height, the pediment is fixed to the corresponding wall (taking into account the required direction of the slope). With this simple design, the required height difference will be set.
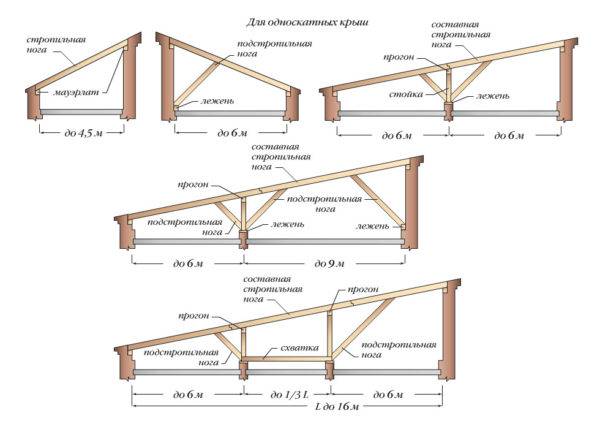
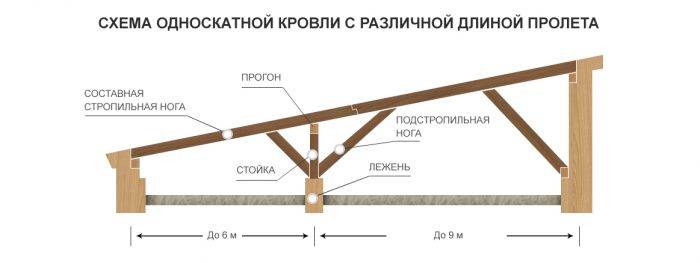
When choosing the design of the rafter system, it is important to consider such a parameter as the length of the span. If the walls on which the rafter legs rest are no more than 450 cm apart from each other, additional strengthening of the rafters is not done
Otherwise, the rafters are propped up with a rafter leg - this is a bar, the lower end of which rests on a bed. The latter is an additional support element, fixed along the wall, which has a great height. This recommendation is relevant for cases when the span between adjacent walls is 4-6 m.
If the span has a length of 6-12 m, the middle of the rafters must reliably rest on a special girder fixed on the racks. On the sides of such a rack, rafter legs are installed. Parallel to the supporting walls is the previously mentioned bed. The distance between the post and the wall in each direction can be a maximum of 600 cm.
If the length of the span is more than 12 m, 2 supports are mounted from the girder with the involvement of the bed and reinforcing racks. Supports are located no further than 600 cm from the walls. The gap between individual posts should be no more than 30-35% of the total length of the entire span. Use a grapple to secure the stanchions together.
Rafter legs are fixed between the rafters and the support posts. Each rack can be combined with one rafter leg. The racks are fixed in the direction of the load-bearing wall, located at a minimum distance.
Features of the construction of a roof with one slope
As part of the structure, there is one slope plane, which is formed by an independent rafter system. The extreme parts of the rafter legs are built on reliable supports, therefore they are classified as layered. The rafter system consists of individual elements, which are supported by their ends on opposite walls of the building.
1 or 2 rows of pillars can be used as supporting parts. A prerequisite for the installation of rafter legs is the presence of a support under the ridge end of the rafter.
The parts must be mounted separately. They are installed on walls of different heights, with which they are fastened through the Mauerlat. The latter is different from an ordinary wooden frame. The structure consists of two beams, which are laid in parallel on the walls of stones, the last crown of a log house or on the strapping of a frame structure.
The overlying part of the Mauerlat is usually called the ridge bar. However, the structure will not create a ridge fracture, it is used as a support. Roof supports of this type can be made:
- Made of brick, concrete or timber.
- With the help of a series of supports, which are intended for further finishing.
Varieties of pitched roofs
The construction of a pitched roof is simple, but it can be erected in different ways.
- The roof can be insulated or cold.
- An attic space can be arranged under the roof. In their pure form, attics are quite rare, since fire safety standards do not allow making an attic with a height of less than 1.6 m.For a pitched roof, it is advisable to make an attic room only if a residential attic or a small room for domestic purposes is arranged between the roof structure and the upper ceiling ...
- Shed roofs in most cases are made flat. Mostly there are structures with a slope of 5–15 °. Although there are steeper roofs with a slope of up to 60 °. It all depends on the wind and snow load in the construction region.
A pitched roof can be built:
- over a separately placed household or residential building;
- above the terrace attached to the main building, a bathhouse, an entrance group, a garage, etc.
The removal of precipitation from the slope will occur automatically. This is achieved due to the difference in the height of the walls, which are used as supports. Accordingly, there is no need to arrange an internal drain. A gutter is often fixed to the low side, which does an excellent job of draining water in the summer. Snow sometimes collects on a gentle slope in winter.
In this case, the roof can be cleaned by taking the necessary precautions.
Gutter systems on pitched roofs
A pitched roof must be with a slope. The drain for such a building can be:
- organized;
- unorganized.
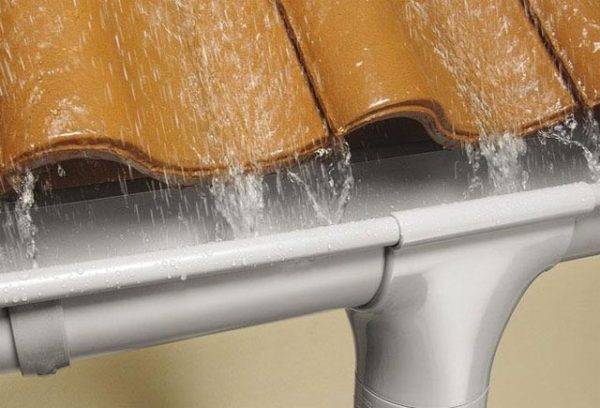 Organized drainage involves the presence of gutters and pipes that drain sediments to specially designated places
The drainage system in such houses is made external, there is no need to arrange an internal one. Drain gutters should be installed on the side of the low wall "in a cross" towards the drain.
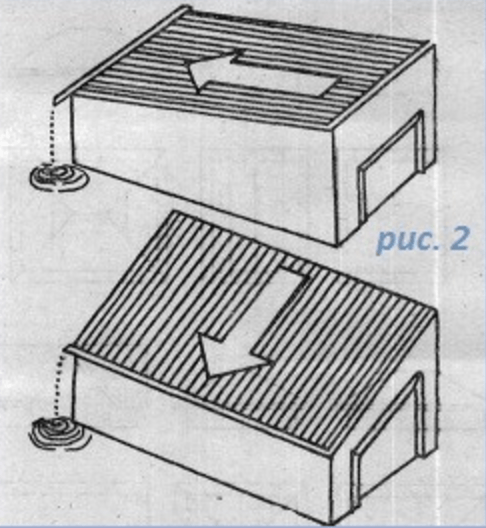 The gutter must be mounted on the side of the low wall perpendicular to the direction of the drain
Wastewater should be discharged to the drainage system.
The slope of the building can be provided:
- partitions differing in height or rows of supports;
- supporting parts fixed to the wall of the main building, which are located above the level of the opposite wall;
- half truss, which is installed on walls or supports of the same height.
Single slope roofing materials
You can cover a lean-to structure with one of the following materials:
- sheet metal for the roof;
- roll materials;
- slate;
- corrugated board;
- metal tile.
If you want to make a beautiful building to match the general style of the rest of the buildings, you can use plastic, slate tiles or shingles.
Installation of an artificial roof is carried out only if the angle of inclination is allowed by the manufacturers of the material. Pitched structures with a small slope should not be covered with straw or other similar materials, as they can quickly rot.
Work instructions
Before making a pitched roof, it is necessary to choose the right timber for the rafter system and lathing. In this regard, we will give the following recommendations:
- for a span up to 4.5 m wide, rafters from a bar of 15 x 5 cm are suitable, up to 6 m - from boards of 200 x 50 mm, spliced in pairs or in length;
- a beam of 150 x 50 mm will go to the wall trim (Mauerlat) and the bed;
- section of racks, struts and girders - 10 x 5 cm;
- the lathing is made of boards 20-25 mm thick and 10-15 cm wide.
For waterproofing, you will need roofing material and a superdiffusion membrane, and for laying the topcoat, metal tiles, corrugated board or other roofing material. If we are talking about a residential building, do not forget about insulation: prepare mineral wool of the required thickness (or other insulation) and a vapor barrier film.
Mauerlat laying
The strapping bar should be placed on 2 opposite walls where the rafter legs rest. If the support of the layered system on the internal partitions is envisaged, then a board called the bed is also laid on them. The exception is log and frame houses, whose walls are ready for the installation of rafters.
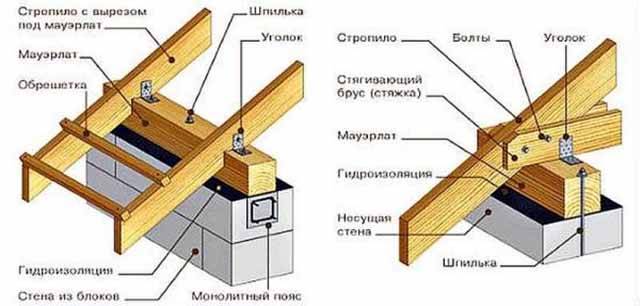
The technology for laying Mauerlat on walls made of different materials looks like this:
- Studs are embedded in the brickwork in advance, on which the strapping bar is attached. Before installation, the stone wall is covered with 2 layers of roofing material. If the studs were not supplied, then the Mauerlat is fixed with anchor bolts or attracted by steel strips.
- Porous walls built of aerated concrete, before installing the Mauerlat, are supposed to be tied with a reinforced concrete belt, as done in the diagram. The studs for fastening are laid into the monolith during pouring.
- In wooden annexes (verandas, terraces), erected by hand, to support the rafters, you need to attach a second board of the same width to the upper strapping beam of the wall. To install the upper end of the rafter leg, it is necessary to screw a horizontal beam 15 x 5 cm to the wall of the existing building. This operation is shown in more detail in the video below.
Installation of rafters step by step
Before building the frame, you need to determine the real length of the rafters, taking into account the outlets behind the walls that form the eaves. However, the visors can be extended after installation by nailing boards cut to size to the rafter legs - the so-called filly. The minimum length of the roof overhang is 300 mm.
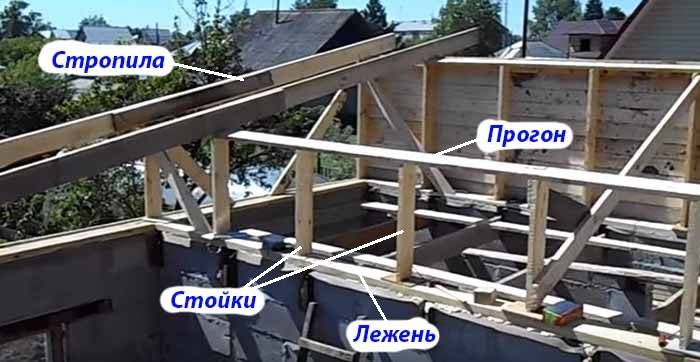
Then proceed in this order:
- To build up the internal partition to the height of the inclined plane of the roof, assemble the frame from vertical supports connected from below by a lay, and from above by a run. The location of each rack must match the pitch of the rafters that will rest on them. For stability, secure the frame with struts.
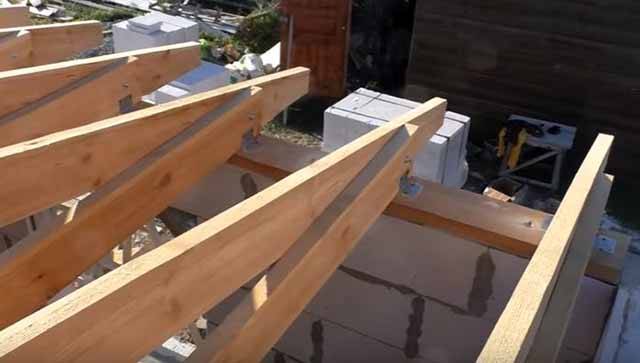
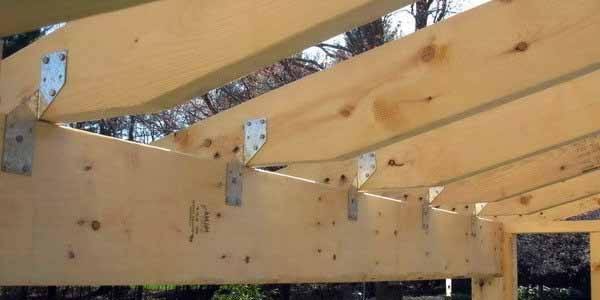
- Try on the rafter in place and cut it from below at three anchor points in order to increase the area of contact with the Mauerlat and the beds, as shown in the photo.
- Install the rafter leg and attach it with self-tapping screws on the steel corners, Repeat the operation at 3 points, then move on to the next beam.
- Trim the legs of the eaves, and then sew them on the bottom and sides with clapboard. It is more convenient to do this while the roofing has not been laid.
If the side gables are not laid out under the slope of the future roof, then they should be revetted immediately after assembling the rafter system. Otherwise, you will then have to do this work from the stairs or build scaffolding. For the installation of the rafter system of a shed roof of a large building, see the next video:
Lathing and topcoat
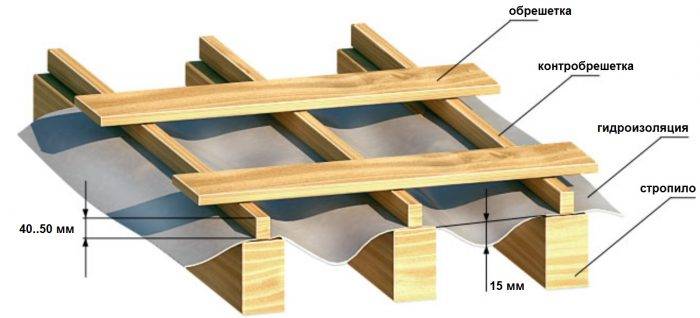
Before laying the boards on the roof slope, the rafter system is covered with superdiffusion membrane canvases, which provide protection from wind and moisture ingress into the attic space. The canvases should be laid horizontally, starting from the bottom, and fastened to the upper plane of the rafters with 5 x 5 cm counter-lattice bars.The membrane should sag slightly between the rafter legs to drain water, and the adjacent canvases should be glued together (overlap size - 15 cm).
The sheathing boards are nailed to the rafters with a step depending on the type of roofing:
- for metal tiles - 35 cm;
- for corrugated board and slate - 50-60 cm;
- under the shingles, bitumen and ceramic tiles, the sheathing is continuous.
The last step is covering and insulation (if necessary). It is better to insulate a pitched roof along the ceiling, leaving the unexploited attic cold. How to properly insulate ceilings is described in our guide.
Installation sequence
Now we will tell you how to make a pitched roof with your own hands step by step. As a rule, the installation of the roof begins with the installation of the Mauerlat. The rafters will rest on this beam. If your building is made of wood, then the last crown will play the role of the Mauerlat. For a brick or concrete structure, the Mauerlat is made of wood (timber 100x100 mm). In this case, it must be isolated from the walls by means of a layer of roofing material.
Installing the rafter system
The most economical option is the installation of rafter legs on two opposite walls of a building that differ in height. You need a minimum amount of lumber to work. Step-by-step instructions for installing rafters are as follows:
- after laying the Mauerlat bar, a board is placed across it, which should protrude from both sides by 40-50 cm;
- markings are made on the board for the rafters (the width of the saw should exactly coincide with the width of the rafter leg, and the height should not exceed a third of the element's height);
- after making the template, the cuts are marked on the Mauerlat under each rafter leg;
- after making the cuts and laying the rafters, they are attached to the horizontal bar by means of nails or self-tapping screws.
In the case of installing rafters on walls of the same height, it is easier to make triangular timber trusses, consisting of rafters, posts and horizontal beams. In this case, you do not need to build up one of the load-bearing walls to the required height, but the consumption of wood increases with this installation. However, due to the fact that the truss can be assembled on the ground, the installation process is greatly simplified and accelerated. The farm mounted on the ground is lifted to the house using winches or other lifting equipment. Otherwise, the process of making cuts in the Mauerlat and laying the trusses on a horizontal bar do not differ from the method described above.
Often, when installing rafters, it is required to use additional struts, struts or supports. The number of additional elements and the place of their installation depends on the following factors:
- weight of the supporting roof frame;
- angle of inclination;
- distances between load-bearing walls;
- the length of the rafter leg;
- types of roofing;
- the choice of thermal insulation material.
Waterproofing and lathing
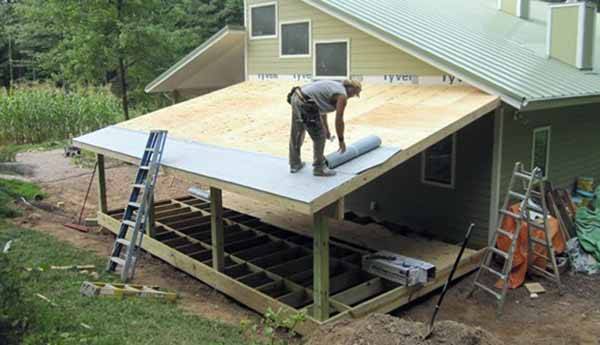
Waterproofing can now be done. To do this, the selected material (roofing felt or plastic film) is rolled across the rafters. The first row is laid along the bottom of the slope, and each subsequent row overlaps the previous one by 0.15 m. The joint of the strips is glued with tape. Waterproofing is attached to the rafters using a construction stapler.
If you decide to make a ventilated roof, then there must be a ventilation gap between the waterproofing layer and the roofing material. For its arrangement, counter-rails are stuffed on the rafter legs on top of the waterproofing. For these purposes, a bar with a section of 0.3x0.4 cm is used.
We proceed to the execution of the lathing. Depending on the selected roof covering, it can be solid or sparse. For the manufacture of solid sheathing, you can use a board, moisture-resistant plywood or OSB. As a rule, such a crate is needed for soft roofing or a thin profiled wall sheet.To perform a sparse sheathing, take a board, which is laid in increments of 0.3-0.4 m. Now you can lay a suitable roofing covering.
Warming
You can find out how the installation of a shed roof is correctly performed from the proposed video:
At the last stage, the roofing structure is insulated. Work is carried out from the inside of the roof. Thermal insulation material is laid between the rafters so that it fits snugly against them without cracks and gaps. For this, it is better to choose insulation plates with a width slightly larger than the step of the rafter system.
It is better to use mineral wool as insulation, since it is denser and will not sag and require additional fixation with ropes. Now, on top of the insulation, we attach a vapor barrier membrane to the rafters. We use a stapler for fixing. Be sure to overlap the strips, and glue the joints with tape.
Shed roof rafter system
Such roofs are especially popular in the construction of yard buildings - sheds, garages. It's just that the size of the buildings allows the use of not very powerful beams, and beams are required in small quantities. With a building width of up to 6 meters, the shed roof rafter system contains almost no additional reinforcing elements (supports and girders), which is beneficial. Also attractive is the lack of complex knots.
For Central Russia, for a span of up to 5.5 meters, beams of 50-150 mm are taken, up to 4 meters, 50-100 mm is enough, although in an amicable way, you need to consider the snow and wind load specifically in your region, and, based on this, determine with the parameters of the beams.
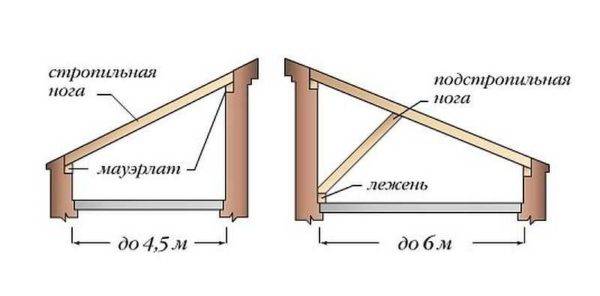
Shed roof rafter system with a small span (up to 6 meters)
With a distance between the walls up to 4.5 meters, a pitched roof consists of two Mauerlat bars fixed to the walls and rafter legs, which rest on the Mauerlat. A very simple construction indeed.
With a span width of 4.5 meters to 6 meters, a bed is also required, fixed on a higher wall at the level of the ceiling and a rafter leg, which rests against the beam almost in the middle. The slope angle of this beam depends on the distance between the walls and the level of installation of the slope.
More complex rafter systems in a pitched roof with a building width of more than 6 meters. In this case, it is optimal if the house is designed so that inside there is also a load-bearing wall on which the racks rest. With a house up to 12 meters wide, the trusses are still simple and the roofing costs are minimal.
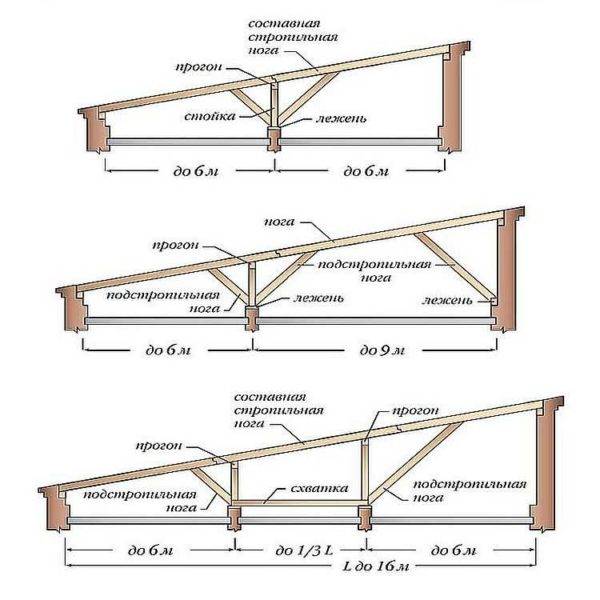
Construction of pitched roof trusses with buildings more than 6 meters wide
For buildings more than 12 meters wide, the system becomes more complicated - there are more rafter legs. In addition, making beams over 6 meters long is expensive. If an increase is required only by the width of the roof overhangs, the beams are grown along the edges with fillets. These are pieces of beams of the same section, connected to the beam and fixed on the sides by two wooden plates at least 60 cm long, fastened with bolts or nails, allow the use of mounting plates.

Rafters splicing option
If the total length of the beams is more than 8 meters, they are usually spliced. The joints are additionally reinforced by nailing boards or mounting plates.
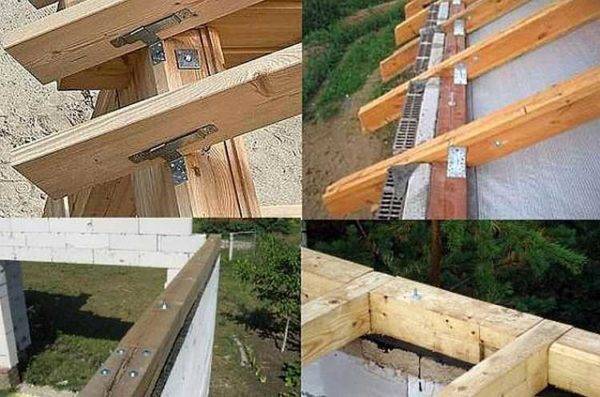
Options for attaching the rafters to the Mauerlat: sliding glory at the top and rigid at the top right. At the bottom right, the option of a tie-in without overhangs (used very rarely)
There may still be questions about how to attach the rafters of pitched roofs to the Mauerlat. There are no fundamental differences. All the same, a cutout is made in the rafter leg, with which the bar rests against the Mauerlat. In order not to suffer with each rafter leg, leveling its landing, sawing out the first one, from a piece of board, thick plywood or timber they make a template that exactly repeats the resulting "drank". All subsequent rafters are filed before installation. A template is applied to them in the right place, a recess of the required shape and size is circled and cut out.
This was a question of rigidly attaching the rafter legs to the Mauerlat. It is used on all buildings that exhibit low shrinkage.On wooden houses, this method of fastening cannot be used - the house settles all the time or rises a little, which may cause a distortion. If the roof is fixed rigidly, it can break. Therefore, when installing a shed or any other roof on wooden houses, a sliding connection of rafters and Mauerlat is used. For this there are the so-called "sliding". These are plates, a state of corners that are attached to the Mauerlat and metal strips movably connected to them, which are attached to the rafter leg. Two such slides are placed on each rafter.
Features of the construction of a pitched roof
For living quarters, a pitched roof is very rarely used, but if you need to cover a garage, terrace or any utility room, then this is one of the most practical and affordable options.
For a shed roof, an elementary rafter system is created, so even a beginner in the construction business can cope with its installation. The support for the rafter system is a wooden beam that is fixed to the outer walls and is called a mauerlat. Such a structure can have a different angle of inclination, usually it is made due to the difference in heights of opposite load-bearing walls. If the building has the same height of the walls, then a pediment is attached to one of them and due to it the necessary angle is created.

A pitched roof can be erected both on residential buildings and on any utility rooms
When overlapping the span, the length of which exceeds 13 m, it is necessary to install two intermediate supports under the rafters, the basis of which are the racks. Between the posts, a distance of 1/3 of the span is usually made. Strengthening is performed by contractions and fixing to the nearest load-bearing wall.
If we talk about the angle of inclination, then it depends on the type of roofing material used and the climatic conditions in which the house is located:
- for roll coatings laid in 3 layers, a slope of 5o is sufficient;
- with a two-layer roof, the angle must be at least 15o;
- under the corrugated board and metal tiles, you can make a slope of 12-14o;
- slate and natural tiles require steeper slopes, starting from 22o.
If there is a lot of precipitation in the region in winter, then the angle of inclination is better to do more - 45o and higher.
Pros and cons of a pitched roof
Most often, when creating a shed roof, they make a rafter system from wooden elements with their own hands.
The main advantages of pitched roofs:
- significant savings in building materials - usually they are required about 2–3 times less than for a gable structure;
- ease of installation - even people who do not have relevant work experience can erect such roofs;
- light weight - the roof can be installed on buildings with a lightweight foundation;
- versatility - pitched roofs can be installed both on residential buildings and on outbuildings;
- high resistance to wind loads - if there is often a strong and gusty wind in the construction region, a pitched roof with a slight angle of inclination would be a good choice.
The lean-to design also has its drawbacks, which must not be forgotten:
- if the angle of inclination of the roof is small, it is highly susceptible to snow loads. At an angle of inclination less than 45o in winter, you will have to clean off the snow, since it will not be able to get off on its own;
- with small slopes, a more thorough and high-quality waterproofing is also required to prevent leaks, and this is an additional cost of time and money;
- with an increase in the angle of inclination of the roof, its windage increases, so the surface becomes more vulnerable to wind;
- the lean-to design does not have the most attractive and respectable appearance.
A pitched roof is perfect for a residential building or utility room located in the southern regions, since there is little snow and strong wind loads.
Basic structural elements
A building with a sloping roof is the easiest to design, calculate, and erect. Its construction requires the least capital and labor-intensive costs.However, if you want to build it yourself, you need to have a certain amount of knowledge. In particular, to figure out what constitutes a shed roof device.
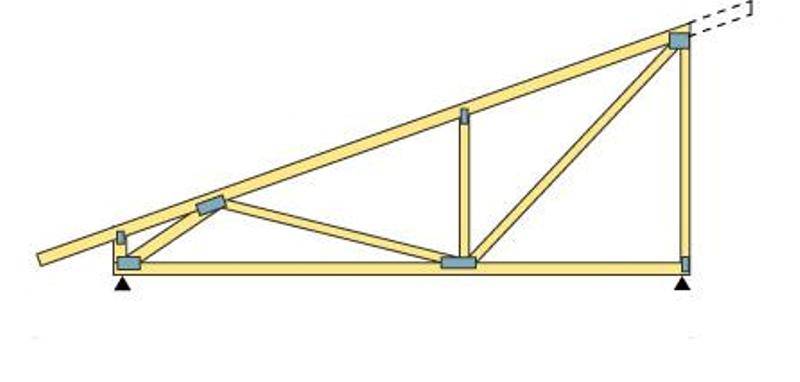
The following is a list of concepts that must be studied:
- slope - an inclined plane along which water flows down and snow rolls down;
- rafter (supporting) system: inclined struts, rafter legs, orthogonal racks;
- lathing - flooring over the rafter legs;
- Mauerlat - the basis of the structure, a support for the rafters, consisting of a log hewn from the outside and inside: it fits along the entire perimeter from the outside of the wall and redistributes the load created by the roof to the entire wall surface, providing additional rigidity).
- ridge - horizontal edge;
- overhangs (pediment) - protruding inclined edges;
- gutter - a narrow channel that receives water for further drainage from the roof;
- water distribution fittings (funnels, drainage pipe system).
Design and construction of pitched roofs

The first step is to draw up a design project and draw drawings and a diagram. This will help you choose the right angle of inclination of the slope and perform the necessary calculations. The angle of inclination will depend on the snow and wind load in each specific region. But this roof option is good because it is possible to erect it with an angle of inclination from 3 to 45 degrees. Roofing material also plays an important role in the choice of the angle of inclination. For example, if you sheathe with metal tiles, then the slope will be 14 degrees.
Roof elements:
- rafter system;
- lathing;
- waterproofing and vapor barrier;
- thermal insulation;
- roofing material
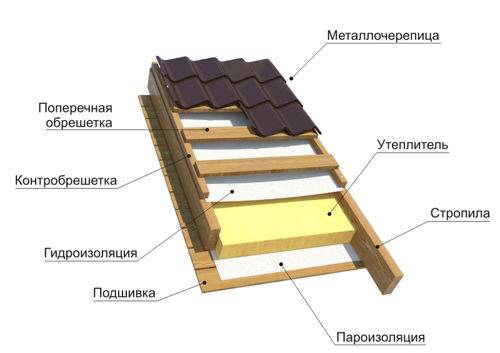
You can buy tiles, slate, metal or ondulin. The cheapest is slate.
If a single-pitched roof is being erected with your own hands on houses in regions with strong winds, then careful insulation of the roof and those walls that are in the wind will be required.
How and what rafters to choose
The types of support, that is, the rafter system, is selected based on a number of characteristics: the dimensions of the spans, the size of the building, the presence of intermediate walls, the material for the roof.
What are the rafters:
- Inclined are additional components that are installed along the length of the ramp. These structures are laid in even layers in the inner part of the roof. They look like "legs", the upper parts of which are attached to the timber, and the lower parts rest on the outer walls. For greater stability, the rafters are connected with a crate. With rafter lengths up to 450 cm, installation of additional support elements is usually not required, but if the length is longer, you will have to install rafter supports. According to the severity of the material used for the roof, the laying step is chosen - from 0.6 to 1.4 cm (the step will be less for heavier materials).
- Hanging - the most complex fastening scheme, which is used if the rafters cannot be fixed with additional methods. They are collected separately in special farms, after which the assembled system is lifted up and fixed on the roof.
- Sliding ones are somewhat laborious to install and therefore they are used more often in the construction of wooden houses. First, the rafters must be installed with support on the Mauerlat, and then fixed to the walls with the help of movable elements.
In order for the installation of a single-pitched roof to proceed according to all the rules, before choosing the types of rafters and other necessary materials, you should create a project drawing, on the basis of which the structure will be assembled.
