The sequence of laying tiles from crumb
Rubber tiles for paths in the country can be paved on a hard (concrete, asphalt) or soft base (sand, crushed stone), so the laying technology will be different.
On a hard surface
For work you will need:
- Tile.
- Sharp knife or jigsaw.
- Polyurethane adhesive.
- Broom.
- Spatula with teeth.
- Sponge and brush.
- Chalk for marking.
- Rubber hammer.
- Container for glue.

The base must be checked before installation. It should be clean, even, without depressions and not crumbling. Do not work in high humidity or rain; dry weather is required. Future paths should be marked with twine and chalk.
Step-by-step laying scheme:
- Applying a primer to the base. You can use a 1: 1 mixture of acetone and polyurethane glue. Wait until the surface is completely dry, about 40-50 minutes.
- Apply glue in the marking areas. You can use polyurethane adhesive or rubber-bitumen mastic.
- Spread the adhesive evenly with a notched trowel.
- It is recommended to start laying rectangular or round slabs from the middle, correctly observing the direction of the pattern. We must not forget about the slope and drainage.
In the process of work, it is necessary to promptly remove excess glue that has appeared on the surface of the path. For a tighter fit, the material must be tapped with a hammer. If the rubber doesn't fit, it can be cut well with a simple, sharpened knife. You can walk along the finished path in 2-3 days.
 Laying tiles from crumb
Advice! Near a wet area: swimming pool, pond, etc., it is recommended to use a double layer of glue.
Installation of slabs on the ground
To pave the building material on a soft base, more thorough preparation will be required. In places of future paths, the land is completely cleared of weeds. A trench is dug with a depth of 14-25 cm. The slabs are laid on a two-layer cushion of crushed stone (7-10 cm) and sand (5-7) cm. For greater strength, the sand can be mixed with cement.
A curb should be used to press the slabs more tightly. The bottom of the soil and each layer must be tamped with a mallet. On such a path, the slope can not be done, the moisture will go into the ground in a natural way.
Plates with special spikes are inserted into special grooves in a row according to the pattern or pattern. The finished surface is sprinkled with sand on top so that it fills the cracks, the excess is swept away with a brush.
Laying of Resiplit flooring
This type of material is a modular slab that vaguely resembles a large puzzle. They are inserted into grooves and secured with decorative colored plugs. The modules have positive aspects:
- More affordable cost.
- High speed of installation.
- The modules can be laid on any surface.
- ResiPlit is made of monolithic rubber, which does not crumble and is resistant to mechanical stress.
- With the help of a special mastic, rubber slabs can be glued to wooden flooring, concrete, asphalt. Without gluing ReziPlit can be laid on grass, sand, compacted crushed stone. Plates are easily and quickly disassembled and reassembled.
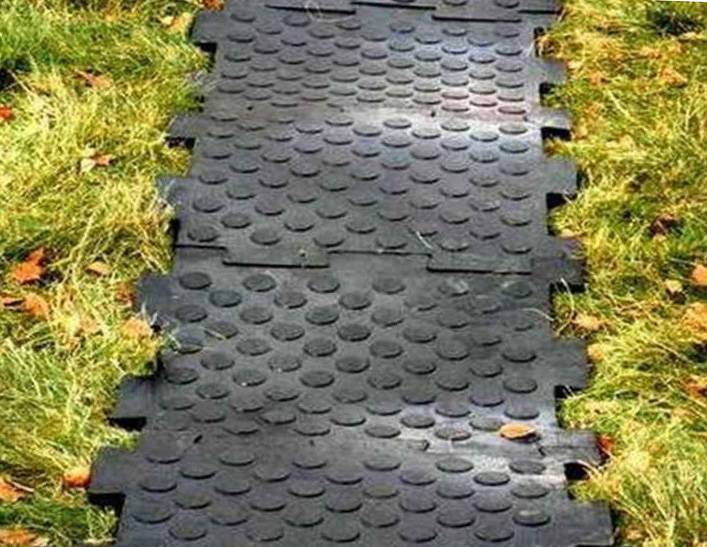 Laying of Resiplit flooring
The downside of the modular coating is a simple, without any special frills, appearance. Large slabs cannot be painted, they are always black. Only decorative plugs can be colored.
Correct care
Rubber material is unpretentious in maintenance. He is not afraid of frost, water, sunlight, mold or rot. It must be borne in mind that rubber is flammable, so it is dangerous to put a brazier or barbecue nearby.
Stains on garden paths can be cleaned with soapy water and a brush.If snow has fallen, you can not clean rubber tracks with an iron shovel. You can sweep or scrub the paths with a broom or a plastic scraper.
Conclusion
Rubber tiles are very practical for garden paths. The construction market offers various options for rubber construction materials for summer cottages, which depend on the composition and production technology. You can purchase more expensive models with 2 layers and a pattern on the surface.

Features of the care of the track
Decking is unpretentious in operation and maintenance, but it still requires regular care. Cleaning options depend on the season. In the warm season, rinsing with soapy water from a hose is sufficient. This cleaning should be done at least once a week, and you can use soft textile napkins.
Did you know? The winding wooden path in the Melodies of the Sea Park in Dalian, China is listed in the Guinness Book of Records as the longest. Its total length is 21 km.
But even with regular high-quality care, there is a likelihood of dark spots from rain, dew and dust. To remove them, special chemicals are used, which do not contain bleaches. If a complex stain has appeared, then it must be removed as quickly as possible, until the pollution has penetrated deep into the structure of the material itself.

In winter, shovels with rounded edges and brooms are used to remove snow from the terrace board. It is forbidden to take crowbars to remove ice from the surface - only a plastic scraper is recommended for this purpose. You can also use table salt, but it should be removed from the surface as soon as it gets warmer.
Decking is popular for garden paths due to its attractive appearance and a number of benefits. The creation of such a path makes it possible not only to decorate the site, but also to improve its functionality. When carrying out installation work, adhere to the general rules and instructions - this way you will ensure the durability and safety of the material.
Benefits of plastic tiles
The plastic coating of the tracks in the country, regardless of its type and configuration, has a large number of positive characteristics:
- durability:
- not afraid of temperature changes;
- able to withstand high pressure:
- high wear resistance;
- low cost.
- easy installation.
Note that the price of plastic tiles is an order of magnitude lower than the cost of natural stone. Therefore, this material is affordable for every customer.
To create a beautiful path in your summer cottage, you absolutely do not need to have special construction skills. Usually, a flat base must be prepared for installation. Then block structures are laid on it, the fastening of which to each other is carried out with special clamps.
Garden parquet or decking is a little more difficult to fit. For the production of work, you must have additional materials.
- sand;
- cement;
- gravel.
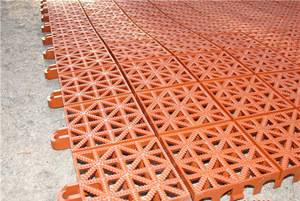
Manufacturers also produce tiles with a rough surface. This is done on purpose to prevent slipping.
Such coverage is very important for laying out areas around swimming pools or private ponds.
The tiles are very easy to dismantle. For the winter, you can put it in the garage, and with the arrival of summer, you can re-create beautiful garden paths in your dacha.
Advantages and disadvantages of plastic tiles

The advantages of plastic garden coverings include:
- Long service life. A high-quality and correctly installed coating can last up to 50 years. The material is resistant to temperature extremes, wear and heavy loads.
- Affordable price. The cost of plastic tiles is lower than the cost of cement-sand tiles.
- Simple installation. The main thing is to prepare the foundation. Installation of plastic tiles consists in laying it on a flat surface and fixing it with locks.
- The rough surface of PVC tiles is non-slip. Can be installed near pools and ponds.However, there are cheap tile options that do not include organic filler. When wet, they slip a lot.
- Easy to dismantle. Most types of PVC coverings can be disassembled for the winter and stored in the house until spring.
Cons of such coverage:
- Plastic is not resistant to aggressive substances. Drops of gasoline or thinner accidentally falling on its surface may damage its appearance.
- During the period of operation, the color saturation and gloss of the plastic coating are gradually lost due to exposure to ultraviolet radiation.
- It is not recommended to install plastic sheeting in parking lots and garages.
- It is more prone to abrasion than stone or paving stones.
- Since PVC tiles are lightweight, they need to be laid on a mortar, unlike paving stones, which are heavier in weight, and it is enough to lay them on sand and tamp them.
And the last point, which refers rather to the features of the polymer material, and not to its disadvantages - plastic has excellent water-repellent characteristics, which does not exclude the need for a drainage device. But in this case, it is made easier than for paving stones - drainage grooves are laid on the sides of the path.
Installation of a seamless crumb rubber coating
A crumb rubber yard cover does not require an even base. It itself perfectly hides and evens out irregularities, but it is worth remembering that the minimum crumb layer is 4-5 mm. If it is thinner, there is no guarantee that it will retain its properties. That is, if after applying crumb rubber you want to have a flat surface, the cavities will have to be filled with it. This will increase consumption, which means that the rubber covering will be more expensive. Therefore, it is better to pre-seal the largest depressions, cut off the protrusions. Dirt and crumbling fragments must also be removed. Otherwise, problems may arise during operation - peeling from the base, followed by the destruction of the rubber coating. The prepared base is also primed with a mixture of glue and solvent, after which you can start laying.
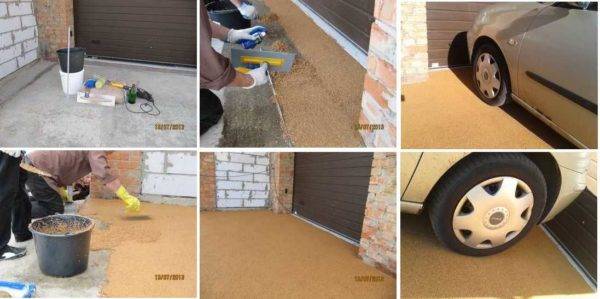
The procedure for laying a seamless coating and its testing
When the base is ready, the crumb is mixed with glue. For small areas, this can be done in large buckets using a drill with an appropriate attachment. For work, you will need spatulas - metal or plastic - as it is convenient for anyone. The mass sticks to any surface - and to the spatulas too, so it will be necessary to lubricate them with something. It can be a multipurpose grease (WD type) or a solvent. With this composition, you will have to wipe the spatula constantly - otherwise you will not even out the superimposed layer of crumb. The applied layer remains elastic for about 40 minutes. This time is enough to eliminate all the blemishes allowed during application, to connect the areas so that the seams are not visible. The monolithic coating of rubber crumb dries for about a day, then it can be used.

One of the options for using crumb
Why is a seamless crumb rubber coating good? High maintainability. Even if a piece comes off somewhere, it is cut out with a knife, the remains are cleaned off with a chisel, the surface is cleaned, primed (a mixture of epoxy glue and white spirit). You can put a patch. The only negative is the difference in color. It will wear off over time, but the new patch will stand out. There is a way to turn this disadvantage into an advantage: to make a patch in the form of a picture. You will get a decoration.
Advantages and disadvantages of a decking track
Decking paths are a modern alternative to wooden coverings and paving slabs, as well as a fairly practical solution for decorating a summer cottage or local area.Being in an open area and exposed to various weather influences, the material for the paths must have high strength and be resistant to the influence of external factors.

Decking has these properties in full, which not only easily tolerates the effects of atmospheric phenomena, but is also not subject to mechanical damage. Such garden paths can be washed with special products, they do not slip in winter, fit well into any site design, and are also easy to install.
- The main advantages of this coating include:
- Resistant to damage. Such a board tolerates moisture, frost, ultraviolet radiation well. At the same time, it does not crack, does not lose its shape and does not fade.
- Ease of installation. The tracks are easy to install without any special knowledge and skills, and, if necessary, they can be disassembled and moved to another place or removed for the winter.
- Durability. With proper care, the decking will last for several decades.
- Stability. If the technology was fully followed during the installation, then such a garden element will not give in to deformation and will maintain a flat surface on any soil.
- Decking can be used to assemble structures of any complexity, based on imagination, preferences and budget.

- Among the disadvantages of decking should be noted:
- Intolerance to high temperatures. This material is not suitable for flooring the surfaces of baths and saunas, where the air temperature rises above + 80 ° C.
- Sensitive to prolonged immersion in water. With constant exposure to moisture, the decking quickly deteriorates and loses its aesthetic appearance.
- It is not recommended to lay panels in poorly ventilated places without exposure to sunlight due to the likelihood of mold.
How to put geotextiles correctly
For a long service life, it is important not only to choose the correct geotextile, but also to lay it without errors.
Laying rules
When carrying out work, you should adhere to certain rules:
- the surface for laying the canvas must be well leveled;
- the packaging is opened immediately before starting work, since some materials are sensitive to sunlight;
- the required dimensions should be calculated and the strips should be cut taking into account the stock of material, but also so that there are as few scraps as possible;
- when calculating the dimensions, an allowance of 5–10 cm should be taken into account, which is necessary for a slight deformation of the geotextile after covering it with sand on top;
- if geotextiles are laid on a layer of gravel or pebbles, then a single layer is used, when laying directly on the ground - the canvas is placed in 2 or 3 layers;
- the geotextile is laid without tension, but the formation of folds should not be allowed;
- the overlap of the canvases should be at least 20 cm;
- the joints of the canvases with each other must be well fixed. They can be fastened with a construction stapler or soldered with a construction hairdryer;
- when applying strips at the joints, it must be borne in mind that the geotextile laid in the area located above should cover the material from the lower area;
- after filling crushed stone on geotextile, it is advisable to wrap its edges 15–20 cm from above in order to prevent contamination of the internal components;
- when fixing the material to the ground with long staples, the damaged areas must be glued with bitumen.
DIY step-by-step instructions for building a track
Laying paths using geotextiles follows a certain algorithm:
- Make a marking of the paths using pegs and a rope stretched between them.
- Dig a trench about 30–40 cm deep and level the bottom well.
- Fill in a layer of sand (preferably fine-grained river sand) up to 5 cm thick.
- Lay geotextiles on a sand cushion so that the edges of the material cover the slopes of the depression by 5–10 cm.
- Connect the joints with a stapler or solder with a construction hairdryer.
- Pour a layer of fine crushed stone 15 cm thick and level.
- Place another layer of geotextile in the same way as the first.
- Cover with sand 10 cm.
- Let stand for 2-3 days.
- Moisten a layer of sand or cover with tile adhesive.
- Lay the base covering.
Important! When using gravel or pebbles as the final coating, only one layer of geotextile can be laid, since these materials do not have a large mass, and will not cause a strong subsidence of the structure. When assembling paths in the country, many owners are wondering: why spend money on geotextile, if you can save
Experienced developers give a negative answer to this question. The use of geotextiles increases the service life of any structure by an order of magnitude, helping to maintain its original appearance for a long time
When assembling paths in the country, many owners are wondering: why spend money on geotextile if you can save money. Experienced developers give a negative answer to this question. The use of geotextiles by an order of magnitude increases the service life of any structure, helping to maintain its original appearance for a long time.
Track laying rules
The installation technology largely depends on the terrain, soil type, and moisture level. With gravel and pebbles, one layer of any geotextile will be enough. In the case of paving with paving slabs, it is necessary to lay 2 layers of compacted material and check how tightly it adheres to the surface.
If the road is equipped on clay or sandy soils, then the surface must be carefully processed, otherwise it will sag after the rain. Concrete pavement requires the selection of a surface that has a drainage function.
When working, you need to take into account some features:
Weather
It is advisable to carry out work in warm weather for several days.
Before starting work, you need to calculate the amount of material with a margin so that there are no problems with the number of layers.
Laying cannot be done on a dry mixture of mortar, it is important to moisten the soil.
You don't need to do too many layers. So, it is possible to clog the space and prevent the material from "breathing", allowing moisture to pass through and retaining heat inside.
Use a variety of geofabrics to ensure the strength and reliability of your garden paths.
Step-by-step instructions for laying the track:
- Outline the boundaries, lay out geotextiles in shape.
- Dig a ditch no more than 40 centimeters deep.
- Level the bottom, remove plant roots, stones and debris.
- Lay a layer of geotextile, and leave the edges above the surface about 5 centimeters on both sides.
- Pour crushed stone. The layer thickness should not be more than 15 centimeters.
- Lay another layer of geotextile. To check how tightly it fits, for this it is better to walk over it with a special spatula several times.
- Then sprinkle with fine-grained sand in a layer of about 12 centimeters.
- Tamp the layers.
- Start laying paving slabs or paving stones.
- Cut off the protruding edges of the textiles, remove excess and arrange the edges.
- Fill the inter-tile gaps with sand carefully compacted in them.
What difficulties may arise
Unfortunately, soil can be unpredictable. Therefore, the paths often sag, the slabs fall through, and the fortifications cannot cope with the weight. For example, if you have to regularly transport carts with loads along the path, the plates can crack and crumble. Under the influence of moisture, excessively dry and hot weather, the durability of the coating cannot be guaranteed. To ensure durability, geotextiles for garden paths must be laid in several layers. It is advisable to choose an area for work where there is no possible erosion, and there are no sources of strong moisture nearby.
Another difficulty that can arise when choosing coverage is cost. Sometimes it is objectively quite expensive, so it is necessary to carefully calculate the budget before buying.And cheap types of geotextiles are not always suitable for a set of properties. You also need to take into account that the material for creating garden paths must be bought with a margin. It is not always possible to get the job done the first time, or the number of rolls will not be enough. It is better to calculate the funds in advance and choose the coverage wisely.
For the garden to be attractive, it is important to pay attention to the walkway cover, which is an essential element that forms not only appearance, but also functionality. Geotextiles for a garden path will not only help to preserve its attractive appearance, but, with a good choice, will provide it with durability and strength, as well as comfort for everyone who likes to walk in the garden. For people who care about the environmental friendliness of materials, geotextiles are also suitable as a coating.
For people who care about the environmental friendliness of materials, geotextiles are also suitable as a coating.
Types of plastic tiles
Depending on the material of manufacture, the tile can be made of pure plastic or with an admixture.
By design features and purpose, such types of inexpensive ways of arranging tracks are distinguished:
- garden parquet;
- lawn lattice;
- modular coverage.
Did you know? The first semi-synthetic material in history, which gave impetus to the invention of plastic, was parkesin. Its discoverer, Alexander Parkes, mixed nitrocellulose, camphor and alcohol, which were heated to a fluid state, poured into molds and solidified.
Polymer boards
Conventional plastic boards are different from polymer ones. If the former are made entirely of synthetic material, then in the manufacture of the latter, various natural additives (sand, quartz or wood), chloride and dyes are mixed with it. Without impurities, the tile looks cheap, wears out quickly, crumbles after exposure to low temperatures and fades.

Plastic tracks are the most affordable and easy to install. For example, you can buy paving rolls that are easy to spread. For the winter, it can be rolled up, which will extend its service life. The polymer version with additives will cost more, but its quality and durability are better, and the appearance is much more solid. Such slabs can be used for the path leading to the house.
Did you know? The word "polymer" is of Greek origin. Literally it translates as "many parts", indicating the principle of the structure of plastic molecules, consisting of monomers.
Garden parquet
Decking, or garden parquet, is an oblong tile modules that are laid horizontally or vertically. Each slab consists of 4-5 planks. They are made from a polymer with the addition of wood flour
When buying, you should pay attention to the percentage ratio between the components, since there are different proportions that affect the cost and quality of products.
This type of coating has a rich exterior, and with the help of fasteners, you can create an original ornament. Deck requires careful alignment of the base underneath.
Important! The higher the wood content in the garden parquet, the higher its moisture resistance.
Lawn grill
This type of coverage is a grid in the form of a square, divided into cells of the same size. The product is sold in green and is designed to strengthen the soil under the lawn and give it a neat appearance. Using the lattice, you can form various compositions on the lawn, filling the cells with rubble or soil with grass seeds.

By connecting the parts together using special fasteners, you can adjust the size of the lawn.
Such a design will save the track from dirt, provide good drainage to the soil and prevent it from weathering. A car that drives on such a lawn will not leave tire marks.
Learn how to make a brick garden path with your own hands.
Modular coatings
The modular coating consists of squares measuring 0.5 × 0.5 m or 0.3 × 0.3 m with a thickness of up to 15 mm. They have a corrugated surface that has slots along or across. The material is suitable for creating paths, covering children's and sports grounds, recreation areas, areas around the reservoir.

Pool area
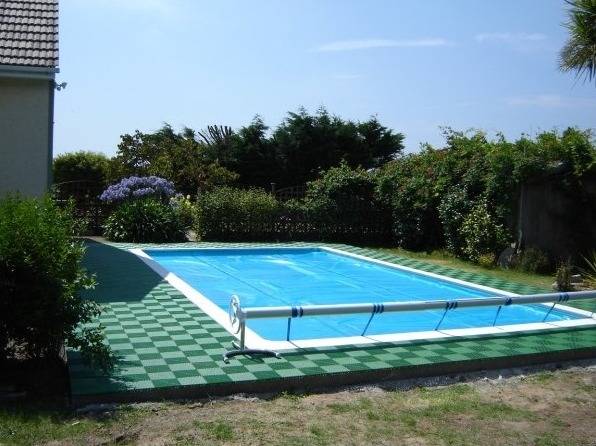
Today, almost any suburban area has a pool, if not a stationary one, then a prefabricated frame or inflatable one for sure. As you know, it is better to install the latter on a flat and solid ground. This means that a modular plastic cover comes in handy here. There is no need to worry that it will not withstand water pressure: the permissible load for the best Russian samples is 80 t / m². A serious argument for: being an excellent heat insulator, the coating will slow down the cooling of water at night. Thanks to the perforated surface of the modules, the approaches to the pool will not be slippery, and the dirt will not stick to the feet. By the way, these qualities are also valuable for indoor swimming pools. If, as planned by the landscape designer, the pool site should repeat the polygonal or oval contour of the bowl, the problem is solved with the help of a grinder or jigsaw, which do an excellent job with plastic.
 |
 |
DIY styling
The process of laying the flooring is simple, but there are some subtleties that should be taken into account when working:
- The design of the borders is mandatory, they carry not only an aesthetic function, but also fix the canvas on the surface, in order to avoid displacement until it dries completely.
- Covering the site with paving stones and tiles, you can do without a slope for rainwater drainage, but for flooring in rolls, this moment should be thought out.
- When installing the flooring on a sand-cement mixture, it is recommended to use a tile with bushings, which has a tongue-and-groove fastening system.
- The space between the slabs and the curb must be filled with pieces of the base material until the elements are tightly joined.
- Tiling always starts from the middle of the track.
For reliable adhesion of the base and rubber material, you should pay attention to the following nuances:
- Air humidity. For work, you need to choose dry weather, the base for the flooring must be dry.
- Temperature conditions. The optimum air temperature is from + 5 ° С, but not higher than + 20 ° С.
- Dry weather 2-3 days after laying. The specified time period is necessary for the polymerization of the adhesive composition.
Did you know? The pigments used to color the material in the production of rubber flooring are of natural origin and do not cause allergic reactions.
The set of tools and materials for laying flooring of different types is practically the same:
- rubber plates, rolled cloth or chips;
- cord and pegs for marking tracks;
- special rubber curbs;
- knife;
- polyurethane glue;
- container for glue;
- sand brush;
- roulette;
- measuring level;
- chalk for marking;
- spatula (special notched);
- roller;
- sponge;
- rubber hammer;
- bayonet and shovels;
- mechanical or manual ramming;
- protective gloves.

On the ground
On soft surfaces such as soil or sand, rubber tiles with a thickness of 30 mm or more or paving stones can be laid.
The flooring is mounted in several stages:
- Clears the area from weeds and roots.
- Remove the top layer of soil.
- The surface is compacted.
- Lined with a layer of crushed stone with a thickness of 8-10 cm.
- A mixture of sand and cement is prepared in a 3: 1 ratio.
- A cement-sand composition is evenly distributed over the crushed stone.
- Lay out the tiles in accordance with the ornament, leaving a small gap between the fragments (from 5 to 7 mm).
- The distance between the tiles is covered with sand.
- Excess sand is swept away with a brush or washed off with water.
Check out the features of the Dutch garden style.
On a hard surface
Before starting work, it is necessary to inspect the surface, to identify the presence of cracks and deformed areas. All significant irregularities must be eliminated prior to installation. Minor flaws are allowed. Laying on a hard surface may differ depending on the type of material.
Installation of tiles:
- Treat the area with a primer. It is recommended to use a primer on concrete or a mixture of polyurethane glue and acetone. Wait until the base is dry.
- Using the cord and pegs, make the markings.
- Apply the adhesive to the tiles with a spatula.
- Press the material to the base as much as possible and tamp down carefully with a rubber mallet.
- Remove excess glue that has gone beyond the base material.
- Install the curb.

Rubber crumb coating:
- Thoroughly clean the surface from dirt particles.
- Apply a primer solution.
- Using a construction mixer, mix the rubber and glue base in the proportion specified by the manufacturer.
- Add color pigment of the required shade.
- Treat the rolling roller with an emulsion that prevents the rubber mass from sticking to the tool.
- Smooth the composition with a roller and leave to dry for at least a day.

Kinds of suitable rubber materials
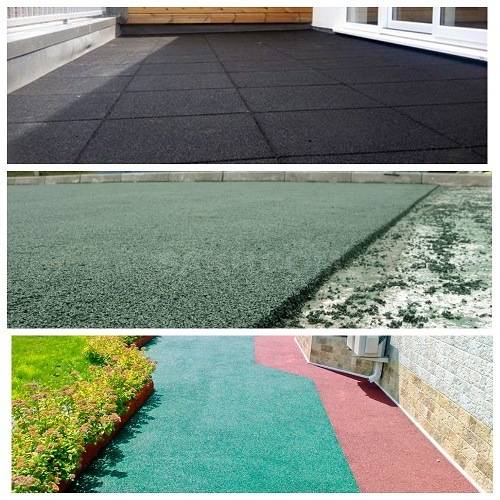
There are three types of rubber coating for sidewalks, paths and platforms on the construction market:
- tile;
- rubber crumb;
- roll coating.
Each of these materials is characterized by its own characteristics and differences in application technology. They come in different thicknesses, and this parameter is a determining factor when choosing a base - concrete or soil.
Tile
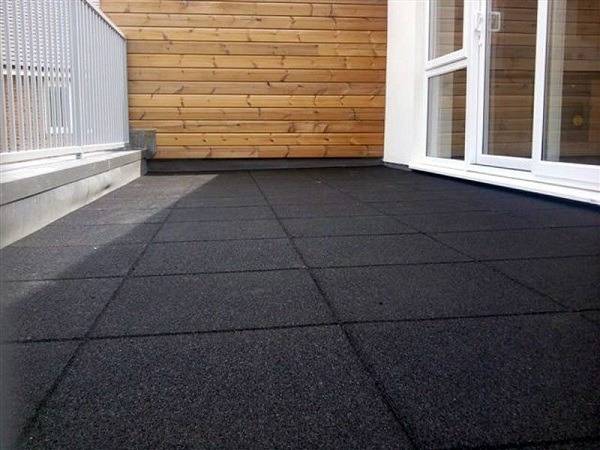
Rubber tiles vary in shape, size and thickness. It can be rectangular, square or curly. Its thickness varies from 15 to 40 mm. Fixation to the concrete screed is carried out with polyurethane glue or concentrated bitumen mastic.
There is also a type of tile - paving stones with a thickness of 40-80 mm, characterized by improved strength characteristics. The cost of tiles is lower than paving stones or roll material, but requires a concrete screed, which increases the total cost and duration of the work. Therefore, it would be most advisable to lay such tiles on an already existing asphalt or concrete base that requires repair.
Rolls

Roll coating canvases are up to 1.5 m wide and 5-15 mm thick. They consist of two layers: the lower one is made of large black crumbs and the upper one is made of small colored crumbs.
Laying of a roller covering for garden paths is carried out only on a solid base (concrete or asphalt). If the concrete screed is reinforced with reinforcement, then parking lots and garages can be improved with such a flooring. Given the straight geometry is dense, laying it on curved sites is difficult.
The material is fastened to the base with glue, mastic or stainless dowels.
Laying roll flooring requires sloping the base or having holes in the covering to remove water from it.
Rubber crumb
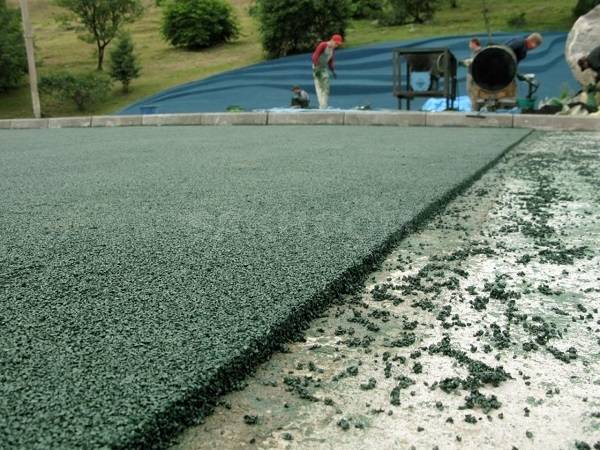
A mixture of colored rubber crumb with special polyurethane glue is suitable for the improvement of a personal plot. For such a flooring, both hard concrete and soft soil can serve as a base. If the base is solid, then the thickness of the flooring may not exceed 20 mm, and the unpaved one requires a thicker and more durable coating - at least 25 mm.
It is possible to ensure good durability of the coating by laying it in two layers, where coarse black chips are used for the lower layer, and fine colored chips for the upper one.
The main advantages of such a material are a monolithic structure with high strength characteristics and the possibility of constructing platforms and paths of complex shapes. But working with a self-leveling rubber coating is more difficult than laying roll material and rubber tiles. It is necessary to possess certain skills for its alignment, as well as to have special equipment for the convenience of work. If all this is not there, then for laying paths with your own hands, it is better to give preference to tiles or material in rolls.
