We draw up a drawing
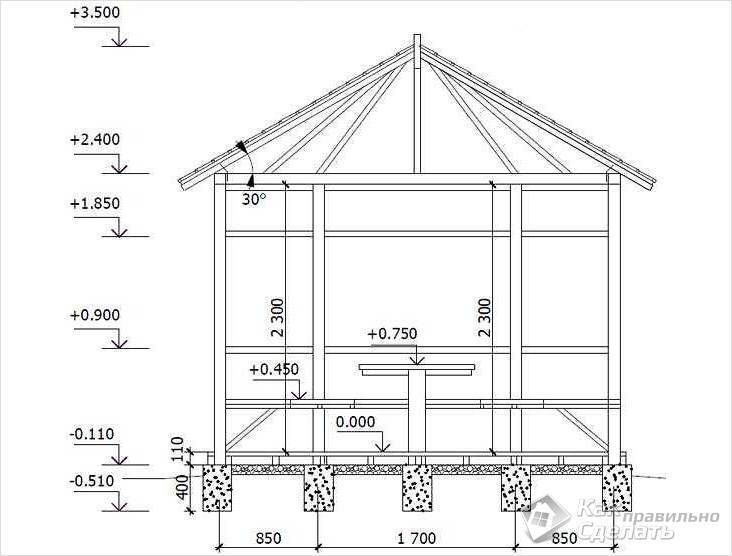 Metal gazebo drawing
With the above questions in mind, it's time to transfer the plan to a piece of paper so that it becomes a little more real than our imagination. Here are some projects that will take up a little space, but will allow you to place all the necessary elements.
- 2.5 x 3.5 m. This solution is enough to place a dining table and chairs inside. Four people will feel quite comfortable.
- 3 × 4 m. In such a gazebo it will be possible to invite guests or gather a large family at a good table.
- 4 × 4 m. This option has a barbecue. A small area with dimensions of 1 × 1 m is being made without covering, so that the smoke can rise freely and does not linger under the roof.
- 5 × 5 m. In such a gazebo it will be possible to build sun loungers on which mattresses and pillows are placed. It will become a really good place to rest and spend time.
Dimensions are given as examples. They can be varied and adjusted to suit specific needs and land. Knowing the specific parameters, you can choose the type of foundation that will be used. There are several options that do not take much time in the construction, but will be a good support for the entire structure:
- columnar brick;
- columnar monolithic;
- pile;
- solid slab.
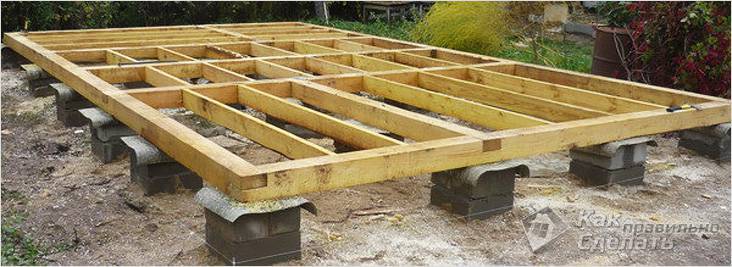 Foundation option
We will consider how each of them is made a little below. The material to be used is also applied to the plan. The gazebo can be closed from all sides with double-glazed windows. In this case, you can make a large number of casement or sliding windows. In such a structure it will be comfortable in any weather. The most common material used is wood. It is available, easy to handle, and no special tools are required to handle it. For the frame, profile metal can be easily used, but to work with it, you need to have the skills of a welder. One or several walls can be lined with facing bricks, which looks quite attractive and makes it possible to combine the design with the main building.
Gazebos made of metal, polycarbonate, brick
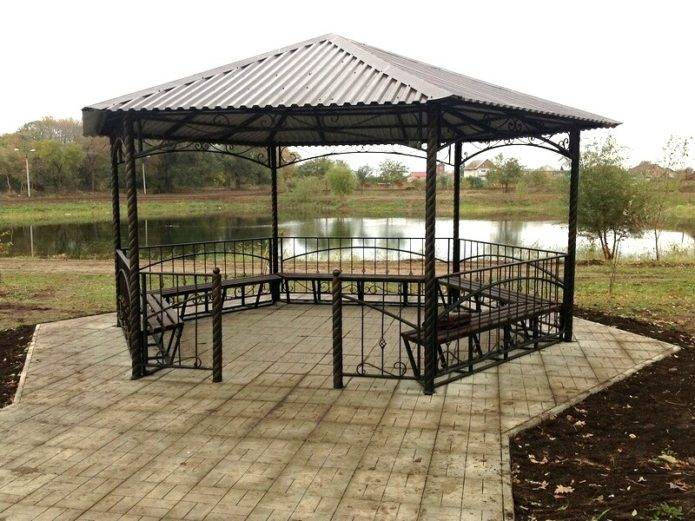
The construction of gazebos made of brick, metal profile or polycarbonate has its own specifics. You can combine all the materials together to create a comfortable place to relax with family and friends.
When designing and planning the construction process, consider:
- metal gazebos will require a lot of work with the profile. You will need a welding machine or a tool to cut holes for hardware. You can make a building with forged spans, metal railings. Please note that the material is susceptible to corrosion, so it must be treated with special compounds. The structure must be placed on a solid foundation made of screw piles, blocks or concrete tape. You can make a roof from any material. The surfaces of benches and tables are best made of wood;
- polycarbonate gazebos are lightweight structures that can be quickly built. Such structures are installed on blocks, screw piles or a grillage from a bar. First, a frame is built from wood or metal. Polycarbonate sheets of different sizes are sewn onto the frame. You can build mid-wall fences and a high-capacity honeycomb roof. Use polycarbonate less than 1.5 cm thick. Remember that plastic is highly flammable. In such a building, it is dangerous to cook food on fire;
- brick gazebos imply the installation of brick supports. You can make masonry instead of racks according to the project. Stone pillars need a strong foundation. Pour concrete tape or monolith under the building. Railings, walls and roof of the building can be assembled from any other material.
You can combine wood with stone, brick with metal, iron with polycarbonate in self-construction. It all depends on your imagination, desire, ability to design and build.
Erection of a hipped roof
The whole process is divided into several stages. It is more complicated and expensive in comparison with the tent version, but it is quite realizable. To understand the terminology, use the figure that shows a diagram with basic concepts.
Hip construction terminology
- The upper harness is reinforced with boards (overlap).
- Along the gazebo (on the long side), a tightening beam is attached. For this, metal corners are used.
- Two meter racks are installed on the puffs.
- To improve the balance, temporary struts are placed, they allow you to fix the vertically directed struts.
- The tops of the posts are connected to the ridge girder (the highest part of the roof).
- Ordinary rafter legs are fixed in 1 meter increments (attached to nails).
- Diagonal rafters are attached so that they continue the ridge run, that is, from its end side.
- Narozhniki are attached first to the diagonal rafters, then to the upper harness with a step of about 65 cm.
- Waterproofing is spread and the roof is laid.
Types and methods of assembly
In addition to different shapes - rectangular, hexagonal, octagonal, round - the metal frame can be installed in two different ways:
-
The vertical pipes of the frame are concreted into the ground. The rest of the structure is then attached to these racks. With this method, the presence of a foundation is not provided. In principle, having made the lower strapping at some distance from the ground, you can lay the floor, but most often with this method of making an iron gazebo, the site is concreted or paving slabs are laid out.
-
First, a shallow columnar or strip foundation is made, sometimes a monolithic slab is poured, the site is laid out with tiles, etc. The frame is constructed separately and fixed after at least the lower harness and racks are ready. If the foundation is columnar or strip, the pipe is placed on it and connected in place: only a crane can lift the finished structure.
Which is the best way? It depends on which side you look at. If from the side of fastening reliability, it is better - the first: the racks are walled up. Also, this option is more economical: there is no bottom piping and there are no costs for making a foundation. But such a structure, if it is without a floor, is only a summer gazebo. For a closed winter one, you need a floor.
A gazebo on a foundation is better from the point of view that it initially assumes the presence of a floor. In addition, the elevation, even if it is small, protects against splash and dirt from entering.
Assembly methods
Traditionally, metal is joined by welding. It is fast and reliable. But in the case of a summer cottage, a collapsible design may be needed. After all, leaving a large amount of iron for the winter in an unguarded dacha is very unsafe. In the sense that it can easily be stolen. In this case, the modules are welded, which are then bolted together. As a rule, such collapsible metal arbors are a frame to which an awning is attached, or another similar quickly mounted or dismantled fence and an equally light roof.
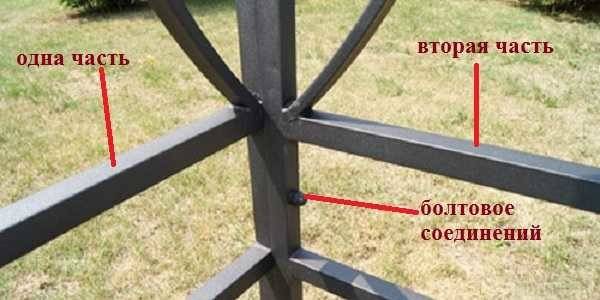
For a prefabricated metal gazebo, frames are separately cooked for each side, then assembled with bolts
The frame in collapsible arbors is broken along the edges. If it is quadrangular, four separate circuits are boiled with all the necessary jumpers. There are six of them in hexagons, etc.
List of required materials
You cannot start work without prior preparation. In order to properly make a gazebo for giving a do-it-yourself photo, dimensions and drawings will be necessary. For preparation, take an ordinary sheet of blank paper and depict the future design on it. Drawing up a drawing will allow you to determine the future dimensions, as well as the type of material used.
Consider the list of required materials for a wooden structure:
- 4 pillars;
- bars with different sections;
- rafters;
- OSB or plywood;
- tile, corrugated board or roofing material;
- wooden slats;
- protective strips;
- crushed stone with sand (preferably with a fine fraction);
- boards for laying on the floor and creating railings;
- materials for wood processing;
- roof ridge;
- drain;
- screws;
- nails;
- container for solutions;
- saw;
- protective gloves.
Naturally, depending on the type of work being done, additional units of materials can be included or removed from the list.
Construction of a hipped roof
We proceed from the fact that the base of the gazebo is already ready - the foundation is securely poured, and the support pillars are level. This material offers a more aesthetic version of the hipped roof than in classical construction. A small turret will be made in the center, which will emphasize the uniqueness of the structure (in construction it is called "torus").
First of all, it is necessary to make a wooden square in the center of the gazebo, to which the rafters will be attached in the future. This base is installed on the support posts, which are then removed.
Installation in the center of a wooden square structure
 Fastening the rafters to the torus
 Installation of the upper turret
Next, the support posts for the wooden square are pulled out, and the entire roof is sheathed with plywood. It turns out an interesting design solution that has a positive effect.
It is necessary to correctly calculate the grooves for the rafters and the angles of inclination, and then "tightly" fasten them. For a hip roof, the optimal angle of inclination can be considered 30 degrees. A similar roof is used by Taras Khodorchuk in his construction of a gazebo from a bar.
Varieties and manufacturing options
To begin with, we note that a garden gazebo can have different shapes (rectangular, six- or octagonal, round). In addition, there are two ways to install a metal frame at once.
- Method one: concreting vertical pipes into the ground. In this case, the rest of the structural elements will be attached to these racks. Obviously, there is no foundation as such in this case, although if the lower strapping is somewhat raised above the ground surface, flooring can be performed, although often in such gazebos, the flooring is laid out with paving slabs or concreted.
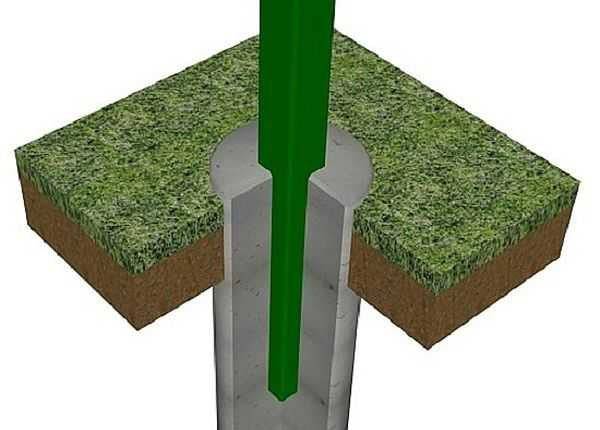

Method two: first, a foundation is built (strip or columnar) or, which is rarely observed, a monolithic slab is poured. The frame is constructed separately, and it is fixed after the installation of the racks and the lower strapping. In the case of columnar / strip foundations, the pipes must be laid directly on top of it and then connected together “in place”. As a result, the finished structure can only be lifted with the help of special equipment.
But a gazebo made of a profile pipe, erected on a foundation, has one advantage with its own hands - it initially provides for the presence of a floor. In addition, this elevation (albeit small) prevents dirt and splashes from entering.
Gazebo with fireplace and wooden blinds
A self-made garden gazebo on the site can be equipped with a stove and a barbecue. How to make this cozy and functional place to relax yourself is described in detail in the step-by-step instructions below.
You need to start work with the construction of a furnace. Work order:
You need to clear a flat area under the stove.
It is important to immediately calculate that a gazebo will be erected around the stove.
It is important to strengthen the area under the stove with a scattering of broken bricks or gravel. Install a frame made of logs around the perimeter of the future furnace, reinforce it with reinforcement and fill it with cement or concrete.
Next, you should erect the walls of the furnace from brick, as shown in the video.
Next, at the desired height, you need to fold the pipe. But this is best done after the frame of the gazebo is ready. The gazebo will resemble a rectangle in shape. Drawings for such a design are shown in the photo above.
You need to make a gazebo like this:
Put logs for the floor, cover the soil with roofing material before this.
- Lay the floors, finish the edges.
- Make a frame for the walls from a bar, fix it. Install the roof frame.
- At this stage, you need to finish building the furnace, fold and remove the pipe.
- Cover the roof with corrugated board.
Sew up the wall with clapboard.
Decorate window openings with wooden blinds made of 40 x 10 mm slats.
For this garden gazebo, you can make doors from the rail with your own hands and hang them on the piano hinges. Inside the gazebo, you can make benches and a table from the same boards. If you burn the board with a burner, you get a stylish timber that can be used for interior decoration of the gazebo and for the manufacture of furniture.
Square gazebo
We suggest starting work with the construction of a simple structure with a gable roof. We considered a similar design in the article about the construction of awnings. Like any design, a do-it-yourself gazebo is made step by step.
Construction procedure:
- As we mentioned above, the structures in question weigh very little. For this reason, work with the foundation will not have to be done. Therefore, the first thing we need is to dig holes for the supports and install pillars in them.
- Installed pillars are poured to the ground with concrete. After that, you need to allow the solution to harden normally, and this takes several days.
- Next, we attach horizontal beams to the supports, fixing them with self-tapping screws. We lay the floor by pre-drilling the holes for the bolts. We fix the boards with bolts. When carrying out these actions, be sure to check the level in order to avoid further destruction of the structure.
- We set and fix the average lags. Fastening is done to the floor. We install intermediate beams under the floor.
- We fix the upper beams while checking the level. We combine the edges and use special corners to fix the upper ridge. Finally, it is recommended to varnish the wood.
You have learned how to make a gazebo with your own hands out of wood, following the step-by-step instructions, now let's start designing a gable roof for our cozy building.
Roof construction:
(Making rafters for roof)
Construction of a gable roof system. Cut off each edge of the material at a sixty degree angle. We make small grooves at the bottom. We make sure that the work performed advises the beams that act as support. We measure the desired size and cut off the pieces. Next, we carry out the processing of the slices. Processing is carried out with fine-grit sandpaper.
We install the rafters at the top of the gazebo frame. Then we check the level, drill holes and fasten them to the frame with bolts.
Assembly of gables. It is necessary to cut the plywood to size, sand the edges. After processing, install the plywood on the edges of the gable roof. We fix the material with nails or screws.
Installation of roofing material. We take sheets of plywood, put them on the rafters. If there are no large gaps, we fix the material to the rafters
We cover the top with roofing material, while it is important that each subsequent strip of roofing material overlaps the previous one. We fix the roofing material with a construction stapler
Now we cut out a piece of material for the roof ridge.
Now we attach the balusters with load carriers to the rails. We fix the handrails and tops. We process the surface of the wooden material. We cover with paint or stain.
At this stage, the work is completed. Knowing how to build a gazebo with your own hands, you can finish building a square shape in just one day. Now let's add a swing for a summer residence, and it will become more fun on the site.
Gazebos made of metal, polycarbonate, brick
A garden gazebo made of wood is an option that will last for decades. But the wide choice of building materials does not limit builders only to wooden blanks. Gazebos made of other materials also look very impressive in the country landscape.
Metal structures, especially with the use of artistic forging, look original and amusing. Curls and flowing lines can repeat natural motives and organically fit into the environment. The main disadvantage of such buildings comes to light in the heat. The metal heats up, and it becomes rather uncomfortable and stuffy to be in the gazebo.
Polycarbonate allows you to create an airspace in which you can see everything that is happening around. Such buildings are distinguished by good performance characteristics. They retain heat in cool weather and are shock and fire resistant. Due to their transparency, they let in a lot of light. And the use of orange polycarbonate gives an additional visual effect: warm light every day, even if it's cloudy outside.
Brick gazebos are reliable and solid. Such a structure will certainly serve for more than one decade. In combination with a polycarbonate roof, decorated in a semicircle, such a structure will become a real design and architectural find for the site.
Modern trends in construction are increasingly talking about the joint use of several types of materials: a polycarbonate roof, wooden base beams, lining, brick brazier. Each building material has its own advantages, and in combination with others, it becomes even better.
Advantages of a hexagonal arbor
A hexagonal gazebo is being built along with structures of traditional shapes: round, square or rectangular.
The original structure has the following undoubted advantages:
- Roominess;
- Profitability;
- Structural strength;
- The relative ease of construction.
If you have a family celebration coming up, then it is difficult to find a better place for holding it. This structure does not look bulky. The compact design can be equipped with everything you need.
Dimensional drawing and design of a hexagonal arbor
The best option is the implementation of through reinforcement of the supports. Metal fittings, rods or small-section pipes are used. The price of building materials for a metal gazebo is considered reasonable.
Hexagonal gazebo floors
You can make high-quality flooring from scrap materials:
- boards;
- plywood;
Work order:
- Cover with plastic wrap.
- Sprinkle sand on it.
- Install logs - beams treated with special protective compounds from fire and decay.
- Install floors.
When finished with the flooring, proceed with the assembly of the frame. When installing vertical beams, it is recommended to check their level using a plumb line, then the base will turn out without distortions.
An example of the device of floor logs in a hexagonal gazebo
At the top, the beams are connected. They are secured with bolts. Excess material is sawed off from them.
Which roof to choose for a hexagonal gazebo
The roof structure is assembled on the ground and installed from above. A DIY hexagonal gazebo is a structure that can be crowned with almost any type of roof. It is required to cut the bars from the end sides at an angle of 60 degrees before fastening.
Calculation of building material
The amount of material is directly proportional to the size of the gazebo - the larger it is, the more it is needed. I suggest that you study the approximate amount of building resources that were needed to build a 3 by 3 meter wooden gazebo. It is pretty standard and typical for most country houses.
The location of the rafters on the roof
Please note that in the last block of information on the construction of a hipped roof, a gazebo 4 by 4 was considered, that is, the amount of material for it took more than the values below. A 100 by 100 beam is used only to create a base; it has only an indirect relationship to the upper part of the structure.
A 100 by 100 beam is used only to create a base; it has only an indirect relationship to the upper part of the structure.
- Base - 5 beams (3 meters);
- Support pillars - 4 beams (2.3 meters);
- Entrance and strengthening of rigidity - 5 bars (1 meter).
A 100 by 50 beam is clearly already being used for the construction of the upper part of the gazebo.
- Rafters - 8 beams (2 meters);
- Crosspiece - 2 beams (4.3 meters);
- Top harness, railings - 7 beams (3 meters);
- Railing - 2 beams (1 meter).
In addition to the basic structure, a number of materials are also needed: lining, floorboard and inch, slats, roofing, paint, cement, brick, nails, screws, impregnation. Depending on the region and country, prices may differ fundamentally, so it is difficult to estimate an average cost.
Final stage of construction: decoration and operation
Completed construction work - go decorate the 6-corner gazebo. Such open gazebos are successfully combined with climbing plants that can be put on the body - it looks beautiful and does not require strong additional spending.
Get involved in the creation of decorative furniture from the remains of a pipe - tables and chairs will fit perfectly into the interior, but they easily absorb heat and cold, so throw pillows over the chairs to make it more comfortable to sit.
A hexagonal gazebo from a professional pipe does not require special skills in operation - all you need is to periodically tint the details of the building and do not forget to treat them with a corrosion agent. It is problematic to use it in winter, therefore we recommend covering it with a film to prevent contact with moisture.
Drawings and dimensions for the most beautiful gazebos
A self-made garden gazebo can become the center of attraction for all family members and friends on vacation in the country. Usually gazebos are made from wooden slats and lining. The roof is covered with soft tiles, slate or tin sheets.

The most popular gazebos can be distinguished in shape:
- rectangular;
- square;
- rounded;
- hex;
- trapezoidal.
These are the simplest and most effective options for a garden gazebo, which you can make yourself on the site pretty quickly. Drawings and photos of the simplest and most beautiful options are given below.
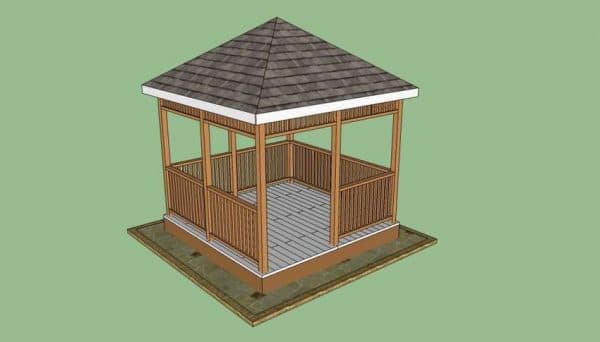
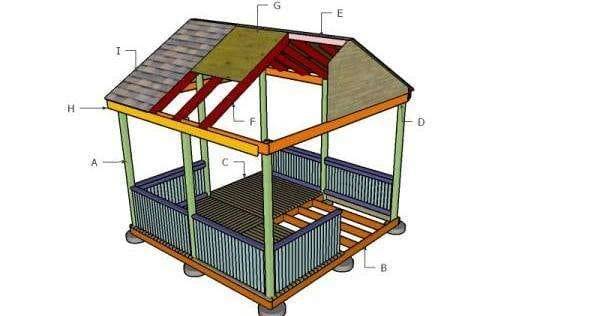
There are several main stages in the construction of a gazebo, which are important to observe:
- Site preparation. The area under the gazebo should be cleaned, leveled. If a light architectural structure is being erected on the ground, then it is better to remove black soil and fill it with stone, gravel. To protect against plants that can germinate under the floor, you can cover the area under the gazebo with roofing material.
- Then you need to make a foundation or base of the floor from logs or stakes.
- Then lay out the floor beams.
- Build the base of the walls.
- Lay the floor.
- Sheathe the walls.
- Make a roof frame and cover it.
The dimensions of all parts can be taken from the drawings and photos of ready-made gazebos or calculated according to your own idea.
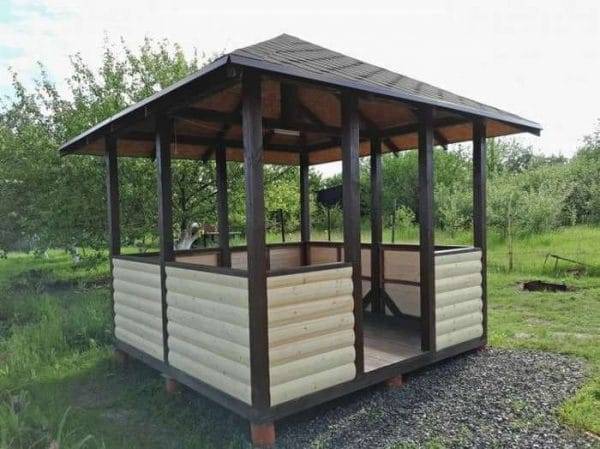
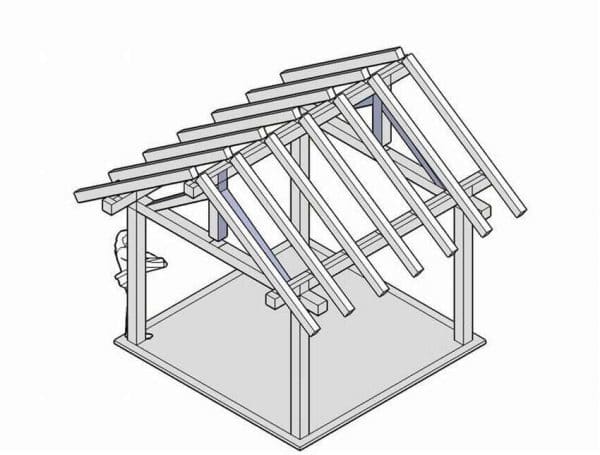


This is followed by decorative work. You can make gratings on window openings, sheathe the walls inside with clapboard, paint them. Consider the most beautiful and interesting options for gazebos with step-by-step instructions for their construction.
What size
 The size of the quadrangular gazebo
In order to fully give a thoughtful answer, it is necessary to analyze a few simple points:
- Where will the building be located?
- What territory can be allocated for it?
- Will the gazebo function as a kitchen?
- How many people will be in the building at the same time?
- What kind of seats will be installed inside?
- Will the structure be adjacent to the house in the form of a canopy?
- Will the water rise high with heavy rainfall?
- Will the supply of communications be necessary?
There is no need to make the structure too large, as it will not be used to its full extent as often. Moreover, it will be additional waste during maintenance. At this stage, you need to think about whether all the walls of the gazebo will be open or several of them will need to be closed. The easiest way is to imagine a table in the middle surrounded by chairs. You can make a decision that is distinctive for some cultures - sunbeds.
Photo of various gazebos 4 by 5 meters
For metal structures, the size is too large, you will have to use thick material and raise the price several times. This is advisable for luxury buildings, and not for a budget recreation area on the site.
With split roof
Thanks to the elongated rectangular shape, you can install a brazier or barbecue directly inside the gazebo. It is not always advisable, and it is expensive, but very convenient in terms of comfort. Cooking under a canopy is a pleasant pastime.
This building is one of the most successful in terms of size. It is not quite large to make openings in the walls for the sake of economy, and at the same time, it is far from small. Even in a 3 by 4 building, you don't feel as free as in this one.
What is required for work

For construction, building materials are required in full, which should be located near the site where the gazebo will be erected. Purchase lumber, roofing elements, paint, protective equipment from the same batch to avoid quality differences.
Prepare the following tools before construction work:
- poles or pegs;
- rope;
- construction tape at least 5 m;
- bayonet shovel;
- screwdriver;
- drill;
- ladder;
- building level;
- hammer;
- Bulgarian;
- hacksaw;
- saw.
Observe safety precautions when building a summer cottage. Work in a protective suit, use gloves, goggles, and comfortable shoes with thick soles on your feet.
Basic construction
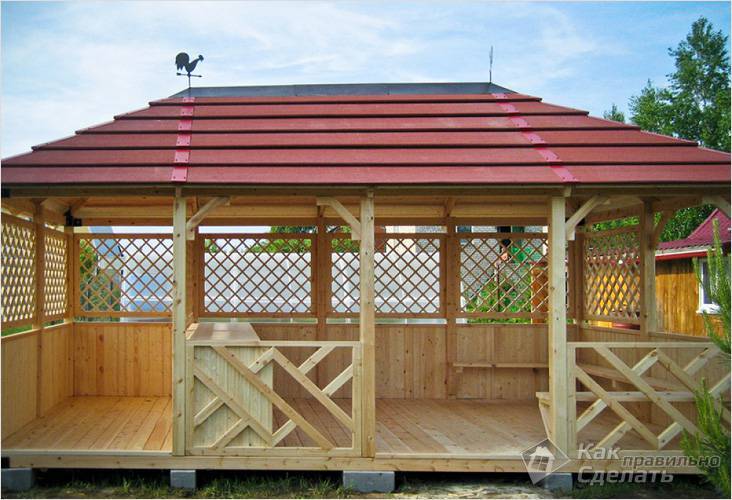 Design
The principle of erecting a wooden and metal frame is in many ways similar. For the first option, you will need a beam of 10 × 10 cm and an edged board of 10 × 5 cm.In the second case, you will need an I-channel for the base, and for the racks, a square profile pipe measuring 6 × 6 cm or 8 × 4 cm.In this case, all work is carried out using welding machine.
- If the first three options for the foundation were chosen, then it is necessary to make the lower strapping. To do this, the timber is cut along the length of each side, in the same way, another element is made, which will be laid in the middle.
- They communicate with each other. For this, a cutout 5 cm deep and 10 cm wide is made in the corners. The grooves are joined together and fixed with self-tapping screws.
- The next step is to install the corner posts. For them, the same material is used as for the grillage. They are attached to the base using metal angle plates. To make the joint more reliable, it is necessary to cut the tenon and sink it into the corresponding groove.
- If the walls are more than 3 meters, then it is necessary to make additional vertical supports from the edged board. They can be installed after 1 m.
- From above, all elements are connected using two boards, which are nailed on the inside and outside. The corners are reinforced with metal strips.
- The next step is to lay the floor. It can be made from a sanded board that is nailed end-to-end. When finishing, it can be varnished and stained.
- If a pitched roof is planned, then the racks on one side must be made 20–30 cm higher. For a gable or hipped roof, they must be the same size. For the first option, it will be enough just after 40 cm to install the boards from one wall to another and fix them. For a gable, you will need to assemble several trusses, they can be arranged in increments of 60–100 cm. They are an isosceles triangle. First of all, the two extreme ones are mounted. They are leveled horizontally and vertically. 3 fishing lines are stretched between them, which will serve as a guide for the rest of the components. You can connect them together using a ridge beam or oblique jumpers. A crate is made for a specific flooring, and the area is covered.
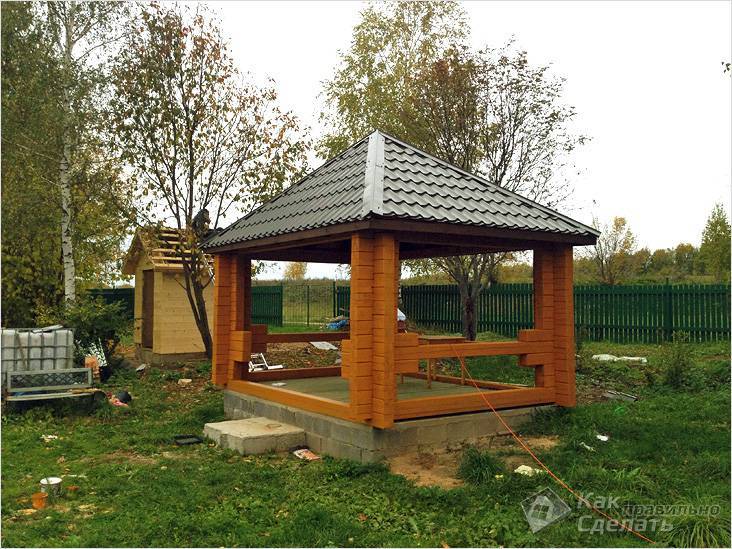 Gazebo with a hipped roof
For a monolithic foundation, the corner posts must be sunk into the ground. This can be done at the stage of filling or after. In 4 corners, pits are dug to a depth of 50 cm. The columns are made according to the principle of the foundation ones, which were written above. They will be the support for the racks. Further, the assembly is the same as in the previous versions, but the bottom strapping is no longer required. In this case, you can go the other way. The main racks may not be wooden, but brick. To do this, columns are laid out in the corners, which are necessarily reinforced inside. A wooden beam 10 × 10 cm is laid on top of them. The elements are tied together, as described for the grillage. This will be the Mauerlat, which will become the basis for the roof.
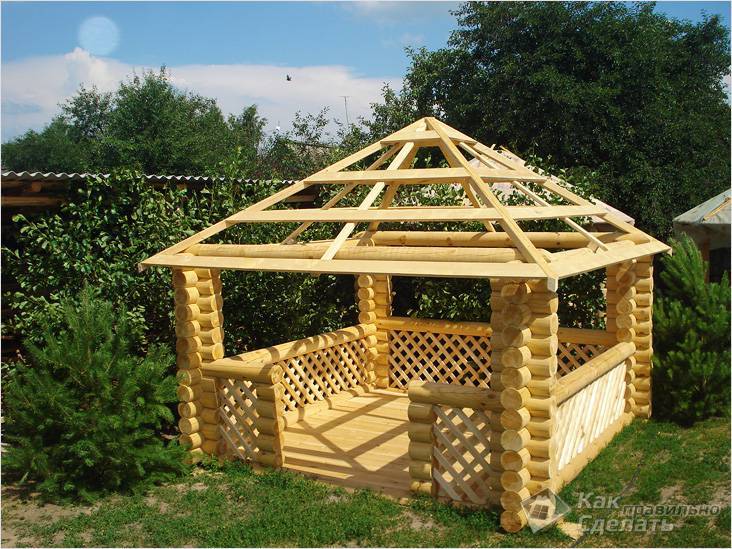 Rafter system of a hipped roof
Some of the elements that can be located inside have already been discussed in the course of the article. The space between the uprights can be open. Several sides can be closed with transparent polycarbonate. In another version, the masonry is made with facing bricks up to the middle. The remaining opening remains as it is, or a wooden grill is mounted in it. Around the area, you can plant wild grapes or ivy. Over time, it will envelop the entire gazebo and get a green island.
If desired, the structure can be made with elements borrowed from the hut. To do this, a hole is left in the middle of the roof, which will be used for the exit of smoke. In this case, you can make a fireplace right in the middle, which will allow you to enjoy the fire in any weather, sitting around it on comfortable chairs or sun loungers.
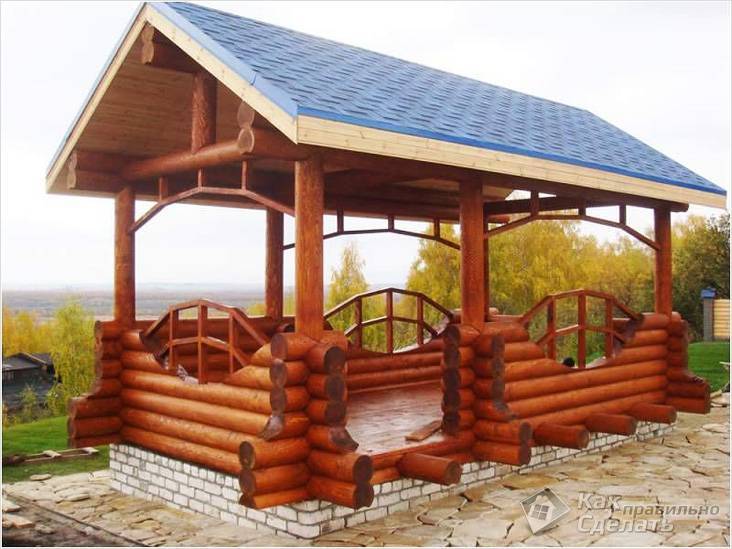 Varnished gazebo
