Do-it-yourself wooden floor in the gazebo
The choice of materials is wide enough. These can be boards, beams, paving slabs, rolled lawn, or you can simply asphalt the surface. Much depends on what time the owner is going to use this structure: all year round or only during the summer period.
If you need a place to rest in the winter, then in this case it is necessary to use a waterproofing base. In this case, the building will be much more reliable and warmer.
You should leave room for windows that will be removed in warm weather, you need to provide a reliable roof that will not leak after autumn rains or melting snow in spring.
The mounted lower rail with lags is the basis of the wooden floor in the gazebo.
But comfort and coziness will betray the wooden floor in the gazebo in the country. In addition, such a coating is considered environmentally friendly, and this is a very important aspect in our time. However, there are also some downsides. Such a floor will require constant maintenance, which must be thorough and correct. If this is not done, then the appearance of the boards will deteriorate in a short period of time, and then nothing can hide the flaws, you will have to change the deteriorated elements.
To avoid such troubles, you should first of all provide for all possible nuances. In addition, you need to prepare in advance the preparation of products that are necessary for caring for a wooden floor.
To make such a foundation yourself, you need to stock up on some elements that you cannot do without. First of all, this applies to wooden beams, bolts, antiseptics, fastening angles, planed boards, a hacksaw, a hammer, tape measure, nails and a level.
After all this is at hand, you can safely proceed to the main work. So, for a start, wooden logs, which are made of timber, are laid on the upper strapping.
If the gazebo is ordinary, then it can be 50/50 (for large-scale structures, 60/100 is used).
Diagram of the device of the plank floor in the gazebo.
You can fix these lags using 2 methods. In one case, you can use bolts, in the other, use special mounting angles. By the way, if there is a need for that, or you just want to make the gazebo more convenient, then these 2 methods are allowed to be combined.
When this stage is completed successfully, you can start laying the boards. These elements should be selected so that they are no more than 2 cm thick. In addition, it is not recommended to join the boards too tightly to each other, as this will ensure normal air circulation in the floor space. However, it is not worth leaving significant gaps.
Of course, this will have a positive effect on ventilation, but the coating will deteriorate by the fact that it will not be very comfortable for a person to walk. A floor with large slots will spring and sag under your feet.
It is imperative to treat the wood flooring with a special antiseptic. Such processing will keep the boards from moisture, as well as prevent rotting, the appearance of fungi, and save you from other troubles that threaten the floor. For such protection to be powerful, it is recommended to apply several layers of antiseptic at once.
With regard to additional care, this work should be done at least twice a year. If we talk about finishing wooden floors, then ordinary painting is enough here.
Wooden floor in the gazebo is a good choice
Natural wood as a natural material has always been valued in interior and exterior decoration. The magnetism emanating from the natural and environmentally friendly material, as well as its aesthetic beauty, attracts many craftsmen and designers to make their fantasies come true.
If you have built a wooden gazebo in the country, then it is quite logical that the floor in it will also be wooden. Wooden boards, treated with moisture-proof and antiseptic impregnation, are laid on logs.Then the floor is sanded if necessary and covered with paint or varnish.
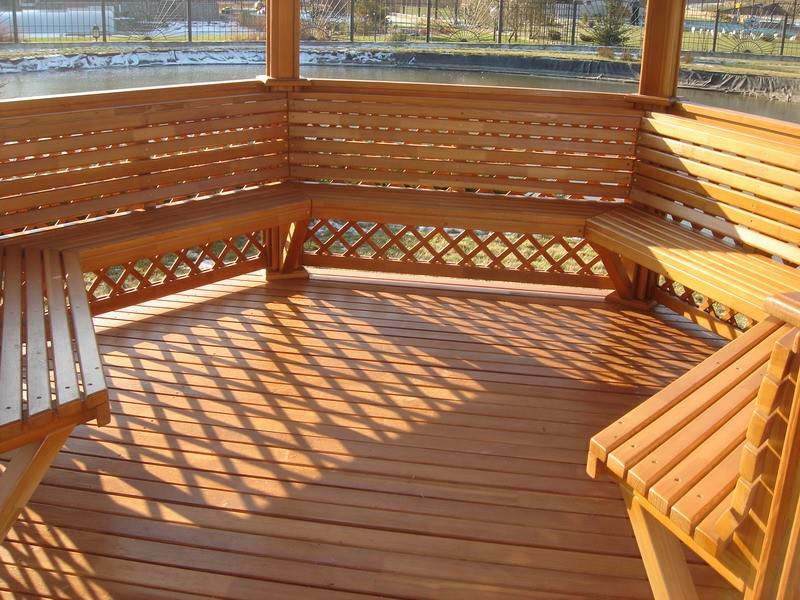
Wooden floor in the gazebo photo
Wood is wood. No matter how attractive it is, it is still prone to rot and mold, bugs and other insects start in it, which slowly but surely disable the wooden product. It is better not to use it in open areas and in gazebos unprotected from natural factors. In this case, the best option would be a composite material, which is made from wood sawdust and polymers. Having the appearance of wood, it has the best properties - it does not rot, is not afraid of high and low temperatures, as well as ultraviolet radiation, insects do not start in it and fungus does not appear.
- Decking board - has excellent performance and appearance. It can fit in open spaces, while serving for several decades without losing its qualities, since it is not afraid of temperature changes, moisture, bugs.
- Garden parquet - unlike boards, it is made in the form of squares with a plastic base, on which WPC (wood-polymer composite) strips are laid in different directions. Garden parquet has various sizes and a fairly wide selection of colors, which allows you to choose it for any exterior and interior.
Both materials have a non-slip base, so you can safely put them in the gazebo, walk on them and not be afraid of slipping. Also, such a floor is easy to care for (even the use of household chemicals is allowed) and does not need to be painted periodically, as is the case with natural wood. If we return to the positive and negative characteristics, then the minus of the composite material is the high price, but if we compare it with the long service life, then the cost is quite justified.
Tie the base
It is needed to evenly distribute the load and fasten all the pillars into a monolithic structure.

As a rule, a beam of 100 × 100 mm is used, which is installed on the posts through a waterproofing layer. For example, pieces of roofing material. At the junction points, the timber is cut in half of the section and connected with galvanized (yellow) screws or nails. If there are anchors, then the tree is drilled and attached to them with nuts and washers.
With the small size of the gazebo, it is enough to strap only around the perimeter. If the length of the building is more than 2 meters, one or more beams are additionally installed in the center.
Surface pretreatment
So that the impregnation does not lose its properties, it is recommended to pre-treat the wood material in a special way. The work is carried out in two stages:
- Grinding. You will need a sander (fast) or you will have to fiddle with sandpaper of different grain sizes for a long time. The surface is leveled in the same way as before traditional priming or painting.
- Cleaning. With the help of a vacuum cleaner, all debris, shavings and dust are removed from the sanded surface. The tree can even be washed afterwards.
The same procedure is used if the appearance of a wooden building has clearly faded over the years. Alas, untreated wood loses its beauty over time, darkening and as if getting dirty. In this case, the external unpleasant plaque is removed in the same way - by grinding.
It is advisable to apply a primer to the cleaned surface. Further, when the primer dries, the tree is covered with a couple of layers of antiseptic, applying it with a spray gun or a brush.
When the surface is ready, you can start impregnation.
 With this material, you can process the gazebo
Porcelain stoneware floor
Porcelain stoneware is a pressed clay fired at a high temperature. In fact, it is a tile, but more resistant to damage.It is great for covering large areas.
One of the most hassle-free and easiest options
Lay the tiles on the pre-concreted floor. To do this, first remove the top layer of soil, and then cover the space with gravel. From above, on gravel, sand is poured and only then concrete is poured and waited until it hardens.
Porcelain stoneware tiles are laid on the hardened concrete. The advantages of porcelain stoneware are its strength and durability.
The material tolerates well not only loads, but also natural conditions, which is a good indicator in Russia.
The disadvantages, albeit conditional, include the fact that there are strong restrictions in shape and colors. Porcelain stoneware is mostly spotted or monochromatic in color, which does not suit everyone.
Minor problems can arise when cutting the material, as it is very dense and difficult to process.
Unusual options
For the construction of the floor, cement-particle boards - DSP can be taken. Their advantage is that they do not rot, they serve for a long time, are moisture resistant, require a minimum of maintenance and withstand temperature effects. Due to the fact that this is a multilayer material, such plates retain heat well. They can be used as a stand-alone coating or as a base for tiles.
To make the floor cost lower, inexpensive and reliable raw materials are used, as well as some construction tricks. So, for example, instead of the foundation in the corners of the structure, you can dig in ordinary wooden chocks and stretch the ropes between them. After the chainsaw cut off the top layer and make them flat. Planed boards are nailed to the posts, and additional ones are attached to the corners for strapping.
To save money, you can buy raw boards and process them yourself. The main condition is that the cuts are even, otherwise the joints will turn out to be of poor quality. Another way to save money is that the final flooring can be made from sheet metal elements such as plywood, OSB or chipboard. In addition, the installation will be faster.
Straight cuts are best done with a miter saw, and complex or shaped cuts with a jigsaw.
Clay
The adobe floor is now less common, but it is gaining popularity and is a suitable choice for flooring in a gazebo.
Clay is an environmentally friendly material that can be purchased at a low cost. Clay is easy to build.
This method does not require a foundation, frame or other structures; the clay must be placed directly on the ground. It can be made as an independent element or become the basis for tiles, porcelain stoneware, etc.
A clay floor can be erected by following these tips:
- first compact the soil well, level and cover with a layer of gravel 4–5 cm;
- prepare a mixture of water, clay and chaff, and add lime to increase strength;
- apply the resulting solution in an even layer over the prepared base, the thickness of such a layer should be at least 7-8 cm;
- after the floor has dried, cover the surface with a lime-clay mortar and rub - this will increase the moisture resistance.
When the clay dries, cracks may appear on the layer. This is not a sign of an error in the procedure; such defects are covered with the remains of the solution.
Bulk alternative
Another non-standard solution for the floor surface has recently become a bulk coating. This method is more often used for open gazebos on the street.
To make such a floor, you will need to arm yourself with a shovel, sand and fine gravel.
With a shovel, remove the top layer of soil so that you get a small depression into which you will need to fill in sand or gravel. You can mix these materials.The layer should be even and evenly distributed over the entire area.
This is the fastest, easiest and most inexpensive way to make a floor. It will easily withstand a large number of people, however, there are a number of disadvantages, including the lack of moisture resistance, heat, grass will often sprout, and bulk materials can wear out with feet and you will often have to clean the area and update the coating. It is worth noting that it is decorated with a lawn, which greatly increases its attractiveness.
So, we examined the main materials that are used to cover the floor in the gazebo in the country. Each of these types has a number of its advantages and disadvantages, and also differs in varying degrees of complexity in construction. Therefore, before you get to work, carefully select the exact type of coverage that suits your needs and capabilities.
Tools and materials for arranging a concrete floor
- Armature
- Cement
- Crushed stone
- Sand
- Shovel
- Planks
- Capacity.
Arrangement of a concrete floor in the gazebo
In the space of the gazebo, you can equip a concrete floor, which should be reinforced with reinforcing rods. They should be laid with a distance of 250 mm. They should be raised above the ground by 5 cm, for which brick supports can be used.
The mixture for pouring the floor in the gazebo should be prepared from cement, sand and crushed stone, using the following ratio of 1: 3: 5. Tiles can be laid on such a base for greater aesthetics.
If the structure is installed on the surface of a strip foundation, then fertile and loose soil layers have to be removed inside it, while it is important to maintain the evenness of the base. After that, you have to equip a sand pillow, the layer of which should be 15 cm
The sand must be tamped well, and then covered with crushed stone with a layer of 10 cm. It also needs to be pressed into the sand.
Now, along the perimeter, on the inside of the base of the gazebo, it is necessary to lay a damper tape, this will provide a 2 cm gap required for the expansion and contraction of the concrete. Next, reinforcement should be laid on the crushed stone, and then the floor should be poured with concrete, providing a screed layer of at least 4 cm. To reduce the thickness of the concrete layer, you can slightly raise the height of the cushion of sand and crushed stone.
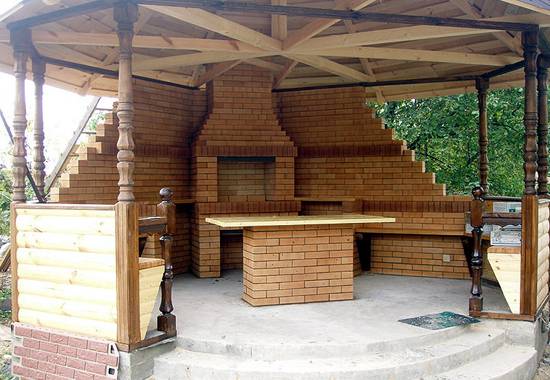 In the photo there is a gazebo with a concrete floor
Floor finishing
Now that the structure is ready, you need to decide how to cover the wooden floor in the gazebo. There are several options:
| Finishing option | Peculiarities |
| Painting | It allows you to give the wood any color, however, it hides its natural appearance. Therefore, experts recommend painting only old floors that have lost their natural appeal. |
| Varnishing | The main advantage of varnish is that it allows you to preserve the texture of the wood. Moreover, some types of varnishes can give the surface a certain shade, thereby making it even more attractive. |
| Impregnation | This finishing option has recently been very popular, since in this case the natural appearance of the wood is completely preserved. As for the effectiveness of such processing, it is not inferior to painting or varnishing, since the protective composition penetrates deep into the pores of the wood. |
Each of these options provides wood with reliable protection from environmental influences for some time. Therefore, the choice of the type of coverage depends only on the design of the gazebo and your own preferences.

Opening the floor with varnish
Before painting the wooden floor in the gazebo, it should be sanded. For these purposes, it is better to use a special grinding machine for processing wood, since it is quite a long time to do the work by hand.
Note! When choosing a paint finish for wood flooring, make sure that the composition is intended for outdoor use and is suitable for covering wood. In order for the wooden structure to serve as long as possible, the treatment of the flooring with paints and varnishes should be carried out every few years.
The exact time depends on the type of composition
In order for the wooden structure to serve as long as possible, the flooring should be coated with paintwork every few years. The exact time depends on the type of composition.

Impregnation for wood
Here, perhaps, is all the basic information on arranging a plank floor.
Wooden floor
The simplest and most popular option from which it is better to make a floor in a gazebo is a wooden floor on logs. It can be installed on almost any foundation: columnar, strip, reinforced concrete slab.
Foundation for the floor
This instruction will show you an example of installation on a columnar foundation, since it is the most popular for building gazebos with your own hands:
- Drill holes for pouring concrete posts below the level of soil freezing depth. Rows of posts for each beam should be located approximately every 1.5 meters, and in places where a high load is planned, for example, installing a stove, posts are placed more often.
- Install the pillars to fill the inside of each hole.

Homemade concrete pile made of roofing material
- Then you need to install a reinforcing cage of 3 reinforcement bars connected by a triangle over the entire length of the post.
- After installing all the posts, you need to trim them to one level using a laser level. Then you can fill them with concrete.
You can also make the installation of a wooden floor and on a strip foundation. But for this you will need to make brick posts inside the tape to support the beams.
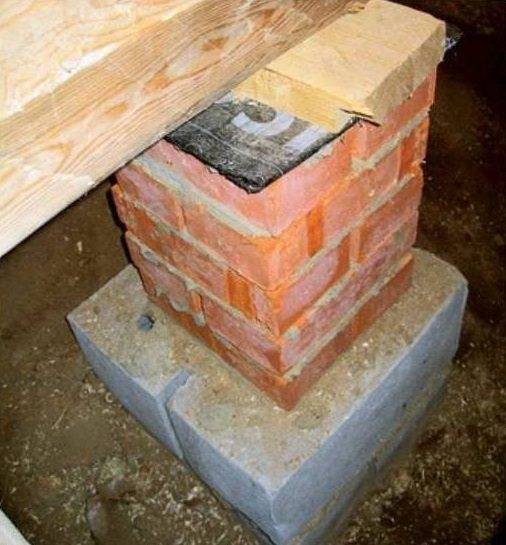
Intermediate floor support post
Installation of a wooden floor on poles
- When the concrete hardens, you can begin to make the strapping around the perimeter. For this, only dry timber is suitable, since when using a damp floor, it can warp and crack after drying.
- Cut out quarters at the ends of the timber to fit it together and drill holes at the desired points.
- Put a lining of roofing material, put the beam on the prepared studs on the foundation and pull it from above with a washer.

Installation of a strapping bar on a foundation
- Then you need to fix the intermediate bar using steel corners. Its edges will rest on the extreme posts, and intermediate brick posts will support it in the center.
- Since the distance between the posts is large, for reliable floor sheathing without deflections, logs are installed perpendicular to the beams every 50-60 cm on which the sheathing will be attached. The first and last lag is installed with a distance of 20-30 cm from the wall.
- In addition, if you have a gazebo of a complex shape, for example, a 6-8 coal one, then you simply will not be able to properly fix the cladding, because the foundation posts will be installed in circles, and the strapping will resemble the shape of orange slices. In this case, additional logs are also installed on top of the strapping, as shown in the photo below.

Finished floor frame
- The frame is sheathed with a grooved floorboard. It is laid perpendicular to the logs so that the edges of the boards fall on the center of the logs.
- The first board is screwed with screws from above to the logs. The second and the next - at an angle from the side of the groove.

Floor covering with boards
- For a tight joining of boards without gaps, they are knocked out with a hammer through the trimming of the same board.
- Also, to rally the boards together, they can be wedged. To do this, a metal bracket is nailed to the log next to it, and 2 wedges are driven in between it and the last board. They will grip the board tightly, giving you time to screw it down calmly.

Wedging boards for tight joining
If necessary, the floor is sanded and covered in several layers with a protective varnish.
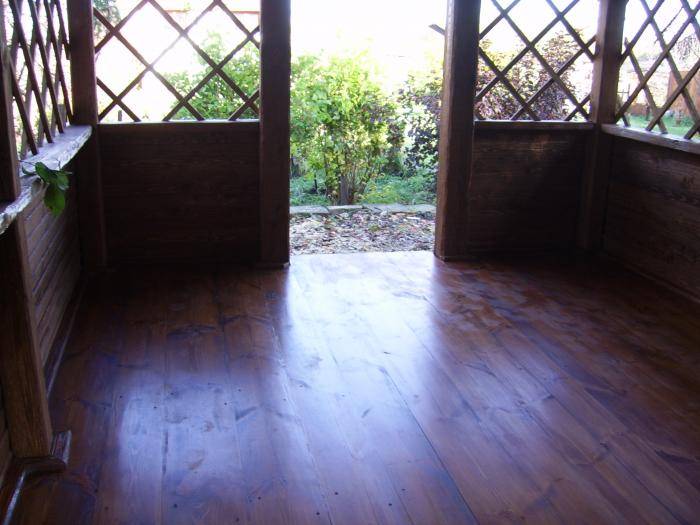
Lacquered wood floor
Budget wood floor
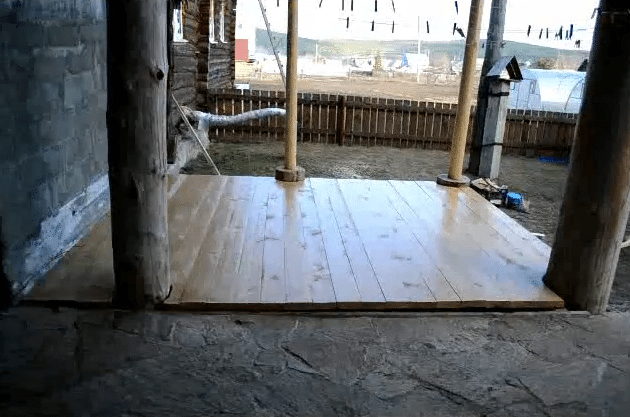
Budget version of the gazebo
Now we will tell you another way how to make an inexpensive wooden floor for a gazebo.

Marking pillars for floor fixing
- For tight fastening of the harness boards, you need to cut off the rounded part of the stumps from the inside with a chainsaw so that they become flat.
- Then 2 planed boards are nailed to wooden posts.
- A second pair of strapping boards is attached to them at the corners.

Installation of piping
Then, inside the strapping, intermediate lags are attached with corners so that the sheathing does not bend. As a result, you should get cells of about 50-70 cm.

Floor frame ready
- The floorboard is cut to size. To save money, you can buy a non-planed board, and then process it with an electric plane. The main thing is to provide flat ends for tight docking with each other.
- Boards are pre-stacked on logs. The places where you will need to file them are marked in advance. In difficult places of joining, for example, next to the posts, a template is cut out of cardboard, and then the place of the drink on the boards is marked on it.
- Straight cuts are best done with a miter saw, and complex cuts with a jigsaw.
- The boards are screwed on from above with long self-tapping screws, and the caps are recessed by about 5 mm so that, if necessary, the top layer can be removed with an electric planer.

Screwing the boards to the frame
Then the floor is also varnished in several layers.
Color selection
The range of modern paint companies comes in a variety of shades to create quirky and eye-catching gazebos.
The most popular colors after brown are the following colors:
- Green - it gives the surface a pleasant, natural, relaxing look. Soothes and blends well with the surrounding greenery.
- Shining blue is also popular. So the gazebo by the reservoir can be painted.
- The shade of gray wood has gained its fans. The structure can be smoky gray or dark gray, but it will look equally noble.

The floor in the gazebo is made of wood-polymer material
Installation diagram of a chipboard floor for a gazebo.
If the option of a wooden floor is not suitable, then you can resort to wood-polymer. Everyone knows that the base of the boards is not durable, and this may scare the owners, but still such a floor looks beautiful and organic. Therefore, you can use an alternative method, as a wood-polymer floor has a number of advantages, but also looks similar to the previous material.
It should be noted that wood retains all the positive properties of wood. In addition, it is more durable, exceeding the service life several times.
This material differs in that it is made in accordance with a special technology, which has several options. So, in the composition of such a material there is always wood, but one more component should include pvc plastisol. This applies to polymer and polyethylene.
Such a floor can be made both from a deck board and a terrace. And the difference between them is not too significant, and their appearance is almost the same.
However, it should be borne in mind that the surface of the terrace material is corrugated, that is, it has so-called anti-slip grooves, which guarantees reliability.
The table of advantages and disadvantages of wood.
But such boards also have their drawbacks, namely, that they are not cheap. Therefore, if the owner decided to save money, then this option will not suit him.
The advantage is not only durability, but also the positive properties of wood. This also applies to mold resistance, non-susceptibility to fungi or ultraviolet light, that is, such material will not fade over time.
Atmospheric phenomena also have no effect on terrace boards, and it is very easy to clean such a floor from dirt. This base does not need finishing, but if the owner wants to change something, then it can be painted.
This material is also quite easy to lay, because it is necessary to use all the same elements and tools that were listed above.
In addition, wood-polymer boards are easy to saw, so they fit in the same way as in the previous version, but you do not need to treat it with an antiseptic.
Masonry methods
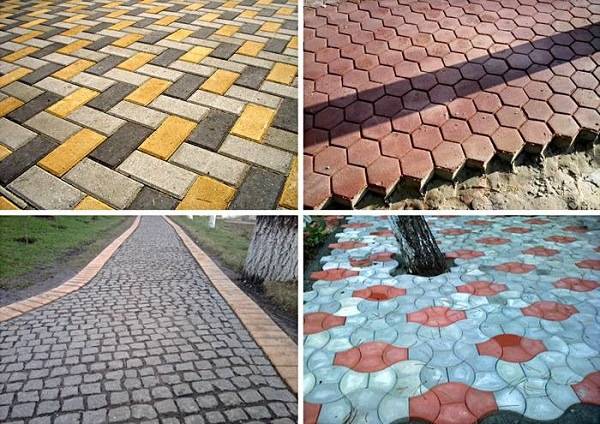
Paving stones can be laid in different ways, creating an original floor covering. The most common are square and rectangular products. You can lay them in this way:
- Using products of different colors to create interesting patterns or ornaments.
- Use two colors of products, stacking them in a checkerboard pattern.
- Lay the material diagonally at right angles, making a herringbone.
- Perform transverse and longitudinal laying at the same time, creating a braid.
- Move tiles evenly to the side (like laying bricks).
- Lay products in one line.
