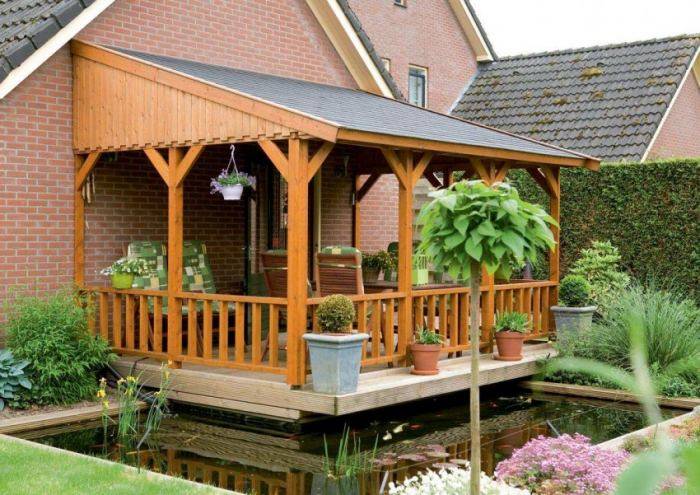
Main construction
Frame. There are several ways to attach the veranda frame to the house. Used for construction are the most common materials such as brick, wood, foam concrete blocks.

Roof. The most common roofing option for a terrace is a single-pitched type of construction. The material is recommended to be used the same from which the roof of the main structure is made.


The main steps for equipping the roof in this way:
- Boards to the rafters are attached close to;
- Roofing material is overlapped and fixed with galvanized steel nails;
- Additional fixation of the canvas is carried out with slats with a certain fastening pitch;
- The bottom edge of the cover is folded over and fixed.

An interesting material used in the construction of the veranda roof is transparent polycarbonate. It is a modern building material that is durable. In addition, the buildings, including the roofs, look quite stylish.

Interior decoration primarily depends on whether the terrace is open or closed. An open veranda is subject to negative environmental factors: wind, rain, frost. In this regard, the finishing material must be resistant to temperature differences and moisture resistant.

Materials are varied, for example, wooden lining, panels made of MDF or PVC, as well as siding. All of these materials are quite diverse in color palette and texture, which pushes the creative boundaries of interior design projects. The photo of the veranda inside shows trends towards natural finishing materials and textures.

Floor covering. As a rule, the material for finishing floor on the terrace remains classic - a board made of wood. The boards are laid directly on the joists on top of the thermal insulation. Upon completion of the installation, the boards are covered with a paint and varnish coating.

Foundation laying rules

Types of foundations.
Regardless of what type of foundation will be chosen, it must be made of the same depth as the foundation of the entire country house. At the same time, you should not turn the foundation of the buildings into a single whole - it is better to make a gap of about 4 cm. A heavy house has a greater degree of shrinkage than a light veranda, so that it can simply pull the extension behind it.
When choosing the type of foundation, it is very important to take into account the overall quality of the soil and the material from which the walls will be made, in order to avoid “playing” the foundation or excessive shrinkage of the veranda
Strip foundation

If the owners decide to make a large and heavy veranda, then they should pay attention to the strip foundation. It can easily withstand buildings made of bricks or blocks that are covered with slate
Below is the order of the actions performed:
- A trench is being dug along the prepared markings.
- Wooden formwork is being erected to the height of the main house.
- Concrete is mixed from cement, sand and crushed stone (proportions 1: 3: 6, respectively).
- A third of the concrete is poured with the addition of stones, after which the foundation is left to stand.
- Pour another third of the concrete, adding stones again.
- Stones are not added to the top layer - on the contrary, it is leveled to make it easier to lay bricks.
If the construction takes place in the middle of a hot summer, then at least once a day it is required to water the foundation with water so that it does not crack.
Column foundation

If the veranda is wooden or frame, then it is worth using a columnar foundation. It is just designed for light buildings. However, when using this type of foundation, it is worth considering the heaving of the soil from temperature changes. In order for the foundation not to start "playing", the posts need to be dug in to a depth below the freezing of the soil (in central Russia - more than a meter). If the veranda is small, you can only limit yourself to supports in the corners.If you plan to make a large room, then it is worth digging in intermediate posts with a step of about half a meter. The construction algorithm is as follows:
- Digging a hole under the post.
- At the bottom, 20-30 cm of sand is poured.
- It is poured with concrete flush with the ground, which is left until the mortar hardens.
- Sand is poured into the gap between what happened and the earth. The column is pre-coated with bitumen.
The support is adjusted to the height of the foundation of the main building with bricks or blocks. There should be at least 30 cm to the future floor of the veranda.
Construction of the veranda frame
So that the floor of the veranda attached to the house does not play when walking on it, it is necessary to make a reliable rigid foundation. Therefore, for the construction of the lower strapping, it is best to use a bar of 150 * 150 mm, and make the floor logs from a bar of 100 * 150 mm.

The beam is laid on a columnar foundation through a waterproofing material and is attached to the house with metal corners. To extend the life of the tree, it must be treated with special impregnations. Since the veranda is not inside the room, but outside, you can use the old old-fashioned way and process the strapping and floor logs with used engine oil.

The timber is fastened to each other with metal pins. It is also better to make racks for the veranda from a bar of 150 * 150 mm, this is more reliable, and a massive thick pillar looks better. The timber for the racks must first be planed and well sanded.
Photo of fastening the timber to the floor joists:
At the bottom, the racks are attached to the beams with the help of studs, and in the corners with metal galvanized corners. Before attaching the racks, you must make sure that they are strictly vertical using a building level. The upper harness is also made from a bar of 150 * 150 mm, and is attached to the racks with 300mm nails.

Before fixing the beam, it must be drilled in the place where the nail is driven. This will make it easier to hammer in the nail and help to avoid cracking the timber. The upper harness is attached to the house using a special metal bracket, which can be purchased at a hardware store or made yourself, with your own hands.
Installing the roof and floor
As a rule, the veranda has a lean-to roof, which is flatter than the roof of the main building.
Let's learn how to do the roof and floor installation with our own hands:
- We are installing a dense sheathing to the rafters (you can take uncut boards to save the budget for the project);
- On the crate we make a roofing material flooring or take any other roofing material (if you want to additionally protect the space from moisture, then you need to put a layer of waterproofing material);
- When laying the floor with our own hands, we nail edged boards about 3-4 cm in thickness on the logs (we use an antiseptic to treat the boards, this will protect the floor from rotting and fungi);
- Next, we paint the boards or cover them with a floor covering (for example, linoleum).
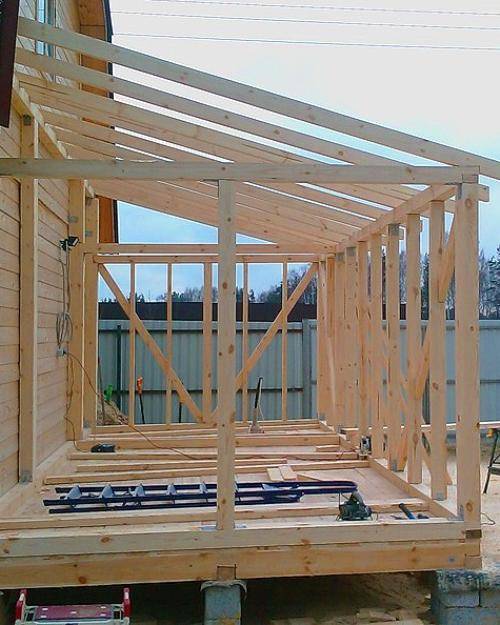
After installing the frame, installing the roof will not cause you any problems. The photo below shows the assembled frame structure.
How to attach a veranda to a house: the main stages of work, similarities and differences
Regardless of what type of veranda is planned to be built, most of the work goes according to the same scheme.
- Site preparation. The site planned for building is cleared, all garbage is removed, the condition of the foundation, the wall of the house and the blind area (if any) in this place is checked. If communications pass on this site, it is necessary to mark their location so as not to damage it during construction. It is better to remove the top layer of soil, uproot the plants. So that in the future the roots do not damage the building, it is advisable to treat the soil with special compounds.
- Markup.First of all, the corners of the structure are marked, then the perimeter is outlined along the cord. For columnar and pile foundations, marks are placed for future supports in accordance with the project, for tape foundations, the width of the tape is outlined.
- Pit / foundation pits are dug. This applies only to buried foundations, screw piles are twisted into the ground without preliminary excavation of holes.
- A sand and gravel cushion is being arranged. This type of preparation is also carried out for screw-pile foundations, but the embankment is carried out around the already mounted piles. The distance from the axis of the pile to the outer edge of the pad is at least 0.5 m. If the soil in the area includes loose sand, the pad can be partially replaced or supplemented with a layer of hot-filled bitumen.
- The foundation is in progress. For columnar supports, columns are made of bricks, blocks or monolithic concrete, strip bases are poured into the formwork or assembled from blocks. The upper part of the tape or columnar supports must be protected by horizontal waterproofing, the underground part is treated with roll or coated waterproofing. The strip foundation or pillars are “connected” to the foundation of the main building with embeds at the stage of reinforcement.
- The grillage is being arranged. This stage is required for columnar and pile foundations.
- Racks are mounted or columns are laid out / cast. The connection of these elements with the foundation with mortgages or other fasteners is mandatory. Stands or columns adjacent to the wall are connected to the main wall. For lightweight structures made of metal or wood, the connection can be omitted.
- The upper and lower harness is assembled. Bottom - only for light frame structures. For capital verandas made of blocks, bricks or monoliths, the upper trim is replaced with a Mauerlat, on which the rafters will rest in the future.
- The roof frame is being assembled. More details about the connection of rafters or trusses with the upper harness (mauerlat) can be found in the article.
- The roof is covered with the selected material. With any design, waterproofing of the seam between the roof and the wall of the house is required. It is also advisable to arrange water drainage and the so-called "rain apron".
- The base and flooring are being installed. The most popular is decking, decking or tongue-and-groove planks on wooden joists.
- The fence of the veranda is being mounted. It can be light or heavy, in the form of masonry or a monolith, supplemented with glazing, mosquito nets, sunscreens and so on.
- Finishing in progress.
Taking into account the difference in materials and qualifications of builders, the duration of the work can be from 2 days to several weeks.
Below is a video for installing a do-it-yourself veranda made of wood:
Veranda attached to the house: stages of construction
First of all, you need to decide on the type - open / closed, from what material, choose the type of foundation. You also need to decide what size it will have, where and how it will be located. It is desirable to draw all this on the plan. Better yet, order a project. Construction according to the project is rather an exception, but at least a plan with dimensions and an indication of the location, binding to paths, etc. you should have.
The construction of a veranda to the house with your own hands goes according to the following plan (we build from wood):
- Use pegs and twine to mark out the contours.
- Remove the sod and fertile layer. If this is not done, vegetation under the decking will rot, spreading odors.
- Mark the foundation. At this stage, questions may arise: how high should it be. If the foundation is made incoherent and "floating", the level of the veranda flooring should be 5-10 cm below the floor level. This is necessary so that, even after rising, the extension does not block the front door. If you do not want the floor to be lower, you will have to make a high threshold in the front door: to ensure the freedom of opening the door. The height of the support bar depends on the height at which the floor of the extension is located. It is nailed to the wall of the house, floor beams are attached to it. The height of the foundation is beaten off along its lower edge (these are the next two steps).
-
You nail a support bar to the wall, along the lower edge of which the height of the foundation beats off.
- Build a foundation.
- While the concrete is gaining at least half the strength, you are completing the site preparation. If at the bottom of the pit (the fertile layer was removed) the soil passes water well (sandy, sandy loam), fall asleep crushed stone at the bottom. It can be compacted, or you can do without it. If there is loam or clay under the fertile layer, you will have to fill the pit with either the same soil (but not fertile) or clean clay. It must be well tamped so that voids are not created in which water will accumulate (it is better to lay layers soaked to a paste state).
- A layer of waterproofing is laid on the finished foundation.
- Support pillars are exposed and fixed under the roof.
-
They make the strapping of the racks: a beam with a thickness of 100 * 150 mm is nailed along the perimeter. It can be nailed on the outside of the posts or between them. Sometimes the racks are nailed down after the floor has been laid. This is not the best option: the floor will deteriorate most quickly. With such a structure, in order to replace it, you will have to disassemble everything, up to the roof. If you first set up the racks, and then the floor, it can be repaired without problems.
- Floor beams are attached to the foundation and support bar (bar 100 * 150 mm). The step of their installation corresponds to the step of installing piles or posts.
- Collect the rafter system.
- Side rails (for open ones) or walls (for glazed ones) are installed. At this point, the general technology ends. Further, for covered ones, it is longer, an open veranda is easier to attach to the house:
- For open beams, floor boards are nailed.
- Insulated floors are made for glazed ones. A rough floor is nailed to the beams. Above - logs, between them - insulation, on top - a finished floor.
- Roofing.
- Wall decoration inside and outside.
These are just general steps. In order to have a more complete idea of how to make a veranda to the house, then we will consider the most problematic aspects of construction in more detail.
Perhaps you are interested in building a gazebo? You can read how to build a gazebo made of wood here.
The place where the roof of the veranda adjoins the house
As a rule, when covering the roof of the veranda, the same roofing materials are used as when building a house, so as not to disrupt the overall design of the building as a whole. The adjoining of the roof of the extension to the house can be done in different ways, depending on which of the walls the veranda is attached to. If the roof of the veranda is ultimately an extension of the roof of the house, then the task is greatly simplified, since it is enough to merge two rafter systems. It turns out that the roof of the veranda is adjacent to the roof of the house.
In this case, proceed as follows:
- The upper veranda harness with the fastening of the racks is being formed.
- Ceiling beams are attached to the harness, to which the veranda ceiling will subsequently be hemmed.
- The rafter legs of the house are shortened so that they do not go beyond the wall.
- Elements of the extension's rafter system are attached to the house's rafter system as shown in the image below. The mounting method is selected depending on the complexity of the design. For greater reliability, metal pads are used.
- In order for the structure to be reliable and able to withstand the loads, special reinforcing struts are attached, the purpose of which is described in the image below.
If the width of the veranda is more than 2 meters, and also if heavy roofing material is used, additional spacers are installed. As a rule, they are not attached to the sides of the rafters, but inserted between the upper and lower beams, after which it is better to secure them.
In order to eliminate the sagging of the roof, spacers are installed between the ceiling beams and the rafters.
Sometimes it turns out that the roof of the veranda is adjacent to the wall of the house.To solve this problem, it is necessary to make a groove in the wall and lay a special profile in it, carefully sealing up all the cracks. The second side of the profile enters the surface of the roofing material, which excludes the ingress of precipitation into the space, which is due to the abutment of the structure to the wall.
How to attach the roof of the veranda to the wall of the house
Such a profile can be made by hand by bending the galvanized section accordingly. The design differs in that it is necessary to strengthen a special beam, which moves this apron from the wall to the required distance. The apron is also attached not to the wall itself, but to the timber embedded in the strobe. In fact, if the construction of the extension is simple and primitive, then such an apron can also be fixed to the wall, bending the edge accordingly. After that, it is better to cover the strobe with a sealant.
The second option for joining the roof of the extension to the wall of the house
The rafters are attached to the outer upper harness using metal corners, as shown in the photo below, since the dimensions of the elements do not allow for special cuttings, as in the presence of a Mauerlat.
The method of attaching the rafter legs of the veranda to the upper harness
The solution is simple and reliable, although it does not look very good, but in fact, no one will see it after the roofing material lies on the roof, and the ceiling is lined with any finishing materials.
Roof construction
After the construction of the frame, they begin to install the rafter system. For the rafter system of the veranda, the same board 150 * 50 mm is used as for the rafters of the house itself. The angle of inclination of the roof of the veranda must correspond to the project. If to attach a veranda to the house, it was decided independently, and was not intended for the project, then the roof should not be made too flat, otherwise it may fall under the weight of the snow.

The rafters are sawn off to the desired size and are attached on one side to the harness with nails, and on the other side to the house with two metal corners. The corners are attached to both sides of the rafter, which is drilled through. A pin is inserted into the drilled hole, and the corners are pulled together.
Photo of fastening rafters in the wall:

Thus, we get a strong, reliable fastening. If the veranda is planned to be insulated in the future, then the roof will also require insulation. To avoid the insulation getting wet, a vapor barrier is pulled along the rafters, a counter rail is nailed, and then a crate is made. If the veranda is open, then immediately along the rafters, a crate is made from a board of 150 * 25 mm. Roofing material can be laid on such a crate: profile sheet, slate, metal tiles.

If you want to cover the veranda with flexible tiles, you will have to make a solid base. To do this, you will have to put sheets of plywood on the board crate, and then the tile itself.
Photo. Plywood base for shingles

Glazing: how and how
Even a large open veranda can be glazed if desired. The easiest way is to call a measurer from a company that sells metal profile windows and listen to their suggestions. The windows they can offer are opening or not. The choice is yours. Such glazing of the veranda looks like in the photo below. For giving seasonal residence, such an option may be unsafe: if the territory is not guarded, they can break it.

Glazing of a large veranda
Even with such a decision, questions arise:
- Install single or double frames. If you have finances, it is better to bet double. They keep warm much better. Even if in winter you come to the dacha just to check how you are doing, in spring or autumn it will be much warmer. Up to the point that if the veranda is on the south side, while the house is heated, you will bask on the veranda: the sun heats the air, and the frames keep the heat.It will be especially warm if you make an insulated floor. But even with a single decking, the temperature in the glazed extension will be much higher than in the house.
- Windows must be burglar-proof or not. If there are no guards nearby, then even the best ones will be able to hack. Even toughened wired glass won't last long against bricks. And in order not to provoke thieves, the entrance to the house should be behind a reliable metal door, while the entrance to the veranda can be equipped with simple doors.
In the photo below, the veranda in the country house was glazed with double windows. With a slit floor in the spring in the extension it is much warmer than in a log house.
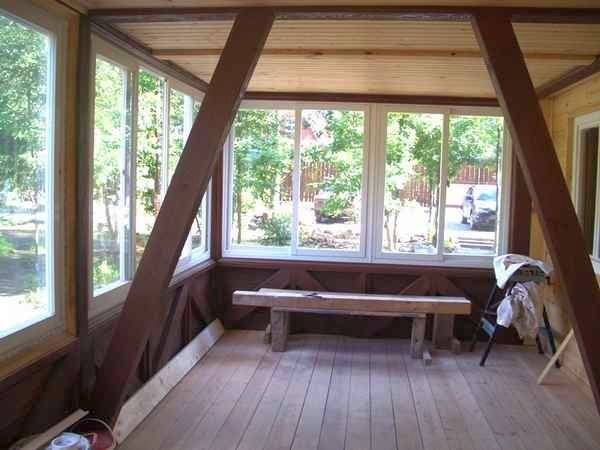
When deciding how to glaze the veranda in the country, keep in mind that double races retain heat better even in an unheated extension
Large glazing area - large sash. If you order double frames made of wood, they will open inward (just like in fiberglass). With a small veranda area, they can interfere. There are several options. First: order those in which both frames will open outward (there are some). The second is to put sliding ones. One point: sliding ones are made only of aluminum profiles. If they can make them out of wood for you, they will cost immeasurably (this type of window made of aluminum is not cheap at all). We see the glazing of the country veranda with sliding metal-plastic windows in the photo.
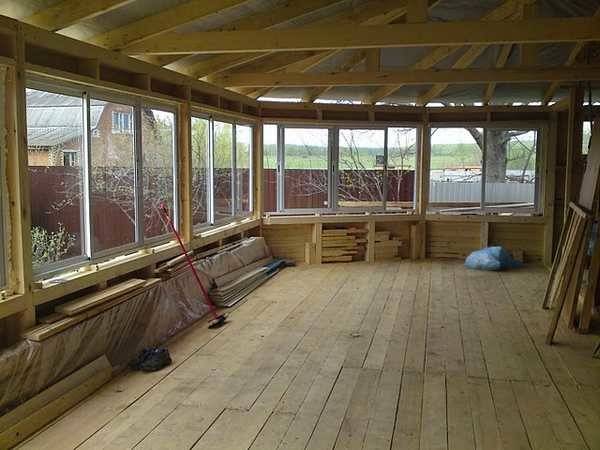
Aluminum profile sliding windows on the summer cottage: comfortable and warm
If the veranda in the house is made of logs, and it was cut down together with the house and was originally planned as open, the white windows in it will look “not very good,” to put it mildly. Not everyone will pull windows in wooden bindings for a large area, metal-plastic is still cheaper. The solution is simple: there is laminated aluminum. It is covered with a film that imitates the surface of a tree. Choose the desired color and everything looks good (an example of such glazing of a veranda on two floors in the photo below).

Glazing of the veranda at the dacha from a log (polyurethane foam is visible, it will then be closed with strips)
After the veranda has been glazed, I want to build an open gazebo. How? Read here.
Another option is frameless glazing. In this case, a strong strapping is made at the top and bottom, special glasses are inserted between them, the gaps between which are laid with rubber seals or covered over.
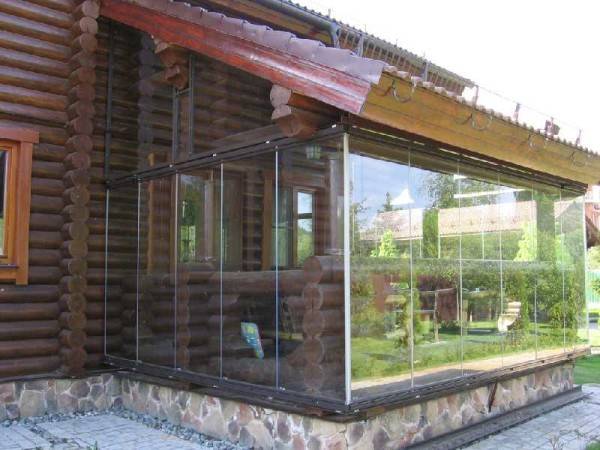
Frameless glazing of the veranda in combination with a log house is not the best solution
Wood is better combined with polycarbonate. Its plus is that you can install it yourself: make frames with a quarter removed, install polycarbonate sheets on the sealant in them. They are attached to the frame with self-tapping screws with special thermal washers that compensate for different temperature expansion. The seams between the sheets are filled with a transparent sealant, but there are special mounting profiles for joining the sheets.
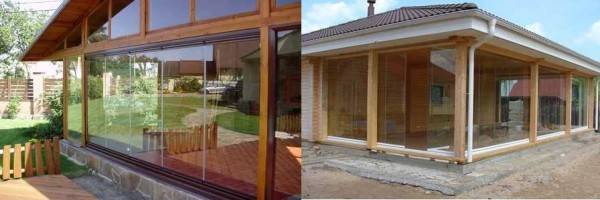
Glazing of the veranda with polycarbonate: you can do it yourself
You can glaze the veranda in this way yourself. Polycarbonate weighs relatively little, is not so picky about the conditions of transportation, it is easier to work with it than with glass. Heat, due to the cellular structure, holds even better than glass: it is used in greenhouses and greenhouses. So a veranda in the country with your own hands can be not only built, but also glazed.
Construction of a wooden veranda
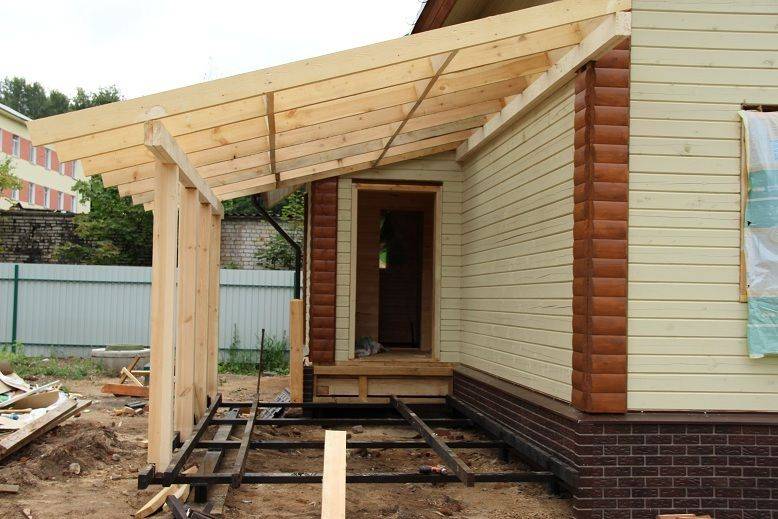
First of all, you need to make a frame:
- A timber is placed on the floor for strapping, in which grooves are cut for attaching the racks. The uprights are installed and fixed with nails. Those that are adjacent to the main building must be anchored with anchor bolts. Be sure to take a step equal to the width of the window in the place where it is planned. It is best to leave space for the door somewhere at the end to avoid drafts.
- Another beam is fixed on the racks from above to create the upper strapping.
- Where the roof slope of the main house is located, you need to anchor the girder with anchor bolts.
- The rafters are being installed.
Roofing "pie"
The roof is created according to the same principle as in the main house, only it is usually made with a lean-to and more sloping roof. An important point is that a vapor barrier on the veranda is not needed, since there is no under-roof layer. It also does not need to be done when insulating walls and floors. Steam should not accumulate inside and it will go to the attic, from where it will escape from the house. Most often, a superdiffusion film is laid for waterproofing, which allows moisture to pass through only in one direction. However, when using metal tiles, they are not used, since the metal will rust from condensation. In this case, you should buy a special condensate film.
Preparatory work
When planning to modify a residential building, it is important not to lose sight of the large number of features. The extension is always organized from the side of the door, since it is its characteristics that determine the length of the selected structure
The width is determined directly by the owner, and depends on personal preference, as well as the materials available.
Site drawing and preparation
The base scheme directly depends on the extension option and its approximate appearance, so you first need to decide on these parameters, sketch ideas on a piece of paper. The next step is to transfer all the preferences into a computer program for creating drawings - there are quite a few of them, they are simple to use, so this stage will not take too long. However, it is quite important, since it helps to build all the components symmetrically, rationally in relation to each other.
 A rather simple way that does not involve a lot of time is to search for ready-made drawings on the Internet - often they all go for standard extensions, but you can also find quite unusual ones.
If you are not confident in your abilities, you can choose the simplest, but at the same time the most expensive option - contact a construction company. There, in a short time, you can get a ready-made and absolutely correct project in all respects, without worrying that the site being built will collapse.
Find out if the veranda and terrace are considered the area of the house according to SNiP.
When the sketch is ready, you can start preparing the site. First of all, it is necessary to clear the desired plot of land from weeds, debris, dry leaves, etc. Then arm yourself with a building level, wooden pegs and a rope - with the help of these materials, it will be possible to deduce the extreme points of the future structure. Further, the site for the extension must be freed from the top layer of soil (20 cm), covered with rubble and sand so that each layer is 10 cm, plus small layer-by-layer rammers.
 If the work is done correctly, the square or rectangle will have equal diagonals. If the numerical values of the segments do not coincide, in no case should the structural elements be left in this form.
Required materials and tools
Regardless of the type of building, you will need the following building materials:
- wooden boards for the manufacture of lathing with a thickness of 25 mm;
- bars 50 × 50 and 100 × 100 mm;
- reinforcement, bars or mesh;
- boards for flooring with a thickness of 3 cm;
- roofing sheets, combined with the material from which the roof of the trailer is made;
- any desired windows (if a veranda);
- fences and partitions (for the terrace);
- ready-made railings and jibs or beams for their manufacture;
- regulating supports - 4 units (necessary if there is high humidity in the area of residence and the tendency of the soil to subsidence).
Important! Since the building is temporary, it is recommended to insulate it with inexpensive materials such as foam or glass wool.
The number of materials is taken from the calculation of the schematic data. Screws, nails, straight and oblique metal corners, as well as self-tapping screws are used as fasteners.
Required tools:
- hand or chainsaw;
- drill;
- Bulgarian;
- screwdriver;
- electric planer, etc.

Terrace decoration
Nice and useful decoration of the terrace space is an important part of the style of a modern home. Forged or wooden fencing elements, stained glass partitions, tulle air curtains around the perimeter of the structure can serve as an active decor for the recreation area.
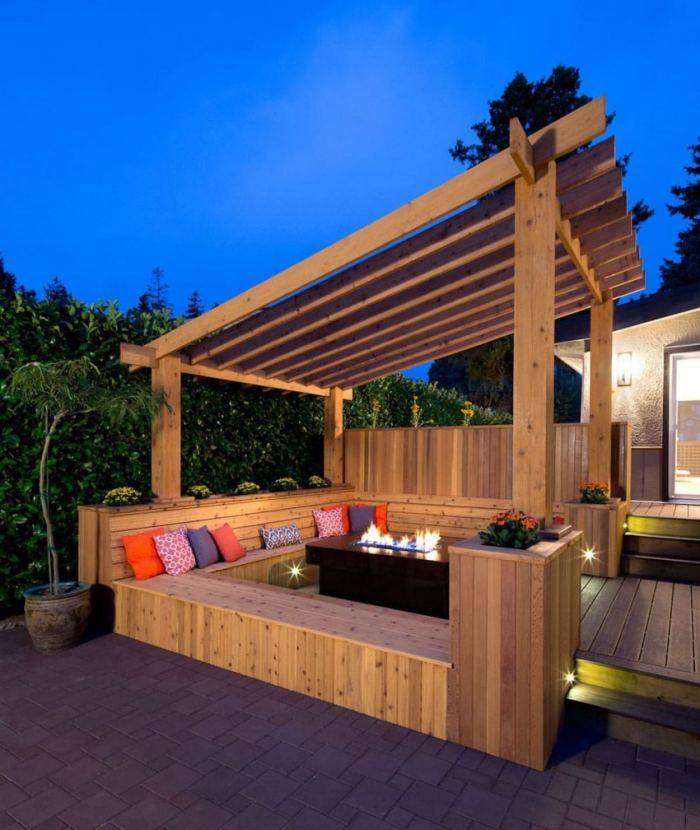
In the recreation area, you can place wicker furniture, beach umbrellas, sun loungers, tables, barbecue facilities. The unique style of the terrace depends on many details. This means that it is worth thinking not only about practical things, but also about pleasing to the eye.
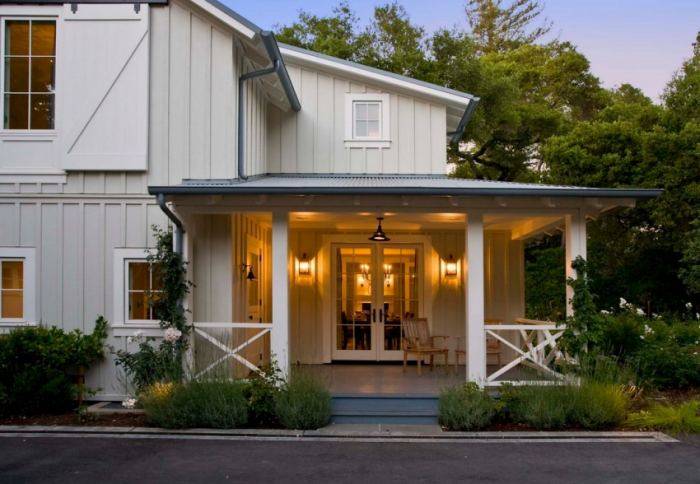
You can complement the interior with plants and flowers in pots, hedges, wind chimes, Chinese paper lanterns.
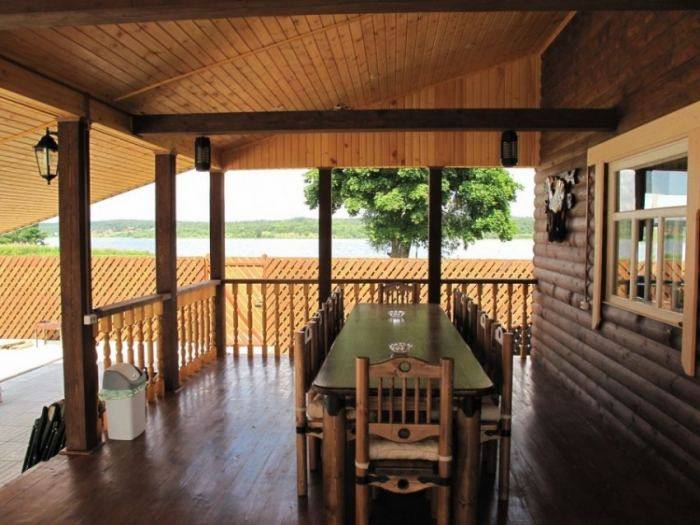
If there are no ideas for your own design, then photos with examples of the design of terraces can inspire and suggest in which direction you should move.
