Types of verandas
There are 2 types of verandas that deserve attention: closed type (with glazing) and open type. Open verandas are less functional and are used mainly in the summer.
As for closed verandas, it is permissible to use them all year round. There are also combined verandas, some of which are closed, and some are open.
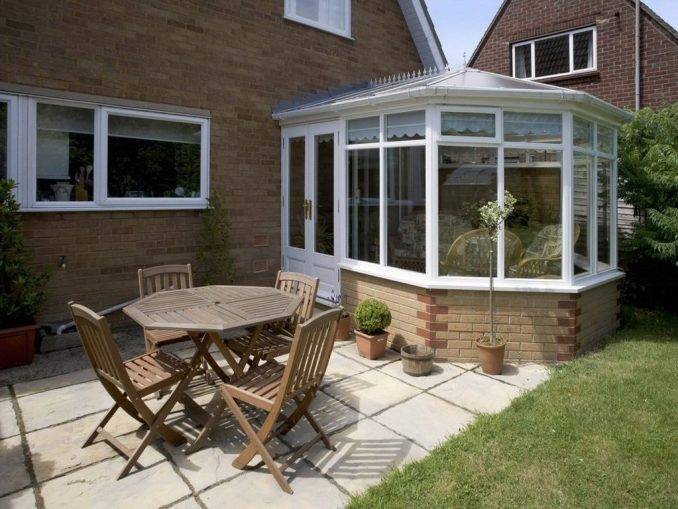 You can relax on the covered veranda all year round. It also reduces heat loss through this wall
As a rule, walk-through verandas are built. To get into the house, you have to go through the veranda. If an impassable veranda is being built, it can only be accessed from the house. You won't be able to go outside from such a veranda. Unfortunately, such verandas are not practical and functional, so few people build them.
The attached veranda can be small and occupy some part of the wall, or it can be large, occupying 2 adjacent walls. Such verandas are called corner.
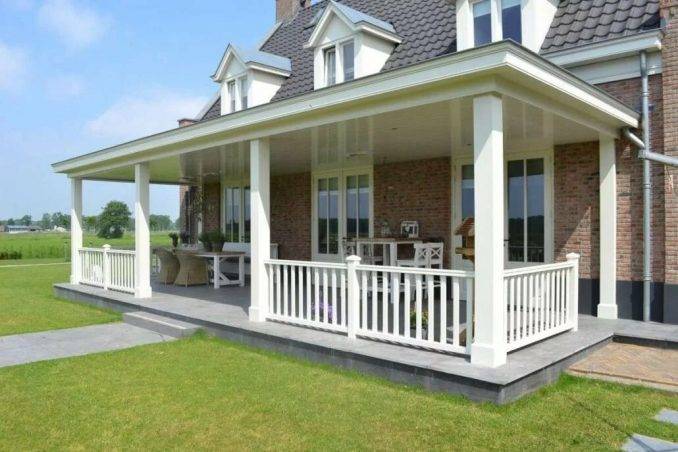 The perimeter extension gives the house an extravagant look
As for the shapes, they can also be different, but they are mostly rectangular. Although rare, there are extensions in the form of hexagons, semicircles and other non-standard shapes, while their construction takes much more time and money.
Various building materials are used for the construction of verandas.
Building materials used
The most popular building material is wood, since wooden structures are easy to manufacture, and wood is quite affordable and environmentally friendly. Unfortunately, not in all regions it is possible to use wooden products due to their high cost, therefore they use metal elements. The frame made of metal can be sheathed with any finishing material. Regular glass, double-glazed windows, polycarbonate, etc. are used as glazing.
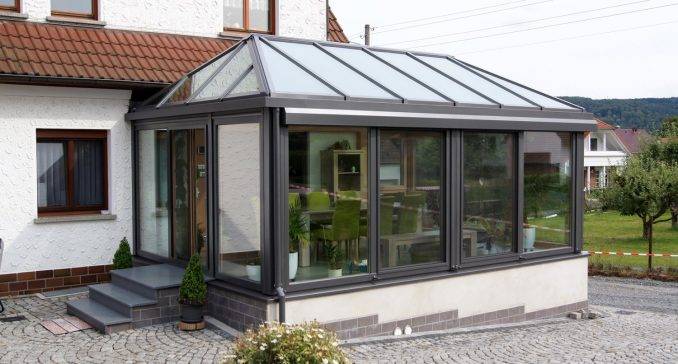 Veranda from a metal frame and special window blocks
For the construction of verandas, such building materials as brick, shell rock, rubble stone, building blocks are actively used. After erecting walls from similar materials, they are subsequently finished with the same materials as the entire house. You do not have to build walls, but simply fence off the extension, as shown in the photo above.
If wood, as a building material, is difficult to get, then the veranda frame is made of metal profiles. This is often easier and faster. In this case, it is easier to use double-glazed windows, as well as other structural elements. In addition, the design is more reliable and more durable. Recently, polycarbonate of various degrees of transparency has been very popular. The advantage of this material is that it is perfectly combined with metal elements, while having a low weight. When using wood, polycarbonate practically does not look, violating the harmonious combination of materials.
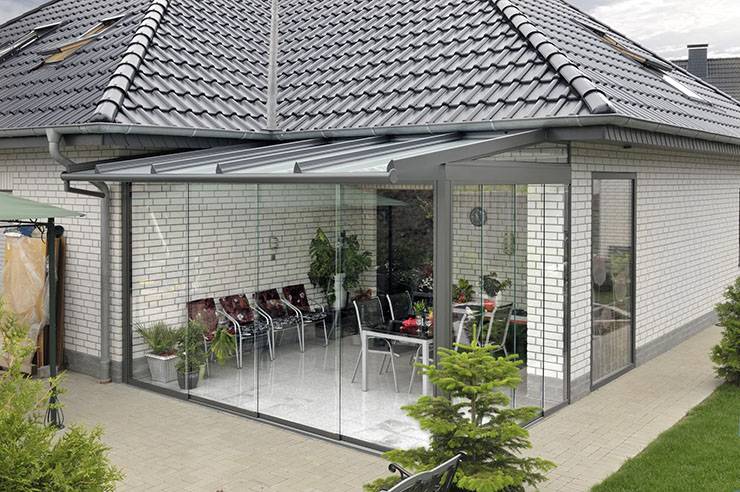
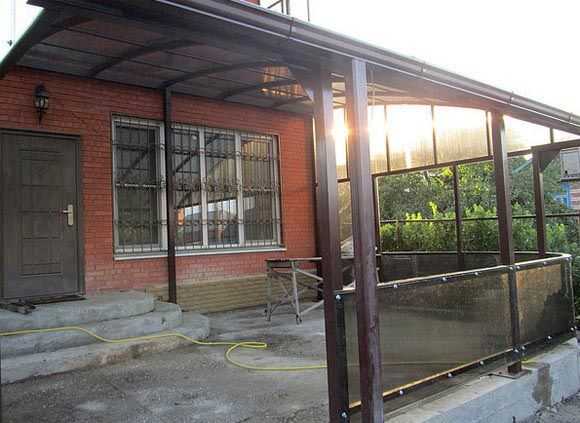 Polycarbonate veranda attached to a brick house. The whole frame is assembled from a shaped tube
Pouring the foundation
In order to minimize risks, the main focus should be on the foundation. It should not differ from the foundation under the main building.
That is, to be exactly the same in width, depth and content
It should not be different from the foundation under the main building. That is, to be exactly the same in width, depth and content.
The foundation for the extension must be proportional to the loads, identical to the main foundation.
It is not recommended to connect the new foundation to the main foundation, as any connection will break. The extension will surely settle and break the connection.
Therefore, it is recommended that when pouring a new foundation, make a small indent from the old one.That is, in the places of contact, between the foundations, lay a roofing material, a tarred (pine) board or a thin sheet of polystyrene.
The foundation is poured either with the letter P, or along a circular closed contour. See the picture below.

Another little trick from practitioners. If the foundation, located parallel to the main building, is made wider than the rest of the foundation, then, when subsiding, the extension will not move away from the building, but will move even closer to it.
For example, the main foundation is 50 centimeters wide, increasing the parallel trench by 10 centimeters, and this side will sink slightly less than the rest of the walls.
Brick extension to a brick house
The foundation and formwork are ready, now the question arises, how to properly attach the brick to the wall? This applies not only to brick extensions. The same recommendations apply to annexes made of foam block or gas silicate blocks.
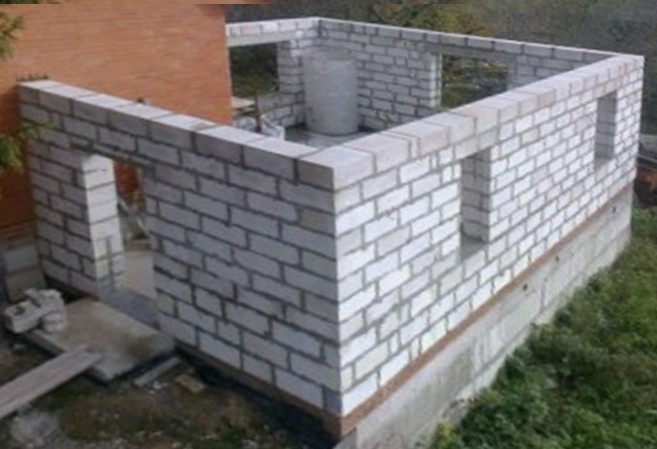
Just like the foundation, it is undesirable to make a bunch of walls. Of course, it is impossible to give one recommendation for everyone. Much depends on the quality of the soil under the building.
Another important factor is the size of the extension. If the extension is large, then there is a fear of how stable it will be, without fixing on one of the sides.
Therefore, large outbuildings are best done as a separate building, which is being built close to the old building.

In this case, there will be a circular, closed foundation, all 4 load-bearing walls and a separate roof that is not connected to the main building.
If the extension is small, then it can be made in the form of the letter P, without being tied to the house.
In any case, you should consult with a specialist, indicating:
- soil characteristics,
- extension dimensions,
- wall thickness,
- the material from which the extension is being built.
How to tie an extension with a house
If you nevertheless decide to tie the extension to the house, then you should start with the foundation.
This work is very difficult and costly. You will need to drill holes in the old foundation into which the reinforcement is glued. Please note that do not clog the fittings, but rather stick on special glue.
The same operation is done with the walls. For joining the walls, holes are also drilled into which the reinforcement is glued.
Then the mesh is laid in the seams, after several rows of masonry. The roof and the roof are made common.
However, even with such a tight connection, there will still be cracks or breaks.
Frame extension to a brick house
Sometimes attached to a brick house:
- Frame extension;
- Wooden extension;
- An extension from a bar and other, lightweight material.
In this case, it is not necessary to fill the strip foundation. It is quite possible to make an extension on a columnar foundation.
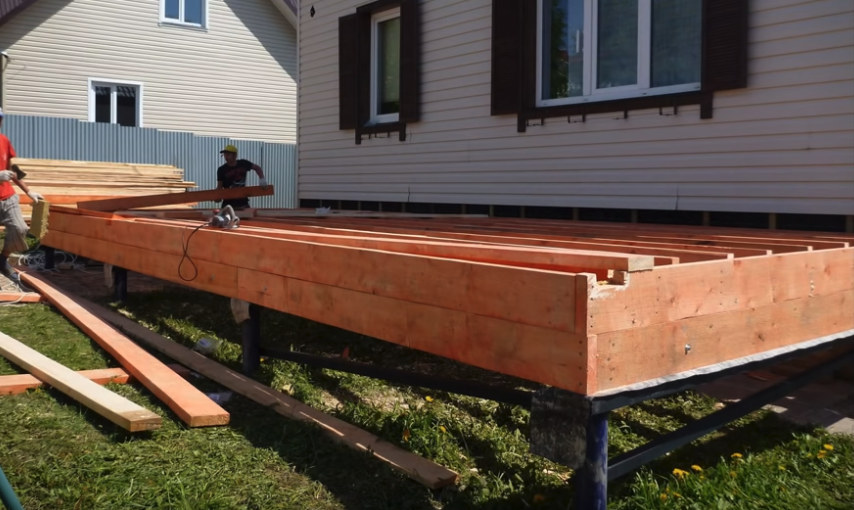
Then, a wooden frame is assembled on a strip or columnar foundation. One side of the frame is attached to the main building. For example, as shown in the photo:

Or in this way, a photo:

Then, the frame is sheathed with basic material: timber, boards, panels, and so on.

A small gap that forms between the brick wall and the frame is blown out with polyurethane foam.

Also widespread, in our country, is the method of connecting a wooden extension with a brick house, using a wall slitting. In this case, the wooden frame is partially recessed into the wall and screwed on with mounting brackets.

We advise you to read:
- How can you use old brick in the country.
- How to properly heat a new brick oven.
- Expanding a window in a brick house, expert advice.
- How to make a homemade brick machine.
- Which house is better made of timber or brick, video review.
- Do-it-yourself brick fireplace.
Installation of cross beams
Now we have a solid foundation, we need to attach the main beams of the veranda base to the pillars.You can do this process in different ways, if you want more reliability, then make grooves and insert the prepared bars.


Next, a base of beams is laid out, a moisture-resistant heat-insulating material is mounted on it, for example, a basalt or fiberglass plate.

A sheet of foam is placed on top, then boards are attached - this will be the floor of the veranda. During finishing work, you can lay linoleum, lay tiles or equip a warm floor.


Then the bars are installed and fastened, after which the areas under the windows are fixed and the excess material can be cut out with a chainsaw. The windows are easy to install by yourself or you can call professionals for help.

The working process
The process of building a brick veranda is a traumatic undertaking if you do not adhere to safety measures. Check the integrity of the instrumentation, put on gloves. Laying is carried out from ceilings or scaffolds, which are installed on a clean, flat surface. Prepare stepladders with a secure base, boards for transitions between grooves. If you have a helmet and a mask, then it is better not to neglect them. Personal health is more important than mild inconvenience.
Pouring the foundation
The foundation is being built on the same level as the dwelling
This is important, as otherwise additional tightening tools will be required. The brick veranda proposed in this instruction will be small, use a foundation made of pillars, since it is installed without reference to the foundation of the house:
- We dig out recesses of 1 m, at the same level as the house.
- Crushed stone and sand are poured into the depression in layers.
- We fill in the concrete base and insert the support pillars made of brick. The top of the pillars should be equal to the height of the base of the house.
 The first step is to fill the foundation.
In the event that there is a need to build a long veranda, we build a strip foundation:
- Dig a trench.
- The formwork is set slightly higher than previously required.
- Pour concrete. From time to time, it needs wetting with water, otherwise cracks will appear.
This is useful: practical advice on pouring the foundation for the veranda.
Forcing walls
Before forcing the walls, be sure to make sure the base of the veranda is even. Carry out the waterproofing of the floor, after which you can start laying out the walls:
- Pull the horizontal ropes along the base of the foundation. They are a kind of level for the evenness of brickwork.
- Lay out the main brick row. On it is insulation and then another row of bricks.
- Remember to measure and leave compartments for the door and windows. Install concrete lintels in them.
- When you get to the last brick row, stir the concrete reinforced belt. Install a metal mesh and fill it with concrete. The belt will prevent cracks from forming in the walls.
- Take time to dry the belt.
- Attach the temporary roof rafters.
Correct roof
From what material the roof will be built, you choose. But usually on the roof they choose the same one that was used for the house, to which the veranda is attached.
Please note that the roof erection process can be simplified. Special coatings are sold in stores in the form of a roll
It is very easy to fix them in any position.
Step by step process:
- Build a crate horizontally from wooden planks. The laying of the boards depends entirely on the materials chosen. They are laid out either tightly or at intervals.
- Choose the corner of the cover. This is necessary for the proper flow of natural sediments.
- Place the rolls on the crate.
- Use nails to nail the rolls to the boards. Unroll the rolls carefully to ensure that the rolls are securely fixed. Leave no unevenness.
- Bend the roof 10 cm around the edges behind the lathing.
- Lock the edges. If your rolls are made of metal, then use specific nails for this.
- Remember to overlap the cover.
Installation of windows
The installation of windows and doors is the final stage in the construction of a brick veranda. Before starting work, remember that we fix all joints, as well as openings, tightly. The absence of drafts and drops of moisture on the veranda will depend on this.
Adhere to the following algorithm of actions:
- Consider the size of your window frames. When choosing large frames, there can be problems with waterproofing and the passage of cold air streams from the street.
- To erect window sills, place the board in the window opening.
- Cover the lower space between the wood board and the harness with clapboard or other convenient material.
- The frame is mounted between the bottom of the board and the top of the garter.
As a decoration, you can carry out a cosmetic finish on the outside of the gazebo. Twisted plants on the outside and landscaping the room inside will also have a good effect on the appearance of the extension.
Erection of the foundation
The foundation for the veranda will have to be erected separately from the main foundation of the house (provided that the house is finished) and connected to it using special fasteners. Depending on the mass of the conceived structure and its size, one of the types of foundations is preferred: a simple columnar for stable soil and a durable belt for wet or loose soil.
- A columnar foundation is the most budgetary and easiest option in terms of physical effort. The foundation consists of several individual rectangular supports. Each support is a collection of pillars located horizontally within a dedicated perimeter. Pits up to one meter deep are dug under the pillars, into which sand and crushed stone about 15 cm thick are poured, followed by ramming. Next, concrete is poured and the support pillars are installed in such a way that their upper edge coincides with the height of the foundation of the house.
- The strip foundation is more painstaking than the previous one, but with greater strength. First, you need to mark the inner side of the foundation with tapes. Next, they dig a trench into which the formwork is installed - a wooden form for filling with concrete. Before pouring, it is advisable to prepare a crushed stone and sand pillow for the future foundation. Next, concrete is poured with a height of about 10 cm. After the layer has hardened, the second layer is poured to the required height.
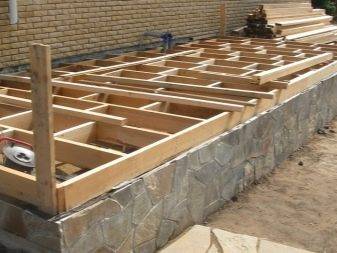
Advantages of an extension to a wooden house
Professional processing, according to the best technologies, of coniferous wood provides a good atmosphere in the room for many years. Wooden architecture is a tradition in which technology is constantly improving. A well-thought-out configuration of elements makes it easier to build houses. The extension, which consists of a profiled beam, has advantages over structures made of other materials:
- it is possible to decorate the facade with elements with rounding or chamfering;
- reducing the thickness of the walls with a leveled surface saves space inside;
- installation technology provides a guarantee of strength, reliable noise insulation and heat saving;
- profile joints exclude the appearance of rotting due to the ingress of water into the seams.
The use of an individually prepared house kit from a bar for an extension is the best option. The absence of the need for adjustment speeds up the construction process. The structure, after a slight shrinkage, requires the least processing. Locking connections prevent changes in shape during operation. Correct geometry provides savings in facade and room decoration. An extension from a bar is a simple but effective solution.
Fastening the racks and bottom strapping
After the foundation is poured, it is given the opportunity to gain at least 50 percent strength. Typically, concrete or grout is used anyway. After that, you can proceed with the installation of the frame.On top of the foundation, no less than a couple of layers of waterproofing should be laid. Roofing material or roofing felt is used as waterproofing, folded in half. It is permissible to use other, more modern waterproofing materials, including in liquid form.
After that, you can do this:
- First, the racks are fixed, after which the strapping is formed.
- First of all, the strapping is done, and then the racks are attached.
In the case of the first option, when pouring the foundation in the places where the racks are installed, special fasteners are poured. In the photo below you can see what such fasteners are. It can also be a metal plate in the shape of the letter "P", while it is poured upside down, and it is better to weld a rod from the bottom of the plate. A stand is inserted inside this letter "P" and fastened with screws or self-tapping screws. Naturally, before installing it, all holes for fasteners must be drilled, and the dimensions of the plate must correspond to the dimensions of the racks in the section. It is permissible to fasten it with ordinary nails, which will not in any way affect the reliability of the entire structure.
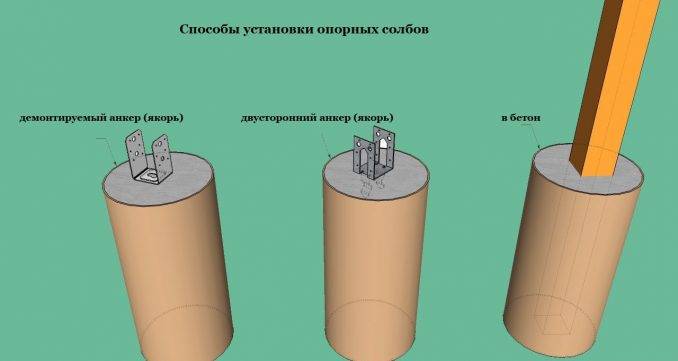 How to attach racks to the foundation
After installing and fastening all the racks, the harness beams are attached between them.
If another option is used, the strapping bar is first mounted. If, at the stage of pouring concrete, with some step, the studs are bricked up, then the task is greatly simplified. In the places where the timber is attached, it is enough to drill holes, after which the timber is pushed onto the studs and reliably attracted by the nuts to the base. After that, they begin to install the racks, armed with one of the methods shown in the image below.
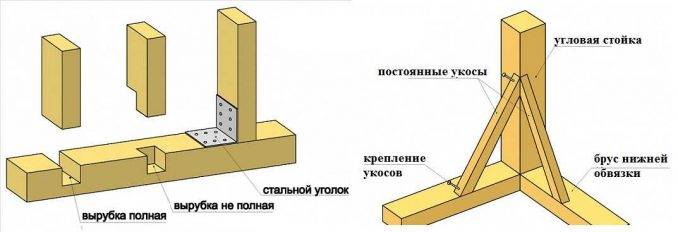 Options for attaching the racks to the strapping bar
In any case, it is better to use metal corners, which will make the structure more durable and more reliable, especially since these racks are loaded with a roof, and this is very important
We make the roof of the veranda
Mauerlat and rafters are installed. It remains to make the crate, mount the insulating layers and lay the finishing roofing material.
The lathing can be solid (for roll materials) and sparse (for sheet roofing). We make a continuous crate from OSB boards. To do this, we attach them to the rafters with a 1-centimeter gap. We fasten the sparse sheathing beams with a step recommended by the manufacturer of the selected roofing material. On average, it is 30-35 cm. For fastening the battens to the rafters, we use galvanized nails or self-tapping screws.
We fill the cells between the battens of the lathing with mineral wool for thermal insulation. We lay a waterproofing film on top and attach it to the crate using a stapler with staples. In the case of arranging a solid lathing, we fix the thermal insulation from the inside of the room. We provide the fixation of the insulation plates with the help of transverse slats, nailing them to the crate.
In the end, it remains to mount the roofing. It is best to match the roof covering of the main house. For the rest, we focus on our preferences and available budget.
Veranda roof
Installation of window frames: step by step instructions
Diagram of the window device on the veranda.
On the veranda, a window sill board is installed at a height of about 50 cm from the floor - this is lower than in a residential building. The space that remains between the window sill and the lower trim must be closed with wood shields or sewn up with clapboard. The veranda is sheathed from the outside.
Window frames are installed between the window sill and the top trim. The space that remains between the door and adjacent pillars should be sewn up tightly. Narrow binders can also be made.The presence of narrow or wide frames, the dimensions of the windows on the veranda attached to the brick house, determine the future appearance of the terrace outside.
On the extension, it is recommended to alternate windows with opening and fixed sashes. Single frames are enough, because the veranda attached to the house is a summer and unheated room.
Window units are installed in the following order:
- the prepared block is inserted into the opening and fixed in the corners of the opening with wooden wedges;
- the window box is attached with nails in several places;
- the gaps are filled with dry tow by about ¾, and the remaining quarter is filled with tow soaked in a gypsum solution;
- caulked gaps between the wall and the installed window frames are closed with wooden platbands.
Features of the construction of the roofing cake
Most often, roofs are made single-pitched. Moreover, they are more sloping than the roofs on the house. The creation of a roofing cake on the veranda is carried out in the same way as installing the roof of an ordinary house.
A solid or intermittent crate is stuffed onto the rafters, depending on the roofing
Only if you have a mansard-type house, then you made a vapor barrier with one of the layers. In the veranda, a vapor barrier is not needed, because the under-roof space will not be used. In addition, with high-quality insulation of walls and floors, the vapor barrier layer is contraindicated. After all, a couple of the room must go somewhere. And it will seep through the ceiling into the attic, and from there it will evaporate outward. To do this, it is worth laying a special superdiffusion membrane as a waterproofing layer, which does not allow moisture from the outside, but the steam passes freely from the inside. True, it is not used for steel and metal coatings, because they can rust from condensation. For metal tiles, they buy a special condensate film.
Superdiffusion membrane consists of microscopic pores that resemble funnels
The foundation for the veranda
columnar foundation
Before making the foundation, you need to refer to the documents for the construction of the house, where it is indicated on what soil it stands, from this you can choose the type of foundation for the extension
Parameters to pay attention to:
- What is the soil's ability to absorb moisture.
- What is the composition of the soil at the site of the construction of the veranda.
- To what depth does the soil freeze through in the region of residence.
- How close the groundwater is to the surface.
- General provisions of soil stability.
Choosing the type of foundation for the veranda, we pay attention to the foundation of the main building, its structure, in what condition the load-bearing walls. After choosing the foundation, marking is done on the ground for further work
Advice! A small wooden veranda will stand quite well on a columnar foundation at the corners of the extension. For wide and long verandas, the installation of pillars is used every 600 millimeters along the length and width of the extension.
Columnar foundation, how to make it?
The base (foundation) for the extension is just as important as for the main house, it must be made of high-quality material. Work order:
- We dig holes for pillars to a depth of at least 100 centimeters, its depth cannot be less than the depth of the foundation under the main structure. The level of soil freezing is taken into account, the hole should be deeper than this level.
- At the bottom of the dug holes, we make a pillow, this is a mixture of sand and gravel. The pillow can be made in layers, sand, crushed stone.
- Fill the pillow with concrete.
- We lay out support posts from brick when the main house is brick. If the main house is wooden, wooden beams are used as posts. Metal supports or asbestos pipes are used in columnar foundations for a frame veranda.
The veranda looks beautiful when it is located on the 2nd floor of the house. In this case, the ground part of the extension support is displayed at the level of the main foundation under the house. When a house with a high basement, it is recommended to display the veranda according to its level.
Making a strip foundation
It is used if a heavy glazed veranda is planned. For its arrangement, a trench is dug around the perimeter of the future veranda, and formwork is installed. It is placed a little higher than it is planned to fill the foundation with concrete.
After the foundation is poured with concrete, it is periodically moistened with water until it is fully formed, this is necessary for uniform solidification of the foundation.
Floor and ladder construction
It is best to lay the terrace floor as a single plank covering. The boards are placed on logs cut between the 1st and 2nd strapping crowns at the bottom. Lags and floorboards must be treated with an antiseptic and covered with paint. The upper step of the porch acts as a continuation of the floor.
After completing the construction of an extension under the roof of the veranda, it is recommended to place an entrance door and a staircase. You can make a separate canopy. An extended top step is placed on the same level as the veranda floor. It is customary to attach elements of a straight wooden staircase to 2 side bowstrings, which are located at an angle.
The board used as the bottom rung is placed on the ground. Its ends should be close to the bowstrings and fastened to them with nails. Next, the inserts are installed, cut according to the template and repeating the contour of the side board. They also need to be attached to the bowstrings. A central support board and a riser are arranged between them.
Work plan
Before proceeding with the construction of a veranda, you should definitely draw up its project. It needs to include drawings of the structure from the side of the two facades, as well as its plan from above. Of course, you must first make all the necessary calculations. Do this work, guided by the following recommendations:
-
The foundation of the veranda should lie at the same depth as that of the house itself. If this condition is not met, in the spring the extension will simply move away from the wall.
-
The roof of the veranda should be flatter than that of the main building.
-
The walls of the veranda, like its foundation, are not rigidly connected to similar structures at home. These two structures have different weights, and therefore, they will shrink differently. The gaps between the walls of the house and the veranda are closed in different ways, depending on the material used in the construction.
-
The dimensions of the veranda should not exceed 1/3 of the area of the house itself. Otherwise, this light extension will look ugly in the general exterior of the building.
-
It is best to choose the material for the veranda the same from which the building itself was built. This rule is especially true for houses assembled from a bar or log. A foam block or brick extension next to such structures will not look very nice. In this case, it is better to build a shield or chopped veranda.
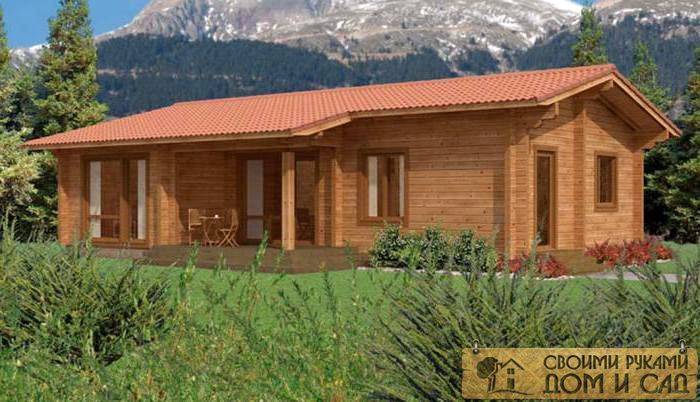
The correct answer to the question of how to attach a veranda to the house (photos of beautiful and durable structures of this type can be seen on the page) - durable and convenient - also consists in the selection of high-quality materials for it
Despite the fact that the structure is small and not as important as the residential building itself, it should be erected thoroughly, adhering to all the recommendations
Do I need to legalize the veranda
The construction of a veranda after the paperwork for the whole house is essentially a restructuring, therefore, it requires official documentation.
To obtain permits for the addition of a veranda, you should prepare and submit to the architecture department:
- certificate of ownership of the site and the house;
- completed project of a house with a veranda;
- notarized consent of all family members registered in the house;
- application for registration.
The cost of services depends on the legislation in force in the country at the time of registration of documents.
A veranda can be attached without formalized documentation, but when committing any acts (selling a house, renting out, donating, inheriting), most likely, you cannot do without difficulties and additional unforeseen costs. Especially if the room is heated.

During the construction of the veranda, all parameters and nuances specified in the officially approved project should be adhered to. Since all unauthorized changes can, on occasion, become a reason for calculating a fine.
Important! Since the procedure for obtaining permits will take a lot of time, it is better to start it at least 3 months before the planned construction of the extension. When building a veranda, you need to believe in your own strength and know that nothing is possible, the main thing is not to show haste and inattention to details
To get real pleasure from the creation of your own hands, you need to observe the overall ensemble of the house and the unity of its style.
When building a veranda, you need to believe in your own strength and know that nothing is possible, the main thing is not to show haste and inattention to details. To get real pleasure from the creation of your own hands, you need to observe the general ensemble of the house and the unity of its style.
