Features of roof systems
The installation option for the rafters depends on the location of the walls of the residential building. Each of the structures has its own tightening parts or retaining elements.

Fortified
The considered roofing system is distinguished by the presence of several additional attachment points, in addition to the support on the load-bearing walls. The use of such a scheme allows you to remove part of the load from the enclosing structures. Side racks are used here as additional supports, as well as additional elements (headstock) that fix the ridge. The beams are used as braces, which reduces the load on the load-bearing walls of the building.
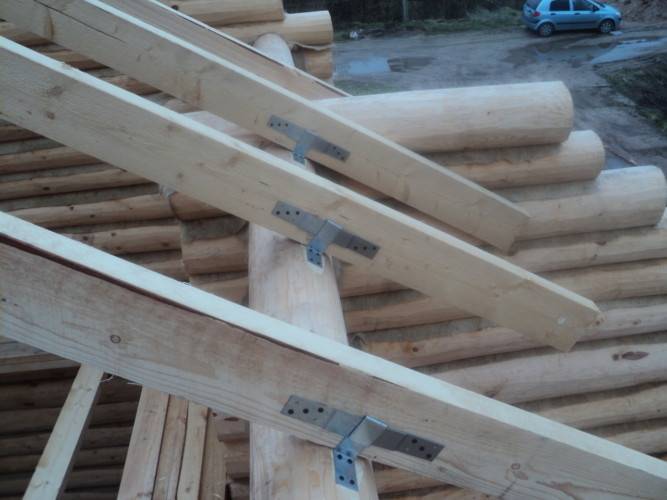
The rafter system is fixed to the Mauerlat with flexible ties. This allows you to ensure the integrity of the roof during shrinkage or deformation of the load-bearing walls. This method of attaching the rafters to the Mauerlat is ideal for new residential buildings. The enclosing structures of new houses will certainly sag under the influence of groundwater or sudden changes in temperature.
Hanging
The hanging system gets its name from the lack of additional anchor points. The rafter legs rest on the load-bearing walls. The beams seem to hang over the building, all the load from the roof will be evenly distributed over the recumbent beam, the Mauerlat. Hanging rafters are fixed with rigid ties, because the frame of the roof structure is supported only in two places of the building.
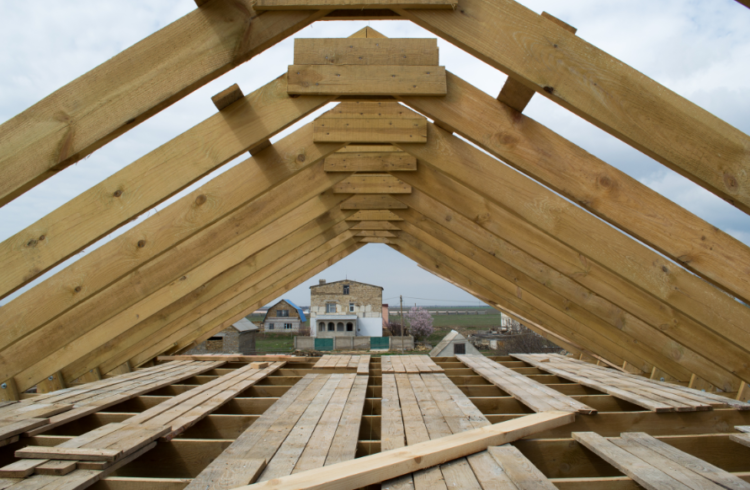
The hanging arrangement of the rafters is considered to be spacer; it exerts significant loads on the load-bearing walls. To relieve some of the forces, additional parts are used, such as tightenings, crossbars, struts or headstocks. Elements allow you to evenly distribute efforts, pull the structure to the ridge. The crossbars connect the rafter legs, they are installed in the gash parallel to the floor beams.
Rigid or flexible joints: what to choose
So, we noted that the support nodes connecting the Mauerlat with the boards can be of varying degrees of mobility: from "0" to "3". Zero degree are rigid fixings that exclude any changes in the position of the beams.
Rigid connections: when you need them
Mauerlat is installed when it is necessary to transfer the spacer load from the rafters to the load-bearing walls. This is done mainly in brick, panel and block houses. In this case, they try to exclude deformation and shrinkage of the roof in order to prevent changes in the load on the supporting walls. This is where the need for a fixed connection of the rafter system with the Mauerlat appears.
Fixed knots, fixed with a saw
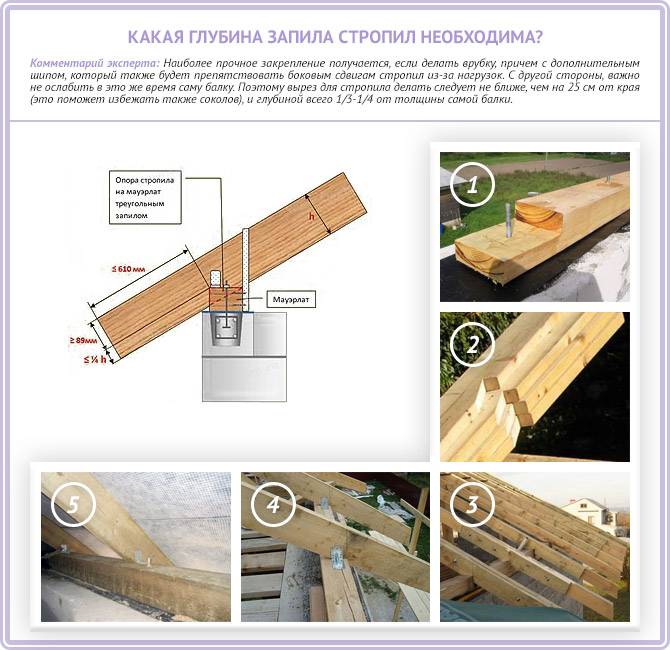
Many experts recommend making appropriate cuts at the point where the rafters are attached to the floor beams for greater strength and immobility of the connecting nodes. These cuts should fit tightly with the Mauerlat. Additionally, such assemblies are reinforced with bolts, anchors and metal plates:
Or with long self-tapping screws:
And one more important point: the size of the cut of the bar should not exceed 1/3 of its section. Otherwise, the rafter system may lose its bearing capacity:
Rigid knots without rafters
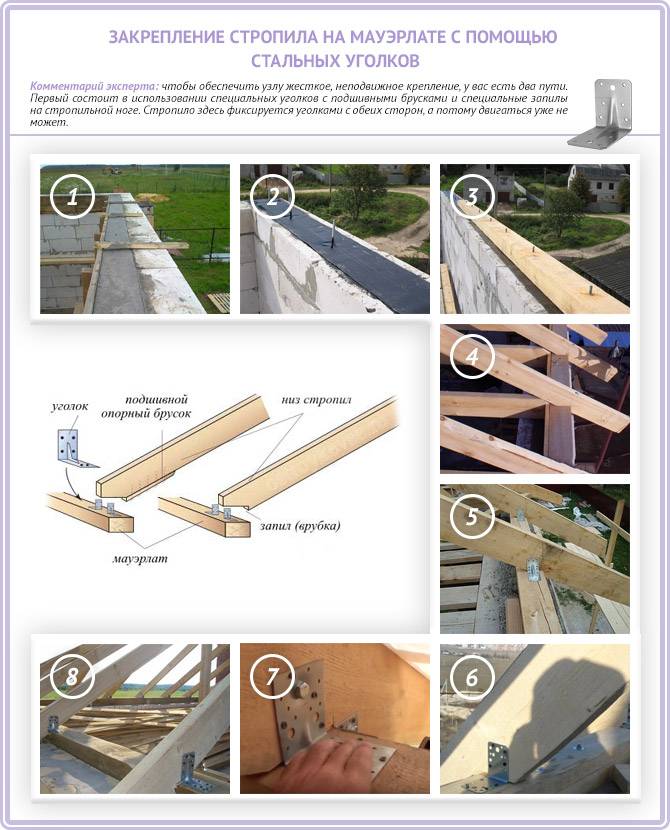
The method of fastening with a hemming bar is used in layered rafter systems. The rafters are cut according to the template and beveled (to give the roof the desired slope) at the point of contact with the Mauerlat. From the inside, such rafters are reinforced with support bars and reinforced with corners on both sides to the base frame:
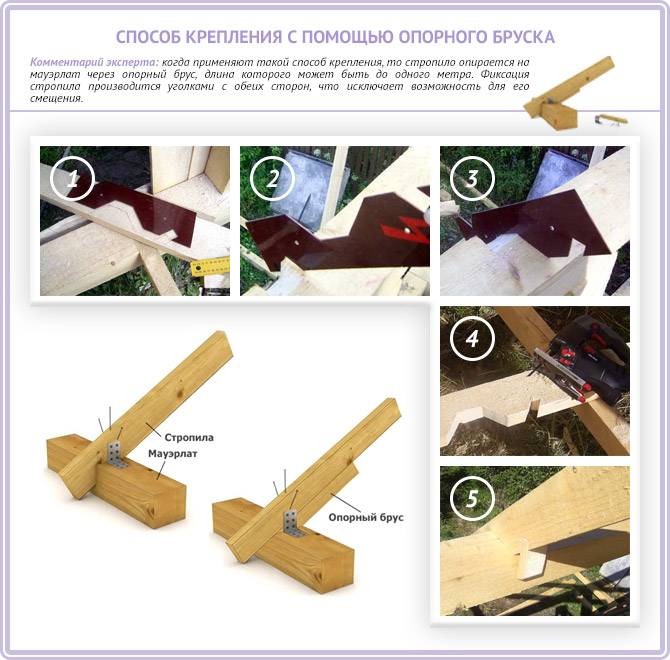
Another option for a non-butt joint is a rigid fastening of the rafters, reinforced with lining beams on both sides. Two boards, at least one meter long, border each rafter leg. One end of such supports is cut at an angle that corresponds to the slope of the roof slope (including rafters). The boards are cut to the Mauerlat with long bolts and reinforced steel corners. The bars are attached at pre-marked places, first one at a time.Then, close to the overlays on one side, the rafters themselves are mounted, which are immediately reinforced with the same overlay on the other side. There is an option of installing two lining beams at once, and then, rafters, but this method is used less often, since it requires more accurate calculations.
Fastening the rafters to the Mauerlat
Correct fastening of the rafters to the ridge beam and to the Mauerlat is a prerequisite for a professionally executed roof installation.
To mount the rafters to the Mauerlat, one of two types of mating is used:
The choice depends on the shape of the roof and its structural features, and accordingly on which rafters are chosen - layered or hanging.
The rigid method assumes that the connection of the rafters and the Mauerlat is performed in such a way that the possibility of turns, shifts, bends, twisting between these two elements is excluded (read: "How and How to Attach the Rafters to the Mauerlat").
To achieve this result, you can use one of the following methods:
- using the corners for attaching the rafters and the support hem;
- by performing a gash on the rafter leg and further securing the connection with nails, staples and wire.
As for the second method, it is used more often than the first. It provides that nails are nailed from the sides at an angle towards each other (as a result, they intersect inside the Mauerlat). After that, the third nail is driven vertically. The obtained rafter attachment points ensure high rigidity (also read: "Rafter attachment points - structural elements").
Additionally, both methods of mating are secured by attaching the rafters to a brick or concrete wall using wire rod and anchors. The rafters are prepared for installation if they have the same angle of inclination throughout the roof by using a template.
Installation of the rafter system, details on the video:
A sliding connection, also called a hinge joint, is achieved by creating a special fastener that allows one of the mating elements to move freely within specified limits. In this particular case, such a part is the rafter leg, and it will move in relation to the Mauerlat.
There are the following ways of installing rafters to the Mauerlat, which provide offset:
- with the help of washed down and subsequent laying of the rafters, I washed it down with a place on the Mauerlat;
- by hammering two nails from the sides obliquely in the direction of one another;
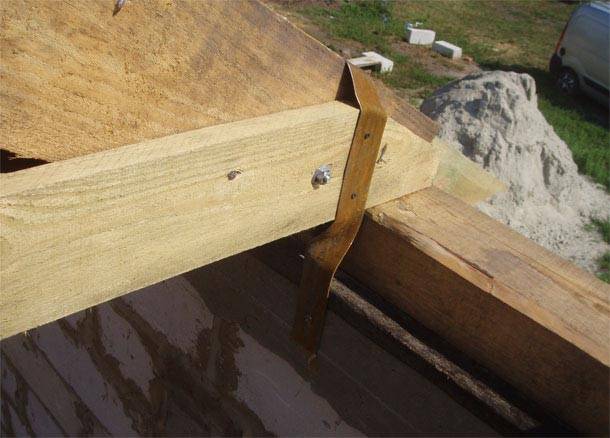
- connection using one nail, which is nailed in a vertical position from top to bottom through the rafter leg into the Mauerlat. Alternatively, you can use rafter fixing plates that have holes for nails;
- by fastening with a staple;
- by releasing the rafter leg outside the wall using a single plate attachment;
- by using specially designed steel fasteners for the rafters, which are called "skids".
All the described methods, on the one hand, make it possible for the rafter leg to rest against the Mauerlat, and on the other, in the event of a movement of the structure, its elements can move relative to each other.
The sliding type is found in the construction of houses quite often, especially such a connection of rafters and Mauerlat is popular when arranging wooden houses that are erected from logs or beams. Over time, the original geometry of the structure is distorted, as the walls shrink and the use of rigid joints leads to the fact that the integrity of the walls is violated.Fastening the rafters to the frame with a sliding connection allows log walls, gables and other building elements to adjust to shrinkage.
Also, the fastening of the rafters in the ridge is not arranged in a rigid way. The assembly of the entire structure is performed first on the ground. Before installing the rafters for the roof, measurements are taken, the cutouts are cut in the Mauerlat and the rafter legs, after which a thorough fit is performed.
Features of layered rafters
This is a classic layered system design suitable for a gable roof. With a pitched roof, the same rules are followed, but with a different implementation. The rafters included in the rafter system are laid with support on opposite load-bearing walls (it turns out that only two supports). An internal baffle is not needed here. In fact, a higher wall performs its function.
To increase the bearing capacity of the truss structure, struts are introduced into the system. Their presence allows to increase the length of overlapped spans.
For single-pitched roofs, it is possible to use layered rafters without the introduction of struts with spans up to 4.5 m. The presence of a brace increases this possible length to 6 m. A similar trend can be traced with gable roofs. The gable structure with one intermediate support is used for spans up to 9 m. The installation of struts increases the maximum span length to 10 m. And the combination of struts with a scrum (horizontal beam connecting a pair of rafter legs) - up to 14 m.

There are several options for the implementation of layered systems, among which there are non-thrust and spacer structures with additional supporting struts, fights, and rafter beams.
Consider the basic structures of layered rafters.
Mauerlat manufacturing materials
Mauerlat can be made from a wooden bar, a board, a log, as well as from metal profiles - a channel, a pipe, an I-beam.
Most often, the Mauerlat is made from a bar. Its cross-sectional size to a certain extent depends on the size, and hence the weight of the future roofing system, as well as on the size of the rafter legs.
Most often, the Mauerlat is made from a wooden bar.
However, given that the Mauerlat must fit firmly along the end of the wall, distributing the load, the hiding or bending stresses in it are small, and the wood copes well with the compressive load. Therefore, in most cases, complex calculations of the Mauerlat section do not require, and bars with sides that are multiples of 50, starting from 100 × 100, are usually used.
The table below shows the dimensions of the sections of lumber, most often used in the construction of roof structures in individual construction.
| Elements of the rafter system | Lumber section, mm |
|---|---|
| Mauerlat | Beam 100 × 100, 100 × 150, 150 × 150, and sometimes more. |
| Rafter legs | Board or timber 60 × 150, 80 × 150, 100 × 200 - according to the results of calculations |
| Runs | Beam 100 × 100, 100 × 150, 100 × 200. |
| Tightening (crossbars) | Board 50 × 100, 50 × 150. |
| Racks | Beam 100 × 100, 150 × 150. |
| Braces, filly, cornice box board | Board 50 × 100. |
| Wind end and hem boards | Board 20 × 100, 25 × 150. |
The beam for the Mauerlat must be chosen carefully, paying attention to its evenness and integrity. Behavioral, deformed lumber is not worth purchasing, even in order to save money, since it will be more difficult to install it on flat wall surfaces without creating internal stresses in it
The wood should not have deep and wide cracks and knots.
Knots are dangerous not only in that they differ from all wood in their density and the release of resin from them, as many think, but also in that they significantly weaken the timber. In addition, if a rafter mount falls on a knot, then it will be more difficult to screw a fastener into it or hammer a bracket, and besides, they will not hold well in such a wood structure.
- Boards, fastened together, are used for lighter truss systems that do not have an insulating "pie", for example, when building a summer cottage.For this version of the Mauerlat, for example, boards with a thickness of 30 ÷ 50 mm, laid in one or two layers, are suitable.
- Mauerlat is rarely made of metal elements, but profiles are sometimes used for combined options, which include both wood and metal.
Wooden Mauerlat reinforced with a steel pipe
When using this option, the load from the rafters is distributed not only to the wood, but also to the pipe laid on top of the timber through wooden inserts and pulled to the Mauerlat with clamps. When choosing pipes to strengthen the Mauerlat, it is necessary to adhere to some criteria for their selection:
- since the pipes will be passed through the through holes in the lower part of the rafters, they should not have too large a diameter - 40 ÷ 50 mm is enough.
- it is necessary to take only a new pipe, and before installation it must be covered with anti-corrosion paint.
Holes in the rafters for the passage of the pipe must be made, departing from their lower edge by about 100 ÷ 120 mm.
Cutouts are made in the wooden Mauerlat, against the bottom of which the end side of the rafter leg will rest. Sometimes on the Mauerlat board, holes for installing rafters are formed by fixing pieces of timber 80 ÷ 100 mm high at a certain distance from each other. The width between the pieces of bars to be installed should exceed the thickness of the rafters by about 8 ÷ 10 mm so that it can freely enter the prepared gap.
Due to the fact that the rafters will not be rigidly fixed to the Mauerlat, but are installed on sliding fasteners, the system will receive the possibility of small displacements when the structure shrinks.
Diagram of a rafter system with a wooden Mauerlat reinforced with a steel pipe (beam)
This diagram shows an option using a combined version of the Mauerlat, consisting of a wooden beam and a pipe extending beyond the bearing walls along their length. This design feature makes it possible to immediately create the base for the roof gable.
Which is better - logs, beams or boards?
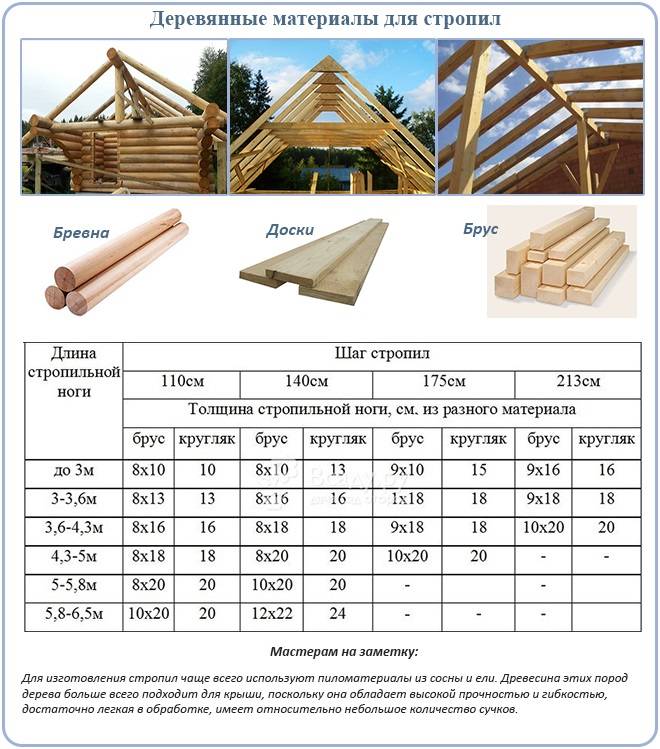
The rafter system must be strong, but not heavy. Of course, for the bearing base of the roof of large industrial buildings and high-rise buildings, you have to use metal or reinforced concrete. And for ordinary private houses, this is an unnecessary excess. In this case, the rafters are made of wood - from boards, timber (ordinary or glued), logs.
Logs are rarely used, exclusively for log cabins. This material is too heavy, requiring high professionalism from the carpenter and the ability to perform complex cuts in the attachment points.
The timber is the best option from which you can mount strong and durable rafters. The only drawback of the timber is the high price.
As a substitute for timber, cheaper boards are often used, at least 40-60 mm thick. The list of their advantages can also include low weight, ease of installation and a high margin of safety.
The following requirements are imposed on the selected sawn timber:
- The minimum acceptable types of wood are 1-3. The presence of knots is allowed in a small amount (it is better to do without them at all!), No more than three knots, up to 3 cm high, by 3 lm. Cracks are also acceptable, but they should not penetrate the wood through and through, their length cannot exceed half the length of the material.
- It is allowed to use dried wood with a moisture content of up to 18-22%. If these figures are higher, the rafters, as they dry, can crack or bend and lose their shape.
- The load-bearing parts of the rafter system are made of material, with a thickness of 5 cm, and a width of 10-15 cm.
- The length of coniferous elements is up to 6.5 m, and of solid deciduous ones - up to 4.5 m.
- All wooden parts of the rafters, prior to use, must be treated with protective compounds that prevent them from rotting, burning and damaging wood-boring insects.
With hanging rafters
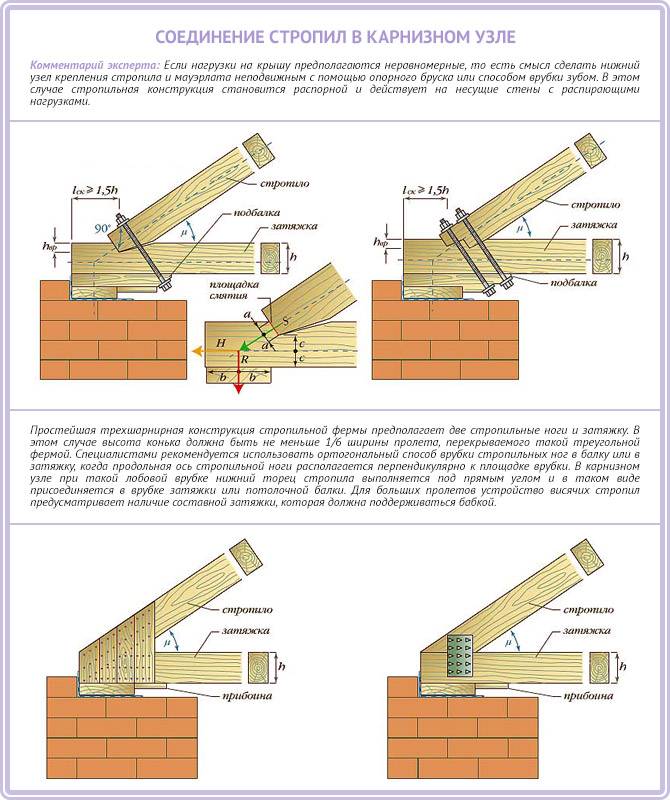
These are systems in which the rafter legs rest only on the outer walls without intermediate supports (load-bearing walls). For gable roofs, the maximum span is 9 meters. When installing a vertical support and a system of struts, it can be increased up to 14 meters.
The hanging type of the gable roof rafter system is good because in most cases there is no need to install a Mauerlat, and this makes the installation of rafter legs easier: you do not need to make cuts, it is enough to mow the boards. To connect the walls and rafters, a lining is used - a wide board, which is attached to studs, nails, bolts, crossbars. With such a structure, most of the bursting loads are compensated, the impact on the walls is directed vertically downward.
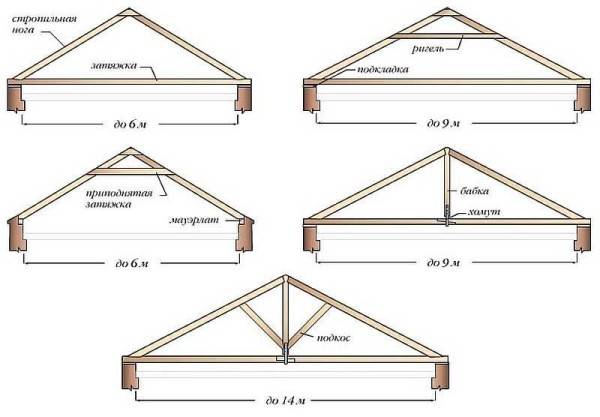
Types of rafter systems with hanging rafters for different spans between load-bearing walls
Gable roof rafter system for small houses
There is a cheap version of the rafter system when it is a triangle (photo below). Such a structure is possible if the distance between the outer walls is no more than 6 meters. For such a rafter system, you can not do the calculation by the angle of inclination: the ridge must be raised above the puff to a height of at least 1/6 of the span length.
But with this construction, the rafters experience significant bending loads. To compensate for them, either rafters of a larger section are taken or the cut of the ridge part is made so as to partially neutralize them. To give greater rigidity in the upper part, wooden or metal strips are nailed on both sides, which securely fasten the top of the triangle (also see not the picture).
The photo also shows how to extend the rafter legs to create a roof overhang. A cut is made, which should go beyond the line drawn from the inner wall upwards. This is necessary in order to displace the notch and reduce the likelihood of the rafter breaking.

Ridge knot and fastening of rafter legs to the underlay board with a simple system version
For mansard roofs
The option with the installation of a crossbar is used when organizing a dwelling under the roof - an attic. In this case, it is the basis for filing the ceiling of the room below. For reliable operation of this type of system, the crossbar cut must be non-hinged (rigid). The best option is semi-rotten (see the picture below). Otherwise, the roof will become unstable to loads.
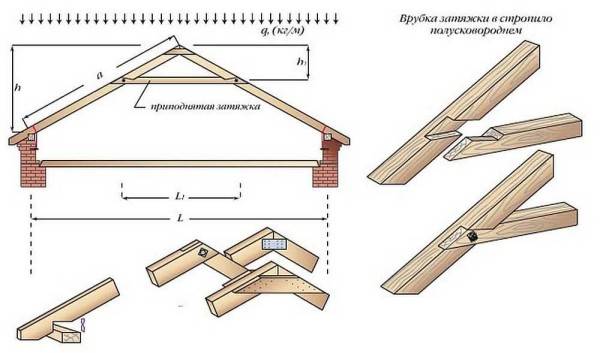
Raised gable roof rafter system and girder notch assembly
Please note that a Mauerlat is present in this scheme, and the rafter legs should extend beyond the walls to increase the stability of the structure. To fix them and dock with the Mauerlat, a cut is made in the form of a triangle
In this case, with an uneven load on the slopes, the roof will be more stable.
With this scheme, almost all the load falls on the rafters, therefore they must be taken of a larger section. Sometimes the raised tie is reinforced with a suspension bracket. This is to prevent it from bending if it supports the ceiling sheathing materials. If the puff is short, it can be secured in the center on both sides with boards nailed to the nails. With a significant load and length of such insurance, there may be several. In this case, too, planks and nails are enough.
For large houses
With a significant distance between the two outer walls, a headstock and struts are installed. This design has high rigidity, since the loads are compensated.
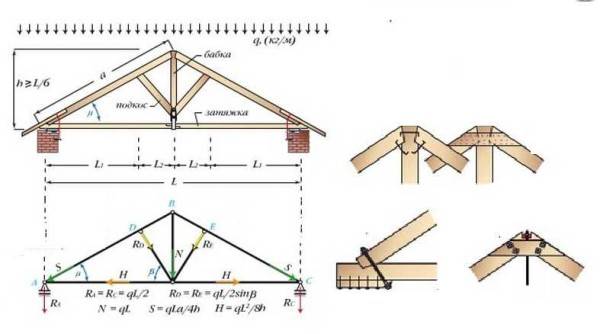
Gable roof rafter system for a large span and cuttings for ridge and rafters
With such a long span (up to 14 meters), it is difficult and expensive to make an integral tightening, therefore it is made of two beams. It is connected with a straight or oblique cut (figure below).
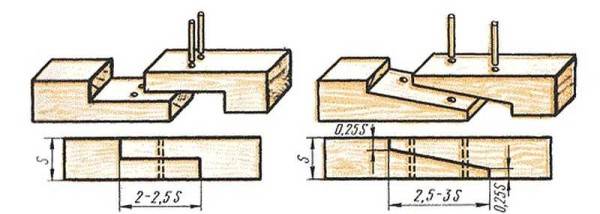
Straight and oblique notch for tightening connection
For a secure fit, the joint is reinforced with a bolted steel plate. Its dimensions should be larger than the dimensions of the cut - the extreme bolts are screwed into solid wood at a distance of at least 5 cm from the edge of the cut.
In order for the circuit to work properly, it is necessary to make the braces correctly. They transmit and distribute part of the load from the rafter legs to the tightening and ensure the rigidity of the structure. Metal pads are used to reinforce the connections.

Attaching the struts for the truss system with hanging rafters
When assembling a gable roof with hanging rafters, the cross-section of lumber is always larger than in systems with layered rafters: there are fewer load transfer points, therefore, each element has a large load.
Making a gash
Fixing beams without sawing is used for a sliding connection. The corner for attaching the rafters to the Mauerlat allows you to securely fix the beams. The fixing method does not allow the roof structure to withstand significant loads, therefore it is used to overlap a hipped roof with small spans.

You can get a reliable bearing unit using a saw cut or a locking tooth. The inset is made in the rafter leg by a quarter of the thickness of the product. In practice, several variants of the saw device are used:
- Rigid fastening - works by compressing the inner side of the support beam.
- A movable mount is obtained when a tooth is formed on the outer side of the bar (so that the rafters cannot slip out of the Mauerlat, they are additionally secured with brackets or corners).
- Instead of a gash, a persistent bar can be used, which is nailed to the beam.
The main characteristics of the nodes of the truss system
The main attachment points for the roof truss system are shown in Fig. 1. They imply the presence of a rafter leg (Mauerlat - 1), a rafter leg (ridge run - 2), a rack (tightening - 3). The structure of the truss system is the main load-bearing element of the roof.
All roof attachment points must have sufficient strength, this must exclude a significant degree of risk associated with roof collapse. The consequences of a mistake made when connecting elements can be the most unpredictable.
Figure 1. The main attachment points for the roof truss system: 1 - Mauerlat, 2 - ridge girder, 3 - tightening.
First, the rafters are installed on the Mauerlat if the building has brick walls. Similar nodes are provided for concrete blocks, then it is necessary to create a reinforced concrete stiffening belt, and studs must be inserted into its structure. Their location should be at a distance of 1 to 1.5 m from each other, and their diameter should be more than 14 mm. The top of the studs must be fitted with a special thread.
The Mauerlat is drilled, making the holes that are necessary to attach the elements to it. Each of the holes must be the same size as the stud diameter, and its pitch must match the distance between the studs. A nut is put on each protruding end of the stud and tightened, due to which the strength of the connection between the Mauerlat and the wall is ensured. The rafters should be connected to the Mauerlat so that their bearing capacity does not weaken.
Description of the main fasteners for the installation of the rafter system
If in the process of building a house a rounded log or timber was used, then it is not necessary to create an armored belt. produced on the upper beam or on the wall log. For this purpose, the connection of the Mauerlat with the rafters uses different methods of cuts (cuts).
What fasteners are used to fasten metal rafters:
- Plates.
- Fasteners LK.
- Corners.
- Brackets WВ.
- Self-tapping screws.
- Varieties of the corner of the Kyrgyz Republic.
- Wire ties.
- Perforated mounting tape TM.
- Bolts with nuts.
- Brackets WВ.
If brackets are used when connecting the rafters to the Mauerlat, then they are not cut into the rafters, which helps to strengthen the bearing capacity. Usually, metal brackets are produced, and the metal is galvanized and has a thickness of 0.2 cm. Brackets are strengthened with nails, anchor bolts or screws.
You can use the LK fastener by creating attachment points not only for rafters with a Mauerlat, but also for other various elements that make up the roof structure. The LK fastener is anchored to wood, like the brackets, with the exception of the use of anchor types of bolts.
Mounting perforated tape allows you to strengthen the connecting nodes when erecting roofing systems. It is used not only to create stronger nodes, but also to strengthen the elements for additional use in order to give rigidity or strength to the system as a whole. The perforated mounting tape is fastened with screws or nails, therefore it is used to strengthen the structure of the rafter system of any roof, the integrity of which will not be violated.
Using the corners of the KR and their various modifications, the attachment points are reinforced so that they can effectively participate in the connection of the Mauerlat and the rafters. Providing adequate strength to the roof nodes is permissible when using corners, which makes it possible to increase the load-bearing characteristics of the roof structure.
The use of metal connecting elements is not associated with cutting corners into the roofing system. This will not reduce the load-bearing capacity of the roofing system. You can use corners for connection using screws or nails, the protrusions of which resemble a ruff.
Types of truss systems
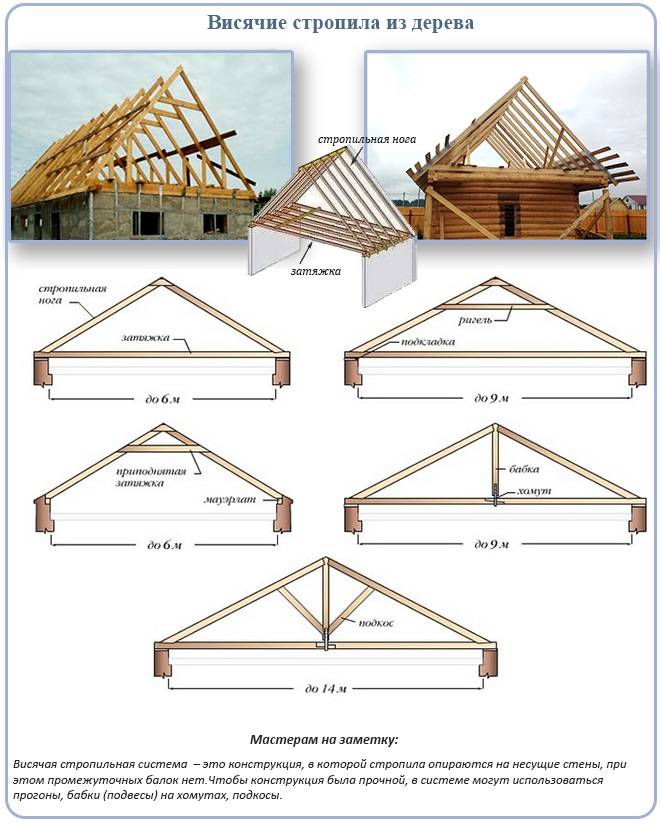
Many options for trusses and, accordingly, rafter systems can be assembled from wood. But all of them can be divided into two types: hanging and layered.
They are used for rooms without internal walls. The trusses, made up of rafters, rely exclusively on the outer walls; there is no need for additional support. That is, hanging rafters cover one span, 6-14 m wide.
An obligatory part of the hanging trusses, in addition to the rafter legs connected at an angle at the top, is a tightening - a horizontal beam connecting the rafters. The tightening becomes the basis of the truss "triangle". In most cases, it is located at the bottom of the structure, connecting the lower ends of the paired rafters. But raised puff circuits are also used. And also with its modified version - a deadbolt, which looks like a raised tightening, but works in compression, not tension, like a true tightening.
The need to use a Mauerlat depends on the presence of a tightening and its location in the farm. If the puff is located at the base of the rafter legs, then the Mauerlat is not needed. During installation, the truss is supported on the outer walls through the existing tightening, which at the same time becomes a floor beam. If the tightening is lifted up or a crossbar is used instead, then the Mauerlat must be included in the circuit as a basis for attaching the rafters to the upper edges of the walls.
Headstock and struts are used as additional elements in the hanging system. They serve to strengthen the truss when covering wide spans.
The headstock in its appearance resembles a vertical stand, going from the center of the tightening to the top point of the truss (ridge part). In fact, the headstock is a suspension, the function of which is to support a too long tightening (more than 6 m) and to prevent its sagging.
In tandem with the headstock, with an even greater increase in the tightening length, they use struts - diagonal beams. They are restrained with one end against the rafter leg, with the other against the grandmother. In one farm, two struts are used, on both sides of the headstock.
In country houses and small private houses, hanging wooden rafters are good because they allow you to arrange spacious attic rooms without partitions inside. Of course, we are talking about schemes where there are no braces and headstock. Their presence imposes on the developer the need to divide the attic into at least two rooms.
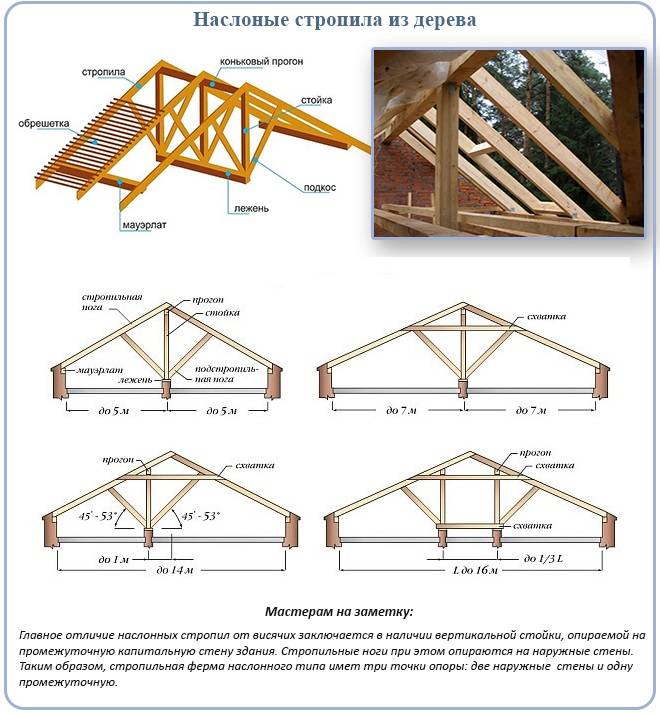
The slanting structure of wooden rafters is used for rooms with internal solid walls, which serve as additional support for the system. In this case, the distance between the outer walls (the total span to be covered) can be within 6-15 m.
The roof trusses, without fail, consist of rafter legs supported by the outer walls and vertical drains supported by the inner wall. If there are two interior walls, two racks can be used in the scheme.
Unlike the hanging one, in the layered system there is always a Mauerlat, to which the rafter legs are attached. The racks crash into a kind of Mauerlat - a bed. This is a bar laid on top of the inner retaining wall.
With a span of 6 m or less, a simple layered truss is used, consisting of two paired rafter legs and a rack. The device of wooden rafters with an increase in the span requires the introduction of additional details into the diagram, such as contractions and struts (rafter legs).
Fits are similar to hanging systems, but they are always positioned above the base of the rafter legs. The main purpose of the scrum is to increase the stability of the system.
For stability, struts are also designed, which are also called rafter legs. The brace supports the rafter leg, that is, in fact, it becomes an additional support for it (the third in a row, after the Mauerlat and the ridge run).
Slanted wooden rafters are the most common for private houses, cottages. As a rule, such buildings have one or more internal capital partition walls, which can become a support and additional support for a solid rafter system.
We fix the rafters: all popular methods
Since
the main task of the Maueralat is to distribute the loads from the roof, be sure to pay special attention to attaching the rafters to it. The fact is that it depends on whether the roof will lead over time, whether it will sag or create stronger loads on one of the walls.
This is serious!
There are two technologies for tying the rafters to the Mauerlat:
- Tough. Here, any displacement of the rafter leg, bends or shifts are completely excluded. For stability, a hemming block is used, which does not allow the rafter leg to slide. And the metal corners do not allow the rafters to move to the sides.
- Sliding. Such fastening is necessary if the house was built from a log or bar, which noticeably sink over time. And the Mauerlat itself is usually not used here - only the upper crown of the frame. If you use a rigid system of fastening the rafters, then the next year the roof will lose up to 50% of its strength - it will simply lead.
And now about everything in more detail.

The main task of rigid fastening is to completely exclude the possibility of displacement of the rafters in any direction. Here, the saddle of the cutout on the rafter is abutted against the Mauerlat and firmly fixed with nails hammered at an angle
But it is extremely important that all such cutouts on the rafters are the same, according to the same template and no more than 1/3 of the rafter width.
The second method is single fastening with a special mounting plate. In addition, in some cases, a meter-long bar is hemmed under the rafter, which also serves as an emphasis, and the fastening is performed with a metal corner.
The sliding mount is also called articulated, and for good reason. Keep in mind that different timber houses shrink in different ways. So, glued laminated timber sags least of all over time, and most of all - a fresh log house, which in just a year drops to 15%! Moreover, the shrinkage itself always occurs unevenly, which even more affects the skew of the entire rafter system - if you have not installed a sliding mount.
Skewed roofs also happen during the very operation of the house. So, in prolonged rains, the wood swells greatly, and in winter it loses a large percentage of moisture and dries out noticeably. Moreover, they settle in completely different ways:
- south and north side;
- the side to which humid river or sea air constantly flows, and more dry;
- the side blown by the winds and the one in front of which there is a utility building;
- hidden from the sun by a tree and open.
During all this time, the geometric parameters of the log house are constantly changing. Moreover, even the central wall of the house changes its parameters, on which the racks and beams of the rafter system rest. Especially during the winter heating period, when it dries up noticeably. Therefore, if the rafters on the Mauerlat or the upper crown of the log house are rigidly fixed, then in winter the snow load will force the rafter system to bend.
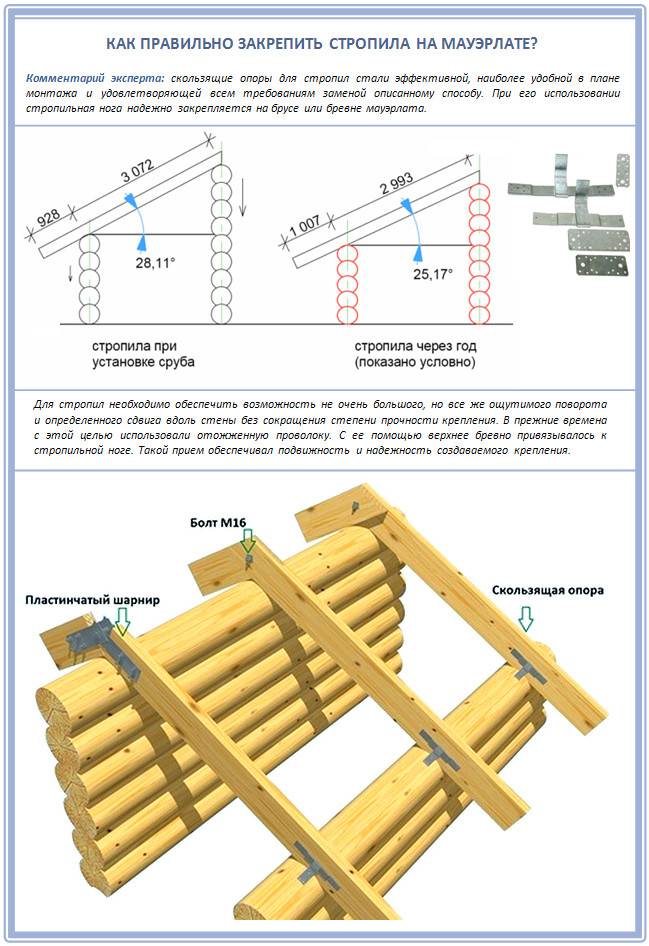
Therefore, the knot needs to be a little free, for which you need such a fastener as a "slide" or "slide", as people like to call it. This is a special piece of metal that looks like a hinge. With a natural change in the geometry of the log house, it shifts along the guide, and the rafters settle a little without any harm to the entire system.
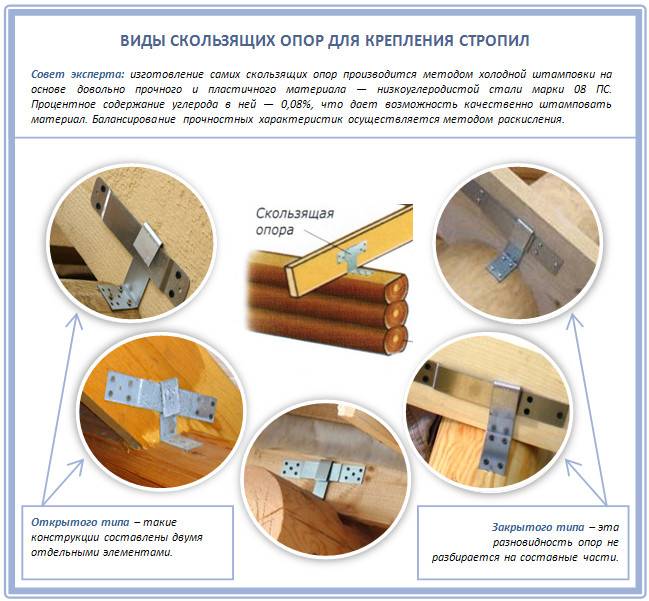
Here's more about the process itself:

By the way, some roofers still perform sliding corners in more traditional ways. To do this, in the rafter leg, they make a gash, put the beam with a cut on the upper crown and fix it in the following ways:
- With staples.
- Crossed nails in a mauerlat.
- One vertically driven nail.
- Stylish fixing plates.
Also, as a good alternative to the modern sliding support, use a strong forged wire twisted twice (we talked about it in the paragraph about attaching the Mauerlat to the wall). It works well in tension and gives a certain degree of freedom to all elements of the roof structure.
As you can see, everything can be dealt with!
