Foundation
The choice of the foundation depends on the design features, construction, material of the gazebo. If the time for construction is allotted to a minimum, you can build a gazebo on a finished concrete slab of the required size.
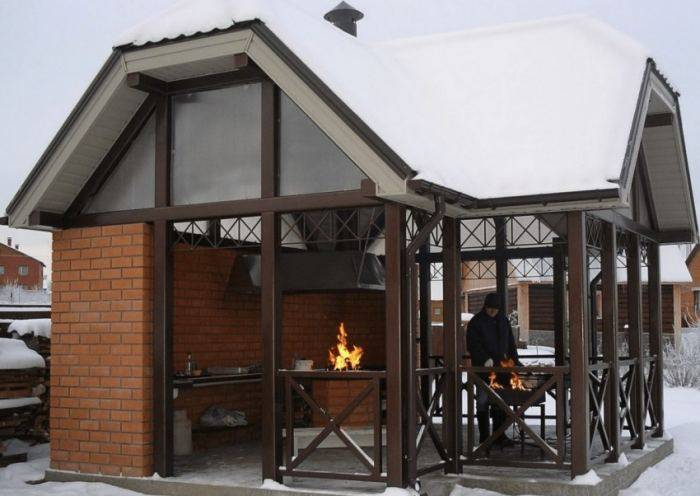
If the time and design of the gazebo allow, they use a pile foundation, or columnar-screw technology. When the foundation is ready, you can start building.

Whatever the gazebo, - metal, wood, brick, - its task will be completed only after the necessary furniture appears in it: a table, chairs, soft armchairs or a cozy sofa and many pillows, when its frame is wrapped in ivy, girlish grapes or the blooming impoomey will dissolve its "gramophone".

Do-it-yourself large gazebo made of wood
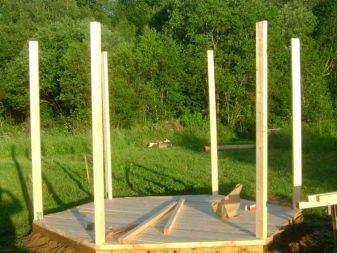
This large gazebo can be called a pavilion rather. Not a bad option if you have a large yard or enough space on the site. Not a bad project in the sense that in the future, under such a canopy, you can install a brazier or barbecue, or even organize a stationary summer kitchen. To build such a gazebo, you need a columnar foundation, but perhaps the most difficult part is the roof. To do this, the upper contour of the gazebo must be installed with horizontal ties. Then fix them with self-tapping screws to the supports.
For the reliability of the screed, it is necessary to fasten it with metal strips. Then secure all other parts. Finally, saw off the central support flush and lay the crate.
Please note that the lathing is made in different ways, depending on the roofing material, if under the slate, then it can be either single-layer or two-layer. But this is a separate topic.
The whole process of building a gazebo is shown in step-by-step photos, if you have any questions, the instructions are on the original site, the link is under the gallery.
Types of gazebos in the country in shape
Modern builders and manufacturers of recreational sheds offer a variety of structures - round, square, in the form of a tent, etc. When choosing polygons with a large number of edges, carefully calculate the place for installation, here you need a large area.
Square gazebos
The standard geometric shape simplifies construction - this explains the popularity of square gazebos. Ready-made structures are on sale, it is also easy to build a canopy yourself. A square is a universal shape that is built from different materials, choosing a design at your discretion.
Polygonal gazebos
These are structures with a lot of faces. Hexagonal gazebos look impressive, have an increased area, and do not limit the decorator's imagination. Open structures are easy to make with your own hands, and any materials are suitable for installation - metal, wood, plastic. Closed polygonal gazebos require a clear design and increased material costs.
Round gazebos
Very beautiful structures that are made of wood or metal. Wrought iron gazebos are made open or semi-open. Compact, round objects will fit well in confined areas, for example, in an area with difficult terrain.
Combined gazebos
A difficult option in construction with the use of different forms, configurations. To make a combined gazebo, you need a lot of space, arrangement of the foundation, a careful calculation of the plan and project.
Photo design ideas
From a bar
The timber is the most versatile building material for arbors, including octagonal ones. It can be conveniently used both for the construction of support pillars and for the rafter system.
The market offers a large number of formats of timber arbors: glazed, open, with and without lathing.
Even taking into account the complex multifaceted shape, you can choose the best option for you.
From a log
Even a smaller amount of material can be used to create a chopped structure from logs than with a classic square or rectangular shape. I propose to study the photo below, which shows this very well.
For the construction, short logs are used, which fit in the corners of the building. And the walls themselves turn out to be open (in the future they can be closed with any cladding material).
Complete log cabin
Made of metal
Metal buildings are distinguished by their high price and durability, therefore, the cost of these structures is noticeably higher than their wooden counterparts. In addition, the octagonal shape implies a large number of elements in the frame, and this is additional work for the welder and construction resources for you.
These buildings look amazing. Regardless of the type of metal - shaped pipes or massive steel pillars, the structure is refined and refined. And if it also fits into the design of the suburban area, then in general everything becomes even more spectacular.
From foam blocks
Only one photo was found on the Internet gazebos from foam blocks exactly the octahedral shape. Nevertheless, the idea is enough to understand the appearance and the basics of construction.
Collapsible gazebo for giving
Collapsible portable gazebo for giving for all occasions. The structure folds easily and is suitable for any terrain. It is a good addition to any plot, can be installed in different places, providing a new point of view from which it is pleasant to enjoy the garden or landscape. Perfectly provide shade from the sun and shelter from the rain, which gives you more time to enjoy nature. The parts of the gazebo do not take up much space and can be easily stored in a garage or under a shed. This design eliminates the fancy joinery usually associated with octagonal roofs and walls. Instead, the author used hinges to secure the walls and the roof umbrella. The cost of the construction is about $ 200, plus an umbrella. The finished structure is decomposed into four hinged pairs of wall panels and eight sets of boards. The wall sections are connected with twelve hinges, it takes less than 30 minutes to assemble or disassemble the gazebo. However, the structure is very stable, even in strong winds. The author used a heavy base for the umbrella of about 40 kg, the ribs of the umbrella are attached to the sides with special hooks. With the manufacture of walls, everything is simple, because all eight sides have the same overall dimensions, and seven of them are identical. This means that for each part, you only need to measure once - and then transfer the marks to other workpieces. You can read detailed instructions for making a portable gazebo on the website.
Gazebo railing
Railings, this is the final stage. There are many plans for an octagonal gazebo railing, so make sure the appearance matches the style of the gazebo and your tastes. The first step is to create the bottom and top guides. Use a router to make a wide and deep channel in the battens as shown in the diagram. These channels will hold the balusters tightly. Then there is the installation of the lower cross members, check with a level that they lie strictly horizontally. Repeat the process on the remaining 6 sides of the gazebo. And the last step is installation railings. Make sure the pilot holes are evenly spaced before drilling the pilot holes and tightening the screws. Place a block of wood between the planks to create consistent spaces
It is very important to secure the bar with the screws before installing the top bar. Check that all parts fit snugly and that the screws are flush with the wood surface
We make a gazebo from scrap materials (self-made drawing)

It is possible to build a summer building for recreation on a garden plot not only from standard materials, but also from improvised means. For example, a beautiful and durable structure is obtained from ordinary wooden pallets. Before construction work, they must be thoroughly cleaned, if necessary, repaired and additionally strengthened.
The pallet construction will be environmentally friendly and will also be in perfect harmony with the overall design of the garden area. Before erecting a structure, you need to decide on the type of material at hand.
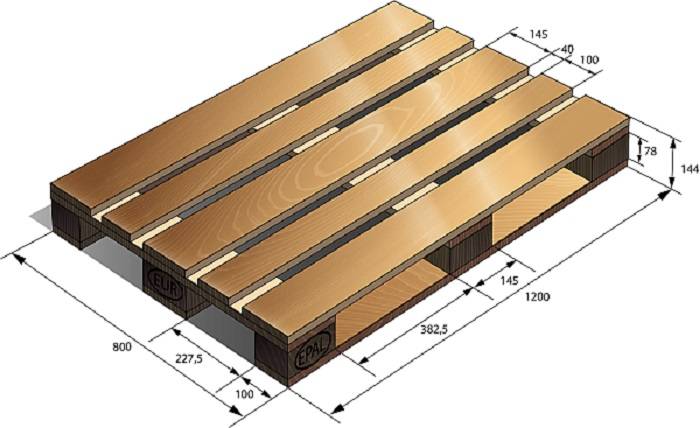
Euro pallet
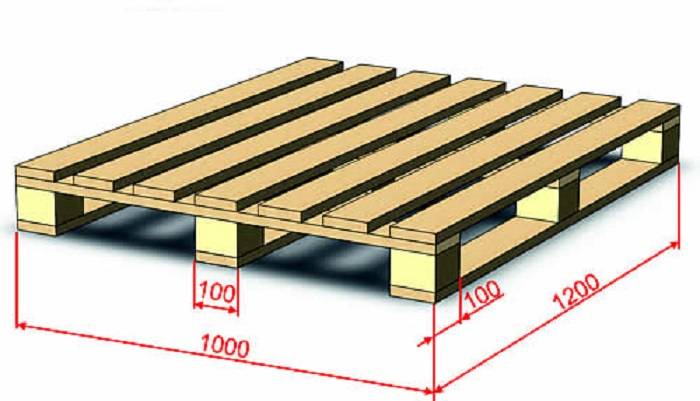
Finnish pallet
First you need to decide on the place, the future gazebo, and then start work. The site should be in a place where there are no large winds and sun rays
This is very important to note for a vacation spot.
First of all, you need to prepare the foundation.
American pallet
They all differ in size, except for the height, which is 145 mm.
The design project depends only on your imagination. Some craftsmen build fairly decent structures from wooden pallets.
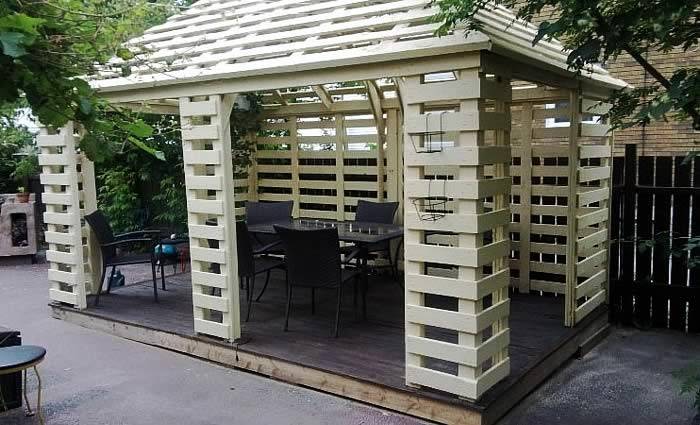
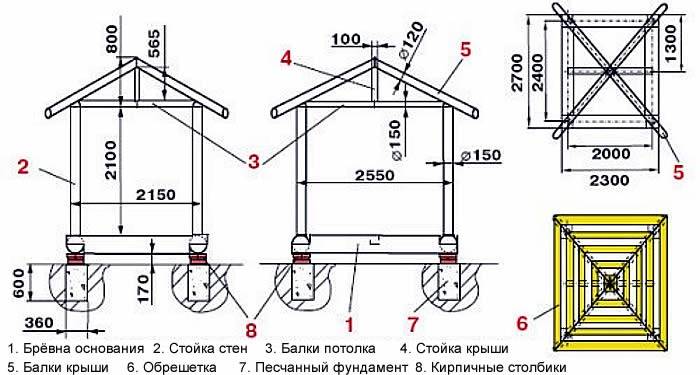
But I recommend using graphic editors. It is enough just to take a photo or sketch, and then indicate the dimensions and material consumption. Or you can use the ready-made version above.
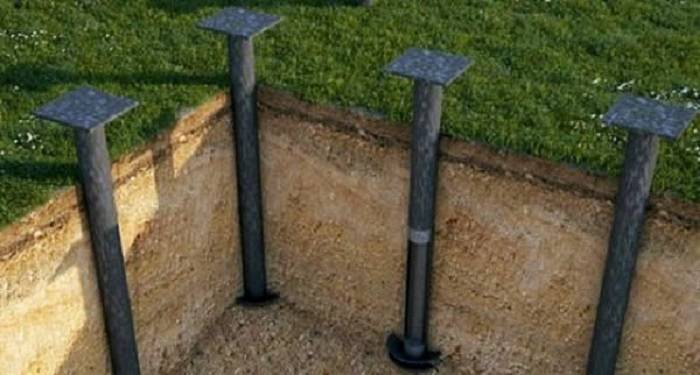
If the project is ready, then you should start building the foundation. First of all, you need to decide on the type of foundation: it can be a light foundation, complex or pile construction.
Even in poor conditions of natural weather and soil quality, it is recommended to install metal pipes around the perimeter. In this case, the work will last several days longer, since the cement slurry will have to harden completely. This will take about two weeks.
At the next stage, we prepare pallets. It is necessary to lay out the base from wooden beams, which are fixed to the base with anchors.

It is recommended to use good quality pallets to support the load of the roof. The rafter system can be fixed after all walls have been installed or after installing support bars... The roof can be made of flexible roofing, polycarbonate or slate. The floors must be treated with a special agent to avoid rotting and the appearance of fungus.
After that, it remains to conduct electricity and arrange pieces of furniture. You can make such a building within one day. The approach to the resting place on the garden plot can also be made from pallets, after sprinkling the path with sand to drain the water. With a barbecue, the building will be not only a resting place, but also a summer kitchen.
Collapsible gazebo for giving
Collapsible portable gazebo for giving for all occasions. The structure folds easily and is suitable for any terrain. It is a good addition to any plot, can be installed in different places, providing a new point of view from which it is pleasant to enjoy the garden or landscape. Perfectly provide shade from the sun and shelter from the rain, which gives you more time to enjoy nature. The parts of the gazebo do not take up much space and can be easily stored in a garage or under a shed. This design eliminates the fancy joinery usually associated with octagonal roofs and walls. Instead, the author used hinges to secure the walls and the roof umbrella. The cost of the construction is about $ 200, plus an umbrella. The finished structure is decomposed into four hinged pairs of wall panels and eight sets of boards. The wall sections are connected with twelve hinges, it takes less than 30 minutes to assemble or disassemble the gazebo. However, the structure is very stable, even in strong winds.The author used a heavy base for the umbrella of about 40 kg, the ribs of the umbrella are attached to the sides with special hooks. With the manufacture of walls, everything is simple, because all eight sides have the same overall dimensions, and seven of them are identical. This means that for each part, you only need to measure once - and then transfer the marks to other workpieces. You can read detailed instructions for making a portable gazebo on the website.
Arbors options by type of material of manufacture
The types of gazebos for summer cottages are classified according to the material of manufacture. A gazebo-canopy for a summer residence is built from wooden boards, sheets of metal, and closed structures on the foundation are built from stone and brick.
Wooden gazebos
In small summer cottages, sheds are built from boards, rounded logs or bamboo. The material does not limit imagination, and with some skill, a summer wooden hinged structure can become an adornment of the local area.
The advantages include:
- efficiency of construction;
- low material consumption;
- lack of foundation;
- the possibility of assembling / disassembling with your own hands;
- high aesthetic performance.
A wooden or wicker gazebo is a great place to relax in the heat. The buildings made of environmentally friendly natural material are lightweight, can be of any size, which allows them to be quickly installed in a free area of the site.
Minuses:
- Regularity of care. Raw materials need to be processed from bugs, mold, decay.
- Flammability. The tree burns very quickly, therefore it is impossible to do without a flame retardant treatment.
- Risk of shrinkage and warpage. These disadvantages arise only when choosing low-quality materials, against a background of weak soil.
There are more advantages, besides, the maintainability of the material allows you to quickly repaint the structure, return its aesthetic appeal.
Metal gazebos
It is difficult to attribute metal products to the budget segment, since such gazebos are often made to order. Forged posts, fences look impressive, but they are expensive. With their own hands, gazebos for summer cottages are made of metal from standard metal structures. Buildings are decorated with ready-made modules, including forged panels.
The simplest option is a frame gazebo. Support posts made of pipes, canopy made of galvanized sheet - reliable, strong and durable. Over time, the canopies are modernized, the openings between the posts are sewn up and a semi-closed or closed structure is obtained.
Additional benefits include:
- incombustibility;
- ease of care;
- the possibility of decoration, for example, coloring;
- long service life.
The high cost of the material, the need to use welding, additional costs for the construction of the foundation increase the estimate - this is a minus. In addition, the material needs maintenance - regular renewal of anti-corrosion impregnation. In the open air, metal rusts quickly, so protection is indispensable here.
Stone and brick gazebos
Depending on the wishes of the owner, capital structures can be of any type - from mounted to closed. However, all buildings require a solid foundation. The development of the project is carried out with special care, entrusting the matter to specialists.
Buildings have the following advantages:
- All-season use. With good insulation, the brick recreation area will be suitable as a guest house.
- Security. The material does not burn, does not emit toxic substances when heated, and withstands many freeze / thaw cycles.
- Many options for interior design. Spacious rooms are complemented by a fireplace, sewage and water supply, a kitchen and recreation area is distinguished.
- Variability of forms, designs.During construction, different materials are used, the presence of a porch, a domed roof, etc. is included in the project.
There are few cons, but they are significant:
- high consumption of materials - the estimate will be significant;
- thoroughness in the development of the project - take into account the area, mass of the building, etc.;
- not all sites can be built, since the object has a large mass;
- on a small area, the construction of a brick structure is irrelevant, so large spaces are needed here;
- the need to build a foundation.
Design features
The main elements that make up any simple summer cottage include:
- base;
- frame;
- roof.
A gazebo for giving with your own hands does not have any special difficulties
But you should pay close attention to some points so that the resting place will delight you in the allotted time. Let's take a closer look at each stage and element of the self-made construction of the gazebo

Base
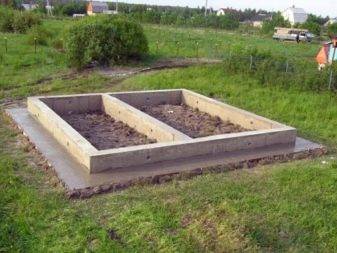
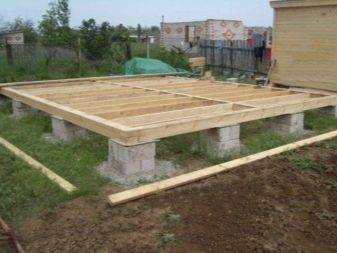
The structure can start from the foundation, if the soil on the site does not please with its evenness, stability and, in general, you just want to feel the floor under your feet. There are a lot of options for the execution of this element: from the simplest tape or on screw piles to the original ones - from tires.
The optimal and widely used type is considered to be a columnar foundation for a gazebo made of any material without walls. The heavier the structure itself, the more thoroughly its support should be.
Those who are more fortunate with the placement may consider the option of a gazebo without a floor. The prevailing landscape of the site will act as a cover under the structure.
Frame
As already mentioned, there can be many options for the frame of the gazebo. The most common for self-erection are wooden beams and metal rods or corners.
Construction professionals focus on simple rules that will help you build a cozy resting place in the country as quickly as possible and for a long time.
- Do not use wood and concrete together in close contact. Wooden elements begin to rot over time, which increases the risk of collapse of the entire structure.
- When designing a brick or aerated concrete gazebo, you must immediately take into account the location of windows and doors. Even if at first it was decided to make only a summer structure, closer to the cold weather there may be a desire to insulate it and use it in the cold season. Openings not included in the original design will be much more difficult to implement at the end of the season.
- As a fence, you can use eurolining and polycarbonate, which are perfectly combined and adjacent to any materials.
- The simplest gazebos can be built right on the ground. For example, a metal frame is very often installed on a site covered with sand. It is then simply covered with existing rugs or floor scraps.
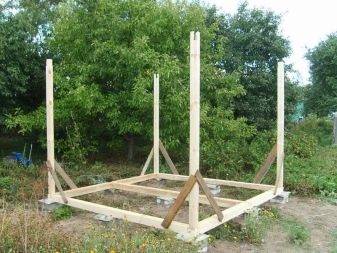
Roof
First of all, it is worth deciding on the shape: single-slope, gable, hip (four-slope), semicircular, hexagonal, hipped, round. Of course, in most cases, the type of roof directly depends on the shape of the gazebo itself. Most often, when building a simple summer cottage with their own hands, craftsmen are determined in favor of one- or gable structures.
As for the coverage, here each owner chooses individually. But also the roofing material is calculated taking into account the use of the gazebo: all-season or only in summer. There is even a category of mobile roofs that can be folded down for the winter and removed before the onset of heat.
To get inspired and find the best option for a summer cottage for yourself, consider the most unusual, but simple projects.

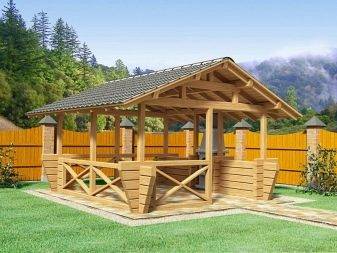
Installation of the roof of the gazebo made of wood
For a square gazebo, the most attractive will be a roof consisting of four slopes. Roof construction begins with the construction of the frame. Inclined rafter legs are cut out of the timber, they are fixed in pairs with nails at an angle. Auxiliary struts are symmetrically attached to each of the main inclined legs. They are fixed with one edge to the strapping bar, the other to the main rafters.
On a note! To work on the roof, invite an assistant, since it is impossible to cope with the installation alone.
 For arranging the roof of the gazebo, you can use sheets of moisture-resistant plywood.
Next, proceed to covering the roof. For this, you can use both a board and a plywood sheet. Fastening of plywood panels is carried out on the surface of the rafters with a pitch of 20-25 cm using self-tapping screws. The surface of plywood sheets is covered with roofing insulating material - roofing felt, and then soft (bituminous) tiles.
Foundation
The construction of a columnar foundation for a gazebo 3x3 m is performed as follows:
- With the help of pegs and a control cord, they mark the territory. Future posts will be located a meter apart. That is, we will fill in 9 supports.
- They remove the fertile layer of soil 30 cm. It will come in handy in the future.
- Pits 50 cm deep are dug according to the markings. Their bottom is well rammed and a sand cushion 10 cm thick is poured in. It is compacted.
- Formwork boards are installed in the pits so that they rise 20 cm above the ground.
- They put (even drive in) metal rods into the ground to reinforce the posts. They can be replaced with a boot (broken brick).
- A concrete solution prepared from cement, sand and crushed stone is poured into the pits in a ratio of 1: 3: 6. The mixture is rammed to drive out the remaining air.
- In the center of each of the extreme corner supports, construction pins are embedded for fastening the strapping beams.
Important: the drying of concrete supports is carried out gradually, covering the columns with oilcloth for the period of solar activity. After they have solidified, the formwork boards are removed, and the space around the pillars is covered with soil, having previously wrapped them with bituminous mastic.
Construction of a frame gazebo with a pitched roof
To avoid serious mistakes and minimize construction costs, you need to start with the simplest. For example, a rectangular gazebo with a pitched roof and on a slab foundation is taken.
Construction of a frame gazebo with a pitched roof
Necessary materials:
- large stone or rubble;
- sand;
- concrete solution;
- formwork boards;
- timber 100x100 mm and 50x50 mm;
- boards with a section of 30x150 mm;
- primer for wood;
- dye;
- slate or corrugated board for the roof;
- screws and bolts;
- reinforcing bars.
You will also need tools:
- shovel;
- building level;
- rule;
- hacksaw;
- jigsaw or circular;
- screwdriver;
- hammer;
- paint brushes;
-
Bulgarian.
Marking the base of the gazebo
Marking the future gazebo
Choose a flat, open area of the garden and make markings. To do this, determine the location of one of the corners of the gazebo and mark it with a peg. They measure the distance to the remaining corners, put beacons, pull a string between them. The diagonals are measured in the resulting rectangle: if they are of the same length, the markings are made correctly.
Pit preparation
Sand filling and ramming
The soil is selected with a shovel to a depth of about 25-30 cm, the bottom is leveled, it is carefully tamped. The pit walls must be strictly vertical. Then coarse sand is poured with a layer of 10 cm, it is well leveled and abundantly moistened for compaction. Formwork from boards up to 10 cm high is placed along the perimeter, reinforced with a bar.
Pouring the foundation
The pit is laid out with large flat stones or covered almost to the top with large rubble. At the corners of the perimeter between the stones, pieces of reinforcing rods are driven in; the rods should rise above the finished foundation by at least 10 cm. A concrete solution is prepared and the foundation pit is poured. The surface is leveled with a rule or smoothed with a trowel.
Foundation
Installing the frame
For the frame, 4 beams of 100x100 mm are taken and cut to the height of the arbor. The front beams are left 15-20 cm longer than the rear ones to make the roof slope. After that, the supports are well treated with a primer and dried. In the lower end of each support, a small hole is drilled along the diameter of the reinforcing rods, which protrude from the concrete at the corners of the base. They put the bars on the rods, set them vertically using a level and additionally strengthen them with metal plates and anchor bolts.
Frame made of timber
After installation, the side supports are interconnected with boards of 50x150 mm, and then the braces for the rafters are mounted. At a height of 10 cm and 0.5 m from the floor of the racks are connected by horizontal jumpers from a bar of 50x50 mm. Vertical bars are fixed between the lintels with a pitch of 40 cm. The doorway is left free. All fastenings are carried out using bolts and steel corners, which are screwed to the tree with self-tapping screws.
All fastenings are carried out using bolts and steel corners, which are screwed to the tree with self-tapping screws.
Prices for various types of timber
Beams
Roof installation
Roof layout
On the boards connecting the support beams, logs are stuffed with a step of 30 cm. From above, the logs are sheathed with an edged board of 30x150 mm. Gaps with a width of 5 to 15 cm are left between the boards. Of course, all roof elements must be treated with an antiseptic primer and well dried. You can cover the top of the board with glassine and fix it with staple staples. Thin strips are stuffed over the film so that there is a ventilation gap between the roofing and the film. Slate is laid on the slats and fixed with 120 mm nails with galvanized heads.
Arrangement of the gazebo
Painting the gazebo
After installing the frame and roof, all wooden surfaces must be painted. When the paint dries, a wooden table and benches along the walls are placed inside the gazebo. Electricity is connected from the house to the gazebo, they hang a light bulb or lamp. To add coziness to the room, you can hang the walls with a dense light-colored fabric. The interior decoration completely depends on the taste and capabilities of the home owners.
This version of the gazebo is basic. If you wish, you can improve the design: install wooden gratings between the supporting beams, sheathe the walls with clapboard or waterproof plywood, lay logs on the concrete base and make a wooden floor. Instead of beams for the frame, you can take metal pipes, and replace the slate with polycarbonate or soft tiles.
