How can you make steel rivets yourself?
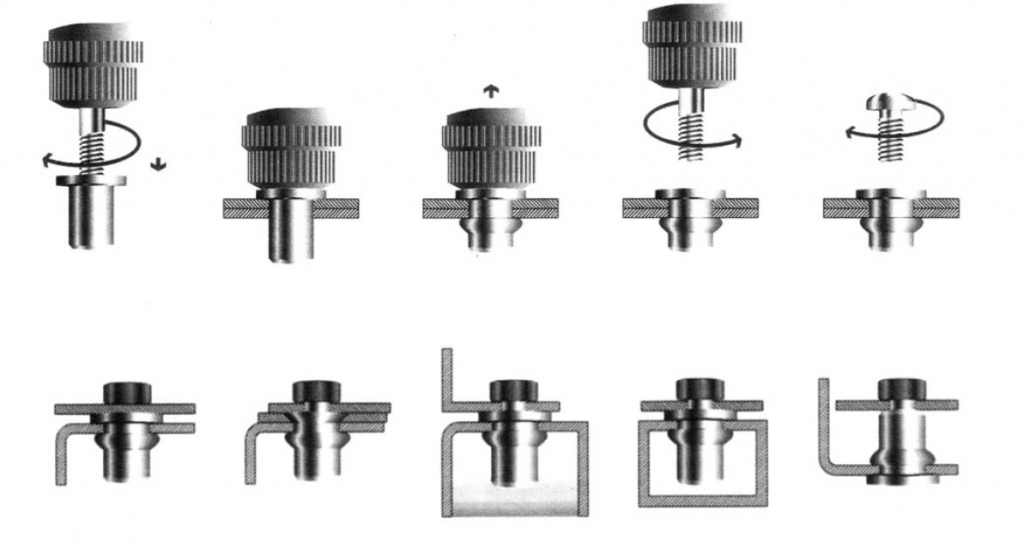
But first, let's figure out how to put on the simplest denim button. Poke a hole in the waist of your jeans with an awl and insert the leg into it. Place the button on the anvil (preferably on a metal surface) and hammer the leg. It is the leg, not the button. When buying a denim button, choose a set that has a leg cut, as shown in this photo. This foot will be securely held inside the button. A smooth leg can "jump out" over time or under load.
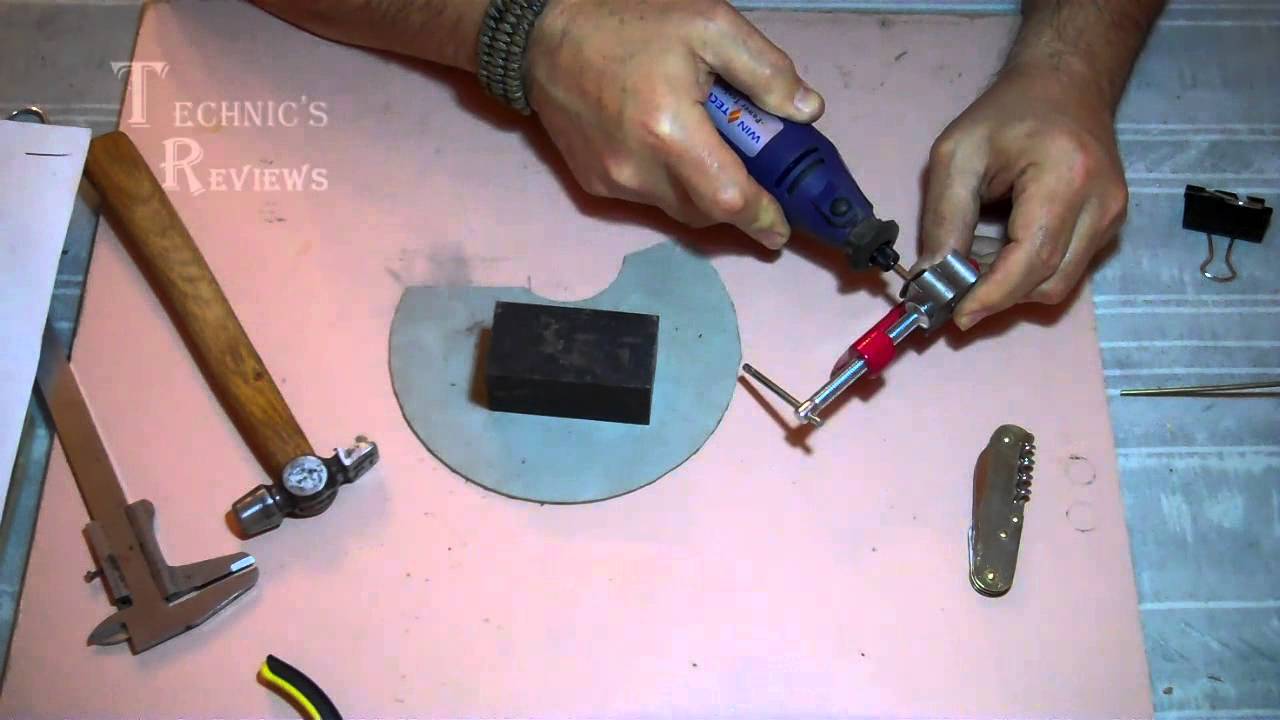
Now let's try to install a button for jeans of a more reliable design, the leg of which moves freely. This is where you need a dowel cut down on emery. The fact is that the leg of such a button needs to be expanded inside the button itself. You will not be able to "get close" to it without a special tool. But with the help of a sawn dowel, this is easy to do. And since the dowel does not bend, it can reliably expand the leg with it. But first, pass the leg into the belt, put a button on top of it and see how far the leg comes out of it. Perhaps the edge of it will need to "bite off" with pliers. Otherwise, your leg will simply bend and then not be flared.
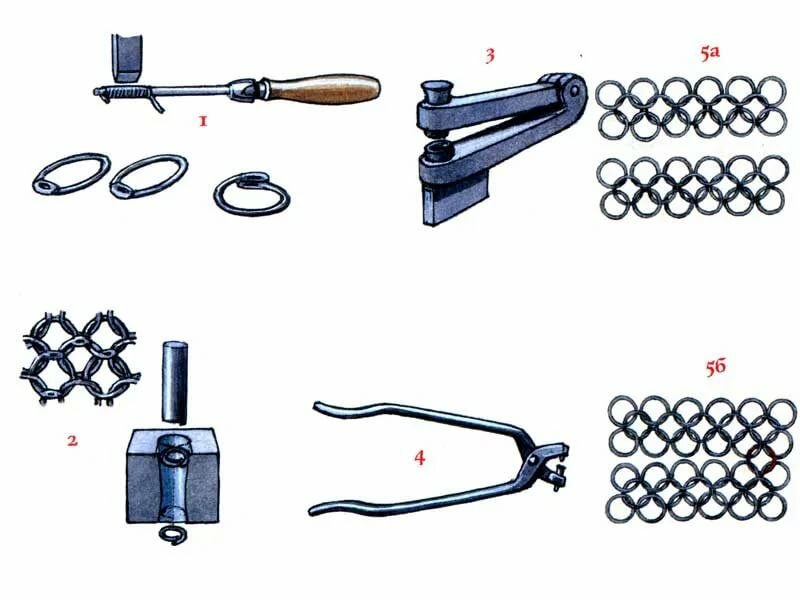
The antennae button (No. 1) is installed approximately the same way, only this operation needs to be performed only for the upper part of the button. The lower part is much easier to install. To install the second part, in the store you can buy a special tool with a recess inside. But if you do not have one, then you can use a metal plate with a hole exactly the size of the "pimples". Insert this pimple into the hole of the metal plate, and “slam down” the leg with a hammer from the back of the garment. The antennae button is very difficult to install without special tools, so buy more of these buttons than you need.
The latter type of button, which is sometimes used in knitted garments, is not difficult to install. However, some advice can be given too. First, make sure the petals on the bottom of the button fit exactly where they should be. Sometimes they are bent, so you have to bend or align them with pliers so that during installation all the petals "go" into the upper part. If for some reason the button is not installed correctly, remove it and put another, new one. It is better not to use the damaged button anymore, since it will no longer be securely held. They are inexpensive, so buy them with a margin.
How to open a mini-studio At home, a press for installing buttons is not required, but in an atelier, such a tool is definitely needed, especially if your atelier is engaged in the repair of leather clothes, bags and other accessories, where various accessories are often used.
Technology of sewing and cutting natural fur Sewing of fur or leather can only be performed with high quality by a professional who has special equipment, tools and experience, including tools for installing clothing accessories. However, in some cases it is possible to install buttons or blocks without special tools and fixtures.
Recommendations for working with leather Almost any leather clothing, accessories use various accessories. To "punch" a neat hole in the skin to install a button or a block, you must use a special punch.
How to sew curtains on your own - small tips For curtains, special accessories are often used - eyelets.The eyelets outwardly resemble blocks, however, it is impossible to install the metal eyelets on your own, because without a special press you will not be able to accurately flare their edges. Use plastic eyelets. Their halves are snapped to each other and therefore installation will not cause any difficulties.
Interlining and adhesives When installing accessories on loose, knitted fabrics, be sure to use adhesive fabrics. The glued sections of the garment will be securely held between the parts of the block.
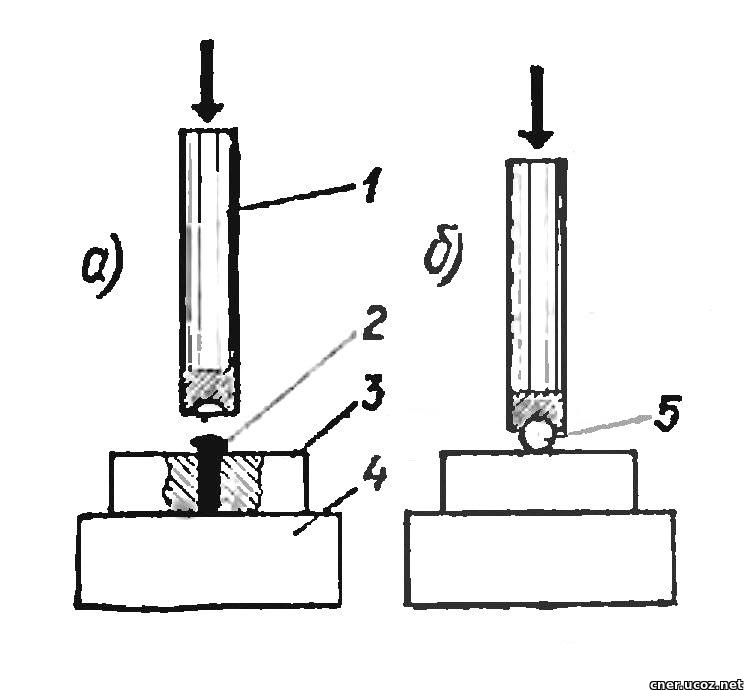
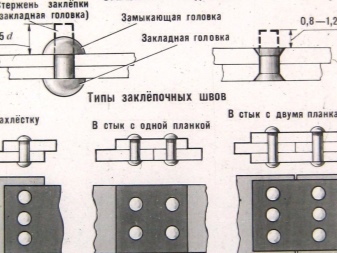
Metal riveting
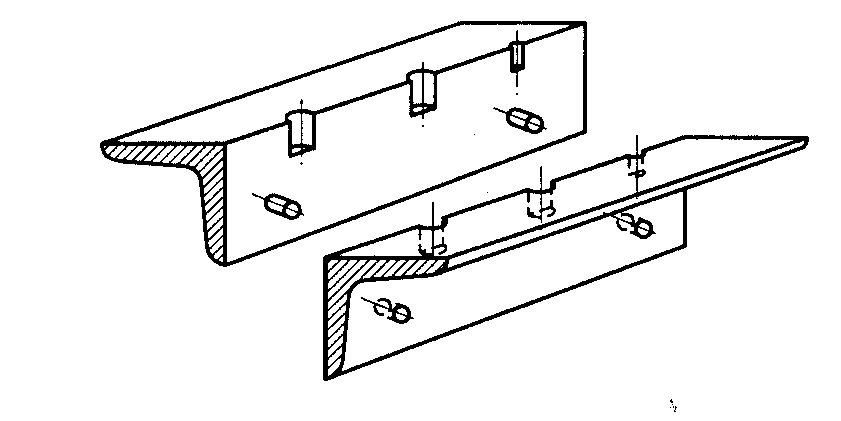
The process of metal riveting consists of two stages: the preparatory and the actual installation of hardware. Preparation - drilling holes, if necessary countersinking for countersunk heads
Please note that countersunk heads can be on one (either) side or on two
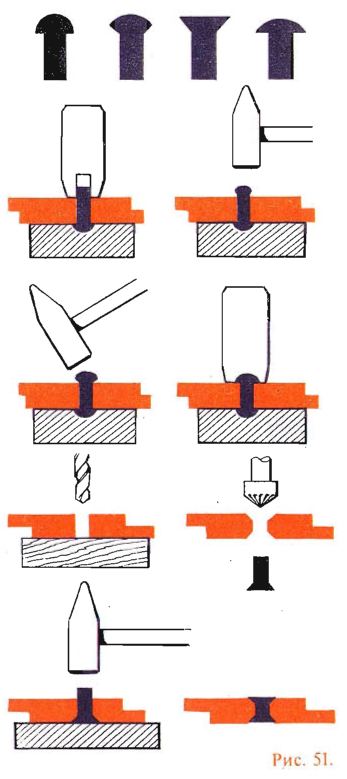
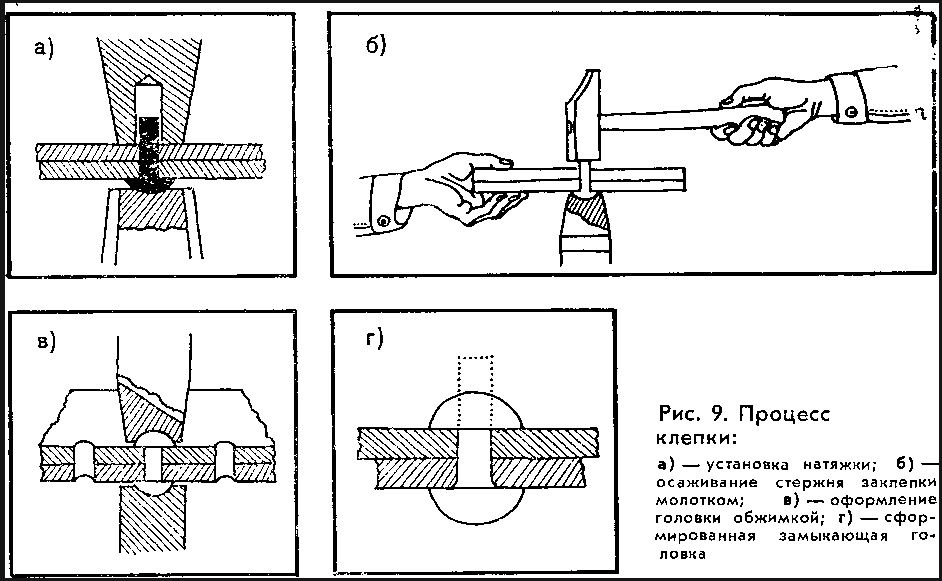
The riveting process itself is as follows:
- insert a rivet;
- pull off the parts to be connected;
- form a closing head with a tool;
- check and strip the connection.
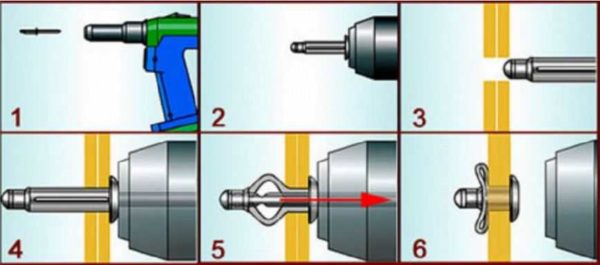
This is how the blind rivets are installed.
With a good instrument, work goes quickly. For private use and one-time work, manual riveters are usually used. And even with them, the process itself (without drilling holes) takes a matter of seconds. If we talk about installing a profiled sheet or metal tile, it is recommended to coat each hole made with paint - to prevent corrosion. It is these processes - drilling and painting - that take a long time.
Generally, there are two ways to install rivets: cold and hot. When hot, the joint is preheated to a certain temperature (determined by the metal and the thickness of the parts). In practice, it is used when installing large diameter rivets - 12 mm or more.
Rivets are placed in rows. The minimum distance between adjacent ones is 4 diameters, from the edge of the sheet to the center of the hardware - not less than 1.5 diameters of the rivet. When attaching a profiled sheet, they are placed in a recess, not in a wave.
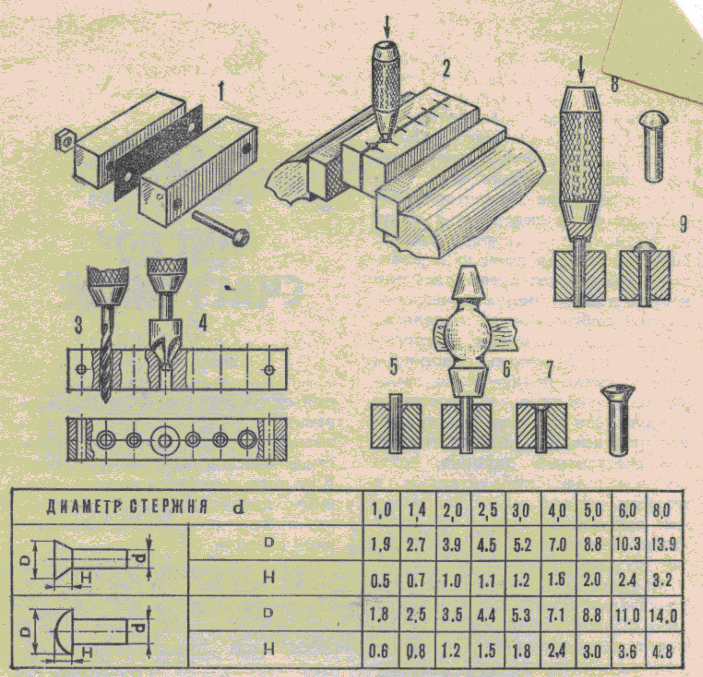
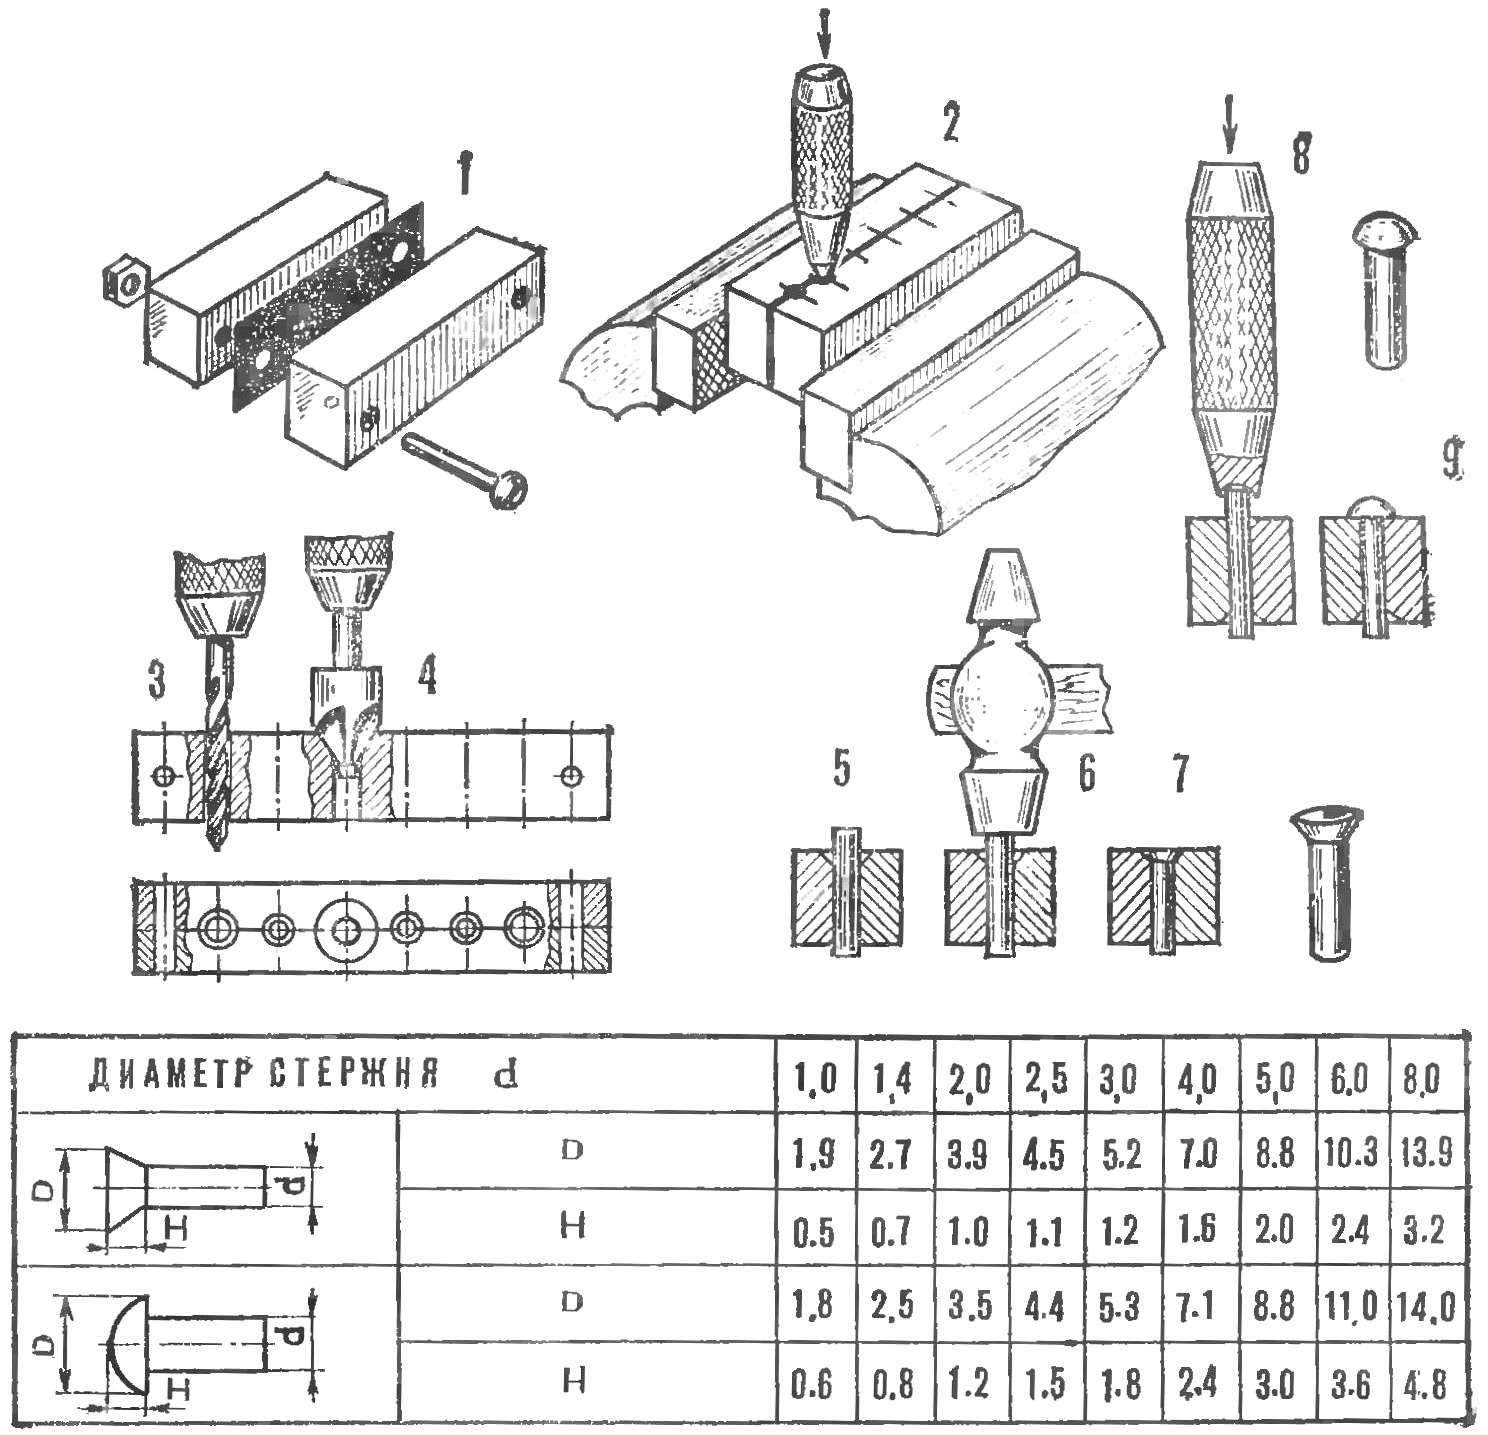
Sizing rivets
The rivets are selected based on the thickness of the metals to be joined. In this case, the following are important: the parameters of the insert head, the diameter of the rod. The diameter of the bar determines the diameter of the drill, which is used to prepare a hole in the parts to be joined. You can roughly determine the diameter of the rivet by doubling the thickness of the parts to be joined. The length of the rod is at least 2 diameters of the rivet, and the protruding part must be at least 1.25-1.5 of the diameter.


| Rivet diameter | 2.0 mm | 2.3 mm | 2.6 mm | 3.0 mm | 3.5mm | 4.0 mm | 5.0 mm | 6.0 mm | 7,0 mm | 8.0 mm |
|---|---|---|---|---|---|---|---|---|---|---|
| Hole diameter for precision assembly | 2.1 mm | 2.4 mm | 2.7 mm | 3.1 mm | 3.6 mm | 4.1 mm | 5.2 mm | 6.2 mm | 7.2 mm | 8.2 mm |
| Hole diameter for rough assembly | 2.3 mm | 2.6 mm | 3.1 mm | 3.5mm | 4.0 mm | 4.5 mm | 5.7 mm | 6,7 mm | 7.7 mm | 8,7 mm |
In general, the diameter of the rivet shank can be from 1mm to 36mm, and its length can be from 2mm to 180mm. Moreover, a larger diameter is not equivalent to a greater bond strength. Here both the material from which it is made and its type (hollow or solid) play a role. How do you choose? According to the characteristics of rivets. After all, you choose them for the connection of certain materials of a certain thickness. You know about the load that will be applied to the connection.
Therefore, when selecting, pay attention to what the manufacturer recommends
How to choose a rivet according to the thickness of the material to be fastened? According to the manufacturer's instructions, but in general, the diameter of the rod should be at least twice the thickness of the materials
It must be indicated:
Recommended connection diameter. You just have to pick up the drill and make a smooth hole without burrs.
Minimum and maximum thickness of the bundle to be joined
It is important that your connection is within the specified range.
Shear force. This is the load applied perpendicularly to the joint that the rivet can withstand without breaking.
Breaking force
At what load along the rivet will it collapse?
It is the tensile and shear forces that determine the strength of the future seam. The higher these values are, the more loads it will withstand.
Varieties of hand tools
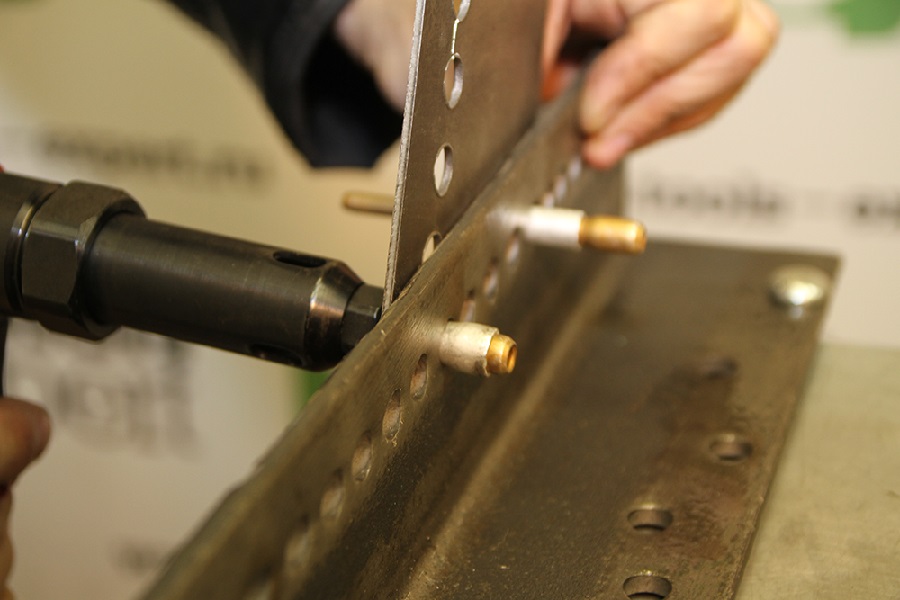
To date, several varieties of riveters have been produced, used in the home workshop. Threaded and draw-off tools fall into this category. To understand which of these tools is better, you need to study their characteristics and functionality in detail.
A hand-held pull-out riveter secures the rivets by creating a certain pulling force. In those blanks that need to be connected to each other, a small through hole is drilled, and after that a rivet is fixed in a certain way in the device itself. After that, the rivet is carefully inserted into the prepared hole and carefully expanded. It is worth considering that reliable fixation occurs due to the squeezing and unclenching of the device handle.
For domestic needs, you can purchase a threaded riveter, the operating mode of which is almost the same as an exhaust unit. The only difference is that in the working body, the ball is pulled into the rivet due to the rotation of the thread. This method of joining is considered optimal for workpieces with a small thickness. This is due to the fact that it is much more problematic to perform threading on thick metal. The great advantage of using this hand tool is that a bolt or screw can be screwed into the rivet itself if needed.
How to install buttons on jeans, outerwear
The easiest way is to install four-piece buttons (pictured # 2) that snap shut with a ring located at the top of the button. Using the same tool as for the blocks, it is easy to "flare" the button leg onto the petals of both the upper part and the lower part. However, for this type of buttons, special punches are often attached to them. But we know from practice that it is ineffective to use them. It is much more convenient and simpler to use a punch that “splits” the leg into petals. By the way, if you often have to install accessories on clothes, various types of buttons, especially antennae (in photo # 1), then be sure to buy several types of dowels in a hardware store. This is such a construction nail with a wide head, which is impossible to bend. Ask your husband to “blunt” several dowels of different thickness. Surely he has something in the garage to do it (emery). Next, you will understand why you need such dowels.
Species overview
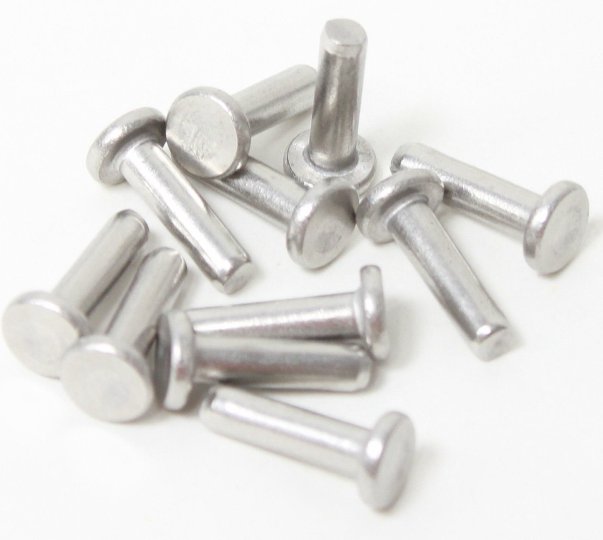
Products with a semicircular head are widespread. This item meets the requirements of GOST 10299-80. The cross-section of the rod is from 0.1 to 3.6 cm. A steel rivet for a countersunk hammer must comply with GOST 10300-80. For products with a flat head, standard 10303-80 applies. Finally, for semi-hollow samples, GOST 12641-80 is used.
For the manufacture of such devices, steel of the following types is used:
- 10kp;
- 15kp;
- St2;
- St3.
All metal shank rivets have excellent load carrying capacity. However, it is rather difficult to establish them. The semi-hollow type is formed in such a way that the section of the rod near the insert head is partially empty. Finally, the hollow product is easy to rivet. The flip side of this advantage is insufficient connection reliability. Semicircular heads can have different heights. Their use is considered the optimal solution from the point of view of the reliability and stability of the seam being formed.
In aggressive environments, rivets with a cylindrical or cone-shaped head are used. Countersunk and semi-secret types are needed if you want to exclude the formation of a protrusion above the surface. Such constructions are used only in cases where there is no worthy alternative to them.A universal type of fastener for a riveter in shape resembles the contours of a mushroom. A separate category is embedded, exhaust, traction and detachable products. Such hardware consists of two main parts. There is no need to hold them on the other side of the seam. This circumstance is very attractive when creating fences and forming roofing.
Sometimes there are so-called threaded rivets. They are used when it is necessary to connect parts with especially thin walls (no more than 0.03 cm). Inside there is a special thread, and outside there is a vertical notch that blocks rotation around its axis. Driven rivets are usually made from:
- brass;
- aluminum;
- copper (and all such products are calculated for hammering, they do not require a riveter).
Sometimes a zinc coating is used to increase corrosion resistance. Both "cold" and "hot" galvanizing shows itself well. After such processing, not only performance is improved, but also the visual perception of products.
Important: it is necessary to take into account the formation of galvanic pairs and electrochemical reactions between them. The copper-steel bond results in accelerated destruction of the product
What material should the rivet be of
Rivets are usually taken from the same material as the parts to be joined - this avoids electrochemical corrosion
Pay attention to the strength characteristics. But, as a rule, when connecting aluminum parts, the strength of aluminum hardware is sufficient
In general, rivets are made from the following metals:
- steel:
- ordinary - grades St2, St3, St10;
- corrosion-resistant Х18Н9Т;
-
galvanized;
- alloyed (stainless) - 9G2, 304, 316.
- copper MT and M3;
- aluminum alloys (more often AD1, D18);
- aluminum-magnesium (AlMg2.5; AlMg5; AlMg3),
- brass (L63).
When connecting copper parts, the installation of brass and copper is permissible. Aluminum is bonded with aluminum alloys. Steel sheets - corresponding grades of steel rivets. There are also mixed hardware - from two different metals (chemically non-conflicting). The most common are aluminum-steel.
For the installation of facade elements, slopes, ebbs, metal tiles and profiled sheets, blind rivets made of galvanized painted steel are usually used. Coloring - in tone with the details.
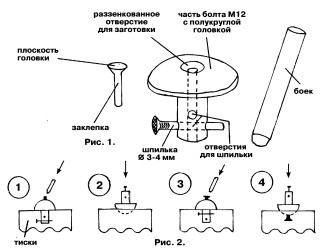
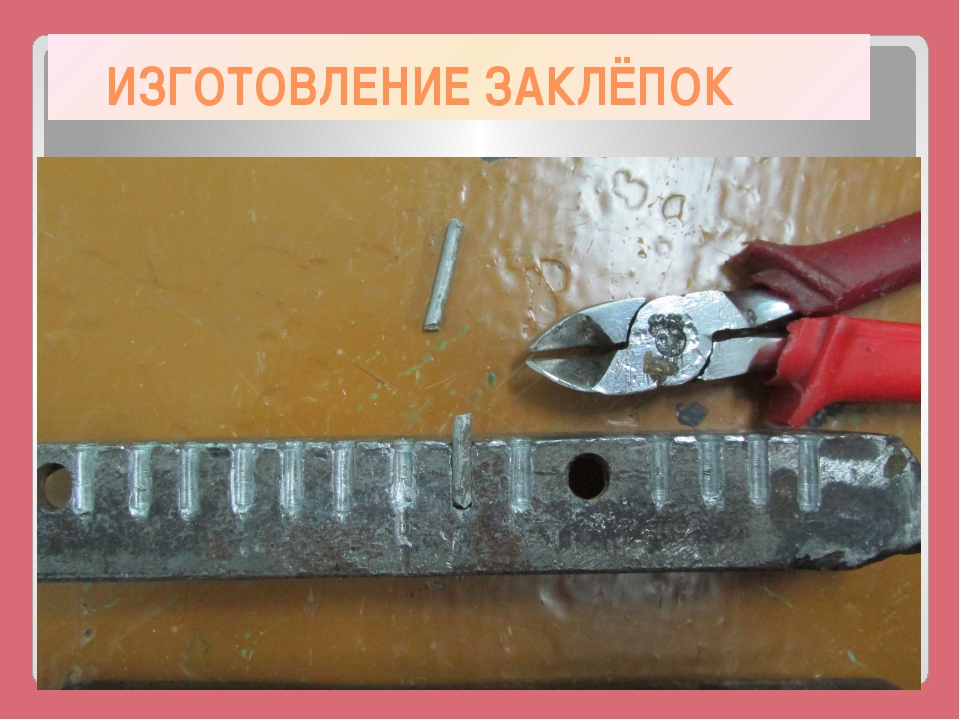
How to make a wire rivet with your own hands
How to make a rivet with your own hands
Fixing something with rivets is quite common. It is not difficult to make a rivet with your own hands, but with the help of such simple fasteners, you can easily repair kitchen utensils, pots, kettles, etc.
It is difficult for motorists to do without rivets, especially VAZ owners. Either there the interior trim must be riveted, then something must be attached there.
In general, a rivet is such a useful thing that will always come to the aid of a craftsman when you need to repair a hole in a saucepan or attach something.
How to make a rivet with your own hands will be discussed in this article.
How to make a rivet with your own hands?
In order to make a rivet from an aluminum wire with your own hands, first of all, you will need the wire itself. As for the diameter of the aluminum rivet wire, it should be about 10 millimeters.
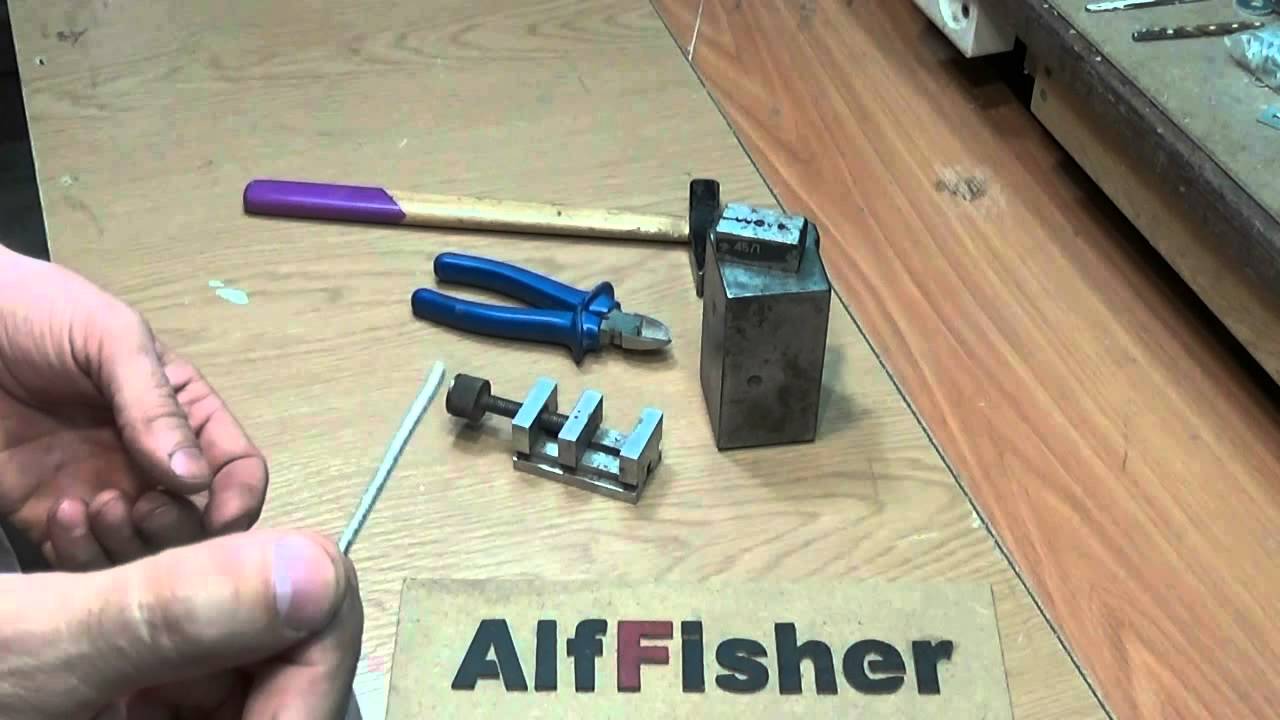
Also, in order to make a rivet, you will need a vise, an electric drill and metal drills. It is worth saying that, of course, today there are ready-made devices for making rivets.

However, there are different situations when there is an urgent need to take and make a rivet with your own hands at home. Then, of course, the following instructions for making rivets from aluminum wire will come to the rescue.
Rivet making instructions
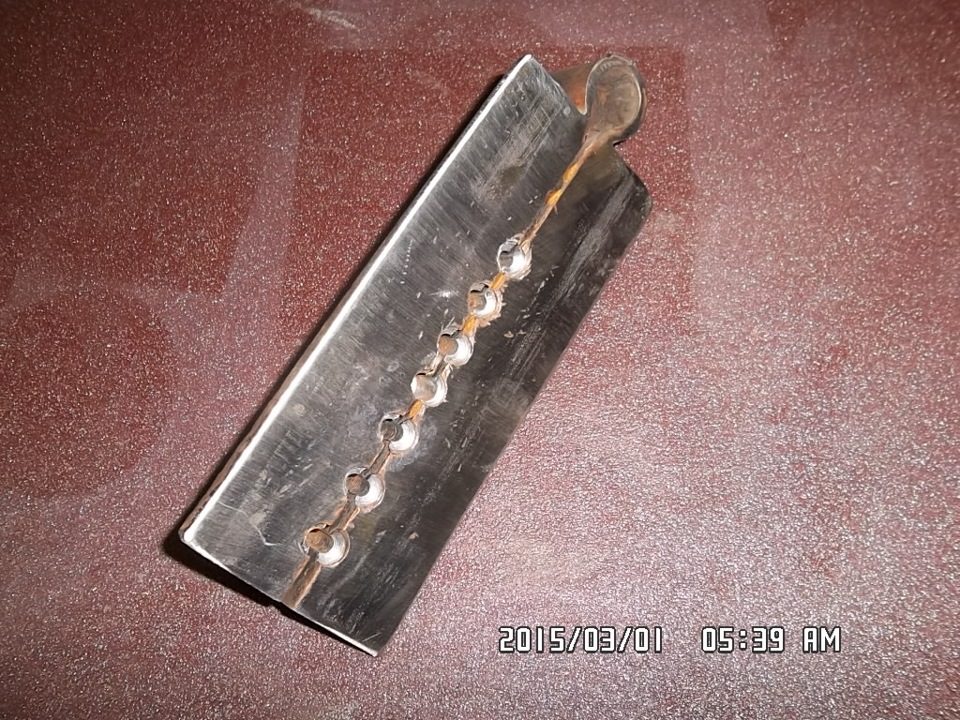
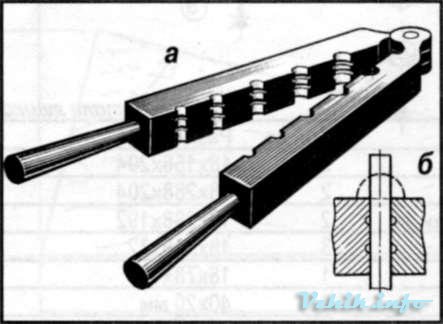
1. From a thick metal, at least one centimeter thick, several strips of about 30-50 centimeters in size are cut.On the wide side, the cut strips of metal are connected by welding with a hinge so that they can subsequently be folded together.
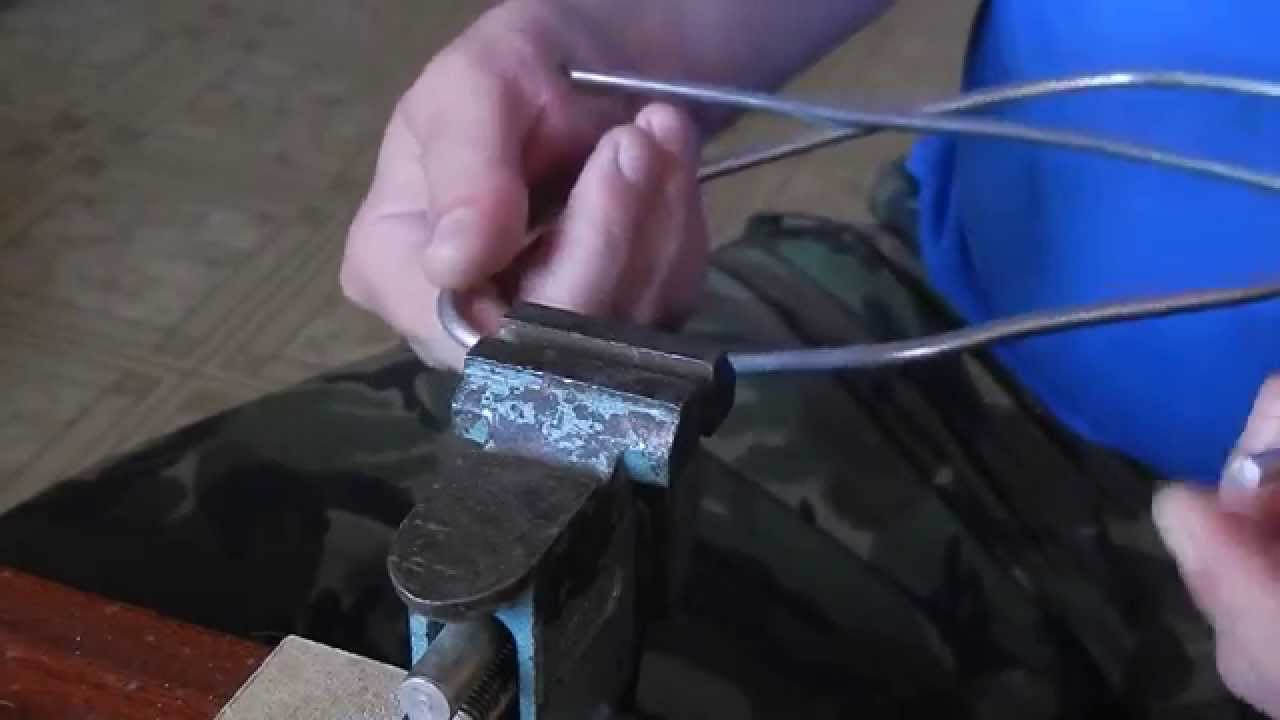
On the other hand, a piece of metal wire 6 mm (wire rod) is welded to the plates along the entire length. The wire is needed as a lever that could clamp the device in a vice when making rivets.
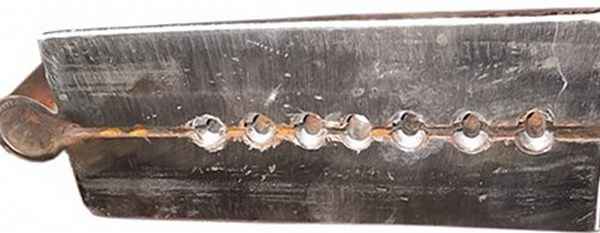
2. After the wire is welded to the plates, clamp them in a vice and make a small hole at the junction of the strips using an electric drill. The depth of the finished hole should be no more than 15 mm, and the diameter should be 4 mm.
Then a drill with a diameter of 7 mm is taken, and with the help of it, the resulting hole is countersunk to a depth of no more than 2 mm. Thus, a tapered hole will be formed in the metal strip to form the head of the aluminum rivet.
In order to make a rivet with your own hands using such a self-made device, it is enough to take a small piece of aluminum wire and lower one end of it to the very bottom of the drilled hole.
Then, using pliers, the wire is bite off over the edge of the metal strip with a margin of at least 3-4 millimeters. Using a hammer, a piece of wire inserted into the hole is gently tapped until the wire finally sits in the hole.
This completes the manufacture of a homemade rivet from aluminum. It remains only to unclench the vice and remove the finished rivet.
As you can see, making a rivet with your own hands is not so difficult, and you will need few materials for this. Nevertheless, knowing the home process of making rivets, you don't have to worry about the fact that, in case of urgent need, the rivets will not be at your fingertips.
Rate the article and share the link:
Fluffy (chenille) wire for crafts
I continue to talk about interesting materials for children's creativity. Today we are talking about fluffy wire for crafts. This wire is also called chenille, shaggy, plush, sometimes it is called fluffy sticks.
Chenille - (from French chenille - caterpillar) - fluffy, with a velvety pile, twisted from several threads, between which a row of short ends of threads sticking out in all directions (pile) is captured. Chenille is often called any fabric with a short nap - velvet, corduroy.
In fact, this flexible fluffy wire is a pipe cleaner. It has never been produced in our country, so a few years ago, many people did not hear anything about it. And foreigners quickly realized that this is a very useful thing for children's creativity. You can make cute fluffy crafts from it. In addition, these crafts can be disassembled and the next time different ones can be made (however, over time, the wire loses its villi from this and in some places ceases to be fluffy).
Foreigners liked this idea so much that many authors of pedagogical methods recommend fluffy wire, among other compulsory manuals for the development of fine motor skills in preschoolers. Therefore, in the United States, for example, children make crafts from chenille wire both in kindergartens and in schools during art classes.
Fluffy wire is of different lengths, different colors, including striped and shiny, has the same thickness along its entire length, or its thin parts alternate with wide ones ("Feathers" shape). The shiny fluffy wire is tougher than regular plush wire, but it makes very beautiful crafts for the New Year and Christmas.
Crafts from fluffy wire
You can make different crafts from fluffy wire: flat,

and voluminous.


Figurines made of fluffy wire can be used to decorate various works, for example, this is how fluffy wire flowers look like on (there are several more options for this link).

When making crafts, it is very convenient to make paws for various animals out of fluffy wire. For example,
In my other blog, I once showed a couple of crafts made by my daughter from fluffy wire: turkeys and a sunflower.

Here is another video master class on how to make a butterfly out of fluffy (chenille) wire.
Where to buy fluffy wire
Where to buy fluffy wire? In the departments for creativity or order online.
For example, you can buy fluffy (chenille) wire at Ozone:
- ordinary one-color fluffy wire in "Ozone",
- striped fluffy wire and fluffy feather wire in Ozone.
Several times I ordered fluffy wire on Aliexpress for my daughter and for gifts (the cost of goods and delivery is much lower than for orders from Ozon or Labyrinth):
- ordinary fluffy wire (I ordered the color "Multicolor" or "Mix" - sets of one hundred wires of 30 cm length, 10 different colors, 10 wires of each color came).
- shiny fluffy wire (I ordered the color "Many" - a set of one hundred multi-colored wires also came).
All the best! If the article was useful to you, please help the development of the site, share the link to it in social networks.
Posting site materials (images and text) on other resources without the written permission of the author is prohibited and prosecuted
.
Many unusual materials are used in needlework. Sometimes they initially had some very primitive application, but over time they became materials for creativity. For example, chenille wire was originally invented as a means for cleaning smoking pipes, and its "great-grandfather" was an ordinary chimney sweep ruff.

To install the fittings, you first need to "punch" a hole
In our practice, in the conditions of the atelier, for the installation of accessories, we use a press and numerous attachments suitable for this or that type of button, block. With the help of such attachments, the edges of a button or a block are neatly flared, acquiring a "factory" look. But since it is unreasonable to buy a press with attachments and other additional tools for home use, we suggest that you use “handy” tools. In your arsenal, you should definitely have a small hammer and anvil (you can use another hammer), an awl and a few additional tools that you will have to buy at a sewing store. One of these tools should be a punch.
It is imperative to use the punch so that the hole is perfectly even and the edges of the fabric do not crumble. The punch can have only one, the smallest size, in extreme cases, two (the second is slightly larger). But it is best to buy a set of punch holes with removable nozzles. It is undesirable to cut a hole with scissors, since from the time block or button will surely "fall out" of it. The hole for the block or button should be minimal, it is advisable to even slightly pull the fabric over the block leg, because the tighter the fabric is pressed against the leg, the more securely it will be fixed.
You need to punch a hole in fabric or leather on an anvil, not metal, but wooden. The tree should be very dense (not loose), for example, the area where the twig is. You can also use other materials that are dense, but will not damage the punch point. Tip: Areas where holes will be punched on knitted fabrics and other bulk materials can be glued with an adhesive cloth.
Tableware repair - do-it-yourself riveting + making rivets | With your own hands
METAL COOKWARE IS STRONG BUT NOT ETERNAL - OVER TIME MAY LEAN OUT AND START LEAKING. BUT THIS IS NOT A REASON TO GET RID OF IT. POTS, BOWLS AND BUCKETS CAN AND SHOULD BE REPAIRED.
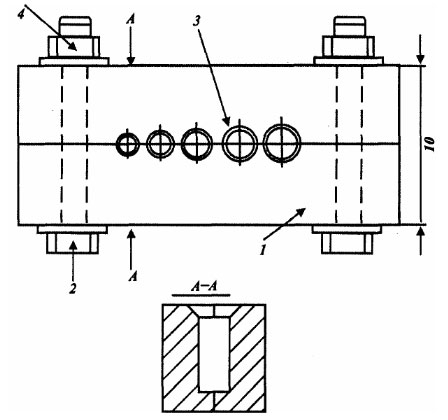
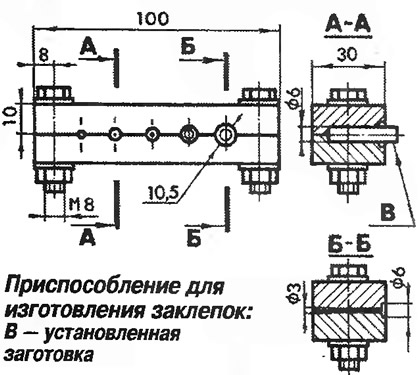
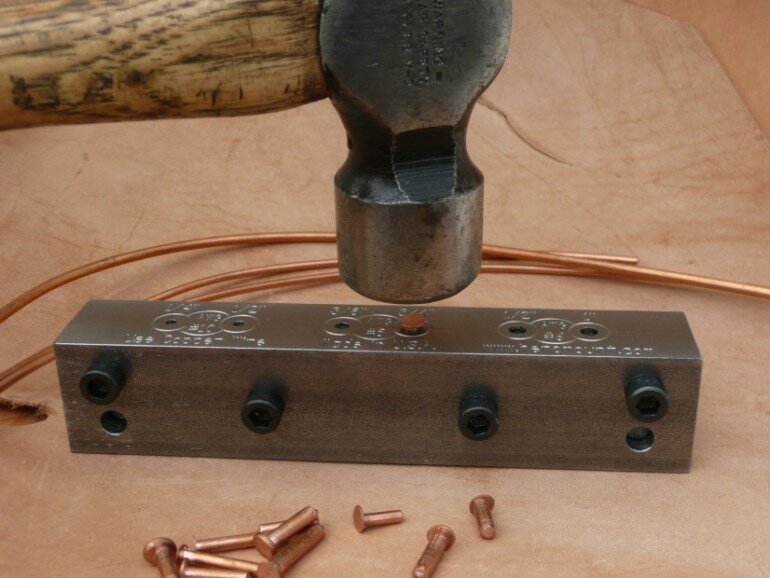
For repairs, it is not at all necessary to have a soldering iron, aluminum wire, a small hammer, a round file, a mandrel for making rivets and a stop are enough.
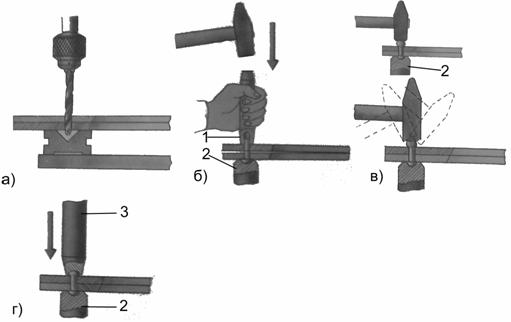
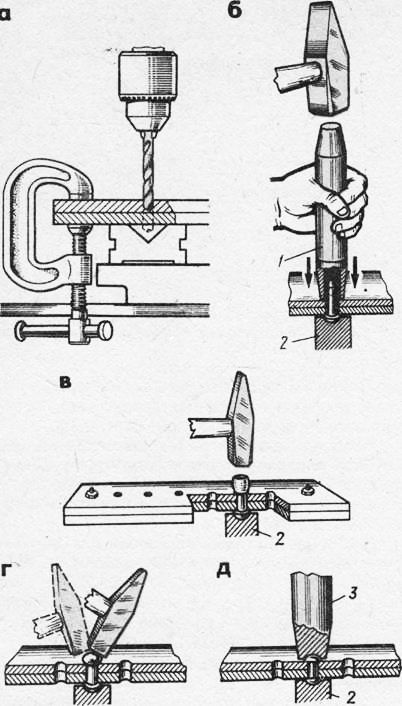
Preparation
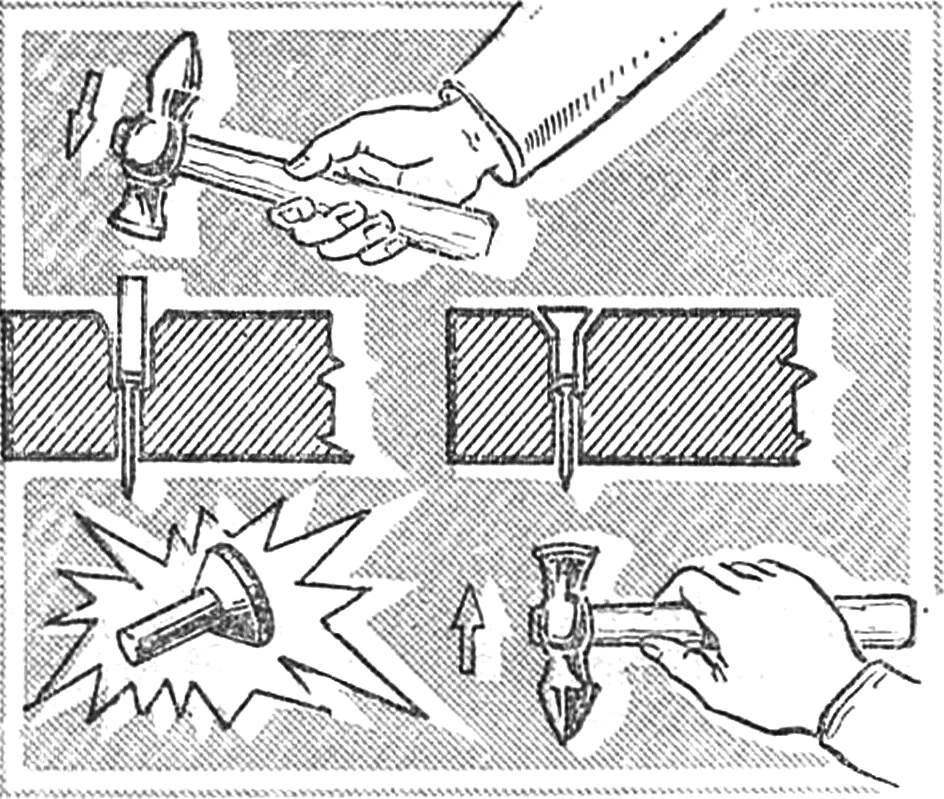
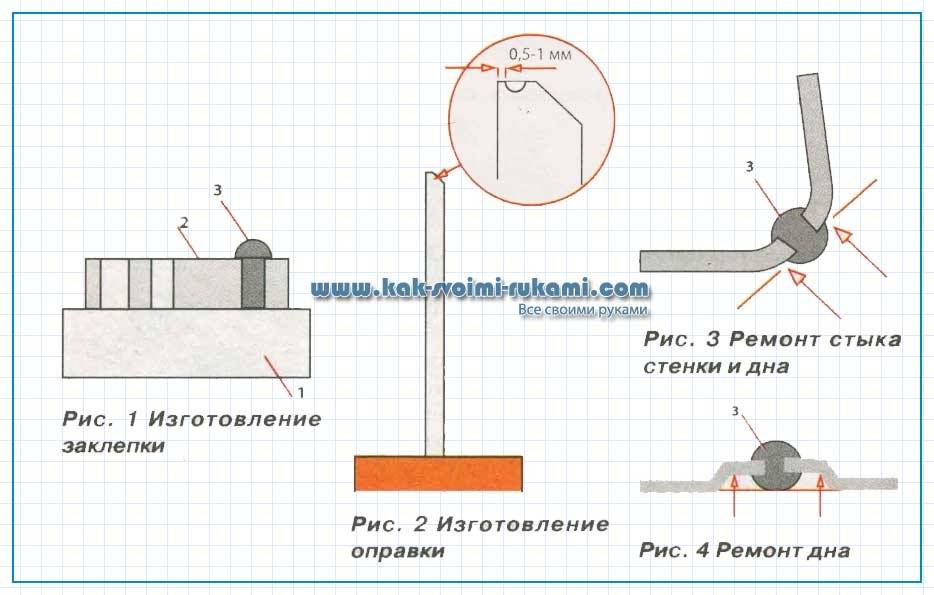
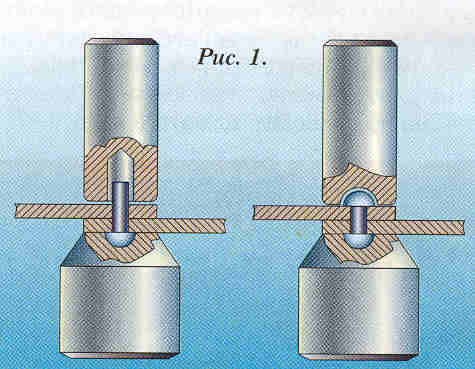
Mandrel.We take a small piece of sheet iron 5-10 mm thick, grind one side and drill holes for different wire diameters.
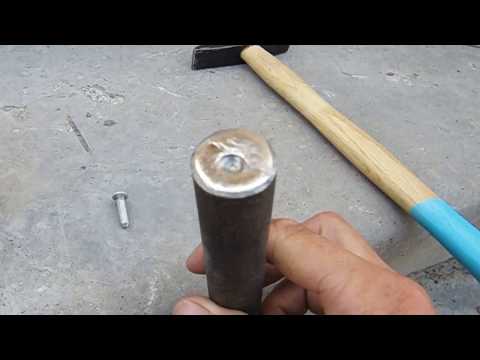
DIY rivets (3).
It can be used not only to patch holes, but also to attach handles that have fallen off the pan. Therefore, we make leg 3 more authentic - the excess can always be cut off. A piece of wire, slightly longer than the thickness of the mandrel sheet, is inserted into the hole and with a hammer we form the head of the future 3 (Fig. 1).
In principle, any heavy metal object can be used instead.
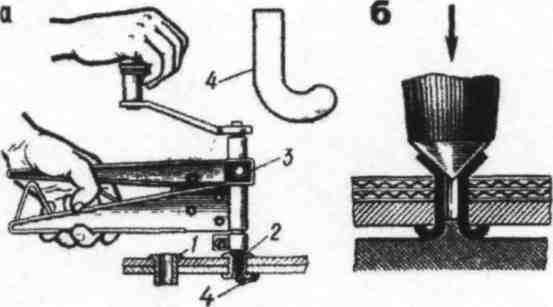
But it is easier, faster and better to put 3 with the help of a simple device (Fig. 2).
We drive an iron rod d 10-14 mm, 30-40 cm long with a pointed end into a wooden block. At the other end, we form a hole for the cap 3. To do this, drill a recess up to 1.5 mm with a suitable drill, insert a ball d 64 mm (from the bicycle bearing) into it.
With a few hammer blows on the ball, we give the hole a spherical shape.
Hole (O).
We insert the file from the inside of the pan into the O to be repaired and by rotating movements from left to right we develop it to a thickness of 3. Since the file has a conical shape, it can be used to obtain O with a diameter of 2-4 mm. The burrs formed on the outside around O are carefully cleaned with fine sandpaper.
DIY aluminum cookware repair
a) A hole formed at the junction of the bottom and the side of the pan.
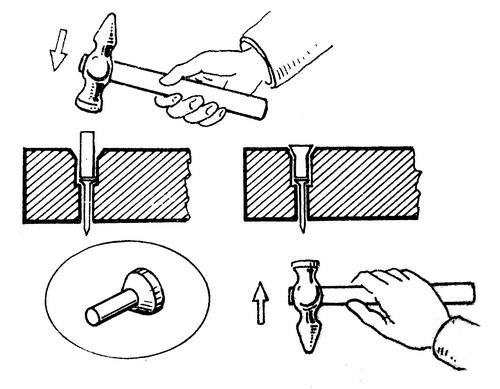
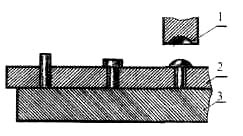
We rivet the spherical surface in the place of the "patch" from the outside, giving it a semblance of a plane (Fig. 3). Preparing O.
We cut off the leg 3 to the desired size, leaving a margin for the formation of the second cap.
From the inside, insert 3 so that it rests with the head against a massive stop, and rivet it outside.
b) The hole is at the bottom.
In this case, it is necessary to precipitate O so that 3 does not touch the surface of the slab (Fig. 4). _
At the final stage of installation 3, we alternately rivet it from the inside and outside, achieving a snug fit of the edges of the cap.
… .And enameled
It is produced in the same way as aluminum, however, in order to preserve the enamel, the bottom is not given a semblance of a plane and is not upset.

Rice. 1 Rivet making: 1 - metal stop, 2 - mandrel and 3 - formed rivet. Rice. 3 Repair of the joint between the wall and the bottom. Rice. 2 Making the mandrel Fig. 4 Repair of the bottom.