Leveling the surface of a wooden floor
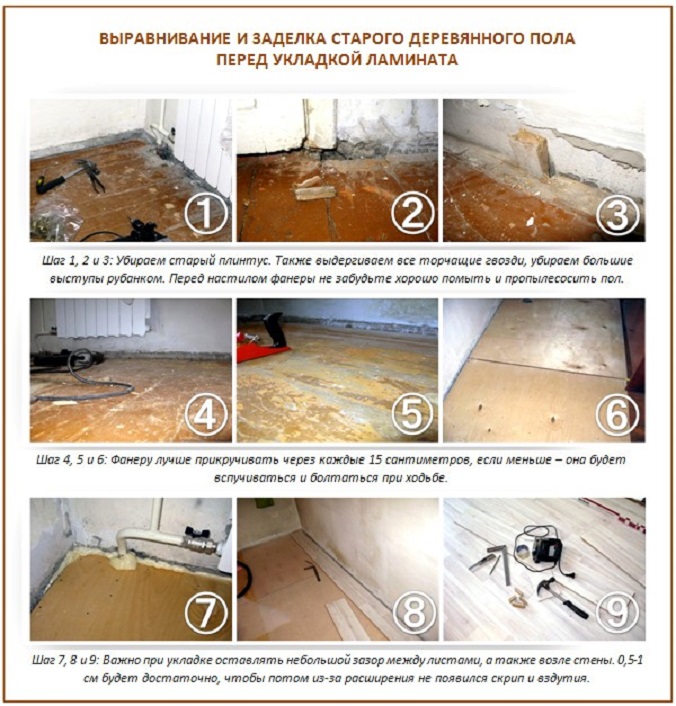
The preparatory stage is the leveling of the wooden surface under the linoleum, since depressions, cracks, bumps or holes from nails are formed on the old coating in any case.
For leveling, plywood is laid, having a thickness of about 7 millimeters, this allows the floor to be brought to almost perfect condition. In case of significant cracks and defects, all irregularities are cleaned and covered with putty on wood, creating complete surface insulation. If the floors are even and have minor defects, it is possible not to use plywood, it is enough to level the boards with a planer or a grinder, the nails are sunk into the surface to the maximum depth, and covered with putty, in the same way, the joints between the floorboards or other holes are closed. After completing the preparatory work, remove all small debris with a broom or vacuum cleaner, the device will help to thoroughly remove the garbage.
Preparing for flooring
When the floor is badly worn, it needs to be repaired. Rotten boards with mold or mildew are dismantled. It is advisable to burn such places with a blowtorch or treat with an antifungal solution, depending on the magnitude of the damage. Loose boards are nailed to the logs. Large cracks are clogged with wooden strips, small ones are putty. Curved boards are leveled with a plane. Small flaws are cycled and sanded. The old paint is warmed up with a building hair dryer and dismantled with a spatula. It is impossible to use a grinder, as the paint melts and the skin is instantly clogged.
If these manipulations represent a very large amount of work or there is a significant difference in the floor level, and the base is strong and allows the height, you can make a new skeleton from the slats of at least 2/4 cm.To do this, we find the highest point and attach the initial rail directly to it. And further down the level, using pads or wedges, we mount a 40/40 cm crate. You can nail it down. Self-tapping screws are easier to use, but fragile. It is better to use dowel bolts. Naturally, the hats are recessed flush with the crate. If the floor is really bad, it will have to be rebuilt again.
How to properly fit the linoleum substrate on a wooden floor, see the video below.
Method 2: leveling with thin screeds
In this case, cement mortars and self-leveling mixtures based on polymers can be used. The mixtures are suitable for pouring in a thin layer up to a maximum of 1 centimeter thick and serve as a finish. It is possible to use special compounds for stairs, treatment of serious cracks. The cement mixture can be poured to eliminate more serious defects and distortions.
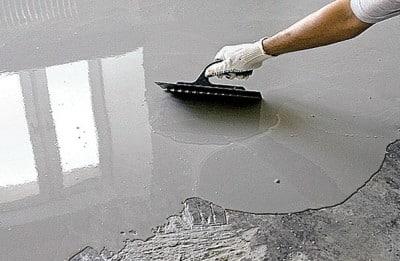
When pouring different polymer mixtures, the surface is first treated with a primer, and then a screed is made. If there are irregularities above 2-3 millimeters, it is better to choose a cement-acrylic mortar, which can be used to make a layer up to 6 centimeters thick. Self-leveling mixtures are prepared according to the recipe specified in the instructions, poured in parts, distributed with a needle roller. Step-by-step pouring is performed quickly, since the mixture sets in a short time.
In order to level the floor with concrete mortar with your own hands, you will need levels, drywall guides, a screed mixture, spatulas, and the usual set of repair tools. Concrete is prepared according to this recipe: 3 parts of M200 cement for 1 part of sand, 0.5 part of water. You can add gravel, glass, expanded clay to the composition. Prepare the screed in a concrete mixer, mixing first the sand with some of the cement and water afterwards.You will also need containers for mixing the solution.
The amount of screed is determined before pouring concrete according to the condition of the base - if the slope of the surface and potholes, bumps are no more than 3 centimeters, it is enough to fill a layer with a height of 7-8 centimeters. When more serious distortions need to be leveled, a foundation is laid.
How to do it yourself under linoleum:
1) Dismantling the old coating, thoroughly cleaning the floor, removing dust.
2) Examination of all defects and irregularities, determination of the lower and upper points of irregularities, marking the floor with a laser level (you can use a regular level and a nylon cord), installation of lighthouse rails.
A straight line is drawn on the wall around the perimeter of the room, distances are measured from it down to the plate itself. Where the shortest indent is the upper point of the unevenness, they retreat upward by 3-6 centimeters and draw a line. This is the height of the future floor, which is guided by when setting the guides.
3) Reinforcement of the floor with metal reinforcement (if necessary) in mesh format, the pitch and diameter of which is selected in accordance with the thickness of the screed.
4) A damper tape is glued along the lower edge of the wall just above the level of the future floor, which will help the screed to survive the effects of external factors and help to avoid the appearance of cracks.
5) Installation of beacons - it can be a moistened wooden beam, a profile for plasterboard sheets. The step between the guides should be less than the size of the tool selected for distributing, leveling the mixture.
6) Dilution of the mixture (or preparation of concrete).
7) Pouring the mixture between the beacons. It is better to serve from the far corner of the room, gradually approaching the exit. When the pouring is completed, the solution is distributed, the surface is leveled.
 Cover the screed with plastic wrap for a day, then remove it, dismantle the lighthouses and rub the seams.
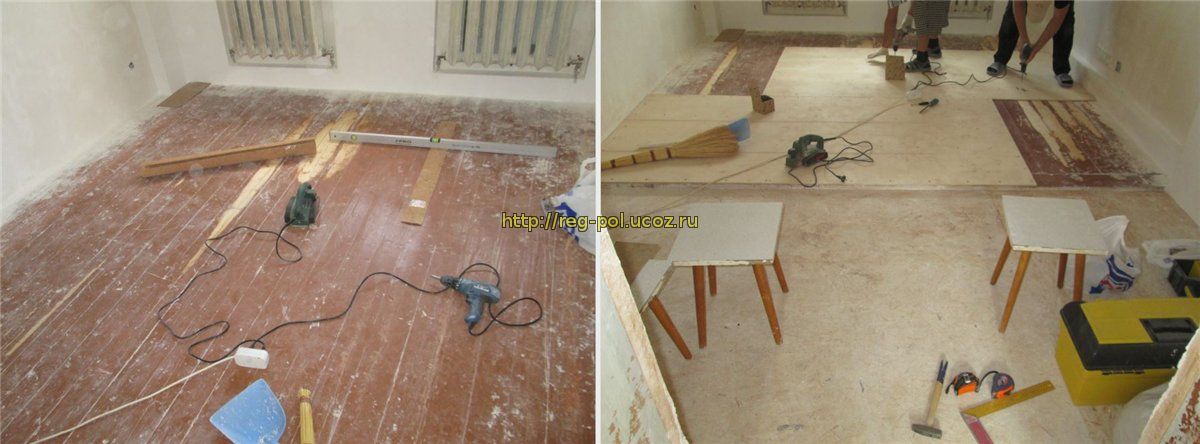
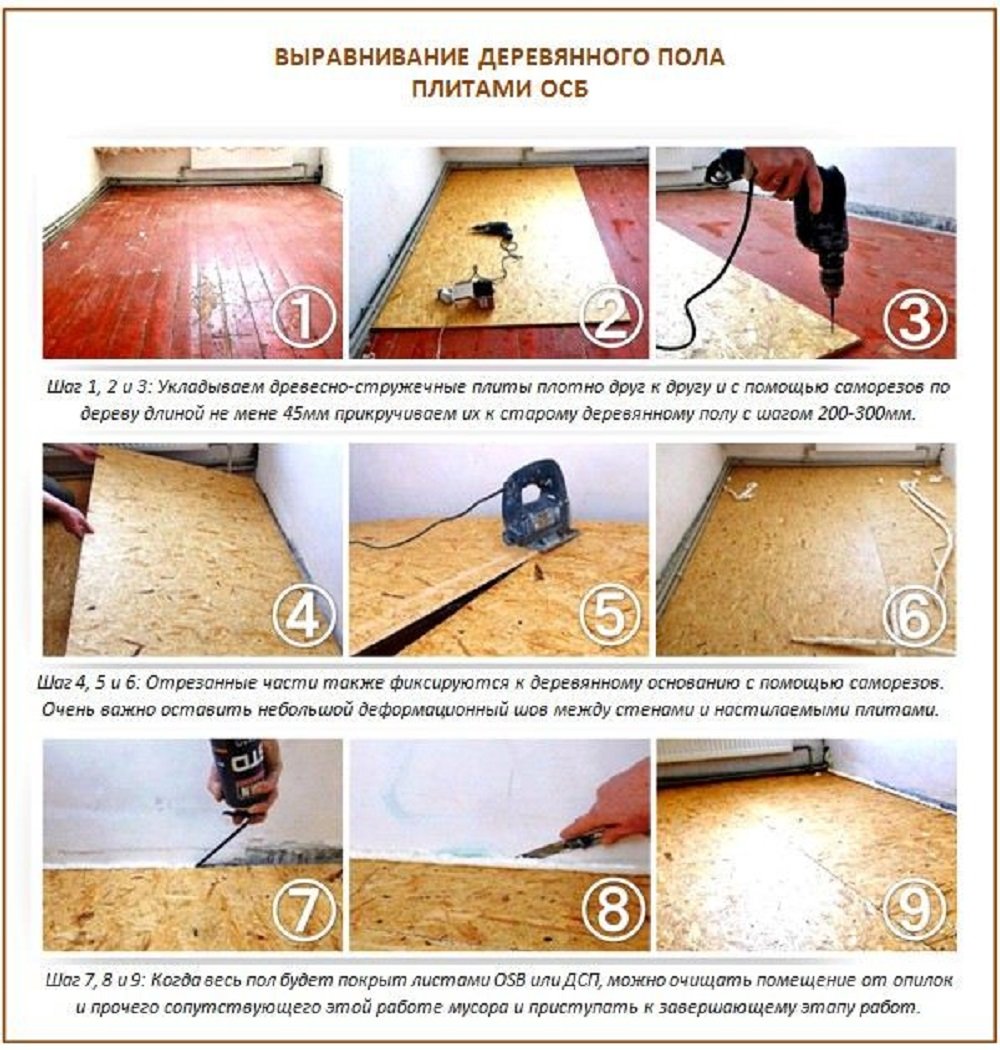
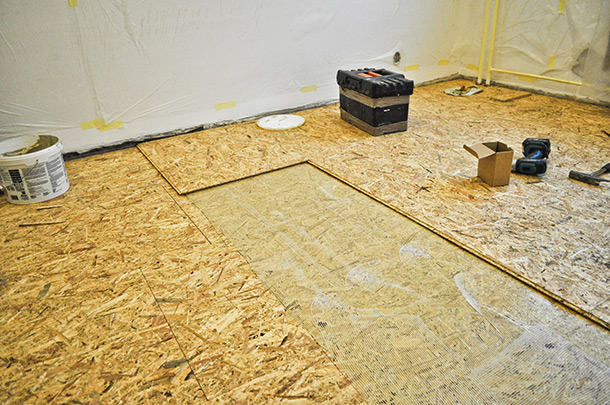
Method 1: leveling the base with slab materials
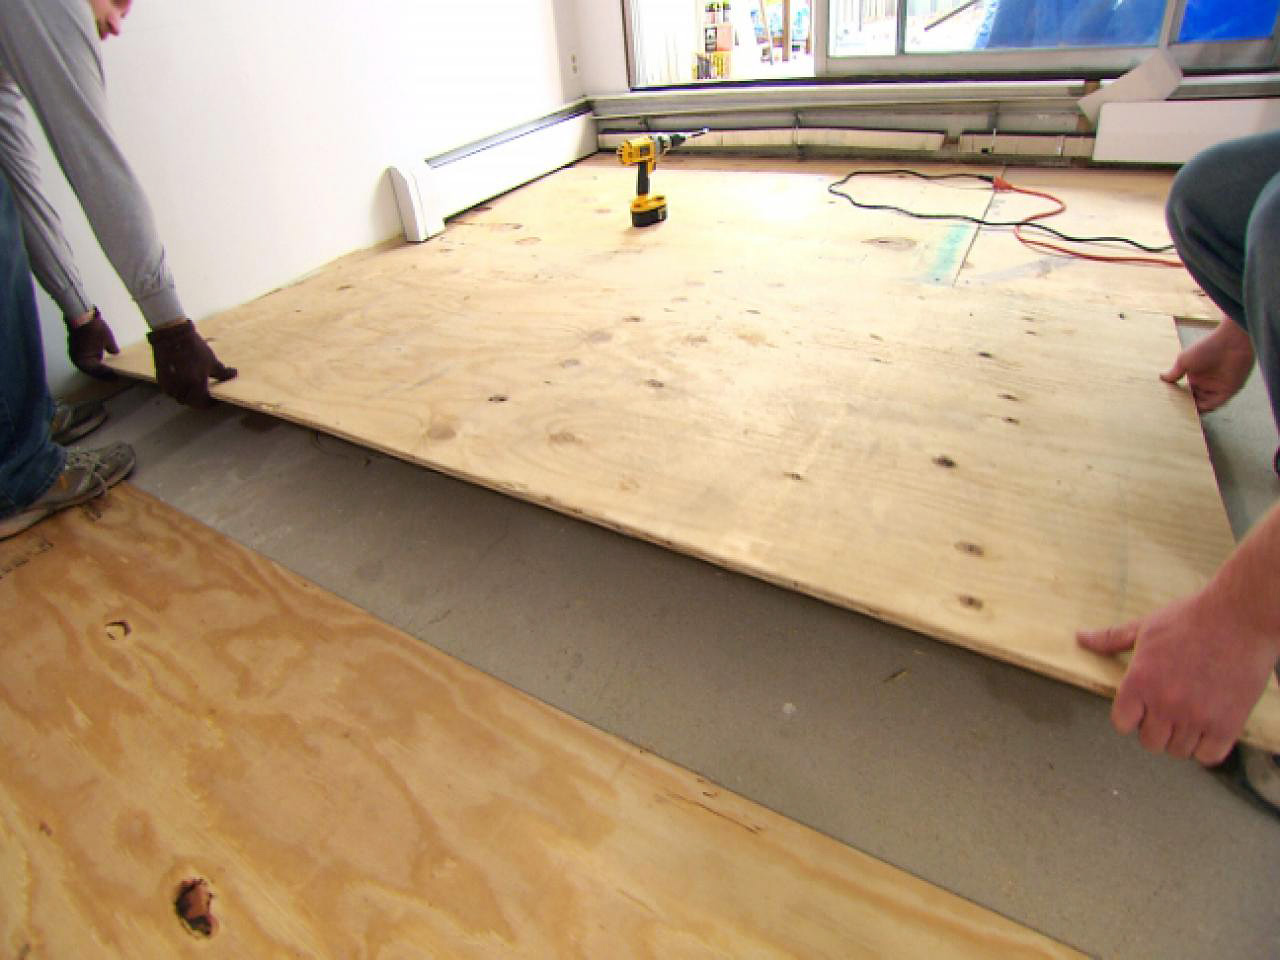
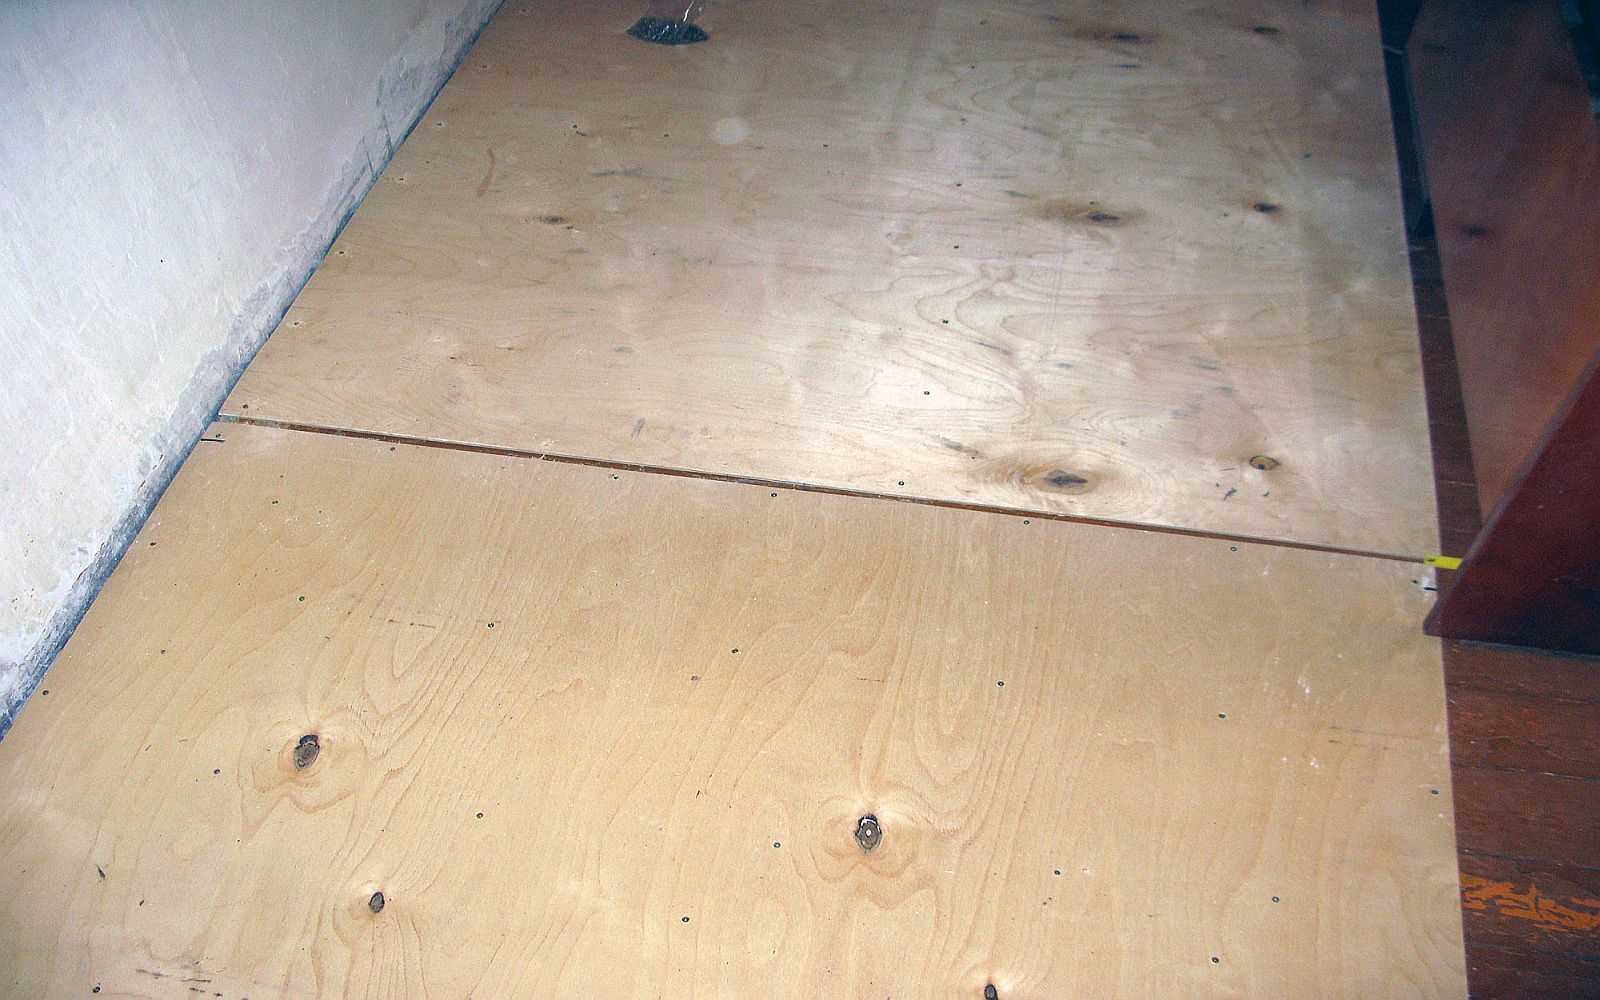
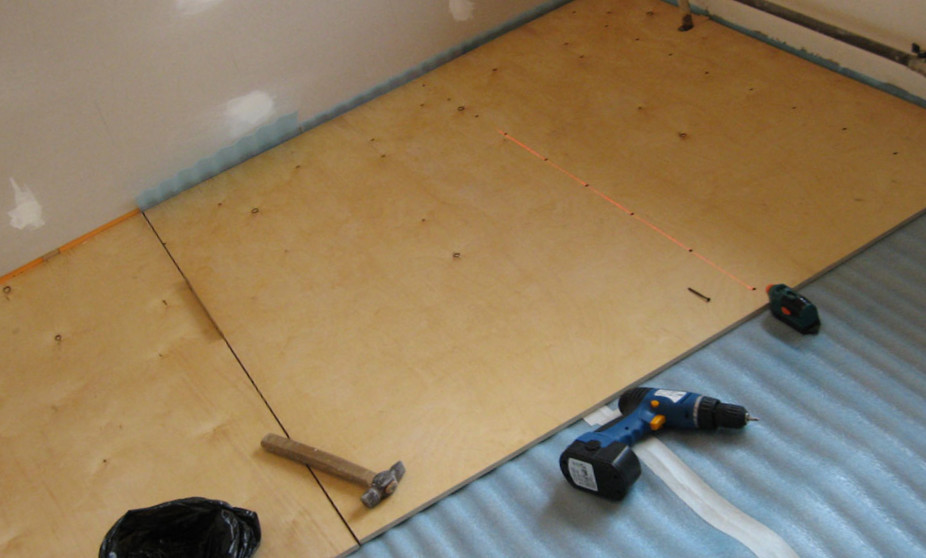
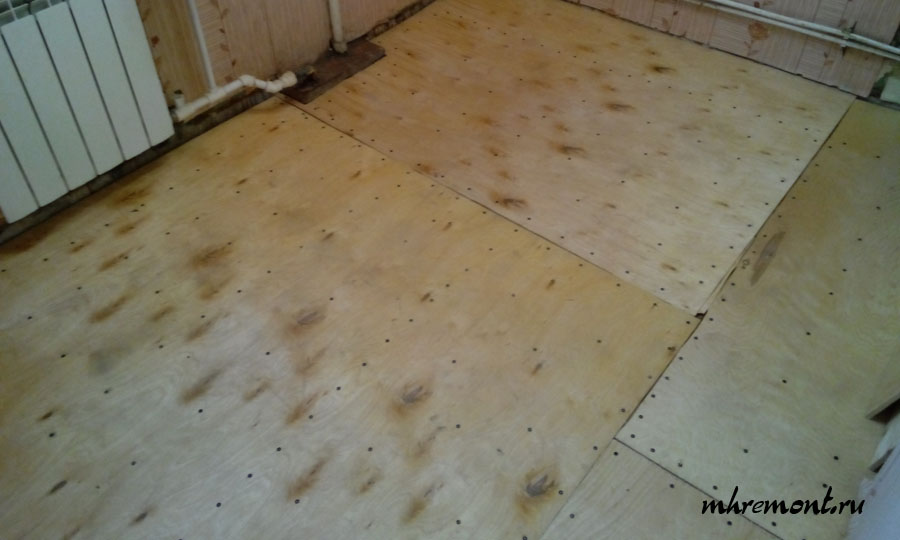
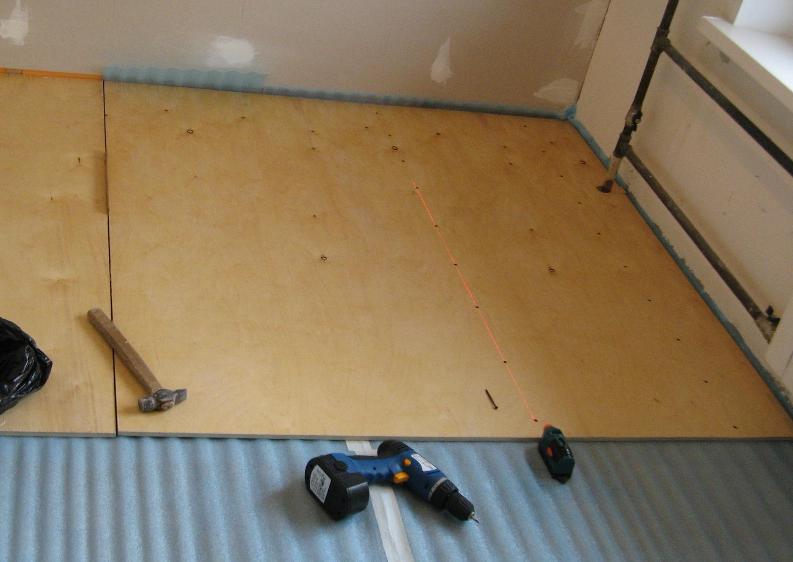
The method is suitable for floors, the base of which has a considerable number of irregularities, defects and drops. Laying chipboard or plywood sheets is the fastest and easiest way to level the floor with your own hands. Special plywood is used, impregnated with moisture-resistant compounds.
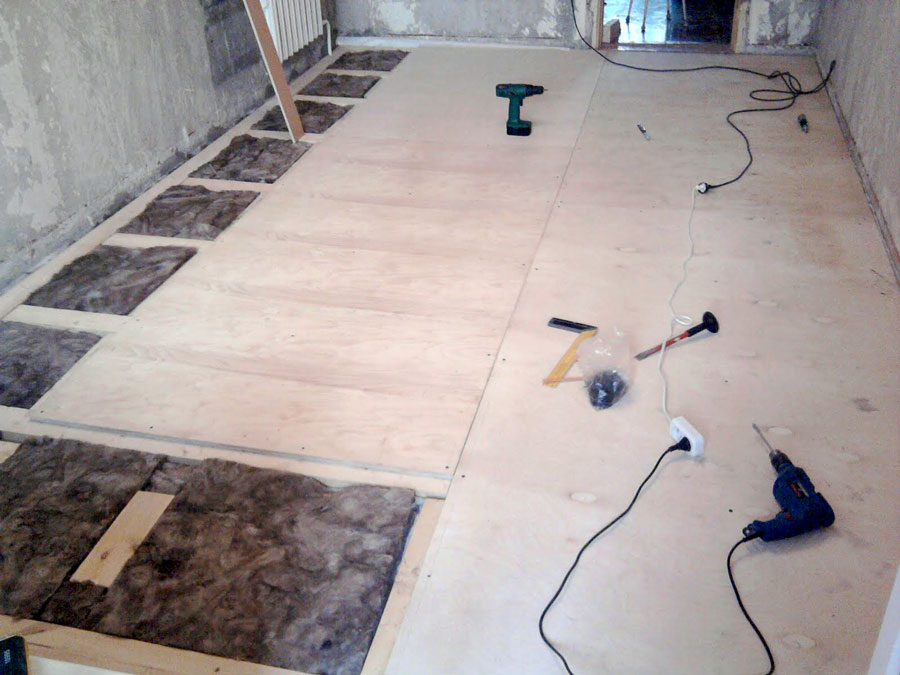
Usually, sheets are chosen with a thickness of 10-14 millimeters, they are mounted with self-tapping screws to the previously installed logs. The logs are aligned horizontally, in their role are square wooden bars with a cross section of 4-5 centimeters, pre-impregnated with antiseptic compounds. They are installed with an optimal step so that the plywood sheets fall in the middle of the bars.
Damper tape is glued around the perimeter of the room, beacons are installed. Further, the floor is covered with expanded clay or quartz sand; expanded polystyrene can also be used.
The sheets need to be adjusted as close as possible to one another, glued and / or fastened with self-tapping screws, and after the joints and holes are processed using putty, be sure to clean it with sandpaper.
What is the best way to fix wood flooring?
 A wooden base is a frequent occurrence in Soviet apartments, country houses, and cottages. Over time, the wooden flooring is deformed, cracks and gaps appear, and therefore it must be leveled before laying linoleum.
Leveling methods:
- Cycling.
- Covering with putty.
- Installation of plywood panels.
- Use of dry self-leveling mixtures.
Let's talk about each of them in more detail.
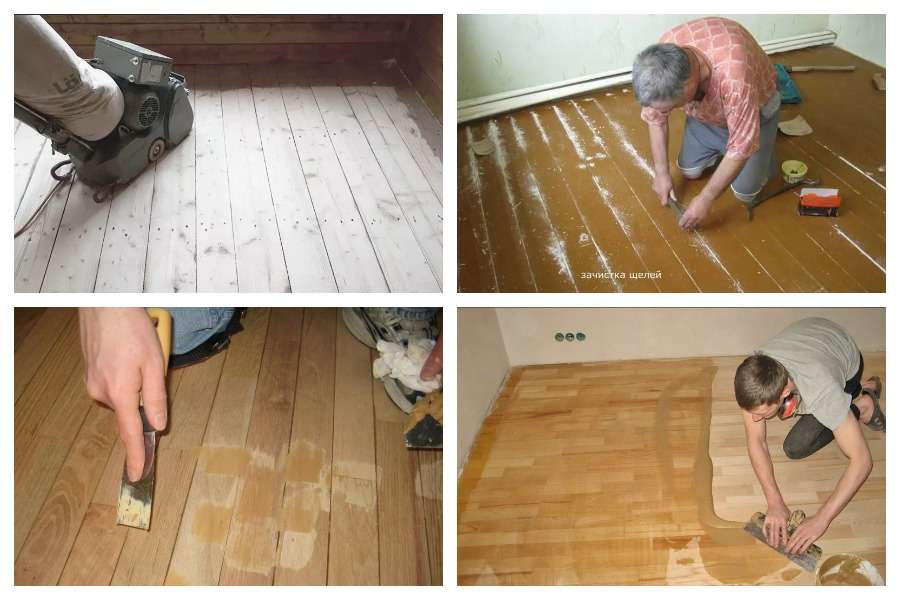
Cycling
For cycling it is best to use a scraper, but if you don't have one, a regular plane will do. Processing starts from the far wall towards the doors.
Rules for using the scraper:
- make sure that there are no metal objects on the floor, no nails sticking out;
- use special headphones when working;
- use a respirator to prevent dust from entering the respiratory tract;
- the device is noisy; therefore, carry out the work within the permitted time.
Cycling processing takes place in 2 stages.
- After the first cleaning, the surface must be covered with a putty, eliminating all defects. When it dries up, you can start secondary processing.
- At the end of the leveling, vacuum the room, treat the base with an antiseptic, and then cover with a protective varnish. Then you can start laying the linoleum.
Putty
The method of leveling with putty depends on the type of material selected:
- For wooden surfaces, a composition of sawdust with glue is suitable, which will cope with even minor defects. Such mixtures are good protection against moisture, noise, unwanted insects.
- Dry putty mixtures, which are diluted to a creamy consistency and applied to the sanded surface.
- A simple dry filler is the most economical but time consuming way to cover wood floors.
Advice
Putties are used less and less - they were replaced by self-leveling mixtures.
Plywood
 This method is suitable for situations where you need to level a tilted floor. Plywood panels, laid in two layers, allow you to bring the floor level to horizontal. The best will be sanded sheets with a thickness of 10 mm.
The order of work is as follows:
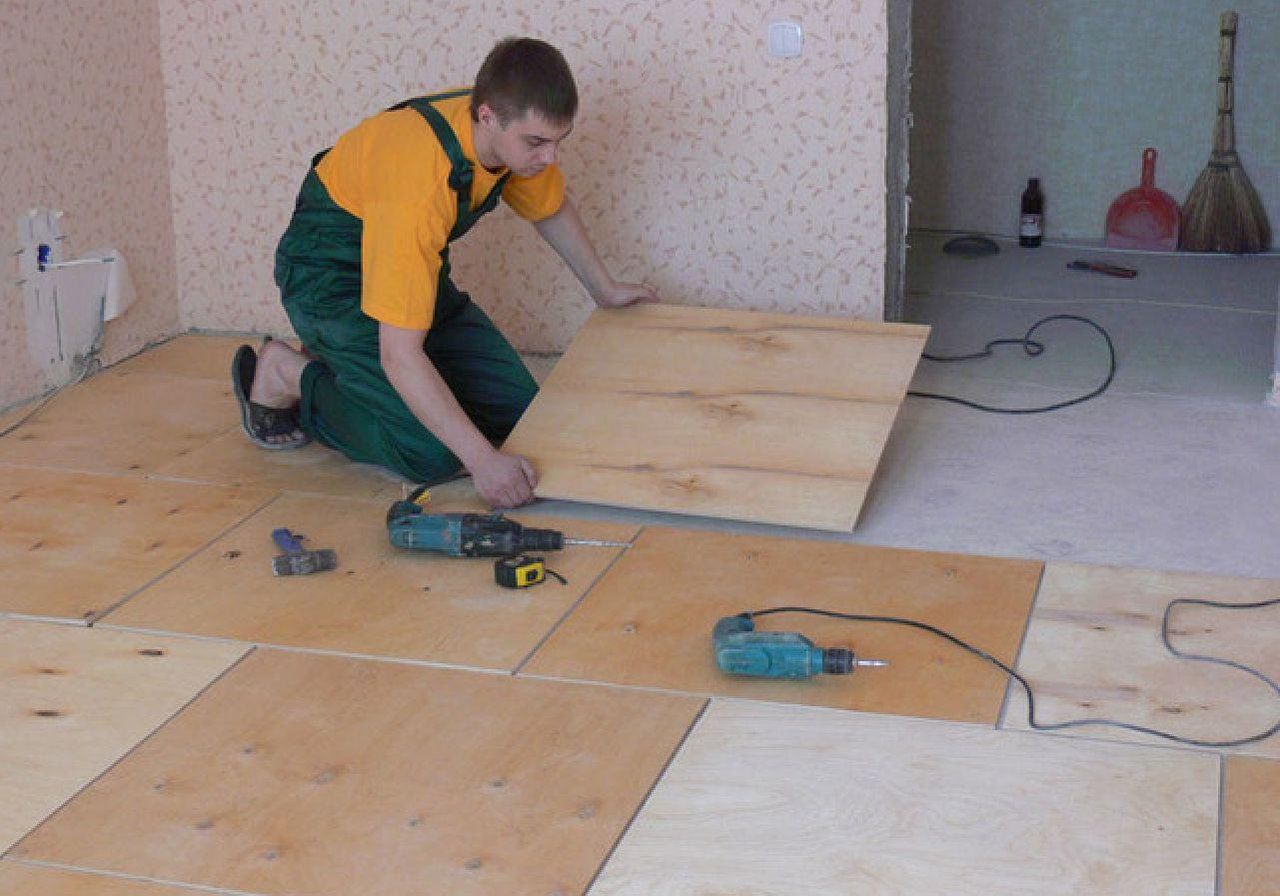
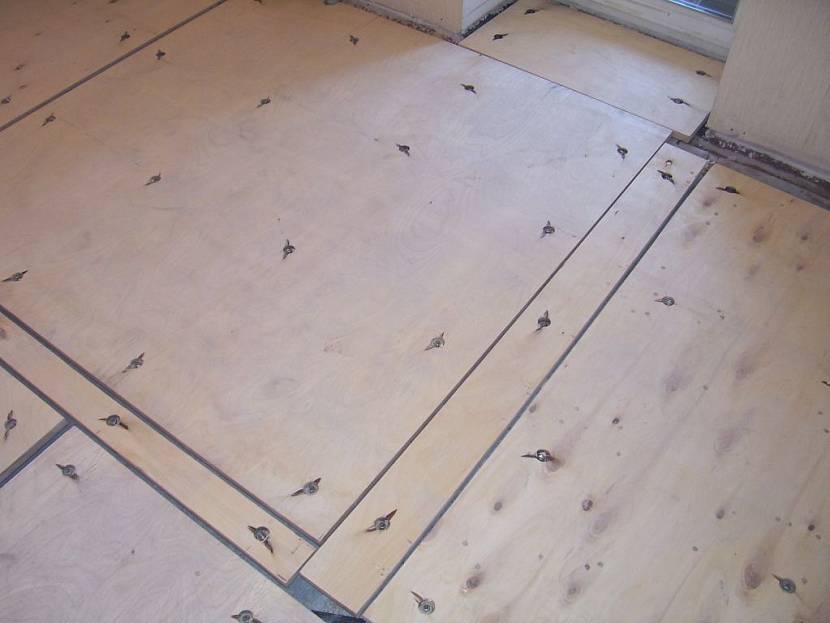
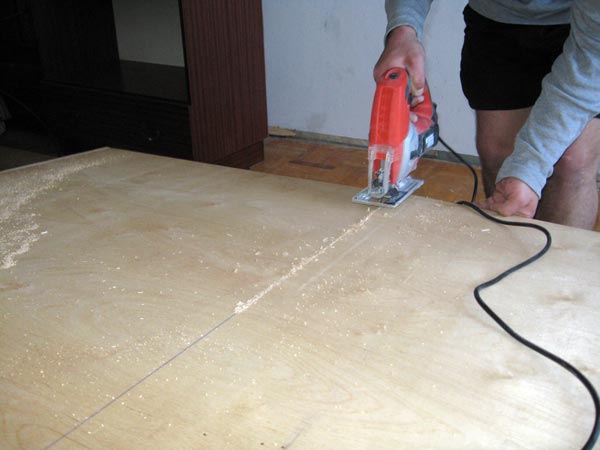
- Plywood sheets are divided into squares measuring 60 × 60 cm. In this case, the material should be even, without chips or cracks.
- Then self-tapping screws are screwed in at a distance of 20-30 cm from each other, which will serve as beacons.
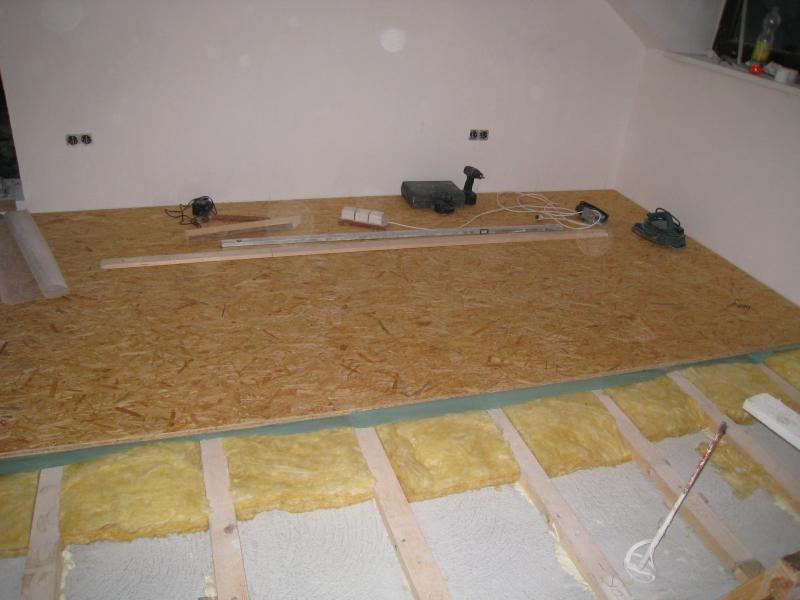
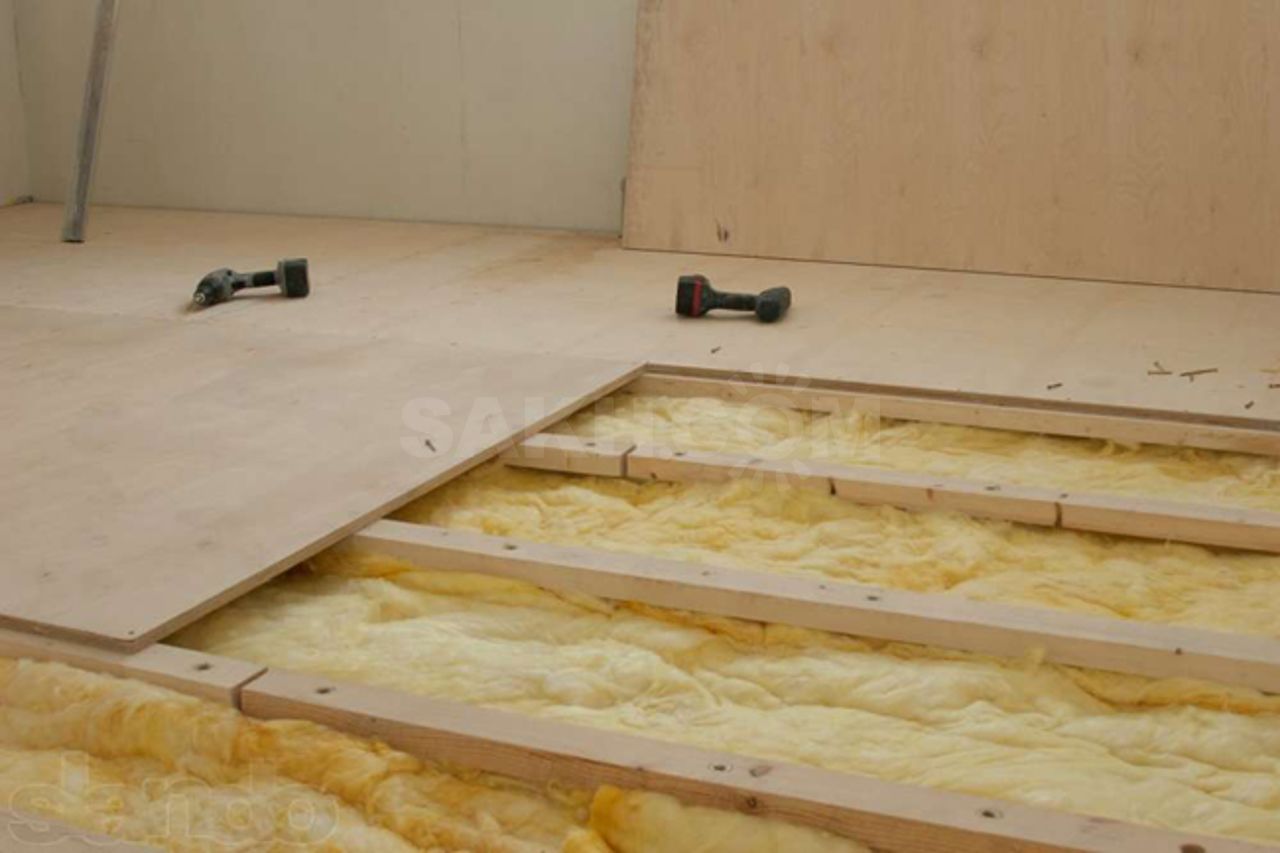
- Logs are installed on the floor - plywood support beams. The width of the lags should be 3-4 cm. Self-tapping screws or wood glue are used for fastening, and the space between the beams is filled with insulation.
- Plywood shields are mounted on the prepared logs on self-tapping screws, and the gaps between the sheets are putty. When laying, plywood must be treated with an antiseptic.
- The final coating is sanded and covered with a protective varnish.
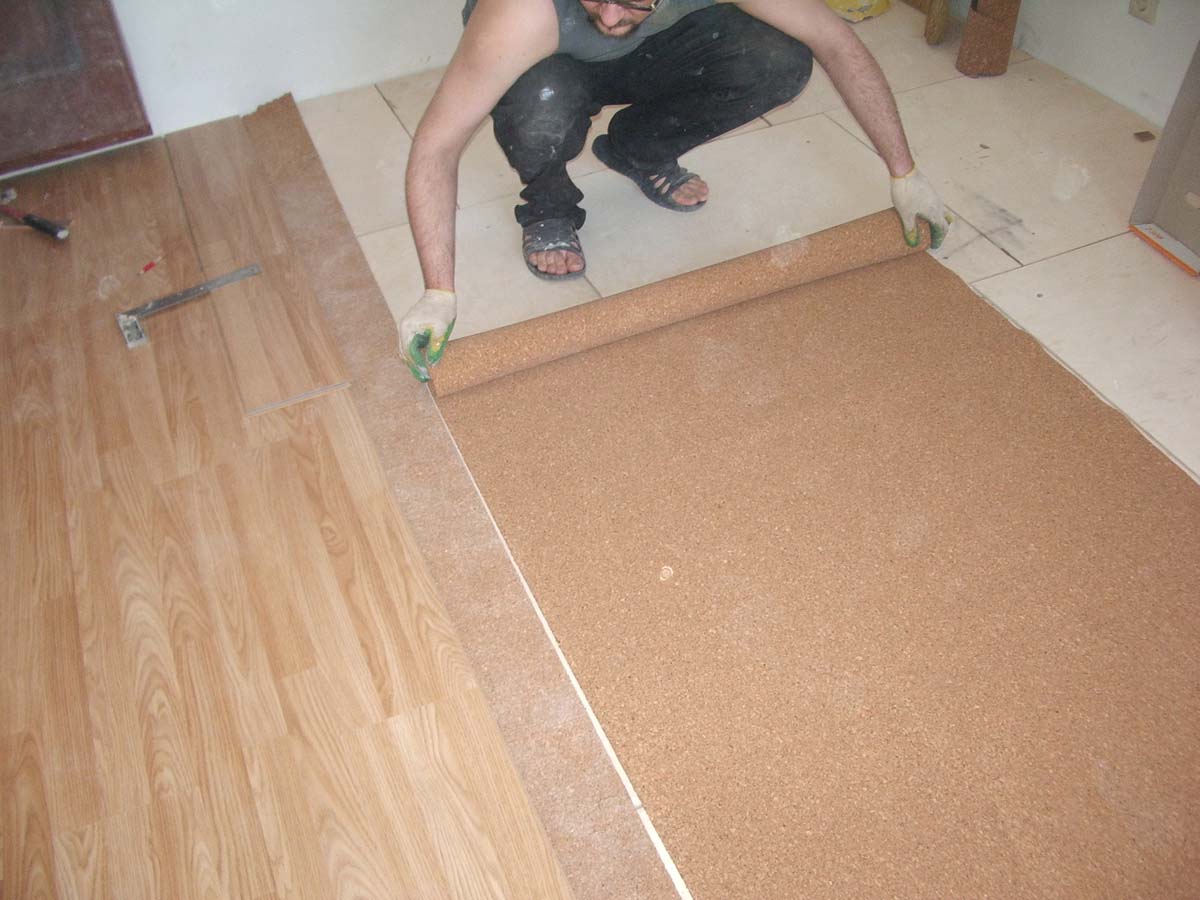
To make the plywood floor last a long time, it is recommended to use a special substrate, on which linoleum is subsequently laid.
Self-leveling mixtures
Dry mixes for flooring allow you to achieve a perfectly even coating. The instructions for diluting the mixture are indicated on the packaging, and anyone can master the filling technology:
- The base is cleaned of dust and dirt. Coated with a primer to make the coating more tight.
- A reinforcing mesh is mounted to give the surface strength.
- The prepared mixture is poured in wide strips (about 30-40 cm), spread with a wide spatula. Then you need to walk through the mixture with a needle roller so that there are no bubbles.
- A layer of sealant is applied along the walls. All work must be done quickly, since the "life" of the self-leveling mixture is short.
- When the first layer is dry, proceed to the finishing coat.
Attention
Drying time may take 1–2 days, depending on the thickness of the filling layer. It is necessary to avoid drafts and bright sun in the room where the work is carried out.
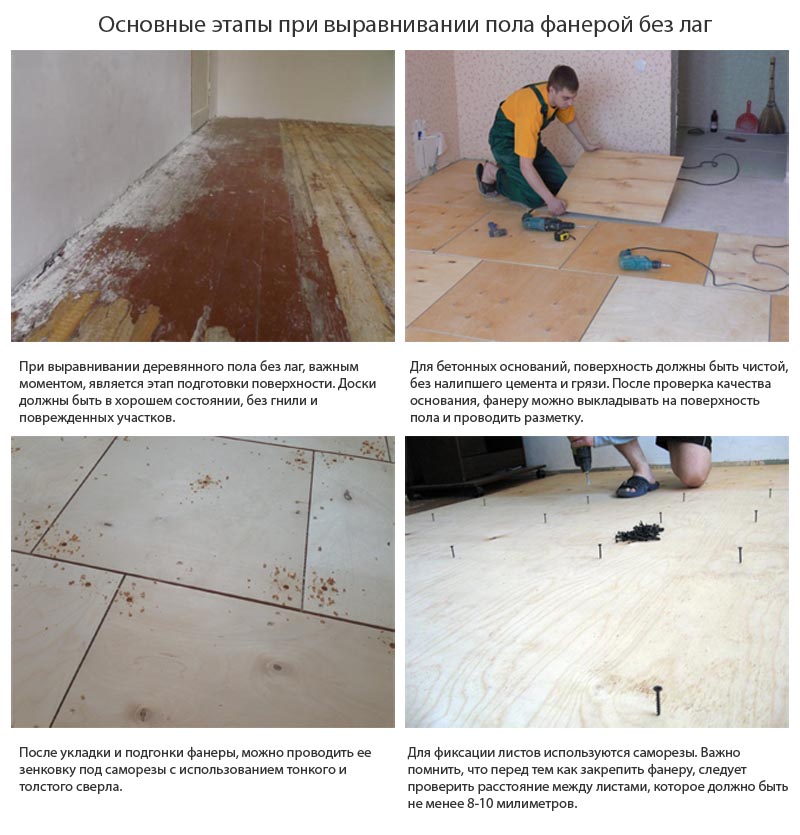
Do-it-yourself work on a concrete or wooden surface
Preparing for installation
Before installing plywood, you need to prepare it. Sheets are bought in advance, since they have to lie at home for two to three days to acclimatize. The material will get stronger, the risk of deformation during installation will be minimal. It is better to stack it in a pile so that the plates are in a horizontal state, they are tightly pressed against each other.


If the material is purchased in winter, then when buying, you need to ask the seller about the storage conditions of the sheets. If the warehouse is unheated, then adaptation will take at least three to five days: the period depends on the thickness of the material, the temperature difference.
In order for the laid plywood to serve for a long time, it is covered with a polyvinyl acetate putty:
- Each sheet is covered with a small layer of putty evenly on both sides. In this case, we must not forget about the ends. The solution is applied with a spatula and a wide brush.
- After the first layer has dried, the second is applied in the same way.Plywood is left in a room with normal humidity for 2-3 days.
- On the fourth day, the sheets are covered with any antiseptic and dried for several hours.
- If the material will be used in a humid room, then several layers of acrylic varnish are also applied to it.
Advice
Those who do not wish to carry out such preparation can be advised to purchase ready-made moisture-resistant sheets. But you need to understand: they are much more expensive than untreated ones.
Tools and materials
Instruments:
- electric jigsaw or hand saw;
- level about 1 meter long;
- flat bar, tape measure;
- drill or screwdriver;
- self-tapping screws;
- plane;
- construction knife;
- stapler;
- brushes of different widths;
- spatulas of various shapes;
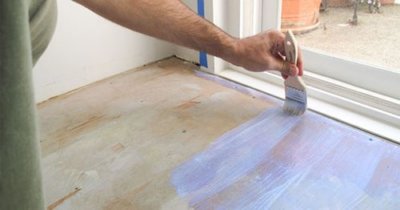
- primer;
- elastic putty.
Plywood is also a working material. Calculations are made in advance, the type of material for leveling the floor is thought out, the thickness of the plywood, depending on the humidity of the room. You will need glue, scotch tape, a primer, a little water just in case, to wash the tools along the way.
Finishing
- If there are gaps in the joints on the surface, then they are treated with wood putty.
- Then check the evenness of the laying with the building level. If drops, irregularities, and other defects are found, then they are eliminated by grinding the surface. Use sanders with medium to fine sandpaper.
- The floor is vacuumed, and to improve adhesion to the finishing layer, they are covered with a primer in several layers.
- If resin protrusions are visible in some areas, then they are lubricated with an acetone solution. The proportions are as follows: 200 ml of acetone is taken for 700 ml of distilled water. It is better to use a natural bristle brush to apply the anti-tar layer.
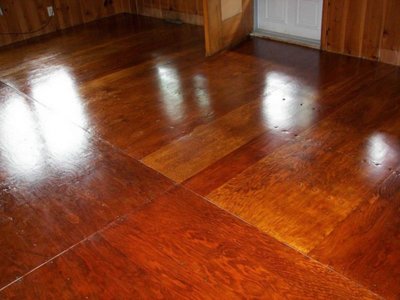
- If the finishing layer is not planned to be laid, then the surface must be painted or varnished. This will improve the appearance and maintain durability.
Attention
Before finishing the surface with a finishing coat of paint or varnish, the windows and doors in the room must be closed. This will prevent sagging and dust ingress.
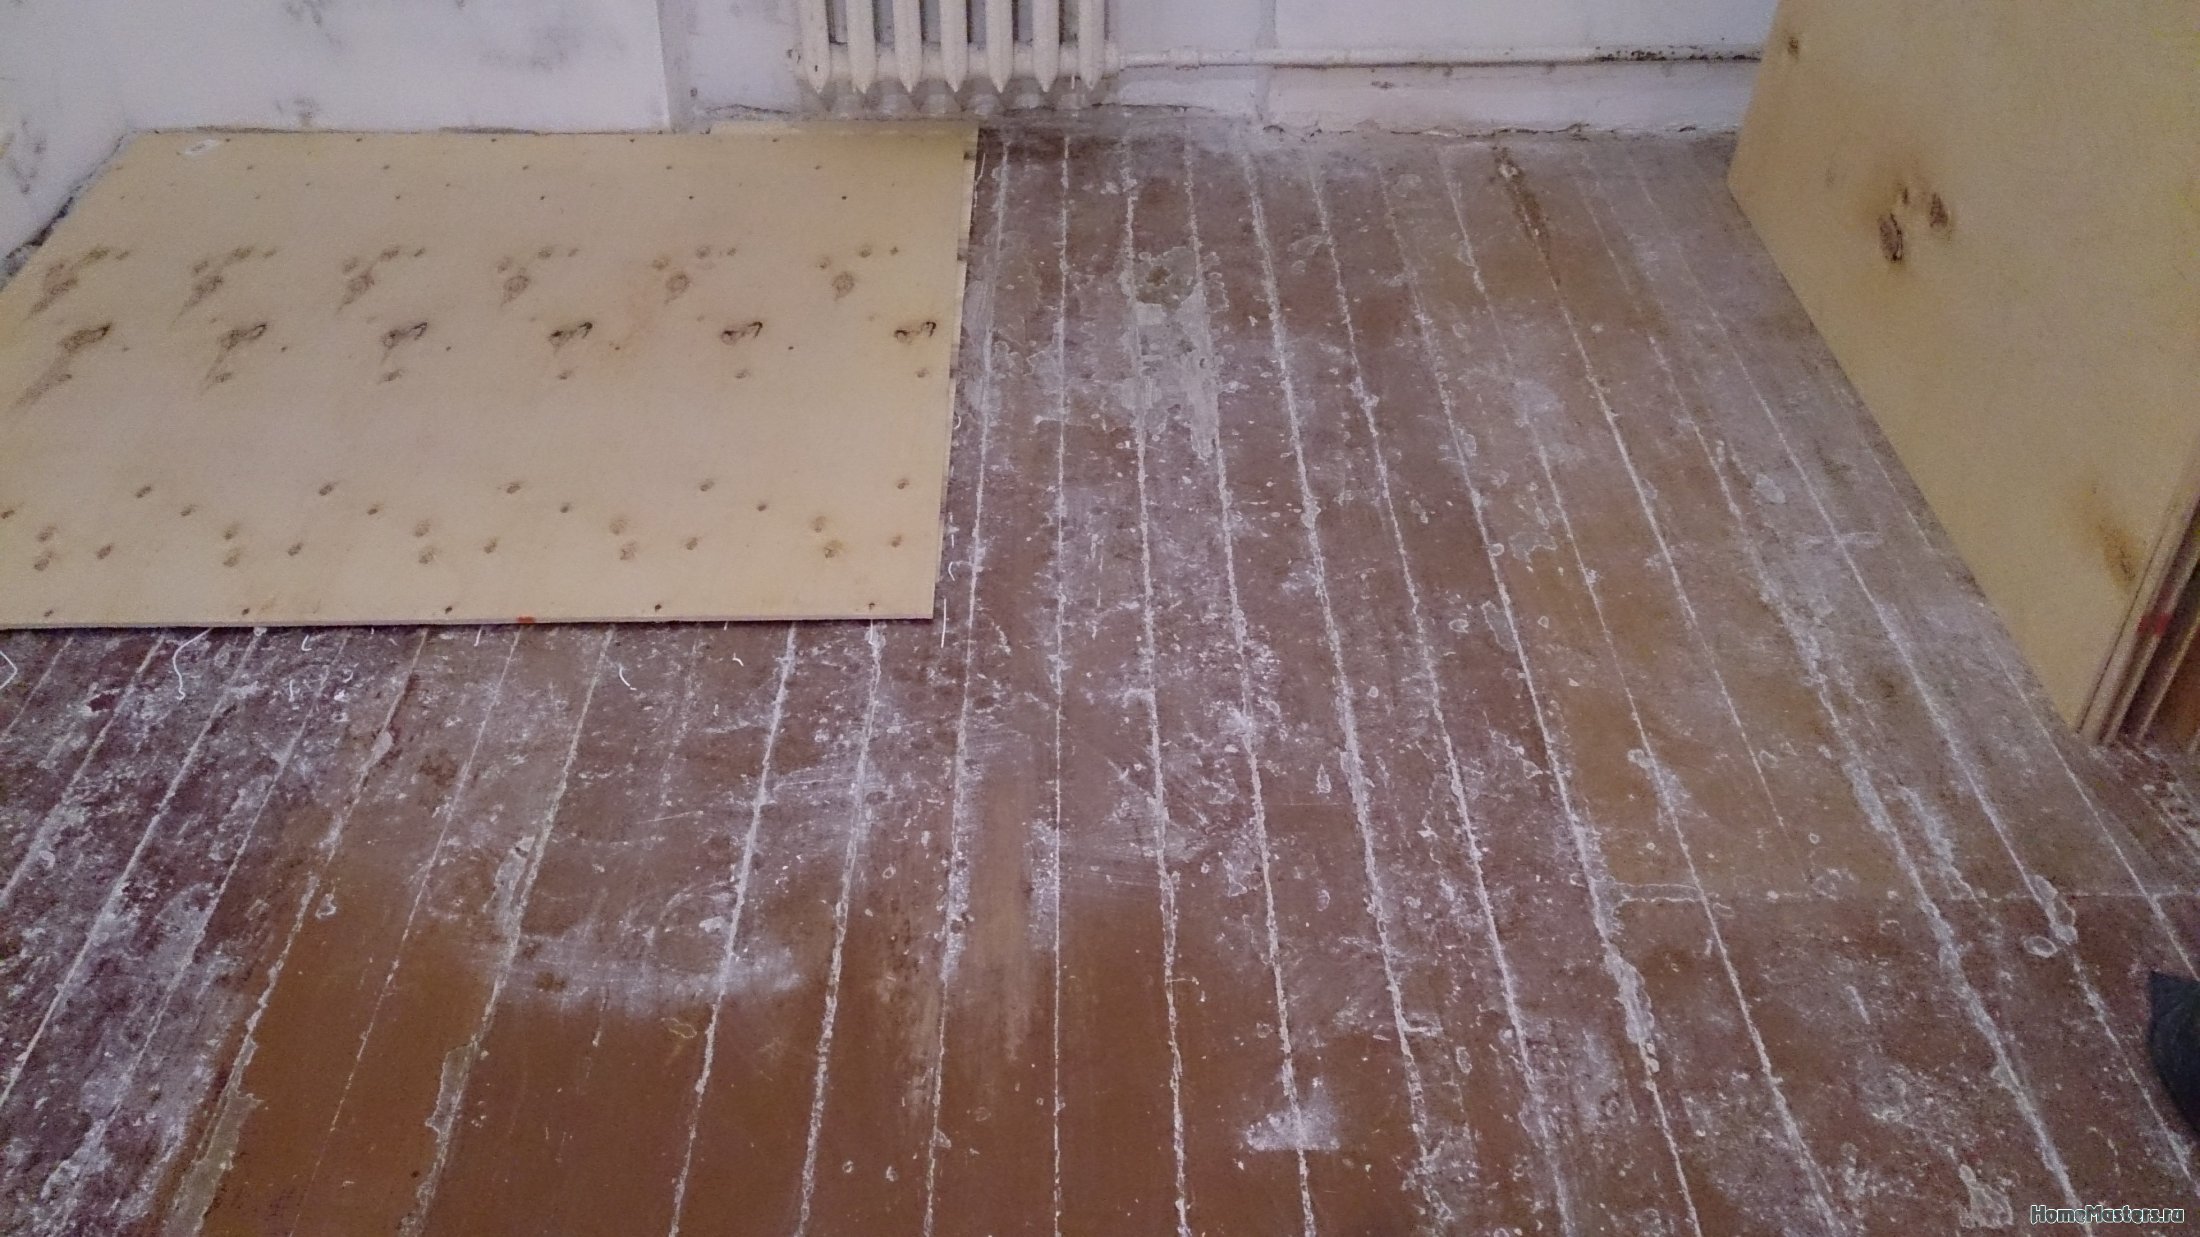
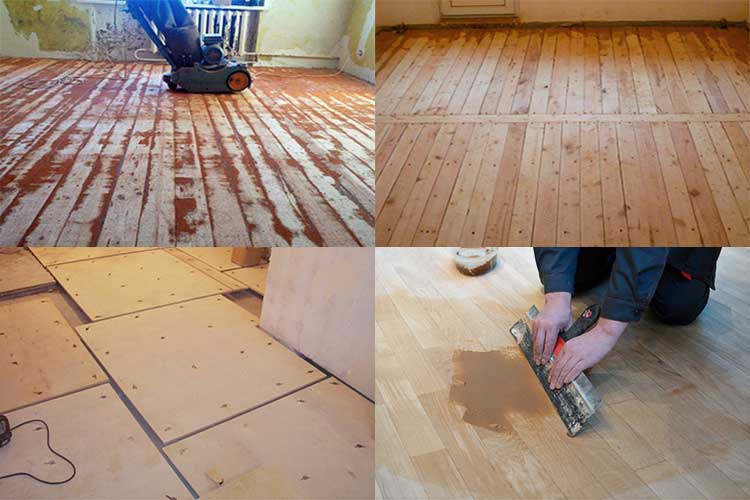
Wood floor scrapping
How can a wooden floor be leveled under linoleum? The order of work largely depends on the condition of the floor itself. It is required to assess the condition of the available wooden floor prior to laying the linoleum. To do this, you can slowly walk over the entire surface of the floor and carefully examine the places where there is a creak, crackle or deflection of one of the boards. If you did not find any of the listed defects, then the condition of the floor can be described as average - such a surface can be leveled. If in some places a creak is heard or a deflection of the board is obvious, all these flaws must be eliminated.

Repairing a wooden flooring is not only about eliminating squeaks and sagging boards. An important point is the study of the state of the internal wooden structure. Experts recommend that it is imperative to bend several boards and check the condition of the beams and the flooring itself. All rotten structural elements must be replaced with new ones. In this case, you will spend more time preparing the floor for finishing with linoleum, but you will save yourself from problems with the floor during its subsequent use. The wood can be additionally treated with an antiseptic compound and a special insect repellent.

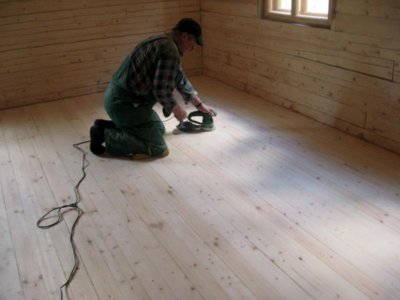
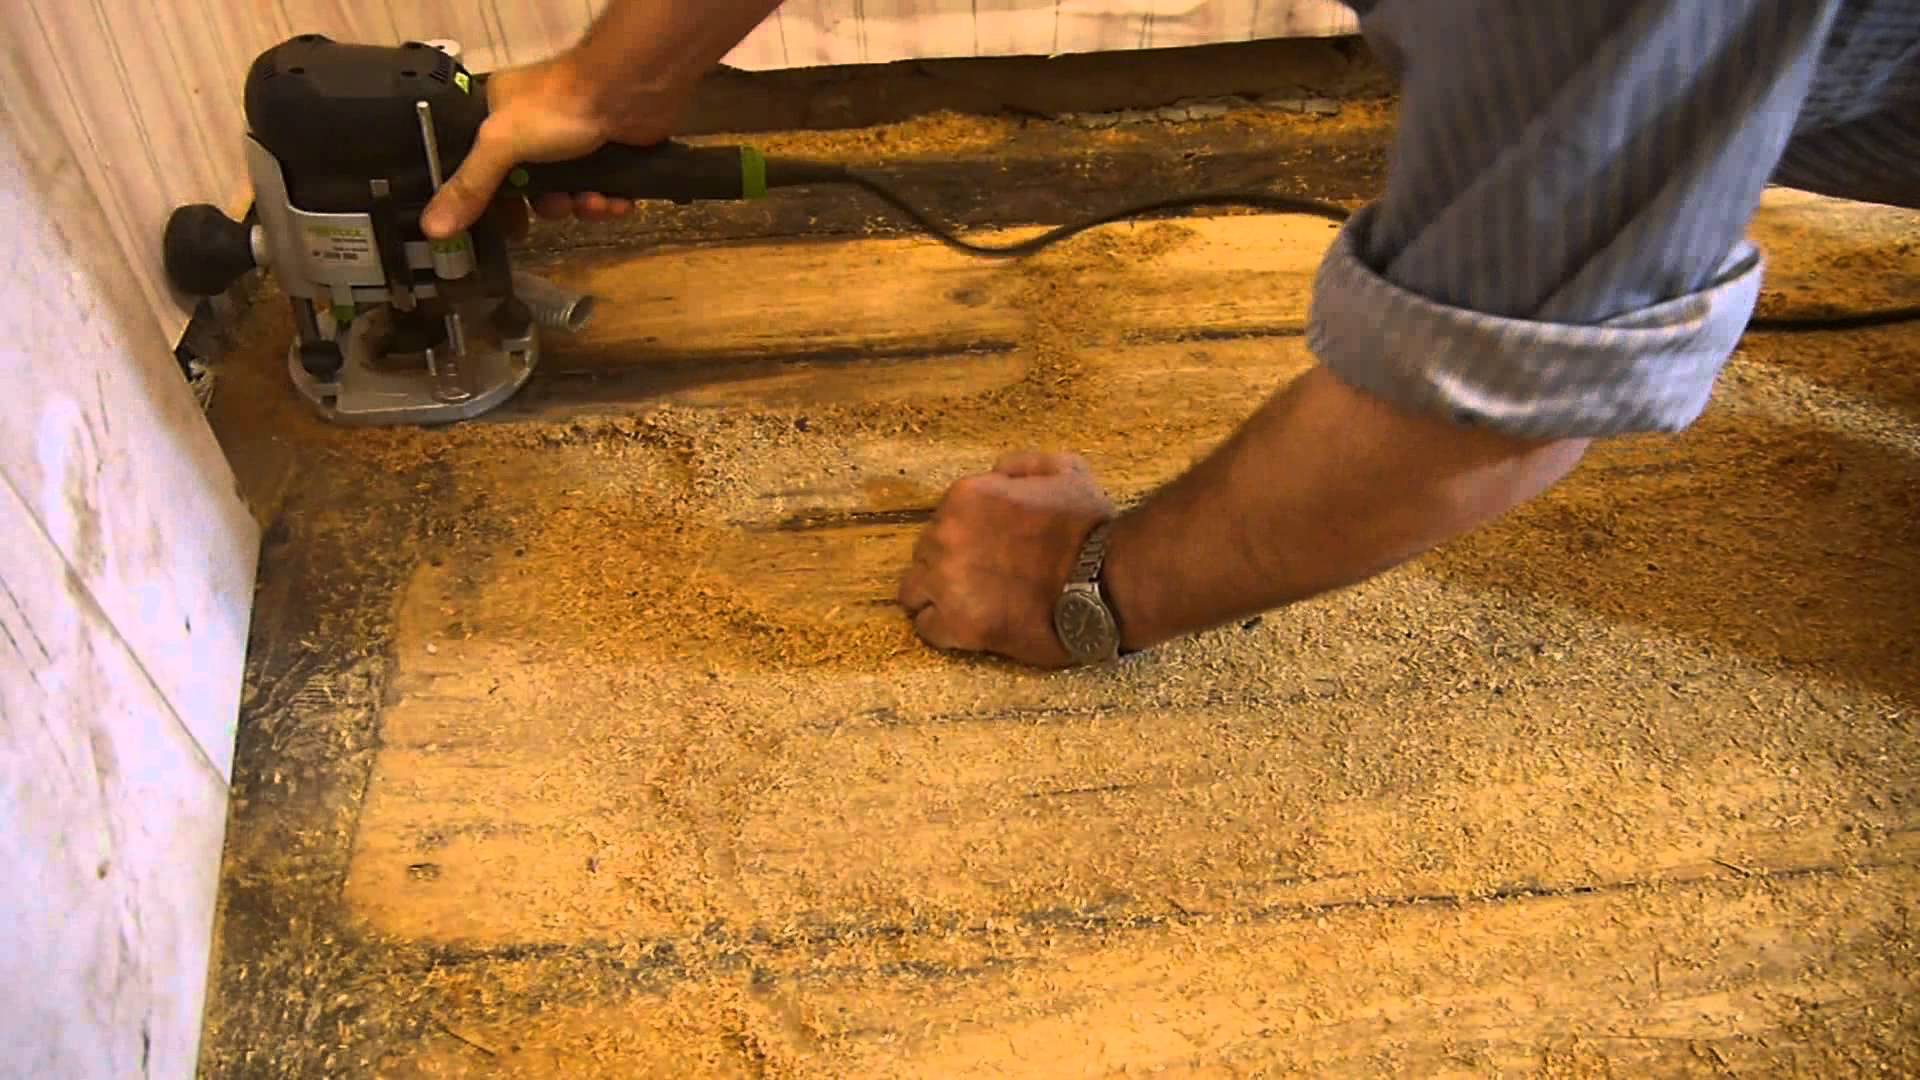
If the original working surface is horizontal and does not have any height differences, then to level the wooden floor under the linoleum, it is enough to scrape the coating. Scraping is the removal of the top layer of wood manually or mechanically: you can use an ordinary plane or purchase a special scraping machine that will speed up the leveling process several times. Using a planer in large rooms is impractical as it takes a lot of time and effort to work.
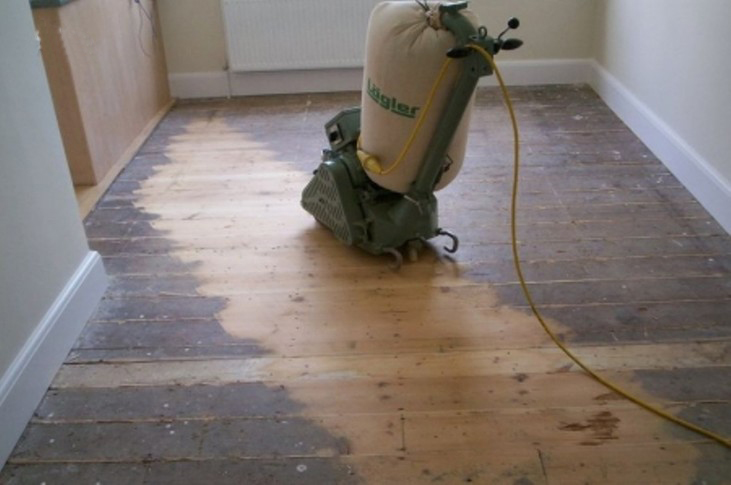
To ensure safety of work, before removing the first layer, inspect the floor for the presence of nails and self-tapping screws sticking out of the boards. After one layer of wood is removed, all cracks on the working surface are closed with a special compound. After that, the floor needs to be looped again. As a result of scraping, you will get a flat wooden surface without significant financial costs, on which you can lay linoleum.
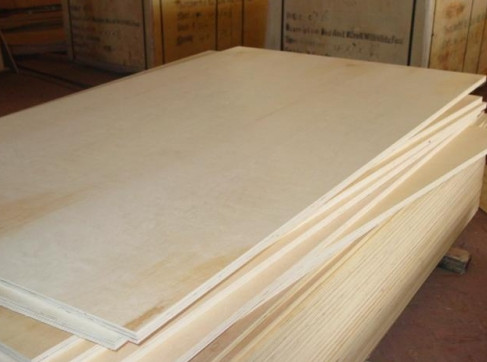
Choosing the right plywood
The thickness of the plywood is taken depending on the level of differences in the old floor, the method of installation and the planned topcoat. Thicker sheets can be placed under carpet and linoleum, as these floor coverings do not require perfect leveling. Laminate and parquet flooring require a perfectly flat base, therefore plywood for the base should be chosen with a thickness of at least 12 mm.
When buying, you need to pay attention to the brand of plywood. For individual construction, you should choose the brand FC or FSF
The FC brand does not contain phenols and is absolutely harmless material. This material has an average moisture resistance and is resistant to mechanical stress.
When choosing plywood for leveling the floor, you must pay attention to its marking
For rooms with high humidity and temperature changes, it is better to take the FSF brand. Such material is more wear-resistant and has mechanical strength. It receives such qualities due to the use of phenol-formaldehyde adhesive resins in its manufacture. Unfortunately, these resins are quite toxic, so you should not use such plywood in living rooms.
According to GOST, 4 grades of material are on sale:
- First grade. This is the highest quality material. On the surface, you will not see practically any external defects, however, GOST allows cracks less than 20 cm or the presence of a slight warped veneer.
- Second grade. For this grade, slight oozing of glue and wood inserts are allowed. Scratches and dents are possible on the sheets up to 5% of the total surface.
- Third grade. On the surface of such material, there may be traces of wormholes, intergrown or fallen out knots.
- Fourth grade. It is the lowest quality material with many manufacturing defects. In case of major deficiencies, the veneer is nevertheless glued well.
Analyzing the price-quality ratio, experienced craftsmen, for leveling a wooden floor, are advised to take 2 grade plywood.
Plywood is sold unpolished and sanded. Marking "Ш1" indicates one-sided grinding, and "Ш2" about two-sided. "NSh" - unpolished plywood. Sanded plywood is marked with the emission class of free formaldehyde:
- "E1" - 10 milligrams of formaldehyde for every 100 grams of dry plywood;
- "E2" - 10 - 30 milligrams of formaldehyde for every 100 grams of dry weight.
Thus, for residential housing construction, the best choice would be plywood sheets of grade 2, with markings FC, Ш1, Е1 and with a thickness of 10-12 millimeters. Such material will make the floor perfectly flat.
Plywood is considered the most acceptable material for leveling a wooden floor.
Views
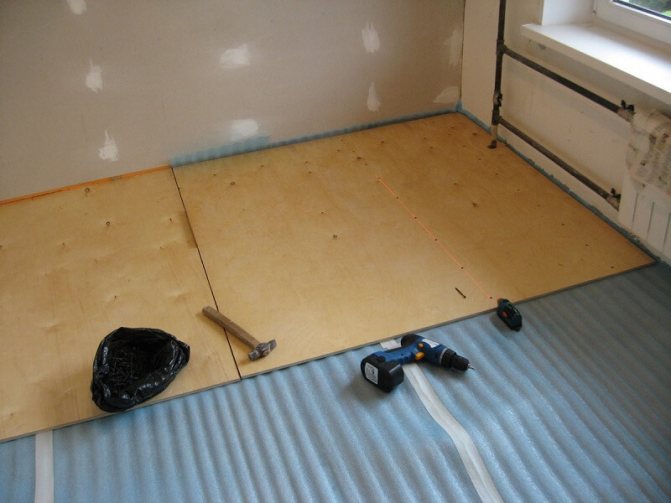
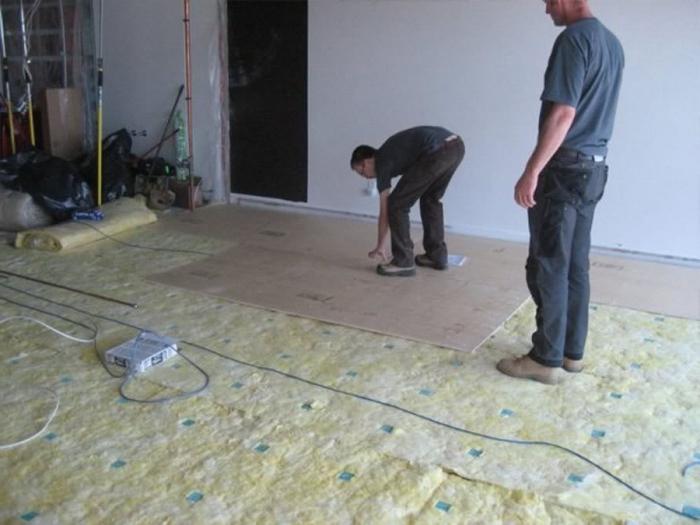
When building a room from scratch, the choice of flooring is done in advance. In a private house, the floor is usually warm, even and reliable, so any linoleum is chosen, and a substrate is not needed here. Also, it is not necessary if you want to lay linoleum on top of an existing one, if the latter is in good condition. But when the floor is to be repaired or the task of sound and thermal insulation is set, the substrate will help to solve these problems. As a rule, this is required in post-war houses with wooden floors, barrack-type houses, "Khrushchevs" and private buildings.
For soundproofing
For sound insulation, you can choose a cork backing. This is perhaps the most versatile option, albeit an expensive one.The environmentally friendly substrate pressed from the bark of the tree gives softness, but when exposed to mechanical stress, it deforms, leaving dents. Therefore, it should be denser. You can put it in a room where bulky and heavy furniture is not used. The combination backing option will also reduce the amount of penetrating noise. It contains wool, linen and jute. It is dense and tough enough for a coating such as linoleum, and therefore fits very well under it.
The foamed version can also be used, it is less environmentally friendly, but an order of magnitude cheaper than the others. It is made from polymers of a porous nature, the basis of which is isolon, or penoizol. In addition, a thicker version of the substrate for soft linoleum will not work, it will tear. With frequent walking, its pores stick together and over time, "paths" are formed in those places where linoleum is most often stepped on. To get rid of these troubles, a thin plywood layer or fiberboard is nailed or screwed on top of the substrate.
For insulation
In addition to sound insulation, floor insulation is often required. It should be noted that the wood floor itself is warm. But there are objects located above the arch of the building, on the basement floor, having a damp basement, or simply there are fistulas in the joints of the outer slabs or brickwork.
In these cases, a draft invariably walks under the floor. In addition to cork and combined substrates, which are also heat insulators, they use a material made from flax fibers, which is rolled on special machines under the influence of high temperatures. This option protects the surface from drafts, and also provides ventilation between the base of the floor and the linoleum, which prevents the accumulation of moisture inside.


The jute substrate does not get wet, but absorbs moisture into itself, gradually getting rid of it. These options are impregnated with a fire retardant that prevents the wood from rotting and protects against fungus. The foam material insulates the floor well, protects the space from drafts. But you need to take into account that over time it wears out. In addition, it does not allow moisture to pass through. In combination with waterproof linoleum, accidental water ingress into the joint does not bode well.
Types of substrates and their characteristics
- The jute backing consists of natural fiber, it has a high resistance to decay and fire due to the addition of a flame retardant. The material absorbs and removes moisture without remaining wet.
- For cork materials, chopped bark of a cork tree is used, the substrate has high environmental performance, since there are no synthetic inclusions in the composition. The layer has high levels of thermal insulation and sound insulation. There are also disadvantages of this insulation, a low degree of rigidity, because of this, traces of furniture may remain, and a high cost.
- The linen interlayer provides good ventilation between the topcoat and the floor, as the fabric is double pierced during production. This ventilation prevents the growth of mold and mildew.
- The foam layer is a synthetic roll material that is distinguished by high rates of heat and noise insulation, low cost, ease of installation, and practicality.
You can use combined materials of linen, jute, and wool, this layer is versatile, high wear resistance, and good insulation.
Cold indoor floors require an additional base for linoleum in the form of a substrate. This will provide high thermal and sound insulation of the floor, protect the surface from cold, so the substrate can be installed even in non-residential rooms.When laying linoleum, check the surface for strength, wooden boards should not be rotten or rotten, in such cases, replace the floorboards, all significant differences are leveled. A finishing material using a backing is able to hide small cracks or defects, but it is better to putty the holes to prevent the penetration of cold.
A linoleum underlay can not always be used, it is not required if laying multilayer material. With a cold surface or minor flaws, laying the interlayer is mandatory, it serves as a quality insulation for the floor. It is quite simple to carry out the work, you can do it yourself, as a result, getting the perfect surface. The correct choice of material allows you to achieve the desired result if the linoleum has a high density and cost, as well as in case of doubt about the work, you can resort to the help of specialists.
Description of work technology for wooden floors
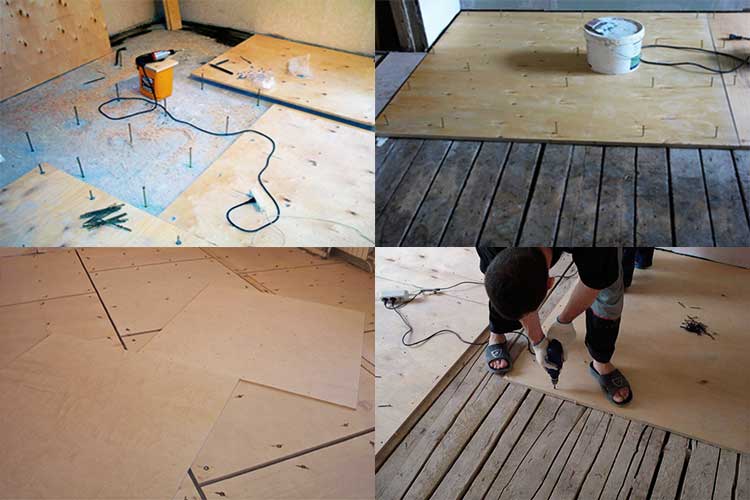
The main stages of attaching plywood to the surface of the base
The technology for leveling a wooden base for laying linoleum or other roll coatings strongly depends on the technical condition of the floor structure.
With height differences up to 2-3 mm, mechanical scraping of the surface is performed. For this, special machines and tools are used. Without the availability of special equipment and skills, this method is difficult to implement, and is not suitable for everyone.
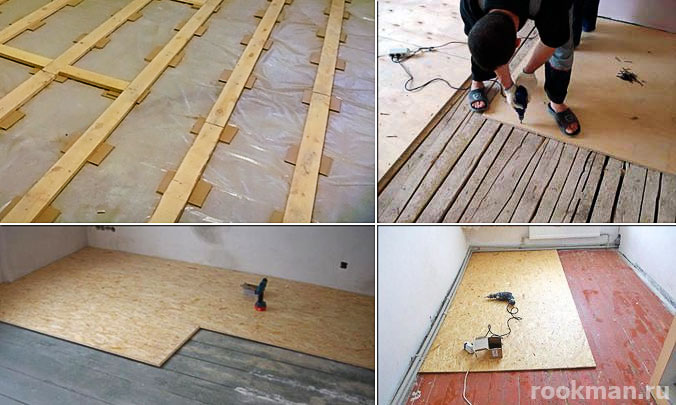
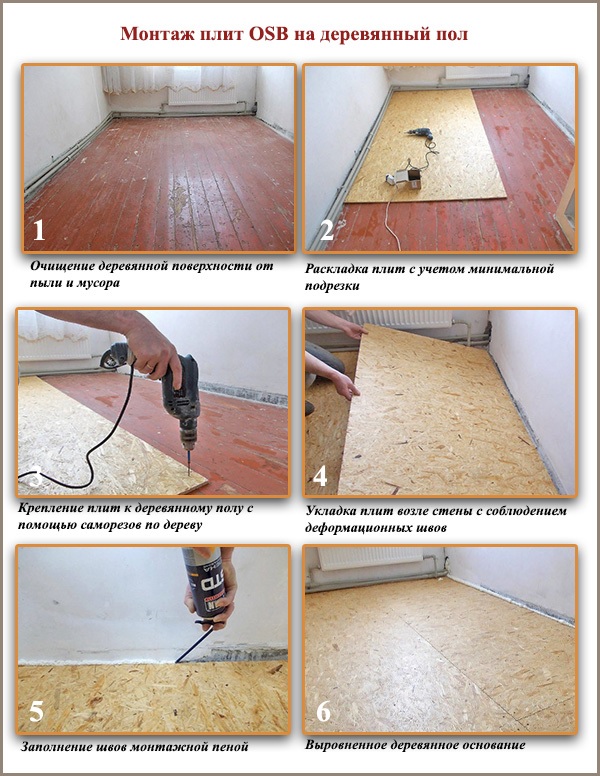
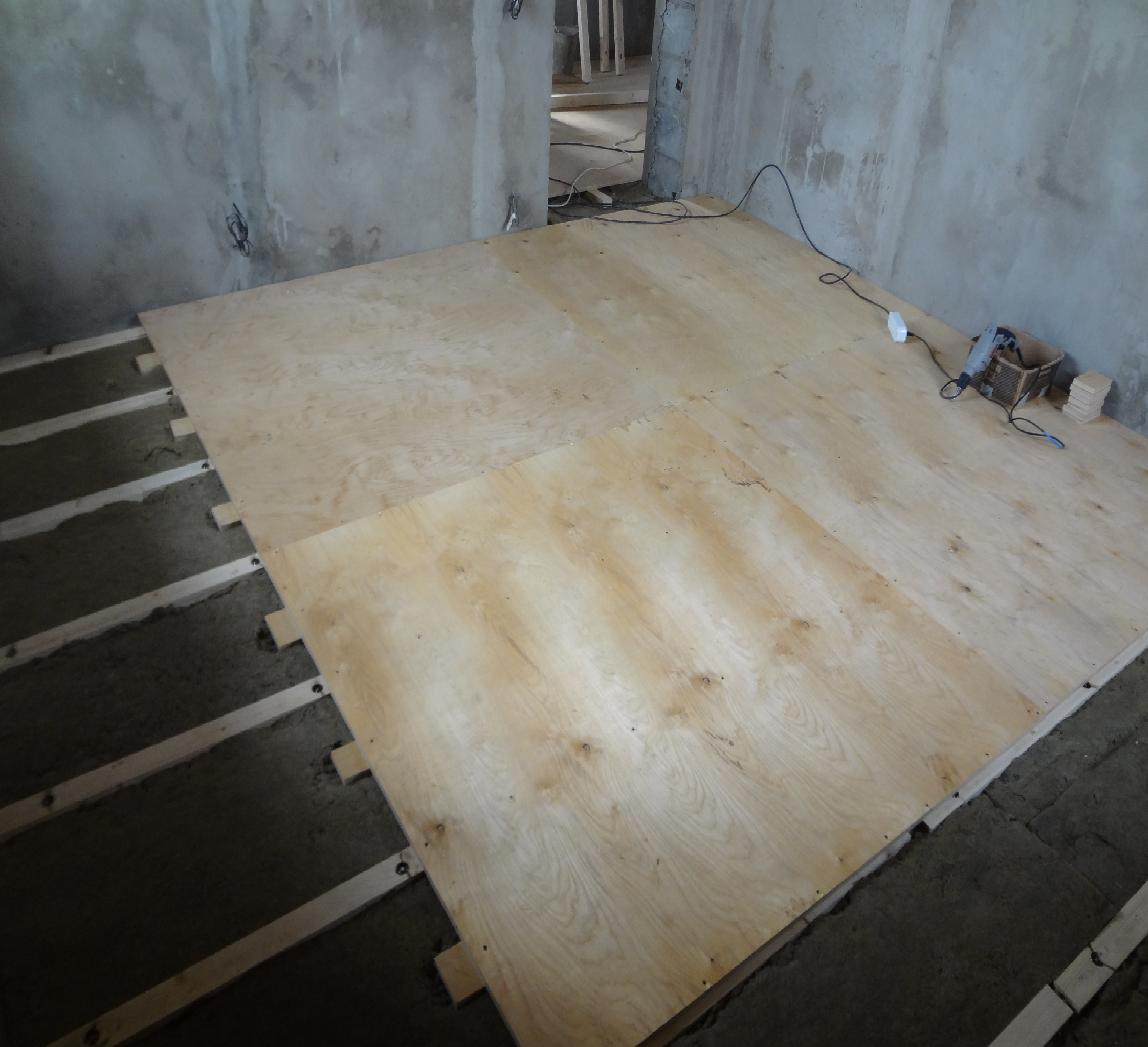
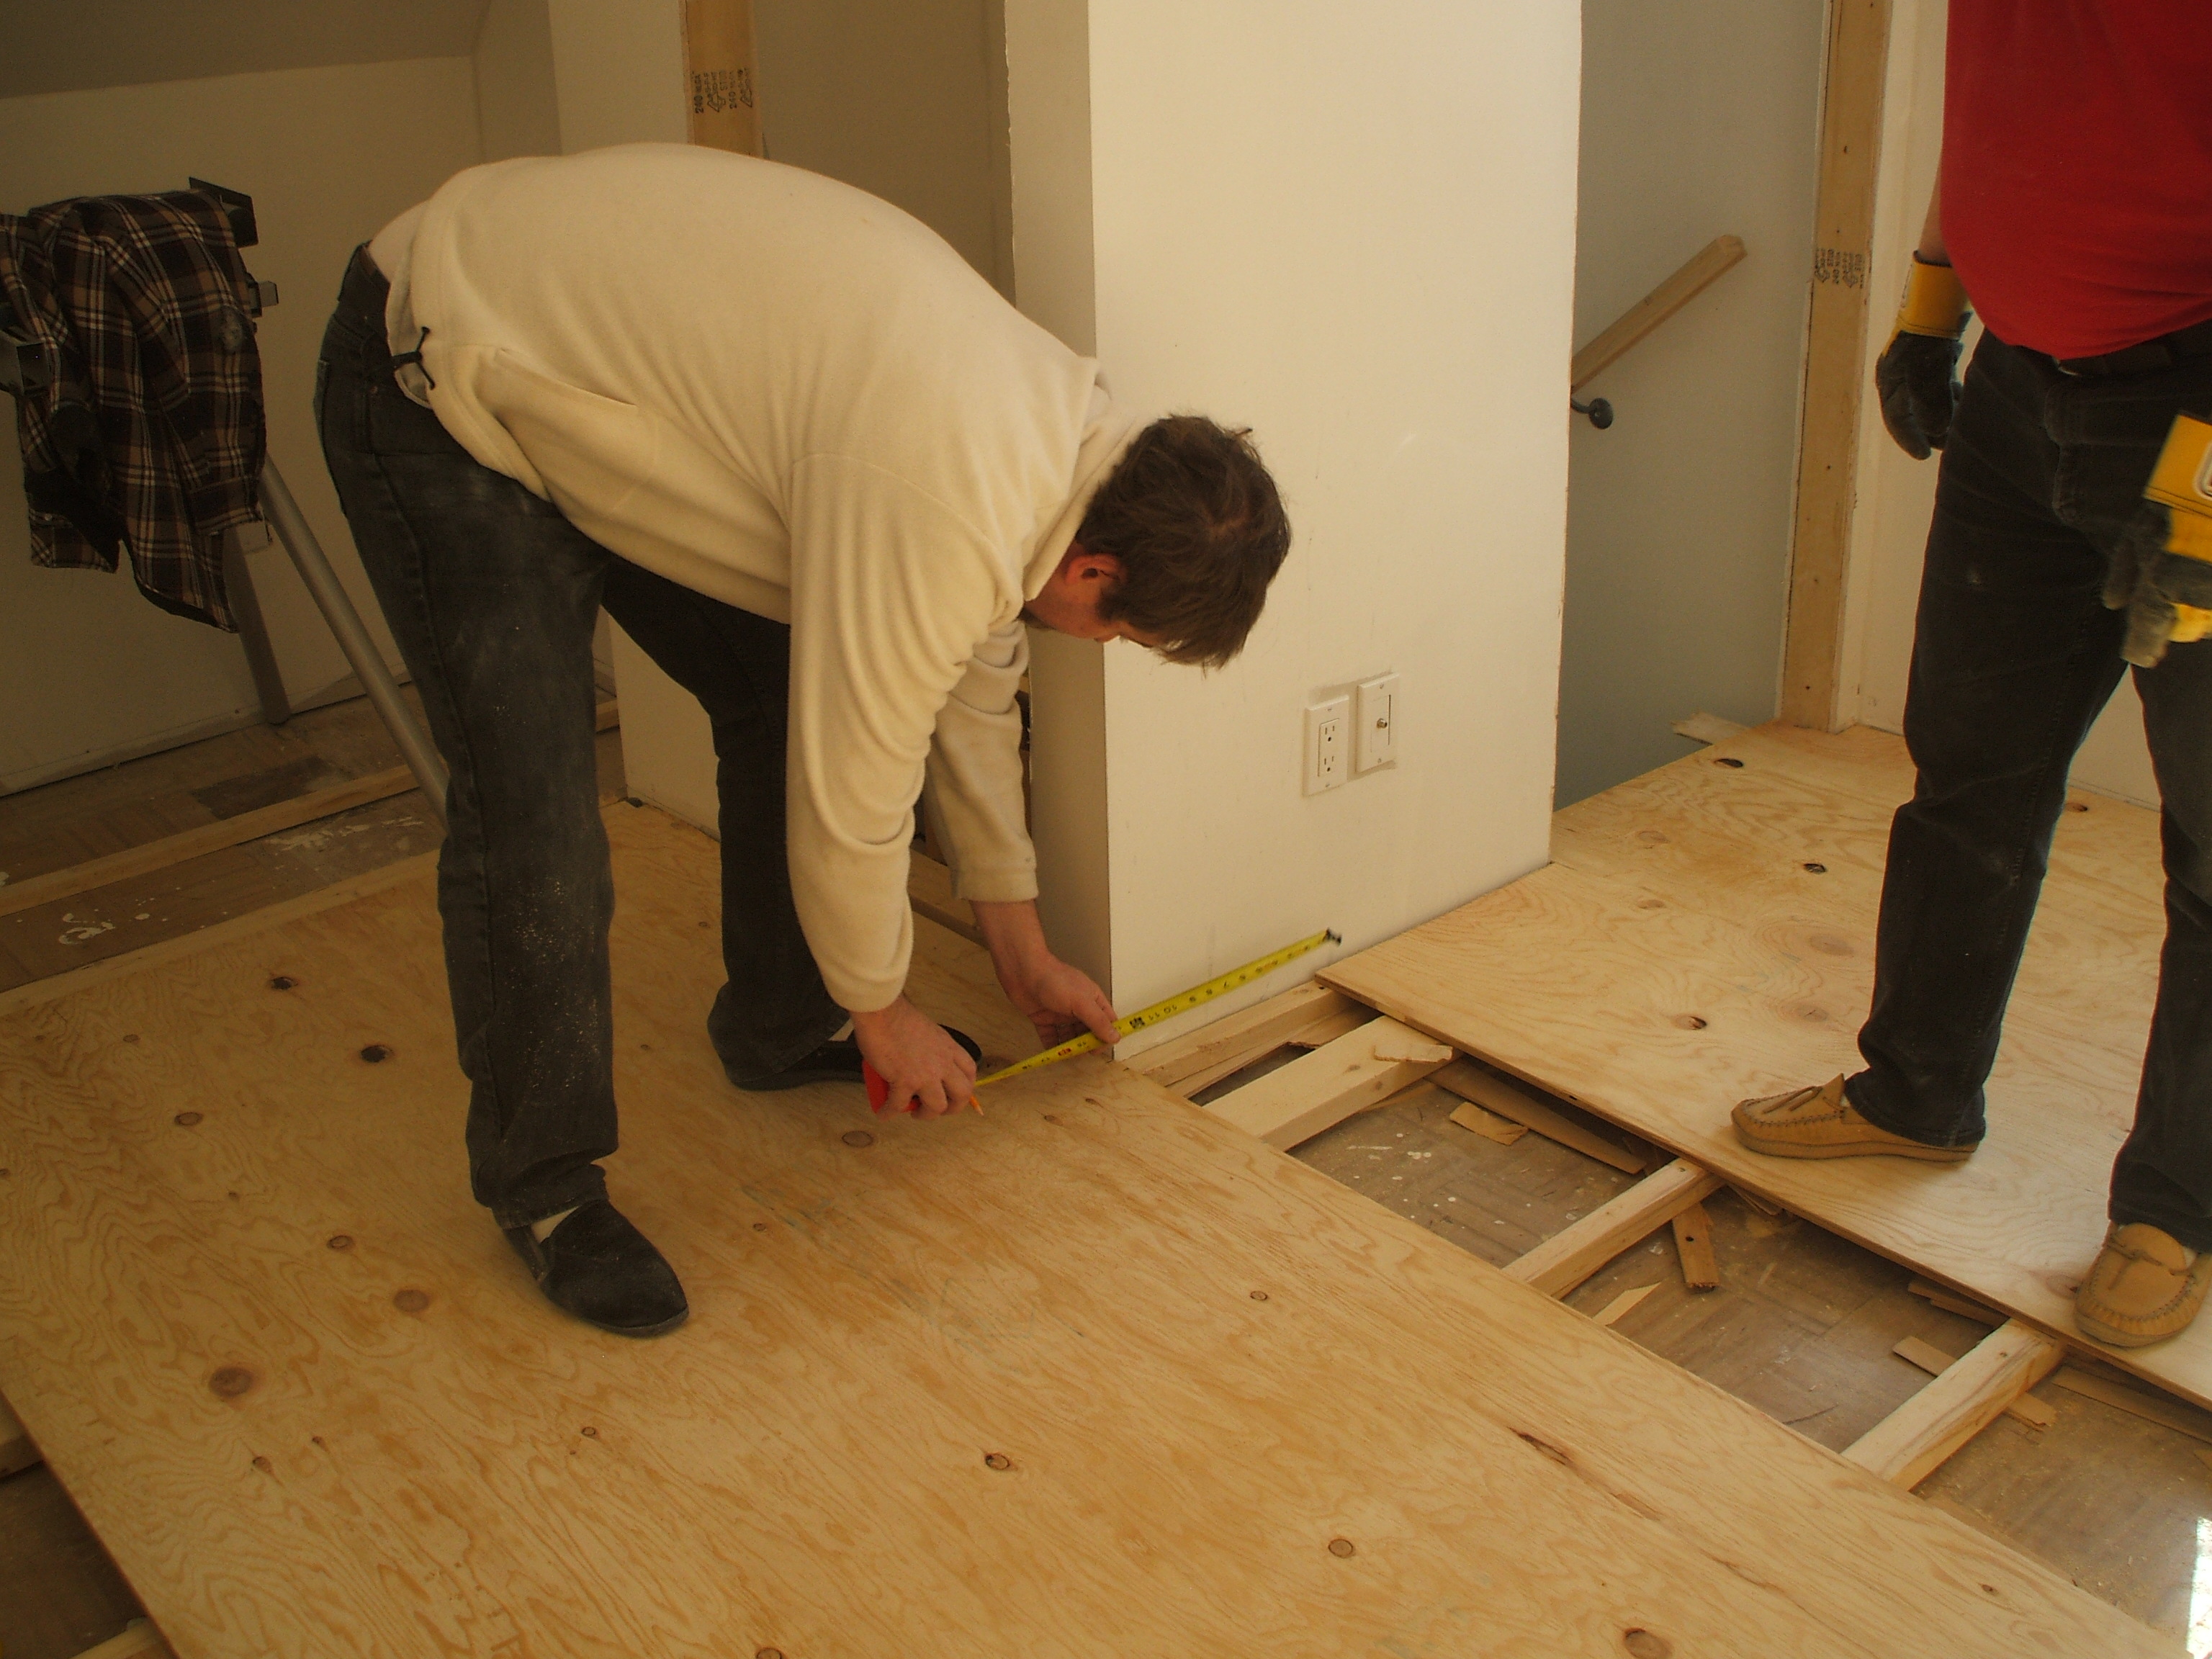
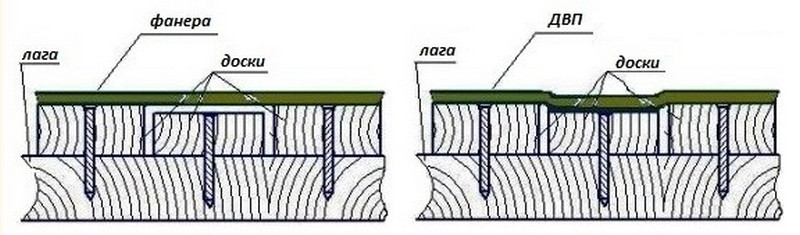
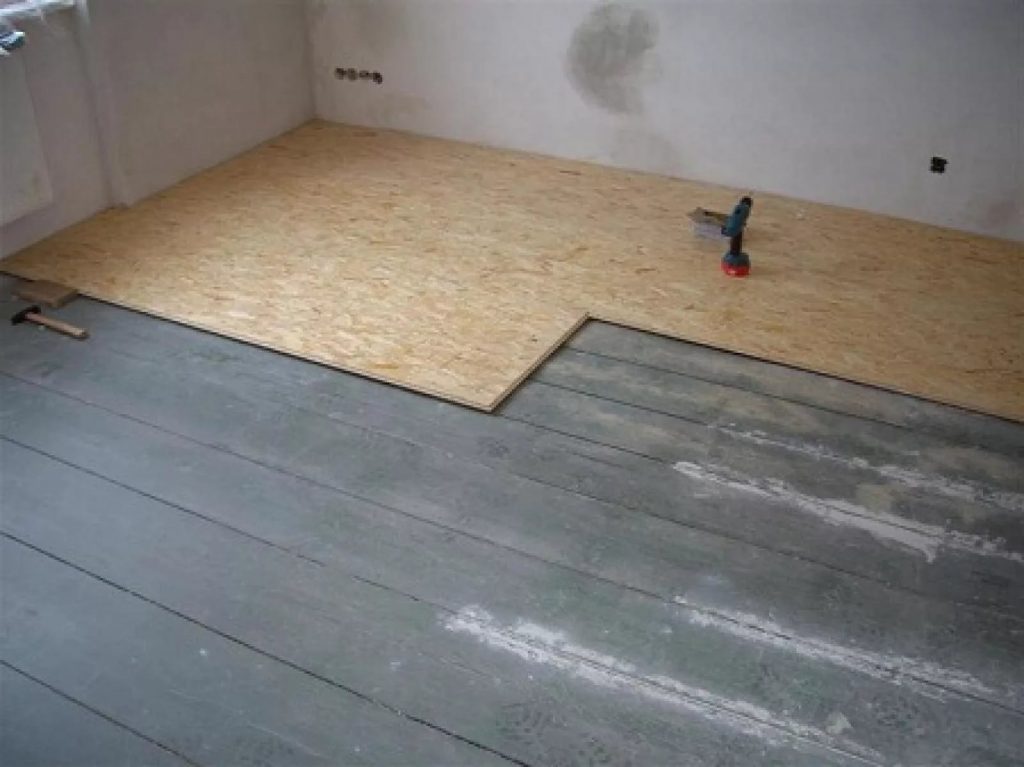
For strong plank bases, with a slight skew or blockage, you can use plywood or DSP sheets, which will be fixed to the old coating.
With strong irregularities, evenly distributed over the entire area of the room, it is most preferable to use alignment with the arrangement of the supporting structure in the form of wooden logs and filling the voids with putty.
For heavily skewed and sagging wooden floors, you will have to open the entire structure, replace rotted and damaged areas, set the support logs in level and lay a rough base from new materials.
As an example, we will describe two methods. The first method is simpler and does not require any special skills. The second, more complex, but quite feasible with knowledge of the technology.
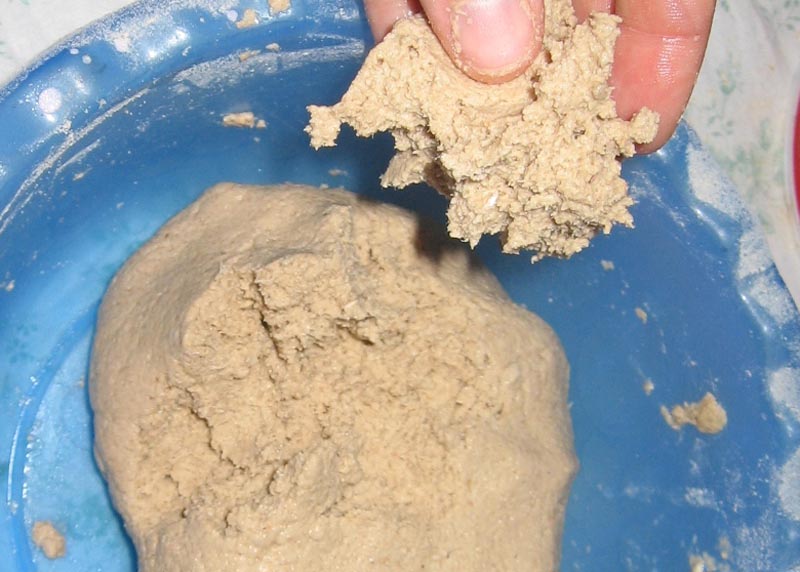
A mixture of sawdust and PVA of a thick consistency
Do-it-yourself work on leveling the floor under linoleum using glue putty will consist of the following:
- The surface of the plank and wooden base is checked for damage, rotted areas and cloths. If found, the damaged area is cut out and replaced with a new board. To do this, you can use a hacksaw or jigsaw, a hammer, self-tapping screws and a screwdriver;
- On the base of the floor, every 30-40 cm, longitudinal slats of small thickness, thin timber, etc. are laid and fixed. Before fastening, check the level of the rail. In case of blockages and distortions, roll materials are placed under the rail;
- Mix a mixture of sawdust and PVA glue. Use a plastic or iron container for mixing. In consistency, the mixture should resemble a thick putty;
- The voids between the longitudinal slats are filled with prepared filler. In one approach, the layer thickness should not exceed 15-20 mm. The second and subsequent layers are applied only after the previous one has completely dried;
- After grouting the floor over the entire area, a level check is performed. On top of the leveled base, you can lay plywood or DSP sheets.
This method of alignment is not particularly complicated, but it is time consuming if you need to align a large area. If possible, instead of homemade putty, it is better to use self-leveling mixtures and solutions.
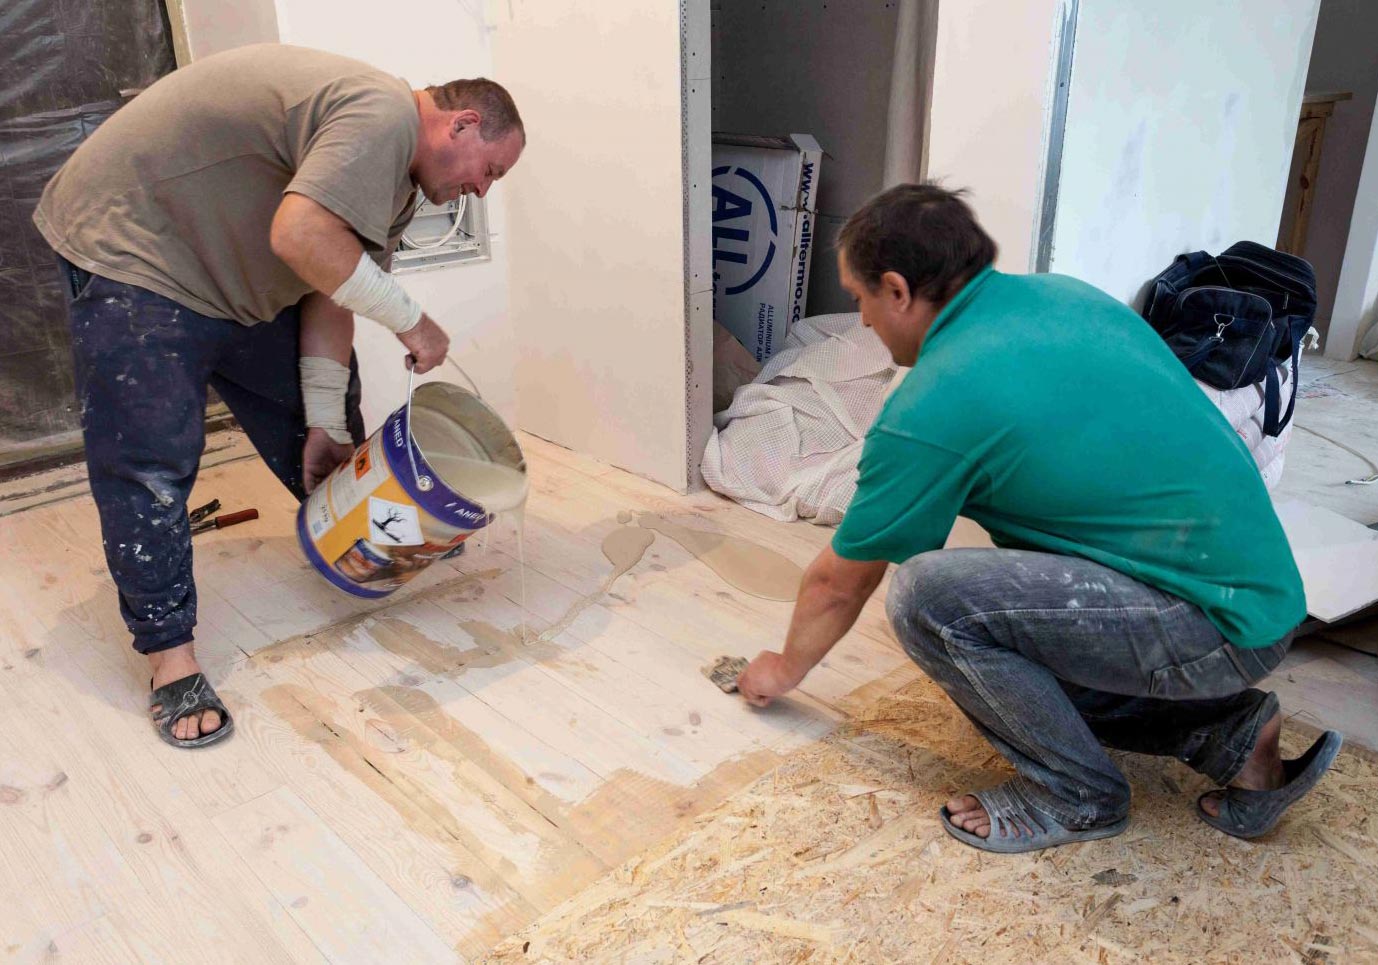


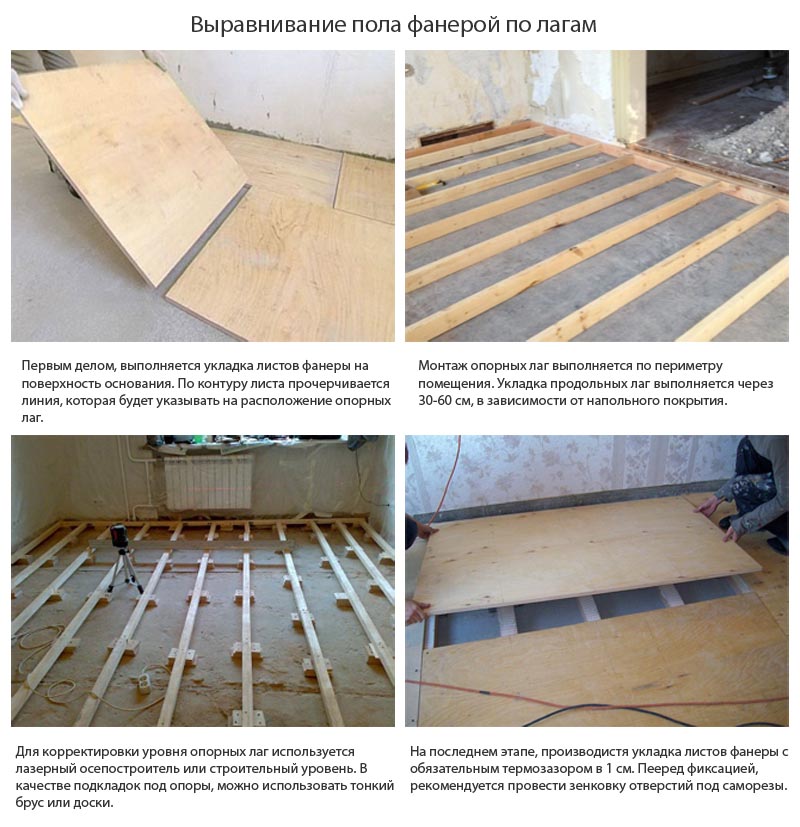
Sequence of work when pouring a cement screed on a concrete base
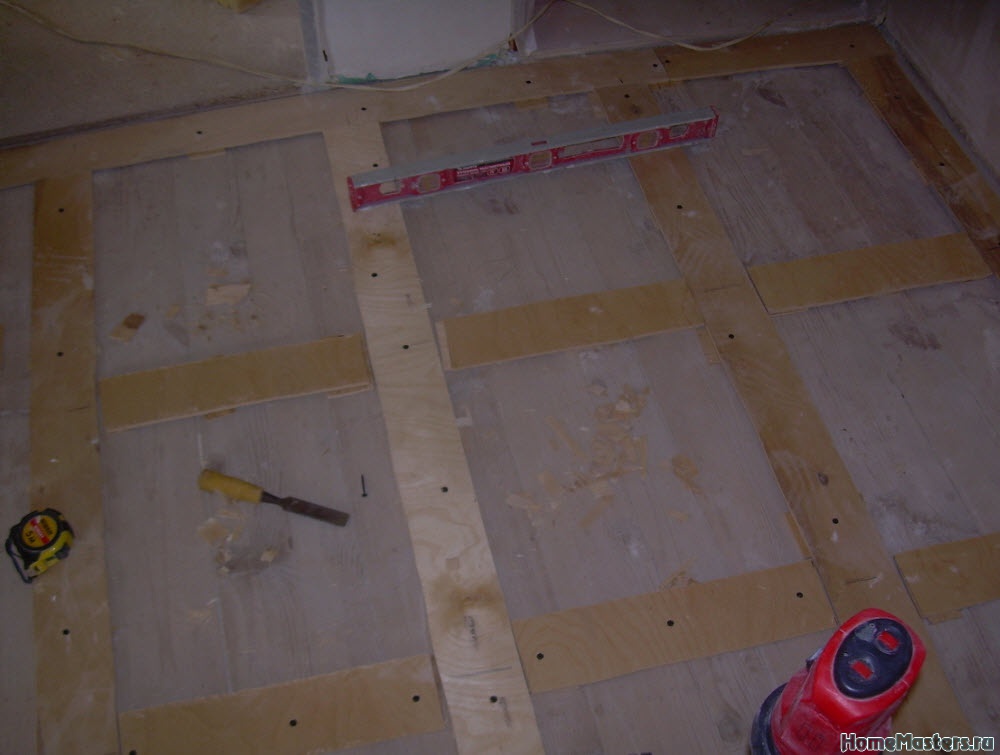
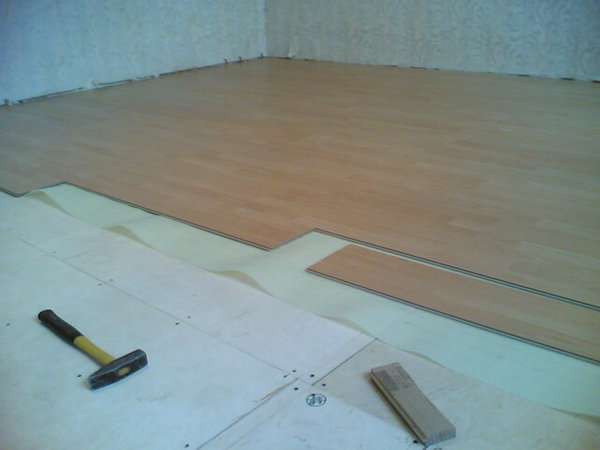
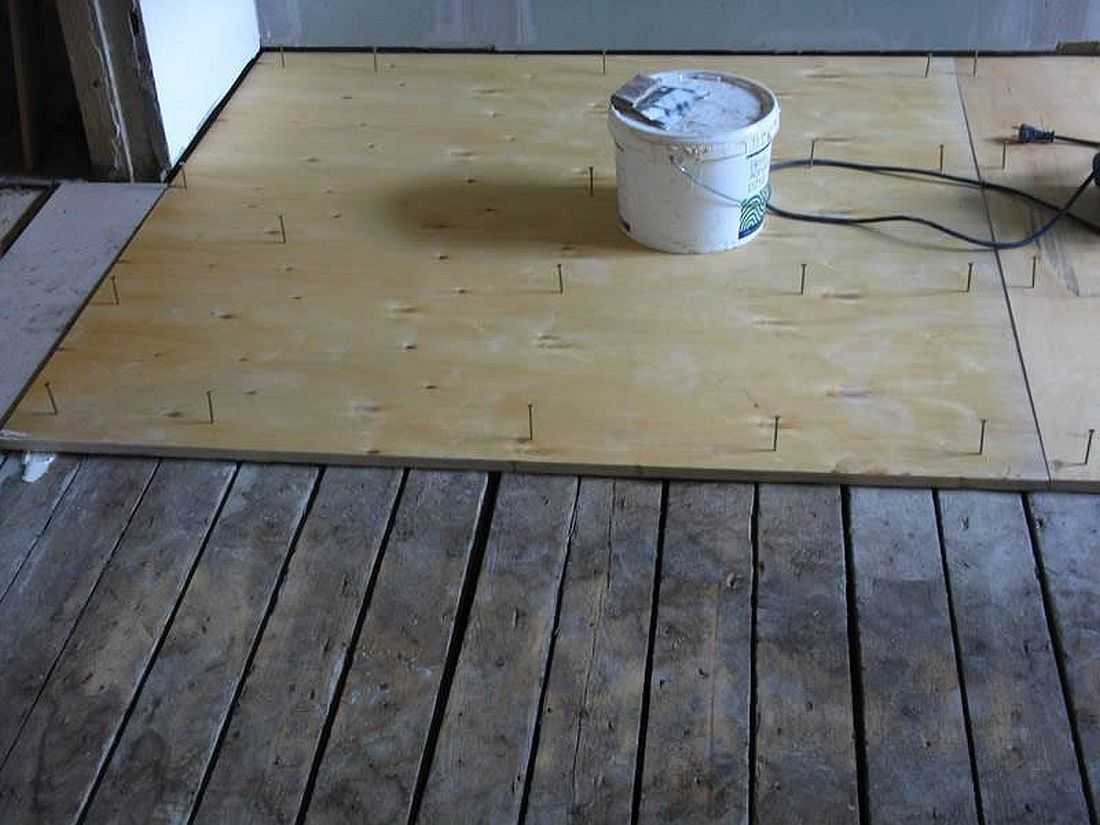
Consistency when leveling with plywood. will look like this:
- Checks are carried out on the supporting base, planks and other wooden parts. In case of damage, rotten areas and strong debris, replace and adjust the structure;
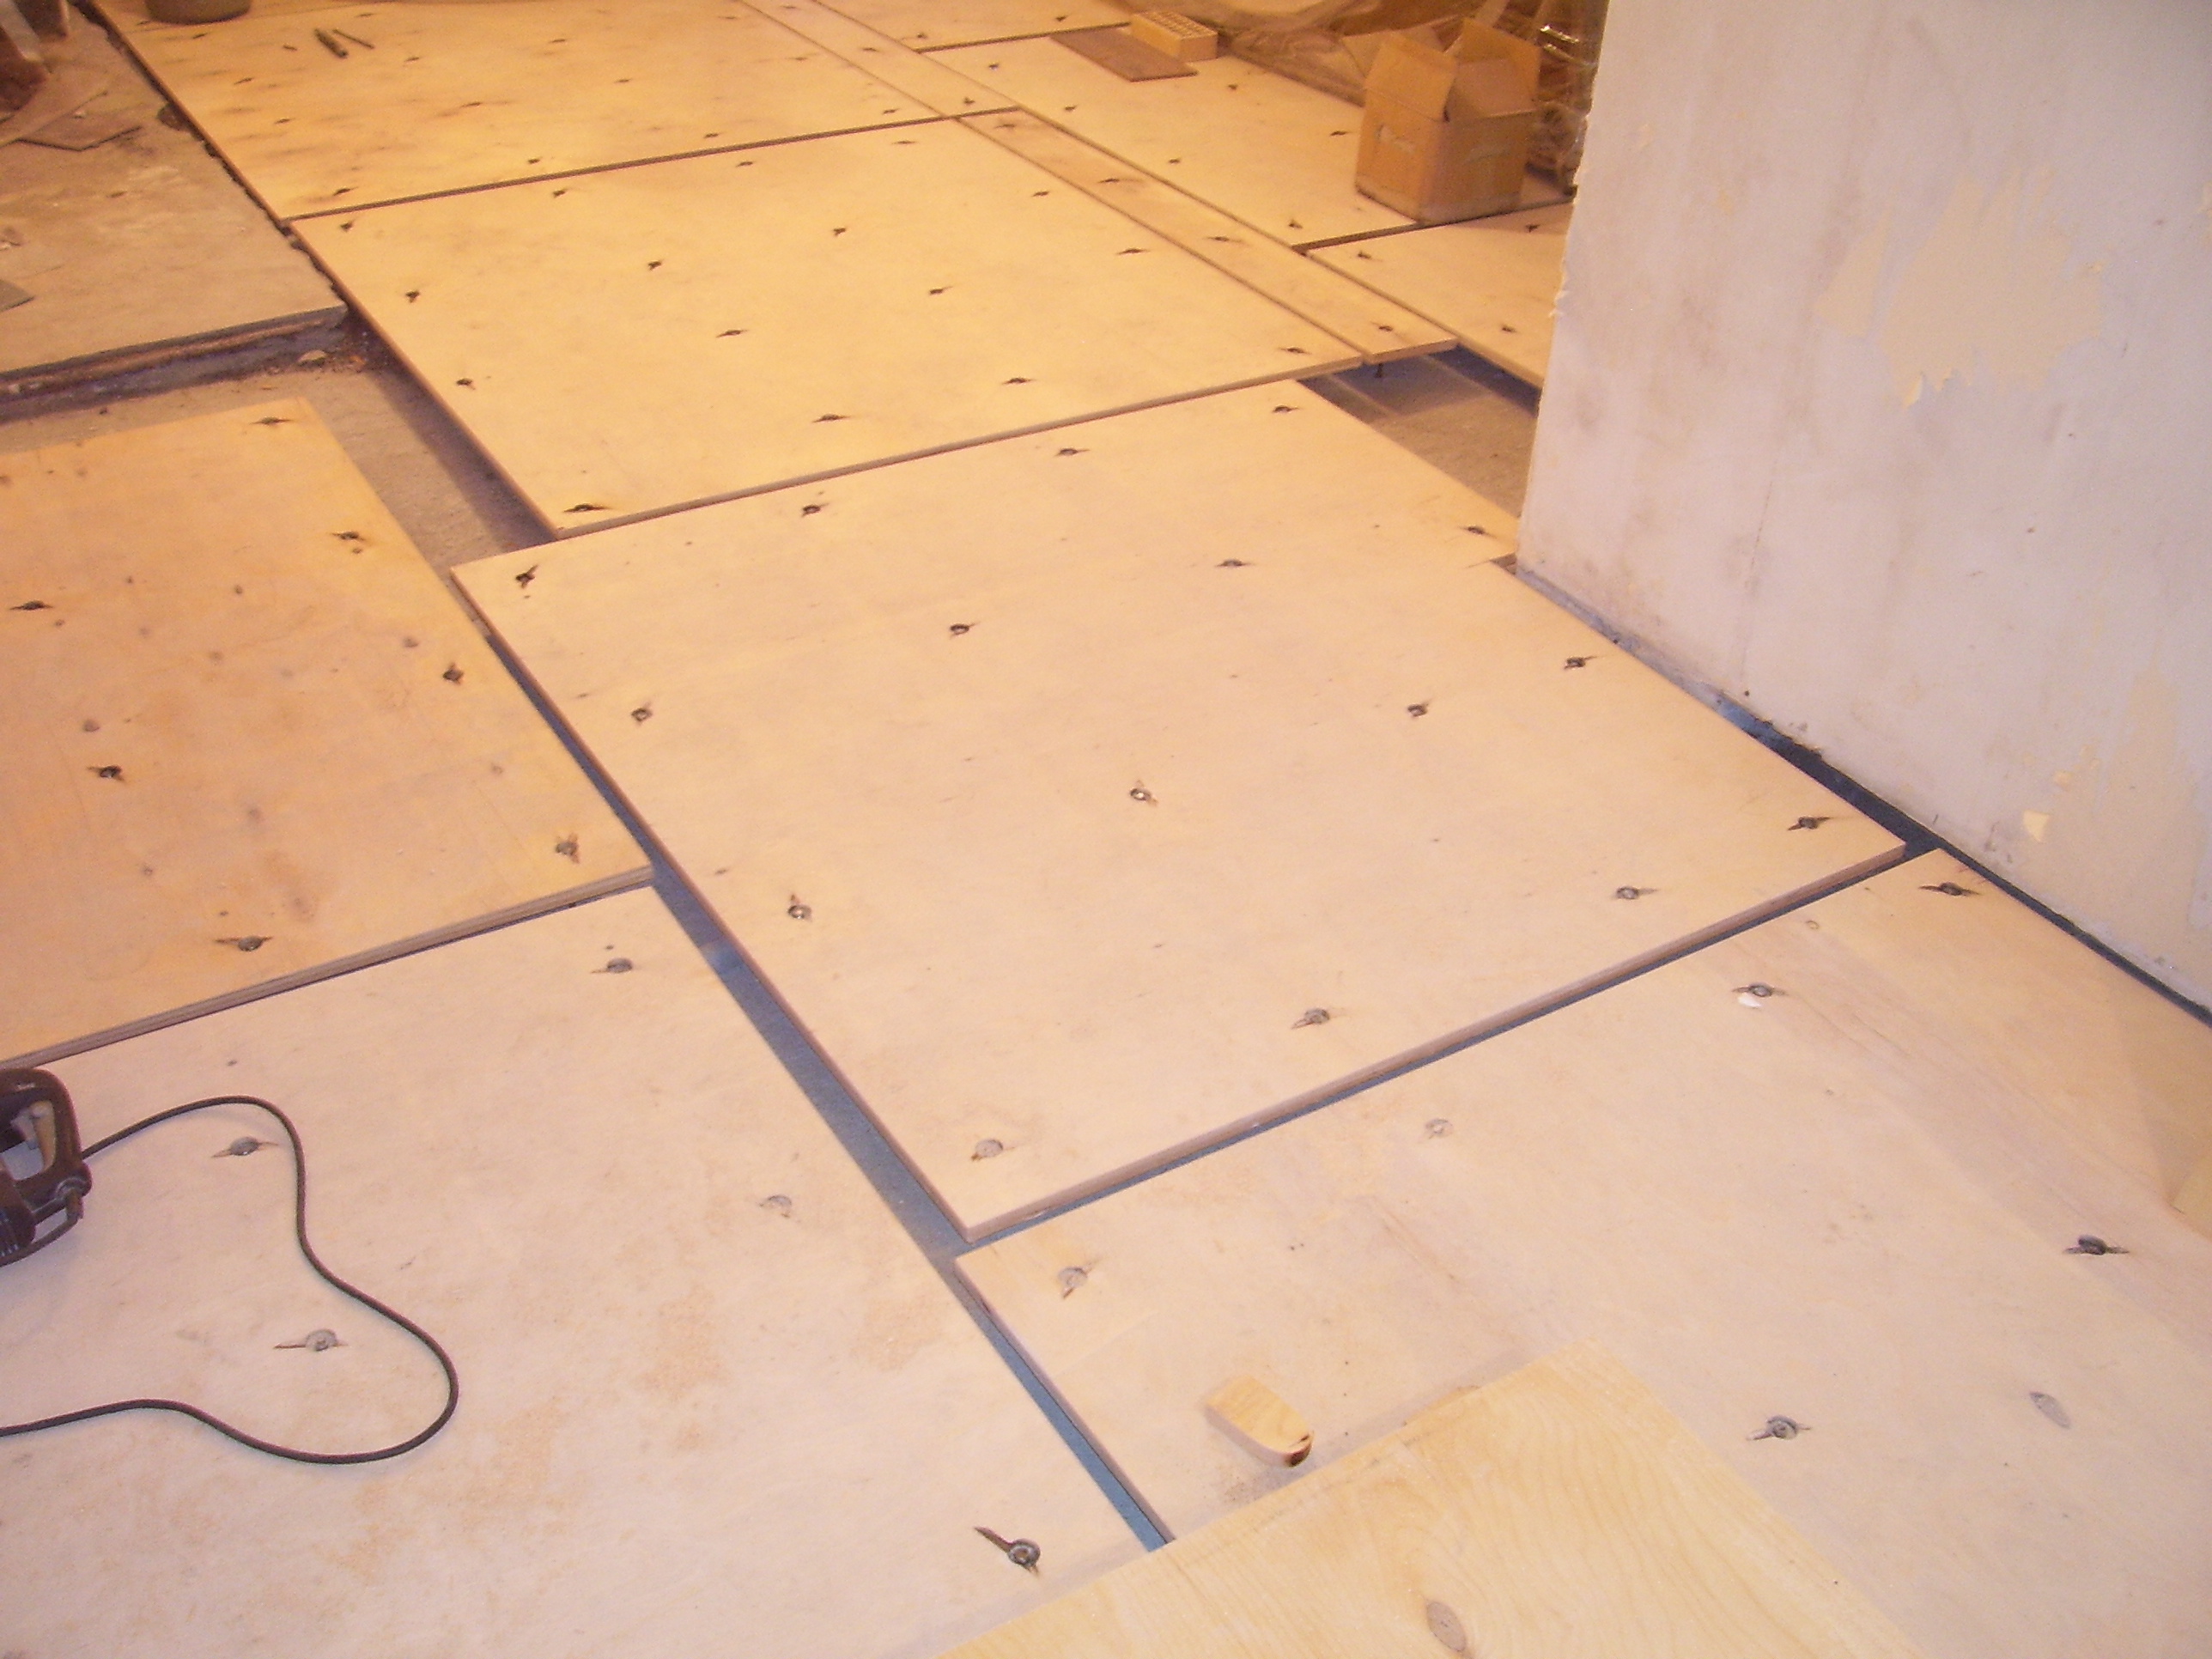
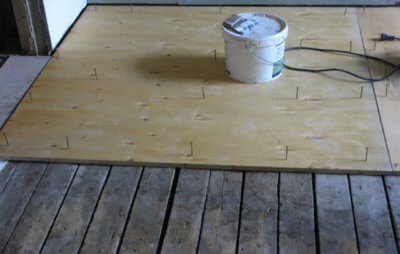
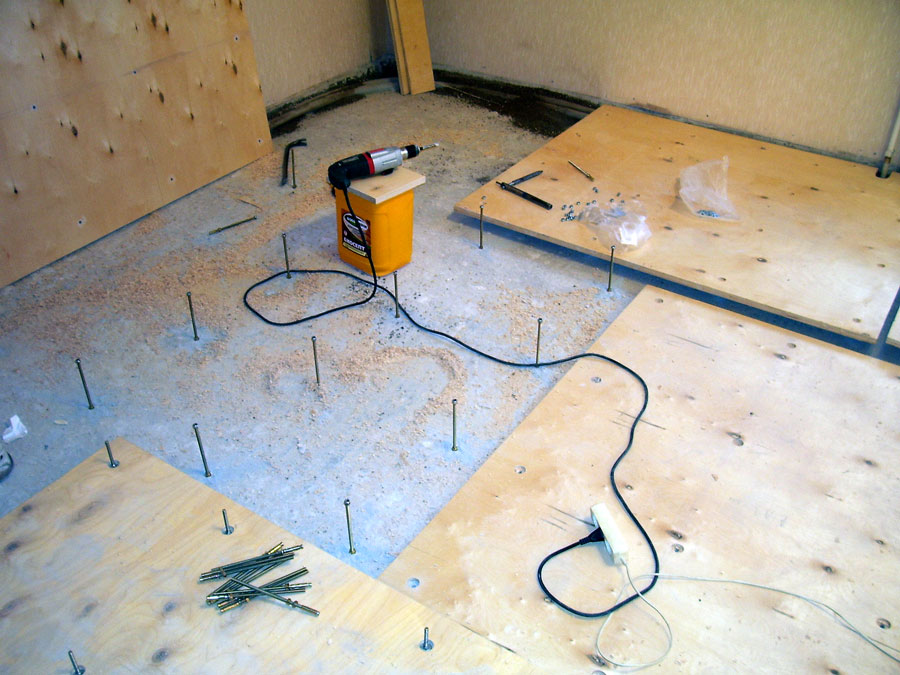
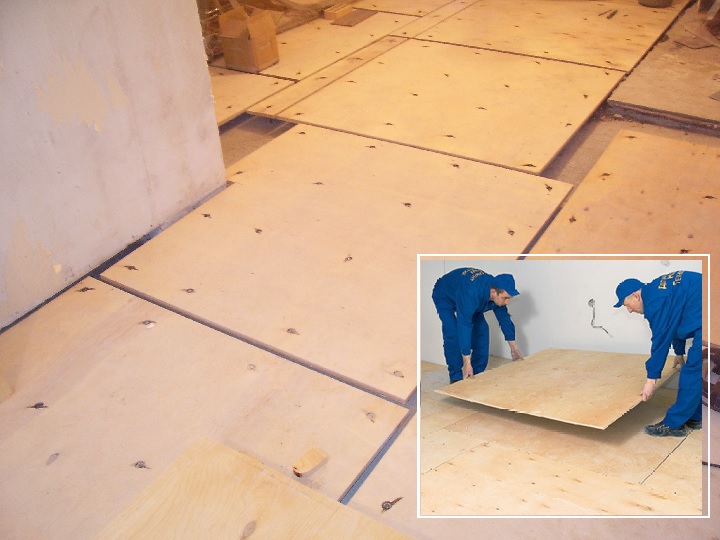
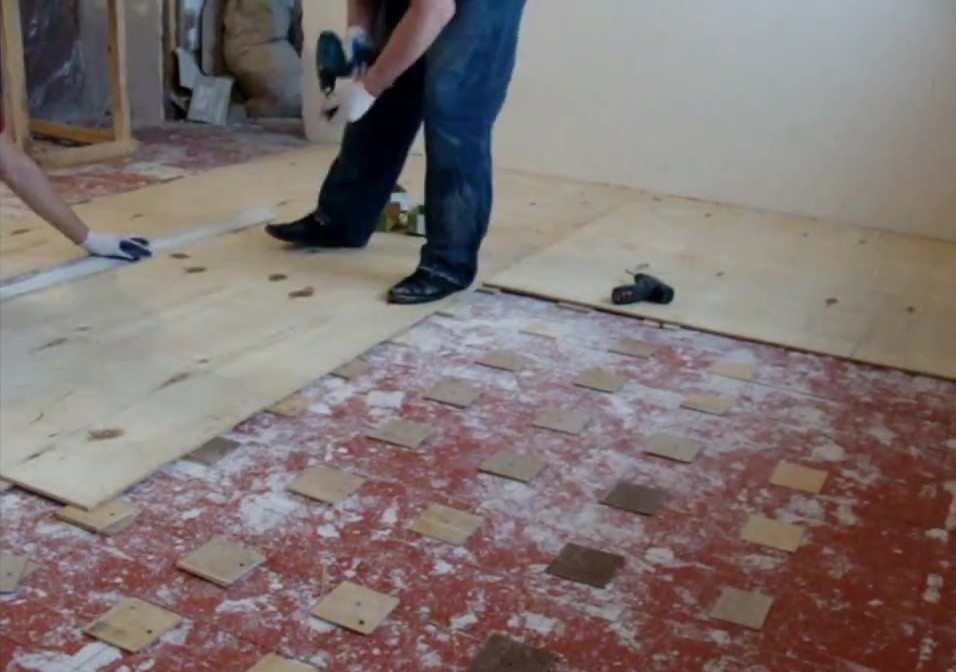
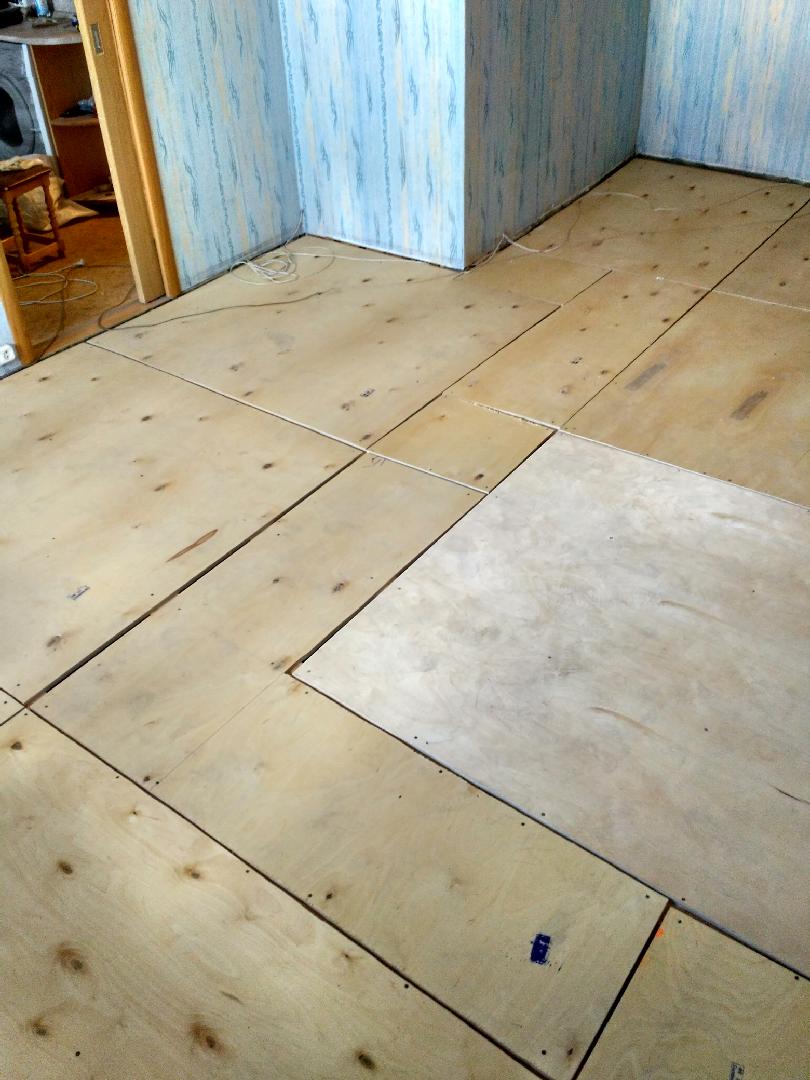
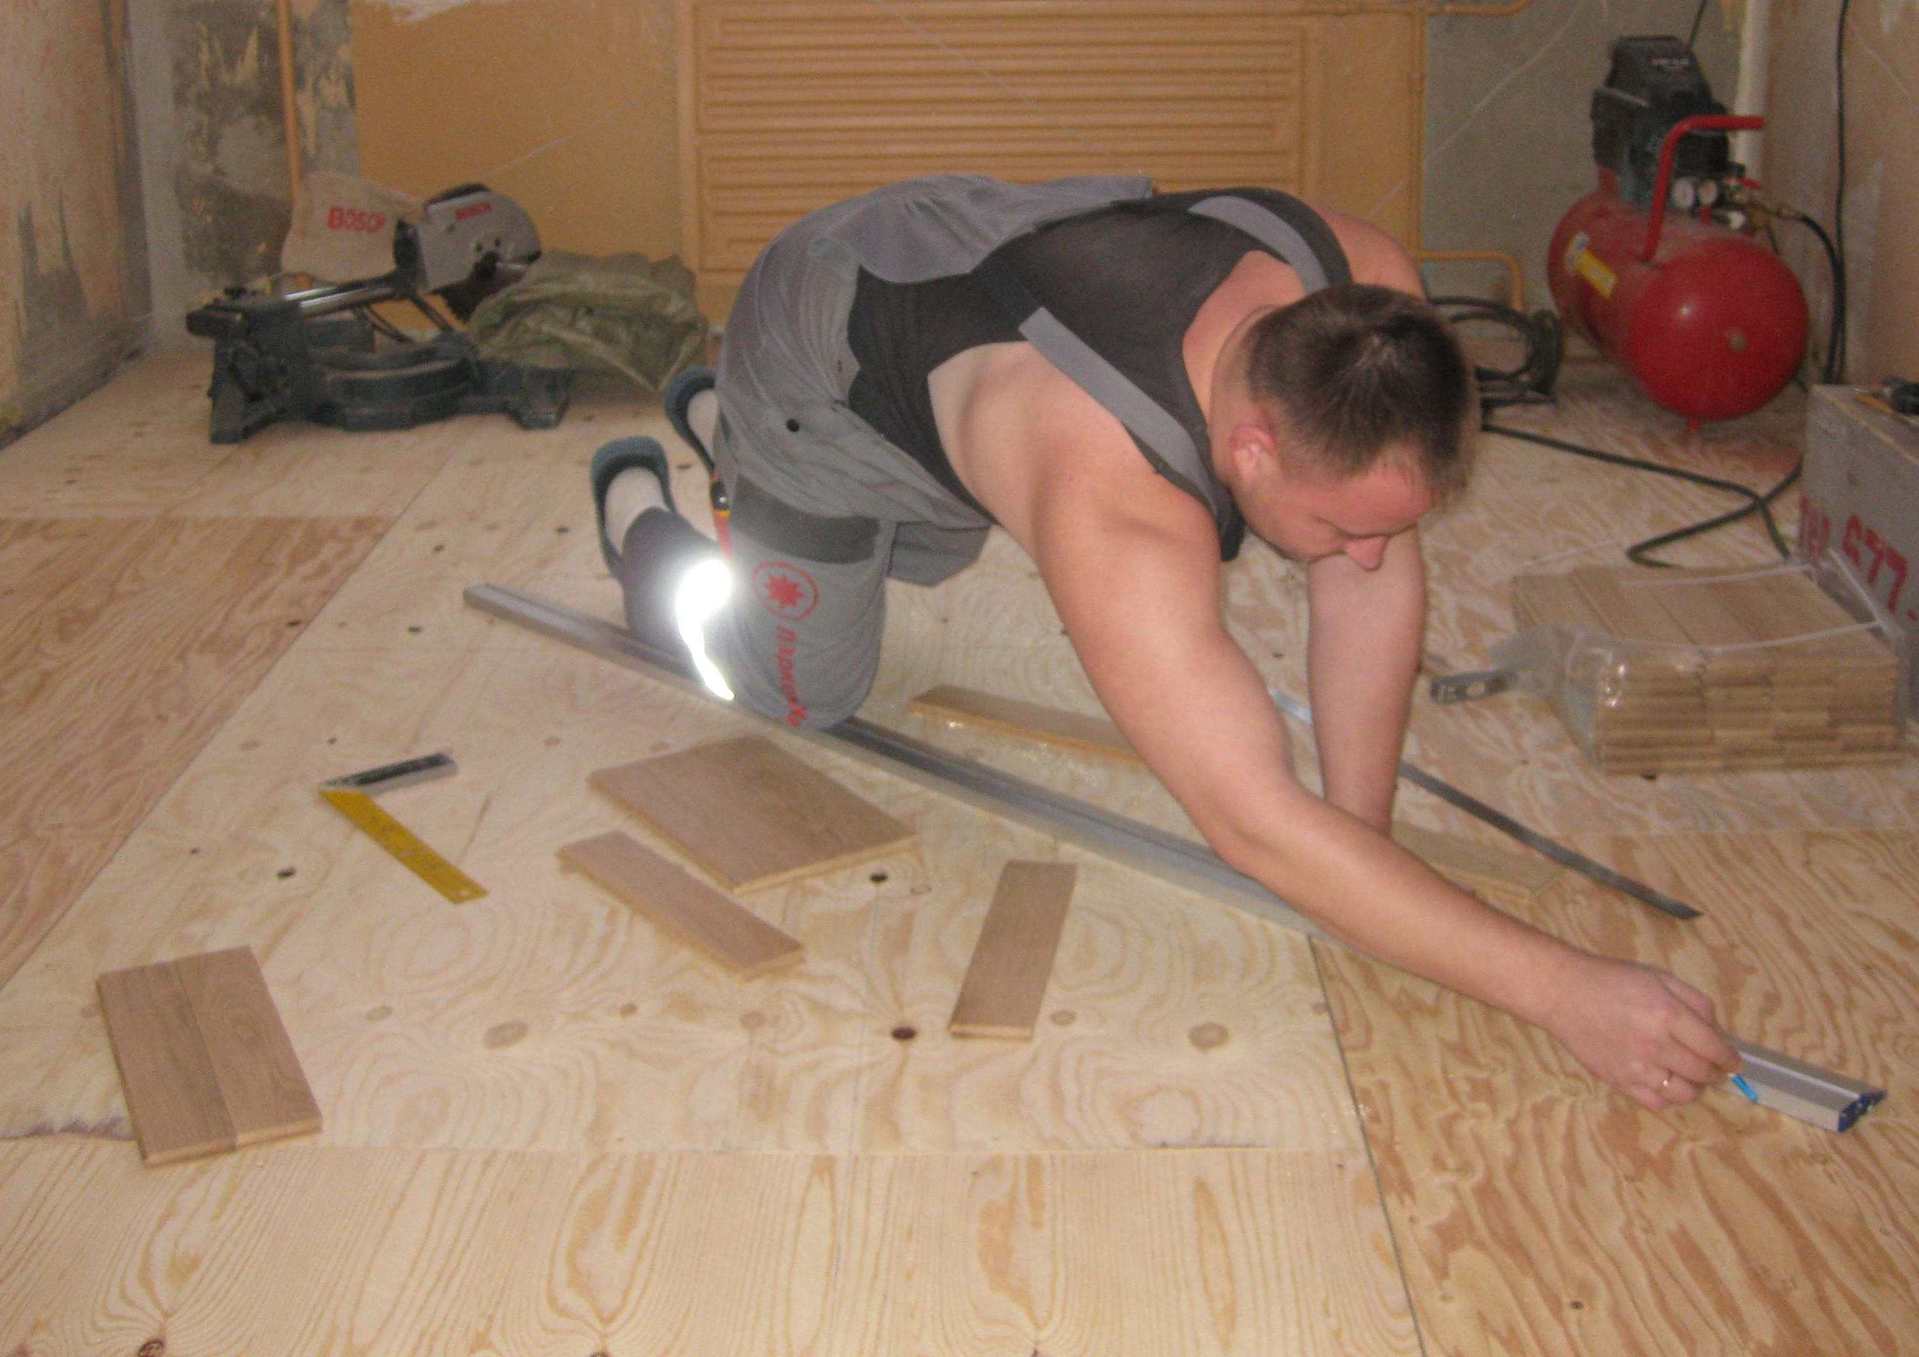
- Plywood sheets are laid out on the base of the floor. The canvases can be moved in any order to achieve a more comfortable positioning on the surface. After laying, a line is drawn along the contour of the sheets lying against the wall. For ease of installation, sheets are numbered and set aside;
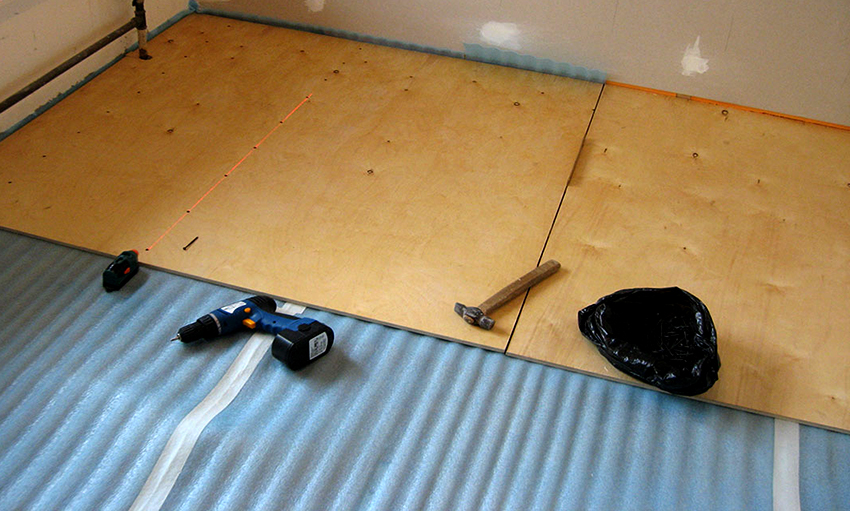
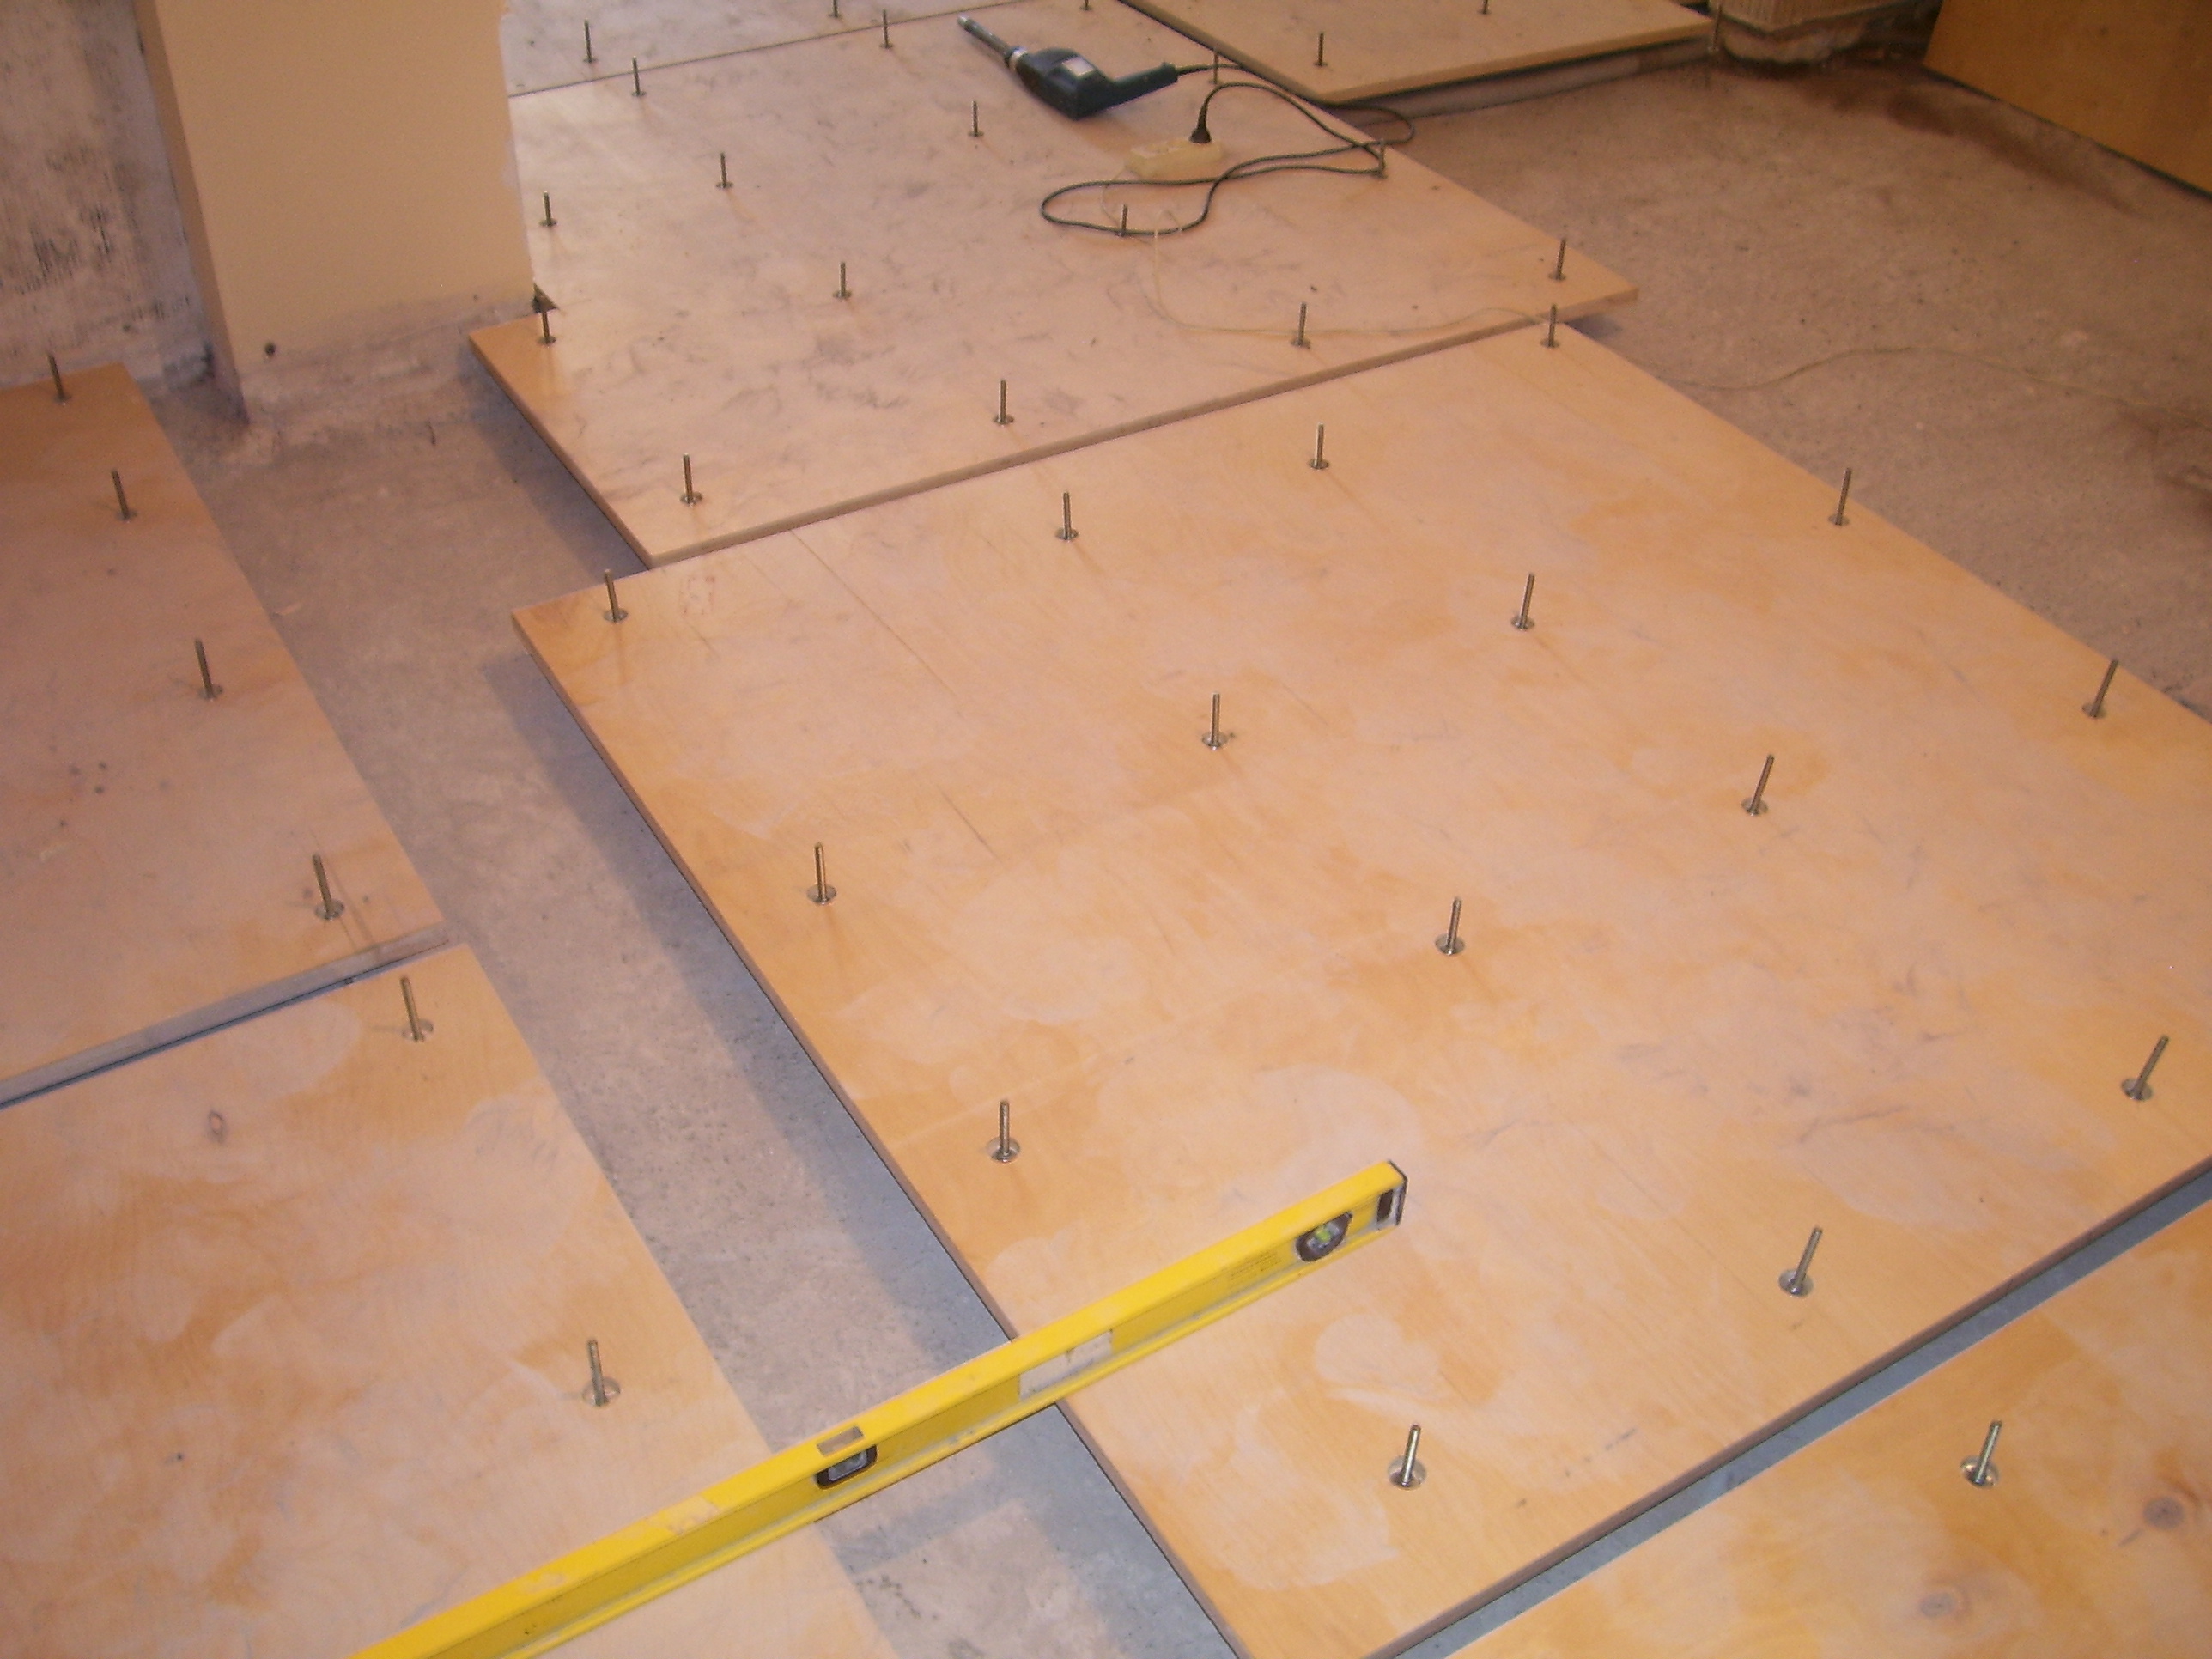
- Installation of wooden guides is carried out according to the markings. For the manufacture of logs, you can use a beam of 50 × 60 mm. After laying the log along the perimeter, every 30-40 cm, the arrangement of the longitudinal and transverse guides is performed;
- The supporting structure is checked according to the level. If necessary, thinner bars or boards are placed under the logs. After checking, the structure is fastened with metal corners and self-tapping screws;
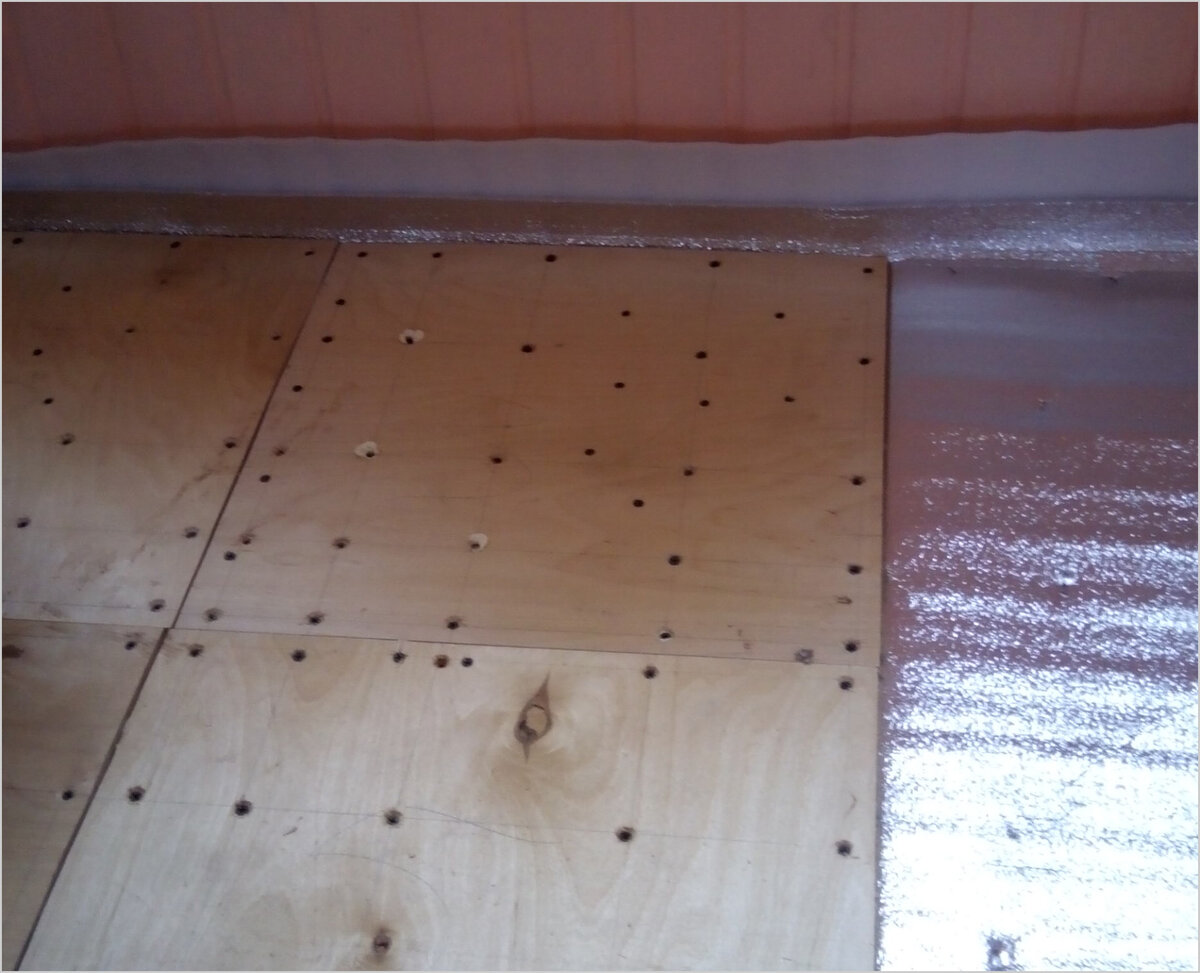
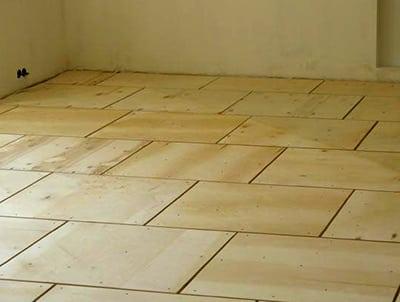
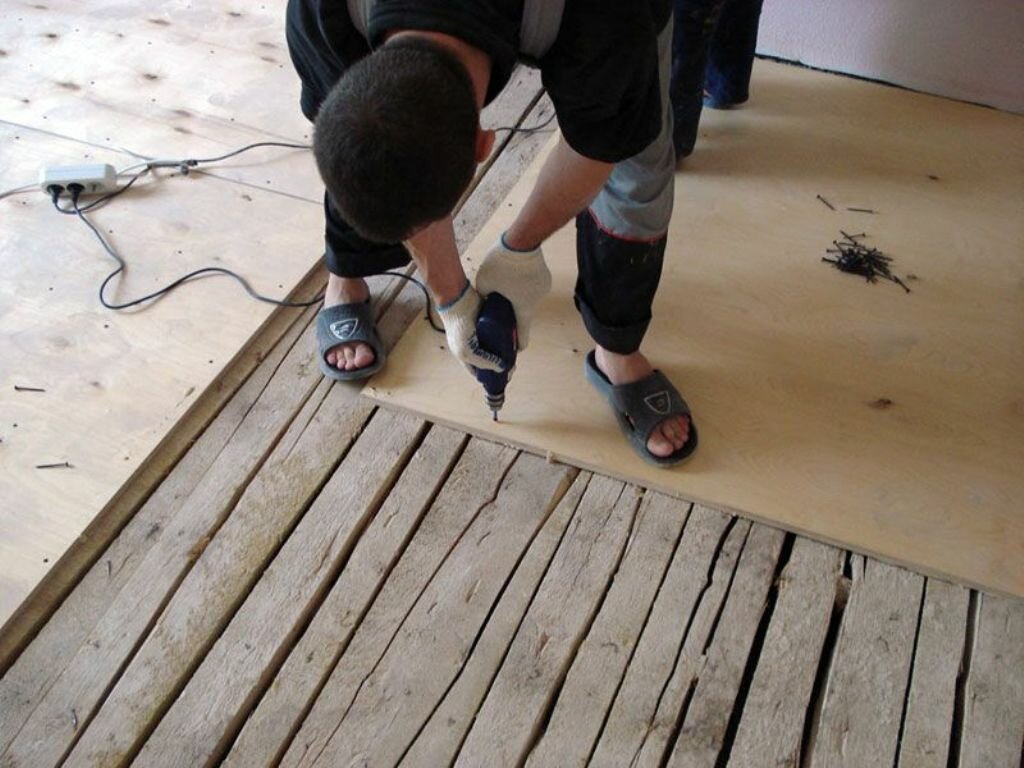
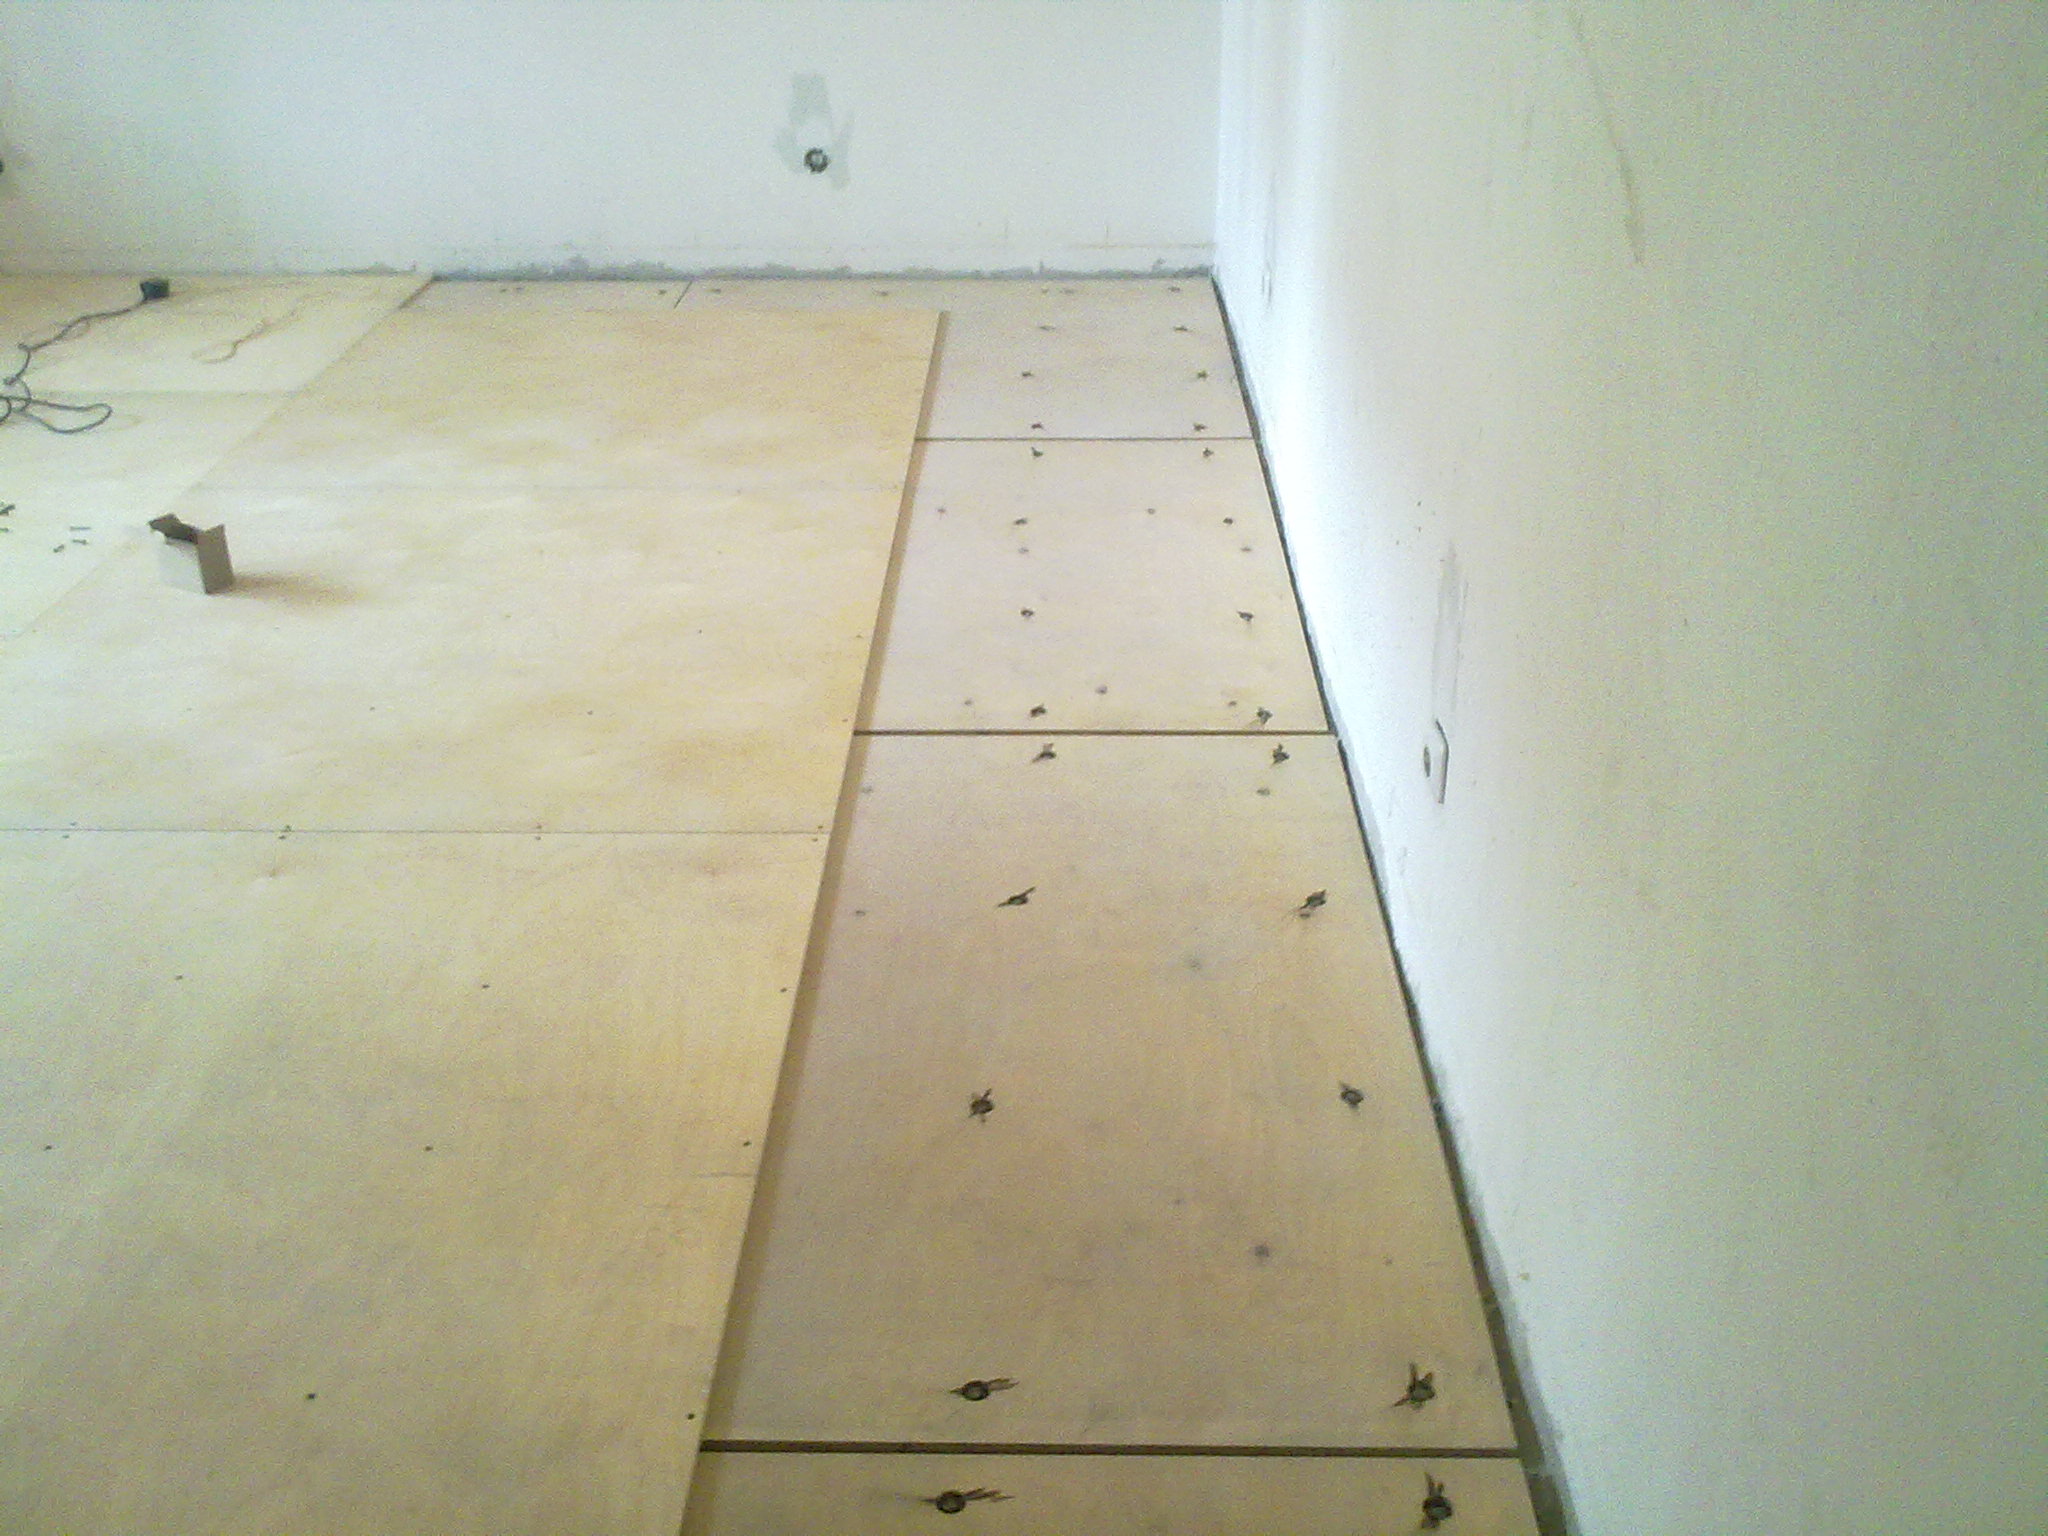
- Plywood sheets are laid on the support beams. A gap of 8-10 mm is observed between the sheets, and 10-12 mm between the plywood and the wall.
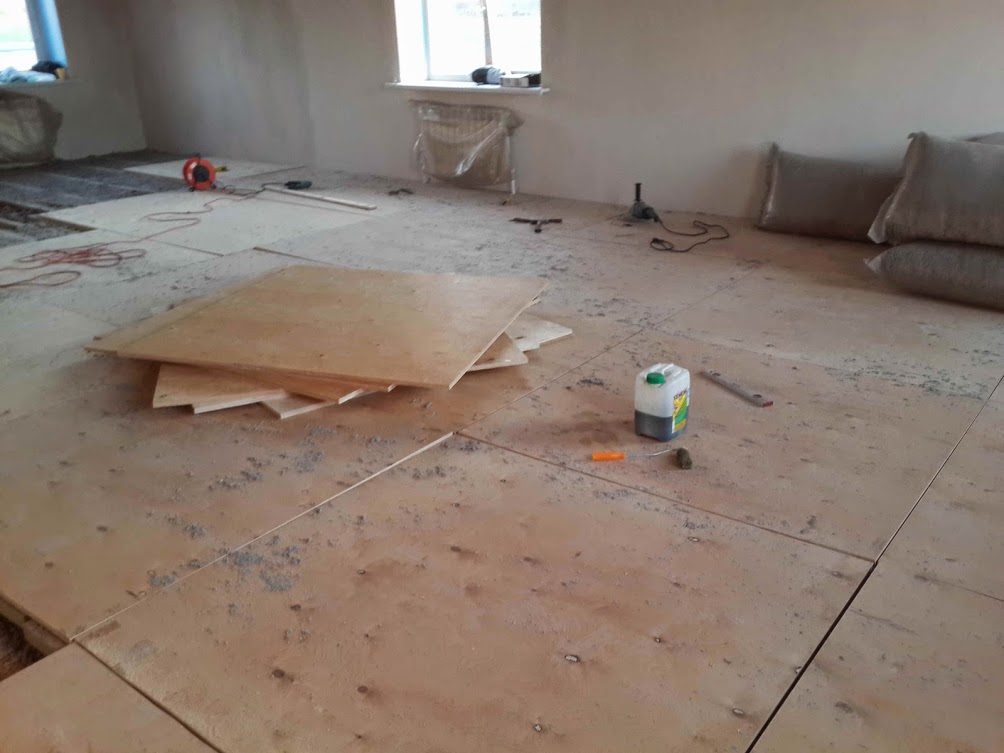
If necessary, after mounting the sheets, you can scrape the plywood to create an even smoother surface. Additional leveling or scraping is not required for laying linoleum.
As an addition to the described technologies, we recommend watching a video showing the process of leveling the base for linoleum in more detail.
Coating features
A variety of types of linoleum allows you to choose it for any style of your interior. The difference lies in the properties of the material and its thickness. There are three types of linoleum:
- Household is the most inexpensive and thinnest material used most often in residential premises. It is easy to clean, elastic and moisture resistant. It is made on a foam base with a fiberglass carrier layer, on which a layer of chemical foam is applied on both sides.
- Commercial - the most durable and thickest, not afraid of all kinds of chemical and mechanical influences. It is also called industrial, but it is also suitable for residential premises. By combining the multi-colored parts of this linoleum, when laying it, you can highlight special zones or simply create your own pattern.
- Semi-commercial - an average option between household and commercial.
There is also cork, liquid and 3D linoleum. There are types that have antistatic or fire-fighting properties, as well as a warmed version. It is already based on a backing material of natural fiber or jute or synthetic polyester.