Types of bricks used
The most widespread is the red clay brick. Silicate white is not inferior to it in properties. The only condition is that it cannot be used when laying fireplaces, stoves and foundations. For the purpose of wall cladding, special yellow facing brick is widely used.

Brick sides: upper and lower bed, spoons, poke.
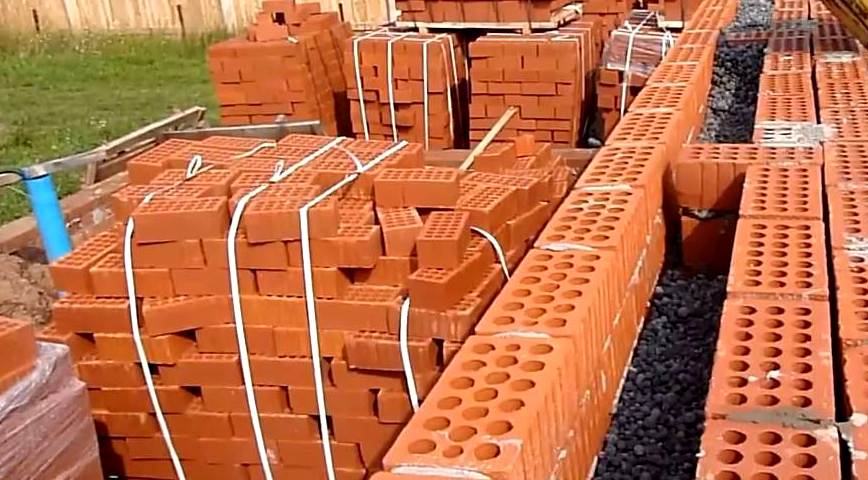
By their structure, bricks differ into hollow and solid. Hollow brick has round or rectangular through holes. It is worth noting that this type of brick has good thermal performance. Aging can be performed to give the material an aesthetic appearance.
Among the builders, there is a terminology for the classification of brick surfaces. So, the wide edge is called the bed (depending on the location - the lower and the upper), the side long edge is called the spoons (and accordingly, the row that fits with the long side to the wall is called the spoon), the short side is called a poke (a row laid across walls, called butcher).
The masonry also has its own specific name. So, the outer rows are called a mile, the inner ones are called zabutka. For the inner row, you can even use chipped and broken brick, even its halves. In addition to the standard brick, ceramic stone may also be suitable for the construction of walls - it differs from brick in a slightly larger size.
When performing facial masonry, there are certain rules. When laying the front wall, you can use bricks of two colors. So, if you use bricks of different colors for the butt and spoon rows, you can get a striped wall.
Laying rules
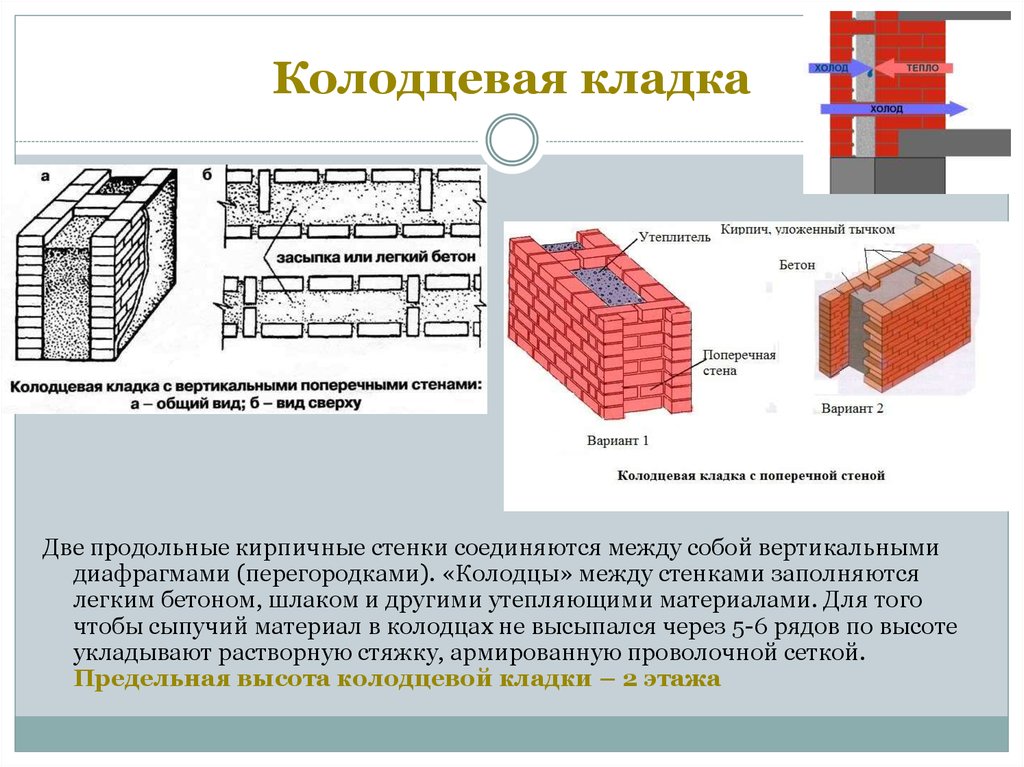
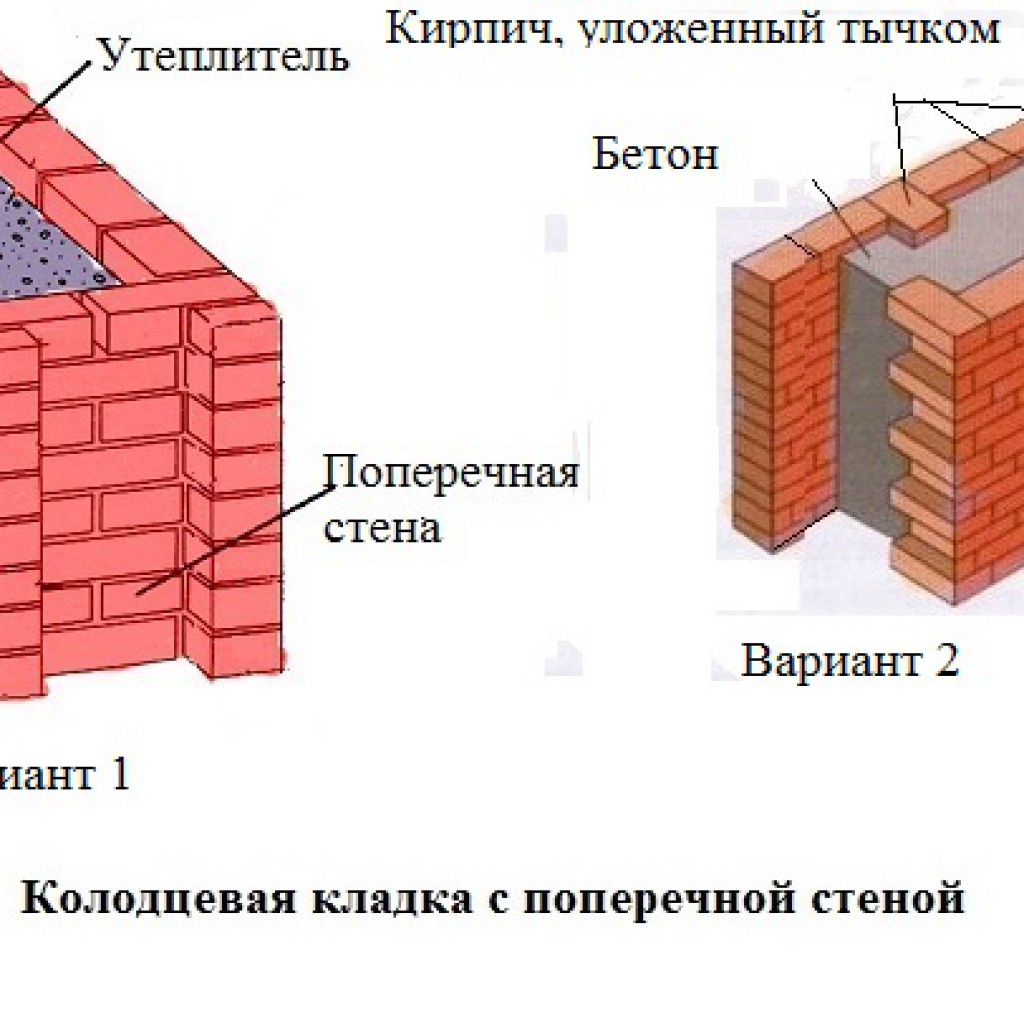
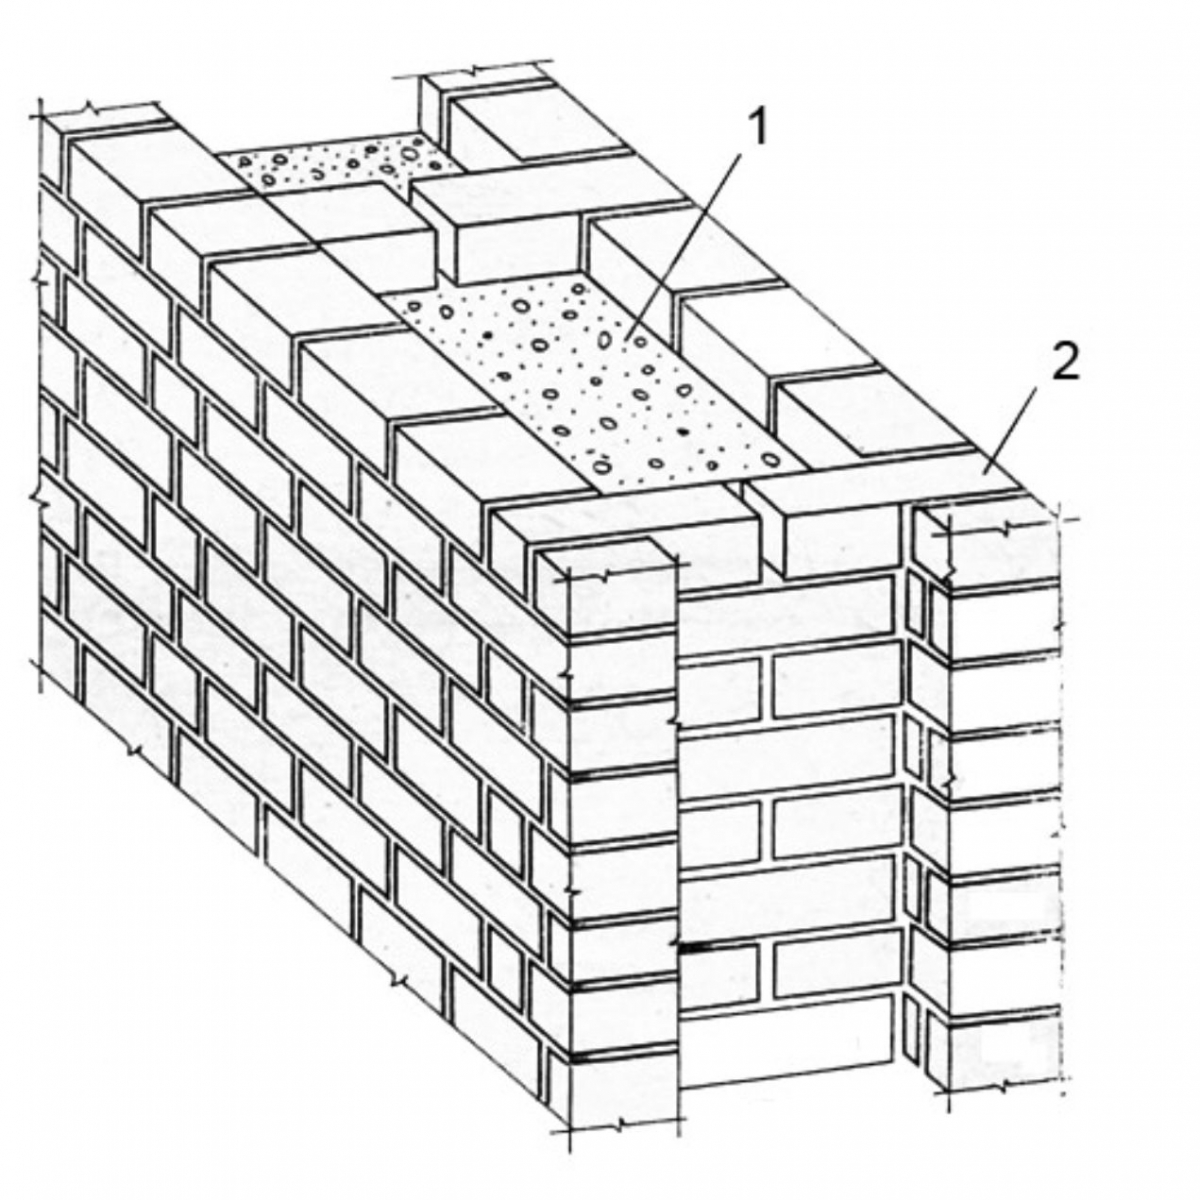
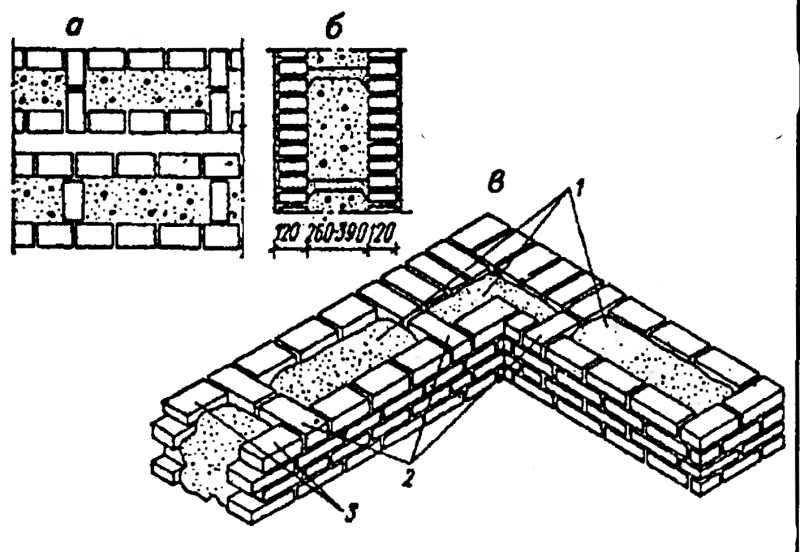
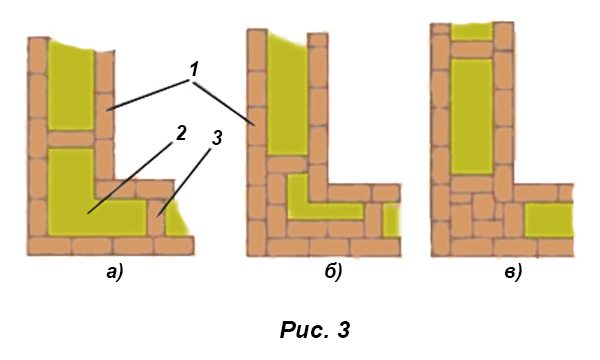
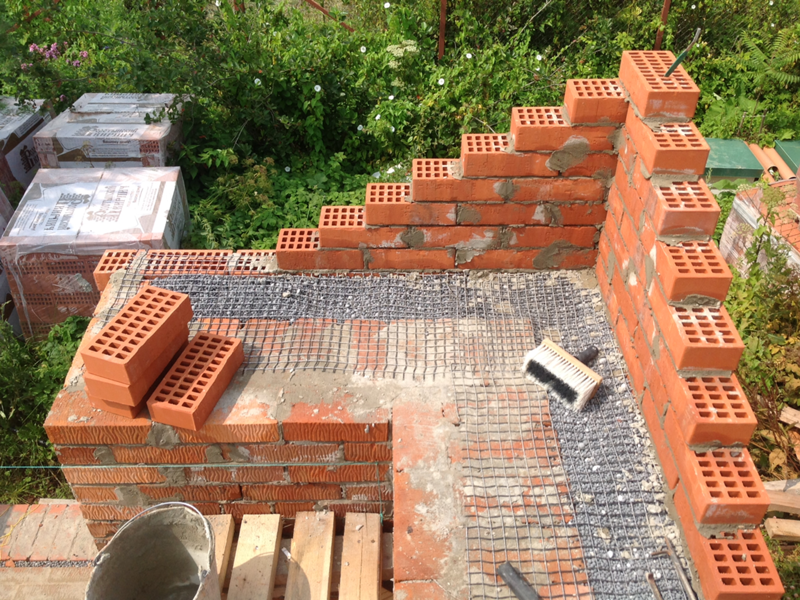
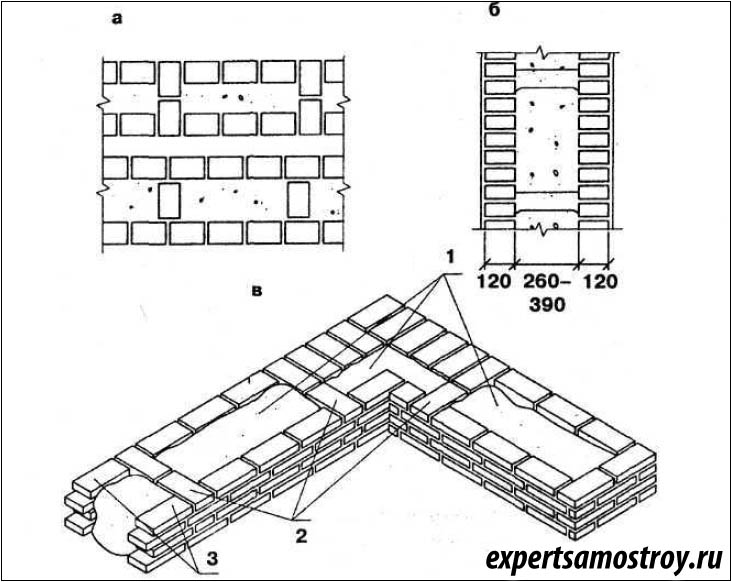
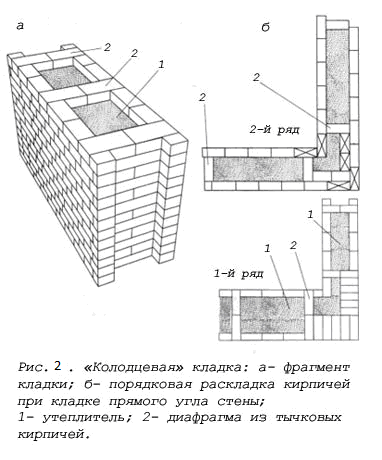
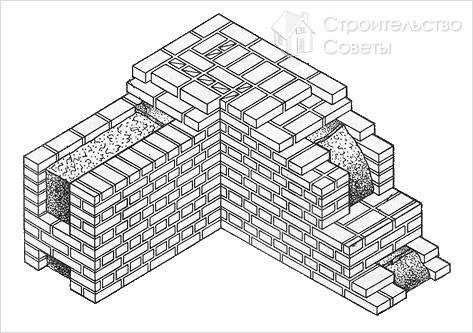
The well masonry must be erected from two different walls spaced up to 34 cm apart.

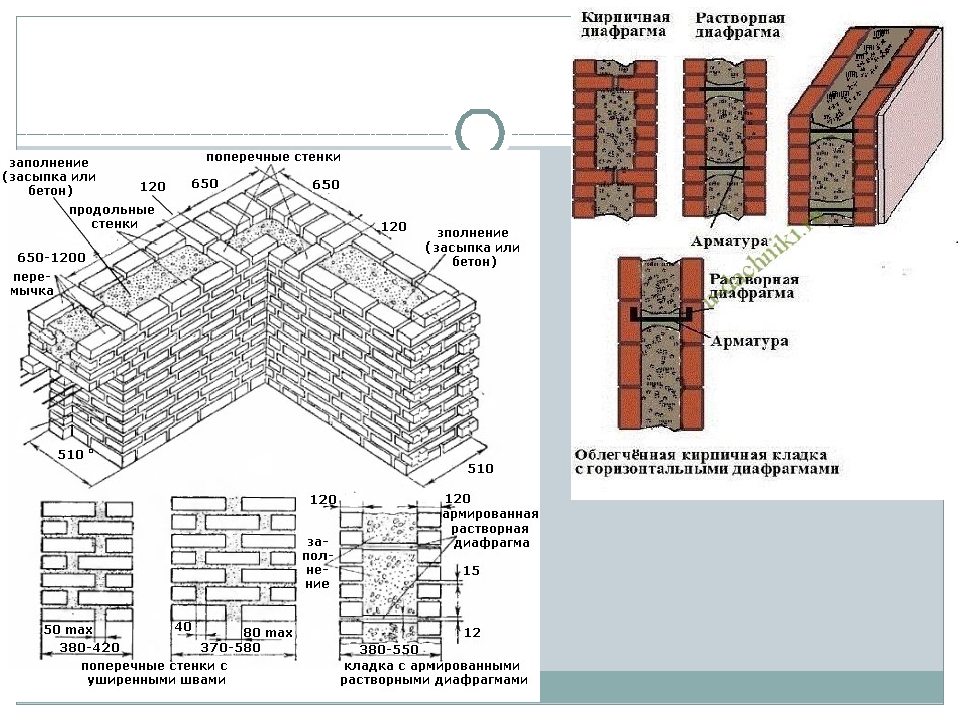
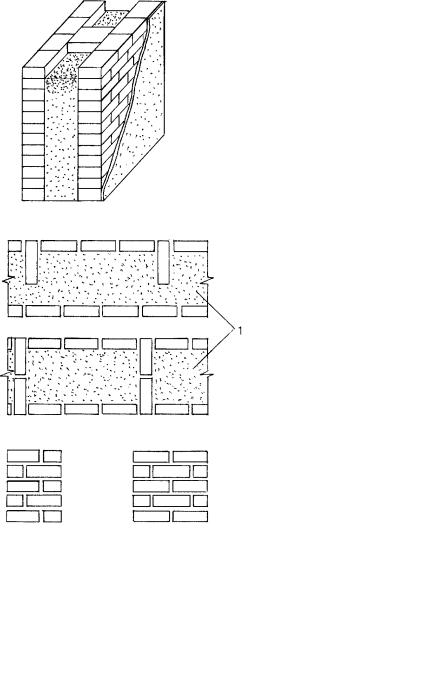
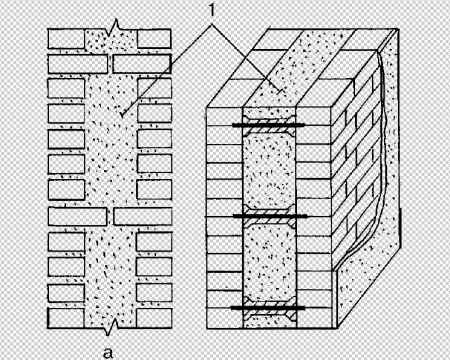
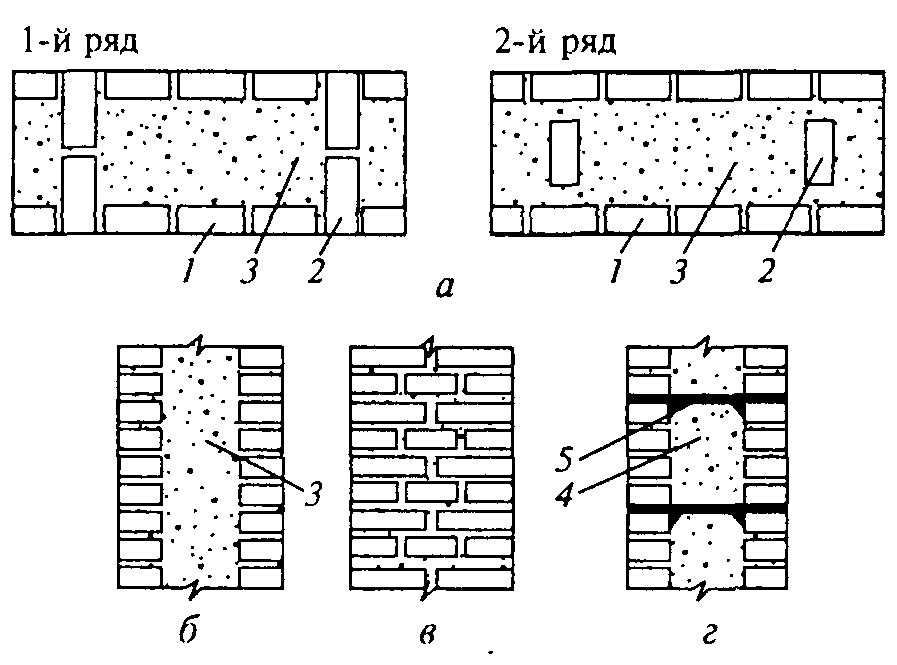
Well masonry walls: a - masonry of a blank section of the wall, b - vertical section along the well; c - the corner of the outer walls: 1 - insulation, 2 - transverse walls 3 - longitudinal walls (versts).
Initially, two rows of bricks are laid out in the transverse direction on the waterproofing layer of the foundation (a feature of this type of masonry is that the materials must be laid out very tightly from the first row to each other, without the slightest gaps).
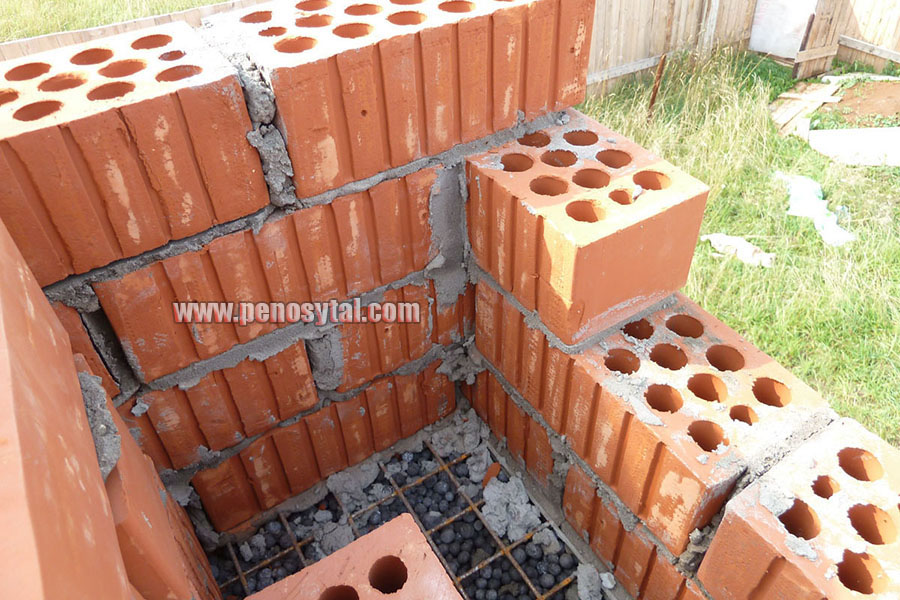
In order to build a corner, it is necessary to start with butcher versts - outer and inner.
To connect the well masonry into a single whole, you can use wire dressings.
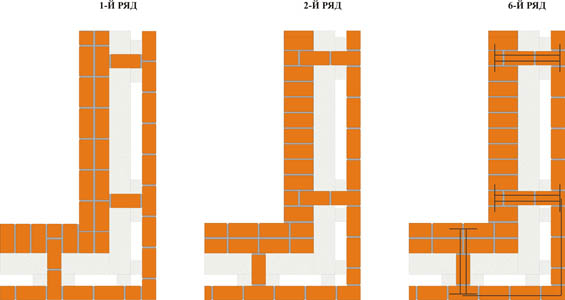
Longitudinal walls are laid out in spoon rows. For laying out the second row of inner and outer versts, it is also necessary to use the spoon method, while laying out the transverse walls is done with pokes. Longitudinal walls with transverse ones are connected by bandaging through one row. Only after the fourth or fifth row of masonry can the well be filled with insulation.
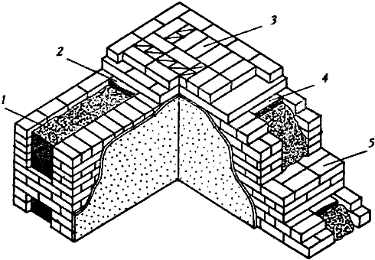
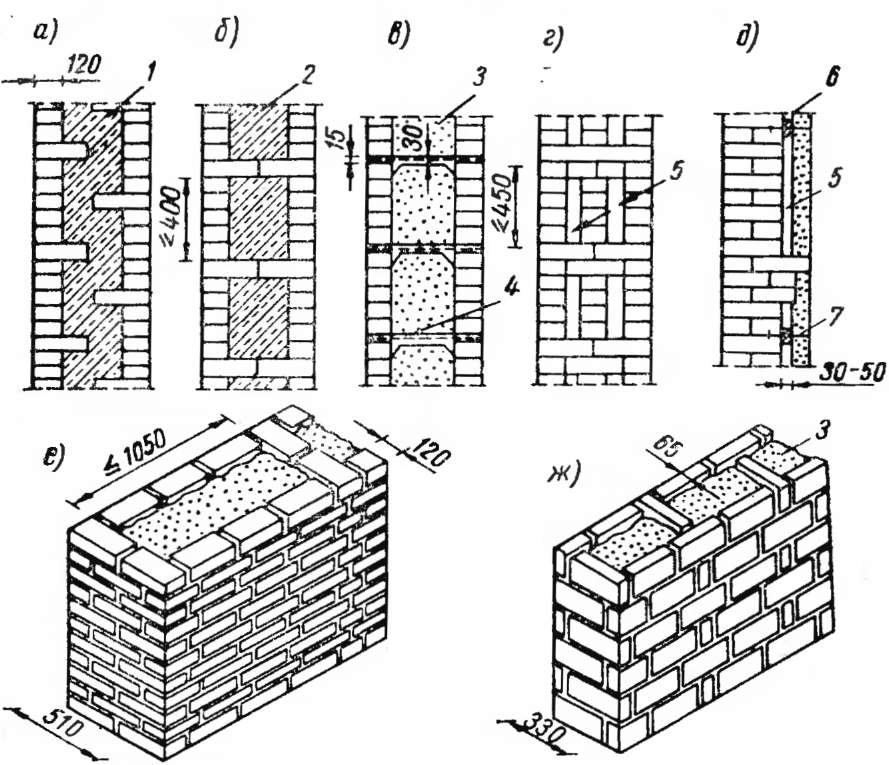
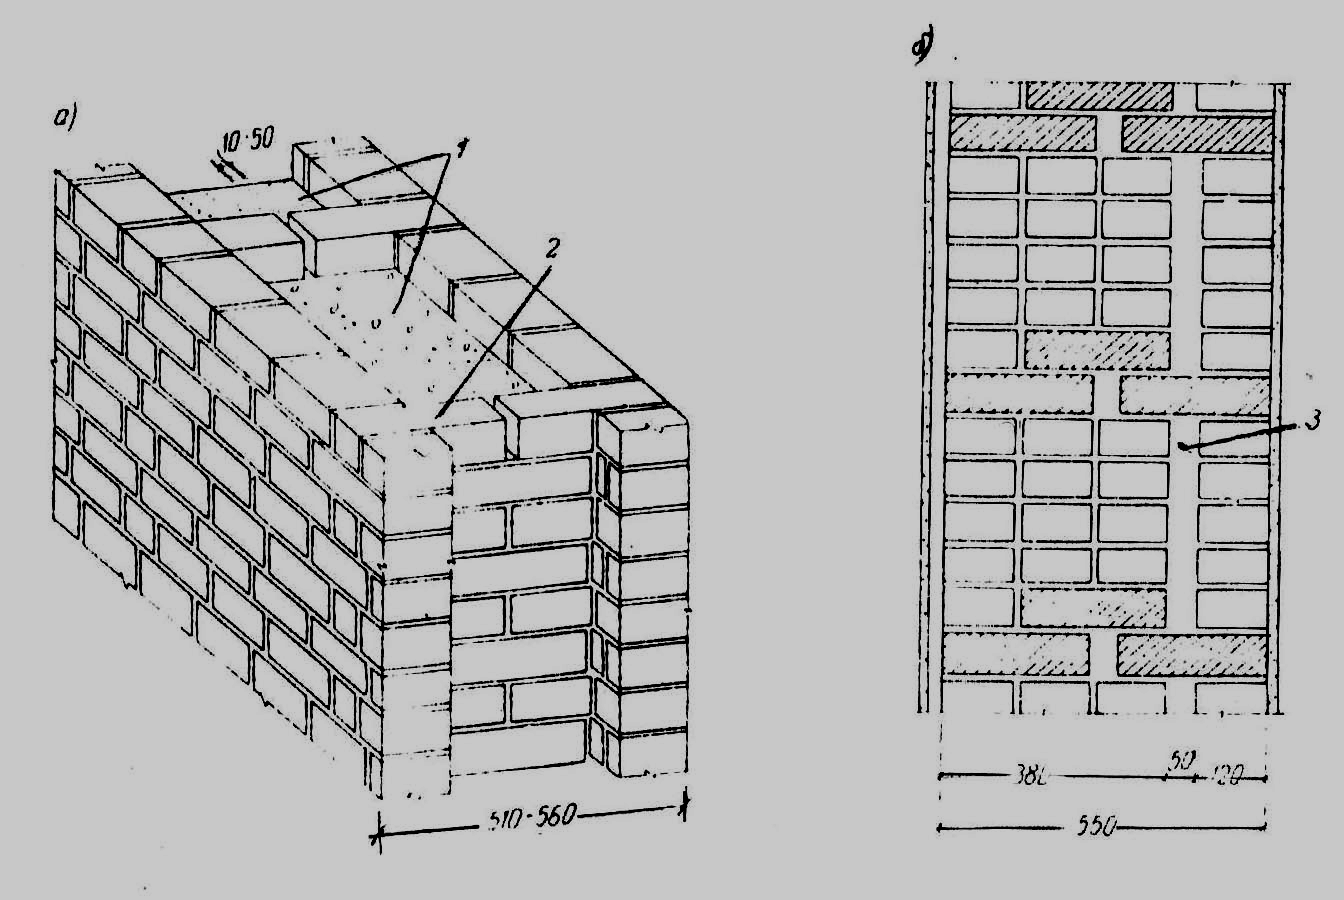
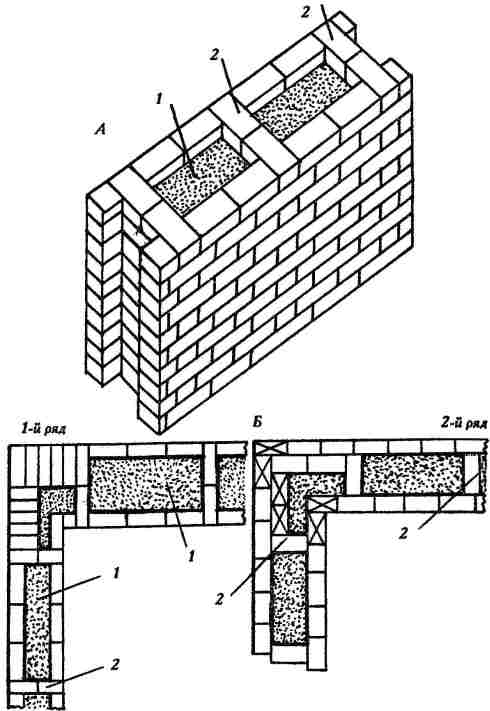
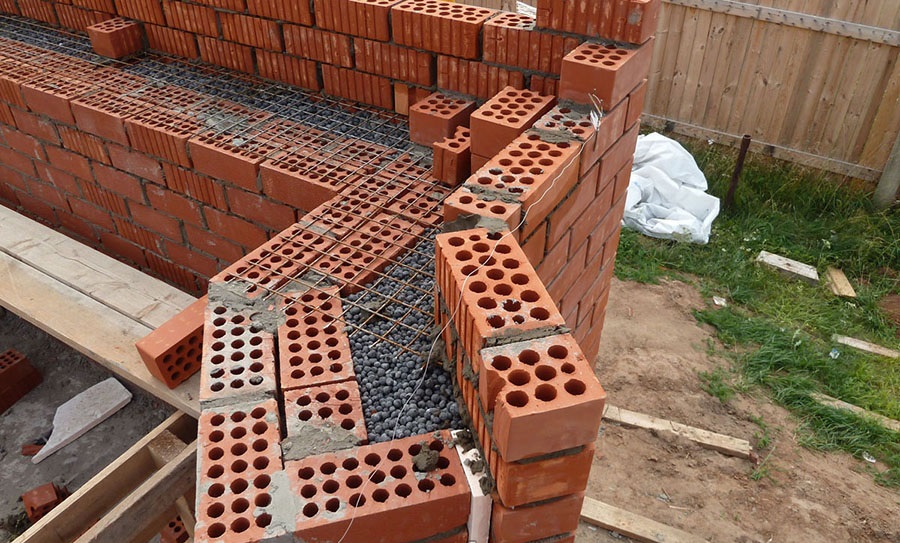
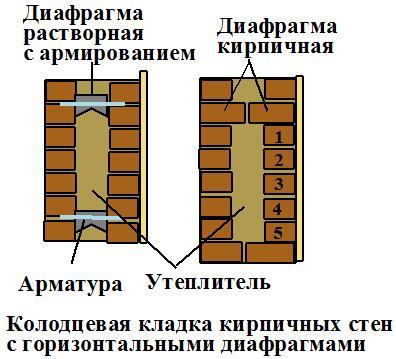
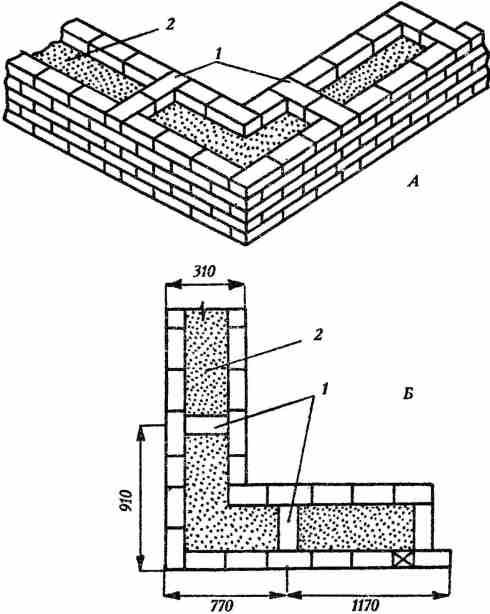
Corner masonry with three-row diaphragms: 1 - insulation; 2 - mortar screed; 3 - area of solid masonry; 4 - mortar screed; 5 - diaphragms from three rows of masonry.
To increase the strength of the structure, it is advisable to lay out corners with three-row diaphragms. Such walls differ from ordinary ones by solid masonry in the corners. It is worth starting the construction of the corner with laying a pair of three-quarters in the outer verst. So, starting from the 1st to the 3rd row, a continuous well masonry is made, which is a single-row system of dressings.At the same level with the fourth day, it is necessary to reserve a place in which the insulation will be laid. In its upper part, you need to make a mortar screed, and, based on it, continue laying the entire corner with diaphragms.
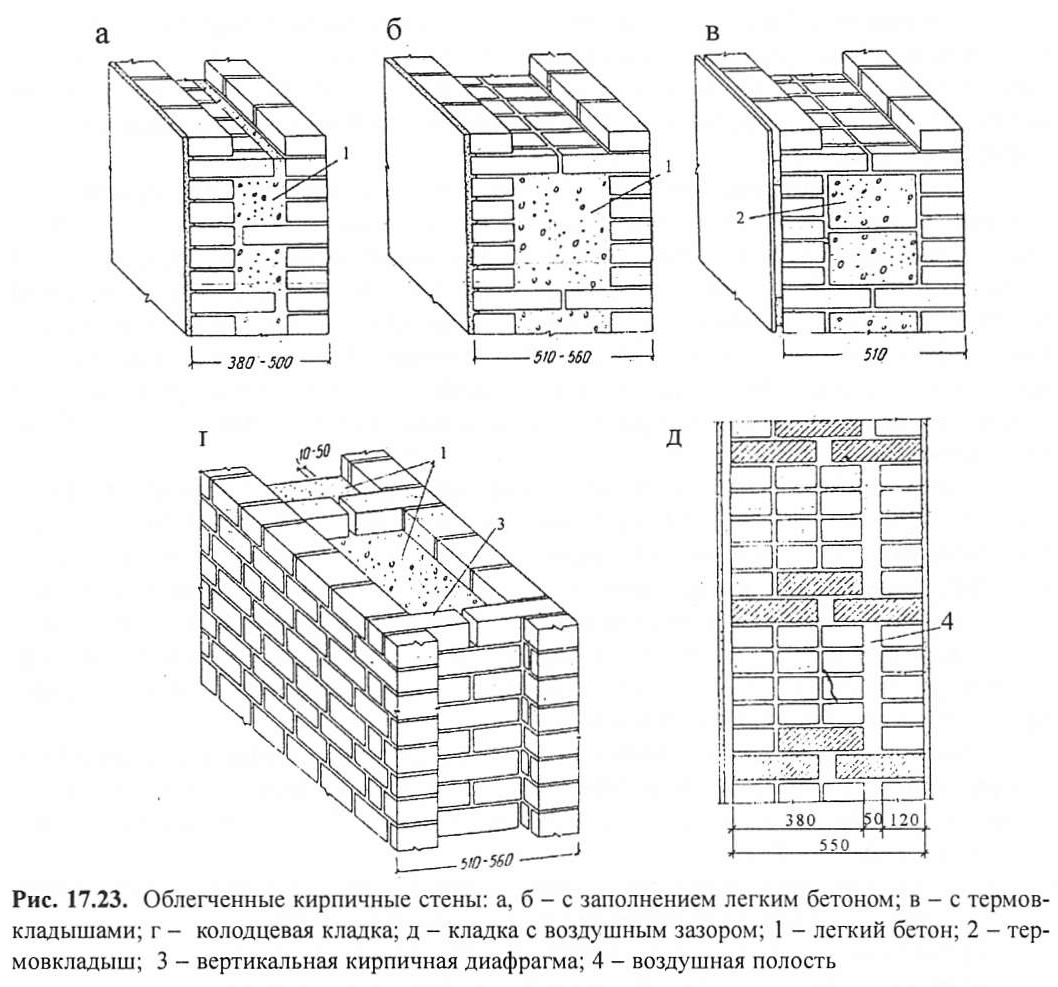
It should be borne in mind that each layer of insulation must be compacted to a thickness of no more than 15 cm.Every 10-50 cm should be watered with filling material with a solution. This method of laying will avoid the negative impact of the environment on the insulating layer. This technique will help to significantly increase the strength of the brick wall.
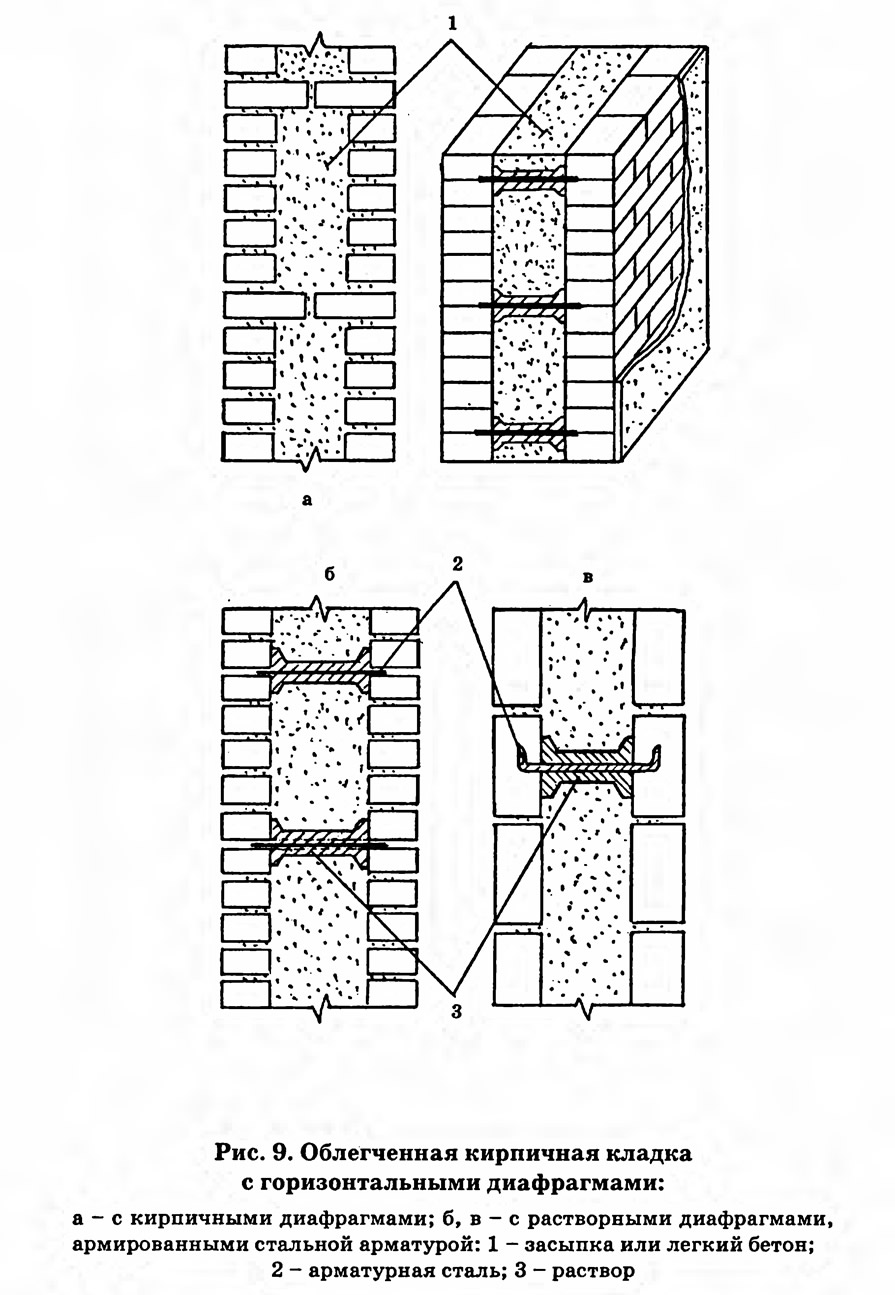
The arrangement of horizontal diaphragms at the level of the arrangement of a number of window openings and dressings will help to increase the strength of the masonry.
In winter and autumn, the level of relative humidity of the brick wall increases noticeably, which reduces the thermal resistance of the material itself. In this case, the method of building the building does not play any role. So, when constructing a well brickwork, it is imperative to follow the rules - to provide for a ventilation gap between the front brickwork and the thermal insulation layer (the thickness of the thermal insulation must exceed 10 mm). Thanks to this gap, in the autumn-winter period, active drying of the building materials from which the walls were built is possible. In the lower and upper rows of brick well masonry, it is necessary to build vertical seams, which will later become the basis for organizing the movement of air masses in the ventilation gap.
Insulation boards can be attached to load-bearing walls using expansion dowels and assembly glue. In order to increase adhesion, each of the wall surfaces can be treated with a primer before fixing the insulation.
The final step in creating a brick well masonry is fixing the roll insulation and aging.
Features of working with ceramic bricks
Although ceramic brick is a durable material, it requires special treatment when working with it:
Ceramics need to be pre-moistened before starting work. It is enough to periodically moisten the ceramic brickwork with water. If the weather is rather hot, it is necessary to moisten the bricks every few hours.
If this is not done, the ceramic brickwork will draw water out of the binder mortar.
Care should also be taken when cutting the material. The method of cutting the material depends on the structure of the ceramic brick.
A solid ceramic element can be separated using aggressive methods. For example, using a hammer. Care must be taken to cut the hollow ceramic brick. A strong blow can damage its internal structure. Therefore, you should only use an electric saw for cutting.
How durable a ceramic brick structure will be depends on how the masonry will be laid. When building walls, it is imperative to use the principle of removing corners.
The walls are laid starting from the corner elements of the building.
Particular attention should be paid to the solution. The thickness of the joints between ceramic bricks depends on the thickness of the walls
For single-layer masonry, it is enough to make a seam of 3-4 mm. For thick walls, the solution is poured 10-12 mm. It should also be borne in mind that the seam should not be completely filled with mortar. A few millimeters should be left for subsequent wall finishing. This is done so that the plaster does not subsequently peel off from the brick wall. The exception is chimneys, for the integrity of the structure of which it is necessary to completely fill the seam with mortar.


Ceramic brickwork is used for the construction of various structures. This is a durable material that practically does not deform under the influence of weather conditions, is completely environmentally friendly and has increased heat resistance. In addition, ceramic bricks are an excellent decorative element.It lends itself well to processing and does not require much maintenance.
Bricklaying technique
Stir the solution before use, as heavy particles can sink down and water rise up. The mixed solution is placed in buckets and transferred to the masonry site, where it is distributed. Immediately put a strip of mortar - bed - for one row. Under the butt row, the bed width is 200-220 mm, for the spoon row - 80-100 mm. If the seam is completely filled, about 10-15 mm recede from the edge, the height of the mortar is 20-25 mm, which, when laying, provides a seam of 10-12 mm. Before installing the brick, the mortar is leveled with a trowel.
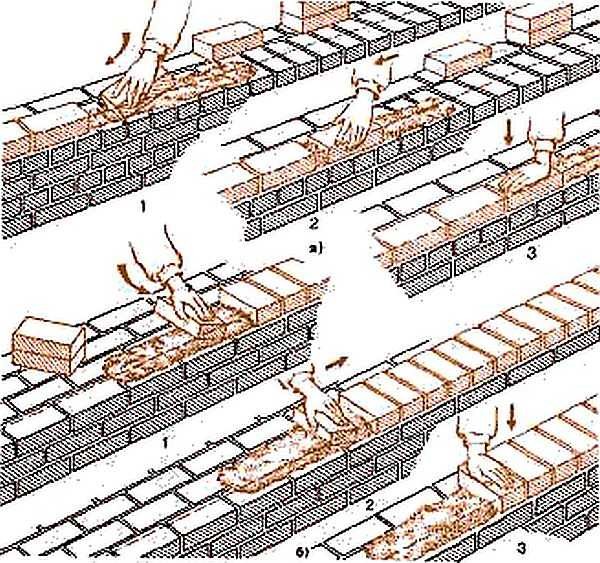
There are three techniques for masonry. On a hard, low-plasticity solution, the "press-on" technique is used. In this case, the seams are completely filled. If the solution is plastic, use the "injected" technique.
Bricklaying technique "interspersed"
As already mentioned, this method of laying bricks is used with a plastic mortar. It should be flexible, easy to apply and displace. This is achieved by adding additives. You can spread the mortar immediately on the entire surface of the wall: additives allow you to extend the time before the start of setting.
The bed is laid with a thickness of about 20 mm, an indent of about 15-20 mm remains from the edge. This indentation avoids squeezing the mortar onto the front surface, but at the same time the edges of the seams often remain unfilled. This significantly reduces the strength of the wall, therefore, in regions with seismic activity, laying verst rows (external and internal) by this method is prohibited.
When laying a spoon row, take a brick, holding it with a slight slope. Approaching the already laid one, at a distance of 8-10 cm, they begin to scoop up the solution with the edge (poke). When joining, it turns out that the seam is already partially filled. The brick is pressed down a little (settles), pressing it to the bed. The surplus is removed with a trowel and sent either to a bucket or to a wall.
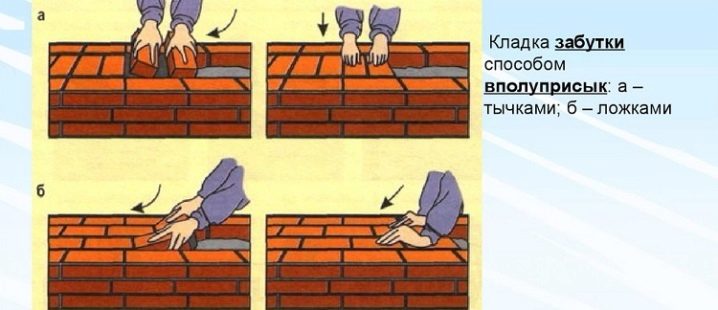
Bricklaying technique "adherent"
With this technique, it often happens that the vertical seams are only partially filled. Therefore, this method is also called "wasteland". They are filled in when laying the bed for the next row. If the technique is not yet very worked out, it is better to fill the seams before laying the next row: voids reduce strength and thermal insulation characteristics.
When laying the butt row, everything is exactly the same, only the solution is raked up with a spoon edge. The zabutka is laid, like the stitching rows, and then pressed with the palm of the hand. It is necessary to ensure that all stones are at the same level. This is done using a building level, and the verticality of the wall is checked with a plumb line every 3-4 rows.
Technique "press-on"
When working with hollow bricks, as a rule, hard mortars are used. In this case, a brick is used with the "press-on" technique. In this case, you also have to work with a trowel.
The bed is laid at a distance of 10 mm from the edge, the thickness is still about 20 mm. Since such a composition stretches badly, it is raked to the edge of the laid brick with the edge of the tool. They take a brick with their left hand and press it against the trowel, at the same time pulling it up. At the same time, they continue to press with a brick, achieving the required seam thickness (10-12 mm).
End-to-end technique
Excess mortar is picked up with a trowel. Having laid several fragments, take a level, checking the horizontalness of the row, by tapping the handle of the trowel, straightening the position. The solution squeezed out at the same time is selected. It turns out dense masonry, but the process takes longer: more movement is required.
Insertion with undercut
An average method in terms of productivity is the butt-in with undercutting of the seams. With this method, the bed is laid out close to the edge (10 mm), as when laying it in a press, and the masonry technique is in place: they grabbed the mortar with a brick, put it down, pressed it down, removed the excess.If the wall is not subsequently planned to be finished with anything, after several rows it is necessary to take a jointing - a special tool and give the seams the required shape (convex, concave, flat).
As you can see, this is a kind of symbiosis. To make it more convenient to work, the solution is also made with "intermediate" plasticity. If it is too liquid, it will run down the wall, leaving streaks, therefore it needs to be kneaded a little denser than when laying in a screed.
Brick load-bearing wall thickness
A building material such as brick has been used for construction for several hundred years. The material has standard dimensions 250x12x65, regardless of the type. Determining what should be the thickness of a brick wall, it is from these classic parameters that they proceed.
Load-bearing walls are a rigid frame of the structure that cannot be torn down and replanned, as the reliability and strength of the building is compromised. The load-bearing walls can withstand colossal loads - these are the roof, floors, dead weight and partitions. The most suitable and time-tested material for the construction of load-bearing walls is precisely brick. The thickness of the load-bearing wall must be at least one brick, or in other words - 25 cm. Such a wall has distinctive thermal insulation characteristics and strength.
A properly constructed bearing wall made of bricks has a service life of more than one hundred years. For low-rise buildings, solid brick with insulation or perforated is used.
Brick wall thickness parameters
Both external and internal walls are laid out of bricks. Inside the structure, the wall thickness should be at least 12 cm, that is, in the brick floor. The cross-section of pillars and piers is at least 25x38 cm. Partitions inside the building can be 6.5 cm thick. This method of masonry is called “on the edge”. The thickness of the brick wall, made by this method, must be reinforced with a metal frame every 2 rows. Reinforcement will allow the walls to acquire additional strength and withstand more substantial loads.
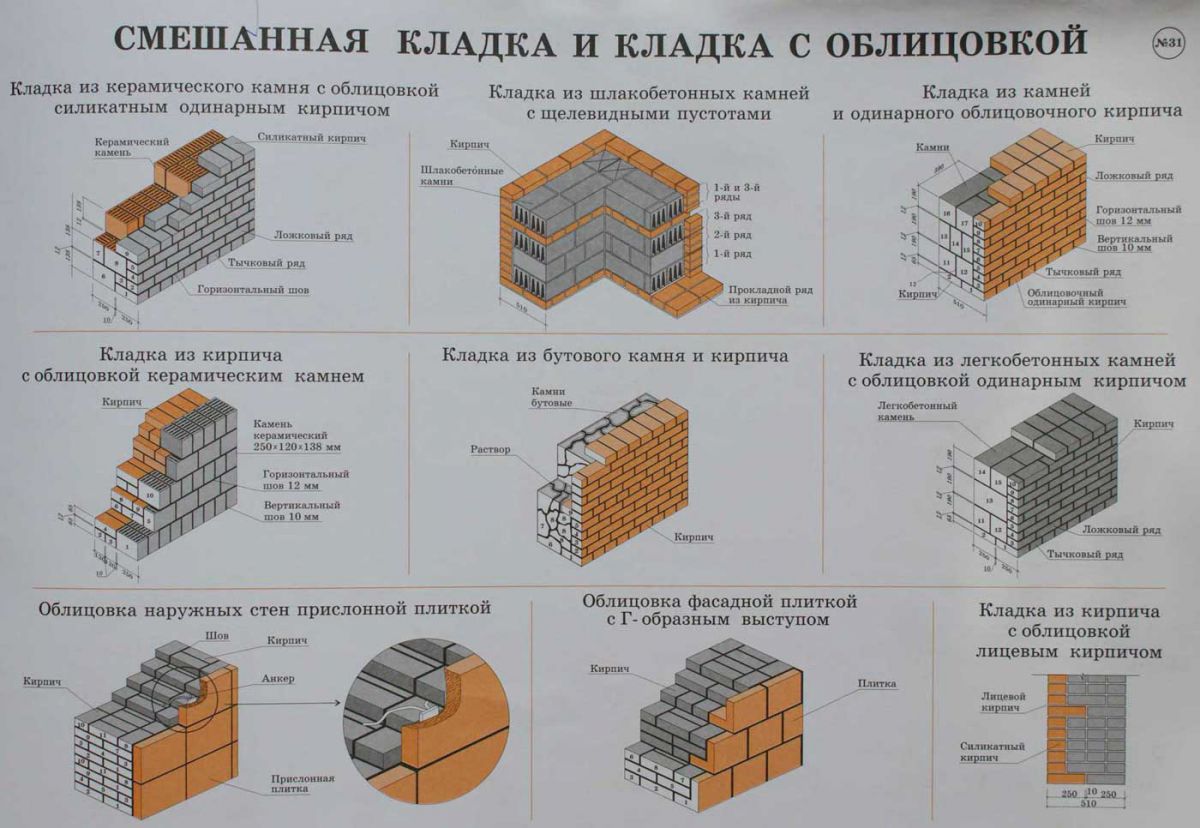
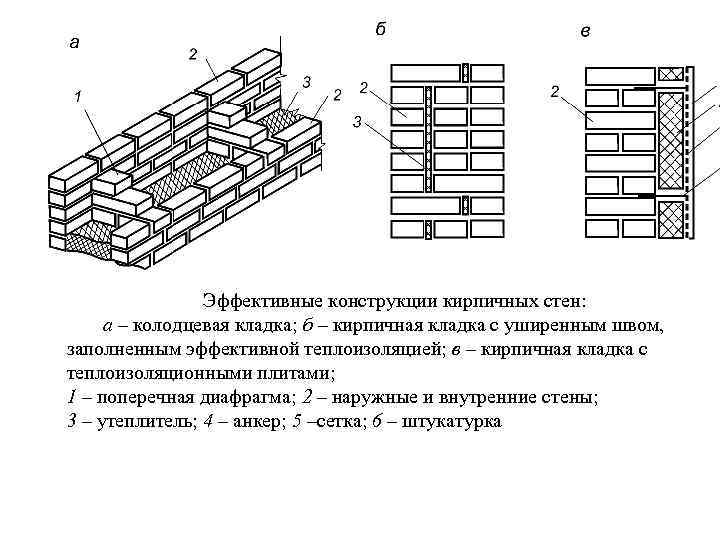
The method of combined masonry, when the walls are made up of several layers, is very popular. This solution allows you to achieve greater reliability, strength and thermal resistance. Such a wall includes:
- Brickwork consisting of porous or slotted material;
- Insulation - mineral wool or foam;
- Cladding - panels, plaster, facing bricks.
The thickness of the outer combined wall is determined by the climatic conditions of the region and the type of insulation used. In fact, the wall can have a standard thickness, and thanks to the correctly selected insulation, all the norms for the thermal protection of the building are achieved.
Wall masonry in one brick
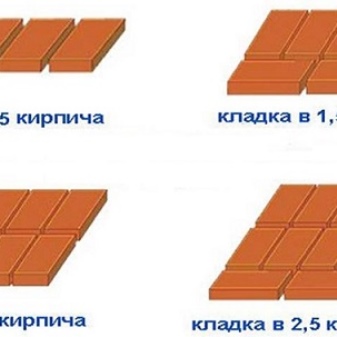
The most common wall laying in one brick makes it possible to obtain a wall thickness of 250 mm. The bricks in this masonry do not fit next to each other, since the wall will not have the required strength. Depending on the expected loads, the thickness of the brick wall can be 1.5, 2 and 2.5 bricks.

The most important rule in this type of masonry is high-quality masonry and the correct dressing of the vertical seams that connect the materials. The brick from the top row must necessarily overlap the bottom vertical seam. Such a dressing significantly increases the strength of the structure and distributes the loads evenly on the wall.
Types of dressings:
- Vertical seam;
- Cross seam that does not allow materials to be shifted along the length;
- Longitudinal seam that prevents horizontal movement of bricks.
Laying a wall in one brick should be carried out according to a strictly selected scheme - it is single-row or multi-row. In a single-row system, the first row of bricks is laid with the spoon side, the second with the butt side. The transverse joints move half the brick.
The multi-row system assumes alternation through a row, and through several spoon rows.If thick brick is used, then the spoon rows are no more than five. This method provides maximum structural strength.
The next row is stacked in the opposite order, thereby forming a mirror image of the first row. Such masonry has special strength, since the vertical seams do not coincide anywhere and are overlapped by the upper bricks.
If it is planned to create a masonry of two bricks, then, accordingly, the thickness of the wall will be 51 cm. Such construction is necessary only in regions with severe frosts or in construction where insulation is not supposed to be used.
Since the brick has its own standard dimensions (6.5 x 12 x 25), then the thickness of the brick wall will have several standard dimensions, given the thickness of the joint between adjacent bricks.
There are other sizes, but they mainly differ in height, and the height of the brick does not affect the thickness of the wall.
Standard brick wall dimensions
Number of bricks, pcs
Wall thickness, cm
0,5
12
1
25
1,5
38
2
51
2,5
64
In addition to a thickness of 65 mm, there is a brick thickness of 88 mm - one-and-a-half brick and 138 mm - double. Those. dimensions 8.8x12x25
and 13.8x12x25
... In general, the thickness (height) of the brick does not affect the thickness of the brickwork in any way.
The main criterion when choosing the thickness of a brick wall is the purpose and location of the wall itself.
DIY brickwork: tools, order and features
Now, you have an idea of how to lay a brick with your own hands, you need to talk about the procedure as well as some technical nuances.
An indicative list of tools for masonry
Let's start with the tool. You will need:
- bricklayer's trowels - apply and level mortar on bricks;
- concrete mixer or container for mixing the solution;
- mortar shovel - for kneading and periodic mixing;
- two to three buckets for solution;
- plumb line - check the verticality of walls and corners,
- building level - to check the horizontal line of the masonry;
- mooring cord - for breaking the rows;
- jointing (for forming seams);
- hammer-pickaxe for breaking off incomplete bricks (halves, 3/4 and checkers - 1/4);
- as a rule - a metal or wooden flat bar to check the plane of the wall.
Further we will talk about the features of the technology. First: it is advisable to soak the brick before use. This is especially true in hot dry weather. Then it will "pull" less moisture from the solution. If there is not enough moisture, the cement will not be able to gain the required strength, which will affect the strength of the building.
First, two corners are driven out, then they are tied with several rows of brickwork
Second, the corners are driven first. First, the first two. They are tied with 2-3 rows of bricks according to the selected masonry scheme. Then the third corner is kicked out. The second and third are also connected in several full rows. After that, a fourth corner is placed and the perimeter is closed. This is how the walls should be erected, bypassing them around the perimeter, and not being driven out by the walls in turn. This is one of the most common mistakes.

Third, there are two row control technologies. The first - nails are inserted into the seams of the corners, to which laces are tied. It needs to be pulled so that it marks the top edge of the brick, and also limits the outer (and, if necessary, inner) surface of the wall.
Ordering for attaching the mooring cord
The second way is to use wooden or metal orders. This is a flat bar or corner, on which marks are applied every 77 mm - risks on wood or cuts on metal. They mark the required row thickness: brick height + joint. They are installed using flat mounting brackets that are inserted into the seam. If necessary, they are then simply taken out and rearranged higher.
There is another way - a mason's corner. It has a slot on one side, into which the dock is inserted. "Sits" at an angle on the solution.
Breaking a row with a bricklayer's corner
The disadvantage of this method is the same as that of a simple nail in the seam: the height of the row must be controlled "manually" when removing the corners. With a lack of experience (and where to get it, if brickwork is being done for the first time with your own hands), it is difficult. Having (having done it yourself) the order is all the easier.
Fourth: preparation of incomplete bricks. As you have seen, halves are used for masonry, three-quarter bricks and 1/4 pieces are used. So that the work does not slow down, it is required to prepare them before laying. This is done with a hammer-pick. During preparation, high accuracy in size is required, otherwise the dressing will fail. To make it easier to control the length, markings of the corresponding length are made on the handle. With a pen attached to a brick, marks are made on both sides of the spoon. Then, attaching the blade of a pickaxe to the mark, they beat on the back with a hammer, making notches. Having made notches on both spoons, a strong blow of the pickaxe breaks the brick.
Types of wells
These structures are different, depending on many factors: purpose, depth of groundwater, soil composition and much more.
There are the following types of wells:
- The key ones are the most economical and simple ones. They are descending and ascending, depending on the availability of keys.
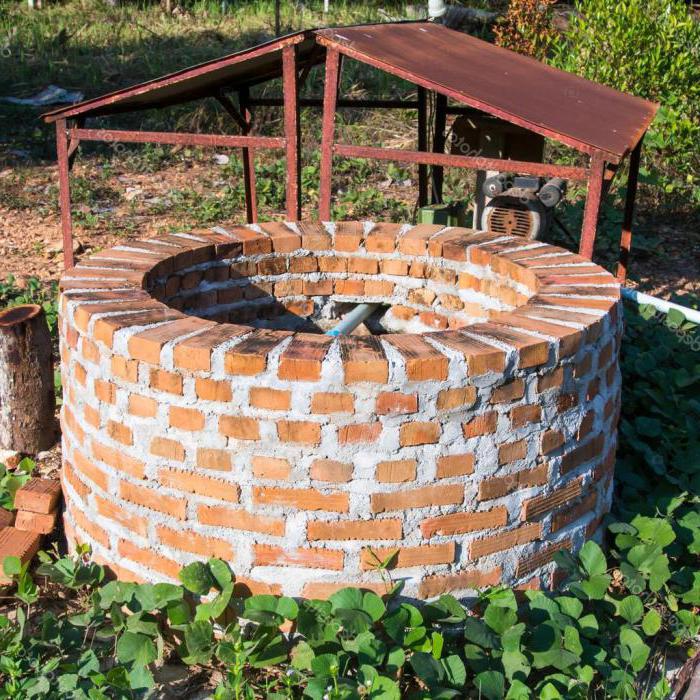
- Mine wells. To create them, it is necessary to dig a mine 10-20 meters deep. The shape of such wells is different: round, rectangular, square.
- Pipe wells. They are made in a round shape, resembling a pipe. They are durable and hygienic structures.
Wells are made of various materials. It can be brick, stone, concrete, reinforced concrete, wood.
Well masonry insulation
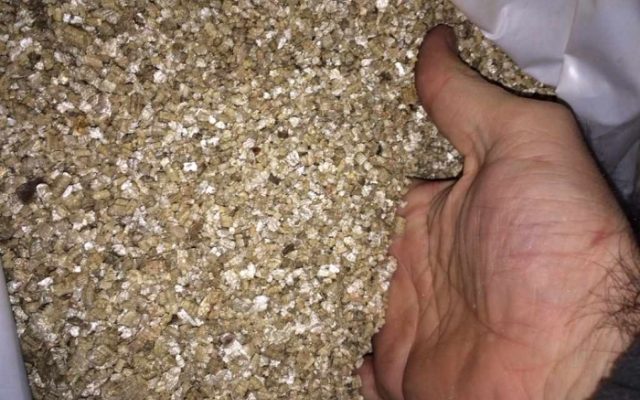
As insulation materials for well masonry, subject to the technology, you can use polystyrene, extruded polystyrene foam (EPS), wool (mineral and fiberglass).
Wadded insulation is a vapor-permeable material, and foam and EPS are vapor-proof. If there is at least one vapor barrier in the wall, then the vapor permeability of the entire wall is practically zero. Therefore, when insulating a wall with Epps or foam, a vapor-tight wall is obtained (not breathable), and when insulated with a wadded insulation, it is vapor-permeable (breathable). Both options are acceptable, since in order to create a normal microclimate in the house, and in any case, it is necessary to arrange correctly working ventilation. And the walls, even if they are very vapor-permeable, are not able to completely remove moisture from the premises.
A multi-layer wall with wadded insulation at different times of the year and even at different times of the day, has time to get wet and dry. But only
It is the moisture (water) in the insulation that does not condense so much (a few grams), and the wall has time to dry out completely. So, subject to the technology, it is possible to insulate a multi-layer wall with cotton wool without fear.
Well masonry insulation technology:
 |
| Thermal insulation boards are attached to the load-bearing wall using special glue and expansion dowels. Previously, to increase adhesion, the surface of the wall is treated with a primer. |
| The glue is applied to the thermal insulation board with a notched trowel over the entire area of the board with a distance of 2-3 cm from the edges. |
| Additional fastening of thermal insulation boards with expansion dowels is performed after the adhesive has completely dried. |
In conclusion, it is worth noting that well brickwork, due to its efficiency, strength and beautiful appearance of the facades, can become a worthy alternative to more modern technologies for the construction of external walls of houses.
How to choose a brick?
Bricks come in different degrees of strength: M-75 and M-100 are weak, M-125 and M-175 are medium, M-200, M-250 and M-300 are strong. For private construction, the M-175 is enough. The material is also distinguished by frost resistance, which is designated by the letter F and a number after it, for example F25.
The number is the number of freeze cycles that the material will withstand. If the house is being built in northern regions, the higher the number, the better.
In building stores, bricks are divided into two broad categories: building and facing. The first is the carrier material. Facing blocks are needed for beauty, they are more expensive and have a more neat look.
Safety precautions when performing work
Any brickwork must be erected very carefully, in compliance with all safety precautions. Before the start of construction, the tool is checked
The slightest defects and burrs are unacceptable both on the working parts and on the handles. Evaluate how the handles are inserted, whether they are firmly held in the designated place. These checks should be done at the beginning and end of each day, and when resuming work after any break.
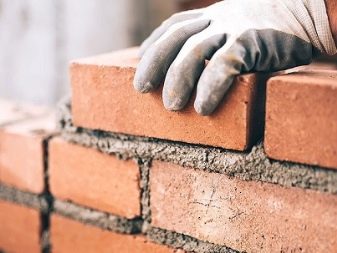
Bricklayers should only work with mittens
Particular attention is paid to the correct construction of the scaffolding and the reliability of the stairs. Putting tools and materials where they can obstruct passage is prohibited.
Scaffolding is equipped with boards made of boards, and if it is necessary to direct cars along them, special rolling moves are prepared. Ladders that go up and down the scaffolding must have railings.

In the next video, you will find the types of brickwork and the features of its construction.
Basic terms
Let's start with general concepts. Everyone knows exactly what a brick looks like, that it is ceramic, and that there is silicate, too. But here's how the facets of this material are correctly called, not many in the course. And in the description of masonry technology, they are very common.
Brick face names: pastel, spoon, poke
The largest edge is called "pastel", the middle - side - "spoons", and the smallest - "poke".
The dimensions of the brick, in principle, are standardized (250 * 125 * 66 mm - single and 250 * 125 * 88 mm - one and a half), but the technology of its production is such that they can differ significantly from different manufacturers: by 2-3 mm in each faces, and this is a rather significant difference when you take into account the number of pieces in one row. Therefore, before ordering a batch, it is advisable to measure samples from several firing in order to determine how accurately the technology is maintained.
It is also important to pay attention to the geometry: the faces must be located strictly at 90 °. Otherwise, bursting loads will occur, and the wall may crumble.
Internal insulation
Internal insulation will be needed if it is not possible to work with the facade of the building. The main purpose of this method is to avoid the accumulation of condensation inside the material. The problem can be solved in several ways:
- Use basalt wool. In this case, the vapor barrier film must be overlapped, the seams must be carefully glued.
- Use materials with low moisture permeability. In this case, a vapor barrier film is not required. Heaters of this type do not get wet.
With internal insulation, expanded polystyrene, mineral wool or penofol are mounted in the wall. Styrofoam installation diagram:
- Brickwork must be leveled with cement mortar and treated with a building antiseptic.
- EPPS sheets are fixed with tile glue. The adhesive solution must be applied with a notched trowel. The degree of adhesion will improve if the insulation is processed on one side with spiked rollers.
- After the glue is completely dry, the joints must be treated with silicone sealant. In this case, dowels with umbrellas are not used.
- A fiberglass mesh is installed on top of the insulation and decorative plaster is applied. Wallpaper is glued with PVA, diluted with water in the right proportion.
How to work with mineral wool:
- A wooden frame must be installed on a prepared wall, previously treated with an antiseptic solution.
- The space between the slats is covered with a vapor barrier film.
- The joints can be sealed with masking tape.
- In the resulting cells, slabs of basalt wool are placed, they must be inserted into a spur.
- Basalt wool is covered with a vapor barrier film. The overlapped joints are glued with tape.
- Finishing work is performed on the crate. PVC plates, waterproof drywall or wood paneling are attached to the bars.
Penofol installation scheme:
- A wooden frame is installed on the treated wall, which provides a gap between the brickwork and the insulation (1.5-2 cm).
- Thermal insulation is laid with a foil layer inside with a mounting stapler.
- The joints can be glued with metal tape.
- A crate is installed on top of the insulation, on which drywall or lining is attached.
- The facing material is dried and pasted over with wallpaper.
Penofol is not recommended to be attached directly to the walls. This will significantly reduce its heat transfer characteristics.
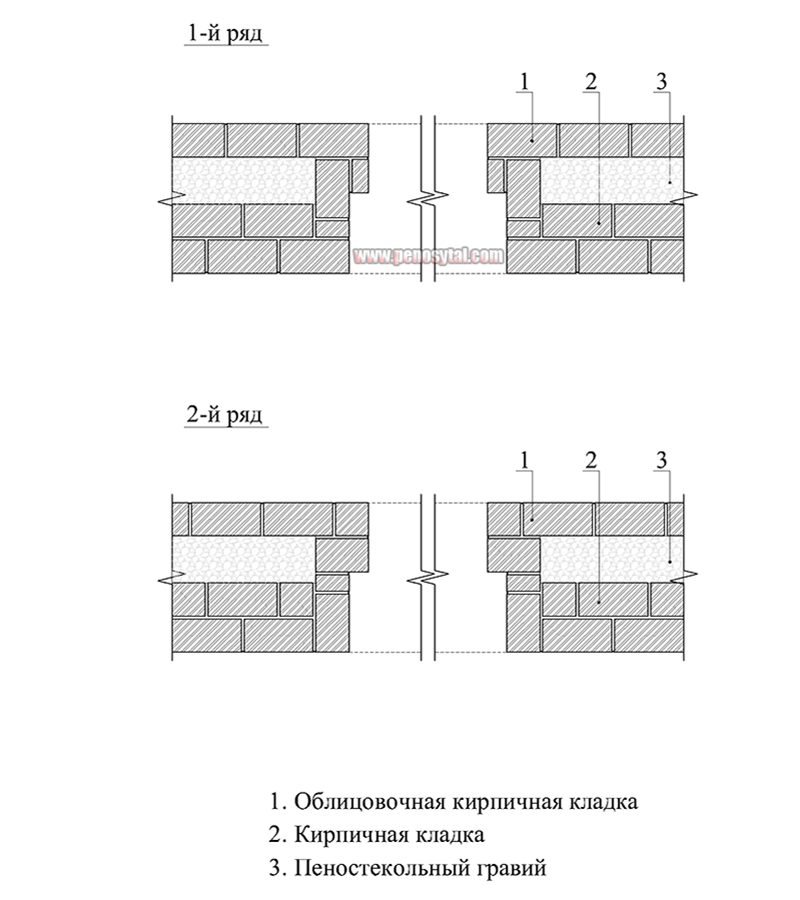
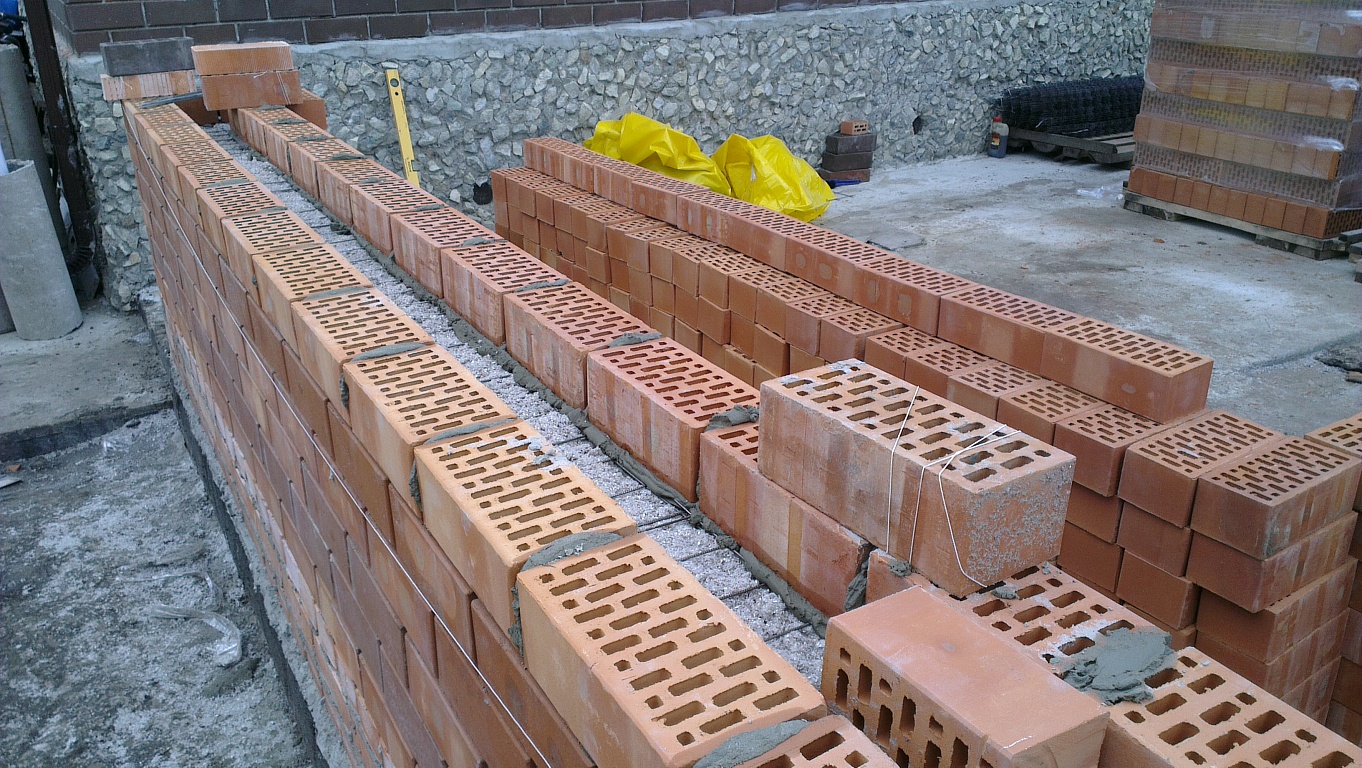
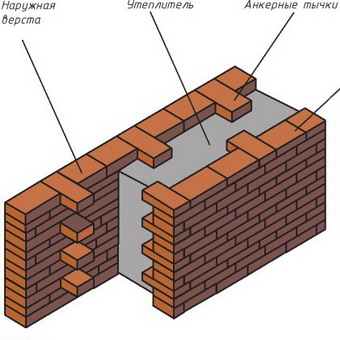
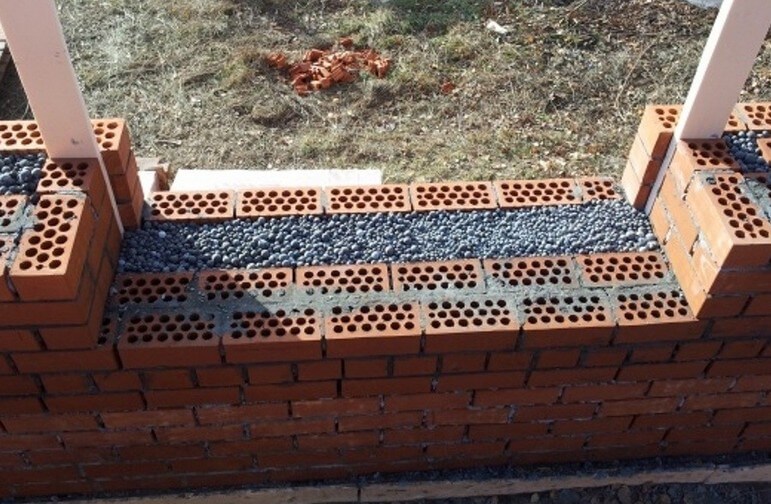
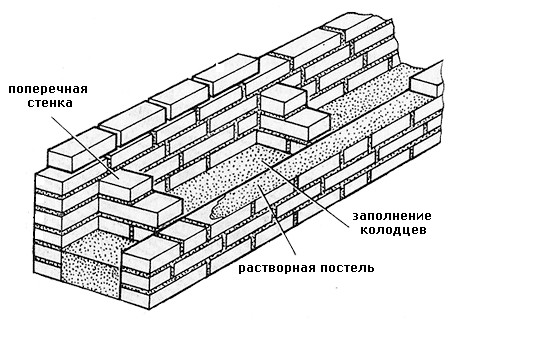
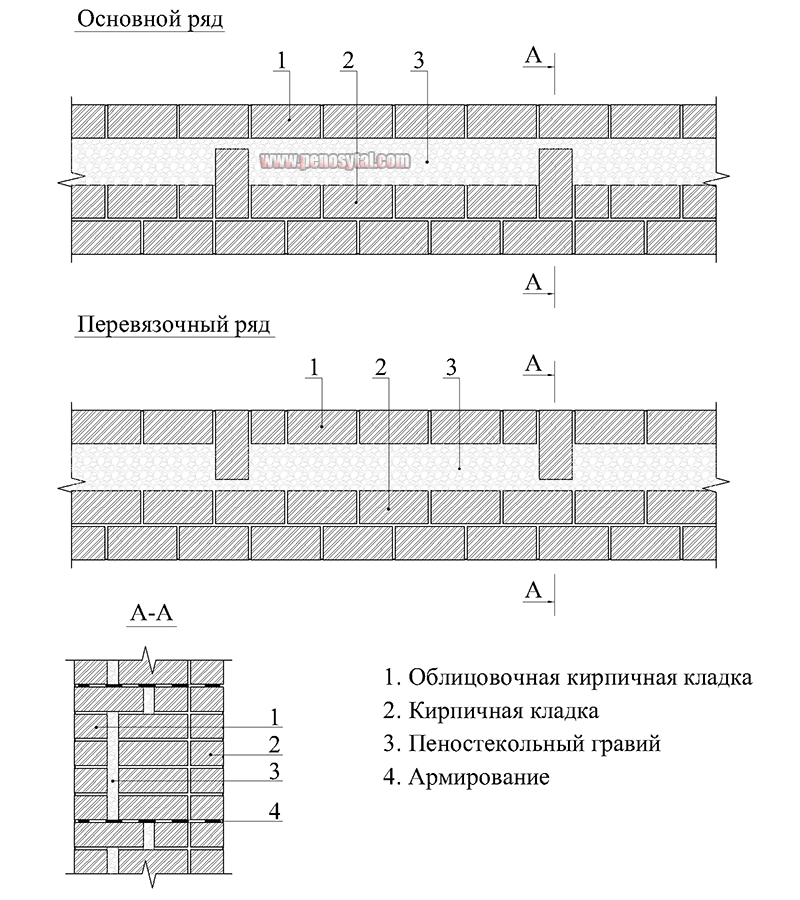
Well masonry
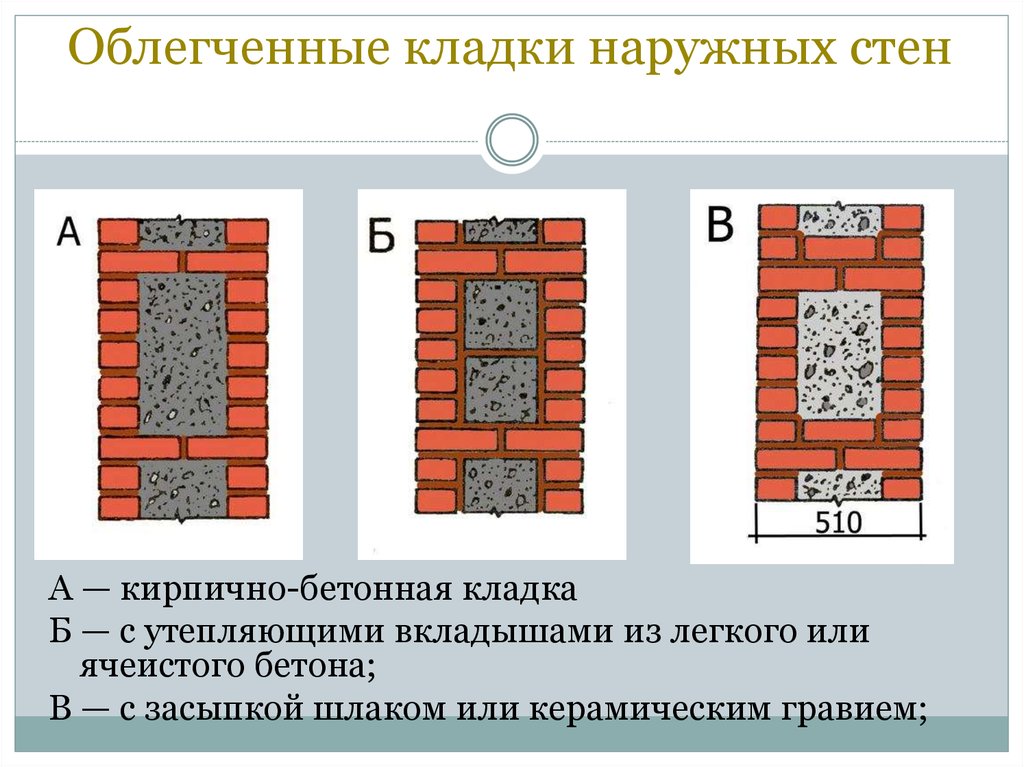
The well masonry of brick walls allows not only to build a warm room, but also to save on building materials. The main feature is the formation of internal wells filled with insulation during the construction process. Any materials can be used:
- friable (slag, sawdust);
- tiled (mineral wool, polystyrene);
- types of concrete (expanded clay concrete, polystyrene concrete).
To provide the required level of strength, the walls located parallel to each other are fastened with vertical and horizontal bridges. The well method has several advantages. These include:
- reduction in terms of work;
- minimum material consumption;
- reducing the load on the foundation;
- no need to additionally insulate the walls;
- decrease in thermal conductivity.
The disadvantages of masonry include a high risk of condensation inside the insulation and a decrease in the strength of the building against the background of the heterogeneity of its walls. Types of masonry are distinguished by the following characteristics:
- material;
- installation method;
- type of insulation;
- distance between walls;
- the thickness of the partitions from the outside;
- total wall thickness.
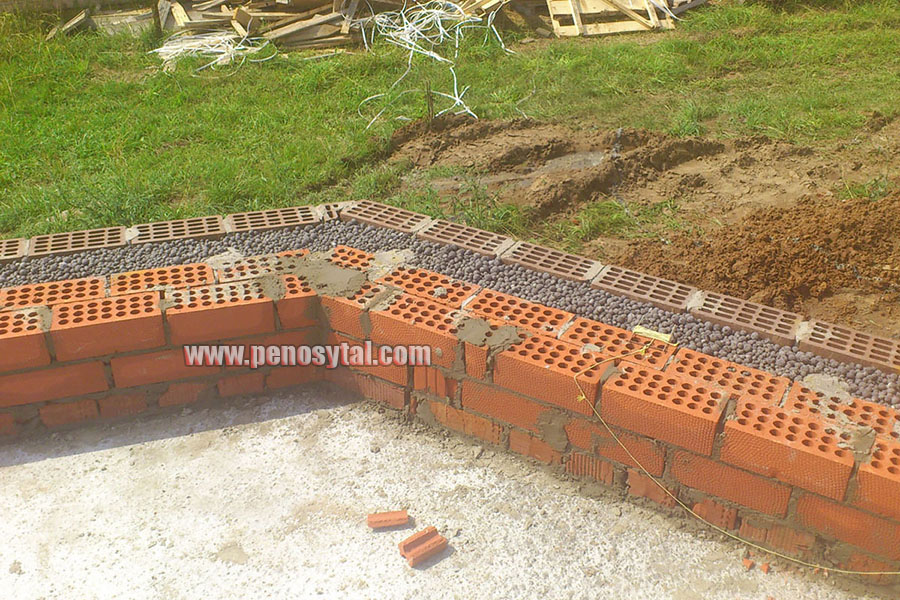
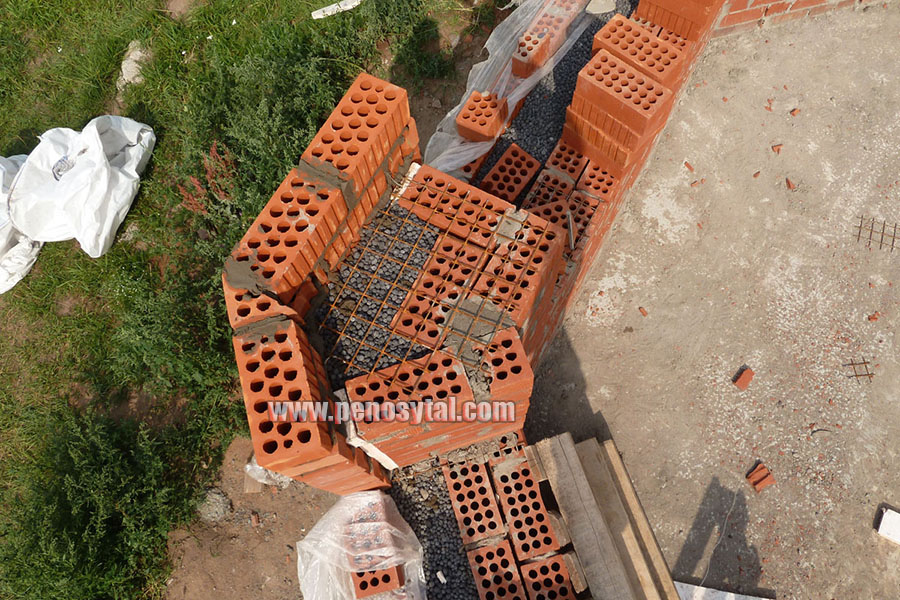
The installation technology of the well masonry is more complicated than the standard version. It begins with the arrangement of the base or foundation. The bricks must be laid in 2 rows using a waterproofing bandage. After the foundation is erected, they begin to lay out parallel walls and vertical diaphragms (partitions connecting the walls). You can install reinforcement in the corners and in the center of the row.
After laying several rows, it is recommended to fill the wells with insulation. The slab material is fixed with glue or foam, the loose material is tamped well. Then, horizontal brick diaphragms are laid out again with a thickness of 1.5-3 rows.

Fence post laying: basic technologies
Usually, the pillars are 1.5-2 m high and 38 × 38 cm or 51 × 51 cm wide (for three-meter supports). Strength is achieved by the way the bricks are laid. The seam between the bricks (8-10 cm) of the lower row should be overlapped by the surface of the upper brick. Such a masonry scheme ensures that the rows are linked to each other.
Operating procedure
To correctly fold a brick post on your own, you need to perform the following work procedure.
- Laying waterproofing under the support so that it is not saturated with moisture. The wet brick starts to deteriorate. For insulation, roofing material or special insulation with bitumen ("Gidroizol") and mastic are used.
- Each layer is checked with a level. Use the handle of the trowel by tapping it on the masonry. It is necessary to have other devices for laying brick posts - a hammer with a rubber tip and others.
- It happens that a badly rubbed solution drips onto the brick. The material is recommended to be slightly moistened with water. This one makes it easier to clean the bricks.
- After laying out several layers, measurements are taken. By tapping with a hammer, the displacement is straightened (even 1-2 mm). The vertical gaps are filled with the solution.
- The voids between the pipe and the masonry are poured with a solution, if it is large, rubble with sand is interfered with, poured into the voids and fixed with a solution.
Brick pillars for bars
Masonry with rods allows the bricklayer to make beautiful seams, since usually excess mixture crawls out onto the plane of the brick, and the seams are made uneven. The bar (side - from 8 to 10 mm) is cut into pieces that are 10-15 cm larger than the pillar. The first row is laid, then the rod is laid along the edge. A layer of mortar and bricks of the second row are applied. Metal prevents them from sinking. A trowel is led along the bar, cleaning off the excess. Bricks are checked by level. The same method is used when laying the bar on its side. The solution is applied with a trowel, the excess is also removed, a level is applied, the workpiece is removed. The bar is removed, the seam is adhered to with a trowel.
Installation of mortgages for fastening the intake sections
The master often overlooks the detail - what to attach the fence to. For fastening to the pipes in the middle of the pillar, mortgages (corner, pins and others) are welded at the same height so that the crossbars are level. For a solid brick wall, wire loops 8 cm thick are used for every fourth row. In the case of profiled sheet and wood, a cut is made in the brick and metal plates are attached that can withstand the weight of the canvas. Logs are welded onto the mortgages for fastening the fence.
Features of designing well masonry
During design and construction, special attention should be paid to the issue of moisture condensation inside the well walls. What happens inside such a construction:
- Water vapor from the room during diffusion, due to the difference in the partial pressures of water vapor in the building and on the street, enters the thickness of the wall structure.
- But on the way of steam there is an external stone facing, and it is characterized by low vapor permeability.
- The moisture collected at the lining during the cold period may not have time to leave the space of the well. And this is fraught with gradual damage to the insulation and the destruction of the wall.
How to deal with this? It is advisable to provide the wall with a ventilated gap and / or a vapor barrier. The need and location of the vapor barrier is determined using a special calculation. The location of the ventilated gap does not need to be calculated. The gap is made between the insulation and the outer stone wall, which contributes to the preservation of the insulation in a dry state that is optimal for the operation of the wall.
Basic requirements for insulation for a well structure:
- Slight compression and tensile deformations.
- High hydrophobicity.
- Resistant to thermal decomposition.
- The ability to resist blowing out with a ventilated gap.
- Non-flammability and no shrinkage.
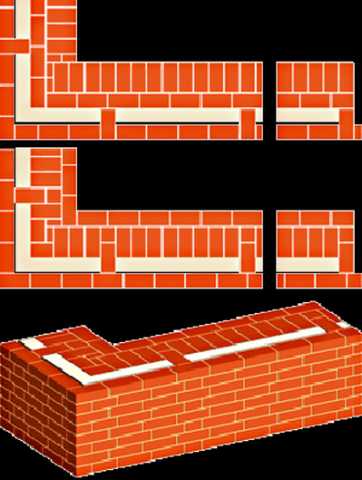
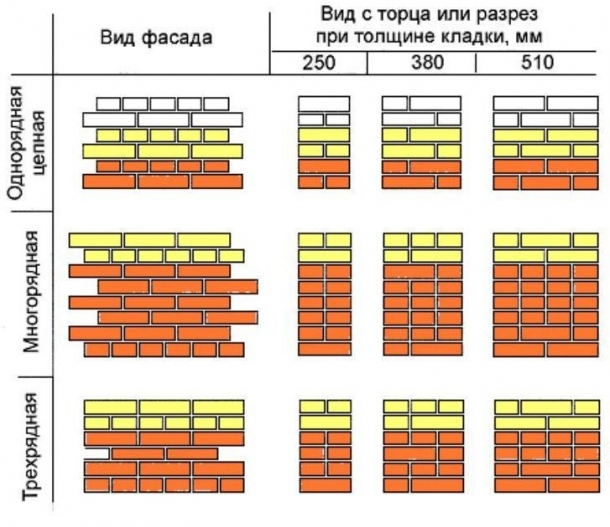
Brickwork seam dressing systems
In order for a brick wall to be strong and have the properties of a monolith, loads must be evenly distributed in it. This is ensured by such a production operation as bandaging the seams of brickwork.
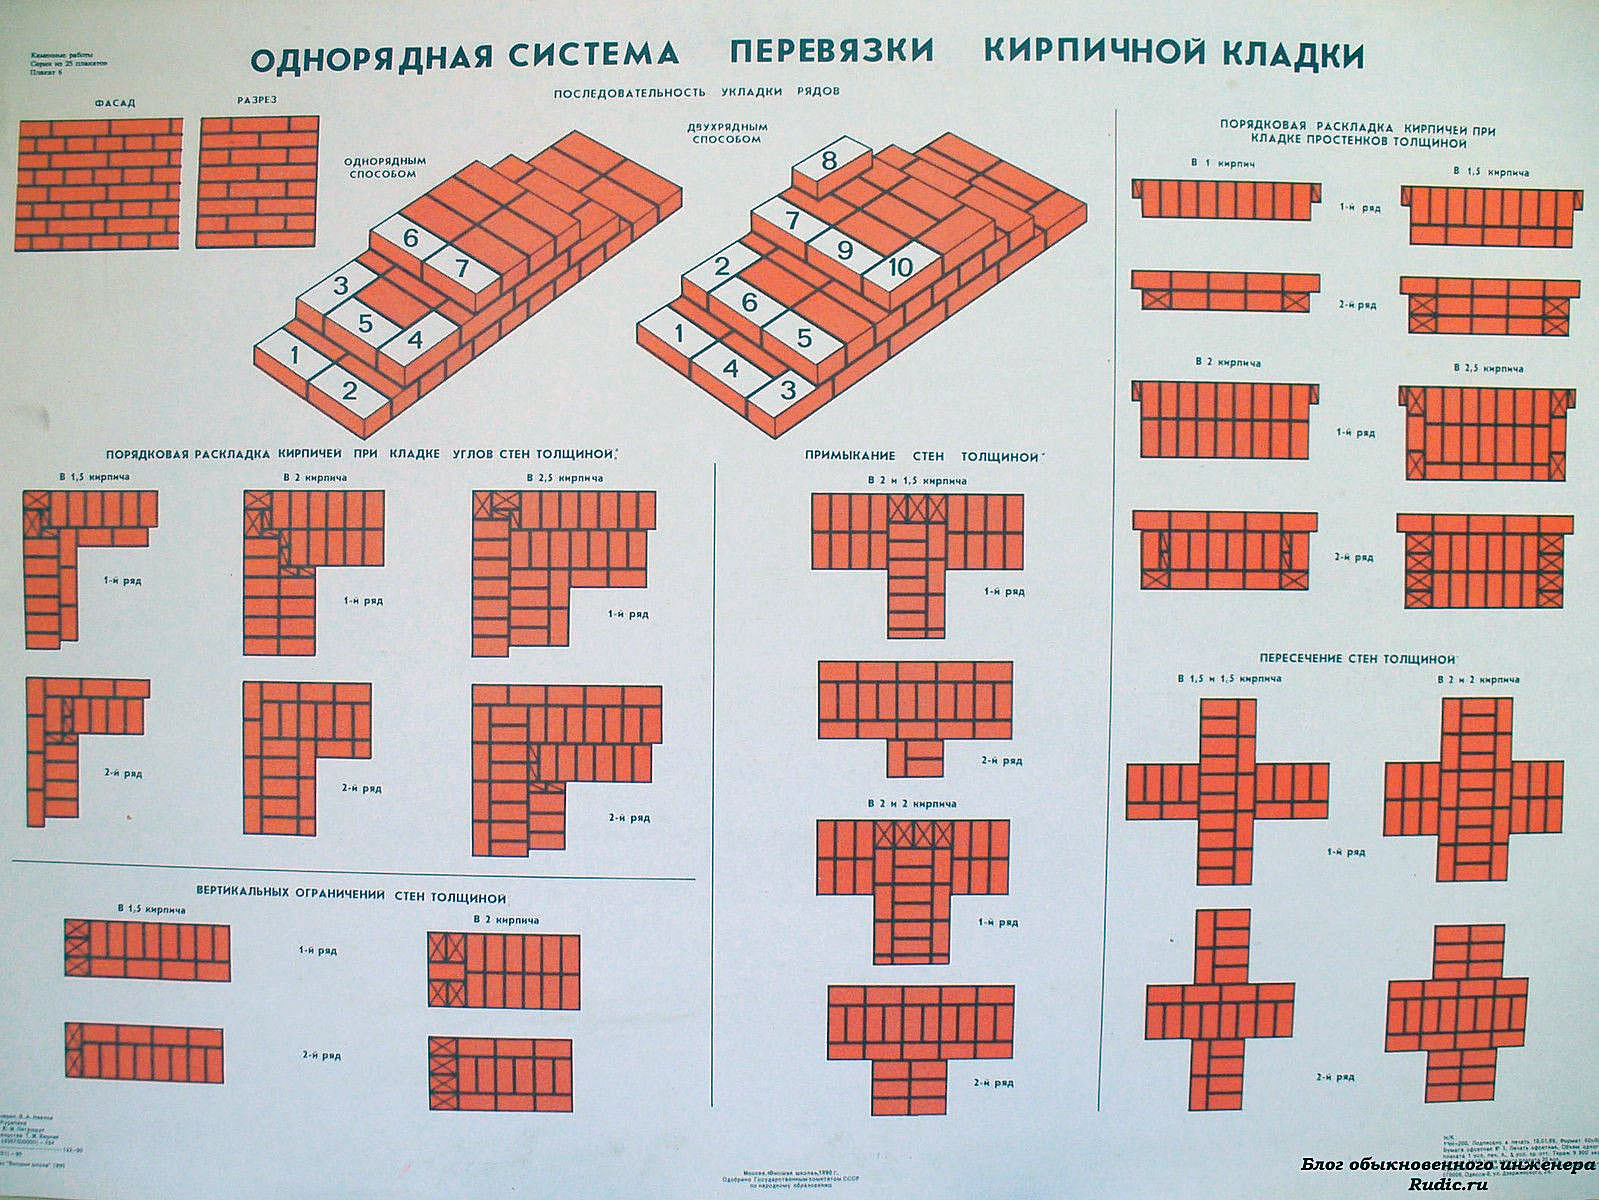
The word "ligation" denotes the laying of bricks in a certain order, which should ensure a gradual displacement of the joints vertically in each subsequent row. This is achieved by laying the bricks a quarter or half to the side of the bricks in the bottom row. There are two main systems for ligating brickwork seams - single-row and multi-row.
The single-row dressing system is very rarely used when erecting the walls of a house. Masonry, in which the dressing of the seams is done in each row, has several serious disadvantages. Its implementation requires a high qualification of a specialist, it takes much more time than with a multi-row system. When laying corners in this way, you need a lot of three-quarter bricks.
It is much easier and more cost-effective to use one of the varieties of multi-row dressing.The simplicity of this type lies in the fact that for several spoon rows of masonry there is one butcher. Fighting bricks is used when jamming spoon rows.
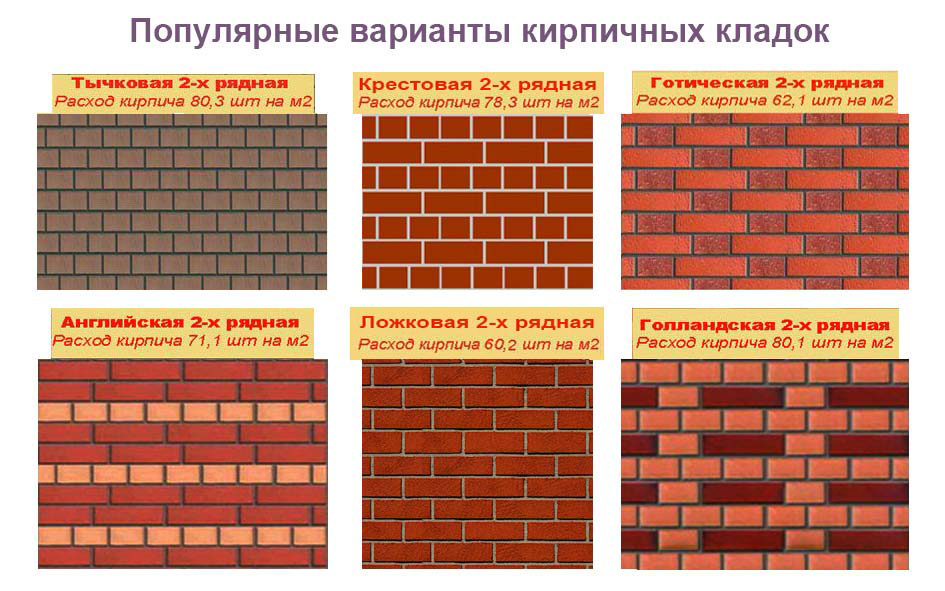
Single row dressing systems. The names of the various single-row dressing systems (chain, cross, Gothic, Dutch) are associated with a decorative pattern that is formed during masonry.
The design of all varieties is exactly the same. The exception is the classic spoon and bonded masonry, since the spoon is made in half a brick, and the bonded one is in a whole brick.
Multi-row dressing systems. The name of each of the systems comes from the number of spoon rows, which are tied with one butt row: in a three-row, three spoon rows are overlapped with one butt, in a four-row, four spoon rows are tied with one butt, in a five-row - there are five spoon rows for one butt row. The seam pattern of the various dressing systems is very picturesque and can serve as an additional decorative element on the outer wall.