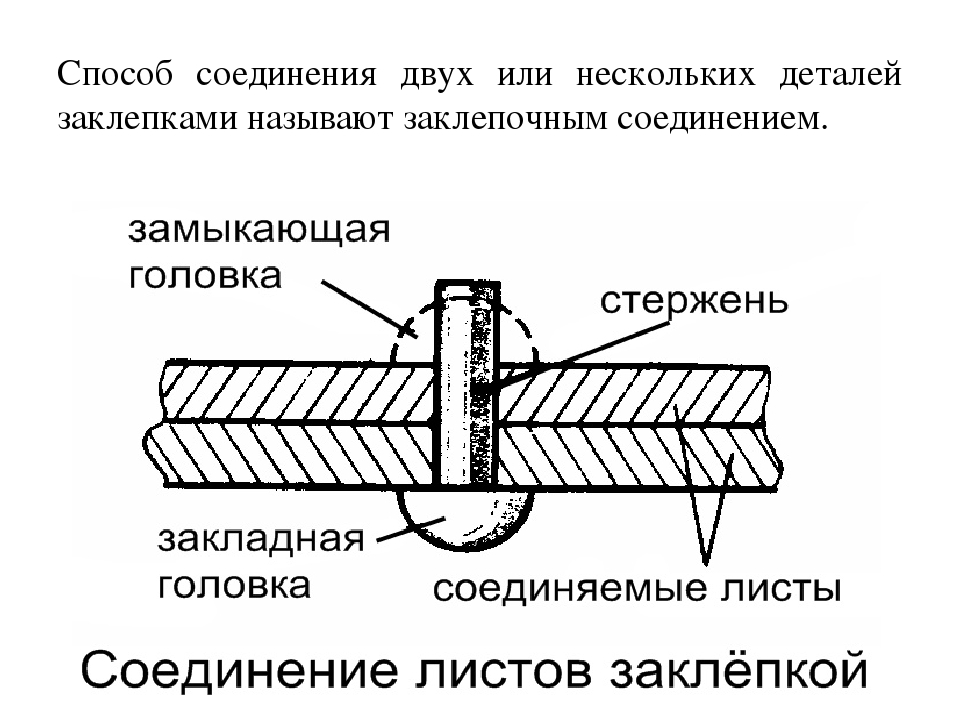
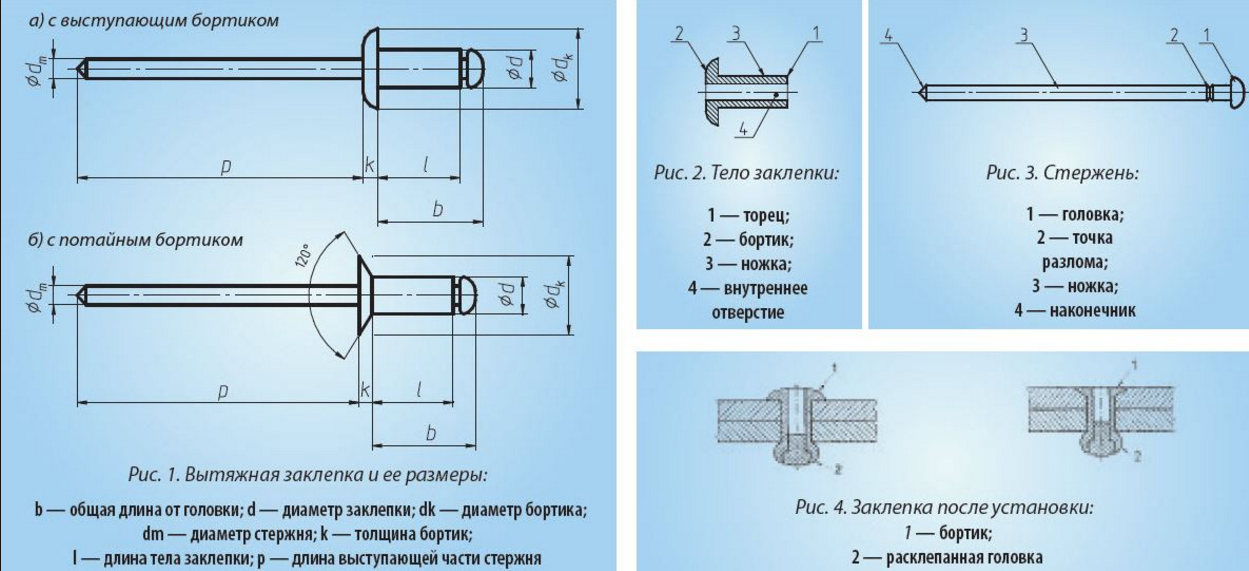
1 Existing types of rivets - types and purpose
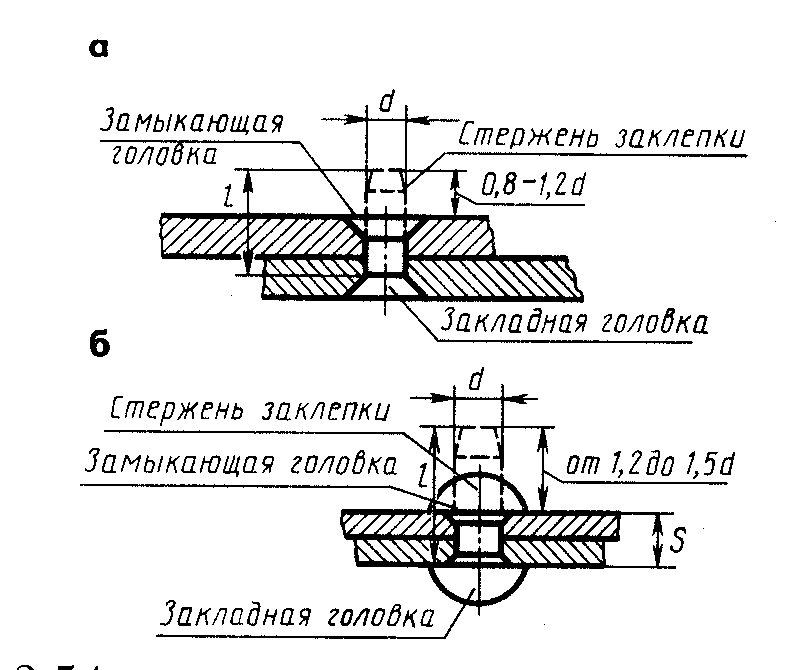
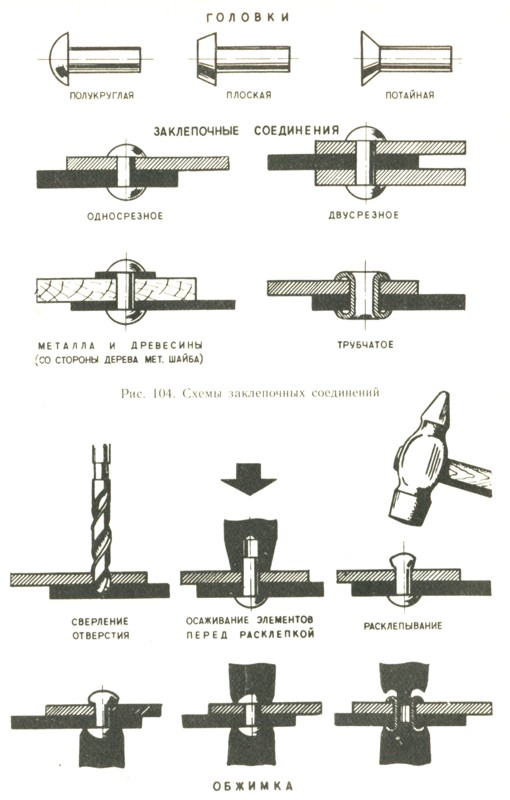
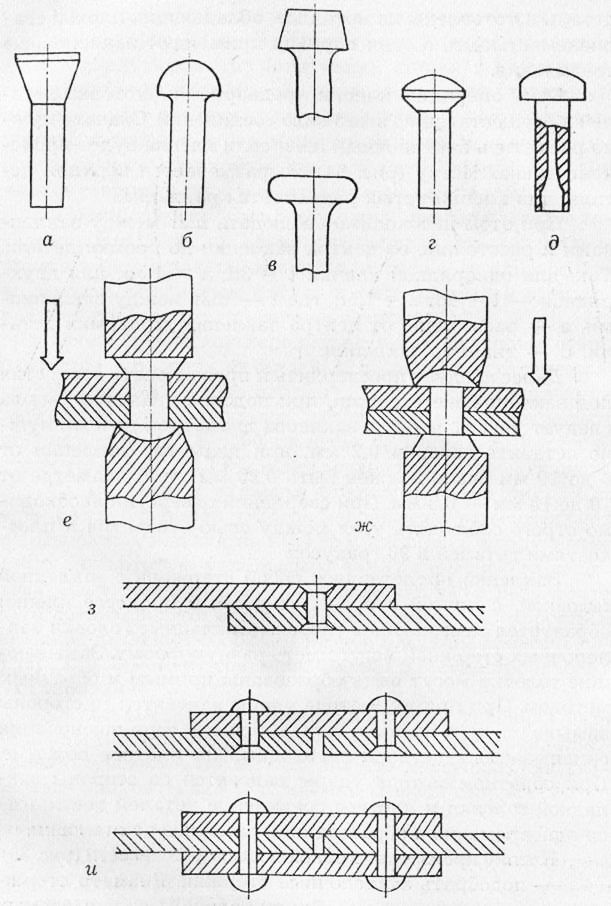
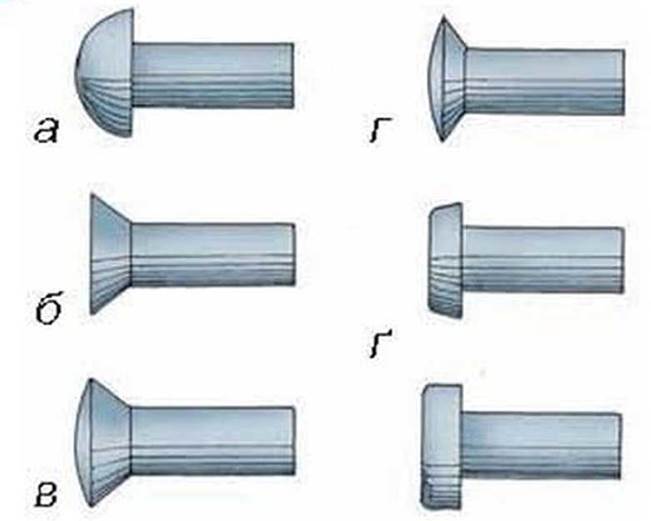
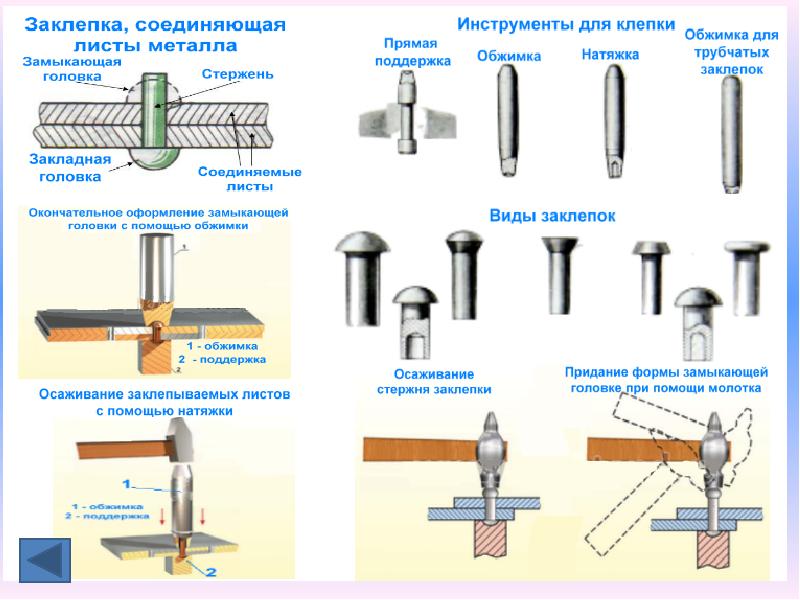
What is this fastener? Initially, historically, it is a metal rod, less often a plate. Always with a cage head on one side (a cap that restricts the movement of an element in the hole) and a closing head on the other end. It was first used for the manufacture of armor, such as armor and chain mail, as well as for connecting some elements of cold and early firearms. If the insert head is present initially, then the closing one occurs as a result of the process of upsetting (riveting) or with the help of a special tool due to deformation by the pull rod. It is logical that the sediment is applied to cast or stamped, all-metal elements, and deformation by a rod is possible only when using hollow (tubular) blind rivets. There are also explosive and split options.
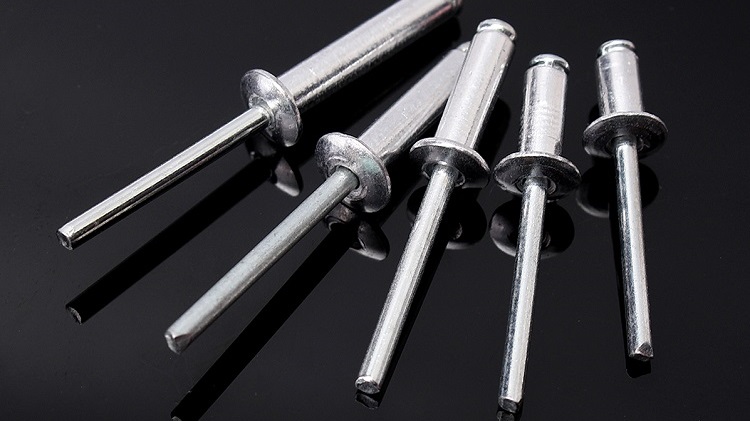
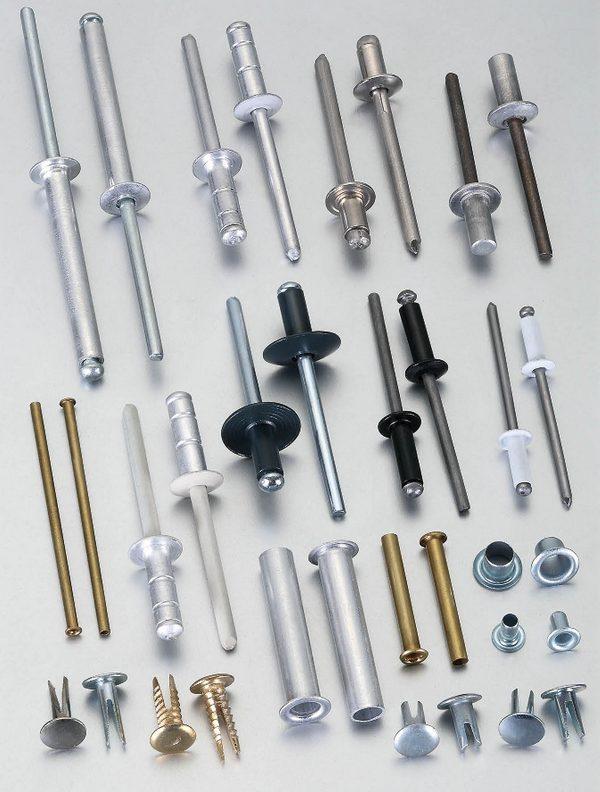
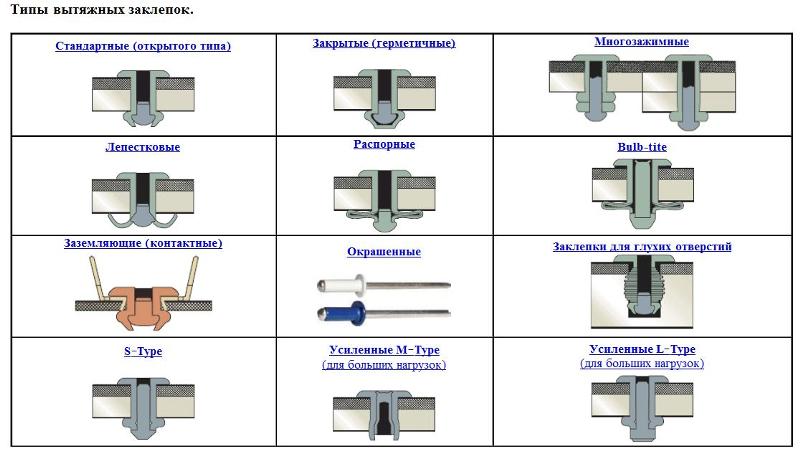
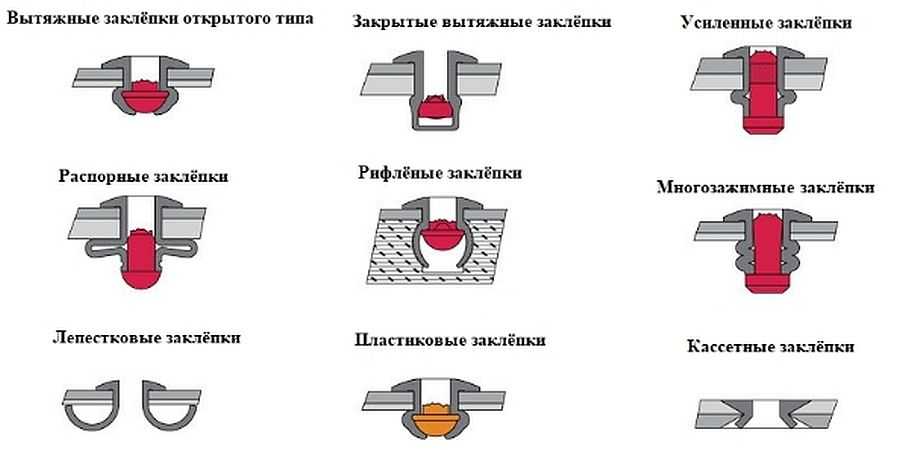
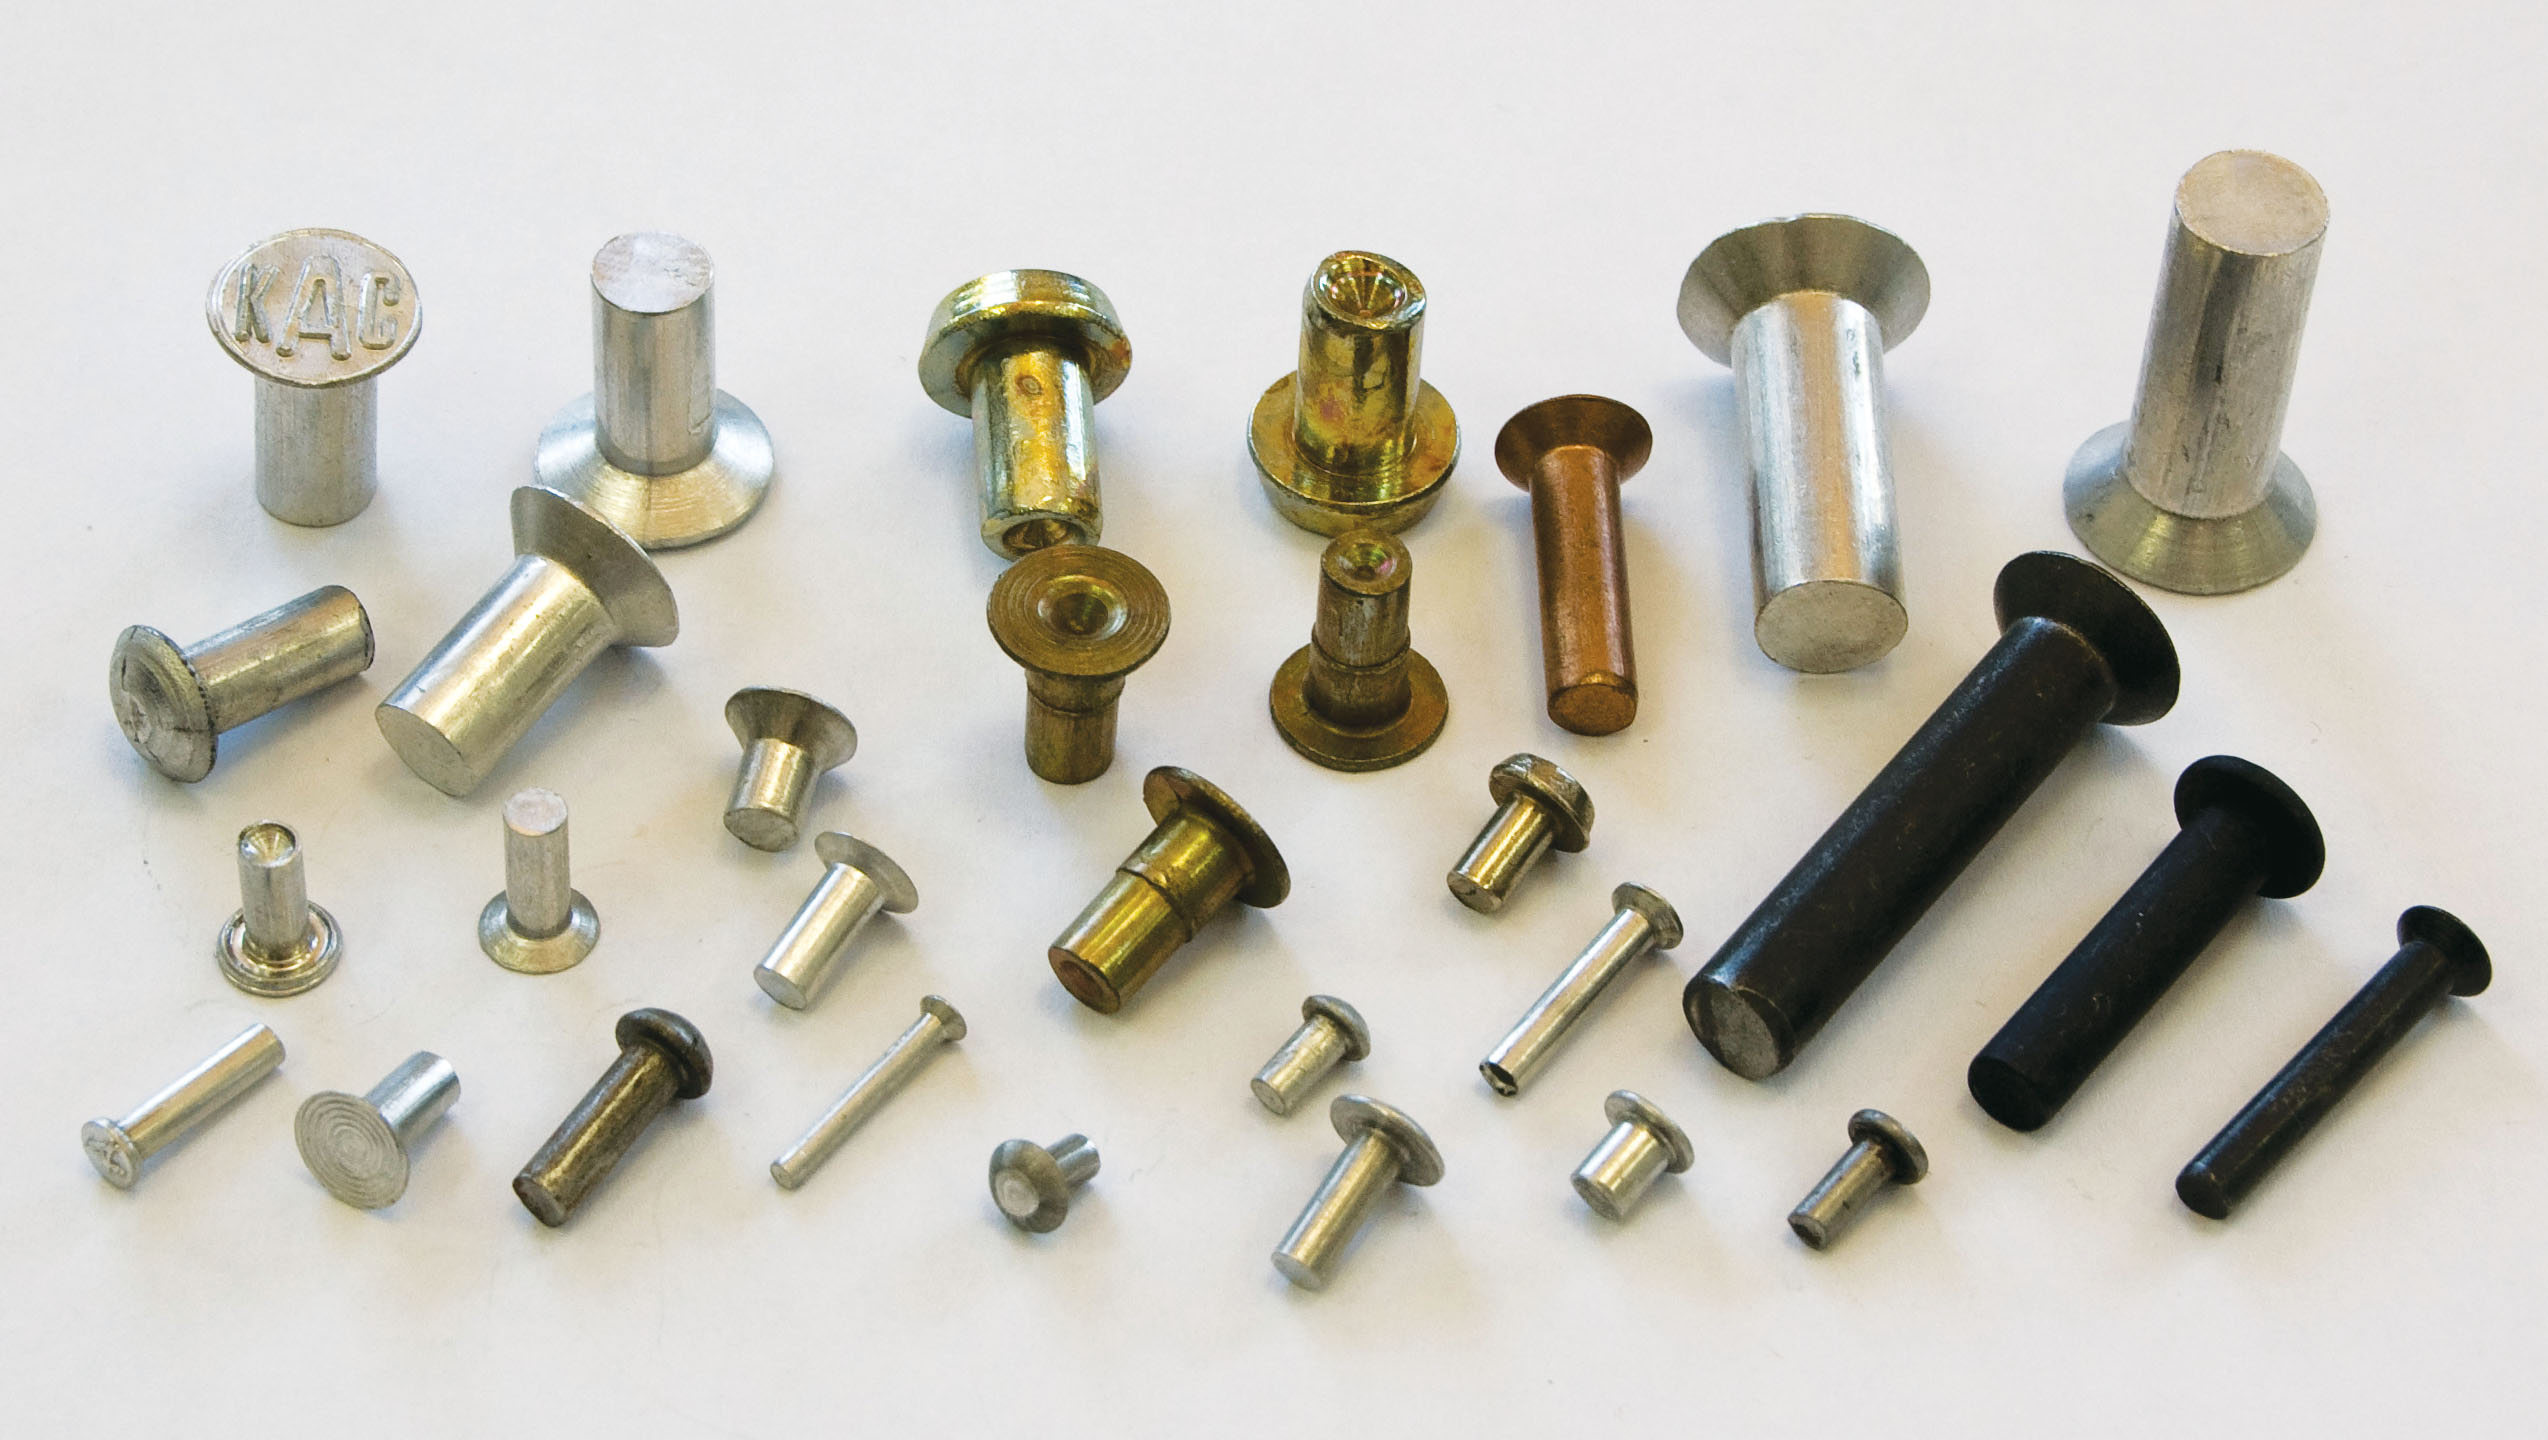
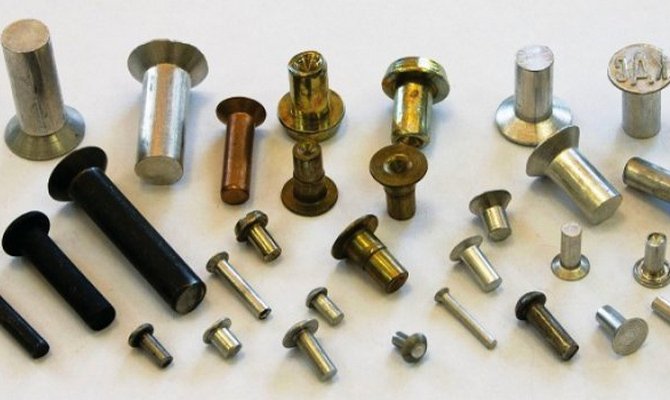 Various types of rivets
So, we know that the fasteners we are considering are one-piece, which often provides high reliability. But the strength of the connection depends primarily on the material, so we first consider the types of rivets for this very characteristic. The most common are aluminum fasteners, copper and brass rods are used in many manufacturing processes as well as in a number of crafts. All these materials do not have a high degree of reliability and are suitable only where there are no heavy loads, for fastening decorative parts. Among other things, there are steel rivets, including stainless ones, they provide a sufficiently strong connection and are even suitable for the assembly of supporting structures and mechanical engineering.
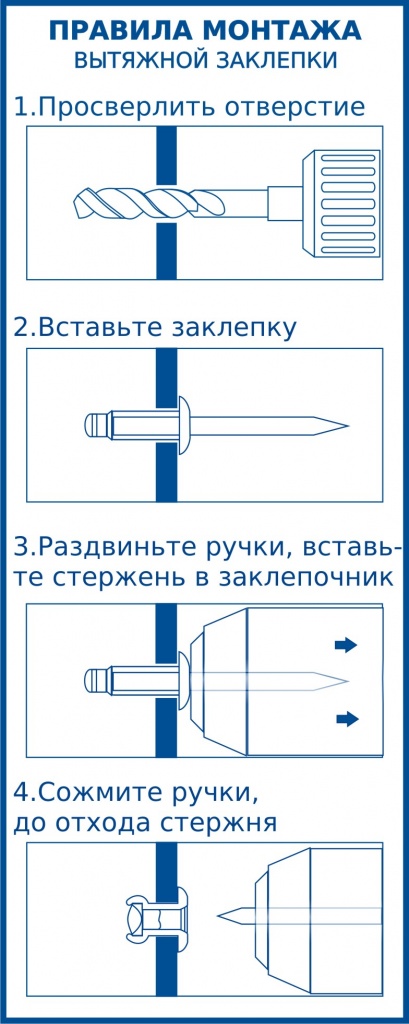
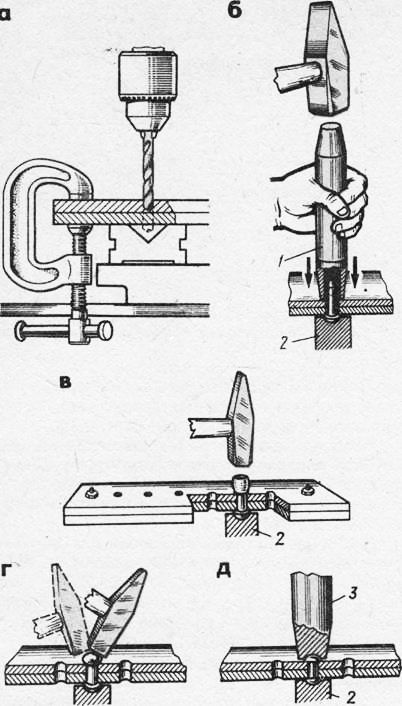
To install the fittings, you first need to "punch" a hole
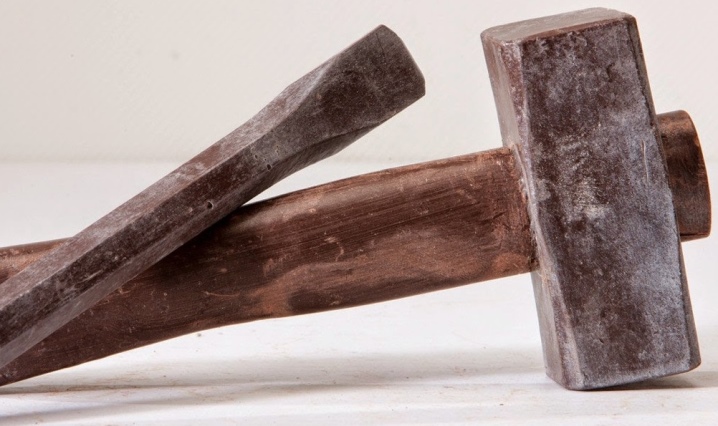
In our practice, in the conditions of the atelier, for the installation of accessories, we use a press and numerous attachments suitable for this or that type of button, block. With the help of such attachments, the edges of a button or a block are neatly flared, acquiring a "factory" look. But since it is unreasonable to buy a press with attachments and other additional tools for home use, we suggest that you use “handy” tools. In your arsenal, you should definitely have a small hammer and anvil (you can use another hammer), an awl and a few additional tools that you will have to buy at a sewing store. One of these tools should be a punch.
It is imperative to use the punch so that the hole is perfectly even and the edges of the fabric do not crumble. The punch can have only one, the smallest size, in extreme cases, two (the second is slightly larger). But it is best to buy a set of punch holes with removable nozzles. It is undesirable to cut a hole with scissors, since from the time of the block or the button will surely "fall out" from it. The hole for the block or button should be minimal, it is advisable to even slightly pull the fabric over the block leg, because the tighter the fabric is pressed against the leg, the more securely it will be fixed.
You need to punch a hole in fabric or leather on an anvil, not metal, but wooden. The tree should be very dense (not loose), for example, the area where the twig is. You can also use other materials that are dense, but will not damage the punch point. Tip: Areas where holes will be punched on knitted fabrics and other bulk materials can be glued with an adhesive cloth.
Name of the site!
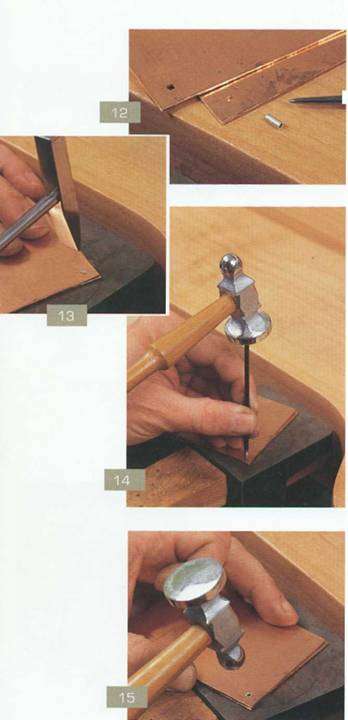
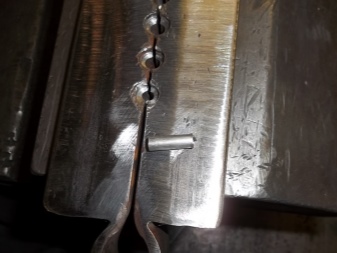
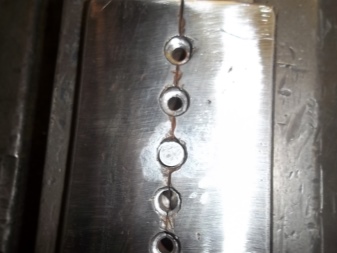
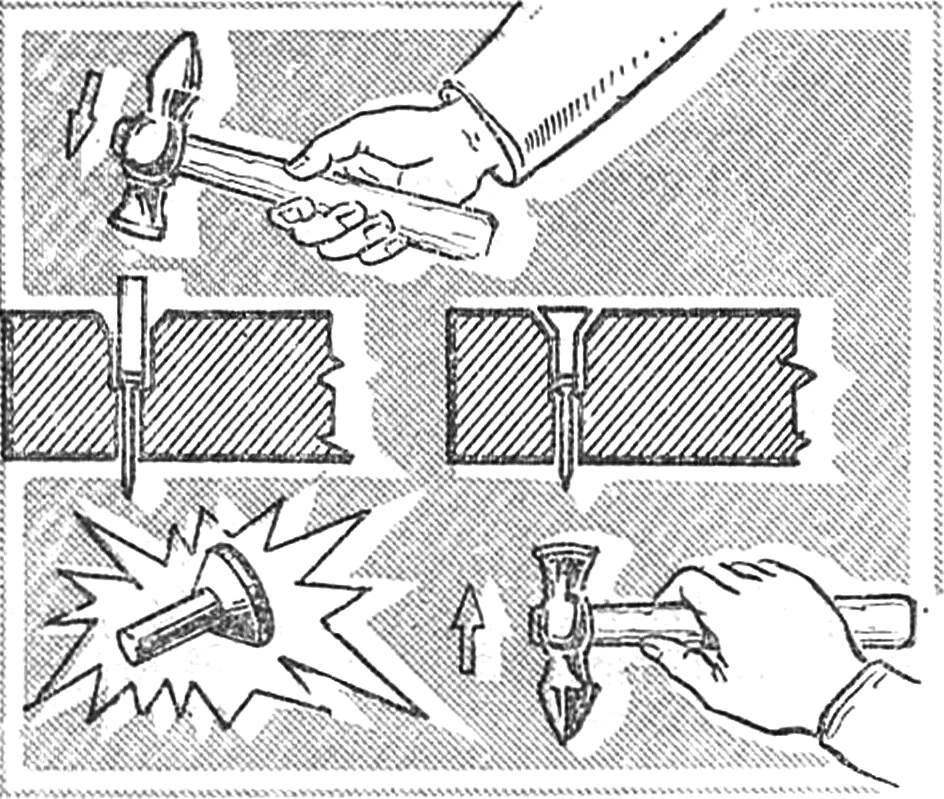
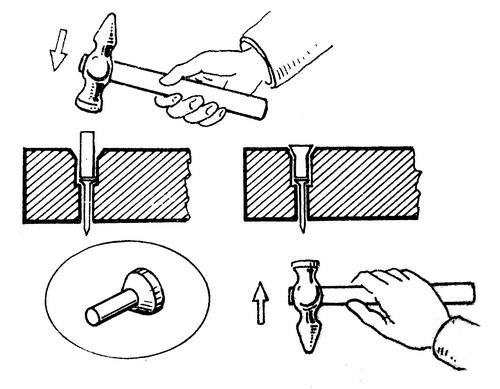
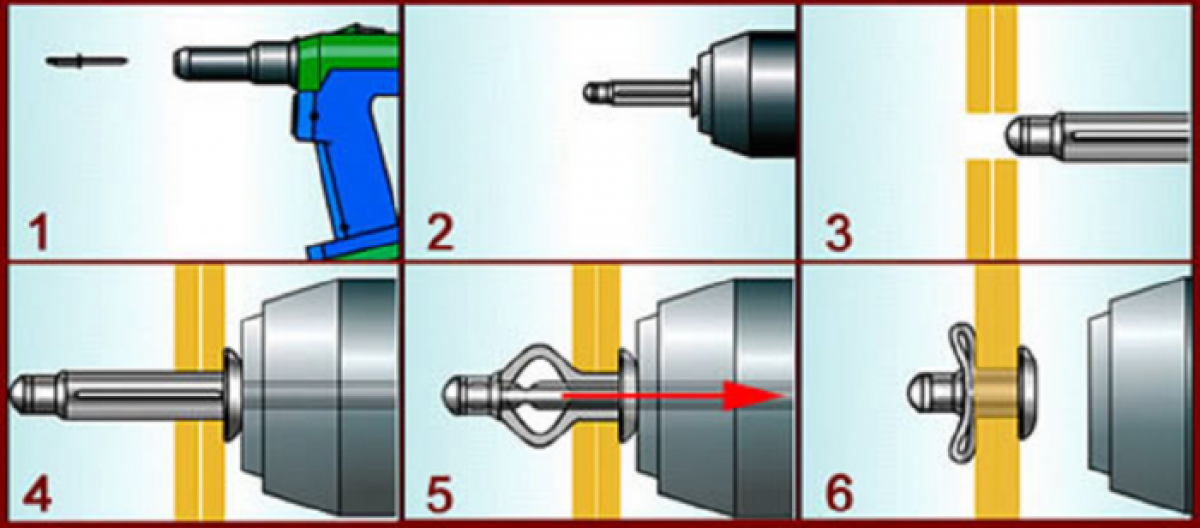
For tube riveting: Insert the expander into one end of the tube.Use a chasing hammer to lightly hit the expander. Turn the fastened parts over, insert the expander into the other end of the tube, and lightly hit it again with a hammer. Repeat the entire sequence of steps as for wire riveting until you see that the tube can no longer be removed from the holes
Then, gently hit the tube several times directly with the round striker of the embossing hammer. The rivet is ready!
Connecting rings made of wire hold the individual pieces of jewelry together. At the same time, they become part of the design, as, for example, in the Play of Colors bracelet. In the Bells necklace, shiny copper connecting rings, in addition to their functional role, provide an interesting contrast of material and color.
You can find ready-made connecting rings on sale, but you can easily make them yourself from wire of any thickness. Such rings can be opened and closed again with pliers, which allows them to be used as connecting elements.
Rings Signs of fidelity. 2002.
Chocolate candy wrappers and boxes. Each 5.4 x 4.4 x 4.4 cm
Brooch Antica. 2005
Paper, silver, casting. 3 x 2.7 x 1.5 cm
Lily's necklace. 2003
Paper, silver, amethyst, pearls. 5.5x45x2.5 cm
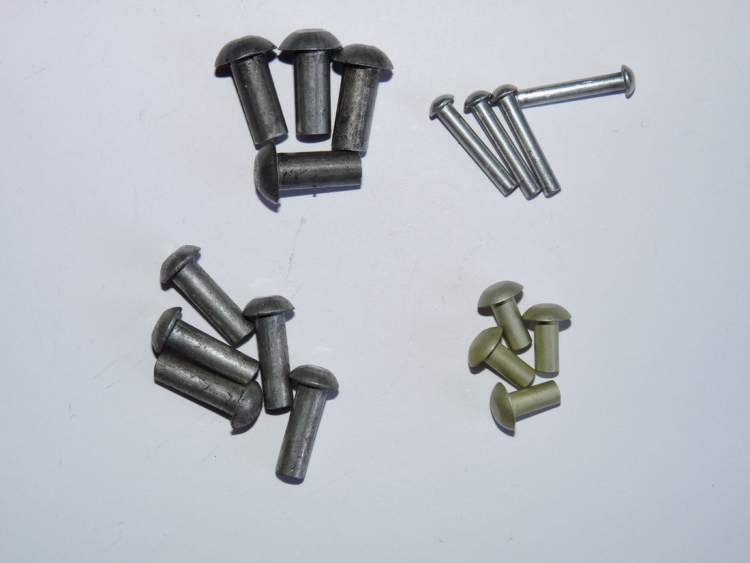
Homemade rivets
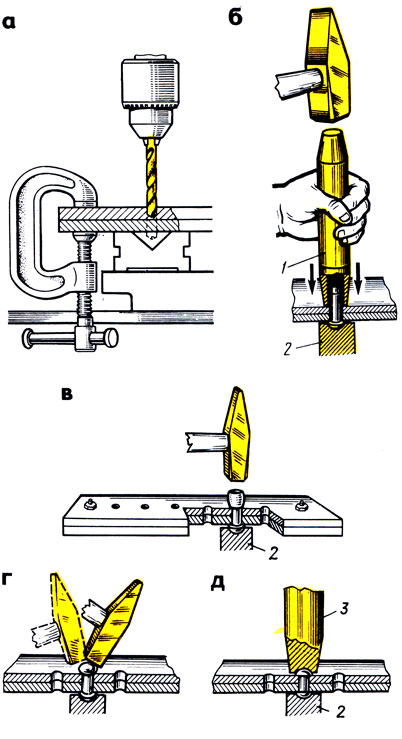
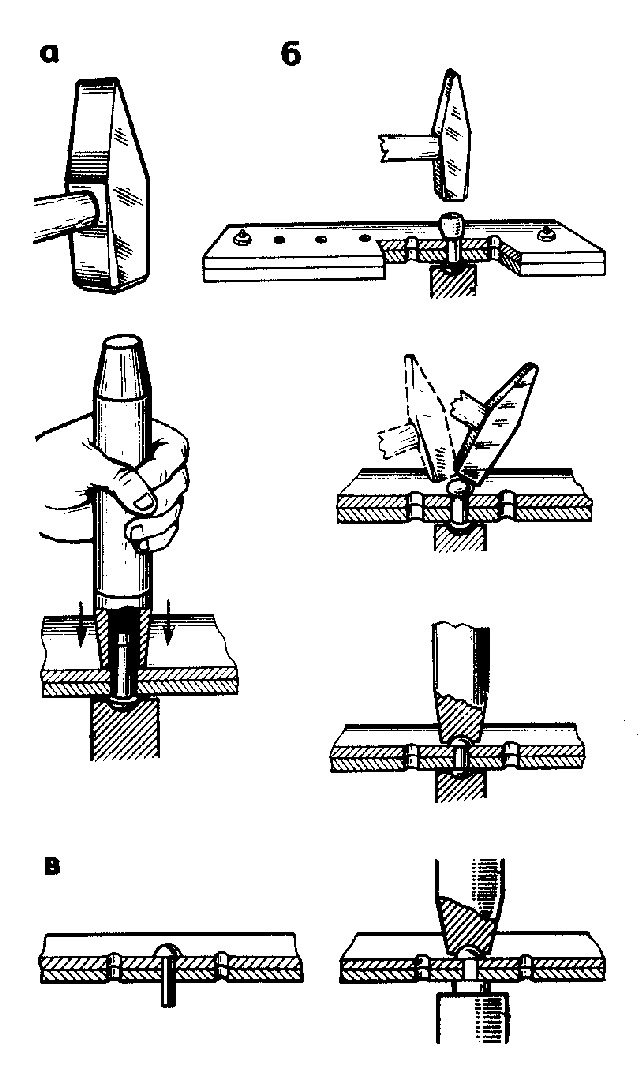
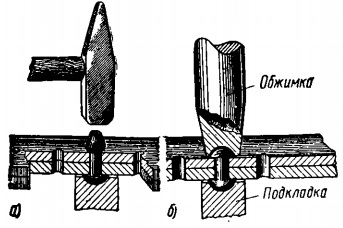
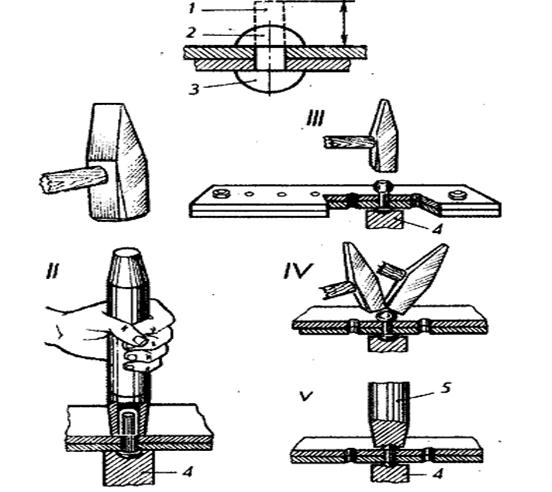
| Rice. 2, A device for making rivets (a.) And a method for forming a recess in a crimp (b): 1 ≈ crimp: 2 ≈ a rivet blank; 3 ≈ plate; 4 ≈ table plate; 5 ≈ steel ball. |
Manufacturing
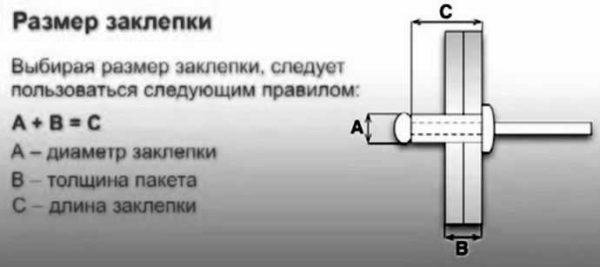
The preparation of blanks should be started after finding out the true dimensions necessary for a high-quality result of subsequent riveting work. You should know exactly the thickness of the connection of the parts that need to be riveted in order to calculate the correct length of the workpiece, taking into account its processing under the mortgage head and lock.

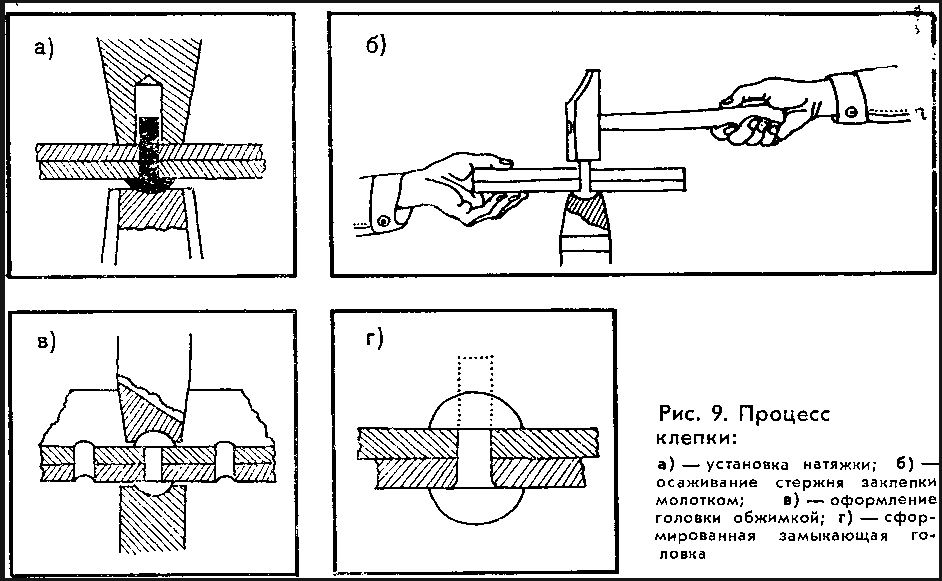
According to the diagram, it will be clear how many blanks are required for each length. Then, using a chisel and a hammer, cut the workpieces from the wire with a margin of quantity.
Making rivets consists of a number of operations. First - about how to make a rivet from a wire with a machine.
- We select on the machine a hole that is suitable in diameter and length for the workpiece we need. The workpiece must have a sufficient length of the protruding part from which the insert head is to be formed.
- By tapping with a hammer on the protruding part of the wire, we form a head. First, flatten the end of the wire with blows from above so that a head is formed, like a nail, and then we process this head by tapping on the sides, giving it a spherical look.
- After the formation of the head, we will correct the result with a file, if it matters for the appearance of the structure to be joined.
- We remove the workpiece from the hole and process the end opposite to the head (align with a file or sharpener).
When making a rivet without a machine, exactly the same actions are performed as with it, only the workpiece is clamped in any other device, for example, in a vice. All other operations are performed in the same order as on the machine.
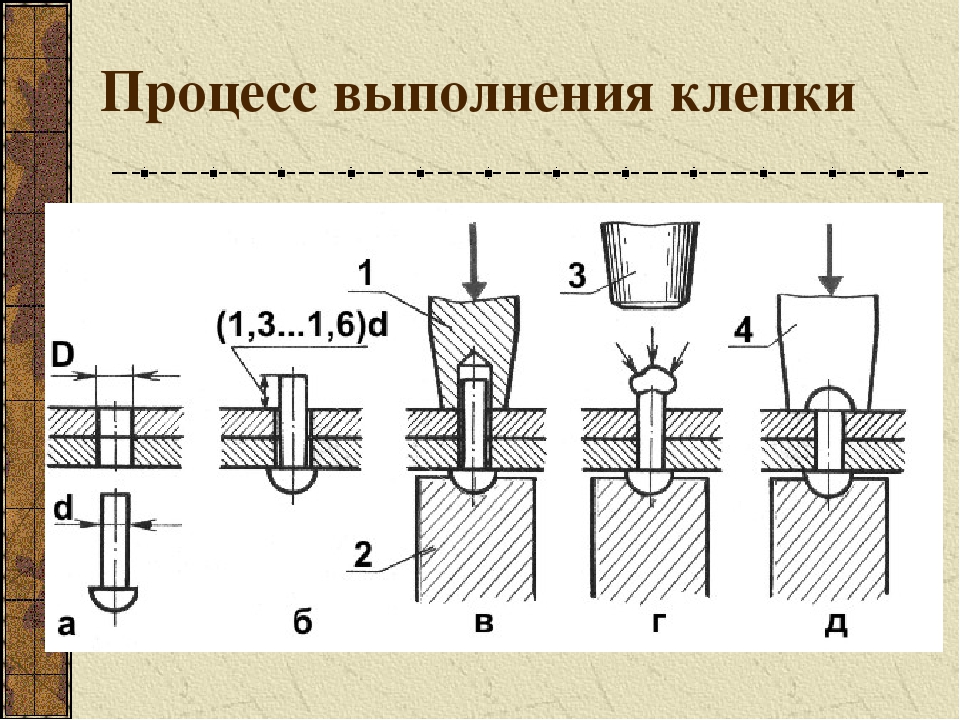
To do this, you need to drill as many holes in the bar as required - they are made deeper than the length of the blind rivets. These holes should then be expanded from above under the cone with a drill with a diameter slightly larger than the holes themselves (under the head).
It is in these newly prepared holes that workpieces are inserted, the length of which is matched to the depth of the hole plus a small protrusion on the head. It remains only to knock on the end of the wire with a hammer, filling the prepared bed for the head with flattening so that it does not protrude above the surface of the machine.
Rivets with flat heads can be made using the same technology as the previous version, but only the bed for the formation of this part of the product is drilled cylindrical, not conical.
It is convenient to make a homemade rivet of a small diameter, consisting of two parts - a mortgage and a lock - from a pair of nails.To do this, one of the nails is taken with a larger diameter - a hole is drilled in its rod that is 0.1 mm less than the diameter of the second nail.
The second nail, the rod of which should have a shorter length than the depth of the lock hole, is sharpened at the end under the cone. The nail heads are ready-made heads, only you will need to grind a little for the look. The hole in the joint for which such a rivet was prepared is drilled to the size of the diameter of the locking part of the fastener.
Hand tools
Before riveting a rivet correctly, you will have to understand the entire range of products on offer. Most often, there are two types of riveters on the shelves: manual and pull-out. Their principle of operation is not the same:
- Exhaust. The basis is traction, due to which fixation occurs. For this, the element is in the device, with simple unclamping and clamping riveting occurs. The fastener itself has a special ball that is flattened. Without it, fixation will not occur even with manual action.
- What does the linkage give? The principle of operation is simple, which is why this manual unit has a low price. The process is similar, but the ball is fixed in the tube when the handle moves. It is used infrequently (for things that are too subtle). The choice is made by the buyer, assessing the complexity of the work, the activity of use.
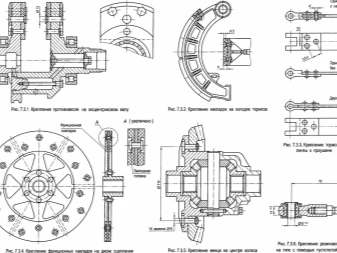
Drawings to the RF patent 2107574
The invention relates to the processing of metals by pressure and can be used in the manufacture of semi-hollow rivets and other similar parts on cold heading machines.
A known method of manufacturing a core having a stepped shape with a blind cavity, including a piece of workpiece, upsetting of the workpiece with alignment of the ends, extrusion of a small diameter step, extrusion of a blind cavity, final upsetting of the head with the design of chamfers.
The disadvantage of this method is the low durability of the punch for extruding the cavity in the third position due to the strengthening of the metal when extruding a small diameter step in the second position. The application of this method is limited by the fact that the depth of the extruded cavity should be no more than 2.5 of its diameter.
In addition, this method does not allow to ensure the durability of the tool when extruding blind cavities with a relative wall thickness of the part S / D det> 0.2, where S, D det are the wall thickness and the outer diameter of the part during extrusion, respectively. The ratio S / D det> 0.2 in conversion corresponds to the degree of deformation when extruding the cavity det> 0.2 and depth h det / d det> 2.5. In addition, the durability of the extrusion punch is low due to the absence of a working belt on it.
This method requires an automatic machine of a special design.
The closest to the proposed method is a method of manufacturing semi-hollow and hollow rivets from wire, in which a rod blank of measured length is cut and deforms it in several transitions with the formation of a head at one end and a blind axial cavity at the other.
This method does not provide a uniform thickness of the walls of the blind cavity along its length. The disadvantage is the complexity of setting up the machine with a large number of tools, and for the implementation of the method requires a special machine.
The invention solves the problem of increasing the tool life in the manufacture of semi-hollow rivets, in which the relative wall thickness is greater than 0.2, and allows you to obtain parts with a relative depth of the cavity h det / d / det> 2.5.
This problem is solved by the fact that in the method of manufacturing semi-hollow rivets, a rod workpiece of measured length is cut off and its deformation is performed in several transitions with the formation of a head at one end of the rod and a blind axial cavity at the other, while in the process of deformation of the workpiece it is sequentially calibrated with extrusion basting, direct extrusion to obtain a blind cavity at one end of the workpiece rod,reduction in a matrix with a conical deforming part to obtain a stepped semi-finished product with a conical transition surface between the degrees and a blind cavity located at the end of the smaller step, the diameter, depth and wall thickness of which are equal to the corresponding parameters of the finished part, and the final design of the rivet head.
The relative degree of deformation during the extrusion of the cavity is prescribed in the range of 0.36 - 0.51.
When a semi-hollow rod is reduced, the inner diameter decreases and the cavity depth increases, which can exceed 2.5 of its diameter.
The drawing shows a method of manufacturing a semi-hollow rivet with a relative wall thickness of 0.24.
The method is carried out as follows.
From a rod or coil of steel 10 with a tensile strength of 400 MPa, a measured workpiece is cut off, a workpiece with an outer diameter of 6.8 mm is upset, leveling the ends and, forming a bump, squeeze out a cavity with an inner diameter of 4.8 mm, a depth of 4.7 mm with a degree of deformation = 0.5, then the reduction is carried out with a thickening of the wall of the semi-hollow rod, then the workpiece is calibrated with the simultaneous design of the head and chamfers.
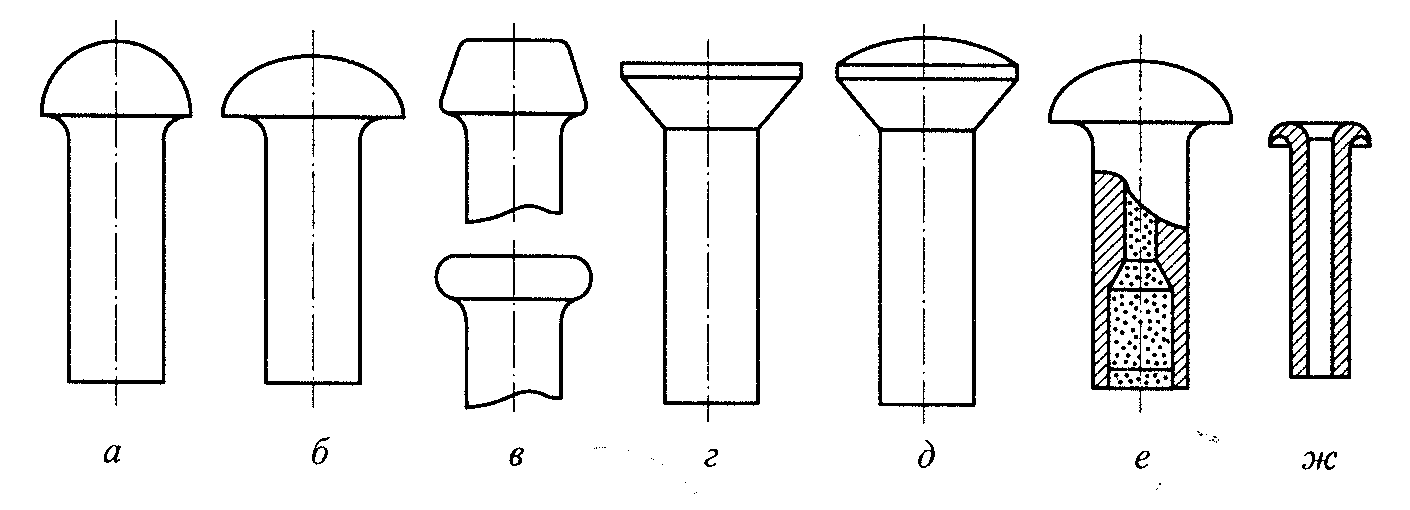
What material should the rivet be of
Rivets are usually taken from the same material as the parts to be joined - this avoids electrochemical corrosion
Pay attention to the strength characteristics. But, as a rule, when connecting aluminum parts, the strength of aluminum hardware is sufficient
In general, rivets are made from the following metals:
steel:
- ordinary - grades St2, St3, St10;
- corrosion-resistant Х18Н9Т;
- galvanized;
Read also: Wrench for loosening wheel nuts

When connecting copper parts, the installation of brass and copper is permissible. Aluminum is bonded with aluminum alloys. Steel sheets - corresponding grades of steel rivets. There are also mixed hardware - from two different metals (chemically non-conflicting). The most common are aluminum-steel.
For the installation of facade elements, slopes, ebbs, metal tiles and profiled sheets, blind rivets made of galvanized painted steel are usually used. Coloring - in tone with the details.
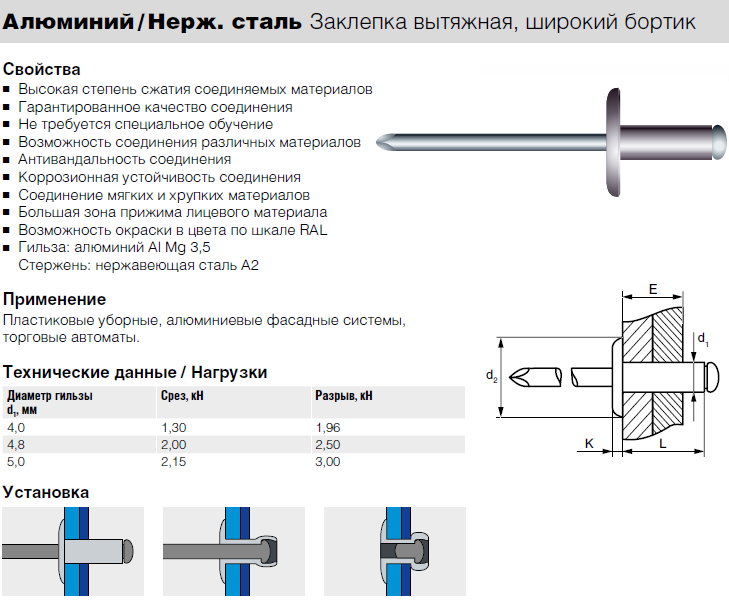
Blind rivet, steel
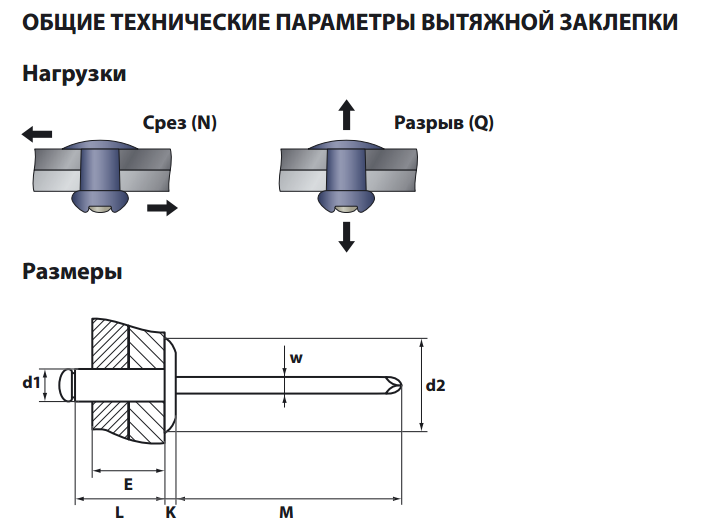
with standard collar ST / ST - steel / steel. Sizes of steel blind rivets from 3.0 x 6 to 6.4 x 45 mm. They are used to create permanent joints of thin sheet materials. Using a riveter, riveting is possible when only one side of the material is accessed.Characteristics and dimensions of steel blind rivets with standard shoulder ST / ST

| Rivet size | d | dk | K | R max | d1 | L1 | Breaking force N | Shear force N |
| 3.0 | 3.0 +0.08 -0.10 | 6.5 -0.7 | 0.8 ±0.2 | 0.2 | 1.90 | 27 | 1125 | 915 |
| 3.2 | 3.2 +0.08 -0.10 | 6.5 -0.7 | 0.8 ±0.2 | 0.2 | 2.00 | 27 | 1285 | 1060 |
| 4.0 | 4.0 +0.08 -0.15 | 8.0 -1.0 | 1.0 ±0.3 | 0.3 | 2.50 | 27 | 1990 | 1550 |
| 4.8 | 4.8 +0.08 -0.15 | 9.5 -1.0 | 1.1 ±0.3 | 0.3 | 2.90 | 27 | 2920 | 2300 |
| 5.0 | 5.0 +0.08 -0.15 | 9.5 -1.0 | 1.1 ±0.3 | 0.3 | 2.90 | 27 | 3255 | 2575 |
| 6.0 | 6.0 +0.08 -0.15 | 12.0 -1.5 | 1.5 ±0.4 | 0.4 | 3.40 | 27 | 5000 | 4000 |
| 6.4 | 6.4 +0.08 -0.15 | 13 -1.5 | 1.8 ±0.4 | 0.5 | 3.85 | 27 | 5400 | 4350 |
The thickness of the materials to be joined and the size of the rivet hole in mm
| Rivet size | Thickness of materials to be joined | Side diameter | Hole diameter |
| 3.0 x 6 | 1.5 — 3.5 | 6.5 | 3.1 — 3.2 |
| 3.0 x 8 | 3.5 — 5.5 | ||
| 3.0 x 10 | 5.5 — 7.0 | ||
| 3.0 x 12 | 7.0 — 9.0 | ||
| 3.0 x 14 | 9.0 — 11.0 | ||
| 3.0 x 16 | 11.0 — 13.0 | ||
| 3.0 x 18 | 13.0 — 15.0 | ||
| 3.0 x 20 | 15.0 — 17.0 | ||
| 3.2 x 6 | 1.5 — 3.5 | 6.5 | 3.3 — 3.4 |
| 3.2 x 8 | 3.5 — 5.0 | ||
| 3.2 x 10 | 5.0 — 7.0 | ||
| 3.2 x 12 | 7.0 — 9.0 | ||
| 3.2 x 14 | 9.0 — 11.0 | ||
| 3.2 x 16 | 11.0 — 13.0 | ||
| 3.2 x 18 | 13.0 — 15.0 | ||
| 3.2 x 20 | 15.0 — 17.0 | ||
| 3.2 x 25 | 20.0 — 22.0 | ||
| 4.0 x 6 | 1.5 — 3.0 | 8.0 | 4.1 — 4.2 |
| 4.0 x 8 | 3.0 — 5.0 | ||
| 4.0 x 10 | 5.0 — 6.5 | ||
| 4.0 x 12 | 6.5 — 8.5 | ||
| 4.0 x 14 | 8.5 — 10.5 | ||
| 4.0 x 16 | 10.5 — 12.5 | ||
| 4.0 x 18 | 12.5 — 14.5 | ||
| 4.0 x 20 | 14.5 — 16.5 | ||
| 4.0 x 22 | 16.5 — 18.0 | ||
| 4.0 x 25 | 18.0 — 21.5 | ||
| 4.0 x 26 | 18.5 — 22.5 | ||
| 4.0 x 28 | 21.5 — 24.0 | ||
| 4.0 x 30 | 21.5 — 26.0 | ||
| 4.8 x 6 | 1.0 — 3.0 | 9.5 | 4.9 — 5.0 |
| 4.8 x 8 | 3.0 — 4.5 | ||
| 4.8 x 10 | 4.5 — 6.0 | ||
| 4.8 x 12 | 6.0 — 8.0 | ||
| 4.8 x 14 | 8.0 — 10.0 | ||
| 4.8 x 16 | 10.0 — 12.0 | ||
| 4.8 x 18 | 12.0 — 14.0 | ||
| 4.8 x 20 | 14.0 — 16.0 | ||
| 4.8 x 22 | 16.0 — 18.0 | ||
| 4.8 x 23 | 16.5 — 19.0 | ||
| 4.8 x 24 | 17.0 — 20.0 | ||
| 4.8 x 25 | 18.0 — 21.0 | ||
| 4.8 x 28 | 21.0 — 23.5 | ||
| 4.8 x 30 | 23.0 — 25.0 | ||
| 4.8 x 32 | 25.0 — 27.0 | ||
| 4.8 x 35 | 25.0 — 30.0 | ||
| 4.8 x 40 | 30,0 — 35.0 | ||
| 4.8 x 50 | 40,0 — 45.0 | ||
| 5.0 x 6 | 0.5 — 2.5 | 9.5 | 5.1 — 5.2 |
| 5.0 x 8 | 2.5 — 4.5 | ||
| 5.0 x 10 | 4.5 — 6.0 | ||
| 5.0 x 12 | 6.0 — 8.0 | ||
| 5.0 x 14 | 8.0 — 10.0 | ||
| 5.0 x 16 | 10.0 — 12.0 | ||
| 5.0 x 18 | 12.0 — 14.0 | ||
| 5.0 x 21 | 14.0 — 17.0 | ||
| 5.0 x 25 | 17.0 — 20.0 | ||
| 5.0 x 27 | 20.0 — 23.0 | ||
| 5.0 x 30 | 23.0 — 25.0 | ||
| 6.0 x 8 | 2.0 — 4.0 | 12.0 | 6.1 — 6.2 |
| 6.0 x 10 | 4.0 — 6.0 | ||
| 6.0 x 12 | 6.0 — 8.0 | ||
| 6.0 x 14 | 7.0 — 9.0 | ||
| 6.0 x 16 | 9.0 — 11.0 | ||
| 6.0 x 18 | 11.0 — 13.0 | ||
| 6.0 x 22 | 13.0 — 17.0 | ||
| 6.0 x 26 | 17.0 — 20.0 | ||
| 6.0 x 30 | 20.0 — 24.0 | ||
| 6.4 x 8 | 2.0 — 4.0 | 13.0 | 6.5 — 6.6 |
| 6.4 x 10 | 2.0 — 5.0 | ||
| 6.4 x 12 | 4.0 — 6.0 | ||
| 6.4 x 14 | 6.0 — 8.0 | ||
| 6.4 x 16 | 8.0 — 11.0 | ||
| 6.4 x 18 | 9.0 — 13.0 | ||
| 6.4 x 20 | 11.0 — 15.0 | ||
| 6.4 x 22 | 13.0 — 16.0 | ||
| 6.4 x 25 | 15.0 — 19.0 | ||
| 6.4 x 26 | 16.0 — 20.0 | ||
| 6.4 x 28 | 17.0 — 22.0 | ||
| 6.4 x 30 | 18.0 — 24.0 | ||
| 6.4 x 32 | 22.0 — 26.0 | ||
| 6.4 x 35 | 24.0 — 30.0 | ||
| 6.4 x 40 | 30.0 — 35.0 | ||
| 6.4 x 45 | 35.0 — 40.0 |
You can order and buy steel blind rivets of any size at wholesale prices.
192007, St. Petersburg, st. Kurskaya, 27
Trading House Neva sells wholesale DIN and GOST fasteners, galvanized hardware and high-strength fasteners. Construction fasteners are supplied to all regions of Russia.
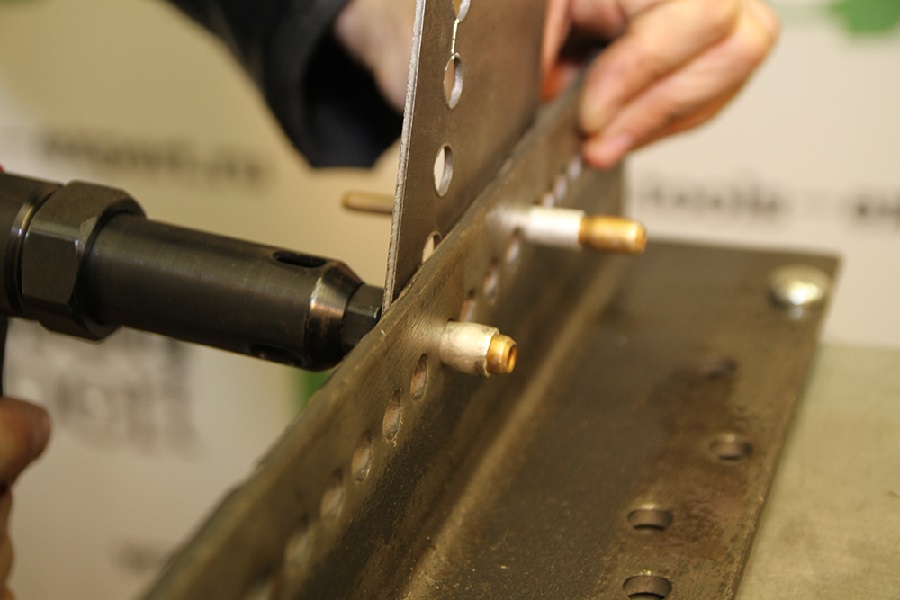
In industry, one of the main operations is the connection of structural elements and parts.
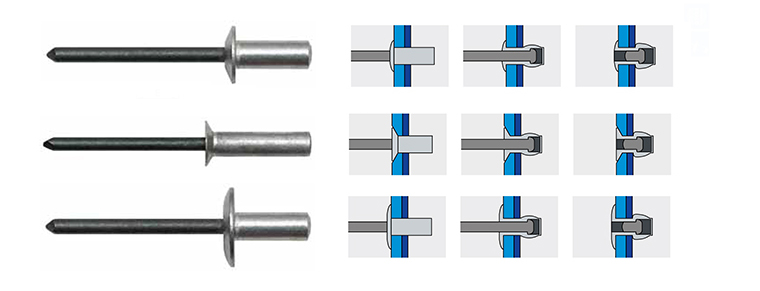
One way is to join with rivets. It is used when it is not possible to weld structural elements, and has many advantages over it. To perform this technology, there is a special riveting tool.
What is riveting
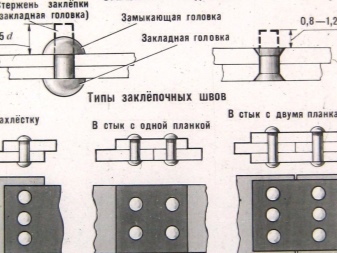
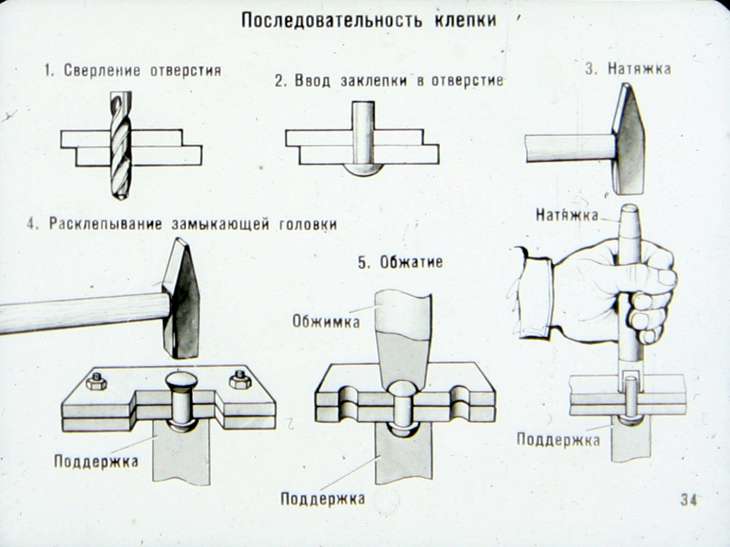
The mechanical connection of parts using a series of rivets is called a riveting, and the connection itself is a riveted seam. It is used where it is inconvenient to weld parts or where non-weldable materials are connected. Not only metals are riveted, thus they connect parts in clothes, accessories, etc. But there it is more of a finish than a loaded connection. So further we will talk about riveting in construction or home improvement. In principle, instead of riveting, you can use a screw connection, but bolts and nuts are more expensive, and their installation takes more time.
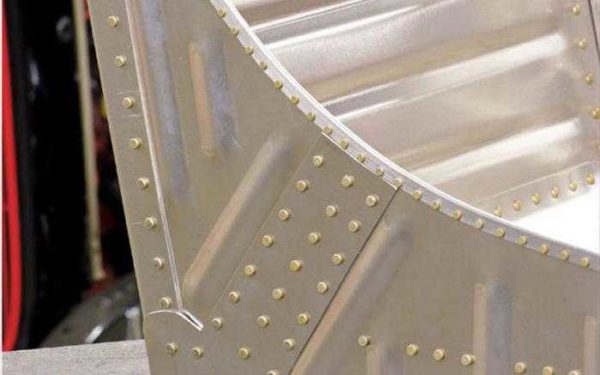
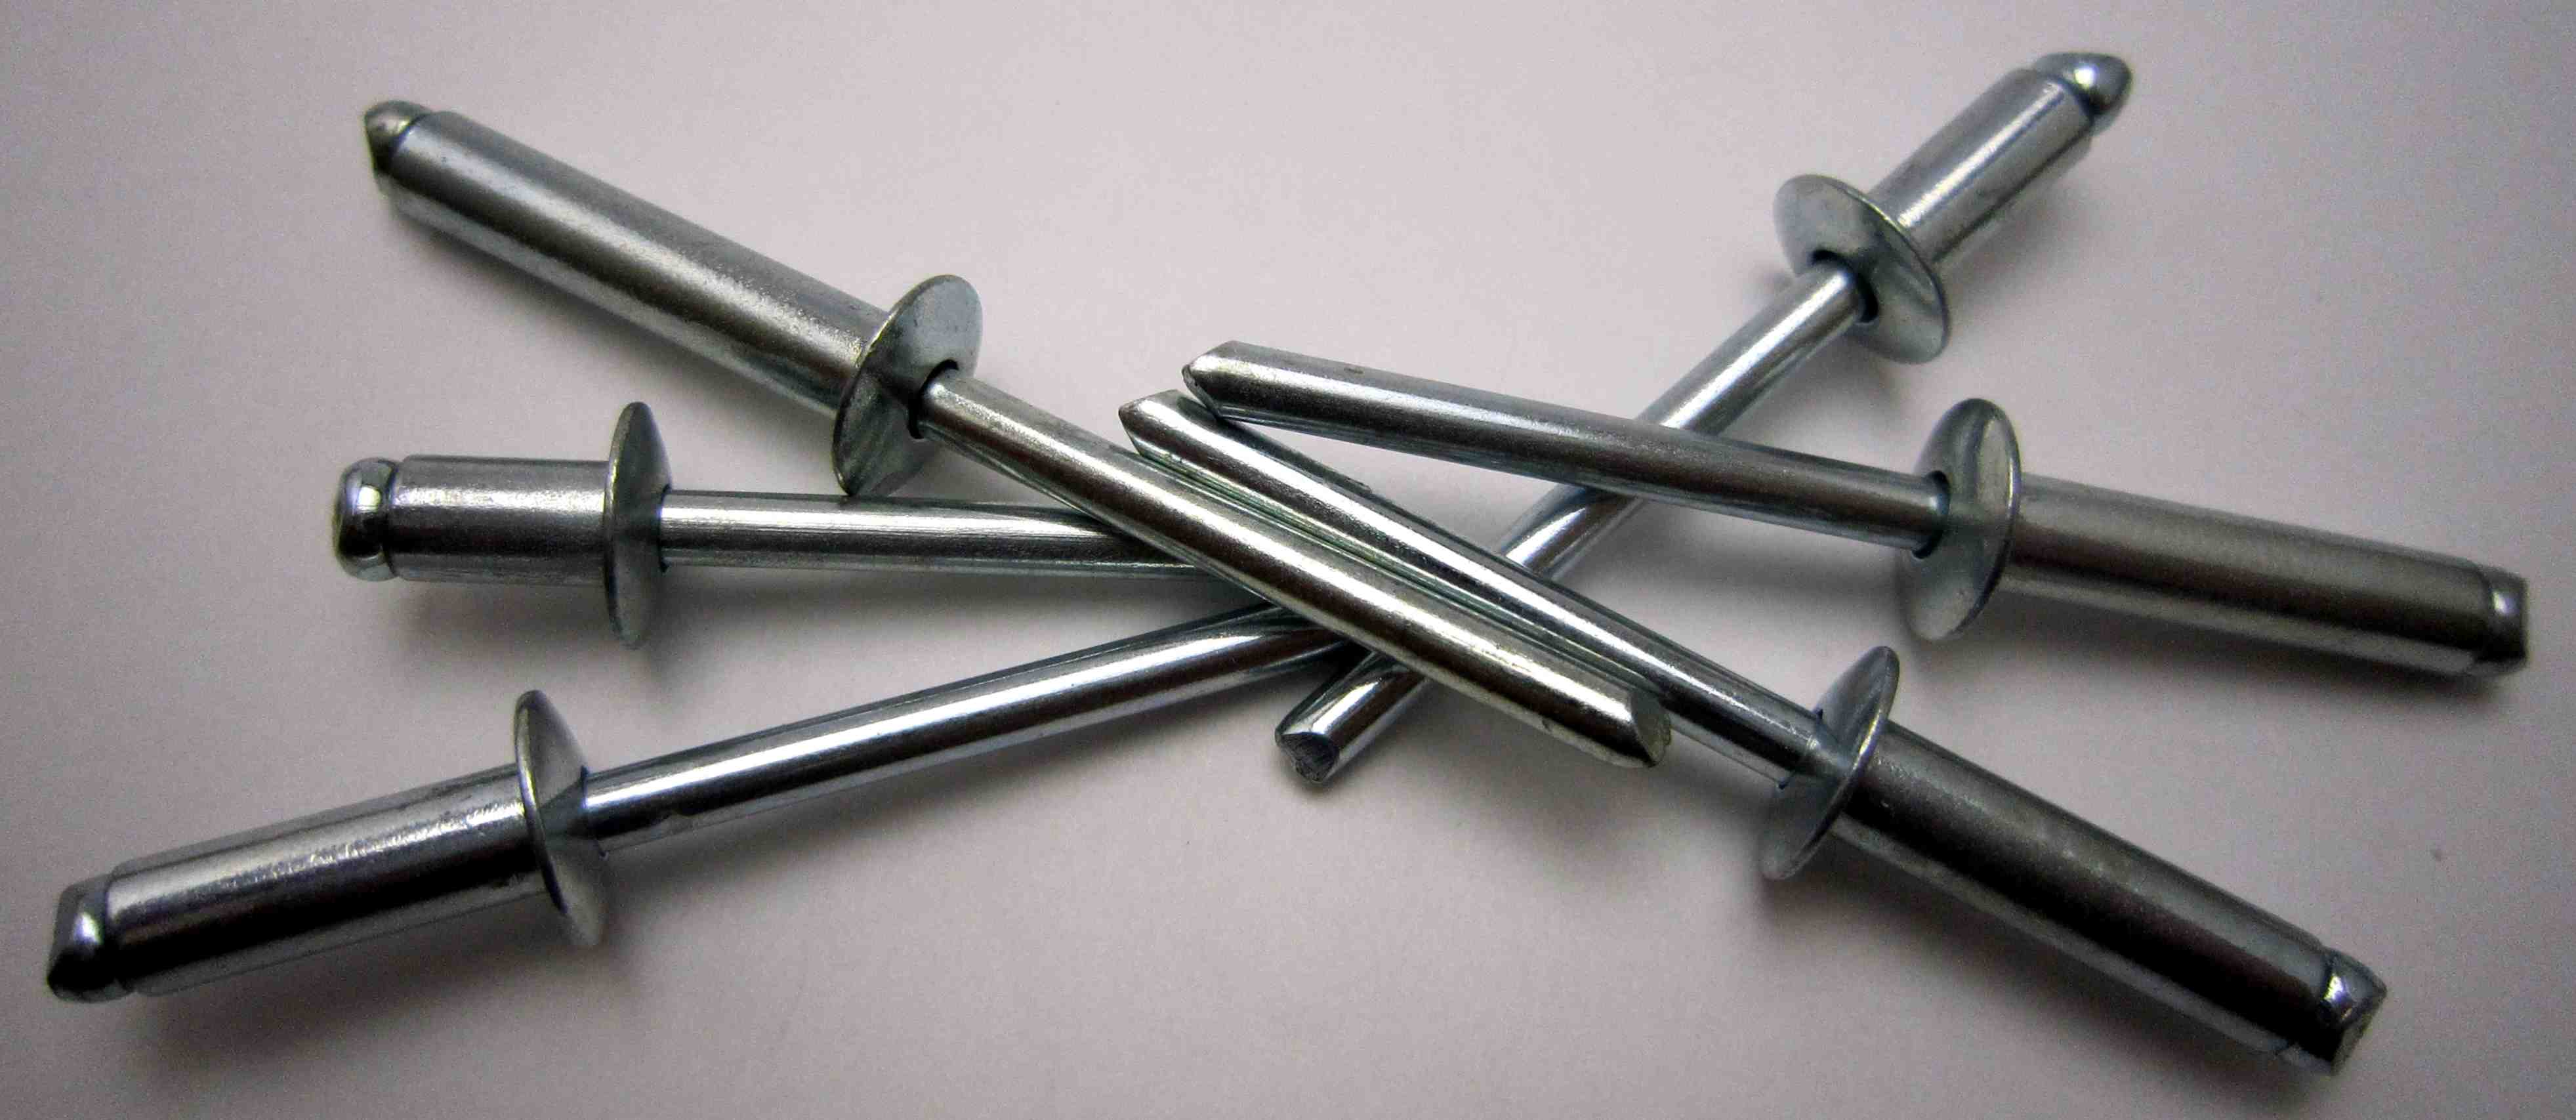
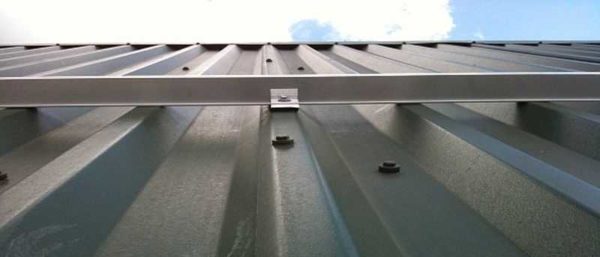
This is what a riveted joint looks like
If we talk about installing fences made of profiled sheet, rivets are more reliable, since they can only be removed by reaming the fasteners. When installing screws or self-tapping screws, they can be unscrewed and carried away both metal and hardware. In some cases, riveting is more convenient when installing a roof from corrugated board or metal. On the roof, the installation of screw connections is problematic and time-consuming. And with rivets, and with a good tool, you can do it in an hour or even less.
The most common use in the personal household
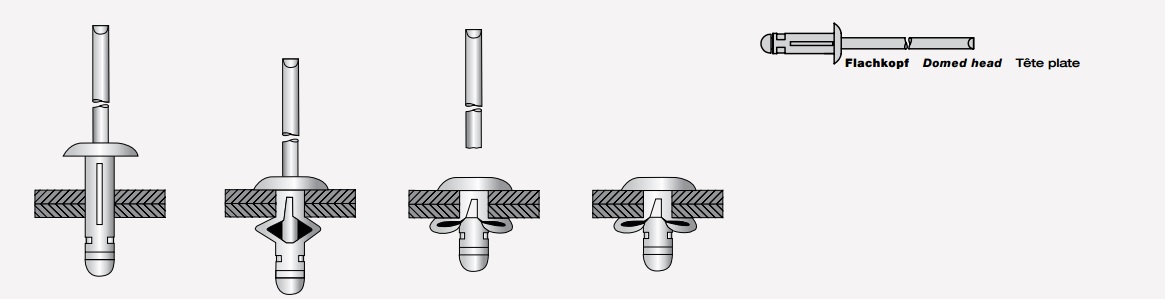
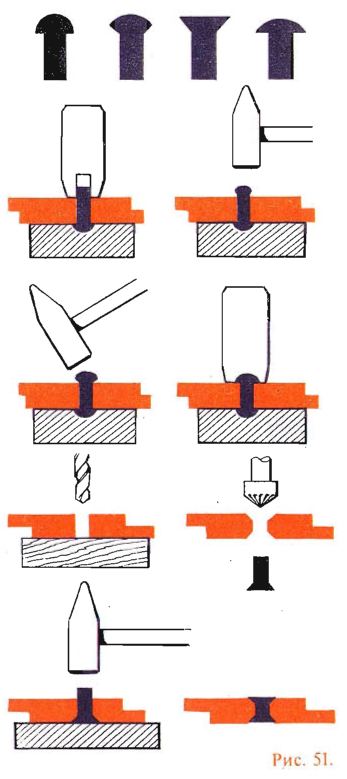
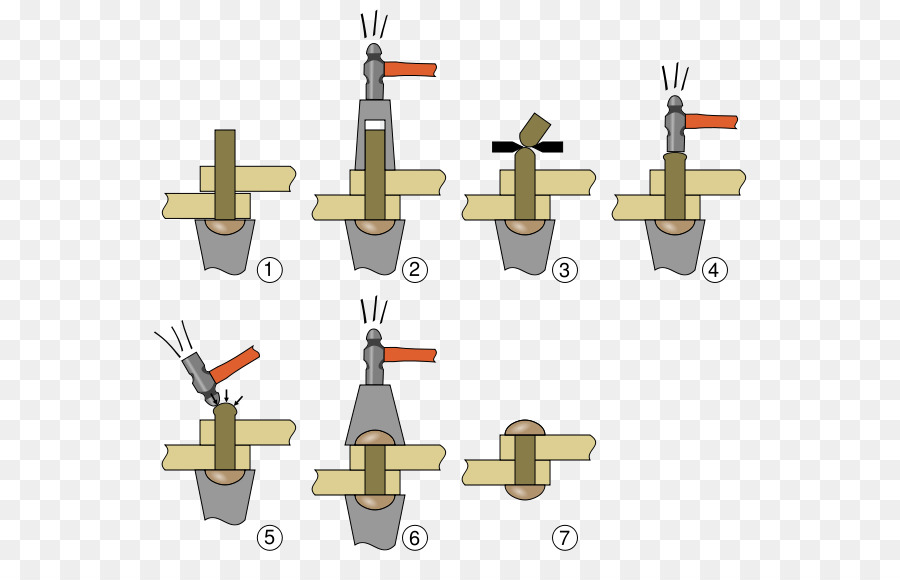
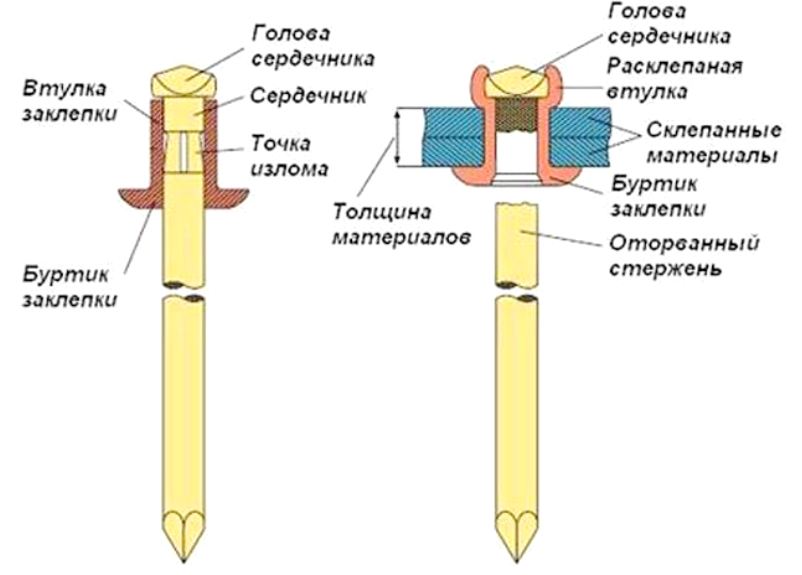
How are parts connected with rivets? The rivet is inserted into the prepared through hole. It has a head that rests against the material and the rod. During the riveting process, the end of the rod is flattened, changing its shape under the influence of force. Therefore, plastic metals are used for these hardware.
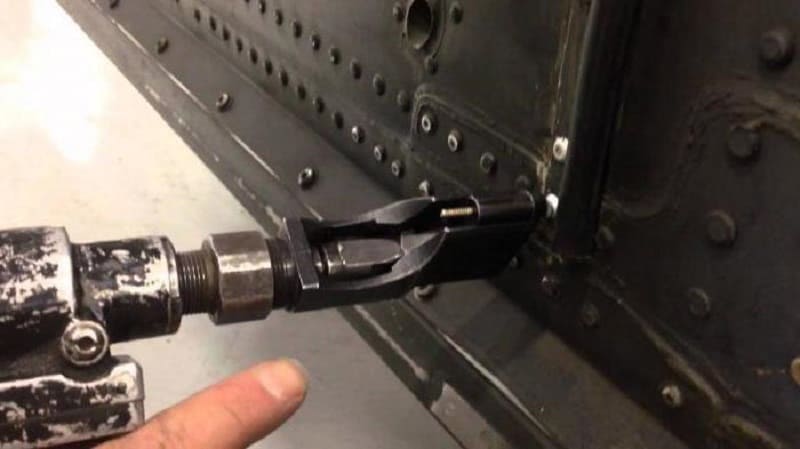
Problems that may arise with the rivet
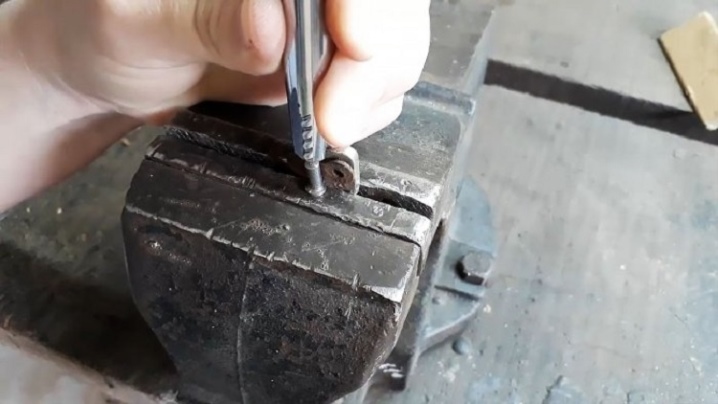
After the extraction part is removed with the tool, it should fall out through the hole. However, after some time of constant use, you may find that the exhaust part will get stuck inside the tool.
If blocking occurs, it is most likely that the jaws inside the instrument are misaligned. You will have to completely disassemble the tool and set the jaws in the correct position. After this procedure, the performance of the equipment will be fully restored.
In the video, the home craftsman clearly demonstrates how to quickly and easily fix the problem with the "biting" of the rivet's drawing part:
We all know what a great thing threaded rivets are.
In some cases, there is no alternative to them. Until a certain time, I somehow managed without them. But one fine day one wonderful car came to me, on which it was necessary to install window protection. Here's one:


Then I began to work on collective farms, and in the end it turned out, although not presentable in appearance, it was adaptable, but very functional, and with its help I put more than a dozen rivets. The base is an M6 bolt, strength 8.8
This is what it looks like assembled, with rivets installed
Main parts: Bolt M6. A piece of M12 bolt. More precisely, there was no bolt, studs. A nut is welded on one side, turning it into a bolt. The hairpin is drilled through D = 6.5mm. Then comes the nut from the UAZ stepladder. Strong. Further - the thrust bearing, the dimensions are not critical. Further - a washer with a fitting from the brake pipe. Also not important. What was, then he put it.
I think the principle of operation is clear. We drill a hole, under the M6 riveting seems to be 9mm. We insert the adapt. We hold nut 1 with one wrench, while unscrewing nut 2 with the second wrench.
As the effort has increased, it means the riveting is over. We twist everything back until loosening, unscrew the M6 bolt, and put the next one.
A practical and easy-to-use semi-automatic manual riveter for blind rivets, if desired, you can do it yourself. Moreover, most of the components for it can be found without any problems in the workshop or in the garage.
A distinctive feature of this design is that it does not have a power lever, as on factory models - here a screwdriver acts as a drive. An electric drill will also work.
To make a homemade riveter, you will need a work bushing with collet cams, a taper bushing and a spring, which can be borrowed from an old rivet gun. You will also need a head where the rivet shank is inserted.
How can you make steel rivets yourself?
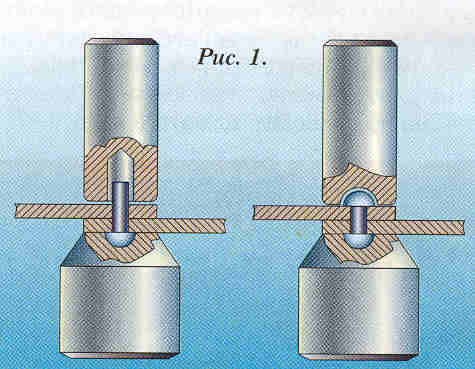
But first, let's figure out how to put on the simplest denim button. Poke a hole in the waist of your jeans with an awl and insert the leg into it. Place the button on the anvil (preferably on a metal surface) and hammer the leg. It is the leg, not the button. When buying a denim button, choose a set that has a leg cut, as shown in this photo. This foot will be securely held inside the button. A smooth leg can "jump out" over time or under load.
Now let's try to install a button for jeans of a more reliable design, the leg of which moves freely. This is where you need a dowel cut down on emery. The fact is that the leg of such a button needs to be expanded inside the button itself. You will not be able to "get close" to it without a special tool. But with the help of a sawn dowel, this is easy to do. And since the dowel does not bend, it can reliably expand the leg with it. But first, pass the leg into the belt, put a button on top of it and see how far the leg comes out of it. Perhaps the edge of it will need to "bite off" with pliers. Otherwise, your leg will simply bend and then not be flared.
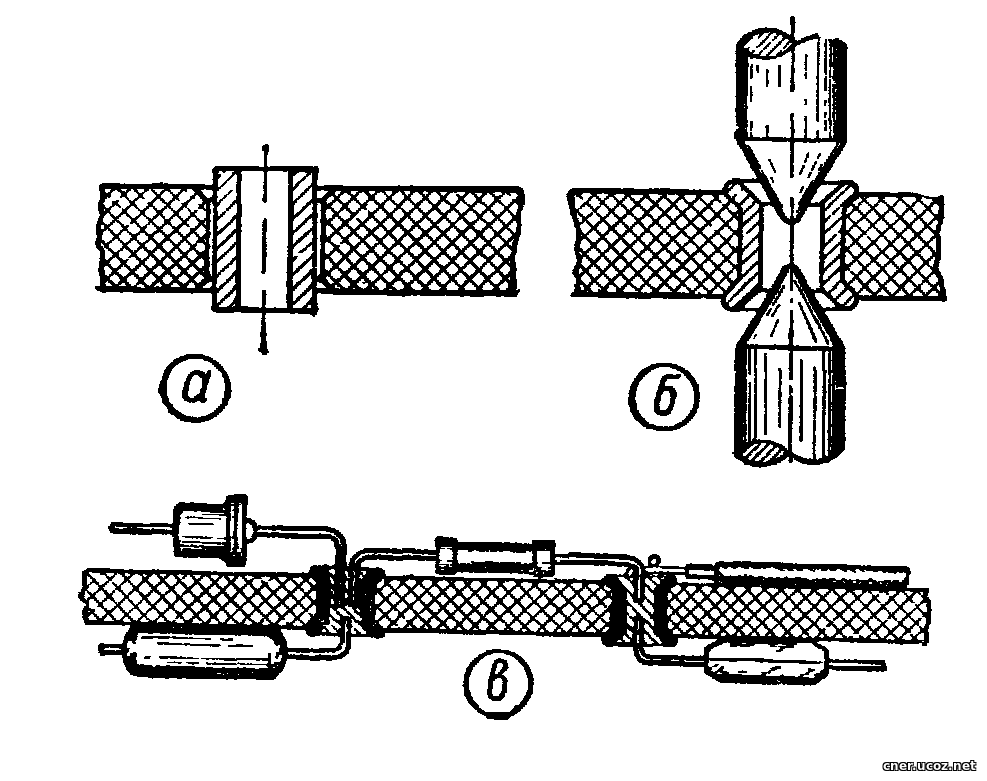
The antennae button (No. 1) is installed approximately the same way, only this operation needs to be performed only for the upper part of the button. The lower part is much easier to install. To install the second part, in the store you can buy a special tool with a recess inside. But if you do not have one, then you can use a metal plate with a hole exactly the size of the "pimples". Insert this pimple into the hole of the metal plate, and “slam down” the leg with a hammer from the back of the garment. The antennae button is very difficult to install without special tools, so buy more of these buttons than you need.
The latter type of button, which is sometimes used in knitted garments, is not difficult to install. However, some advice can be given too. First, make sure the petals on the bottom of the button fit exactly where they should be. Sometimes they are bent, so you have to bend or align them with pliers so that during installation all the petals "go" into the upper part. If for some reason the button is not installed correctly, remove it and put another, new one. It is better not to use the damaged button anymore, as it will no longer hold securely. They are inexpensive, so buy them with a margin.
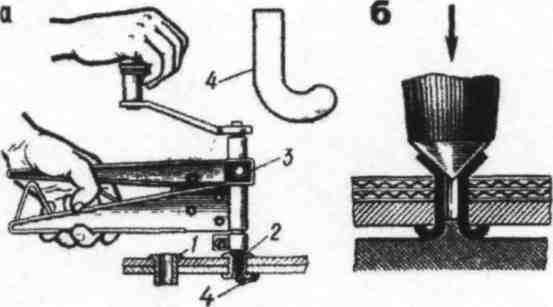
How to open a mini-studio At home, a press for installing buttons is not required, but in an atelier, such a tool is definitely needed, especially if your atelier is engaged in the repair of leather clothes, bags and other accessories, where various accessories are often used.
Technology of sewing and cutting natural fur Sewing of fur or leather can only be performed with high quality by a professional who has special equipment, tools and experience, including tools for installing clothing accessories. However, in some cases it is possible to install buttons or blocks without special tools and fixtures.
Recommendations for working with leather Almost any leather clothing, accessories use various accessories. To "punch" a neat hole in the skin to install a button or a block, you must use a special punch.
How to sew curtains on your own - small tips For curtains, special accessories are often used - eyelets.The eyelets outwardly resemble blocks, however, it is impossible to install the metal eyelets on your own, since without a special press you will not be able to accurately flare their edges. Use plastic eyelets. Their halves snap together and therefore installation will not cause any difficulties.
Interlining and adhesives When installing accessories on loose, knitted fabrics, be sure to use adhesive fabrics. The glued sections of the garment will be securely held between the parts of the block.
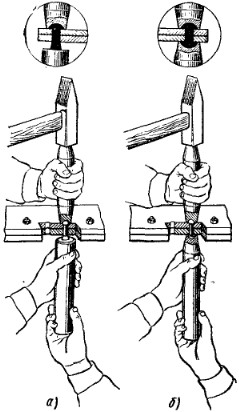
Features of the riveter's work
The main condition for riveting is that when forming the heads, the force must be applied on both sides of the riveting. The riveter can be brought to the parts only from one side, therefore the load on the rivet on the other side is provided by the design of the rivet itself.
Mechanical riveter device.
There are several types of riveters. They differ in the type of drive of the working element - mechanical, pneumatic, pneumohydraulic rivets. According to the type of rivets used, riveters are divided into devices for blind rivets and for nut rivets. In addition, universal fixtures and fittings for hex rivets are available. Finally, riveters can be amateur or professional.
In domestic conditions, mechanical amateur riveters are usually used. Structurally, they can be subdivided into devices with one handle, with two sliding handles and "accordion" type.
The design of the riveter is based on a lever mechanism with a significant ratio of the length of the lever arms. The mechanical drive drives the collet, which pulls the riveting element until the rivet head is formed.
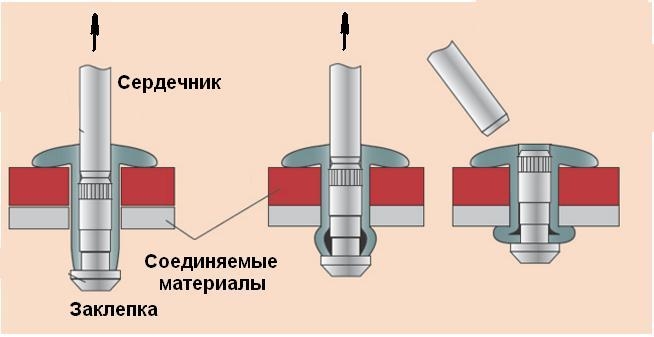
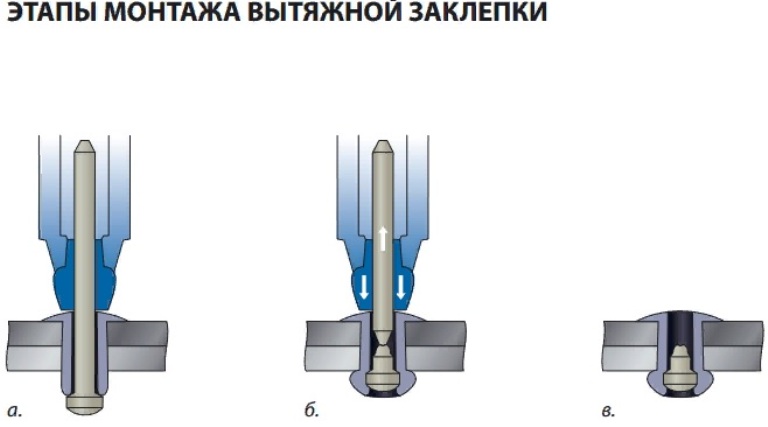
A riveter with pulling elements works by pulling an additional rivet wire along the inner channel of the main element. In this case, the force is applied from one side, but redistributed to both sides of the parts. This is achieved by installing the elements (body and punch) on different sides of the metals to be joined. The punch is pulled while at the same time a significant load is applied to the head of the body in the opposite direction, which causes the body to flatten inside the hole and thereby clamp the punch.
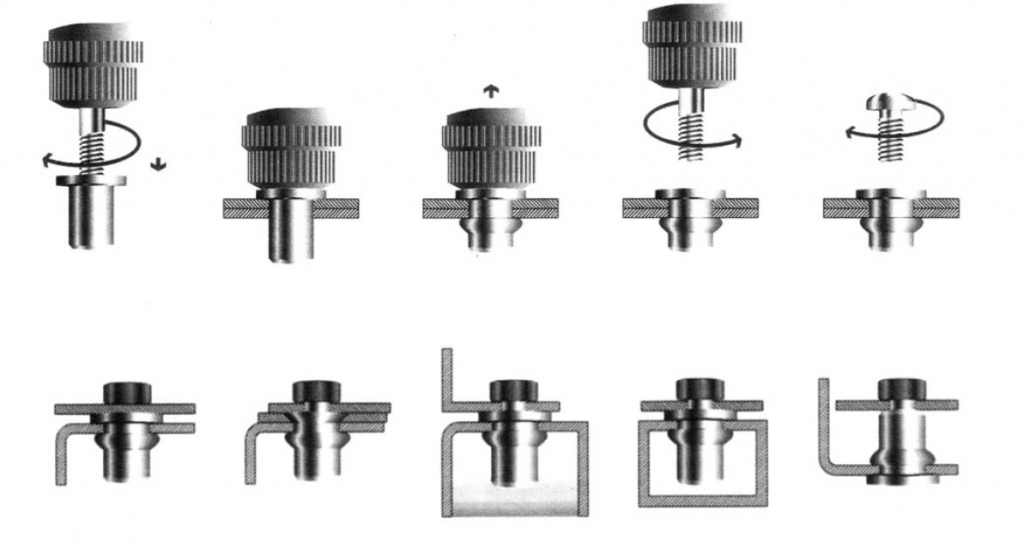
The blind rivet is installed using a special screw head. During the application of force due to the rivet, folds are formed on both sides of the parts, fixing the rivet in the hole. The device has a set of heads for rivets of different diameters (3-10 mm).