Removing the top layer of soil
From the surfaces planned for tiling, the top layer of soil 25-30 cm thick is removed, this is approximately one bayonet of a shovel. If the areas are significant, this operation is performed using a bulldozer. Then manually level and level the new base. If the soil is sandy or sandy loam, then it needs to be compacted.
Sealing is performed with a tamper made by hand from a piece of log 1 meter long with a transverse handle-crossbar nailed to the end. Better compaction is carried out with a movable vibrating plate with an electric drive, the use of which, in addition, will save time and effort.
The type of geotextile used in this technology does not matter.
Calculation of the weight of building materials
Before proceeding with a set of materials, you need to make the correct calculations. Sand and crushed stone can lie until the next repair, while cement is not suitable for long-term storage. Therefore, it is first recommended to calculate how much building materials will be needed for work.
Depending on the type of soil, the thickness of the concrete layer is calculated:
| Swampy soil | Clay soil | Loam |
| Concrete - 7-8 cm
Gravel - 5 cm |
Concrete - 5-7 cm | Concrete - 10 cm |
In addition to the concrete masonry, it is necessary to take into account the sandy base, the layer height of which is from 10 to 15 cm.
The calculation of the weight of building materials is made according to the formula LxWxH, where D is the length of the track, W and H are the width and height, respectively.
For example, you need a track with a width of 1 m, a length of 5 m and a height of 0.1 m.The height of the sand cushion will be taken as 10 cm.
Then, according to the formula, you can get the following:
- with a volume of sand (building material is accepted according to GOST) 1x5x0.1 = 0.5 m³ - the weight of sand from the reference book will be equal to 775 kg;
- with a concrete volume of 0.5 m³, the average weight ratio will be 1075 kg.
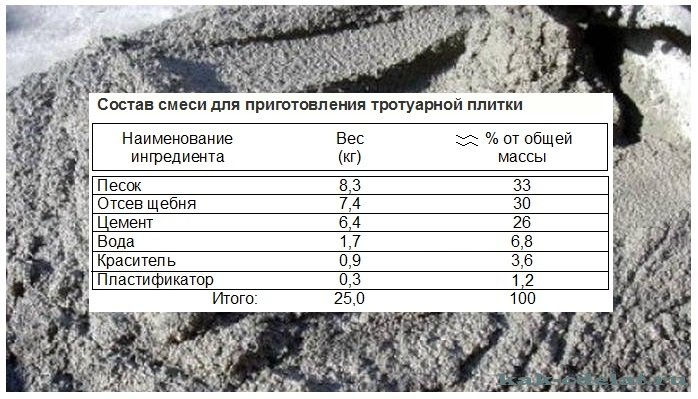
Based on the calculation of the proportions "cement-sand-crushed stone" in parts 1: 3: 1 and the total weight of a cubic meter of concrete, equal to 1075 kg according to the reference book (the total weight is divided into 5 equal parts), the following values can be obtained:
- cement - 215 kg;
- sand - 645 kg;
- crushed stone - 215 kg.
This means that for the construction of a simple concrete path 1 m wide, 5 m long and 10 cm high, 215 kg of road cement and crushed stone and 645 kg construction sand. All calculations are carried out without taking into account the addition of water and various pigment dyes.
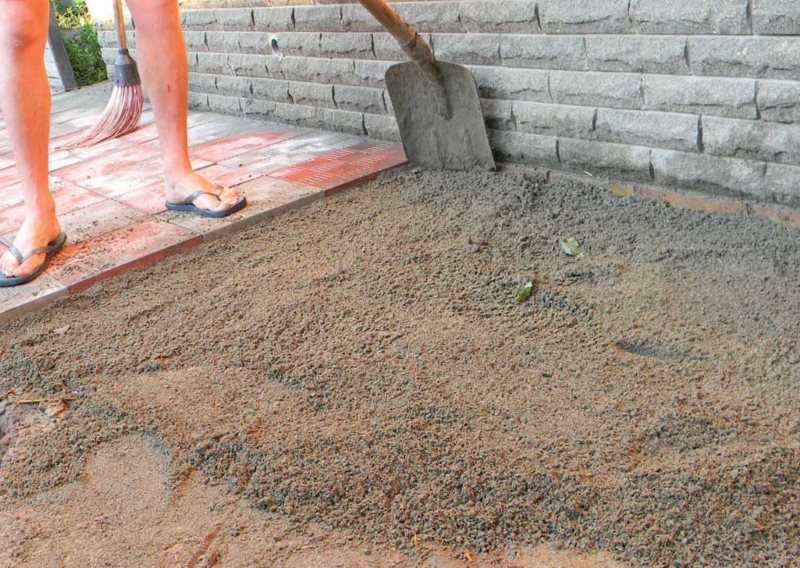
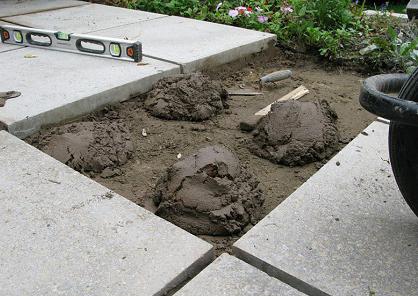
Algorithm for preparing the base
The base for the tiles is prepared in the following order:
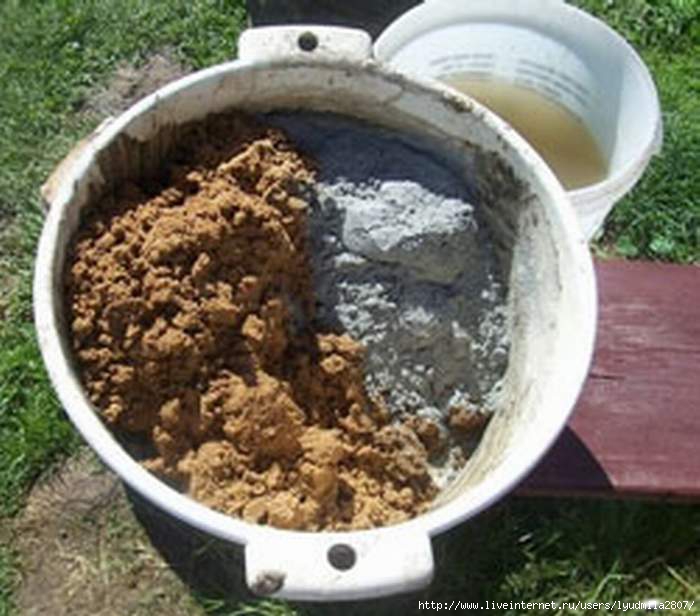
- Sand and cement are mixed.
- Add a plasticizer.
- Pour crushed stone into the resulting mixture.
- Gradually add water until the solution takes the form of a thick mass.
- Further, when you are sure that the solution is ready, you can pour it into the molds.
- Place the molds on the vibrating table. Grease the molds with oil and a special brush. The excess can be removed with a sponge or paper.
- Drying can take up to two days at a temperature of 15 to 25 degrees.
If everything is done correctly, you will get a good sample of decorative tiles, which, in their properties and appearance, are not inferior to those prepared at the factory.
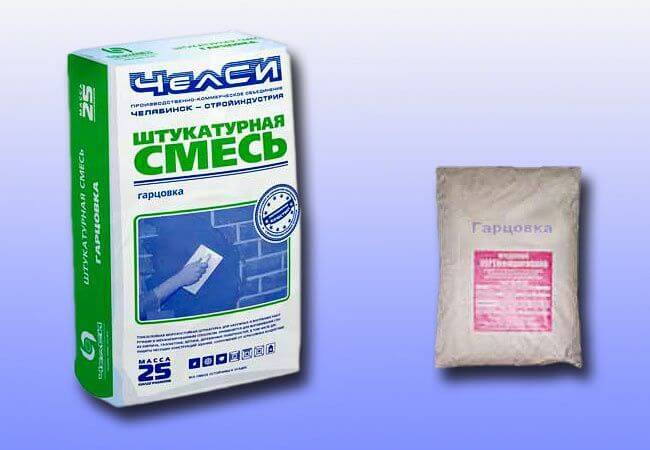
What types of gartsovka mixture are
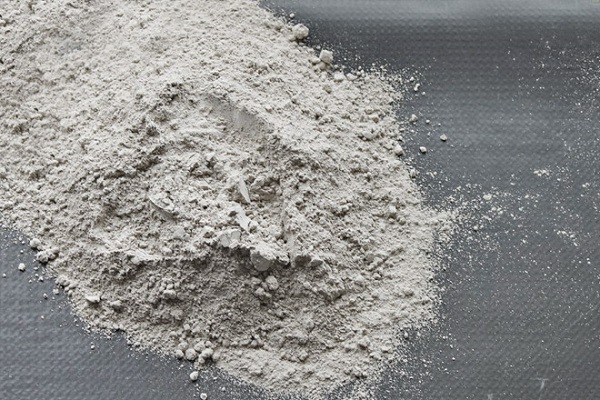
Depending on the area of application, the racer can consist of two or more components. The simplest composition, cement with sand, - such a mixture can be prepared independently, which is done when laying tiles. If you want to plaster the walls or ceiling, you can use a two-component composition of lime and dolomite, or expanded clay flour and gypsum.
If you need to fasten the masonry of bricks, cobblestones or other bulky material, then you will need to increase the adhesion force of the adhesive base. In this case, it is necessary to use a complex composition, including cement, sand, expanded clay, lime.
Construction mixture brand
Manufacturers offer 4 brands of building mixture: M1, M2, M3, M4. The numbers from 1 to 4 indicate the number of parts of the filler in relation to the binder.
For example, the grade of the M3 mixture means that the hartsovka consists of 1 part of cement and 3 parts of sand (or other element).
Differences in compositions
The formulations can vary according to the type of components used. Possible ready-mix options are presented in table 1.
Table 1. Types of pork mixture
By the number of components:
- simple - The composition contains only 2 components (filler - sand, expanded clay, calcium and marble flour or dolomite; binder - gypsum, lime or cement).
- complex - from 3 to 5 components are mixed (in addition to the main filler and binder (sand with cement), new binders are added: clay, gypsum, lime).
By fraction size:
- light - consists of components of small fractions (granule size reaches 1.25 mm).
- heavy - Includes components of medium fractions (granule size ranges from 2 to 2.55 mm).
Each type of mortar mixture is used for working with different types of masonry material. If paving slabs are laid out, then a simple two-component mixture is suitable for this (a simple option is sand and cement). If you plan to pave the paths with paving stones or large stones, then it is recommended to use a complex dry mixture.

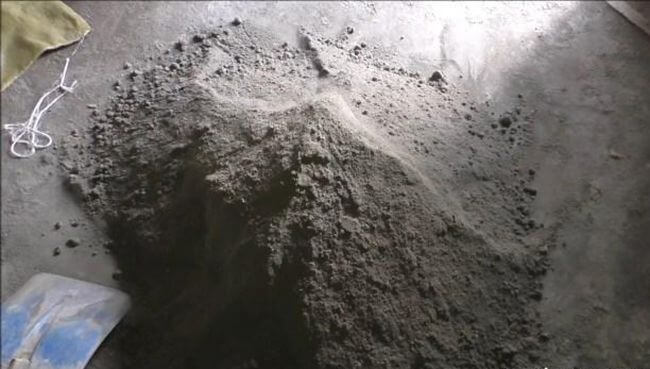
Vibration casting proportions
The proportions of the solution for vibrocasting take into account the following ratio of additives:
- М250 / В20 - a bucket of cement, 2 buckets of sand and 3.5 buckets of rubble.
- М300 / В22.5 - a bucket of cement mixture, 1.7 buckets of sand and 3.2 buckets of rubble.
- М400 / I30 - a bucket of cement mixture, a similar amount of sand and 2.5 buckets of rubble.
In addition to factory cements, homemade sand concrete can also be used for vibration casting. The concrete recipe provides for a combination of 1/3 of cement and sand. Liquid and dry mix volumes are determined by the weight of the final product.
For gray tiles
If a solution is being prepared for laying gray tiles in Moscow, the following factors must be taken into account:
- Region of use. The stability of figured products to negative temperatures depends on this nuance.
- Soil and climate conditions. If the region has high GWL values, frequent precipitation or high humidity, it will be necessary to reduce the W / C and add additives that improve water resistance to the paving slab mortar.
- Production technology. If the vibratory casting method is used, the surface of the paving stone will be flat and smooth. For the purpose of roughening, coarse sand is used.
If a special deep vibrator is used during the construction of monolithic buildings, then when laying tiles in a country house or near a private house, you can use the bayonet method inside the formwork using a vibrating table.
Such equipment solves two problems:
- Provides uniform filling of a rigid mixture with a minimum water-cement ratio.
- Removes air mixture from concrete, reducing porosity and providing a strong, fine-grained structure with low hydrophobic properties.
For colored
The surface of the tile is painted in layers by mixing or in mass. The first option is more affordable, but requires some skill and effort:
- For the tile, 2 portions of the concrete mixture are created - 2/3 of the volume of the gray consistency and 1/3 of the colored pigment additives.
- Colored concrete is placed inside the workpiece.
- The vibration equipment is turned on for 20 seconds.
- After that, the mold is poured with plain concrete and treated with a vibrating table for another 40 seconds.
- At the last stage, the mixture is wrapped in polyethylene and transferred to a drying place.
During the dyeing process, the color is added to the concrete mixer. The shade of the tile becomes pale, but even with intense abrasion of some elements, the design of the track does not change.
Choice of materials
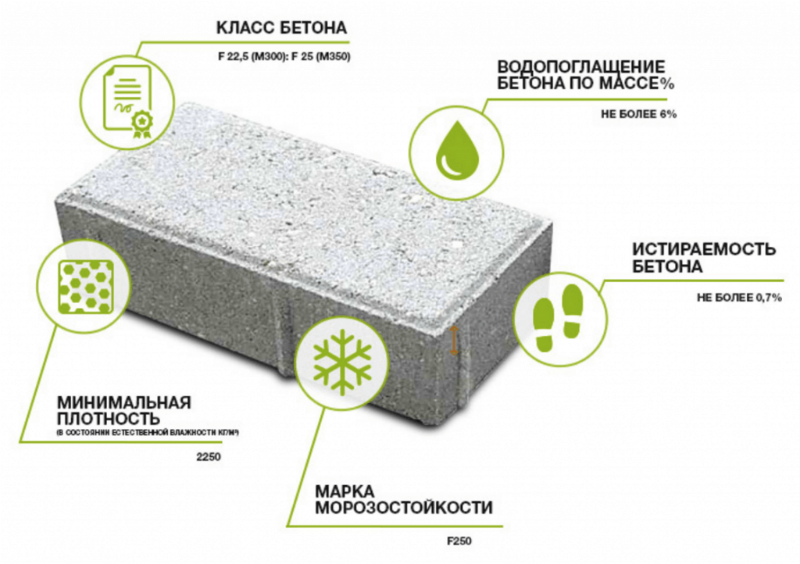
To create paving slabs with high strength, frost resistance and water resistance, it is important to select materials of the appropriate quality
Cement
The main element of any concrete is cement.For the manufacture of paving elements, you should choose medium-aluminate cements with a content of mineral additives of not more than 5%, as well as with a strength class of 42.5. On the packaging of such a binder, the CEM I 42.5 N or B grade is indicated. Medium aluminate cements include binders with a C3A content of 5 to 8%. You can find out the content of aluminates from the seller by asking for a cement passport.
Fine aggregate
It is best to use washed quarry sand with a fineness module of 2 - 2.5 as a fine aggregate.
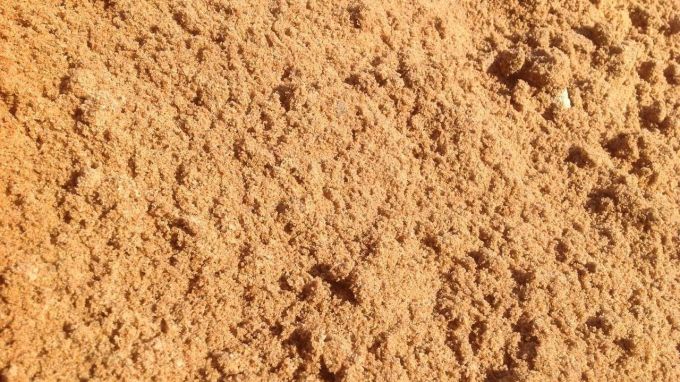
Such material belongs to construction sands of the first class, when using it, the composition of concrete is characterized by a lower consumption of binder and a low cost price with higher quality indicators.
Large placeholder
When using coarse aggregate, it is best to purchase crushed granite with a grain size of 3 - 10 mm. Such a material will provide an increase in strength and durability with a high mobility of the mixture. But its cost is high, so you can purchase a standard mixture of grains with a diameter of 5 - 20 mm and adjust the recipe by reducing the content of coarse aggregate.
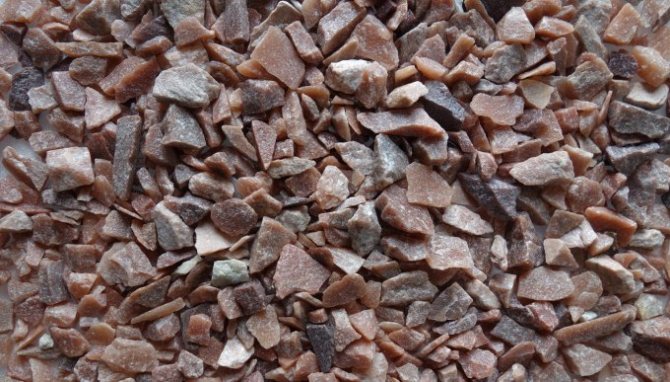
This approach will provide high mobility and uniformity during the formation of the stone frame in the composite body.
Advantages and disadvantages
The attractiveness of a tiled coating depends not only on the type of products, but also on the correct arrangement of elements on the surface. An important stage in the work is the preparation of the base for paving stones.
When choosing a laying method, it is recommended to take into account the features of the landscape, the properties of the soil. Sandy material is used for groundwater drainage. Moisture that comes with precipitation or during hydraulic cleaning of the surface penetrates through the seams of the styling elements.
The canvas is made up of separate pieces, movable relative to each other, so the coating retains its shape. The tile, located on a sandy base, provides ease of maintenance of the canvas.
If a piece of styling is damaged, it can be easily removed and replaced with a new one. It is recommended to buy materials for the arrangement of the territory with a margin so that a replacement can be made at any time.
Such structures have their own disadvantages, which can be caused by a violation of the technology of preparatory work. In the absence of a well-equipped drainage system, the sandy base is destroyed.
Arrangement of a water drainage system is an important stage in the design and implementation of work
The laying surface is designed for the maximum permissible loads, therefore, when arranging it, it is important to take into account the purpose of the coating.
The quality of the installation depends on the professional skills of the master. Therefore, it is recommended to contact companies that provide coating installation services.
In case of independent work, you need to carefully read the recommendations, choose high-quality material and equip the base, taking into account the water level and climatic conditions of the area.
Advantages and disadvantages
Parson mixture is appreciated for the following indicators:
- Strength. With dry installation, the coating is fixed as firmly as when using mortar.
- Durability. The coating laid on the grinder serves as much as that laid on the cement-sand mortar.
- Good maintainability. If the adhesive base is damaged, the sidewalk covering can be easily removed, the adhesive layer is replaced.
- Availability. The initial components (standard: sand, lime, cement) have a relatively low cost, moreover, they are easy to buy.
- Excellent adhesion properties. Gartsovka is indispensable for dry installation, when the addition of water during installation is undesirable.
- Environmental friendliness. The constituent substances do not contain chemical components.
- Ease of manufacture. The standard mix has only 2 ingredients that you can mix yourself.
- Cooking in any volume.The mixture does not solidify over time, unlike a solution, so it can be cooked in any quantity.
However, along with the advantages, the hartsovka also has disadvantages:
some inconvenience when mixing;
increased attention when dosing components.
It is advisable to prepare the mixture for work independently on a flat surface - experienced builders claim that this method of mixing the components will be of better quality than in a container. However, it is not always convenient to mix components right on the construction site.
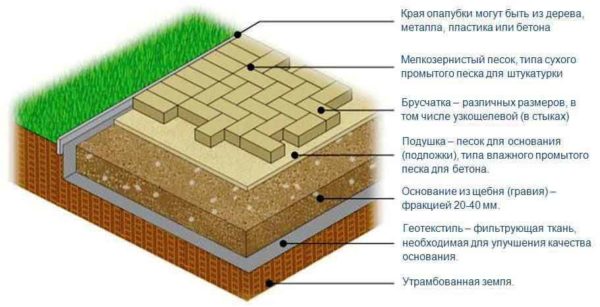
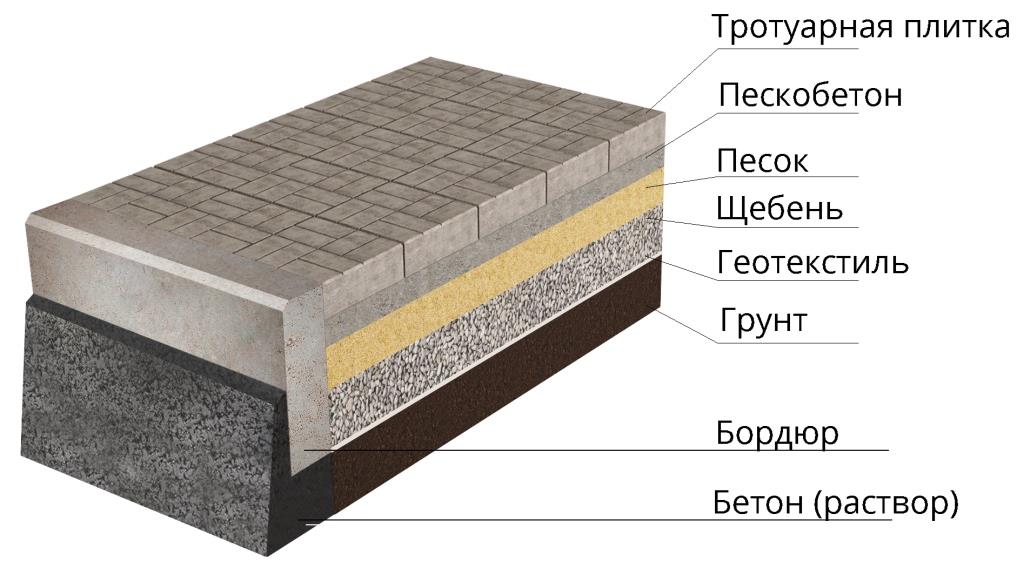
Preparatory earthworks
Further actions depend on which type of foundation is chosen:
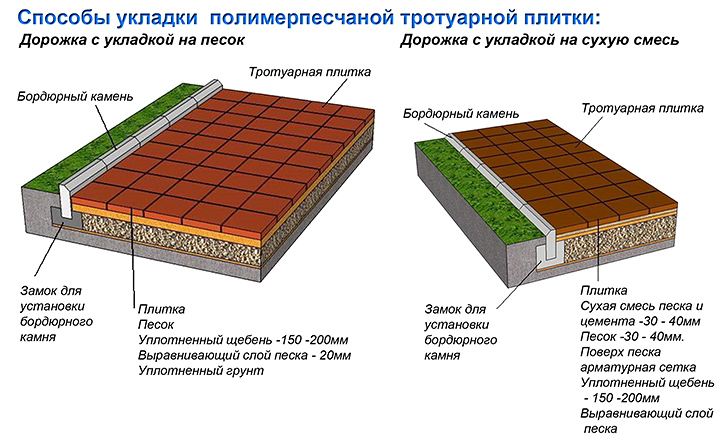
- sandy coating;
- sand-cement;
- concrete.
In the first case, the sand is rammed without the use of auxiliary materials. Sand-cement mixture is a more durable coating. After connecting the main components, the trench is backfilled.
The cement mortar is not prepared in this case, but a dry mixture is used. Filling with water is carried out after laying the base. To create a concrete coating, a cement mortar is kneaded. In this case, formwork is created, the sequence of actions in preparation for earthworks will be different.
The general stage for the formation of any foundation is excavation in the area where the tiles are planned to be laid. The work is done with their own hands, because in this case, you do not need to dig a deep pit, as under the foundation.
The main criteria to be guided by when the soil is excavated:
- the platform formed from the tiles must be flush with the ground, while using so many materials that after shrinkage this requirement is fulfilled;
- if the top layer of the soil is loose, it is permissible to equip the coating so that it is 2-4 cm below the surface of the earth.
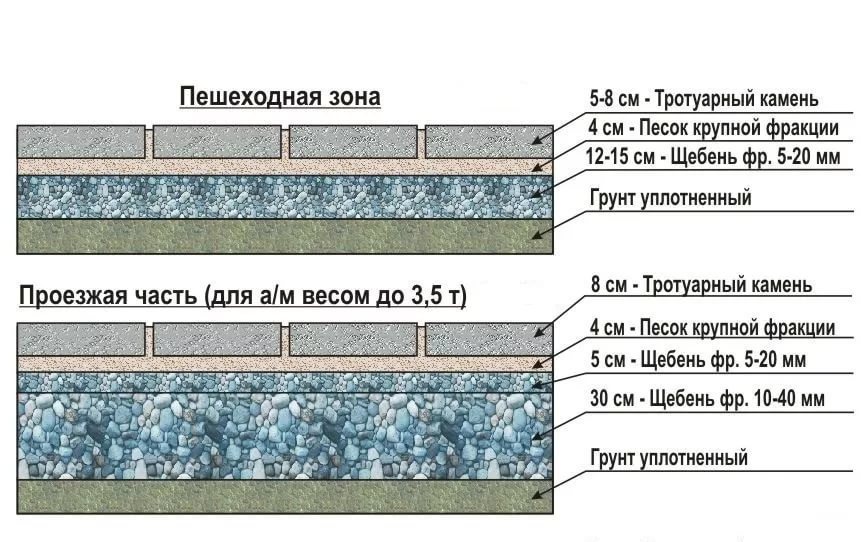
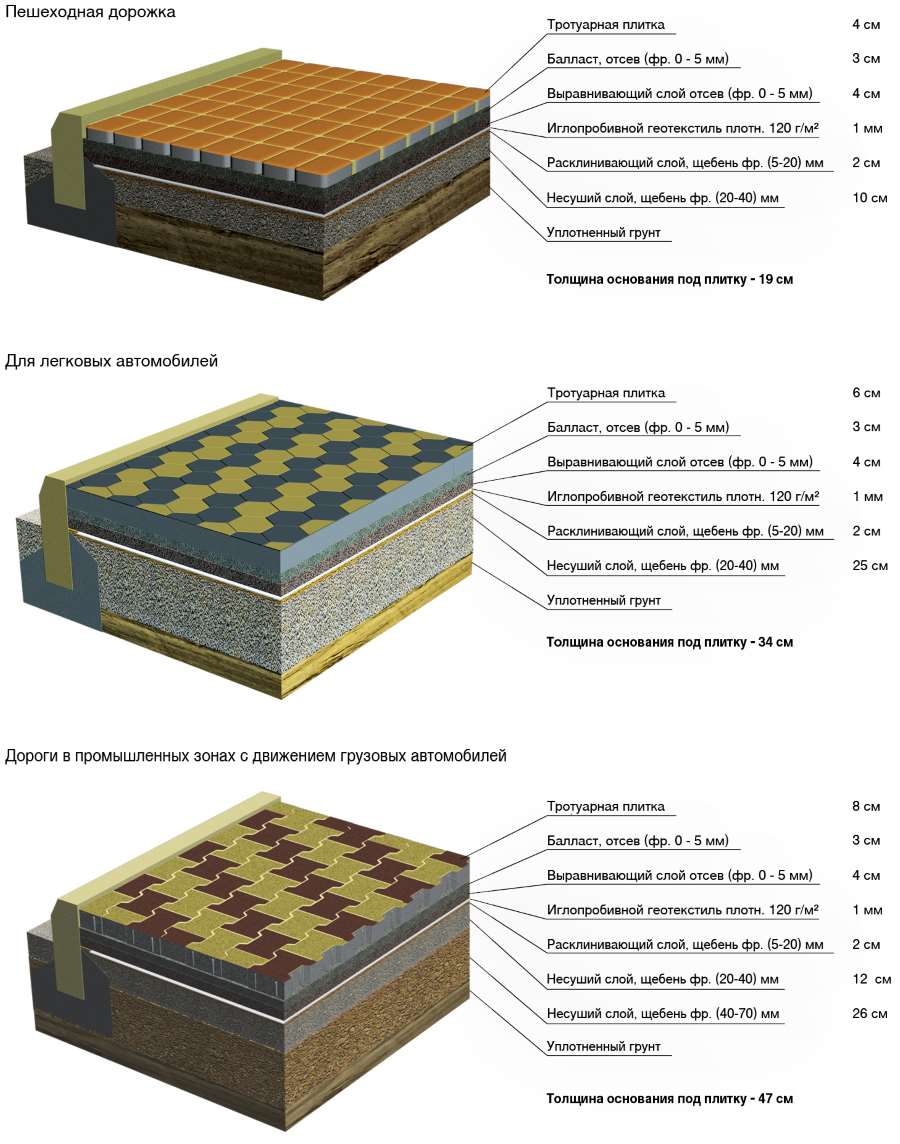
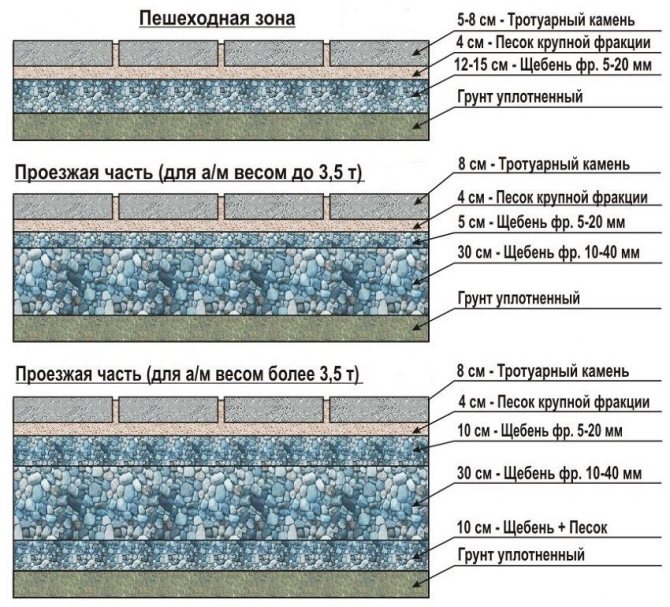
In both cases, it is important to take into account the shrinkage of the used bulk materials and soil. When garden paths and sidewalks are being arranged, in most cases the thickness of the soil layer that is removed is 20 cm
To make the coating of the parking area more durable, another 8-10 cm is additionally removed.As a result, the depth of a small pit reaches 30 cm.Material consumption will increase, since in this case it is necessary to create a reliable foundation that can withstand cars and trucks. cars.
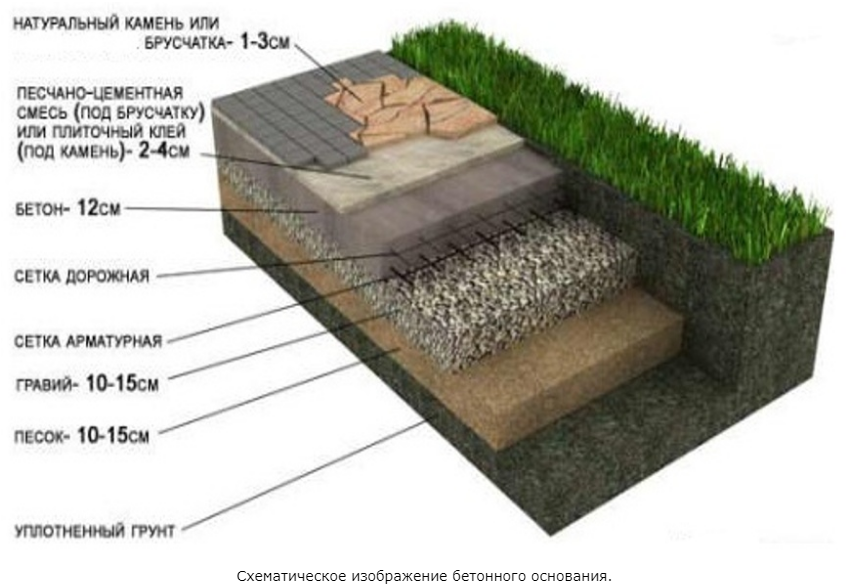
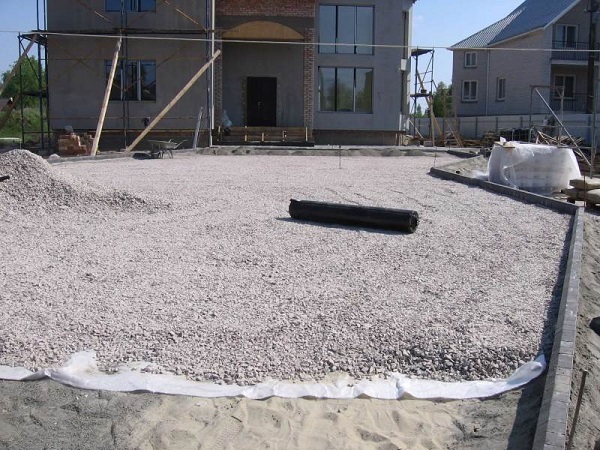
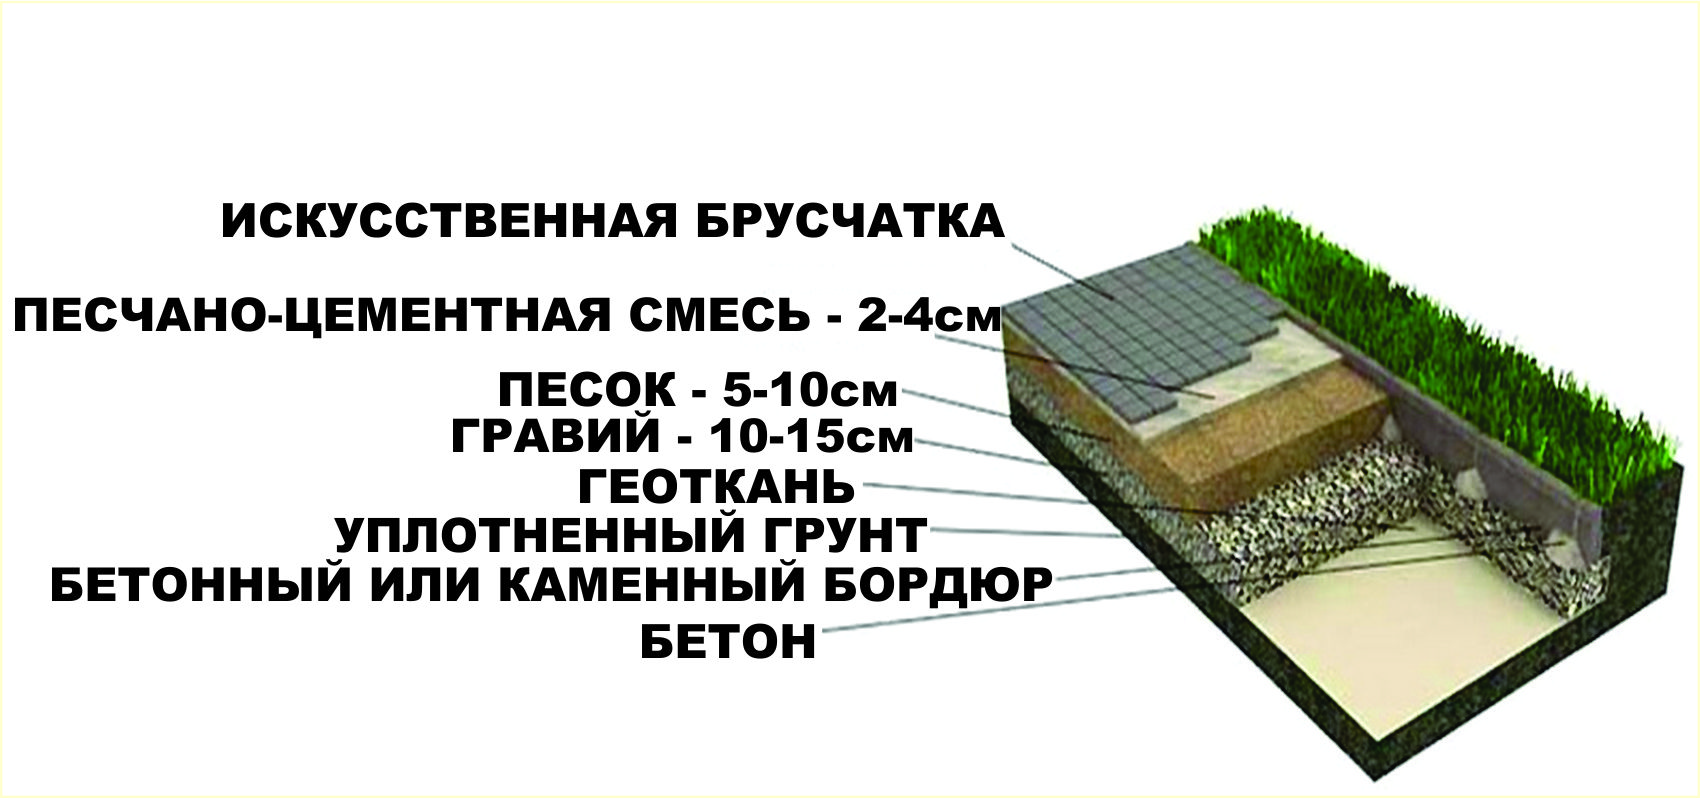
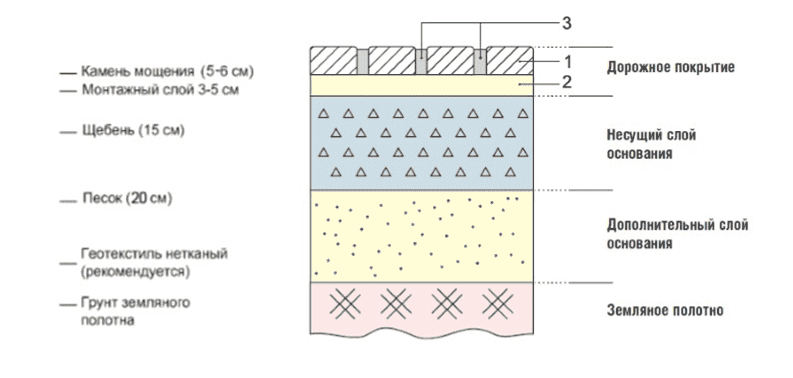
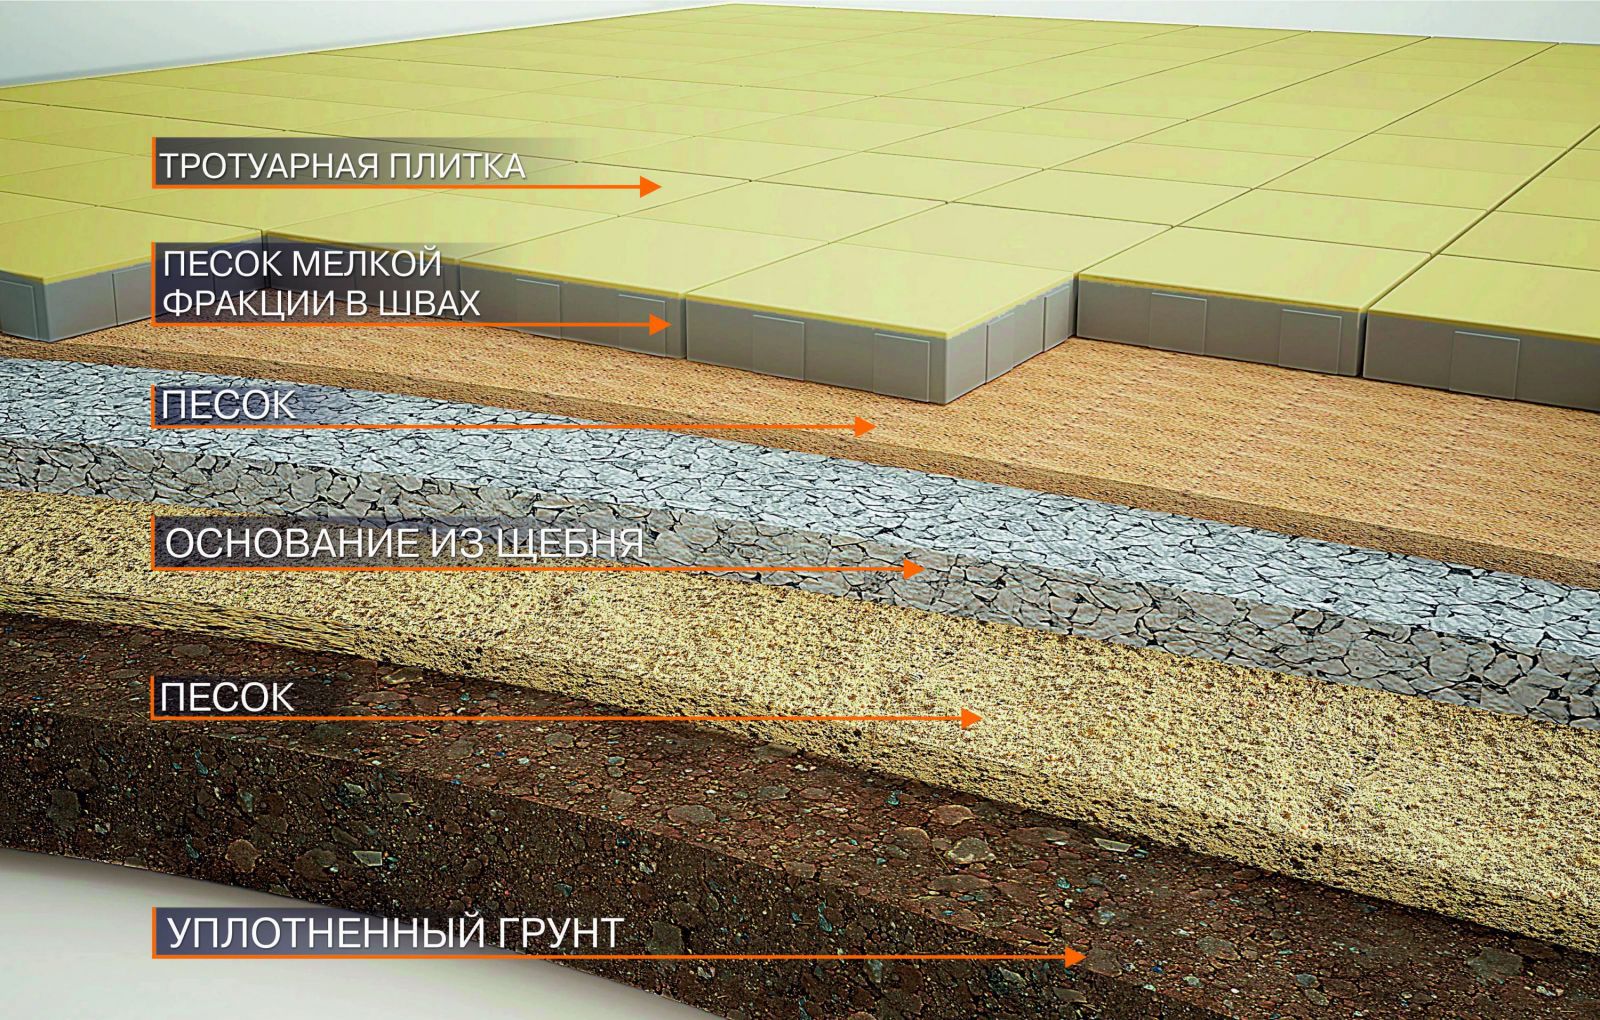
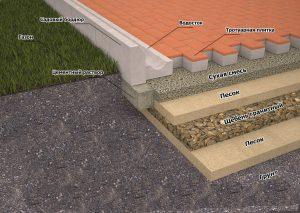 Sand and gravel cushion device.
At the stage of removing the soil layer, litter, stones, weeds are removed. If the topsoil is fertile, it is not recommended to scatter it along the construction site. Weeds will sprout here. It is better to use such soil for arranging beds and flower beds.
After removing litter and stones, a slope is formed in the direction away from the buildings (no more than 3%). The bottom of the trench is compacted. This will make the future coating more durable, since the risk of soil shrinkage under the weight of the materials used is reduced. Installed.
What is needed for work in order to properly lay the tiles
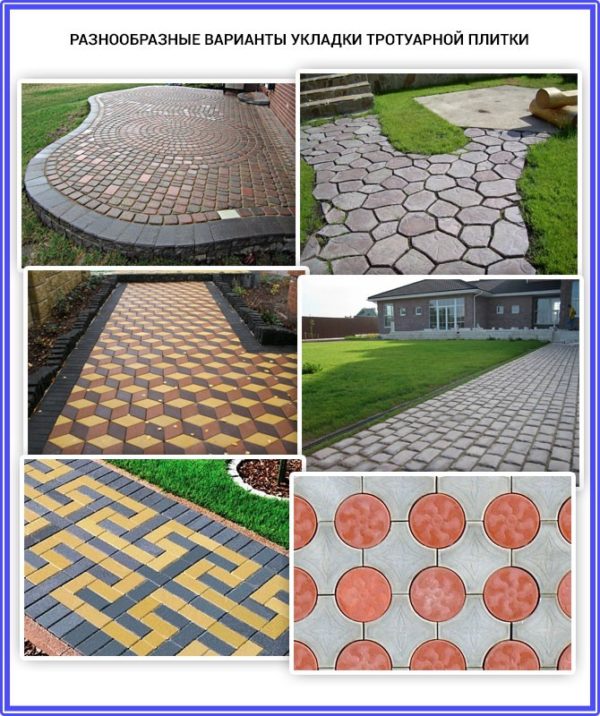
Laying paving slabs requires the implementation of certain points that will ensure the long-term operation of garden paths, eliminating the occurrence of irregularities. We carry out the laying of paving slabs on the sand step by step. Read about the composition of the grinder for laying paving slabs here.
Choice of tool and material
There are two criteria for choosing a tile:
- Performance characteristics;
- Colors and shape of the product.
If in the second case you are determined with the purchase based on taste preferences, then in the first case you will need the qualified help of a specialist.
The questions that he must answer you must be as follows:
- What is the maximum load the product can withstand?
- Is the tile surface smooth or rough?
- Will the tiles need to be trimmed?
- Will the selection of a drawing be required?
When the tile is selected, proceed to the selection of the tool for the work.
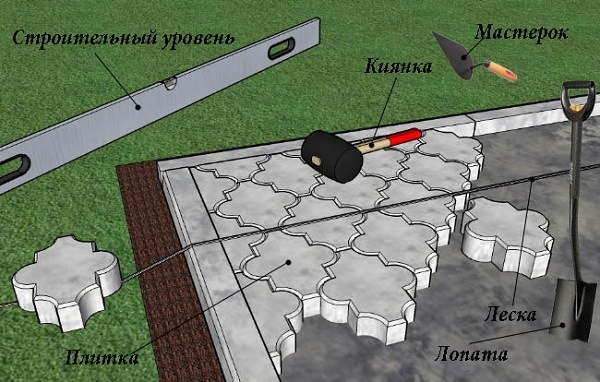
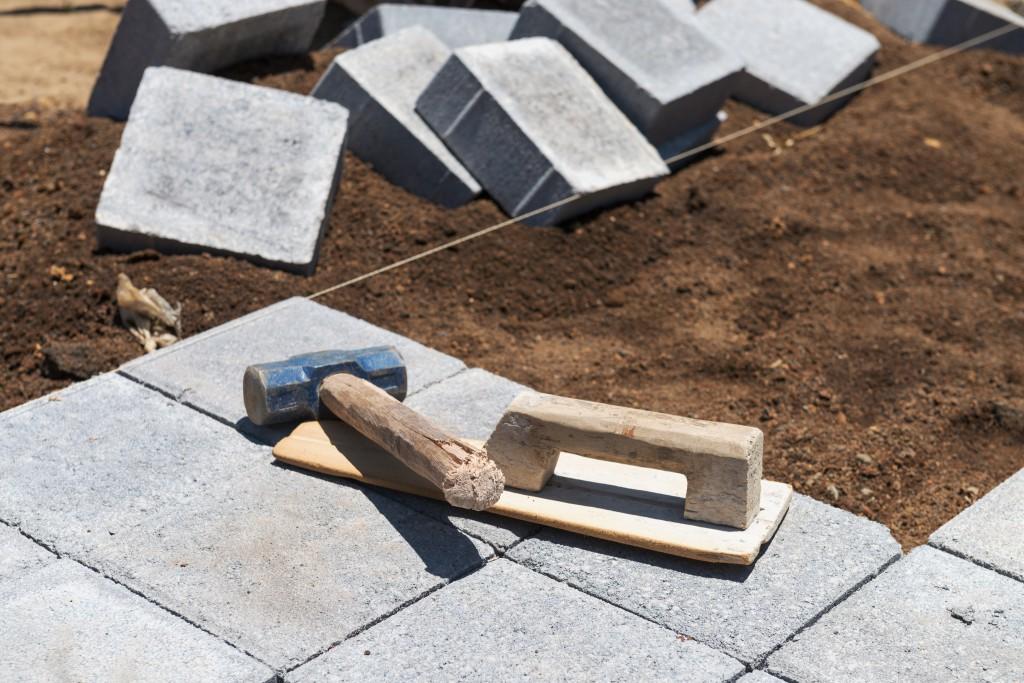
You should always have at hand:
- Master OK;
- Mallet made of rubber or wood;
- Rammer;
- Pegs;
- Cord;
- Construction level;
- Pipe of any diameter;
- Watering can;
- Rake;
- Broom;
- Cement;
- Sand.
To get started, you must also carefully calculate the number of tiles, taking into account the location and area of the paths.
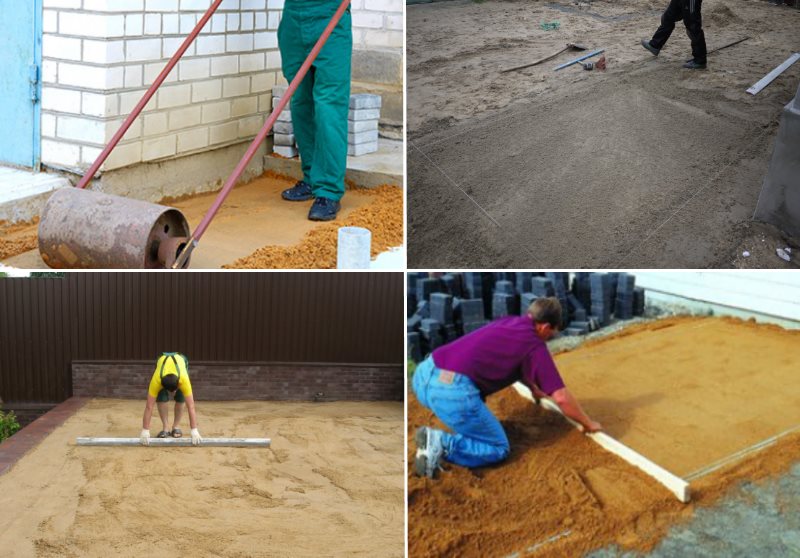
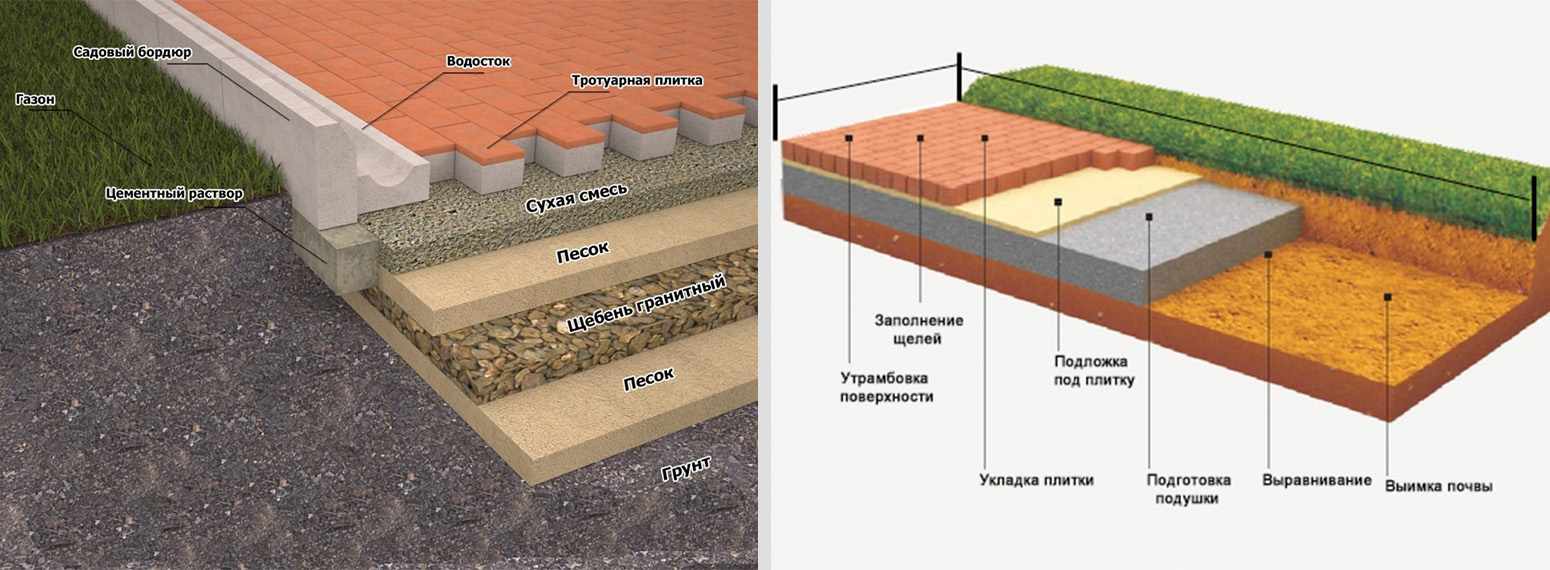
Base arrangement: thickness
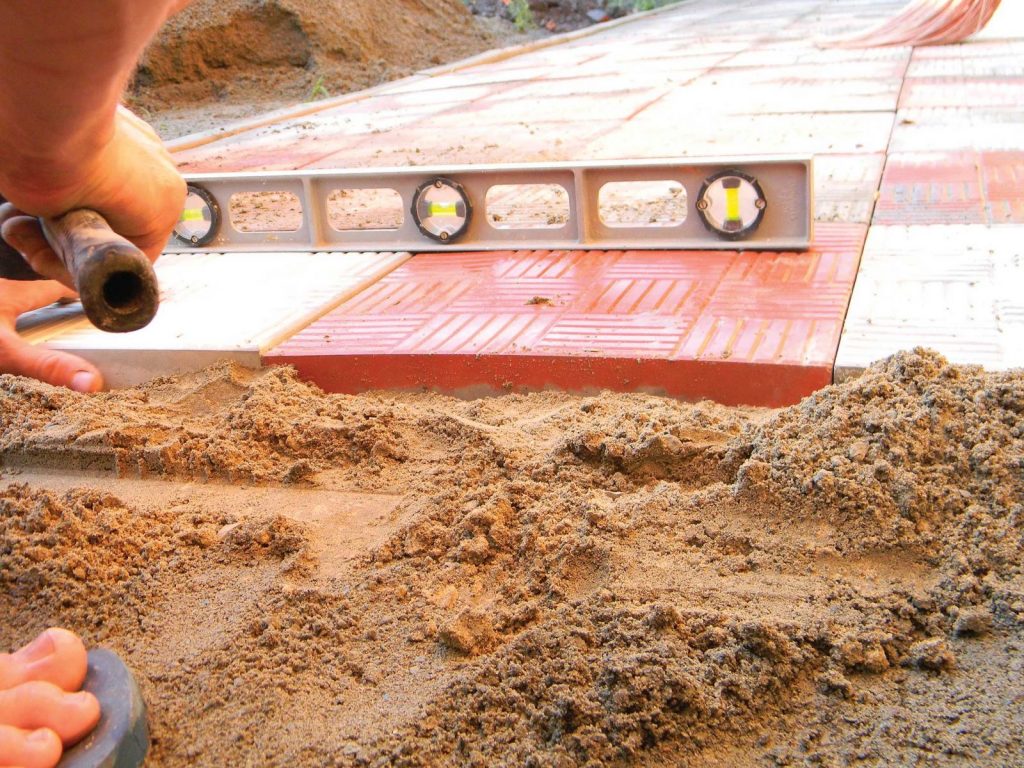
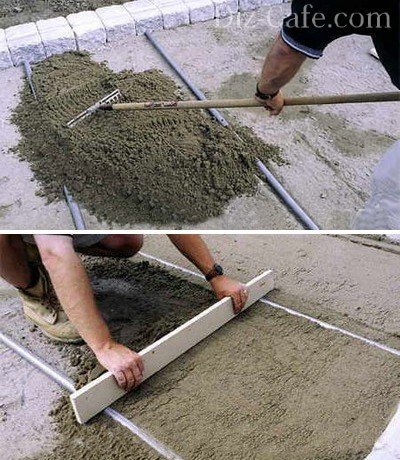
The most crucial step when laying paving slabs on sand is creating a base surface. The service life of the track or site and the success of the construction itself directly depend on its quality.
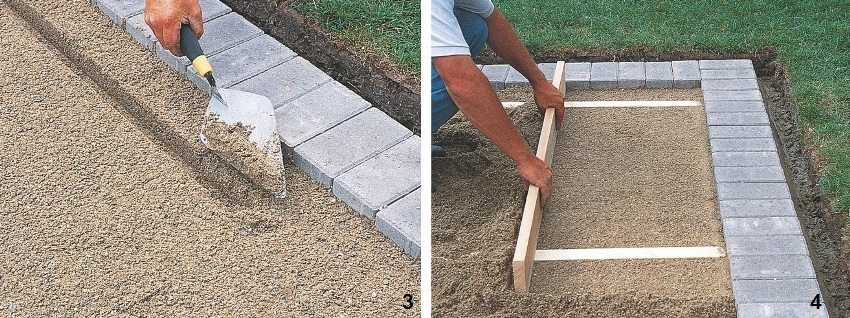
First, they limit the path along the edges, driving pegs about 7 cm high into the ground, and pull the cord at the level. Then the top layer of soil with vegetation and debris is removed. If the surface has irregularities, then on the hills a larger layer of soil is removed, and in places where there are depressions, it is poured.
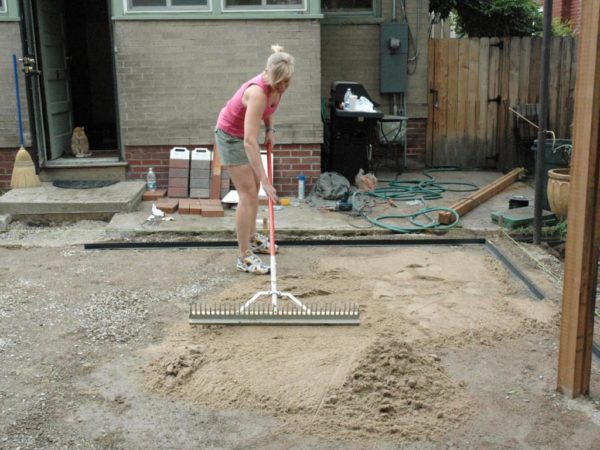
The entire area is leveled with a rake and carefully compacted to avoid unevenness during laying.
Video: technology, how to lay on sand
The video shows the technology and arrangement of the base for laying paving slabs on the sand:
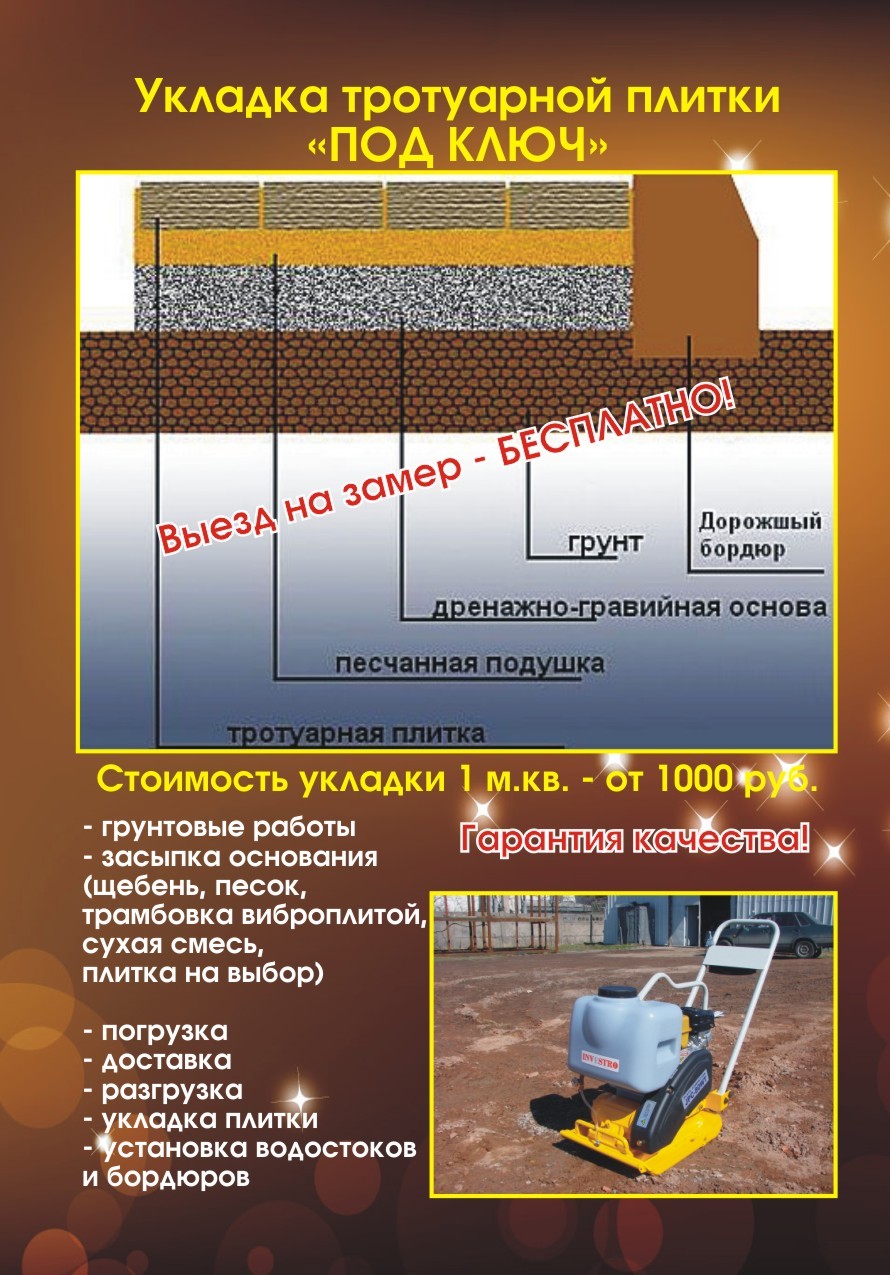
Creating a "pillow"
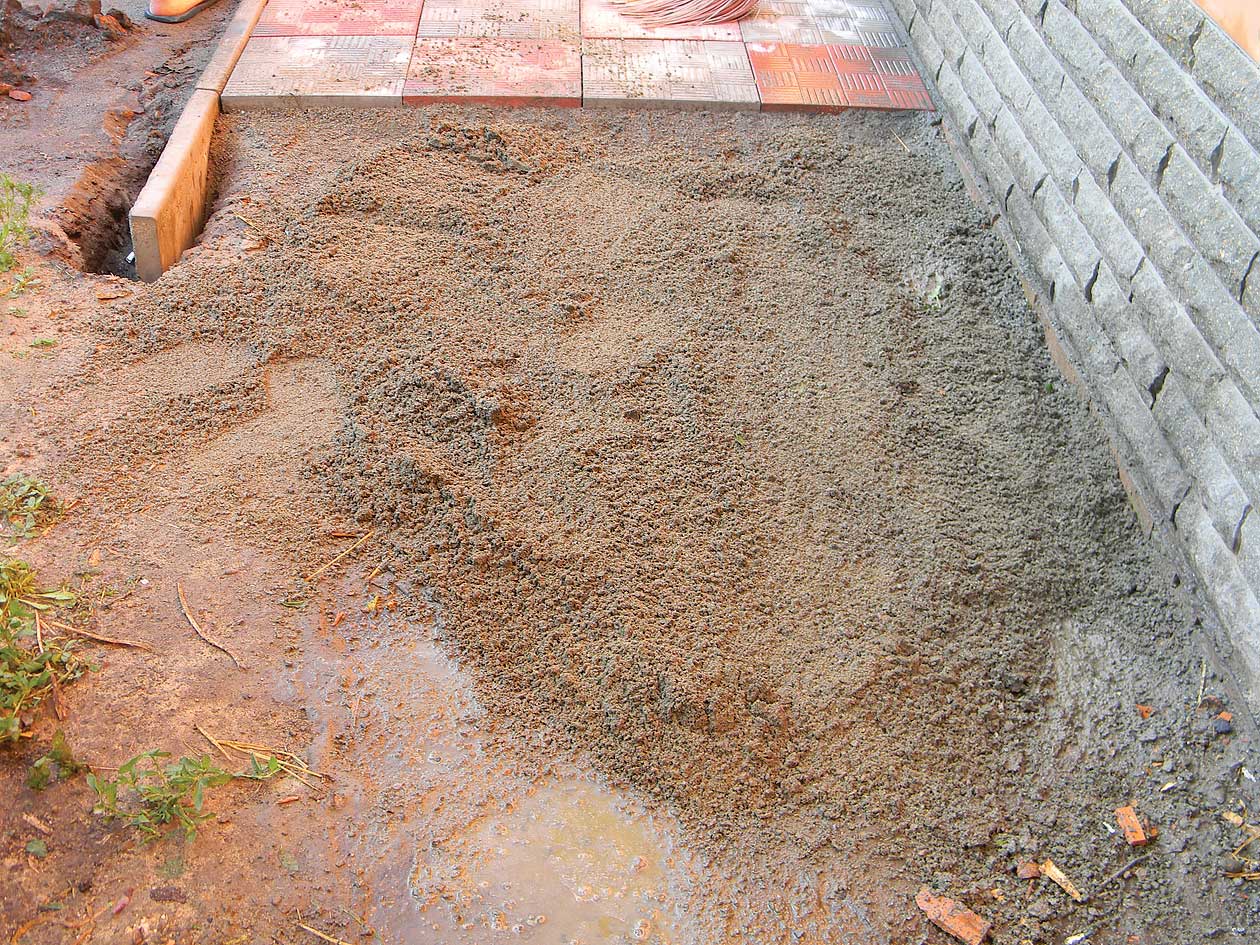
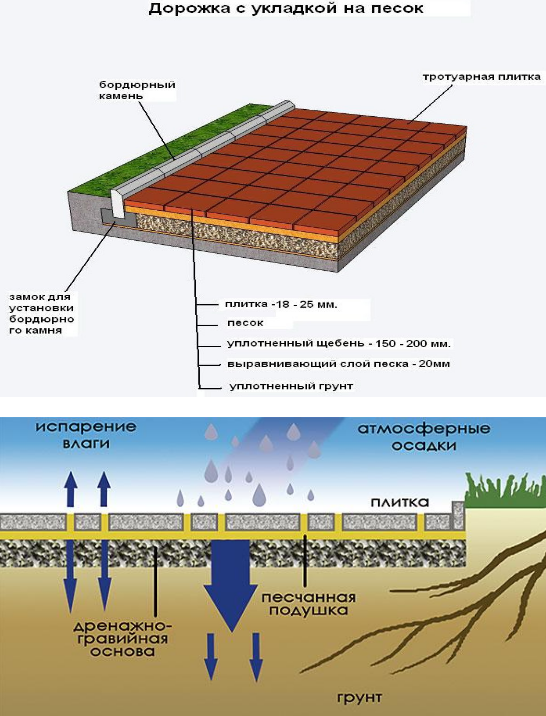
Prepared soil - the base for paving slabs, cover with a layer of sand, which will increase the stability of the sidewalk and will serve as a drainage system. What sand does it fit on? It is better to take medium-grained or coarse sand for the base. Read about paving slab laying schemes here.
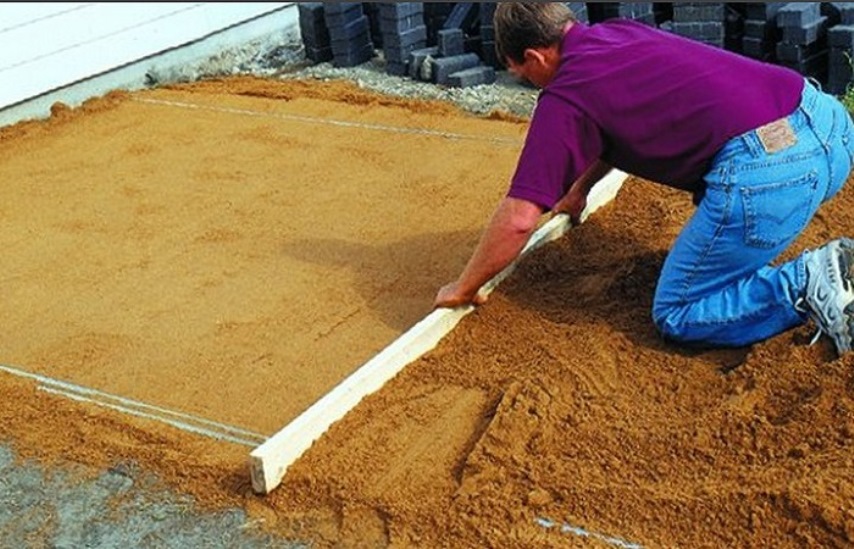
It is best to level the sand with a rake, then it must be poured with water until puddles appear on its surface. After 3 hours, level the sand layer with a profile or pipe. The coating can be made especially durable with a base made of crushed stone or mortar.
In the video: creating a pillow for laying paving slabs and rules on how to lay the tiles on the sand:
We spread the finished mixture on the sand. Advice: at each stage, it should be borne in mind that the future track should have a slope for water drainage. This will eliminate the formation of puddles on its surface during heavy rains.
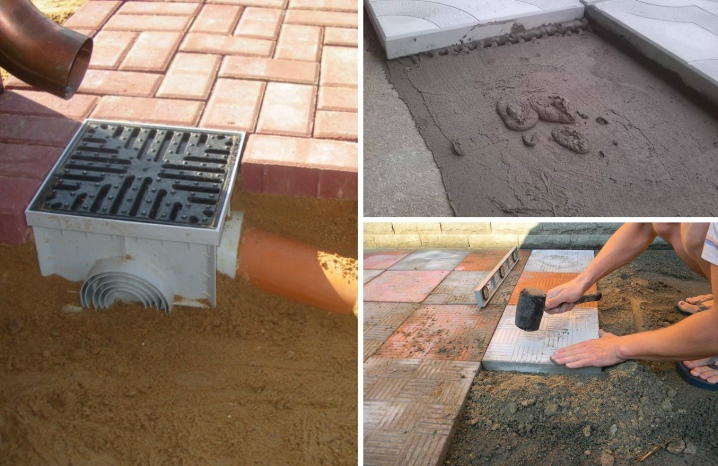
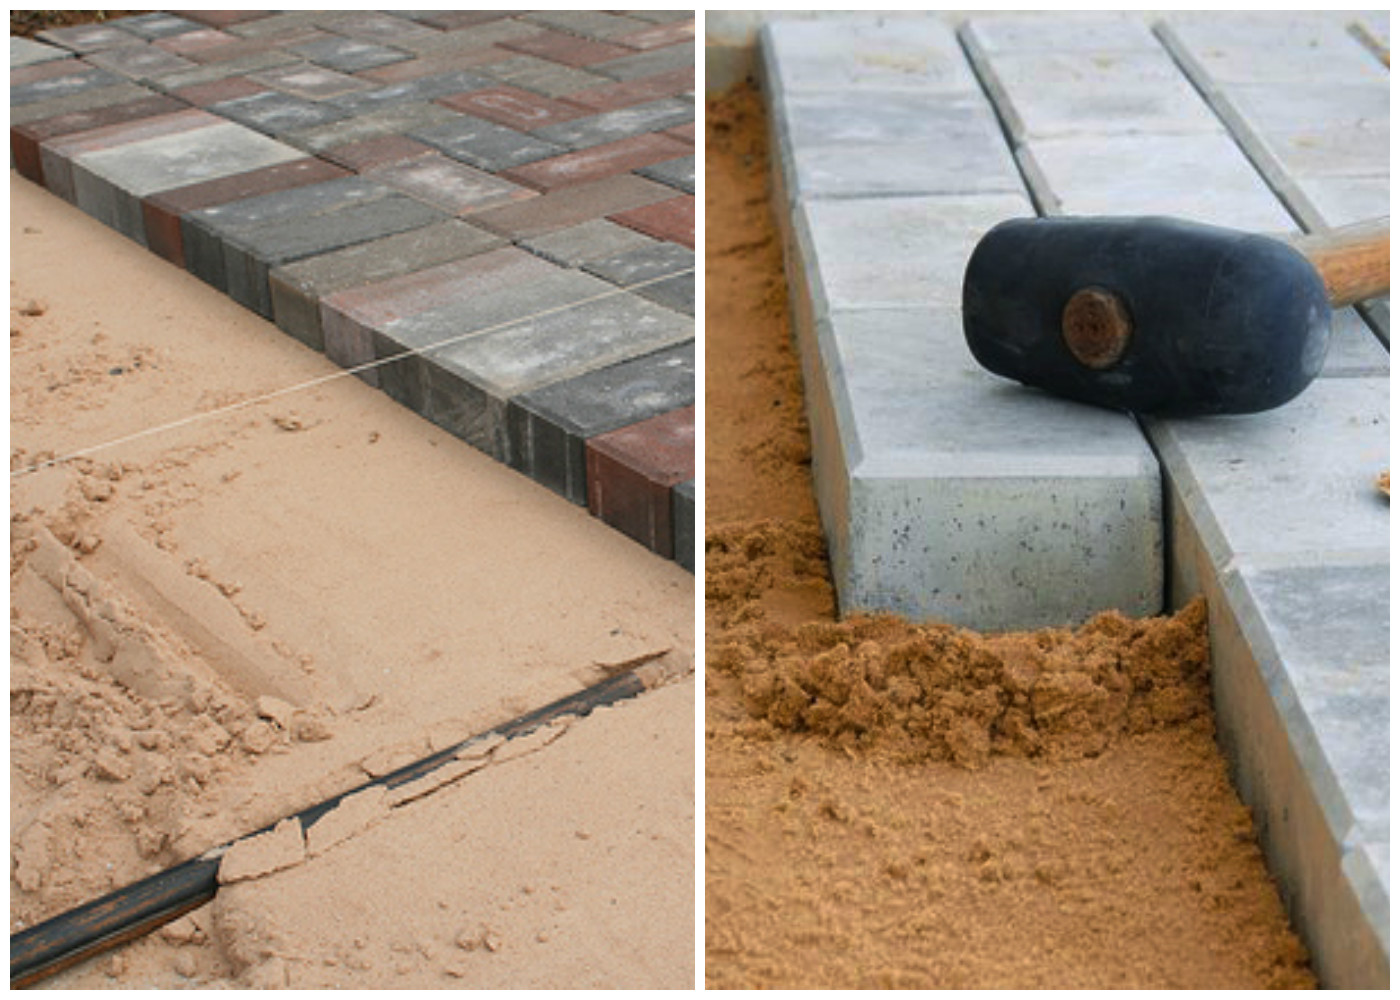
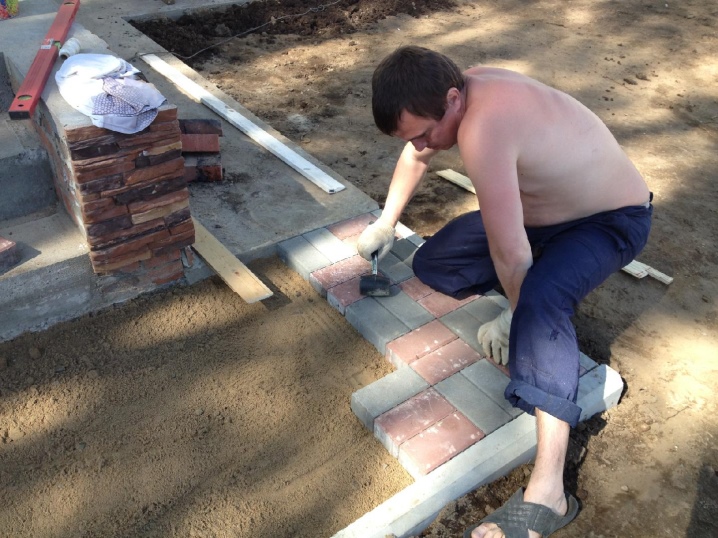
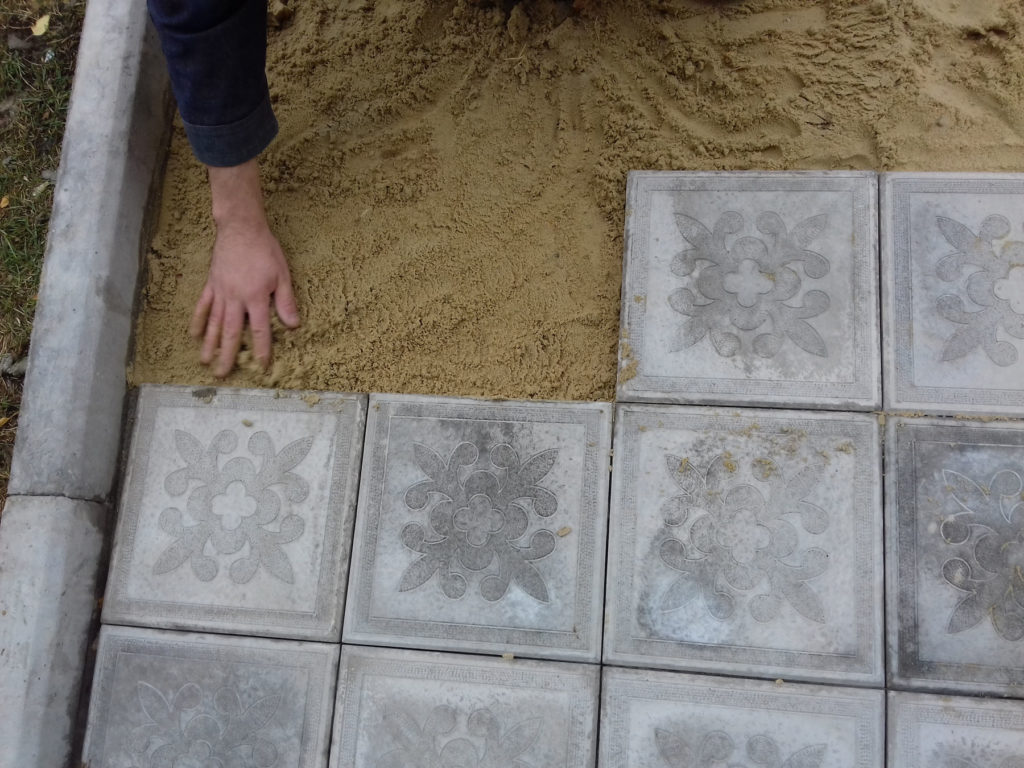
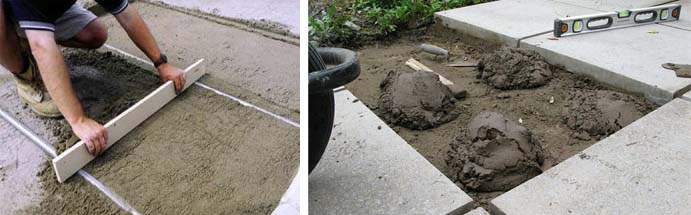
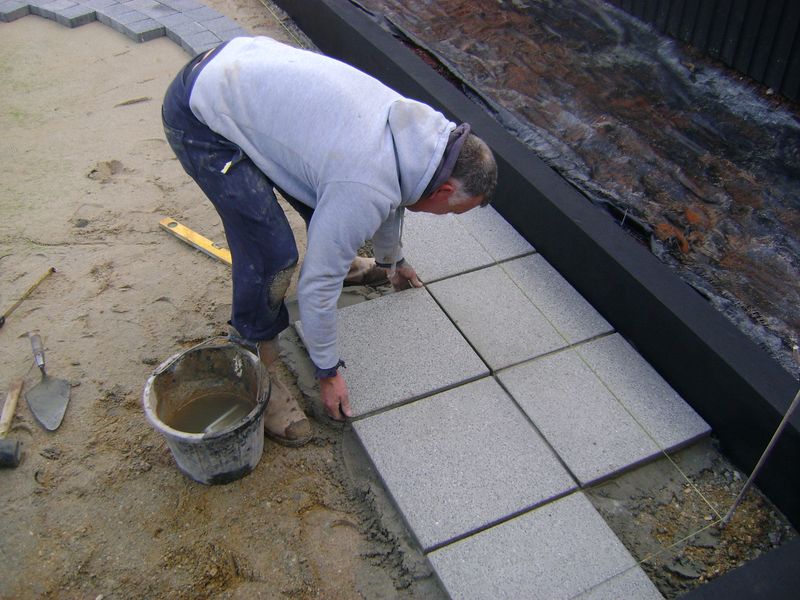
Laying and correct laying of paving slabs
To ensure even rows when laying paving slabs, you should start with the installation along the chamfer of the cord-ordering, and the laying should be started from the curb. We make the masonry from ourselves, and strictly adhere to the cord. About plastic, garden paving slabs at this link.
It is quite easy to achieve equal gaps between the tiles; it is enough to use crosses when laying. Sometimes the tile may not fit very evenly. In such cases, you can remove a layer of sand with a trowel or report it, and then tamp it thoroughly. As for the pictures of paving slabs, find out about the options in the article.
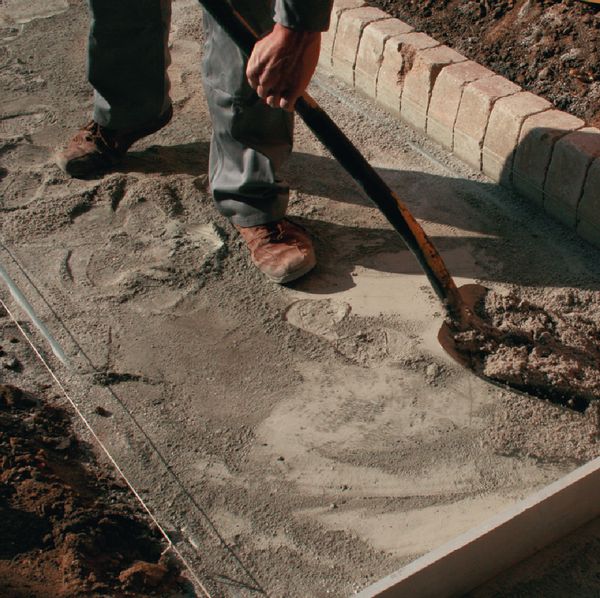
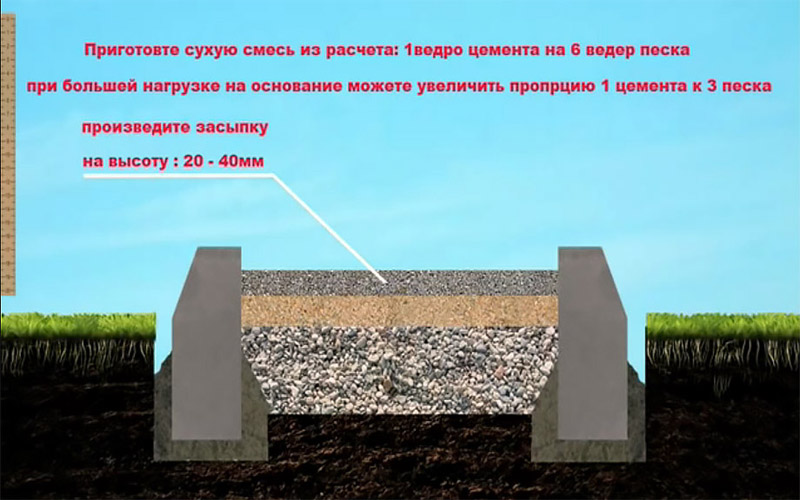
A perfectly flat coating surface is possible using a building level or a mallet. When the laying work is completed, we proceed to refining the joints by filling them with a cement-sand mixture. The sand for filling the joints must be very fine. To ensure that the mixture fills the seam tightly, water the seams with water.
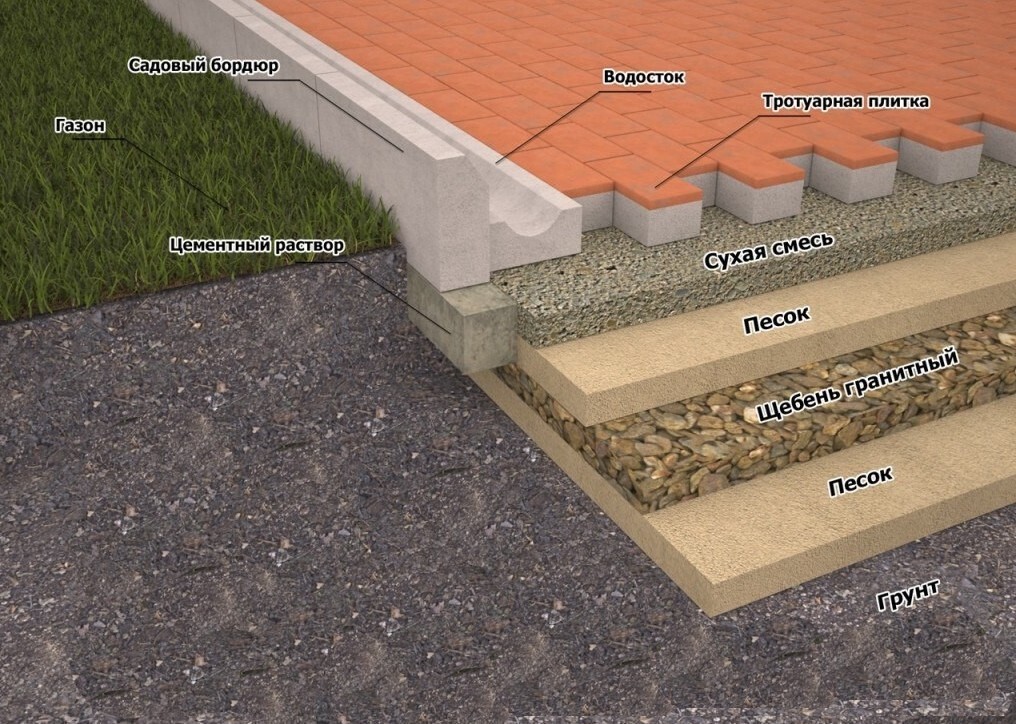
In places where paving slabs adhere to parts of landscape design or buildings, the edges of the tiles can be trimmed with a grinder. The installation of the curb will allow to avoid loosening of the tiles, and subsequently the spread of the path. Read about installing a curb for paving slabs in this material.
During the operation of the path, the sand in the seams can be washed out and it will have to be updated from time to time. Of all the methods of laying paving slabs, the method of laying on sand is the easiest to carry out work on your own. We also recommend an article about technology installation of a wet facade.
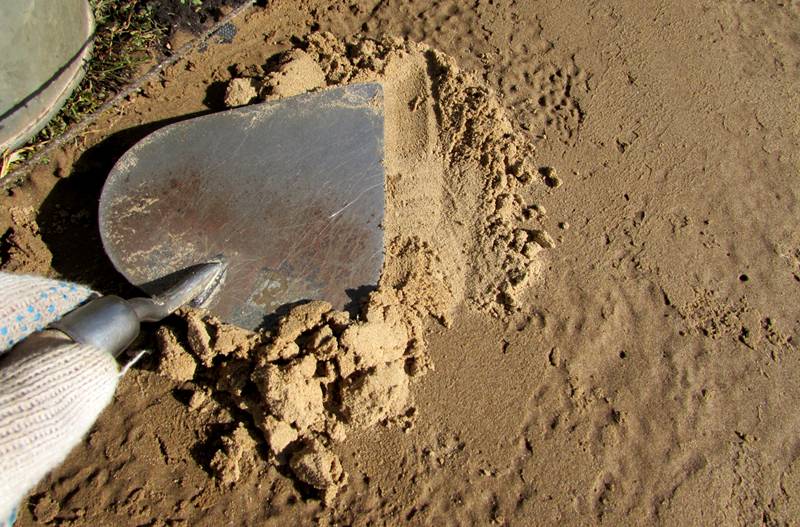
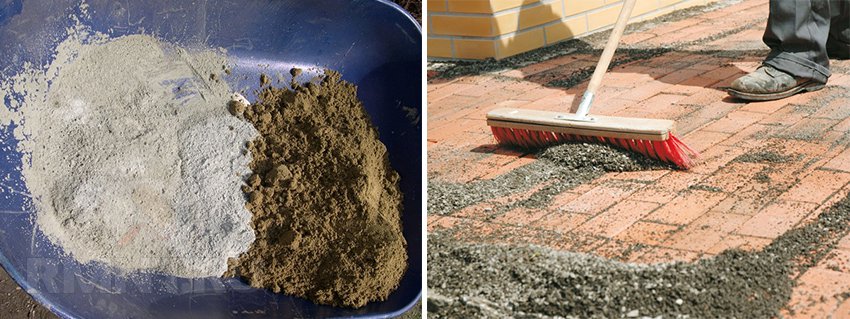
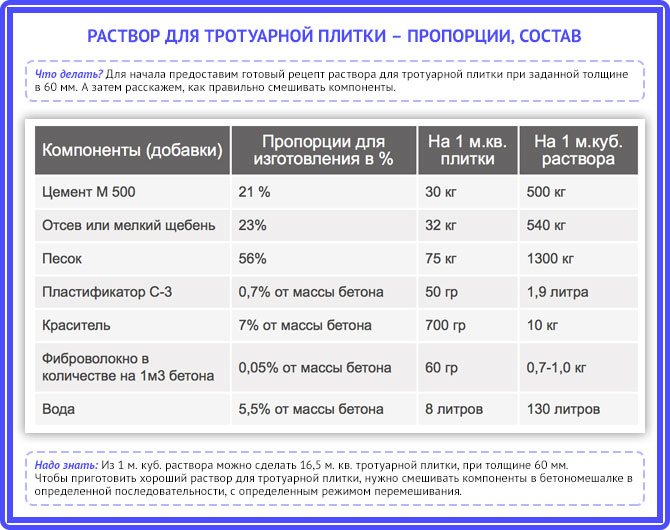
How to calculate the proportions for a cement and sand mortar suitable for making paving slabs with your own hands?
Experts in the construction business suggest that home production of paving slabs is somewhat different from industrial production, so it is not at all necessary to strictly observe GOST standards. But the main components remain the same as in government regulations. Here they are:
- Cement (means "broken stone" in Latin) is an inorganic binder, created artificially, used in construction.
- Sand is a small building material, which is a sedimentary rock or artificially crushed grains of these rocks (most often mineral quartz).
- Water is a liquid, in construction, especially for the manufacture of concrete mortar, not any water is used, but pure from any impurities.
The quality of the prepared concrete solution also depends on the quality of the listed components. This mortar of concrete made of cement and sand can be used both for the manufacture of the paving slabs themselves and for their laying.
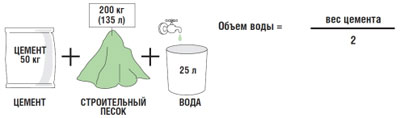
Most often, for a concrete solution intended for the manufacture of tile material for equipping paths in gardens and in personal plots, cement of the M400 or M500 brand is chosen. The proportions for it are as follows: 1 part of cement needs 3.5 parts of sand. And the liquid is added until the mixture is thick sour cream in consistency.
There are ready-made proportions calculated according to this scheme, where the usual ten-liter bucket is taken as a measure (it is most often used on the farm):
- cement (1 part) - 2 buckets;
- sand (3.5 parts) - 7 buckets;
- water - about 15 liters.
First, the dry components are mixed, and already in the resulting mixture, a little liquid should be added in small portions
How to check if the concrete solution is ready? To do this, it is enough to pay attention to its sticky qualities - it should not stick to the walls of the container in which it was mixed.
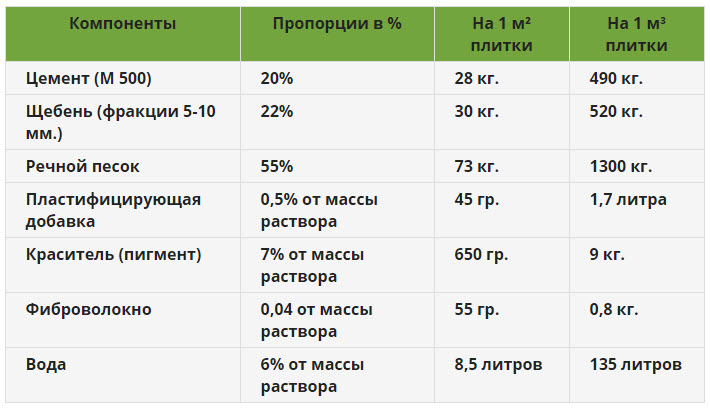
To improve the quality of paving slabs, crushed stone (for strength) and a plasticizer (for plasticity and toughness) are added to the main components. In this case, the proportions of the mixture will be changed (consider the option as a percentage):
- 23% cement.
- 20% sand.
- 57% crushed stone.
- 0.5% plasticizer (based on the total mass of cement).
And water will make up 40% of the mass of all dry components. Similar proportions are suitable for making paving slabs at home.
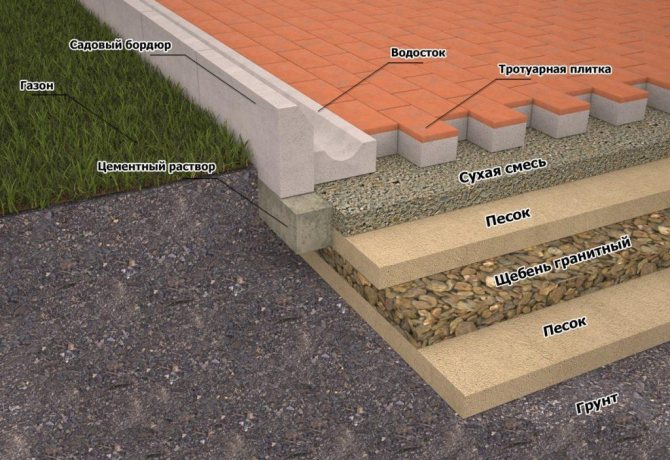
Base waterproofing
After the arrangement of the drainage, it is waterproofed. This event is intended to create protection of subsequent levels from ground moisture. It is advisable to use one continuous piece of material, since over time the joints diverge and begin to let water through. If the base for the site is being prepared, then the strips are sewn on a sewing machine and pasted over with aluminum tape on both sides.
The optimal choice for waterproofing is dense cellophane sold in rolls. The material is durable, flexible and resilient. It is not subject to rotting and decay. At the same time, the polymer does not emit harmful substances into the environment.
To increase its strength, it is advisable to fold it in half. The edges are pulled out to ensure a complete seal. Immediately after laying the polyethylene, it must be sprinkled with sand to prevent it from being blown away by the wind and damaging it with sharp objects.
Tile mortar composition
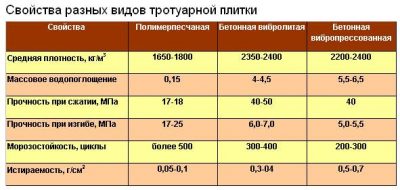
Required qualities for a tile composition:
- Abrasion resistance, wear resistance.
- Finely porous structure.
- Low water absorption.
- Frost resistance.
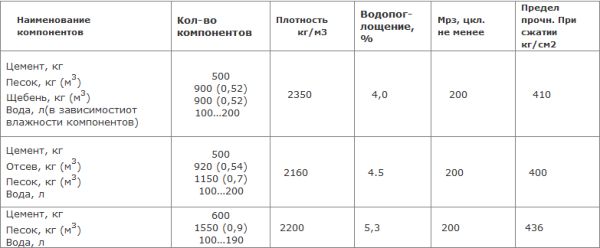
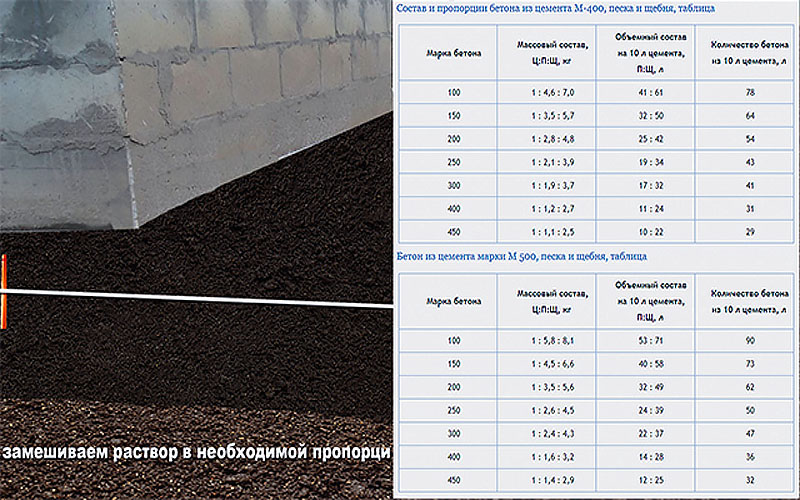
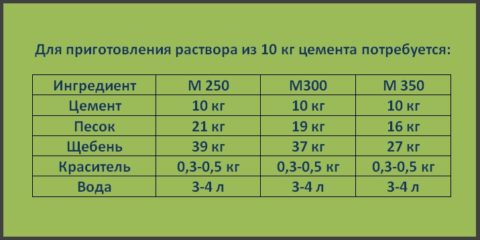
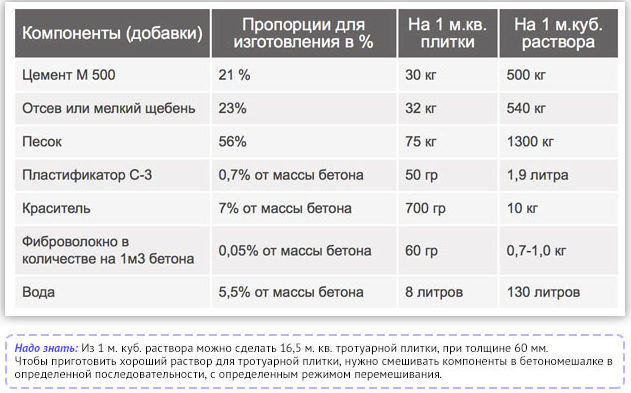
Table of proportions of concrete components when using cement grade M500 (cement, sand, crushed stone)
More about the components:
- Cement for paving slabs. For the preparation of concrete, cement is needed; for paving slabs, Portland cement of grade 500 and higher is used. Cements of lower quality will not be able to provide the required quality.
- Sand. Serves as a fine placeholder.A medium group of sand is used, with a size modulus of about 2 (according to GOST 8736-93), you need to use raw materials from river quarries. The sand should be sifted, without unnecessary impurities and debris.
- Crushed stone. As a large aggregate, granite chips are used, which improves the strength of the tile, its frost resistance. Fractions ranging in size from 5 to 10 mm, and needle and lamellar additions are less than a quarter of the volume of granular crushed stone. This material should only be used when washed. Crushed stone from igneous rocks is suitable, for example, granite, GOST 8267-82. Compressive strength grade is required from 1000 and above, and frost resistance above 200.
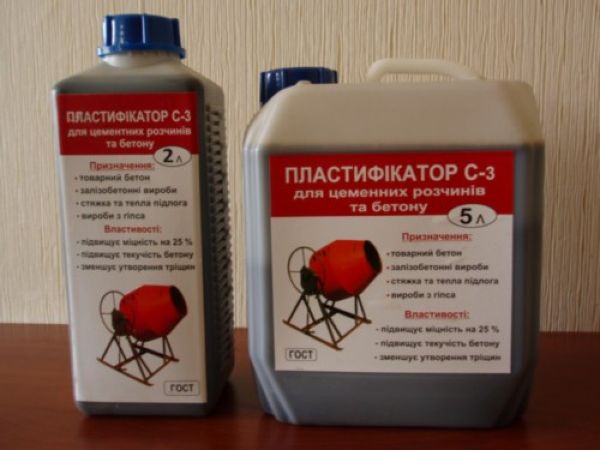
- Additives and plasticizers - give plasticity to the raw mass of concrete, prevent delamination and cracking both during drying and use, adds water-repellent properties to the concrete mixture, the product becomes less brittle. When using plasticizers, they should be pre-diluted in warm water, which will be added to the concrete solution. In this case, the addition takes place with constant stirring of water and the gradual addition of the plasticizer. Plasticizers are added in a proportion of 0.5 to 1% by weight of the cement.
Plasticizer imparts plasticity to the mass
To achieve high strength characteristics, polypropylene, polyamide and alkali-resistant glass fibers can be added to the concrete composition, in a mass of about one kilogram per cubic meter of mortar.
- Dyes. The variety of color palette of tiles is carried out by adding dyes and pigments to the concrete mixture. The requirements for dyes are high resistance to ultraviolet light and alkalis, since the paving surface will have to experience large solar loads, and cement has alkaline properties. Pigments, like plasticizers, are first mixed in water, and then the mixture is added to the cement. It should be added in a proportion of 3 to 15 percent to the volume of cement, depending on the desired color saturation. It is not recommended to add too little or, conversely, a lot of dye, since a small amount gives a bad color, and a large amount lowers the strength characteristics of concrete and increases the requirements of the solution to water. The proportions are indicated in the instructions for the pigment from the manufacturer.
- Water. Here it is worth strictly following the recipe, since an excess amount of water will lead to an increase in the drying time of the finished tile and a decrease in its quality. Water should be taken free of dirt and impurities.
Step-by-step preparation of the solution
Now we will consider several options for the correct preparation of a solution for the production of paving slabs. Let's start with the simplest methods and gradually move on to more complex ones. Recent Entries
Chainsaw or electric saw - what to choose for the garden? 4 mistakes when growing tomatoes in pots, which are made by almost all housewives Secrets of growing seedlings from the Japanese, who are very sensitive to the earth
When you are preparing a mortar for the production of paving slabs at home, it is not necessary to follow the norms that are recommended for businesses. If you try very hard, then any recipe for a concrete mixture can be used to produce this material. A few of the most common ones are listed below.
Preparation of dry cement-sand mortar in a ratio of 1: 1.5. Gradually add water to the sand and cement and bring the mixture to the consistency of thick sour cream. For better mixing it is necessary to use a perforator or drill equipped with a mixer attachment. When the desired consistency is obtained, we lay it out in prepared forms.
Another way to prepare a mixture for paving slabs. You need to take two buckets of sand and fill it with six liters of water, and then mix everything thoroughly. After that, you need to add two buckets of cement to the mixture.
When the mixture is ready, you need to fill in five more buckets of sand, carefully fill everything with water, which will take about six liters. The result should be a thick solution that should not stick to the trowel. The finished mixture must be mixed for several minutes, and then loaded into the mold.
If a plasticizer is added to the finished solution as an additive, then the properties of the composition expand significantly. The composition acquires elasticity and becomes more resistant to low temperatures.
When adding plasticizers, care must be taken to keep the composition thick. When the mixture is ready, it is distributed among the molds, and then the tiles are formed by vibration.
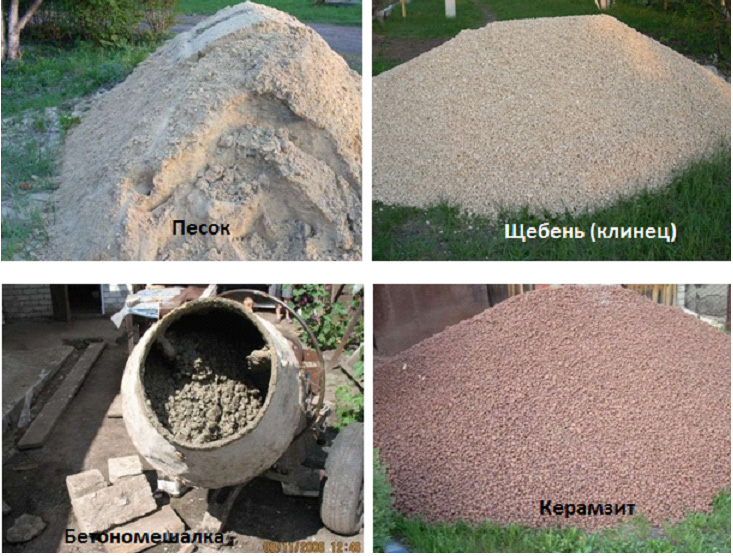
To increase the strength of the solution, it is necessary to add crushed stone, screening or microsilica to the composition. In this case, there is no need for a hammer drill. If you use a mixer for stirring, then breakage cannot be avoided. It is best to use a shovel. To make it easier for yourself to prepare the mixture, you can use a concrete mixer.
If paving slabs are planned to be manufactured on a production scale, then it is necessary to approach concrete preparation more responsibly. It is necessary to familiarize yourself with the norms of the state standard in advance and adhere to these parameters when preparing the mixture. It is necessary to approach the selection of material with special care.
It is also important to take into account the brand of cement, which must be at least M500 and not contain additives. Crushed stone for the preparation of the mixture must be used granite, fraction 5-10 mm
Supplements must be used without saving.
For staining, it is best to use an imported color scheme of German or Czech production. If the choice fell in favor of a dye of domestic production, then the bookmark should be increased by 80%. The dosage of cement and dyes cannot be changed, otherwise it will affect the quality characteristics of paving slabs, its color will be unstable.
Features of the preparation of the plasticizer
It should be remembered that the preparation of the plasticizer must be taken care of in advance. This is done as follows. Plasticizer C-3 is poured into water heated to 40 degrees. Here it is necessary to adhere to the ratio of 1: 2. Then it is mixed for 15 minutes with a perforator with a mixer attachment. When mixing is finished, the solution must be left for a while.
It is best to prepare the solution in the evening. In the morning, when the preparation of the concrete mixture begins, it will be enough to stir the mixture for 15 minutes, after which it can be used.
All materials that will be used to prepare the concrete mixture must be located within walking distance. It is advisable to determine in advance how many measuring containers will be used for each component of the mixture.
The workplace should be equipped as follows: cement, sand and crushed stone are poured onto metal sheets that are laid around the concrete mixer at a swing distance. A container is located nearby, which must be filled with water in advance.
Laying sandstone with your own hands
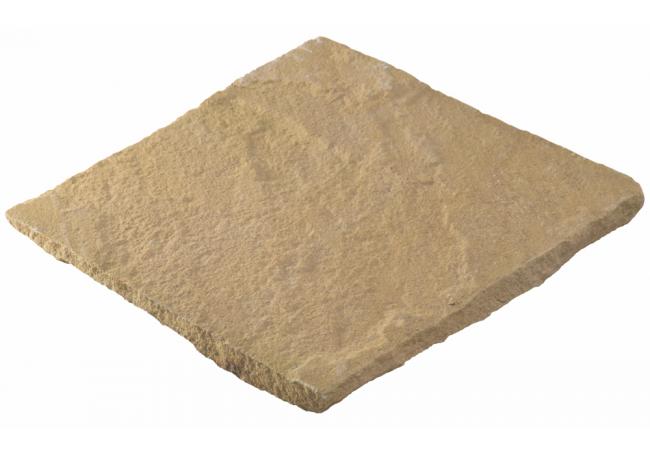
First of all, you need to wash the sandstone - do-it-yourself laying is done only with clean stones.
Use a brush for best results. After, spread the plates to dry.
Drying can be combined with a preparatory stone layout to present the final result.
Cutting with a grinder to give the desired shape is easy, but do not overdo it.
All the beauty of natural material in its minimal processing.
Stones with different thicknesses, hit with a hammer to the same level.
The final touches in the styling - cleaning from drops of solution.
Such paths are rarely framed by a curb, more often they level the ground levels and paths.