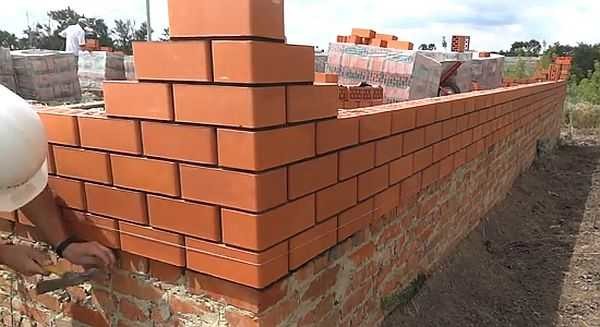
Fence masonry: technology
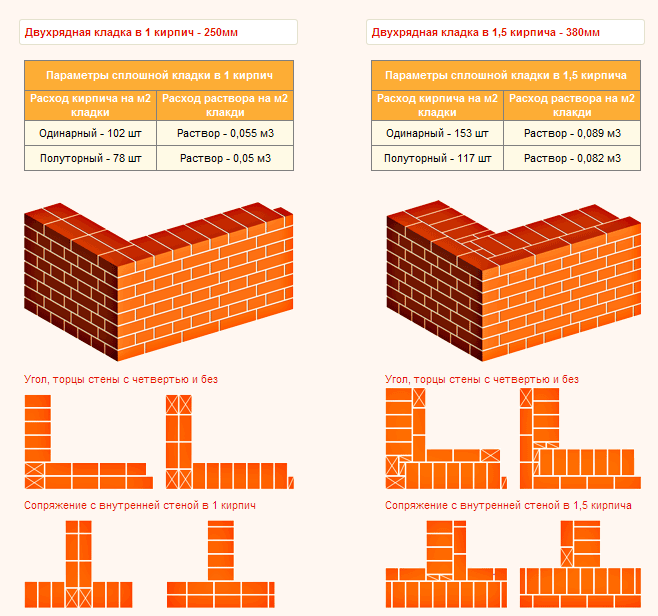
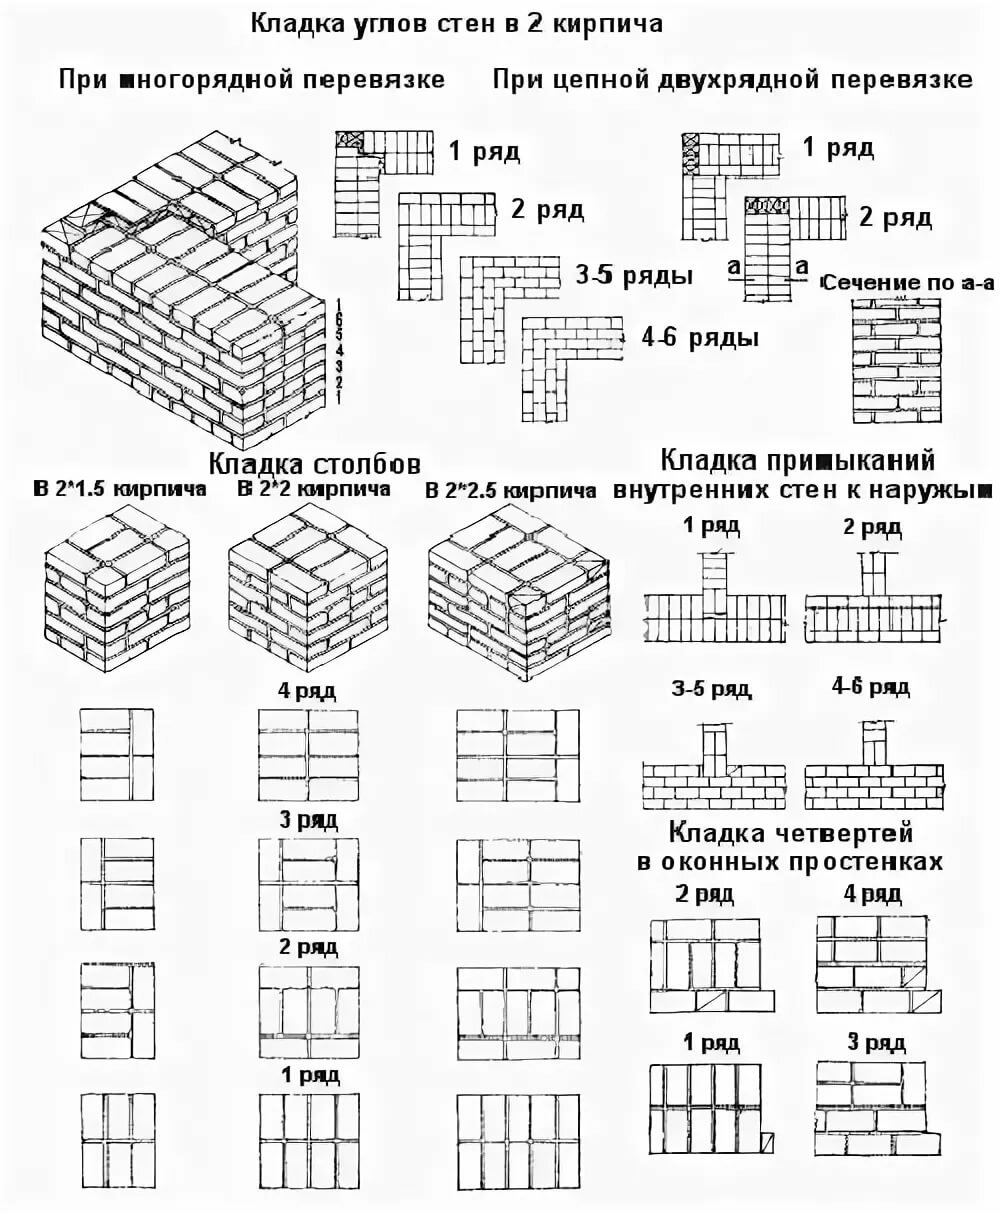
In most cases, the posts for the fence are made in 1.5 or 2 bricks, the section is 380 * 380 mm and 510 * 510 mm, respectively, the height is up to 3 meters.
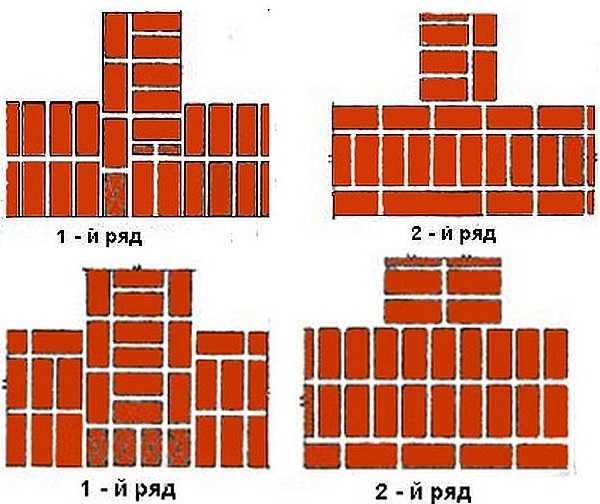
The laying is carried out with a bandaging (offset) - the seam of the lower row is overlapped by the "body" of the brick lying on top. The seam is standard - 8-10 mm. The scheme of laying posts in one and a half and two bricks in the photo below.
Brick pillars in 1.5 and 2 bricks
Laying pillars: order of work
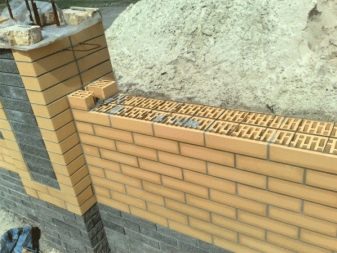
Cut-off waterproofing is spread on the finished foundation. It can be roofing material in two layers, but waterproofing on bituminous mastic is better. This layer is necessary so that the brick does not "pull" moisture from the soil. If wet brick freezes, it quickly begins to crack and crumble. Therefore, waterproofing is necessary. Rolled waterproofing can be replaced - twice smear the foundation with bituminous mastic, and in areas with high humidity it is better to make a double waterproofing - smear with mastic, and then lay also "Gidroizol".
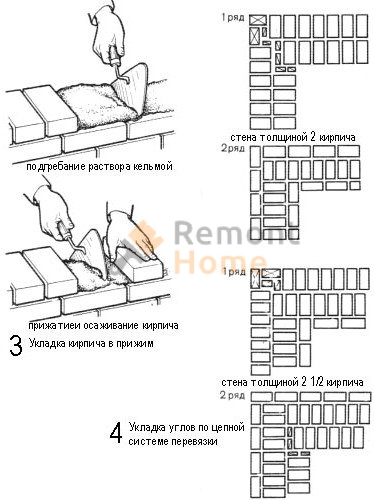
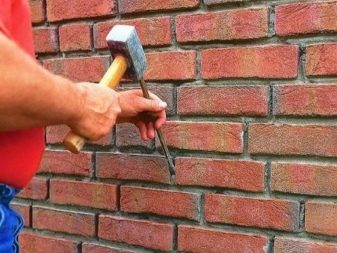
According to the dimensions of the pillar, a solution is applied to the waterproofing with a layer of slightly more than 1 cm.According to the diagram, bricks are laid on it. They are leveled vertically and horizontally by tapping with a special rubber mallet. Craftsmen can use the handle of the trowel, but, in this case, the remnants of the mortar can fly off the plane of the trowel, staining the hands and brick, and it is not wiped off the cement well.
Ceramic brick absorbs moisture very quickly, so if you hesitate a little, it will be difficult for you to "put" it in place. In order for the mortar to retain its plasticity longer, the brick is dipped in water for a few seconds before laying. The same maneuver makes it easier to wipe the solution from the surface (it is removed immediately, with a dry cloth).
Hammer down
The second row is also placed: a solution is spread on the bricks, bricks are placed on it, but with a dressing - unfolding so that the seam is blocked. Level again. Then they take a tape measure and check the dimensions of the stacked rows. Even a small offset of 1-2 mm is eliminated. Tap on the end of the brick (called "poke"), moving the bricks closer. Then, if the side edges were not coated, the vertical seams are filled. All subsequent rows are laid in the same way.
If there is a void between the inner reinforcement pipe and the brickwork, it is filled. If the distance is small, you can use a masonry mortar, if the void is significant, to save space, you can fill it up with rubble, tamp it, then spill it with a liquid cement-sand mortar.
Bar masonry
The laying of the pillars described above has long been tested, but for beginners, when making their own, it is difficult to maintain an even seam. Another problem - the solution crawls out of the seam, staining the surface. It turns out not very nice. To facilitate the work, they came up with a masonry for a bar. Take a square metal bar with a side of 8-10 mm, cut it into pieces, 10-15 cm longer than the size of the post.
Bar layout
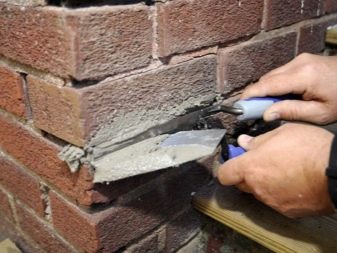
Having laid the first row, a bar is laid on it along the edge of the brick. The site is filled with a solution with a small margin, and closer to the pipe, the layer is made larger. Then, leading with a trowel along the bar, remove the excess, cleaning the bar from the solution. But at the same time, the slope of the solution remains. They put a brick, level it. At the same time, the bar does not allow it to settle strongly, and the position of the other end is controlled by the level.
Apply the solution to the side face under the bar.
Then they take a short piece of a bar of about 10 cm (for a vertical seam), put it along the butt, apply the mortar with a trowel to the side of the laid brick, also removing the excess along the bar. The second brick is placed and leveled.After the level is set, the seam is pressed from above with a trowel, and the vertical bar is removed.
We take out the bar, holding the seam with a trowel
This is how all the bricks in a row are laid out. Then the rods are taken out, proceed to the next row. This technology of laying brick posts allows you to control the seams and make them neat. Even a novice amateur bricklayer can fold a pillar with his own hands.

It is only important in the process to control the parameters of each row (so that the column in the section is of the same size)
Video lessons
A more complex version of a brick pillar - twisted with a screw
Features of working with ceramic bricks
Payment
A standard brick is a product 25 centimeters long, 12 centimeters wide and 6.5 centimeters high. The proportions are quite harmonious. Knowing the size of one brick, it is easy to determine the quantitative need for its application. It is believed that if the mortar joint is 1.5 centimeters, at least 112 bricks will be used for each square meter of masonry. However, the brick that was available after production and transportation may not be ideal (with chips, etc.), plus the stacker may not have very good skills. In this case, it is appropriate to add 10-15% of the required amount of material to the calculated amount.
112 bricks per square meter turn into 123-129 pieces. The more experienced the worker, the fewer additional bricks. Thus, 112 bricks per 1 meter is a theoretical minimum, and 129 pieces is a practical maximum. Let's consider the simplest example of calculation. The wall is 3 meters high and 5 meters long, giving an area of 15 square meters. It is known that 1 square meter of single-row masonry requires 112 standard bricks. Since there are fifteen square meters, the number of 1680 bricks needs to be increased by another 10-15%. As a result, no more than 1932 bricks are required for laying the specified wall.
DIY brickwork: tools, order and features
Now, you have an idea of how to lay a brick with your own hands, you need to talk about the procedure as well as some technical nuances.
An indicative list of tools for masonry
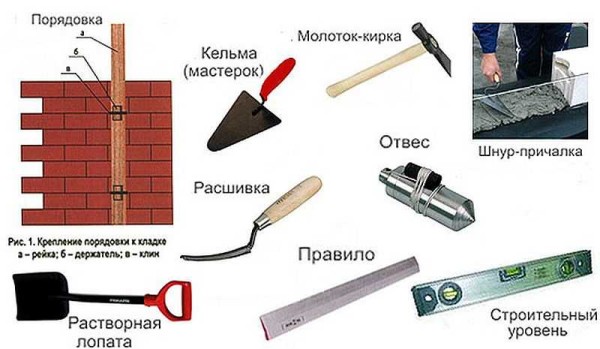
Let's start with the tool. You will need:
- bricklayer's trowels - apply and level mortar on bricks;
- concrete mixer or container for mixing the solution;
- mortar shovel - for kneading and periodic mixing;
- two to three buckets for solution;
- plumb line - check the verticality of walls and corners,
- building level - to check the horizontal laying of the row;
- mooring cord - for breaking the rows;
- jointing (for forming seams);
- hammer-pickaxe for breaking off incomplete bricks (halves, 3/4 and checkers - 1/4);
- as a rule - a metal or wooden flat bar to check the plane of the wall.
Further we will talk about the features of the technology. First: it is advisable to soak the brick before use. This is especially true in hot dry weather. Then it will "pull" less moisture from the solution. If there is not enough moisture, the cement will not be able to gain the required strength, which will affect the strength of the building.
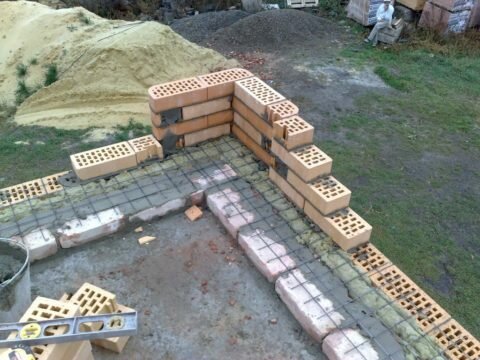
First, two corners are driven out, then they are tied with several rows of brickwork
Second, the corners are driven first. First, the first two. They are tied with 2-3 rows of bricks according to the chosen masonry scheme. Then the third corner is kicked out. The second and third are also connected in several full rows. After that, a fourth corner is placed and the perimeter is closed. This is how the walls should be erected, bypassing them around the perimeter, and not being driven out by the walls in turn. This is one of the most common mistakes.
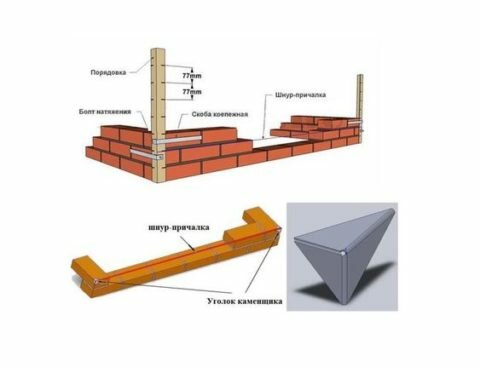
Third, there are two row control technologies. The first - nails are inserted into the seams of the corners, to which laces are tied. It needs to be pulled so that it marks the top edge of the brick, and also limits the outer (and, if necessary, inner) surface of the wall.
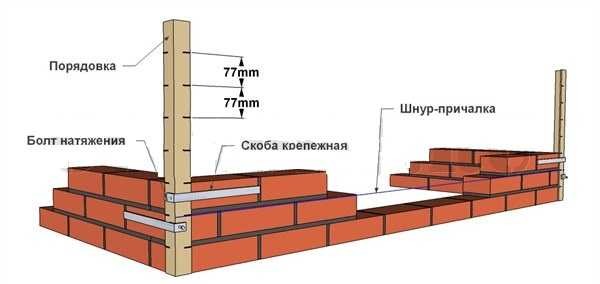
Ordering for attaching the mooring cord
The second way is to use wooden or metal orders. This is a flat bar or corner, on which marks are applied every 77 mm - risks on wood or cuts on metal. They mark the required row thickness: brick height + joint. They are installed using flat mounting brackets that are inserted into the seam. If necessary, they are then simply taken out and rearranged higher.


There is another way - a mason's corner. It has a slot on one side, into which the dock is inserted. "Sits" at an angle on the solution.
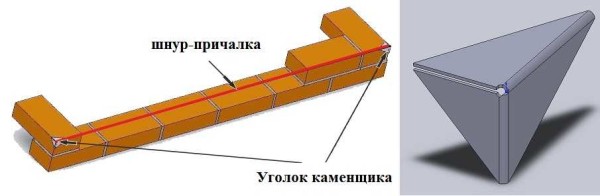
Breaking a row with a bricklayer's corner
The disadvantage of this method is the same as that of a simple nail in the seam: the height of the row must be controlled "manually" when removing the corners. With a lack of experience (and where to get it, if brickwork is being done for the first time with your own hands), it is difficult. Having (having done it yourself) the order is all the easier.
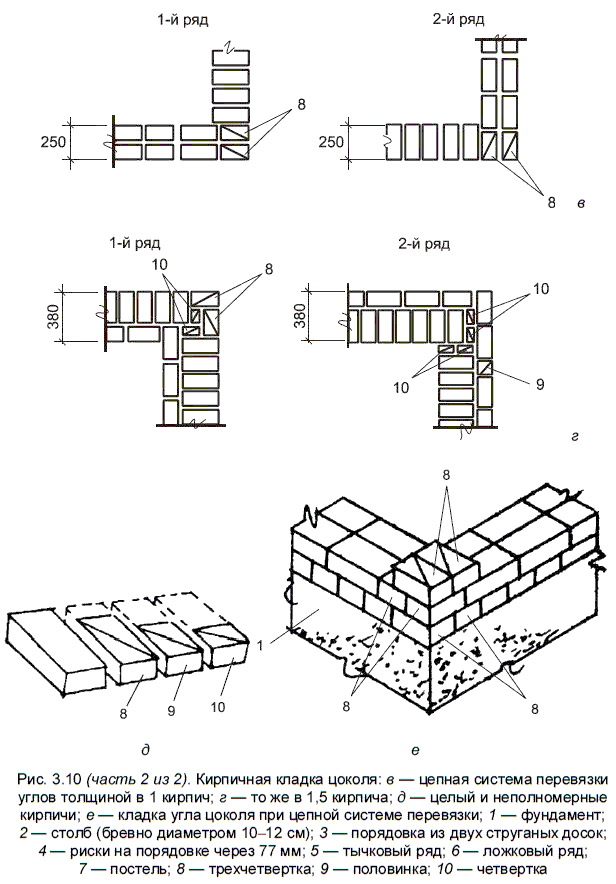
Fourth: preparation of incomplete bricks. As you have seen, halves are used for masonry, three-quarter bricks and 1/4 pieces are used. So that the work does not slow down, it is required to prepare them before laying them. This is done with a hammer-pick. During preparation, high accuracy in size is required, otherwise the dressing will fail. To make it easier to control the length, markings are made on the handle for the corresponding length. With a pen attached to a brick, marks are made on both sides of the spoon. Then, attaching the blade of a pickaxe to the mark, they beat on the back with a hammer, making notches. Having made notches on both spoons, a strong blow of the pickaxe breaks the brick.
Features of the construction of brick plinths
First of all, let's clarify what a base is. This term refers to the ground part of the foundation walls.
Brick, as a structural material, can be used to erect them along the entire height. Building codes permit this - provided, of course, that only the ceramic version is used.
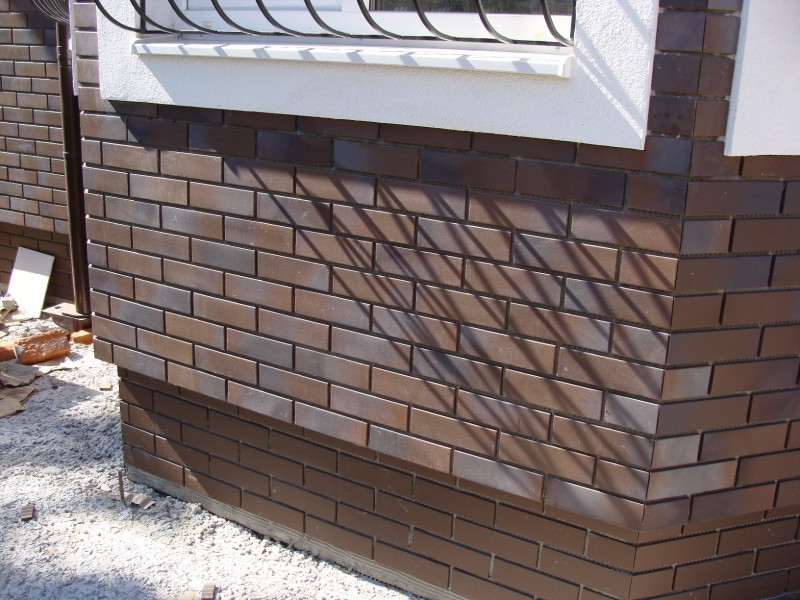
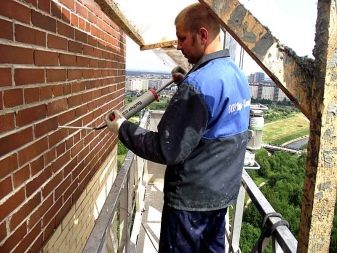
In this case, the foundation walls, which may "part-time" turn out to be the walls of the basement, are built of bricks, starting from the bottom and ending with the top of the basement. It can rise from 20 to 90 cm above the ground - rarely more. If in the ground part, as well as in the buried one, ordinary brick was used, then the outer surfaces of the masonry are then plastered, sheathed with panels, or, as in the photo below, they are revetted with ceramic tiles.
 Facing the basement with brick tiles
- But still, more often the strip foundation is made monolithic concrete, bringing it flush with the ground surface. In this case, the basement part of the wall is laid out of brick, more often facing - after all, it is in no way inferior in strength to ordinary products, and the aesthetics are completely different. By the way, the brand of brick for the basement should not be less than M75.
- If only clay bricks can be used for the construction of the foundation, then silicate and hyper-pressed bricks can also be used in the basement part - only their brand should be no less than M100. The wall thickness of the bearing base is selected based on the structural features of the building.
 Laying of basement bricks along the perimeter of the pile foundation
If the walls of the house are built of bricks or concrete, then the foundations and plinths are laid at least one and a half bricks (38 cm). For a timber or frame structure, one brick (25 cm) thick is enough.
If the basement is non-bearing, but decorative, which is usually arranged on pile foundations, then the wall thickness can be minimal - half a brick (12 cm). Our further proposed instruction on the topic: "Laying a brick base: how to do it right" - will relate to the construction of the supporting structure.
Brick layout
Regardless of whether it is professional work, or independent, it must be performed in accordance with existing standards.Of course, there is no separate SNiP for masonry of the basement - the requirements for masonry from all types of bricks, blocks and stones are formulated in one document.
These are norms and rules numbered 3.03.01 * 87, where one of the sections of this document is devoted to stone structures, which include brick walls. There you can find all the necessary recommendations - we also present our information in accordance with them.
Important! Even at the design stage of the house, the length and thickness of the walls should be determined so that whole bricks can be laid, and not cut in each row. The length of the wall is determined by the formula, where the sum of the length of the brick and the thickness of the vertical seam is multiplied by the number of bricks in the row
From the resulting figure, one seam is minus.
 Base / plinth brickwork: sinking option
- The length of the basement is determined after the length of the wall of the house has been determined. Much depends on the constructive version of the base and its finish. If the basement will be laid out of clinker bricks, or faced with decorative bricks during the construction process, then its thickness usually corresponds to the thickness of the walls of the house.
- In the case when the owner prefers, for example, to sheathe the basement with siding panels, it is necessary to leave space for finishing. Then the base will be sinking, and the difference between its vertical plane and the wall will be a quarter of the brick length (4 cm).
Although, you can make a sinking base in any case - it looks very nice, and the walls of the foundation are protected from water ingress and without specially mounted ebb tides. In the next chapter, we will look at how to lay a brick basement with your own hands.

How to do it yourself?
A wall, a basement and any other structure can be made using 1.5 brick masonry without the involvement of professionals. Of course, the result will largely depend on the quality of the work performed. It is necessary to rely on step-by-step instructions to achieve the desired result. Let's get acquainted with all the stages of such work on the example of making a wall of 1.5 bricks.
Preparatory stage
As with any other construction work, the manufacture of a brick structure according to the above scheme involves a number of preparatory steps. You will need to buy high-quality building materials and prepare a suitable binder solution for it. In addition, you will definitely need to purchase a number of tools and accessories:
- trowel (otherwise it is called a trowel);
- hammer;
- jointing;
- mop;
- plumb line;
- level;
- square;
- cord;
- ordering;
- roulette;
- rule;
- pendulum.
Before proceeding to installation, you will need to familiarize yourself with a number of nuances (consider them using the example of building walls):
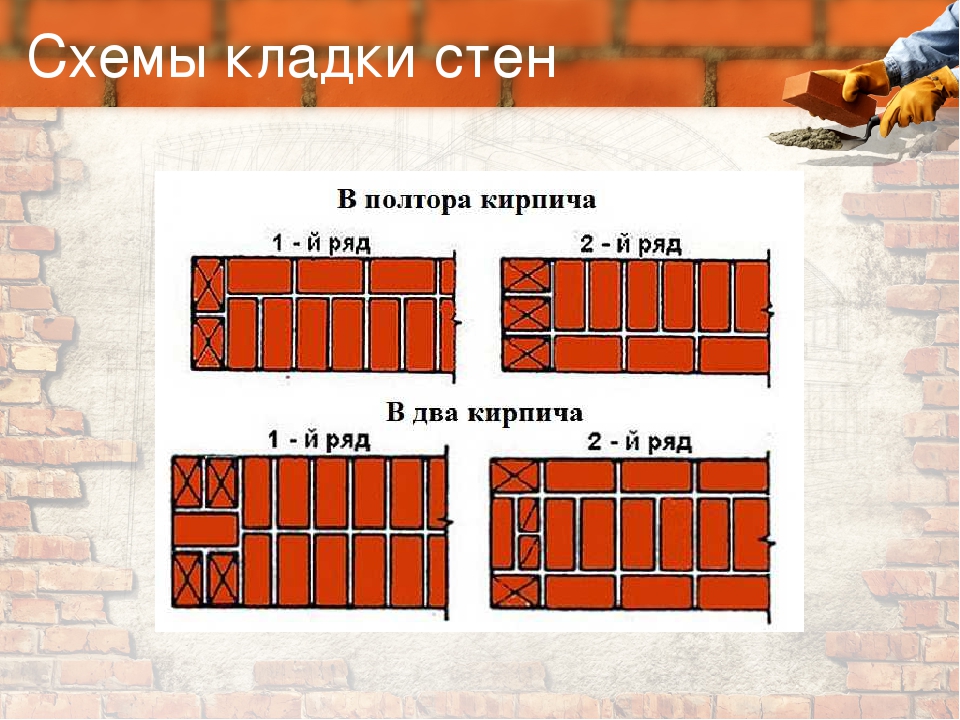
the thickness of the specified masonry usually reaches 380 mm (this parameter is the sum of the parameter of the width of one part, the width of the element joining it and the thickness of the seam);
you will need to pay special attention to the correct layout of each corner and bandaging of the rows;
for a sufficiently good bandaging of 1.5 bricks, it is required to use full-length, half-length, and three-quarter products;
you will first need to mark the placement of 1 row (of course, after choosing the laying technology).
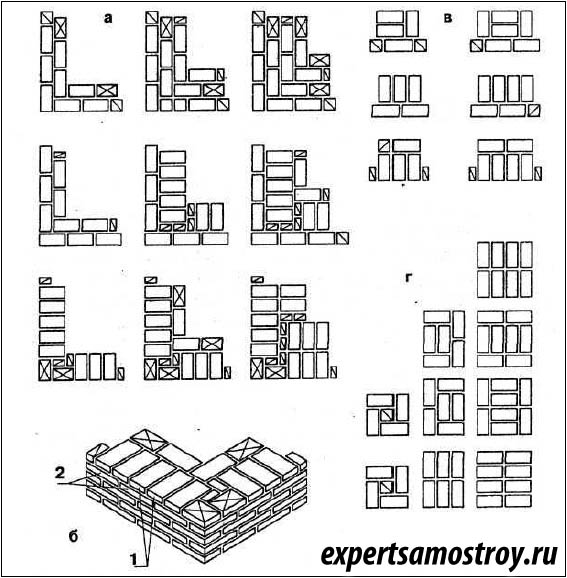
Bandaging options
Usually, masters turn to these types of dressings:
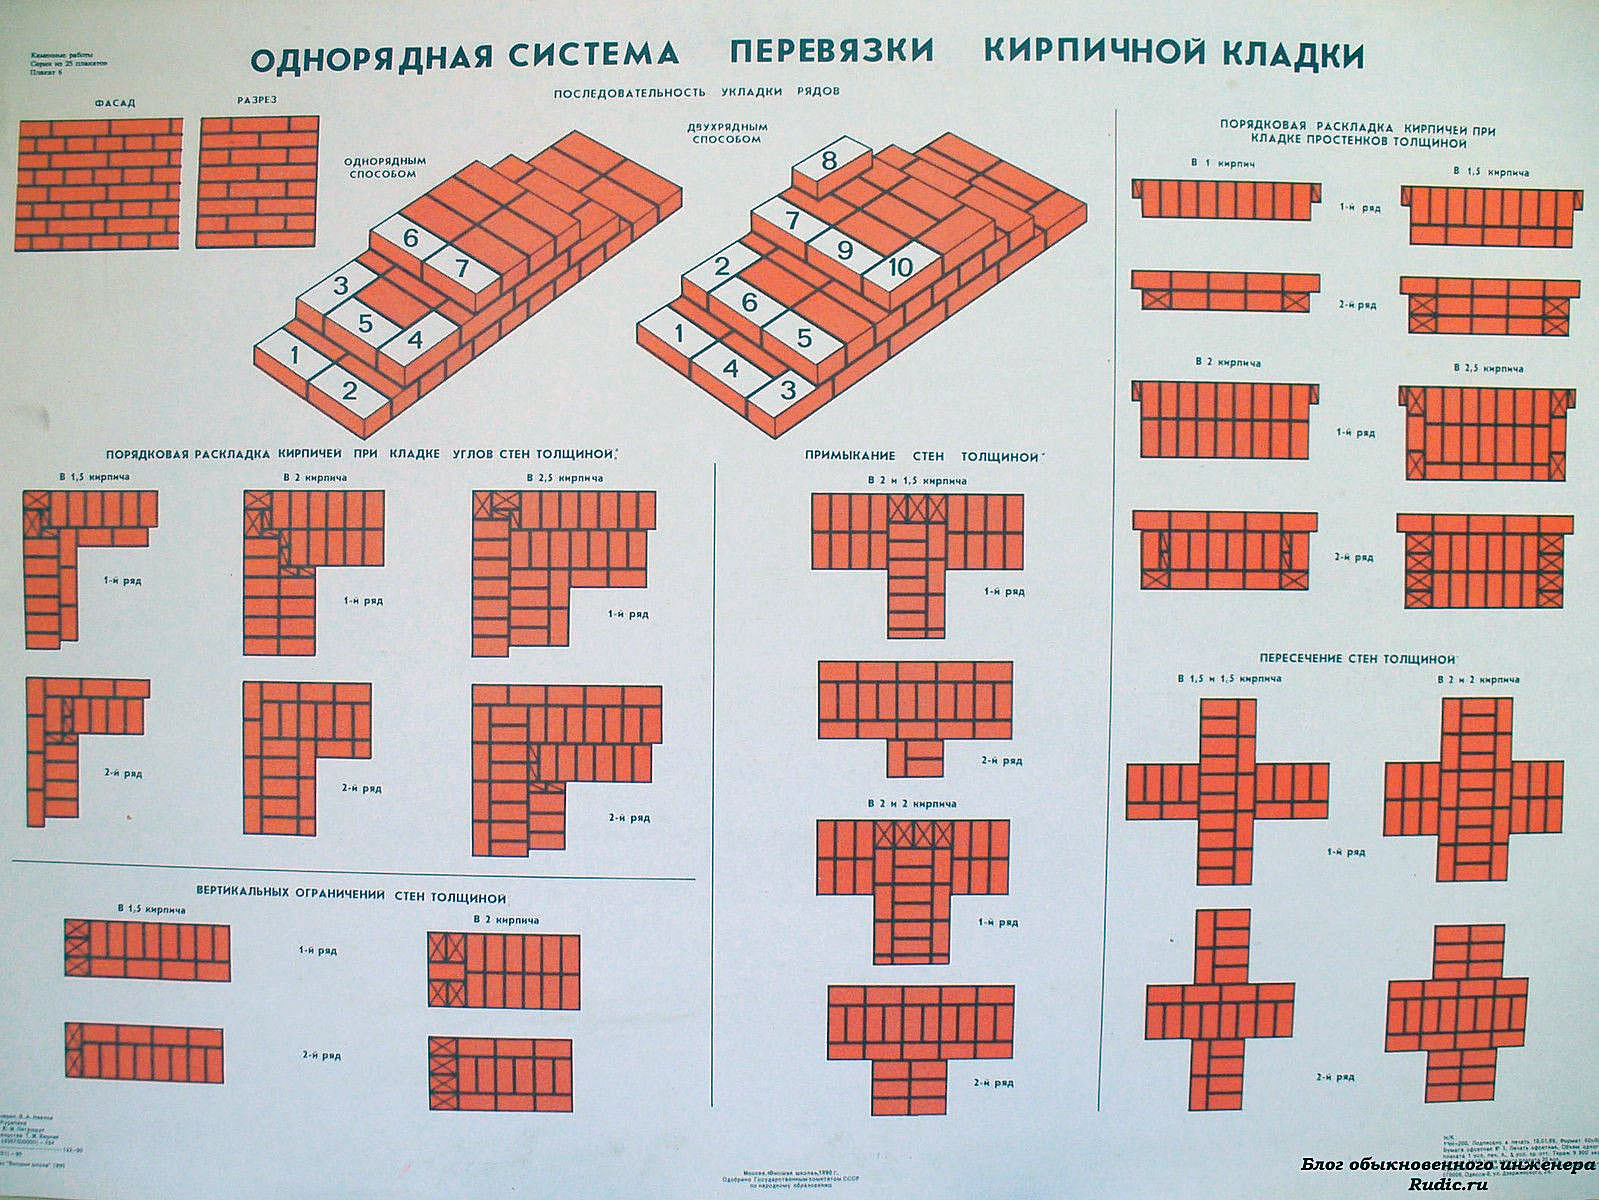
- single row (or chain);
- multi-row.
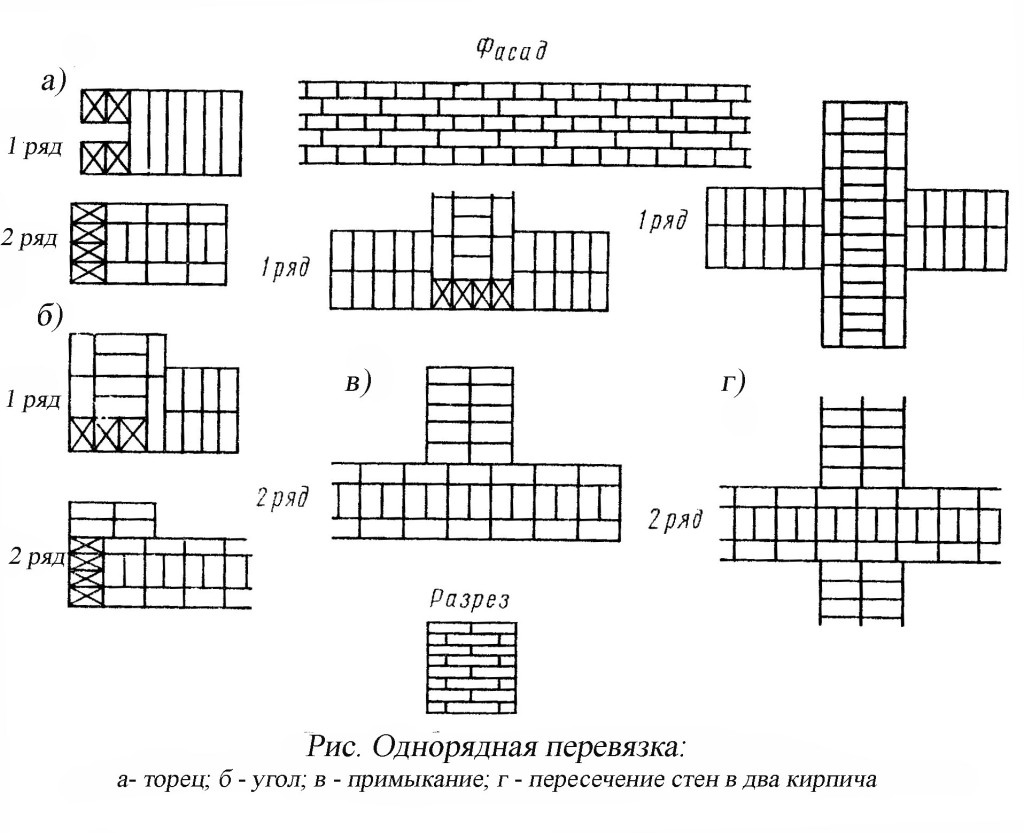
Single-row dressing is recognized as simple. With it, the butt and spoon rows are alternated on the outside of the planned base (if it is a wall). In this case, large quantities of non-full-sized bricks will be needed.
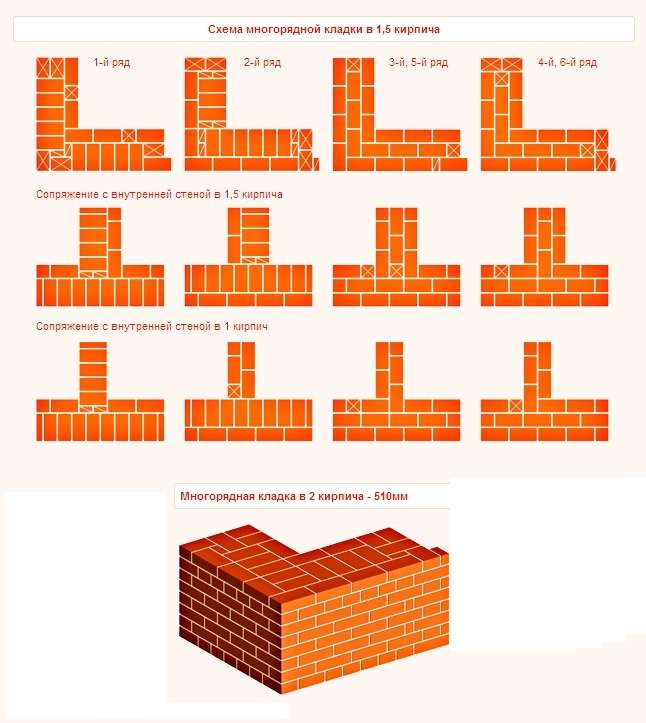
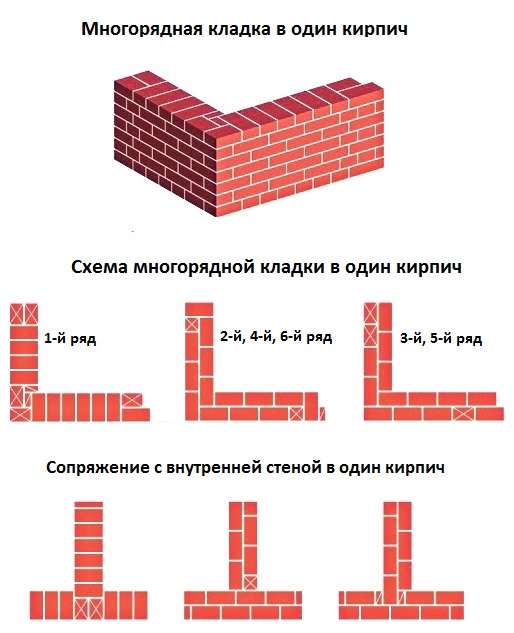
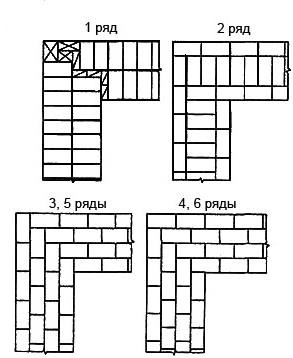
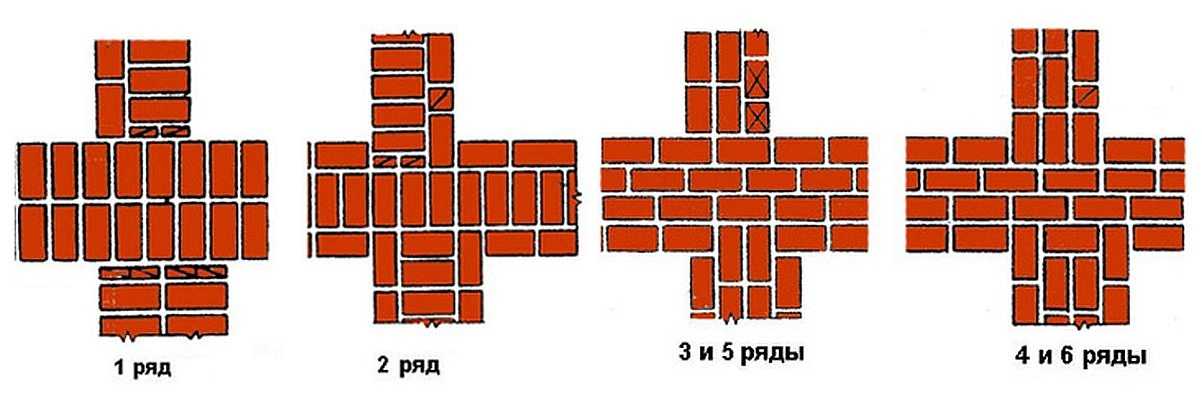
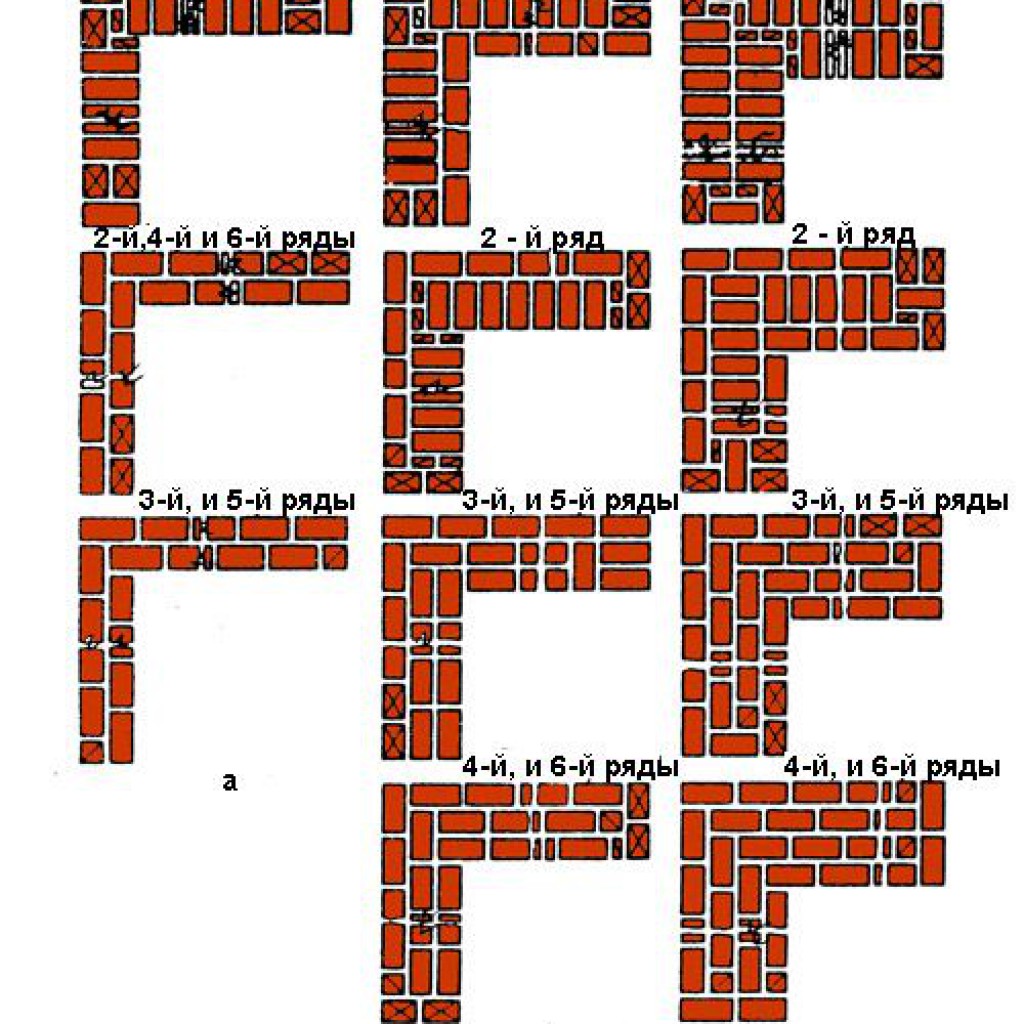
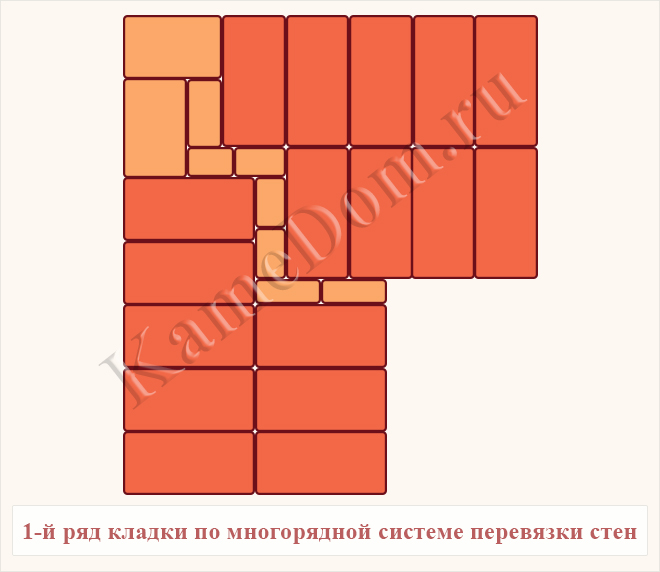
Multi-row dressing is done like this:
- the starting row is laid out with a "spoon-poke";
- the second is the opposite;
- 3,4,5,6 rows are laid out with spoons with a bunch of seams in a half-brick.
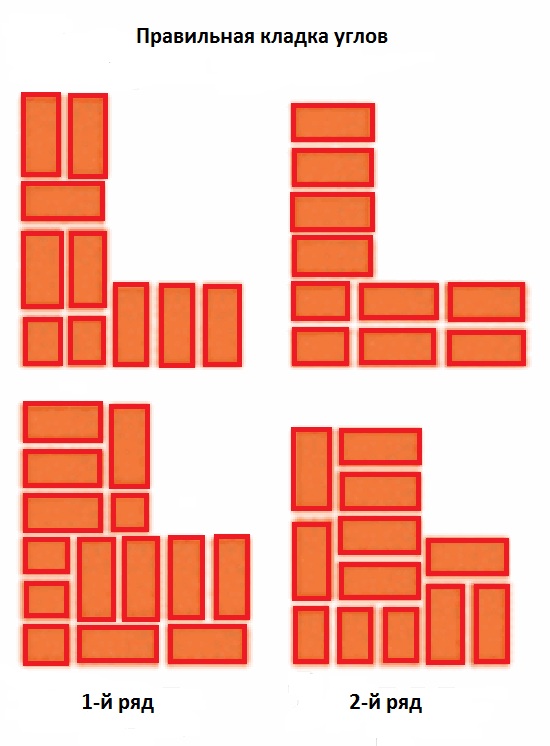
Laying corners
Angles are the basis for building brick structures such as walls.Even small flaws in the layout here can lead to a serious violation of the geometry. Because of this, the bearing capacity of the structure can be significantly reduced.
This is required so that it becomes possible to set orders and it would be possible to stretch a special cord between them. It will help keep track of the evenness of the rows during the laying process. The technology of laying out 1.5 bricks is complicated when compared with the technique of 1 block. This is due to the fact that in the first case, it will be necessary to use building materials of various formats (this means fours, three-quarters and half).
Masonry work
First, you need to waterproof the foundation by laying sheets of roofing material on it. After that, using the building level in the corners of the future construction, masonry is made in several rows. Angular orders will then be attached to them using special brackets. You will need to stretch a special lace along the orders. It is advised to place it every 5 m. If the value of the length between the constructed corners is more significant, then in order to avoid stretching the lace, a beacon made of bricks is placed in the middle. After that, it is possible to move on to arranging brick rows.
Using a trowel, lay out the prepared masonry composition. The distance from the edge of the wall should be about 20 mm. If the seam begins to fill entirely, then no more than 10-15 mm. The thickness of the layer should be kept within the range of 25-30 mm. Based on the consistency of the solution, seams of 10-12 mm will be obtained.
Masonry techniques
There are three types of masonry in 1.5 bricks. Let's get to know them.
- We will press. This method of laying bricks is recommended if you are working with a solid binder. At the same time, the seams are completely poured, their jointing is carried out. The remains of the mortar are pushed to the vertical of the previously delivered block with a trowel. Then they put the next brick, which must be pressed against the trowel. The trowel must be pulled out sharply. At the same time, the laid out part is upset.
- Inspired. This method is relevant when working with a plastic composition. At the same time, the brick is slightly tilted, the laid mortar is touched with one face, it is moved to the previously fixed part and upset.
- Insertion with undercut. This technology differs from the above only in that the binder must be laid at a small distance from the edge of the wall. The solution protruding beyond the joints is then removed with a trowel.
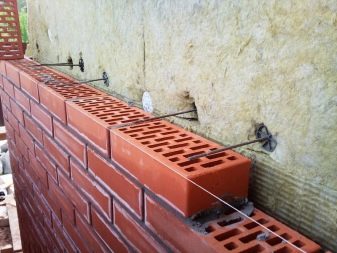
A 1.5 block layout can be done with insulation. It is simply attached to a load-bearing wall base with further plastering.
Bandaging rows and other subtleties
Individual elements are laid on the mortar, but this cannot adequately ensure the solidity of the entire structure. In order for the wall to be strong, a bandage of brickwork is required - that is, the displacement of the seams relative to each other. The simplest way here is to alternate spoon and butt rows.
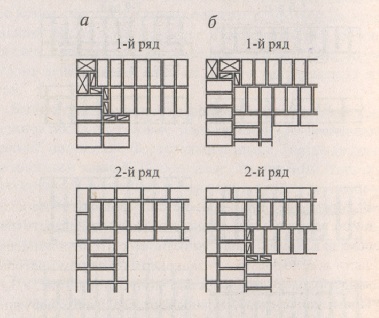
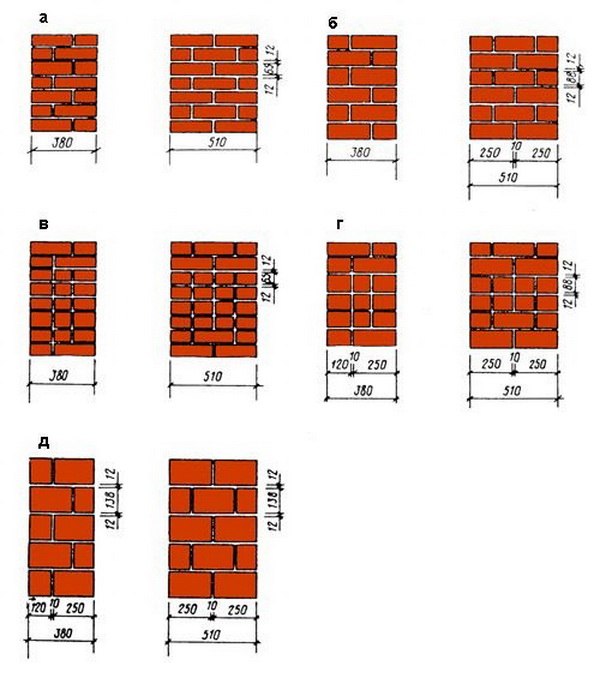
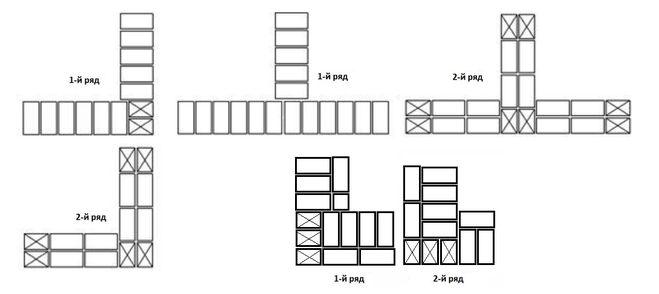
The simplest suture dressing scheme
Bandaging can be done in two main ways:
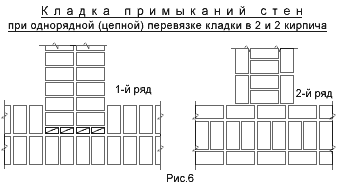
Single-row (chain) dressing is a fairly common way of arranging external walls or cladding. The appearance is very aesthetic and does not require additional finishing.
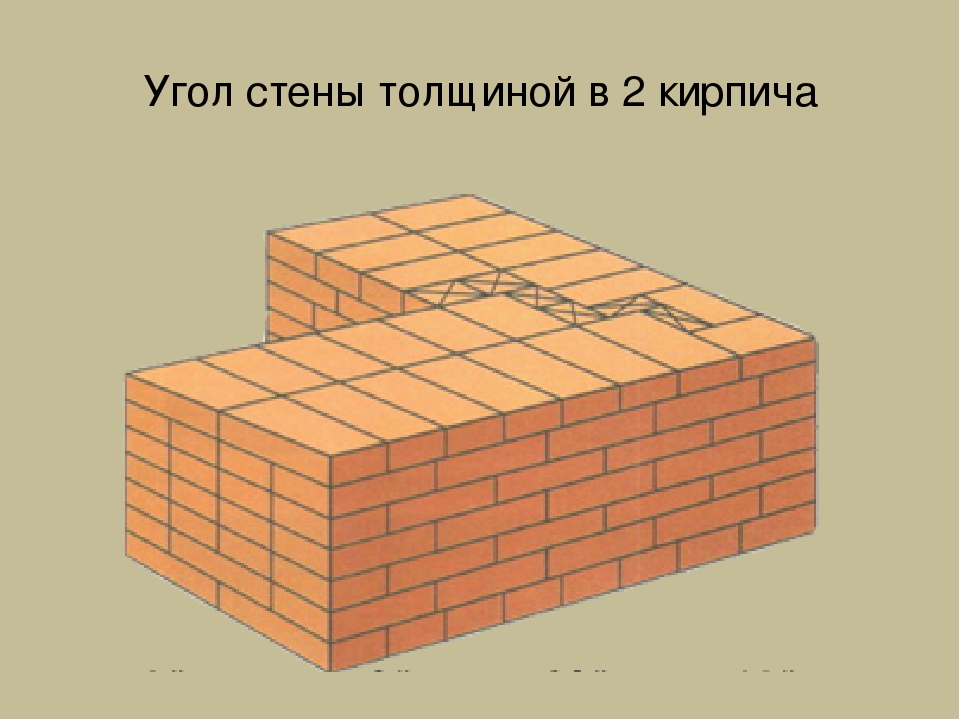
The two-brick construction has two outer (inner and front) spoon rows, which are called versts. For them, quality material is used without marriage.
Between these rows, you can place parts with defects in appearance, for example, used or low grade. This layer is called zabutka. In this design, not only solid bricks are used, but also halves and ¾.
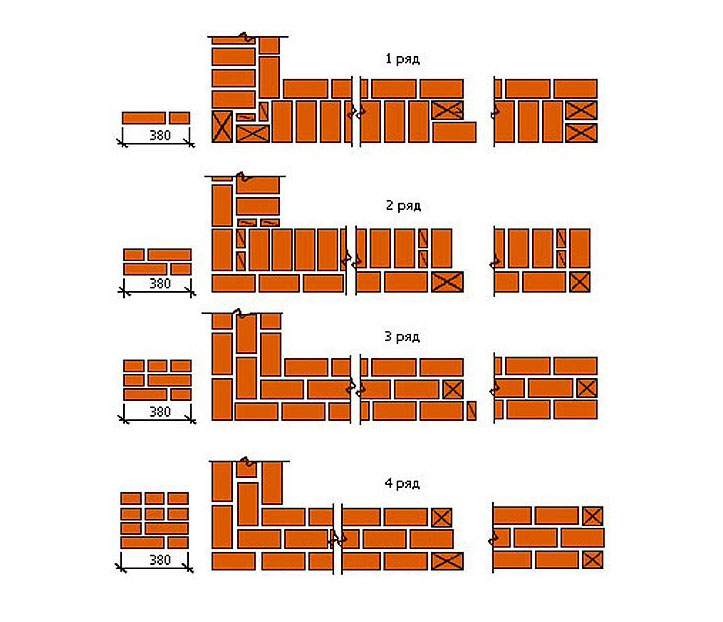
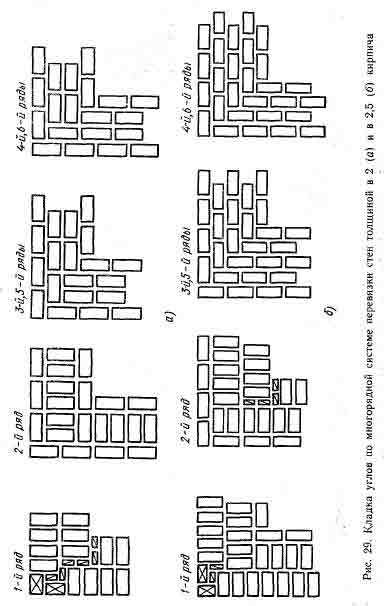
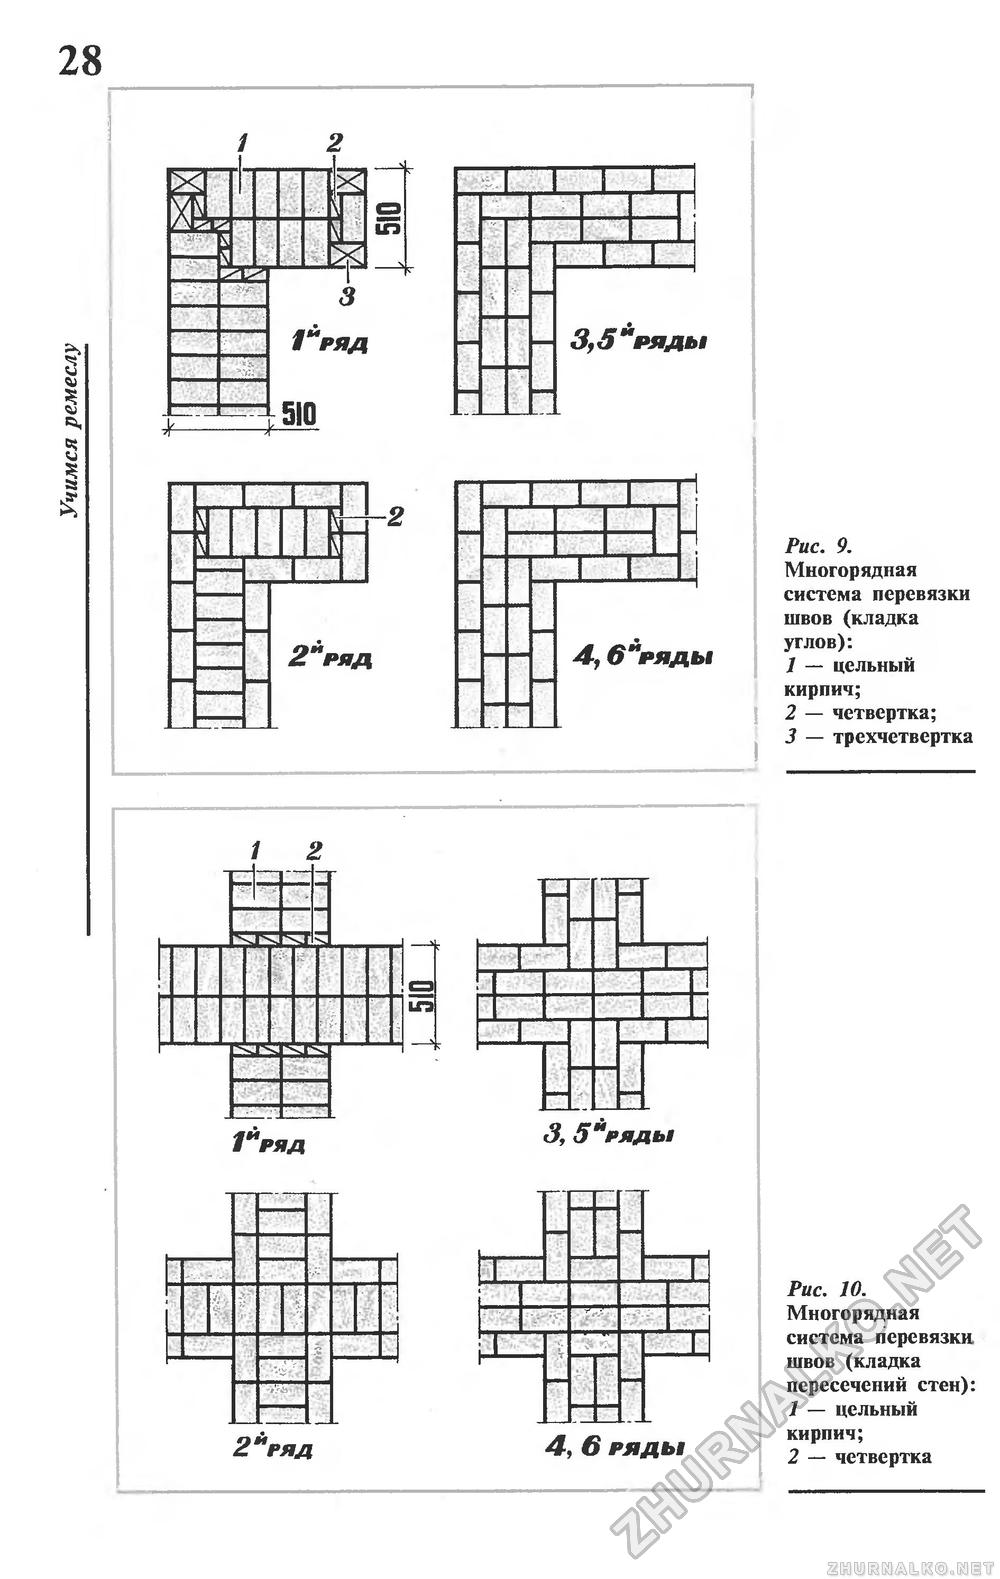
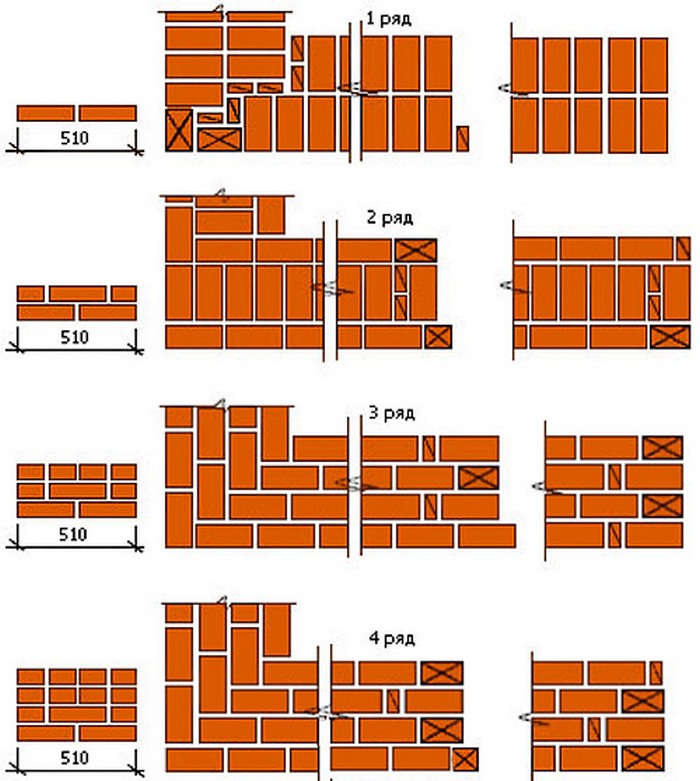
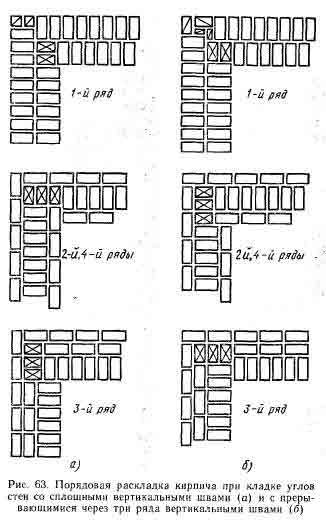
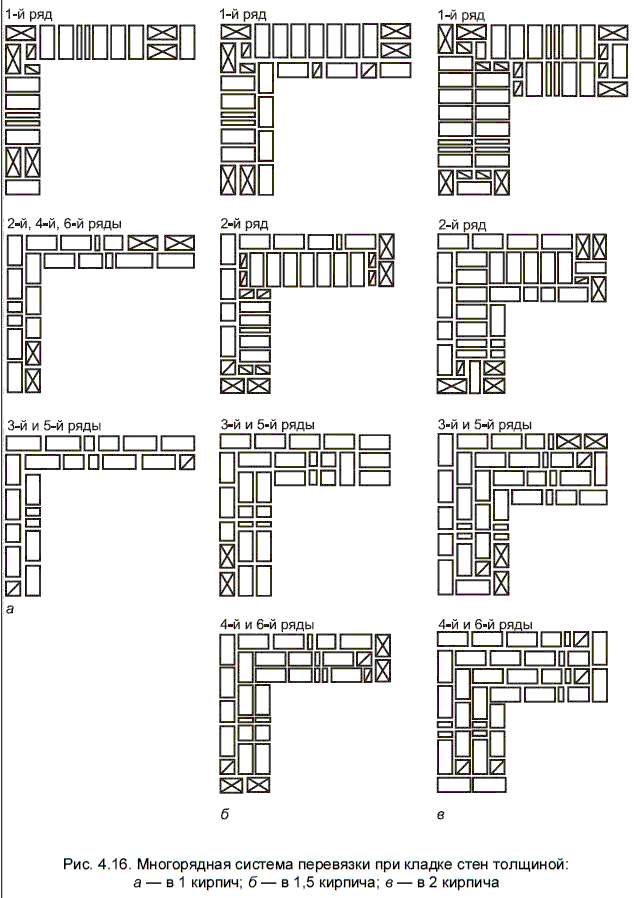
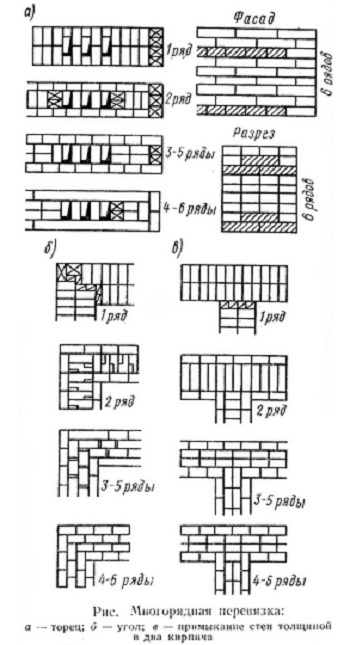
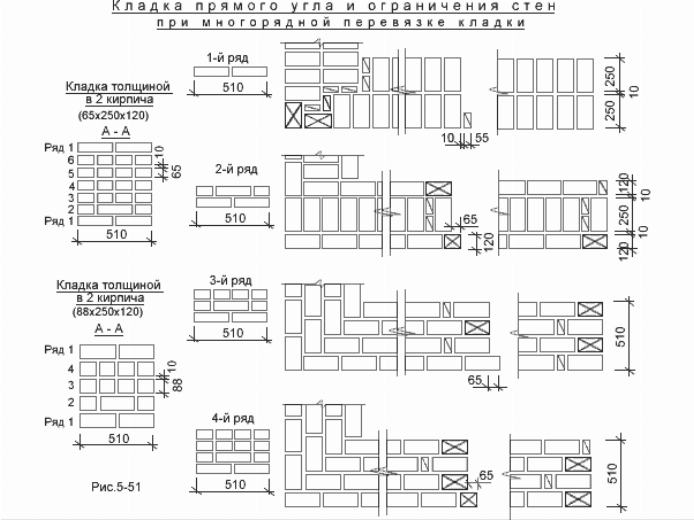
Multi-row dressing of seams is performed as follows: five (one-and-a-half masonry) or six (single masonry) spoon rows, then one butt row. But the spoon rows are also bandaged.The offset of the seams within the row is ensured by using incomplete elements. The very first row along the top of the foundation and the last row of the wall are laid out with a butt joint. Usually this method is used for further finishing of the structure or its insulation.
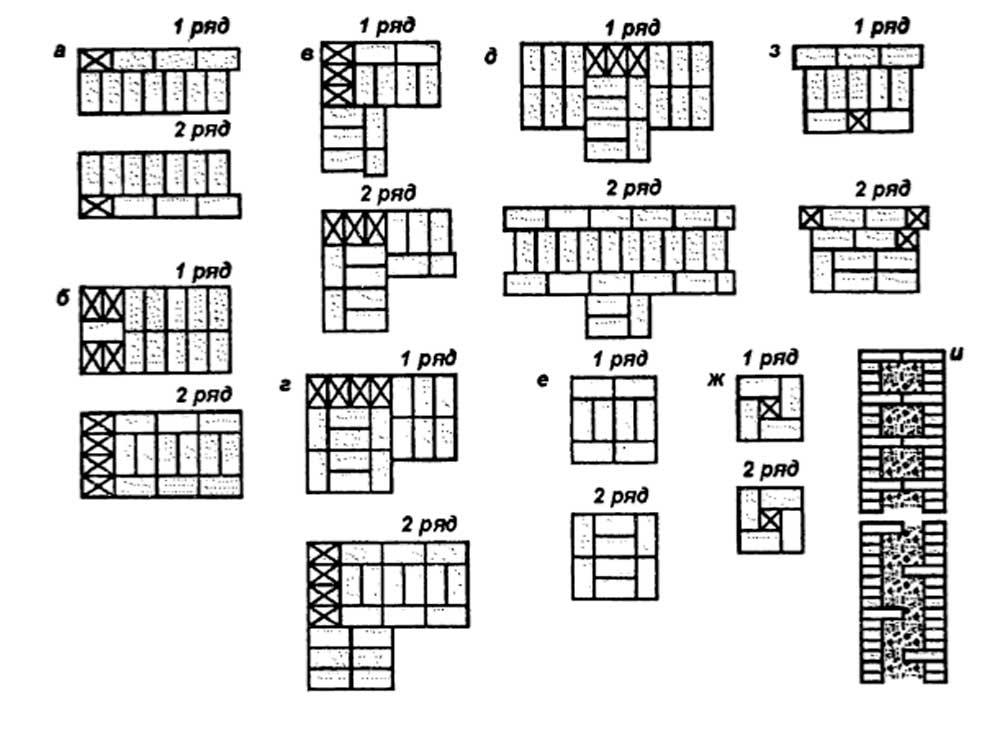
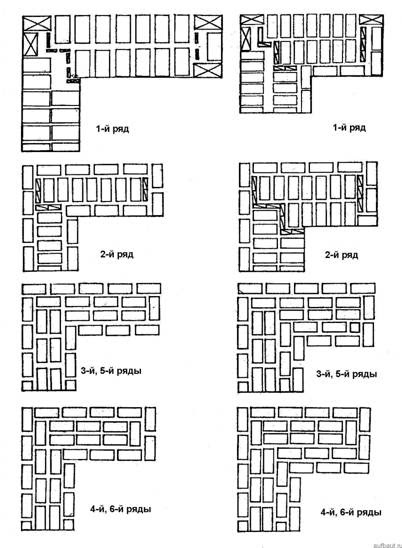
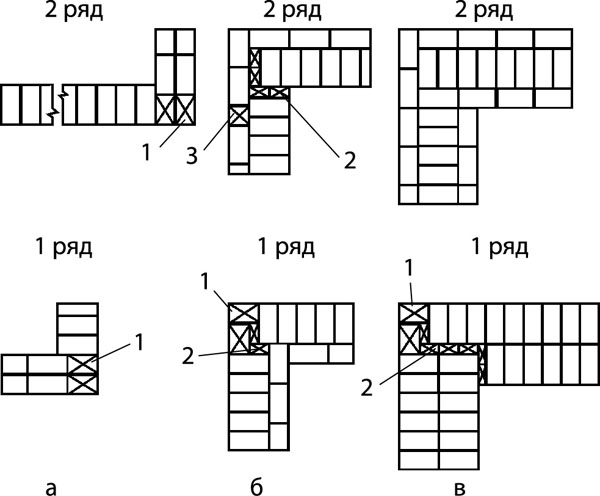
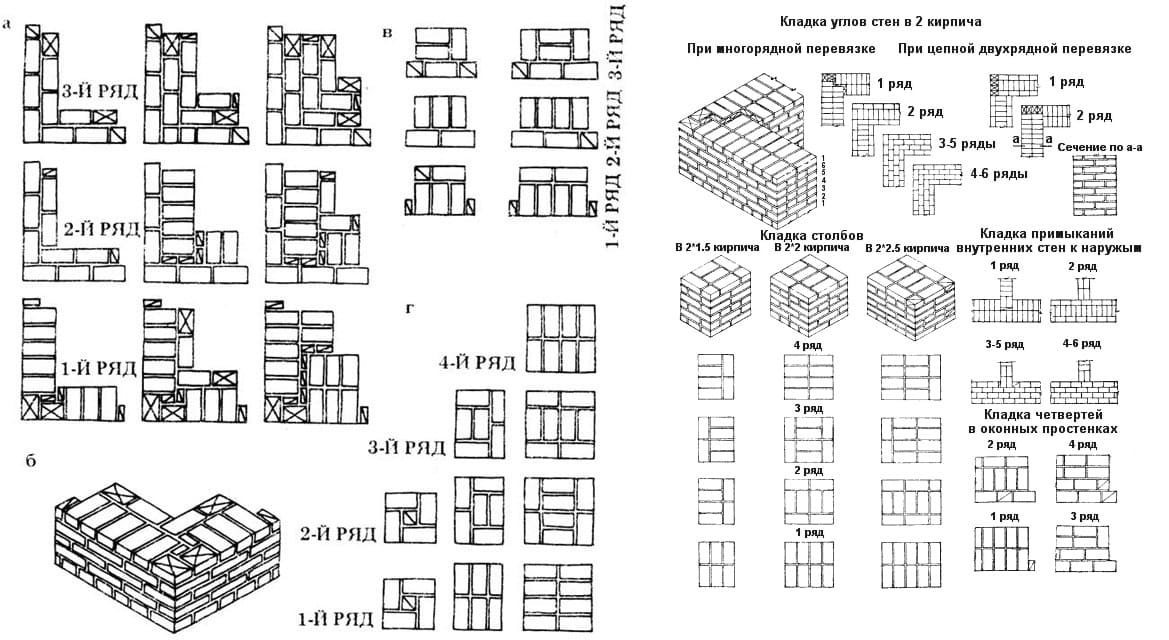
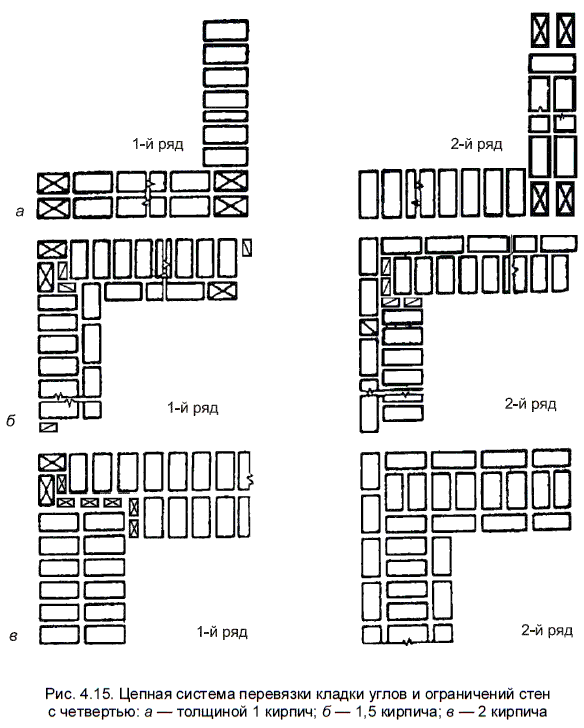
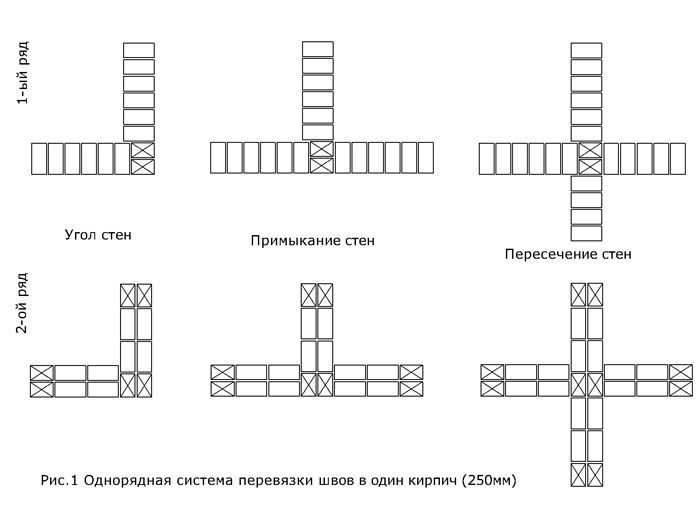
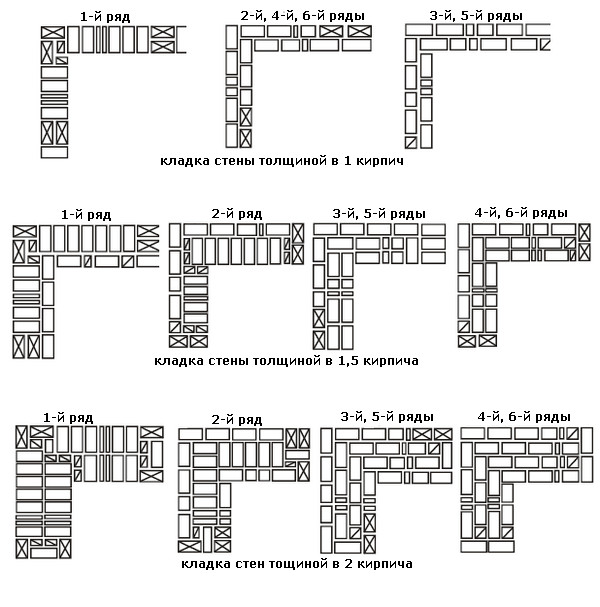
Chain dressing scheme for walls in one and a half and two elements
Abutment of the transverse wall with single-row dressing
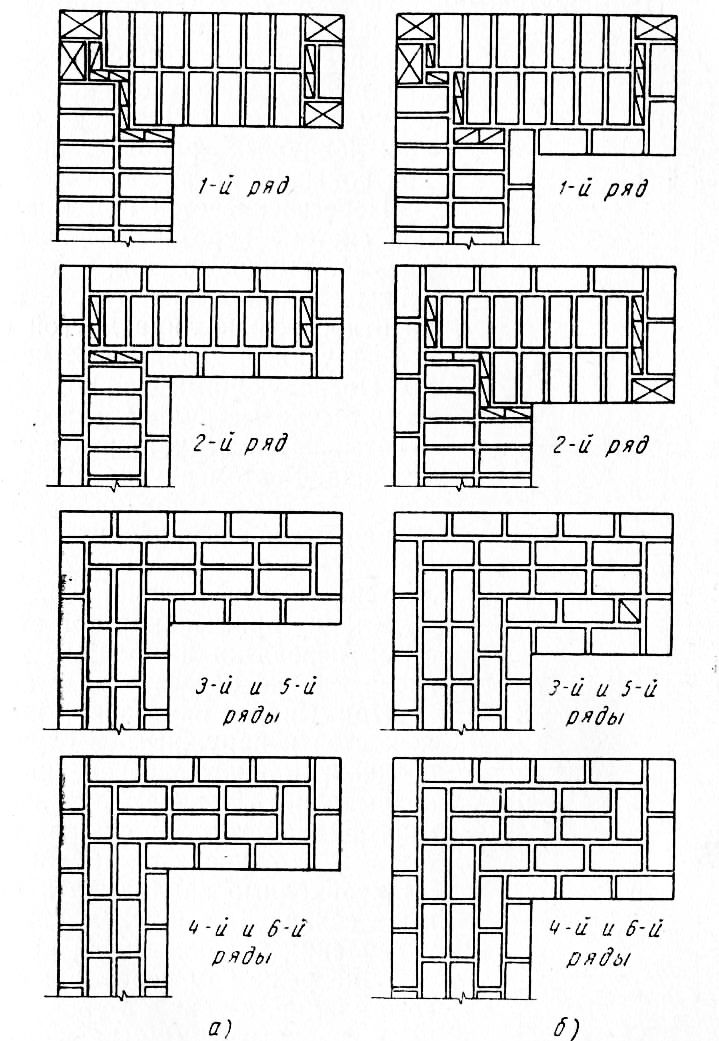
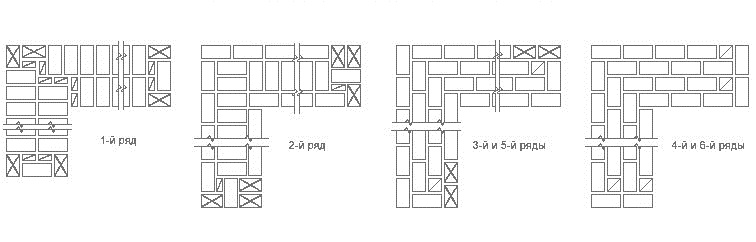
Six-row brick masonry - junction of the transverse wall with multi-row dressing
Bandaging the seams is necessary to ensure the strength and stability of the wall structure.
Laying out corners
The quality of the entire masonry largely depends on how professionally the corners of the wall structure are made. Their implementation is different for single-row and multi-row dressing of seams. It also depends on the thickness of the wall.
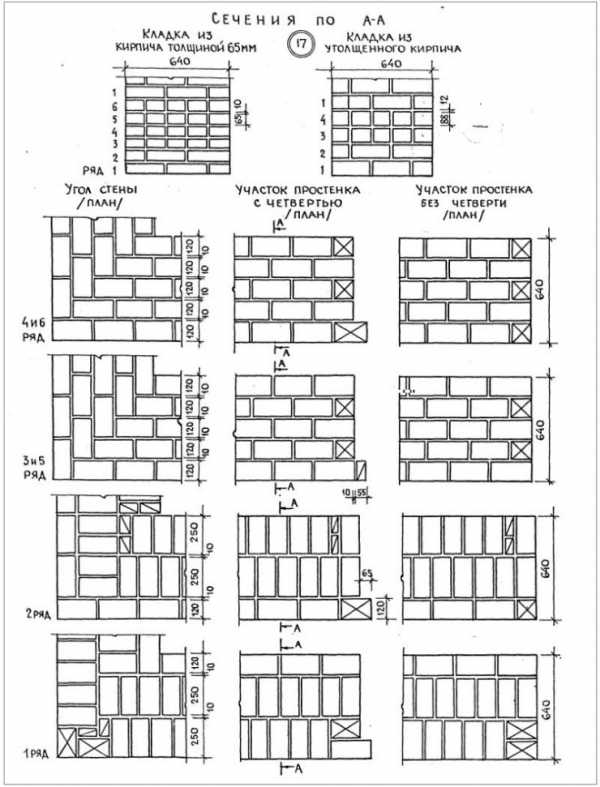
Diagram of the device of the corners of the wall in one, one and a half and two bricks with chain dressing of the seams
Diagram of the device of the corners of the wall in one and one and a half bricks with multi-row dressing of the seams
First of all, the corners of the building are laid out, which play the role of lighthouses
The laying of the entire building begins precisely with the forging of the corners.
Quality control of rows
In order for the wall to turn out to be even and vertical, constant monitoring of the execution of the rows is required.
It can be done in several ways:
- With the help of a mooring cord - it is attached in the corners of the masonry and marks the upper edge of the row elements. In addition, the use of a cord prevents the wall from collapsing inward or outward.
- The use of special planks made of wood or metal - ordering. They are marked every 77 mm. This is the height of the row and seam. They are attached to the corners of the wall with staples.
- A special corner of the bricklayer is installed on the corner of the masonry on the mortar mixture.
Controlling the rows
For novice bricklayers, the most appropriate way would be to use ordering.
Some nuances of masonry
In each type of work, as a rule, there are various points that should be paid special attention to:
- The cement-sand mortar will be able to gain the necessary strength only if there was a sufficient amount of water in it. At high ambient temperatures, dry bricks will draw moisture out of the mortar. Therefore, it is better to wet it first.
- The construction of the building is being carried out along the entire perimeter. First of all, two corners are laid out, which are connected by 2-3 rows of masonry. Next, the third corner is driven out, a connection is made with the second corner. Then a fourth is arranged, which will close the entire perimeter.
The order of the masonry
Most of the features can only be seen in practice.
Features of single-row masonry
A brick house is a set of tightly connected small parts that create a monolithic structure. Any brick has three dimensions: length, width and height. When it comes to laying in one row, it is understood that the thickness of this row is equal to the largest dimension. In the standard version of the brick, it is 25 centimeters. Above twenty meters, a brick is not placed in one row due to a critical increase in the load. In such cases, multi-row masonry is used.

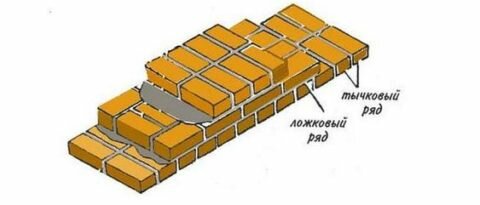
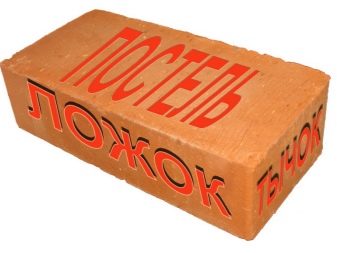
A brick is a piece of thermally processed clay in a standard shape. Each side of the product has its own name. The pastel is the largest side, the middle side is the spoon, and the smallest end is the poke. The modern quality of production is such that, before laying, it is advisable to make sure how exactly the sizes of different batches of the products obtained match. The quality of the future design depends on this.

1 brick masonry is used for the construction of small buildings and partitions. An extremely important point regarding the future quality of the building is the geometry of the brick. The edges must strictly diverge at 90 degrees, otherwise structural defects cannot be avoided. To enhance the strength of the masonry, vertical seams must be made with an offset.Receiving a displacement of the seam is called dressing. Laying a row with the smallest end face of the brick outward is called butt. If you lay the brick out with the longer side, this is a spoon laying.

Single row rule: the first and last rows are always bonded. In these cases, broken or damaged brick is never used. Chain masonry is a method in which the butt and spoon rows alternate all the time. Correct laying of the corners ensures the success of the rest of the details. When erecting a building, two corners are first made, which are connected by rows of bricks, then the turn of the third corner comes, which is also connected. The fourth corner creates a complete perimeter. Walls are always built around the perimeter. In no case should you build walls one by one.