How to screw a self-tapping screw into a brick. How to screw a self-tapping screw into a brick wall
Tools first
nails, screws, rivets, anchors
Reliable fastening of the structure is a guarantee that it will last a long time without requiring additional repair
In this regard, it is very important to choose reliable tools and fasteners. And this choice must be approached with all responsibility.
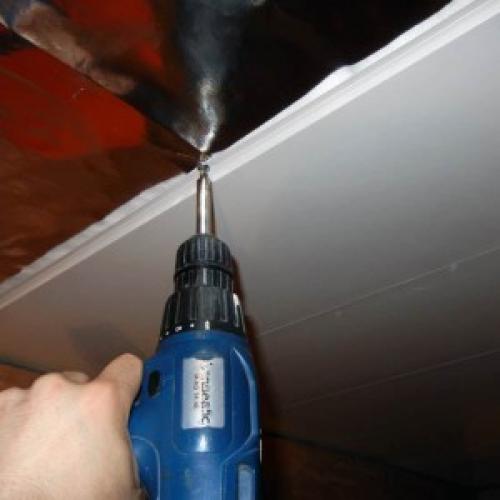
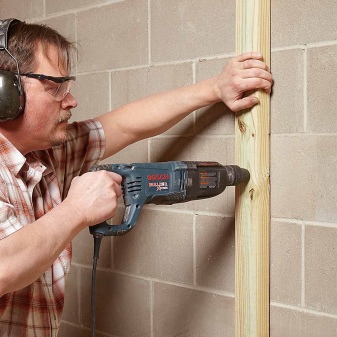
You will need special tools. An impact drill works best.
You can also choose a conventional drill, to which the victorious tip is matched. But in this case, the work will be complicated. At a cost, this will result in approximately the following figures: from 800 rubles for the tool itself and from 40 to 50 rubles in addition for the drill. Sizes are considered to be running diameters by 6 and 8 mm.
The list of materials such tools can work with is extensive. Their choice will depend on the future load of the hinged structure. The most popular are the following:
- self-tapping screws for bricks;
- dowels (will help withstand a heavy load);
- anchors (capable of holding very heavy things on themselves);
- rivets (for delicate glass shelves);
- corners (for small cabinets and shelves);
- regular nails combined with all the others.
It is also important to consider what kind of product is used for laying the surface - it can be either solid or hollow. The types and varieties of this product will also tell you how reliable the self-tapping screws used for bricks are.
The main rules of fastening
correct fastening of self-tapping screws
Before starting work, you need to learn some rules. They will help not to spoil the surface and to carry out the correct fasteners:
- The most basic requirement that must be met when attaching something to a wall made of such a material is not to spoil the mortar that holds the blocks together.
- It is best to use a drill. It will help to avoid cracks that may appear if, for example, try to "push" screws into a brick with a puncher.
- Drilling should be unhurried and gradual. This approach will help secure any element to such a wall.
Ways of work
work with self-tapping screws
There are several ways that you can make it easier to place the fasteners on such a wall. Some of them are quite interesting:
If we work with dowel nails, it is important to prepare a container with water - in it we will periodically cool the drill. You can wind electrical tape on the drill itself, which will serve as a limiter
After the hole is ready, insert the glass of the dowel and hammer in the nail.
In order to facilitate the process that self-tapping screws driven into bricks go through, you can use the "old" method. The dowel inserted into the drilled hole is secured with a wooden peg.
Another "old-fashioned" method will consist in the fact that a hole is drilled, a cork or chopik, previously soaked in PVA glue, is twisted into it. Then the "excess" peeping out of the wall is cut off and a self-tapping screw is screwed in. But such a mount is considered short-lived.
It is best to use dowels for work, designed specifically for a brick wall. They have protrusions that will prevent it from turning, even if a screw or nail is being screwed in. This rule applies even for hollow bricks, in which it will roll up into a knot and take up the entire required volume.
When you need to decorate an external wall (for example, a house entrance), you can use corners along with dowels and self-tapping screws.They will not only connect the structure and the wall, but even become supporting elements.
How to screw it in?
In order for the self-tapping screw to be able to screw in firmly enough into the concrete and ensure a strong fixation of the entire structure, you first need to check the material itself. If the concrete is "loose" and crumbles a little, then you should first make a small depression at the point where the device will be inserted.
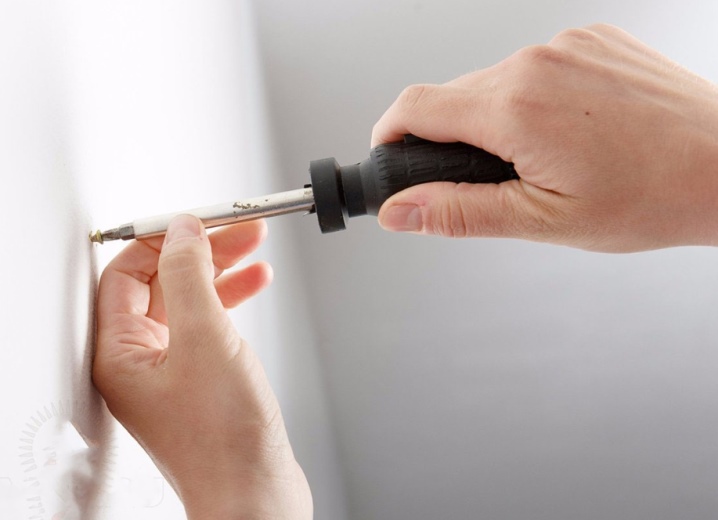
The self-tapping hole can be made with a Phillips screwdriver. If it is not there, take an awl, but it is better not to use a drill. The recess made will not allow the element to go to the side during installation. It will be fixed strictly perpendicular to the surface.
In the process of screwing in, the self-tapping screw will begin to delaminate the material. When installing fasteners, some rules must be taken into account. Remember that the length of the anchor should be significantly less than the thickness of the concrete. Otherwise, the tip of the fastener will simply end up on the outside of the other side.
Depending on the density of the concrete base, the distance between the individual self-tapping screws without drilling should be between 12 and 15 centimeters. If you fasten the edges of concrete products, then a small distance should be retreated from it. It should be twice the length of the retainer itself.

The following video shows you how to drive a screw into concrete.
How to use?
It is possible to screw the dowel into a concrete wall in two ways - either using a dowel, or without it. The presence of a plastic sleeve in the hole will provide a more reliable hitch due to its "branches" that act as struts. The use of a dowel is required in cases where the screw has an excessive load, or it is necessary to fix the part on porous or cellular concrete. In principle, a plastic spacer should also be used when working with structures that are subject to vibration. The installation of a self-tapping screw on concrete with a dowel begins with the fact that it is necessary to drill a recess in the wall, the diameter of which will coincide with the cross-section of the sleeve, and the depth will be 3-5 millimeters more. You can drill with an electric drill, but when processing soft or porous material, it is better to use a screwdriver with a drill.
The hammer drill is used in situations where the density of the concrete wall is 700 kilograms per cubic meter or even more. The resulting hole is cleaned of debris, and then the dowel is driven into the socket with an ordinary hammer. The self-tapping screw itself will be correct to tighten with a simple screwdriver or a screwdriver with a bat to an already prepared place. The installation of the dowel on concrete can also take place without preliminary drilling. This is done either according to a template or with a preliminary drawing of a channel outline. When using a template, it will be necessary to screw the hardware into the concrete surface directly through the hole in the pattern made from a piece of wood or a piece of board. If everything is done correctly, then the fasteners will be securely fastened perpendicular to the surface.
When working with a basting, the hole will need to be drilled slightly smaller than the diameter of the self-tapping screw itself. It is customary to drive a dowel with a herringbone thread into concrete with a hammer. Be sure to mention that the use of screws presupposes a preliminary marking. The distance from the edge of the structure must be equal to at least double the length of the anchor
In addition, it is important that the depth of the hole exceeds the length of the self-tapping screw by an amount equal to its one diameter. When working with lightweight concrete, the planting depth should be selected, equal to 60 millimeters, and for heavy blocks - about 40 millimeters
When the dowel is selected to fix wooden structures or window frames on concrete or brick walls, the surface is first cleaned and a recess is drilled with a drill. Further, about 5-6 centimeters recede from the edge.When installing PVC window frames, the gap between the screws remains equal to 60 centimeters. In the case when it comes to wood or aluminum structures, you will need to maintain a distance of 70 centimeters, and, plus, keep 10 centimeters from the corner of the frame to the racks.
Some experts recommend wetting the drill bit with water or oil throughout the work process to avoid excessive heat build-up. If the dowel will be screwed in with a screwdriver, it should be selected in accordance with the drawings printed on the head of the product. Both curly and cruciform varieties can be suitable.
To remove a broken self-tapping screw from a concrete wall, it is better to drill the area around it and carefully pick up the fasteners with thin round-nose pliers. Next, the resulting hole is closed with a plug of the same diameter, coated with PVA glue, or it is filled with a larger dowel
To fasten the skirting boards with self-tapping screws on concrete, manipulations will need to start from the inner corner of the room.
Having made the markings, it is necessary to prepare holes for the screws in the baseboard and on the wall. First, the dowels are fastened, and then with the help of self-tapping screws, the plinth is neatly fixed on the wall. In the case when the surface is made of concrete, a recess equal to 4.5 centimeters is usually drilled, and the fastening itself is carried out at a distance of 3 centimeters. When working with a wall of silicate bricks, the hole will have to be deepened by 5.5 centimeters, and the anchoring should be carried out to a depth of 4 centimeters. This type of self-tapping screws can also be used for pumice surfaces - in this case, you will first need to create a recess equal to 6.5 centimeters, and keep the gap between the hardware equal to 5 centimeters.
For information on how to wrap a screw in concrete, see the next video.
Dowel selection
When purchasing various objects for fastening to a concrete wall, you should choose the right dowel for concrete, its dimensions can be roughly selected from the table:
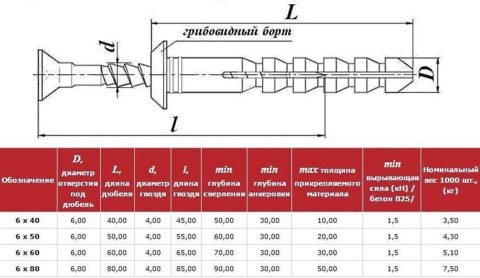 Table for determining the dimensions of the fastener from the type of load on it
Fasteners are selected depending on the type of place where it will be used.
Before driving a dowel into a concrete wall, the future load must be taken into account:
To secure structures of a large mass, for example, a Swedish wall or mounted exercise machines, it is best to use dowels with an attachment depth of at least 85 mm;
When fixing horizontally into a concrete wall, it is recommended to purchase fasteners with an attachment depth of at least 30 mm, and the diameter of the dowel from the outside is 7 - 11 mm;
For the device of a suspended ceiling, lamps, where the main load is located from below, fasteners should be selected with spacer antennae and cross-notches;
When choosing dowels for an already drilled hole, it is important that the parameters of the fastener and the diameter of the hole match. In this case, the dowel for expanded clay concrete or other material must have a diameter not less than the size of the hole;
When using mounting hardware, the dowel should serve as a cushioning pad to prevent weak walls from collapsing.
In this case, the fastener fits snugly enough to the fastener, and the load is distributed evenly throughout the product.
Features of mounting the dowel into the wall
 Dowel installation technology in a concrete wall
To carry out work with your own hands, you need to purchase:
- Electric drill;
- Drill out is victorious;
- Sharp nail;
- Dowel of the required design;
- Insulating tape;
- The hammer is small.
After preparing all the tools, you can start installing the dowels.
Work instructions:
- The location for installing the fasteners is outlined with a ballpoint pen or a simple pencil;
- Make a small indentation with a nail, hacksaw or pin. This will allow the drill to be positioned correctly when making a hole;
- If the number of dowels was not calculated correctly, you can make the product yourself. To do this, take wooden blocks of the required length. They are given rounded sections, with a thickening from above, and a decrease in diameter downwards. After that, self-tapping screws are screwed into concrete without a dowel;
- The drill of the required diameter is inserted into an electric drill;
- The drill is placed in the recess made earlier. The drill is located strictly perpendicular to the surface;
- Dust and cement chips are removed from the drilled hole. This can be done with a vacuum cleaner;
- The dowel is carefully inserted and hammered in with a hammer, but not too hard, until it stops;
- A screw is screwed into the dowel if it is part of the structure.
To properly hammer the dowel into the wall, you should watch the video in this article.
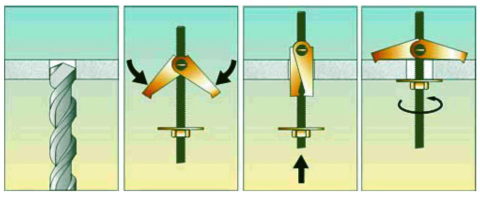 Spring dowel installation
Plain straight cut drywall
Before starting work, it is necessary to prepare the workplace. Since the sheet is quite large, you will need enough floor space, and do not forget to leave yourself extra space to walk around the sheet, as you can only step on drywall as a last resort. The surface of the floor must be dry and even, as during operation you may need to step on the sheet, and the slightest unevenness on the floor will damage or split it. When cutting, a lot of dust is generated - in order not to contaminate the floor, it is recommended to use a special covering film.
Place the sheet carefully on the prepared floor surface.
IMPORTANT: Never drop the plasterboard sheet on the floor - it can crack easily. Using a tape measure and a pencil, mark out on a sheet of drywall, then use a long ruler or rule to draw cutting lines
Using a tape measure and a pencil, mark out on a sheet of drywall, then use a long ruler or rule to draw the cutting lines.
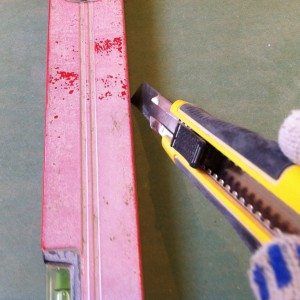
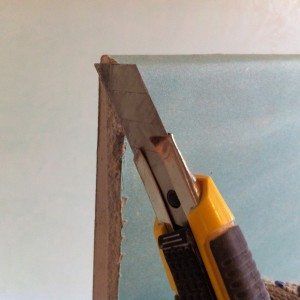
Now, using a construction knife (for this operation, it is desirable to use new blades), we cut the surface of the sheet along the drawn line. To make a straight cut, do not use plastic or wooden tools, but only tools of high rigidity (metal), in order to avoid injury - the tool must be of sufficient thickness. Better to use a building level or rule.
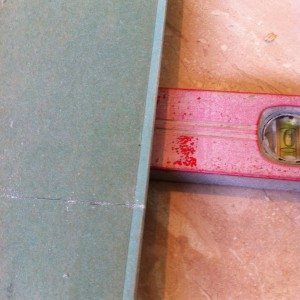
You do not need to cut the sheet to the end - this will ruin the floor, it is enough to cut through the material a little less than half (the less you drag the knife along the line, the smoother the edge will be). With enough skill, you only need to make one cut. Lift the sheet and, holding the cut part with one hand, place a level or rule under the cut line (stepping back a little towards the rest of the part).
Let go of the sheet and break it at the cut.
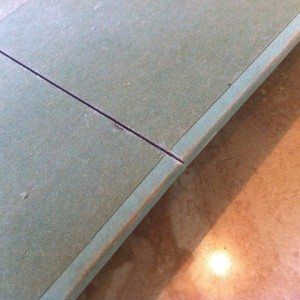
Then, turn the sheet over and fold it along the cut line. After that, carefully cut the cardboard layer on the other side and separate the cut part.

Work the cut off edge with a special plane or a construction knife and sandpaper.
How to screw a nail into concrete
- Before installing the structure, it is necessary to calculate the load. This is quite simple to do, since the diameter of the screws is standard. Lightweight items such as wall shelves can be mounted on 72 mm dowels. For heavy and bulky objects, the screw is selected individually.
- Before drilling, the surface of the wall must be cleaned. On the surface, the marking of future fastenings is carried out. Before marking, you need to make sure that it does not fall into the place of passage of fittings or wiring. There should be no more than 60 centimeters between the attachment points, when installing windows - a step of no more than 70 centimeters. 5-6 centimeters recede from the edge of the wall.
-
The depth of the drilled hole should be slightly more than the length of the dowel.If the hole is not deep enough, a metal pin can be used to get the desired depth. During installation, deviations from the drilling axis are unacceptable; it is necessary to hold the drill strictly perpendicular to the wall. The hole is cleaned of dust with a cleaning rod or a construction vacuum cleaner.
- In the absence of a tool, simply a drill is used to drill a preliminary hole. He is hammered into the wall with a hammer. After a few strokes, turn and hammer again until a hole of the required size is obtained.
- When screwing the dowel into concrete, it is not advised to use a screwdriver. Since the screw itself is quite fragile, it may not be able to withstand the excessive tightening and heat generated by the power tool. For installation, use a simple screwdriver. If you have problems with screwing in, it is better to take a hammer. When screwing the screw into a porous concrete wall, the installation must be done carefully.
How to screw in a self-tapping screw when installing drywall
Before screwing a self-tapping screw into drywall, you need to think about tools that can simplify the work. Let's analyze what tools and devices can be used: For a repair master, screwing in self-tapping screws is something understandable, which does not raise any questions. Newbies believe that fixing drywall to the frame with self-tapping screws is the easiest to repair. But not everyone knows how to screw a self-tapping screw into drywall so that later there will be no problems. Errors at this stage of the repair can lead to a fragile coating.
Self-tapping screws should be screwed from one edge of the sheet to the other. Do not screw them in randomly, because this can lead to deformation of the drywall. The attachment pitch is 15 to 30 cm, depending on the specific situation. A screwdriver produces a slight pressure on the fasteners, and the maximum speed is turned on.
This is necessary so that the screw can enter the profile to which the gypsum board is attached. As soon as it passes in the profile, the speed can be reduced and the screw can be tightened slowly. If the speed is not reduced, the sheet core will be damaged. The screw should enter the sheet so that the cap sank into it by 1-2 mm.
You need to work with a screwdriver gently, without much effort at first. If the self-tapping screw has not yet begun to enter the gypsum board, then the screwdriver under pressure can jump off and pierce the surface. When the screw has entered a little into the core of the material, then you can already apply more effort to screw it in to the end.
Additional information on the topic:
- What is the Difference Between Ceiling Plasterboard and Wall Plasterboard
- Projects of plasterboard ceilings with stretch ceilings
- How to properly glue serpyanka on drywall when puttying
- What you need for a plasterboard false ceiling
- Prices for plasterboard ceiling plaster for painting
Drilling drywall
Due to the great softness of drywall, almost any drill, drill and crown can be used to drill sheets. However, preference should be given to drills (including feather drills) for wood, as well as crowns for wood and ceramics.
When drilling, it is advisable to put a wooden block or other not too hard material on the opposite side of the sheet, and, in the case of using a crown, you should drill approximately halfway from one side and final from the opposite, so you can avoid chipping of soft gypsum on the back of the sheet ...
Types and sizes
Depending on the type of head, all self-tapping screws can be divided into several independent groups.
Countersunk head varieties. Such models most often have a tapered design with cross-type splines. To work with such a variety, you first need to prepare a seat. To do this, you need to make a small chamfer, which will allow you to place the butt so that it is in the plane of the material.Models with this head structure will not protrude from the concrete surface after installation. Today, there are versions with a reduced head. They have a smaller diameter, provide a more reliable fastening, but more effort should be applied when installing them.
Self-tapping screws can also be divided into separate categories depending on their protective coating. Many models are produced with a special oxidized coating. The latter is in the form of a thin oxide film, which gives the details a black color. Such options are able to withstand significant loads, but at the same time we must not forget that they should not come into contact with moisture during operation.
There are also models coated with phosphated compounds. These varieties, like the previous version, will be colored black. They are also able to fix material of significant weight, while they have good resistance to water influences. The cost of such models will be higher compared to other types.
Galvanized self-tapping screws for concrete can be white or yellow, but at the same time they practically do not differ from each other in important properties. These models are most often used to install products that will be located in the open air, since these self-tapping screws are especially resistant to various atmospheric influences.
Self-tapping screws are also classified depending on the material from which they are made. The most common option is high strength, high quality carbon steel. Such a foundation is considered to be quite strong. Most often it is used together with impurities. In addition, this metal is particularly durable. Fasteners made from this metal are relatively inexpensive.
Also, ordinary stainless steel can be used for the production of such self-tapping screws. This material will become the best options in the event that further contact of fasteners with moisture is possible. After all, models made of such material will not rust and will not lose their properties.
As a rule, self-tapping screws made of alloy stainless steel are not covered with additional protective coatings. Indeed, in the composition of such a metal there is nickel and chromium, which already provide excellent anti-corrosion properties of products.
There are also special types of decorative screws. They are most often made from wood, plastic or various non-ferrous metals. But such samples are extremely rarely taken for concrete surfaces, since they cannot withstand too much stress.
The sizes of self-tapping screws for concrete can be different. They are chosen depending on the thickness of the surface and on what diameter the holes should be made.
Tools can have different thread configurations.
- "Herringbone". This type is a slightly oblique thread, which is formed by small metal cones nested into each other. The herringbone model most often has a cross section of 8 millimeters.
- Universal. Such a thread on a self-tapping screw can be used with or without a dowel. As a rule, the tool is available in sizes up to 6 millimeters.
- With an inconsistent pitch of turns. These variable-pitch specimens provide the most reliable fastening of materials, while additionally performing notches. It is this type that is more often found on self-tapping screws without drilling. The standard value for the diameter of such devices is 7.5 millimeters.
The length of these devices can vary from 50 to 185 mm. The depth ranges from 2.3 to 2.8 mm. The height of the cap reaches values of 2.8-3.2 mm. The diameter of such self-tapping screws can be from 6.3 to 6.7 mm.
The thread pitch also plays an important role. For different models, it can reach a value of 2.5-2.8 mm
General information
Although the modern construction market offers many options, self-tapping screws remain the most popular. They are peaked rod-shaped screws, the head of which has a cross notch. Such a fastener is highly durable, which allows it not to bend or collapse under the influence of heavy loads.
How to use a concrete screw when working with aerated concrete
Material
For the manufacture of self-tapping screws, various materials can be used, which are selected depending on the type and conditions of use.
The main ones are:
- carbon steel;
- stainless steel;
- brass.
The common feature of each of them is high strength, and their price does not differ much from each other.
The most common fasteners are made of carbon steel. Such self-tapping screws have an additional protective coating that protects them from oxidation and other types of influences.
Anchor screws for concrete
In order not to get confused about the types of coating for carbon steel, you must remember their color designation:
| Silver | In this case, the protective coating is a zinc layer. Such self-tapping screws can be used equally effectively for various jobs. |
| Yellow | Such fasteners are also processed with zinc, but they have a slight drawback in comparison with silver ones. It can only be used when working with concrete indoors. |
| Black | Another type of coating for carbon steel screws is oxidized. It is recommended to use them during interior work in rooms with normal air humidity. |
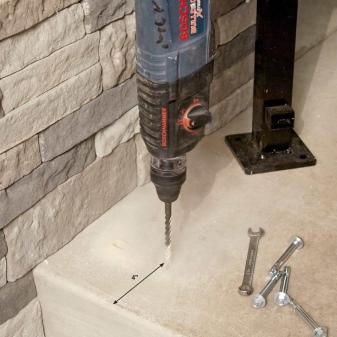
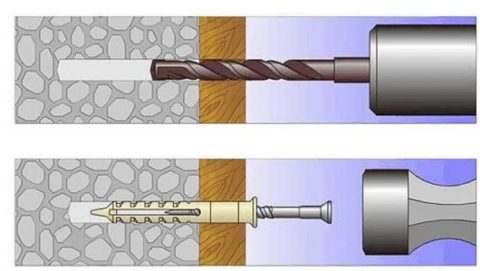
Before installing the self-tapping screw - make a hole for the dowel with a puncher
Views
Self-tapping screws can be supplied complete with dowels or simply screwed into the surface without them with your own hands.
Due to the different characteristics of the elements, they can be divided into three main groups, each of which has different properties:
- Universal with medium thread pitch. The range of lengths of such fasteners is 12-220 mm, and the diameter is 3-6 mm. They can be used equally effectively with or without concrete dowels in bases made of bricks (concrete).
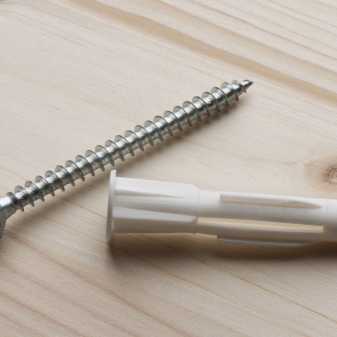
In the photo - a self-tapping screw with a herringbone thread
- With herringbone thread. The range of lengths is similar to the first group, and the diameter can be in the range of 3-8 mm. These elements are fixed only using dowels. To create a dowel hole, use a drill with the same diameter as the dowel. The drilling depth should exceed the length of the latter by 3-5 mm, and the self-tapping screw should have the same length.
Installation of a self-tapping screw into concrete without drilling
- Dowels - variable type of thread with notches. Such elements differ in different lengths (in the range of 70-200 mm) and a constant diameter of 7.5 mm. It is used without a dowel. To install it, it is necessary to drill a hole Ø 6 mm in the base and a length exceeding the length of the self-tapping screw by 10-15 mm.