Methods for installing a profiled sheet
There are several ways to fix corrugated board:
- Overlap. The most reliable installation method. The overlap is done on one wave. Self-tapping screws are screwed in until they are tightly connected to the surface of the profiled sheet. Holes for hardware are made in advance, then they need to be coated with an anti-corrosion agent.
- Butt. Each segment of the fence must be separately connected to the logs. As a rule, the fasteners are self-tapping screws, which require 2–4 pcs. one joint. From the bottom, to increase rigidity, additional hardware is screwed in. Holes for mounting are pre-made. In diameter, they should slightly exceed the section of the self-tapping screw. At the sections of the joint of the profiled sheet, strip strips are attached.
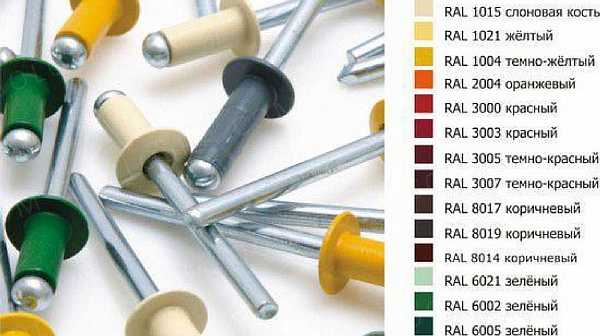 Rivet options
It should be noted that regardless of the chosen installation option, the correct fastening of self-tapping screws is possible only if you use a building level, setting the top line of the sheet. This will ensure that the profiled sheet is evenly fastened to the fencing frame.
If you fix the profiled sheet yourself with self-tapping screws, you need to take into account the following nuances:
- To install the profiled sheet for the fence was faster, in the places in which the hardware will be screwed into the profile, you need to make marks with a felt-tip pen.
- First, you need to fix the edges of the sheets, determine their verticality, and then fix the intermediate hardware.
- If the logs are made of wood and the self-tapping screw turns during fastening, you can nail a small chip on the fastener section.
- To cut the profiled sheet, you should use metal scissors. It is not advised to use a grinder. Sparks during operation will damage the protective layer, the material will be susceptible to corrosive processes.
 Screw tightening options on one sheet
It is advisable to cover them better with a steel bar, picking it up to match, like the fence, screwing in self-tapping screws with an interval of 35 cm.
On the video you can see the instructions for fixing the corrugated board with self-tapping screws.
How many self-tapping screws are there on a sheet of corrugated board when attaching it to the roof?
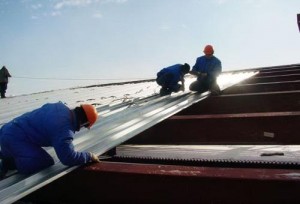
Installation of corrugated board begins from the side of the eaves. First, the first left sheet of the bottom row is laid, then the second with an overlap in one wave. After aligning the sheets along the edge of the cornice, the profile is attached to the bottom beam of the sheathing in each wave. In the place of the overlap, the sheets are joined together with rivets.
After installing the first two bottom sheets with an overlap of 200 mm, the left sheet of the second row is installed. In the place of the overlap, the lower and upper sheets of corrugated board are attached to the crate in each wave. In the interval, each sheet of corrugated board is fastened in a checkerboard pattern after 1-2 waves. For reliable fastening, the distance between the roofing screws should not be more than 500 mm.
Based on the above-described technology for fastening the profiled sheet, it is determined how many self-tapping screws on the profiled flooring are needed for reliable laying of the roofing.
To do this, you need to perform a simple calculation. self-tapping screws for corrugated board... If we lay a sheet with a length of 8.0 m and a width of 1.1 m with a step of fastening to the lathing of 500 mm, then we need 10 self-tapping screws for attaching the profile in the upper and lower parts, as well as 8 more pieces for fastening the middle part of the corrugated board. The total consumption of self-tapping screws for the profiled sheet will be 18 pcs. This number must be multiplied by the number of sheets on the roof and we will get the number of self-tapping screws needed to directly fix the corrugated board.
The number of self-tapping screws per profiled sheet may differ depending on the length and width of the sheet. In addition, with large slopes, it is recommended to reduce the fastening step, which also increases the consumption of self-tapping screws per 1 m2 of profiled sheet.
When fixing corrugated board, the greatest attention should be paid to the joints of the roofing, it is there that the probability of leakage is highest
At the ends of the pitched roof, in the places of the pediment overhangs, the profiled sheet of the roof covering must be fixed to each batten of the sheathing. This also increases the number of self-tapping screws per 1m2 of profiled sheet.
Thus, such a concept as the rate of consumption of self-tapping screws on a profiled sheet can hardly be considered completely correct when it comes to installing a roof. Rather, we can talk about some average figure that allows you to make an approximate calculation of self-tapping screws for a profiled sheet when ordering materials for installing roofing. In this case, it is necessary to order 5-10% more than calculated, since there is always a possibility of marriage, unforeseen expenses, loss and breakage of self-tapping screws.
What are the limitations when attaching corrugated board with self-tapping screws?
When arranging a roof with a large angle of inclination, the overlap strip is made wider, which must be taken into account. When it is ten degrees, only one wave overlap is sufficient. A wider angle of inclination requires an overlap of two to three waves
Installation is carried out not from the center, but from the end parts. The fastening step is important, but the location of the sheets is also important. They should be located strictly along the roof.
Even a slight deviation should not be allowed. To control the position of the sheets, it is recommended to pull the thread along which the first row of corrugated board is laid, and the remaining elements are aligned along it.
Calculation of the number of fasteners for one sheet of corrugated board
When fixing the roofing material on the roof using self-tapping screws, it is necessary to start laying the sheets from the eaves. The laying of the first sheet is carried out in the lower part of the slope, the installation of the second and subsequent sheets in this row is carried out with an overlap in one wave. All canvases are aligned along the lower edge of the eaves and fixed on the lower bar of the sheathing, twisting a self-tapping screw into each wave.
When laying sheets of the second row, an overlap is also made, here it can be up to 20 cm, like an overlap of a profiled sheet on the wall. In places of overlap, the sheets are riveted and fixed with fasteners in each wave. On the rest of the area of the canvas, self-tapping screws are screwed in a checkerboard pattern in every third wave. More reliable fixation requires a distance between fasteners of no more than 50 cm. According to the described technology, the required number of self-tapping screws is calculated for fixing one sheet of corrugated board.

For example, you can consider a roofing material 8 meters long and 1.1 meters wide, the step between the fasteners is 50 cm:
- On the upper and lower edges of the sheet, fastening is performed using 10 self-tapping screws.
- In the middle part, the canvas is fixed with 8 elements.
- Therefore, one sheet can be fastened with 18 self-tapping screws.
To determine the number of fasteners for the entire roof area, multiply the number of sheets of roofing material by 18.
The number of fasteners for corrugated board will be correspondingly different if wider and longer sheets are used. A significant slope of roof slopes requires an increase in the number of fasteners due to a decrease in the distance between them. In addition, it is worth considering that at the ends located along the gable overhangs, the mount should be located on each bar of the sheathing, which accordingly leads to an increase in the number of self-tapping screws
When purchasing fasteners according to the calculations, it is very important to make a small margin, about 10%. This is necessary to cover defective elements and unforeseen expenses, as well as in case of breakage or loss of screws.
Self-tapping screws for fixing corrugated board
This type of fastener is available in C1022 carbon steel. Self-tapping screws, according to the existing GOST, must have a zinc coating, which gives the hardware resistance to corrosion.In addition, the fastener must be able to withstand wind, snow and operational loads. All self-tapping screws undergo a tensile test. On sale, most often there are hardware with an indicator of 102 kg per cm, but there are also those that are capable of withstanding loads in the range of 150-170 kg.
Fastener features
There are a huge number of types of fasteners. It is recommended to fasten the corrugated board with self-tapping screws, since these hardware have properties that facilitate the process of laying the material and ensure reliable fastening at the joints of the sheets and the frame. This hardware has a tip made in the form of a drill. Thus, there is no need to drill the corrugated board in advance. The holes are formed already during the fastening process. The hexagonal head, which is included in the chuck of a drill or screwdriver, greatly facilitates the process of arranging the roof.
Criterias of choice
Self-tapping screws for attaching the profiled sheet to the roof must meet certain requirements. You need to know that these fasteners are different. Some are designed for fastening corrugated board to metal, others - to a wooden frame. The latter are selected taking into account the fact that the thread pitch must be sparse... This allows you to create the most reliable fastening and provide convenience in working even with hard wood species.
The metal frame is exposed to intense wind load. Fastening to it requires the use of self-tapping screws, which have a drilling end and a special sharpening. Preference should be given to products that are made of high quality steel. They are characterized by increased strength and resistance to stress. The roofing device involves the installation of additional and ridge elements. These structural elements should be fastened with long self-tapping screws.
Useful Tips
Many people confuse the methods of fastening slate and metal profiles. Indeed, the slate is attached to the top ridge. This is done so that moisture, flowing down the wave, does not get through the hole into the under-roof space. Self-tapping screws are protected by a rubber gasket, and there is no such danger.
The fastening of the corrugated board should be more durable - after all, unlike heavy slate, metal sheets have a fairly high windage.
How to make and decorate beautiful garden beds with your own hands: simple, tall, smart. For flowers and vegetables. Original ideas (80+ Photos & Videos) + Reviews

Lifting sheets along lags
Plus, if you try to screw the corrugated board into the upper wave, deflections are formed in the metal, which are clearly visible externally. Therefore, to the question of which wave to fix the corrugated board on the roof, we answer unequivocally - to the bottom.
The sheets are laid on either side of the roof from its lower edge. So that the seams from the overlap are not striking, it is better to start from the far end, gradually moving towards the entrance to the building. A similar method is used, for example, when wallpapering.
They are glued from the window precisely because the seam joint is not conspicuous when entering
When joining sheets, pay attention to the direction of the prevailing winds. Upwind joints are highly undesirable
Otherwise, moisture will get into the seams.
Novice builders often complain that gaps are formed in the overlap areas when laying the corrugated board. But this happens due to the usual carelessness. After all, the width of the waves and shelves always alternates. That is, the wider shelf should only be at the bottom. When the sheets are joined, a narrower shelf should be located on top of it. Only if this condition is met, the sheets will lie back to back, without gaps. Please note that at the edges of the sheet, the width of the shelves is different. If you need a wider, or, conversely, a narrower shelf, just flip the sheet 180 °
How to properly fasten the corrugated board to the roof with self-tapping screws? Many users do not pay enough attention to the angle of inclination of the fasteners.But if it is screwed in not at a right angle, but with a slight slope, the gasket will not adhere tightly to the surface, and moisture will penetrate inside.
Roof measurements should be taken twice. After all, the length of the rafters on different slopes is unlikely to coincide to a millimeter. Measurements can be considered accurate only if both results differ by no more than 2 cm.Otherwise, you will buy more (or less) material than required
Avoid too many slices. In such places, due to damage to the coating, the risk of rust increases. To minimize the number of cuts, select the length of the sheets to be a multiple (taking into account overlaps) of the roof height
There is no point in saving money by purchasing a corrugated board with a low corrugation height. After all, it will need to be mounted with a large overlap (in 2 waves). The high-wave material is applied to adjacent sheets with an overlap of 1 wave
Metal will always bend under the weight of a person. Although visually it may not be noticeable. Therefore, to obtain a perfect joint, without gaps, when fastening adjacent sheets, be sure to tighten the adjacent edges to each other by hand. For the same reason, installation should be done gradually, from sheet to sheet. If you connect them randomly, then gaps will necessarily form at the joints of the missing sheets. It is undesirable to step on the lower layer of material during installation
In order to avoid gaps in the overlap, it is necessary to start the installation of the roof from the edge having a shorter length.
Installation of corrugated board during strong winds is prohibited. Due to the high windage, the plate "blown" by the wind can easily fall off the roof, dragging a person along with it.
A serious drawback of corrugated board is its increased noise - during the rain, the ringing of falling drops is very well heard in the room. Therefore, when laying this material, be sure to take care of reliable sound insulation.
For detailed instructions on how to fix corrugated board on the roof, see the video:
VIDEO: Instructions for installing corrugated roofing
How to properly fix the corrugated board on the roof: DIY step-by-step poultrying of fasteners, cutting, installation on self-tapping screws, tips (Photo & Video) + Reviews
8
Total Score
Fastening corrugated board to the roof
8.3 Average score
Relevance of information
9
Availability of application
7
Disclosure of the topic
8
Reliability of information
9
7.7 User rating
Relevance of information
7
Availability of application
9
Disclosure of the topic
8
Reliability of information
7
|
Benefits of professional sheets
One of the advantages of corrugated sheets is their plasticity: they can take on almost any shape.
A wide range of sizes makes it possible to use profiled sheets not only as an excellent roofing material, but also for the construction of load-bearing ceilings, ceilings, and building facades.
The low weight of the profiled sheet makes it easy and safe to transport and lift it to the required height.
The main advantages of the material are:
- resistance to corrosion and long service life;
- plasticity, ease of installation;
- resistance to ultraviolet radiation;
- thinness of sheets and at the same time high strength;
- ease of transportation;
- affordable price;
- environmental Safety;
- profitability;
- no need for further care and maintenance;
Correct laying of profiled sheets
So, how to properly lay and fix the roof sheeting and what should you know about this type of work?
- Installation should start from the lower right corner, exposing the first sheet with an overhang of the edge no more than 50 mm, screw a self-tapping screw into the center, then, if required, turn the corrugated board to correct the position along the edges of the slope.
- Next, the sheet is fastened up (if there are more than one rows) or to the left, if there is one row. That is, the scheme is observed from bottom to top and from right to left.
- In the presence of capillary grooves, adjacent sheets are joined so that they coincide, otherwise gaps will form.
- Also, when laying adjacent sheets, be sure to observe the overlap. In this case, all joints are treated with a sealant and additionally fastened with self-tapping screws screwed into the wave.
- When moving on a roof already covered with corrugated board, you cannot step on the corrugation ledges, shoes are selected with soft soles, and your feet are placed in the places where the crate boards are located.
Some experts advise to do the styling according to the scheme from right to left, increasing the rows after laying the lower one. This option is perfectly acceptable.
When laying in several rows, it is very important to observe overlapping installation, having previously calculated it at the angle of inclination of the slope
What screws to fasten the corrugated board to the fence
To install the fence, C20 brand profiled sheet is most often used. And it doesn't matter whether it is mounted on a mow or on a flat surface. For fixing, a fastener is used, which is called a self-tapping screw.
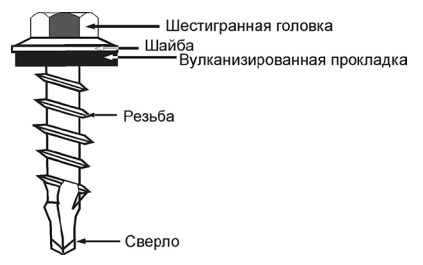 Drawing of one screw
It is a steel bar with a head and an external thread. The self-tapping screw is able to cut the thread itself in the material where it is screwed, without the need to first make a hole.
The main difference between a self-tapping screw and screws and bolts is that the thread is on the entire surface of the rod. Fasteners have a good indicator of the strength they receive after being factory heat treated during manufacture.
 The scheme of screwing the metal profile to the fence
Taking into account GOST, all types of self-tapping screws are certified according to international requirements. High quality galvanized steel or stainless steel is used as a production material.
The choice of self-tapping screws, which are designed to fix the profiled sheet to the fence, is large. Fasteners have different head shapes, diameters and sizes. They are made with a diameter of 3.9–6.4 mm, with a size of 18–24 mm.
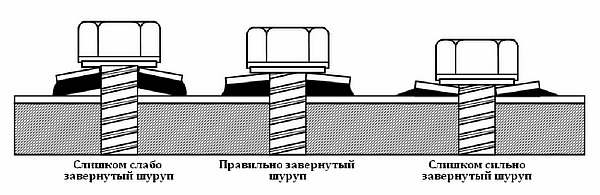
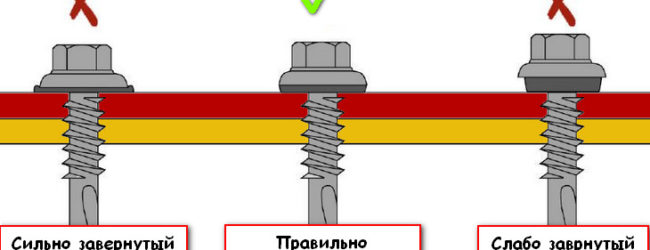
 Sketch of the correct screwing of self-tapping screws
The head slots can be of different shapes. The choice of tool for fastening will depend on this. Also, self-tapping screws can be supplied complete with rubber washers, which has a good effect on the tightness of the connecting fasteners.
In the photo you can see different types of self-tapping screws.
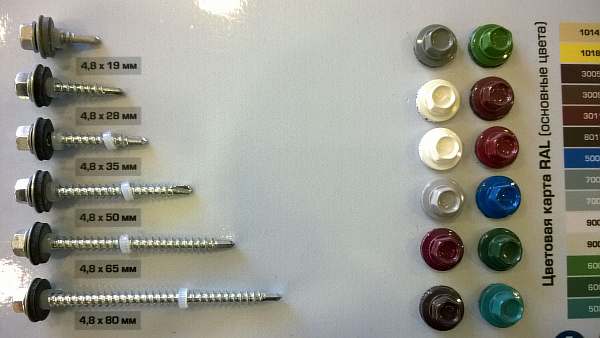 In one hardware store
How is corrugated board fastening performed when installing different structures?
Consider how the corrugated sheets are attached when laying material on the roof and when installing fences.
How is the material attached to the roof?
In order to securely fix the corrugated board on the roof, it is necessary to build a crate. During the construction of housing, the lathing is usually assembled from wood. In the construction of industrial facilities, the frame for laying the corrugated board can be assembled from metal elements.
 The spacing of the elements during the construction of the lathing is determined depending on the type of corrugated board used, namely, on the height of the profiling of the sheets, as well as on the slope of the roof slopes.
After the crate is ready, you will need to make a preliminary layout of the foxes. It must be remembered that the sheets must be laid with an overlap. Moreover, the width of the overlap depends on how steep the roof slopes are.
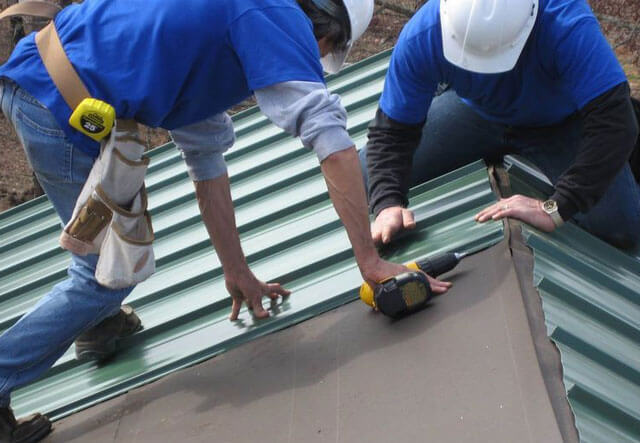
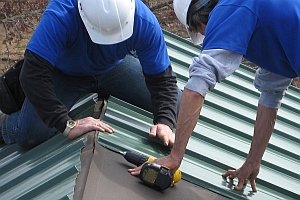
After completing the preliminary marking, you can proceed directly to the fastening of the sheets. Here are the basic rules for doing this job:
Self-tapping screws should be screwed in only in places where the profile is lowered, that is, where the material most closely adheres to the crate.
- In the upper and lower parts of the sheet, it is necessary to screw self-tapping screws into each lowering of the profile.
- Fastening the sheets along the long sides, it is necessary to screw in the self-tapping screws in increments of 50 cm.
- Self-tapping screws are screwed in over the sheet area, passing one wave. The screws are staggered.
- To make the coating as even as possible, it is not recommended to fasten the sheets to the crate one by one.First, you need to assemble a block consisting of 3-4 sheets fastened together, and only then screw the block to the crate.
- How to collect blocks? For this, the starting sheet is laid and after it is aligned relative to the ends, it is fixed with one self-tapping screw, screwing it into the upper part of the sheet. Then the next sheet is placed next to it, laying it with an overlap. After alignment, the sheets are connected to each other using short self-tapping screws or steel rivets. Similarly, one or two more sheets are attached to the block. Next, the block is aligned and fixed on the crate.
How should the corrugated board be fixed when constructing fences?
When building fences, a frame is first assembled on which the corrugated board will be attached. The frame is assembled from supports, which are installed in pits and concreted. Transverse logs are attached to the fixed supports, which are placed in two or three rows.
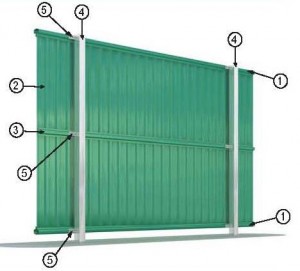
- Before you start attaching the corrugated board to the frame, you will need to measure the assembled structure to make sure that there are no distortions.
- They begin to fasten the sheet of corrugated board from the end part, screwing in self-tapping screws in increments of 50 cm.
- During the construction of fences, sheets are installed, as a rule, with an overlap of one wave width.
- If necessary, the protruding parts of the corrugated board can be cut using a hacksaw or metal scissors. It is not recommended to use a tool with abrasive discs (grinder), since during the cutting process the protective layers are destroyed and rusty spots will soon appear on the assembled fence.
- The ends of the sheets and the places of the corner joints of the fence are closed by installing special strips. The planks are matched to the color of the corrugated board and fixed with self-tapping screws.
So, the correct fixing of the corrugated board during assembly is a guarantee that the assembled structure will serve for a long time, delighting the owners with its reliability and attractive appearance.
Choice of fasteners
Unfortunately, not all developers pay attention to the hardware during the construction of the roof, but in vain. Such frivolity can cause very unpleasant situations that arise already during the operation of the building.
What hardware are there for corrugated board?
For wood
According to the international DIN standard, they are made of metal grade C1022, premium class self-tapping screws (M) must have a zinc coating thickness of 12–12.5 microns. Self-tapping screws of standard execution (MS) have a zinc coating thickness in the range of 7.7–8.2 microns. The letters are located on the head of the hardware. To improve the appearance of the roof and increase the service life of self-tapping screws, polymer paint is applied to their surface with the same parameters as the outer coating of the profiled sheets. The tip is made of alloyed metal, its diameter is less than the diameter of the self-tapping screw body. Due to this design, the self-tapping screw is firmly held in wooden rafter systems, the small diameter of the drilled hole allows the thread to reliably hold the roof.
For metal
The exact technical name is self-tapping screw. Wrench head, the tip resembles a drill. The diameter of the tip is the same as the diameter of the outer threads. It does not cut into metal, but is screwed into it
The thread pitch must be less than or equal to the metal thickness. This is a very important condition, not a single self-tapping screw can independently cut the thread, it is screwed into the prepared hole and clings to the edges of the metal.
Regardless of the type of thread and type of lathing, there are uniform fixation rules.
Hardware should fit into a wooden or metal crate strictly at right angles. Such requirements are put forward for two reasons: an increase in the fixing strength and a reliable sealing of the inlet. The fact is that if the angle of inclination does not correspond to the norm, then the rubber gasket cannot reliably seal the roof.In one place, it shrinks excessively, in the opposite, it hardly touches the profiled sheet.
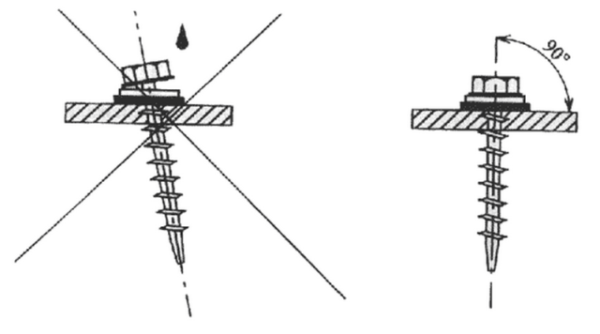
Self-tapping screws are screwed in at right angles
The clamping force should be in accordance with the manufacturer's recommendations. If the gasket is squeezed, then excessive internal stresses arise in it. In this condition, the effect of material fatigue quickly appears, the gasket cracks, and water gets through the cracks. The amount of water is not so significant that problems arise in the interior. But she soaks the wooden crate, and under the profiled sheets it dries for a very long time. As a result, the structures rot, the rafter system loses its original stability values.
The same problems arise in cases where the pressing force of the gasket is less than the standard values. Experienced roofers advise using professional screwdrivers during installation, they can be used with great precision to adjust the automatic control of the screwing force. But this does not mean that the master no longer controls anything. Self-tapping screws can get caught in knots, the screwing force increases significantly. Manual finishing is required, otherwise the compression force of the rubber pad will be insufficient.
Fastening the corrugated board with self-tapping screws
During screwing in, you need to monitor the applied efforts. There are times when the hardware fell into a crack in the crate or even passed by, this is noticeable by the extraordinary ease of screwing
He does not fulfill his task, does not fix the sheet to the roof. What to do? Do not try to remove it and twist it at an angle in the same hole in the hope of getting on a strong section of the batten. The danger of that position of the self-tapping screw has already been written above. There is only one optimal way out - leave the old self-tapping screw in the unchanged position, and screw another next to it. There is nothing terrible if two screws are located next to each other, from the ground it is completely imperceptible. In addition, during the construction of the roof, you need to be puzzled not so much by the appearance, although this is also important, as by the reliability and durability of the roof.
If the hardware fell past the crate, do not twist it
As for the distance between individual hardware, it must be adjusted taking into account the thickness of the sheets, the maximum values and direction of the winds and the location of the screw. The general rule is that the outer sheets should have an increased reliability of fixation, self-tapping screws are often twisted. The same applies to the line of the cornice.
The professional sheet is attached to the crate with a step through the corrugation
How to close the bottom of the fence?
During construction, it is undesirable to leave a gap between the fence and the ground, since the profile is prone to corrosion, and the fence itself becomes less stable. To close the bottom of the profile sheets, you can:
- Fill up the cracks with soil or rubble. To prevent animals from blowing up the fence, it is recommended to first dig a ditch 10 cm deep and fill it with a compacted layer of rubble;
- Another simple way is to close the space with a chain-link mesh, slate or profiled sheet scraps;
- The most labor-intensive option is brickwork or a monolithic concrete base, for which you will need to make a foundation of concrete and a metal frame.