The nuances of erecting walls from aerated blocks: the brand and thickness of the blocks
For the construction of load-bearing walls from aerated concrete blocks, D500 and higher blocks are used. The numerical index means the volumetric weight in kg / m3. For internal non-load-bearing walls and partitions, it is permissible to use the D400 grade. The lower grade D300, as a rule, is used as wall insulation from a more durable material.
When the number of storeys is three or more, blocks with a brand not lower than D600 are used.
The thickness of the walls is determined by a heat engineering calculation. The thermal resistance of a wall is determined by the sum of the heat transfer resistance coefficients of the inner and outer surfaces of the walls, as well as of each layer of the wall itself.
Consider the heat engineering calculation of the resistance to heat transfer of a wall made of D500 blocks with a thickness of 375mm, insulated with a 50mm mineral wool board.
The thermal resistance of a wall layer to heat transfer is determined by dividing the layer thickness by the thermal conductivity coefficient (see table).
Thermal characteristics of aerated concrete blocks.
Very often in advertising brochures you can find the value of the thermal conductivity coefficient for the D500 brand equal to 0.1. This is nothing more than a marketing ploy. This value is either intentionally rounded down, or simply provided for a completely dry state of the block. In real operating conditions, the thermal insulation properties are worse - their values are given in the column of calculated coefficients. The letters "A" and "B" denote the humidity zone corresponding to the construction site. For the coasts of large reservoirs, zone "B" is adopted, for other places, as a rule, zone "A". The higher the water saturation of the material, the worse its thermal insulation properties.
The characteristics of other materials are shown below.
Thermal characteristics of common building materials.
The sum of the coefficients of resistance to heat transfer by wall surfaces (external and internal) is 0.158 W / mC.
Determine the thermal resistance for masonry from D500 blocks with a thickness of 375 mm (0.375 m) in the humidity zone "B":
0.375 / 0.16 = 2.344 W / mS
Thermal insulation with a 50mm (0.05m) mineral wool slab will give the following indicators:
0.05 / 0.09 = 0.556 W / ms
The total resistance of the wall to heat transfer will be:
R = 0.158 + 2.344 + 0.556 = 3.058 m2 / W * C
Is this result sufficient? It depends on the climatic zone of the construction. Determination of the required value of R is performed according to table. 4 SNiP 23-02-2003. The calculation is relatively cumbersome, it is easier to find out the required R value for your region through any search engine. The higher the value of this indicator, the warmer the house.
Materials used
In addition to the classic version (the use of reinforcement), other materials can be used to reinforce masonry from blocks:
Galvanized metal mesh
Consists of steel rods welded in mutually perpendicular position.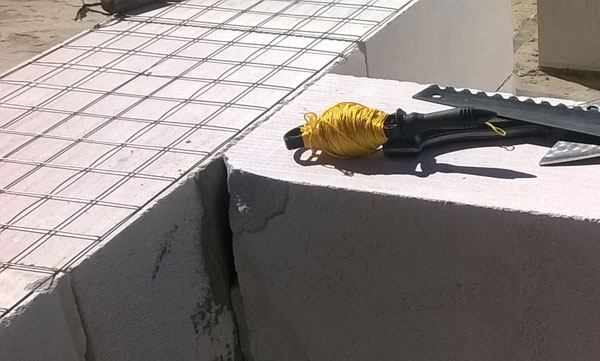
Of all the types of mesh used, metal is the most durable. But it has one big drawback: a special adhesive composition for connecting wall blocks promotes the development of corrosion, which leads to a fairly rapid loss of all the positive properties of such reinforcement. Also, the transverse rods act as cold bridges in winter. I do not recommend this type of amplification.
Basalt mesh
It is made of basalt fiber rods, which are located perpendicular to each other. In butt joints, the rods are fixed with wire, clamps or specialized glue. Such bonding ensures the correct and even geometric shape of the cells.
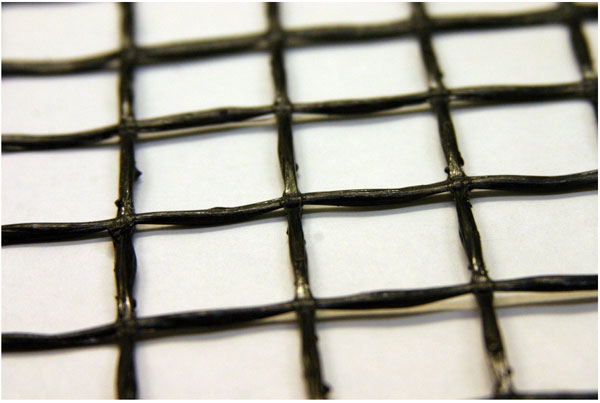
Basalt mesh can withstand the strong impact of breaking loads - about 50 kN / m.Its weight is several times less than that of a metal mesh, which ensures ease of reinforcement work.
Basalt-based grids are resistant to the negative effects of corrosion and do not react to changes in temperature conditions. They have a very low thermal conductivity, which ensures that there is no cold bridge that occurs when reinforced with a steel mesh.
Help Basalt mesh costs a lot, so this solution is the most expensive of the proposed.
Metal mounting perforated tape
It is a galvanized strip of steel with holes drilled along its entire length.
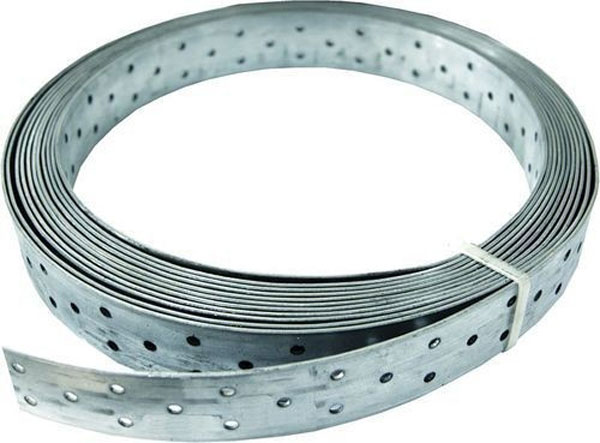
It is enough to purchase a tape with dimensions of 16x1 mm. Reinforcement of masonry is carried out without chipping aerated concrete by fastening to self-tapping screws. The rest of the principle is the same as when using fittings. To increase the strength, it is possible to connect the strips in pairs using steel wire. Has a lower bending strength in comparison with profiled reinforcement.

Attention! Punched tape with a thickness of 0.5-0.6 mm is common in chain hardware stores and markets. It is not suitable for reinforcement
Look for 1mm punched tape in specialty stores or order online in advance. Unfortunately, it is not so easy to buy it on the regular construction market.
I see the advantages of using this material in comparison with traditional fittings in the following:
- savings on delivery due to the compactness of the tape;
- no need to make grooves (saving on work and mounting glue).
Fiberglass reinforcement
The main material of the reinforcement is fiberglass, on which a thread is spirally wound to ensure better adhesion to concrete.
Much lighter in weight than its metal counterpart. Low thermal conductivity will avoid a cold bridge in aerated concrete masonry. Ease of installation is ensured by the minimum number of joints, since such fittings are sold in packs in coils.
Attention! Fiberglass reinforcement has a significant disadvantage - it does not withstand large fracture loads, and this is the main task of reinforcing masonry from aerated concrete blocks with an increased bending effect.
It is impossible to build a rigid frame from this material, therefore such reinforcement is not recommended in seismically hazardous construction areas. Our verdict is not to use.
The benefits of wall reinforcement are obvious. Therefore, it is worth sacrificing small additional monetary costs and time during installation, so that the building being erected will serve you faithfully for many years.
Mounting
rules
Mounting aerated concrete partitions blocks are performed with obligatory bandaging of vertical seams. Simply put, the joint between blocks in the same horizontal row should not be above the same joint next to it below. The minimum horizontal distance between vertical seams is 20 cm;
Pay attention to the ligation of the vertical stitches
The top of the partition must not reach the ceiling. Between the upper row of blocks and the overlap, there is an expansion gap of 1.5-2 cm, which is filled with polyurethane foam or any other elastic sound-insulating material. In this case, thermal expansion and deflection of the floor under load will not lead to cracks in the aerated concrete;
The joint between the wall and the ceiling is filled with polyurethane foam
The partition should be attached to adjacent walls in increments of no more than a meter in height. This instruction is intended to provide additional stability with respect to horizontal loads, and the absence of cracks in the corners. For fastening, stainless or galvanized anchor plates and perforated strips laid between the rows of masonry are used;
Fastening an aerated concrete partition to an adjacent wall
For masonry, use only and exclusively special glue. The use of a cement-sand mortar will make you spend extra time sealing rough joints;
Thin glue from one of the largest manufacturers of aerated concrete
Storage of aerated concrete
In what conditions can aerated concrete blocks for interior partitions be stored before starting work, and how can they be properly unloaded to avoid damage?
- To unload pallets from transport, use belts or soft slings. Steel cables are guaranteed to damage the side walls of the blocks;
Aerated concrete pallet unloading: soft belts are used
- Fold the individual blocks on a flat surface, placing a rag or other soft material under them;
- If repair or finishing work is underway in the room, cover the aerated concrete partition blocks with polyethylene. The film will protect their surface from paint, grout and other contaminants.
First row
Do-it-yourself aerated concrete partition erection begins with laying out the first row. The appearance and durability of the wall as a whole depends on how smooth it turns out. Yes, it is durability: uneven masonry contributes to the appearance of cracks in places of maximum stress.
Here are some rules for laying the first row:
- Waterproof the wall from the floor or foundation. It will eliminate the suction of moisture through the capillaries of the porous material. To do this, spread two layers of roofing material along the future partition;
- On an uneven surface, lay aerated concrete partition blocks on a leveling cement-sand cushion with horizon control along a long level and a mooring - a cord stretched at the height of the block surface;
Laying the first row. The photo shows the waterproofing and the cement-sand cushion.
Control the relative position of the blocks with a long level
- Having laid a row, check the absence of the slightest difference between adjacent blocks. If the differences remain, remove all irregularities with a float and sweep away the remaining dust;
- To mark and make strictly vertical the boundaries of the openings, install vertical slats with marks at the level of each new row. Between the marks on the slats, the mooring cord will move as the wall grows.
Next rows
The second and subsequent rows are laid on the same level and mooring cord. On the vertical surface of the previous block or wall, and on the top of the previous row, glue is applied with a notched bucket, carriage or notched trowel; then the aerated concrete partition block is fitted with a rubber hammer. The last in the row, the additional block is cut in place.
Application of glue using a carriage with a width corresponding to the thickness of the block
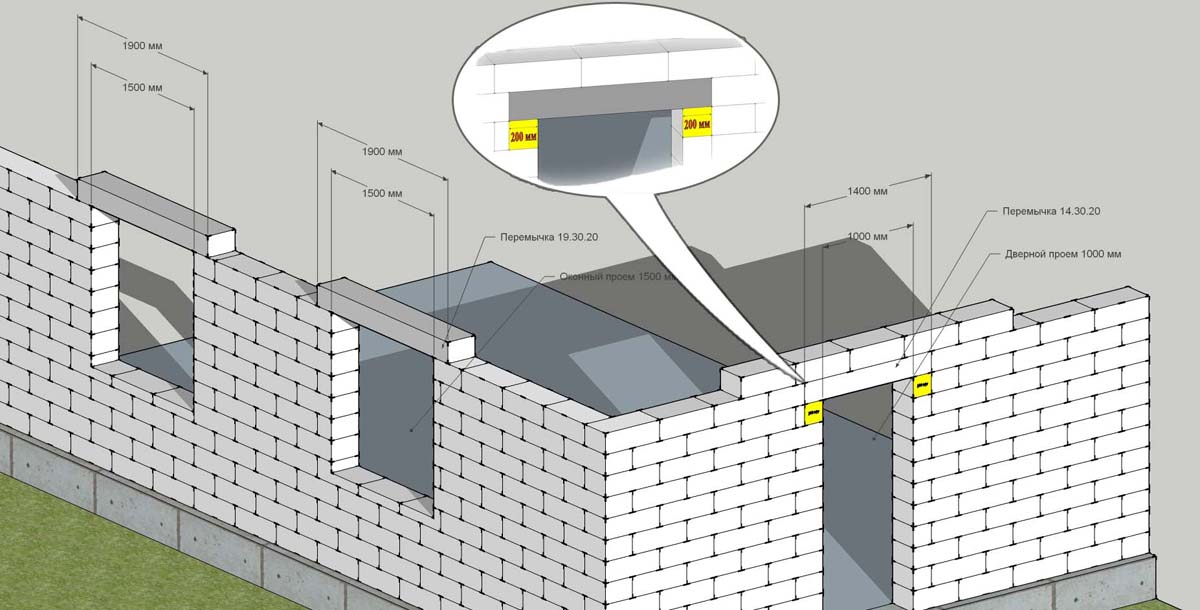
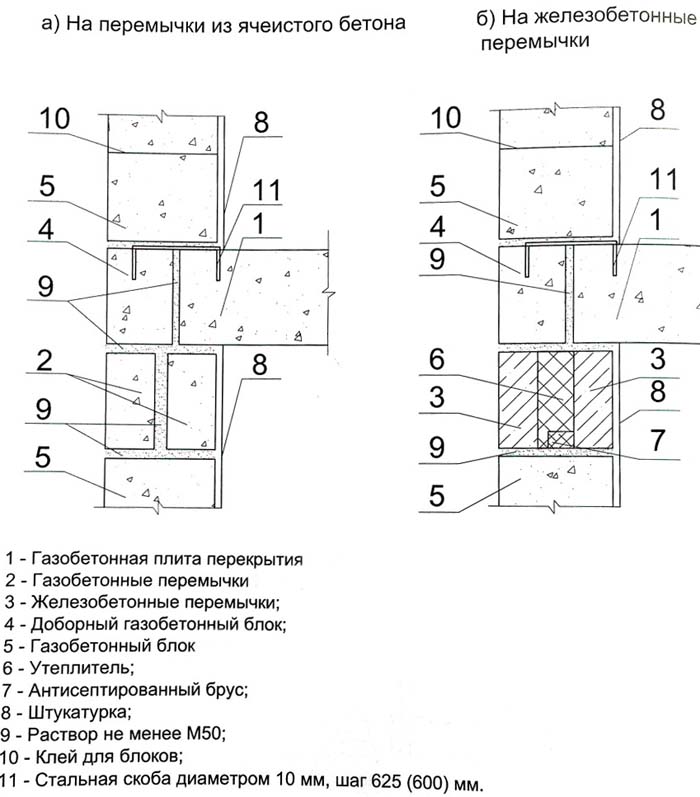
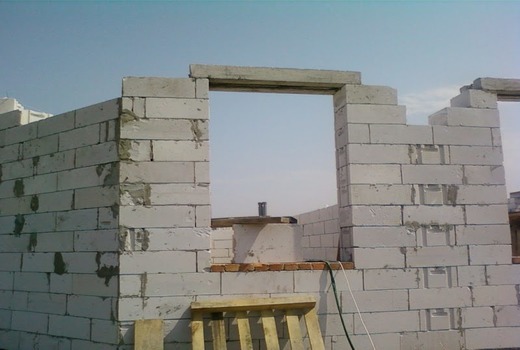
Sequence of installation of a lintel in aerated concrete trays
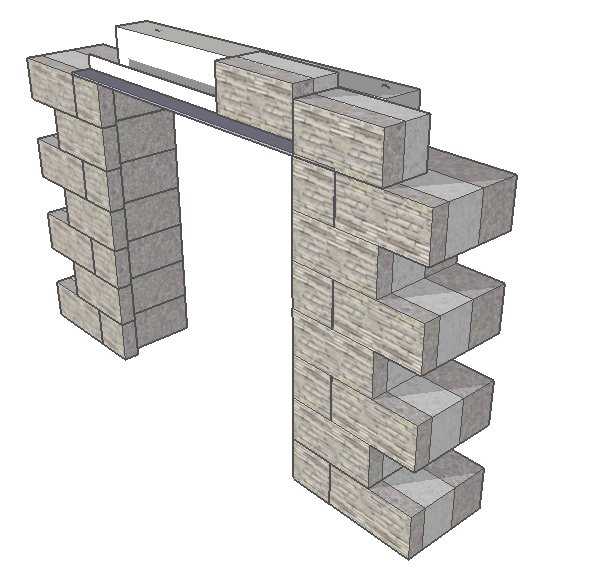
- Installation of the base. A solid board is installed on the upper blocks of the window opening, supported from below by wooden beams or metal pipes. The beams or pipes should rest at the bottom against a wide, strong wooden substrate. Recall that the penultimate row of the window opening must be reinforced.
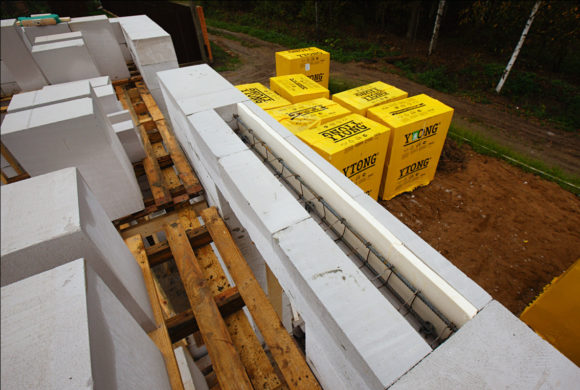
- Laying of tray blocks. These blocks are stacked with a 250 mm overhang on the wall. The ends of the trough blocks are glued together with a glue mixture for aerated concrete.
- In the trays of the lintels on the outer walls, additional heat-insulating material can be placed, it can be mineral wool, expanded polystyrene.
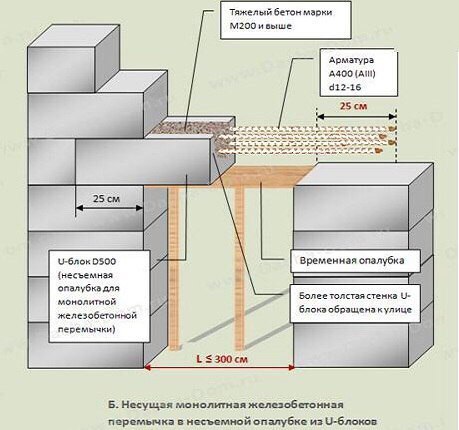
- Reinforcement cage laying in trays. For the frame, reinforcement of this class is taken: A400-500, diameter: 12 - 16. In trays 120 mm wide, two rods are laid, if the width of the trays is larger, four rods are used, two at the top and bottom. All reinforced with reinforcement across the length of the rods.
- Concrete preparation. For pouring, concrete for foundation work P3M200 grade and higher is used.
- Pouring, compacting and leveling the surface of the concrete in the tray.
The lintel dries completely within three days.
Self-supporting structures can be used for openings in houses of five floors, up to 15 meters high. And there are no restrictions on the use of non-load-bearing reinforced beams.Various sizes produced by manufacturers allow them to be used in a variety of openings.


Mounting
Having familiarized ourselves with what is the lintels on aerated concrete and the depth of support, we will proceed to the direct process of their installation.
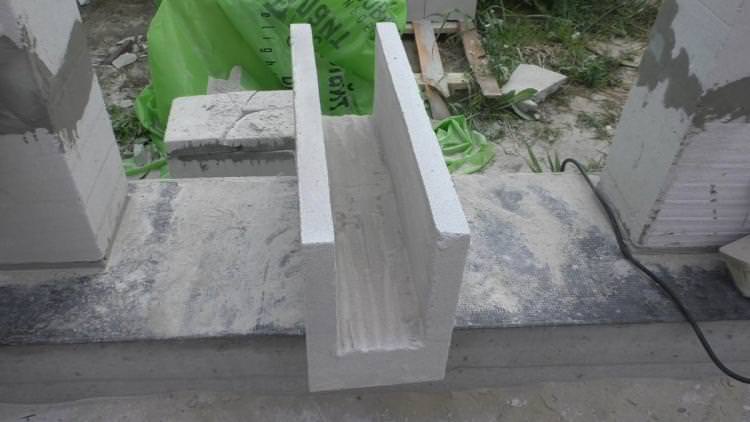
Sequence of actions when installing aerated concrete U-blocks
Such beams are the most common in recent years, since the process of laying the finished factory product is quite simple. In addition, the craftsmen manage to maintain the continuity of the masonry, while obtaining a perfectly flat surface. The technology is used to strengthen openings up to three meters, the work is as follows:
- Supports are made for the lintel so that it does not bend under the weight of the concrete. For this, a board is installed along the length of the upper masonry, which is propped up with wooden blocks, bricks or metal pipes.
- Blocks are stacked in such a way that the thick wall goes out, and the arrow points up. For the correct orientation, we use the markings. It is very convenient if the thickness of the timber corresponds to the thickness of the masonry, and its height coincides with the height of the block. If necessary, several beams can be laid simultaneously to build houses with thick walls. To lift products, the weight of which ranges from 100-200 kg, a lift is used.
- All seams are glued, including horizontal ones.
- The blocks from the outside are insulated with mineral wool or expanded polystyrene sheets.
- A frame made of reinforcement and fastening wire is arranged above the opening. It is pre-coated with an anti-corrosion compound.
- M200 concrete is poured into the blocks to the level of their edges. We align and compact the composition.
- After the concrete has dried, remove the boards and props.
Stages of work when reinforcing the opening with a monolithic concrete product
Pouring with concrete is, as already mentioned, the cheapest way to equip a future window. We follow the step-by-step instructions:
- We lay a block row, providing the necessary space on both sides of the opening.
- We mount removable formwork from scrap materials (plywood, beams, etc.),
- We strengthen it every 50 cm with elements in the vertical and horizontal directions.
- We fix the insulation from the outer part of the wall.
- We install the frame from the reinforcement. For small structures, it is possible to use a steel reinforcing mesh.
- The formwork is filled with M200, M300 mortar.
- The composition should be tamped and leveled.
- We remove the formwork elements after the mortar has dried.
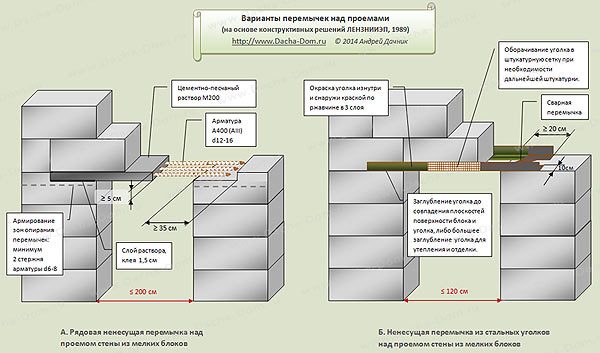
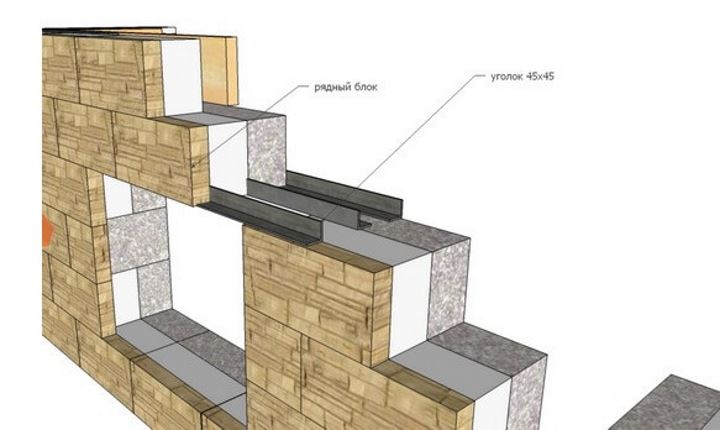
Installation of jumpers from corners
Experts advise using metal corners to strengthen window structures up to 1.2 meters if the height of the subsequent masonry is at least two-thirds of the width of the opening. Subject to this requirement, we proceed as follows:
- We cut out the grooves for the corners with an indent from the edges, by about 10-13 cm.
- We treat the metal structure with an anti-corrosion compound, wrap it with a plaster mesh.
- We make sure that the product rests against the walls.
- We lay the corners from the inside and outside.
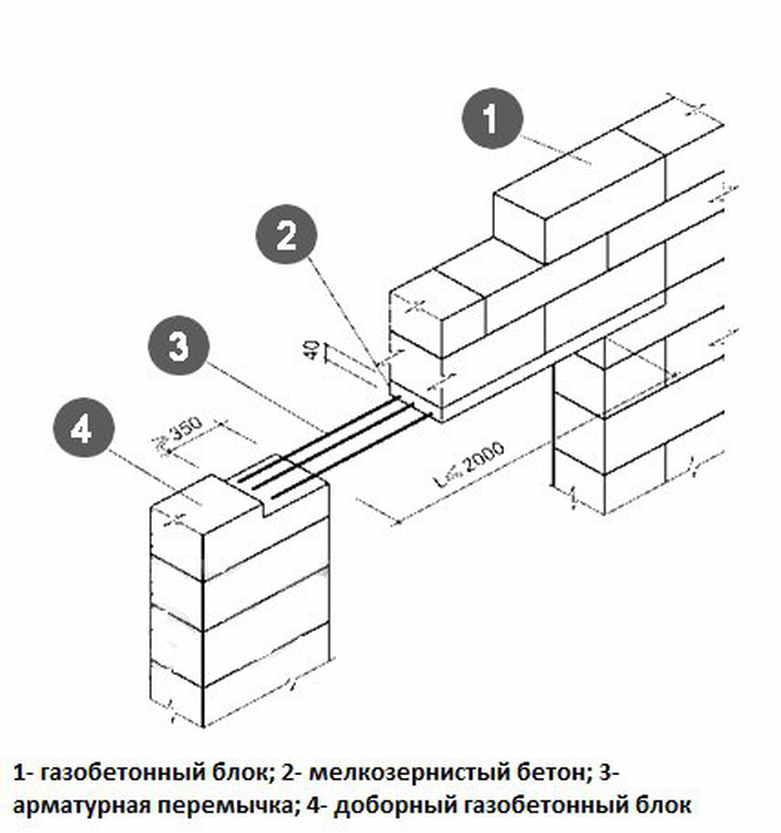
Along with this method, reinforcement is also successfully used to strengthen narrow openings. The use of aerated concrete or reinforced concrete beams in these cases is not justified. To reinforce one opening, four rods with a diameter of 10 mm are used. The rods are placed in holes, which are then filled with glue or mortar. Blocks are then laid on the fixed rods.
Strengthening the opening is a process that requires certain knowledge and skills
To ensure the reliability and durability of the structure, it is important to correctly perform the calculations and consistently perform the described actions.
Installation methods
Let's consider how to make a jumper above the window in more detail.
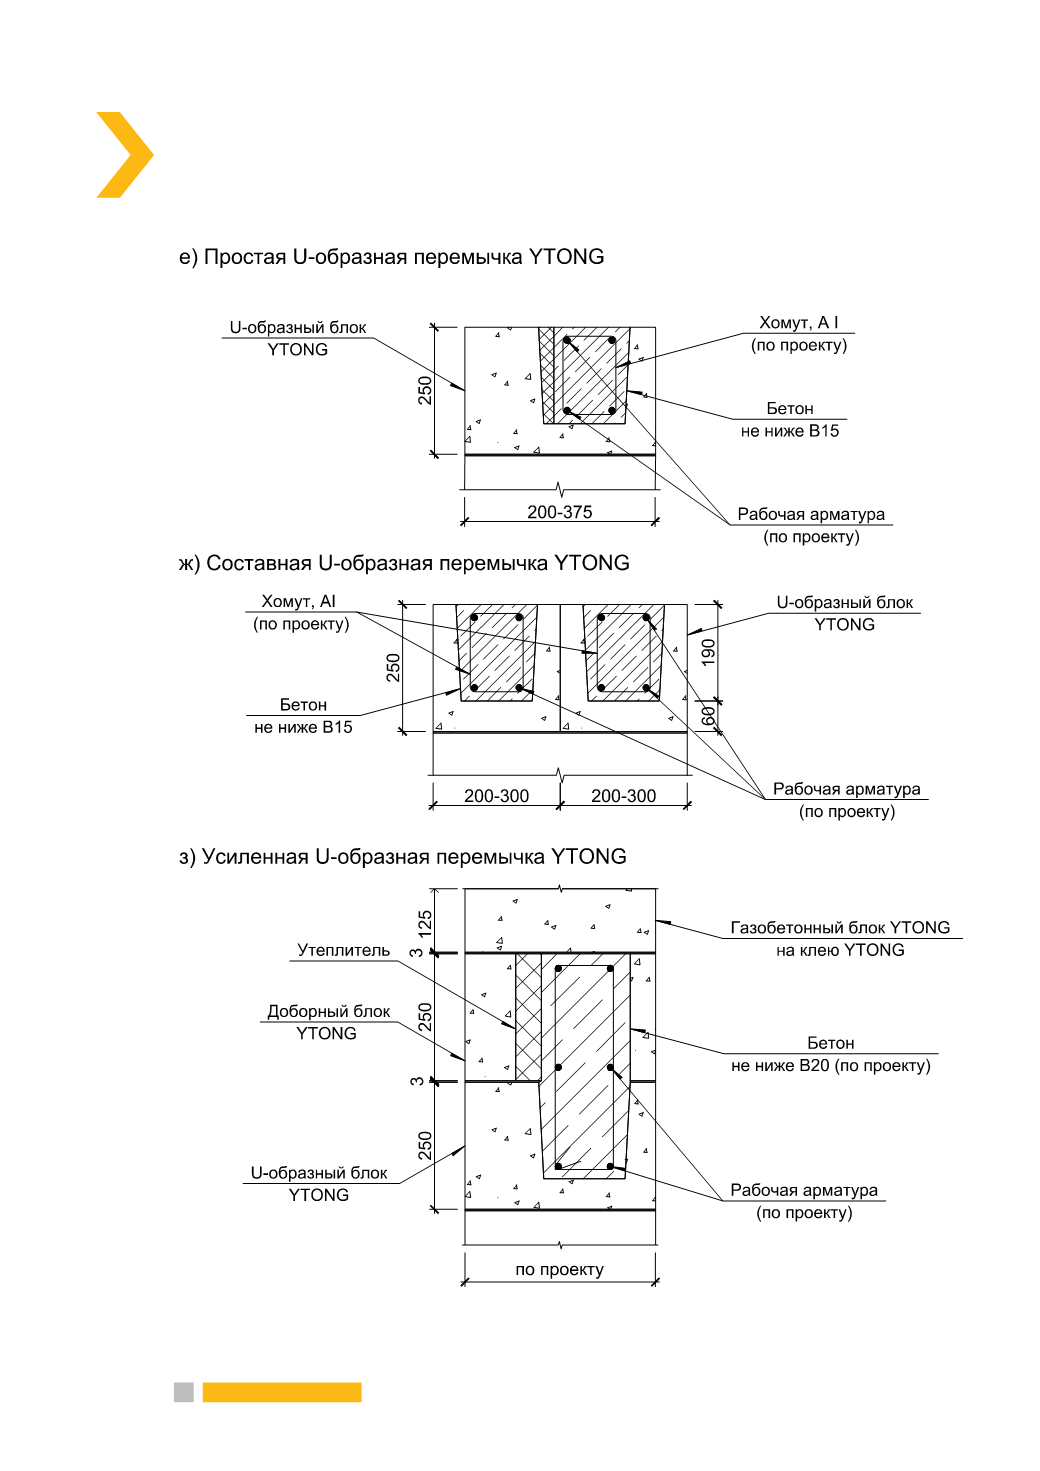
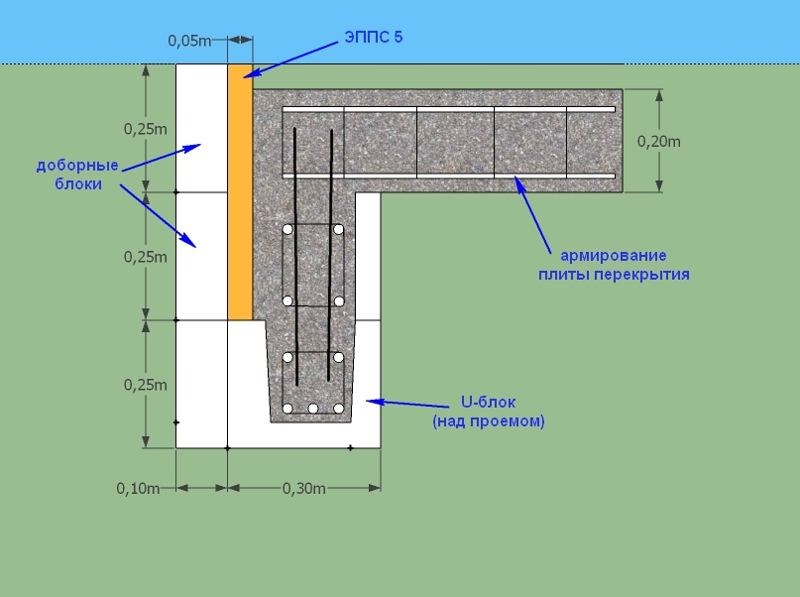
Device using U-blocks
The structure is designed to work with ceilings, the width of which does not exceed three meters.The use of lightweight elements makes it possible to exclude the involvement of a construction crane and other types of special equipment.
Reinforcement is carried out with corrugated metal rods having a strength class of A400-500 with a diameter of 10-16 mm (as determined by calculation):
- if the width of the tray is less than 120 mm, it is recommended to use a double-rod reinforcement;
- when the width of the tray is more than 150 mm, it is recommended to use four reinforcing rods, which are connected with a knitting wire with reinforcing rods with a pitch of 40-50 mm to obtain a spatial reliable lattice.
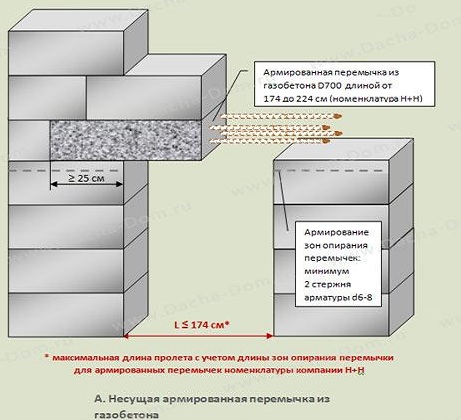
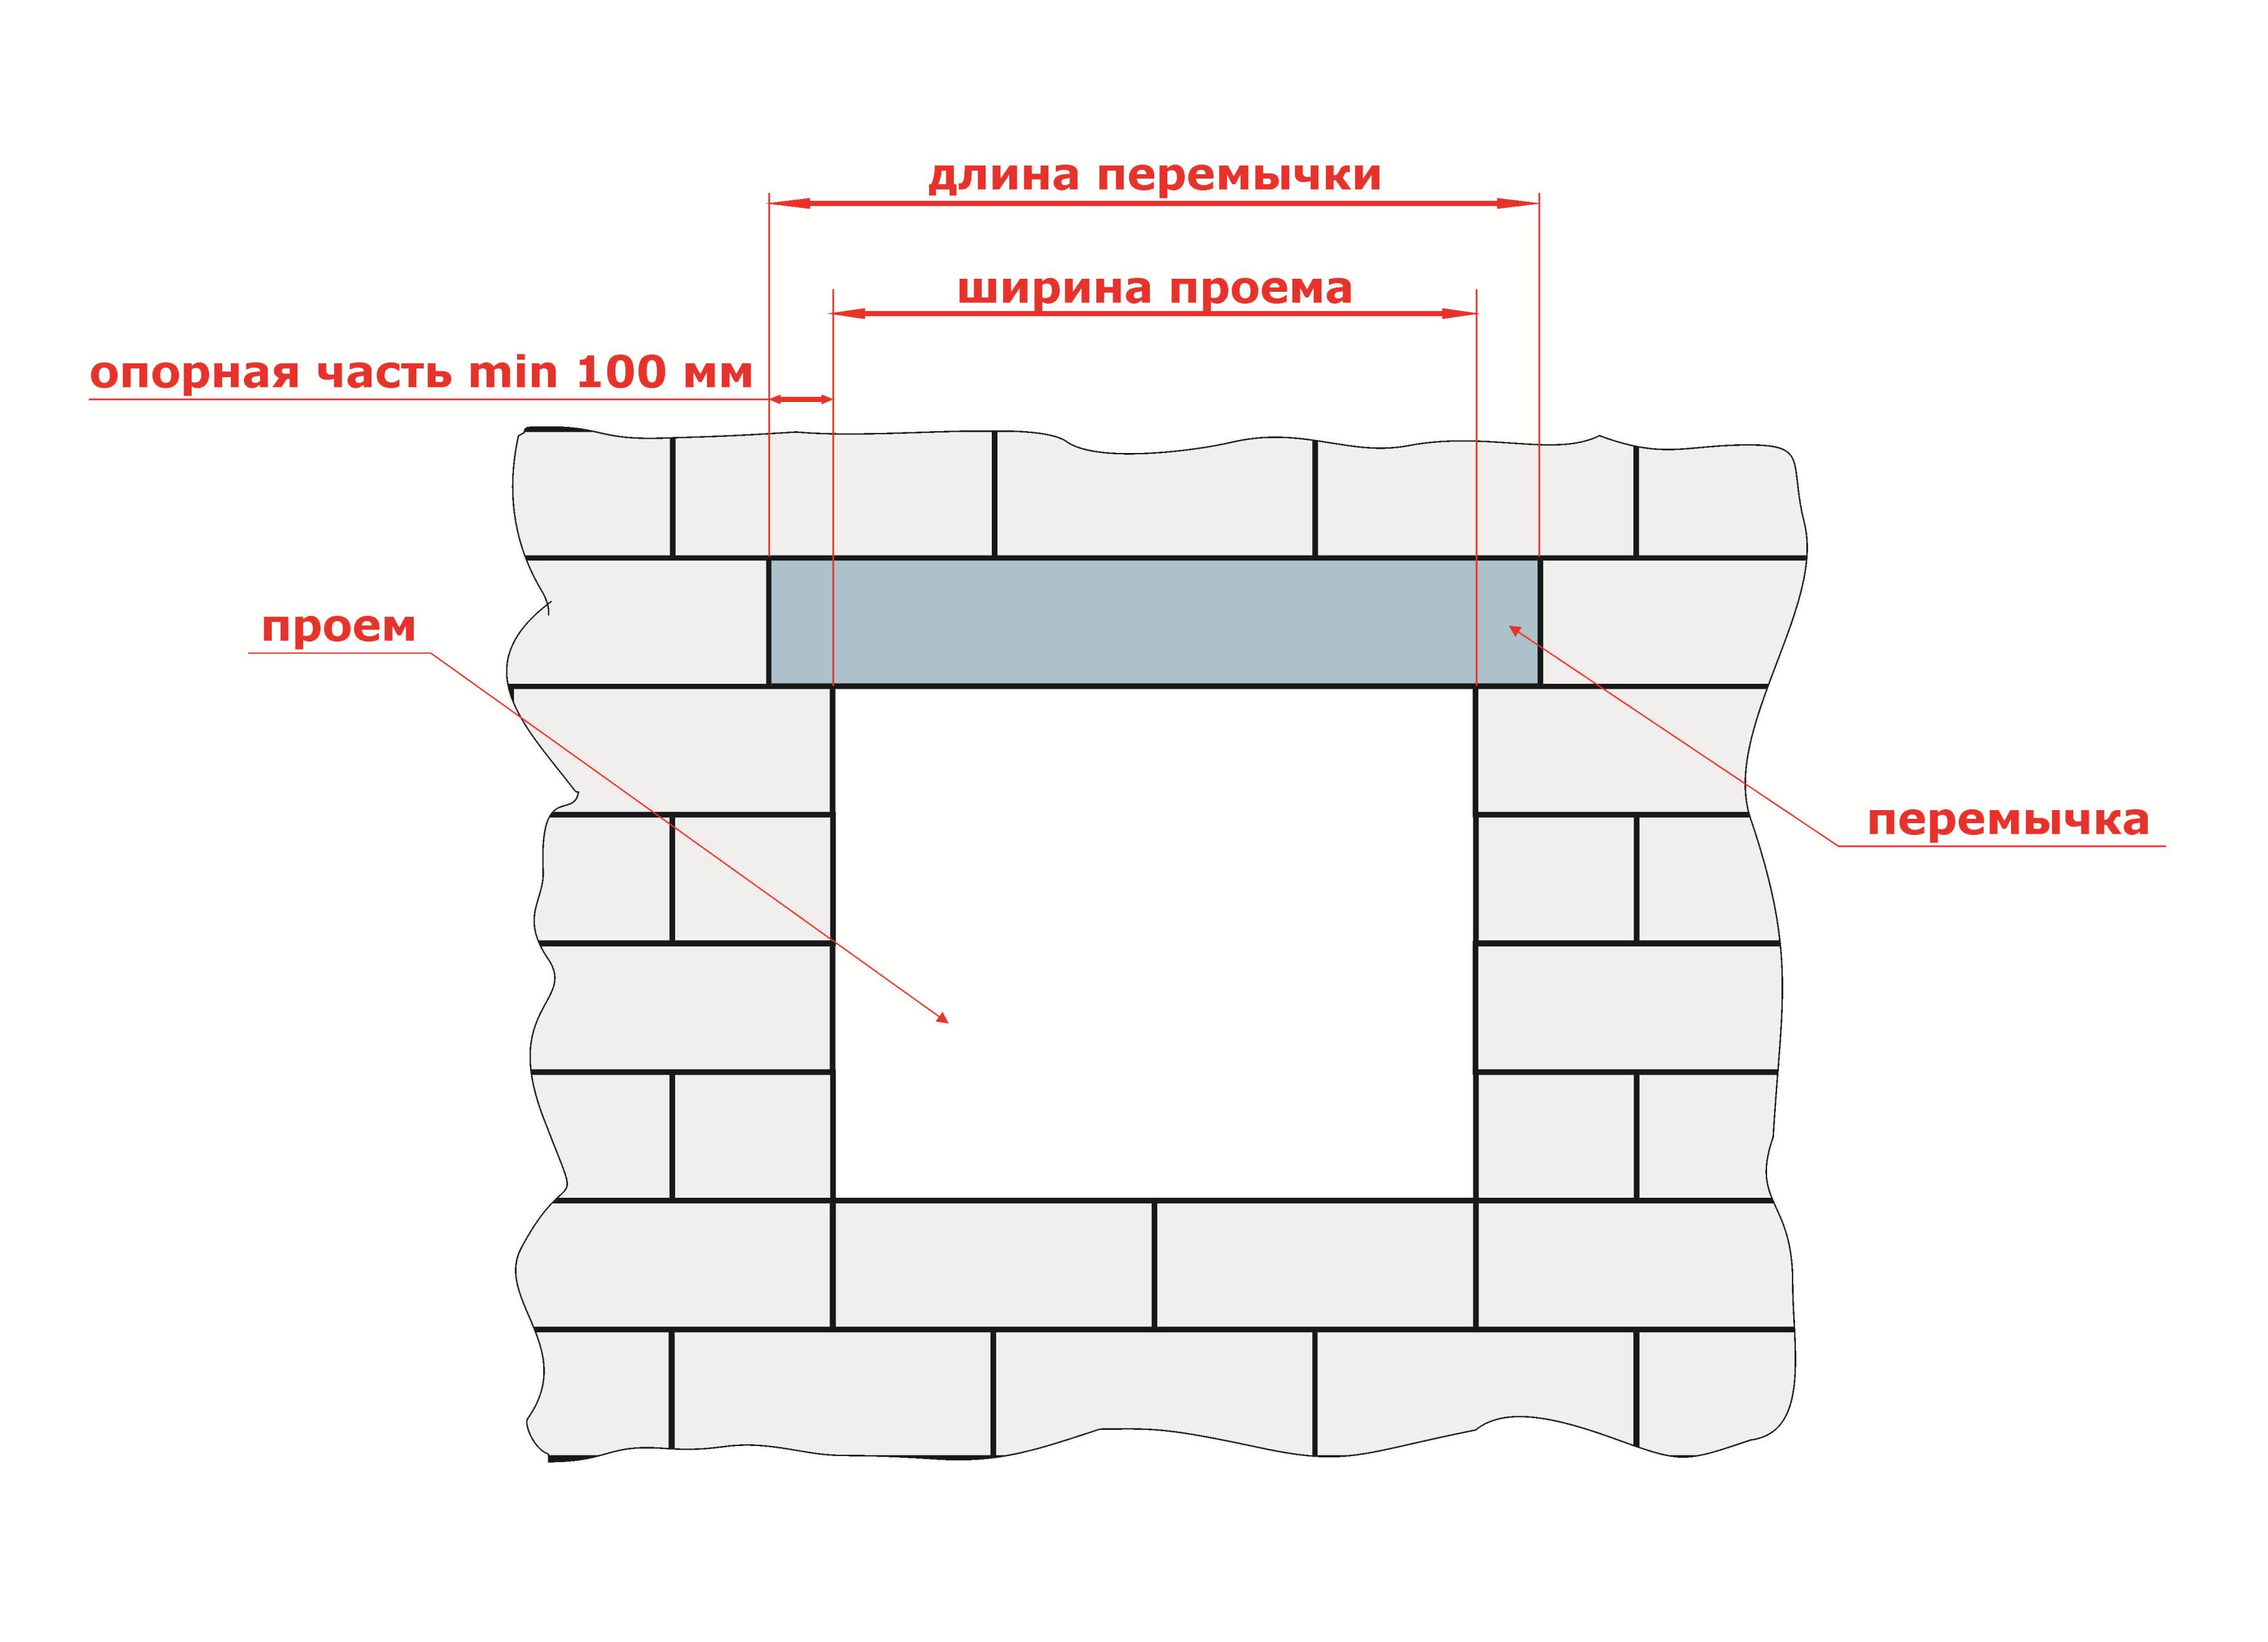
The support area of the outer blocks should be 25 cm. For gluing the ends of the blocks, a standard assembly adhesive for cellular aerated concrete is used. Learn about its choice and consumption from this article.
You can do without special U-shaped trays and build the formwork in place from boards and (or) aerated concrete partition blocks. Then reinforce and pour concrete. Various methods are discussed in the article about the manufacture of an armored belt. The construction is similar here.
Arrangement of reinforced lintels
This option is reliable due to the volumetric steel frame inside the product and is the best basis for finishing decoration.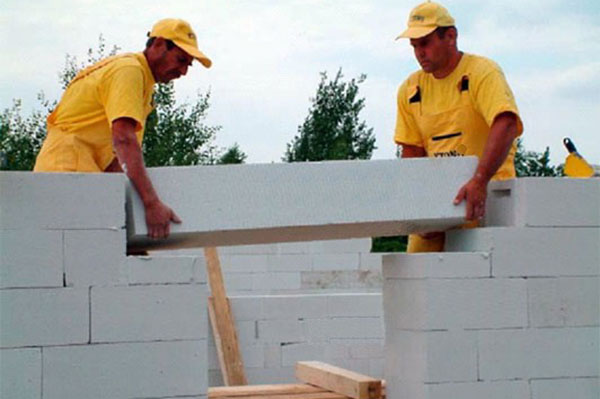 The dimensions are selected in accordance with the span length and width of the wall blocks. Such an element is used as a beam for one span and is mounted in accordance with the following recommendations:
- lifting the part to the required height and installing it with the arrow upward, observing the reference depth of 30 cm;
- if necessary, it is allowed to use a pair of jumpers in one opening, but the device of the base of the window opening is performed exclusively by a monolithic product;
- in the support areas, all elements must be fastened with special adhesive solutions, and the second part is mounted close to the already installed window lintel using a rubber mallet.
The surface, if necessary, is leveled with a plane. Further work is carried out only after the adhesive mixture has completely dried.
Corner or reinforcing bar device
A variant widely used in the construction of houses from aerated concrete. But professionals do not approve of such installation and call it the word "collective farm". If you still decide to poke around, then use this design on narrow windows up to 120 cm wide in one-story buildings. And take the corners more powerful, for example, with a section of 75x75x6 mm.
I would not recommend fencing a lintel from the corners on a wide window, as here.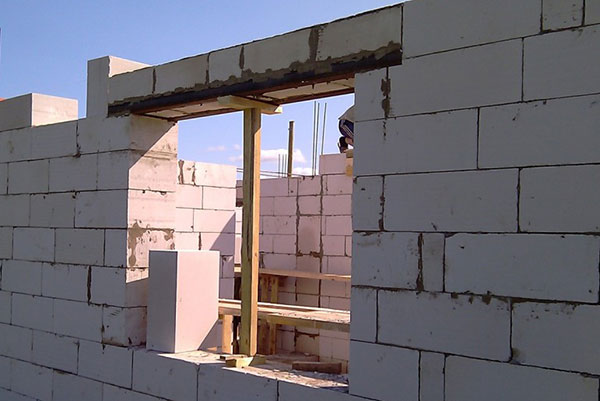
This design is the use of metal corners installed with a reference depth of 30 cm. Installation work is carried out taking into account the following requirements and rules:
- steel corners must be painted on all sides with special compounds against corrosion changes;
- the minimum support length of the metal corner to be installed on the wall masonry should not be less than 20 cm;
- the corners are fastened together using steel tape, welding or using a standard wire tie;
- metal elements must be recessed into aerated concrete, which will not allow the corners to protrude above the wall surface.
Here's another option: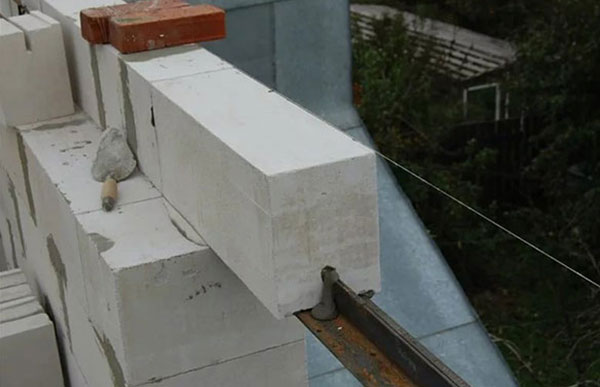
Important! If you intend to plaster an aerated concrete structure, then the metal lintels from the corners must be wrapped with a special plaster mesh.
Projects of houses from aerated concrete blocks
Number of projects 371
- 5 rooms
- 3 bathrooms
Saami House Project
To favorites
- 325.6² Total area
- 16 x 17m Building area
from 9 299 000 rub. Construction time 158 days
- 4 rooms
- 2 bathrooms
Optima House Project
To favorites
- 158² Total area
- 11 x 9m Building area
from 2,133,000 rub. Construction time individually
- 4 rooms
- 2 bathrooms
Spruce House Project
To favorites
- 125.78² Total area
- 10 x 13m Building area
from 4 096 000 rub. Construction time 88 days
- 4 rooms
- 2 bathrooms
Eridan's House Project
To favorites
- 137.2² Total area
- 10 x 10m Building area
from 4 498 000 rub. Construction time 91 days
- 3 rooms
- 1 bathroom
House project Wisla 153
To favorites
150² Total area
from 1 891 500 rub. Construction time individually
- 4 rooms
- 2 bathrooms
House project SDM-13
To favorites
- 126² Total area
- 11 x 8m Building area
from 2 772 000 rub. Construction time 90 days
- 6 rooms
- 2 bathrooms
House Project Classic Plus
To favorites
- 212² Total area
- 12 x 11m Building area
from RUB 2,925,600 Construction time individually
- 5 rooms
- 2 bathrooms
Danish House Project
To favorites
- 211.75² Total area
- 8 x 15m Building area
individual calculation Construction time 40 days
- 10 rooms
- 4 bathrooms
House project Tula gingerbread-2
To favorites
366.6² Total area
from 9 279 636 rub. Construction time 169 days
- 9 rooms
- 4 bathrooms
House project Vasily
To favorites
- 352.3² Total area
- 15 x 12m Building area
from 7 592 000 rub. Construction time 172 days
- 8 rooms
- 2 bathrooms
Luxury House Project
To favorites
- 264.8² Total area
- 11 x 19m Building area
individual calculation Construction time 145 days
- 5 rooms
- 2 bathrooms
House project "Optium"
To favorites
9 x 7m Building area
from 2 100 000 rub. Construction time 60 days
- 5 rooms
- 3 bathrooms
Jasmine House Project
To favorites
- 283.42² Total area
- 19 x 12m Building area
from 7,046,000 rub. Construction time 131 days
- 3 rooms
- 2 bathrooms
Mitrofanushka House Project
To favorites
- 133.9² Total area
- 12 x 10m Building area
from 4 382 000 rub. Construction time 90 days
- 4 rooms
- 2 bathrooms
Daisy House Project
To favorites
- 222.9² Total area
- 13 x 11m Building area
from 5,216,000 rub. Construction time 120 days
- 3 rooms
- 3 bathrooms
Finnish House Project
To favorites
- 132.9² Total area
- 11 x 9m Building area
from 4,158,000 rub. Construction time 89 days
- 4 rooms
- 2 bathrooms
House project My Marusya
To favorites
- 170.6² Total area
- 13 x 11m Building area
from 5 089 000 rub. Construction time 105 days
- 6 rooms
- 3 bathrooms
Amur House Project 528
To favorites
500² Total area
from 6 558 650 rub. Construction time individually
- 3 rooms
- 2 bathrooms
House project Danube 123
To favorites
120² Total area
from 1 621 500 rub. Construction time individually
- 4 rooms
- 1 bathroom
Hut House Project
To favorites
- 150² Total area
- 13 x 12m Building area
from 4,700,000 rubles Construction time 95 days
See all projects
We find out what lintels for aerated concrete blocks are, their main types and how they are selected. Correct use and installation of jumpers during the construction of a house from aerated concrete blocks
Read the article to the end, and you will learn about what types of jumpers exist, what options to look for when buying and what rules you need to adhere to when installing products.

Lintels are an essential element in the construction of any house.


Reinforcement of masonry with aerated concrete blocks
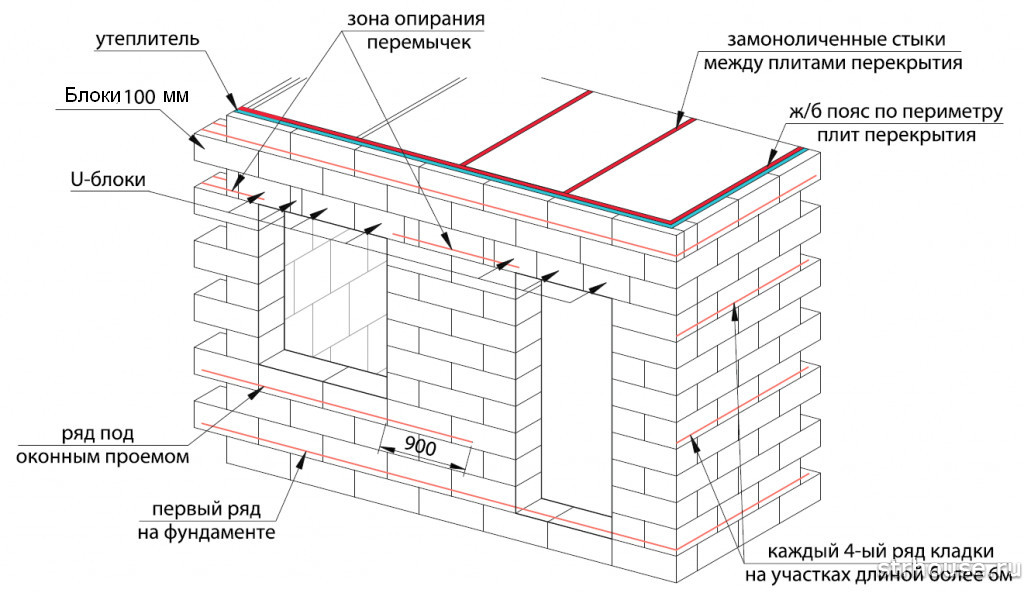
If the conditions for reinforcing aerated concrete masonry are not specified in the design documentation, you should independently determine the location of the reinforcing belt. As a rule, reinforcement is performed for:
- the first row of masonry;
- the level of the location of the floors;
- blank walls;
- support zones of jumpers;
- walls with a distance between floors of more than 3 m.
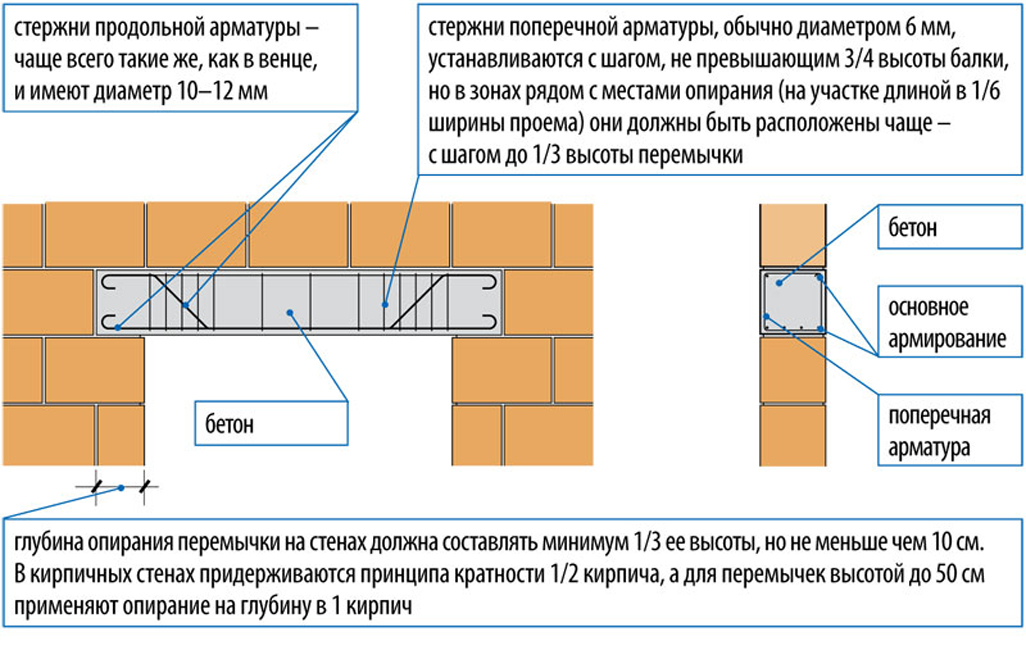
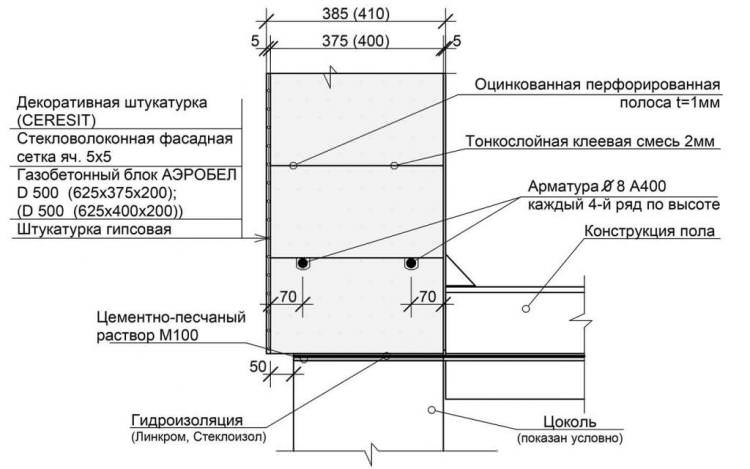
The area of the window sills is additionally reinforced. In the area of the window sills, the reinforcement is laid in the grooves prepared in advance and fixed with a special glue. For fixing and sealing, you can use a cement-sand mortar.
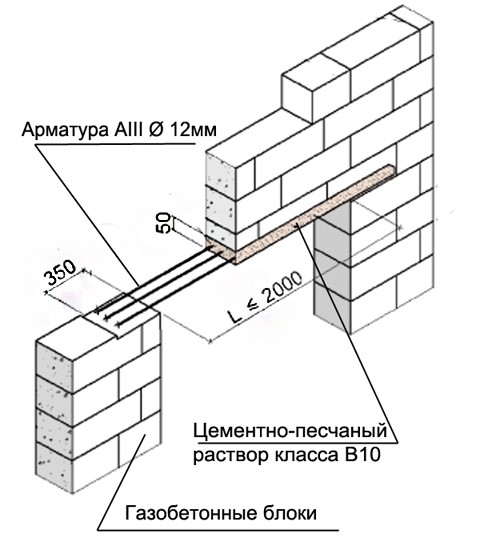
The section of the reinforcement selected for wall reinforcement is taken equal to 0.75 sq. see class AIII. If it is not possible to lay two bars in parallel, it is allowed to use one longitudinal bar d = 10AIII. The armature is installed at a distance of 600 mm from the edge of the window opening.
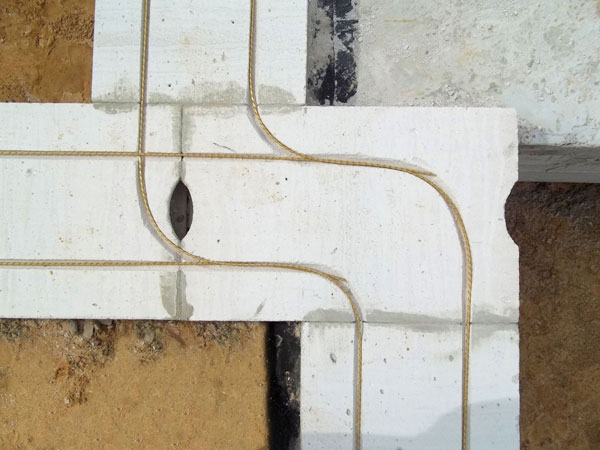
Reinforcement of the first row of aerated concrete masonry
We take a special tool for aerated concrete - a groove cutter, it can be bought together with aerated concrete and we start sawing a groove - in the scientific language of a groove. You need to make two grooves, each of which should be located at a distance of at least 60mm from the outer edge of the gas block.

The laying of reinforcement during the construction of a building using aerated concrete blocks is carried out in specially prepared grooves.The size of the groove must correspond to the diameter of the reinforcement, plus a small margin so that the reinforcement does not protrude when it is poured with glue or using a solution.
In order for the building block to not be damaged when cutting the groove, maintain a distance from the edge of the block of at least 60 mm. The reinforcement rods of the walls along the perimeter are welded by contact or gas welding.
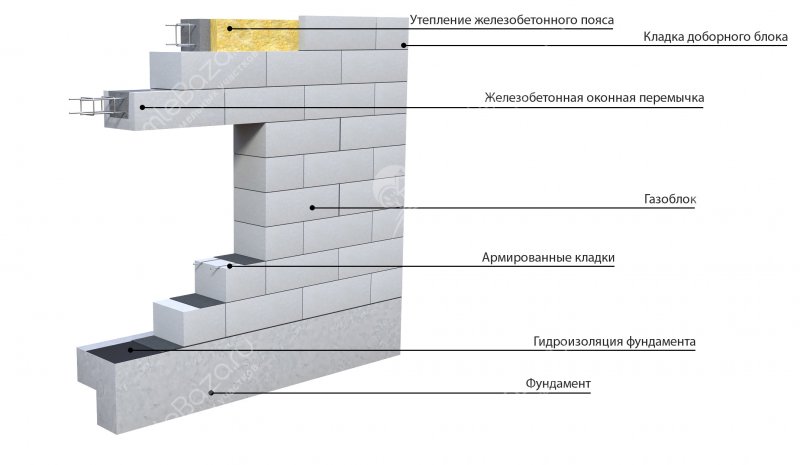
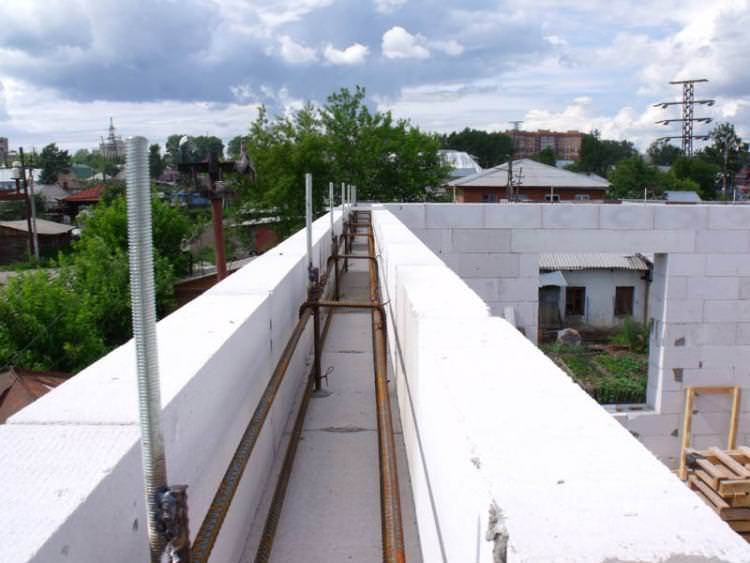
Armopoyas for aerated concrete
Armopoyas is called a reinforced concrete structure, which is designed to strengthen the walls of the house.
This is necessary to protect the walls from loads arising from external / internal factors. External influences include wind, slope / hilly terrain, floating ground and earth seismic activity. The list of internal factors includes all household building devices used in the interior decoration of the house.
Reinforcement of lintels when building a house from aerated concrete blocks
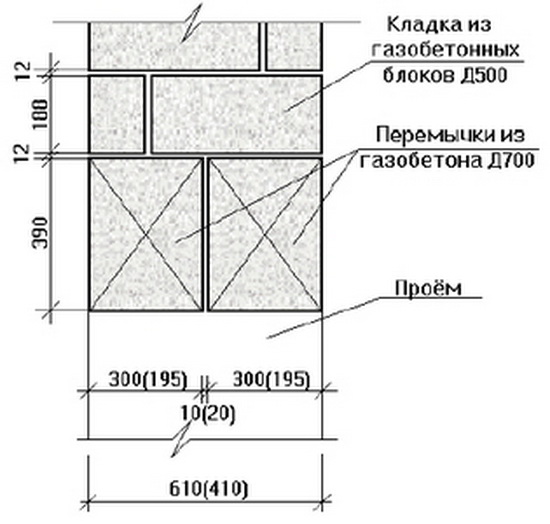
Installing lintels over window openings is a difficult stage in the work that requires care, diligence and adherence to technology. The support of any lintel on the aerated concrete wall must be installed to a length of more than 2 m. Further, the opening is made as follows. Taking into account the thickness of the walls, one or two jumpers are placed, located tightly to each other. If the window is 1.2 m or more wide, it must be reinforced by extending the support to 2.5 m.
In the construction of buildings from aerated block, the following jumpers are used:
Depending on the reinforcement zone:
- load-bearing ones are reinforced in the stretched zone with working reinforcement calculated for bending strength, support cut, deflection, shear force;
- non-bearing ones are structurally reinforced (gas and reinforced concrete lintels).
Depending on the material used:
- aerated concrete, subdivided into lintels made of U-shaped aerated concrete blocks and reinforced lintels made of aerated concrete;
- reinforced concrete;
- wooden;
- rolled metal profiles - angles, I-beams, channels.
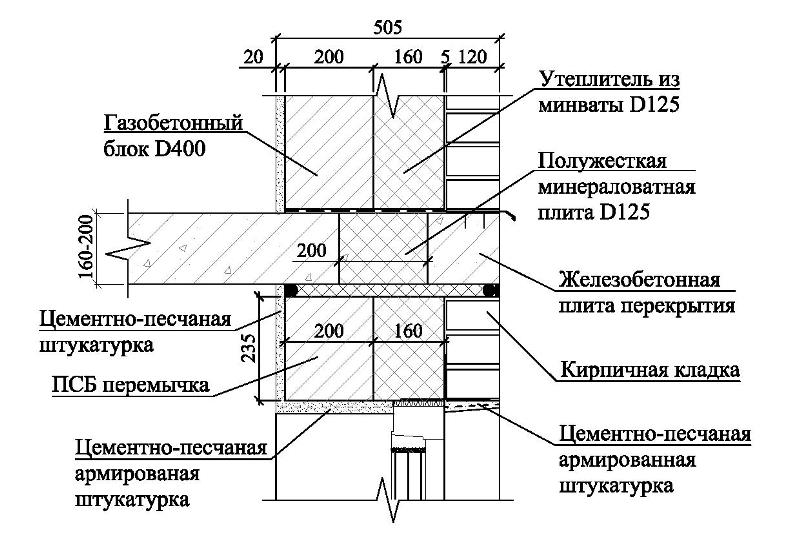
Precast-monolithic lintels are produced from U-shaped heavy concrete (M200) blocks with the assistance of fixed formwork. U-blocks are aerated concrete blocks made in a specific format, within the section of which reinforcement is performed. The walls of the U-block perform the function of formwork (bearing capacity) for monolithic lintels and thermal insulation. The frame is made of steel reinforcement class A III. Prefabricated bulkheads, depending on the size and weight, can be produced by hoisting mechanisms or manually by themselves. Further, the lintels are laid only on the mortar used for laying the walls. The window opening in aerated concrete does not have a quarter. Wooden boxes are fastened with galvanized nails or metal brushes. The gaps between the window opening and the box are plugged with insulation with elastic gaskets or polyurethane foam, the slopes are treated with plaster.
Advantages of reinforced aerated concrete lintels
 Advantages of reinforced aerated concrete lintels
- Correspondence in size (width and height) to the blocks from which the construction is carried out.
- High thermal insulation qualities.
- High coefficient of fire resistance.
- Low weight in comparison with reinforced concrete and monolithic counterparts.
- High-precision geometric parameters.
- Full compliance of the homogeneity of aerated concrete lintels with blocks of the same material from which the walls were installed, as a result of which the same coefficient of expansion occurs.
- Use of reinforced structures, both on load-bearing and self-supporting walls.
Reinforced aerated concrete lintels made in production have a higher thermal conductivity than even beams made with monolithic concrete in U-shaped blocks. They are also covered with an anti-corrosion compound, the installation of ready-made jumpers is much faster.