Step-by-step DIY finishing
 Proper preparation of all surfaces, structural elements, cladding, fasteners will allow you to create a high-quality surface finish with clapboard. All calculations and measurements are required for:
- the selected type of canvases;
- the dimensions of the room;
- the presence and location of doorways, window openings, niches or other objects in them.
Fastening the lining is the penultimate stage of finishing before sheathing with strips, baseboards and other auxiliary parts.
Frame installation
You can fix the lining without it, but there is no guarantee that the material will retain its qualities for a long time, it will not deteriorate due to the lack of a ventilation slot on the back side. Therefore, masters recommend making a load-bearing crate, regardless of the presence of insulation between its bars.
Installation instructions:
- Measurements of the premises. The room is measured along the perimeter, all key points of the location of corners, openings of doors, windows, etc. are marked.
-
Calculation of the amount of material required for the lathing. To do this, you need to multiply the perimeter of the room minus the openings by the number of steps in the location of the bars. This is done by vertically fixing the panels.
In the case of horizontal calculations, they will be the multiplication of the perimeter of the room, divided by the step width (the number of beams vertically is determined), by the height from the floor to the ceiling. In this case, the amount of material that fills the openings of windows and doors according to the plan is subtracted.
If a diagonal or combined method of fastening the cladding panels is assumed, then the calculations (as for a standard fastening) are simply multiplied by the required coefficient, since the bars must be placed more often.
-
Markup. With a building level and a plumb line, a control zero line is applied on the wall opposite to the door. For vertical mounting - at a distance of 5-6 cm from the floor and ceiling for the first and last planks. For horizontal - in the corner, at a distance of 5-6 cm from the adjacent wall.
Advice
To facilitate subsequent work on the installation of other elements of the crate, you can stretch the fishing line between the control beams. It will mark the level along the length or width of the wall. - Measurement and cutting of bars. Since it is better to gradually cut the bars of the required length to save resources, this must be done accurately and with fresh measurements. Let the labor intensity increase slightly, but the surface due to this will be perfectly flat.
- Fastening the bars. The block of the required size is leaning against the wall at the markup site. With a drill with a thin drill, about 2.1 mm, as for screwing self-tapping screws into the wood, holes are drilled in the bar and wall to a depth of up to the stop. Then these holes are re-drilled with a thicker one (according to the diameter of the unopened dowel cover), the dowel covers are inserted. Only after that, the element is re-leaned in the same place, fastened with dowels.
Actions are performed until the installation of all the necessary load-bearing elements of the crate is complete.
Before installation, all wooden materials must already have a dried protective coating against decay and harmful microflora.
another article
Docking panels
 Depending on the orientation of the direction of the blades, the lamellae can be attached in several ways. The installation mechanism will depend on:
- from the type of fasteners;
- varieties, type of lining itself;
- features of the room to be finished, its microclimate, and other characteristics;
- the presence of a heat, steam, waterproofing layer under the finish.
In general, fastening is a cyclical process:
- The location of the first board on the crate is verified by the level.
- Fixation is in progress.
- The ridge of the next one is inserted into the groove of the previous panel, while the maximum joining density is achieved (how to properly join the lining panels?).
- The second board is fixed in the same way as the first one, the next one is taken.
- The process is repeated until all the required surfaces of the room are completely covered.
separately
Where to apply
Clapboard decoration is often used in steam rooms and other bath rooms. In this case, panels are chosen from linden and alder (for parylen) and conifers (for other places). These types of wood are endowed with healing properties, thanks to substances that are released when heated. Knotted boards should not be used in steam rooms, as the areas in question become hotter. For a good aroma, it is recommended to install several coniferous boards in the area of the stove. The lining treated with protective compounds is suitable for cladding facades, the type of wood in this regard is not of particular importance. Interior decoration of premises is a difficult task; panels in a uniform color scheme are needed. Mahogany lining is used for wall cladding in expensive mansions. Partitions are also made of panels to divide the space: both in apartments and in open areas.

Characteristics of euro lining for walls and its differences
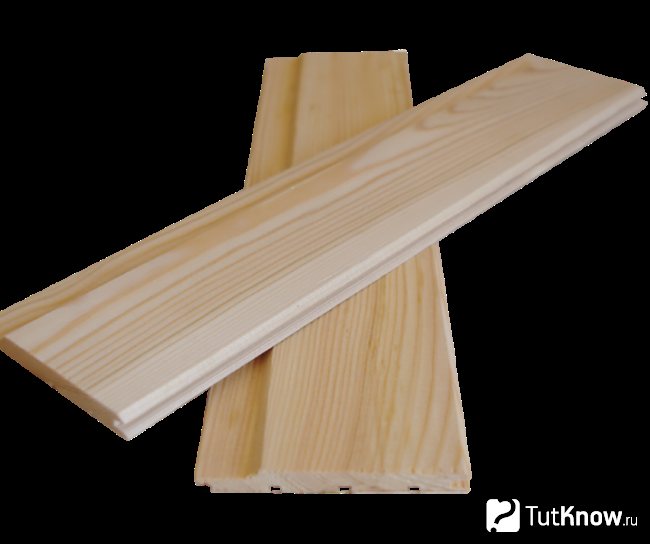
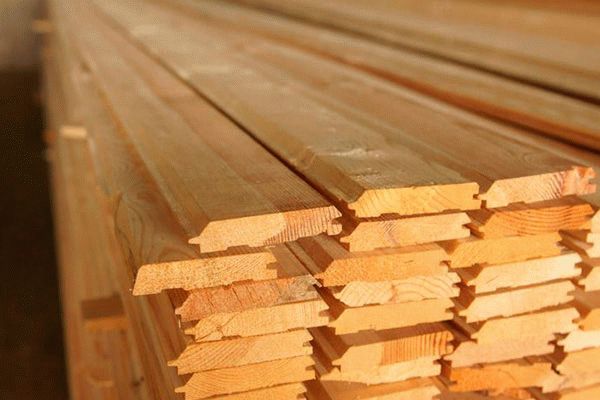
Any wooden lining is made from edged boards, which are obtained after sawing round logs using special equipment. After drying, the board is milled on all four sides to create the required profile and lock joints. Finished products are sorted by types and classes, providing for the quality of the products received, and then packed in packs.
Euro lining is manufactured according to the European standard DIN 68126/86. It provides strict requirements for the geometric shape of the board, the quality of its surface treatment and the moisture content of the starting material. Unlike ordinary lining, its European counterpart is distinguished by a wider spike of the lock connection, which ensures reliable joining of the cladding elements.
In addition, the panels are equipped with ventilation ducts on the back side, which remove excess moisture, counteracting the formation of condensation at the joints of the boards with the elements of the sheathing. This protects the cladding from decay and the insulation from getting wet. The channels have an additional function: elimination of internal stresses of the material with a drop in humidity and air temperature. In addition, the lining has external differences: when installing the Europrofile board, a pattern is formed on the cladding.
Depending on the type of wood and profile, any lining can have a thickness of 12.5-20 mm and a width of 95-135 mm. Classic euro lining has strictly defined characteristics and dimensions:
- board thickness - 12.5 mm;
- total width - 96 mm;
- working width excluding the spike - 88 mm;
- board length - from 1.8 to 6 m;
- material moisture - 12 ± 2%;
- number of panels in one package - 10 pcs.
The surface of the Euro lining is made according to the Soft Line and Standard versions. The first version of the panel provides for rounded board chamfers. The cost of panels depends on the type and type of their wood and ranges from 100 rubles / m2.
How beautiful to cover the walls?
Before you sheathe the house with your own hands, you need to take time to acclimatize the boards in the room where they will be mounted. This will take at least two days. Otherwise, the board may warp and deform on the wall. It is not recommended to carry out installation at negative temperatures or high air humidity.
Stages of lining installation:
- Preparing the walls. It includes insulation and waterproofing.
- Selection of material, preparation of tools necessary for work.
- The choice of the plating method.There are four of them: horizontal, vertical, diagonal, shaped.
- Installation of the lathing on which the lining will be mounted. If necessary, electrical wiring is placed under it.
- Wall cladding with clapboard.
- Application of a finishing decorative or protective coating (varnish, paint).
- Installation of sockets, lamps.
- Installation of skirting boards, window and door frames.
Outside
 The step-by-step process of clapboarding the house outside:
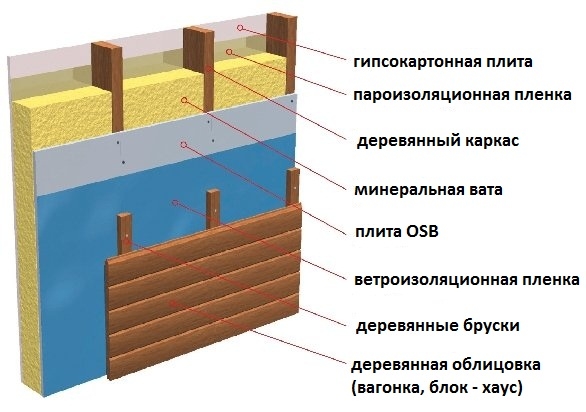
Installation of a vapor barrier layer. It can be made of several materials: film, foil or roofing material. The purpose of the layer is ventilation and steam removal. The material is fastened to wooden slats 2.5 cm wide, the distance between them is 1 m. A vapor barrier is attached to the top with nails. Holes 2 cm in diameter are made on the entire surface for air movement.
Installation of the frame. For its construction, boards 5 cm thick and 10 cm wide are used. They are placed vertically on the wall, with their end to the surface. The distance between the frame elements is slightly less than the size of the insulation sheets.
Thermal insulation of walls. The choice of material and its thickness is made based on the temperature indicators of the local climate. When working, it is necessary to avoid gaps between the sheets of insulation. If there are several layers, then the joints should be staggered. If the insulation is placed correctly, without gaps and tightly, then additional fasteners are not required. Details on how to insulate a room when working with clapboard is described in a separate material.
Creating a waterproofing layer
When placing the film, it is important that the rough layer is located outward - this is the only way the material does not allow water to pass through and takes vapors out. Film fastening option - staples
All seams are overlapped, additionally secured with tape.
Installation of the second frame. Wooden slats 3x5 cm are nailed to the first base for additional ventilation. At the bottom, along the perimeter of the house, there is a fine metal mesh from rodents.
Facade decoration with clapboard. All boards are pre-measured and cut to size. Work is carried out from the bottom up. The first board is positioned with the groove up and the tenon down. It is carefully leveled, only after that it is nailed or fixed with a special clamp. The next bar is located in the groove to the previous one. To make it tight, you need to hit it lightly with a mallet. When the grooves of the lining have coincided, the second rail is fixed. Subsequent elements are mounted in the same way.
Securing the boards. When the entire lining is installed, fixed, it must be additionally fixed vertically, going one board over another. Window and door openings also need strengthening.
Installation of decorative elements.
Painting, coating with varnish or protective compound.
Step-by-step instructions for self-laying lining on the wall
Before attaching the lining to the wall, watch the video and follow the instructions:
- Coniferous boards are treated (degreased) with acetone, then a disinfecting layer is applied to them, they are wiped with a soft cloth moistened with water and dried.
- To make the surface homogeneous, it should be treated with a solution of peroxide and oxalic acid.
- If it so happens that a board with minor damage has come across in the package and there is no way to replace it, you can restore it with a special putty for wood.
- To change the shade of the board, use a stain or special impregnation.
- Install only on the crate, not on the wall. Let's consider step by step how to sheathe the walls with clapboard with our own hands, the training video can be viewed just below, for greater clarity.

Preparation of wall surfaces
Before installation:
- Dry the walls;
- Correct defects;
- Align the walls with unevenness;
- They are primed and waterproofed.
Without their implementation, the material may not cope with high humidity.So that later you do not have to redo everything again, it is strictly forbidden to ignore these stages of work. Areas with fungal infections must be cleaned and treated with an antiseptic. After they are thoroughly saturated with a raster, they will increase their resistance to negative factors, moisture, mold and fire. It is advisable to choose the impregnation with a water-repellent effect.
If desired, the walls can be additionally insulated with heat or sound-absorbing material. For this, mineral wool or expanded polystyrene is suitable. A vapor barrier is also required. It is laid before the installation of the lathing and heat insulator. It will perform a very important task - steam isolation.
Installation of the frame and heat insulator
The installation of the lathing is carried out according to the following principle:
- After laying the vapor barrier layer (fixed directly to the wall with an overlap of 10-15 cm). Fastened (with screws or nails) wooden beams. The design will be more reliable if you fix them horizontally.
- If the wall is built of bricks, it is recommended to fix it with a frame dowel. First, holes are drilled, then the bar is fixed with a dowel.
- After the first beams of the lathing are fixed, a heat insulator will be attached to them. Lay a waterproofing layer on top, it is fixed with staples.
- Then, to the already finished frame, a new layer of lathing is attached. Only this time, the beams are installed vertically.

The correctness of the installation of the beams is checked by the building level
This is very important as the panels will stick and align with their surface. Wooden lining is heavier than plastic or MDF, so the frame must be strong and stable
Installation of panels
Use a plumb line, level or square to keep the boards level. You can calculate the material consumption with simple arithmetic: the total usable area of the room is divided by the area of one lining strip. It is necessary to buy material by 10 percent more, taking into account unforeseen errors and their elimination.
The panels are fixed to the pre-installed battens. The first board is fixed at a distance (indentation) of 1-2 cm from the floor. This gap will further serve as ventilation and protection of the coating from deformation. The same indentation will be done at the top.

The planks are fixed with self-tapping screws so that their head goes inside the board by about 3 mm. During installation, the spikes must point straight up, corner joints can be fastened with corners. The caps of the self-tapping screws are hidden (masked) with PVA glue, wooden paste, special caps, and plaster.
Before you install the lining board on the walls, decide on this parameter:
- Horizontal position. Choose when you need to visually enlarge a small room;
- The vertically positioned lining makes the ceiling lower.
The preliminary preparation and processing of the lining cannot be ignored. This would be considered a serious violation of the installation technique. This means that it will not meet the previously promised qualities and advantages. Rules are set to be followed, not just read and forgotten.
Types and characteristics
The lining can be made of wood, MDF (wood waste), as well as PVC (plastic lining).
From wood
Wooden lining is the ancestor of all lining, which has not lost its popularity in our time. Lining made of wood finds extensive use both in the external and internal cladding of structures. It looks especially respectable in hallways or saunas. Of course, in order for the service life of the lining to be long, even in places with high humidity, the basis for its manufacture should be appropriate tree species, such as linden or alder. Other types of wood (pine, spruce) are suitable for use in more acceptable temperature conditions.
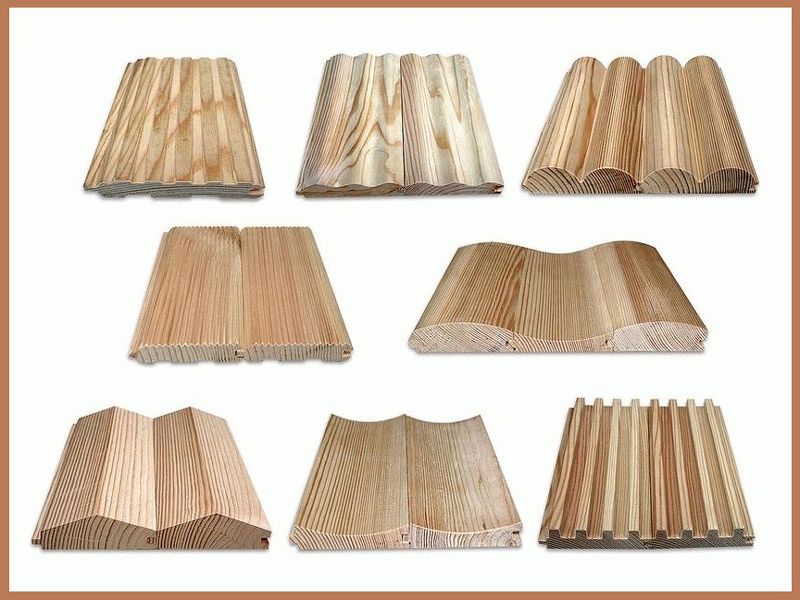
This material can also be of different shapes. There are several types of profiles.
The standard profile is the front side with equal bevels on both the groove side and the tenon side. In this case, the outer corners and edges of the profile are straight and look somewhat rough.
Made of MDF
This material can be attributed to wood, but relatively. The raw material for its production is finely chopped wood waste or wood dust. Thanks to specialized heat treatment of raw materials, a fairly strong and relatively light material comes out, the environmental characteristics of which make it possible to use it even in children's and bedrooms.
To undoubted merits profile from MDF there is an almost limitless range of colors. Due to the ability to externally reproduce not only the patterns of wood, but also the pattern of stone, marble and other materials, the profile has gained particular popularity among people with modest material wealth.
Plastic
A profile made of plastic or PVC panels is a strong competitor to the first two types of lining. Often the plastic version is chosen because of its relatively low cost, low weight and the same ease of installation and reliability in operation.
It is successfully used in both exterior and interior decoration of the house. Although this material is environmentally friendly and can be used in almost any room, you must be aware that such material will not add a certain comfort to the interior of the room. The walls (or some of them), lined with plastic clapboard on the balcony or in the bathroom, look good. Nevertheless, in a living room or bedroom, such a design can look somewhat awkward. Where PVC panels look especially attractive, it is on the ceiling, and then only in common areas, such as a kitchen, bathroom, corridor.
Cladding examples
- There is an opinion that the lining is more suitable for a bath or a summer residence than for an apartment and a cottage. This misconception is successfully refuted by designers who harmoniously fit wood cladding into a wide variety of trends and styles.
- The lining of wood in the interior is harmoniously combined with wallpaper, tiles, plaster. With a professional combination of textures, you can create a stylish and elegant interior.
- The lining can become an integral part of the interior in the Scandinavian style. In this design, it is in harmony with artificial or natural stone and large beams on the ceiling.
- For those who are in love with Provence, the execution of the walls with material made of wood of natural tones will certainly suit. In this version, the combination of wood with plaster and rough plank floors looks nice and at ease.
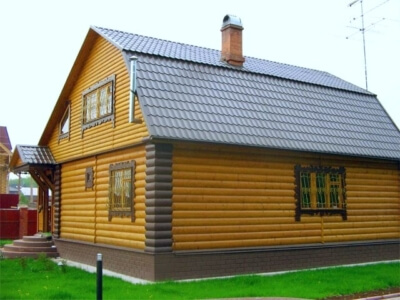
- Another style that requires the use of natural wood cladding is Russian. The walls faced with a block house look like the walls of a log house.
- You can also use lining in high-tech style. In this version, materials painted in neutral white or gray colors are used as a background for rich accessories.
- Fans of minimalism will most likely like the combination of lining with a strict cladding of ceramics and stone.
See below for more details.
Nuances to consider
Lining - is a board (of different thickness), which is made from various types of wood. The material gets its name from its original place of use. Namely, train carriages, the inner surfaces of which were sheathed with small wooden slats, which created an excellent microclimate. Nowadays, wood products are returning to their former popularity, which diminished slightly when plastic and MDF versions began to appear.
 The modern construction market offers a wide range of types of lining
It should be borne in mind that clapboard wall cladding with your own hands requires a balanced approach.
Therefore, it is important to pay attention to the product at the stage of its acquisition. Pay attention to the following points:
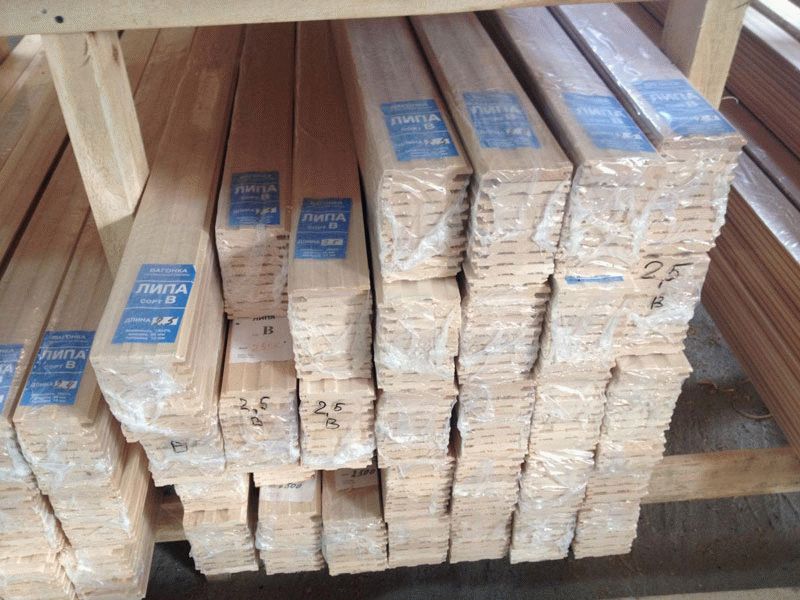
- The correct storage of the purchased goods. Packages should be stored horizontally on a support.
- The moisture level of the warehouse must be within the normal range.
- It is not allowed to find products in an open space, under the rays of sunlight.
You should also pay attention to the expiration date on the label. All information about the storage and shelf life of the lining must be indicated on the packaging of the material.
 All information about the storage and shelf life of the lining must be indicated on the packaging of the material.
This precaution is necessary in order to neutralize possible risks. The fact is that work with lining is carried out only after they are fully convinced that the material meets all standards
 It is necessary to buy material with a margin of 10%
Wood panel mounting technology
Before installing the lining, the wooden surface must be treated with special protective equipment. There are a huge number of them in construction markets. Prices range from high to low thresholds. You also need to make sure that there are no chipping or protruding knots on the face of the board. If present, they must be removed with a grinder.
After the work done, the next step will be the installation of the lathing. For this, a profile is used. It can be made of wood and metal. It is worth considering that one of the advantages of the lining is the alignment of the walls. The lining itself is fastened in a thorn and groove type, that is, its thorn snaps into the groove. An assistant is indispensable.
The next step is to pull the line from one end of the platform to the other end. The distance between the frame parts must be at least 50 centimeters. If you want to do less, then keep in mind that it may not be enough for laying the mineral wool sealant.
Before installing the lining, it should be dried in the sun or indoors. If it is dried in the open air or where finishing work will take place, it is advisable to leave the material for a longer time. After these recommendations are fulfilled, proceed with the facing of the room.
The lining sheet has a spike on one side, and a groove on the other. During installation, the groove should be located at the bottom, to prevent the formation of moisture at the bottom of the structure.
Decorating the house from the inside with wooden clapboard begins from the ceiling, although assembly from the floor is possible. In this case, the gaps can be hidden under the skirting board. Structural slats are fastened with nails or on a kleimer, which is more aesthetically pleasing and beautiful.

3 How to prepare a room for cladding - walls and frame
Wooden lining is suitable for finishing living rooms in whole or in some part. In the latter case, this allows you to zone the room. It fits harmoniously into almost any design style. But all efforts will be in vain if the preliminary work is not carried out technologically correctly and with high quality.
Pay attention to the readiness of the building itself to sheathe it with clapboard. If the walls do not impede the penetration of cold or are porous, you will need to insulate them from the outside and install waterproofing
The base surface is prepared from the inside: it is leveled, and in the bathhouse, hallway, kitchen, protection from steam and water is installed using foil insulation. After that, they begin to manufacture the lathing.
The process is not particularly difficult, but neglect of certain points affects the quality of the finish:
- 1. The material is wooden blocks, which are able to withstand the load, be even and strong. These are slats of 20 × 20 mm or 20 × 40 mm, which is better - it is more convenient to join individual boards on them.
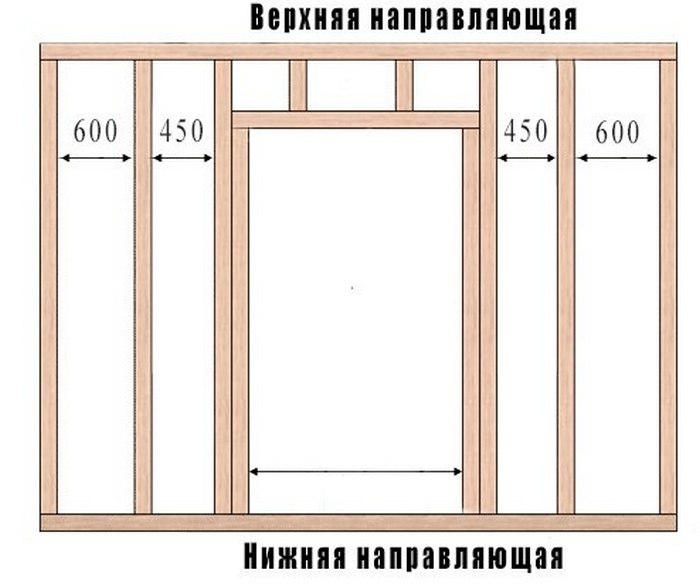
- 2. The step of the lathing is maintained with a range of 40 cm. The bars on which two lining are connected at the end fall out of the total row. Their location is calculated based on the length of the finishing material and set first.
- 3. For leveling the frame in the plane, use wooden spacers.She joins the wall first, then to it with self-tapping slats.
The installation of the lathing begins with marking. Determined in advance with the direction of the lining. Vertical increases the height of the room, horizontal - expands. With any choice, the bars are positioned perpendicularly. Depending on the chosen location, the fishing line is pulled, checked with a level or plumb line and applied to the surface of the line. According to the landmark, the bars are attached close to it. They must be installed around doors and windows.
Installing a batten in a steam room has its own characteristics. First, foil-insol is fixed on the walls, which traps steam. In a room with constantly changing temperature conditions within a wide range, an ordinary frame does not withstand for a long time. Therefore, more powerful racks are installed, recesses are cut into them, where smaller strips are put. A rigid structure is created that virtually eliminates deformation.
Watch the video about finishing the steam room.
The frame on a log house is more difficult to install due to significant differences in plane. It is possible to level the surface, but very expensive. Beacons are used, along which the remaining bars are oriented. You will need a lot of linings, and in some places you will have to scrape off the wall with an ax or a plane. Instead of self-tapping screws, nails are used, which saves money. On a flat wooden wall, fastening is carried out without lathing.