How to dismantle a beveled plank
Dismantling is more laborious than dismantling a rectangular plank. When replacing one or more boards, you need to follow the following algorithm:
- By tapping with a hammer, find the attachment points to the batten.
- Holes are cut in these places with a chisel and mallet.
- When the metal fastener appears, you need to take an angle grinder (LBM), cut off the fasteners with a small cutting disc.
- Cut fasteners consistently across the board.
- Carefully remove the rail.
The new strip can only be inserted with nails. To do this, you need to follow the recommendations. If you removed several adjacent rails, you can use standard metal fasteners.
What is planken
We are trying to give professional advice to site visitors, all our articles are not related to manufacturers, the performance characteristics of the materials are only objective. So what is planken?
This is an ordinary board made of various types of wood, planed on four sides, beveled corners. The thickness is about 20-24 mm, the length is from 2 m and more, taking into account the technological characteristics of the manufacturers. Depending on the geometry, planken is produced in three types:
- Straight. The angle between edge and face is 90 °. It is not recommended to use it for cladding houses for several reasons. Firstly, the wooden lathing is visible in the small gap between the individual planks. Secondly, rainwater penetrates through horizontal slots without problems, wooden structures become wet, as a result, rapid decay. And this is the best case. Such planken is recommended for the manufacture of various decorative fences, furniture elements, etc.
- Beveled. The angle between edge and face is approximately 45 °. This type can already be used for external finishing of facade walls, due to the parallelogram, moisture penetration into the cracks is excluded.
- Wedge-shaped. The thickness of the planking varies in width. Has an original look and nothing more.
Now we need to say a few words about the price of the "new" material. Why do we use quotation marks? Because the planed board has been known to builders for many hundreds of years, now this board was called planken and they are trying to pass it off as a new building material. For comparison, let's take the cost of European lining and larch planken. The same price proportions are maintained for other types of wood.
| Lumber grade | Larch lining | Larch planken |
|---|---|---|
| Extra | 860 rubles / m2 | RUB 1300 / m2 |
| Prima | RUB 595 / m2 | RUB 1100 / m2 |
| A | RUB 400 / m2 | RUB 750 / m2 |
| AB | RUB 280 / m2 | RUB 600 / m2 |
One more point. To make a plank, you only need a four-sided planer with straight cutters. Straight cutters are easy to manufacture, sharpening takes little time, and flat cutters are much easier to set up than with a complex profile used during the manufacture of lining. In addition, the loss of electricity is significantly reduced due to the fact that less wood is removed. As a result, the actual production cost of planken is much cheaper than the lining. How can you explain the high cost? There are two reasons. The first is the lack of understanding by inexperienced developers of the production technology and the mechanism of price formation. The second is a successful advertising campaign. Both reasons ultimately force developers to buy material with fairly low performance at a very high price.
Where is the beveled plank used?
Beveled planken is made from natural wood of various species, it is a completely safe material.True, to improve the appearance and protect against putrefactive processes, the surfaces are impregnated and coated with special compounds, varnishes and paints. It is not recommended to use paints - the attractive natural drawing of the tree is lost. Planken can be used for:
- External cladding of brick, concrete and wooden facade walls. Sheathing is done both on new buildings and during major repairs or reconstruction. Due to the new type of facade, you can completely change the appearance of the house, the old building takes on a modern look. For planking sheathing, there is no need to restore the bearing characteristics of the foundations - the cost of work is significantly seduced.
- Interior wall cladding. The design of the premises resembles natural country houses, which is considered a fashionable trend at the present time.
- Production of furniture from natural wood, production of decorative elements.
- During the construction of fences and decorative fences. The structures have an excellent design, but not all developers can afford it at a cost.
For cladding facade walls, we recommend using the overlap method for straight and wedge-shaped or beveled planks with fastening with metal elements. The peculiarities of the profile of the beveled planken exclude the ingress of moisture under the structure and make the places of fixing the boards to the supporting frame invisible. How to sheathe walls?
Planken mount: general installation nuances
When considering modern facing materials, many contractors forget to mention to the customer about the possibility of facing the house with planken. Mounting the plank on the wall does not take much time, but the result is ready, striking in its excellent appearance.
This siding is a set of wood planks fixed to the facade of a building or indoors. Planks come with rounded, square and oblique edges, it all depends on the imagination of the interior designer and the wishes of the customer.
General installation nuances
In order for the finished result to meet expectations, and a beautiful result pleasing to the eye for a long time, it is necessary that the mount for the planken be correctly selected (Snake, Key, Planfix, Crab, etc.), and the work is done by professionals. In addition, the veneering result is influenced by:
- board - type, profile, quantity, type of wood;
- processing - varnish, enamel, anti-corrosion and other compounds;
- wall - the working surface is important and must be prepared, it must also be opened with protective equipment, if necessary, heat-insulating (waterproofing) materials are laid before the frame is installed.
- frame - the fasteners must be correctly selected for the desired end result, the board is always a board, and the desired decorative result is achieved precisely by the correct selection of the type of frame and its competent installation.
Mounting options
There are two types of plank fastening: hidden and open. Open fastening means fixing the plank elements to the frame with screws or self-tapping screws, in the case of a metal lathing.
But this approach has several drawbacks: the caps are visible, the screws violate the physical integrity of the wood, accelerate corrosion, promote the development of fungus, in addition, some types of wood (for example, larch) simply crack.
Concealed fasteners
This topic is extensive, because for such a fastening many types of special hardware are used: "Wave" ("Snake"), "Crab" and others. The choice of fastening depends on the required pattern and the type of elements (straight, beveled or a system of grooves).
A straight profile is the easiest to install, but it has one significant drawback, namely the need for a technological gap, which slightly spoils the aesthetic part of such a cladding.
Beveled profile - the boards are attached, going behind the adjacent one, completely covering the frame, therefore it is considered the most highly aesthetic and popular.
A profile with grooves is an imitation of a bar, this type of plank is sometimes called clapboard, and the boards have a thorn-groove design, the fastening is hidden and completely covers the frame.
General settlement rules
In addition to the attractive appearance, hidden fastening systems have a number of technical advantages that make the industry of such frame fasteners so developed and diverse.
Only hidden fasteners can fix hard (iron wood, oak) and fragile (larch) wood species, make the fastening invisible, so that the structure will look whole and neat.
As a general rule, calculations of the consumption of fasteners are made according to the formula:
K = S / (W + Z) / L
Where abbreviations mean the following points:
K is the estimated consumption of fasteners;
S is the area of the required siding;
W is the width of the planken beam;
З - gap width (for straight profile);
L is the distance between the details of the lathing.
Block quote: "The simplest and most reliable calculation method for a specific fastening system is a calculator on the manufacturer's website."
Fastening systems
Before proceeding with the purchase of materials, it is necessary to accurately determine the question: "how to fix the planken?" The modern market offers a lot of options for hidden mounts, and many companies offer their product.
PLANfix
This fastener is designed for a rectangular profile that does not have grooves. The fittings are plates with a 90-degree bend; the plate has mounting holes and a fixing spike.
Advantages:
- mounted on the side of the board, so you can fix the plank, up to 18 mm thick;
- technical clearance provides effective ventilation;
- can be fixed without electrical appliances.
Basic principles of planken mounting
Plankening can be performed vertically, horizontally and at an angle. The most convenient installation method is horizontal. It does not require special construction skills and special equipment from the master, and therefore there is a chance of its successful independent implementation. Houses sheathed with planken will keep warm and cozy for many years, and this requires a step-by-step adherence to the following technological points:
- Installation work, as when working with other cladding materials made of natural wood, begins with the lathing of the wall surfaces of the building with harvested lags or larch bars. In any case, such parts must be treated with a special protective antiseptic. The elements are attached to the wall frame with long screws on top of a layer of insulation. The logs are finished with a finishing protective layer.
- For additional protection against moisture and mold, before installing the planken, it must also be opened with a layer of high-quality antiseptic. Each sawn-off end also needs to be covered with a protective layer.
- The length of the wooden plank depends on the size of the wall. Naturally, experts recommend refraining from cutting the board, but if the parameters of the wall do not make it possible to do without this, then no more than 3 boards can be stacked in one row, taking into account the mandatory breakdown. This moment is taken into account before the fastening of the lag begins.
- A feature of this technology is that the fastening of planks begins not from the 1st row, but from the 2nd. Using the usual building level (you can laser), the lags are marked according to the required dimensions. The bar will be attached to this marking. This will greatly facilitate the further process of installing the wall cladding.
- A board is applied to the bar, marking is made on it for future fasteners.
- The fasteners are located on the back of the planks in such a position that the hole for the self-tapping screw remains on top. At the bottom there is a solid part of the fastener, which starts behind the bar.
- The section from above is attached to the log with a screwdriver, and the lower part remains hooked to the bar.
- All subsequent rows of planken are attached according to the same principle.
- When the wall is sheathed, it is necessary to remove the bar and fix the first row in its place.
- A mounting angle and a fastening element are fixed to the back plane of the 1st row of planks, which slides behind the boards of the 2nd row. At this time, the corner is screwed to the lag, from below.
There is also a modern and, in the opinion of most experts, a more reliable and faster way of fastening planks. There are no fundamental differences in the technology itself, the difference lies in the fastening element called "planfix". It is an L-shaped metal plate. With its help, you can finish the facade of the house with planken up to 25 millimeters thick.
A special feature of this mount is the presence of a special spike. Planfix refers to the type of hidden mounts, therefore, the most smooth and durable construction is obtained. Despite its novelty, planfix does not require the use of modern tools. Having a hammer in stock and observing the following steps, you can do it yourself:
- The lathing is made with a wooden beam, which are located at a distance of 45-50 cm from each other.
- The 1st board is mounted to a wooden mounting frame with a self-tapping screw or an ordinary nail.
- Technologically correct installation implies combining the plane of the planfix with a bar of wooden lathing and the 1st board.
- All other planks that form the cladding are attached in the same way, according to an understandable principle: the cladding material is tightly fixed on the wooden crate and sits on the planfix spike. This procedure is performed using a hammer and a backing that will soften the blows to the planks.
There is no doubt that houses sheathed with planken look especially impressive, because if you have the financial resources, you can mount custom planks with drawings printed on them in advance. But the main thing to remember is that the success of cladding with such a peculiar board directly depends on the quality of the selected materials. Therefore, when buying plankens, be sure to ask the seller for a certificate of quality. If this is the case, then you can safely purchase this product.
How to fix planken correctly
First, you need to erect a crate for attaching the panels.
It is important to make the structure level and in one plane so that there are no distortions when installing the boards. Installation of a plank on the facade is carried out in two ways - open and closed
Let's consider each of these methods.
Closed mounting method
1.With PlanFix fasteners
This fastener is for mounting with a straight profile. Despite the fact that this method is with hidden fasteners, the first board in a row is fastened with an open method.
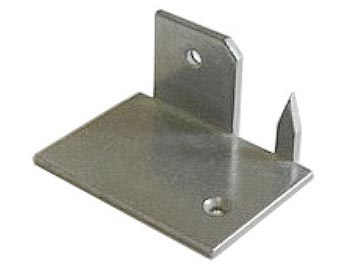
The fastener is nailed to the first board and to the rail. The second board, previously cut to size, is installed on top and with a hammer, through the gasket, we stuff it onto the spikes of the fastener. We mount the following boards in the same way.
The last board in a row is fixed through the plank using an open method, with a countersunk head self-tapping screw.
When installing in this way, no special tools are needed.
2. With the help of fasteners "snake" or "wave".
Both straight and beveled profiles can be attached. When mounting beveled, the fasteners will not be noticeable.
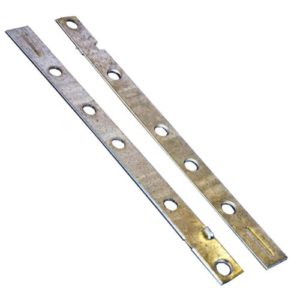
Lay the boards upside down on a flat surface.
Mark the installation of the fasteners in such a way that the fasteners are staggered relative to the longitudinal axis of the guide. Fasten the plates so that the plates protrude on both sides.
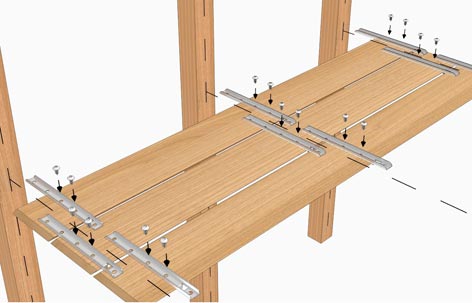
After that, we fasten the boards one by one to the guides. We put one end of the mount (on which there is no hole) behind the board that has already been attached and screw it to the crate through the hole in the second end of the same mount.
Open mounting method
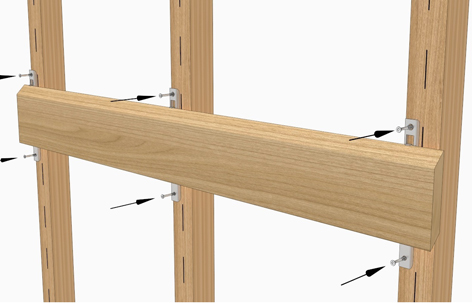
Compared to the closed one, the open method is much cheaper and takes much less time.The method differs in that the boards are attached to the logs directly using self-tapping screws. However, this method has a significant drawback - the caps of the fasteners remain visible.


Features of planken and its installation
Reading time: 6 minutes
Among the wide range of finishing materials, planken is especially appreciated for its beautiful appearance, since it very faithfully imitates timber.
Fans of natural, natural materials for finishing the facades of houses will like planken. To sheathe a house with this finishing material, you need to figure out how to choose the right fasteners for the planken.
The service life and the appearance of the cladding will depend on how well the fastening of wooden planks will be.
Features and benefits of a facade board
Planken is a versatile cladding profile for exterior and interior decoration. It can be mounted vertically or horizontally, diagonally. When installing in an oblique way of laying, the effect of a “herringbone” or one-sided oblique pattern is obtained.
Planken is of three types:
- Classic - straight, the end of the board in the projection is a rectangle with straight edges. Such a plank is assembled with a gap.
- Beveled - It has beveled sides. The sheathing of this type of planks is assembled with an overlap or in special grooves.
- With grooves - grooves are made along both sides of the plank.
This finish has a number of advantages:
- additional protective properties, the ability to hide defects;
- long service life;
- resistance to temperature extremes;
- resistance to any precipitation;
- aesthetic appearance;
- wide range of designs, colors and shapes;
- easy installation and easy maintenance;
- low probability of deformation during operation;
- environmental Safety;
- fire resistance;
- resistance to mold and mildew formation;
- multifunctionality.
Planken is used for:
- cladding of walls, facades of houses;
- ceiling and floor finishes;
- construction of fences;
- improvement of gazebos;
- landscape design.
It may seem that planken has something in common with clapboard, but there are clear differences. Unlike lining, planken does not allow water and dampness to accumulate in the wood. Due to this, its service life is significantly increased. In addition, the plank is installed with a small gap between the boards.
For the production of planken wood is used:
- pines and spruce;
- larch;
- cedar;
- dachoma;
- merbau and teak.
Snake
Fasteners snake for planken is an elongated galvanized steel plate with pre-drilled holes. The fasteners were named for their characteristic installation method. The snake is used for work with beveled and rectangular profiles. Fasteners advantages:
- there are several types that allow you to mount boards of any width;
- suitable for all surfaces;
- fastening is carried out with screws and self-tapping screws;
- reliability of fasteners;
- the snakes have a ventilation stopper.
Step-by-step instructions for plating:
- Prepare material and tools.
- Lay out the bars with the back side up, mark the installation locations.
- A snake is fixed on the bar, taking into account its protrusions in both ends by 2 cm.
- The first block is turned upside down, installed on the crate.
- The second bar is brought into the gap between the first bar and the crate, the side of the snake where there is no screw hole. And with the other end of the snake, the board is attached to the elements of the sheathing.
- In this sequence, the planken is mounted on the wall.
will help you familiarize yourself with the process in more detail:
Planfix
To fix a straight planken without grooves, use planfix fittings made of galvanized steel. It represents plates bent at right angles. The planfix has holes for fastening and a spike for fastening.
Material advantages:
- side mounting is performed;
- there is a technological gap;
- fastened with nails, self-tapping screws;
- easy to assemble.
Installation procedure:
- On the crate along the horizontal mark on the lower edge, the first board is fixed with self-tapping screws.
- Planfix is installed tightly to the first board and the frame - with a thorn forward.
- Fastening is done by driving a nail into the board and only then into the frame.
- In the part of the crate, a cord is installed for installation, A-spacers are hooked onto it.
- Attach the second board tightly to the fastening spike, helping with a hammer.
- Hammer in a nail, similar to item 3.
- The assembly is then repeated according to the scheme until the very end.
- The last panel is fastened with nails, and then the A-spacers and the cord are removed.
More details can be found here:
Crab
A stainless steel fastener called a crab secures the grooved planken material. It is a metal base, the middle of which consists of two L-shaped lapels for grooves, and the base is applied tightly to the timber.
Practical advice
- When designing the location of the planks on the facade, try not to place them more than three in a row.
- For painting, processing the ends of the boards, use not a brush or roller, but a small sponge. The work will be more accurate.
- When using nails for fastening, choose resistant to corrosion, protect the surface from it with a paint and varnish coating. Otherwise, the appearance of rust stains on the surfaces is inevitable.
- The nails used can be made invisible, or almost invisible, by hammering each of them into the bar and depriving it of the cap (cut with pliers). Then it is driven into the wood with a small drift. Remaining small dents can be hidden with wood putty (if final painting of the facade with an opaque paint is intended).
- You can use homemade putty to hide the dents from the nails. Mix one part of clear varnish (which will cover the surface later) with one part of sawdust of this planken wood (easy to collect when sawing off excess pieces of boards at corners, in niches). The mixture is used to cover the dents with a construction knife or an artistic palette knife.
Varieties
There are three types of planken:
- Straight. It looks like a regular edged board with chamfers at four corners. Each side is strictly perpendicular to the two adjacent ones. The material is often used for interior decoration. In the open air, it is used to build fences, gazebos. The reason is low protection against water vapor, rain drops, man-made splashes.
- Wedge-shaped. On the cut it looks like a wedge. They are often overlapped. Very decorative.
- Beveled. Used as a facade material. It looks like a heavily skewed parallelepiped. Two angles 40-45 degrees. The other two are 125-135 degrees. Advantages - protection against water splashes, ventilation of the space behind the cladding, decorative effect.
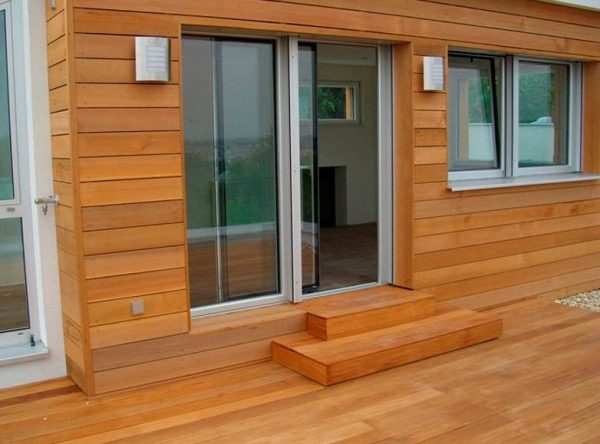 Finishing with a direct variety of the entrance group of the house
Advantages over clapboard
If we compare the popularity of planken and lining, then the latter is still winning and is significantly ahead. However, the former has several advantages. One of the most significant is that it is assembled with a certain gap between the boards, and this allows some size fluctuations with temperature and humidity changes. As you know, all building materials can change their size insignificantly in case of external negative factors. At the same time, the building itself, even due to small changes, can seriously shorten its service life. In addition, due to its fastening method, it is much easier to replace a separate plank than a lining.
All these obvious advantages increase the chances of an environmentally friendly building material in the near future to seriously break away from rivals and overtake even its most important competitor - lining.
How to install planken with your own hands
First. where to start work is the preparation of everything you need:
- The required number of fasteners is calculated according to the formula, which takes into account the width of the front board in meters, the area of the final facing, the pitch of the lathing bars and the size of the gap.
- A crate is installed - wooden or metal.It is built from logs and insulation (or without it). Wooden lathing is preferred. Before installation, it is treated with antiseptics and impregnations. And planken is treated with fire and moisture protection agents.
- The structure is assembled in accordance with the above schemes and assembly methods.
- After the completion of the installation work, it is recommended to treat the planken with natural oils that protect against mold, dampness, and loss of color.
