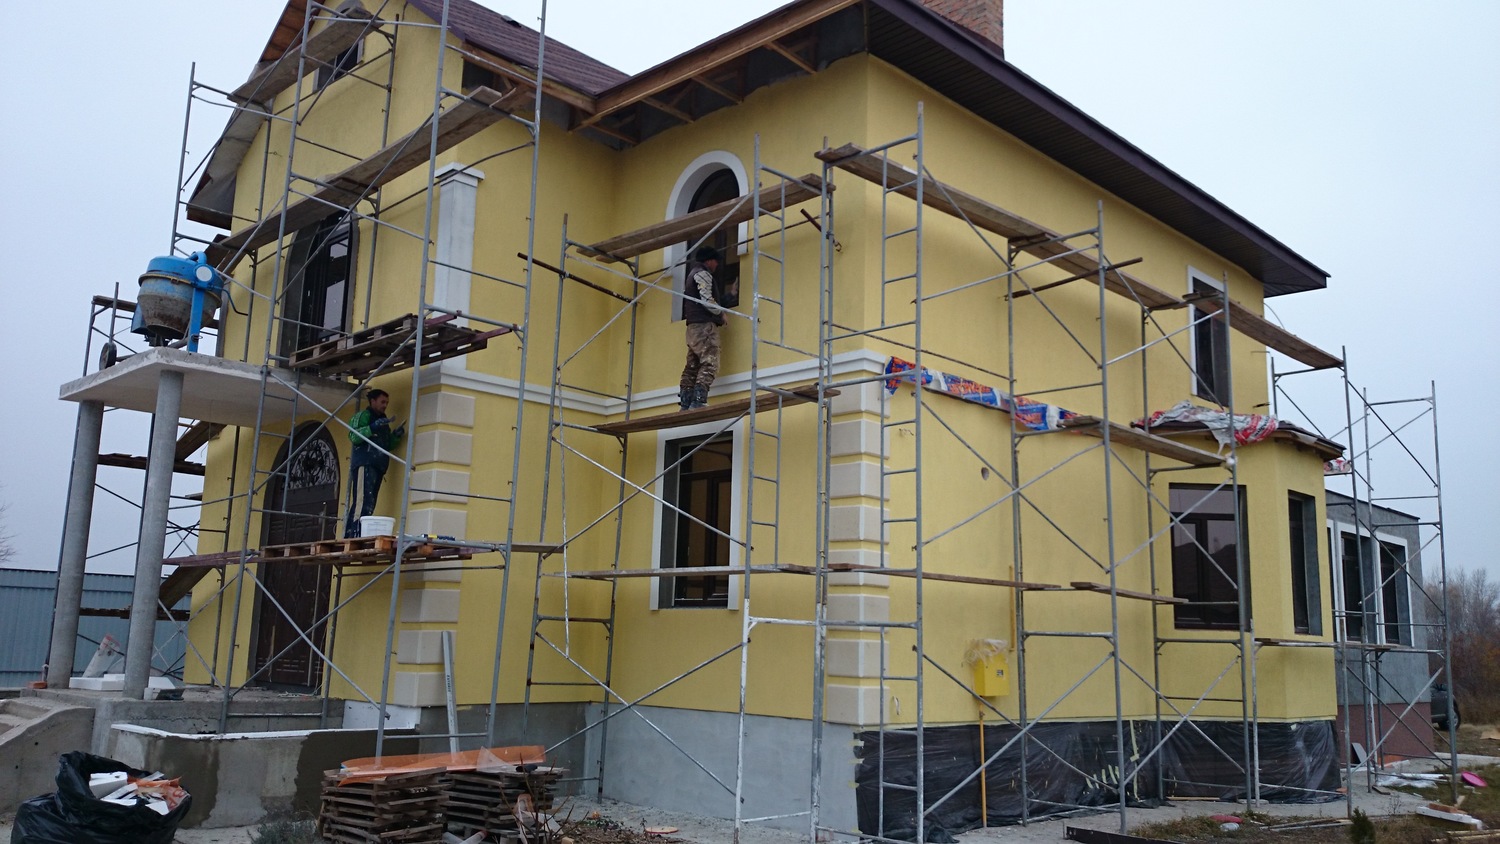
DIY wet facade
The outer walls of the building have both a protective and a decorative function. There are many options for home decoration, among which the so-called wet facade is considered one of the simplest, but at the same time, universal technologies.
What it is
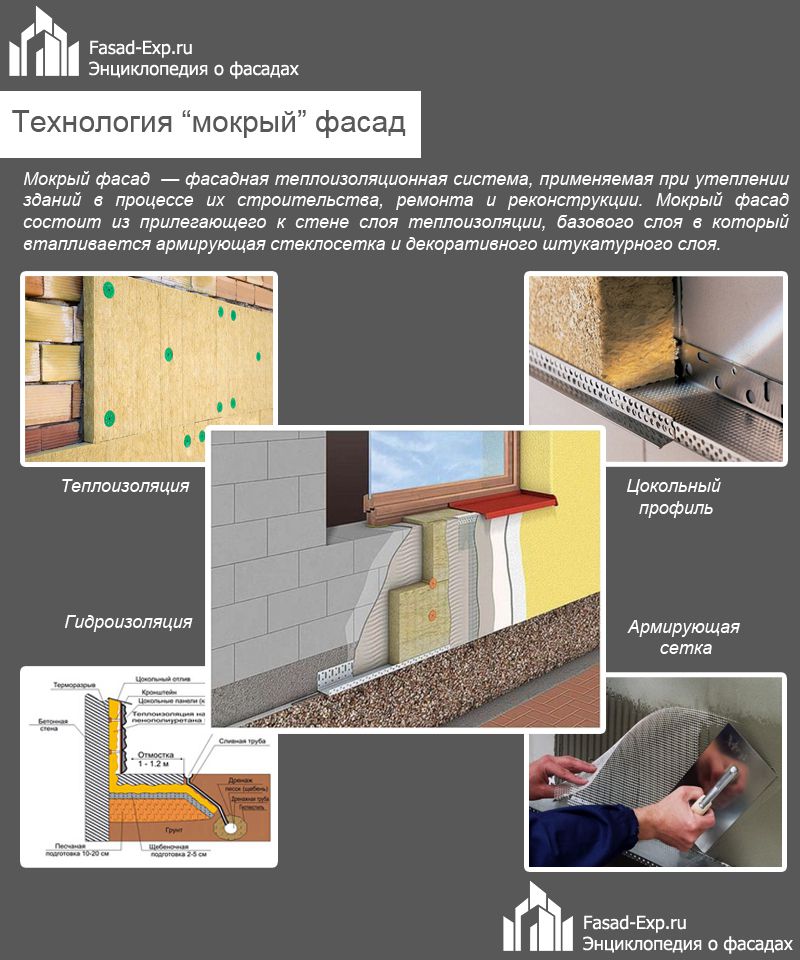
A wet exterior façade or wet plaster is a wall finish in which a dew point is placed on the basement profile, which reduces the formation of condensation on the interior walls. Such a system is very convenient in regions where indoor and outdoor temperatures differ significantly for most of the year. In such climatic conditions, a frequent problem is wall steaming and, as a result, the formation of mold and cracks on them.
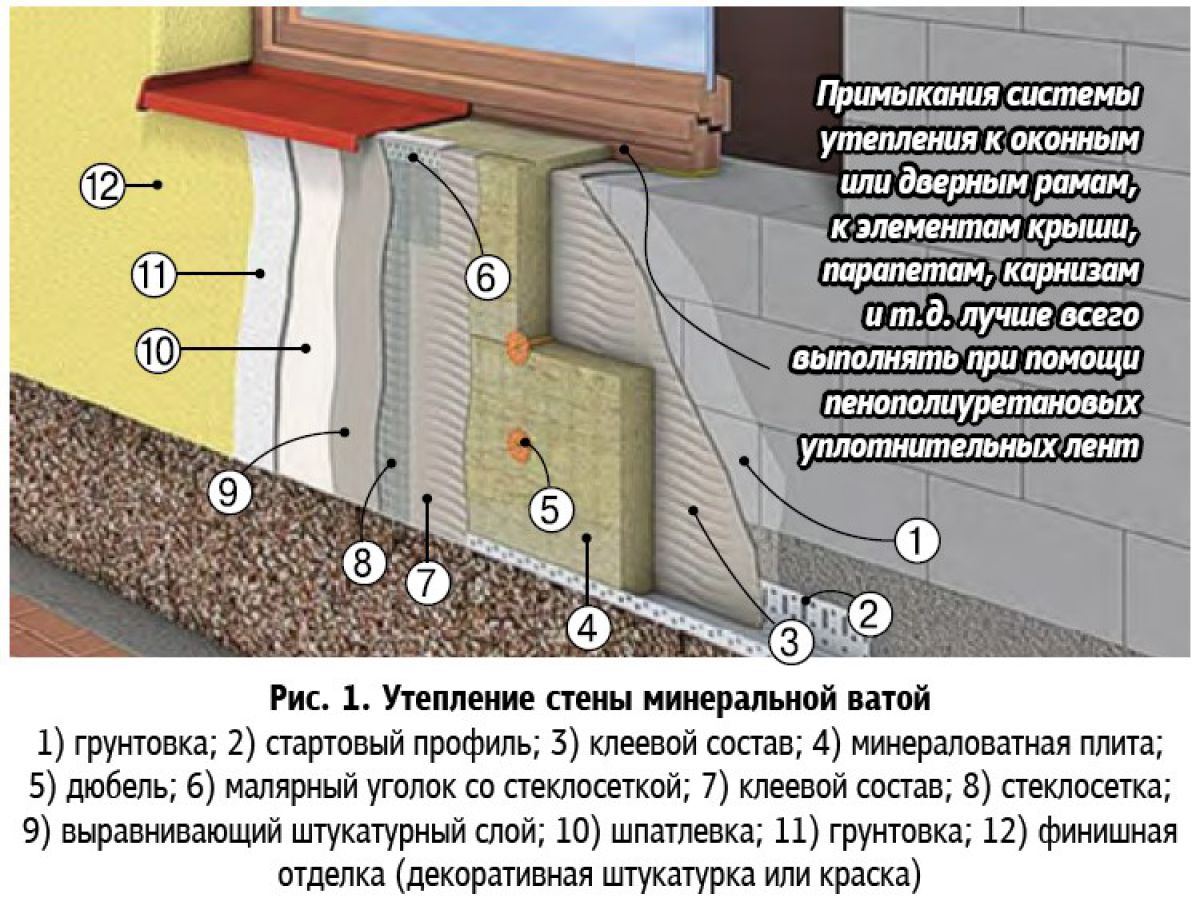
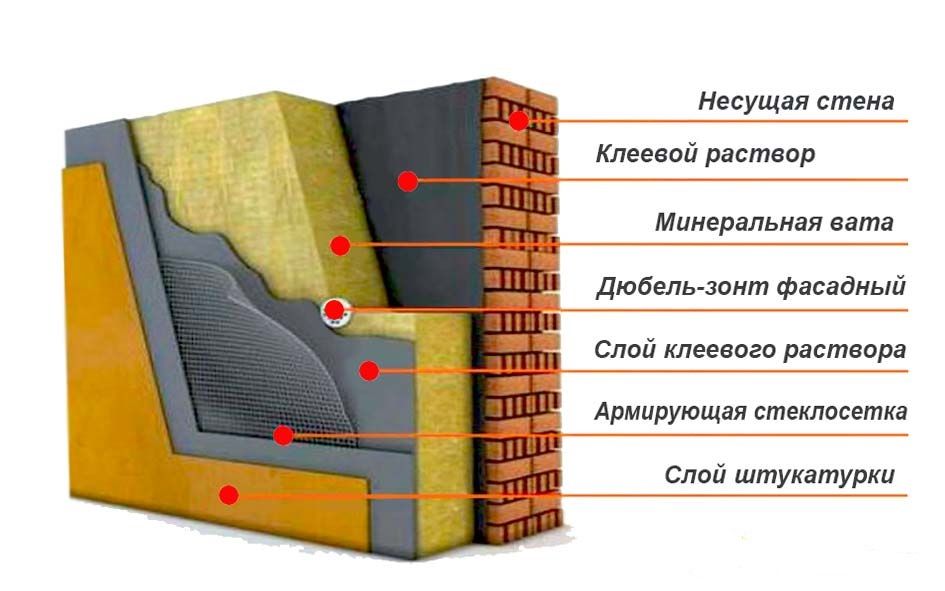
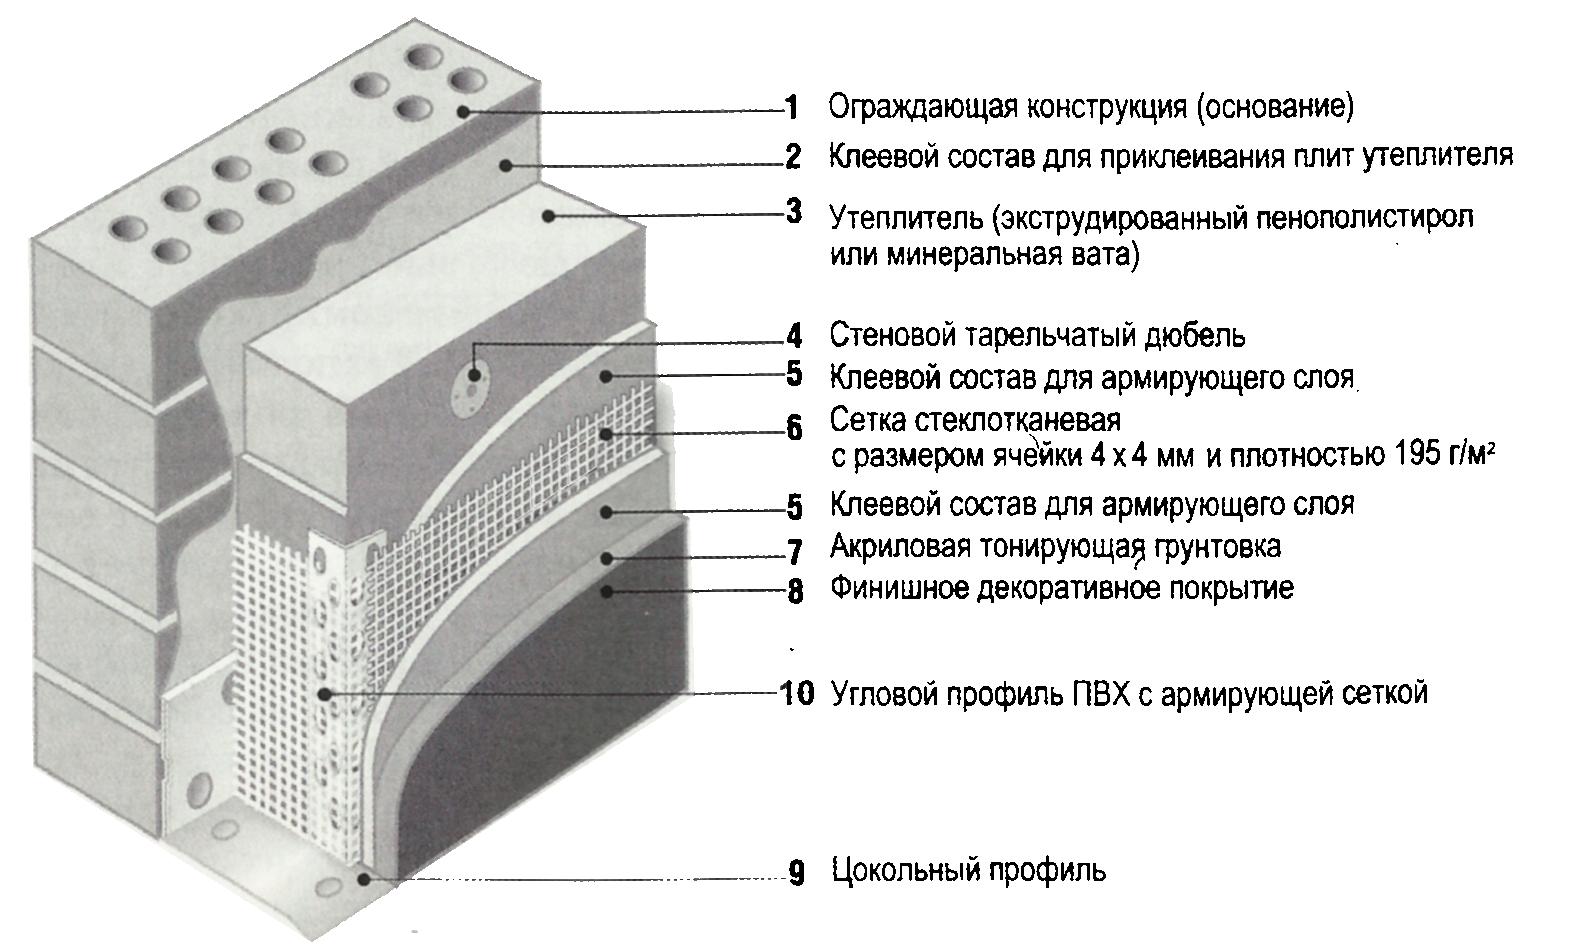
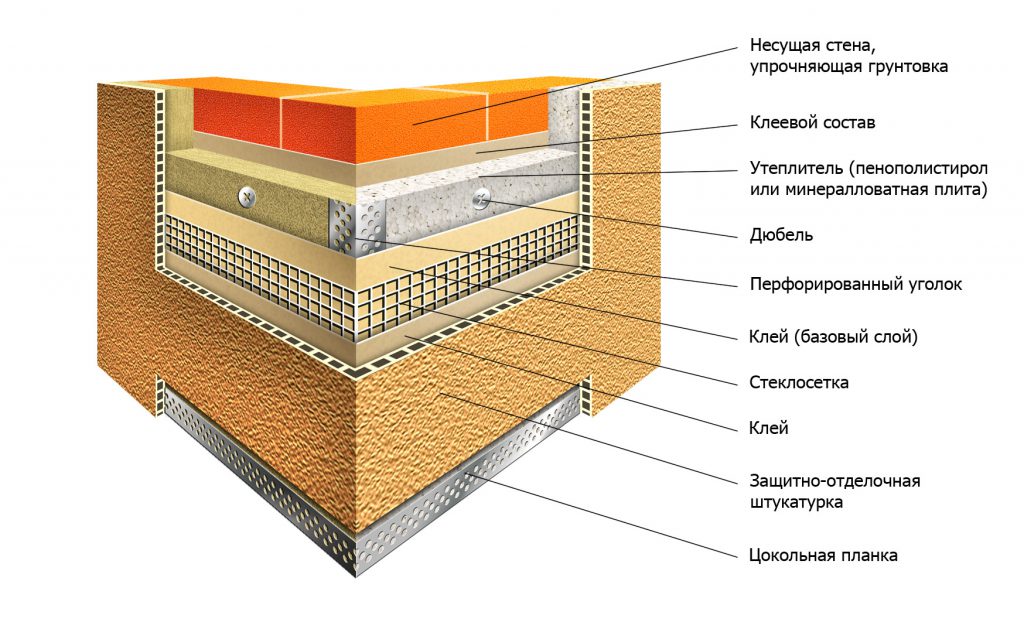
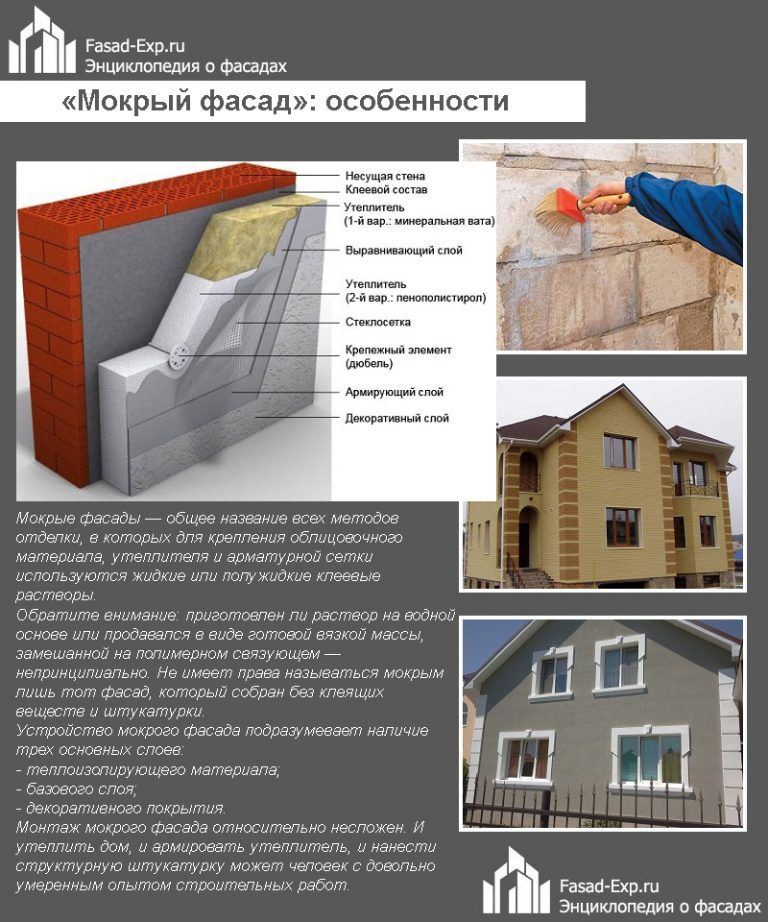
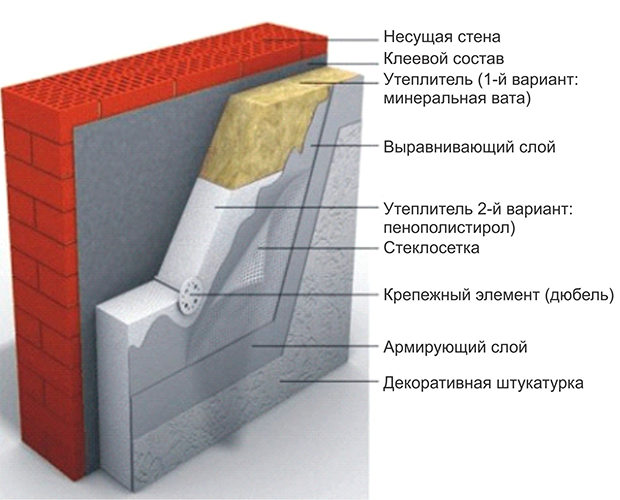
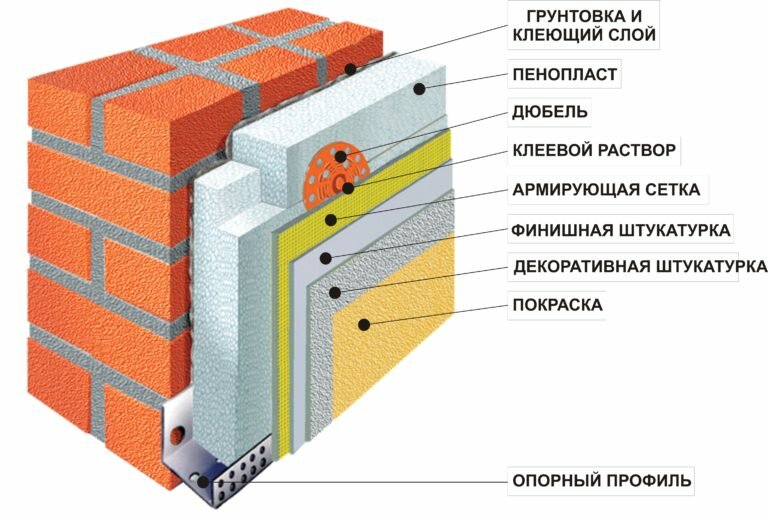
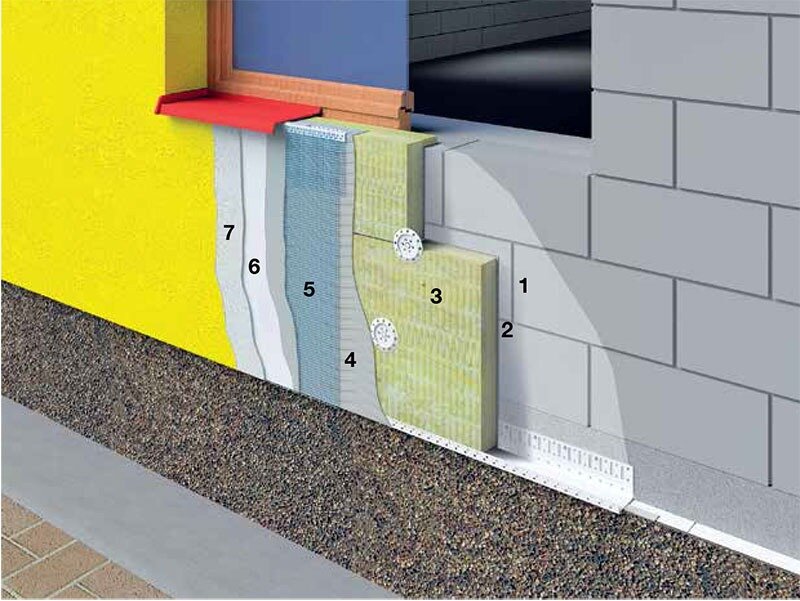
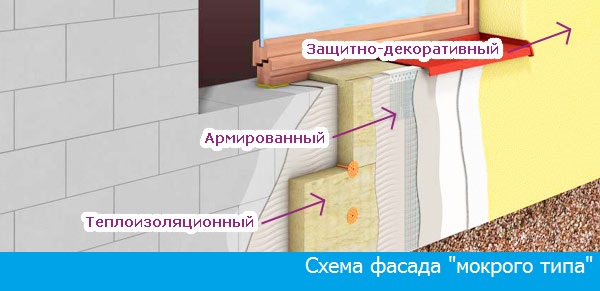
Photo - general scheme
The finish has this name due to the fact that many components are mounted using glue mixtures diluted with water. For example, this is foam glue, cement or special decorative plaster (dry bark beetle).
Pros of a wet facade:
- Simplicity in execution. The technology is quite easy to carry out independently, without the involvement of specialists;
- Availability. Installation does not require the use of fasteners, the cost of installing the frame, etc. All work is performed using a cement mixture, which is an order of magnitude cheaper than most facing materials;
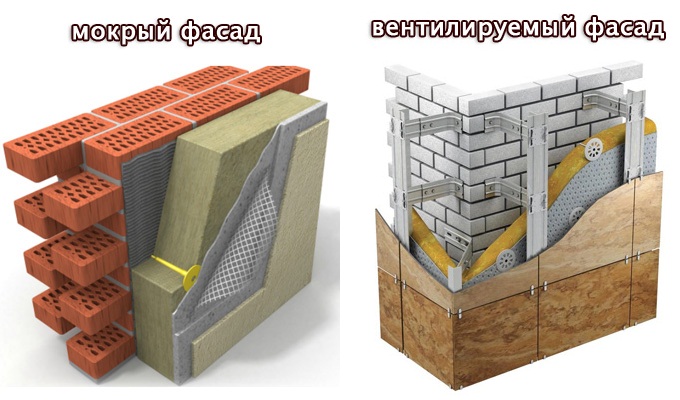
- Saving space. Unlike a ventilated facade, a wet one does not need to allocate a certain place outside the wall;
- Due to the lightness of the system, it is perfect for installation on a frame or log house. This quality will also appeal to the owners of buildings on a strip or post foundation.
But at the same time, the wet facade system has certain disadvantages. Cement, which is the main material, is highly hydrophobic. Therefore, it is not recommended to install such a finish in regions with high levels of humidity, especially near the sea. Warming of private houses with the help of a solution can only be carried out at a positive temperature, at least 5 degrees.
Installation technology
Installation of a wet facade can be carried out only after careful preparation of the surface and waterproofing (in particular, this applies to the basement finish, where additional blind areas will need to be erected). The first step is to remove the old finish on the surface of the house. To do this, you can use chemicals or a metal brush, which will quickly remove the old plaster and putty.
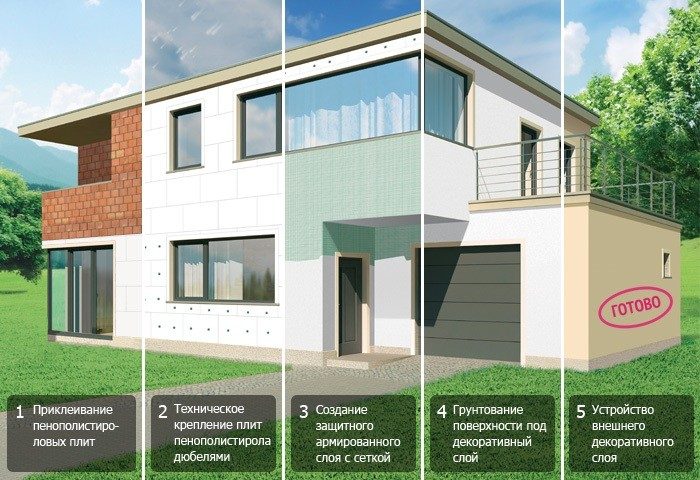
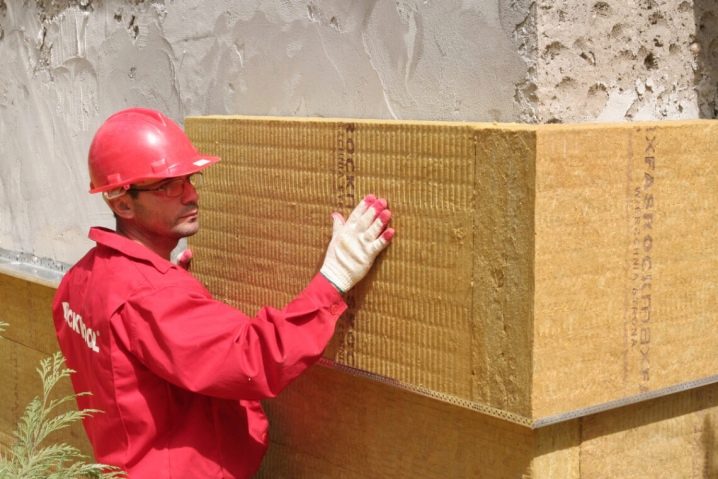
Step-by-step instructions on how to make a wet facade on mineral wool with your own hands (insulation can be anything):
- The wall of the building is being prepared for decoration. It is leveled and must be primed. It is necessary to putty with special compounds that will have antibacterial properties in order to prevent the facade from becoming rotten;
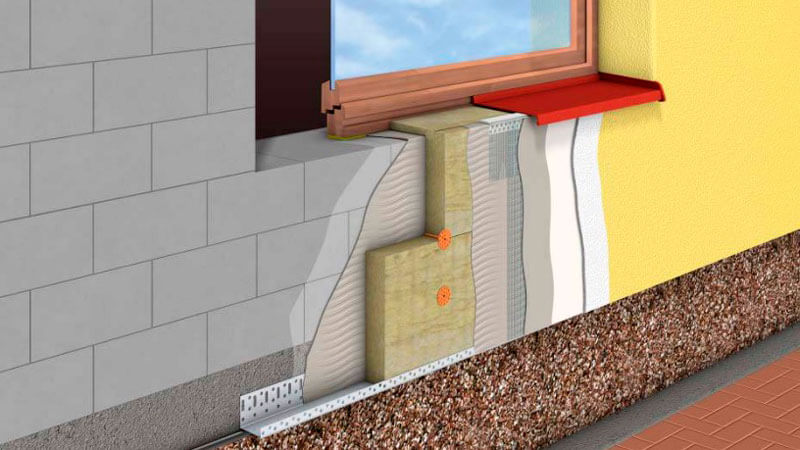
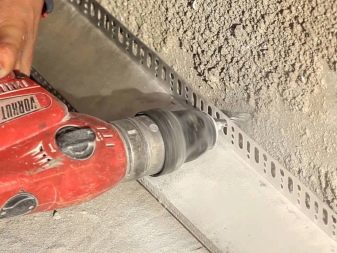
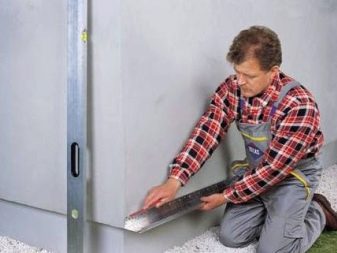
- After that, you need to install a profile, which will be the frame for the insulation. Correctly recede from the ground 40 centimeters, so that there is room for installing blind areas. It is required to leave a gap of at least 3 mm between the horizontal strips for expansion under temperature influence;
Photo - profile height
There is no clear norm for the number of fasteners, it depends on the area of the facade. The average step of assembly products according to SNiP is 10 centimeters;
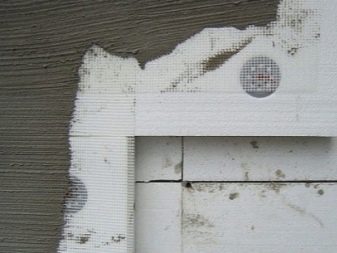
After the profile is additionally reinforced with dowels;
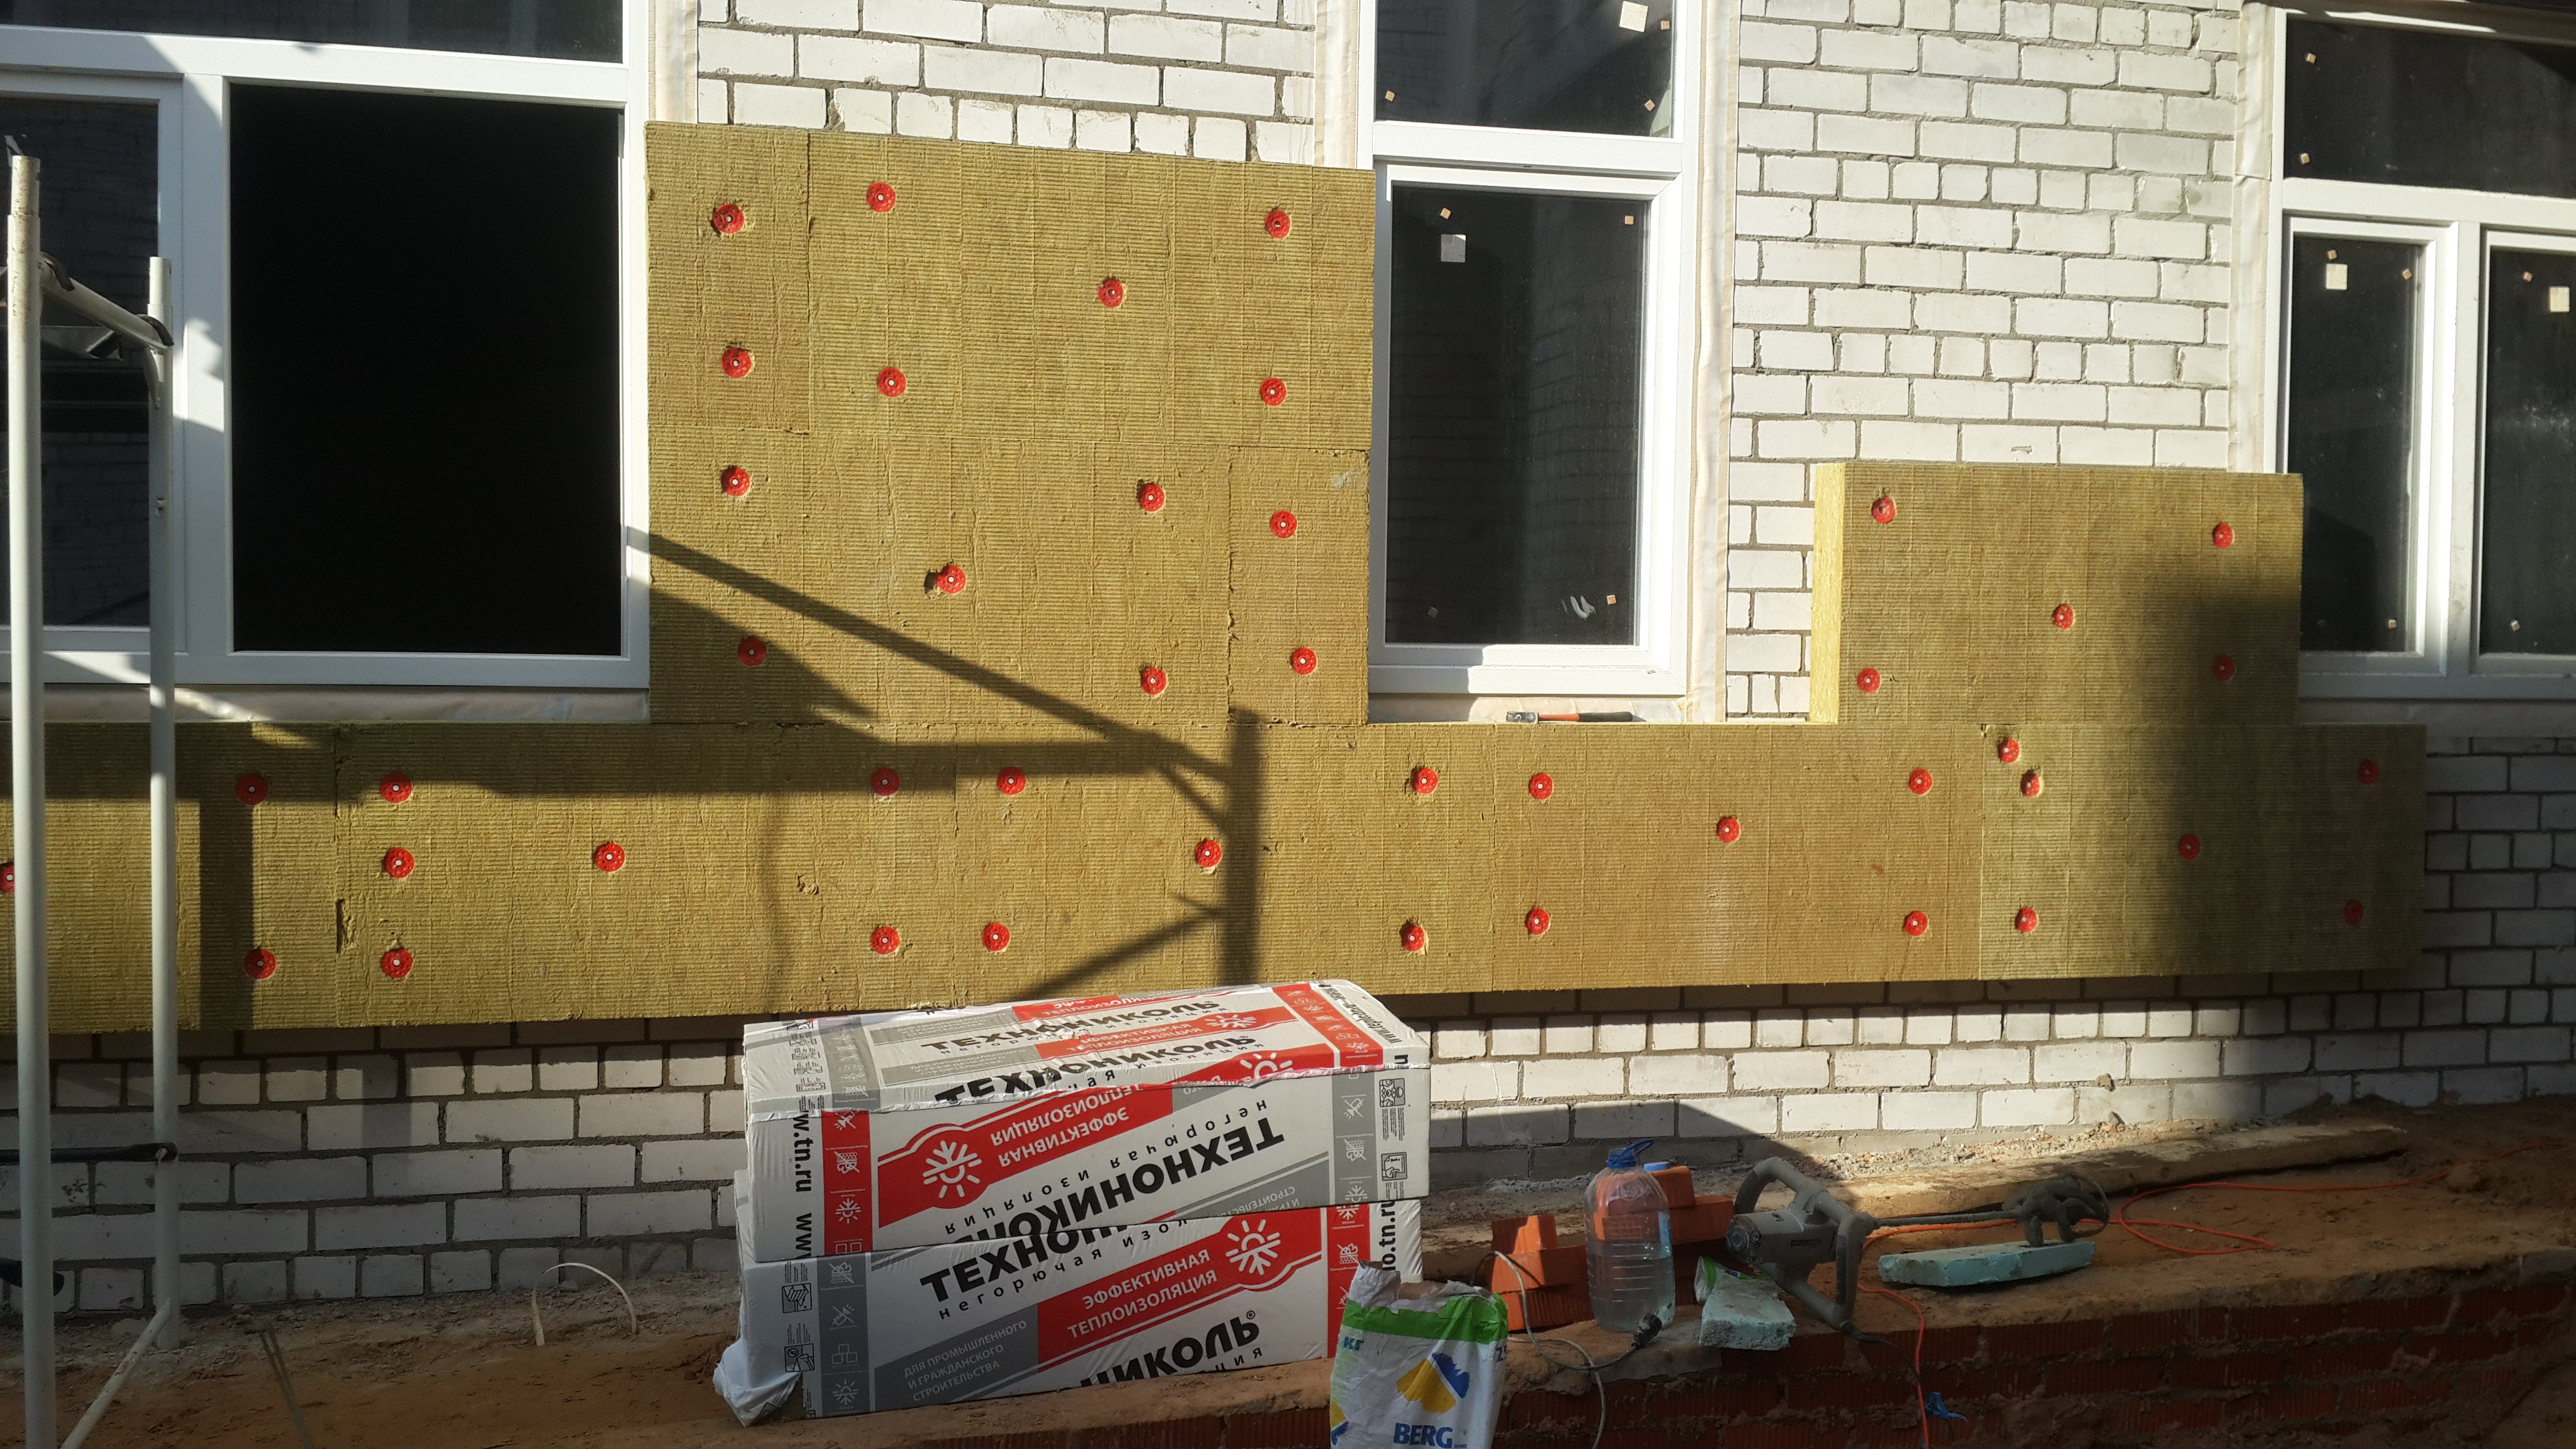
Heaters are attached to the adhesive layer. But before starting the installation work, you need to prime the wall well. It is necessary to apply the mixture 3 centimeters above the profile, while from below and from above it is smeared with a line, and throughout the rest of the area - pointwise;
When installing the plates, make sure that they are evenly positioned.It is very important to immediately remove any excess adhesive mixture that may come to the surface. To ensure the most snug fit, you need to press on the sheets evenly, for this many craftsmen use special rollers;
Installation of this type of facade requires little expense, but quite a significant investment of time. After installing the insulation, you need to wait 3 days until the glue completely hardens;
Photo - parachutes for foam and mineral wool
After that, "parachutes" are installed (dowels for foam or mineral wool). They will provide the maximum stiffness of the insulation;
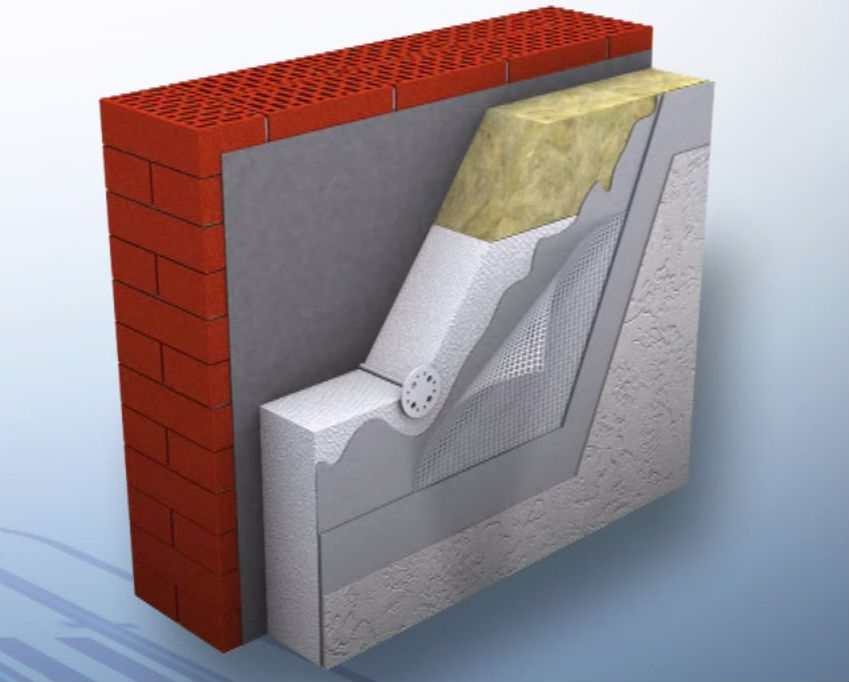
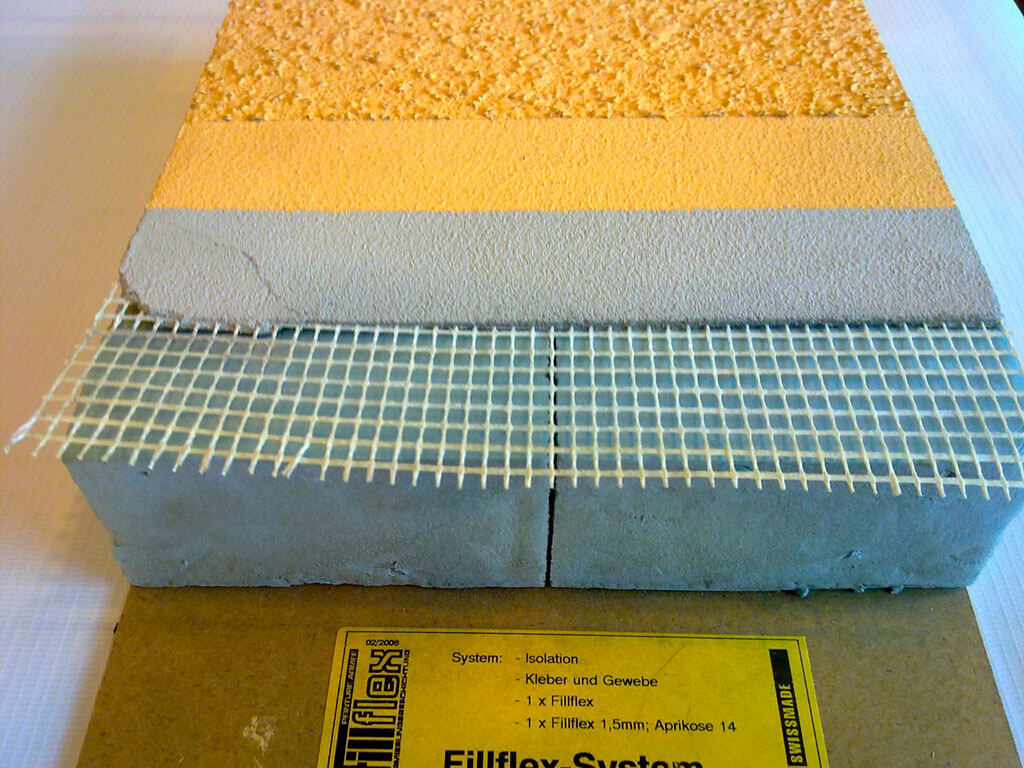
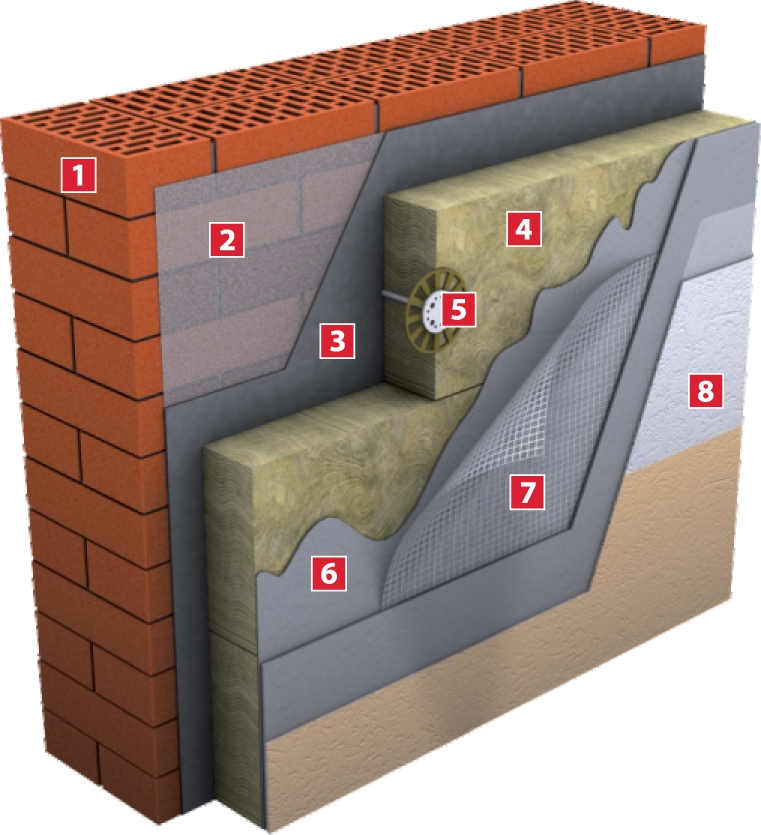
What layers does a wet facade consist of?
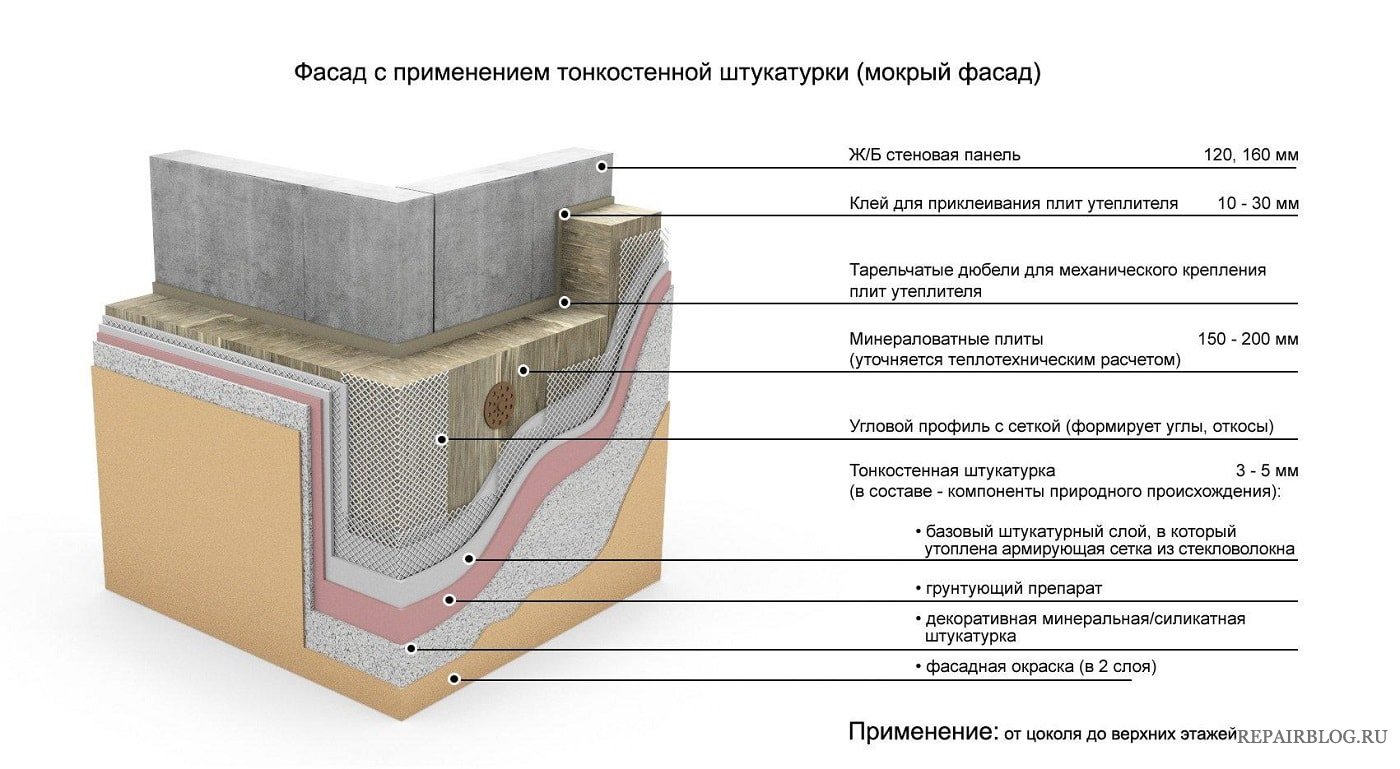
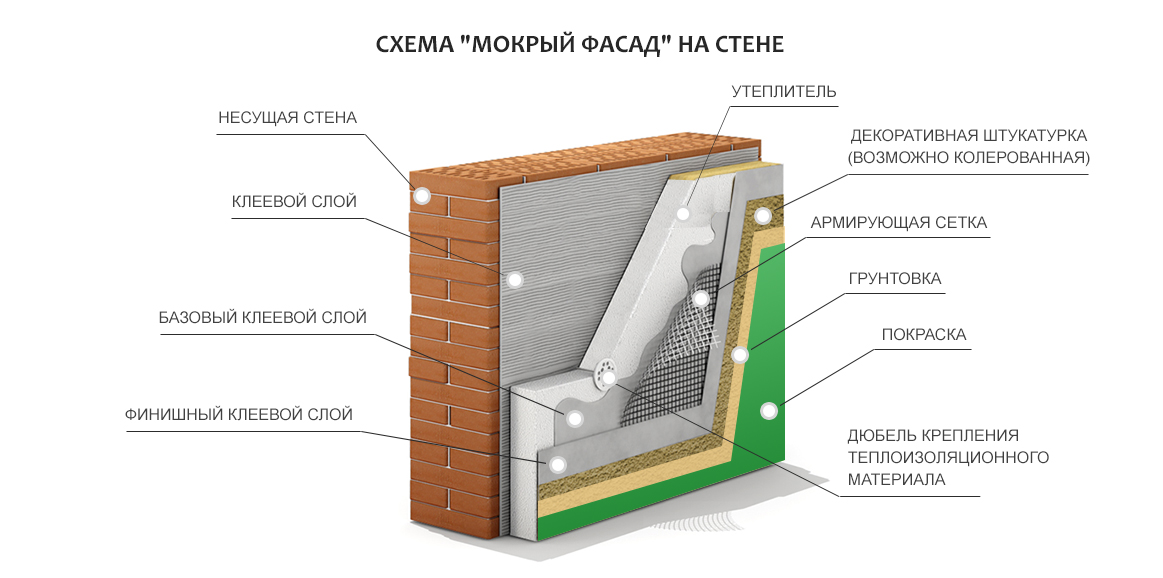
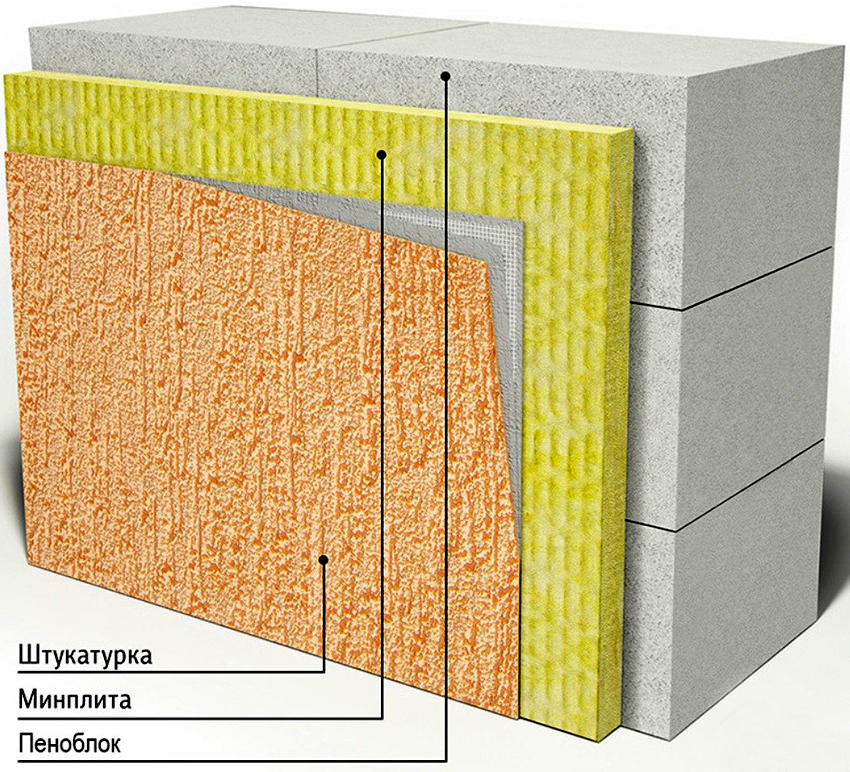
If you imagine what a puff cake looks like, the structure of a wet facade will be understandable. It is created from several layers of building materials.
Pros and cons of wet facades
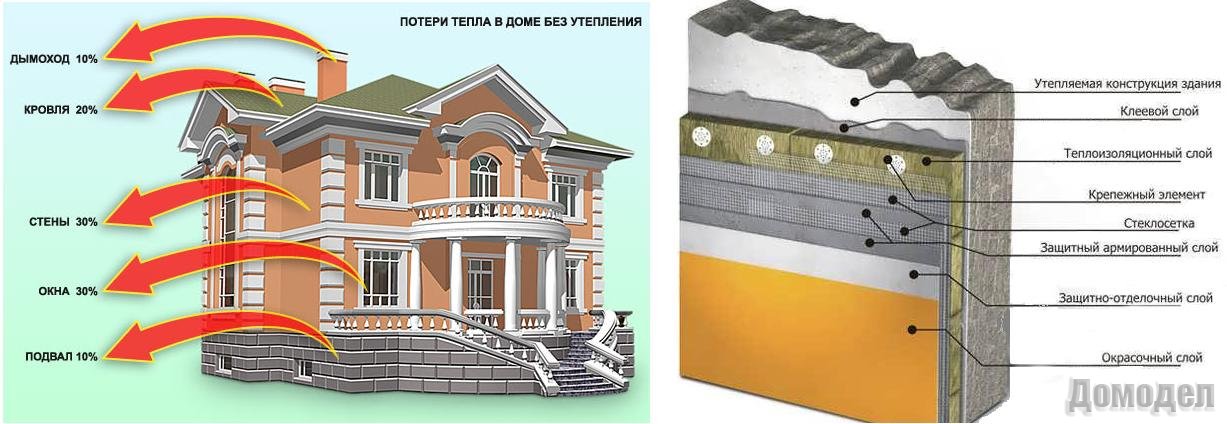
The most important advantage of a wet facade is that the so-called dew point is brought out in it.
Quote. The dew point is the temperature at which water vapor condenses into dew.
A residential building in the process of operation constantly undergoes movement of moisture: from a warm internal environment, water vapor moves outward. The amount of steam depends on the following factors:
- the number of people, animals and plants in the house;
- water consumption;
- temperature difference inside the house and outside;
- humidity outdoors and indoors.
There is a rule: when creating a cake from external insulation, their vapor permeability should increase from the inner layer to the outer. If this rule is neglected, then the dew point forms inside the thermal insulation materials, which will lead to the accumulation of condensation, heat loss and the formation of mold.
The rest of the characteristics (pros and cons) of wet facades are reflected in our table.
There are much more advantages to a wet facade than disadvantages. Therefore, this method of insulation is becoming more and more popular.


Preparation for installation of the wet facade system
Installation of a wet facade is done after the main stages of construction work have been completed.
- The installation of the roof is completed.
- The building has already shrunk and dried out enough.
- Completed installation of air conditioning, ventilation, double-glazed windows.
- Immediately before performing the facade work, you need to prepare consumables.
Before facade work, you need to prepare the necessary consumables and components.
- Insulation (mineral slab or foam) is taken at the rate of 1.05 square meters per 1 square meter of wall surface. A few centimeters are taken in reserve. As for the thickness of the insulation, it depends directly on the climate.
2. Consumption of the reinforcing mesh is about 150 g / m3.
3. The required number of fungus dowels: 6-7 pieces per 1 sq. M.
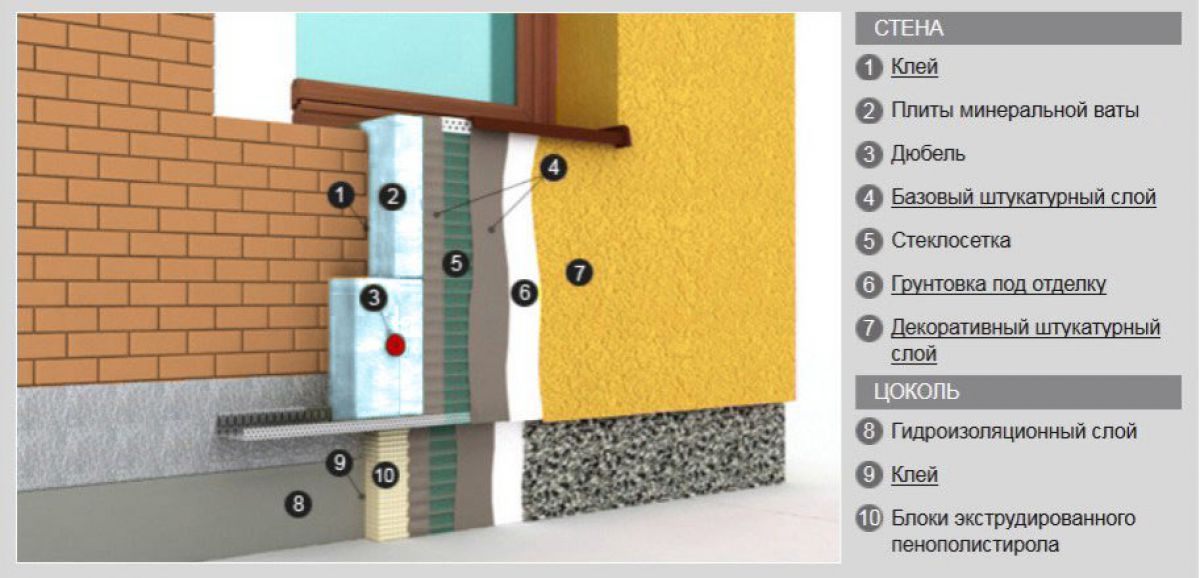
4. Profiles. The corner profile is needed so that the wall does not crumble from the effects of mechanical nature. The basement profile will serve as the base for the lowest row of slabs.
5. The wall itself must be primed.
6. Adhesive for fixing insulation plates and mesh.
7. The volume of plaster for finishing is taken from the area of the facade + 10% for windows and doors.
When starting to apply materials, you need to make sure that the surface is free of previous coatings and there are no cracks on it (in case an old building is being dismantled). The mixture is first applied to the wall to increase adhesion.
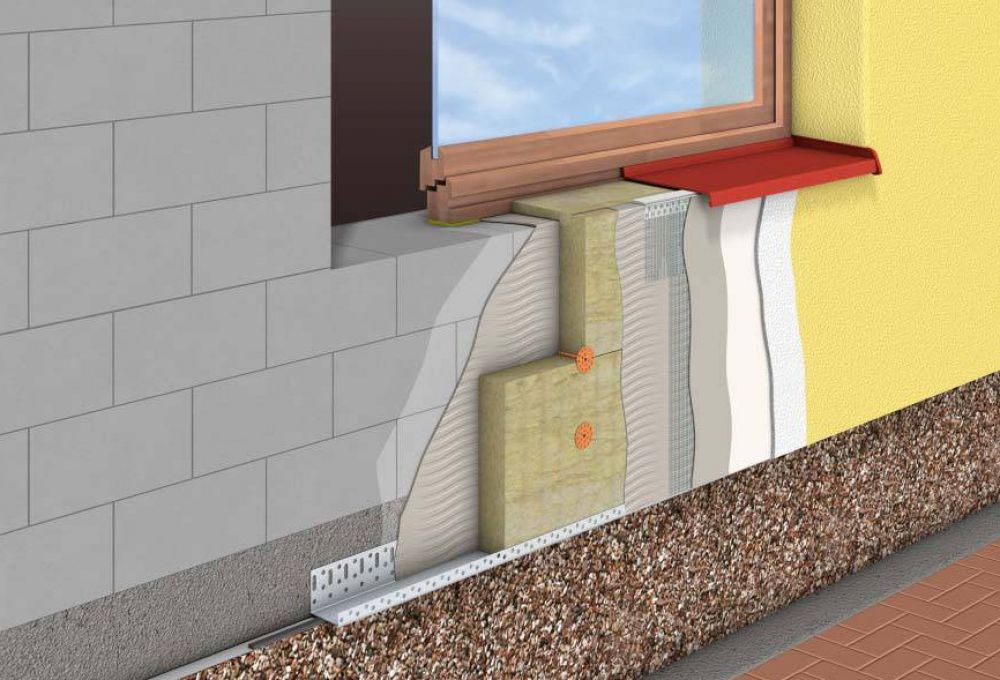
The entire pie made of insulation and other layers is on the supporting basement U-shaped profile. It is fastened at a height of 0.4 m from the ground using dowels and self-tapping screws. And the corners are reinforced with corner profiles.
Glue should be applied to the insulation slabs along the perimeter in the form of a wide strip on the basis that it will cover 40% of the slab area. Within 2-3 days, the thermal insulation layer will dry out, after which it must be specially strengthened with dowels. Then comes the turn of installing the reinforcing layer. Take your time to apply the plaster solution right away, let this layer dry too.
Wet facade types
Depending on the installation methods, a distinction is made between heavy and light façades.
Heavy wet facade
This technology provides for fastening the insulation without glue, but only using a system of dowels with hooks. At the same time, the surface of the insulation does not directly contact the wall, but remains independent. Thanks to this, the thermal insulation layer is not subject to deformation and moisture from the inside.
In this technology, you need to use a special metal mesh, which needs to be masked with a thick layer of plaster. That is why the method was called difficult. Its cost is significantly higher than that of the lightweight alternative.
Quote
It is important that the wall material is able to withstand heavy loads. Such materials include: aerated concrete, brick or expanded clay concrete block
Light wet facade
As a heat-insulating layer for a light wet facade, mineral slabs or increased strength foam are usually used. The plaster should be finely dispersed, and the total thickness of its layers should not exceed 0.1 cm. Thus, the total weight of the structure will turn out to be small.
So, we told what the wet facade technology is. It is widely used in construction, and the main requirement that it makes is careful observance of technological standards during work on external insulation and decoration.
Views
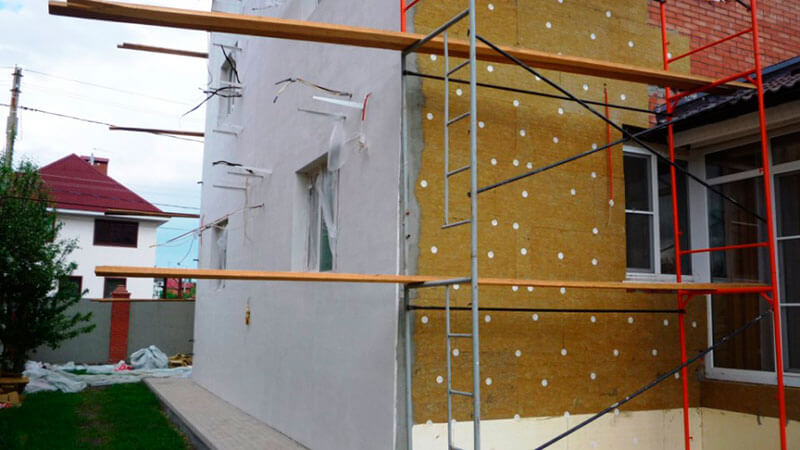
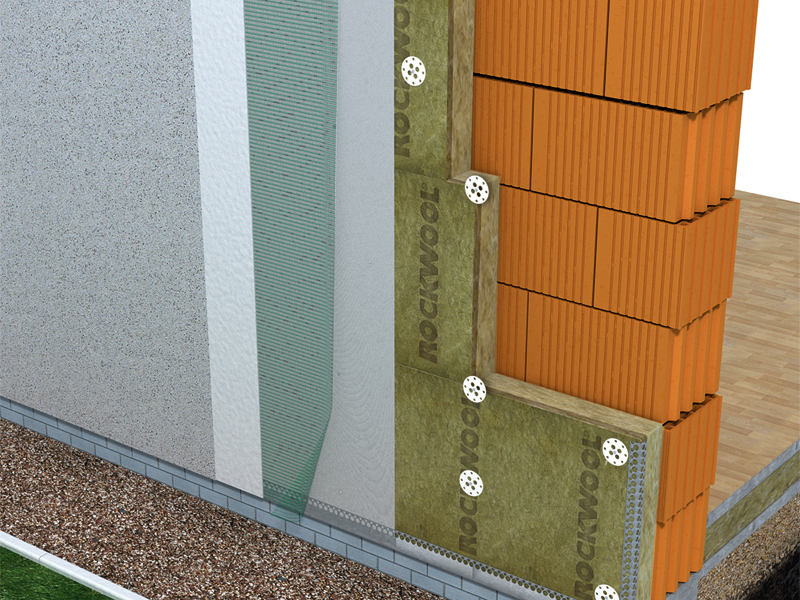
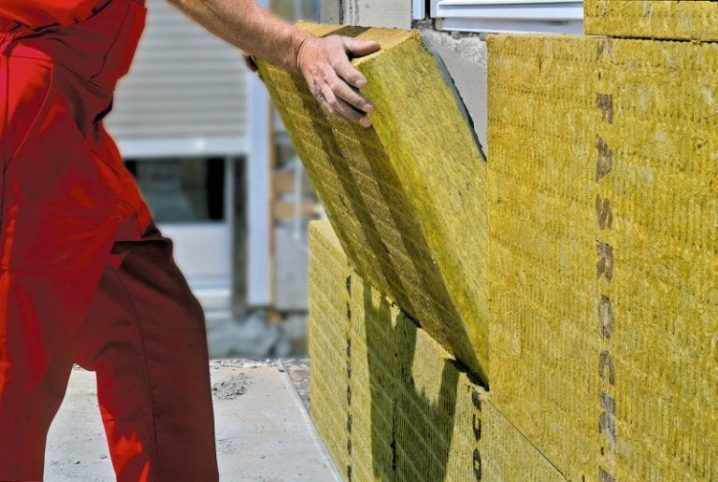
 Figure 2. Installed insulation for a wet facade
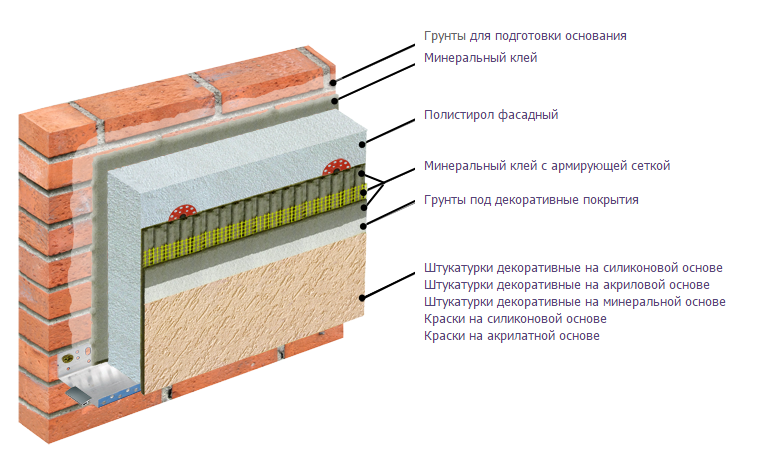
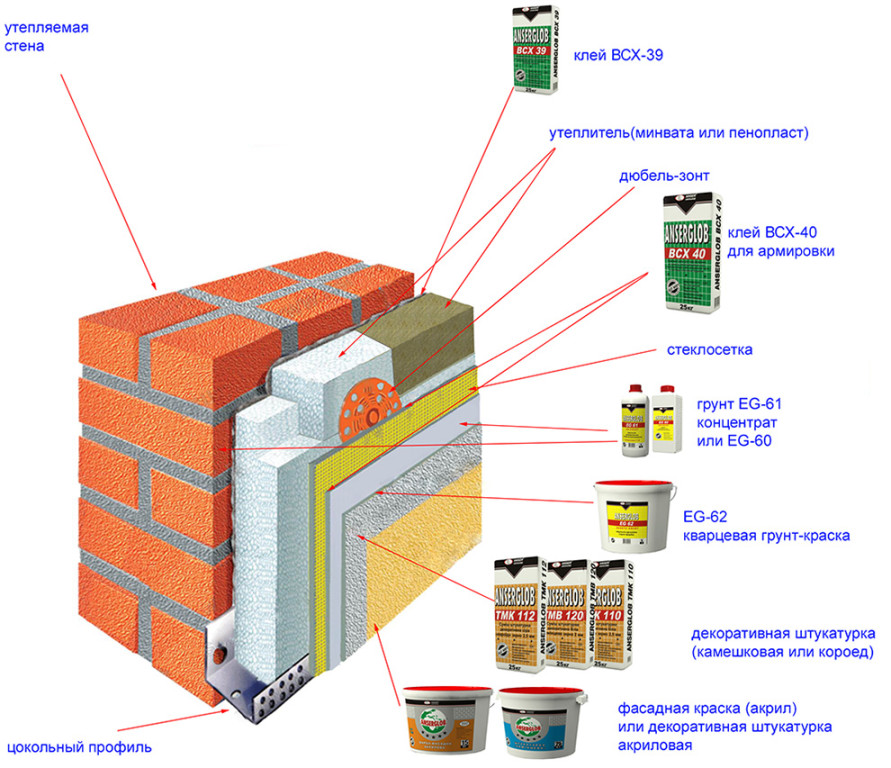
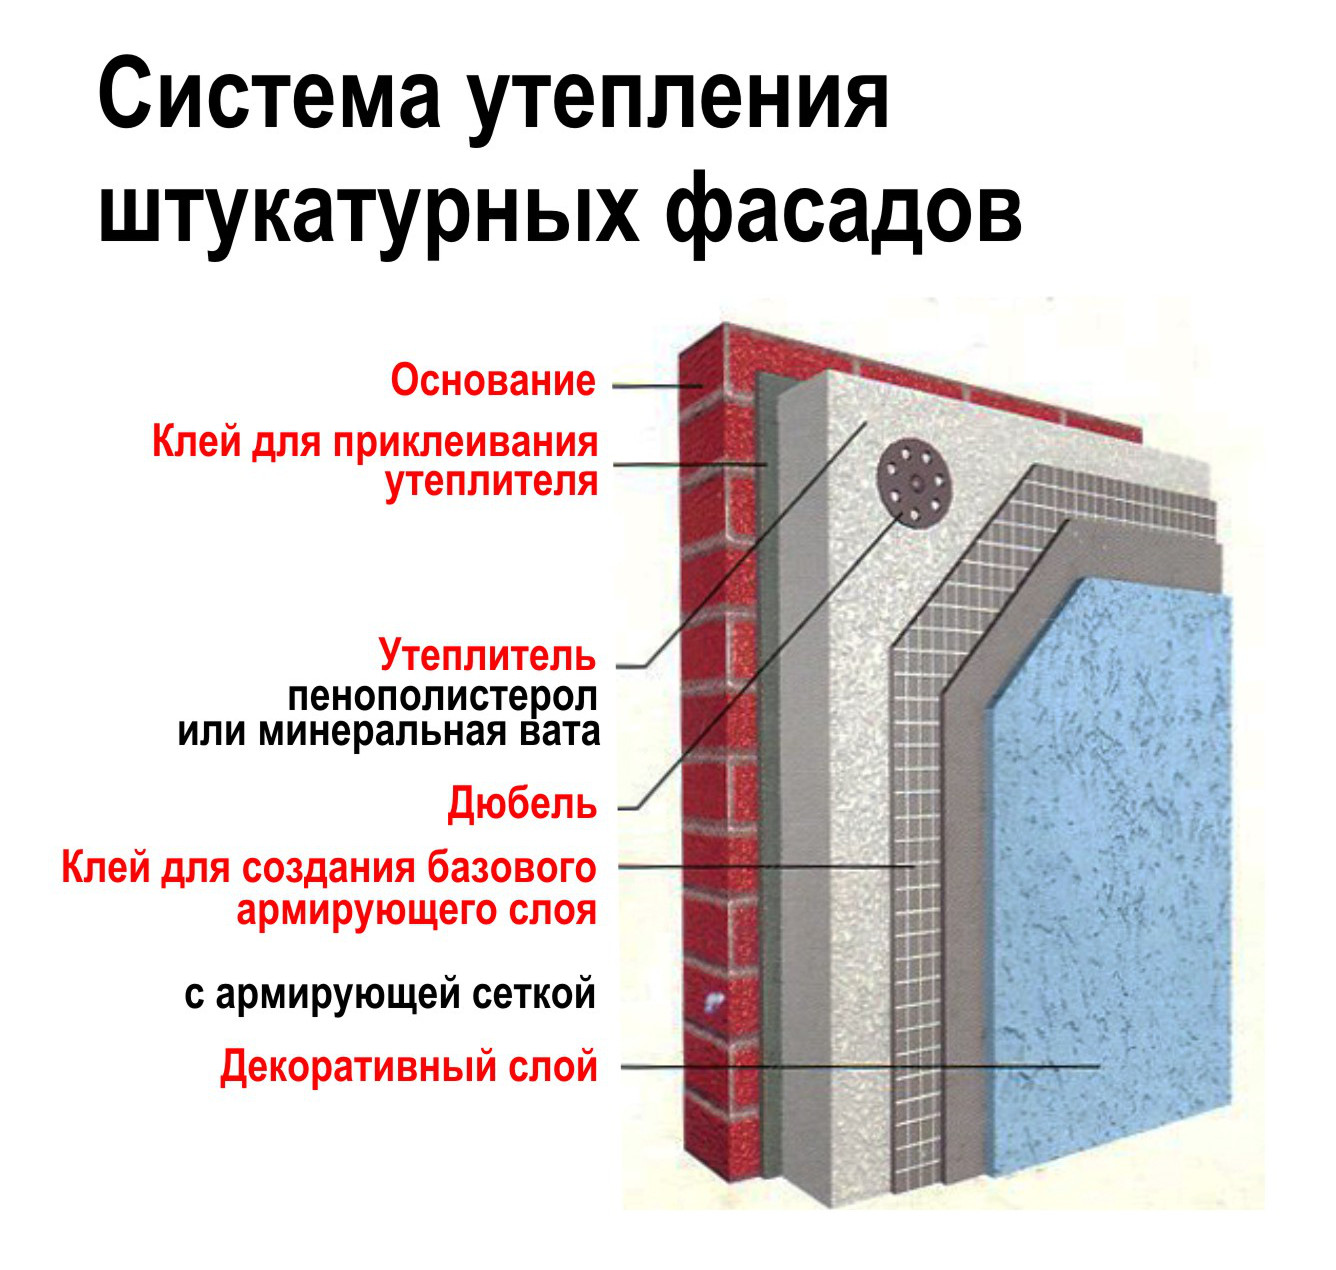
Wet facades are divided into several types, depending on the insulation used, on which the plaster for the external coating depends. The main types of insulation:
- Expanded polystyrene in combination with acrylic or silicone plaster;
- Mineral wool combined with mineral or silicate finishes;
- Combined insulation with a mineral composition.
Each type has its own advantages and disadvantages.
Expanded polystyrene (styrofoam)
The density of this insulation is the highest; it effectively protects the wall from moisture and heat loss. Significantly reduces heating costs in winter and air conditioning in summer by maintaining a stable temperature inside the house. It is used on facades made of dense heavy materials - bricks, concrete, cinder blocks. This technology is suitable for multi-storey buildings, the walls of which are just made of such materials.


In a wet facade, several layers of foam with different vapor permeability are used to effectively remove moisture from the walls. The device of foam insulation in houses with walls made of porous concrete will lead to the opposite effect - water will accumulate in the pores of the concrete, gradually destroying the walls.
As a decorative design, two types of plaster are combined with polystyrene - acrylic and silicone. Acrylic resin is an organic substance with great plasticity. The plaster is produced in the form of a water-dispersible composition, the permeability to steam is medium.
Silicone resin, which is part of the silicone plaster, makes it extremely durable, resistant to any weather conditions, does not pass or absorb water. Necessarily requires preliminary priming with a special composition, preferably of the same brand as the plaster itself, otherwise all its useful qualities are nullified.
Mineral wool
It is a lightweight material with high vapor permeability, best suited to porous lightweight concrete walls. For a wet facade, not any mineral wool is suitable, but only basalt, increased strength. Mineral wool made of basalt has another important property - it does not burn at all. The bottom layer can be softer to compensate for uneven walls. The rule of reducing vapor permeability from the inside to the surface remains.
Plasters, which are used together with mineral wool, have a high vapor permeability.This is a cement-based mineral plaster that easily permits steam and does not burn, a more expensive option is silicate plaster (not to be confused with silicone). It requires a special primer, is expensive, but has an excellent appearance and is very durable.
Combined materials
This is a combination of foam plastic and mineral wool in the composition of a wet facade. Two types of insulation make it possible to provide good insulation and protect the finished facade from fire. Together with them, only mineral plaster is used, other solutions are rarely used. It is distinguished by high reliability, but also by the same high cost of work.
Wet facade repair
Firstly, when carrying out all installation and decorative work, do not forget to save all documents for building materials, so that later you will know exactly the name and composition of all mixtures used, paint tinting, etc. This is necessary so that, if necessary, tint the facade, you would not have a bright spot on your wall that would clearly stand out from the main color.
Secondly, if the decorative plaster begins to lag behind, then it is necessary to clean it up to a strong layer, then sand it, prime it and apply a fresh layer of plaster. If it is necessary to replace part of the insulation, then use the same one that was used earlier.
In general, there should be no problems with the repair of a wet facade, and the appearance should please both the owners and guests of the house.
Preparation for work
Before proceeding directly to the installation, you need to select the material for the insulation. It has already been mentioned above that mineral wool is better suited as such. But it can also be different. The insulation must withstand the plaster on the front side and the glue on the other. It should be tight and not afraid of compression or delamination. No glass wool or slag wool, only basalt wool of increased strength and density. Some manufacturers produce a ready-made version specifically for a wet facade.
 The thickness of the material also plays a role. Too small a thickness will not produce the desired effect, and a large one will lead to the accumulation of condensation. The thickness is selected from the standard indicators for a specific region. In addition to the insulation itself, you will need other materials and tools.
Plinth profile for the bottom row. In width, it must exactly match the thickness of the insulation. You will need connectors to fix the profile. With their help, the profile will rise exactly. The connector is located one per joint if the thickness of the insulation is less than one hundred cm. And if it is more, then two. The profile must be secured. For this purpose, dowel nails are used. The length of the nails varies with the material of the wall. Concrete and brick walls - 4 cm. Empty brick - 6 cm. The step between the dowels is calculated from the thickness of the insulation. More than 8 cm, step - 3 cm. Less - step - 5 cm. The dowel is fixed with a spacer washer.
Priming is a necessary step for a more durable fixation. A layer of primer increases adhesion and enhances protection. It must be applied, so a deep penetration primer is required.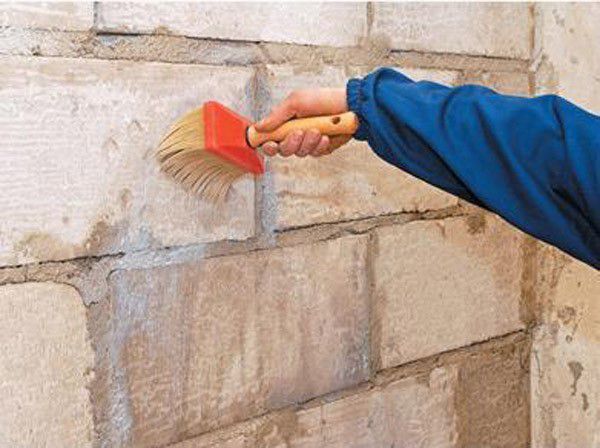 The insulation is fixed with glue. Therefore, the solution must be special for fixing the thermal insulation layer. Manufacturers often indicate on the insulation itself the optimal solutions for this material. Dowel mushrooms will be needed to secure the insulation. Their length should be the same as the thickness of the insulation and spacers.
The option is also suitable for using the same glue in this capacity.
You will also need a reinforcing mesh. And also the corners, which will cover the corners along the entire height of the corners. For cladding, you will need decorative plaster or paint. It all depends on your personal preference.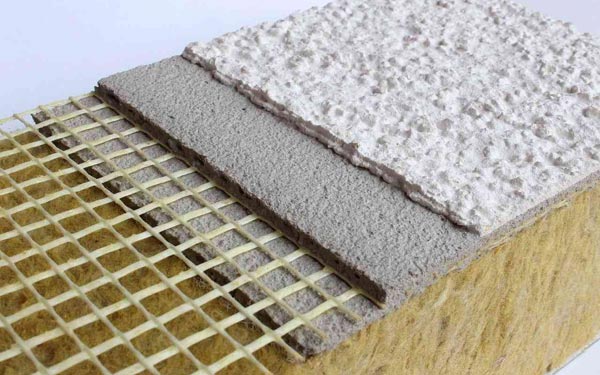
Preparing walls for work
The process of warming consists of several stages, among which there are those that are not directly related to installation, but therefore they are no less important.Failure to complete one of them can lead to poor installation and subsequently wasted effort and materials.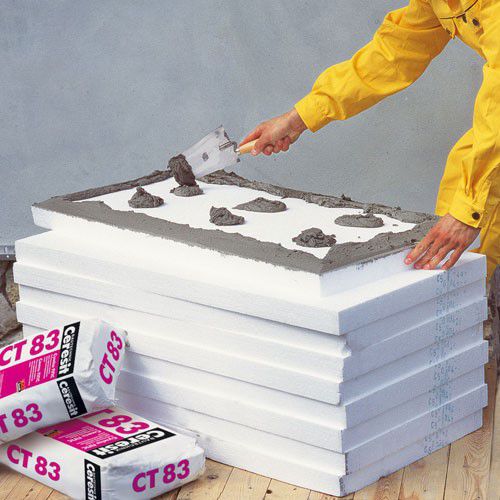 Preparation is one of such stages. At first glance, it seems insignificant, but it depends on the correct preparation how well the material will fit. The glue will adhere well only to the cleaned surface.
 The old layer of plaster or paint must be removed completely, otherwise the adhesive may come off. You can heat the wall with a building hair dryer or use special solutions to remove old finishes.
It would be nice to flush the wall. If a strong pressure of water is directed against the wall, this will save you a lot of dirt: stains or peeling plaster. But after that, she must be allowed to dry. Mold and mildew must also be removed and then treated with a germicidal solution.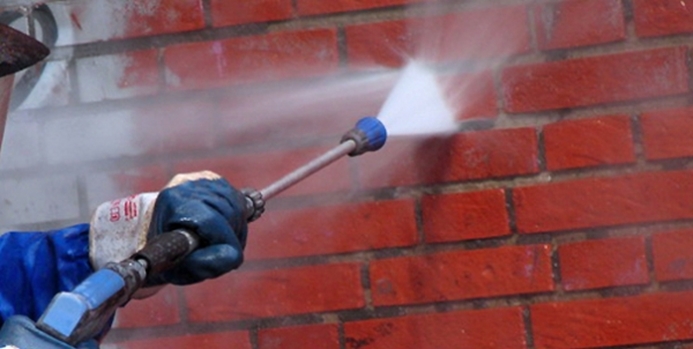 In order for the microflora not to form on the wall in the future, it is treated with an antiseptic. If there are irregularities, then they need to be repaired. Putty is suitable, it must be applied tightly and aligned with the general level of the wall. And all the potholes, on the contrary, are removed.
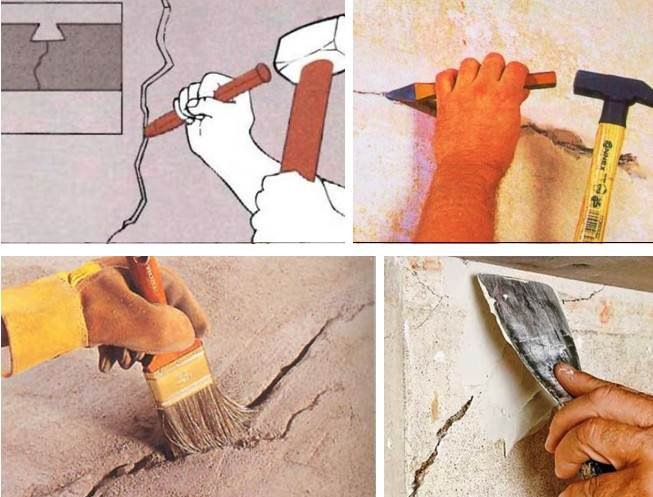 Check the walls for bevels. Deviations of more than 2 cm should be leveled out immediately. For these purposes, cement plaster is suitable. But you will have to wait for it to dry completely, which can delay the repair. After all the work, the walls are primed. If the base material absorbs well, then two layers are needed.


Wet facade: what it is and its main advantages
The facade has become "wet" because it uses wet processes with the use of special adhesive solutions, plasters, as opposed to "dry" options for insulating buildings, for example, hinged systems.
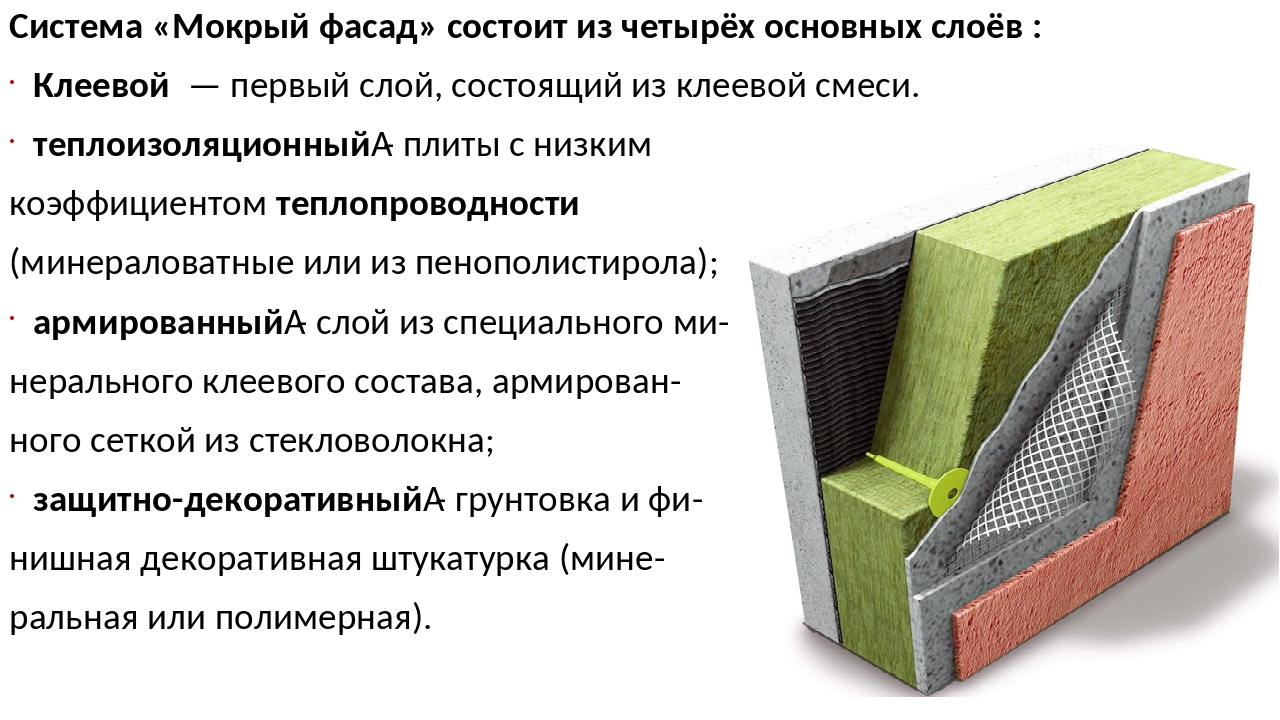
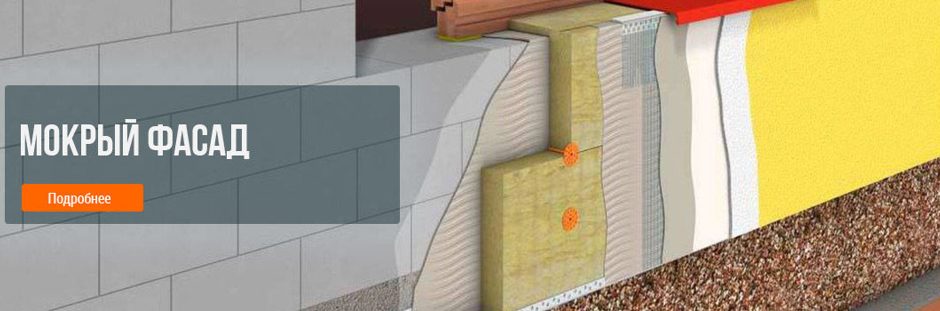
The main distinguishing feature of the "wet facade" is its multi-layering, in which each element (layer) is assigned a specific and unique role:
There is a similar article on this topic - How to paint wooden house outside and inside?
- adhesive, is responsible for fixing the structure;
- insulating, performs the function of insulation and, in fact, is the main one;
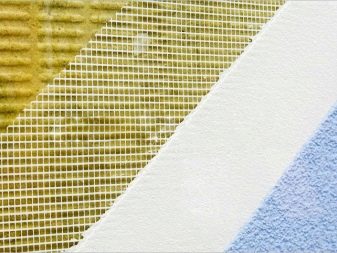
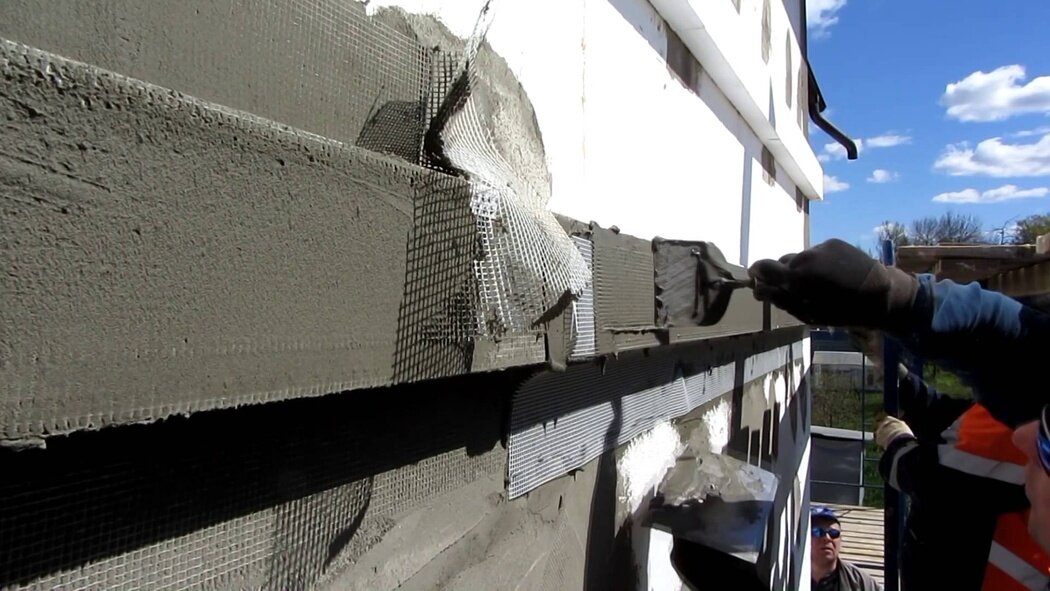
- reinforcing, is responsible for the strength of the structure, and also provides and facilitates the process of applying the outer finishing layer;
- plastering and decorative, serves as a protection for insulation from external negative factors and at the same time solves architectural and aesthetic problems, forming the external appearance of the building.
When choosing this method of insulation, the problem of removing the "dew point" outside the house is solved: in this case, it will always be located on the outside, and condensation will not occur in the room, leading to many unpleasant consequences, one of which is the formation of mold.
Also, the "wet facade" allows you to eliminate all existing cold bridges, which are the culprit for significant heat loss from the premises. And, in addition, it is possible to achieve a greater heat capacity of the walls, that is, they not only have the ability to accumulate heat, but also to hold it for as long as possible, gradually returning it back to the room.
In the "wet facade", the main attention is paid to the choice of insulation, which is used as mineral and expanded polystyrene plates, as well as wood concrete, which, although rarely, finds its use as a heat-insulating material. Fiberglass, despite its low thermal conductivity, is not used for this type of work, since products made from it have a very low breaking strength.
Fiberglass, despite its low thermal conductivity, is not used for this type of work, since products made from it have a very low breaking strength.
But the most important thing is that they are susceptible to the aggressive effects of adhesive and plaster solutions, which are alkaline compounds.
Some requirements are imposed on the choice of insulation in terms of density and fire resistance.Therefore, if expanded polystyrene is used, then it should be treated with special antipyrite impregnations.
Additionally, fire-prevention cuts and edging should be made in the area of door and window openings, for which mineral wool is used
Particular attention should be paid to the density and moisture resistance of the material, and this is especially true for mineral wool
What is a wet facade
The correct design of the facade plays a very important role.
Not all home owners understand what a wet facade means. In this situation, it is customary to use liquid or semi-liquid adhesive solutions for finishing the facade. Due to this, dew points will not occur in the future. In the case of using a wet facade, moisture is removed to the outside, and not gradually penetrates into the floors, which leads to their destruction.


What is included in the list of the system
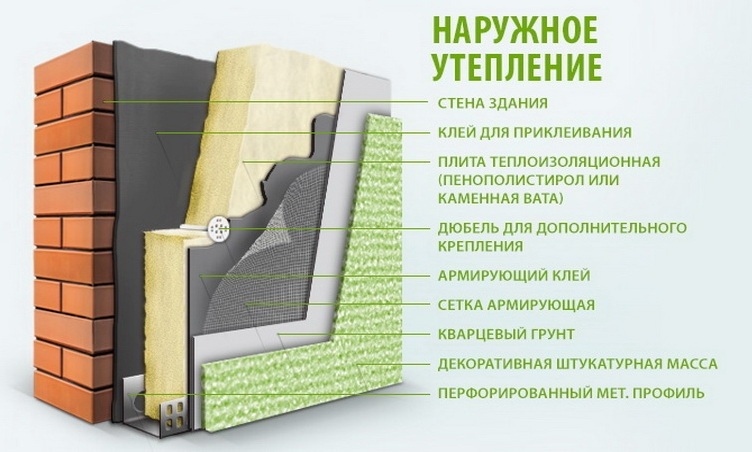
In order to properly equip a high quality wet facade, it is necessary to make a "pie". It consists of several layers, without which a high-quality and reliable coating will not be obtained. The basis in this situation will be the facade wall, which can be made from a wide variety of materials. The main requirement is that the base must be perfectly flat. In the event that there are various kinds of defects on the wall, this will lead to air circulation between the ceiling and the insulation. Because of this, it will not be possible to achieve the required insulation value in the room.
Next, a reinforced layer is installed, which contains a reinforcing stack and mineral glue. Then a layer of decorative plaster is applied or a special facade paint is used. Lightweight facade slabs can be used as a finishing finish.
It is very important that the "cake" of a wet façade does not allow moisture to pass through. Therefore, finishing materials should be chosen so that each layer had more vapor permeability from the inside than the previous one.
It is very important that the decoration does not have any cracks or crevices through which heat can escape from the premises.
Pros and cons of technology
- A wet facade is capable of combining a thermal insulation function and a decorative one. Due to this, you can save money and time for carrying out certain works on finishing the facade.
- A wet façade is ideal for situations where the building has very thin or very light walls. Such a system will not only improve the appearance of the building, but also make it warmer and more comfortable.
- A wet facade allows you to save on heating, because the house will not require additional heating even in the most severe frost.
- Wet facade technology can be used for buildings with a wide variety of foundations.
- The technology helps provide a building with an additional level of soundproofing.
- A wet facade allows you to increase the service life of a building several times, because this type of finish provides an additional level of protection against negative environmental influences.
- Such an interesting design will make the building not only visually attractive, but also more accurate.
- Over time, a salt-type stain will not appear on a wet facade, which is quite difficult to remove.
- Overlapping of this type is not very heavy, so there is no need to additionally strengthen the foundation.
- Professionals say that a wet facade will bypass home owners several times cheaper than other analogues.
Today, a wet facade is made by absolutely all home owners who want not only to improve the condition of the building, but also to increase its service life. But it is worth remembering that this finishing option, like all the others, has certain disadvantages. The main ones include the following.
- It is possible to make a wet facade only when the air temperature exceeds 5 degrees.Otherwise, all materials will be unusable even during application.
- Do not carry out work if it rains even slightly. It is also worth abandoning installation during wet weather.
- Installation work should be carried out as efficiently and carefully as possible. Absolutely all materials used for a wet facade must fit tightly to each other.
- If direct sunlight is constantly falling on a wet facade, this can cause the ceiling materials to dry out. As a result, the service life can be significantly reduced.
- The plaster base must be protected from the wind, so that dust or dirt does not adhere to the coating, which negatively affects the appearance of the finish.
If done correctly, these shortcomings can be easily eliminated or avoided.
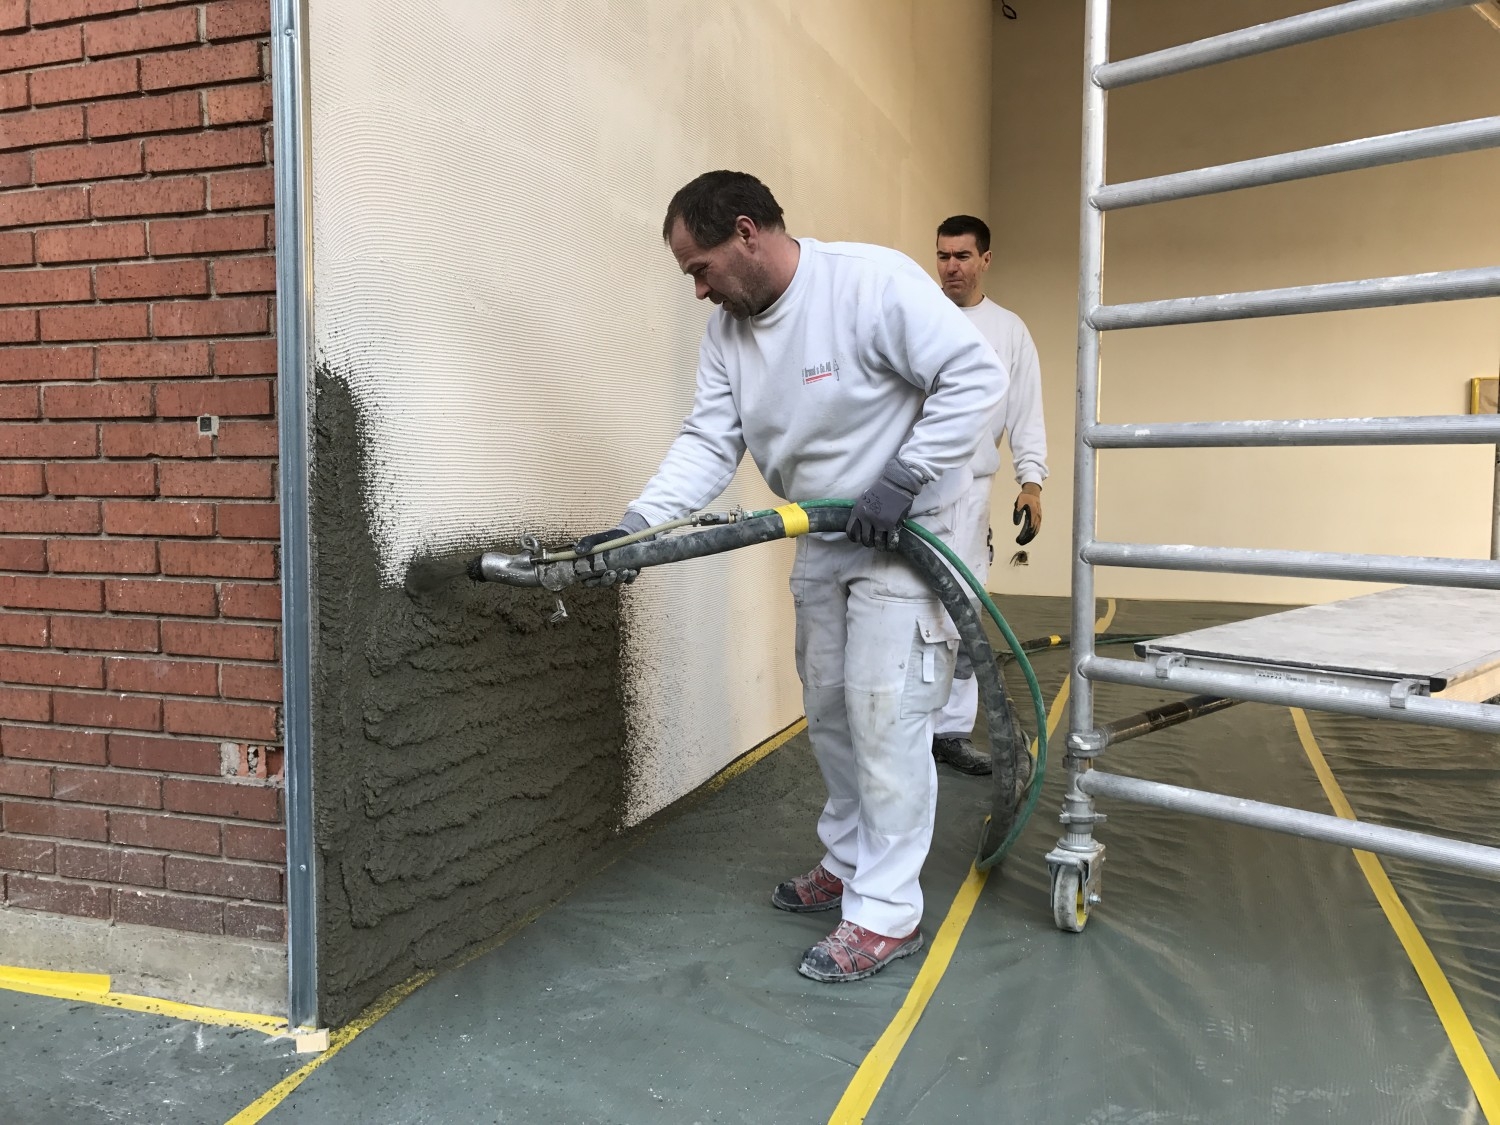
Installation and plastering
If the base is prepared correctly, then you can proceed to the installation of the starting basement profiles and the further installation of the insulating material.
It is worth considering step-by-step instructions for carrying out these works.
- The basement profile must be placed strictly horizontally. It is on it that the first insulation plate will be installed. The evenness of the location of this part should be monitored using a level.
- You should never overlap profiles. It would be more correct to mount these parts exclusively end-to-end, maintaining an interval of 2-3 mm.
- At the outer and inner corners, the profiles must be fastened while maintaining a gap. For this purpose, these parts are cut at an angle of 45 degrees.
- If the density of the insulation exceeds 80 cm, then you should take care of temporary stops for mounting the starting profile. These parts should not bend. After installing the insulation, the supports are simply removed.
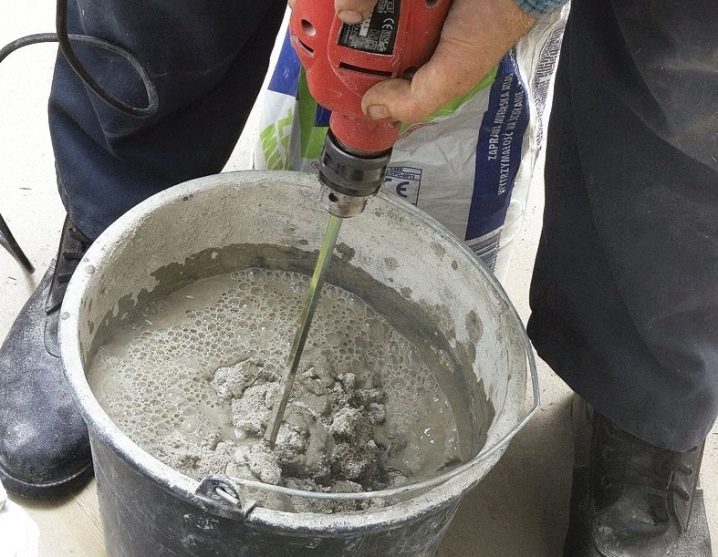
- When all the supports are ready, you should proceed to preparing the solution. You should follow the instructions on the package.
- Gradually add a dry solution to the required amount of water. To bring all the components to a liquid state, you need to use a drill with a mixer attachment.
- Stir the composition until a single mass without lumps is formed. This usually takes 5 minutes. Next, you need to make a short pause for 6–8 minutes and mix the solution again.
It is permissible to lay the glue on the insulation material in the following ways:
- in strips of 100 mm along the perimeter, leaving 20-30 cm from the edge;
- small slides with a diameter of about 200 mm, while the height of the applied solution can be 10 or 20 mm.

If the wall to be insulated is fairly flat, then the glue can be applied to its entire surface using a notched trowel. It is recommended to apply the glue as follows:
- a small amount of the mixture must be rubbed into the coating of the insulation plate, with little effort;
- transfer the required amount of adhesive.

Further, the slab, smeared with glue, leans into place and presses firmly against it. It is necessary to distribute the glue, slightly moving the part to the sides, up and down. Any excess glue that will enter the edges should be removed as soon as possible. The next plate of insulation should be placed as close as possible to the previous one, without leaving gaps. If it does not work without them, then they can be closed with mineral wool wedges. As a rule, the installation of insulation begins from one corner, moving further in rows.


In this case, the following rules must be observed:
- the initial row must be installed in such a way that it rests against the first profile along the side (limiter);
- the slabs must be laid with a displacement of the vertical joints by at least 200 mm;
- at the corners, use the "gear lock" technique;
- parts of slabs close to corners, partitions or slopes should not be more than 200 mm wide;
- as soon as possible, you need to dock the insulation layer with the ceilings and slopes.
When completing the installation of the insulation, you need to make sure that there are no gaps and gaps anywhere.All defects must be eliminated with the remnants of mineral wool. After laying the insulation, a reinforcing mesh should be installed. It is needed for the finishing layer.