Fixation methods
The installation option is selected depending on the location of the panels. If a horizontal Euro lining is used, then the element is mounted at the very bottom in close proximity to the floor.
The kleimer is attached to the panel spike. It is installed in its proper place, and the fixation is performed with nails or screws passed through the holes in the body of the cleaimer and hammered or screwed into the crate. Each bracket usually has at least three mounting holes, but you can use two of them.
The first panel of the lining is placed with a groove in the body of the bracket on the hook. Subsequent panels are slotted into the ridge and secured with a clip. The thickness of the tongue of the part allows the next clapboard panel to be inserted into the groove of the previous one, together with the kleimer installed on it. This is how the whole process is repeated cyclically.
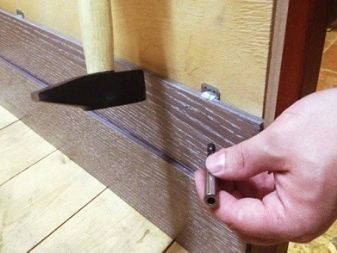

The vertical installation of the lining is carried out by very tightly pressing the end with the ridge to the wall surface and fixing the bracket with hardware. In this case, the panels must be cut exactly to size in order to avoid the appearance of gaps in the body of the structure. It is worth remembering that liquid sealants cannot be used to process joints.
It should be noted that the horizontal method of mounting the finishing coating from the lining is one of the most popular. Some varieties of this material (for example, "American" and "quarter") are attached to the surface they are finished using only in this way.
If you plan to equip a steam room in a Russian bath or sauna, then you will need to install the lamellas upside down with a thorn. It is in this position that water and steam condensate will flow down the wall without lingering.
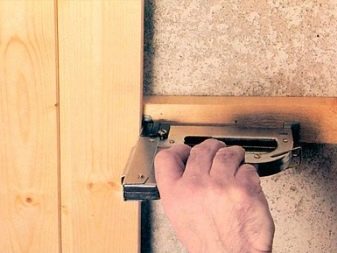
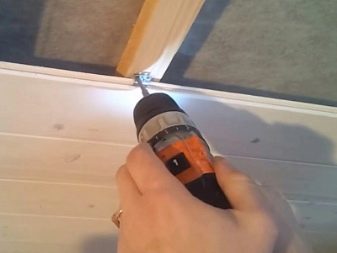
Vertical installation of panels visually increases the volume of the room, visually raising the ceiling. This technique is usually used when decorating baths and other rooms that do not require special design originality. The installation of panels with this method can be carried out from any corner, placing the first board outward with a groove. It is recommended to fasten the lining to the ceiling surface, moving away from the light. This avoids the formation of shadows between the trim elements.
There are also diagonal and combined-patterned styling methods. Such decorative installation methods are often used for wall decoration and ceiling decoration inside residential premises.
The artistic combined-patterned method provides for the installation of lining elements at different angles. As a result, you can achieve a very interesting pattern, make the interior more expressive. However, this option for installing the material requires considerable professionalism. Unlike the other methods described above, it is not available to novice performers, despite the simplicity of fastening parts.
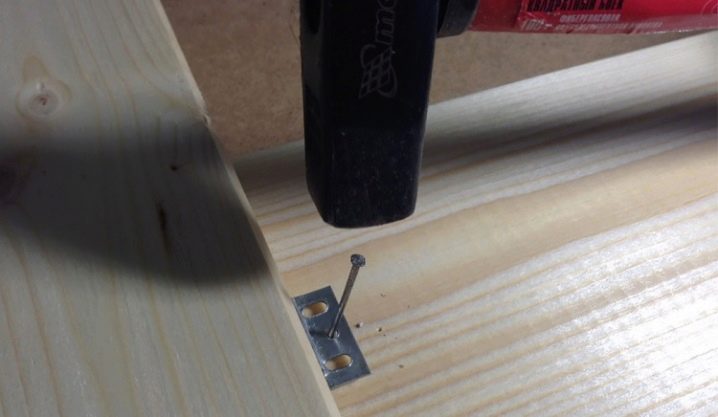
You can find out about the non-standard method of fastening wooden lining by watching the video below.
How to do everything without mistakes
The most common question when carrying out repairs is how to properly sheathe a balcony with clapboard. After all, having finished, you can stumble upon curved walls, gaps, cracks and other shortcomings that were worth calculating when performing all the stages.
In fact, if there is experience in the repair of other premises, then the balcony will not cause difficulties. The main thing is to understand the algorithm - first the frame is built, and then the lining is applied. The frame must be flat
The most important thing is to correctly set the horizontal line on each wall. That is, the first board. Since it is from her that the rest will be exhibited
Since it is from her that the rest will be exhibited.
If you follow the rules, exposing the frame as evenly as possible, it is possible to make a balcony without a single mistake.
Lathing
There are several important rules to remember about the crate. In fact, the lathing is the installation of a frame for repair. In fact, this is the most important stage, in the presence of an error in which everything will go downhill.
The frame is made of wooden blocks. The height of such a bar depends on the thickness of the insulation, if any. That is, you need a bar in the height of the insulation from the wall and another two centimeters more. This is to ensure sufficient air circulation. This "layer" of air allows you to keep both the insulation itself and the lining. These two materials require insulation from fungus and moisture. This clearance provides it.
The second secret of successful repairs is the correct direction of the lining and frame bars. If the lining is laid horizontally, then the frame bars must be laid vertically. If the lining is laid vertically, then it is necessary to lay the frame horizontally. That is, in any case, the frame and the sheathing itself must be strictly perpendicular to each other.
Mounting
There are also a couple of important points for the installation of the lining itself. The lining is attached to the frame boards. That is why the sheathing and the frame are strictly perpendicular. Can be fastened with nails, self-tapping screws, using a construction stapler. Any option that is convenient for you will do. The main thing is not with glue.
The second point - the boards are attached to the frame through one. The second is inserted into the grooves of the first, thus fixing itself on the required surface. That is, you do not need to nail all the lining boards to the frame.
How to fix the lining: installation methods
There are several ways to attach clapboard boards. Fasteners can be made with simple nails, staples, screws or staples.
- During installation, be careful not to split the wood.
- In order for the head of the nail to completely enter the wood, and the fastener looks neat, you should use a doboiner.
- With the hidden method of fastening, the boards are screwed or nailed to the crate where the groove meets the spike.
- The easiest way of installation is to fasten the lining with nails with small heads, which are randomly nailed throughout the cladding. In this case, the nails will be visible.
- Most often, a more complex and neat method of fastening is used, in which nails are nailed into the grooves of the lining and are practically invisible.
- For high-quality installation of lining boards, you can use special devices - metal clamps. They come in different sizes and shapes and are selected according to the thickness of the boards. One side of the fastening grips is screwed to the crate, and with the other side they cut into the grooves of the lining with their teeth. Clamers are usually sold in a set with nails.
- It is possible to install the cladding using stapling staples. With a special gun, a rigid bracket pierces the groove of the board and attaches it to the crate.
- Another reliable fastening method is the use of decorative screws. Even a beginner can achieve good results and aesthetic beauty with this fastening method.
Having bought the lining, installing the lathing and choosing the method of fixing the boards, you can proceed directly to the installation.
Vertical clapboard
Fastening the clapboard boards should start from the corner.
- The first board is fastened with nails, the heads of which will later be closed with a decorative corner. If the installation of such a corner is not provided, then the caps should be bite off with side cutters.
- If the installation is carried out using clamps, then the fastening grips are inserted into the groove of the previous board and are attached to the crate with self-tapping screws or nails.
- Installation is carried out in a systematic manner, plate to plate.
- Using a plumb line, check the evenness of the structure every ten boards.
- The last board is adjusted in width using a hacksaw or saw. The lining is nailed, the gap is closed with a plinth.
In order for the sheathing to take on a finished look, it is decorated with slats.
Horizontal clapboard
- In this case, the fastening of the boards starts from the ceiling to the floor, the grooves of the material should be directed downward. In this case, debris and moisture will not clog them.
- Installation continues in the same way as with vertical cladding - one wagon board is inserted into another.
- When sheathing the walls with clapboard, which imitates a rounded log, the fastening begins with the groove up. This is done in order to hide the docking points.
- There will be no gaps between the planks if they are adjusted to each other with a hammer.
- The block house is mounted to the crate at an angle of forty-five degrees. The fastening is carried out with self-tapping screws, the caps of which are hidden under the groove of the next panel.
- So that no gaps are visible in the corner of the room, a processed timber is inserted between the boards of the block house.
It is not necessary to paint such a wall. It is enough just to clean the surface from dust. Natural wood will add coziness and natural flavor to the room.
How to fix the lining to the ceiling
In order to attach the planks to the ceiling with high quality and without errors, you need to know some of the nuances.
1
- the bars for the lathing should have a cross section of two by two and a half centimeters;
- their length should be equal to the length of the ceiling;
- fix the bars perpendicular to the lining on the dowels with self-tapping screws;
- timber, the length of which is three meters or more, should be fixed strictly horizontally in at least five places;
- in order for the crate to turn out even, on both sides of the ceiling, two laces should be pulled, along which you should then navigate.
2. On the frame prepared in this way, the installation of the lining board is done:
- wooden planks are nailed to the frame with finishing nails;
- so that the nails do not break out, in some places they should be fixed with self-tapping screws;
- stepping back from the wall about two centimeters, attach the first lining;
- it is more convenient to lay boards with a thorn towards you;
- the planks are nailed at the intersection of the lining with the lathing with nails or attached with clamps.
Types of lining for cladding
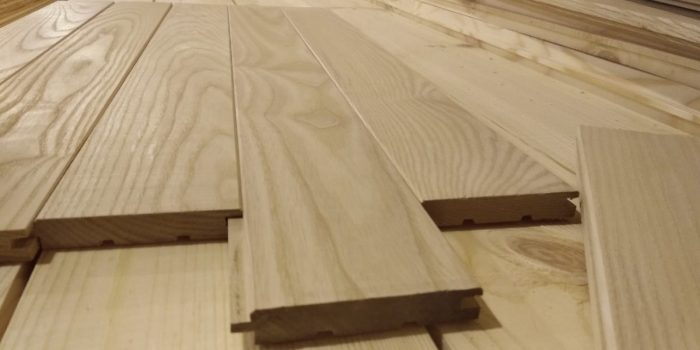
Usually, when lining is mentioned in a conversation, they mean wooden products. Plastic PVC panels are called so much less often. The point here is a very similar, convenient installation of such material: both are long boards with a spike on one side and a groove on the other. The choice of two applicants is influenced by their cost, the desire of the owners: they proceed from practical or aesthetic considerations. Therefore, the first question is not about how to sheathe a balcony with clapboard, but about its preferred form. We need to get to know both candidates better.
Plastic variety
The raw materials for these panels are polyvinyl chloride (PVC) or vinyl. Due to the peculiarities of the structure, the material has good sound and heat insulation characteristics. The asset of this type can include a low price, a decent service life (they promise 30 years), a wide range of colors. Other "virtues" of plastic lining include:
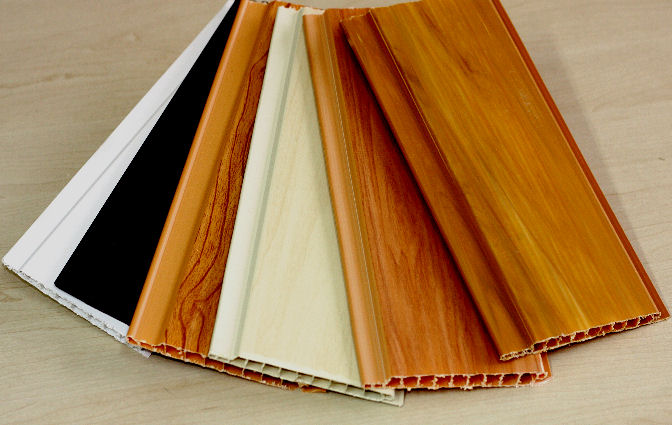
- Quite nice looking. Such panels are produced not only in different colors: imitation wood, natural stone and metal are very popular.
- Lack of fear of precipitation. This is a great advantage for balconies if the owners open the windows very often for ventilation.
- Profitability. Artificial material is not too whimsical, so unnecessary costs disappear. Plastic lining does not need protection and paintwork.
- The ideal combination with the same plastic windows makes it possible to get a one-piece, harmonious interior on the balcony.
- Ease of installation and maintenance.
Along with the advantages, plastic sheathing has serious disadvantages, especially for the balcony. This list includes:
- The fragility of the material. The panels cannot withstand impacts, cracks form on them from mechanical impact.
- Color change.Over time, the lining will fade, under the sun's rays, light models will begin to acquire a yellowish tint.
- Deformation due to high temperature. If the balcony is on the south side, then this is not a good option.
- The release of an unpleasant odor in the summer heat is one of the most unpleasant properties of artificial material.
- Fire hazard. Plastic is very flammable, and when it burns, it releases toxic substances. This is a huge drawback of this lining.
If you handle the material with care, prevent force majeure situations and protect it from severe sunlight, as well as from high temperatures, then the plastic lining will provide a nice appearance of the balcony with minimal costs for covering it.
Wooden lining
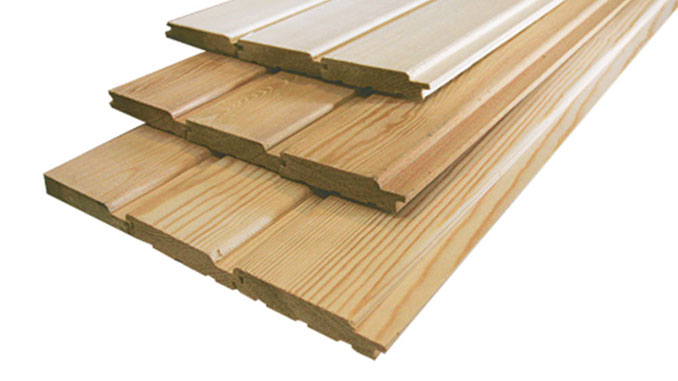
The average service life of the material is 10 years, but its "lifespan" depends more on the quality of protection. These panels are made from different types of wood. For covering the balcony, they buy lining made of oak, linden, alder, ash and other hardwoods. Spruce, larch and pine finishing materials are rarely used where there is a lot of sun and high temperatures. The reason is the release of resin in such uncomfortable conditions.
We all know the advantages of wood.
- Environmental friendliness is the main advantage. Thanks to him, the tree often wins the "battle" with other, unnatural, pretenders.
- Versatility. The material allows you to sheathe not only the walls of the balcony, but also the floor with the ceiling.
- Amazingly beautiful, noble appearance.
- Excellent sound and heat insulation performance.
It is necessary to bring all the qualities, even those that are negative. This category includes:
- Much greater laboriousness of installation, when compared with plastic clapboard cladding.
- The need for wood processing. She needs protection from moisture, mold, rot, insects and fire.
- Expenses for paints and varnishes, which are used to improve the lining and additional protection of the tree.
If we compare the disadvantages of plastic and wood, then the disadvantages of the second material are less serious, relative: most of them are easy to handle with your own hands. That is why wooden lining is much more often the winner when choosing a material for cladding a balcony.
Installing the lining on the crate
This mounting option is used most often. The result is a robust and rigid structure that can withstand any mechanical stress and has a long service life. In addition, it will be possible to hide electrical wiring, ventilation ducts, heating mains and so on under the clapboard. To decorate the balcony with clapboard with your own hands using this method, it will take a little more time than in the case of installing it on glue.
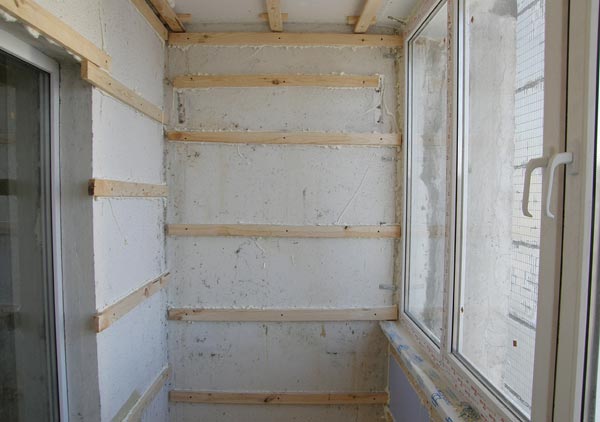 Sheathing the balcony with clapboard begins with the installation of the lathing
Installation of battens and insulation
The first thing to do is to mark the surface to be trimmed.
First, you need to draw vertical lines at a distance of 10 cm from the corners and openings. Check the correctness of the marking with the building level, then draw horizontal lines around the perimeter of the walls, retreating from the floor by 40 cm.Further, they continue to draw lines horizontally, but now in increments of 60 cm.
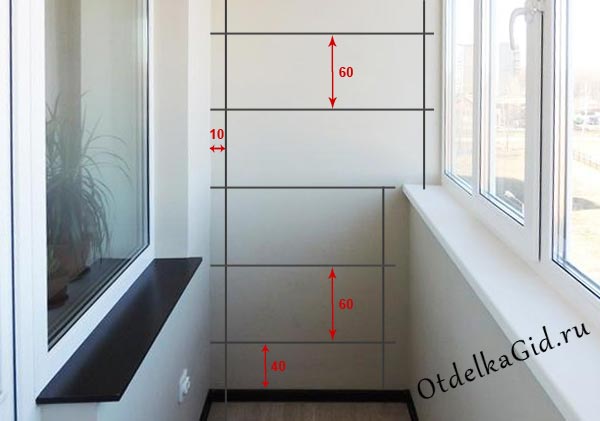 Layout for the installation of the lathing
At the end, you need to check the markup with the building level again. And you can start installing the frame:
- First of all, using a hacksaw or a jigsaw, cut the slats to the required length.
- Then you should attach a wooden product to the line, step back 5 cm from the edge and drill the first hole with a puncher so that its depth in the wall is no more than 5 cm.
- Further, it is necessary to drill holes along the entire length of the timber in increments of no more than 80 cm.
- So you need to process all the products, and then install plastic dowels in the holes in the wall.
- Now you should put the lathing aside for a while and install the waterproofing material on liquid nails.Allow time for the glue to set (the period is indicated by the manufacturer on the packaging).
- Then the lathing is simply installed on the screws, which are screwed into the previously prepared holes. The installation is also checked by the building level. It is better not to screw the fasteners completely right away, but after checking with the level, slightly drown the caps in the material.
At the end of this stage, a heater is installed. If we are talking about roll materials, then they must be laid before the installation of the frame begins. Thermal insulation materials in the form of slabs are simply placed in the niches that were formed during the installation of the battens. At this stage, all engineering communications are also stretched and heating radiators are installed.
Clapboard technology
Finishing the balcony with eurolining includes the following steps:
- The slats are cut to length and carefully treated with antiseptic compounds.
- With a hacksaw, cut off the thorn of one strip and apply it to the corner with a groove in the direction opposite to it. The vertical is checked with a level.
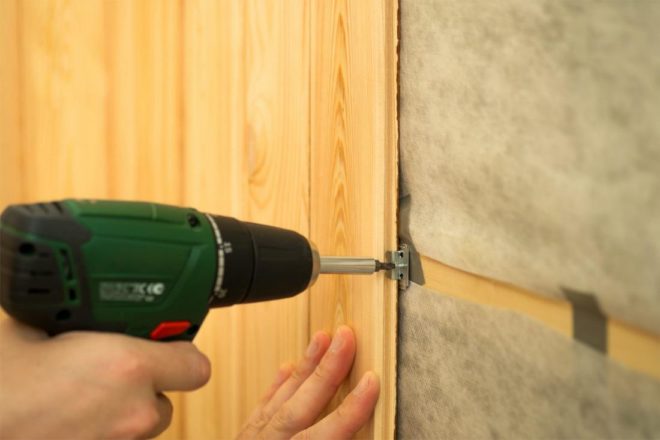
- Then you need to fix the element to the frame with nails or clamps. In the first case, the hardware is simply driven in at an angle. In the second, the process is a little more complicated: the bar is fixed with two nails from above and below, driving them not completely. A kleimer is mounted in the groove of the panel and fixed with screws. At the end, the nails are simply removed.
- The next product is installed in the same way, but putting the spike into the groove of the previous one.
- The last plank may need to be trimmed. This should be done in such a way as to leave the thorn intact.
- At the end, the surface is varnished, plugs, ceiling and floor plinths are installed.
The procedure for installing the lining on the ceiling is exactly the same. It may only be necessary to install a metal frame, and not a wooden one, if heavy products were purchased.
Video: an interesting way to install lining on the ceiling
Installation methods
The lining is attached in two ways - directly to the wall or to a frame made of slats - a crate. The first option is used for installation on wooden walls, the second - on brick or concrete.
Installation of wooden panels on crate with insulation
The lining can be installed vertically or horizontally. The frame slats are attached to the wall perpendicular to the finishing lamellas. Insulation is placed between the rails. A vapor barrier is laid on top of the heat insulator, targeting the crate with a stapler.
When placing the finishes horizontally, make sure that moisture cannot get into the joint. The boards are laid from the bottom, guiding the edge tenon upward. The next element is pushed onto the protrusion, thereby ensuring the tightness of the connection.
Calculation of materials
Before sheathe the balcony with clapboard with your own hands, determine the consumption of basic materials:
- finishing board or imitation;
- bars for lathing;
- fasteners;
- insulation, hydro and vapor barrier.
The calculation is needed so that surpluses do not form or do not have to go in the midst of work for missing materials.
Lining
Stores offer lumber by the piece or in cubic meters. The width of the finishing wooden boards is 60-200 mm, the length is 300-6000 mm with a step of 100 mm. When calculating, take into account the working part of the lining without a thorn, which is indicated in the marking. The conversion of volume to area is carried out by dividing by the thickness of the element.
The width of PVC panels varies from 100 to 250 mm, length - up to 3000 mm. The lining from MDF has dimensions - 150-325 x 2400-3700 mm.
The working area of one board is found by multiplying the width by the length. For example, for a material marked 15x96x3000 mm, it is 0.288 m2.
To determine the required number of panels, find the area of the walls and ceilings minus the openings, then divide it by the area of one element.
Drawing for determining the area of finishing
When calculating, take into account that the lining may have to be cut. The remaining pieces are installed over windows or balcony doors.
Lathing
The frame is made of wooden bars, treated against decay, 30x30 mm. They are installed with a pitch of 400-600 mm. For rooms with high humidity, it is recommended to use aluminum or galvanized steel profiles.
The slats are also mounted near openings, internal or external corners, niches, floor and ceiling, in order to subsequently fix the plates to them. If this is not done, deformations or distortions of the coating are possible. When calculating the consumption of bars or profiles, take into account the height and length of the room, the size of the openings, the presence of protrusions.
Fasteners
Information on how to sheathe a balcony with clapboard would be incomplete if you do not consider the advantages and disadvantages of fasteners.
For fastening use:
- self-tapping screws;
- nails;
- staples;
- kleimers.
Self-tapping screws are used in damp rooms where wood is subject to constant deformation. They provide a secure fixing of the panel due to the increased thread pitch.
It is recommended to use yellow or white hardware with a protective coating that protects the metal from corrosion. Most often, the lining is fastened with self-tapping screws 20-45 mm long and 2.2-3.5 mm in diameter. Consumption - 30-50 pieces per 1 square meter.
Nails are used only in dry rooms, they are prone to pulling out when the wood shrinks. During installation, damage to the surface with a hammer is possible, therefore, furniture hardware with wide decorative hats is recommended. For 1 sq. meter spend 30-60 pieces.
The horizontally located boards are fastened with staples, directing the stapler at an angle into the spike of the already mounted element. Then the next lamella is placed on top, the operation is repeated. The most common sizes are the leg length 4-14 mm, the staple width 11.4 mm. For wet rooms, copper-plated or galvanized metal products are used.
Cleamers - special flat brackets with a tongue for fixing the board and holes for attaching to the lathing. They are absolutely invisible; when applied, the lining is not damaged.
Kleimer fastening
Recommended only for dry rooms, if the humidity fluctuates, the lamella can simply jump out of the fasteners. For the same reason, fixtures, shelves or other suspended equipment should not be mounted on the surface. You can combine clamps with self-tapping screws or nails, installing brackets only in visible places.
How to sheathe a balcony with clapboard?
All stages of the operation can be considered using the example of vertical installation of panels.
Cleamers or concealed mount
- First, they are engaged in sheathing the area under the window frame. The lining is cut in accordance with the required length. Remove the thorn from the first element with a jigsaw or a hacksaw, apply it to the corner, check its vertical position.
- Then the bar is fixed with clamps. Another option is in the groove with nails driven obliquely. The advantage of the first method, since in this case the lining remains intact. It will take some time to learn how to drive nails correctly the first time.
- The easiest way to mount on clamps is to temporarily fix the panel with nails on both rails, and then insert the bracket into the groove, fix it with screws or nails. After the operation, the temporary fasteners are removed.
- The next panel is driven all the way with a mallet, then they act in a similar way. The last plank is cut lengthwise so that it fits into place without any problems. Fix it with nails or self-tapping screws.
Fixing the lining on high walls is done in the same way, but there is one exception. If the length of the lining is insufficient, then it is increased with the help of an extension.
- The long panel is fixed so that its edge reaches half of the timber. A short element is attached to it.
- Using a similar scheme, they move on to the next strips, but they act in a ragged manner - they alternate (swap) long and short strips.
Open installation of lining
How to sheathe a balcony with clapboard quickly, simply, but efficiently? There is a simple method that does not require skills in working with clays, or masterly handling nails driven into grooves. This option is not very attractive, but it has a right to exist. In this case, no tricks are taken. The lining is fixed on the bar with nails or self-tapping screws: the former are driven in, the latter are screwed in, but directly into the canvas, into its front side.
A big minus is the attachment points that remain in sight, but there is a way to level this drawback. Hats, deeply sunk into the wood, can be hidden by making the "correct" putty from PVA and the smallest shavings, more like dust. This "camouflage" allows you to hide ugly holes from the eyes, getting an almost perfect surface.
Rules and recommendations for clapboard wall cladding
When using this material for external or internal decoration, it is recommended to follow the following rules:
- If you cannot close the wall with a solid board, then you can use the "fungus" profile to hide the joints.
- The joints in the inner and outer corners are masked with the corresponding corner profiles.
- Sheathing is often associated with the creation of an insulating cake, so you need to remember the rule about increasing the throughput of the material from the inside out. This means that each subsequent layer, starting with the interior clapboard, should allow steam to pass through better than the previous one. It depends on this whether condensation will accumulate inside the "pie".
- You can start painting or varnishing the mounted lining no earlier than two days later.
- Before applying the second layer of varnish, the surface is sanded in order to eliminate possible lint.
Clapboard decoration of housing or summer cottages is possible even for a non-professional, and the prices are so low that they are available for the most budgetary construction or renovation. Such a finishing material is simply doomed to remain among the most popular.
We sheathe the wall with clapboard
It is very important to keep the wood material in a dry room for about 48 hours before proceeding with the cladding. Getting down to business right away, you run the risk of getting a deformation of the structure.
Make sure that during the working process the above-zero temperature and air humidity of at least 60% are kept.

Horizontal arrangement
How to properly attach the lining to the wall:
- Planks are usually installed horizontally. In this regard, we put the first lower board with the spike up.
- Mounting is carried out from the far corner (relative to the entrance to the room).
- To avoid visible defects on the top panel, carefully monitor the horizon and vertical, starting from the first board.
- We fix the first element and again check the level for possible errors.
- Then we insert into the grooves and fix the subsequent strips.
Vertical arrangement
As a rule, the lining is attached in the same way, both horizontally and vertically. Therefore, starting from the above instructions, we perform the following actions:
- We expose the panels from the far corner. We fix the first one.
- We drive the subsequent panels into the grooves and also fix them. Be sure to monitor the density of the docking by lightly tapping on the edge of the board.
- Wide panels are better for this option. With their help, you can create a beautiful plane with few joints.
An experienced craftsman is able to do this kind of work during the day. When the installation is completed, the skirting boards and corners are installed. Then the walls are treated with wood stain and varnish.
Preparing the balcony for cladding
Any repair work is not complete without preparatory measures. To ensure the reliability of the structure, the surfaces are first removed from all old coatings - from tiles, paint, plaster, which is ready to fall off.
- After that, a thorough check of the walls is carried out. All large cracks, crevices, chips are blown out with polyurethane foam or covered with a solution.Small defects are first expanded and then filled.
- Before the operation, all cracks and grooves for better adhesion (adhesion) must be treated with a primer designed for a specific base material.
- Using a level, check the degree of curvature of walls and floors. The depressions are leveled with plaster (putty), the protruding areas are removed with a hammer.
- To protect against mold, a primer is applied to the entire surface area. The operation is performed in several layers. Before applying the next one, wait until the previous one is completely dry.
While they are waiting for the primer to dry, the lining and timber are treated with an antiseptic in the same way.
