Edge mills
Designed for processing the edges of the product. All edge mills feature a bearing that rolls around the edge of the workpiece during operation. In this case, the working (cutting) part is located above or below the bearing.
Straight edge mills
Straight edge mills are most in demand when working with templates, and they have an upper or lower bearing. The latter are cheaper, but when using them, the workpiece is located between the template and the milling cutter, which does not allow machining in two passes in depth (this is possible with the upper bearing).
Techniques for working with edge mills - video
Such cutters are characterized by a working length, a working diameter, as well as a bearing diameter (it is not always equal to the working one). For most cases, it is more convenient to choose cutters for which these diameters coincide, which makes it easier to manufacture and attach the template to the workpiece.
Shaped, or molding, edge milling cutters
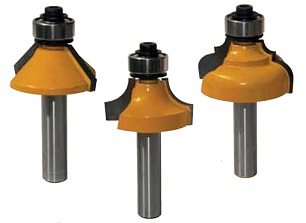
They are very diverse. The choice of such cutters is dictated only by the desired edge profile, which is selected based on the appearance of the product.
Their dimension, as a rule, is determined by the height of the working part, as well as by the largest diameter and radius of curvature that they make.
If there are several roundings in the profile, then the profile of the largest of them is usually indicated. It is extremely rare, but there are adjustable molding edge mills. They can adjust the distance between the working parts.
Disc edge mills
They are designed for severing the rebate, but unlike straight grooved ones, they are based on the edge by a bearing, which is why the groove they select is more accurately located relative to the edge of the workpiece. True, they are more expensive than straight slotted ones. Often, these cutters are made adjustable to select grooves of different depths or widths. At the same time, the set includes bearings of different diameters or a stack of thin cutters on the axle, so that the height changes by disassembling the cutter and removing excess discs.
How to choose the right cutter. Tips for beginner milling machines in this video
Shaped edge cutters
They can have a bearing at the end, but the shape of their edges is much more complicated than that of shaped edge ones, and the height is greater. Suitable for baguette production and processing of the edges of panels, skirting boards, facade frames. These cutters are also available without a bearing. In this case, they must be worked with a parallel stop or a copying sleeve and a template.
Combined frame or counter profile cutters. They are used when machining adjacent edges in order to create part of the frame connection. Such cutters are also prefabricated.
Horizontal figurine cutters
Designed for decorative milling of panel edges. Due to their large diameter, mass and cutting force, they are produced exclusively with a 12 mm shank and can only be used in the table, that is, when the router is stationary. Sometimes such equipment consists of two cutting discs and is capable of processing both sides of the panel in one pass.
Such cutters have the largest diameter of all, so when choosing a milling machine, you should immediately think about whether you will make panels. This consideration directly affects the choice of the tool according to the diameter of the hole in its sole.
Milling cutter - appearance, application, features
It is difficult to think of a more perfect tool for curly woodworking. A milling cutter is a fairly easy-to-use tool, which is a washer (with several blades of a certain shape) with a shank that is clamped into the chuck of the machine.The number of blades varies from 2 to 6, depending on the field of application of the tool, the material with which it processes, the power of the power plant.
The standard cutter washer has 2 knives to cut material out of the board. The strong shank, 8-12 mm in diameter, ensures the transmission of torque to the knives. The process of handling the board is simple enough, but severely penalizes errors. It is quite easy to spoil the board, not only at the stage of material removal, but also after it: improper drying, insufficient chemical impregnation can put an end to the finished sheet.
Types of cutters for wood
In most cases, not all cutters are needed, but only groove cutters. But for applying decorative notches, others can also come in handy. When buying a cutter for wood for the manufacture of lining, you need to take into account the diameter of the shank. To do this, you should find out what collets the existing manual milling cutter or machine is equipped with. Most often there are cutters with shank diameters: 6.8 and 12 mm.
Inch and conventional cutters (with mm shanks) are not interchangeable. That is, they cannot be inserted into a "millimeter" collet, although it seems that the difference is only tenths of a millimeter.
By design features, cutters are:
- Monolithic - The cutting edges and shank are one piece. This is the cheapest and most common type. When the working edges become dull, the cutters are thrown away.
- With replaceable cutting edges, reversible knives are removable and can be turned upside down.
- Prefabricated - cutting elements are welded (soldered) to the main rod.
- For soft woods, high-speed alloys are used, denoted by the letters HM.
- If the surface to be treated is hard, then use carbide types of steels - HSS.
- Grooved straight cutters - with their help you can get a rectangular groove, the working part of the cutter itself looks like a cylinder with cutting lower edges.
- Slotted fillet - similar to slotted straight lines with a rounded working edge, as a result, the shape of the slot is obtained in the form of the letter "U".
- Groove fillet V-shaped - the tool is used to obtain various V-shaped grooves, they differ in the size of the groove and the size of the corners.
- Structural groove - after milling, the groove has the shape of the letter "T", turned upside down. Or "dovetail" - a groove in the form of an isosceles trapezoid that tapers towards the top.
- Grooved shaped - are needed to create curly carvings, work with edges, the groove resembles a funnel and other symmetrical elements.
- Edging - differ in that they are designed for processing ends and edges, often there is a bearing in the design for working according to a template.
- Edge straight lines - are needed to obtain a right angle between the upper plane of the workpiece and the end part.
- Edge molding - to obtain a semicircular edge in the form of a wave, and of different shapes (depending on which part of the cutting plane is used), in double milling cutters, there may be an adjustment of the gaps between the blades of the cutter.
- Edge seamed - allow you to select a rectangular groove, a quarter on a flat or curved workpiece. The working depth is adjusted using the position of the router or the diameter of the thrust bearing.
- Tapered edge - needed to create all kinds of decorative chamfers, to work with edges before joining them with other products, and so on.
- Edge fillet - with their help, semicircular grooves are obtained, In order to avoid distortions during operation, 2 bearings are provided in the design of the tool.
- Curly edge (multi-profile) - to create complex-profile side edges, the length of such cutters is longer than that of conventional cutters, a powerful router is required for normal operation.
- Edging semi-rod - needed to obtain a semicircular protrusion at the end.
- Combination cutters are used to create tenon joints of several boards, both for corner and panel structures.
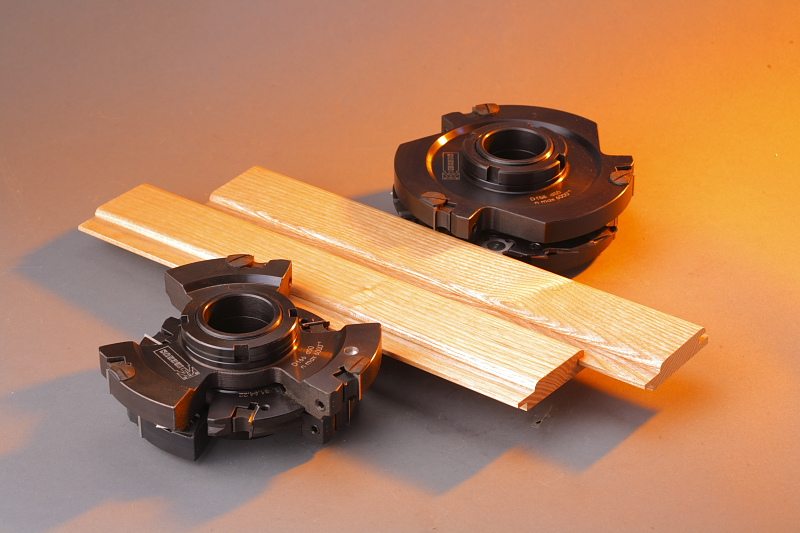
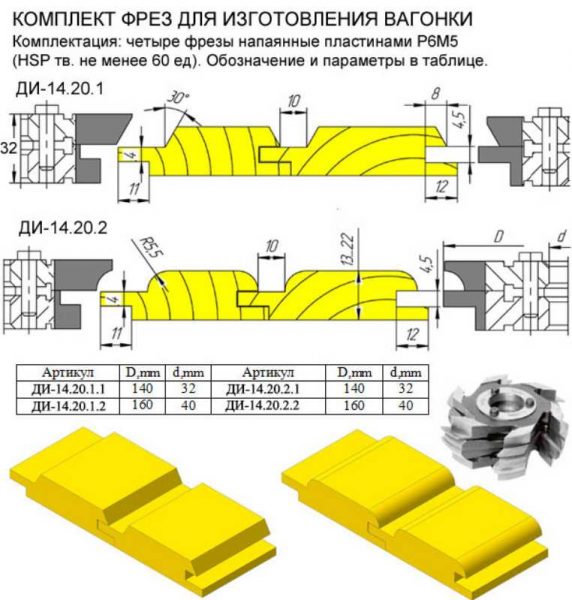
Most of all, you will need groove-and-tenon cutters for the lining for work. It is with this tool that a groove-tenon system is created to connect the panels during assembly. They come in a set of two. And for work, you no longer have to calculate the dimensions of the groove and spike.
There are varieties of groove-and-tenon conventional paired cutters and those that are designed specifically to create lining panels. The latter are distinguished by the fact that they allow you to simultaneously grind the groove / lock and round off the edges from the front side. Using conventional cutters, you can make flat panels from boards, for example, for a garage, where decorative bevels are not needed.
Combined frame - these are typesetting kits, the blades can be positioned on the main axis, depending on what kind of work is supposed to be done. Includes: one or more thrust bearings, lock washer-grover and clamping nut.
Figures - needed for decorative processing of edges when creating panels. Since there is a bearing, both straight and semicircular surfaces can be processed. The diameter of the working edge of such tools is large enough, therefore, powerful electrical equipment is needed to work.
Spiral cutters
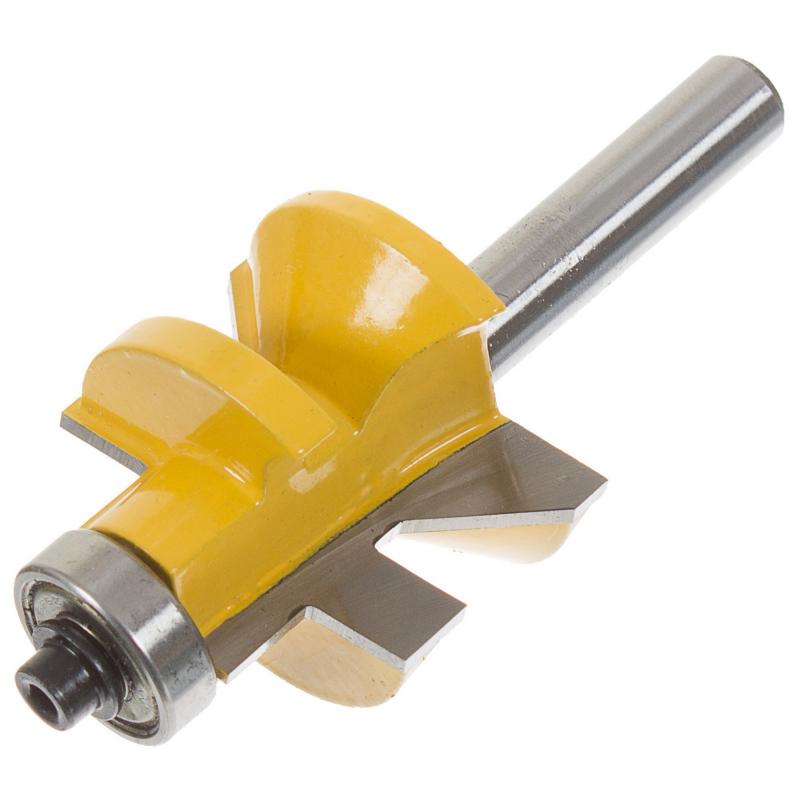
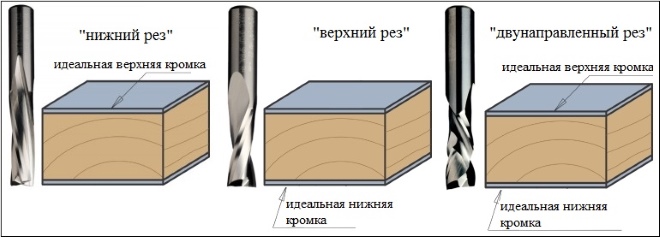
Spiral cutters are also actively used in the furniture industry. They are very similar in appearance and design to drills. As with twist drills, there are grooves on their working part, with the help of which chips of waste material are removed from the machining zone. Spiral cutters are divided into the following categories:
- with a downward cut;
- with an upward cut;
- combining both mentioned types.
Types of spiral cutters
The main areas of application of spiral cutters, which are presented in a wide range on the modern market, are:
- cutting the material;
- the formation of elements of various configurations on the surface of hardwood products;
- creation of grooves and grooves of various configurations on the surface of wood products.

Spiral cutters are often used in conjunction with a copying sleeve
Among the advantages of using spiral cutters for woodworking are the following:
- the formation of a cut, characterized by high purity and accuracy of the processing performed;
- significantly less sawdust emission than when using other tools;
- low noise and vibration level during operation;
- high accuracy and productivity of processing when performing plunge milling.
Thus, the variety of cutters that can be used to equip both stationary and manual electrical equipment allows you to successfully perform various technological operations. With the help of such tools, not only do-it-yourself lining can be made, but also many other technological operations can be performed to improve the home interior.
What determines the quality of homemade lining
Lumber is much more difficult to work with than metal. In nature, there are no two completely identical boards, not to mention the different properties of soft and hard rocks. The metal has no knots, does not absorb moisture, has no malformations, etc. And these indicators affect the processing technology. Industrial equipment allows you to greatly simplify the process due to the large mass of machines, accuracy of adjustments, stable mechanical feed and strong pressure.
At home, all cutting parameters must be observed independently and quickly changed depending on the characteristics of the board and the capabilities of the machine. What should you keep in mind?
Pay attention to grain placement, never cut against the grain.
Monitor the condition of the bearings. The slightest beating will certainly affect the roughness of the surfaces.
As soon as it is found that the machine shaft is wobbling a little, the bearing needs to be urgently changed or, if possible, adjusted.
Tenths of a millimeter of vibration will noticeably degrade the final quality.
The serviceability of cutting tools is one of the important components of surface cleanliness. Saws and cutters must be sharp. If you make your own milling cutters, use only strong grades of tool steel. The geometry of all cutters must be the same. Otherwise, some of them will not work, and this is a very undesirable phenomenon.
Position the cutters accurately, take your time. It is very difficult for an inexperienced master to set all the cutters at once, do not be discouraged. Waste more time, but achieve the desired result. The lost time will pay off in excess in the future.
The more cutters the better. If the head allows you to install four, then do so, do not work with two. Four cutters slightly increase the installation time, but then the machine works longer - they are less blunt.
Always use exactly the same wedge to secure the knives. Even small differences in weight will cause the head to vibrate. Vibration not only degrades the quality of processing, but also causes rapid bearing wear and increases the risk of injury.
Observe the cutting conditions for sawn timber
This is a very important condition. Cutting modes include the number of shaft revolutions, the number of cutting planes, the feed rate and the sharpening angle. You can talk on this topic for a very long time, cutting modes have a huge number of options
Novice craftsmen need to get acquainted with the theory at least a little, and in the future it all depends on the ability to practically learn and the desire to work with woodworking machines.
Before feeding the board to the machine, inspect it, select the optimal cutting direction, taking into account the features of the surfaces, the presence and type of knots and other defects.
Fold the finished lining in even piles, do not put it vertically, do not scatter it throughout the workshop. Cleanliness and order are evidence of the professionalism of the master
You can talk on this topic for a very long time, cutting modes have a huge number of options. Novice craftsmen need to get acquainted with the theory at least a little, and in the future it all depends on the ability to practically learn and the desire to work with woodworking machines.
Before feeding the board to the machine, inspect it, select the optimal cutting direction, taking into account the features of the surfaces, the presence and type of knots and other defects.
Fold the finished lining in even piles, do not put it vertically, do not scatter it throughout the workshop. Cleanliness and order are evidence of the professionalism of the master.
If there is little experience, then the entrance / exit of the board may be defective due to a slight change in the direction of movement and non-parallelism with the ruler. Keep this in mind when determining the length of the lining, make a margin in length.
Subject to the above recommendations, you do not need to use an abrasive for the final fit of the surfaces. Remember that only amateurs make lining in such a way that it then has to be polished for a long time and tediously by hand.
How to make lining from edged boards
Master class from the Samodelkin YouTube channel.
Choosing an edged board
In a home workshop, it is possible to make lining not from every edged board. For this, as a rule, 1 or 2 grade of sawn timber with dimensions of 100x25x6000 mm is used. This is a standard board size that is in demand at all stages of home construction.
There are certain
requirements for edged board for lining. The lumber must have
natural humidity, but not more than 16%. The boards should be free of mechanical
damage, signs of rot or wormholes.
 Cane board for lining
Wood species for
the lining is selected depending on what will be sheathed: the outer part
houses, interiors, sauna. For homemade lining, they usually use
inexpensive wood species that are often found in the trade network:
- pine - pronounced texture, high strength, good thermal insulation properties;
- spruce - light texture, a large number of knots, easy processing, does not warp, non-moisture resistant;
- alder - there are many shades in the texture, high moisture resistance and thermal insulation;
- linden - beautiful texture, easy processing, resistance to temperature extremes.
Manufacturing of lining with a milling cutter
First of all, edged
the board, processed on a planer, is rounded off with a thickness gauge. With his help
form the geometric dimensions of the future lining.
Board processing on a thicknessing machine
Edged board can be
process in another way. For example, it is enough to walk with a plane, and then
sand the surface.
Before milling,
the edges are planed, and the wane is removed with a sharp knife.
Removing wane
Since after the planer
the surface of the boards is rough, then they have to be skinned.
View of boards before milling
For milling
use a handheld router with a power of 2100 watts.
Manual frezer
Profile milling is performed
combined cutters included in a set of two cutters. If you use
separate cutters, the work will take much longer.
Milling profiles
The set of cutters is suitable for processing all types of wood. V
a set of one large-diameter milling cutter, which forms a docking spike, and
edging on the front of the workpiece. A cutter with a smaller diameter forms a butt
groove and edging on the other side of the board.
Set of cutters
Milling cutter for docking
the tenon is clamped in the spindle of the router and the depth of milling is selected.
Installing the cutter on the router
Install the rip fence included in the kit
milling cutter.
Assembled router
To facilitate the processing of edged material, boards
laid on the racks with wane down. A special rail holds the board and does not give it
move when milling.
Holding the board on the racks
Make the first cut
a docking spike with a milling cutter. This cutter is used to process all the boards one by one. Back and front side
processed boards have a different look.
The reverse side of the finished board
The front side of the processed board
On the milling cutter change the cutter
onto the docking groove, and cuts are made on one board with a docking spike.
Sawed groove lining
Check the correct choice of the cutter installation height
a docking groove by the presence of a gap between two docked lining.
If the cutter is installed
wrong, then after docking there will be a gap. It is enough to drown the cutter, and the gap will disappear.
The gap in the boards after docking
After adjusting the height of the cutter, the docking groove
all remaining spiked boards are milled.
The quality of the lining made by the milling cutter is assessed by
assembled shield.
The front part of the panel from the lining
View of the shield from the wane side
Before installing the lining
stored indoors. If you leave the material on the street, then it will lead, and the slats will
unsuitable for cladding.
The lining made by a milling cutter has a reliable lock.
Castle type
Such material is used for cladding not only inside
premises, but also for cladding the outer parts of the house.
Indoor cladding
Sheathing of the outside of the house
Master class video:
Tool application ideas
It should be noted here that the independent production of finishing materials will require a lot of time, effort and money. After the production of the lining from the board, it is necessary to dry it correctly and treat it with protective agents.
However, you can use a cutter to change the pattern on the lining.Often this method is used by designers to visually expand the space of the room - the torn asymmetry in the alternation of grooves between the lamellas of the lining is an interesting technique from the point of view of the interior.
It is possible to "run" the finished lining through the milling machine. But at the same time, it is worth observing the dimensions of the thorn and the lock. The new cutter should not change the fastening - just remove the larger stop on the face of the trim.
Block house machine
One of the varieties of lining (by the way, in enormous demand) is a block house. The material imitates rounded logs and is widely used for interior and exterior decoration of premises. It is reasonable to sheathe houses with a block house, because such a lining has a solid appearance, is durable and environmentally friendly, since it is made of natural wood. The panels are characterized by a complex shape, therefore the connection of the elements is carried out according to the "groove-tenon" principle. Making them by hand is difficult and fraught with "inconsistency" of individual "logs" in the future, so it is advisable to use specialized equipment:
- band sawmill;
- drying chamber;
- lining machine.
When processing workpieces on machines, you can perform a number of operations:
- trimming the prepared raw material to the required size;
- surface milling;
- the formation of grooves (grooves and spikes).
Cutters suitable for the manufacture of lining with a hand mill
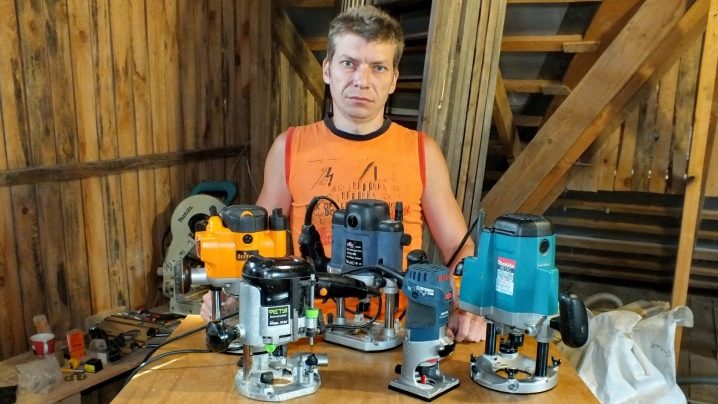
Regardless of the class of the tool, that is, professional or amateur hand tools, it uses exclusively the end view of the cutters. At one of its ends there is a collet (shank) with a diameter of 8 or 12 mm for a rigid grip with a chuck, and at the other there is a profile cutter directly with a width of up to 50 mm. The quality of the cutters themselves and the service life of the cutting tool depends primarily on the steel grade of the cutter and on the manufacturer. Models of well-known brands are always equipped with only durable grades of tool steel.
Important! When worn, the cutting part of the cutters in most cases must be reground, but no more than four times. Cutters and broken bearings are sold in specialized stores .. All cutters for sampling wood are usually divided into two main groups: edge and groove
They are sold both separately and as part of sets. Edge cutters are easily distinguished from others by their characteristic feature - the presence of a bearing in front of the cutter. There are universal cutters - this is useful to keep in mind when performing operations of the same type - for example, in the case of lining. They cost slightly more than single models, but will save you more production time by reducing the number of passes.
All cutters for sampling wood are usually divided into two main groups: edge and groove. They are sold both separately and as part of sets. Edge cutters are easily distinguished from others by their characteristic feature - the presence of a bearing in front of the cutter. There are universal cutters - this is useful to keep in mind when performing operations of the same type - for example, in the case of lining. They cost slightly more than single models, but will save you more production time by reducing the number of passes.
Choosing cutters for wood
When choosing cutters, you need to take into account all their features, firstly, it is desirable that the cutters are made of high quality, the quality guarantee in most cases is the brand, therefore it is best to buy tools that have already been tested by time, such brands include tools from the firm "Shtil". Secondly, it is necessary to be guided by the strength of the material from which the cutter is made, it must be selected based on what material this tool will need to work with. And, thirdly, it is necessary to choose the right type and type of tool that is suitable for your type of work, for example, as mentioned above - a disk cutter is more suitable for working with clapboard.
For the manufacture of lining
At the same time, the latter are much more expensive. In the complex, it makes sense to use additional equipment designed to impregnate a block house in order to increase the service life of fire retardants / antiseptics.
For home production, it is enough to produce 350-450 m3 of finished products (70% -50% level of normal production). Annual revenue of home production exceeds $ 10,000 (depending on costs and sales volumes). These recommendations will help budding entrepreneurs to implement an interesting and effective project.
Encyclopedia of Technologies and Techniques
|
Woodworking machines |
Accessories for hand router
How to make a clapboard with a hand router
Oval edges, V-grooves on products can be added to any project - large or small. Use a cutter with an inner or outer oval and it will allow you to easily create your own shape of decoration on the product.
Try your hand at making lining boards using our simple tips and technology for manufacturing products on a milling machine. Oval edges, grooves on the product, look great as an addition to any project. Making them yourself, you can not only shape the appearance of the product for yourself, but also choose any type of wood, and the whole simple process of making a lining board will be done on your milling table.
Use the correct cutter. An oval or furrow can be created using a matching cutter and cutter table.
CONFIGURATION. It is not difficult to make panels from lining boards. A lining board is a narrow board that has a groove on one side for connection and a spike on the other. The front side of the lining board can have oval edges, grooves in the center and edges, it all depends on your imagination. You will work with a large number of boards, so it is worth thinking over and organizing all the work in the form of a conveyor. Thus, you will perform one operation with the router with all boards and under the same conditions. As you can see from (see picture), I started by making grooves on all the boards.
Note: Make a small sample of the grooved lining board, you may need to re-tune the router to make V-grooves in the future.
MILL. Using a single cutter, as seen in (photo below), you can get good results by simply moving the stop.
So, when you have made a pass, there will be seizures at the bottom of the groove, remove them by making a sharp sanding block (see photo below). Keep in mind that some types of wood, such as cherry, pine, tend to burn. The photo below shows a simple way to remove burn marks.
Grinding grooves. Sand the grooves with sandpaper wrapped around the sharpened sanding block.
Removal of burns. To remove burns, use the same burr to clean both sides of the groove.
Lining with circular
Often a situation arises when it is not the aesthetics of the material that comes to the fore, but only its practicality, for example, it is necessary to decorate the walls or ceiling of a utility room, cellar, workshop. For these purposes, a simple and reliable, do-it-yourself lining on a circular board is perfect.
The first step is to prepare the lumber. You will need boards 15-20 mm thick, 8-10 cm wide. It is reasonable to assume that the wider the board, the less it will be needed, the faster the work will be done. This is true, but only partially. A large width plus a primitive connection, the grooves for which the circular allows you to make, are guaranteed to lead to warping of the board, thereby the fragility of the coating.
The workpieces must be aligned in width. To do this, the side stop of the circular saw is set using a ruler and fixed. Each plank is processed in turn, the width is adjusted to a single value.
After the planks are leveled, they are cycled.A planer is best suited for this, but factory circulars can also perform this function. You can, of course, cut the board with a hand or electric plane.
Next, you need to create a groove and a spike for fixing the lining. The easiest way is to make mirrored selections at opposite ends of the board. Their accuracy and symmetry is achieved by adjusting the height of the blade exit and the distance from the saw to the stop.
With a board thickness of 20 mm, the disc exit should be 10 mm, the distance to the ruler should also be 10 mm. The first pass is done flat. Pressing the board against the side stop, make a groove in it half the thickness. Then the board is placed on the edge, the operation is repeated. The same actions, but in a mirror image, are performed from the other end.
As a result of the described actions, a rough version of the lining is obtained, which is easy to install, it creates an attractive flat surface.
Operating tips
Working with a milling cutter can be traumatic, therefore it is necessary to clearly know and follow the rules for operating the equipment. And then the manufacturing process will not bring unpleasant surprises, but will be a joy.
Manufacturers give simple tips for extending the life of the cutter.
- When working with wood, resinous deposits accumulate, which leads to premature wear. Therefore, it is necessary to clean the instrument from plaque on a daily basis.
- Do not start working with a blunt instrument. Lack of sharpening can provoke burning of the cutting edge and the occurrence of an irreparable defect on the working surface.
- Observe the rules of sharpening. In the backed models, it is performed along the front edge of the cutting tool with CM1, CM2 stones, with a grain of A25 or A35. Sharpening knives made of carbide materials are done with diamond wheels. Do not forget to ensure that the edge does not burn.
For information on how to choose high-quality cutters and how they differ, see the next video.
